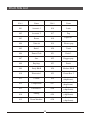
1
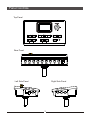
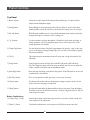
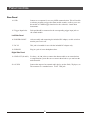
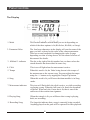
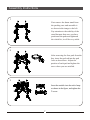
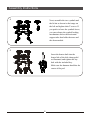
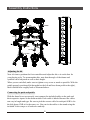
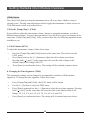
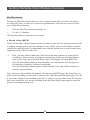
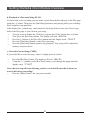
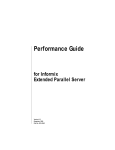
Important Information
Thank you for purchasing this electronic instrument.For perfect operation and
security, please read the manual carefully and keep it for future reference.
Safety Precautions
CAUTION
RISK OF ELECTRIC SHOCK
DO NOT OPEN
The lightning flash with arrowhead symbol within an equilateral triangle
is intended to alert the user to the presence of uninsulated dangerous
voltage within the product s enclosure that may be of sufficient
magnitude to constitute a risk of electric shock to persons.
The exclamation point within an equilateral triangle is intended to alert
the user to the presence of important operating and maintenance(servicing)
instructions in the literature accompanying the product.
Important Safety Instructions
1) Read these instructions.
2) Keep these instructions.
3) Heed all warnings.
4) Follow all instructions.
(Figure 1)
5) Do not use this apparatus near water.
6) Clean only with dry cloth.
7) Do not block any ventilation openings, install in
accordance with the manufacturer s instructions.
8) Do not install near the heat sources such as
radiators, heat registers, stoves, or other apparatus
(including amplifiers) that produce heat.
9) Do not defeat the safety purpose of the polarized
or grounding-type plug. A polarizedplug hase two
blades with one wider than the other. A grounding
type plug has two blades and a third grounding
prong. The wide blade or the third prong are
provided for your safety, if the provided plug does
not fit into your outlet. consult an electrician for
replacement of the obsolete outlet.
10) Protect the power cord from being walked on or
pinched particularly at plugs. convenience receptacles,
and the point where they exit from the apparatus.
11) Only use attachments/accessories specified by
the manufacturer.
12) Use only with the cart, stand, tripod, bracket, or
table specified by the manufacturer, or sold with the
apparatus. When a cart is used, use caution when
moving the cart/apparatus combination to avoid
injury from tip-over(Figure 1).
13) Unplug this apparatus during lightning storms
or when unused for a long periods fo time.
14) R efer all servicing to qualified service personnel.
Servicing is required when the apparatus has been
damaged in any way, if the power-supply cord or
plug is damaged, liquid has been spilled or objects
have fallen into the apparatus, the apparatus has
been exposed to rain or moisture, does not operate
normally, or has been dropped, etc.).
WARNING: To reduce the risk of fire or electric
shock, do not expose this apparatus to rain or moisture.
CAUTION: Apparatus shall not be exposed to
dripping or splashing and no objects filled with
liquids, such as vases, shall be placed on the
apparatus.
Always make sure all batteries are inserted in
conformity with the +/- polarity markings.
Always replace all batteries at the same time. Do
not use new batteries together with old ones. Also,
do not mix battery types, since this can cause
overheating, fire, or battery filuid leakage.
Remove the batteries from the instrument if it is
not to be used for a long time.
WARNING: This product contains chemicals,
including lead, known to the State of California
to cause cancer, and birth defects or other
reproductive harm.
Wash hands after handling.
Contents
Panel Controls.......................................................................................................3
Assembly Instructions .........................................................................................7
Connections...........................................................................................................10
Connecting the Power Supply............................................................................10
Connecting an Amplifier......................................................................................10
Connecting External Audio Equipment...............................................................10
USB MIDI............................................................................................................11
Using Headphones..............................................................................................11
Getting Started & Drum Module Overview.........................................................12
Switch the Power On .........................................................................................12
Select Drum Kits ...............................................................................................13
[Enter] Button ....................................................................................................13
[Back] Button ...................................................................................................13
[Kit edit] Button .................................................................................................14
[Setup] Button ...................................................................................................19
Working with the Trigger Setup parameters......................................................25
[Song] Button ...................................................................................................26
[Click] Button ....................................................................................................28
[Tempo/Tap] Button ................................................................................ ..........29
[Rec/Play] Button ..............................................................................................30
Factory Reset .....................................................................................................32
Drum Kits List .....................................................................................................33
Instruments .........................................................................................................34
Song/Style List ....................................................................................................38
MIDI Implementation Chart.................................................................................39
Specifications......................................................................................................40
Panel Controls
Top Panel
Setup
Kit Edit
Tempo/Tap
Click
Song
Rec/Play
Trigger
Back
Click Edit
Start/Stop
Enter
Kit Select
Rear Panel
RIDE
CRASH
TOM3
TOM2
TOM1
SNARE
Left Side Panel
POWER
ON OFF
DC 9V
BD
HH
USB
HHC
Right Side Panel
PHONES
AUX IN
3
R
T
LINE OU L
Panel Controls
Top Panel
1. Master Volume
Adjust the overall volume of the drum module with this pot. It controls the line
outputs and the headphone output.
2. [Setup] button
Press [Setup] to access parameters that affect all of the kit presets in the drum
module equally, such as the sensitivity, threshold, and velocity curve for each pad.
3. [Kit edit] button
Kit Edit mode enables you to select which instrument (drum sound) is played by
each pad and adjust its volume or effects settings, etc.
4. [-][+] buttons
Use these buttons to navigate through the 30 drum kits, switch menu selections, or
change parameter values. Pressing them both at once will reset the value of the
current parameter to its default.
5. [Tempo/Tap] button
You can adjust the tempo of the built-in metronome, the practice songs, or the song
you are recording by pressing [Tempo/Tap]. You can also set the tempo by tapping
this button repeatedly.
6. [Click]
This button turns the metronome on and off at any time, except from within Click
Edit mode.
7. [Song] button
[Song] toggles between the Song Select and Mix Edit modes. Mix Edit mode
lets you to toggle the drum track of the song on and off, and also lets you adjust the
relative volumes of the drum and accompaniment tracks.
8. [Start/Stop] button
Starts and stops recording or playback in Song mode. In Kit Edit mode it can be used
to audition the selected drum.
9. [Rec/Play] button
Gives you the option to record, play back, or erase your own song.
10. [Enter] button
This button will confirm and save the parameter changes you have made. It is also
used to access the sub-pages of each menu.
11. [Back] button
Pressing this button takes the drum module to the previous menu. From the highest
Edit menu it will exit to the Kit Select menu, except in Song mode where it will exit
to the Song Select menu.
Button Combinations
12. [Tempo/Tap] + [Click]
13. [Back] + [Enter]
Pressing these buttons at the same time provides access to the volume, sound and
time signature of the metronome.
This button combination is used to return to the Kit Select menu at any time.
4
Panel Controls
Rear Panel
14. USB
Connect to a computer for two-way MIDI communication. This will enable
a software program to trigger the drum module sounds, or allow you to use
the module as a MIDI trigger interface for the software's virtual drum
instruments.
15. Trigger Input Jacks
Each pad should be connected to the corresponding trigger input jack on
the sound module.
Left Side Panel
16. POWER ON/OFF
After assembly and connecting the included DC adapter, use this switch to
turn the power on or off.
17. DC 9V
This jack is intended for use with the included DC adapter only.
18. PHONES
Plug in a pair of stereo headphones here.
Right Side Panel
19. LINE OUT (R and L) Use these 1/4 jacks to connect the drum module to an external mixer
or amplification system. Be sure to connect them both so you can hear the
entire drum kit.
20. AUX IN
Connect the output of an external audio device such as iPod, CD player, etc.
The connector is a standard stereo 1/4 TRS jack.
5
Panel Controls
The Display
1. Mode
This section indicates which mode you are in depending on
which of the three options is lit (Kit Select, Kit Edit, or Setup).
2. Parameter/Value
The four large characters in the display tell you the name of the
page you have selected or the value of the current parameter.
There are several methods for changing the value or page
depending on what is being shown. See the related sections of
this manual for details.
3. Edited
The dot to the right of the kit number lets you know when the
stored drum kit has been edited in some way.
indicator
4. Click
This icon will light when the metronome is active.
5. Tempo
When this word is lit, the Value being shown is the tempo of
the metronome or the current song. You may adjust the tempo
using the -/+ buttons or by tapping the Tempo/Tap button.
6. Song
When this word is lit you'll know the drum module is in Song
mode.
7. Metronome indicator
This icon will flash while the click is active, or while recording
or playing a song. When the full icon is lit, that's the downbeat
of the bar. When only the Center dot is lit, that is one of the
sub-beats of the current time signature.
8. Playing Song
When the triangle is lit you will know that a song is playing
back, not recording.
9. Recording Song
The large dot indicates that a song is currently being recorded.
Anything played on the pads will be captured for later playback.
6
Instruction
Assembly Instructions
1
First remove the drum stand from
the packing case and assemble it
as shown in the image to the left.
Pay attention to the stability of the
stand but note that once you have
positioned the pads and tightened
the whole kit, it will be very stable.
2
Tom 1
Snare
After removing the four pads from the
box, insert the pad rod into the pad
hole as shown here. Adjust the
position of each pad and tighten the
screw when you are satisfied.
Tom 2
Tom 3
3
Insert the module into the rack clamp
as shown in the figure, and tighten the
T-screw.
7
Instruction
Assembly Instructions
4
Next, assemble the two cymbals and
the hi-hat as shown in the image on
the left and tighten their T-screws. If
you prefer to have the cymbals lower,
you can relocate the cymbal locking
mechanisms below the horizontal
support tube that holds the toms and
the drum module.
5
Insert the beater shaft into the
beater link of the kick drum pedal
as illustrated, and tighten the key
bolt with the included key.
Make sure the hammer head hits the
center of the pad.
8
Instruction
Assembly Instructions
RIDE
CRASH
TO RIDE
TO CRASH
TOM3
TOM2
TO TOM1
TOM1
TO HH
TO TOM2
SNARE
BD
TO SNARE
TO TOM3
TO KICK
HH
HHC
TO HHC
USB
Adjusting the kit
Now it's time to position the foot controllers and adjust the kit so it works best for
your playing style. To accommodate this, note that the angle of the drums and
cymbals can be adjusted as well as their height.
When you are satisfied, make sure to tighten every screw as much as possible. With the
pedals properly positioned (hi-hat pedal on the left and bass drum pedal to the right),
the kit should now roughly look as illustrated above.
Connecting the pads and pedals
With the drum kit set up correctly, next connect the included cables to the pads and
their respective inputs on the drum module. Each cable is labeled because the cables
can vary in length and type. Be sure to pick the correct cable for each pad: KIK is for
the kick drum, SNR is for the snare, etc. You can tie the cables to the stand using the
included Velcro straps so it looks nice and tidy.
9
Assembly Instruction
Connections
Connect
Connecting the Power Supply
AC POWER
Be sure the power switch is set to OFF and connect the
power adapter to the DC 9V jack on the rear panel. Then
connect the power adapter to a wall socket as shown at right.
Connecting an Amplifier
If you want to play your kit through an amplification or mixer system, connect a cable to
each of the LINE jacks on the drum module and then to an appropriate input on the
receiving device. The output volume of the drum module can be adjusted with the
MASTER VOLUME knob.
Note: If you connect only one cable you will not be able to hear all of the drum sounds
correctly. Cables not included
AUX IN
R
T
LINE OU L
AMPLIFIER
Connecting external audio equipment
The audio output from a CD player, MP3 player or other device can be connected to the
stereo AUX IN jack on the right side panel and then mixed with the sound of the drum
module. This is ideal if you want to play along with songs or are following an audio drum
tutorial.
If necessary, adjust the input level from the external device to prevent clipping of the signal.
Then the combined mixed signal may be adjusted with the MASTER VOLUME knob.
Cable not included
CD player
AUX IN
10
R
T
LINE OU L
Assembly Instruction
Connections
Connect
USB MIDI
Your drum module is USB class-compliant. This means you can plug it into a USB
classcompliant host (for example, a computer running OS X, Windows XP, Vista or
Windows 7) and it should be recognized immediately. There are no drivers to install;
simply plug n' play. If you connect the drum module to a computer, you can trigger
drum libraries on the computer or record your performance into a MIDI sequencing
application. Check the operation and setup instructions for the software you intend to
use for more details.
USB cable not included
Using Headphones
You can also connect a set of stereo headphones (optional,
not included) to the PHONES jack located on the left side
of the unit. Use the MASTER VOLUME knob to adjust
the headphone volume.
PHONES
Warning: Never use headphones at high volume, as it may hurt
your ears.
11
Assembly
Instruction
Start to Started
Play
the&Drum
Getting
Connect
Drum Module Overview
Switch the Power On
With everything set up and ready to go, it's time to start playing the drum kit. Locate the on/off
power switch on the drum module and switch the power on. The drum module is ready to
operate when the display shown below appears. This is the location from which you select the
drum kit you want to play or edit.
POWER
ON OFF
DC 9V
PHONES
Next, connect headphones or a speaker system as described on the previous two pages. Start
with the MASTER VOLUME set to MIN and press the [Start/Stop] button on the drum
module. Gradually increase the volume until you hear a song playing through your speaker
system or headphones. If you hear no sound, please check all of the cables connecting the
drum module to your speakers and repeat the procedure. When the levels are set to a
comfortable level, press the [Start/Stop] button again to stop the song.
Once you have established that your sound system or headphones are connected correctly to
the drum module, play each of the pads, cymbals, and kick and hi-hat pedals. You should
hear a sound for every hit. If one pad or cymbal does not play a sound, check the cable
connection from that pad to the sound module.
With everything set up and the kit sounding from all pads, it's time to start playing! When
you are ready to learn more about your new drum system, pick up the manual again and
continue with the next page.
12
Assembly
Instruction
Start to Play
the&Drum
Getting
Connect
Started
Drum Module Overview
Selecting Drum Kits
Ready to explore the sound module some more? Then let's cover the rest of the features.
The unit comes with 30 preset drum kits, any of which may be edited to suit your tastes. If
you're not already at the Kit Select display, press the buttons marked [Back] and [Enter] to
get there. You will see the number of the current kit appear in the LED display along with the
letter K (for Kit ). The display should look something like the image pictured below.
You can use the [-/+] buttons to step through any of the 30 kits. For a complete list of the
preset kits, please see page 33 of this manual.
Back
Enter
Kit Select
[Enter] button
Think of the [Enter] button as similar to the Enter or Return key
on a computer. It has two main functions:
to take the unit down another menu level
in one of the modes (Kit Edit, Setup, and
Song)
to confirm and save the new value or
function of an edited parameter.
Back
Enter
Kit Select
Once the selection has been confirmed, the display
will return to the previous menu.
[Back] button
Press the [EXIT] button, if you want to quit the current
menu.
Once pressed the LED display will take you back to the
previous menu.
13
Back
Enter
Kit Select
Assembly
Instruction
Start to Started
Play
the&Drum
Getting
Connect
Drum Module Overview
[Kit edit] Button
You can adjust a number of parameters for every drum kit, enabling you to customize the kit
according to your preferences. The changes you make to these settings will be preserved after
you shut the unit off.
Note: You can use the Factory Reset procedure described on page 32 if you decide you want
to restore all of the drum kits to their original settings at the same time, or use the procedures
on page 18 to restore a single kit to its factory settings.
Let's have a look at the Kit editing options.
Press the [Kit edit] button: the display will read INST (Instrument).
Use the [-/+] buttons to view the other parameter menus: LEVL (Level), COPY, and
RSET (Reset).
We will go through these options in greater detail on the following pages.
a. Selecting an Instrument (INST)
Each drum kit consists of 12 instruments (kick drum, snare drum, etc.). You can replace any
instrument in a kit with any other instrument in the drum module.
For example, to select a new snare drum for the current drum kit:
Press the [Kit edit] button: the display will read INST
Press [Enter] and use the [-/+] buttons to select SNAR, or hit the snare pad.
Press [Enter]. There are two ways to choose a new snare drum at this point:
Use the [-/+] buttons to select a new instrument, or
Hit the snare pad repeatedly to advance through the sounds one after the other.
Note: You can also use the [Start/Stop] button to audition the current instrument.
Press [Enter] to confirm the new selection, or press [Back] to retain the original snare.
To change the instrument assignment of a different pad, follow the steps above but instead of
selecting the snare, select the desired pad from the list below:
Bass Drum
HiHat Open
Snare
HiHat Closed
Snare Rim
HiHat Pedal
Tom 1
Crash
Tom 2
Ride
Tom 3
14
Assembly
Instruction
Start to Started
Play
the&Drum
Getting
Connect
Drum Module Overview
Changing categories quickly
There's another useful feature available while on the Instrument Select page. Let's say
you'd like to assign a different type of instrument, perhaps a kick or a snare, to one of the
tom pads.
Here's a quick way to jump from one category to another:
Press the [Kit edit] button: the display will read INST
Press [Enter] and use the [-/+] buttons to select TOM3, or hit the third tom pad.
Press [Enter]. You'll be on the Instrument Select page at this point.
Hold the [-] button and then press the [+] button. You will see the instrument jump to
101, which is the first instrument in the Kick drum category.
While still holding the [-] button, press the [+] button repeatedly. The instrument
selection will jump to 201 (Snares), then 301 (Toms), then 401 (Cymbals), etc.
Try it the other way: hold the [+] button and press the [-] button repeatedly. This will
take you to 101 (Kicks), 601 (Percussion), 501 (Hats), 401 (Cymbals), etc.
Now use [-/+] buttons or the pad to select an instrument within the new category.
b. Pad Volume (LEVL)
You can also adjust the volume level for each instrument in a kit.
For example, to set the volume level of the snare drum for the current kit:
Press the [Kit edit] button: the display will read INST
Use the [-/+] buttons to select the LEVL menu
Press [Enter] and use the [-/+] buttons to select SNAR. You may also hit the snare
pad to select it.
Press [Enter] and use the [-/+] buttons to set the snare volume level to a value
between 000 and 127.
Press [Enter] to confirm the new value, or press [Back] to retain the original value.
To change the instrument assignment of a different pad, follow the steps above but instead of
selecting the snare, select the desired pad from the list below:
Bass Drum
HiHat Open
Snare
HiHat Closed
Snare Rim
HiHat Pedal
Tom 1
Crash
Tom 2
Ride
Tom 3
15
Assembly
Instruction
Start to Play
the&Drum
Getting
Connect
Started
Drum Module Overview
c. Reverb send level (RSND)
You can also adjust the reverb send level for each drum kit independently.
Here's how to set the reverb send level for the current kit:
Press the [Kit edit] button: the display will read INST
Use the [-/+] buttons to select the RSND menu
Press [Enter] and use the [-/+] buttons to set the reverb send level to a value between
000 and 127.
Press [Enter] to confirm the new value, or press [Back] to retain the original value.
Bass Drum
HiHat Open
Snare
HiHat Closed
Snare Rim
HiHat Pedal
Tom 1
Crash
Tom 2
Ride
Tom 3
Note: the reverb send will be adjusted for all instruments in the kit at the same time.
d. Chorus send level (CSND)
You can also adjust the chorus send level for each drum kit independently.
For example, to set the chorus send level for the current kit:
Press the [Kit edit] button: the display will read INST
Use the [-/+] buttons to select the CSND menu
Press [Enter] and use the [-/+] buttons to set the chorus send level to a value between
000 and 127.
Press [Enter] to confirm the new value, or press [Back] to retain the original value.
Note:The Chorus feature is set to OFF in Setup mode by default. In order to hear the different
chorus choices, you will need to set this parameter to ON. See page 23 for details. And as with
the reverb send, the chorus send will be adjusted for all instruments in the kit at the same time.
16
Assembly
Instruction
Start to Play
the&Drum
Getting
Connect
Started
Drum Module Overview
e. Reverb Type (RTYP)
It is possible to select a different reverb type for each drum kit. To do this:
Press the [Kit edit] button: the display will read INST
Use the [-/+] buttons to select the RTYP menu
Press [Enter] and use the [-/+] buttons to select one of the eight Reverb Type choices
Room (ROM 1-3), Hall (HAL1-2), Plate (PLAT), Delay (DLAY), or Panned delay
(PAND).
Press [Enter] to confirm the new selection, or press [Back] to retain the original
reverb.
f. Chorus Type (CTYP)
It is possible to select a different type of chorus effect for each drum kit. To do this:
Press the [Kit edit] button: the display will read INST
Use the [-/+] buttons to select the CTYP menu
Press [Enter] and use the [-/+] buttons to select one of the eight Chorus Type choices:
Chorus (CHR1-4), Slapback delay (SLPD), Flange (FLNG), One-shot delay (SHOT),
and Stereo feedback delay (FBDL).
Press [Enter] to confirm the new selection, or press [Back] to retain the original
chorus type.
Note: The Chorus feature is set to OFF in Setup mode by default. In order to hear the
different chorus choices, you will need to set this parameter to ON. See page 23 for
details.
g. Copy Drum Kit to New Location (COPY)
Any drum kit can be copied to any one of the 30 kit locations. This is handy if you want to
change the order in which the kits appear for a live performance, for example.
To copy the current drum kit to another location:
Press the [Kit edit] button: the display will read INST
Use the [-/+] buttons to select the COPY menu
Press [Enter] and use the [-/+] buttons to select one of the drum kit numbers as the
destination. The display will flash the number of the targeted kit.
17
Assembly
Instruction
Start to Play
the&Drum
Getting
Connect
Started
Drum Module Overview
Note: the next step will overwrite the destination kit. Be sure you have chosen the right
one before you proceed!
Press [Enter] to confirm the destination kit to be overwritten, or press [Back] to exit
the Copy function without making any changes.
If you pressed [Enter] to execute the Copy function in the previous step, the display
will flash DONE and exit to the Kit Select page with the new location selected.
h. Resetting the Current Drum Kit
If you have made changes to the current drum kit and decide you want to get back to the
factory starting point, we've provided a way to do this.
The procedure has been divided into two parts: resetting the instrument/pad assignments and
resetting the effects. We'll cover how to reset the effects in the next section. If you want to
reset the instrument/pad assignments for the current drum kit, here's what to do:
Press the [Kit edit] button: the display will read INST
Use the [-/+] buttons to select the RSET menu
Press [Enter] and use the [-/+] buttons to select the DRMS option
Press [Enter]. The display will flash DONE and return to the previous menu.
i. Resetting the Effects for the Current Drum Kit
You may be happy with the instruments you have assigned to the pads but want to return the
reverb and chorus to the original settings. If this is what you would like to do, here's how:
Press the [Kit edit] button: the display will read INST
Use the [-/+] buttons to select the RSET menu
Press [Enter] and use the [-/+] buttons to select the EFCT option
Press [Enter]. The display will flash DONE and return to the previous menu.
18
Assembly
Instruction
Start to Started
Play
the&Drum
Getting
Connect
Drum Module Overview
[SETUP] Button
The parameters in Setup mode are global, which means they affect all drum kits equally.
This is where you can adjust the trigger pad response, change the MIDI channel assignment for
the drum module, turn local response off and on, mute the effects, disable the snare rim trigger,
reset the all of the triggers to their factory settings, or restore the instrument assignments for all
of the drum kits at one time.
a. Trigger Settings (TRIG)
The trigger functions allow you to adapt how the drum module responds to your playing style.
Adjustable parameters include sensitivity, threshold, velocity curve, crosstalk and a copy
function. We will explain each function in detail, but first, let's go through the basic process
of changing these parameters.
For example, if you would like to adjust the trigger settings for the snare drum pad:
Press the [Setup] button: the display will read TRIG
Press [Enter] and use the [-/+] buttons to select SNAR. You may also hit the snare
pad to select it.
Press [Enter] and use the [-/+] buttons to select one of the options (SENS, THRS,
CURV, XTLK, and COPY). You may also press [Setup] to cycle through the options.
Press [Enter] to access the adjustable parameter and use the [-/+] buttons to select a
new value.
Press [Enter] to confirm the choice, or press [Back] to retain the original value.
To adjust the trigger settings for a different pad, follow the steps above but instead of selecting
the snare, select the desired pad from the list below:
Bass Drum
Tom 3
Snare
HiHat Open/Closed*
Snare Rim
HiHat Pedal
Tom 1
Crash
Tom 2
Ride
* The Open and Closed hi-hat triggers share the same set of trigger parameters, so you will
See the same label in the display for both.
19
Assembly
Instruction
Start to Play
the&Drum
Getting
Connect
Started
Drum Module Overview
SENS Sensitivity: Simply put, set this to as high a value as you can. The lower the value, the
less sensitive the pad will be. If you find the pad overly sensitive, including the
unexpected triggering of the pad you are playing, try reducing the sensitivity of the
pad a little. Range: 001-008
THRS Threshold: This setting allows a trigger signal to be received only when you hit the
pad above a certain force level. This can be used to prevent a pad from sounding
because of vibrations from other pads. When set to a higher value, no sound is
produced when you strike the pad lightly. Range: 000-050
CURV Velocity Curve: This allows you to choose a curve for each pad so it responds the way
you want. There are four velocity curves from which to choose: Normal (NORM),
Dynamic (DYNM), EASY, and Fixed (FIXD).
EASY As the name implies, this curve makes it relatively easy to reach the maximum
MIDI velocity of 127. So as a general rule, lower velocity hits are more likely
to produce a louder volume.
NORM Allows an evenly-distributed change in output in response to changes in velocity.
DYNM This setting provides the widest dynamic range overall. As a result it is possible
to play more quietly, easier to produce a more subtle change in volume, and
requires slightly more forceful playing to reach the maximum MIDI velocity
of 127.
FIXD
No matter how hard or soft you hit the pad, the engine will always receive a
MIDI velocity of 100.
XTLK Crosstalk can happen when you strike one of the pads forcefully, causing one of the
other instruments in the kit to be triggered unintentionally. When you have noticed
that one trigger pad is picking up signals from the other pads, adjust the XTLK
setting for the affected pad to a higher value until it stops receiving trigger events
from the pads that are causing the problem. Range: 000-080
Note: the hi-hat foot trigger (HH-P) does not offer adjustments for SENS, THRS, or XTLK.
You will see the word NULL in the display when you select those parameters for the
hi-hat pedal. You can adjust its velocity curve, however.
See page 25 for a more detailed description of the interaction between the SENS, THRS and
XTLK parameters.
20
Assembly
Instruction
Start to Play
the&Drum
Getting
Connect
Started
Drum Module Overview
COPY This feature allows you to copy the trigger settings from one pad and paste them
to another pad without having to recreate them manually. So once you have the
SENS, THRS, CURV and XTLK parameters set to their optimal values for the
Tom 1 pad, for example, here is how to duplicate those settings to Tom 2:
Press the [Setup] button: the display will read TRIG
Press [Enter] and use the [-/+] buttons to select TOM1. You may also hit the first tom
pad to select it.
Press [Enter] and use the [-/+] buttons to select the COPY menu. You may also press
[Setup] to cycle through the options until you reach that menu.
Press [Enter]. The display will begin to flash one of the trigger pad names; this is to
show you the destination to which the TOM1 settings will be pasted.
Use the [-/+] buttons to select the TOM2 pad. You may also hit the second tom pad to
select it. The display will keep flashing until after the next step.
Press [Enter] to confirm the choice, or press [Back] to exit without making any changes.
If [Enter] is pressed, the display will flash DONE to indicate that the copy/paste
operation has taken place.The drum module will exit to the Trigger Select page with the
new Trigger pad selected.
To copy and paste the trigger settings for a different set of pads, the steps are basically the same
as the ones described on the previous page. But instead of selecting Tom 1 and Tom 2, select the
source and destination pads from the list below:
Bass Drum
Tom 3
Snare
HiHat Open/Closed*
Snare Rim
HiHat Pedal
Tom 1
Crash
Tom 2
Ride
*The Open and Closed hi-hat triggers share the same set of trigger parameters, so you
will see the same label in the display for both.
21
Assembly
Instruction
Start to Play
the&Drum
Getting
Connect
Started
Drum Module Overview
b. Changing the MIDI Channel for the Drum Module (CHAN)
Depending on how you plan to use the device connected to the drum module's USB port, you
may want to change the MIDI channel on which the drum module transmits and receives. You
may also want to defeat MIDI transmission altogether momentarily. If either of these scenarios
is the case, here is what to do:
Press the [Setup] button: the display will read TRIG
Use the [-/+] buttons to select the CHAN menu. You may also press [Setup] to cycle
through the options.
Press [Enter] and use the [-/+] buttons to select a new MIDI channel number between
001 and 016. If you want to disable MIDI transmission for some reason, select the value
Off instead.
Press [Enter] to confirm the choice, or press [Back] to exit without making any changes.
c. Using the Drum Pads as MIDI Triggers Only (LOCL)
You might want to use the pads to trigger another sound source over USB but not hear
the drum module's internal sounds at the same time. This condition is known as "Local
Off." It can also be useful if you are triggering the drum module's sounds via USB
MIDI and want to eliminate any double triggering.
To configure the drum module in this way, do the following:
Press the [Setup] button: the display will read TRIG
Use the [-/+] buttons to select the LOCL menu. You may also press [Setup] to cycle
through the options.
Press [Enter] and use the [-/+] buttons to select either Off or On depending on
what you want to do. On is the normal operating mode: when you play the pads the
internal sounds will trigger. Off will not trigger the internal sounds directly.
Press [Enter] to confirm the choice, or press [Back] to exit without making any changes.
22
Assembly
Instruction
Start to Started
Play
the&Drum
Getting
Connect
Drum Module Overview
d. Defeating the Effects for All Drum Kits (EFCT)
We have added reverb effects to many of the drum kits. However, it's possible you might want
to turn off the reverb for all of the drum kits and process the audio with an external effects
unit. To do this:
Press the [Setup] button: the display will read TRIG
Use the [-/+] buttons to select the EFCT menu. You may also press [Setup] to cycle
through the options.
Press [Enter] and use the [-/+] buttons to select one of the following options:
REVB: The next step will allow you to toggle the reverb off or on for all kits
CHRS: The next step will allow you to toggle the chorus off or on for all kits
Press [Enter] and use the [-/+] buttons to select Off or On to suit your needs.
Press [Enter] again to confirm your choice, or [Back] to exit to the previous menu
without having changed anything.
e. Restoring All Trigger Settings to the Factory Defaults (RSET/TRGS)
If you have set up your drum kit in a new location, such as on a stage with a drum riser, you
may find that you need to readjust your trigger crosstalk settings, for example. If you would
prefer to start over from the factory trigger settings, follow this procedure:
Press the [Setup] button: the display will read TRIG
Use the [-/+] buttons to select the RSET menu. You may also press [Setup] to cycle
through the options.
Press [Enter] and use the [-/+] buttons to select the TRGS option
Press [Enter]. The display will flash DONE and the trigger settings will have been
restored to their factory defaults.
23
Assembly
Instruction
Start to Play
the&Drum
Getting
Connect
Started
Drum Module Overview
f. Restoring All Drum Kit Presets to the Factory Defaults (RSET/KITS)
You may decide that you would like to erase all of the changes you have made to instrument
assignments within the drum kits and restore them to the factory presets. If you would like to do
this, then follow these steps:
Press the [Setup] button: the display will read TRIG
Use the [-/+] buttons to select the RSET menu. You may also press [Setup] to cycle
through the options.
Press [Enter] and use the [-/+] buttons to select the KITS option
Note: the next step will erase every change you have made to the drum kits. Be sure this is
what you want to do before proceeding!
Press [Enter]. The display will flash DONE
been restored to their factory defaults.
and all of the drum kit presets will have
g. Snare Rim Trigger On/Off (RIM)
The snare pad has a second trigger in its rim, which allows you to assign an additional
instrument to the snare rim. This helps to enhance the realism of the overall performance.
Typically this second sound would be a cross-stick instrument, or perhaps a percussion
instrument such as a tambourine. However, you can assign any one of the drum module's
instruments to the snare rim trigger.
There may be times, though, when you do not want to have a sound assigned to the snare rim.
So we've provided an easy way to disable and re-enable the rim trigger. Here is how to do it:
Press the [Setup] button: the display will read TRIG
Press the [-] button once to select the RIM menu. You may also press [+] or [Setup]
to advance through the options until you reach the RIM menu.
Press [Enter] and use the [-/+] buttons to select either Off or On depending on
what you want to do. On is the default setting: when you play the snare rim trigger
an internal sound will trigger. Off defeats the functionality of the snare rim trigger;
it will not trigger an internal sound, nor will it transmit MIDI note data over the USB
connection.
24
Assembly
Instruction
Start to Play
the&Drum
Getting
Connect
Started
Drum Module Overview
Working with the Trigger Setup parameters
The Sensitivity (SENS), Threshold (THRS) and Crosstalk (XTLK) parameters can be
used in conjunction to reduce or eliminate the possibility of accidental triggering of
sounds. Each of these parameters serves a particular purpose in customizing the drum
triggers for your playing style and performance environment.
In a nutshell, the difference between THRS and XTLK is that THRS is a parameter that
determines the level below which a sound will not be triggered by any trigger event,
from the pad itself or from another pad, while XTLK is a parameter that looks
specifically for vibrations that are caused by the other pads in the drum kit, not the one
for which you are adjusting the XTLK parameter. SENS is used to reduce or increase
the overall sensitivity of a given pad to any form of input, whether from the pad itself
or from an external source, once the signal has crossed over the THRS level.
How they interact
As described earlier, the XTLK parameter is designed to help to prevent a pad from
receiving unwanted triggers from other drum pads. This is more likely to be an issue
between pads that share a section of the drum rack, such as the Tom 1 and Tom 2 pads,
than between Tom 3 and the Snare pad, for example, which are on opposite sides of
the drum kit.
If you're having trouble with false triggering, first try increasing the XTLK parameter
on the pad that is being affected by crosstalk. If you reach the maximum XTLK value
for the affected pad and are still experiencing the unwanted triggering of an instrument,
try increasing the THRS value for that pad. But keep in mind that THRS also affects the
point at which a pad will detect any form of trigger event, even from the pad itself, so it
is possible to set it too high and not be able to play softly on that pad.
As a last resort, lower the Sensitivity (SENS) parameter on the affected pad if you still
hear false triggering caused by vibrations from elsewhere in the kit. Use this parameter
sparingly, as its most immediate effect is on the dynamic range of the sounds triggered
by the pad.
If the above parameters have been adjusted and false triggers are still being picked up
by the pads, then consider reorienting the drum set. In this case it is possible that
environmental factors are responsible for the unwanted trigger events.
It isn't possible to anticipate every situation in which you might use this electronic
drum set (drum risers, crowded stages, jam sessions in your garage, etc.), so you may
need to experiment with different combinations of settings until you find the one that
works best for your circumstances.
25
Assembly
Instruction
Start to Play
the&Drum
Getting
Connect
Started
Drum Module Overview
[Song] button
The drum module provides thirty preset songs (001-030) and two demo songs (DEM1 and
DEM2). It is possible to control the relative levels of the drums and the accompaniment
instruments within these songs, or to mute the drums from the songs altogether so you
can play the drums yourself along with the accompaniment parts.
To access any of these functions you begin with the [Song] button. Pressing [Song]
repeatedly will toggle the display between the Song Select page and the Mix page,
which is where the various level control pages are found.
Song Selection
Here's how to select and listen to the songs:
Press the [Song] button. The display will show the number of the last song selected
Use the [-/+] buttons to select one of the songs you'd like to listen to
Press the [Start/Stop] button to start or stop the song.
Song
Mix Parameters
When the Mix page is seen in the display, several options become available for controlling
the levels of the instruments being used in the current song. To access them, press the [Enter]
button and use the [-/+] buttons or the [Song] button to cycle through the various pages.
What follows is an explanation of what these pages are and what they do.
a. Drum On/Off (DRUM)
Weve
' included songs in a number of styles and tempos from which you can choose. If you
would like to play along to these songs without listening to the pre-recorded drum and
percussion parts, here is the method for disabling those parts:
Press the [Song] button until the MIX menu appears in the display
Press [Enter] to access the DRUM menu
Press [Enter] and use the [-/+] buttons to select either Off or On depending on
what you want to do. If you want to mute the pre-recorded drums, select Off.
Press [Enter] to confirm the choice. The setting will be retained on power-down.
26
Assembly
Instruction
Start to Play
the&Drum
Getting
Connect
Started
Drum Module Overview
b. Drum Part Volume (DVOL)
If you'd like to adjust the volume of the pre-recorded drums while listening to or playing
along with the songs, here is how to do that:
Press the [Song] button until the MIX menu appears in the display
Press [Enter] and use the [-/+] or [Song] buttons to select the DVOL menu
Press [Enter] and use the [-/+] buttons to adjust the volume up or down. Press
both [ ] and [+] at the same time to reset the drum part volume to the default
value of 020. Range: 000-032
Press [Enter] to confirm the new value.
Note: The drum part volume setting returns to the default value on power-down, so you
should only use the value of 000 to silence the drums temporarily. If you want to turn off the
drum parts completely, use the Drum On/Off feature described on the previous page.
c. Accompaniment Part Volume (ACCV)
If you'd like to adjust the volume of the pre-recorded accompaniment instruments while
listening to or playing along with the songs, here is what to do:
Press the [Song] button until the MIX menu appears in the display
Press [Enter] and use the [-/+] or [Song] buttons to select the ACCV menu
Press [Enter] and use the [-/+] buttons to adjust the volume up or down. Press
both [ ] and [+] at the same time to reset the accompaniment part volume to the
default value of 020. Range: 000-032
Press [Enter] to confirm the new value.
Note: The accompaniment part volume setting returns to the default value on power-down.
d. Reset All Mix Parameters (RSET)
If you'd like to restore the default values for all of the Mix parameters, follow these steps:
Press the [Song] button until the MIX menu appears in the display
Press [Enter] and use the [-/+] or [Song] buttons to select the RSET menu
Press [Enter] to execute the procedure. The display will flash DONE, indicating
that the default Mix settings have been restored.
27
Assembly
Instruction
Start to Started
Play
the&Drum
Getting
Connect
Drum Module Overview
[Click] button
Press the [Click] button to turn the metronome on or off at any time, whether a song is
playing or not. The only time this button will not toggle the metronome is when you are in
Click Edit mode, which is described below.
Click edit: [Tempo/Tap] + [Click]
It is possible to adjust the metronome volume, change its assigned instrument, or select a
different time signature. To access these parameters you will need to press two buttons at the
same time: [Tempo/Tap] and [Click]. After you have done this, the following options become
available to you:
a. Click Volume (LEVL)
To adjust the metronome volume, follow these steps:
Press the [Tempo/Tap] and [Click] buttons at the same time. This will access the
LEVL menu
Press [Enter] and use the [-/+] buttons to adjust the click volume up or down.
Pressing both [ ] and [+] at the same time will reset the click volume to the
default value of 020. Range: 000-032
Press [Enter] to confirm the choice. The setting will be retained on power-down.
b. Changing the Time Signature (TSIG)
The metronome settings can be changed to accommodate a number of different time
signatures. To change the time signature, follow these steps:
Press [Tempo/Tap] and [Click]: the LEVL menu will be shown
Use the [-/+] buttons to select the TSIG menu
Press [Enter] again and use the [-/+] buttons to select the new time signature. Pressing
both [ ] and [+] at the same time will reset the click to the default value of 4/4.
Range: 1/4, 2/4, 3 /4, 4/4, 5/4, 6/4, 7/4, 3/8, 6/8, 9/8, and 12/8.
Press [Enter] to confirm the choice. The setting will be retained on power-down.
28
Assembly
Instruction
Start to Play
the&Drum
Getting
Connect
Started
Drum Module Overview
c. Selecting the Click Sound (SND)
It is possible to select one of three different sounds for the metronome click. If you'd like to
experiment with the options to see which one is best for you, here is what to do:
Press [Tempo/Tap] and [Click]: the LEVL menu will be shown
Use the [-/+] buttons to select the SND menu
Press [Enter] again and use the [-/+] buttons to select one of the three sounds.
Press [Enter] to confirm the choice. Your selection will be retained on power-down.
d. Restoring Factory Click Settings (RSET)
There's a quick way to return all of the click settings to their factory defaults. If you would
like to do this, follow this procedure:
Press [Tempo/Tap] and [Click]: the LEVL menu will be shown
Use the [-/+] buttons to select the RSET menu
Press [Enter] to execute the reset procedure. The display will flash
return to the RSET menu.
DONE
and
[Tempo/Tap] button
The tempo of the click or the current song may be set by using one of several methods.
Each of these procedures is detailed in the paragraphs ahead:
a. Setting the Tempo with the [-/+] Buttons
For making precise adjustments to the tempo, use this procedure:
Press the [Tempo/Tap] button: the current tempo value will be shown
Use the [-/+] buttons to change the tempo value. Range: 020-240
b. Setting the Tempo by Tapping
You can also enter the tempo by tapping it out on the [Tempo/Tap] button or by
using one of the pads. Here's how:
Press the [Tempo/Tap] button: the current tempo value will be shown
Press the [Enter] button: the tempo value will flash
Tap on the [Tempo/Tap] button or on one of the pads four times. Those four
taps will be used to calculate the new tempo value. Range: 020-240
Note: A song must be playing in order for its tempo to be changed.
29
Assembly
Instruction
Start to Play
the&Drum
Getting
Connect
Started
Drum Module Overview
[Rec/Play] button
Pressing the [Rec/Play] button takes you into a separate mode where you have the option
to record, play back, or erase one of your own performances. There are two ways to select
one of those three functions:
Press the [Rec/Play] button repeatedly, or
Use the [-/+] buttons.
Well
' go through these functions one at a time:
a. Record a Song (RECD)
There will be times with this drum set where you have a great idea for a groove and you want
to capture it on the spot so you can remember it later. We've given you the ability to do that
with the Record/Play mode. Go ahead and work with this feature now so you're ready when
inspiration strikes! Here's what to do:
First, you may want to enable the Click and set the time signature or tempo before
recording; see the previous two pages for instructions on how to use those features.
Once you're ready, press the [Rec/Play] button. The display will read RECD
Press the [Start/Stop] button to start recording. You will hear the click giving you a
full measure of count-in, and then start playing!
Press the [Start/Stop] button again to stop recording. Your song will be retained in
memory on power-down.
Note: after you stop recording, the display will return to the RECD page. Be aware that you
will lose the recording you just made if you press the [Start/Stop] button again right away! So
if you want to listen to the recording, press the [+] button so you are taken to the PLAY page.
But if you would like to re-do the recording, press the [Start/Stop] button again to erase the
previous recording and start over.
30
Assembly
Instruction
Start to Play
the&Drum
Getting
Connect
Started
Drum Module Overview
b. Playback of a Recorded Song (PLAY)
To listen back to the recording you just made, switch from the Record page to the Play page
using the [+] button. Then press the [Start/Stop] button to start playing back your recording.
Press it again to stop playback.
If the display has timed out and returned to the Song Select screen, here's how to get
back to the Play page so you can hear your song:
You may want to disable the Click first, so press the [Click] button once to do this.
Next, press the [Rec/Play] button. The display will read RECD
Press the [+] button or the [Rec/Play] button until the display reads PLAY
Press the [Start/Stop] button to play back your song.
Press the [Start/Stop] button again to stop playback. Your song will be retained in
memory on power-down.
c. Clear the Current Song (CLER)
If you would like to erase the song , there's a simple process for this:
Press the [Rec/Play] button. The display will read RECD
Using the [-/+] buttons or the [Rec/Play] button, cycle through the pages until the
display reads CLER
Note: the next step will erase the song you have recorded. Be sure this is what you
want to do before proceeding!
Press the [Enter] button. the song you recorded.
31
Assembly
Instruction
Start to Play
the Drum
Factory
Connect
Reset
There is a simple way to restore everything in the drum module to the factory settings. This
includes all trigger settings, drum kits, effects, and the song you recorded. If you are certain
you want to do this, follow these steps:
Turn the power switch on the left side of the drum module to OFF
Hold down the [-/+] buttons
Turn the power switch to ON. The display will read LOAD , and then RSET ,
which means all of the parameters in the drum module have been restored to their factory
settings.
32
Drum Kits List
Kit #
Name
Kit #
Name
001
Acoustic 1
016
Latin
002
Acoustic 2
017
Pop
003
Room
018
Eight-oh
004
Nine-oh
019
Electro-pop
005
Rock 1
020
Trash
006
Dance Club
021
Rock 2
007
Jazz
022
Reggae-pop
008
Rap-hop
023
Brush
009
Early R&B
024
Modern R&B
010
Electronic 1
025
Drum Box 2
011
Crunch
026
012
Compressed
027
013
Electronic 2
028
014
Analog
029
Room
(duplicate)
Eight-oh
(duplicate)
015
Drum Machine
030
Rock 1
(duplicate)
33
Acoustic 1
(duplicate)
Acoustic 2
(duplicate)
Instruments
Group 1: Kick Drums
01 Acoustic kick 1
02 Acoustic kick 2
03 Room kick 1
04 Room kick 2
05 Rock kick 1
06 Jazz kick
07 Early R&B kick
08 Compressed kick
09 Latin kick
10 Pop kick
11 Trash kick
12 Rock kick 2
13 Reggae-pop kick
14 Brush kick
15 Modern R&B kick
16 Big kick
17 Rock kick 3
18 Rock kick 4
19 Rock kick 5
20 8-oh kick
21 9-oh kick
22 Dance club kick
23 Rap-hop kick
24 Electronic kick 1
25 Electronic kick 2
26 Analog kick
27 Drum box kick
28 Drum machine kick
29 Crunch kick
30 Electro-pop kick
31 Thick kick
32 Crunch snare 1
33 Electronic snare 2
34 Analog snare 2
01 Acoustic snare 1
35 Crunch snare 2
02 Piccolo snare 1
36 Drum box snare 3
03 Piccolo snare 2
37 Noise snare
04 Room snare 1
38 Reso-snare
05 Room snare 2
39 Bubble snare
06 Rock snare 1
40 Acoustic rimshot 1
07 Rock snare 2
41 Early R&B rimshot
08 Rock snare 3
42 Pop rimshot 1
09 Rock snare 4
43 Piccolo rimshot 1
10 Compressed snare
44 Rock rimshot 1
11 Jazz snare
45 Jazz rimshot 1
12 Acoustic snare 2
46 Acoustic rimshot 2
13 Acoustic snare 3
47 Compressed rimshot
14 Trash snare
48 Room rimshot
15 Pop snare 1
49 Pop rimshot 2
16 Reggae-pop snare
50 Rock rimshot 2
17 Brush snare
51 Reggae-pop rimshot
18 Early R&B snare
52 Brush rimshot
19 Pop snare 2
20 Latin snare+tambourine 53 Analog rimshot 1
54 Modern R&B rimshot
21 Electro-pop snare
55 Trash rimshot
22 Rap-hop snare
56 Drum box rimshot 1
23 Analog snare 1
57 8-oh rimshot
24 Modern R&B snare
58 Dance club rimshot
25 Rock snare 5
59 Electronic rimshot 1
26 Electronic snare 1
60 Crunch rimshot
27 Drum box snare 1
61 Electronic rimshot 2
28 8-oh snare
62 Analog rimshot 2
29 Dance club snare
63 Drum box rimshot 2
30 9-oh snare
64 Electro-pop rimshot
31 Drum box snare 2
Group 2: Snare Drums
34
Instruments
Group 3: Toms
01 Acoustic tom 1 (high)
02 Acoustic tom 1 (mid)
03 Acoustic tom 1 (low)
04 Acoustic tom 2 (high)
05 Acoustic tom 2 (mid)
06 Acoustic tom 2 (low)
07 Room tom 1 (high)
08 Room tom 1 (mid)
09 Room tom 1 (low)
10 Compressed tom (high)
11 Compressed tom (mid)
12 Compressed tom (low)
13 Rock tom 1 (high)
14 Rock tom 1 (mid)
15 Rock tom 1 (low)
16 Rock tom 2 (high)
17 Rock tom 2 (mid)
18 Rock tom 2 (low)
19 Pop tom 1 (high)
20 Pop tom 1 (mid)
21 Pop tom 1 (low)
22 Pop tom 2 (high)
23 Pop tom 2 (mid)
24 Pop tom 2 (low)
25 Tight tom (high)
26 Tight tom (mid)
27 Tight tom (low)
28 D-dub tom (high)
29 D-dub tom (mid)
30 D-dub tom (low)
31 Rock tom 3 (high)
32 Rock tom 3 (mid)
33 Rock tom 3 (low)
34 Rock tom 4 (high)
35 Rock tom 4 (mid)
36 Rock tom 4 (low)
37 Rock tom 5
38 Modern R&B tom (high)
39 Modern R&B tom (mid)
40 Modern R&B tom (low)
41 Jazz tom (high)
42 Jazz tom (mid)
43 Jazz tom (low)
44 Brush tom (high)
45 Brush tom (mid)
46 Brush tom (low)
47 Early R&B tom (high)
48 Early R&B tom (mid)
49 Early R&B tom (low)
50 Reggae-pop tom & timbale
51 Reggae-pop tom & conga
52 Reggae-pop tom & conga
53 Latin tom & conga
54 Latin tom & bongo
55 Electro-pop tom (high)
56 Electro-pop tom (mid)
57 Electro-pop tom (low)
58 Electro-pop tom 2 (high)
59 Electro-pop tom 2 (mid)
60 Electro-pop tom 2 (low)
61 Trash tom (high)
62 Trash tom (mid)
63 Trash tom (low)
64 Crunch tom (high)
65 Crunch tom (mid)
66 Crunch tom (low)
67 Rap-hop tom (high)
68 Rap-hop tom (mid)
69 Rap-hop tom (low)
70 Electronic tom 1 (high)
35
71 Electronic tom 1 (mid)
72 Electronic tom 1 (low)
73 Electronic tom 2 (high)
74 Electronic tom 2 (mid)
75 Electronic tom 2 (low)
76 Analog tom (high)
77 Analog tom (mid)
78 Analog tom (low)
79 9-oh tom (high)
80 9-oh tom (mid)
81 9-oh tom (low)
82 9-oh tom 2 (high)
83 9-oh tom 2 (mid)
84 9-oh tom 2 (low)
85 8-oh tom-fall (high)
86 8-oh tom-fall (mid)
87 8-oh tom-fall (low)
88 Drum box tom 1 (high)
89 Drum box tom 1 (mid)
90 Drum box tom 1 (low)
91 Drum box tom 2 (high)
92 Drum box tom 2 (mid)
93 Drum box tom 2 (low)
94 Dance club tom (high)
95 Dance club tom (mid)
96 Dance club tom (low)
Instruments
Group 4: Cymbals
01 Crash cymbal 1
02 Crash cymbal 2
03 Rap-hop crash
04 Mid crash 1
05 Mid crash 2
06 Dark crash
07 18" crash 1
08 18" crash 2
09 Mid splash
10 High splash
11 Crispy splash
12 Trash splash
13 Small splash
14 Electro splash
15 Dark splash
16 Low crash 1
17 Low crash 2
18 Analog crash
19 Electro-pop crash
20 Dance club crash
21 Electro crash 1
22 Electro crash 2
23 Falling crash
24 Submarine crash
25 Sizzle ride
26 Sizzle ride plus bell
27 Cymbal ride bell 1
28 Cymbal ride bell 2
29 Low ride
30 Early R&B ride
31 Ride crash
32 Brush ride
33 Cymbal ride plus bell 3
34 Latin ride & cowbell
35 Cymbal ride plus bell 1
36 Cymbal ride plus bell 2
37 Trash ride
38 Electronic ride 1
39 Electro-pop ride
40 High ping ride
41 Drum box ride
42 9-oh ride crash
43 Pie tin ride
44 Electronic ride 2
45 Crunch ride
Group 5: Hi -hats
0 1 Brush hat 1 closed
02 Brush hat 1 foot
03 Brush hat 1 open
04 Brush hat 2 closed
05 Brush hat 2 foot
06 Brush hat 2 open
07 Room hat closed
08 Room hat foot
09 Room hat open
10 Rock hat 1 closed
11 Rock hat 1 foot
12 Rock hat 1 open
13 Rock hat 2 closed
14 Rock hat 2 foot
15 Rock hat 2 open
16 Small hat 1 closed
17 Small hat 1 foot
36
19 Small hat 2 closed
20 Small hat 2 foot
21 Small hat 2 open
22 Snappy brush hat closed
23 Snappy brush hat foot
24 Snappy brush hat open
25 Trash hat closed
26 Trash hat foot
27 Trash hat open
28 Early R&B hat closed
29 Early R&B hat foot
30 Early R&B hat open
31 Boom snap hat closed
32 Boom snap hat open
33 Rock hat 3 closed
34 Rock hat 3 open
35 8-oh hat closed
36 8-oh hat foot
37 8-oh hat open
38 Dance club hat closed
39 Dance club hat foot
40 Dance club hat open
41 Rap-hop hat closed
42 Rap-hop hat foot
43 Rap-hop hat open
44 Electronic hat 1 closed
45 Electronic hat 1 foot
46 Electronic hat 1 open
47 Crunch hat closed
48 Crunch hat foot
49 Crunch hat open
50 Electronic hat 2 closed
51 Electronic hat 2 foot
Instruments
Group 6: Percussion
52 Electronic hat 2 open
53 Analog hat closed
54 Analog hat foot
55 Analog hat open
56 Drum box hat 1 closed
57 Drum box hat 1 foot
58 Drum box hat 1 open
59 9-oh hat closed
60 9-oh hat foot
61 9-oh hat open
62 Electro-pop hat closed
63 Electro-pop hat foot
64 Electro-pop hat open
65 Modern R&B hat closed
66 Modern R&B hat foot
67 Modern R&B hat open
68 Drum box hat 2 closed
69 Drum box hat 2 foot
70 Drum box hat 2 open
71 Shaker hat closed
01 Agogo (high)
02 Agogo (low)
03 Agogo (high/low)
04 Conga (high)
05 Conga (low)
06 Hand claps
07 Timbale (high)
08 Timbale (low)
09 Triangle mute
10 Triangle open
11 Triangle (open/mute)
12 Woodblock (high)
13 Woodblock (low)
14 Woodblock (high/low)
15 Shaker
16 8-oh cowbell
17 Tambourine (down)
18 Tambourine (up)
19 Tambourine (up/down)
37
Song/Style List
Number
Song Name/Style
Number
Song Name/Style
01
Rock Shuffle
16
Pop Ballad
02
Surf Pop
17
8 Beat Dance
03
Techno
18
8 Beat Modern
04
60's Rock
19
70's Disco
05
Hard Rock
20
Big Band
06
Pop Bossa
21
Country 8 Beat
07
80's Rock
22
3/4 Gospel
08
16 Beat
23
Soul
09
Pop Shuffle
24
8 Beat Two
10
Guitar Pop
25
Reggae
11
Modern 6/8
26
Swing Reggae
12
Swing Funk
27
English Waltz
13
Piano Ballad
28
Tango
14
Rap
29
Rhythm & Blues
15
16 Beat Ballad
30
Polka
We gratefully acknowledge the permission granted by Groove Monkee to use som e of
their excellent drum patterns in our demo songs. (Http://www.groovemonkee.com)
VELCRO is a registered trademark of Velcro Industries B. V.
38
MIDI Implementation Chart
Function
Basic
Default
Channel Changed
Mode
Default
Messages
Altered
Note
Number True voice
Velocity Note ON
Note OFF
Aftertouch
Pitch Bend
Control Change 0, 32
1
5
6
7
10
11
64
65
66
67
80, 81
91, 93
100,101
121
Transmitted
1-16
1-16 each
Mode 3
X
**********
0~127
**********
O 9nH,v=1~127
O 8nH,v=0
X
X
X
X
X
X
X
X
X
X
X
X
X
X
X
X
X
Recognized
1-16
1-16 each
Mode 3
X
X
0~127
0~127
O 9nH,v=1~127
O 9nH,v=0 or 8nh
X
O
X
O
O
O
O
O
O
O
O
O
O
O
O
O (*1)
O
Program
Change True number
System Exclusive
System Song Pos
Common Song Sel
Tune
Aux
Local on/off
Messages All Notes Off
Active Sense
Reset
O 0-29
O 0-127
0-127
X
X
X
X
O
O
O
O
X
X
X
X
X
O
X
X
Mode1:OMNI ON, POLY
Mode3:OMNI OFF, POLY
*1: Registered parameter number:
#0: Pitch sensitivity
#1: Fine tuning
#2: Coarse tuning
39
Remarks
Memorized
Bank Select
Modulation
Portamento time
Data Entry
Volume
Pan
Expression
Sustain
Portamento
Sostenuto
Soft pedal
DSP TYPE
DSP DEPTH
RPN LSB,MSB
Reset all Controllers
All Notes Off is sent
as All Sound Off
(CC# 120)
Mode2:OMNI ON, MONO
Mode4:OMNI OFF, MONO
O: Yes
X: NO
Specifications
Drum Pads:
1 Snare pad with function, 3 Tom pads, 2 Cymbal pads,
1 Hi-Hat pad, 1 Hi-Hat control pedal, 1 Kick trigger pad
Display:
Custom multi-function backlit LCD display
Polyphony:
64 notes
Sounds:
326 drum instruments, 30 customizable kits
Effect:
Reverb (8 types),Chorus (8 types)
Practice Songs:
30 styles
Pad Control:
Sensitivity; Threshold ;Velocity curve; Crosstalk
Song recording:
Real-time record and playback.
Other Features:
Tap Tempo, Click level, Three click sounds
Selectable time signatures (1/4 - 7/4, 3/8 - 12/8)
Connections:
DC 9V Power jack , Headphones, USB MIDI, Left/Right
Out, AUX In, HH-Ctrl, Hi-Hat, Crash, Ride, Snare, Tom 1,
Tom 2, Tom 3, Kick
10505626V1.0
40