1
Electronic Payment Processing Software
Setup Guide and User's Manual
Copyright 2011, VeriFone Inc.
PCC-5-10-0
Notice
Copyright 2011, VeriFone Inc. All rights reserved. VeriFone, the VeriFone logo, PAYware
PC, PAYware SIM, PAYware Transact, PAYware Mobile, PAYware Connect, PAYware STS
and PCCharge and are registered trademarks of VeriFone. Other brand names or
trademarks associated with VeriFone products and services are trademarks of VeriFone,
Inc. All other brand names and trademarks appearing in this manual are the property of
their respective holders.
VeriFone has attempted to ensure the accuracy of the contents of this Program Guide.
However, this Program Guide may contain errors or omissions. This Program Guide is
supplied “as-is,” without any warranty of any kind, either expressed or implied, including
the implied warranties of merchantability and fitness for a particular purpose
In no event shall VeriFone be liable for any indirect, special, incidental, or consequential
damages, including without limitation damages for loss of business, profits, or the like,
even if VeriFone or its representatives have been advised of the possibility of such
damages.
© VeriFone Inc.
8001 Chatham Center Drive Suite 500
Savannah, Georgia 31405
General Fax: (912) 527-4533
Technical Support: (877) 659-8981
Technical Support Fax: (727) 953-4110
www.verifone.com
Printed in the United States of America.
No part of this publication may be copied, distributed, stored in a retrieval system,
translated into any human or computer language, transmitted in any form or by any
means without prior written consent of VeriFone, Inc.
2
Software License
IMPORTANT
PCCHARGE AND PAYWARE PC END USER LICENSE AGREEMENT
CAREFULLY REVIEW THIS AGREEMENT BEFORE CONTINUING THE INSTALLATION OR USE OF
VERIFONE’S PROPRIETARY SOFTWARE PROVIDED TO YOU ("VERIFONE SOFTWARE"). THIS
AGREEMENT IS A LEGAL AGREEMENT BETWEEN YOU ("LICENSEE") AND THE VERIFONE
ENTITY THAT PROVIDED YOU WITH THE VERIFONE SOFTWARE (“VERIFONE”). ALL
REFERENCES HEREIN TO “YOU” AND “LICENSEE” MEAN YOU AND THE COMPANY OR OTHER
LEGAL ENTITY YOU REPRESENT. BY ACCEPTING THIS AGREEMENT, YOU ARE BINDING
SUCH ENTITY; YOU HEREBY REPRESENT THAT YOU HAVE THE AUTHORITY TO BIND SUCH
ENTITY.
IF YOU DO NOT AGREE TO THE TERMS OF THIS AGREEMENT, TERMINATE THIS
INSTALLATION AND PROMPTLY RETURN ALL SOFTWARE TO VERIFONE. BY ACCEPTING
THESE TERMS, BY DOWNLOADING THE SOFTWARE AND/OR OPENING THE SOFTWARE
PACKET(S) AND/OR USING THE SOFTWARE, YOU ACKNOWLEDGE THAT YOU HAVE READ
THIS AGREEMENT, UNDERSTAND IT AND AGREE TO BE BOUND BY ITS TERMS. THE
SOFTWARE ALSO INCLUDES THE MEDIA ON WHICH THE SOFTWARE IS RECORDED, AS WELL
AS ANY PRINTED MATERIALS OR "ONLINE" OR ELECTRONIC DOCUMENTATION PROVIDED TO
YOU BY VERIFONE.
NOTWITHSTANDING THE FOREGOING, IF YOU HAVE SIGNED A LICENSE AGREEMENT WITH
VERIFONE FOR YOUR USE OF THE SOFTWARE, THIS AGREEMENT SHALL NOT APPLY; YOUR
USE OF THE SOFTWARE SHALL BE GOVERNED BY SUCH SIGNED LICENSE AGREEMENT.
1.
GRANT OF LICENSE. Subject to the terms and conditions of this Agreement, and
Licensee’s payment of the applicable license fees, VeriFone hereby grants to
Licensee a limited, non-transferable, non-exclusive license to use the VeriFone
Software solely (i) in object (executable) code form, (ii) on a single computer (the
"Computer"), and (iii) for your internal use only. You understand that You must
comply with the VeriFone Software registration policies and the failure to comply
with those policies may result in the disablement of the VeriFone Software. The
VeriFone Software is in "use" on a computer when it is loaded into temporary
memory (i.e. RAM) or installed into permanent memory (e.g. hard disk, CD-ROM, or
other storage device) of a computer. Licensee acknowledges that the VeriFone
Software is designed for use only in connection with supported VeriFone terminal
products.
2.
OWNERSHIP. The VeriFone Software and all copies provided to you are licensed and
not sold. All title to the VeriFone Software resides and remains in VeriFone and its
licensors. The VeriFone Software is protected by U.S. copyright laws and
international copyright treaties.
3.
RESTRICTIONS. Licensee shall not use or copy the VeriFone Software except for the
purposes set forth in Section 1 above. Licensee shall not disclose or publish any
results of any benchmark tests run on the VeriFone Software. Licensee may not
copy the VeriFone Software onto any public network. Licensee shall have no right to
obtain source code for the VeriFone Software by any means. Licensee shall not
reverse engineer, decompile, disassemble, translate, modify, alter or change the
VeriFone Software, or any part thereof, without the prior express written consent of
VeriFone, except to the extent that the foregoing restriction is expressly prohibited
3
by applicable law. Licensee shall have no right to market, distribute, sell, assign,
pledge, sublicense, lease, deliver or otherwise transfer the VeriFone Software.
Licensee shall not obfuscate or remove from the VeriFone Software, or alter, any of
VeriFone's trademarks, trade names, logos, patent or copyright notices, or other
notices or markings, or add any other notices or markings to the VeriFone Software,
without the prior express written consent of VeriFone. Licensee shall duplicate all
such proprietary rights notices on all copies of the VeriFone Software permitted to
be made hereunder.
4.
SUPPORT. You must purchase support for the VeriFone Software at time of initial
purchase. Support services shall commence on the earlier of: (a) the date of initial
activation of the VeriFone Software, or (b) one (1) year from date of original
shipment of the VeriFone Software by VeriFone to you or your reseller, if you have
purchased through a reseller. Support shall be provided in accordance with
VeriFone’s then current support policies and procedures. Any upgrades or updates
to the VeriFone Software, if any, provided to you under support shall be subject to
this Agreement, including the license rights and restrictions set forth herein.
5.
MEDIA WARRANTY. VeriFone represents and warrants that the media and the
encoding of the VeriFone Software on the media will be free from defects in
materials and workmanship for a period of ninety (90) days from the date of original
shipment of the VeriFone Software by VeriFone to you or your reseller, if you have
purchased through a reseller. To the maximum extent permitted by applicable law,
in the event of a breach of the foregoing limited warranty, Licensee’s sole and
exclusive remedy shall be to return the media to VeriFone, postage prepaid.
VeriFone shall, at its option: (a) provide a replacement in exchange for the
defective media; or (b) correct the defective media. Any replacement media will
be warranted for ninety (90) days.
6.
DISCLAIMER OF WARRANTIES. EXCEPT FOR THE LIMITED WARRANTY PROVIDED
UNDER SECTION 5 ABOVE, THE VERIFONE SOFTWARE IS PROVIDED "AS IS”, WITH ALL
FAULTS AND, TO THE MAXIMUM EXTENT PERMITTED BY LAW, WITHOUT ANY
WARRANTY OF ANY KIND, EXPRESS, IMPLIED OR STATUTORY, INCLUDING WITHOUT
LIMITATION THE IMPLIED WARRANTIES OF MERCHANTABILITY, FITNESS FOR A
PARTICULAR PURPOSE AND NON-INFRINGEMENT OF THIRD PARTY RIGHTS. WITHOUT
LIMITING THE GENERALITY OF THE FOREGOING, VERIFONE DOES NOT WARRANT AND
MAKES NO ASSURANCES THAT THE OPERATION OF THE VERIFONE SOFTWARE WILL BE
SECURE, UNINTERRUPTED OR ERROR FREE AND HEREBY DISCLAIMS ALL LIABILITY ON
ACCOUNT THEREOF. UNDER NO CIRCUMSTANCES DOES VERIFONE REPRESENT OR
WARRANT THAT ALL PROGRAM ERRORS IN THE VERIFONE SOFTWARE CAN BE
REMEDIED.
7.
LIMITATIONS OF LIABILITY. NOTWITHSTANDING ANYTHING TO THE CONTRARY
CONTAINED IN THIS AGREEMENT, EXCEPT TO THE EXTENT PROHIBITED BY LAW: (A)
VERIFONE SHALL HAVE NO LIABILITY TO LICENSEE OR ANY THIRD PARTY FOR SPECIAL,
INCIDENTAL, INDIRECT, EXEMPLARY, OR CONSEQUENTIAL DAMAGES (INCLUDING, BUT
NOT LIMITED TO, LOSS OF PROFITS, GOODWILL OR SAVINGS, DOWNTIME, OR DAMAGE
TO, LOSS OF OR REPLACEMENT OF SOFTWARE AND DATA) RELATING IN ANY MANNER
TO THE VERIFONE SOFTWARE (WHETHER ARISING FROM CLAIMS BASED IN WARRANTY,
CONTRACT, TORT OR OTHERWISE), EVEN IF VERIFONE HAS BEEN ADVISED OF THE
POSSIBILITY OF SUCH CLAIM OR DAMAGE; (B) IN ANY CASE, VERIFONE'S ENTIRE
LIABILITY RELATING IN ANY MANNER TO THE VERIFONE SOFTWARE, REGARDLESS OF
THE FORM OR NATURE OF THE CLAIM, SHALL BE LIMITED IN THE AGGREGATE TO THE
FEES ACTUALLY PAID BY LICENSEE FOR LICENSING THE VERIFONE SOFTWARE UNDER
THIS AGREEMENT, OR $1000 IF NO FEES WERE PAID; AND (C) VERIFONE SHALL NOT BE
LIABLE FOR ANY CLAIMS OF THIRD PARTIES RELATING TO THE VERIFONE SOFTWARE,
AND LICENSEE SHALL DEFEND VERIFONE FROM, AND INDEMNIFY AND HOLD VERIFONE
HARMLESS AGAINST, ALL SUCH CLAIMS. THE LIMITATIONS CONTAINED IN SECTION 6
4
ABOVE AND THIS SECTION 7 ARE A FUNDAMENTAL PART OF THE BASIS OF VERIFONE'S
BARGAIN HEREUNDER, AND VERIFONE WOULD NOT LICENSE THE VERIFONE SOFTWARE
TO LICENSEE ABSENT SUCH LIMITATIONS.
8.
TERMINATION. VeriFone may terminate this Agreement upon notice to Licensee if
Licensee breaches any of the terms in this Agreement, fails to pay the applicable
license fees for the VeriFone Software or upon termination of Licensee's business.
Upon termination for any reason whatsoever, Licensee’s license rights shall
terminate and Licensee shall immediately destroy or return to VeriFone the
VeriFone Software, together with all copies in any form. Upon request of VeriFone,
Licensee agrees to certify in writing that the VeriFone Software and all such copies
have been destroyed or returned. Notwithstanding anything to the contrary
contained in this Agreement, Sections 2, 3, 4, 6, 7, 8, 9, 10 and 11 shall survive any
expiration or termination of this Agreement.
9.
U.S. GOVERNMENT RESTRICTED RIGHTS. If the VeriFone Software is acquired by or
on behalf of a unit or agency of the U.S. government, this provision applies.
Licensee agrees that the VeriFone Software is delivered as “Commercial computer
software” as defined in DFARS 252.227-7013 (Oct 1998), DFARS 252.211-7015 (May
1991) or DFARS 252.227-7014 (Jun 1987), or as a “commercial item” as defined in
FAR 2.101(a), or as “Restricted computer software” as defined in FAR 52.227-19
(Jun 1987), whichever is applicable. Licensee agrees that all the VeriFone Software
is adequately marked when the Restricted Rights legend is included on or encoded
in the VeriFone Software. Licensee further agrees that the VeriFone Software has
been developed entirely at private expense.
10. EXPORT/LAWS. Licensee shall fully comply with all laws and regulations of the
United States and other countries relating to the export, import and use of the
VeriFone Software. Export or re-export to certain countries may be prohibited.
Licensee will defend, indemnify and hold harmless VeriFone and its affiliates from
and against any and all claims, proceedings, losses, damages, liabilities, fines,
penalties, costs, and fees (including reasonable attorneys' fees) arising in connection
with any violation of any regulation of any United States or other governmental
authority relating to the export, import or use of the VeriFone Software by
Licensee.
11. GENERAL. Except as set forth above with regard to a signed license agreement, this
Agreement constitutes the entire agreement between VeriFone and Licensee and
supersedes all prior or contemporaneous communications and proposals, whether
electronic, oral or written, relating to the subject matter hereof. This Agreement
will be governed by the laws of the State of California, without regard to its conflict
of law provisions. Licensee hereby acknowledges and agrees that the U.N.
Convention on Contracts for the International Sale of Goods shall not apply to this
Agreement. The parties also agree that the Uniform Computer Information
Transactions Act or any version thereof, adopted by any state, in any form
("UCITA"), shall not apply to this Agreement. To the extent that UCITA is applicable,
the parties agree to opt out of the applicability of UCITA pursuant to the opt-out
provision(s) contained therein. Each party consents to the exclusive jurisdiction and
venue of the appropriate courts in Santa Clara County, California for all disputes
arising out of or relating to this Agreement. The official text of this Agreement shall
be in English. In the event of any dispute concerning the interpretation or
construction of this Agreement, reference shall be made only to this Agreement as
written in English. The failure of a party to exercise or enforce any right or
provision of this Agreement will not constitute a waiver of such right or provision.
Licensee may not assign this Agreement, in whole or in part, without VeriFone’s
prior written consent. Subject to the preceding sentence, this Agreement shall bind
Licensee and its permitted successors and assigns. VeriFone may assign or delegate
this Agreement, or any of its rights or obligations hereunder, in its sole discretion.
5
If any provision of this Agreement is found by a court of competent jurisdiction to
be invalid, the parties agree that the court should endeavor to give the maximum
effect to the parties' intentions as reflected in the provision, and that the other
provisions of the Agreement shall remain in full force and effect. All notices,
demands, or consents required or permitted hereunder shall be in writing and shall
be delivered in person or sent via overnight delivery or certified mail to the
respective parties. Notices for VeriFone shall be sent to VeriFone’s General Counsel
at 2099 Gateway Place, Suite 600, San Jose, CA 95110 or such other address as shall
have been given to Licensee in writing. Notices for Licensee shall be sent to the
address in VeriFone’s customer database, or such other address as shall have been
given to VeriFone in writing. Such notices shall be deemed effective upon the
earliest to occur of: (a) actual delivery; or (b) three days after mailing, addressed
and postage prepaid, return receipt requested.
Rev Date: 2/25/10
6
Table of Contents
Notice ............................................................... 2
Software License ................................................. 3
Introduction ....................................................... 9
Important Security Notice .................................... 10
Introduction and Scope .............................................................................. 10
Applicability ........................................................................................... 10
Distributions and Updates ........................................................................... 10
What does PA-DSS mean to you? ................................................................... 11
Third Party Applications ............................................................................. 11
PA-DSS Guidelines .................................................................................... 12
More Information ..................................................................................... 18
System Requirements.......................................... 19
Installation ....................................................... 20
Windows 7, Vista, and 2008 Server Users ......................................................... 21
Welcome! .............................................................................................. 22
License Agreement ................................................................................... 23
Setup Type............................................................................................. 24
Choose Destination Location ........................................................................ 25
Select Features ....................................................................................... 26
Ready to Install! ...................................................................................... 27
Installing ............................................................................................... 28
Installation Completed!.............................................................................. 29
Setup Process.................................................... 30
Starting PCCharge Client ............................................................................ 31
Setup Wizard .......................................................................................... 32
PCCharge Path .................................................................................. 33
Credit Card Processing Company Setup ..................................................... 36
Debit Card Processing Company Setup ...................................................... 37
Check Services Company Setup .............................................................. 38
Gift Card Processing Company Setup ........................................................ 39
End of Setup Wizard ........................................................................... 40
Client User Setup ..................................................................................... 41
Client Receipt Printer Setup ........................................................................ 42
Client Report Printer Setup ......................................................................... 45
Client Card Reader Setup ........................................................................... 46
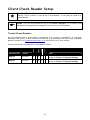
Client Check Reader Setup .......................................................................... 51
Client PIN Pad Setup ................................................................................. 52
Performing Test Transactions....................................................................... 56
User’s Guide ..................................................... 59
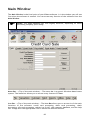
Main Window .......................................................................................... 60
Processing Transactions ............................................................................. 62
7
Credit Card Transactions ............................................................................ 63
Using Credit Card Processing ................................................................. 63
Credit Card Transaction Types ............................................................... 66
About Book & Ship Transaction Processing ................................................. 68
Using Book and Ship Transaction Processing ............................................... 69
About Restaurant Transaction Processing .................................................. 70
Using Restaurant Transaction Processing ................................................... 71
About Commercial Card Processing.......................................................... 72
Using Commercial Card Processing .......................................................... 73
Offline Processing .............................................................................. 74
Processing an Import File ..................................................................... 75
Debit Card Transactions ............................................................................. 76
Debit Card Transaction Types ................................................................ 76
Debit Card Processing.......................................................................... 76
Check Services Transactions ........................................................................ 79
Check Services Processing..................................................................... 79
All about Check Verification/Guarantee.................................................... 80
All about Check Conversion/Truncation .................................................... 81
Gift Card Transactions ............................................................................... 82
Gift Card Transaction Types .................................................................. 82
Gift Card Processing ........................................................................... 83
Cashier Privileges..................................................................................... 85
Log On ............................................................................................ 85
Manager Override Password................................................................... 86
Customer Database................................................................................... 87
Customer Info ................................................................................... 88
Credit Card Info................................................................................. 90
Customer Transactions ........................................................................ 92
Processing a Customer Transaction .......................................................... 92
Reports ................................................................................................. 94
Viewing a Report ............................................................................... 97
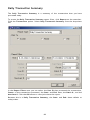
Daily Transaction Summary ................................................................... 99
Credit Card Detail .............................................................................100
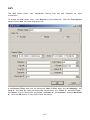
AVS...............................................................................................101
Book .............................................................................................102
Ship ..............................................................................................103
Customer Transaction.........................................................................104
Batch Pre-Settle ...............................................................................105
Batch Post-Settle ..............................................................................106
Check Summary ................................................................................107
Check Detail....................................................................................108
Debit Summary.................................................................................109
EBT Summary...................................................................................110
Periodic Payments by Expired Contracts...................................................111
Periodic Payments by Account ..............................................................112
Periodic Payments by Date...................................................................113
Reprint Receipts ...............................................................................114
Audit.............................................................................................115
Restaurant Pre-Settle .........................................................................117
Restaurant Detail ..............................................................................118
Gift Card ........................................................................................119
Frequently Asked Questions ................................120
8
Introduction
This Client software can be used in conjunction with PCCharge Pro or PCCharge Payment
Server (PS) to form a client-server relationship when used on a Windows NT or Peer-toPeer network. Several users can process transactions using one merchant account. Please
consult the PCCharge Pro User’s Manual or the PCCharge Payment Server User’s Manual
for more information on specific functionality.
Feel free to direct any comments or suggestions regarding your PCCharge documentation
to [email protected]. Please note that this address is not a source for
technical support. Any such requests should be directed to the normal support channels.
Using This Manual
As you use this manual, you'll come across the following text boxes. These are meant to
draw your attention to certain concepts, and are easily identifiable by their icons.
Simple Explanation:
(
Note: A note is important information that either helps to explain a concept
or draws attention to ideas that should be kept in mind. We recommend that
you carefully review the notes you encounter.
!
WARNING: We HIGHLY recommend that you read ALL warnings in the
sections of the manual that you read. These warnings will help to prevent
serious issues from occurring.
/
Technical Details: These technical details give more in-depth
explanations of concepts described in this manual. These extra bits of
information are often useful, but are not necessarily pertinent to all users.
The simple explanations found in this manual will
provide you with an easy-to-digest summary of the information in that
section. If you want to get through the manual as quickly and easily as
possible, pay special attention to the simple explanations.
PCCharge Appendices
PCCharge includes some extra documentation that isn't found in this manual. This
documentation, the PCCharge Appendices, contains specific information on the various
payment processing companies. You'll need to refer to this information as you use the
PCCharge manual. We recommend that you print out those sections related to your
payment processing company.
To access the PCCharge Appendices (available at the Server location), click the Windows
Start button, then Programs (or All Programs), then PCCharge Pro (or PCCharge
Payment Server), then PCCharge Appendices.
9
Important Security Notice
Introduction and Scope
The Payment Card Industry Payment Application Data Security Standard (PCI PA-DSS) is
comprised of fourteen requirements that support the Payment Card Industry Data
Security Standard (PCI DSS). The PCI Security Standards Council (PCI SSC), which was
founded by the major card brands in June 2005, set these requirements in order to
protect cardholder payment information. The standards set by the council are enforced
by the payment card companies who established the Council: American Express, Discover
Financial Services, JCB International, MasterCard Worldwide, and Visa, Inc.
PCI PA-DSS is an evolution of Visa’s Payment Application Best Practices (PABP), which was
based on the Visa Cardholder Information Security Program (CISP). In addition to Visa
CISP, PCI DSS combines American Express’ Data Security Operating Policy (DSOP),
Discover Network’s Information Security and Compliance (DISC), and MasterCard’s Site
Data Protection (SDP) into a single comprehensive set of security standards. The
transition to PCI PA-DSS was announced in April 2008. In early October 2008, PCI PA-DSS
Version 1.2 was released to align with the PCI DSS Version 1.2 which was released on
October 1, 2008. On January 1, 2011, PCI PA-DSS Version 2.0 was released. This extends
the PCI DSS Version 1.2 which was released on October 1, 2008 and is effective as of
01/01/2011.
Applicability
The PCI PA-DSS applies to any payment application which stores, processes, or transmits
cardholder data as part of authorization or settlement, unless the application would fall
under the merchant’s PCI DSS validation. PAYware PC, PAYware Transact, PAYware SIM,
and PCCharge (collectively the “PAYware NA Payment Applications”) were developed by
VeriFone for use by third parties, and therefore are subject to PA-DSS validation.
PAYware Connect (also included under “PAYware NA Payment Applications”) falls under
PCI DSS. See the PCI PA-DSS Program Guide to determine if PCI PA-DSS validation is
required for any other payment applications used at the merchant location. It is
important to note that PA-DSS or PCI DSS validated payment applications alone do not
guarantee PCI DSS compliance for the merchant. The validated payment application
must be implemented in a PCI DSS compliant environment. If your application runs on
Windows XP, you are required to turn off Windows XP System Restore Points.
Distributions and Updates
This guide will be provided to VeriFone’s customers including processors, resellers, ISOs,
and integrators along with the PAYware NA payment applications. It is the responsibility
of these parties to ensure the information contained in this guide is passed on to their
customers (the merchant), in order to illustrate the requirements for complying with PCI
DSS.
Additional information about PA-DSS and VeriFone’s PA-DSS Training can be found on our
website at www.verifone.com/padss.
10
What does PA-DSS mean to you?
VeriFone submits its PAYware NA payment applications to an annual PA-DSS audit in order
to maintain PA-DSS validation. In addition, if any major version change is made in any
PAYware NA payment applications, VeriFone submits that application for a full PA-DSS
audit again. An example of a major version change would be PCCharge 5.8 moving to
PCCharge 5.9. For minor changes, such as PCCharge 5.8.1 to 5.8.2, an attestation form
for minor change revisions is required. These minor change revisions are submitted to
VeriFone’s Qualified Security Assessor (QSA) which creates a report to submit to PCI SSC.
All validated applications are listed on the PCI SSC web site at
https://www.pcisecuritystandards.org/security_standards/vpa/.
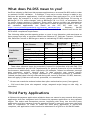
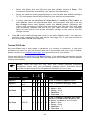
Summary
PA-DSS
requirements material given by VeriFone is not intended to be viewed/used as the full
PCI/PA-DSS compliance requirement.
The following table provides opening points to cover in any discussion with merchants on
data storage and why a merchant should use PAYware PC, PAYware Transact, PAYware
SIM, PAYware Connect or PCCharge to assist in maintaining PCI-DSS compliance.
Data Element
Cardholder
Data
Sensitive
Authentication
Data 2
Primary Account
Number
Cardholder Name 1
Service Code 1
Expiration Date 1
Full Magnetic Stripe
Data 3
CAV2/CID/CVC2/CVV2
PIN/PIN Block
Storage
Permitted
Protection
Required
Yes
Yes
Yes
Yes
Yes
Yes
Yes
Yes
PCI DSS
Req. 3, 4
Yes
1
1
1
No
No
No
No
N/A
N/A
No
No
N/A
N/A
N/A
N/A
1
- These data elements must be protected if stored in conjunction with the PAN. This
protection should be per PCI DSS requirements for general protection of the cardholder
environment. Additionally, other legislation (for example, related to consumer personal
data protection, privacy, identity theft, or data security) may require specific
protection of this data, or proper disclosure of a company's practices if consumerrelated personal data is being collected during the course of business. PCI DSS, however,
does not apply if PANs are not stored, processed, or transmitted.
2
- Do not store sensitive authentication data after authorization (even if encrypted).
3
- Full track data from the magnetic stripe, magnetic-stripe image on the chip, or
elsewhere.
Third Party Applications
A PAYware NA payment application validation does not extend to any external third party
application that has integrated such PAYware NA payment application as the payment
engine. The end-to-end transaction process, beginning with entry into the third party
application until the response from the payment engine is returned, must meet the same
level of compliance. In order to claim the third party application is end-to-end
compliant, the application would need to be submitted to a QSA for a full PA-DSS audit.
11
The use of a PAYware NA payment application also does not exempt a third party
integrator’s application from a PA-DSS audit. The end user and/or P.O.S. developer can
integrate and be compliant in the processing portion of a payment transaction. A brief
review (given below) of the PA-DSS environmental variables that impact the end user
merchant can help the end user merchant obtain and/or maintain PA-DSS compliance.
Environmental variables that could prevent passing an audit include without limitation
issues involving a secure network connection(s), end user setup location security, users,
logging and assigned rights. Remove all testing configurations, samples, and data prior to
going into production on your application.
PA-DSS Guidelines
The following PA-DSS Guidelines are being provided by VeriFone as a convenience to its
customers. These PA-DSS Guidelines were copied from PCI DSS Program Guide as of
March 31, 2009. Customers should not rely on these PA-DSS Guidelines, but should
instead always refer to the most recent PCI DSS Program Guide published by PCI SSC.
1. Sensitive Date Storage Guidelines.
Do not retain full magnetic stripe, card validation code or value (CAV2, CID, CVC2,
CVV2), or PIN block data.
1.1 Do not store sensitive authentication data after authorization (even if
encrypted):
Sensitive authentication data includes the data as cited in the following
Requirements 1.1.1 through 1.1.3.
PCI Data Security Standard Requirement 3.2
Note: By prohibiting storage of sensitive authentication data after authorization,
the assumption is that the transaction has completed the authorization process and
the customer has received the final transaction approval. After authorization has
completed, this sensitive authentication data cannot be stored.
1.1.1
After authorization, do not store the full contents of any track from
the magnetic stripe (located on the back of a card, contained in a chip, or
elsewhere). This data is alternatively called full track, track, track 1, track 2, and
magnetic-stripe data.
In the normal course of business, the following data elements from the magnetic
stripe may need to be retained:
• The accountholder’s name,
• Primary account number (PAN),
• Expiration date, and
• Service code
• To minimize risk, store only those data elements needed for business.
Note: See PCI DSS and PA-DSS Glossary of Terms, Abbreviations, and Acronyms for
additional information. PCI Data Security Standard Requirement 3.2.1
1.1.2
After authorization, do not store the card-validation value or code
(three-digit or four-digit number printed on the front or back of a payment card)
used to verify card-not-present transactions.
Note: See PCI DSS and PA-DSS Glossary of Terms, Abbreviations, and Acronyms for
additional information.
PCI Data Security Standard Requirement 3.2.2
12
1.1.3
After authorization, do not store the personal identification number
(PIN) or the encrypted PIN block.
Note: See PCI DSS and PA-DSS Glossary of Terms, Abbreviations, and Acronyms for
additional information.
PCI Data Security Standard Requirement 3.2.3
1.1.4
Securely delete any magnetic stripe data, card validation values or
codes, and PINs or PIN block data stored by previous versions of the payment
application, in accordance with industry-accepted standards for secure deletion, as
defined, for example by the list of approved products maintained by the National
Security Agency, or by other State or National standards or regulations.
PCI Data Security Standard Requirement 3.2
Note: This requirement only applies if previous versions of the payment application
stored sensitive authentication data.
1.1.5
Securely delete any sensitive authentication data (pre-authorization
data) used for debugging or troubleshooting purposes from log files, debugging files,
and other data sources received from customers, to ensure that magnetic stripe
data, card validation codes or values, and PINs or PIN block data are not stored on
software vendor systems. These data sources must be collected in limited amounts
and only when necessary to resolve a problem, encrypted while stored, and deleted
immediately after use. PCI Data Security Standard Requirement 3.2
2. Protect stored cardholder data
2.1 Software vendor must provide guidance to customers regarding purging of
cardholder data after expiration of customer-defined retention period. PCI Data
Security Standard Requirement 3.1
2.2 Mask PAN when displayed (the first six and last four digits are the maximum
number of digits to be displayed).
Notes:
•
•
This requirement does not apply to those employees and other parties
with a legitimate business need to see full PAN;
This requirement does not supersede stricter requirements in place for
displays of cardholder data—for example, for point-of-sale (POS)
receipts.PCI Data Security Standard Requirement 3.3
2.3 Render PAN, at a minimum, unreadable anywhere it is stored, (including data
on portable digital media, backup media, and in logs) by using any of the following
approaches:
• One-way hashes based on strong cryptography with associated key
management processes and procedures.
• Truncation
• Index tokens and pads (pads must be securely stored)
• Strong cryptography with associated key management processes and
procedures.
The MINIMUM account information that must be rendered unreadable is the PAN. PCI
Data Security Standard Requirement 3.4
The PAN must be rendered unreadable anywhere it is stored, even outside the
payment application.
Note: “Strong cryptography” is defined in the PCI DSS and PA-DSS Glossary of Terms,
Abbreviations, and Acronyms.
13
2.4 If disk encryption is used (rather than file- or column-level database
encryption), logical access must be managed independently of native operating
system access control mechanisms (for example, by not using local user account
databases). Decryption keys must not be tied to user accounts. PCI Data Security
Standard Requirement 3.4.2
2.5 Payment application must protect cryptographic keys used for encryption of
cardholder data against disclosure and misuse. PCI Data Security Standard
Requirement 3.5
2.6 Payment application must implement key management processes and
procedures for cryptographic keys used for encryption of cardholder data. PCI Data
Security Standard Requirement 3.6
2.7 Securely delete any cryptographic key material or cryptogram stored by
previous versions of the payment application, in accordance with industry-accepted
standards for secure deletion, as defined, for example the list of approved products
maintained by the National Security Agency, or by other State or National standards
or regulations. These are cryptographic keys used to encrypt or verify cardholder
data. PCI Data Security Standard Requirement 3.6
Note: This requirement only applies if previous versions of the payment application
used cryptographic key materials or cryptograms to encrypt cardholder data.
3. Provide secure authentication features
3.1 The payment application must support and enforce unique user IDs and secure
authentication for all administrative access and for all access to cardholder data.
Secure authentication must be enforced to all accounts, generated or managed by
the application, by the completion of installation and for subsequent changes after
the “out of the box” installation (defined at PCI DSS Requirements 8.1, 8.2, and
8.5.8–8.5.15) for all administrative access and for all access to cardholder data. PCI
Data Security Standard Requirements 8.1, 8.2, and 8.5.8–8.5.15
Note: These password controls are not intended to apply to employees who only
have access to one card number at a time to facilitate a single transaction. These
controls are applicable for access by employees with administrative capabilities, for
access to servers with cardholder data, and for access controlled by the payment
application. This requirement applies to the payment application and all associated
tools used to view or access cardholder data.
3.1.10 If a payment application session has been idle for more than 15
minutes, the application requires the user to re-authenticate. PCI Data Security
Standard Requirement 8.5.15.
3.2 Software vendors must provide guidance to customers that all access to PCs,
servers and database with payment applications must require a unique user ID and
secure authentication. PCI Data Security Standard Requirements 8.1 and 8.2
3.3 Render payment application passwords unreadable during transmission and
storage, using strong cryptography based on approved standards
Note: “Strong cryptography” is defined in PCI DSS and PA-DSS Glossary of Terms,
Abbreviations, and Acronyms. PCI Data Security Standard Requirement 8.4
4. Log payment application activity
4.1 At the completion of the installation process, the “out of the box” default
installation of the payment application must log all user access (especially users
with administrative privileges), and be able to link all activities to individual users.
PCI Data Security Standard Requirement 10.1
14
4.2 Payment application must implement an automated audit trail to track and
monitor access. PCI Data Security Standard Requirements 10.2 and 10.3
5. Develop secure payment applications
5.1 Develop all payment applications in accordance with PCI DSS (for example,
secure authentication and logging) and based on industry best practices and
incorporate information security throughout the software development life cycle.
These processes must include the following: PCI Data Security Standard Requirement
6.3
5.1.1 Live PANs are not used for testing or development PCI Data
Security Standard Requirements 6.4.4.
5.1.1.1 Validation of all input (to prevent cross-site scripting, injection
flaws, malicious file execution, etc.)
5.1.1.2 Validation of proper error handling
5.1.1.3 Validation of secure cryptographic storage
5.1.1.4 Validation of secure communications
5.1.1.5 Validation of proper role-based access control (RBAC)
5.1.2
Separate development/test, and production environments
5.1.3
Removal of test data and accounts before production systems
become active development PCI Data Security Standard Requirements 6.4.4.
5.1.4
Review of all payment application code prior to release to customers
after any significant change, to identify any potential coding vulnerability.
Removal of custom payment application accounts, user IDs, and passwords
before payment applications are released to customers.
Note: This requirement for code reviews applies to all payment application
components (both internal and public-facing web applications), as part of the
system development life cycle required by PA-DSS Requirement 5.1 and PCI DSS
Requirement 6.3. Code reviews can be conducted by knowledgeable internal
personnel or third parties.
5.2 Develop all web payment applications (internal and external, and including
web administrative access to product) based on secure coding guidelines such as the
Open Web Application Security Project Guide. Cover prevention of common coding
vulnerabilities in software development processes, to include:
5.2.1 Injection flaws, with particular emphasis on SQL injection. Cross-site
scripting (XSS). OS Command Injection, LDAP and Xpath injection flaws, as well
as other injection flaws.
5.2.2 Buffer Overflow.
5.2.3 Insecure cryptographic storage.
5.2.4 Insecure communications.
5.2.5 Improper error handling.
5.2.6 All “HIGH” vulnerabilities as identified in the vulnerability identification
process at PA-DSS Requirement 7.1.
5.2.7 Cross-site scripting (XSS)
5.2.8
Improper Access Control such as insecure direct object references,
failure to restrict URL access and directory traversal.
5.2.9 Cross-site request forgery (CSRF)
Note: The vulnerabilities listed in PA-DSS Requirements 5.2.1 through 5.2.9 and in
PCI DSS at 6.5.1 through 6.5.9 were current in the OWASP guide when PCI DSS v1.2 /
PCI DSS v2.0 (01/01/10) was published. However, if and when the OWASP guide is
updated, the current version must be used for these requirements.
15
5.3 Software vendor must follow change control procedures for all product
software configuration changes. PCI Data Security Standard Requirement 6.4.5. The
procedures must include the following:
5.3.1
Documentation of impact.
5.3.2
Management sign-off by appropriate parties
5.3.3
Testing functionality to verify the new change(s) does not adversely
impact the security of the system. Remove all testing configurations and data
before finalizing the product for production.
5.3.4
Back-out or product de-installation procedures.
5.4 The payment application must not use or require use of unnecessary and
insecure services and protocols (for example, NetBIOS, file-sharing, Telnet,
unencrypted FTP, must be secured via SSH, S-FTP, SSL, IPSec and other technology
to implement end to end security.). PCI Data Security Standard Requirement 2.2.2
6. Protect wireless transmissions
6.1 For payment applications using wireless technology, the wireless technology
must be implemented securely. Change wireless vendor defaults, including to but
not limited to default wireless encryption keys, passwords and SNMP community
strings. The end to end wireless implementation must be secure.PCI Data Security
Standard Requirements 1.2.3 & 2.1.1
6.2 For payment applications using wireless technology, payment application must
facilitate use of industry best practices (for example, IEEE 802.11i) to implement
strong encryption for authentication and transmission.
Payment applications using wireless technology must facilitate the following
regarding use of WEP: PCI Data Security Standard Requirement 4.1.1
* The use of WEP as a security control was prohibited as of 30 June 2010.
7. Test payment applications to address vulnerabilities
7.1 Software vendors must establish a process to identify newly discovered security
vulnerabilities (for example, subscribe to alert services freely available on the
Internet) and to test their payment applications for vulnerabilities. Any underlying
software or systems that are provided with or required by the payment application
(for example, web servers, 3rd-party libraries and programs) must be included in
this process. Remove all test configurations and data after testing and before
promoting the changes to production. PCI Data Security Standard Requirement 6.2
7.2 Software vendors must establish a process for timely development and
deployment of security patches and upgrades, which includes delivery of updates
and patches in a secure manner with a known chain-of-trust, and maintenance of
the integrity of patch and update code during delivery and deployment.
8. Facilitate secure network implementation
8.1 The payment application must be able to be implemented into a secure
network environment. Application must not interfere with use of devices,
applications, or configurations required for PCI DSS compliance (for example,
payment application cannot interfere with anti-virus protection, firewall
configurations, or any other device, application, or configuration required for PCI
DSS compliance). PCI Data Security Standard Requirements 1, 3, 4, 5, and 6.
16
9. Cardholder data must never be stored on a server connected to the Internet
9.1 The payment application must be developed such that the database server and
web server are not required to be on the same server, nor is the database server
required to be in the DMZ with the web server.
PCI Data Security Standard Requirement 1.3.7.
10. Facilitate secure remote software updates
10.1 If payment application updates are delivered securely via remote access into
customers’ systems, software vendors must tell customers to turn on remote-access
technologies only when needed for downloads from vendor, and to turn off
immediately after download completes. Alternatively, if delivered via VPN or other
high-speed connection, software vendors must advise customers to properly
configure a firewall or a personal firewall product to secure authentication using a
two factor authentication mechanism. PCI Data Security Standard Requirements
8.3.
10.2 If payment application may be accessed remotely, remote access to the
payment application using a two factor authentication mechanism. PCI Data Security
Standard Requirements 8.3.
10.3 Any remote access into the payment application must be done securely. If
vendors, resellers / integrators or customers can access customer’s payment
applications remotely, the remote access must be implemented securely. PCI Data
Security Standard Requirements 1, 8.3 and 12.3.9.
11. Encrypt sensitive traffic over public networks
11.1 If the payment application sends, or facilitates sending, cardholder data over
public networks, the payment application must support use of strong cryptography
and security protocols such as SSL/TLS and Internet protocol security (IPSEC) to
safeguard sensitive cardholder data during transmission over open, public networks.
Examples of open, public networks that are in scope of the PCI DSS are:
• The Internet
• Wireless technologies
• Global System for Mobile Communications (GSM)
• General Packet Radio Service (GPRS)
PCI Data Security Standard Requirement 4.1
11.2 The payment application must never send unencrypted PANs by end-user
messaging technologies (for example, e-mail, instant messaging, chat). PCI Data
Security Standard Requirement 4.2
12. Encrypt all non-console administrative access
12.1 Instruct customers to encrypt all non-console administrative access using
technologies such as SSH, VPN, or SSL/TLS for web-based management and other
non-console administrative access. Telnet or rlogin must never be used for
administrative access. PCI Data Security Standard Requirement 2.3
13. Maintain instructional documentation and training programs for customers, resellers,
and integrators
13.1 Develop, maintain, and disseminate a PA-DSS Implementation Guide(s) for
customers, resellers, and integrators that accomplishes the following:
13.1.1
Addresses all requirements in this document wherever the PA-DSS
Implementation Guide is referenced.
13.1.2
Includes a review at least annually and updates to keep the
documentation current with all major and minor software changes as well as
with changes to the requirements in this document.
17
13.2 Develop and implement training and communication programs to ensure
payment application resellers and integrators know how to implement the payment
application and related systems and networks according to the PA-DSS
Implementation Guide and in a PCI DSS-compliant manner.
13.2.1 Update the training materials on an annual basis and whenever new
payment application versions are released.
More Information
VeriFone, Inc. highly recommends that merchants contact the card association(s) or their
processing company and find out exactly what they mandate and/or recommend. Doing
so may help merchants protect themselves from fines and fraud. For more information
related to security, visit:
•
•
•
•
•
•
http://www.pcisecuritystandards.org
http://www.visa.com/cisp
http://www.sans.org/resources
http://www.microsoft.com/security/default.asp
https://sdp.mastercardintl.com/
http://www.americanexpress.com/merchantspecs
CAPN questions: mailto:[email protected]
!
WARNING: Although VeriFone, Inc. has designed PCCharge to properly
secure credit card cardholder information according to PCI guidelines, it is
ultimately the merchant’s responsibility to secure the system on which
PCCharge resides and the environment in which it is used.
18
System Requirements
YOU MUST HAVE THE FOLLOWING:
•
•
•
•
•
•
•
•
PC with one of the following versions of Microsoft Windows installed:
o
Windows Vista Business Edition (32-bit or 64-bit)
o
Windows XP Professional Edition (32-bit)
o
Windows 7 Professional (32-bit or 64-bit)
o
Windows 7 Ultimate (32-bit or 64-bit)
o
Windows 7 Enterprise (32-bit or 64-bit)
o
Windows 2008 Server Enterprise Edition (32-bit or 64-bit)
o
Windows 2003 Server Edition (32-bit or 64-bit)
256 MB minimum of RAM, 512 MB preferred
50 MB of available hard-disk space, 100 MB recommended
CD-ROM drive
600 MHz or higher processor
Latest Microsoft service pack updates installed
Merchant Account with a PCCharge-certified processor
Latest version of Microsoft's Internet Explorer (version 6 or later)
/
•
•
Technical Details: We require that you install the latest version of
Microsoft's Internet Explorer no matter how you connect to your processor.
Some processors require Internet Explorer version 6 or later to be installed in
order to process transactions. Internet Explorer is more than just an Internet
browser; it actually upgrades your operating system.
Each Client location must have a Windows Networking connection (2000, NT, or
Peer-to-Peer) to the computer on which PCCharge Pro/PS is installed.
Each Client location must have FULL (read/write) access to the PCCharge Pro/PS
application folder.
(
Note:
If you intend to process transactions from the Server location of
PCCharge, install the Client software on that same machine and use that
instead of the PCCharge Pro/PS interface. Do not process transactions at the
Server location using the PCCharge Pro/PS interface.
THE FOLLOWING ARE OPTIONAL:
•
•
•
•
Track I & II reader
Check Reader/Scanner
Debit Card PIN pad
Windows compatible receipt printer
CLIENT LICENSES
•
A user license is required for each Client location. At least two users are necessary
(one is included with PCCharge Pro/PS, and one additional user license is required
for each Client location).
19
Installation
Simple Explanation:
(
Note:
Basically, one computer is used as the "Server".
This computer would have the standard software installation. The computers
that would connect to this Server would have a copy of the "Client" software
installed. These Client machines would then accept transactions and pass
them to the Server location to be processed. The Server does not have to be
the actual network server, but it must be able to connect to your credit card
processing company (via modem, TCP/IP, etc.).
As with most other software installations, you should be logged into
Windows as a user with administrator access in order to install or launch
PCCharge. If you do not have administrator access to Windows (or are not
sure of what that means), contact one of the following:
•
•
Whoever maintains your business' computer systems
The technical support department of your computer's manufacturer.
Before you get started, you'll need some information to set up this Client location:
•
•
•
The name of the payment processing company in the Server location that will
be accessed from this Client location
The merchant account numbers for that payment processing company
The network address of the PCCharge Server location
Once you've obtained this information and have it ready, complete the following steps.
1.
Insert the PCCharge Installation CD into the CD-ROM drive of your computer. The
PCCharge Installation Menu should automatically appear.
(
Note:
If the PCCharge Installation Menu does not automatically appear,
your copy of Windows may be set up to not allow auto-run of CD-ROMs. If
so, you'll need to manually access the PCCharge Installation Menu.
Click your Windows Start button, and then click Run. Click the Browse
button. Click the drop-down list to the right of the Look In: field. Select
your CD-ROM drive. Double-click the file CD_Start.exe. The PCCharge
Installation Menu will appear.
2.
Once you can access the PCCharge Installation Menu, click the PCCharge Client
button. Next, click the Install PCCharge Client button.
3.
The PCCharge Client installation process will begin. The following sections explain
each screen displayed during the installation process.
20
Windows 7, Vista, and 2008 Server Users
PCCharge has been successfully tested on Windows Vista Business Edition (32-bit and 64bit), Windows 7 Professional (32-bit and 64-bit), Windows 7 Ultimate (32-bit and 64-bit),
Windows 7 Enterprise (32-bit and 64-bit), and Windows 2008 Server Enterprise Edition
(32-bit and 64-bit). However, these operating systems require that certain steps be
performed for proper installation. Please carefully review the document
VISTA_7_2008_README.pdf (found in the Pro, Client, and Payment Server
directories on your PCCharge installation CD) prior to installing PCCharge.
21
Welcome!
Click Next > to proceed to the next step in the installation process.
22
License Agreement
Select I accept the terms of the license agreement and click Next > to proceed to the
next step in the installation process.
23
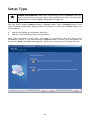
Setup Type
Simple Explanation: Most users should simply select Complete and click
Next > to proceed to the next step in the installation process. You may then
skip ahead to the section Ready To Install (see page 26).
You may select either Complete setup or Custom setup. Select Complete setup if you
want to install all PCCharge program files and features. If you select Custom setup, you
will be able to:
•
•
Specify the PCCharge installation directory
Specify which PCCharge utilities are installed
After you've selected a setup type, click Next > to proceed to the next step in the
installation process. If you have selected Complete setup, you may then skip ahead to
the section Ready To Install (see page 26). Otherwise, continue on to the next section.
24
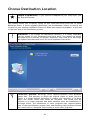
Choose Destination Location
Simple Explanation:
If you selected Complete as your setup type, you
may skip this section.
This window allows you to specify where on your local hard drive you'd like to install
PCCharge Client. If you're upgrading PCCharge, use the Browse… button to specify the
location of your existing installation directory. Most users should click Next > to proceed
to the next step in the installation process.
!
WARNING: If you change the destination directory, it is vitally important
that you install to your computer's local hard drive. You should not install
PCCharge across a network to another computer's local hard drive. PCCharge
uses system files that must be on the local computer's hard drive.
/
Technical Details: PCCharge Client replaces/updates some Windows
system files. This directory is where the original copies of those files are
placed. If it should become necessary to restore your computer to its state
before the install, these files would be retrieved. This would only be
effective if no other programs had been installed since the installation of
PCCharge Client. The installation of other programs may replace/update
some of the same Windows system files, and restoring older versions of those
files could result in disrupted functionality of those other programs.
25
Select Features
Simple Explanation:
If you selected Complete as your setup type, you
may skip this section.
This window allows you to specify which PCCharge features you'd like to install. You can
uncheck a feature if you do not want that feature to be installed. Most users should click
Next > to proceed to the next step in the installation process.
26
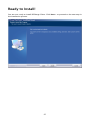
Ready to Install!
You are now ready to install PCCharge Client. Click Next > to proceed to the next step in
the installation process.
27
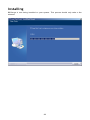
Installing
PCCharge is now being installed to your system. This process should only take a few
minutes.
28
Installation Completed!
The installation process is complete. You may now remove the PCCharge Installation CD
from your computer. Click Finish to proceed to The Setup Process.
29
Setup Process
During your first use of PCCharge Client, you will go through a setup process. If you need
to make changes to the following settings at any time after the initial software setup,
you can access all of the setup parameters from the Setup menu.
The following sections explain each window displayed during the PCCharge Client setup
process.
30
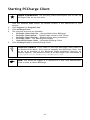
Starting PCCharge Client
1.
2.
3.
4.
5.
Simple Explanation:
The following instructions explain how to start up
PCCharge Client for the first time.
Click the Windows Start button (its default location is the bottom-left of your
screen).
Click Programs (or Program Files).
Click PCCharge Client.
The following shortcuts are available:
•
PCCharge Client Help File -- Also available within PCCharge
•
PCCharge Client Manual -- The PCCharge manual in PDF format
•
PCCharge Client Read Me -- Readme shown during installation
•
PCCharge Client -- The PCCharge executable
•
Uninstall PCCharge Client -- Uninstalls PCCharge Client
Click PCCharge Client to start PCCharge Client.
Technical Details:
/
If you chose to not have PCCharge Client added to
the Windows Start Menu, you'll need to manually start PCCharge Client. You
can do so by browsing to the PCCharge Client installation directory via
Windows Explorer. The default location of the PCCharge Client executable is
C:\Program Files\PCCWClient\PCCWClient.exe.
(
Note: You should be logged in to Windows as a user with administrator
access in order to launch PCCharge.
31
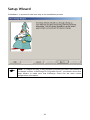
Setup Wizard
Click Next > to proceed to the next step in the installation process.
(
Note:
If changes are may to any payment processing account information in
the Server location of PCCharge Pro/Payment Server, you should revisit this
Setup Wizard to make sure that PCCharge Client has the most recent
configuration information.
32
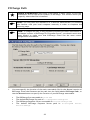
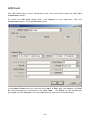
PCCharge Path
Simple Explanation: PCCharge Client needs to know where to find the
"executable" file for the Server location of PCCharge. This window allows you
to specify where that file is installed.
(
Note:
(
Note:
1.
You may need the assistance of a network administrator (or someone
else familiar with your local computer network) in order to complete the
following steps.
If changes are may to any payment processing account information in
the Server location of PCCharge Pro/Payment Server, you should revisit this
Setup Wizard to make sure that PCCharge Client has the most recent
configuration information.
You must specify the location of the main executable file for the Server location of
PCCharge. Enter the filename and its path into the field labeled PCCharge Path, or
use the Browse button to specify the location of your PCCharge executable.
•
•
•
•
The PCCharge Pro executable is: pccw.exe
The default PCCharge Pro path is: C:\Program Files\pccw
The PCCharge Payment Server executable is: Active-Charge.exe
The default PCCharge Payment Server path is: C:\Program
Active-Charge
33
Files\
(
2.
Note:
The example shows a path where Client is installed on the same
machine as the server application. If the Client is not on the same machine as
the server application, the installer will need to browse across the network to
the machine that has the server application installed or use a UNC path. The
installation directory of the server application MUST be shared out so that the
Client can recognize it.
Click the Configure IP Settings button to access the Integration Configuration
screen. As of 5-8-0, Client uses a Secure TCP/IP (SSL) connection to send
transactions to the server. Not only do merchants have to set the path to the server
application (so that they can run reports or access the customer database), but
they need to enter the IP Address (Default = 127.0.0.1) of the server machine and
the Listen On Port (Default = 31405) used for the secure TCP/IP connection.
(
Note:
The default address will only work if the Client and the server
application are installed on the same machine. Otherwise, the installer will
need to know the address of the server machine.
From the Certificate section, the merchant can select the Store Location and Store
Name from the combo box. Click on Display Store to list all of the certificates
under the selected location. The certificate details can be viewed by clicking the
View Details button.
Click OK to set the certificate, or click Cancel to cancel the operation. If the
installer cancels out of selecting the certificate, Client will not work.
3.
Enter a Transaction Timeout (in seconds) to specify how long the Client will wait
for the Server to respond to an attempted transaction. We recommend that most
users set this to 60 initially, but you'll be able to adjust this value more precisely
once you've had some experience with your processing company.
34
4.
Enter a Card Swipe Timeout (in seconds) to specify how long the Client will wait
for a card swipe device to completely transmit card information. We recommend
that most users set this to 9 initially, but you'll be able to adjust this value more
precisely once you've had some experience with your processing company.
5.
Click Next > to proceed to the next step in the installation process.
35
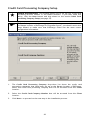
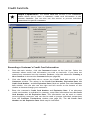
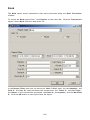
Credit Card Processing Company Setup
Simple Explanation: This window allows you to set up your credit card
processing account number in the Client software. If you don't need this
ability, click the Next button and skip ahead to the section Debit Card
Processing Company Setup (see page 37).
(
Note:
If changes are may to any payment processing account information in
the Server location of PCCharge Pro/Payment Server, you should revisit this
Setup Wizard to make sure that PCCharge Client has the most recent
configuration information.
1.
The Credit Card Processing Company drop-down list shows the credit card
processing companies that have been set up at the Server location of PCCharge.
Select the credit card processing company that will be accessed from this Client
location.
2.
Select the Credit Card Company Number that will be accessed from this Client
location.
3.
Click Next > to proceed to the next step in the installation process.
36
Debit Card Processing Company Setup
Simple Explanation: This window allows you to set up your debit card
processing account number in the Client software. If you don't need this
ability, click the Next button and skip ahead to the section Check Services
Company Setup (see page 37).
(
Note:
If changes are may to any payment processing account information in
the Server location of PCCharge Pro/Payment Server, you should revisit this
Setup Wizard to make sure that PCCharge Client has the most recent
configuration information.
1.
The Debit Card Processing Company drop-down list shows the debit card processing
companies that have been set up at the Server location of PCCharge. Select the
debit card processing company that will be accessed from this Client location.
2.
Select the Debit Card Company Number that will be accessed from this Client
location.
•
3.
If you’ve selected Paymentech (GSAR) as your debit card processing company
for Canadian debit cards, you will be prompted to enter your assigned threedigit Paymentech Client Terminal ID. This is a unique Terminal ID tied to a
specific PIN pad serial number for your client workstation.
Click Next > to proceed to the next step in the installation process.
37
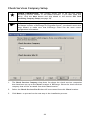
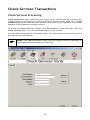
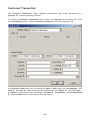
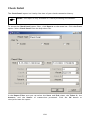
Check Services Company Setup
Simple Explanation:
(
Note:
This window allows you to set up your check
processing account number in the Client software. If you don't need this
ability, click the Next button and skip ahead to the section Gift Card
Processing Company Setup (see page 39).
If changes are may to any payment processing account information in
the Server location of PCCharge Pro/Payment Server, you should revisit this
Setup Wizard to make sure that PCCharge Client has the most recent
configuration information.
1.
The Check Services Company drop-down list shows the check services companies
that have been set up at the Server location of PCCharge. Select the check services
company that will be accessed from this Client location.
2.
Select the Check Services Site ID that will be accessed from this Client location.
3.
Click Next > to proceed to the next step in the installation process.
38
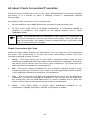
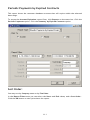
Gift Card Processing Company Setup
Simple Explanation: This window allows you to set up your debit card
processing account number in the Client software. If you don't need this
ability, click the Next button and skip ahead to the section End of
Automated Client Setup (see page 40).
(
Note:
If changes are may to any payment processing account information in
the Server location of PCCharge Pro/Payment Server, you should revisit this
Setup Wizard to make sure that PCCharge Client has the most recent
configuration information.
1.
The Gift Card Processing Company drop-down list shows the gift card processing
companies that have been set up at the Server location of PCCharge. Select the gift
card processing company that will be accessed from this Client location.
2.
Select the Gift Card Processing Company Numbers that will be accessed from this
Client location.
3.
Click Next > to proceed to the next step in the installation process.
39
End of Setup Wizard
The automated setup process is complete. Click Finish to proceed to the final setup
steps.
40
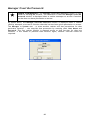
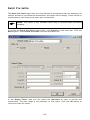
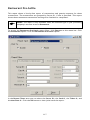
Client User Setup
Simple Explanation: This window allows you to specify which PCCharge
user (from the Server location) you'll use to process transactions.
!
WARNING: You must have more than one user to properly use the Client
software. Using User1 to process multiple Client transactions will result in
loss of data and/or program functionality.
1.
Each Client location needs to have a different User. This window displays the users
set up at the Server location of PCCharge.
2.
Select the User for the current Client location by clicking on that User name.
(
3.
Note: When Show at Startup option is checked, this Select User window will
be displayed when the Client software starts up.
Select the User for the current Client location by clicking on that User name. Click
OK to confirm your selection and continue on to the next section.
41
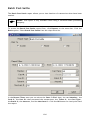
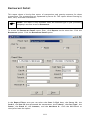
Client Receipt Printer Setup
Simple Explanation:
The Receipt Printer Setup window allows you to
select the printer you'll use to print receipts from this Client location. This
window is separate from the Receipt Printer Setup window at the Server
location. You may choose to set up (or not set up) receipt printing from
either location (Server and/or Client).
If you do not have a printer or you simply do not want to print receipts, leave
this window set to its default settings (as shown below), click OK, and skip
ahead to the section Client Report Printer Setup (see page 44).
(
1.
Note: You will be required to log in as System, Manager, or a Cashier with
Hardware Configuration privileges in order to set up this feature.
Click the small drop-down arrow button to the right of the Printer field. Select the
printer that Client will use to print receipts. Optional: You may configure your
printer's settings by clicking the Configure button on the right side of this window.
42
2.
Select the Orientation that you want for your printed receipts. You may select a
Portrait or Landscape orientation.
3.
In the section labeled Receipt Options, specify the # of Copies you want to print.
4.
You now have the option to uncheck the box labeled Print Receipts for PreAuths/Books. Pre-auth and book transactions "set money aside" on a customer's
credit card without actually initiating the transfer of funds from the customer's
account to your account. These transaction types are often used when the exact
final amount of the transaction is not known. Unchecking this box makes PCCharge
not print out receipts for these two transaction types.
5.
If you want the credit card number on all receipts to be "masked" (covered with X's),
put a check in the box labeled Secure Receipts.
6.
Set your Margins. The values for the margins are displayed in twips. There are 1440
twips in an inch, so the default setting of 720 twips is equal to one-half of an inch.
The margin settings allow you to place the receipt information in different areas of
the page to permit the use of preprinted invoices. We recommend that you leave
these settings at their default values. You should wait until you see your printed
receipts before you modify these values.
7.
Click the Comments button. Client will display the Receipt Comment Setup
window. This feature allows you to include a customized message at the end of your
receipt. The comment section can be up to five (5) lines long, with each line being
no longer than forty (40) characters. Click OK to save your comments.
8.
Click the OK button. Client will display its main window. Proceed to the next
section, Client Report Printer Setup.
Tested Receipt Printers
We test Client with a wide range of hardware in a variety of conditions. If you have
hardware not shown on this list and are able use it successfully with your copy of Client,
please contact us at [email protected] and inform us of your results.
Set up each device as specified in the Notes column. If no additional information is given
(other than the device to be selected from the drop-down list in Client), use the default
settings listed above.
Windows' generic text printer drivers were used for all printers that
were tested on Windows 2003.
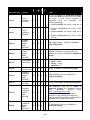
Manufacturer Product
2000
XP
2003
Vista
2008
7
(
Note:
Notes
Citizen
CBM 1000
X X X
Manual tear-off. Drivers available
online. Set up in PCCharge as Roll
Printer. Set the Column Width to 40.
Citizen
iDP 3550
X X X
Drivers available online. Set up in
PCCharge as Roll Printer.
Set the Column Width to 40.
43
Citizen
2000
XP
2003
Vista
2008
7
Manufacturer Product
Notes
Thermal printer. Drivers available
online. Set up in PCCharge as Roll
Printer. Set the Column Width to 40.
CPM 10
X X
(without
card reader)
X X X
Manual tear-off. Drivers available
online. Set up in PCCharge as Roll
Printer. Set the Column Width to 40.
X X X
Automatically cut-off. Thermal printer.
Drivers available online. Set up in
PCCharge as Roll Printer. Set the
Column Width to 40.
Star Micronics TSP643C
X X X
Automatically cut-off. Thermal printer.
Drivers available online. Set up in
PCCharge as Roll Printer. Set the
Column Width to 40.
Star Micronics TSP700
Automatically cut-off. Thermal printer.
Drivers available online. Set up in
X X X X X X PCCharge as Roll Printer. Set the
Column Width to 40. All Windows 64bit Users: see Note at end of table.
Star Micronics SP2000
Star Micronics TSP143U
Epson
M129C TMT88IIIP
X X
Drivers available online. Set up in
PCCharge as Roll Printer. Set the
Column Width to 39.
Epson
TM-T90
X X
Set up in PCCharge as Roll Printer.
Set the Column Width to 39.
Epson
TMU220B
X X
Set up in PCCharge as Roll Printer.
Set the Column Width to 45.
X X X X
Set up in PCCharge as PCCharge
Partner. This device is a combined PIN
pad, card reader, and receipt printer.
You must set up the PIN pad
functionality of this device prior to
setting up any other functionality.
Consult the documentation included
with this device to determine how to set
it up.
VeriFone
PCCharge
Partner
(
Note for All Windows 64-bit Users: The Star Micronics TSP700 printer was
tested using with Windows' Generic Text Printer drivers. There are no 64bit device drivers for this printer available from the manufacturer.
(
Note: The automatic tear-off feature (available with certain Star Micronics
receipt printers) is only accessible when using Star Micronics' printer
drivers. The feature is not accessible when using Windows' generic text
printer drivers.
44
Client Report Printer Setup
Simple Explanation: This window allows you to set up a standard
Windows-compatible printer to print reports from this Client location. This
window is separate from the Report Printer Setup window at the Server
location. You may choose to set up (or not set up) report printing from either
location (Server and/or Client).
If you do not have a printer or you simply do not want to print receipts, leave
this window set to its default settings (as shown below), click OK, and skip
ahead to the section Client Card Reader Setup (see page 46).
(
Note: You will be required to log in as System, Manager, or a Cashier with
Hardware Configuration privileges in order to set up this feature.
1.
Click Setup on the menu bar. Click the Printer option. Click the Report option.
2.
Click the small drop-down arrow button to the right of the Report Printer field.
Select the printer that Client will use to print reports and contracts.
3.
Click the Configure button. Client will cause Windows to display the configuration
window for the printer selected in the Report Printer field.
4.
Review the configuration window and make sure the correct settings have been
configured for your printer. You may want to refer to your printer's documentation.
Click the Print button when you're done to return to the Report Printer Setup
window.
5.
Click the OK button to return to the main Client window. Proceed to the next
section, Client Card Reader Setup.
45
Client Card Reader Setup
Simple Explanation: This window allows you to set up a card reader to
"swipe" cards--that is, to read the data stored on the card's magnetic strip by
manually passing it through the card reader. This window is separate from the
Card Reader Setup window at the Server location. You may choose to set up
(or not set up) this device at either location (Server and/or Client).
If you do not have a card reader installed on your machine, leave this window
set to its default setting (as shown below, with Keyboard Wedge selected)
and skip ahead to the next section, Client PIN Pad Setup (see page 51).
(
Note: If you are processing debit card transactions, you'll need to have a
card reader and PIN Pad connected to your computer.
(
Note: You will be required to log in as System, Manager, or a Cashier with
Hardware Configuration privileges in order to set up this feature.
1.
Click Setup on the menu bar. Click the Devices option. Click the Card Reader
option.
2.
Click the small drop-down arrow button (to the right of the Card Reader field).
Select the type of card reader that you'll use with Client.
•
Serial Reader -- A serial card reader is connected to your computer's COM port
by a cord that ends in a 9-pin plug.
•
Keyboard Wedge -- A keyboard wedge reader is usually a card swipe device
that connects in between your keyboard and your computer. However, the
setting Keyboard Wedge also refers to keyboards with built-in card readers.
46
3.
4.
If you've selected Keyboard Wedge, complete the following steps:
•
Notice the default Time Out value (4 seconds). This value determines how long
Client waits for a card swipe to be completed. You should not change the
default value unless you are experiencing difficulties with your device.
•
Click OK to save these settings and return to the main Client window. You may
now perform a test transaction using your device (see page 55), or you may
proceed to the next section, Client PIN Pad Setup (see page 51).
If you've selected Serial Reader, Review the Tested Card Readers table (at the end
of this Card Reader Setup section) to determine if there are any special settings
recommended for your card reader. Next, complete the following steps:
•
Select the baud appropriate for your serial card reader (the default value is
9600). This information should be provided by your device's documentation.
•
Select the parity that the serial card reader uses. This information should be
provided by your device's documentation.
•
Click the small drop-down arrow button (to the right of the Com Port field).
Select the COM port of the serial card reader that you'll use with Client. Most
users can select Port(Com1), but some users may have plugged the device into
port 2 and should select Port(Com2).
•
Select the data bits setting appropriate for your serial card reader (the default
value is 8). This information should be provided by your device's
documentation.
•
Click OK to save these settings and return to the main Client window. You may
now perform a test transaction using your device (see page 55), or you may
proceed to the next section, Client PIN Pad Setup (see page 51).
Tested Card Readers
We test Client with a wide range of hardware in a variety of conditions. If you have
hardware not shown on this list and are able use it successfully with your copy of Client,
please contact us at [email protected] and inform us of your results.
Set up each device as specified in the Notes column. If no additional information is given
(other than the device to be selected from the drop-down list in Client), use the default
settings listed above.
47
2000
XP
2003
Vista
2008
7
Manufacturer Product
Notes
Set up in Client as Keyboard Wedge.
Review the Note at the end of this table
and refer to your Cherry manual to
determine how to configure the
following settings:
• Enable Header for track 1 and set to
%
• Enable Terminator for track 1 and
set to ?
• Enable Header for track 2 and set to
;
• Enable Terminator for track 2 and
set to ?
Cherry
Cherry
Keyboard
MY 7000
X X
Cherry
Cherry
Keyboard
MY 8000
X
IDTech
MiniMag
Reader
Model#
IDMB334112B
X X X X
USB wedge reader. Set up in Client as
Keyboard Wedge.
IDTech
MiniMag
Reader
Model#
IDMB333112B
X X X X
Keyboard Wedge (connects via PS/2
keyboard). Set up in Client as Keyboard
Wedge.
IDTech
Serial Model
# WCR3321- X X X
12
Set
•
•
•
IDTech
USB Model #
X X X X
IDT3331-12U
Set up in Client as Keyboard Wedge.
IDTech
VersaKey
Keyboard
Model#
IDKA334333B
USB Keyboard. Set up in Client as
Keyboard Wedge.
IDTech
Model IDMBX X X X X X Set up in PCCharge as Keyboard Wedge.
334133B
IDTech
VersaKey
Keyboard
Model#
IDKA234112B
X X X X
USB Keyboard. Set up in Client as
Keyboard Wedge. For Windows Server
2003,
download
drivers
from
http://idtechproducts.com.
For Windows Vista, you must boot
computer with a different keyboard
attached and then plug in and Vista will
automatically install the drivers.
IDTech
VersaKey
Keyboard
Model#
IDKA233112W
X X X X
PS/2 Keyboard. Set up in Client as
Keyboard Wedge.
X X X X X X
48
up in Client as Serial Reader.
Baud = 9600
Parity = Even
Data Bits = 7
2000
XP
2003
Vista
2008
7
Manufacturer Product
Notes
MagTek
Maxi Micr
X X X X
Check and card swipe device.
Set up in Client as Keyboard Wedge.
MagTek
Mini Micr
X X X X
Check and card swipe device.
Set up in Client as Keyboard Wedge.
SEMTEK
Model
9272USB
X X X
Set up in Client as Keyboard Wedge.
Uniform
Industrial
USB Model
MSR210U33AUBN
X X X X X X Set up in Client as Keyboard Wedge.
MX830
Set up in PCCharge as Keyboard Wedge.
This device is a combined PIN pad and
X X X X X X card reader. You must set up the PIN
pad functionality of this device prior to
setting up any other functionality.
VeriFone
VeriFone
VeriFone
VeriFone
VeriFone
Set up in Client as Keyboard Wedge.
This device is a combined PIN pad, card
reader, and receipt printer. You must
set up the PIN pad functionality of this
device prior to setting up any other
functionality. Consult the
documentation included with this device
to determine how to set it up.
PCCharge
Partner
X X X X
PCCharge
Performer
[SC 5000
(MAC or
DUKPT)]
Set up in Client as Keyboard Wedge.
This device is a combined PIN pad and
card reader. You must set up the PIN
pad functionality of this device prior to
X X X X X X
setting up any other functionality.
Smart card reader functionality is not
supported. Windows 7 was only tested
with SC 5000 DUKPT.
MX830
Set up in PCCharge as Keyboard Wedge.
This device is a combined PIN pad and
X X X X X X card reader. You must set up the PIN
pad functionality of this device prior to
setting up any other functionality.
VX810(MAC
or DUKPT)
X
Set up in Client as Keyboard Wedge.
This device is a combined PIN pad and
card reader. You must set up the PIN
X X X X X pad functionality of this device prior to
setting up any other functionality.
Smart card reader functionality is not
supported.
49
(
Note: The following example text shows the correct format of a swiped
transaction after a Cherry keyboard device has been properly configured. You
can use Microsoft's Notepad to view a swiped transaction.
%B6011000998980019^DISCOVERY / JD^0412123456?
;6011000998980019=0412123456?
Additionally, Cherry Electronics has created a page on their website that
details the setup of the Cherry Keyboard MY 7000/8000.
http://support.cherry.de/english/new_faqkb.asp?faqkbid=237
50
Client Check Reader Setup
Simple Explanation: No additional setup is required for Check Reader
devices. Once a device is set up as a Card Reader, it can also be used as a
Check Reader.
(
Note: You will be required to log in as System, Manager, or a Cashier with
Hardware Configuration privileges in order to set up this feature.
Tested Check Readers
We test Client with a wide range of hardware in a variety of conditions. If you have
hardware not shown on this list and are able use it successfully with your copy of Client,
please contact us at [email protected] and inform us of your results.
Manufacturer Product
2000
XP
2003
Vista
2008
7
Set up each device as specified in the Notes column.
Notes
MagTek
Maxi Micr
X X X X
Check and card swipe device.
Set up in Client as Keyboard Wedge.
MagTek
Mini Micr
X X X X
Check and card swipe device.
Set up in Client as Keyboard Wedge.
51
Client PIN Pad Setup
Simple Explanation:
(
Note: If you plan to process debit card transactions, you'll need to have a
card reader and PIN Pad connected to your computer.
(
Note: You will be required to log in as System, Manager, or a Cashier with
Hardware Configuration privileges in order to set up this feature.
This window allows you to set up a PIN Pad for
accepting debit transactions. If you do not have a PIN Pad installed on your
machine, leave this window set to its default setting (as shown below, with
NONE selected) and skip ahead to the next section, Performing Test
Transactions (see page 55).
1.
Click Setup on the menu bar. Click the Devices option. Click the Pin Pad option.
2.
Review the Tested PIN Pads table (at the end of this PIN Pad Setup section) to
determine if there are any special settings recommended for your PIN pad.
3.
Click the small drop-down arrow button to the right of the PIN Pad field. Select the
PIN Pad that you'll use with Client. Depending on the PIN Pad selected, you may not
need to set up all (or any) of the following fields.
•
Click the small drop-down arrow button to the right of the Com Port field.
Select the COM port of the PIN pad that you'll use with Client. Most users can
select Port(Com1), but some users may have plugged the device into port 2
and should select Port(Com2).
•
Select the baud appropriate for your PIN pad (the default value is 1200). This
information should be provided by your device's documentation.
•
Notice the default Time Out value (4 seconds). This value determines how long
Client waits for input from the PIN pad. You should not change the default
value unless you are experiencing difficulties with your device.
52
4.
•
Select the parity that the PIN pad uses (the default setting is Even). This
information should be provided by your device's documentation.
•
Select the data bits setting appropriate for your PIN pad (the default setting is
7). This information should be provided by your device's documentation.
•
If you've selected the VeriFone SC 5000 (MAC) or VeriFone V 810 (MAC) as
your PinPad, select the appropriate debit card processor and then click the
Key Change button that appears under the Cancel button. PCCharge will
contact your processing company and synchronize your PIN pad's key with what
your processing company has set up for your debit account. Your Canadian
debit account must be the active merchant number at the time of the Key
Change request.
X
Click OK to save these settings and return to the main Client window. You may now
perform a test transaction using your device (see page 55), or you may proceed to
the section User's Guide (see page 59).
Tested PIN Pads
We test Client with a wide range of hardware in a variety of conditions. If you have
hardware not shown on this list and are able use it successfully with your copy of Client,
please contact us at [email protected] and inform us of your results.
Set up each device as specified in the Notes column. If no additional information is given
(other than the device to be selected from the drop-down list in Client), use the default
settings listed above.
Manufacturer Product
2000
XP
2003
Vista
2008
7
(
Note: Some PIN pads will only work with certain payment processing
companies. Check with your processing company and/or merchant service
provider to determine which PIN pads are available for you to use.
Notes
Ingenico
3010
X X X
Set up in Client as Ingenico 3010.
Ingenico
eN-Crypt
2100
X X X
Set up in Client as eN-Crypt 2100.
1000
X X X X
Set
•
•
•
•
1000 SE
Set up in Client as VeriFone 101/1000.
Windows 7/2008 and all Windows 64bit Users: see Note at end of table.
X X X X X X • Baud = 1200
• Parity = Even
• Data Bits = 7
• Time Out = 4
VeriFone
VeriFone
53
up in Client as VeriFone 101/1000.
Baud = 1200
Parity = Even
Data Bits = 7
Time Out = 4
VeriFone
2000
XP
2003
Vista
2008
7
Manufacturer Product
Notes
Set up in PCCharge as VeriFone
101/1000. Windows 7/2008 and all
Windows 64-bit Users: see Note at end
of table.
1000 SE USB X X X X X X
• Baud = 1200
• Parity = Even
• Data Bits = 7
• Time Out = 4
VeriFone
2000
X X X
Set
•
•
•
•
VeriFone
Everest
X X X
Set up in Client as VeriFone Everest.
Device must be on COM port 1. Requires
device drivers from VeriFone.
VeriFone
Everest Plus X X X
Set up in Client as VeriFone Everest.
Device must be on COM port 1. Requires
device drivers from VeriFone.
VeriFone
MX830
up in Client as VeriFone 2000.
Baud = 1200
Parity = Even
Data Bits = 7
Time Out = 4
Serial only device. Set up in PCCharge
as MX830.
• Baud = 115200
X X X X X X
• Parity = None
• Data Bits = 8
• Time Out = 9
Set up in PCCharge as PCCharge
Partner. This device is a combined PIN
pad, card reader, and receipt printer.
You must set up the PIN pad
functionality of this device prior to
setting up any other functionality.
Consult the documentation included
with this device for setup .
VeriFone
PCCharge
Partner
X X X X
VeriFone
PCCharge
Performer
[SC 5000
(MAC)]
Set up in PCCharge as VeriFone SC5000
(MAC). Canadian debit processing only.
• Baud = 9600
X X X X X X
• Parity = None
• Data Bits = 8
• Time Out = 4
VeriFone
PCCharge
Performer
[SC 5000
(DUKPT)]
Set up in PCCharge as VeriFone SC5000
(DUKPT). American debit processing
only.
X X X X X X • Baud = 1200
• Parity = Even
• Data Bits = 7
• Time Out = 4
54
2000
XP
2003
Vista
2008
7
Manufacturer Product
Notes
This device is only compatible with the
Elavon payment processing network. Set
up in PCCharge as VeriFone VX810.
American debit processing only.
X X X X X X
• Baud = 9600
• Parity = Even
• Data Bits = 7
• Time Out = 4
VeriFone
VSP200
VeriFone
Set up in PCCharge as VeriFone V 810
(MAC). Canadian debit processing only.
• Baud = 9600
VX810 (MAC) X X X X X X
• Parity = None
• Data Bits = 8
• Time Out = 4
VeriFone
Set up in PCCharge as VeriFone V 810.
American debit processing only.
• Baud = 9600
X X X X X X
• Parity = Even
• Data Bits = 7
• Time Out = 4
X
X
VX810
(
Note for Windows 7 and 2008 Users: Windows 7 and 2008 have been tested
to work with all VeriFone PP1000se devices with part numbers higher than
170. Example: P003-180-02-USA. Windows 7 and 2008 have also been tested
to work with VeriFone PP1000se USB (P/N P003-190-02-WWE). This device is
powered solely by the USB cable, unlike other PP1000se devices.
(
Note for All Windows 64-bit Users: Only VeriFone PP1000se P/N P003-18002-USA was tested. There is currently no 64-bit driver for the USB powered
VeriFone PP1000se P/N P003-190-02-WWE device (as of 06/07/10).
55
Performing Test Transactions
Simple Explanation: These test transactions will help you to determine
if your modem is set up properly and working with your payment processing
company. Since these test transactions will be performed using a live credit
card number, actual funds will be transferred to and from your account. If
you get an appropriate response from these transactions (as described
below), you'll be ready to begin processing "live" transactions using PCCharge.
(
Note: The copy of PCCharge Pro/Payment Server at the Server location must
be running and functioning correctly in order to process the transactions sent
from PCCharge Client.
1.
Client should be displaying the Credit Card Sale window. It will look similar to the
window displayed below, but will may vary slightly from what you see in your copy
of Client (since different credit card processing companies offer different abilities).
56
2.
You'll need a credit card with an active account (use one that has adequate funds
for testing purposes). We suggest that you use your own credit card, since you'll be
transferring funds from that card's account to your business' merchant account.
Enter the credit card's number into the Credit Card Number field. Make sure that
you enter the number without spaces or dashes.
3.
Click in the white space next to the words Card Member and type in the cardholder
name exactly as show on the credit card. Look at the Card Issuer field. It should
now display the type of card being processed (VISA, MC, DISC, etc.). If UnKn is
displayed, it means that the card number you've entered is incorrect and that you'll
need to re-enter it. After you've re-entered it, click in the white space next to the
words Card Member. PCCharge should display the correct card type in the Card
Issuer field.
4.
Enter the card's four-digit expiration date into the Exp. Date (MMYY) field without
using spaces or dashes.
5.
Enter the number 1 into the Amount field without a dollar sign or a decimal point.
Client will automatically recognize 1 as one dollar. Click the Process button.
6.
Client may ask if the customer's card is present. Click Yes. You may be asked if you
want to enter a ticket number. Click No. Finally, Client may ask if you want to
enter CPS qualifiers (AVS information). Click No.
/
7.
Technical Details: Client is asking if the card is present to
determine if you can provide the CVV2/CVC2 number shown on the back
of the card, which would help you to obtain better per-transaction rates.
You would normally provide the ticket number and CPS qualifiers (AVS
information) during a "live" transaction to obtain better per-transaction
rates.
Watch the status window near the bottom-left of the Client main window. This will
display the status of the transaction being processed. Client will make two attempts
to contact the processing company and make a transaction request. Once you've
received a Result for the transaction, compare it to the four possible scenarios
listed below.
•
If the processing company is contacted and the transaction is authorized,
Client will display a Result of CAPTURED and some other information related
to that transaction. If you receive a Result of CAPTURED, proceed to step 9.
•
If the processing company is contacted and the transaction is not authorized,
Client will display a Result of NOT CAPTURED and a Response indicating the
reason for the transaction was not captured. This error message may vary, but
some of the likely possibilities are shown below. These indicate that you've
successfully processed a test transaction, even though the response shows that
the transaction was not authorized. If you receive a Result of NOT CAPTURED
and one of these responses, proceed to step 13.
Example Responses: Declined, Lost Card, Stolen Card, Hold-Call,
Call for Auth, Pick Up Card
57
•
If neither attempt at contacting the processing is successful, Client will display
Result of NOT CAPTURED and a communications-related error message for a
Response. This error message may vary, but some of the likely possibilities are
shown below. If you receive a communications-related error message for a
Response, investigate the Server location.
Example Responses: Port Access Error, No Carrier, No Dial Tone,
No Answer, Connect Failure, Com Error
•
8.
If you received some other error message, you will need to contact Technical
Support at (877) 659-8981.
Since you've received a Result of CAPTURED, you know that the Client location is
properly communicating with the Server location. Click OK on the Result window.
(
Note:
This means that $1.00 from the credit card has been reserved or
"put on hold". This step in transaction processing is called
"authorization". The next step in transaction processing is called
"settlement".
Settlement is when your payment processing company instructs your
business' bank and the cardholder's bank to initiate the transfer of
authorized transaction funds. For some processing companies, this
happens automatically. For others, it must be manually initiated. In
either case, settlement is a HIGHLY IMPORTANT step in payment
processing. During "live" processing, you will not receive your funds
unless your authorizations are settled. The following steps will take you
through settlement of your test transaction.
9.
Contact the administrator of the PCCharge Server location. Ask the administrator to
Void the test transaction you just processed (so that no funds are deducted from the
card you used).
10. Now that you've successfully processed a test transaction, you may begin processing
live transactions. Continue on to the next section, User's Guide, to learn how to use
the functionality of Client.
(
Note:
If you think that your account is set up to process other credit card
types (American Express, Discover, MasterCard, etc.), you may also perform
test transactions using those credit card types. To test a different credit card
type, just repeat steps 1-13 (using the new card type).
58
User’s Guide
This section describes how to process single transactions, view reports, and use other
options accessible in Client.
59
Main Window
The Main Window is the focal point of your Client software. It is the window you will see
first when the software is started. You can access any function of the software from the
Main Window.
(
Note: Your Main Window may look slightly different, depending on which
processing company you're using.
Menu Bar -- (Top of the main window) -- The menu bar is a generic Windows-based menu
system. The menu bar allows you to access every feature of Client.
Icon Bar -- (Top of the main window) -- The Icon Bar allows you to access six of the main
functions of the software: credit card processing, debit card processing, check
processing, gift card processing, cashier log on/off, the customer database, and the help
file. Simply click the appropriate icon to access the desired function.
60
Action Selector Row -- The Action Selector Row allows you to select the type of
transaction to be performed. As you access different functions of the software, the
Action Selector Row changes. The Action Row displays all types of actions that can be
performed using the currently selected processor and processing function (Example:
Functions available when processing credit card transactions are not all available when
processing debit card transactions).
Active Company Display -- (Bottom-middle of the main window) -- This drop-down box
displays the currently selected merchant account number and the company name
associated with that account. Whatever account is shown here will be used to process all
credit card transactions performed from the Credit Card Transactions window.
61
Processing Transactions
Client was designed to process four types of transactions:
•
Credit Card Transactions
•
Debit Card Transactions
•
Check Services Transactions
•
Gift Card Transactions
Before trying to process any transactions, make sure you have followed all the steps in
the Setup Wizard section of this documentation (see page 31). Next, make sure that the
Server location is running.
The following sections give specific information on processing each of the four
transaction types available in Client.
62
Credit Card Transactions
Using Credit Card Processing
(
Note: The following instructions describe a standard Sale transaction. For
information on other transaction types, consult the section Credit Card
Transaction Types (see page 66).
From the main Client window (see page 60), click the Credit icon to access the Credit
Card Transaction window. Or, click Transactions on the menu bar, and then click the
Credit Card option.
(
Note: If you are using a PIN pad device with PCCharge, you must click the
Credit icon before you can swipe a credit card through your PIN pad (even if
the Credit Card window is already onscreen). This will activate the magnetic
strip reader and make it ready for use.
63
1.
From the Action Selector Row, select the desired transaction type (Sale, Credit,
etc.).
2.
In a RETAIL environment: Swipe the credit card through your card reader. If the
card is swiped, the credit card number, card member, and expiration date are
immediately masked and X’s will be displayed for those fields, as in the example
above. The mouse-over hover tooltip will show the first two digits, masking X’s, and
the last four digits of the card number.If a card reader is not available, type in the
Credit Card Number and Exp. Date.
3.
In a NON-RETAIL environment: Type in the Credit Card Number and Exp. Date.
Client will display the Card Issuer (VISA, DISC, AMEX, etc.).
4.
Enter the dollar Amount of the transaction.
5.
Enter your invoice number (or some internal reference number) in the Ticket
Number field. This field is required for some processing companies (check your
processor's information in the PCCharge Appendix).
6.
If you are in a non-retail environment (or are manually entering transactions in a
retail environment), type in the cardholder's Street address and Zip code. This
information is optional with most payment processing companies, but you'll usually
get a better per-transaction rate if you supply it.
7.
Enter the Card Verification Value if the card has one. This information is optional
with most payment processing companies, but you'll usually get a better pertransaction rate if you supply it.
•
Visa / MasterCard / Discover -- enter the last three digits from the long
number on the back of the credit card (below the magnetic stripe).
•
American Express -- enter the four digits from above the credit card number
on the front of the credit card.
8.
Click the Process button. Client will connect to the Server location.
9.
You may be prompted to enter additional information. Input any extra information
as instructed by Client.
10. The Server location will contact your payment processing company and get a
transaction response. Finally, the Server location will return the transaction
response to you (at the Client location).
64
/
Technical Details: Most responses will be received in 5-20 seconds,
depending on whether a modem or TCP/IP connection is used. There is no
status message while the transaction is processing, so please allow enough
time for the transaction to process (up to 90 seconds) before assuming the
transaction didn’t process. If the transaction was unsuccessful, the Server
location should return a response explaining the problem. If you are
concerned about processing duplicate transactions, please enable the
Require Duplicate Transactions to be Forced feature at the Server location
(consult the section Configure Setup or Preferences in the PCCharge Pro or
Payment Server manual, respectively).
FSA/HRA Transactions
The Credit Card Transaction form now has a checkbox for FSA transactions if the Enable
FSA/HRA Cards option is enabled in the processor setup. This FSA checkbox, which
appears in the lower right side of the Credit Card Transaction form, can be enabled to
‘force’ the prompting for healthcare amounts in cases where the card is an FSA/HRA
card, but the BIN range is not in the BIN table for PCCharge. The BIN ranges for these
cards as well as for other card types are changed constantly at the issuer level, so it is
impossible for PCCharge to always be completely up to date. This checkbox will allow the
user to circumvent the BIN checking and send the proper data for their transaction.
The FSA checkbox will also appear on the Post Auth form once an authorization code has
been entered.
When PCCharge recognizes that the card is an FSA/HRA card based upon the BIN range or
the FSA checkbox is enabled on the Credit Card Transaction form, the following form will
be loaded when the merchant clicks on the Process button:
Total Healthcare Amount: Enter the portion of the transaction amount that is FSA/HRA
eligible. This amount cannot be greater than the transaction amount.
65
The Sub Amount section is a breakdown of the Total Healthcare Amount. Indicate how
much of the Total Healthcare Amount can be assigned to each of the healthcare
categories: Prescription Amount, Vision Amount, Clinic Amount, and Dental Amount.
The total of the amounts submitted for the different categories does not have to add up
to the Total Healthcare Amount; however, the total cannot be greater than the Total
Healthcare Amount.
Credit Card Transaction Types
Sale -- This action decreases the cardholder's limit to buy. It authorizes a transfer of
funds from the cardholder's account to your account.
Credit -- This action increases the cardholder's limit to buy. It authorizes a transfer of
funds from your account to the cardholder's account.
Void Sale -- This action removes a sale transaction. No funds will be received from this
transaction. Use the Void Sale action to correct mistakes and on same-day returns. This
action can only be performed before batch settlement/close. With a host based autoclose system, this action has to be performed on the same day.
Pre-Auth -- This action reduces a cardholder's account's limit to buy for a predetermined
amount of time. A Pre-Auth is the first half of a sale. A Pre-Auth specifies that amount
to be set aside for a potential transfer of funds. The funds are not transfer at batch
settlement/close unless a Post-Auth is performed using the Pre-Auth's approval code. As
previously mentioned, there is a time limit on a Pre-Auth's usability. The processor
determines the time limit, which is usually 7-10 days. You should contact your merchant
service provider/credit card processing company for the exact time.
Post Auth -- This action makes an approved Pre-Auth or voice authorized transaction
available for batch settlement/close. This action is the second half of a sale.
Void Credit -- This action removes a Credit transaction. This action can only be
performed before settlement/close. This action can only be performed before batch
settlement/close. With a host based auto-close system, the action has to be performed
on the same day.
Void Auth -- This action removes a Post-Auth transaction. This action can only be
performed before re-transmission. With a host-based system, the action has to be
performed on the same day. This transaction is not available with all processing
companies. If you want to void a Post-Auth and the action is not available, use the Void
action.
(
Note: You will notice there is no action to void a Pre-Auth. This is because
you cannot void a Pre-Auth. To remove a Pre-Auth, you can have the
processing company remove the transaction (if your processing company is
host-based, they can probably do it). Or, you could follow up the Pre-Auth
with a Post-Auth and do a Void Sale. The only other option is to simply wait
for the authorization to expire.
Book -- This action is essentially the same as a Pre-Auth; it reduces a cardholder's
account’s limit to buy for a predetermined amount of time. The Book transaction is used
with the Ship transaction to make for an efficient and easy-to-use payment processing
solution for MOTO and e-Commerce retailers. A Book transaction is made when the
customer places an order, and is followed by a Ship transaction when the order is
shipped.
66
(
Note: A Book transaction’s corresponding Ship transaction must be
performed at the Server installation.
The following two tabs are available when your account is set up to process prepaid cards
using PCCharge:
Balance Inquiry -- This action is used to determine the balance on a prepaid card.
Reversal -- This action is used to fully reverse a prepaid sale transaction. In a host
environment, this can only be done if it is the next transaction after the transaction
being reversed.
The following tab is available when your account is set up to process FSA/HRA cards using
PCCharge:
Reversal -- This action is used to reverse an FSA transaction. PCCharge will allow the
merchant to attempt to process a Reversal on any “voidable” transaction. There are
processor-specific rules regarding when Reversal transactions can be performed. In a host
environment, this can only be done if it is the next transaction after the transaction
being reversed.
67
About Book & Ship Transaction Processing
Simple Explanation:
Client has the ability to process a special type of
Pre-Auth transaction specifically designed for MOTO and e-Commerce
industries: the Book transaction.
If your company is not set up as a mail order or e-Commerce business, skip
ahead to the section About Restaurant Transaction Processing (see page
70).
(
Note:
The Book transaction type is not accessible in Client unless the credit
card processing company account accessed is setup as MOTO or e-Commerce
at the Server location. Client must be used in conjunction with PCCharge Pro.
A Book transaction performed at the time a customer’s order is placed is the same as a
Pre-Auth. That transaction is then available for completion at the time of shipment using
the Ship transaction type (which is the same as performing a Post-Auth). The Ship
transaction type is only available from the Server location.
The real difference between Pre-Auth & Post-Auth and Book & Ship is that when a
Client user performs a Book transaction, the user at the Server location has a
convenient, easy-to-use drop-down menu in the Ship transaction window. The Server
user can select which transactions to perform, in batch, simply and quickly without
referring to reports to get the information on the original Book transaction (Pre-Auth).
The user is not allowed to change the amount of the transaction from the Book to the
Ship. The amount shipped HAS to be the amount booked.
With Pre-Auth & Post-Auth, the user can authorize the transaction at one amount and
then change that amount when the transaction is posted.
68
Using Book and Ship Transaction Processing
Simple Explanation: If your company is not set up as a mail order or eCommerce business, skip ahead to the section About Restaurant Transaction
Processing (see page 70).
Book & ship transaction processing is handled in much the same way as Pre-Auth and
Post-Auth transaction processing. Essentially, a Book transaction is the same as a PreAuth, and Ship transaction is the same as a Post-Auth. The Ship transaction must be
performed at the Server location. The Client can only perform Book transactions.
Enter all of your transaction information into the Book transaction window. Since the
Book transaction type is similar to the Pre-Auth transaction type, you can refer to the
section Credit Card Transaction Types for more information on both of the types (see
page 66).
(
Note:
As with Sale transactions, processing companies often offer a better
per-transaction rate if you enter the ticket number, zip, CVC2/CVV2/CID, and
street.
69
About Restaurant Transaction Processing
Simple Explanation:
Client has the ability to process restaurant-based
transactions in a way specifically suited for that type of business. Using
Client and a processing company that is certified for restaurant transaction
processing with the Server location, the user can add a gratuity to the total
transaction amount.
If your company is not set up as a restaurant, skip ahead to the section About
Commercial Card Processing (see page 72).
Client can process the following types of restaurant transactions:
•
A Sale (including an estimated gratuity amount) -- This transaction should be used
when the actual gratuity amount is not yet known but the total sale amount is
known at the time of transaction.
•
A Sale (including a known gratuity amount) -- This transaction should be used when
both the actual gratuity amount and the total sale amount are known at the time of
transaction.
•
A Pre-auth (including an estimated gratuity amount) -- This transaction should be
used when the actual gratuity amount is not yet known, but the total pre-auth
amount is known at the time of transaction.
•
A Post-auth (including a known gratuity amount) -- This transaction should be used
when the actual gratuity amount is known after the original corresponding Pre-Auth
transaction has been processed.
•
A Gratuity (after a Sale including an estimated gratuity amount) -- This transaction
should be used when the actual gratuity amount is known after the original
corresponding Sale (including an estimated gratuity amount) transaction has been
processed.
Client can also be configured to require that a two-character Server ID be entered at the
time the transaction is processed. The Server ID entered is then associated with that
transaction, and can be referenced from the Gratuity or Open Gratuity Reports.
70
Using Restaurant Transaction Processing
Simple Explanation: If your company is not set up as a restaurant, skip
ahead to the section About Commercial Card Processing (see page 72).
Restaurant transaction processing is handled in much the same way as normal processing.
The major difference is that there is a second step for some types of restaurant-based
transactions: establishing the actual gratuity amount. This second step ensures that the
correct gratuity amount is transferred from the customer’s account to your account.
The different types of restaurant transactions are explained in detail below:
•
A Sale (including an estimated gratuity amount) -- This transaction should be used
when the actual gratuity amount is not yet known but the total sale amount is
known at the time of transaction. This Estimated Gratuity Amount: can be entered
simply by typing a value in the Estimated Gratuity Amount: field. This transaction
should be followed by a Gratuity transaction.
•
A Sale (including a known gratuity amount) -- This transaction should be used when
both the actual gratuity amount and the total sale amount are known at the time of
transaction. This Actual Gratuity Amount: can be entered simply by typing a value
in the Actual Gratuity Amount: field.
•
A Pre-auth (including an estimated gratuity amount) -- This transaction should be
used when the actual gratuity amount is not yet known but the total pre-auth
amount is known at the time of transaction. This Estimated Gratuity Amount: can
be entered simply by typing a value in the Estimated Gratuity Amount: field. This
transaction type differs from a Sale (including an estimated gratuity amount) in that
a Pre-Auth sets money aside in anticipation of a Post-Auth (including a known
gratuity amount). A Post-Auth can for less than the original Pre-Auth. A Pre-Auth
must be followed by a Post-Auth in order for the funds to be transferred from a
customer’s account to your account.
•
A Post-auth (including a known gratuity amount) -- This transaction should be used
when the actual gratuity amount is known after the original corresponding Pre-Auth
transaction has been processed. This Actual Gratuity Amount: can be entered
simply by typing a value in the Actual Gratuity Amount: field. A Post-Auth (and/or
Actual Gratuity Amount:) can for less than the original Pre-Auth (and/or Estimated
Gratuity Amount:). A Pre-Auth must be followed by a Post-Auth in order for the
funds to be transferred from a customer’s account to your account.
•
A Gratuity (after a Sale including an estimated gratuity amount) -- This transaction
should be used when the actual gratuity amount is known after the original
corresponding Sale (including an estimated gratuity amount) transaction has been
processed. A Gratuity can for less than the original Estimated Gratuity Amount:. A
Sale (including an estimated gratuity amount) must be followed by a Gratuity in
order for the amount of the gratuity to be transferred from a customer’s account to
your account.
71
About Commercial Card Processing
Simple Explanation: Client has the ability to process commercial card
transactions. Commercial cards (also known as corporate cards or purchasing
cards) are special credit cards that are given to employees of businesses,
governments, etc., for company purchases.
If your company is not set up to accept commercial cards (also known as
purchasing or corporate cards), skip ahead to the section Offline Processing
(see page 72).
Commercial card transactions record a customer code and a tax amount. The customer
code is the code that is assigned to that cardholder (by his/her company), and is typically
used for accounting within the cardholder’s company. The tax amount is added to the
total amount to be charged from that card--it’s also kept separate for accounting
purposes.
72
Using Commercial Card Processing
Simple Explanation: If your company is not set up to accept commercial
cards (also known as purchasing or corporate cards), skip ahead to the
section Offline Processing (see page 72).
Commercial cards are processed in almost the same way as normal credit cards. If your
credit card processing company is certified for commercial card processing, Client will
allow you to add a tax amount to the total transaction amount and can also include a
customer code with the transaction information sent to the credit card processing
company.
Client automatically recognizes commercial cards, so no special steps need to be taken
to process commercial cards other than inputting the customer code and tax amount at
the time of the sale.
73
Offline Processing
Simple Explanation: Offline processing allows you to enter all the
necessary data for each of your transactions without having to connect to the
processing company for each transaction immediately. The card information
is saved into a new or existing Super DAT (SDT) file and is held there until the
credit card processing company is actually contacted.
If you don't think you'll need this ability, skip ahead to the section Debit Card
Transactions (see page 76).
!
WARNING: Transactions processed via offline processing have a higher pertransaction rate than swiped transactions. However, you can often achieve
better rates by providing the greatest amount of information available for
each transaction (Zip, address, etc.). Check with your payment processing
company for details on per-transaction rates.
Offline processing saves time because the credit card processing company is not
contacted for transaction authorization until after the user has finished inputting all
transactions and is ready to process them all as one batch (group). It can also be used
should you temporarily lose your connection to the credit card processing company.
How to Process Offline Transactions
1.
To enable Offline Processing, click Transactions on the menu bar. Click the Credit
Card option. Client will display the Credit Card Transactions window. Click the
Process Offline button.
2.
Client will display a New/Edit Existing window, allowing you to create a new SDT
file or open an existing one (to add transactions). This Super DAT (SDT) file will
contain your offline transactions.
3.
•
If you're creating a new SDT file, enter a filename into the box labeled File
name. Click the Open button to create your file, or click the arrow to the right
of the Look In drop-down box to browse to a different save location.
•
If you're opening an existing SDT file, select the file you wish to open (you may
need to change the Look In location to find your file). Click the Open button to
open the file.
Click OK to create or load your file. Client will return to the Credit Card
Transactions window. Notice that the Process Offline button is activated. This
indicates that any transactions processed will be recorded in the file displayed at
the bottom of this window.
(
4.
Note: If your connection to the processing company is still available and
you're only using offline processing to speed up transaction processing, you can
interrupt offline processing and return to normal processing at any time by
clicking the Process Offline button again to deactivate it.
Process any transactions that you want included in the offline batch of transactions.
Clicking the Process button saves that transaction to your SDT file, and Client will
74
update the transaction count at the bottom of the Credit Card Transactions
window.
5.
When you're done entering transactions, click the Process Offline button to close
the file and save all the transactions you've just entered. Click Cancel to exit the
Credit Card Transactions window.
6.
To actually have your credit card company process the transactions, you'll need to
import your SDT file. Consult the following section, Processing an Import File, for
more information on this subject.
Processing an Import File
Import files must be processed from the Server location. This is intended as a security
feature, since Client-generated import files are usually created in response to a
temporary communications outage. Consult the Server location manual for instructions
on importing offline processing files.
75
Debit Card Transactions
Debit Card Transaction Types
There are two main types of debit card transactions: Sales and Credits. Other debit card
transactions (Void Sale, Void Credit, etc.) are variations on these. The different types of
transactions are also known as actions. Here is a list with general descriptions:
1.
Sale -- This action decreases the cardholder's limit to buy. It authorizes a transfer of
funds from the cardholder's account to your account.
2.
Credit (Return) -- This action increases the cardholder's limit to buy. It authorizes a
transfer of funds from your account to the cardholder's account.
3.
Void Sale -- This action removes a sale transaction. No funds will be received from
this transaction. Use the Void Sale action to correct mistakes and on same-day
returns. This action can only be performed before batch settlement/close. With a
host based auto-close system, the action has to be performed on the same day.
4.
Void Credit (Return) -- This action removes a Credit transaction. This action can
only be performed before batch settlement/close. With a host based auto-close
system, the action has to be performed on the same day. If you want to void a
credit and the action is not available, use the Void action.
5.
Sale Recovery -- This action removes a Void Sale transaction. The original sale will
be processed as if the sale was never voided. This action can only be performed
before batch settlement/close. With a host based auto-close system, the action has
to be performed on the same day.
6.
Credit (Return) Recovery -- This action removes a Void Credit (Return)
transaction. The original credit will be processed as if the credit was never voided.
This action can only be performed before batch settlement/close. With a host based
auto-close system, the action has to be performed on the same day.
Debit Card Processing
1.
From the Client's main window (see page 60), click the Debit icon to access the
Debit Card Sale window. Or, click Transactions on the menu bar, and then click the
Debit Card option.
(
Note: If you are using a PIN pad device with PCCharge, you must click the
Debit icon before you can swipe a debit card through your PIN pad (even if the
Debit Card window is already onscreen). This will activate the magnetic strip
reader and make it ready for use.
2.
Select the transaction type (Sale, Return, etc.) you want to perform. Swipe the
debit card through your card reader.
3.
Depending on your PIN pad and debit card processing company, Client may prompt
you to enter addition transaction data (using either your PIN pad or the Client
interface).
76
4.
Click the Process button. Your PIN Pad will prompt you to have the customer enter
their PIN. After the number is entered, the Server location will contact debit card
processing company and this Client location will display the results of the
transaction.
(
Note: The fields shown below may differ from what you see in your copy of
the Client software, depending on your debit card processing company and the
transaction type being performed.
Debit Card Transaction Fields
Debit Card Number: -- Displays the debit card number captured by your card reader.
Card Member: -- The cardholder's name.
Ticket Number: -- This field allows you to enter an invoice number or some other
internal reference number.
Amount $: -- The dollar amount of the transaction to be processed.
77
Cash Back $: -- This field allows you to enter the cash back amount. The cash back is an
amount over the amount of purchase. This amount is to be given to the customer. It is
basically a service that debit transactions allow you to offer for your customers.
Total $: -- This field shows the total amount of the transaction to be processed. It is
calculated by adding the Amount: and Cash Back $: field.
78
Check Services Transactions
Check Services Processing
Check Verification verifies that the check writer has an account that does not have any
"negative flags" for that method of check verification (drivers license, MICR, etc.). Check
Guarantee guarantees that the check amount will be paid to you regardless of the funds
available in the customer's checking account.
To access the Check Services window, click Transactions on the menu bar. Click the
Check Services option. Or, click the Check button on the Icon Bar.
A check swipe is available for processing checks. You can contact your merchant service
provider for more information.
(
Note:
Your Check Services window may look slightly different depending on
which check services company you are using.
79
Action Tabs
The action tabs allow you to select the desired Action: Sale, Credit, etc. Not all Action
Tabs or fields will be available to every check processing company for every transaction
type.
(
Note: Some of the following fields may not appear in your Check Services
window. This is because each check services company offers different options.
Transit Number -- Allows you to enter your customer's transit number.
Phone Number -- Allows you to enter your customer's phone number.
Zip Code -- Allows you to enter your customer's zip code.
Check Number -- Allows you to enter your customer's check number.
Account Number -- Allows you to enter your customer's checking account number.
Driver's License -- Allows you to enter your customer's driver's license number.
Birth Date -- Allows you to enter your customer's birth date from his or her driver's
license.
State Code -- Allows you to enter your customer's state code.
Amount $ -- Allows you to enter the amount of the transaction.
Ticket -- Allows you to enter an internal invoice number.
(
Note: If you perform check truncation/conversion, you'll need to close your
batch at the end of the day. It is necessary to perform this procedure to have
funds transferred from the customers' accounts to yours. Consult the section
Truncation Close for further explanation of this process (consult the Server
documentation).
All about Check Verification/Guarantee
In verifying/guaranteeing a check, funds are not being moved. Check
Verification/Guarantee is only a one step process. There is no need for re-transmission
(batch settle/close).
1.
Check Verification -- Verification allows you to verify that the check writer has an
account that does not have any "negative flags" for that method of check
verification (driver's license, MICR, etc.).
2.
Check Guarantee -- Guarantee first performs a Check Verification, and then
guarantees that the funds are available, regardless of how much money is actually in
the check writer's account.
80
All about Check Conversion/Truncation
Check Conversion/Truncation is one of the newer developments in electronic payment
processing. It is a process by which a checking account is immediately debited
electronically.
Processing a check conversion is a two-step process:
1.
Process whatever check Sale transactions you have for that particular day.
2.
As with credit cards, there is secondary transmission of information needed to
complete a transaction. This happens at the Server location and is called
Truncation Close.
(
Note: The important thing to remember is that without re-transmission of
the check information, you will not receive your money. Every day that you
perform truncations, the Server location should perform a truncation close
after all transactions are complete.
Check Conversion Up-Close
Check Conversion takes verifying one step further. The first step is to verify/guarantee
the check. The second step is to have the funds electronically moved from your
customer's checking account to yours.
1.
Verify -- This action allows you to verify that a checking account exists for your
customer and guarantees that the amount of the transaction is available. This action
also allows you to perform the first half of a sale transaction. This action does not
make information available for re-transmission.
2.
Sale -- This action reduces the balance of your customers' checking account. A sale
actually performs two functions. First, a sale will verify/guarantee a check. Second,
it will make the transaction available for re-transmission.
3.
Void -- This action removes a Sale or Forced transaction from the re-transmission
information. You will be deleting the transaction. You will not get the funds from
this transaction. Use the Void Sale action to correct mistakes and on same day
returns. This action can only be performed before re-transmission.
4.
Force -- This action makes a verified check transaction available for retransmission. A Verify followed by a Force is equivalent to a Sale.
81
Gift Card Transactions
Gift Card Transaction Types
There are several gift card processing companies currently supported by Client, each
with its own unique transaction types. Consult the PCCharge Appendices for a description
of the transaction types available for each processor.
To access the PCCharge Appendices (available at the Server location), click the Windows
Start button, then Programs (or All Programs), then PCCharge Pro (or PCCharge
Payment Server), then PCCharge Appendices.
82
Gift Card Processing
From the Main Window (see page 60), click the Gift Card icon to access the Gift Card
Transaction window. Or, click Transactions on the menu bar, and then click the Gift
Card option.
(
1.
2.
3.
4.
Note: If you are using a PIN pad device with PCCharge, you must click the
Gift icon before you can swipe a gift card through your PIN pad (even if the
Gift Card window is already onscreen). This will activate the magnetic strip
reader and make it ready for use.
From the Action Selector Row, select the desired action (Redemption, Register,
etc.).
Enter the gift card number.
•
In a retail environment, the gift card should be swiped through your card
reader. If a card reader is not available, type in the gift card number.
•
In a non-retail environment, type in the gift card number.
Enter the dollar amount of the transaction.
Click the Process button.
83
(
Note: The fields shown may differ from what you see in your copy of the
Client, depending on the processor selected and the transaction being
processed.
Gift Card Number: -- Displays the gift card number.
Amount $: -- This field allows you to enter the dollar amount of the transaction to be
processed.
84
Cashier Privileges
Simple Explanation: In order to use cashier privileges at the Client
location, they must be first set up at the Server location (consult the Server
documentation for instructions). Cashier privileges are used to control what
functions a cashier can access.
The Log On icon will be enabled and there will be a Log Off menu choice under File. The
active cashier's User Name is shown at the bottom of the main Client window, next to
the Active Company Display (see page 60).
Log On
Simple Explanation: If you encounter the following Log On window, it is
usually because you have started up Client. Enter your User Name and
Password for your cashier account, then click the Log On button. This
information will be available from whoever set up cashier privileges at the
Server location.
The Client will display the Log On window at these times:
•
•
•
•
when
when
when
when
the
the
the
the
Client is started
Log On/Off icon is clicked
Log Off option is selected from the File menu
PCCharge Pro/PS path is changed in the Setup Wizard
You may also log in and out of a cashier account by clicking the Log On/Off button on the
Icon Bar. This icon is immediately to the left of the help icon.
85
Manager Override Password
Simple Explanation:
The Manager Override Password window is very
similar to the Log On window. The difference is that the Manager Override
Password window is displayed when a cashier attempts to access a function
that he does not have permission to access.
As stated above, the Manager Override Password window is displayed when a cashier
(Shelly) attempts to access a function that she has not been given permission to access.
The Manager or System user – or even another cashier who has permissions for that
particular function -- can override that protection by entering their User Name and
Password. The first cashier (Shelly) is granted access to that function for that one
instance. If she needs to perform that function again, another override would be
required.
86
Customer Database
Simple Explanation: The Client customer database allows you to store
information about your clients, process transactions, and create recurring
billing contracts. There are two main sections of the Customers window:
•
•
Customer Info -- Allows you to record a customer's personal
information
Credit Card Info -- Allows you to record a customer's credit card
information
The Customer Database accessible from the Client is identical to PCCharge Pro's in every
way except that the Client Customer Database cannot create or process contracts. This
function is reserved for the Server location.
All other functions of the customer database are accessible by Client. The following
sections describe how to use the client customer database.
(
Note: Since the customer database is not available in PCCharge Payment
Server, the customer database functions are not available when the Client is
used in conjunction with PCCharge Payment Server.
87
Customer Info
Simple Explanation: The Customer Info section of the Customers
window allows you to store, view, and edit a customer's credit card
information. This information is stored in the customer database.
Creating a New Customer
1.
From the main window, click the Customers button on the icon bar. Click the Credit
Card Info tab. Note that you can also use the right and left arrows at the bottom of
this window to browse through your customers.
2.
From the Customer Info section of the Customers window, click the New button.
3.
You can manually create a Customer ID, or Client can auto-create the Customer ID
field. If you check the box labeled Auto Assign Customer ID, Client will
automatically create a Customer ID when you click the New button.
4.
Enter your customer's personal information. It is not necessary to use every field.
However, you must at least provide a Company Name or First Name & Last Name.
If you fill out a First Name and Last Name but not a Company Name, a Company
Name will be generated for you.
(
Note:
(
Note: You'll usually get the best per transaction rate from your credit
card processing company if you provide complete name and address
information. Check with your processing company for information on how
to get the best per transaction rate.
You must use a letter for the first character of Company Name.
Any characters that follow can be letters or numbers. Additionally, all
punctuation is prohibited (due to database restrictions).
88
5.
The Credit Limit field allows you to specify (in dollars) a credit limit for the
displayed customer. This field is just a convenient reference; it does not actually
affect whether or not the Client software will allow a transaction to be processed.
6.
After filling out all applicable fields, click the Update button. You will be prompted
to commit changes. If you click Yes, your information will be saved. A plus sign
should appear next to the corresponding folder (on the left side of the Customers
window). A plus sign shows that a folder contains on or more entries. The entries in
the database are listed alphabetically by the Company Name field.
Deleting a Customer
The Client Customer Database can delete database entries.
Finding an Existing Customer
Click the Find button to access the Find Customer window and search through customer
database entries for a particular customer. The search allows you to use the Customer
ID, Company Name, and Last Name fields from the Customers window to find the
desired customer. Select the field you would like to use in the search, and enter the
information you'd like to find (using the Search For field).
89
Credit Card Info
Simple Explanation:
The Credit Card Info section of the Customers
window allows you to store a customer's credit card information in the
customer database. You can also use this section to process individual
transactions for specific customers.
Recording a Customer's Credit Card Information
1.
From the main window, click the Customers button on the icon bar. Select the
customer whose credit card information you wish to view/edit. If you have not
entered any customers into the customer database, refer the subsection Creating a
New Customer in the section Customer Info (see page 88).
2.
Click the Credit Card Info tab to access the Credit Card Info section of the
Customers window. The values in the Credit Card Number, Expiration Date, Alt
Credit Card Number, and Alt Expiration Date fields are pulled from the Customer
Info window. You can also use the right and left arrows at the bottom of this
window to browse through your customers.
3.
Enter the customer's Credit Card Number and Expiration Date. If an alternate
credit card number is available for customer, enter that information into Alt Credit
Card Number and Alt Expiration Date. This information can be used to create
recurring billing contracts, and can also be used to process individual transactions
from the Customer Transactions window (see page 92). The Alt Credit Card
Number and Alt Expiration Date fields may be left blank.
90
4.
You can enter an Amount if you expect to constantly manually process transactions
for this customer for the same amount (instead of using automatic recurring billing).
This field may be left blank.
5.
If you're performing a commercial card transaction and your processing company is
set up to process commercial cards, enter the cardholder's Customer Code, Tax
amount, and Ship To Zip. These fields are not available for editing unless you're
processing a commercial card. Refer to the section All about Commercial Card
Processing for more information on commercial cards (see page 72).
6.
Click the Update button, and your customer's credit card information will be saved
to the customer database. After you click Update, only the first four and last four
digits of the credit card number will be displayed (for security reasons), but the
entire number is stored in the customer database.
Editing a Customer's Credit Card Information
1.
To edit an existing customer's credit card information, you must first select a
customer using the folder on the left of the Customers window. If you have not
entered any customers into the customer database, refer the subsection Creating a
New Customer in the section Customer Info (see page 88).
2.
Make any changes as necessary.
3.
Click the Update button, and your customer's credit card information will be saved
to the customer database. After you click Update, only the first four and last four
digits of the credit card number will be displayed (for security reasons), but the
entire number is stored in the customer database.
Processing a Customer Transaction
Using the folder on the left of the Customers window, select the customer for whom you
wish to process a transaction. Click the Process button to access the Customer
Transaction window and process a transaction for the selected customer (see page 92).
Finding an Existing Customer
Click the Find button to access the Find Customer window and search through customer
database entries for a particular customer. The search allows you to use the Customer
ID, Company Name, and Last Name fields from the Customers window to find the
desired customer. Select the field you would like to use in the search, and enter the
information you'd like to find (using the Search For field).
91
Customer Transactions
Simple Explanation: The Customer Transactions window allows you to
process non-recurring transactions for specific customers. The difference
between this window and the main Credit Card Transaction window is that
this window provides a convenient way to process transactions for customers
recorded in the customer database.
Processing a Customer Transaction
(
Note:
The following instructions apply to processing individual customer
transactions using a credit card. If a customer wants to use an alternate form
of currency for a contract-based payment, refer to the Manual Payment
method described in the subsection Editing a Customer Contract in the
section Contracts (in the Server manual).
1.
To access the Customer Transactions window, click Customers on the menu bar.
Click the Customers option. Select the customer for whom you wish to process a
transaction. Click the Credit Card Info tab. Click Process to access the Customer
Transactions window.
2.
Client will automatically fill out this window with the transaction, customer, and
card information from the Customer Info and Credit Card Info sections of the
Customers window. You can manually modify some of the values listed in the
Customer Transactions window), but any changes made in this window will not
affect the customer's recorded information. To make permanent changes to the
customer's information, use the Customer Info (see page 88) and Credit Card Info
(see page 90) sections of the Customers window.
92
3.
Using the Credit Card Number drop-down box, select the customer's credit card
number you wish to use to process the transaction. The Exp. Date field will
automatically display the expiration date associated with the selected credit card
number.
4.
Select the transaction type you wish to process from the Trans Type drop-down
box.
5.
Enter a ticket number for the transaction. This should be some internal reference
number you create (invoice number, sales number, etc.).
6.
If you are performing a Void or a Post-Auth, enter the original transaction's
Reference Number.
7.
If you are performing a commercial card transaction and your processing company is
set up to process commercial cards, enter the cardholder's Customer Code.
8.
If you are performing a CitiCorp Private Label Sale or Post-Auth transaction, enter a
Promo Code (up to 5 digits).
9.
You may enter a tax amount in the Tax field whether or not you are performing a
commercial card transaction However, the tax amount will not be recorded to the
customer database unless you are processing a commercial card and your processing
company is set up to process commercial cards.
10. By default, the Sub Total will be the same as the value entered in the Amount field
in the Credit Card Info section of the Customer window. You can change the Sub
Total manually entering a new value into the field. Alternatively, you can enter
product/service Descriptions and Amounts, and Client will compute a Sub Total for
you.
(
Note: This information is not stored in the customer database for later
retrieval. It is merely a convenience used to itemize purchases at the time of
the transaction. This information will not be printed to your receipts.
11. Click OK and Client will attempt to contact the Server location and have it process
the transaction.
93
Reports
Simple Explanation: This section explains how to access each report
and find out what transaction information each report presents. You will also
learn how to configure your report's data.
(
Note: This function provides access to all reports accessible at the Server
location of PCCharge. If you find that a report is not accessible, it usually
means that the active processing company does not support that report type.
The Reports menu on PCCharge Client's menu bar has many sub-menus. The reports are
categorized by the type of data they display: credit card Transactions, Batches, Check
transactions, Debit transactions, etc. When selected, each Reports menu item brings up
a window similar to the following:
94
(
Note:
Not all Reports windows selectable from the Reports menu will have
the same options and fields accessible. For example, in the Today's Summary
Report, you wouldn't be able to change the Member: and Ticket #: fields.
Further, not all processing companies will have access to the same reports. An
account using a host based system would, of course, not be able to access the
Settled Batch report (host based systems close their batches, terminal based
systems settle their batches).
Report Type
Each Reports menu item will display a different report type in the Report Type: field.
You can select a different report type from this list by clicking on the small arrow to the
right of the Report Type: field.
Print To
Window -- (Default = Selected) -- Select this option if you want to view the report from
within PCCharge. After the report is shown on window, you may print it out by clicking
the Print button.
Printer -- (Default = Unselected) -- Select this option if you want to send the report to
the printer selected in the Report Printer Setup window (see page 44). If this option is
selected, two additional options become available: Portrait and Landscape. Select the
page orientation you wish to use.
File -- (Default = Unselected) -- Select this option if you want to send the report to your
hard drive as an ASCII text file. After this option is enabled and you click OK, you'll need
to specify the desired file name and location of the text file.
Report Filters
Start: -- Click the small drop-down arrow button (to the right of the Start: field). Select
the start date for report range you wish to view.
End: -- Click the small drop-down arrow button (to the right of the End: field). Select the
end date for report range you wish to view.
Member: -- Use this field if you want to generate a report that shows only those
transactions processed for a specific card member. Enter the exact card member name
used in the original transaction(s).
Card #: -- Use this field if you want to generate a report that shows only those
transactions processed for a specific credit card number. Enter the exact credit card
number used in the original transaction(s).
(
Note:
Enter the first four digits of the credit card number, eight periods, and
then the last four digits of the credit card number.
If the card number contains fewer than 16 digits, then adjust the number of
periods between the first four and last four to add up to the total card length.
95
User ID: -- Use this field if you want to generate a report that shows only those
transactions processed by a specific user ID. This report applies only to multi-user version
of PCCharge. Enter the exact user ID used to process the original transaction(s).
Ticket #: -- Use this field if you want to generate a report that shows the transaction
associated with a particular ticket number. Enter the exact ticket number used in the
original transaction.
Merchant #: -- (Default = All) -- Select a merchant number. All transactions processed
with the selected merchant number will be used to generate the report. If All is selected
as the Merchant #:, then all transactions processed with all merchant numbers
registered with PCCharge will be used to generate the report.
Card Type: -- (Default = All) -- Select a card type. All transactions processed with the
selected card type will be used to generate the report. If All is selected as the Card
Type:, then all transactions processed with all card types will be used to generate the
report.
Status: -- (Default = Approved) -- Select the result of a transaction: Approved or
Declined. All transactions processed with the selected status will be used to generate
the report. If All is selected as the Status:, then all transactions processed - regardless of
status - will be used to generate the report.
Batch: -- Enter a batch number. All transactions processed within the selected batch will
be used to generate the report. Enter the exact batch number used for the original
transaction(s).
Amount: -- Enter an amount. All transactions processed for the selected amount will be
used to generate the report. Enter the exact amount used in the original transaction(s).
96
Viewing a Report
(
Note: Some reports are larger than your viewable window. Use the scroll
bars (located on the right hand side and bottom of the window).
97
Report Window Buttons
Icon
Description
Print -- Click this button to print the report.
Copy -- Click this button to copy this report to system memory as an image.
You may then paste the image into a graphics editing application.
Find -- Click this button to find a text string within the report.
Single Page -- Click this button to view a single report page at a time.
Multiple Pages -- Click this button to view multiple report pages at once.
You may specify how many pages you wish to view simultaneously.
Zoom Out -- Click this button to decrease the current magnification level.
Zoom In -- Click this button to increase the current magnification level.
Previous Page -- Click this button to view the previous page in the report.
Next Page -- Click this button to view the next page in the report.
Move Backward -- Click this button to move backward in your page view
history.
Move Forward -- Click this button to move forward in your page view
history.
98
Daily Transaction Summary
The Daily Transaction Summary is a summary of the transactions that you have
processed today.
To access the Daily Transaction Summary report filter, click Reports on the menu bar.
Click the Transactions option. Select Daily Transaction Summary from the drop-down
list.
In the Report Filters area you can select the User ID that processed the transactions,
Status: of the transactions processed, the Start: and End: date, the Batch #:, and the
Merchant #. Click the OK button to view/print/save the report.
Because this is a Daily Transaction Summary, the Start: and End: dates default to
today's date.
99
Credit Card Detail
The Credit Card Detail report is a line-by-line view of your credit card transaction
history.
To access the Credit Card Detail report filter, click Reports on the menu bar. Click the
Transactions option. Select Credit Card Detail from the drop-down list.
In the Report Filters area you can select the Start: & End: date, the card Member:, the
Card #:, the User ID: that processed the transactions, the Ticket #:, the Card Type:,
the Status: of the transactions processed, the Batch #:, the Amount:, and the Merchant
#:. Click the OK button to view/print/save the report.
100
AVS
The AVS report shows your transaction history with the AVS response for each
transaction.
To access the AVS report filter, click Reports on the menu bar. Click the Transactions
option. Select AVS from the drop-down list.
In the Report Filters area you can select the Start: & End: date, the card Member:, the
Card #:, the User ID: that processed the transactions, the Ticket #:, the Card Type:,
the Status: of the transactions processed, the Batch #:, the Amount:, and the Merchant
#:. Click the OK button to view/print/save the report.
101
Book
The Book report shows transactions that were performed using the Book Transaction
window.
To access the Book report filter, click Reports on the menu bar. Click the Transactions
option. Select Book from the drop-down list.
In the Report Filters area you can select the Start: & End: date, the card Member:, the
Card #:, the User ID: that processed the transactions, the Ticket #:, the Card Type:,
the Status: of the transactions processed, the Batch #:, the Amount:, and the Merchant
#:. Click the OK button to view/print/save the report.
102
Ship
The Ship report shows transactions that were performed using the Ship Transaction
window.
To access the Ship report filter, click Reports on the menu bar. Click the Transactions
option. Select Ship from the drop-down list.
In the Report Filters area you can select the Start: & End: date, the card Member:, the
Card #:, the User ID: that processed the transactions, the Ticket #:, the Card Type:,
the Status: of the transactions processed, the Batch #:, the Amount:, and the Merchant
#:. Click the OK button to view/print/save the report.
103
Customer Transaction
The Customer Transaction report displays transactions that were processed as a
payment for a recurring billing contract.
To access the Customer Transaction report filter, click Reports on the menu bar. Click
the Transactions option. Select Customer Transaction from the drop-down list.
In the Report Filters area you can select the Start: & End: date, the card Member:, the
Card #:, the User ID: that processed the transactions, the Ticket #:, the Card Type:,
the Status: of the transactions processed, the Batch #:, the Amount:, and the Merchant
#:. Click the OK button to view/print/save the report.
104
Batch Pre-Settle
The Batch Pre-Settle report lets you view batches of transactions that are waiting to be
settled. As soon as you settle the transactions, the report will be empty. There will be no
transactions to view until you process more transactions.
(
Note: This report is only available when using a terminal-based processing
company.
To access the Batch Pre-Settle report filter, click Reports on the menu bar. Click the
Batch option. Select Batch Pre-Settle from the drop-down list.
In the Report Filters area you can select the Merchant #: used to process the
transactions. The date range is not pertinent to this report. Click the OK button to
view/print/save the report.
105
Batch Post-Settle
The Batch Post-Settle report allows you to view batches of transactions that have been
settled.
(
Note: This report is only available when using a terminal-based processing
company.
To access the Batch Post-Settle report filter, click Reports on the menu bar. Click the
Batch option. Select Batch Post-Settle from the drop-down list.
In the Report Filters area you can select the Start: & End: date, the card Member:, the
Card #:, the User ID: that processed the transactions, the Ticket #:, the Card Type:,
the Batch #:, the Amount:, and the Merchant #:. Click the OK button to view/print/save
the report.
106
Check Summary
The Check Summary report gives a summary of check transactions.
(
Note: This report is only available in a check-processing environment.
To access the Check Summary report filter, click Reports on the menu bar. Click the
Check option. Select Check Summary from the drop-down list.
In the Report Filter area you can select the Start: and End: dates, the Ticket #:, the
Amount:, and the Status: of transactions processed. Click the OK button to
view/print/save the report.
107
Check Detail
The Check Detail report is a line-by-line view of your check transaction history.
(
Note: This report is only available in a check-processing environment.
To access the Check Detail report filter, click Reports on the menu bar. Click the Check
option. Select Check Detail from the drop-down list.
In the Report Filter area you can select the Start: and End: dates, the Ticket #:, the
Amount:, and the Status: of transactions processed. Click the OK button to
view/print/save the report.
108
Debit Summary
The Debit Summary report is a summary of your debit transaction history.
(
Note: This report is only available in a debit processing environment.
To access the Debit Summary report filter, click Reports on the menu bar. Click the
Debit option.
In the Report Filters area you can select the User ID that processed the transactions, the
Start: and End: dates, the Ticket #: of the transaction, the Status: of transactions
processed, the Batch #:, and the Amount:. Click the OK button to view/print/save the
report.
109
EBT Summary
The EBT Summary report is a summary of your EBT transaction history.
(
Note: This report is only available in an EBT processing environment.
To access the EBT Summary report filter, click Reports on the menu bar. Click the EBT
option..
In the Report Filters area you can select the User ID that processed the transactions, the
Start: and End: dates, the Ticket #: of the transaction, the Status: of transactions
processed, the Batch #:, and the Amount:. Click the OK button to view/print/save the
report.
110
Periodic Payments by Expired Contracts
This report shows the customer database accounts that will expire within the selected
date range.
To access the Account Expiration report filter, click Reports on the menu bar. Click the
Periodic Payments option. Click the Summary by Expired Contracts option.
Sort Order:
You may sort by Company name or by Final Date
In the Report Filters area you can select the Start: and End: dates, and a Sort Order:.
Click the OK button to view/print/save the report.
111
Periodic Payments by Account
This report shows a summary of periodic payments based on customer database accounts
that were processed within the selected date range.
To access the Periodic Payments by Account report filter, click Reports on the menu
bar. Click the Periodic Payments option. Click the Summary by Customer ID option.
In the Report Filters area you can select the Start: & End: date, the card Member:, the
Card #:, the User ID: that processed the transactions, the Ticket #:, the Card Type:,
the Status: of the transactions processed, the Batch #:, the Amount:, and the Merchant
#:. Click the OK button to view/print/save the report.
112
Periodic Payments by Date
This report shows you a line-by-line report of periodic payment transactions from the
customer database that were processed within the selected date range.
To access the Periodic Payments by Date report filter, click Reports on the menu bar.
Click the Periodic Payments option. Click the Summary by Date option.
In the Report Filters area you can select the Start: & End: date, the card Member:, the
Card #:, the User ID: that processed the transactions, the Ticket #:, the Card Type:,
the Status: of the transactions processed, the Batch #:, the Amount:, and the Merchant
#:. Click the OK button to view/print/save the report.
113
Reprint Receipts
The Reprint Receipts function allows you to reprint a receipt. The Report Filter section
of this window is similar to the other report filter windows. However, here you must
specify a single transaction or a range of transactions for which you wish to reprint
receipts.
To access the Reprint Receipts report filter, click Reports on the menu bar. Click the
Reprint Receipts option.
•
•
•
Enter the number of the first receipt in the Start Number: field.
Enter the number of the last receipt in the End Number: field.
Click the OK button to reprint the receipt(s).
114
Audit
The Audit report allows you to view actions performed by your cashiers. It shows
attempted logons, functions accessed, etc.
To access the Audit report filter, click Reports on the menu bar. Click the Audit option.
Enter the name of the cashier in the Cashier Name field.
Or, enter the name of the supervisor in the Supervisor Name field.
In the Report Filters area you can select the Start: & End: date. Click the OK button to
view/print/save the report.
115
Cashier Name
If you specify a Cashier Name, then the audit report will only show the actions
performed by that specific cashier.
Supervisor Name
If you specify a Supervisor Name, then the audit report will only show the actions
authorized by that specific supervisor's override. A supervisor is a cashier (or the system
user) that has access to a function and grants access to that function to a cashier that
does not have access.
116
Restaurant Pre-Settle
This report shows a line-by-line report of transactions and gratuity amounts for those
transactions. The transactions are grouped by Server ID, if one is specified. This report
shows those restaurant transactions waiting to be finalized or completed.
(
Note:
This report is only available when the business type of your processing
company's account is set to Restaurant.
To access the Restaurant Pre-Settle report filter, click Reports on the menu bar. Click
the Restaurant option. Click the Restaurant Pre-Settle option.
In the Report Filters area you can select the Server ID:, the Card #:, the Ticket #:, and
the Merchant #:. Click the OK button to view/print/save the report.
117
Restaurant Detail
This report shows a line-by-line report of transactions and gratuity amounts for those
transactions. The transactions are separated by Server ID. This report allows filtering by
date, card, and other information.
(
Note:
This report is only available when the business type of your processing
company's account is set to Restaurant.
To access the Restaurant Detail report filter, click Reports on the menu bar. Click the
Restaurant option. Click the Restaurant Detail option.
In the Report Filters area you can select the Start: & End: date, the Server ID:, the
Card #:, the User ID: that processed the transactions, the Ticket #:, the Card Type:, the
Status:, the Batch #:, the Amount:, and the Merchant #:. Click the OK button to
view/print/save the report.
118
Gift Card
The Gift Card report shows transactions that were performed using the Gift Card
Transaction window.
To access the Gift Card report filter, click Reports on the menu bar. Click the
Transactions option. Click the Gift Card option.
In the Report Filters area you can select the Start: & End: date, the Card #:, the User
ID: that processed the transactions, the Card Type:, the Status: of the transactions
processed, and the Amount:. Click the OK button to view/print/save the report.
119
Frequently Asked Questions
Question: Does PCCharge Pro/PS have to be on my actual network server?
Answer: No. PCCharge Pro/PS can be on any computer to which the Client can establish
a network connection. The Server must have the ability to connect to the processing
company and the ability to share the PCCharge Pro/PS folder to the Client locations.
Question: Will the Client work with the PCCharge Server operate over a Novell
network?
Answer: PCCharge Pro/PS and Client were designed to operate on a Windows 9X/NT
network. We have had some of our customers tell us they were able to get the
relationship to work on a Novell network, but our Technical Support Department cannot
support such an arrangement.
120