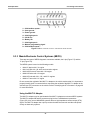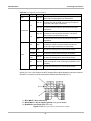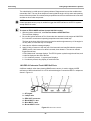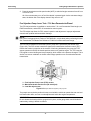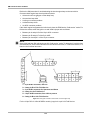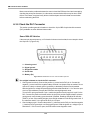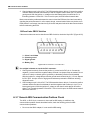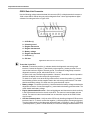
1
US Domestic Vehicle Communication Software Manual February 2011 EAZ0025B01H Rev. B Trademarks Acknowledgements Snap-on is a trademark of Snap-on Incorporated. All other marks are trademarks of their respective holders. Copyright Information ©2011 Snap-on Incorporated All rights reserved. Disclaimer The information, specifications and illustrations in this manual are based on the latest information available at the time of printing. Snap-on reserves the right to make changes at any time without notice. Visit our Web site at: http://diagnostics.snapon.com For Technical Assistance Call: 1-800-424-7226 ii Safety Information For your own safety and the safety of others, and to prevent damage to the equipment and vehicles upon which it is used, it is important that the accompanying Safety Information be read and understood by all persons operating, or coming into contact with, the equipment. We suggest you store a copy near the unit in sight of the operator This product is intended for use by properly trained and skilled professional automotive technicians. The safety messages presented throughout this manual are reminders to the operator to exercise extreme care when using this test instrument. There are many variations in procedures, techniques, tools, and parts for servicing vehicles, as well as in the skill of the individual doing the work. Because of the vast number of test applications and variations in the products that can be tested with this instrument, we cannot possibly anticipate or provide advice or safety messages to cover every situation. It is the automotive technician’s responsibility to be knowledgeable of the system being tested. It is essential to use proper service methods and test procedures. It is important to perform tests in an appropriate and acceptable manner that does not endanger your safety, the safety of others in the work area, the equipment being used, or the vehicle being tested. It is assumed that the operator has a thorough understanding of vehicle systems before using this product. Understanding of these system principles and operating theories is necessary for competent, safe and accurate use of this instrument. Before using the equipment, always refer to and follow the safety messages and applicable test procedures provided by the manufacturer of the vehicle or equipment being tested. Use the equipment only as described in this manual. Read, understand and follow all safety messages and instructions in this manual, the accompanying safety manual, and on the test equipment. Safety Message Conventions Safety messages are provided to help prevent personal injury and equipment damage. All safety messages are introduced by a signal word indicating the hazard level. ! DANGER Indicates an imminently hazardous situation which, if not avoided, will result in death or serious injury to the operator or to bystanders. ! WARNING Indicates a potentially hazardous situation which, if not avoided, could result in death or serious injury to the operator or to bystanders. ! CAUTION Indicates a potentially hazardous situation which, if not avoided, may result in moderate or minor injury to the operator or to bystanders. iii Safety Information Important Safety Instructions Safety messages contain three different type styles. • Normal type states the hazard. • Bold type states how to avoid the hazard. • Italic type states the possible consequences of not avoiding the hazard. An icon, when present, gives a graphical description of the potential hazard. Example: ! WARNING Risk of unexpected vehicle movement. • Block drive wheels before performing a test with engine running. A moving vehicle can cause injury. Important Safety Instructions For a complete list of safety messages, refer to the accompanying safety manual. SAVE THESE INSTRUCTIONS iv Table of Contents Safety Information ..................................................................................................................... iii Table of Contents........................................................................................................................ v Chapter 1: Using This Manual ................................................................................................... 1 Conventions.................................................................................................................................. 1 Bold Text ................................................................................................................................ 1 Terminology ........................................................................................................................... 1 Notes and Important Messages.................................................................................................... 2 Notes...................................................................................................................................... 2 Important ................................................................................................................................ 2 Chapter 2: Introduction.............................................................................................................. 3 Chapter 3: Chrysler Operations ................................................................................................ 4 Identifying a Vehicle ..................................................................................................................... 4 Manual Identification .............................................................................................................. 5 Automatic Identification .......................................................................................................... 5 Selecting a System....................................................................................................................... 6 Connecting to the Vehicle............................................................................................................. 6 Chrysler Vehicles Without Self-diagnostic Capability ................................................................... 9 Chapter 4: Chrysler Testing .................................................................................................... 10 Testing Engine Systems............................................................................................................. 10 Control System Summary .................................................................................................... 10 Functional Tests—1988 and Earlier, 1989 Turbo II ............................................................. 11 Functional Tests—1989 and Later ....................................................................................... 18 Codes and Data Selections ................................................................................................. 20 Memory Resets .................................................................................................................... 22 System Tests ....................................................................................................................... 24 Testing Body and Transmission Systems .................................................................................. 27 Bus Communication System Modules ................................................................................. 27 ATM Tests............................................................................................................................ 28 Functional Tests................................................................................................................... 29 Codes and Data ................................................................................................................... 31 Testing ABS Systems................................................................................................................. 33 ABS Control Systems .......................................................................................................... 34 Chrysler ABS Tests Available .............................................................................................. 34 Codes and Data ................................................................................................................... 34 Functional Tests................................................................................................................... 35 ATM Tests—Teves Systems................................................................................................ 37 Chapter 5: Ford Operations..................................................................................................... 40 Identifying a Vehicle ................................................................................................................... 40 Identifying a 1980 EEC-III System ....................................................................................... 41 v Table of Contents Selecting a System..................................................................................................................... 41 Connecting to the Vehicle........................................................................................................... 41 Using the MULTI-1 Test Adapter ......................................................................................... 43 MCU EEC-IV and EEC-V Systems ...................................................................................... 44 Mazda Electronic Control Systems (MECS) ........................................................................ 47 Integrated Vehicle Speed Control (IVSC) ............................................................................ 49 ARC and ASARC ................................................................................................................. 50 4-Speed Electronic Automatic Transmission (4EAT) ........................................................... 50 Rear Antilock Brake System (RABS) ................................................................................... 52 Ford Vehicles Without Self-Diagnostic Capability ...................................................................... 53 Chapter 6: Ford Testing ........................................................................................................... 54 Testing Engine & Powertrain Systems ....................................................................................... 55 Codes Menu......................................................................................................................... 55 EEC-IV Functional Tests...................................................................................................... 63 Non-Powerstroke Diesel 7.3L Functional Tests ................................................................... 69 EEC-V Functional Tests (OBD II)......................................................................................... 73 Powerstroke Diesel Functional Tests................................................................................... 78 Data Display......................................................................................................................... 82 Testing ABS Systems................................................................................................................. 83 1994–96 Econoline Vans with 4WABS ................................................................................ 83 Codes Menu......................................................................................................................... 84 Data Display......................................................................................................................... 87 ABS Systems Without Serial Data ....................................................................................... 87 ABS Functional Tests .......................................................................................................... 90 Air Suspension and Automatic Ride Control Systems................................................................ 91 Air Suspension (EVO) and Automatic Ride Control Systems (ASARC) .............................. 92 Super Star II Emulation Mode .............................................................................................. 92 Rear Air Suspension (RAS), Electronic Variable Orifice (EVO) ........................................... 93 Air Suspension Automatic Ride Control (ASARC) Dual Action Electronic Strut Control for 1988 to 1994 Lincoln Continental ........................................................................................ 96 Testing Optional Body Systems ............................................................................................... 103 GEM, CTM, FEM, and REM Body Systems....................................................................... 104 ICM, HEC, and VIC Body Systems .................................................................................... 105 Tire Pressure Monitor (TPM) and Low Tire Warning (LTW) Systems................................ 105 Anti-theft (PATS) Systems ................................................................................................. 106 Optional Body Systems (DDM, DSM, EATC, LCM, NAV, OCS, PAM, PRB, PSDM) ........ 108 Testing 4X4/Transfer Case Systems........................................................................................ 109 Testing Airbag Systems............................................................................................................ 110 Super Star II Emulation Mode .................................................................................................. 110 Super Star II Controls and Indicators ................................................................................. 110 Basic Super Star II Operation ............................................................................................ 111 Testing 4EAT Systems ............................................................................................................. 112 Gathering Codes—1991–95 Escort and Tracer................................................................. 113 Testing Integrated Vehicle Speed Control (IVSC) .................................................................... 114 Diagnostic Procedures ....................................................................................................... 115 Chapter 7: GM Operations ..................................................................................................... 117 Identifying a Vehicle ................................................................................................................. 117 vi Table of Contents Selecting a System................................................................................................................... 118 Selecting Systems ............................................................................................................. 118 Connecting to the Vehicle......................................................................................................... 119 GM Vehicles with Partial or No Self-Diagnostic Capability....................................................... 122 Chapter 8: GM Testing ........................................................................................................... 123 Testing Control Systems .......................................................................................................... 123 Scan Tool Communication ................................................................................................. 123 Codes and Data Selections ............................................................................................... 124 Functional Tests—1995 and Earlier................................................................................... 130 Functional Tests—1996 and Later ..................................................................................... 134 Clear Codes ....................................................................................................................... 139 Testing ABS Systems............................................................................................................... 139 ABS Codes and Data ......................................................................................................... 140 Bosch 2 Codes and Data—1990–97 ................................................................................. 148 Bosch and Delco Bosch 5.0/5.3 Codes and Data—1995–2004 ........................................ 149 Delco-Moraine III Codes and Data—1988–91 ................................................................... 149 Delco-Moraine VI Codes and Data—1991–2001............................................................... 150 VCM 4WAL Codes and Data—1994–97............................................................................ 151 4WAL Codes and Data—1990 and Later .......................................................................... 151 Rear-Wheel Antilock (RWAL) Brakes ................................................................................ 151 Rear-Wheel Antilock (RWAL) Codes and Data—Some 1993–95...................................... 152 Teves II ABS Codes and Data—1986–91 ......................................................................... 152 Teves IV ABS Codes and Data—1990–99 ........................................................................ 154 Delphi Brake Controller 7 (DBC 7) Codes and Data—1999–2004 .................................... 154 Display ABS Codes—RWAL & Teves II............................................................................. 155 Read This First (Instructions) ............................................................................................. 156 Chapter 9: Jeep Operations................................................................................................... 157 Identifying a Vehicle ................................................................................................................. 157 Manual Vehicle Identification ............................................................................................. 157 Automatic Identification ...................................................................................................... 158 Transmission System Identification.................................................................................... 158 Selecting a System................................................................................................................... 159 Connecting to the Vehicle......................................................................................................... 159 Jeep Vehicles Without Self-Diagnostic Capability .................................................................... 162 Chapter 10: Jeep Testing....................................................................................................... 163 Testing Engine Systems........................................................................................................... 163 Functional Tests................................................................................................................. 163 System Tests ..................................................................................................................... 165 Codes and Data Selections ............................................................................................... 167 Data (No Codes) ................................................................................................................ 168 Memory Resets .................................................................................................................. 168 Testing Transmission Systems................................................................................................. 169 Codes and Data ................................................................................................................. 169 Testing Body Systems.............................................................................................................. 170 ATM Tests.......................................................................................................................... 170 Codes and Data ................................................................................................................. 170 Testing ABS Systems............................................................................................................... 170 vii Table of Contents ABS Control Systems ........................................................................................................ 170 Teves Functional Tests ...................................................................................................... 171 Codes and Data ................................................................................................................. 173 Chapter 11: Parameters Overview ........................................................................................ 175 Chapter 12: Chrysler and Jeep Data Parameters ................................................................ 176 Engine Parameters................................................................................................................... 192 Transmission Parameters......................................................................................................... 229 Body Parameters...................................................................................................................... 238 Antilock Brake System (ABS) Parameters ............................................................................... 245 Chapter 13: Ford Data Parameters ....................................................................................... 252 Alphabetical Parameter List...................................................................................................... 252 4x4 Parameters ........................................................................................................................ 281 Powertrain Control Module (PCM) Parameters ........................................................................ 285 Airbag Parameters.................................................................................................................... 349 Antilock Brake Parameters ....................................................................................................... 350 Passive Antitheft System (PATS) Parameters ......................................................................... 364 Generic Electronic Module (GEM) Parameters ........................................................................ 366 Transmission Control Module Parameters ............................................................................... 374 Tire Pressure Monitor (TPM) Parameters ................................................................................ 386 Chapter 14: GM Data Parameters.......................................................................................... 390 Alphabetical Parameter List...................................................................................................... 390 Engine Parameters................................................................................................................... 435 Instrument Panel Cluster (IPC) Parameters ............................................................................. 541 Transmission and Transfer Case Parameters.......................................................................... 542 Airbag Parameters.................................................................................................................... 592 Antilock Brake System Parameters .......................................................................................... 599 Body Control Module (BCM) Parameters ................................................................................. 627 Tire Pressure Monitor and Tire Inflation Monitor Parameters................................................... 641 Vehicle Theft Deterrent (VTD) Parameters .............................................................................. 645 Appendix A: Troubleshooting .........................................................................................646 Chrysler Communications Problems ........................................................................................ 646 Common Vehicle Problems................................................................................................ 646 Does Not Perform Tests..................................................................................................... 649 Testing the Engine Diagnostic Connector.......................................................................... 649 Bus Communication Problems........................................................................................... 650 Testing the CCD Diagnostic Connector ............................................................................. 652 Testing the 16-pin Data Link Connector (DLC) .................................................................. 653 Identifying 1987 Models that use 1986 Logic Modules ...................................................... 654 Ford Communications Problems .............................................................................................. 655 Common Symptoms........................................................................................................... 655 Checklist, Check These Points First .................................................................................. 655 Ford Troubleshooting Sequence........................................................................................ 656 EEC-III Systems................................................................................................................. 657 EEC-IV and MCU Systems ................................................................................................ 659 EEC-IV DCL and EEC-V Systems ..................................................................................... 663 viii Table of Contents ABS System Does Not Transmit Codes............................................................................. 667 GM Communications Problems................................................................................................ 668 Common Communication Problems .................................................................................. 669 Common No Communication Symptoms ........................................................................... 670 Check Scan Tool Connection and Operation..................................................................... 671 Check the Check Engine Lamp (Except OBD-II) ............................................................... 671 Check the ALDL Connector ............................................................................................... 674 Check the DLC Connector ................................................................................................. 676 General ABS Communication Problem Check................................................................... 677 Special Cases—Specific Vehicles ..................................................................................... 678 Jeep Communications Problems.............................................................................................. 679 No Communication ............................................................................................................ 679 Check Scan Tool Operation ............................................................................................... 680 Engine Runs but Does Not Perform Tests ......................................................................... 680 Scan Tool Does Not Operate ............................................................................................. 680 Engine Does Not Start or Perform Tests............................................................................ 680 Check the Check Engine Lamp ......................................................................................... 681 Testing the Diagnostic Connector ...................................................................................... 682 Jeep Bus Communication Problems .................................................................................. 687 Glossary .................................................................................................................................. 689 Index ........................................................................................................................................ 705 ix Chapter 1 Using This Manual This manual contains instructions for testing BMW vehicles. Some of the Illustrations shown in this manual may contain modules and optional equipment that are not included on your system. Contact a Snap-on Sales Representative for availability of other modules and optional equipment. 1.1 Conventions This manual uses the conventions described below. 1.1.1 Bold Text Bold text is used for emphasis and to highlight selectable items such as buttons and menu options. Example: • Select OK to continue. 1.1.2 Terminology Certain terms are used to command specific actions throughout this manual. Those terms are described below. Select The term “select” means to highlight a menu item or other option, then pressing the Y/a, OK, Accept, or similar button to activate it. Example: • Select Functional Tests. Scroll The term “scroll” means moving the cursor or changing data by using the directional arrow buttons, scroll bars, or other means. Example: • Scroll to see any other codes and the data list. 1 Using This Manual Notes and Important Messages Scan Tool The term “scan tool” will be used to refer to any tool that communicates directly with the vehicle data stream. When necessary, the term “Scanner” is used to distinguish Snap-on equipment from another diagnostic device, such as the BMW factory scan tool. 1.2 Notes and Important Messages The following messages appear throughout this manual. 1.2.1 Notes A NOTE provides helpful information such as explanations, tips, and comments. Example: i NOTE: For additional information refer to... 1.2.2 Important IMPORTANT indicates a situation which, if not avoided, may result in damage to the test equipment or vehicle. Example: IMPORTANT: To avoid incorrect TPS adjustment or component damage, be sure to follow the on-screen instructions. Refer to a vehicle service manual for complete test or adjustment procedures. 2 Chapter 2 Introduction The US Domestic Vehicle Communication Software (VCS) allows your scan tool to test multiple vehicle systems: engine, transmission, ABS and SRS. The functional and component tests offered by the software allow for simplified diagnostics and troubleshooting. The US Domestic VCS establishes a data link between the scan tool and the electronic control systems of the vehicle being serviced. This data link allows you to view diagnostic trouble codes (DTCs), serial data and freeze-frame information available from the electronic control module (ECM). On models with bi-directional communication, the VCS also lets you perform certain system and component tests and provides the ability to switch off the malfunction indicator lamp (MIL) after repairs are made. The amount and type of information and tests available with the US Domestic VCS varies by the year, make, model and equipment options of the test vehicle. With the software you can: interpret electronic control module trouble codes, read input and output signals, perform tests on OBD-II vehicles, test specific systems and components, check the operation of certain actuators (solenoids, valves, and relays), customize your scan tool function, and record and view data movies. Manufacturer specific sections feature detailed locations of hard to find connectors and information on manual code reading. This manual also includes chapters on manufacturer specific data parameters and scan tool specific troubleshooting advice. The first two chapters of this manual overview safety and usage conventions. The remainder of this manual is divided into the following chapters: • Chapters 3 and 4 offer testing information and procedures for various Chrysler control systems. • Chapters 5 and 6 offer testing information and procedures for various Ford control systems. • Chapters 7 and 8 offer testing information and procedures for various General Motors control systems. • Chapters 9 and 10 offer testing information and procedures for various Jeep control systems. • Chapters 11–14 provide data parameter definitions. • Appendix A offers advice for troubleshooting scan tool-to-vehicle communication and other issues. • Glossary of Terms lists terms and acronyms used in this manual and in US Domestic manufacturer’s literature. 3 Chapter 3 Chrysler Operations This chapter explains how to begin the scan tool’s basic setup and test functions. This information is specific to Chrysler vehicles. For general scan tool functionality, refer to the user manual for your diagnostic tool. For additional information on Chrysler vehicles, see the following sections: • Chrysler Testing, on page 10 • Chrysler and Jeep Data Parameters, on page 176 • Chrysler Communications Problems, on page 646 Figure 3-1 Basic Chrysler test routine 3.1 Identifying a Vehicle Vehicles are identified by entering specific vehicle identification number (VIN) characters into the Scanner module. Refer to the Scanner User Manual for instructions on Identifying a vehicle. Many late-model vehicles have an automatic vehicle identification (ID) function that identifies the test vehicle based on information transmitted on the serial data stream. For others, the vehicle must be manually identified by entering specific vehicle identification number (VIN) characters into the scan tool. 4 Chrysler Operations Identifying a Vehicle 3.1.1 Manual Identification You must manually enter the vehicle ID for all 1995 and earlier vehicles. You may also manually identify automatic ID systems. Note the following when manually identifying Chrysler vehicles: • Because of midyear manufacturing changes in engine computer systems, you should always enter a new identification when you test a different vehicle, even when two vehicles are the same year, model, and have the same engine and accessories. • Models with Mitsubishi-built engines must be identified as an Asian Import. • The following models were built using 1986 logic modules: – Some 1987 Sundance and Shadow (P-body) models with turbocharged engines – Some 1987 Omni, Horizon, and Charger (L-body) Vehicle identification for these models should be entered into the scan tool as 1986 models (10th VIN character G for 1986, instead of H for 1987). A 1986 logic module can be identified by the MAP sensor mounted on the module case. The 1987 logic modules use MAP sensors mounted in the engine compartment. • To test Jeep vehicles with the US Domestic software: – 1990 and later—select Chrysler from the manufacturer selection menu – 1989 and earlier—select Jeep from the manufacturer selection menu • Many 1983 and later Chrysler imports, except Maserati TC, are tested with the Asian Import software. The US Domestic software does not test these vehicles, which often have “Diamond Star” imprinted on the body label attached to the firewall. The vehicle ID process begins from the Software Confirmation message, which requires a response to continue. 3.1.2 Automatic Identification Automatic ID is available on most 1996 and later models. z To automatically identify a vehicle: 1. Attach the test adapter to the data cable. 2. Connect the adapter to the vehicle. 3. Turn the ignition switch on. 4. Select Domestic > Chrysler 5. Select the year (10th VIN character) and follow the additional screen requests. The scan tool automatically identifies the vehicle and control module, then displays a vehicle ID confirmation screen. 6. Verify the displayed information and follow the screen prompts to continue. 5 Chrysler Operations Selecting a System 3.2 Selecting a System Four control systems are generally available from the System Selection menu (Table 3-1). Table 3-1 Chrysler control system tests Control System Tests Available Description Engine Codes & Data Functional tests System tests Engine system tests include all available engine control tests from 1983 to the current model year. Transmission Codes & Data Functional tests Transmission functional tests include test programs for the following: Transmissions: 42RE, 44RE, 45RFE, 46RE, 47RE Transaxles: A604, 41TE, 42LE Codes & Data Actuator test mode (ATM) tests Body system tests include: Body computer Driver information systems Electronic ride control Electronic and mechanical instrument cluster tests Codes & Data Functional tests ABS functional tests include antilock brake tests on 1990–2006 vehicles with the following ABS control systems: Bendix 4, ABX-4, 6, or 10 Kelsey-Hayes Teves Body ABS Selecting any one of these systems may cause additional vehicle identification menus to display. For instance, select Engine and a Vehicle Options menu displays. This menu describes whether the vehicle has an automatic or standard transmission, and if it has air conditioning. Other menus are similar and all require a selection. 3.3 Connecting to the Vehicle Once a vehicle has been identified and a system has been selected, a scan tool connection message instructs you to use the vehicle test adapters supplied to connect the scan tool for testing. Follow the screen instructions to connect the scan tool to the vehicle. Each test adapter plugs into a specific vehicle diagnostic connector and attaches to one end of the data cable. The other end of the data cable attaches to the scan tool. The following adapters are available to test Chrysler vehicles: • CHRY-1—engine test adapter (except LH cars) • CHRY-2—body, ABS, transmission, and LH-car engine test adapter • MITSU-1—Mitsubishi engine and transmission test adapter (used for Avenger, Sebring, and Talon models) • OBD-II—16-pin adapter for vehicles with the 16-pin OBD-II connector 6 Chrysler Operations Connecting to the Vehicle – The K-7 Personality Key™ must be installed into the OBD-II adapter when used with MITSU-1 for the Avenger, Sebring, and Talon. – The K-13 or K-25 Personality Key™ must be installed for all other Chrysler applications – The K-25 Personality Key™ must be installed with the CAN-1B adapter for CAN vehicles. Figure 3-2 CHRY-1 adapter Figure 3-3 CHRY-2 adapter Figure 3-4 MITSU-1 adapter Figure 3-5 OBD-II adapter Figure 3-6 CAN-1B adapter The CHRY-1 test adapter has a socket for connecting the battery power or cigarette lighter power cables. A power cable is not required with the CHRY-2 and the OBD-II test adapters. Table 3-2 on page 9 contains connector locations for Chrysler vehicles. For 1995 and earlier models, diagnostic connectors can be found in one of two places: • Under the instrument panel (except LH models, Figure 3-7) • Under the steering wheel (LH models only, Figure 3-8) 7 Chrysler Operations Connecting to the Vehicle Figure 3-7 1995 and earlier diagnostic connector under the instrument panel (except LH models) Figure 3-8 1995 and earlier diagnostic connector under the steering wheel (LH models only) Figure 3-9 1995 and earlier diagnostic connector (except LH models) Figure 3-10 16-pin connector and the OBD-II adapter with Personality Key™ device z To connect the scan tool to the test vehicle: 1. Be sure the ignition switch is off. 2. Follow the on-screen instructions and connect the scan tool data cable to the test vehicle. 8 Chrysler Operations Chrysler Vehicles Without Self-diagnostic Capability a. Select the proper test adapter and attach it to the data cable. b. Connect the other end of the data cable to the scan tool data port. c. Connect the test adapter to the vehicle. Test adapters fit into the connectors only one way. Be sure the connector is installed securely. 3. Switch the ignition on. 4. Select to continue. The main menu for the selected system displays when the scan tool establishes communication with the vehicle data stream. 3.4 Chrysler Vehicles Without Self-diagnostic Capability The Chrysler vehicles listed below either do not have electronic engine control systems or they have control systems without self-diagnostics capabilities. Table 3-2 Chrysler vehicles without self-diagnostics capability Year pre–1983 Models All models 1983–84 All carbureted engines 1985–87 2.6L, 4-cylinder carbureted engine with Mitsubishi control system (VIN code G) 1988 5.9L carbureted (VIN code W) 1983–91 All rear-wheel-drive passenger cars (with V8 or 6-cylinder engine) 1983–91 All diesel-powered vehicles pre–1992 All Eagle and AMC-Renault models, except 1984–88 4.2L Eagle 9 Chapter 4 Chrysler Testing This chapter provides information and procedures for using the scan tool with these systems: • Engine • Body and Transmission • ABS For additional information on Chrysler vehicles, see the following sections: • Chrysler Operations, on page 4 • Chrysler and Jeep Data Parameters, on page 176 • Chrysler Communications Problems, on page 646 4.1 Testing Engine Systems The following sections contain scan tool testing information for Chrysler engine systems. 4.1.1 Control System Summary This section contains a brief summary of the engine control system variations used on Chrysler carbureted and fuel-injected engines from 1983 to the present. Carbureted Engines Chrysler domestic-built, 4-cylinder engines used in 1985–87 cars and 1985–88 trucks, as well as 1985–88 V6 and V8 truck engines with carburetors, have diagnostic capabilities. Carbureted 6-cylinder and V8 engines in rear-wheel drive cars do not. Carbureted engines use a spark control computer (SCC) and diagnostic capabilities are limited to sensor, switch, and actuator tests. Scan tool communication, or serial data, is not available on these engines. Carbureted engines are placed in the diagnostic mode by blocking the carburetor idle switch open. Vehicles with carbureted engines do not have a malfunction indicator lamp (MIL). Fuel-Injected Engines All Chrysler fuel-injected engines provide access to computer data in the Codes and Data mode (“Codes and Data Selections” on page 20). Most 1988 and earlier systems must be placed in the diagnostic mode for sensor, switch, and actuator tests by cycling the ignition on-off-on-off-on. Most 1989 and later systems do not require the on-off-on-off-on cycle to enter diagnostic mode. 10 Chrysler Testing Testing Engine Systems Logic and Power Modules The engine control system computer on most Chrysler fuel-injected engines built from mid-1983 through late 1987 is divided into two separate modules: the logic module and the power module. • The logic module contains the system programs. It receives all sensor signals and processes all information used to control the system actuators. • The power module controls the high-current actuators, such as the ignition coil, the fuel injectors, and the auto shutdown relay. SMEC, SBEC, and JTEC In late 1987, Chrysler introduced the single-module engine controller (SMEC), which combines the logic and the power modules in a single assembly. The single-board engine controller (SBEC I), which was introduced in 1989, combines all logic and power functions onto a single circuit board. The updated SBEC II is used on 1991–95 models. The SBEC III computer (OBD-II-compliant) is used on vehicles manufactured since mid-1995. In 1996, Chrysler introduced the Jeep/Truck Engine Controller (JTEC) on trucks, which is also OBD-II compliant. NGC Starting in 2002, both SBEC and JTEC controllers began to be replaced by the Next Generation Controller (NGC). The NGC combines the PCM and the TCM into a single unit and can be identified by the four 32-pin connectors on vehicles with automatic transmission, or by the three 32-pin connectors and an empty cavity on vehicles with manual transmission. 4.1.2 Functional Tests—1988 and Earlier, 1989 Turbo II i NOTE: Operations described in this section are not available on all tool platforms. The Functional Tests menu shows only the tests available for the identified vehicle. The Functional Tests menu selections for most 1983½ through 1988 and 1989 Turbo II are discussed in the following sections: • • • • • Engine Off Tests, on page 11 Engine Running Functional Tests, on page 15 Read IGN(+) at DLC, on page 16 CDR Tester, on page 16 Fuel Pressure Test, on page 17 Engine Off Tests Selecting Engine Off Tests accesses a series of diagnostic tests from Chrysler service manuals. The Engine Off tests follow this general order: 11 Chrysler Testing Testing Engine Systems 1. A review of fault codes from the PCM. 2. A group of switch tests to check driver-controlled switch operation. 3. An actuator test mode (ATM) to check the operation of actuators, such as fuel injectors, the engine cooling fan and relay, and others. 4. A group of tests to check the operation of sensors, such as the oxygen sensor and the throttle position sensor. z To conduct Engine Off tests: 1. Select Engine Off Tests. A test activation screen, which explains how to activate the test, displays. 2. Cycle the ignition switch as instructed to begin the tests. Tests are performed in a programmed sequence. 3. Select a test to initiate it. Fault Codes If there are any codes are present, they display in numerical order between 88 and 55. • 88 signals the start of the fault code display. • 55 signals the end of the code display. DTCs may be classified as either “hard” or “soft” codes. Some control modules indicate if a code is hard or soft on the screen, but many do not. • Hard codes indicate a problem that exists at the time of testing. • Soft codes indicate a problem that occurred in the past but is not present now. These may also be referred to as “history” codes, “continuous memory” codes, or another name. z To distinguish between hard and soft codes: 1. Clear the PCM memory and reenter Codes and Data. 2. Watch for codes to reappear: – A hard code reappears quickly, from immediately to a couple of minutes. – A soft code does not reappear until the problem that caused it reoccurs. z To view fault codes: • Turn the ignition key on and off three times within five seconds and leave it on. If codes are not present, a message showing the start of faults code (88) and the end of faults code (55) with nothing in between displays. If codes are present, a list of codes displays in numerically ascending order. Switch Tests Switch tests are available from the fault codes display. 12 Chrysler Testing Testing Engine Systems IMPORTANT: Keep hands and equipment test leads away from the electric cooling fan and other engine components during the switch tests. The fan and other actuators may operate without warning. z To conduct a switch test: 1. Press Y after fault codes display. The Switch Test screen displays. The specific switches on the vehicle are listed on the second and third lines of the display. 2. Actuate any of the switches listed in the display to check its operation. As the switch position changes, the fourth line indicates either 88 for on or 00 for off. These are Chrysler change of state symbols. 3. Press Y to open the Engine Off Functional Tests Menu. See the following sections for descriptions of engine off functional tests. Review Codes When fault codes are displayed at the beginning of the engine off tests, the scan tool records them in memory. Selecting Review Codes displays the complete code list in memory without waiting for the PCM to transmit a new list. Clear Codes Selecting Clear Codes erases codes from the vehicle PCM, not from scan tool memory. The code list stays in the tool memory until the fault code display operation is repeated. The clear codes operation is the same as that described in “Clear Codes” on page 22. Print Codes Selecting Print Codes prints the list of fault codes stored in scan tool memory. See the user’s manual for your diagnostic tool for printer setup details. ATM Tests Selecting ATM Tests initiates actuator test mode (ATM), which is used to check the operation of system actuators. The ignition must be on and the engine must be off to begin the ATM tests. For 1983–88 vehicles, except 1983–84 EFI and turbo models, the PCM stays in the last ATM selection made until the ignition is switched off or the test time limit expires. Keep hands and equipment test leads away from the electric cooling fan and other engine components during the ATM tests. The fan and other actuators may operate without warning. z To stop the actuation: • Either switch off the ignition or select another test. For 1989 vehicles, the ATM test stops as each individual test is exited. 13 Chrysler Testing z Testing Engine Systems To conduct ATM tests for 1983–84 EFI and Turbo: 1. Select ATM Tests. A screen that explains how the test works displays. 2. Select to start the test. The ignition coil, automatic idle speed (AIS) motor, and injectors cycle on and off until Y is pressed again to stop the cycle. 3. Exit to return to the ATM Test Menu. z To conduct an ATM test for all other vehicles: 1. Select ATM Tests. The ATM test menu displays. The following choices are typically available: – – – – – – – – – – – 01 Ignition Coil 02 Fuel Injectors 03 Automatic Idle Speed (AIS) Motor 04 Radiator Fan Relay 05 A/C WOT Cutout Relay 06 Shutdown Relay 07 Canister Purge Solenoid 08 Shift Indicator Light 09 Alternator Field 10 Auto Trans Lockup Solenoid 11 EGR Solenoid 2. Select the desired test. The ATM number and the name of the actuator display on the top line. 3. Select to end the test and proceed to the next test in the sequence. Sensor Tests Selecting Sensor Tests checks the operation of individual sensors with the engine off. i NOTE: Sensor tests are not available on 1983–85 models with limited ATM tests. Values displayed in these sensor tests are the actual sensor signals. They are not default values used by the PCM in the case of sensor failure. z To conduct sensor tests: 1. Turn the ignition on with the engine off. 2. Select Sensor Tests. A menu of individual tests displays. Selections vary for different vehicles, but the menu for a fuel-injected engine typically includes the following: 14 Chrysler Testing Testing Engine Systems – – – – – – – – 01 Battery Temp Sensor (Volts) 02 Oxygen Sensor (Volts) 03 Charge Temp Sensor (Volts) 04 Coolant Temp Sensor (Volts) 05 Throttle Position (Volts) 06 Battery Voltage (Volts) 07 MAP Sensor (Volts) 08 Speed Control Switches 3. Select the desired test. The selected sensor test number and the name of the sensor display on the top line. The measured value of the input signal from the sensor to the PCM display at the right. The input signal displays as voltage, temperature, or another value. 4. Select to end the test and proceed to the next test in sequence. Engine Running Functional Tests i NOTE: Operations described in this section are not available on all tool platforms. Selecting Running Tests checks the operation of the AIS motor and the sensors. i NOTE: These functional tests are not available on 1983–85 models with limited ATM tests. During engine running tests, the scan tool LEDs are activated to indicate two engine-operating conditions: • LED 1 turns on when exhaust oxygen content is rich and off when the exhaust is lean. • LED 3 flashes when engine pinging is detected by the knock sensor. z To conduct engine running functional tests: 1. Select Running Tests. 2. Switch the ignition off, then start the engine. 3. Select to continue. The Engine Running Functional Tests Menu displays. Two choices are available from the menu: • AIS Motor Test (Increase Idle Speed) • Continue To Sensor Test Menu AIS Motor Test Selecting AIS Motor Test checks the operation of the automatic idle speed (AIS) motor. The test allows you to switch engine speed between idle and 1500 rpm. 15 Chrysler Testing Testing Engine Systems Sensor Tests Selecting opens a menu of engine running sensor tests, which operate the same as those previously described for engine off sensor tests (see “Sensor Tests” on page 16). Selections vary for different vehicles, but all menus are similar. As in Codes and Data, the values displayed in these tests may be default values used by the PCM in case of sensor failure. z To conduct engine running sensor tests: 1. Select Continue To Sensor Test Menu. A menu of individual tests displays. 2. Select the desired test. A value for the selected test displays. Read IGN(+) at DLC The Read IGN(+) AT DLC selection from the Functional Tests menu displays the ignition supply circuit to the power module. It runs from the battery, through the ignition switch, to the power module or to the SMEC or SBEC connector. When selected, the supply, or battery, voltage at the diagnostic connector displays, which should be the same, or close to, vehicle battery voltage. Use this test to check for the following: • • • • A faulty ignition switch Bad connections Open fusible links Other problems in the voltage supply to the engine control system CDR Tester The CDR tester mode is designed for a technician familiar with Chrysler Diagnostic Readout (CDR) test equipment. In this mode, the scan tool operates exactly like a CDR Tester or a diagnostic readout box (DRB). In CDR mode, the 2-digit readout provided by the Chrysler tester is shown at the right of the “Display” field on the screen. Typical “Display” readouts include: • 88 = start of codes or switch change of state • 55 = end of codes • 00 = switch change of state Other numbers shown may be a fault code number, an ATM or switch test number, or a PCM data reading for a switch, sensor, or actuator. Refer to Chrysler service manuals for specific readout meanings and CDR test procedures. 16 Chrysler Testing z Testing Engine Systems To use CDR Tester mode: 1. Select CDR Tester. The CDR Tester screen displays. 2. Scroll to either Hold, ATM, or ATM+Hold. The Y button acts as the equivalent button on the Chrysler tester. Selecting ATM+Hold works as both buttons simultaneously. 3. Press Y to switch the selected function between On and Off. Fuel Pressure Test Selecting Fuel Pressure Test from the Functional Tests menu energizes the auto shutdown (ASD) relay to operate the electric fuel pump and pressurize the fuel rail or throttle body, which allows you to check fuel system pressure. Fuel pressure is limited to the relief pressure of the fuel pressure regulator. A regulator holds a specified pressure for a certain time. If previous tests were performed, the PCM may be in the self-diagnostic mode, which is activated by turning the ignition key on-off-on-off-on. If so, the PCM cycles through ATM tests in the background during the fuel pressure test. This does not affect test results or PCM operation. i NOTE: To avoid unnecessary actuator operation, it is best to crank the engine briefly, then turn the ignition off before testing. z To conduct a fuel pressure test: 1. Select Fuel Pressure Test. A test activation screen displays. 2. Turn the ignition on with the engine off. 3. Select to energize the relay and operate the pump. The fuel pump operational status is shown on the bottom line. 4. Select to de-energize the relay. 5. Exit to return to the Functional Tests menu. 6. Connect a pressure gauge to the fuel rail or throttle body to read regulated pressure or to test for a leaking pressure regulator. Refer to a Chrysler service manual for specifications and procedures. If the fuel pump is activated for more than a few seconds, the PCM recognizes that the auto shutdown relay is not turning on and off as expected and sets fault code 42. This is a false code that may be disregarded under these circumstances. If in doubt, clear the codes from the PCM, then recheck for codes. If code 42 does not reappear, it was a false code resulting from the fuel pressure test. 17 Chrysler Testing Testing Engine Systems 4.1.3 Functional Tests—1989 and Later i NOTE: Operations described in this section are not available on all tool platforms. The Functional Tests menu for most 1989 and later vehicles, except Turbo II models, are different from the menu for 1988 and earlier models (see “Functional Tests—1988 and Earlier, 1989 Turbo II” on page 11). The Read IGN(+) at DLC and Fuel Pressure Test selections work the same as explained in “Read IGN(+) at DLC” on page 16 and “Fuel Pressure Test” on page 17. Other functional tests for 1989 and later vehicles are discussed in the following sections: • • • • i ATM Tests, on page 18 Module Info, on page 19 Minimum Airflow RPM, on page 20 Reset EMR Lamp, on page 20 NOTE: Do not operate the DIS ATM tests after operating the fuel injector ATM tests. Start and run the engine to remove any residual air-fuel charge before operating DIS ATM tests. Engine-Off and Engine-Running Tests The 1989 and later tests do not distinguish between engine-off and engine-running conditions. If a particular test cannot be performed with the engine either off or running, the scan tool either does not accept the test command or a lost communication message displays. If so, return to the test menu and make another selection, or either stop or start the engine for the selected test. ATM Tests The ATM Tests selection is similar to that previously discussed for 1988 and earlier models (see “ATM Tests” on page 13) and must be performed with the engine off. However, there are some additional tests available and some different functions. Only the differences are explained here. Test with the key on and engine off. The vehicle does not accept ATM test commands if the engine is running. The ATM Exit menu offers two choices that require a yes or no selection: • Exit ATM test mode and turn the actuator off. • Exit the ATM test mode and leave the actuator on. During troubleshooting, leaving the actuator on is useful when you want to exit an ATM test so the scan tool may be used to monitor related engine data parameters or check a signal. Making a selection returns you to the ATM test selection screen. Select a new ATM test to turn off an actuator that has been left on after exiting, or turn the ignition switch off. 18 Chrysler Testing Testing Engine Systems Direct Ignition System (DIS) ATM Tests This selection, available on some 1990 and later engines with direct (distributorless) ignition systems, fires each ignition coil. ! WARNING An active test may fire a spark plug in a cylinder that contains an air-fuel charge. This may cause a backfire through the throttle body or cause a vehicle with a manual transmission to lunge if the transmission is in gear and the parking brake is not set. ! CAUTION Do not operate the DIS ATM tests after operating the fuel injector ATM tests. Start and run the engine to remove any residual air-fuel charge before operating DIS ATM tests. AIS Motor Test Selecting AIS Motor Test runs a test that should be performed with the engine running. z To conduct an AIS motor test: 1. Select AIS Motor Test. The AIS Motor Test screen displays. 2. Scroll to obtain the desired RPM. As you scroll, the PCM commands the AIS motor to extend and retract. Module Info Selecting Module Info checks automatic vehicle ID at any time when testing a 1989 or later model. More importantly, it is used to double-check and verify a manually entered ID. z To check the test vehicle ID: 1. Select Module Info. A gathering information screen briefly displays, followed by one of two module information screens. If the module information check matches that of the vehicle ID already entered in the scan tool, the module information displays. If the module information check does not match the vehicle ID entered in the scan tool, an “ID Mismatch” message appears on the bottom line. A selection is required to continue. 2. When a mismatch displays, press Y to overwrite the previous identification in memory and store the new, correct identification, or press N to ignore the new identification and continue to operate with the previously entered identification. 19 Chrysler Testing Testing Engine Systems Minimum Airflow RPM Selecting Min Airflow RPM runs a test that is available for most 1989 and later models. When selected, the AIS motor retracts to close the throttle and obtain the minimum idle speed, and the air-fuel mixture is enriched. Refer to the appropriate Chrysler service manual for model specific test procedures and specifications. Reset EMR Lamp Selecting Reset EMR Lamp resets the emission maintenance reminder (EMR) lamp on some 1989 and later vehicles which lights at approximately 60,000 miles to alert the driver that the vehicle should have emission-related services performed. The EMR lamp cannot be turned off manually; it must be reset through the PCM. The Reset EMR Lamp selection is on the Functional Tests menu for all 1989–94 vehicles and some 1995 and later vehicles, but some of these models do not have an EMR lamp on the instrument panel even though EMR memory exists in the PCM. The scan tool resets this memory, though there is no instrument panel lamp to be affected. z To reset the EMR lamp: 1. Switch the ignition on without starting the engine. 2. Select Reset EMR Lamp. A confirmation screen displays. 3. Select to reset the lamp. A “resetting EMR lamp” message briefly displays, then the message changes to indicate the EMR lamp is reset. 4. Exit to return to the Functional Tests menu. 5. If the ignition is off and the vehicle does not respond to the lamp reset request, a “no response” message displays. If so, return to the menu and repeat the operation. If the vehicle repeatedly transmits no response, refer to Chrysler test procedures to diagnose the problem. 4.1.4 Codes and Data Selections The Codes and Data selection on the Main Menu is available on all fuel-injected Chrysler vehicles. It is not available for carbureted engines. Because the scan tool does not affect PCM or engine operation, the vehicle can be driven in the Codes and Data mode. The Codes and Data selection for Chrysler vehicles opens a display of DTCs and ECM data on some models. On others, it opens the Codes and Data Menu that offers up to three choices: • Codes & Data • Secondary Indicators • 1 Trip Codes Each choice offers a different way of viewing PCM data. Codes and Data is most often used because it displays all data available on the PCM data stream, including any codes. 20 Chrysler Testing Testing Engine Systems Default Values—1988 and Earlier In the Codes and Data mode for 1988 and earlier vehicles, the scan tool displays the parameter values on which the PCM is operating. If certain sensors fail, the PCM substitutes a value from its own program for the faulty sensor signal. This is called a “default” value, and this is what the scan tool displays in Codes and Data. If any parameter value in the Codes and Data display appears to be different from what you expect, select Engine-Off Sensor Tests on the Functional Tests menu and compare the reading for the same sensor. In the Engine-off Sensor Test mode, the scan tool displays the actual sensor signal, not a default value. If the values for the same sensor are different in Codes and Data and the Engine-off Sensor Tests, the PCM is operating on a default value. Codes and Data Selecting Codes and Data displays the PCM data list and trouble codes. The top line of the screen remains fixed and the second line is the test mode name, the data list and any codes that may be present follow below. Fault Code Display—1989–95 The fault code display for most 1989–95 Chrysler vehicles is unique. Instead of just displaying the fault message (code description) in full capital letters, a longer message displays with words using lowercase and uppercase letters as shown below. • 23 air Charge temp sensor Voltage too Low Words in lowercase add descriptive content. Words in uppercase form the fault message as it appears in the 1989–95 Chrysler driveability manuals and the dealer Diagnostic Readout Box (DRB-II). The DRB-II displays a message but not a code number, as shown below. • Charge Voltage Low i NOTE: Most 1989–95 Chrysler driveability manuals index the fault messages that identify the test procedures alphabetically, not by code number. z To get code numbers on 1989–95 vehicles: • Cycle the ignition key from the off to on positions three times. Codes are displayed by flashing the Check Engine lamp. False Fault Codes Some Chrysler vehicles may display false fault codes in Codes and Data. These usually are the result of accessory circuits in the control system for options that are not installed on the vehicle. In these cases, the circuit is continuously open. If that circuit is included in the fault code library for the vehicle, the PCM transmits a code to the scan tool. 21 Chrysler Testing Testing Engine Systems For example, a 1988 Dakota truck may have either a 3-speed or 4-speed automatic transmission. All models have the circuitry for a fourth gear overdrive solenoid, and the PCM may transmit a false code 45 for a truck with a 3-speed transmission. For trucks without a lockup torque converter, the PCM may transmit a false code 37 for the lockup solenoid. To avoid confusion by false codes, always verify that the vehicle has the component for which the PCM transmits a code. Secondary (SEC.) Indicators Secondary indicators are PCM-detected faults that are not stored in memory. Selecting Secondary Indicators only displays the faults when they are present. Intermittent faults may flicker in this mode. 1 Trip Codes One-trip codes are faults that occur once. If these faults occur a second time, the PCM sets a DTC and the scan tool removes the fault from the 1 Trip Code list. 4.1.5 Memory Resets Memory Resets for most 1990 and later Chrysler vehicles allows you to reset the adaptive memory for a number of electronically controlled systems. Memory Resets selections are discussed in the following sections: • • • • • • • • Clear Codes, on page 22 Adaptive Fuel Reset, on page 23 Minimum Throttle Reset, on page 23 Idle Air Control (IAC) Reset, on page 23 Cam/Crank In-Sync Reset, on page 23 All Adaptives Reset, on page 23 Battery Disconnect, on page 24 Relearn Cam/Crank, on page 24 Clear Codes For some 1990 and later vehicles, Clear Codes appears on the Memory Reset menu. On 1989 Turbo II and most 1987½ and 1988 models, Clear Codes appears on the Functional Tests Menu. In any case, it functions the same. z To clear codes: 1. Select Clear Codes. A fault code erase confirmation message displays. 2. Select to continue. 22 Chrysler Testing Testing Engine Systems When codes are cleared, a completed message displays. 3. Exit to return to the Codes and Data display. If the code-clearing operation fails for any reason, repeat the procedure. Adaptive Fuel Reset On vehicles with an Adaptive Fuel selection, the PCM is programmed with factory-set injector pulse-width (PW) values. To adapt to changes in driving conditions, fuel quality, engine wear, and other variables, the PCM adjusts the programmed values by increasing or decreasing injector PW. This value may display on the Codes and Data list as added fuel in microseconds, fuel percent, or both. When Adaptive Fuel is selected, the adaptive fuel values return to their initial settings. Minimum Throttle Reset On vehicles with a MIN (minimum) Throttle selection, the PCM is programmed with a factory-set closed throttle position. To adjust this value, the PCM monitors throttle position sensor voltage and interprets the lowest voltage received as the closed throttle position. This value may also appear on the Codes and Data list as minimum TPS voltage. The minimum throttle reset returns the value to its initial setting. Idle Air Control (IAC) Reset On vehicles with an IAC (AIS) Position selection, the PCM is programmed with a factory-set value for the automatic idle speed (AIS) motor step position. The PCM adjusts this value, which may display on the data list as AIS steps, as necessary. Select IAC (AIS) Position to reset to the factory preset value. Cam/Crank In-Sync Reset On vehicles with a Cam/Crank In-Sync selection, the PCM is programmed with a factory-set value for camshaft-to-crankshaft synchronization. This procedure is typically performed after internal engine repairs are made. Select Cam/Crank In-Syn to reset to the factory preset values. All Adaptives Reset When available, the All Adaptives selection simultaneously resets the adaptive fuel, minimum throttle, and the AIS motor values to their initial settings. This selection also clears the adaptive numerator, which requires the vehicle be driven to relearn. The adaptive numerator is a PCM-calculated value unique to each engine. The PCM uses the adaptive numerator to accurately determine crankshaft position for misfire diagnosis. 23 Chrysler Testing Testing Engine Systems For the engine to run properly, the PCM must accurately calculate a new adaptive numerator value. Do this by performing the adaptive numerator relearn procedure. z To perform an adaptive numerator relearn: • While driving the vehicle on a level street without load, decelerate to a minimum of 20 MPH (32 KPH) at least three times without braking. Battery Disconnect Selecting Battery Disconnect allows you to reset all PCM memories as if the battery had been disconnected. This also clears the adaptive numerator, which requires the vehicle be driven in order to relearn. Relearn Cam/Crank The Relearn Cam/Crank selection resets PCM camshaft and crankshaft learned values. Perform this function only after replacing one or more of the following: • • • • • • • Camshaft Camshaft position target magnet Camshaft position sensor Cylinder head Cylinder block Water pump PCM 4.1.6 System Tests The System Tests selection from the Main Menu (CHRY ENG) is available on most 1994 or 1996 and later engines, except diesels. This selection does not display if it is unavailable for the identified vehicle. Available system tests are discussed in the following sections: • • • • • • • • • Purge Vapors Test, on page 25 EGR Systems Test, on page 25 Read VIN, on page 25 Generator Field Test, on page 26 Misfire Counters, on page 26 Set Sync Signal Test, on page 26 Speed Control, on page 26 Theft Alarm Status—1990–95, on page 27 EVAP Monitoring Test, on page 27 24 Chrysler Testing Testing Engine Systems Purge Vapors Test The Purge Vapors Test selection is available on 1994 and later models and displays various evaporative emissions parameters and allows manual control of the purge valve. z To conduct a Purge Vapors test: 1. Select System tests > Purge Vapors Test. The purge vapors test screen displays. 2. Select to switch the state of the purge valve between normal, flow, and block. The selected purge valve state is shown as “Purge Status” on the display. EGR Systems Test Selecting EGR Systems Test on 1994 and later models displays various parameters related to EGR control and operation and allows manual control of the EGR valve. z To conduct an EGR Systems test: 1. Select System tests > EGR Systems Test. The EGR systems test screen displays. 2. Select to switch the state of the EGR valve between normal, flow, and block. The selected EGR valve state is shown as “EGR Status” on the display. Read VIN Selecting Read VIN on 1996 and later models displays the VIN stored in the PCM. If a replacement PCM has not yet been programmed with a VIN, the scan tool guides you through the PCM VIN programming procedure. Read this entire procedure before beginning. The PCM can only be programmed with a new VIN once! If a false VIN is programmed into the PCM, the PCM must be replaced with a new one. z To display the VIN: 1. Select SYstem Tests > Read VIN. If a VIN is already stored in the PCM, a “controller cannot be programmed” message appears, and you may press N to exit. If a VIN is not stored, the VIN entry screen displays. A cursor on the third line points to a VIN position on the second line. 2. Select each character of the vehicle VIN. After the 17th character is selected, a confirmation screen displays. 3. Before continuing, carefully compare the VIN that appears on the screen to the characters on the VIN plate. IMPORTANT: For the vehicle to run properly, the programmed VIN must match the VIN plate. 25 Chrysler Testing Testing Engine Systems 4. Select to permanently program the displayed VIN into the PCM. The PCM checks to verify that the entered VIN is a valid DaimlerChrysler Motors VIN. – If the PCM does not recognize the VIN as valid, a “the VIN that was entered is not valid!” message displays. – If the VIN is valid, a “VIN program successful!” message displays. Generator Field Test Selecting Generator Field Test on 1996 and later models displays various parameters related to the vehicle charging system. It also allows manual control of the generator field. z To conduct a Generator Field test: 1. Select System Tests > Generator Field Test. The generator field test screen displays. 2. Select to switch the generator field state between normal, full, and off. The selected field state is shown as “Generator Field” on the display. Misfire Counters Selecting Misfire Counters on 1996 and later models displays the number of misfire occurrences for each individual cylinder and the PCM adaptive learn state for the present drive cycle. Set Sync Signal Test Selecting Set Sync Signal Test on 1994 and later models resets fuel injection synchronization. This procedure is necessary when certain repairs are made, such as cylinder head removal or timing belt replacement. The “Distributor(°)” value refers to fuel synchronization only. Ignition timing is PCM-controlled. Moving the distributor does not set timing. Speed Control Selecting Speed Control on 1990–95 models displays the present speed control operating mode and the reason for the last system disengagement, or cutout. Four speed control parameters display on the speed control status screen as well. Other speed control parameters are available in Codes and Data mode for engine testing. z To verify that the speed control system is operating properly: 1. Road test the vehicle with the speed control status screen displayed. 2. Engage and disengage speed control to verify proper operation. 26 Chrysler Testing Testing Body and Transmission Systems Theft Alarm Status—1990–95 Selecting Theft Alarm Status Test on 1990–95 models displays the present communication link between the engine control module (ECM) and the theft alarm module. Use this test to determine if a no-start is the result of an unauthorized attempt to start the engine. The vehicle theft alarm (VTA) system monitors vehicle entry and ignition. During unauthorized entry, the VTA sends a message to the ECM that it is not OK to start the engine. The ECM responds by disabling electronic fuel injection after the engine starts. EVAP Monitoring Test The EVAP Monitoring Test is available on most 2001 and later models. This test will force the PCM to run the evaporative system self test. The test can be used to confirm repairs made to the evaporative system without taking the vehicle on an EVAP drive cycle road test. If the system fails, the test DTCs will be set in Codes or 1 Trip Codes. 4.2 Testing Body and Transmission Systems This section explains how to test 1988 and later models with Chrysler collision detection (CCD) or programmable communication interface (PCI) multiplex communication bus systems. Vehicles with bus communications have multiple electronic control functions, and each function has its own electronic control module (ECM). 4.2.1 Bus Communication System Modules The number and type of bus communication modules used varies for different vehicles. The modules communicate and exchange data over a multiplex network that interconnect them. The network is a multiplex serial data bus. The scan tool, once connected to the bus diagnostic connector, communicates on the network for testing. The bus communication modules and the functions they control include: • Body Computer—The body computer, or body control module (BCM), controls driver information functions like door ajar and lamp failure indicators, fluid level indicators, and seat belt lamps and chimes. It also contains the electronic odometer circuitry. • Serial Bus Traveler—The traveler is a driver information module that controls the electronic odometer and provides data on fuel consumption and mileage. The serial bus traveler shares some information with other modules on the bus system. • Stand-Alone Serial Bus Traveler—The stand-alone traveler is used on Spirit and Acclaim models (A-bodies). It provides the same information as the serial bus traveler, but it is the only body module used on these models. It shares some data with the engine control module. • Electronic Vehicle Information Center (EVIC)—The EVIC provides the same kind of driver information as the traveler but also includes information on time, outside temperature, and direction. The EVIC module shares data with the engine module and other body modules. • Electronic Temperature and Compass—The electronic temperature and compass module provides the driver with vehicle direction and temperature information. It is located in the 27 Chrysler Testing Testing Body and Transmission Systems overhead console on some models. If the vehicle also has an EVIC module, the temperature and compass module sends information to the EVIC on the bus communication system. • Electronic Instrument Cluster—On models with electronic instrumentation, the electronic instrument cluster module controls the speedometer, odometer, and other instruments. It receives most of its information from the BCM and the engine control module (ECM) on the bus system. • Electromechanical Instrument Cluster (MIC)—On models that have an electrical instrument cluster with analog displays, the electromechanical instrument cluster module controls the speedometer, odometer, and other instruments. The MIC receives most of its information from the BCM and the ECM on the bus communication system. • Engine Node—The engine node module monitors brake fluid level, engine coolant level, and engine oil level. This module transmits information to the BCM and electronic instrument panel on the bus communication system. • Air Suspension—On vehicles that have electronically-controlled air suspension on the body system, the suspension module can be tested through the bus communication system. • Automatic Transmission—On Chrysler electronically controlled transmissions (A604, 41TE, 42LE, and 45RFE), gear selection and clutch applications are controlled through solenoids and servos actuated by the electronic module. The transmission control module (TCM), or the powertrain control module (PCM), receives engine operating data from the engine control module on the bus communication system. Bus Module Identification The scan tool automatically identifies the control modules on all OBD-II vehicles and on pre-OBD-II LH-models during the vehicle identification process. z To automatically ID vehicles with separate bus communication connectors: 1. Identify the vehicle through the engine connector. 2. Select the bus system to be tested. 3. Hook up to the bus connector. 4.2.2 ATM Tests The actuator test mode (ATM) tests are available from the Main Menu for some BCMs, while transmission ATM tests are available from some TCM Functional Tests menu. Body system ATM tests are discussed below. Use ATM tests to check the operation of switches, solenoids, relays, valves, and lamps controlled by the selected module. Specific tests vary for different modules, but all operate in the same way. For most ATM tests, the BCM pulses the actuator regularly for five minutes, or until a command is entered. Switching time varies for different actuators: three seconds for some, four seconds for others, and so on. The second line alternates between “test is running” and “test is completed” as the actuator cycles. The following ATM tests are exceptions to the general rules: • Headlamp doors open and closed—Cycles between OPEN and CLOSE until ATM test is selected. 28 Chrysler Testing Testing Body and Transmission Systems • Power door locks—Operates the door lock motors. This is a one-time test that does not automatically cycle. IMPORTANT: The power door lock ATM test for the BCM operates the motors to lock the doors, but an ATM test to unlock the doors may not be available. Do not lock the vehicle with the keys inside. • Mechanical instrument cluster—Activates various analog gauges, such as speedometer, tachometer, and fuel. When active, these tests should momentarily deflect the gauge on the vehicle. They do not necessarily cause the gauges to go full scale. z To conduct body ATM tests: 1. Select ATM Tests. An ATM Tests menu displays. 2. Select the desired ATM test. When an ATM test is active, the actuator name displays on the top line. 4.2.3 Functional Tests i NOTE: Operations described in this section are not available on all tool platforms. Selecting Functional Tests opens a Functional Tests menu. Functional tests, including ATM tests, are available on the Main Menu. Up to five functional tests are available on the menu, as described in the following sections: • ATM Tests, on page 18 • EMCC Reset, on page 30 • Pinion Factor, on page 31 ATM Tests The ATM Tests selection is used to check the operation of certain switches, solenoids, relays, valves, and lamps controlled by the TCM. Specific transmission ATM tests vary for different modules, but all operate as described in “ATM Tests” on page 28. The ATM tests actuate solenoids in the transmission. The parking brake must be set during the tests. The shift lever must be in park to exit an ATM test. If the shift lever is not in park, the scan tool does not exit the test. Quick Learn Selecting Quick Learn initiates a quick learn test and is usually performed when battery power to the PCM is interrupted. During normal operation, the transmission control module (TCM) continually monitors and “learns,” or updates, clutch volume index (CVI) values. 29 Chrysler Testing Testing Body and Transmission Systems Newer clutches require less volume, or lower CVI, while worn clutches require more volume, or a higher CVI. If battery power is interrupted, the TCM reverts to baseline values and must “relearn” each clutch circuit. The transmission learning that occurs during normal operation is intended to compensate for normal wear. However, simply driving the vehicle to “relearn” CVI values is time-consuming, and typically the transmission shift quality is poor. Quick learn allows the TCM to make coarse adjustments quickly, before the vehicle is driven. z To initiate a quick learn test: 1. Select Quick Learn. A “to begin test” screen displays, follow the on-screen instructions. 2. With the transmission in park and the engine running, press the brake pedal to begin. A shift request screen displays. 3. Continue holding the brake and move the shift lever into neutral to continue. Some transmission movement may be felt as the TCM corrects neutral shift pattern. Once complete, the display updates and another shift request screen displays. 4. Continue holding the brake and move the shift lever into overdrive (OD) to continue. Again, movement in the transmission may be felt. After OD “learning” is complete, the display updates. A “quick learn test complete” message displays. Other Messages During Quick Learn During the quick learn functional test, the TCM monitors various operating conditions to ensure accurate “learning.” These conditions include: • • • • • Brake on/off switch Shift lever position Engine RPM Throttle angle Transmission oil temperature If conditions are not what the TCM expects, the scan tool prompts you with various messages. For example, if the transmission temperature is too low for testing, a wait message displays. Similar messages display if the test is started without the brake pedal being pressed, or if the brake is released during testing. In addition, messages display if engine RPM goes too low, throttle angle goes too high, or the shift lever is not in the proper position. EMCC Reset The EMCC Reset selection resets the electronically-modulated converter clutch (EMCC) logic program. The TCM on late-model vehicles with an A604 or A606 transmission uses an EMCC logic. The EMCC logic adapts, or learns, during the break-in period on a new vehicle, or after being reset on a vehicle in service. During the first 500 miles after an EMCC reset, there is no EMCC. During miles 500 to 1500, the TCM gradually decreases EMCC from a 200 RPM to a 60 RPM slip. 30 Chrysler Testing z Testing Body and Transmission Systems To reset the EMCC: 1. Select EMCC Reset. A status screen displays. The second line indicates the status of the EMCC break-in period. During the first 1500 miles on a new vehicle, or after an EMCC reset, this line reads “in progress,” and then reads “complete” after 1500 miles. 2. Select to clear the learned EMCC values from memory A “sending command” message momentarily displays, followed by a “break-in started” message. This indicates the EMCC has reset. Battery Disconnect Selecting Battery Disconnect momentarily interrupts the power supply (B+) signal to the TCM. Battery Disconnect is used to reset all of the TCM learned values, without interfering with the clock, radio, or other presets. Pinion Factor The TCM used on 1993–2001 models with a 41TE transmission and on 1998–2001 models with a 42LE transmission store a programmable value called pinion factor. The Pinion Factor selection provides a way to adjust speedometer calibration to compensate for a tire size change. The Controller Antilock Brake (CAB) generates the vehicle speed based on the input from the rear wheel speed sensor, the differential size, and the size of the tires. If these variables are not programmed in, the speedometer will not work and the automatic transmission may exhibit erratic shift quality. z To reprogram the pinion factor: 1. Select Pinion Factor. A “tire size” screen displays. 2. Select the correct tire size. Pinion factor programming takes about ten seconds, then the “tire size” screen displays. 4.2.4 Codes and Data The Codes and Data selection operates similarly to the Codes and Data mode for engine testing. It displays all of the available switch and sensor readings and module output commands, as well as any fault codes that may be present. Because the scan tool does not affect control module operation, the vehicle can be driven when in the Codes and Data mode. A Codes and Data Menu selection for body and transmission systems are discussed in the following sections: • Codes Only and Data (No Codes), on page 32 • Clutch Volume Index (CVI) Display, on page 32 • RPM Display, on page 33 31 Chrysler Testing Testing Body and Transmission Systems All sensor and switch readings in Codes and Data are “live” values. The control modules do not substitute default values for failed components. Fault Codes All fault codes—except those for the TCM—are hard codes. That is, the fault is present at the time of testing. If the fault is intermittent and goes away, the code disappears. These modules do not store soft codes. The TCM does store soft codes for intermittent problems. A code that appears in the transmission Codes and Data or Codes Only display may be either hard or soft. Hard codes are present during testing, while soft codes are intermittent and setting conditions may not be present when testing. Codes Only and Data (No Codes) The Codes Only and Data (No Codes) selections function like the Codes and Data in engine or ABS test menus (see “Codes and Data” on page 31), except that Codes Only shows codes without data and Data (No Codes) shows data without codes. Clutch Volume Index (CVI) Display When available, selecting CVI Display displays wear parameters for the automatic transmission clutches. The numbers next to each parameter represent the volume of fluid required to pressurize each clutch circuit. The CVI values change as the TCM “learns” or updates clutch fill volumes during normal use and wear. New clutches have the maximum amount of friction material. Therefore, newer clutches require less volume and have a lower CVI value. The range of “normal wear” for CVI values are: • • • • LR Clutch = 35 to 83 2-4 Clutch = 20 to 70 UD Clutch = 24 to 70 OD Clutch = 48 to 150 The OD Clutch value varies per model year. Refer to the Fast-Track® Domestic Transmission Troubleshooter or the Chrysler Service Manual for correct OD clutch CVI values. Besides clutch wear, factors that affect CVI values include: • • • • • • • • Incorrect fluid level High transmission temperature Restricted clutch or solenoid feed circuits Leaking valve bodies, lip seals, or rings Circuit leaks in pump housing or reaction shaft support Case porosity Damaged accumulator seal ring Clogged oil filter, faulty oil pump, or aerated fluid 32 Chrysler Testing Testing ABS Systems • Inadequate clutch pack clearance • Sticky regulator valve • Bad clutch return spring If battery power is interrupted, the TCM reverts to initial, or baseline, CVI values and the TCM must “relearn” each clutch circuit. Be aware, initial CVI values are not used during troubleshooting. They are startup values only. z To “teach” clutch volumes to the transmission control module: 1. Run the quick learn functional test i NOTE: “The ATM tests actuate solenoids in the transmission. The parking brake must be set during the tests. The shift lever must be in park to exit an ATM test. If the shift lever is not in park, the scan tool does not exit the test.” on page 39 2. Road test and run through a complete up and down shift sequence. Avoid moving the throttle on steady acceleration upshifts. The TCM must also learn high-speed and low-speed kickdown shifts. Refer to Chrysler test procedures for more information. RPM Display • Selecting RPM Display displays speed parameters available from the TCM. Values are based on sensor signals for engine speed, turbine acceleration, and output shaft speed data. The Engine RPM parameter is from the ignition system, all others are from the TCM. The TCM looks at the PRNODDL, hydraulic pressure, and speed sensors to determine automatic gear selection. 4.3 Testing ABS Systems This section explains the diagnostic functions available to test antilock brake systems (ABS) on 1991 and later Chrysler vehicles. Refer to Chrysler service procedures for complete test and repair information for these systems. ABS diagnosis with the scan tool does not require opening the hydraulic system or disassembling mechanical parts. Complete ABS service, however, may require opening the hydraulic system. Any ABS hydraulic system operates with pressures of about 2000 psi or higher. The system must be completely depressurized before any hydraulic connection is opened. In most cases, depressurize the system by applying and releasing the brake pedal at least 25 times. Follow instructions from the vehicle and system manufacturers for information on hydraulic system service and safety. 33 Chrysler Testing Testing ABS Systems 4.3.1 ABS Control Systems There are two indicator lamps on the instrument panel on most antilock brake systems: a red brake warning lamp, and an amber antilock warning lamp. Both lamps illuminate at vehicle startup and go out when the ABS self-diagnostics determine that the system is normal. If the ABS controller detects a fault: • The amber lamp illuminates until the fault is cleared, or the ignition is turned off, depending on the type of fault. • The red lamp illuminates when the parking brake is applied, the fluid level is low, or a hydraulic failure occurs. The amber lamp may also illuminate in tandem with the red brake lamp to indicate a more serious failure. When this occurs, antilock braking is disabled. Before driving a vehicle with an ABS complaint, especially if the red brake warning lamp is on, test the brakes at low speed to make sure that the vehicle stops normally. An illuminated brake warning lamp may indicate reduced braking ability. 4.3.2 Chrysler ABS Tests Available The scan tool performs ABS diagnostic tests on many 1991 and later Chrysler ABS-equipped vehicles. These vehicles have wheel speed sensors, as well as the red and amber indicator lamps on the instrument panel. If ABS is present on the test vehicle, the indicator lamps momentarily light when the ignition is turned on. The VIN model year and body code inform the scan tool which type of ABS is on the vehicle. If the VIN character for the test vehicle is not available, then the scan tool cannot test that particular system. 4.3.3 Codes and Data The ABS Codes and Data selection operates similarly to Codes and Data for engine testing (see “Codes and Data” on page 21) and displays trouble codes and all information available on the ABS data stream. The ABS Codes and Data selection requires communication with the ABS ECM through the same diagnostic connector used for CCD testing. To ensure efficient communication with the ABS ECM when using Codes and Data: 1. Be sure the ignition is switched off when entering the vehicle ID. 2. Switch the ignition on before selecting Codes and Data. 3. Switch the ignition off after completing the tests. Bendix Systems A Codes and Data display is available for models with Bendix 4, ABX-4, Bendix 6 and Bendix 10. In the ABS Codes and Data mode, the antilock functions of the Bendix systems are fully functional, and new trouble codes may set. The vehicle may also be driven for testing. 34 Chrysler Testing Testing ABS Systems Teves Systems There are currently three Teves ABS systems used by Chrysler: • Mark IV • Mark IVg • Mark 20 The ABS data parameters vary depending on which system is installed on the vehicle, however, the display for all three is similar. When in the ABS Codes and Data mode, the antilock functions of Teves systems are not fully functional. The vehicle can be driven safely for testing, new codes do not set. Kelsey-Hayes, TRW Dodge trucks, SUVs, and full-sized vans currently use two different types of ABS: • EBS-125 RWAL • EBC-325 4WAL In the ABS Codes and Data mode for these systems, the ABS is fully functional, and the vehicle may be driven for testing. 4.3.4 Functional Tests i NOTE: Operations described in this section are not available on all tool platforms. A Functional Tests selection is available for Bendix 4, Bendix ABX-4, and all Teves systems. Functional tests for Bendix 6 and 10 systems are limited to the ATM tests. For these Bendix systems, an ATM Tests selection appears on the Main Menu (CHRY ABS) in place of the Functional Tests selection. Only the tests available for the identified vehicle display. ATM Tests—Bendix 4 and ABX-4 Systems The ATM Tests selection for Bendix 4 and ABX-4 systems is available from the Functional Tests menu. For Bendix 6 and 10 systems, the ATM tests are available on the Main Menu (CHRY ABS). ATM tests are similar for all Bendix systems. The ATM mode is used to check the operation of switches, solenoids, relays, valves, and lamps controlled by the ABS ECM. Specific ATM tests vary for different systems. All operate in the same way. For most ATM tests, the ABS ECM pulses the actuator regularly for 5 minutes, or until you stop the test. The actual cycle times vary depending on the ATM selected (three seconds for some, four seconds for others, etc.). The important thing is whether the selected actuator responds to the ABS ECM. Hydraulic ATM tests vary slightly from the general rule of ATM operation. These tests cycle the selected ATM once. A hydraulic ATM cycle consists of a 250 millisecond pressure decay, then a 1 second pressure build. 35 Chrysler Testing Testing ABS Systems The following is a complete list of Bendix 4 and ABX-4 ATM test selections: • • • • • • • • • • • • • • • • • z Stop All Tests ABS Warning light Motor pump Output All Outputs Lamp/Relay driver LF Build/Decay Valve LR Build/Decay Valve RF Build/Decay Valve RR Build/Decay Valve System Relay Left T.C. Isolate Valve Right T.C. Isolate Valve LF Hydraulic Test RF Hydraulic Test LR Hydraulic Test RR Hydraulic Test Rear Hydraulic Test To conduct ATM tests for Bendix 4 and ABX-4 systems: 1. Select Functional Tests. The Functional Tests menu displays. 2. Select ATM Tests. The ATM tests screen displays. 3. Select the desired ATM test. Brake Bleeding The Brake Bleeding selection is available on Bendix 4 and ABX-4. The Chrysler recommended brake bleeding procedure must be followed in order to purge all the air from these systems. Failure to follow proper brake bleeding procedures results in improper brake system operation, or brake system failure. Refer to Chrysler Service Manuals for proper brake bleeding procedures. The Bendix 4 and ABX-4 systems must be manually bled, but in order to thoroughly purge these systems, certain solenoid valves must cycle while the brake pedal is held down. Do this only when instructed by a Bendix brake bleeding procedure in a Chrysler service manual. z To cycle solenoid valves during a brake bleeding procedure: 1. Select Bleed Brakes. The bleed brakes activation screen displays. 2. After 5 seconds an exit screen displays. Once the exit screen displays, you must choose whether to exit or repeat the test. 3. Select to continue cycling the solenoid valves. 36 Chrysler Testing Testing ABS Systems 4.3.5 ATM Tests—Teves Systems The ATM mode is used to check the operation of switches, solenoids, relays, valves, and lamps controlled by the ABS ECM. Specific ATM tests vary by system, but all operate in the same way. The complete list of available Teves ATM tests includes: • • • • • • • • • • • • • • • LF Inlet Valve LR Inlet Valve RF Inlet Valve RR Inlet Valve Rear Inlet Valve LF Outlet Valve LR Outlet Valve RF Outlet Valve RR Outlet Valve Rear Outlet Valve Pump Motor TC Valve #1 TC Valve #2 TC Warning lamp TC Active lamp ABS Simulated Stop The ABS Simulated Stop selection is available for Teves Mark IV and IVg systems. This selection is not available on Teves Mark 20 system. This mode is used to simulate an ABS stop without driving the vehicle. z To simulate an ABS stop: 1. Select ABS Simulated Stop. The ABS simulated stop screen displays. 2. Press the brake pedal to begin and “simulating” appears on the second line. A pulsation should be felt in the pedal. Bleed Brakes Brake bleeding on Teves Mark IV, IVg, and 20 ABS consists of: 1. Manually bleeding the brakes. 2. Bleeding the hydraulic control unit (HC). 3. Repeating the manual brake bleed. Chrysler recommended brake bleeding procedures must be followed for these systems. Refer to Chrysler service manuals for procedures. 37 Chrysler Testing Testing ABS Systems Failure to follow proper brake bleeding procedures results in improper brake system operation or brake system failure. When Bleed Brakes is selected, the scan tool cycles the various ABS components on in the proper order for system bleeding. Remember, the brake system must be manually bled before the functional test is selected. z To select: 1. Manually bleed the brakes. 2. Select Bleed Brakes. The “actuating motor” screen displays. 3. Once the ABS pump motor turns on, the second line of the display changes to read “actuating motor/outlet valves.” Bleed the HCU while this message is on the screen. After the outlet valves cycle, the “actuating motor” screen displays again. At the end of the test sequence, “test is complete” displays on the second line. Hydraulic Test Selecting Hydraulic Test from the Functional Tests menu allows you to actuate each of the solenoids individually as well as powering up the hydraulic pump motor and valves contained in the hydraulic control unit (HCU). i NOTE: Chrysler recommends that the HCU be bled any time it is opened or replaced. You must bleed the brake system before and after actuating HCU bleeding. When Hydraulic Test is selected, the ABS ECM begins by cycling the left front valves on and off. Once the left front valves have been cycled, the ECM begins to cycle to the next component in the sequence. This sequence continues until all of the valves and the pump motor have been cycled. The complete hydraulic test cycle sequence is: 1. Left front valves 2. Right front valves 3. Left rear valves 4. Right rear valves 5. Pump motor z To conduct a hydraulic test: 1. Select Hydraulic Test. A test initialization screen displays. 2. Press the brake pedal and the first in a series of test screens displays. The screen updates automatically as each component cycles. At the end of the test sequence, “test is complete” displays on the second line. 38 Chrysler Testing Testing ABS Systems Clear Codes i NOTE: ABS codes are cleared the same as engine codes, described on “Clear Codes” on page 13. If code-clearing fails for any reason, previous codes reappear in the ABS Codes and Data display. If so, repeat the clear codes operation. In addition, ABS codes are automatically cleared by the ABS controller after 50 ignition cycles. 39 Chapter 5 Ford Operations This chapter explains how to begin using the scan tool’s basic setup and test functions. This information is specific to Ford vehicles. For general scan tool functionality, see the user’s manual appropriate to your diagnostic tool. For additional information on Ford vehicles, see the following sections: • Ford Testing, on page 54 • Ford Data Parameters, on page 252 • Ford Communications Problems, on page 655 Figure 5-1 Basic Ford test routine 5.1 Identifying a Vehicle Selecting VIN Entry Mode from the Tester Mode Selection menu initiates the vehicle identification process. The scan tool identifies the vehicle being tested from certain characters of the vehicle identification number (VIN). 40 Ford Operations Selecting a System Note the following when identifying a Ford vehicle: • Because of midyear manufacturing changes in engine computer systems, you should always enter a new identification when you test a different vehicle, even when two vehicles are the same year, model, and have the same engine and accessories installed. • If an engine code does not appear on the list for a particular vehicle, try identifying the vehicle as one year earlier or later. Then look for the correct engine VIN code. The vehicle ID process begins from the Software Confirmation menu. 5.1.1 Identifying a 1980 EEC-III System A few 1980 5.0L V8 engines were built with 1981 EEC-III control systems. These can be tested with the EEC-III programs in the Ford software. However, not all 1980 vehicles use the 17-character VIN sequence used on 1981 and later models. Therefore, you cannot identify a 1980 car to the scan tool using the VIN characters requested on the scan tool display. Substitute the following characters to identify a 1980 EEC-III system: Table 5-1 Substitute VIN characters for 1980 EEC-III systems VIN 5.0L Fuel-Injected 5.0L Carbureted 10th B B 5th P F 8th F F 5.2 Selecting a System Once the vehicle ID is confirmed, the System Selection menu specific to that vehicle displays. The scan tool contains Ford system tests that may include ABS and transmission control, as well as Generic Electronic Module (GEM) and other systems. Once the system to test is selected, a vehicle-specific test menu displays. Selecting a system may open additional menus that involve choosing options. 5.3 Connecting to the Vehicle Once a vehicle has been identified and a system has been selected, a connection message displays, instructing you to use the test adapters supplied to connect the scan tool for testing. The following adapters are available to test Ford vehicles: • FORD-1A—(Figure 5-2) Fits all EEC-IV and MCU connectors. Connect both the adapter and the single-wire pigtail for EEC-IV systems (Figure 5-10). MCU does not require the pigtail. • FORD-1B—(Figure 5-3) Same as FORD-1A but without the pigtail. • FRD-4—(Figure 5-4) A 3-lead male ABS adapter that is used on 1994–96 Econoline Vans with 4WABS (see “1994–96 Econoline Vans with 4WABS” on page 83 for details). 41 Ford Operations Connecting to the Vehicle • MULTI-1—(Figure 5-5) Use to test Probe, Festiva, Tracer, Capri and any other vehicle with the Mazda Electronic Control System (MECS) as well as vehicles with EEC-III systems. You can also use the optional MULTI-2 adapter on earlier MECS systems. • OBD-II—(Figure 5-6) Used for the 16-pin connector on EEC-V (OBD-II) vehicles. Ford vehicles use the K-2, K-2A, K-16, K-17, K-19, or K-20 Personality Key™ device (Figure 5-6). Figure 5-2 Ford-1A Figure 5-3 Ford 1B Figure 5-4 FRD-4 Figure 5-5 MULTI-1 Figure 5-6 OBD-II adapter with a Personality Key™ device Note the following regarding Personality Key™ devices: • • • • z K-16 = UART-based protocol (UBP) applications K-17 = high-speed CAN K-19 = medium speed CAN K-2A, K-2A, K-20 = all other applications To connect the scan tool to the test vehicle: 1. Make sure the ignition is off. 2. Follow the on-screen instructions to connect the scan tool data cable to the test vehicle. a. Select the proper test adapter and attach it to the data cable. 42 Ford Operations Connecting to the Vehicle b. Connect the other end of the data cable to the scan tool data port. c. Connect the test adapter to the vehicle. Test adapters fit into the connectors only one way. Be sure the connector is installed securely. 3. Switch the ignition on. 4. Select to continue. The main menu for the selected system displays, and the tool is connected to the data stream. 5.3.1 Using the MULTI-1 Test Adapter The MULTI-1 test adapter is used on the following connectors: • Mazda Electronic Control System (MECS) 6-pin connector and Self-Test Input (STI) terminals (Figure 5-7)—this connector is in the passenger compartment on early Tracers. On all other models, it is underhood. • MECS 17-pin connector (Figure 5-8) • EEC-III diagnostic connector (Figure 5-9)—The EEC-III connector is in the right fender panel, near the TAB and TAD solenoids. 1— STI terminal—For all models except early Tracer. 2— Red MULTI-1 wire 3— STI terminal—For early Tracer (in engine compartment). 4— 6-pin connector 5— Blue MULTI-1 wire 6— Brown MULTI-1 wire 7— Black MULTI-1 wire to chassis ground Figure 5-7 MECS 6-pin connector and STI terminals—uses the MULTI-1 adapter 43 Ford Operations Connecting to the Vehicle 1— Black MULTI-1 wire to chassis ground—Use ground adapter. 2— Blue MULTI-1 wire (engine STO) 3— Brown MULTI-1 wire 4— Red MULTI-1 wire (engine STI) Figure 5-8 MECS 17-pin connector—uses the MULTI-1 adapter 1— Black MULTI-1 wire 2— Blue MULTI-1 wire 3— Brown MULTI-1 wire Figure 5-9 EEC-III connector—uses MULTI-1 adapter i NOTE: 1983 5.0L trucks have a separate STI pigtail. 5.3.2 MCU EEC-IV and EEC-V Systems See Figure 5-10 for microprocessor control unit (MCU) EEC-IV and EEC-V systems. The Ford-1A, Ford-1B, FRD-4, and MULTI-1 adapters have a socket for connecting the cigarette lighter power cable or the battery power cable. The engine diagnostic connector on all Ford vehicles except OBD-II is located under the hood (Figure 5-10). The scan tool will prompt you with the connector location when a connection is necessary. 44 Ford Operations Connecting to the Vehicle 1— Pigtail EEC-IV only 2— EEC-IV and MCU connector 3— EEC-V (OBD-II) connector Figure 5-10 MCU systems do not require the pigtail connection i NOTE: Some 1994–95 Ford vehicles have an OBD-II style 16-pin DLC under the dash that only functions for the Generic Electronic Module (GEM) or ABS. This connector does not work for engine, powertrain, or transmission testing. Check the VECI label to see if the vehicle is OBD-II compliant. 1— Vehicle power (+) 2— Flash eprom supply 3— Data (–) 4— Power ground 5— Case ground 6— Data (+) Figure 5-11 EEC-V data link connector—1994–95 45 Ford Operations Connecting to the Vehicle 1— Data bus + 2— Case ground 3— Power ground 4— ABS (Villager only) 5— Data bus – 6— Module programming signal 7— Battery B+ Figure 5-12 EEC-V data link connector—1996–2002 early model without UBP 1— SCP bus – 2— UBP 3— Case ground 4— Power ground 5— ISO K-line 6— ABS (Villager only) 7— SCP bus + 8— Module programming signal 9— Battery B+ Figure 5-13 EEC-V data link connector—2002 and later model with UBP 46 Ford Operations Connecting to the Vehicle 1— CAN medium speed + 2— Case ground 3— Power ground 4— CAN high speed + 5— ISO K-line 6— Battery B+ 7— CAN high speed – 8— Module programming signal 9— CAN medium speed – Figure 5-14 EEC-V data link connector—2003 and later model with CAN 5.3.3 Mazda Electronic Control Systems (MECS) There are two types of MECS diagnostic connectors available, the 6-pin (Figure 5-7) and the 17-pin (Figure 5-8). The MECS system is used on the following models: • • • • • • 1994–97 Aspire with 1.3L engine 1991–94 Capri with 1.6L turbo and non-turbo engines 1992–96 Escort and Tracer with 1.8L engine 1988–93 Festiva with 1.3L engine 1989–95 Probe with 2.0L, 2.2L, and 2.5L engines 1988–91 Tracer with 1.6L engine Do not connect the red lead of the MULTI-1 adapter to the vehicle tach terminal. It is important to properly identify the STI connector before connecting the red lead of the MULTI-1 adapter to the self-test input (STI) connector on the vehicle. Refer to “Identifying the STI Connector” on page 48 for more information. Using the MULTI-2 Adapter The MULTI-2 adapter may be used instead of the MULTI-1 adapter to test some MECS systems. The MULTI-2 adapter 2B and 2E connectors plug into the Ford-Mazda test connectors (Figure 5-5). Also, some 1989 MECS systems deliver a high-impedance self-test output (STO) signal. The MULTI-2 adapter has a pull-up resistor that lets the scan tool read the code pulses clearly on these early systems. 47 Ford Operations Connecting to the Vehicle 1— 6-pin MECS connector 2— STI connector 3— Ground to chassis 4— 2E connector 5— 2B connector 6— MULTI-2 adapter Figure 5-15 The MULTI-2 adapter with MECS connectors IMPORTANT: When using the MULTI-1 adapter, do not connect the scan tool to the MECS tach connector. Doing so may damage to the scan tool. See the “Identifying the STI Connector” section that follows. Identifying the STI Connector Most Ford models with MECS have two similar, single-wire connectors in the engine compartment. One is the self-test input (STI) connector that triggers self-tests; the other is a tach connector. Identifying the STI connector may be difficult as connector color, wire color, and location vary by model. The scan tool display gives instructions to help locate the proper connector. Use to identify and locate the STI connector. i NOTE: STI and tach circuits are integrated into the 17-pin diagnostic connector on 1991–93 Escort and Tracer and 1993 Probe (see Figure 5-8 on page 44). There are no single-pin connectors. If you are still not sure whether you are connected to an STI or tach connector, follow the procedure below. z To safely check which kind of connector you are connected to: 1. Connect a 12 V test lamp between the connector and ground. 2. Crank the engine. Interpret as follows: – If the test light flashes, it is on the tach connector, do not connect the scan tool here. – If the test light does not flash while cranking and the engine runs, it is connected to the STI connector. Connect the scan tool here. 48 Ford Operations Connecting to the Vehicle Table 5-2 STI connector identification Model Capri Year Engine 1991–93 1.6L EFI & Turbo 1.3L carb 1988–89 Festiva 1.3L EFI 1990–93 1.3L EFI 2.2L EFI w/turbo 1989 2.2L EFI w/o turbo Probe 2.2L EFI w/turbo 1990– 92 2.2L EFI w/o turbo Tracer 1988–89 1.6L EFI Test Connector Wire Color Connector Color Location STI Y Green Left rear of engine compartment TACH Y/BL White At ignition coil STI Y/BL White TACH none none STI Y/BL White TACH Y/GRN Black STI Y/GRN Black TACH Y/GRN White STI R/W Black TACH Y/BL White STI R/W Black TACH none none Left rear of engine compartment Left rear of engine compartment STI R/W TACH Y STI R/W TACH Y/BL STI Y Green Left rear of engine compartment TACH Y/BL White At ignition coil Black 5.3.4 Integrated Vehicle Speed Control (IVSC) The Integrated Vehicle Speed Control system (IVSC) is the Ford computerized cruise control system, available as an option on: • 1986–90 Taurus and Sable • 1988–90 Crown Victoria, Grand Marquis, and Lincoln • 1988–90 Thunderbird and Cougar The IVSC is not used on 1991 and later models. Test procedures and code definitions for IVSC are available in the “Tests and Procedures” section of the Driveability Troubleshooter. z To connect to an IVSC: 1. Make sure the ignition is off. 2. Connect the data cable to the EEC-IV self-test connector in the engine compartment. Use the standard FORD-1 test adapter. For IVSC testing, the single-wire STI pigtail of the FORD-1 adapter is not connected for the KOEO self-test, but the pigtail is connected for the KOER self-test. 49 Ford Operations Connecting to the Vehicle 5.3.5 ARC and ASARC The Automatic Ride Control (ARC) system is used on some 1989 and later Thunderbird and Cougar models and includes electronic control of both the air suspension and the power steering. The Air Suspension Automatic Ride Control (ASARC) system, used on some 1988 and later Lincoln Continentals, provides electronic control of the front and rear air suspension. On Lincoln models, the ASARC test connector is at the left rear of the trunk, behind a panel near the suspension on/off switch. The ARC test connector is under the hood on the right side of the firewall on Thunderbirds and Cougars. Refer to a service manual for the exact location. Both test connectors are the same shape as the EEC-IV engine connector; use the standard FORD-1 adapter. If a mating connector is not found on the system harness, the single-wire pigtail connection is not needed. z To connect to an ARC or ASARC: 1. Make sure the ignition is off. 2. Connect to the ARC or ASARC test connector. Use the FORD-1 (A or B) test adapter. 5.3.6 4-Speed Electronic Automatic Transmission (4EAT) The 4-Speed Electronic Automatic Transmission (4EAT) is available on some 1989 and later Probe and 1990 and later Escort and Tracer models. The 4EAT on the 1989 Probe with a 4-cylinder, non-turbo engine has a separate electronic control module and test connector. On the 1990–92 4-cylinder non-turbo Probe and the 1993 1.9L Escort, the 4EAT is integrated with the PCM engine control system. The system transmits transmission codes through the same connector and terminal as during engine tests. All other 1990 and later Probe, Tracer, and Escort models use a separate diagnostic connector or integrated underhood diagnostic connector (see Figure 5-17 on page 51) for the 4EAT. On models with 1.6L, 2.2L, or 3.0L engines, the diagnostic connector is in the passenger compartment under the instrument panel by the TCM. On these models, the 4EAT connector is the same shape as the engine connector. Connect the MULTI-1 adapter as shown in Figure 5-16. Use Table 5-3 to locate the correct diagnostic connector. 1— STI connector 2— Red MULTI-1 wire 3— 6-pin 4EAT test connector 4— Blue MULTI-1 wire 5— Black MULTI-1 wire to chassis ground Figure 5-16 The 4EAT diagnostic connector for 1.6L, 1.9L, 2.2L, and 3.0L engines 50 Ford Operations Connecting to the Vehicle Table 5-3 4EAT diagnostic connector locations Vehicle Capri Engine - Year 1991–94 4EAT STI & STO located behind the glove compartment (above and to the right) taped to the wire harness. 1991–92 4EAT STI and STO are integrated into one diagnostic connector along with the PCM. The connector is located on the left side of the engine compartment. 1993–94 4EAT integrated with PCM shares the same diagnostic connectors which are located on the left side of the engine compartment. 1991–92 4EAT STO connector is located on the left side of the engine compartment near PCM self-test connectors. The STI for 4EAT is always grounded within the TCM. 1993 4EAT integrated with PCM shares the same diagnostic connectors which are located on the left side of the engine compartment. 1993 4EAT module is integrated with the PCM control assembly and shares a multi-pin connector located in the left front corner of the engine compartment, near the battery. 1.8L Escort/Tracer 1.9L 2.0L Probe Diagnostic Connector Locations 2.2L 1989 non-turbo 4EAT STI & STO located under the instrument panel on the left side of the steering column near the 4EAT module. 2.2L 1990–92 non-turbo 4EAT integrated with PCM shares the same diagnostic connectors on the left side of the engine compartment. 2.2L turbo 1990–92 4EAT STI & STO located under the instrument panel on the left side of the steering column near the 4EAT module. 2.5L 1993–94 4EAT STI and STO pins are integrated into a multi-pin DLC, located in the left front corner of the engine compartment, near the battery. 3.0L 1990–92 4EAT STI & STO located under the instrument panel on the left side of the steering column near the 4EAT module. Do not connect to the engine test connector in the engine compartment. With a 1.8L, 2.0L, or 2.5L engine, the 4EAT is tested at the engine diagnostic connector. However, the MULTI-1 connector must be connected to different terminals (Figure 5-17). 1— Blue MULTI-1 wire (Trans STO) 2— Black MULTI-1 wire to chassis ground—Use ground adapter. 3— Red Multi-1 wire (Trans STI)—2.5L only. Figure 5-17 MECS 17-pin connector—uses the MULTI-1 adapter 51 Ford Operations Connecting to the Vehicle 5.3.7 Rear Antilock Brake System (RABS) Some 1987 and later light trucks have Rear-only ABS (RABS). There are two variants—RABS 1 and RABS 2—that use different-colored leads. • RABS 1 uses a single pigtail-style test lead, usually a black wire with an orange stripe. • RABS 2 uses the pigtail lead but is connected to a mating red wire for keep-alive memory. The key must be on before disconnecting the red keep-alive memory wire. These systems have code-setting capability, but do not communicate directly with the scan tool. If ABS or REAR ABS Only is selected, a “manual codes available” message may display. The connections described are for powering the scan tool so the user will be able to access code-gathering information. See Figure 5-18 and Table 5-4 for connector locations. 1— RABS module 2— RABS diagnostic test connector 3— RABS diagnostic test connector 4— PSOM test connector 5— RABS module Figure 5-18 Sample RABS diagnostic connector locations Table 5-4 RABS diagnostic connector locations Vehicle Diagnostic Connector Location Aerostar In the main loom, under the dash near the ignition switch. Bronco & F-Series Behind the glovebox, near the RABS module or attached to the main loom about 6 inches from the bulkhead near the park brake pedal. Econoline Far right side of dash, below brace or near RABS module wiring near the parking brake, or under the left side of the dash, taped to the main loom. Explorer & Ranger Near the emergency brake, on the left side of the dash attached to the main loom. (On late model Rangers, it may be behind the RH kick panel.) 52 Ford Operations Ford Vehicles Without Self-Diagnostic Capability 5.4 Ford Vehicles Without Self-Diagnostic Capability The Ford vehicles listed below either do not have electronic engine control systems, or they have systems without self-diagnostic capabilities. They do not communicate with a scan tool. Table 5-5 Ford vehicles without self-diagnostic capability Year Models 1982 and earlier Any with EEC-I or EEC-II. The scan tool can test 1980 and later EEC-III, EEC-IV, and MCU systems with test connectors. 1982–83 3.3L, 6-cylinder carbureted engine (VIN code B for 1982; X for 1983). 1983–85 1.6L, 4-cylinder carbureted Escort, Lynx, EXP, and LN7 (VIN codes 2 and 4). 1986 1.9L, 4-cylinder carbureted Escort and Lynx (VIN code 9). 1983–84 3.8L, V6 carbureted engine (VIN code 3 & C). 1983–85 5.0L, V8 carbureted HO engine in Mustangs only (VIN codes F, 1983; M, 1984). Has a self-test connector, but no tests are available. 1983–87 5.8L, V8 carbureted truck engines (VIN codes G for 1983–85; H for 1985–87). 1981–87 7.5L, V8 carbureted truck engine (VIN code L). 1989–95 7.3L, V8 Diesel (non-Powerstroke). scan tool tests automatic transmission only. 53 Chapter 6 Ford Testing This chapter provides information and procedures for using the scan tool with these systems: • • • • • • • • • • • • • • • • • • • • • i Engine & Powertrain Transmission Antilock Brake System (ABS) Airbag Body Systems GEM (Generic Control Module) CTM (Central Timer Module) FEM (Front Electronic Module) REM (Rear Electronic Module) PATS (Passive Anti-Theft System) RCM (Restraint Control Module) SCLM (Steering Column Lighting Module) ICM (Instrument Cluster Module) HEC (Hybrid Electronic Cluster) VIC (Virtual Image Cluster) 4X4 Transfer case 4EAT (4-speed Electronic Automatic Transmission) ECS (Electronic Crash Sensor) IABM (Integrated Airbag Module) SRS (Supplemental Restraint System) NOTE: Specific selection and menu items may vary by year, make, and model. For additional information on Ford vehicles, see the following sections: • Ford Operations, on page 40 • Ford Data Parameters, on page 252 • Ford Communications Problems, on page 655 i NOTE: When testing optional systems, always consider that a specific test vehicle may not be equipped with a particular option. The menu choices for subsystems display whether or not the vehicle actually has the optional equipment installed. Attempting to communicate with a non-existent subsystem results in either a “no communication” message, or data values displayed as “N/A”. IMPORTANT: Always verify that the correct Personality Key™ or CAN adapter is being used as directed by the on-screen massages 54 Ford Testing Testing Engine & Powertrain Systems 6.1 Testing Engine & Powertrain Systems After selecting Engine and Powertrain from the System Selection menu, the Main Menu - PCM displays. Selections vary by model and year. This section is divided into the following subsections: • “Codes Menu” on page 55 • “EEC-IV Functional Tests” on page 63 • “Data Display” on page 82 Movies and Custom Setup options are discussed in detail in the manual for your scan tool. 6.1.1 Codes Menu Selecting Codes Menu gives you several options for working with diagnostic trouble codes (DTCs). There are slight differences between EEC-IV and EEC-V/CAN codes menus. Codes Menu options are discussed in the following sections: • • • • • • KOEO Self-Test, on page 56 KOER Self-Test, on page 58 Code Speed, on page 61 Memory Codes, on page 62 Clear Codes, on page 62 Review Codes, on page 63 A Note about Service Codes Ford refers to DTCs as “service codes,” and classifies them as either on-demand codes or continuous codes. • On-demand codes occur during either a key-on, engine-off (KOEO) self-test, or a key-on, engine-running (KOER) self-test. • Continuous codes are memory codes from the PCM. These indicate intermittent problems that occurred in the past during normal vehicle operation. Memory codes cannot be set while running a self-test. Microprocessor Control Unit (MCU) and EEC-III systems do not have memory codes. Some DTCs only set as continuous codes. During the KOEO self-test, EEC-IV systems transmit any on-demand codes first, followed by any continuous codes. An EEC-IV system does not transmit continuous codes during the KOER self-test, except on some 1983 Escort models with a 1.6L engine. An EEC-V/CAN system does not generate continuous codes during either the KOEO or KOER self-test. Instead, continuous memory codes are generated by selecting Codes Menu > Memory Codes. To assist in diagnosing intermittent faults, engine-off and engine-running wiggle tests are available as functional tests on EEC-IV systems. These tests place the scan tool and PCM in a standby mode to allow checking for intermittent problems caused by wiggling electrical harnesses. If a fault occurs during a wiggle test, the PCM records it as a continuous code. The KOEO test must be run to read codes set during a wiggle test. 55 Ford Testing Testing Engine & Powertrain Systems Earlier EEC-IV systems display DTCs as a 2-digit numerical code. Many 1991 and later EEC-IV vehicles transmit 3-digit service codes. An EEC-V system displays DTCs in the standard 5-digit OBD-II format. Be aware that Ford DTC P1000 sets on an EEC-V/CAN system any time one of the following conditions is met: • DTCs are cleared • Readiness monitors have not successfully completed • The vehicle battery is disconnected Unless required by a mandated inspection and maintenance program, it is not necessary to clear DTC P1000 after a vehicle has been serviced. This code automatically clears upon the successful completion of all the readiness monitors. The only way to clear a DTC P1000 is through a Drive Cycle Test. EEC-IV Ignition Key Cycles A basic guideline for Ford testing is to turn the ignition key off, wait 10 seconds, then turn the key back on before repeating any particular test. This is not absolutely required on all vehicles, but it is good practice in order to avoid erroneous self-test actions by the PCM. Instructions on-screen tell when it is advisable to turn the key off and back on, or to restart the engine before proceeding. You may choose whether or not to follow these instructions. If test results appear erroneous or incomplete, or the PCM does not respond, switch the key off, wait 10 seconds, then restart the test. KOEO Self-Test The KOEO Self-Test selection displays on-demand codes present with the ignition on and the engine not running. These are usually electrical open and short circuits and must be serviced first, before any other codes. On EEC-IV systems, the KOEO test displays continuous memory codes of intermittent faults from PCM memory. On an EEC-V/CAN system, the continuous memory codes are accessed by selecting Memory Codes. Memory Codes are serviced last, after any on-demand codes. EEC-III KOEO Self-Tests The KOEO Self-Test selection on a Ford EEC-III system displays a checklist based on preliminary tests recommended by Ford. Ford advises these checks be completed before performing an engine-running test. These checks are also helpful for troubleshooting a no-start condition. EEC-IV KOEO Self-Tests The KOEO Self-Test selection for EEC-IV systems displays on-demand codes that are present with the ignition on but the engine not running, as well as continuous codes of intermittent faults from PCM memory. 56 Ford Testing Testing Engine & Powertrain Systems Any of the KOEO on-demand codes are usually the result of electrical open and short circuits and must be serviced before any other codes. Continuous codes should be serviced last, after any on-demand codes. The scan tool displays on-demand codes first, followed by continuous memory codes. This is the order in which they must be repaired. If no codes are present, a “11 System Pass” message displays. If codes are present, they display by number and description. z To select a KOEO self-test for EEC-IV: 1. Select KOEO Self-Test. The KOEO self-test confirmation screen displays. 2. Select and “self-test initiated wait for codes” displays. After 45 to 60 seconds when reading fast codes, or a minute or more for slow codes, a “review codes” screen should display. If the “wait for codes” message is on-screen for more than a few minutes, the test probably did not start. Refer to “Ford Communications Problems” on page 655 to diagnose the cause of a self-test failure. i NOTE: The last line reads “End of List” when you reach the end, but this does not necessarily mean that the test is complete, especially with slow codes. EEC-V/CAN KOEO Self-Tests The KOEO self-test for EEC-V is similar to that for EEC-IV. The main difference is that the EEC-V is OBD-II compliant, so it transmits 5-digit DTCs. No memory codes, or “soft codes,” are gathered during the KOEO self-test with EEC-V/CAN. Memory clearing, also called PCM reset, is required to switch off the MIL on EEC-V systems. Certain memory codes trigger the MIL, and they must be cleared to turn the lamp off. Drive symptoms may appear or disappear when the PCM is reset. z To select a KOEO self-test for EEC-V systems: 1. Select KOEO Self-Test. The KOEO self-test confirmation screen displays. 2. Select and a “self-test initiated wait for codes” message displays. The KOEO self-test takes about 30 to 60 seconds to complete, then the “service codes” screen should display. If the “wait for codes” message stays on the screen for more than 2 to 3 minutes, the self-test probably did not run. Refer to “Ford Communications Problems” on page 655 to diagnose the cause of a self-test failure. MCU KOEO Self-Tests The KOEO self-test for an MCU system displays on-demand codes that are present with the ignition on and the engine not running. This is a limited function system that only controls fuel mixture at cruise speed. There is no idle speed, timing, or EGR control. Fuel corrections are made in response to O2S feedback. 57 Ford Testing Testing Engine & Powertrain Systems KOEO self-tests for MCU systems and EEC-IV systems are similar (see “EEC-IV KOEO Self-Tests” on page 56), except MCU does not output continuous codes of intermittent faults and does not perform wiggle tests. Also, self-tests detect only MCU-related faults. Problems outside of the MCU control system do not set codes. Use the KOEO self-test for EEC-IV systems described on “EEC-IV KOEO Self-Tests” on page 56 to test an MCU system. KOER Self-Test Selecting KOER Self-Test displays on-demand codes present with the engine running. Service these codes after KOEO on-demand codes and before memory codes. Most Ford vehicles do not perform a KOER test if any KOEO hard codes are present and uncorrected. The entire engine-running test usually takes about 1 to 3 minutes for an EEC-V/CAN system or an EEC-IV system when reading fast codes. The time varies depending on the particular application and the number of codes. The test takes longer on EEC-IV systems with slow codes. The “self-test initiated wait for codes” message means that the scan tool attempted to start the test, but it does not mean the PCM responded. If the message stays on the screen for more than 2 to 3 minutes with no code response, the test probably did not start. i NOTE: A rough-running engine may produce false KOER DTCs. The scan tool displays only on-demand codes for faults present during the engine-running test. Diagnose and repair problems in the order in which codes display. Repair any KOEO on-demand codes first, before diagnosing codes from the KOER self-test. If codes are not present, a “System Pass” message displays. If codes are present, they display by number and description. Other engine systems may require different operator actions during the engine-running test. Some MCU systems, for example, require that engine speed be held at a specified RPM during the test. The scan tool displays any special instructions when required. EEC-III KOER Self-Test The KOER self-test is programmed into the PCM; codes recorded during the test display afterward. The EEC-III system has no long-term memory; it records and displays only on-demand codes. However, the scan tool stores codes for later review or printing. Repeating the EEC-III self-test erases memory and stores the codes from the latest test. If the KOER self-test does not start, the display does not change when vacuum is released. If this happens, apply vacuum to the BMAP sensor again and release it quickly to trigger the test. If a test repeatedly will not start, refer to “Ford Communications Problems” on page 655. In some cases, the EEC-III system may not complete the self-test if certain engine conditions are out of limits. For example, if the engine is not fully warm or if an engine coolant temperature (ECT) sensor circuit problem exists, the KOER self-test routine may stop before checking fuel control and air injection. The scan tool automatically displays any codes recorded and transmitted up to the point where the test stopped. 58 Ford Testing Testing Engine & Powertrain Systems The code display is a valid report of system problems. Diagnose and correct the condition that caused the code. This may be as simple as ensuring that the engine is fully warm and repeating the test. After the problem is corrected, always repeat the test to be sure that the code is not reset and that no other codes are present. i NOTE: A hand-operated vacuum pump is needed to trigger the KOER self-test on all EEC-III systems except 1983 5.0L trucks. z To select an EEC-III KOER self-test (except 1983 5.0L trucks): 1. With the ignition switched off, select Service Codes > KOER Self-Test. The test screen displays. 2. Be sure the ignition has been off for 10 seconds; then start and run the engine at 2000 RPM for 2 minutes to reach normal operating temperature and enter closed loop. The timer at the lower right of the screen counts time as the engine warms up. If the engine is not fully warm, the self-test may not complete. 3. Select and an initiation message displays. 4. Apply 22 inHg of vacuum to the vent port of the barometric and manifold absolute pressure (BMAP) sensor. Hold vacuum for about 8 seconds; then release it. The vacuum release triggers the self-test. A “test initiated wait” message displays. The EEC-III system cycles through the self-test, and a code list displays at the end of the test: a. If no codes are present, “11 system pass” displays. b. If codes are present, they display in numerical order. 1983 EEC-III Carbureted Truck KOER Self-Tests A different method, rather than releasing BMAP sensor vacuum, is used to trigger a KOER self-tests on 1983 trucks with a 5.0L or 5.8L carbureted engine. Connect the MULTI-1 adapter as shown in Figure 6-1. 1— STI pigtail 2— Jumper wire 3— EEC-III STI connector 4— Black MULTI-1 wire 5— Blue MULTI-1 wire 6— Brown MULTI-1 wire Figure 6-1 EEC-III test connector 59 Ford Testing z Testing Engine & Powertrain Systems To perform a KOER self-test on these models: • On trucks with a 5.0L 2-barrel (code F) engine, connect a jump wire from the STI pigtail (pink wire) to ground (Figure 6-1), wait 8 seconds, then disconnect the jump wire to start a self-test. • For all other 5.0L carbureted truck engines, connect a jumper wire from the self-test input (STI) pigtail to the ground terminal in the EEC-III test connector for 8 seconds. Then, remove the jumper to start the test. • On trucks with a 5.8L carbureted engine, route manifold vacuum to the tee in the thermactor air bypass valve line before running the test. EEC-IV and EEC-V/CAN KOER Self-Tests On most 1988 and all 1989 and later models, the vehicle PCM does not enter the KOER self-test if any of the on-demand codes found during the KOEO self-test are not corrected. If KOEO on-demand codes are present, a “fix all hard codes” message displays when the KOER self-test is selected. In some cases, the scan tool may display a message indicating that the cylinder identification cannot be found. If this happens, follow the procedure below. z To check for on-demand codes that have not been repaired: 1. Return to the Codes Menu. 2. Select Review Codes. 3. If no uncorrected codes are present, momentarily disconnect the scan tool from the vehicle to recall the vehicle ID from memory. Verify that the ID entered is correct. z To select a KOER self-test for EEC-IV and EEC-V/CAN: 1. Select KOER Self-Test. The test screen displays. An EEC-IV screen is similar to the EEC-V/CAN screen shown. Follow the on-screen instructions. The engine must be warm for test results to be valid. The timer at the right side of the bottom line counts minutes and seconds from when this test is selected. It counts to 9:59, then repeats from 0:00. IMPORTANT: Keep hands and test leads away from the fan and other engine parts during all engine running tests. Certain components may cycle on at any time during engine running tests. 2. After 2 minutes a test initiation message displays. On an EEC-IV system, if you performed the engine-off test before the engine-running test, a “warning” message displays if the ignition was not switched off. This message means the self-test output (STO) circuit to the PCM is energized from a previous test. For some vehicles, you can ignore this message and press Y to enter the KOER test. If uncertain, turn the key off, wait 10 seconds, and test. 3. Select and “self-test initiated wait for codes” displays. You should hear engine speed change with most systems during the test if it progresses normally. Also, the screen changes and may make certain requests during the self-test. At the end of the KOER self-test, a code list displays. 60 Ford Testing Testing Engine & Powertrain Systems Reading EEC-IV Slow Codes If you choose to read slow codes during the KOER test, it takes longer to receive all of the codes. LED #1 flashes as the scan tool receives code pulses. The LED flickers briefly as the PCM transmits fast codes. It then pulses evenly as the scan tool receives the slow codes. The PCM transmits on-demand codes. All of the code digit pulses are one-half second on and one-half second off. A two-second pause is used to separate the digits of each code, and a four-second pause separates the codes from each other. The entire test may take several minutes. The time it takes to run depends on the length of the code list. IMPORTANT: Do not cancel or exit a KOER test until the last code pulse is received. Wait at least 5 to 10 seconds after the last LED flash before exiting. Exiting sooner interrupts the code transmission and not all codes are received. “End of List” does not necessarily mean that the test is over. MCU KOER Self-Tests The KOER self-test for MCU systems displays on-demand codes that are present with the ignition on and the engine running. The MCU is a limited function system that only controls fuel mixture at cruise. There is no idle speed, timing, or EGR control. Fuel corrections are made in response to oxygen sensor feedback. A KOER self-test for an MCU system is similar to that for an EEC-IV system (see “EEC-IV and EEC-V/CAN KOER Self-Tests” on page 60), except MCU does not output continuous codes and does not perform wiggle tests. In addition, the self-tests detect only MCU-related faults. Problems outside the MCU system do not set codes. Use EEC-IV and EEC-V KOEO self-test for procedures to test MCU. i NOTE: MCU cylinders 4 and 6 require 2500 RPM before the test will initiate. Code Speed Most EEC-IV systems transmit both slow codes and fast codes, and the scan tool reads either. The only difference between the slow and fast codes is the transmission speed from the system PCM. Typically, fast code transmission is the quickest and most accurate way to perform tests. However, some vehicles may not reliably transmit fast codes. On others, signal interference causes invalid service codes. Use the Code Speed selection on the Codes Menu to choose the desired code-reading speed. On an EEC-IV vehicle, the Code Speed selection also allows choosing between automatic or manual clearing of continuous codes. Code speed selections remain as set until you change it, or until the internal battery is disconnected. If you select Fast Codes w/Automatic Code Clearing, the scan tool automatically clears codes from the PCM after reading the fast code transmission cycle during the KOEO test. Select slow codes and you must manually clear codes using the Clear Codes selection on the Codes Menu. Selecting Code Speed opens the Select Code Speed menu. 61 Ford Testing Testing Engine & Powertrain Systems Memory Codes Available on power stroke diesel and EEC-V systems only, selecting Memory Codes displays the continuous codes of intermittent faults from PCM memory. These codes should be serviced last, after any on-demand codes. On EEC-IV systems, memory codes gather at the end of the KOEO self-test. Clear Codes Clear Codes is available on EEC-IV and EEC-V/CAN systems only, this selection manually clears continuous codes from PCM memory. On EEC-IV systems, you have the option of clearing codes automatically after a KOEO self-test. EEC-IV Code Clearing The Clear Codes selection for EEC-IV systems is used to manually erase the PCM memory. When selected, the scan tool repeats the KOEO test, then interrupts the self-test input line to clear the PCM. Ford service procedures advise clearing all codes after making repairs and then repeating the self-test to verify the repair. Note that continuous codes displayed during a self-test are saved in scan tool memory. If codes are cleared and the problem does not reoccur for an on-demand code when a self-test is repeated, the PCM does not set the code. Repeating a self-test erases the code list from a previous test in memory—including continuous codes—and replaces it with a new list. i z NOTE: This manual code-clearing method must be used if the code speed selection is set to read slow codes or fast codes with auto code clear. See “Reading EEC-IV Slow Codes” on page 61 for more information. To clear codes on EEC-IV systems: 1. Select Clear Codes. A confirmation screen displays. 2. Select and switch the ignition on. The display changes to read “self-test initiated wait for code clearing.” After about 40 to 60 seconds, the “codes cleared” screen should display. If the codes cleared message does not appear after about 1 minute, refer to “Ford Communications Problems” on page 655 to diagnose a vehicle self-test failure. EEC-V/CAN Code Clearing The Clear Codes selection on EEC-V/CAN systems, which manually erases the PCM code memory, is similar to that for EEC-IV systems. i NOTE: Before clearing codes on an EEC-V/CAN system, always check freeze frame data, pending DTCs, OBD-II Readiness Monitors, and Mode 06 Data. 62 Ford Testing z Testing Engine & Powertrain Systems To clear codes on EEC-V/CAN: 1. Select Clear Codes. A confirmation screen displays. 2. Select to continue. A “self-test initiated” message displays. After about 40 to 60 seconds, the “codes cleared” screen should display. If the codes cleared message does not appear after about 1 minute, refer to “Ford Communications Problems” on page 655. Review Codes The Review Codes selection is available on the Codes Menu after running a self-test. This selection is available on EEC-III, MCU, EEC-IV, and EEC-V/CAN systems. z To review codes: 1. Select Review Codes. 2. Repair faults in the order listed. Also, remember these points: 3. Review all codes until “end of list” appears. 4. Select Fast Codes w/Automatic Code Clearing for any EEC-IV system and the scan tool clears codes from the PCM automatically after a test but saves them in the scan tool memory. 5. The scan tool saves the codes from the most recent KOEO or KOER self-test for display in review codes. If a test is repeated, new codes replace previous ones. 6. Always record continuous memory codes after any EEC-IV test. They may be automatically cleared from the PCM, and subsequent tests may not display them. 7. If you are reading slow codes or fast codes without auto code clear on an EEC-IV system, the scan tool saves them in memory. However, the Clear Codes selection must be used to clear the PCM. MECS Service Codes Selecting Auto Code Read displays a “gathering codes” message. If multiple codes are received, the scan tool continues to add to the list. Scroll to view the numbers and titles of all codes. Code numbers appear on the top line in the order in which the ECM transmits them. The LEDs flash simultaneously with the codes as they are received by the scan tool. i NOTE: Some vehicles transmit codes very slowly. Allow several seconds after receiving any code to ensure that no more codes follow. 6.1.2 EEC-IV Functional Tests i NOTE: Operations described in this section are not available on all tool platforms. 63 Ford Testing Testing Engine & Powertrain Systems EEC-IV systems typically offer several functional tests. i NOTE: For EEC-IV vehicles, the ignition key should be switched off when selecting Functional Tests from the Main Menu - PCM. This section includes the following functional tests for EEC-IV systems: • • • • • • • Computed Timing Test, on page 64 Wiggle (Engine Off) Test, on page 64 Wiggle (Engine Running) Test, on page 65 Output State Check, on page 66 Idle Speed Adjustment Test, on page 66 SEFI Cylinder Balance Test— 1986 to 1995 EEC-IV Engines Only, on page 67 LFC and HFC (Low and High Fan Control), on page 69 Computed Timing Test The Computed Timing functional test checks ignition timing with the engine running at a controlled idle speed. It also verifies the ability of the PCM to advance and retard timing. Connect either a timing light or a magnetic timing meter to the engine before testing. On most EEC-IV engines, the PCM advances timing 20° above the base timing setting. So if the base timing specification is 10° BTDC, expect to read 30° BTDC with a timing light or meter. Refer to Ford service manuals for timing specifications and test procedures. z To conduct a computed timing test: 1. Select Computed Timing. The “timing check” screen displays. i NOTE: A “warning” message displays if the timing check test is selected with the engine running or with the ignition switch on. This means the PCM self-test output (STO) circuit is still energized from a previous test. On some vehicles, this message can be ignored. If uncertain, turn the key off, wait 10 seconds, restart the engine, then enter the test. 2. With the engine warm and running at idle, select to start the test. 3. Check the timing with a timing light or timing meter within 2 minutes. Wiggle (Engine Off) Test Selecting Wiggle (Engine Off) puts the EEC-IV system into a program that records intermittent service codes that occur as you wiggle or tap on various engine sensors, actuators, and wiring connectors with the ignition on and the engine off. 64 Ford Testing z Testing Engine & Powertrain Systems To conduct a wiggle (engine off) test: 1. Select Wiggle (Engine Off). The test initiation screen displays. 2. Switch the key on and select to continue. After a brief startup message, the test displays. 3. Wiggle or tap the engine sensors, actuators, and wiring connectors. The bottom line of the screen is blank until a fault occurs and a code sets. If a code sets, the bottom line displays a “memory code stored–run KOEO test” message. Always check for memory DTCs after a wiggle test. i NOTE: Do not wiggle the test adapter loose from the self-test connector during this test or a false code may set. Always exit the test before turning off the ignition or a false code may result. z To read the service codes from a wiggle test: • Select Codes Menu > KOEO Self-Test. Wiggle (Engine Running) Test Selecting Wiggle (Engine Running) from the EEC-IV Functional Tests menu places the EEC-IV system into a program that records intermittent service codes as you wiggle or tap on engine sensors, actuators, and wiring connectors with the engine running. The test is not valid for the following engines because the self-test output line continuously switches from high to low, which could mask any faults detected by the Wiggle test: • • • • z 1984–85 1.6L 1984–85 2.3L SVO 1985–86 2.3L turbo 1986 3.0L To conduct a wiggle (engine running) test: 1. Select Wiggle (Engine Running). The test instruction screen displays. 2. If the engine is running, a warning message displays. Switch the engine off, wait 10 seconds, then restart the test. Otherwise, start and run the engine at idle speed. 3. Once the engine is fully warm, select to enter the test. The screen momentarily displays a test initiated message, then switches to the test screen. 4. Wiggle or tap on sensors, actuators, and wiring connectors. The bottom line of the screen is blank until a fault occurs and a code sets. When a code sets, the bottom line reads “memory code stored–run KOEO test,” but this message only appears during a fault. Always check for memory DTCs after a wiggle test. i NOTE: Do not wiggle the test adapter loose from the self-test connector during this test, or a false code may set. Always exit the test before turning off the ignition. 65 Ford Testing z Testing Engine & Powertrain Systems To read the service codes from a wiggle test: • Select Codes Menu > KOEO Self-Test. Output State Check Selecting Output State Check from the EEC-IV Functional Tests menu allows you to switch the PCM signals to the engine actuators on and off to take voltmeter readings. If the engine is running, turn it off before selecting the output state test. i NOTE: The EEC-V menu selection is Output State Test instead of Output State Check for EEC-IV systems. This difference is with terminology only; the function is the same. z To conduct an output state test: 1. Select Output State Check. The test initiation screen displays. 2. Following the screen instructions, switch the ignition on with the engine off, then press Y. IMPORTANT: When the test begins, all actuators (except IAC and fuel injectors) should be off and the control circuits from the PCM should be high (above 10 V). Use the DVOM or lab scope to check actuators. A “self-test initiated” screen displays, followed by the test screen. 3. Press the accelerator to wide open throttle (WOT) to switch all engine actuators from off to on or from on to off. All of the actuators stay on or off until the throttle is pressed again. As the actuators change state, the bottom line of the display shows if they are on or off. Idle Speed Adjustment Test The Idle Speed Adjust functional test allows you to adjust the idle speed for certain 1990 and later engines. Before adjusting idle speed, make sure the throttle body and idle speed control (ISC) device are clean, and the throttle linkage is not sticking or binding. Certain throttle bodies and ISC devices cannot be cleaned. Refer to Fast-Track® Troubleshooter, Ford Reference F051 for throttle body cleaning information. Also, switch all accessories off and make sure the O2S is working properly, ignition timing is correct, and there are no vacuum leaks. Place the transmission in park or neutral before selecting the test. A command from the scan tool starts the engine-running test, and a signal from the EEC-IV PCM indicates when the test is complete. During this waiting period, the cylinder identification displays along with instructions to press the brake pedal, turn the steering wheel, or snap the throttle. These actions are not necessary, however, doing them speeds the self-test. 4. If any service codes other than “11–no faults present” are displayed after the engine-running test, correct any code problems before proceeding with the idle adjustment. 66 Ford Testing z Testing Engine & Powertrain Systems To conduct an idle speed adjustment test: 1. Select Idle Speed Adjust. The test initiation screen displays. If another test was performed before this one, a “warning” screen may display because the self-test output (STO) circuit is still energized from the previous test. For some vehicles, it is safe to ignore this message and enter the test. If you are uncertain, turn the key off, wait 10 seconds, and restart the engine before entering the test. 2. Start the engine and run at 2000 RPM for two minutes. There is a clock displayed in the lower right corner of the screen. Skip this warm-up if the engine is already warm. 3. Select the test and the “test initiated” screen displays. Once the test is complete, the scan tool sends a start-idle-test signal to the PCM. The screen changes as the scan tool waits for a response from the PCM. Some 1991 5.8L truck engines do not have the idle speed test. When the idle speed test signal is received from the PCM, the throttle stop screw adjustment screen displays. The display indicates if idle speed is too high, too low, or correct. If the display reads “TPS out of adjustment—fix first,” the throttle position sensor must be fixed to proceed. If idle speed is correct, skip to the last step. Ten minutes after the idle speed test signal is received, the PCM stops communicating. Normally, this is enough time to complete the adjustment. If not, return to the Functional Tests menu and repeat. 4. Turn the throttle stop until “idle RPM correct” displays. 5. Exit when the idle RPM is correct. An instruction and verification screen displays. 6. Run the engine at 1500 RPM for 10 seconds, return to idle, and activate the test. An idle RPM correct message should display. If not, repeat the idle speed adjustment. 7. When the idle is properly adjusted, select to exit. SEFI Cylinder Balance Test— 1986 to 1995 EEC-IV Engines Only The cylinder balance test, used only on EEC-IV models with sequential electronic fuel-injection (SEFI), is actually a functional test. However, it is entered at the end of a KOER self-test. The test isolates a weak cylinder. The PCM begins the test by fixing the idle speed control duty cycle and allowing the engine to stabilize. The PCM then records and stores the engine speed for future reference. Depending on the engine, the PCM: 1. Shuts off fuel to a specific cylinder. 2. Allows the engine to stabilize. 3. Records and stores engine speed. 4. Switches the fuel back on. 67 Ford Testing Testing Engine & Powertrain Systems This process repeats for each remaining cylinder in descending order. Table 6-1 SEFI Cylinder Balance Application Chart Year z Engine 1986 to 1988 5.0l Thunderbird/Cougar, Lincoln Town Car, Lincoln Mark VII, Crown Victoria/Grand Marquis 1989 to 1990 3.0L SHO Taurus, 3.8L Taurus/Sable, Lincoln Continental, Thunderbird/ Cougar, 5.0L Thunderbird/Cougar, Lincoln Town Car, Lincoln Mark VII, Crown Victoria/Grand Marquis 1991 All Except: 2.3L Tempo, Topaz, Mustang, 3.0L Probe, all Truck engines 1992 All Except: 2.3L Mustang, 3.0L Probe, 2.3L, 2.9L, & 4.0L Ranger, 4.0L Aerostar and Explorer, 4.9L, 5.0L, 5.8L Truck 1993 All Except: 2.0L Probe, 2.3L Mustang & Ranger, Non-California 4.0L Ranger, Explorer, Aerostar, 4.9L, 5.8L, 7.0L & 7.5L Truck engines 1994 All Except: Non-California 2.3L & 4.0L Ranger, Explorer, Aerostar 1995 All Except: 4.9L, 5.8L, 7.0L & 7.5L Truck engines To perform the SEFI Cylinder Balance Test on 1986 to 1987 models: 1. Perform a KOER self-test. 2. After the last repeated service code is received, wait approximately 10 seconds. 3. Lightly depress throttle and release. You will notice a RPM rise and cylinder deactivation when the test starts. The test will run for approximately 90 seconds. 4. Repeat the test as needed by lightly tapping the throttle after the last repeated service code. 1988 to 1995 models The SEFI Cylinder Balance Test on 1988 to 1995 models has three levels of sensitivity: • First Level—65% gross misfires. • Second Level—43% partially contributing. • Third Level—20% partially contributing. z To perform a First Level SEFI Cylinder Balance Test on 1988 to 1995 models: 1. Perform a KOER self-test. 2. After the last repeated service code is received, wait approximately 10 seconds. 3. Lightly depress throttle and release. You will notice a RPM rise and cylinder deactivation when the test starts. The test will run for approximately 90 seconds. z To perform a Second Level SEFI Cylinder Balance Test on 1988 to 1995 models: 1. Perform a First Level SEFI Cylinder Balance Test. 2. After the last repeated Cylinder Balance test pass code 90, re-enter the test within 2 minutes by lightly depressing and releasing the throttle. The second level testing will now complete. 68 Ford Testing z Testing Engine & Powertrain Systems To perform a Second Level SEFI Cylinder Balance Test on 1988 to 1995 models: 1. Perform a Second Level SEFI Cylinder Balance Test. 2. After the last repeated Cylinder Balance test pass code 90, re-enter the test within 2 minutes by lightly depressing and releasing the throttle. The third level testing will now complete. Table 6-2 SEFI Cylinder Balance DTC Chart Service Code 90 10 20 30 40 50 60 70 80 77 Cylinder Number Pass 1 2 3 4 5 6 7 8 Rerun Test Injector Number Pass 1 2 3 4 5 6 7 8 58 59 12 13 14 15 42 52 PCM pin # Table 6-3 1988 to 1995 SEFI 3 Levels. Example With #3 Cylinder Level 1 Level 2 Level 3 Indication 90 X X All cylinders contributing equally. 30 90 X Indicates a weak cylinder. Cylinder is firing but not contributing as much as the others. 30 30 90 Same as above but more severe. 30 30 30 Very weak or dead cylinder. LFC and HFC (Low and High Fan Control) The LFC and HFC (Low Fan Control and High Fan Control) functional test allows manual control of the engine cooling fans during KOEO engine fan testing in 1992 to 1995 Escorts and 1.9L Tracers with EEC-IV systems. z To perform a LFC and HFC test: 1. Select engine Functional Tests from the PCM main menu. 2. Select Output State Check 3. When the output state is ready, depress and hold the throttle down. 4. Wait for the MIL to flash once (10 seconds) and release the throttle for low speed. 5. Wait for the MIL to flash twice (15 seconds) and release the throttle for high speed. 6. Depress and release the throttle to cycle fans on and off. 6.1.3 Non-Powerstroke Diesel 7.3L Functional Tests This section includes the following functional tests: • Wiggle (Engine Running) Test, on page 70 • Output State Check, on page 70 • Fuel Injection Pump Lever Test—7.3L Non-Powerstroke Diesel, on page 71 69 Ford Testing Testing Engine & Powertrain Systems Wiggle (Engine Running) Test Selecting Wiggle (Engine Running) places the PCM system into a program that records intermittent service codes as you wiggle or tap on engine sensors, actuators, and wiring connectors with the engine running. z To conduct a wiggle (engine running) test: 1. Select Wiggle (Engine Running). The test instruction screen displays. 2. If the engine is running, a warning message displays. Switch the engine off, wait 10 seconds, then restart the test. Otherwise, start and run the engine at idle speed. 3. Once the engine is fully warm, press Y to enter the test. The screen momentarily displays a test initiated message, then switches to the test screen. 4. Wiggle or tap on sensors, actuators, and wiring connectors. The bottom line of the screen is blank until a fault occurs and a code sets. When a code sets, the bottom line reads “memory code stored–run KOEO test,” but this message only appears during a fault. Always check for memory DTCs after a wiggle test. i NOTE: Do not wiggle the test adapter loose from the self-test connector during this test, or a false code may set. Always exit the test before turning off the ignition. z To read the service codes from a wiggle test: • Select Codes Menu > KOEO Self-Test. Output State Check Selecting Output State Check from the Functional Tests menu allows you to switch the PCM signals to the engine actuators on and off to take voltmeter readings. If the engine is running, turn it off before selecting the output state test. i NOTE: The EEC-V menu selection is Output State Test instead of Output State Check for EEC-IV systems. This difference is with terminology only; the function is the same. z To conduct an output state test: 1. Select Output State Check. The test initiation screen displays. 2. Following the screen instructions, switch the ignition on with the engine off, then press Y. IMPORTANT: When the test begins, all actuators (except IAC and fuel injectors) should be off and the control circuits from the PCM should be high (above 10 V). Use the DVOM or lab scope to check actuators. A “self-test initiated” screen displays, followed by the test screen. 70 Ford Testing Testing Engine & Powertrain Systems 3. Press the accelerator to wide open throttle (WOT) to switch all engine actuators from off to on or from on to off. All of the actuators stay on or off until the throttle is pressed again. As the actuators change state, the bottom line of the display shows if they are on or off. Fuel Injection Pump Lever Test—7.3L Non-Powerstroke Diesel The FIPL Adjust selection is available on trucks with a 7.3L non-Powerstroke Diesel engine, an E4OD transmission, and an EEC-IV transmission control system. The FIPL adjust test allows for FIPL sensor inspection and adjustment. Improper adjustment causes harsh upshifts and transmission damage. i NOTE: Use a 0.515-inch gauge block (Ford tool T83-78200-AH, or equivalent) when performing this test. See Transmission Troubleshooter Reference F1002 for tool dimensions and usage. The FIPL sensor attaches to the diesel injection pump and is operated by the throttle lever (Figure 6-2). The FIPL sensor transmits a signal to the transmission electronic control (TEC) module that varies in proportion to the amount of fuel being delivered by the pump. An FIPL sensor operates much like the throttle position sensor on a gasoline engine. The TEC uses the FIPL signal to control shifting and torque capacity, which results in line pressure changes. This is similar to a vacuum modulator or throttle valve linkage operation on a conventional automatic transmission. 1— Fuel Injection Pump Lever (FIPL) sensor 2— Maximum throttle travel screw (do not adjust) 3— Low idle adjust screw Figure 6-2 Sample diesel fuel injection pump top view Two people are required to perform this test, one inside the vehicle to operate the scan tool and hold the throttle down, and one to make adjustments inside the engine compartment. IMPORTANT: Do not release the throttle with the gauge block in place, as the gauge block can fall inside the intake valley, making it difficult to retrieve. 71 Ford Testing i z Testing Engine & Powertrain Systems NOTE: When the FIPL sensor malfunctions, the TCM detects an out-of-limit signal and goes to a backup mode to protect the transmission. In this mode, the TEC commands maximum throttle valve (TV) pressure for a single shift schedule regardless of throttle position—equivalent to a heavy, but not wide open, throttle. Harsh upshifts, particularly noticeable at light throttle, result. An intermittent or erratic signal or an incorrectly adjusted FIPL sensor may not be detected by the TEC, resulting in shifting problems and possible transmission damage. To conduct a FIPL adjust test: 1. Select FIPL Adjust. The tool installation screen displays. 2. Insert the 0.515-inch gauge block between the gauge boss and the maximum throttle travel screw (Figure 6-3). Hold the throttle open against the gauge block to keep it in place. 1— Fuel pump lever travel screw (do not adjust) 2— Gauge block 3— Gauge boss 4— Low idle adjust screw Figure 6-3 Gauge block installation (right side view) On F-series trucks, the throttle return spring may be used to hold the throttle lever open. To do this: a. Release the throttle and remove the throttle cable from the throttle lever on the right side of the pump. b. Remove the throttle return spring. c. Install one end of the spring over the throttle lever ball stud and the other end over the throttle cable support bracket. 3. After inserting the gauge block, select to continue. The FIPL adjustment screen displays. 4. Without starting the engine. Hold the throttle down, select the test, and turn the ignition on. A “self test initiated” screen displays, the scan tool starts the KOEO test, then waits for a signal from the PCM indicating that the vehicle is ready for FIPL adjustment. The display indicates when the FIPL adjust test is complete. IMPORTANT: Do not turn the key off until the FIPL Adjust test is complete and the engine off test complete message displays on the screen. Doing so gives inaccurate test results. 72 Ford Testing Testing Engine & Powertrain Systems 5. Press the overdrive cancel switch once to begin the FIPL test. The overdrive cancel switch is on the end of the shift lever or the instrument panel. Ten minutes after the overdrive-cancel switch is pressed, the PCM stops communicating with the scan tool. Normally, this is enough time to complete the test and adjustment. If not, exit the test, go to the Functional Tests menu, and repeat this procedure. IMPORTANT: Incorrect FIPL sensor adjustment may result in transmission damage. The sensor is attached to the pump with tamperproof screws. Do not move the mounting bracket. Only adjust the clearance between the sensor-to-bracket screws and the sensor. 6. If needed, adjust the FIPL sensor as follows and refer to Figure 6-4. a. Loosen the two FIPL sensor attachment screws. b. Slowly rotate the sensor until the display indicates the setting is correct. The FIPL sensor rotates slightly in either direction. Rotate the FIPL first one way, and then the other until properly adjusted. If the sensor cannot be properly adjusted, replace it. c. Tighten the screws to 75 to 90 inch-pounds of torque. d. Remove the gauge block and cycle the throttle lever from idle to WOT five times. e. Use the gauge block and verify the FIPL setting. If further adjustment is necessary, repeat the procedure. 1— Fuel Injection Pump Lever (FIPL) sensor 2— FIPL attachment screws (do not over-tighten) 3— FIPL bracket screws (do not adjust) Figure 6-4 Adjusting the FIPL sensor (left side view) 7. When the FIPL setting is correct, exit. 8. Remove the gauge block and attach the throttle return spring and throttle cable in the proper locations. 9. Exit to end the FIPL test. 10. After testing, drive the vehicle to check throttle operation and transmission shifting. 6.1.4 EEC-V Functional Tests (OBD II) i NOTE: Operations described in this section are not available on all tool platforms. 73 Ford Testing Testing Engine & Powertrain Systems The EEC-V Functional Tests menu offers various selections for vehicles with gasoline engines including: • • • • • • Output State Test, on page 74 Module Identification Test, on page 74 Bypass EVAP System Cold Soak, on page 74 EVAP System Test, on page 75 Interactive Bi-directional Functional Tests— EEC V (OBD II), on page 75 Testing Transmission Systems and Functional Tests, on page 76 Output State Test An output state test allows you to switch PCM signals to the engine actuators on and off so they can be tested with a DVOM or lab scope. The engine must be off before the test is selected. Output state tests for gasoline and diesel systems are slightly different. During an output state test, actuators stay on or off until you switch them. Actuators default to their normal state after 10 minutes, after the vehicle is started, or after cycling the ignition switches off and on. ! CAUTION Make sure the fuel system is intact and not being serviced before proceeding. Selecting all outputs on causes the electric fuel pump to briefly energize. Also, make sure fan blades are clear of obstruction before selecting low or high speed fan on. z To conduct an output state test on a vehicle with a gasoline engine: 1. Select Output State Test. A test activation screen displays. 2. Activate and the test list displays. 3. Select the desired test. If the vehicle performs the test, “activated” displays to the right of the selected test. If the vehicle does not perform the test, “error” displays to the right of the selected test. 4. Take circuit readings while the test is activated. Module Identification Test The Module ID selection from the EEC-V Functional Tests menu displays the PCM module software file, part number, and, if available, the VIN of the vehicle. Bypass EVAP System Cold Soak Selecting the EVAP system cold soak bypass test allows the OBD ‘EVAP running loss drive cycle’ to proceed for the purpose of evaporative system fault verification. This functional test is designed to bypass the ‘engine off cold soak timer’ that otherwise requires an engine off waiting period (for instance, 6 hours) before the EVAP monitor is available. Do not shut the ignition off once the EVAP 74 Ford Testing Testing Engine & Powertrain Systems bypass mode is enabled, or the EVAP cold soak timer will be reset. Certain conditions, such as the correct fuel level, are required for successful EVAP system testing. IMPORTANT: Performing this procedure will clear the PCM of any stored diagnostic information and reset the Readiness Monitor Status. It is recommended to gather any desired diagnostic information such as memory DTCs or Freeze Frame Data before testing. Follow the factory recommendations for specific EVAP system drive cycle procedures. EVAP System Test Selecting EVAP System test initiates a functional leak check of the evaporative emission system. The test routine manipulates EVAP control solenoids and engine RPM for the purpose of detecting system leaks that are 0.040” or larger. For accurate results, the test requires that the engine is running as well as other operating conditions such as the correct fuel level input. The EVAP system test does not affect the OBD EVAP monitor readiness status and is only designed to function as an automated system leak test. The test is not designed to set or clear any specific trouble codes. The scan tool may report any conditions that are preventing successful leak testing, such as low fuel level, or engine RPM out of range. When testing is complete, either a ‘system pass’ or specific fault detected message will display. Certain conditions (for instance, the amount of vapor present in the EVAP system) may cause various engine responses such as low idle or stalling. These are normal and do not affect overall test results. IMPORTANT: If the EVAP system test is repeated, a waiting period (at least 90 seconds) is recommended to prevent a possible false leak condition. Interactive Bi-directional Functional Tests— EEC V (OBD II) Many late-model Ford vehicles have bi-directional ECMs. This means that the ECM not only transmits data, but also accepts commands from the scan tool. Bi-directional ECMs transmit a complete data stream to the scan tool and provide many functional test capabilities. Functional Test Operation There are four general types of functional test operations: • Information Tests—These are read-only tests. For instance, select Module ID from the functional tests and the scan tool displays the VIN number. • Toggle Tests—These tests switch a component, such as a solenoid, relay, or switch, between two operating states. The terms “on/off,” “open/clsd,” “enab/disa”, “excd/norm”, “pass/fail,” “lean/rich,” “high/norm,” or “rev/fwd” may be used to name states. • Variable Control Tests—These tests command a certain value for a system or component. For instance, the “Electronic Pressure Control, test allows the scan tool to vary EPC in 15 percent increments up to 90 percent. • Reset Tests—These tests reset the adaptive, or learned, values stored in the PCM. The toggle tests, variable control tests, and reset tests all look very similar on the scan tool display. 75 Ford Testing Testing Engine & Powertrain Systems Testing Transmission Systems and Functional Tests The majority of Ford transmission and engine systems are integrated into a single PCM controller. Code output and Data display include faults and information for both engine and transmission. 2004 and later models may use a separate TCM (transmission control module) which must be tested separately. Ford transmission testing menu selections vary by year and model. Transmission test menu locations 2003 and earlier transmission tests are available by selecting Engine & Powertrain from the system menus. Transmission tests are integrated into the PCM menu. 2004 and later transmission tests are available in a separate menu selection. Transmission tests are available at the transmission main menu. Transmission Functional Tests • Interactive bi-directional functional testing is available on most OBD-II vehicles. • The tests include Bench Mode, Drive Mode, and Clear or Stop Transmission Adaptive Tables. • Transmission functional tests allow the technician to command certain parameters to control the transmission. • For example the Scanner can be used to shift the transmission only when a gear change is commanded (if 1st gear is commanded, the transmission will remain in 1st gear until the next gear is selected). • Another example, the Scanner can command a shift solenoid to turn on or off. ! CAUTION Do not enter a functional test while conducting a road test unless the road test requires it. The PCM makes changes to transmission shift scheduling, the ignition timing, fuel delivery, and other vehicle functions, which may affect engine operation and vehicle control. If a device control limit message displays while performing a functional test, it means the test aborted due to an internal function of the PCM. This does not indicate a problem with the scan tool. Some safety limits are engineered into the PCM to prevent a functional test from enabling under certain inappropriate conditions. Always use caution when controlling the automatic transmission to prevent injuries and damage. Two functional tests are available to test transmission systems: • Trans Bench Mode, on page 76 • Trans Drive Mode, on page 77 z To navigate to transmission functional test: • Select Functional Test from the main menu, Trans Bench Mode and Trans Drive Mode will display as menu selections. Trans Bench Mode The Trans Bench Mode allow users to command various transmission solenoids on or off or vary a PWM signal. Electrical tests, data value collection, and other measurements may be performed during Trans Bench Mode testing. 76 Ford Testing Testing Engine & Powertrain Systems Trans Bench Mode operates only when: • • • • • Digital TR sensor is operational and no digital TR sensor DTCs are present. Vehicle speed sensor is operational and no VSS sensor DTCs are present. Transmission range selector lever is in P. Key is ON. Engine is Off. Trans Bench Mode command values: • OFF—turns the solenoid Off. • ON—turns the solenoid ON. Trans Drive Mode The Trans Drive Mode is a bi-directional functional test that allows the scan tool to control the main functions of the transmission. Gear shift, torque converter clutch and shift solenoids can be controlled. For example, the scan tool Trans Drive Mode allows the technician to command the torque converter clutch to engage while monitoring the actual converter slip or disengage the torque converter clutch while testing the transmission upshifts and downshifts. Trans Drive Mode operates only when: • • • • • • • • Digital TR sensor is operational. No digital TR sensor DTCs are present. Vehicle speed sensor is operational. No VSS sensor DTCs are present. Engine is ON. TCC is Off. Transmission range selector lever is in O/D. Vehicle speed is greater than 3.2 km/h (2mph) Trans Drive Mode command values: • • • • 1—PCM selects 1st gear. 2—PCM selects 2nd gear. 3—PCM selects 3rd gear. 4—PCM selects 4th gear. Clear Trans Tables, Stop Trans Adaptive Learning, Stop Use of Trans Adaptive, Enable Trans Table Selecting transmission functional tests lets you clear, block or enable the transmission adaptive tables. During the normal vehicle operation, or repeated drive cycle, the ECM or TCM stores the transmission adaptive information in KAM tables. This stored adaptive information may affect the way the vehicle operates. Clearing or stopping the transmission tables eliminates any information that you no longer want to the vehicle to use when driving. Transmission adaptive functions are only applicable to certain vehicles with specific transmissions. A validation message may display if the test or function selected is not supported or the test conditions are not correct (for instance if the vehicle is moving). 77 Ford Testing Testing Engine & Powertrain Systems Operating Conditions and Vehicle Requirements • Each test mode has a unique set of vehicle operating requirements. • Certain conditions must be satisfied for a transmission functional test to operate properly. • The presence of DTCs (including non-transmission DTCs) or other system faults may affect functional testing. • If vehicle requirements are not met when sending a functional test command, the Scanner will display an error message. • When the error message is received, functional test is aborted and must be restarted. Before Initiating a Functional Test • Select Codes Menu and perform the KOEO and KOER Self Tests (engine and transmission may have to be tested separately). • Service DTCs, including non-transmission DTCs. • Service any digital TR Sensor DTCs and verify the TR sensor is operational. • Service all vehicle speed DTCs and verify the VSS source is operational. Potential Vehicle Speed Sources (Varies By Application) • Anti-lock braking system (ABS or RABS). • Output shaft speed sensor (OSS). • Vehicle speed sensor (VSS). • Transfer case speed sensor (4x4 equipped) 6.1.5 Powerstroke Diesel Functional Tests The following functional tests are available for trucks with 7.3L Powerstroke diesel engines: • • • • • Output State test Injector Buzz test Glow Plug test Cylinder Contribution test Switch test Two functional tests are currently available for 6.0L direct injection turbo (DIT) diesel engine: • Injector Buzz test • Glow Plug Engine Running test Output State Test An output state test allows you to switch PCM signals to the engine actuators on and off so they can be tested with a DVOM or lab scope. The engine must be off before the test is selected. Output state tests for gasoline and diesel systems are slightly different. 78 Ford Testing Testing Engine & Powertrain Systems During an output state test, actuators stay on or off until you switch them. Actuators default to their normal state after 10 minutes, after the vehicle is started, or after cycling the ignition switches off and on. ! CAUTION Make sure the fuel system is intact and not being serviced before proceeding. Selecting all outputs on causes the electric fuel pump to briefly energize. Also, make sure fan blades are clear of obstruction before selecting low or high speed fan on. z To conduct an output state test on a vehicle with a Powerstroke 7.3L diesel engine: 1. Select Output State Test. A test activation screen displays. 2. Press and release the accelerator pedal to cycle the output state of relays, solenoids, the transmission control indicator lamp (TCIL), the fuel delivery command signal (FDCS), the cylinder identification (CID) signal, the wait-to-start lamp, and the electronic feedback (EF) signal from the injector drive module (IDM). 3. Take circuit readings while the test is activated. 4. Press the brake pedal to exit. Module Identification Test The Module ID selection from the Powerstroke Diesel Functional Test menu displays the PCM module software file, part number, and, if available, the VIN of the vehicle. Injector Buzz Test The injector buzz test performs an operational check of the injector solenoids and valves on 6.0L and 7.3L diesel engines. The engine must be off to run the injector buzz test. ! CAUTION Make sure the fuel system is intact and that no fittings or connections are open for service before proceeding with the injector buzz test. z To conduct an injector buzz test: 1. Select Injector Buzz Test. An instruction screen displays. Make sure all accessories, including auxiliary powertrain control, are shut off. 2. Activate the test and switch the ignition on. 3. Select to begin the test and “self-test initiated” displays. This means the scan tool attempted to start the test. It does not mean that the PCM responded. If the message stays on-screen for more than several minutes, the test probably did not start. Refer to “Ford Communications Problems” on page 655 to diagnose the cause of a self-test failure. 79 Ford Testing Testing Engine & Powertrain Systems During the test, all injectors buzz together for about two seconds, then each injector buzzes individually in cylinder sequence, 1 through 8, for about one second. At the end of the test, a service code list displays. Glow Plug Test/Glow Plug Engine Running Test The glow plug test checks of the glow plugs on 6.0L and 7.3L EEC-V diesel engines. i z NOTE: The vehicle batteries must be in good condition and the charging system working properly before testing. During the test, battery voltage must be above 11.8 V and below 14.0 V. Connect a DMM to the battery to monitor voltage. If necessary, raise the engine speed during the test to maintain battery voltage. To conduct a glow plug test: 1. Select Glow Plug Test or Glow Plug Engine Running Test. A “turn off accessories” message displays. Make sure all accessories, including auxiliary power control, are off before beginning the test. 2. Select to continue. The begin test screen displays. 3. Select to continue. The “self-test initiated” message displays, which means the scan tool has attempted to start the test. It does not mean the vehicle responded. If the message remains on-screen for more than several minutes, the test probably did not start. Refer to “Ford Communications Problems” on page 655 to diagnose the cause of a vehicle self-test failure. When the PCM finishes the test, a service code list automatically displays. Cylinder Contribution Test The cylinder contribution test monitors individual cylinders and injectors to determine if all are contributing equally to engine performance. The PCM first checks each cylinder sequentially, 1 through 8, to make sure they are all contributing. The test checks for cylinder-to-cylinder decrease in speed and sets a code if the decrease is too high. A fault must be present at the time of testing for the KOER Cylinder Contribution Self Test to detect a fault, so the engine operating condition at which the idle is worst will produce the best test results. Note the following when performing a Cylinder Contribution test: • Only California vehicles will set a Continuous Misfire DTC. Both 49-state and California vehicles will set a KOER Cylinder Contribution Test (CCT) code for a low or non-contributing cylinder. If any CCT or Misfire codes are set, diagnose those codes first. • Late-model Powerstroke Diesel engines run this test without any obvious cylinder shorting or RPM change. Test results are the same. Possible causes of a misfiring cylinder are: • Broken compression rings • Leaking or bent valves 80 Ford Testing Testing Engine & Powertrain Systems • • • • Bent push rods Bent connecting rods Damaged rocker arms Faulty injector Before starting repairs, perform basic engine diagnostic tests. If all systems are operating within specifications, the injector may not be functioning properly and may need replacement. Also be sure to check the solenoids and wiring. Verify that the KOEO Injector Electrical Self-Test has passed. To ensure proper test results, the following conditions must be met: • Engine oil temperature is above 68°F (20°C) • A/C is off z To conduct a cylinder contribution test: 1. Select Cylinder Contribution Test. A “turn off accessories” message displays. All accessories, including the auxiliary power control, must be off before beginning the test. 2. Select to continue. The begin test screen displays. 3. Select to continue. The “self-test initiated” message displays. This message means the scan tool attempted to start the test. It does not mean the vehicle responded. If the message stays on the screen more than several minutes, the test probably did not start. See “Ford Communications Problems” on page 655 to diagnose the cause. During the test, some changes in engine RPM may occur. However, a weak cylinder has little effect on idle quality during the test. When the PCM finishes the test, a service code list displays. Switch Test Selecting Switch Test initiates a key-on, engine running test of various driver input circuits. This test is available for 7.3L diesel engines only. ! CAUTION Always chock the vehicle wheels before performing an engine running switch test. This test requires parking brake apply and release. z To conduct a switch test: 1. Activate the test. A test initiation screen displays. 2. Select to continue. Verify the engine is running, then perform the driver inputs in the following order: a. Press and release the accelerator to start the test. b. Set and release the parking brake. 81 Ford Testing Testing Engine & Powertrain Systems c. Press and release the speed control switches. d. Press and release either the TCS switch or the clutch pedal. e. Press and release the brake pedal. 3. When the PCM finishes the test, a code list automatically displays. i NOTE: False codes may set if the test sequence is followed improperly. Allow about 1 second between activation of each switch. 6.1.6 Data Display The Data Display test selection is available on the Main Menu - PCM of many 1990 and later Ford vehicles with an EEC-IV powertrain control module (PCM) and DCL, and also on most 1994 and later vehicles with an EEC-V PCM. These tests display the input and output signals from switches, sensors, and actuators. The speed at which the scan tool operates and displays data depends on the number of data parameters and how busy the vehicle control system is. This affects how quickly data changes on the screen, and the length of time it takes to display a movie. Differences in scan tool operation may be noticed from vehicle to vehicle. The data readings may appear to change almost instantly on some models, while they occur much slower on another vehicle. Certain parameters (especially switches) only change state if held in position. The Data Display selection requires the scan tool to communicate with the PCM. The ignition must be on to establish communication. If communication is not established within 5 seconds of the ignition switching on a “no communication” message displays. EEC-V/CAN Data Display When Data Display is selected on an EEC-V system, the Data Menu menu displays. This allows you to select groups of parameters for viewing. Selecting any of the Data Menu menu items causes the Custom Data menu to display. This feature allows you to customize the data list by selecting which data parameters to display. Eliminating unneeded parameters results in a faster display update rate. The fewer parameters displayed, the faster the update rate. When the Custom Data menu is first entered, all parameters are selected, as denoted by the asterisk that appears before them. Custom data list selections are retained in scan tool memory until a new vehicle ID is entered or another vehicle control system is selected. Be aware, this may limit Troubleshooter operation with tips that display data parameters. 82 Ford Testing Testing ABS Systems 6.2 Testing ABS Systems Antilock brake systems (ABS) are available on many 1987 and later Ford, Lincoln, and Mercury vehicles. When a system malfunction occurs, the ABS electronic control module (ECM) illuminates the ABS warning lamp on the instrument panel. On some systems, the ABS ECM stores service codes in memory for most malfunctions. These codes transmit to a scan tool through either the OBD-II DLC or the ABS test connector. In addition, some late-model ABS modules provide data stream information. Data stream information displays when the ABS control system provides it. i NOTE: The following sections apply to ABS systems on vehicles with or without traction control. After selecting ABS from the System Selection menu, the Main Menu - ABS displays. Selections vary by model and year. This section is divided into the following subsections: • • • • • “1994–96 Econoline Vans with 4WABS” on page 83 “Codes Menu” on page 84 “Data Display” on page 87 “ABS Systems Without Serial Data” on page 87 “ABS Functional Tests” on page 90 The Movies and Custom Setup options are discussed in detail in the user manual for your diagnostic tool. 6.2.1 1994–96 Econoline Vans with 4WABS The FRD-4 test adapter is used for ABS testing on the 1994–96 Econoline with 4-Wheel Antilock Brakes (4WABS). A special connection message displays if one of these vehicles is identified. i NOTE: Some 1997 Econolines also require the FRD-4 test adapter. z To connect the FRD-4 adapter for these vehicles: 1. Turn the ignition switch to the off position. 2. Attach the FRD-4 test adapter to the data cable. 3. On the underhood ABS connector near the master cylinder, insert the red wire of the FRD-4 adapter into pin 571, which is a black wire with an orange tracer (Figure 6-5). 83 Ford Testing Testing ABS Systems Figure 6-5 ABS DLC for 1994–96 Econoline with 4WABS 4. Attach the Ground adapter to the black wire on the FRD-4 adapter (Figure 6-6). 1— Black wire (to ground) 2— Red wire (to DLC Pin 571) Figure 6-6 FRD-4 adapter 5. Connect the other end of the ground adapter to a known good ground (the green wire on the FRD-4 adapter is not used). 6.2.2 Codes Menu During a KOEO self-test, the ABS ECM transmits on-demand codes (see “A Note about Service Codes” on page 55 for a description of on-demand codes). On most systems, continuous codes are gathered by selecting Memory Codes from the Codes Menu. Some early systems gather continuous codes automatically at the end of the KOEO self-test. The Codes Menu displays when Codes Menu is selected from the Main Menu - ABS. Menu selections include: • KOEO Self-Test—This test displays on-demand codes present with the ignition on, but the engine not running. These are usually electrical open and short circuits and must be serviced first, before any continuous codes. On some early systems, the KOEO test displays continuous codes. For these vehicles, the Memory Codes selection below does not appear. • Memory Codes—Available on late-model systems only, this selection displays continuous codes of intermittent faults from ABS module. Memory codes should be serviced last, after any other codes generated by the KOEO self-test. • Clear Codes—Clears continuous memory codes from the ABS ECM memory. • How To Get Codes—Only available on early systems with RABS, this selection gives instructions for manually gathering and clearing ABS codes. • Review Codes—Allows you to view gathered codes. • Print Codes—Allows you to print gathered codes. 84 Ford Testing Testing ABS Systems KOEO Self-Test Selecting KOEO Self-Test initiates a self-test for ABS that is similar to that for engine testing. See “KOEO Self-Test” on page 56 for details. z To conduct a KOEO self-test: 1. Select KOEO Self-Test. A “key on” verification screen displays. 2. Make sure the ignition is switched on, then press Y select Continue. i NOTE: Some systems require the ignition to be cycled on after selecting Continue pressing the Y button. Follow scan tool screen instructions. A self-test initiated message displays. This message means the scan tool attempted to start the test, it does not mean the vehicle responded. If the message stays on the screen more than a few minutes, the test probably did not start. Refer to “Ford Communications Problems” on page 655. 3. At the end of the test, the service code list displays. If no codes are detected during the test a “P0000 no faults present” message displays. Memory Codes The Memory Codes selection displays continuous codes of intermittent faults from the ABS ECM. Some early-model vehicles automatically gather memory codes at the end of the KOEO self-test. Continuous codes should be serviced last, after servicing any on-demand codes found during the KOEO self-test. z To gather memory codes: 1. Select Memory Codes. A “key on” verification screen displays. Make sure the ignition is switched on. 2. Select to continue. A self-test initiated screen displays. This message means the scan tool attempted to start the test, it does not mean the vehicle responded. If the message stays on the screen more than a few minutes, the test did not start. Refer to “Ford Communications Problems” on page 655 to diagnose the cause of a self-test failure. When the ABS ECM finishes the test, the service code list displays. If no codes are detected during the test a “P0000 no faults present” message displays. Clear Codes Selecting Clear Codes from the Codes Menu erases any continuous codes from the ABS ECM. On some systems, the KOEO test repeats and the scan tool then interrupts the self-test input line to clear ABS memory. Some early systems require the vehicle to be driven above 25 MPH (40 KPH) to clear codes. 85 Ford Testing Testing ABS Systems If the Codes Cleared does not appear after about one minute of completing a test, refer to “Ford Communications Problems” on page 655 to diagnose a vehicle self-test failure. Note the following when clearing codes: • Some systems prioritize DTCs. After repairing and clearing a DTC, always recheck for additional faults that may be present. • Only continuous codes can be cleared. Codes that reappear when the KOEO self-test is repeated are on-demand codes that must be serviced. Be aware that certain codes, such as those for the wheel speed sensors and the pump motor, only set while the vehicle is being driven. z To clear the codes: 1. Select Clear Codes. A “key on” verification screen displays. Make sure the ignition is switched on. 2. Select to continue. A self-test initiated screen displays. 3. When the test finishes a codes cleared screen displays. Clearing Scan Tool Code Memory The scan tool retains codes in its memory, which can be cleared doing any of the following: • Repeat the test, which overwrites the previous code. • Select a different system for testing. • Enter a new vehicle ID. Review Codes Return to the service code menu from the KOEO self-test or memory code test and Review Codes appears as a selection. When this selection is available, it indicates recorded codes are in scan tool memory. z To review codes: 1. Select Review Codes. A code list, similar to the lists displayed at the end of the self-tests, displays. 2. Fix the problems in the order listed. Also, remember these important points: 3. Review all codes until “end of list” appears. 4. The scan tool saves codes from the most recent test for display under review codes. On a re-test, codes from the previous test are replaced with a new list. 5. Always record continuous memory codes after any test. 6. If Memory Codes was selected, the scan tool saves the codes in memory, but the Clear Codes selection must be used to clear the ABS module memory. 86 Ford Testing Testing ABS Systems Print Codes See the Scanner User’s Manual for information on printing. A Print Codes selection is also available on the Codes Menu following either a KOEO self-test or a memory code test. All printouts of the code list include the vehicle ID. z To print the service code list from memory: 1. Connect the scan tool to a compatible printer. 2. Select Print Codes. 6.2.3 Data Display The Data Display selection for ABS systems operates similarly to Data Display for Ford engine testing. See “Data Display” on page 87 for details. i NOTE: ABS functions are disabled during data communication. If the vehicle is driven, ABS is not functional. ABS lamp may flash rapidly during data transmission. ABS Data Communication Guidelines z Follow these steps to enter and exit ABS data: 1. Be sure the ignition is off when entering the vehicle ID. 2. Turn the ignition on. 3. Select Data Display. 4. Turn the ignition off after completing ABS data tests. 6.2.4 ABS Systems Without Serial Data Certain models produced prior to 2002 only provide trouble codes for diagnosis. These systems do not provide serial data stream information or functional tests. There are two basic categories: • 4 Wheel Anti-lock (Cars and SUVs), on page 87 • Rear Anti-lock/RABS (Trucks and SUVs), on page 89 4 Wheel Anti-lock (Cars and SUVs) The anti-lock brake control module monitors system operation and can store diagnostic trouble codes (DTCs) in its memory. The diagnostic functions only provide DTC output. It is important to understand that the anti-lock brake control module cannot recognize some failures. Therefore, if a symptom exists and no DTCs are stored by the anti-lock brake control module, other diagnostic steps must be followed. 87 Ford Testing Testing ABS Systems Figure 6-7 Typical 4 Wheel Anti-lock data connector Code Reading z To read codes: 1. Connect the scan tool using a Ford 1A or 1B adapter to the ABS data link connector located in the engine compartment or trunk. The scan tool provides specific locations. The ABS main menu displays. 2. Select the Codes Menu. 3. Select KOEO Self-Test. 4. Turn the ignition switch to the ON position. At this time, any stored DTCs will be transmitted and displayed on the scan tool (DTCs, if present, will also flash out on the ABS lamp during the self test). The amber ABS lamp should go out immediately after cycling the ignition on, indicating that self-test has initiated. If no DTCs are stored (ABS lamp goes out and does not flash). The scan tool display will remain unchanged. 5. DTC transmission may take 15 seconds each, leave test initiated until all codes are output. z To clear codes: 1. The 4 wheel ABS system includes an automatic code clearing function. 2. DTCs will remain in the ABS ECU until they are transmitted to the scan tool or flashed out on the amber warning lamp. 3. After the DTCs are transmitted, you must test drive the vehicle above 25 mph. 4. Any memory DTCs that were stored in the ABS ECU will be cleared at this time. 5. A DTC that does not clear after road testing represents a hard fault. 88 Ford Testing Testing ABS Systems Rear Anti-lock/RABS (Trucks and SUVs) How To Get Codes (RABS Systems) This selection displays only when testing rear antilock brake systems (RABS) and provides information on diagnostic connector locations, code-flashing methods, code definitions, and basic code-clearing. A RABS consists of the following: • • • • • • RABS module RABS valve Diagnostic connector Yellow antilock warning light Speed sensor Exciter ring (located in the rear differential housing) The RABS module performs system tests and self-tests during startup and normal operation. If a problem is found, RABS is deactivated, the ABS lamp comes on, and a code may set. A RABS-I vehicle only stores codes while the ignition is on. If a DTC is present, the ABS or RABS lamp goes on (no “pass” code). A RABS-II vehicle is equipped with a keep alive memory. DTCs remain in memory until the diagnostic connector is disconnected and the ignition is cycled off. A system with no detected faults transmits DTC 16. A base brake fault such as low fluid may cause the ABS lamp and possibly the red brake warning lamp to go on without storing a DTC. For information, refer to the Snap-on ABS Troubleshooter Cartridge. DTCs consist of short flashes followed by a series of long flashes. Count all flashes to read a DTC. A DTC will flash continuously until the key is turned off. It is best to read a DTC several times and disregard the first code output because part of the code may be lost when code output begins. On RABS-I or RABS-II, only one DTC is output at a time. i NOTE: The ABS lamp will be on if a DTC is present. Leave the ignition on for the test or the DTC will be erased. z To access flash codes on a vehicle with RABS-I: 1. Locate the RABS connector (see “Rear Antilock Brake System (RABS)” on page 52) and attach a jump wire to the black/orange wire. 2. Touch the jump wire to ground for 2 seconds and release. The ABS lamp should go out and then start the code flash sequence. A memory DTC is cleared whenever the ignition is cycled off. z To output additional codes: 1. Repair the code. 2. Restore the diagnostic connector. 3. Test drive the vehicle. 4. Repeat the procedure above to re-test. 89 Ford Testing z Testing ABS Systems To access flash codes on a vehicle with RABS-II: 1. Locate the RABS connector (see “Rear Antilock Brake System (RABS)” on page 52) and disconnect the mating connector with the key on. 2. Attach a jump wire to the black/orange wire. 3. Touch the jump wire to ground for 2 seconds and release. The ABS lamp flashes a DTC. To see additional codes, use the procedure for RABS-I. i NOTE: RABS-II has the ability to retain the last failure DTC in memory, even if it occurs intermittently z To clear a memory DTC on a vehicle with RABS-II: 1. Disconnect the keep-alive memory power feed wire from the diagnostic connector. 2. Switch the ignition key off. 3. Reconnect the keep-alive memory power supply wire to the diagnostic connector lead after diagnosis is completed. 6.2.5 ABS Functional Tests A Functional Test selection is available for certain Ford ABS systems (only ABS systems that are accessed through the OBD II data connector). For these systems, a Functional Tests selection appears on the menu. Select Functional Tests to display the Select Test menu. Bleed Brakes Functional Test The Bleed Brakes selection is available on certain Ford ABS systems. The Ford recommended brake bleeding procedure must be followed in order to purge all the air from these systems. The Bleed Brakes selection is only used to bleed the hydraulic control unit (HCU). Whenever the hydraulic control unit is removed, air enters the system and bleeding of the entire system is required. ! CAUTION Failure to follow proper brake bleeding procedures may result in improper brake system operation or brake system failure. Refer to the Ford Service Manual for proper brake bleeding procedures. IMPORTANT: The ABS system must be manually bled, but in order to thoroughly purge these systems, certain solenoid valves must cycle while the brake pedal is held down. Perform the ABS Bleed Brakes functional test only when directed by a brake bleeding procedure in a Ford Service Manual. Typical Bleed Brakes Test During a Bleed Brakes functional test, the following instructions are typically displayed on the scan tool to prepare the vehicle for the automatic brake bleeding sequence. During the ABS bleeding 90 Ford Testing Air Suspension and Automatic Ride Control Systems sequence, the scan tool displays instructions for depressing and releasing the brake pedal as necessary. Follow the screen instructions when prompted. Keep the following in mind: • The ABS module automatically activates the hydraulic control valves when the brake pedal is depressed. Continue holding the brake pedal as directed during the valve activation (about three seconds). Clicking noises from the hydraulic control unit may be noticed during this portion of the ABS bleed. • The Release Brake Pedal message automatically appears at the completion of the valve activation sequence. • When the brake pedal is released, the ABS pump motor is automatically energized for about 20 seconds. • At the completion of the pump motor activation cycle, the ABS bleed sequence repeats up to three times. Follow the on-screen messages until the Test Is Complete message displays. ABS Pump Motor Test During a Pump Motor Test, instructions are typically displayed on the scan tool to prepare the vehicle for the automatic pump motor test sequence. If there are any ABS DTCs present at this time, the Pump Motor Test will not continue. Pressing Y automatically starts the ABS Pump Motor Test, and the ABS pump motor will automatically run for about 15 seconds. A test complete message displays at the end of the test. 6.3 Air Suspension and Automatic Ride Control Systems The following table includes vehicles equipped with air ride suspension, automatic load leveling, electronic variable orifice power steering, and electronic shock damping systems that require the use of Super Star II Emulation Mode. i NOTE: Super Star II Emulation Mode has been removed from the Ford Main Menu and is now located in the Branch Menu as applicable to the system. Diagnosing these systems involves a series of automatic tests, code gathering, functional tests and manual tests. Table 6-4 Air suspension and ride control applications Vehicle Crown Victoria/Grand Marquis Lincoln Town Car Lincoln Continental Year System 1992 to 2002 RAS Rear Air Suspension 1991 to 2002 EVO Electronic Variable Orifice 1992 to 2002 RAS Rear Air Suspension 1991 to 2002 EVO Electronic Variable Orifice 1988 to 1994 ASARC Air Suspension Automatic Ride Control Dual Action Strut Control 91 Ford Testing Air Suspension and Automatic Ride Control Systems Table 6-4 Air suspension and ride control applications Vehicle Lincoln Mark VIII Thunderbird/Cougar Year System 1993 to 1998 SSM Steering and Suspension Module 1993 to 1998 EVO Electronic Variable Orifice 1993 to 1994 SDC Shock Damping Control 1989 to 1995 ARC Automatic Ride Control EVO Electronic Variable Orifice 6.3.1 Air Suspension (EVO) and Automatic Ride Control Systems (ASARC) It is recommended to check the system thoroughly before performing an on-board diagnostic test. The following chart lists general inspection items that may not generate a DTC. Table 6-5 General Inspection Items Mechanical Inspection Electrical Inspection Shock absorber failure Open fuses Leaks from air lines or air springs Air suspension fuse or breaker Ruptured air springs Loose or corroded connections Damaged height sensor Air suspension switch Off Height sensor disconnected ! WARNING To prevent injury, always follow manufacturer procedures when servicing suspension systems. Air Suspension Switch ! CAUTION The air suspension switch must be turned to the Off position when the vehicle is hoisted, jacked, towed, jump-started, or raised off the ground, to avoid unnecessary operation of the system and possible damage to the air suspension system components. 6.3.2 Super Star II Emulation Mode The Super Star II Emulation Mode configures the scan tool to operate similar the Ford factory tester. This mode is only available for certain systems, such as speed control, automatic ride control, air suspension, and the 4EAT transmission. Super Star II Mode appears as an option on the system main when available. 92 Ford Testing Air Suspension and Automatic Ride Control Systems 6.3.3 Rear Air Suspension (RAS), Electronic Variable Orifice (EVO) Rear air suspension is a computer controlled suspension and the electronic variable orifice is a power steering and effort control. One ECU controls both steering and suspension functions. Figure 6-8 DLC location RAS/EVO—1992 to 2002 Crown Victoria, 1992 to 2002 Grand Marquis, and 1991 to 1998 Lincoln Town Car Diagnostic Test Descriptions There are three main diagnostic steps available: 1. Auto/Manual Diagnostic Check • Auto test—detects electrical faults, raises and lowers the vehicle to verify the 3 height sensor states (trim, high, low) can be reached. • Manual test—requires interactive steering and door switch inputs. 2. Functional Test • • • • Use only if Auto/Manual DTCs do not identify a concern (diagnostic aid). The functional test will overheat the compressor if used excessively. The auto/manual test must be completed first. Each test requires that [Test] is selected for the entire test. 3. Drive Cycle Diagnostic Test (1995 & later) • Use to duplicate a DTC while driving. z To perform the auto/manual test: 1. Auto Test: Turn the ignition Off. 2. Remove excessive loads from the truck. 3. Turn the Air Suspension Switch Off and then ON. 4. Select Super Star II Emulation Mode with the Hold and Live options selected. 5. Connect the scan tool using a Ford 1A or 1B adapter to the ARC DLC in the trunk. 6. Start the engine, or connect the battery charger, and wait at least 2 seconds. 7. Select Test. 8. Within 20 seconds a DTC 10 (Auto Mode in progress) should appear. 9. Auto test runs for 2 to 3 minutes. 93 Ford Testing Air Suspension and Automatic Ride Control Systems 10. A DTC 80 at this time indicates insufficient battery voltage, DTC 13 (auto test failed) will appear if a shorted or open circuit is detected 11. Manual Test: After a DTC 12 (or 13) appears, open and close each door and turn the steering wheel 1/4 turn in each direction. This can be performed in any sequence. 12. Select Hold. Wait 2 seconds and then select Test. 13. Within 20 seconds any DTCs detected will be displayed. DTCs appear sequentially for 15 seconds each and will continue to cycle until Hold is selected or the ignition is turned Off. This exits the auto test. Functional Tests The functional test is used if the auto/manual test does not identify a symptom. Functional tests are only available after the auto/manual test has transmitted its DTCs. Leave the scan tool connected and vehicle running to enter Functional Tests. z To perform a functional test: 1. Select Hold and wait at least 20 seconds. 2. Select Test. 3. The functional tests are numbered and will sequentially appear (similar to DTCs) for 15 seconds each (Table 6-6). Table 6-6 Air suspension functional test identification Test ID 23 Description Vent Rear. 26 Compress Rear. 31 Cycle Compressor on and off repeatedly. 32 Cycle vent solenoid valve on and off repeatedly. 33 Cycle air spring solenoid valves on and off repeatedly. 4. If the functional test ID numbers do not appear, repeat steps 1 and 2. 5. To select a functional test, select Hold within 4 seconds from the appearance of the functional test’s ID number (23, 26, 31, 32, or 33). 6. Exit the functional test by disconnecting the scan tool and turning the ignition off. • • • • The functional test will continue as long as Hold is selected. To exit the functional test, select Test. A new functional test can now be selected, tests can also be repeated as necessary. Reminder: avoid compressor overheating. RAS / EVO Drive Cycle Diagnostic Test (1995 to 2002 Crown Victoria, 1995 to 2002 Grand Marquis, and 1995 to 1998 Lincoln Town Car) z To perform a drive cycle diagnostic test: 1. Drive vehicle over 25 MPH to verify the VSS operation. 2. Park the vehicle and turn the ignition Off. 94 Ford Testing Air Suspension and Automatic Ride Control Systems 3. Connect the scan tool to the DLC on the right hand side of the trunk. 4. Select the Super Star II Emulation Mode with the Hold and Live options selected. 5. Wait 3 seconds and select Test. Memory DTCs display. DTC 15 indicates that no errors are stored in the ECU memory. 6. To exit the test, select Hold. 7. Disconnect the scan tool from the DLC. 8. See Table 6-7 for rear air suspension or EVO DTC descriptions. z To clear stored DTCs. 1. Perform a drive cycle diagnostic test as outlined above. 2. Select Hold. 3. Wait 2 seconds. 4. Select Test. DTC 35 displays indicating memory is erased. 5. Exit by selecting Hold. Table 6-7 Rear Air Suspension EVO DTC definitions for 1992 to 2002 Crown Victoria, 1992 to 2002 Grand Marquis, and 1991 to 1998 Lincoln Town Car (part 1 of 2) DTC Description 10 Diagnostics Entered, Auto Test in Progress 11 Vehicle Passes 12 Auto Tested Passed, Perform Manual Inputs. 13 Auto Test Failed, Perform Manual Inputs. 15 No Drive Cycle Errors Detected (1995 & later only) 16 EVO Error Code Short Circuit. 17 EVO Error Code Open Circuit. 18 EVO Error Code Bad Valve. 23 Functional Test, Vent Rear. 26 Functional Test, Compress Rear. 28 No Description Available. 31 Functional Test, Air Compressor Relay Toggle. 32 Functional Test, Vent Solenoid Toggle. 33 Functional Test, Air Spring Solenoid Toggle. 35 Drive Cycle Error Codes Erased OK (1995 & later only). 39 Compressor Relay Circuit Shorted to Battery. 40 Compress or Relay Control Circuit Short to Ground, (1995 & later only). 42 Air Spring Solenoid Circuit Shorted to Ground or Brown Fuse. 43 Air Spring Solenoid Circuit Shorted to Battery. 44 Vent Solenoid Circuit Shorted to Battery. 45 Air Compressor Relay Circuit or Vent Solenoid Circuit Shorted to Ground. 46 Height Sensor Power Supply Circuit Shorted to Ground or Battery. 95 Ford Testing Air Suspension and Automatic Ride Control Systems Table 6-7 Rear Air Suspension EVO DTC definitions for 1992 to 2002 Crown Victoria, 1992 to 2002 Grand Marquis, and 1991 to 1998 Lincoln Town Car (part 2 of 2) DTC Description 51 Unable to Detect Lowering of Rear. 54 Unable to Detect Raising of Rear. 55 Speed Greater than 15 MPH (24KPH) Not Detected (1997 & later only). 60 Service Switch Shorted to Battery (1997 & later only). 61 Service Switch Shorted to Ground or Open (1997 & later only). 68 Height Sensor Output Circuit Shorted to Ground. 70 Replace Control Module. 71 Open Height Sensor Circuit. 72 Four Open and Closed Door Signals Not Detected. 74 EVO Error Code Steering Wheel Rotation Not Detected. 80 Insufficient Battery Voltage to Run Diagnostics. — Unable to Enter Auto Test or Warning Light Remains On After Vehicle Passes (Code 11) 6.3.4 Air Suspension Automatic Ride Control (ASARC) Dual Action Electronic Strut Control for 1988 to 1994 Lincoln Continental The Air Suspension Automatic Ride Control (ASARC) Dual Action Strut Control for 1988 to 1994 Lincoln Continental includes three sections: 1. Drive Cycle Diagnostic Test. 2. Auto/Manual Diagnostic Test. 3. Spring Fill Diagnostics. Drive Cycle Diagnostics The Drive Cycle Diagnostics will light the Check SUSPENSION warning indicator in the message center if a malfunction is detected in the system while driving the vehicle. Up to 32 diagnostic trouble codes (DTC) will remain stored in memory for up to one hour after the ignition switch is turned Off. The air suspension service switch in the luggage compartment must remain ON during this time. The DTCs should be written down at this time. If the vehicle has not been driven in over an hour or the air suspension service switch has been turned Off, the vehicle must be driven with the air suspension switch ON to try to duplicate the condition. z To perform a drive cycle diagnostics test: 1. Verify Air Suspension switch is in the ON position. The switch is located in the trunk. 2. Drive the vehicle over 15 MPH (24KPH) for over 4 minutes. 3. Park the vehicle and turn the ignition Off. 4. Turn the head lamps off to conserve battery power. 5. Connect the scan tool to the DLC located on the ride-hand side of the trunk. 96 Ford Testing Air Suspension and Automatic Ride Control Systems 6. Select Super Star II Emulation Mode. 7. Wait 5 seconds, select Test. 8. Drive Cycle DTCs will display after 20 seconds. 9. Refer to DTC chart for code descriptions. 10. Disconnect the scan tool from the DLC. Automatic and Manual Mode Testing, Spring Fill Diagnostics IMPORTANT: Do not lean on the vehicle or open doors while DTC 10 is displayed. This will introduce false errors into the test results. Remove any excess vehicle loads, vehicles should be at curb weight. z To test in Automatic Mode: 1. Connect the battery charger to the power the vehicle during testing. 2. Turn the air suspension switch Off and then ON again. The switch is located in the trunk. 3. Select Super Star Emulation Mode. 4. Connect the scan tool using a Ford 1A or Ford 1B adapter to the DLC located on the left side of the trunk area. 5. With the ignition Off, wait ten seconds. 6. Cycle the ignition ON with the brake pedal and accessories Off. 7. Wait a minimum of 5 seconds and select Test. 8. Within 20 seconds a DTC should appear, diagnose all DTCs displayed except for DTC 10. 9. DTC 10 indicates that the automatic diagnosis is in progress. Do not touch or lean on the vehicle while the DTC 10 is displayed. If no faults are present, the test will take 3 to 4 minutes. If faults are present, test may take up to 14 minutes. 10. When a DTC 12 or 13 appears, the auto test is completed. Leave the scan tool connected to perform the following manual test. (DTC 12 = Auto Test Passes, DTC 13 = Auto Test Failed.) z To test in Manual Mode (only after automatic mode testing) 1. Open the driver-side door and sit in the driver seat, leaving the door open. 2. Press the accelerator to the floor and then release it. 3. Press the brake pedal to the floor (press hard) and then release it. 4. Turn the steering wheel a minimum of 1/4 turn in both directions. 5. Exit the vehicle and close the driver-side door. 6. Open and close the other three vehicle doors, one at a time. 7. Select Hold. 8. Wait 5 seconds and select Test. 9. The DTCs will be displayed on the scan tool. The list will continue to repeat as long as Test is selected. Codes will display for about 15 seconds each. 10. Select Review to view all of the DTCs. • DTC 11 indicates that the vehicle has passed the Auto Test. • If DTC 55 was output in the Drive Cycle Diagnostics Test, include it with the Auto Test DTC list. • A drive cycle DTC that is not duplicate in the Auto Test should be considered a memory fault. 97 Ford Testing Air Suspension and Automatic Ride Control Systems • Refer to the Table 6-9 for DTC descriptions (follow the recommended DTC repair priority.) • To exit diagnostics, switch the ignition off (leave the battery charger on for the Spring Fill Test). Spring Fill Diagnostics Test ! CAUTION This test will inflate and deflate the air springs. Remove any vehicle loads, vehicle should be at curb weight with all accessories off. The Spring Fill Diagnostics test allows a technician to fill or vent each air spring individually. z To perform the spring fill diagnostics test: 1. Connect a battery charger to maintain the battery level. 2. Connect the scan tool to the DLC in the left side of the trunk area. 3. Select Hold. 4. Turn the air suspension switch Off and then ON. The switch is located in the trunk area. 5. Turn the ignition Off and wait ten seconds. 6. Hold the brake pedal down hard and cycle the ignition switch to ON. 7. Wait five seconds and release the brake pedal. 8. Wait a minimum of 5 seconds and then select Test. 9. DTCs will display within 20 seconds. 10. DTCs 21 through 28 are the individual Spring Fill Tests and indicate that the Spring Fill Tests have been entered. Any other DTC indicates an inability to enter the test and must be diagnosed separately. 11. Select and activate any desired Spring Fill Test by selecting Hold after the desired Spring Fill Test has been displayed for 2 to 5 seconds. 12. The selected test will run as long as Hold is selected. 13. Selecting Test will stop the test and continue the DTC test selection. 14. Refer to Table 6-8 and Table 6-9 for DTC descriptions. Table 6-8 Spring Fill Diagnostic DTCs DTC Description 21 Vent RF air spring 22 Vent LF air spring 23 Vent RR air spring 24 Inflate RF air spring 25 Inflate LF air spring 26 Inflate RR air spring 27 Vent LR air spring 28 Inflate LR air spring 98 Ford Testing Air Suspension and Automatic Ride Control Systems Table 6-9 Air suspension automatic ride control DTC definitions (part 1 of 2) Code Description Service Priority 10 Auto test entered. N/A 11 System Checked out OK N/A 12 Auto test completed, No faults detected. Perform manual tests. N/A 13 Auto test completed, Faults detected. Perform manuals tests. N/A 15 No faults detected. N/A 21 Vent RF air spring N/A 22 Vent LF air spring N/A 23 Vent RR air spring N/A 24 Inflate RF air spring N/A 25 Inflate LF air spring N/A 26 Inflate RR air spring N/A 27 Vent LR air spring N/A 28 Inflate LR air spring N/A 31 Air Compressor Toggle. N/A 32 Vent Solenoid Valve Toggle. N/A 33 Air Spring Solenoid Valve Toggle. N/A 34 Shock Actuator Toggle (Firm/Soft) N/A 35 Door Open & Closed Detection N/A 40 Short - Left Front Air Spring Solenoid Valve Circuit 2nd 41 Short - Right Front Air Spring Solenoid Valve Circuit 2nd 42 Short - Left Rear Air Spring Solenoid Valve Circuit 2nd 43 Short - Right Rear Air Spring Solenoid Valve Circuit 2nd 44 Short - Vent Solenoid Valve Circuit 2nd 45 Short - Air Compressor Relay Circuit. 2nd 46 Short - Height Sensor Power Supply Circuit. 2nd 47 Short in Soft Electric Shock Absorber Actuator Relay Circuit. 2nd 48 Short in Firm Electronic Shock Absorber Actuator Relay Circuit. 2nd 49 Unable to Detect Lowering of RF Corner. 5th 50 Unable to Detect Lowering of LF Corner. 5th 51 Unable to Detect Lowering of RR Corner or Rear of Vehicle. 5th 52 Unable to Detect Raising of RF Corner. 6th 53 Unable to Detect Raising of LF Corner. 6th 54 Unable to Detect Raising of RR Corner or Rear of Vehicle. 6th 55 Speed greater than 24KPH (15MPH) not detected. 7th 56 Soft Not Detected - Left Rear Shock Actuator Circuit. 4th 57 Soft Not Detected - Right Front Shock Actuator Circuit. 4th 58 Soft Not Detected - Left Front Shock Actuator Circuit. 4th 59 Soft Not Detected - Right Rear Shock Actuator Circuit. 4th 99 Ford Testing Air Suspension and Automatic Ride Control Systems Table 6-9 Air suspension automatic ride control DTC definitions (part 2 of 2) Code Description Service Priority 60 Firm Not Detected - Left Rear Shock Actuator Circuit. 4th 61 Firm Not Detected - Right Front Shock Actuator Circuit. 4th 62 Firm Not Detected - Left Front Shock Actuator Circuit. 4th 63 Firm Not Detected - Right Rear Shock Actuator Circuit. 4th 64 Soft Not Detected - All Shock Actuator Circuits. 4th 65 Firm Not Detected - All Shock Actuator Circuits. 4th 66 Short - Right Front Height Sensor Circuit. 2nd 67 Short - Left Front Height Sensor Circuit. 2nd 68 Short - Rear Height Sensor Circuit. 2nd 69 Open - Right Front Height Sensor Circuit. 3rd 70 Open - Left Front Height Sensor Circuit. 3rd 71 Open - Rear Height Sensor Circuit. 3rd 72 At Least Four Open & Closed Signals Not Detected. 7th 73 Brake Pressure Switch Differential Valve Warning Lamp Activation Not Detected. 7th 74 Steering Wheel Rotations Not Detected. 7th 75 Accelerator Signal Not Detected. 7th 78 Unable to Detect Lowering of Left Rear Corner. 5th 79 Unable to Detect Raising of the Left Rear Corner. 6th 80 Insufficient Battery Voltage to Run Diagnostics. 1st Shock Damping Control (SDC) for 1993 to 1994 Lincoln Mark VIII z To diagnose the SDC: 1. The system performs an on-board diagnostic test when initiated by the scan tool. 2. Turn the ignition switch to the Off position. 3. Connect the scan tool using a Ford 1A or Ford 1B adapter to the SDC DLC located near the right-hand deck lid hinge. 4. Select Super Star II Emulation Mode. 5. Start engine and perform the following diagnostic steps within 20 seconds of starting the engine: • • • • Wait 10 seconds. Select Hold and within 5 seconds select Test. Press the brake pedal very hard within 9 seconds. The shock damping control module will perform on-board diagnostics and report DTCs to the scan tool (Table 6-10). 100 Ford Testing Air Suspension and Automatic Ride Control Systems Table 6-10 Shock damping control DTC Test Code Description 11 System OK 10 Fault in LH rear actuator circuit. 20 Fault in FH rear actuator circuit. 70 Replace shock damping control module 12 Soft relay short to ground or open circuit 13 Hard relay short to ground or open circuit 22 Soft relay short to battery 23 Hard relay short to battery 31 Brake input not seen by module Automatic Ride Control (ARC), Electronic Variable Orifice (EVO) for 1989 to 1995 Thunder Bird/Cougar DLC Location The DLC is located in back of the right-hand shock tower cover and is marked ‘ARC/EVO’. Figure 6-9 Typical firm ride switch and warning lamp z To perform the diagnostic mode test: 1. Turn the ignition and all accessories Off. 2. Set the shock select switch to the Auto position. 3. Select Super Star II Emulation Mode. 4. Connect the scan tool using the Ford 1A or Ford 1B adapter to the DLC near the rear of the right-hand shock tower. 5. Select Test. 6. Start the engine and wait 5 seconds. Perform the following tests within 20 seconds. 7. Select Hold. 8. Within 5 seconds, select Test. 9. As the self-test routine proceeds, DTCs transmit to the scanner and pulse out on the FIRM RIDE lamp. 101 Ford Testing Air Suspension and Automatic Ride Control Systems 10. DTCs will repeat 2 times. 11. If DTC 11 shows, continue with the Test option to continue with the Quick Test. Table 6-11 Automatic ride control and EVO DTC descriptions DTC Description 11 No problem yet (continue to manual tests) 10 Fault in LH rear actuator circuit 20 Fault in RH rear actuator circuit 30 Fault in RH front actuator circuit 40 Fault in LH front actuator circuit 50 Short in soft relay 60 EVO steering open 70 Replace automatic ride control module 12 Soft relay short to ground or open circuit 13 Hard relay short to ground or open circuit 14 Fault in relay control circuit 15 FIRM RIDE lamp short to ground or open circuit 16 EVO steering circuit short 22 Soft relay short to battery 23 Hard relay short to battery 25 FIRM RIDE lamp short to battery ground 26 EVO steering valve bad 00 FIRM RIDE indicator lamp circuit Manual Tests Perform manual tests only if DTC 11 is received in the diagnostic mode test. Table 6-12 Automatic ride control and EVO DVC manual test procedures (part 1 of 2) Test Step Check Steering Sensor 1. Wait for the FIRM RIDE lamp to stop flashing. 2. With the vehicle at rest and the engine running, turn the steering wheel from lock to lock, 3 full turns, or until the FIRM RIDE lamp comes on. Speed Sensor Check Result Action FIRM RIDE lamp comes on for 5 seconds. Proceed to next step. FIRM RIDE lamp does not turn on. Fault in steering sensor circuit. FIRM RIDE lamp turns on and stays on until the vehicle 1. Wait for the FIRM RIDE lamp to stop speed drops below 29 KPH/ Proceed to the next step. flashing. 18MPH (1995 models, 19 KPH/12MPH). 2. Drive the vehicle above 29 KPH/ FIRM RIDE lamp does not Fault in the speed sensor 18MPH (1995 models, 19 KPH/ turn on. circuit. 12MPH). 102 Ford Testing Testing Optional Body Systems Table 6-12 Automatic ride control and EVO DVC manual test procedures (part 2 of 2) Test Step Result Remaining Tests 1. Stop the vehicle and turn the engine FIRM RIDE lamp turns on off. Verify that the FIRM RIDE switch is and stays on. set to AUTO. FIRM RIDE lamp turns on 2. Cycle the ignition to RUN with the and stays on even though engine Off. switch is in the AUTO position. FIRM RIDE lamp turns on for 3. Wait until the FIRM RIDE lamp turns 4 seconds then flashes a off (about 4 seconds). DTC. Check Brake Sensor 1. Verify that the shock selector switch FIRM RIDE lamp turns on. is set to AUTO. 2. After the FIRM RIDE lamp turns off, FIRM RIDE lamp does not depress the brake pedal until the FIRM turn on. RIDE lamp turns on. Action Proceed to the next step. False Firm Signal. Record DTC and refer to the DTC chart. Proceed to the next step. Fault in brake sensor circuit. 3. After the FIRM RIDE lamp has turned FIRM RIDE lamp flashes a Record DTC and refer to the on, release the break pedal. DTC. DTC chart. Check Acceleration Signal FIRM RIDE lamp turns on when the pedal is pressed to 1. Verify the shock selector switch is set the floor. The lamp turns off 4 Proceed to the next step. to AUTO. seconds after the pedal is released. 2. After the FIRM RIDE lamp has turned off, depress the accelerator pedal to the floor. The FIRM RIDE lamp should turn on. 3. After the FIRM RIDE lamp has turned on, release the accelerator pedal. Check Dimming Function FIRM RIDE lamp does not turn on. Fault in acceleration signal circuit. FIRM RIDE lamp flashes a code. Record DTC and refer to the DTC chart. FIRM RIDE lamp is bright 1. Move the shock selector switch to the when headlamps are off, FIRM position to turn on the instrument lamps are dimmer when panel indicator. headlamps are on. 2. Cycle headlamps on and off while FIRM RIDE lamp does not observing the FIRM RIDE lamp. dim with headlamps on. If no faults, vehicle has passed diagnostics. Perform lamp diagnostics. 6.4 Testing Optional Body Systems There are numerous body system modules available as optional equipment on various Ford products. Applications vary by model design and equipment level Some of the current supported systems include: • CTM—Central timer module • DDM—Driver door module • DSM—Driver seat module 103 Ford Testing Testing Optional Body Systems • • • • • • • • • • • • • • • EATC—Electronic automatic temperature control FEM—Front electronic module GEM—Generic electronic module HEC—Hybrid electronic cluster ICM—Instrument cluster module LCM—Light control module NAV—Navigation module LTW—Low tire warning OCS—Occupant classification system PAM—Parking aid module PATS—Passive anti-theft system PRB—Power running board module PSDM—Power sliding door modules 1 and 2 TPM—tire pressure monitor VLC—Virtual instrument cluster 6.4.1 GEM, CTM, FEM, and REM Body Systems The Generic Electronic Module (GEM) is available on many 1995 and later Ford vehicles. On some late-model vehicles, the GEM is referred to as the FEM (front electronic module) or REM (rear electronic module). For vehicles with the central timer module (CTM), the CTM option will display along with GEM; the CTM option never displays by itself. Selecting GEM, GEM/CTM, FEM, or REM from the System Selection menu opens a main menu. These systems control numerous body system functions, including but not limited to: • • • • • Power door locks Chimes Interior lighting 4x4 transfer case Wiper control The circuits controlled by these systems vary, depending on the vehicle. All operate similarly and have the following functions available: • • • • KOEO Self-Test Gather and clear memory codes Review and print codes (only after codes have been gathered) View data parameters During the KOEO self-test, the GEM transmits on-demand codes. Continuous codes are generated by selecting Memory Codes from the GEM Codes Menu. Although Codes Menu options access tests specific to GEM-controlled electronics, scan tool operation is the same as for ABS Codes Menu options. Refer to “Codes Menu” on page 84 for detailed instructions. 104 Ford Testing Testing Optional Body Systems Data Display Before viewing data on some EEC-IV and all EEC-V vehicles, you are prompted to select a data parameter group from the Custom Data menu. The GEM Custom Data menu works exactly like the Engine Custom Data menu. See “EEC-V/ CAN Data Display” on page 82. 6.4.2 ICM, HEC, and VIC Body Systems Selecting ICM/HEC or VIC Module from the System Selection menu opens a main menu. These systems have the following functions available: • • • • KOEO Self-Test Gather and clear memory codes Review and print codes (only after codes have been gathered) View data parameters During the KOEO self-test, the ICM/HEC and VIC modules transmit on-demand codes. Continuous codes are generated by selecting Memory Codes from the Codes Menu. Although Codes Menu options access tests specific to ICM/HEC- and VIC-controlled electronics, scan tool operation is the same as for ABS Codes Menu options. Refer to “Codes Menu” on page 84 for detailed instructions. The Data Display selection is available on most 1996 and later vehicles. It operates like Data Display for Ford engine testing. See “Data Display” on page 105 for detailed information. 6.4.3 Tire Pressure Monitor (TPM) and Low Tire Warning (LTW) Systems ! CAUTION Always follow the recommended Ford Service Manual procedures when diagnosing or servicing the Tire Pressure Monitor and Low Tire Warning systems. Tire pressure monitoring (TPM) and Low Tire Warning systems are available on certain models as optional or standard equipment. A vehicle that is not equipped may result in a no communication or no response message from the scan tool. Applicable vehicles are typically equipped with one of two basic styles, LTW as an indirect system (tire rotational system) and TPM as a direct system (measuring and transmitting tire pressure to an ECM). Low Tire Warning (LTW) System The Low Tire Warning (LTW) is an indirect system that detects the difference in inflation pressures in one or more ties. The system uses the ABS wheel speed sensors to monitor the rolling radius of the wheel and tire assemblies. If a difference in rolling radius is detected, the ABS module illuminates the LTW lamp located in the instrument cluster. The LTW system is not capable of 105 Ford Testing Testing Optional Body Systems detecting rapid loss of inflation. The system may not detect loss of inflation in more than one tire. Always refer to the Ford Service Manuals for proper service procedures. Testing the Low Tire Warning (LTW) System The scan tool supplies system description, basic operating characteristics, warning lamp operation, and system reset procedures. Follow on screen instructions provided for each test listed. The LTW system does not transmit trouble codes or serial data information. z To select a LTW test: 1. Select Body Systems. 2. Select Low Tire Warning. 3. Select a test. Tire Pressure Monitor (TPM) System The tire pressure monitoring system (TPMS) monitors the air pressure of all four regular road tires. The tire mounted pressure sensors transmit via radio frequency (RF) signals to the TPMS module, using the valve stem as an antenna. These transmissions are sent approximately every 60 seconds when the vehicle speed exceeds 32 km/h (20 mph). The TPMS module compares each tire pressure sensor transmission against a set of low-pressure limits. If the TPMS module determines that the tire pressure has fallen below these limit, the TPMS module communicates this on the CAN network to the vehicle’s instrument cluster which then illuminates the TPMS indicator and displays the appropriate message center message (if equipped). Always refer to the Ford Service Manuals for proper service procedures. Testing the Tire Pressure Monitor (TPM) System TPM test functions include data display, DTC reading, and DTC clearing. z To get to TPM test functions: 1. Select Body Systems. 2. Select Tire Pressure Monitor [Optional]. z To select the TPM Data Display: • Select Data Display from the TPM menu. z To get to read and clear TPM codes: 1. Select Codes Menu from the TPM menu. 2. Select KOEO Self-Test, Memory Codes, or Clear Codes from the codes menu. 6.4.4 Anti-theft (PATS) Systems After selecting PATS from the System Selection menu, the Main Menu (PATS) displays. 106 Ford Testing Testing Optional Body Systems PATS systems have the following functions available: • • • • KOEO Self-Test Gather and clear memory codes Review and print codes (only after codes have been gathered) View data parameters During the KOEO self-test, the PATS module transmits on-demand codes. Continuous codes are generated by selecting Memory Codes from the Codes Menu. Although Codes Menu options access tests specific to PATS-controlled Electronics, scan tool operation is the same as for ABS Service Code Tests. Refer to “Codes Menu” on page 84 for detailed instructions. The Data Display selection operates similarly to Data Display for Ford engine testing. See “Data Display” on page 87 for detailed information. About PATS PATS is a vehicle security feature introduced on 1996 and later vehicles. There are several variations, but all PATS modules generally work the same. 1. When energized, the PATS control module (Rx) requests the ignition code through the PATS transceiver (Tx). 2. The SecuriLock key sends the ignition code to the PATS transceiver, which sends it to the Rx). 3. The Rx compares the ignition key code to the key codes stored in non-volatile memory. 4. The Rx transmits a signal to the PCM to either enable or disable the fuel pump and injectors. The starter relay is ground as well on some vehicles. PATS consists of the following: • PATS control module—communicates with the PATS transceiver to verify key code through the Tx and Rx signal wires. • SecuriLock Ignition Key(s)—contains a unique key code that is “married” to the vehicle. • PATS Transceiver—mounted on the ignition lock cylinder housing and energizes the ignition key electronics through circular antenna. • Powertrain Control Module (PCM)—enables fuel pump and injectors if a valid PATS key is detected. • Theft lamp—operates as follows: – Ignition = Off: lamp flashes every two seconds on some vehicles. – Ignition = RUN or START: lamp flashes on for two or three seconds and then off. – System fault: lamp flashes briefly, and then flashes rapidly or remains on for one minute. Important Tips for Testing PATS Systems • When replacing keys, make sure the vehicle owner throws out all old keys. • Erasing and reprogramming keys does not fix any known intermittent PATS no-start issues. Do not reprogram keys if a fault cannot be identified. • Make sure you have all keys programmed into the PATS module when reprogramming or diagnosing. 107 Ford Testing Testing Optional Body Systems • Always verify that there are no aftermarket devices causing interference, such as alarms, remote starters, or other devices using transponders. Devices that power up the PCM without powering up the PATS module may cause no-start problems. • Some aftermarket audio equipment can keep the RUN/START circuit active for over 5 seconds past ignition off. This can prevent PATS from properly reading ignition keys during programming. Remove or disable aftermarket equipment if this occurs. • Some objects can cause interference with the PATS key, like foil stickers, brass key tags, other PATS keys, transponders used to purchase gasoline, and other metallic objects. • Reprogramming the PCM does not have any effect on PATS operation. • Disconnect battery cables when replacing the PATS module. • If the engine does not crank on vehicles that have PATS providing a ground to the starter relay, verify the PATS output to the starter relay. • If the PCM sets code P1260, look for other codes in the PATS module. • Systems B, C, and E have an anti-scan function. If you attempt to start the vehicle with an unprogrammed key, the theft indicator lamp will flash rapidly and the vehicle will not start. Leave the key in the RUN position for 30 seconds to allow the anti-scan feature to time out. The vehicle will fail to start during this 30-second time period even if a correctly programmed key is used. 6.4.5 Optional Body Systems (DDM, DSM, EATC, LCM, NAV, OCS, PAM, PRB, PSDM) There are numerous body system modules available as optional equipment on various Ford products. Applications vary by model design and equipment level. When Body Systems is selected from the system selection menu, a menu of available body systems displays. Only systems available on the identified vehicle are included. Some of the current supported systems include: • • • • • • • • • Driver door module (DDM) Driver seat module (DSM) Electronic automatic temperature control (EATC) Light control module (LCM) Navigation module (NAV) Occupant classification system (OCS) Parking aid module (PAM) Power running board module (PRB) Power sliding door modules 1 and 2 (PSDM) These systems control numerous body system functions, including but not limited to featured body electrical systems such as: • • • • • Seat and pedal controls Climate control systems Navigation systems Parking Aid systems Security systems 108 Ford Testing Testing 4X4/Transfer Case Systems • Remote keyless entry • Convenience groups: Power Running Boards or Power Sliding Door Module The circuits controlled by these systems vary depending on the vehicle. All operate similarly and have the following functions available: • • • • KOEO Self-Test Gather and clear memory codes Review and print codes (only after codes have been gathered) View data parameters During the KOEO self-test, the ECU transmits on-demand codes. Continuous codes are generated by selecting Memory Codes from the Codes Menu. Although Codes Menu options access tests specific to a particular ECU subsystem, scan tool operation is the same as for ABS Codes Menu options. Refer to “Codes Menu” on page 84 for detailed instructions. The Data Display selection is an available test option. It operates similarly to Data Display for Ford engine testing. See “Data Display” on page 87 for detailed information. 6.5 Testing 4X4/Transfer Case Systems Selecting 4X4 Module, 4X4 (UBP NETWORK), or Transfer Case from the System Selection menu opens a main menu. i NOTE: You will need to use the K-16 Personality Key™ device on UBP Network systems. 4X4/Transfer Case systems have the following functions available: • • • • KOEO Self-Test Gather and clear memory codes Review and print codes (only after codes have been gathered) View data parameters During the KOEO self-test, the 4X4 module transmits on-demand codes. Continuous codes are generated by selecting Memory Codes from the Codes Menu. Although Codes Menu options access tests specific to 4X4-controlled electronics, scan tool operation is the same as for ABS Codes Menu options. Refer to “Data Display” on page 87 for detailed instructions. The Data Display selection is available on most 1996 and later vehicles. It operates like Data Display for Ford engine testing. See “Data Display” on page 87 for detailed information. 109 Ford Testing Testing Airbag Systems 6.6 Testing Airbag Systems i NOTE: Information in this section does not cover pre-1996 EEC-IV SRS systems. These earlier systems flash the DTC on the SRS warning lamp as soon as the code sets. The control module does not store codes or provide data. Select Airbag from the System Selection menu. Airbags, or the Supplemental Restraint System (SRS), with a data stream are found on some 1995 and most 1996 and later OBD-II Ford models. Occupant Classification Systems (OCS) are available on 2007 and later models. The control module stores DTCs. The stored DTCs and data stream information are available through the OBD-II diagnostic link connector (DLC). An airbag systems menu displays when airbag is selected as the system to test. The Data Display selection is available on most 1996 and later vehicles. It operates like Data Display for Ford engine testing. See “Data Display” on page 87 for detailed information. 6.7 Super Star II Emulation Mode In this mode, scan tool operations are similar to the Ford Super Star II Tester factory scan tool. Use the Super Star II Test Emulation Mode to read codes or initiate tests on the following systems: • • • • • Integrated vehicle speed control (IVSC) Automatic Ride Control (ARC) Air Suspension and Automatic Ride Control (ASARC) 4-speed electronic automatic transmission (4EAT) Electronic variable orifice (EVO) The Super Star II Emulation Mode may also be used to test an EEC-IV, MCU, or MECS engine control systems as well as ABS control systems. This test mode may be convenient for technicians familiar with the Ford tester. Refer to Ford service procedures for the specific vehicle year, model, and system, and for procedures to test these systems. The Super Star II Mode is available as a main menu item where applicable. Select Super Star II Mode and the operating screen displays. 6.7.1 Super Star II Controls and Indicators Scan tool controls operate as follows in the Super Star II mode: • Moving the cursor up and down selects any of the three functions on the screen. • The Y button switches between alternate functions as indicated by the cursor. • The N button exits from the Super Star II mode back to the starting test selection screen. 110 Ford Testing Super Star II Emulation Mode 6.7.2 Basic Super Star II Operation The following sections outline basic Super Star II operations for testing Ford electronic systems. Refer to Ford test procedures in Ford service manuals or equivalent publications for specific instructions. ECA Manufacturer The manufacturer of the electronic control assembly (ECA) for the test system must be identified when using Super Star II Emulation Mode. There are two choices: Ford and Mazda. Mazda control systems are used for: • • • • • • 1994–97 Aspire with 1.3L engine 1991-94 Capri with 1.6L engine 1992–96 Escort and Tracer with 1.8L engine 1988–93 Festiva with 1.3L engine 1989–95 Probe with 2.0L, 2.2L, and 2.5L engines 1988–91 Tracer with 1.6L engine All other models use a Ford system. The ECA Manufacturer selection affects test procedures and code displays on the test vehicle. i NOTE: Some 4EAT transmissions use a separate MECS transmission control module (TCM). Test/Hold When the cursor is in the Test/Hold position, the Y button works as the Test/Hold button on the Super Star II tester. The Test/Hold button is the main control on the Super Star II tester. z To begin a test: • Select Test/Hold to display Test. i NOTE: Be aware that if Y, or hold, is pressed during most self-test code output transmissions, codes are erased from memory. Follow Ford test procedures exactly. Code Display There are two code display modes, live and review. In the live mode, codes display “live” as the vehicle transmits them, at the right of lines two and three under the heading Code. The first code received displays on line two; the second on line three. As more codes are received, they move upward on the display lines. The most recent code displays on line three. 111 Ford Testing z Testing 4EAT Systems To review codes: 1. Select Code Display to display Review. 2. Review all codes recorded in memory. While reviewing codes, the scan tool continues to receive any codes that are transmitted and may add new ones to the list. The most recent code is at the bottom of the list, followed by an “end” message. Press Y at any time to return to live codes. The selection preset is live. If the scan tool memory becomes filled with codes, the message at the end of the list changes to read “full.” If this occurs, press N to exit from the Super Star II mode and clear the memory. Then press Y to reenter for further testing. Code Speed The scan tool receives and displays both fast and slow codes and indicates whether each code was a fast or a slow transmission under the code speed display. Some systems transmit both fast codes and slow codes; others transmit only slow codes. Code speed does not affect code meaning. Fast codes are transmitted one time each. Slow codes are transmitted two times each. The scan tool records and displays all codes. Reading Codes Most Ford ABS, cruise control, and other electronic systems transmit codes after the self-test starts. Some systems transmit a “pass” code if no faults are present. Others transmit nothing if no faults are present. Some systems may take up to one minute to transmit the first code, or may pause for 30 seconds or a minute between codes. Certain systems transmit only one code at a time, which must be corrected before other codes are transmitted. Because of code variations, it is important to exactly follow the Ford test procedures for the specific vehicle and system being tested. Clearing Codes Several different methods are used to clear codes from various Ford electronic systems. Some require that the vehicle battery be disconnected to clear codes from the control module. Refer to Ford test procedures for the exact vehicle and system being tested for instructions to clear codes. The code memory of the scan tool clears automatically every time you exit from the Super Star II emulation mode. 6.8 Testing 4EAT Systems The 4-speed Electronic Automatic Transmission (4EAT) is available on some 1989 and later Probe and 1990 and later Escort and Tracer models. On the 1990–92 4-cylinder non-turbo Probe and the 1993 1.9L Escort, the 4EAT is integrated with the MECS. All other 1990 and later Probe, Tracer, and Escort models use a separate test procedure for the 4EAT. 112 Ford Testing i Testing 4EAT Systems NOTE: The scan tool must be operating in the Super Star II mode, as discussed earlier, to test the 4EAT control system. See “4-Speed Electronic Automatic Transmission (4EAT)” on page 50 for test connection instructions when testing models that transmit 4EAT data on the engine diagnostic connector. The 4EAT system records service codes in memory and transmits codes in more than one test mode. Because several different tests are possible, refer to Ford service procedures for the specific vehicle. Available tests include: • Wiggle test (engine off) • Wiggle test (engine running) • Key-on, engine-off (KOEO) self-test Five 4EAT codes are available: • • • • • 55—Pulse Generator 60—1-2 Shift Solenoid (SS1) 61—2-3 Shift Solenoid (SS2) 62—3-4 Shift Solenoid (SS3) 63—Lockup Solenoid (SS4) Follow Ford procedures and the instructions below for 4EAT testing. z To start a 4EAT test in Super Star II Mode: 1. Switch the ignition off before starting a 4EAT test. Follow the Ford test steps exactly. 2. Select “ECA manufacturer=[Mazda].” 3. Turn the ignition on or off and press Y at the “test/hold” position as directed. 4. Read codes as they appear on the display. 5. Follow Ford test procedures to troubleshoot and clear codes and to perform specific functional tests. 6.8.1 Gathering Codes—1991–95 Escort and Tracer Use an analog voltmeter to gather 4EAT codes on a 1991–92 Escort or Tracer with a 1.9L engine, or a 1991–95 Escort or Tracer with a 1.8L engine. The DTC output voltage from these models is low (about 0–2 V). Set the voltmeter to the 2 V scale and connect it as shown in Figure 6-10 and Figure 6-11. The self-test input (STI) is internally grounded in the transmission control module, so codes output continuously until the ignition is switched off. The first digit of the DTC sweeps longer than the second digit. For example: a DTC 61 has 6 long sweeps followed by 1 short sweep of the voltmeter needle. z To read 4EAT codes on 1.9L 1991–92 Escort and Tracer: • Connect an analog voltmeter to the STO terminal of the 4EAT connector (Figure 6-10). 113 Ford Testing i Testing Integrated Vehicle Speed Control (IVSC) NOTE: Connect the negative voltmeter lead to the negative battery terminal. Figure 6-10 STO terminal on the 6-pin 4EAT test connector z To read 4EAT codes on a 1.8L 1991–95 Escort or Tracer: • Connect an analog voltmeter to the pins shown in Figure 6-11. 1— Ground 2— Connect here for 1991–92 models 3— Connect here for 1993–95 models Figure 6-11 Code-reading pin locations for 1991–95 Escort and Tracer 6.9 Testing Integrated Vehicle Speed Control (IVSC) The Integrated Vehicle Speed Control (IVSC) system is the Ford computerized cruise control system, available as an option on: • • • • • 1986 to 1990 Taurus and Sable 1988 to 1990.5 Crown Victoria, Grand Marquis (5.0L Only) 1988 to 1990 Thunderbird and Cougar 1988 to 1990 Lincoln Mark VII 1988 to 1990 Lincoln Continental 114 Ford Testing Testing Integrated Vehicle Speed Control (IVSC) 6.9.1 Diagnostic Procedures i NOTE: Always diagnose DTCs in the order they are received. z To perform a IVSC KOEO Self-Test 1. Turn Off Ignition switch. 2. Set transmission to Park. 3. Connect the scan tool using a Ford 1A to 1B adapter to the engine DLC located in the engine compartment. Do not connect the single pigtail (STI). 4. Select Super Star II Emulation Mode. 5. Cycle the ignition key ON. 6. Within ten seconds, press the speed control “ON” switch. 7. The scan tool will display a code ‘10’ indicating the self test has initiated. 8. After the code 10 is received, press speed control Off, COAST, ACCEL, RESUME buttons, and tap the brake pedal once (do not depress the throttle). 9. Code ‘11’ or ‘111’ indicates a system pass (proceed to the KOER test). 10. Any other DTC received refer to the DTC chart (Table 6-13, Table 6-14, Table 6-15, and Table 6-16). z To perform a IVSC KOER Self-Test 1. Warm up the engine before initializing the KOER self-test. 2. Connect the scan tool to the engine DLC using a Ford 1A or 1B adapter (Connect the STI pigtail for this test.) 3. Shut the engine Off. 4. Select Super Star II Emulation Mode. 5. Start the engine and within 30 seconds, press the speed control ‘ON’ switch. 6. Within 15 seconds, select Test/Hold = [Test]. 7. The scan tool will display a code ‘10’ indicating the self-test has initiated. 8. Do not depress the throttle or brake during self test. 9. If the engine stalls at the end of the IVSC KOER test, shut the ignition off to prevent the engine KOEO test from starting. 10. Refer to the Table 6-13, Table 6-14, Table 6-15, and Table 6-16 for IVSC KOER self-test DTC descriptions. Table 6-13 KOEO 2 digit integrated vehicle speed control DTC descriptions KOEO 2 Digit DTC Integrated Vehicle Speed Control KOEO DTC Description 11 System Pass 23 TP sensor input out of range 47 No input from speed control switches 48 Speed control switch input stuck 49 Speed control switch open ground 53 TP sensor input is greater than self-test maximum 115 Ford Testing Testing Integrated Vehicle Speed Control (IVSC) Table 6-13 KOEO 2 digit integrated vehicle speed control DTC descriptions KOEO 2 Digit DTC Integrated Vehicle Speed Control KOEO DTC Description 63 TP sensor input is less than self-test maximum 74 Brake on off signal always low 75 Brake on off signal always high 67 Neutral Pressure Switch circuit open, A/C input high 81 Servo Vent solenoid circuit 82 Servo Vacuum solenoid circuit Table 6-14 KOEO 3 digit integrated vehicle speed control DTC descriptions KOEO 3 Digit DTC Integrated Vehicle Speed Control KOEO DTC Description 111 System Pass 121 TP sensor input out of range 457 No input from speed control switches 458 Speed control switch input stuck 459 Speed control switch open ground 123 TP sensor input is greater than self-test maximum 122 TP sensor input is less than self-test maximum 536 Stop Light Switch 528 Clutch Pedal Position Circuit 567 Servo Solenoid Circuit 568 Servo Solenoid Circuit Table 6-15 KOEO 3 digit integrated vehicle speed control DTC descriptions KOER 2 Digit DTC Integrated Vehicle Speed Control KOER DTC Description 11 System Pass 27 Does not hold speed during dynamic test, Servo leaks down 28 Does not hold speed during dynamic test, Servo leaks up 36 Speed does not increase during dynamic test 37 Speed does not decrease during dynamic test Table 6-16 KOEO 3 digit integrated vehicle speed control DTC descriptions KOEO 3 Digit DTC Integrated Vehicle Speed Control KOER DTC Description 111 System Pass 453 Does not hold speed during dynamic test, Servo leaks down 454 Does not hold speed during dynamic test, Servo leaks up 455 Speed does not increase during dynamic test 456 Speed does not decrease during dynamic test 116 Chapter 7 GM Operations This chapter explains how to begin using basic setup and test functions of the scan tool. This information is specific to GM vehicles. For general scan tool functionality, see the user’s manual appropriate to your diagnostic tool. i NOTE: The GM selection includes testing capabilities for GM, Hummer, and Workhorse vehicles. For additional information on GM vehicles, see the following sections: • GM Testing, on page 123 • GM Data Parameters, on page 390 • GM Communications Problems, on page 668 Figure 7-1 Basic GM test routine 7.1 Identifying a Vehicle During vehicle identification, you are prompted to identify the test vehicle by entering vehicle identification number (VIN) characters and answering questions For instructions on identifying a vehicle and selecting a system, see the scan tool User Manual. 117 GM Operations i Selecting a System NOTE: Because of midyear manufacturing changes in engine computer systems, you should always enter a new identification when you test a different vehicle, even when two vehicles are the same year, model, and have the same engine and accessories installed. The vehicle ID process begins from the Software Confirmation menu. z To identify a vehicle: 1. Confirm the software selection. A vehicle ID request screen displays. 2. Enter all VIN characters and answer any questions. The scan tool may ask a series of questions to determine the exact configuration of the test vehicle. Table 7-1 Help with some vehicle identification questions Question Help Is it 4L80 E automatic? Vehicles with 4L80E transmissions do not have a transmission throttle valve cable connected to the throttle body. Is it turbo? Look for a turbocharger on the engine next to exhaust. S/T Pickup with manual transmission? Is it Chevy S10 or GMC Sonoma with manual transmission? Light duty under 8600 GVW? GVW rating is located on the drivers door, near latch. Normally 1500 series or C10 Trucks. Postal vehicle? Small van equipped with a 2.5L 4-cylinder. Also known as LLV. With overdrive transmission? Automatic transmission with 4 forward speeds. Sequential fuel injection? Fires injectors same as ignition firing order. May say SFI on VECI sticker or valve cover. With OBD-II emissions? Found on VECI label. When you are finished, a Vehicle ID Confirmation screen displays. 3. Select to continue if the vehicle ID is correct. 7.2 Selecting a System The system is selected after identifying the vehicle. The System Selection menu for these vehicles offers all systems the vehicle is equipped with. 7.2.1 Selecting Systems Select Systems presents codes and data for engine, body, transmission, airbag, and vehicle theft deterrent, ABS control systems, and functional tests for engine, transmission, ABS, airbag, BCM, vehicle theft, IPC and transfer case. 118 GM Operations i Connecting to the Vehicle NOTE: Some vehicles only have engine tests available. In this case, the Select System menu does not display and you go straight to the main menu for engine testing. 7.3 Connecting to the Vehicle Once a vehicle has been identified, a scan tool connection message is shown, instructing you to use the supplied test adapters to connect the scan tool for testing. The following adapters are available to test GM vehicles: • GM-1—(Figure 7-2) The standard GM 12-pin adapter used for engine testing on all GM vehicles with 12-pin ALDL connectors. • GM-2—(not shown) The GM 5-pin adapter used on 1981–82 GM vehicles with 5-pin ALDL connectors. • MULTI-1—(Figure 7-3) This universal, multi-lead male connector adapter is required to test 1980½ Buick, Oldsmobile, and Pontiac systems, as well as some 4WAL antilock brake systems and any vehicle with the 3-pin Isuzu diagnostic connector. This adapter may be used in place of the GM-2 adapter, but the molded 5-pin adapter is easier to connect to the vehicle. • OBD-II—(Figure 7-4) This 16-pin adapter is used for the 16-pin connector available on a few 1994–95 and most 1996 and later GM vehicles. The correct Personality Key™ device must be inserted into the OBD-II adapter for GM applications. Figure 7-2 GM-1 adapter Figure 7-4 OBD-II adapter with Personality Key™ Figure 7-3 MULTI-1 adapter i NOTE: The GM-2 adapter is similar to the GM-1. 119 GM Operations Connecting to the Vehicle On 1980 to 1995 GM vehicles, the test connector is referred to as the assembly line diagnostic link (ALDL) or the assembly line communication link (ALCL). Some 1994 to 1995 GM vehicles and most 1996 and later GM vehicles use a standard 16-pin OBD-II connector referred to as the data link connector (DLC). Connector locations are presented on screen when a connection to the vehicle is prompted. The following figures show other GM vehicle connectors that require the MULTI-1 test adapter, along with instructions for connecting them. i NOTE: You can also use the MULTI-2-D adapter for Spectrum and Storm. 1— White MULTI-1 wire 2— Black MULTI-1 wire 3— Brown MULTI-1 wire 4— Green MULTI-1 wire 5— Red MULTI-1 wire Figure 7-5 Connector for 1980½ Buick and Pontiac with 3.8L (VIN A) engine 1— Brown MULTI-1 wire 2— Green MULTI-1 wire 3— White MULTI-1 wire 4— Red MULTI-1 wire 5— Black MULTI-1 wire to chassis ground Figure 7-6 Connector for 1980½ Oldsmobile with 4.3L (VIN F) engine 120 GM Operations Connecting to the Vehicle 1— Brown MULTI-1 wire—Not used on Cadillac. 2— Green MULTI-1 wire 3— Red MULTI-1 wire 4— White MULTI-1 wire 5— Black MULTI-1 wire Figure 7-7 Connector for all 1981–82 models 1— White MULTI-1 wire 2— Yellow or Green MULTI-1 wire 3— Black MULTI-1 wire Figure 7-8 Connector for Spectrum and Storm i NOTE: The Storm ECM ALDL is white; the airbag ALDL is orange. 1— Ground 2— 2-D Figure 7-9 MULTI-2 Asian adapter z To connect the scan tool to the test vehicle: 1. Be sure the ignition switch is off. 2. Follow the on-screen instructions and connect the scan tool data cable to the test vehicle. a. Select the proper test adapter and attach it to the data cable. b. Connect the other end of the data cable to the scan tool data port. c. Connect the test adapter to the vehicle. 121 GM Operations GM Vehicles with Partial or No Self-Diagnostic Capability Test adapters fit into the connectors only one way. Be sure the connector is installed securely. 3. Switch the ignition on. 4. Select to continue. The main menu for the selected system displays, and the scan tool is connected to the vehicle data stream. 7.4 GM Vehicles with Partial or No Self-Diagnostic Capability The General Motors vehicles listed in either do not have electronic engine control systems, or they have systems without self-diagnostic capabilities. By itself, the presence of an ALDL connector does not mean the vehicle has self-diagnostic capabilities. The vehicles in Table 7-2 have limited self-diagnostic capabilities. Table 7-2 GM vehicles without self-diagnostic capability Year Models All Diesel passenger cars Pre 1981 All models, except 1980 4.3L Olds (VIN code F) and 1980 Buick and Pontiac 3.8L (VIN code A) 1981–82 All trucks 1983–85 All Federal (49-state) trucks, except: 2.5L, 4-cylinder with TBI (VIN code E) and 6.2L diesel (VIN code C) 1981–90 All LPG-powered vehicles 1981–90 6.2L diesel trucks (VIN code J) 1981–91 All 7.4L carbureted trucks (VIN code W) and 4.8L in-line 6-cylinder carbureted trucks (VIN code T) 1985–88 Chevrolet Nova (Troubleshooting tips available in Asian Import cartridge by identifying as same year Toyota with the 5th VIN as E and a 4-AC or 4ALC engine.) Table 7-3 GM vehicles with partial self-diagnostic capability Year Models 1991–97 Some 6.2L and 6.5L diesel trucks (VIN code J) have an ALDL that offers transmission module communication only. 2003 and earlier Some trucks with 6.5L diesel engine (8th VIN Y) with federal emissions offer transmission module communication only. 122 Chapter 8 GM Testing This chapter provides information and procedures for testing the following control systems: • • • • Engine Transmission Airbag Antilock Brake System (ABS) For additional information on GM vehicles, see the following sections: • GM Operations, on page 117 • GM Data Parameters, on page 390 • GM Communications Problems, on page 668 8.1 Testing Control Systems Select Systems from the System Selection menu to open the main testing menu. To test GM vehicles, the scan tool must communicate with the vehicle electronic control module (ECM) and receive data over a serial data link. It does this through the DLC. “Serial” means data parameters are transmitted one after the other, in series. The scan tool operates at a speed that depends on the length of the serial data stream and on the baud rate of the vehicle ECM. Baud rate is the data transmission speed in digital bits per second. Typical GM engine baud rates are 80 for minimum-function systems, 160 for carbureted and early fuel-injected systems, 8192 for 1988–95 port fuel-injected engines, and 10,400 (10.4K) for 1996 and later, fuel-injected engines. The baud rate determines how quickly the scan tool responds to an ECM and how fast data readings change on the screen. It also affects the length of time that it takes to record a movie. Data from a high-baud ECM may appear to change almost instantly. Data from a low-baud module appears to change much more slowly. This display speed, or “data update rate” depends on the ECM; it is not controlled by the scan tool. 8.1.1 Scan Tool Communication The Codes and Data and Functional Tests selections on the main menus require the scan tool to communicate with the selected ECM. The ignition must be on to establish communication. Select either Codes and Data or Functional Tests and a “waiting for module to communicate” message displays. If communication is not established, the screen displays a “no communication” message. This message stays on the screen until communication is established, then the scan tool displays the selected function. 123 GM Testing Testing Control Systems 8.1.2 Codes and Data Selections The Codes and Data selections for different vehicles vary, but each one, with or without road test, opens a data display screen that presents DTCs and onboard computer data. The Codes and Data test selections are: • Codes and Data—displays trouble codes and data stream information from the selected ECM. The vehicle should not be driven during this test. • Codes—displays trouble codes only, no data parameters. • Data—displays data parameters only, no trouble codes. • Road Test (Data)—allows the vehicle to be driven while displaying trouble codes and data stream information from the selected ECM. • Road Test (No C & D)—allows the vehicle to be driven with the scan tool connected, but no trouble codes or data display while driving. • Codes and Data and Road Test—displays trouble codes and data stream information from the selected ECM, whether or not the vehicle is being driven. • Codes and Data Menu—accesses a submenu of data test selections that group similar data parameters together on smaller data lists for faster, more efficient testing. • Code History—displays code history information. • Adaptive Report—displays the adaptive, or learned, information that the transmission control module (TCM) uses to control shifting. Codes and Data Selecting Codes, Data or Codes and Data displays the data list or trouble codes for the selected module. Data for carbureted engines is slightly different than for fuel-injected engines, but both work the same. Data Lists Some GM vehicles transmit slightly different data lists for different test functions. For example, certain models transmit a data list during some functional tests that is shorter than the data list transmitted in diagnostic mode. Some models do not transmit codes during a road test. However, many GM vehicles transmit the same data under all conditions. On OBD-II vehicles, the scan tool may display the data parameters in multiple data lists. Whether a vehicle transmits an identical data list or variable data lists for different test conditions affects some settings on the scan tool. • Fix display lines or reassign LED functions for an ECM that always transmits the same data list and those settings stay in the scan tool memory until they are changed or a new vehicle ID is entered. • Fix display lines or reassign LED functions for a vehicle that transmits variable data lists and those settings return to their preassigned functions when test selections are changed (when changing from Road Test to Diagnostic Testing mode, for example). See the manual for the diagnostic tool you are using for instructions on reassigning LED functions. 124 GM Testing Testing Control Systems Diagnostic Trouble Codes Current (Hard) Codes and History (Soft) Codes On some models, DTCs may be classified as either “current (hard)” or “history (soft).” Most 1988 and later GM vehicle controllers separate soft codes from hard codes. • Current (Hard) codes—indicate a problem that exists at the time of testing. These are referred to as “current codes” in the trouble code menu. • History (Soft) codes—indicate a problem that occurred in the past but is not present now. These are referred to as “history codes” in the trouble code menu. z To distinguish between current (hard) and history (soft) codes: 1. Clear the ECM memory and reenter Codes and Data. 2. Watch for codes to reappear: – A current (hard) code reappears quickly—from immediately to a couple of minutes. – A history (soft) code does not reappear until the problem that caused it reoccurs. 1995 and Earlier Cadillac Engine System Codes Cadillac systems transmit current (hard) codes for the engine. However, history (soft) codes are available only from the Cadillac on-board diagnostic system, with the following exceptions: • 1989 and earlier models transmit a history (soft) code 52 • 1990–95 models transmit history (soft) codes 52 and 109 Refer to Cadillac service procedures or the Fast-Track Troubleshooter Reference G074 for instructions on using the Cadillac system. Diagnostic Trouble Codes Without Definitions Some OBD-II GM vehicles output OBD-II style DTCs that have varying definitions. The correct DTC definition cannot be determined by the VIN characters entered during the vehicle ID sequence. In these instances, the display shows the DTC followed by a message that refers you to this manual. Use Table 8-1 and Table 8-2 to determine the DTC definition. Table 8-1 2001 and earlier passenger car DTCs with multiple definitions (part 1 of 2) DTCs with Multiple Definitions–Cars DTC P1641 Year 4th VIN Engine 1996 B/D/Y 4.3/5.7 1996–97 F 5.7 1996–99 Z 1.9 1996–2001 All others 1998 W 3.8 All 3.8 N 3.4 1999 Definition Fan relay #1 circuit fault QDM “A” fault MIL control circuit 125 A/C relay GM Testing Testing Control Systems Table 8-1 2001 and earlier passenger car DTCs with multiple definitions (part 2 of 2) DTCs with Multiple Definitions–Cars DTC Year 4th VIN A,L,N,W 1996 1996–97 P1642 P1643 1996–99 Y 5.7 F 5.7 E/K 4.6 G, Olds only 4.0 1998–99 W 3.1 1999 N 3.4 1996 B/D/Y 4.3/5.7 1996–97 F 5.7 1996–98 All others 1996–98 1996–99 1997–2000 1999 1999 1999–2001 1996 Definition Air pump relay circuit Cooling fan relay 2 control circuit All others 1996–97 Cooling fan relay 2 & 3 control circuit Vehicle speed output circuit Driver 1 line 2 Change oil lamp circuit Engine speed output circuit Fuel pump PWM circuit B/D/Y 4.3/5.7 Vehicle speed output circuit A/L/N/W 3.1 Fan relay #2 circuit fault F 5.7 Vehicle speed output circuit Fan relay #2 circuit fault C/F/G/H 3.8 E/K 4.6 G 4.0 Y 5.7 Chassis pitch fault Fan relay #2 circuit fault C/H/W 3.8 W 3.1 N 3.4 F 3.8 E/K 4.6 All others Lift/dive output circuit Fan relay 2 & 3 circuit Ride control circuit A/C clutch control circuit Low engine oil level lamp fault 1996–98 C/G/H 3.8 TCS delivered torque output circuit 1996–99 G 4.0 A/C clutch control circuit F/W 3.1/3.8 Fuel level output fault F 5.7 Low engine oil level lamp fault F 3.8 TCS delivered torque output circuit P1653 1998 1999 2000–01 1996–99 P1654 All others 1997–98 1996 P1652 Engine 3.1/3.4 1996–98 1999 1999–2000 All others Fuel level output or low oil level lamp circuit All Low engine oil level lamp fault E/K 4.6 G 4.0 All others Cruise control disable circuit fault A/C relay circuit fault W 3.1 N 3.4 C/F/G/H/W 3.8 126 2nd gear start lamp circuit Reduced engine power lamp circuit GM Testing Testing Control Systems Table 8-2 Truck DTCs with multiple definitions DTCs with Multiple Definitions–Trucks DTC Year 5th VIN Engine Definition P1641 2000 P 6.5 MIL control circuit fault P1642 1996 U 3.4 Air pump relay P1643 1997–2001 All 6.5 Wait to start circuit U 3.4 Fan relay #2 circuit fault Others - Vehicle speed output circuit 2000 All 4.8/5.3/6.0 Powertrain induced chassis pitch circuit fault 1996 All 4.3/5.0/5.7/7.4 Oil level lamp fault 1996–97 All 6.5 EGR vent solenoid circuit fault 1999–2000 All 6.5/7.4 EGR vent sol or EPR circuit 1996–2001 All 6.5/7.4 Service throttle soon circuit 1996 P1652 P1653 P1654 Road Test (Data) Selecting Road Test (Data) from the Main Menu GM Engine initiates what some service manuals may call the “open” or “normal” mode because the scan tool does not place a load across the ALDL connector as it does in the diagnostic mode. Whether data displays in the Road Test mode depends on the PCM of the specific test vehicle. If codes and data are available in Road Test mode, the menu selection reads Road Test (C&D). If not, the menu selection reads Road Test (No C&D). Generally, the same data information displays in Road Test (Data) mode as those described for the Data mode, except for the following important differences: • The scan tool does not place a resistive load on the ECM, and the engine operates normally under ECM control; it is safe to drive the vehicle for troubleshooting intermittent problems. • The data list may differ from that of the list in Diagnostic mode. For example, some fuel-injected engines display a slightly shorter data list in Road Test mode. Road Test (No C&D) Several GM engine ECMs, particularly on vehicles with carbureted engines, provide a Road Test mode but do not transmit data. For these vehicles, Data and Road Test are separate selections on the Main Menu GM Engine. The Road Test (No C&D) selection removes the resistive load the scan tool applies in Codes and Data mode and allows the vehicle to be safely driven with the scan tool connected. After selecting Road Test (No C&D), the following screen displays. 127 GM Testing Testing Control Systems Codes and Data and Road Test Many 1986 and later GM vehicles provide only the Road Test mode, or “open mode,” for viewing the engine and transmission data. For these vehicles, Codes and Data and Road Test displays on the Main Menu GM Engine. This mode may be used for testing in the shop, as well as for road testing. Select this function and the second line of the display shows the vehicle may be driven. Codes and Data Menu Some vehicles have a Codes and Data Menu selection, which is used to access data from various data groups. A data group combines similar data parameters into smaller data lists for faster, more efficient testing. Menu choices vary depending on the vehicle. As with other menus, only the items available for the specific test vehicle display. Codes and Data menu choices may include: • • • • • • • • • • Adaptive Report Codes Code History EGR, EVAP, ACC EGR and Misfire Data Engine Data I Fuel Trim Data Idle and Cruise Data Misfire Data Spark Data Codes On OBD-II vehicles, selecting Codes from the Codes and Data Menu opens a submenu that may include the following options: • • • • • • • • Current Freeze Frame/Failure Records History MIL, SVS, or Message Requested Last Test Failed Test Failed Since Code Cleared Failed This Ignition DTC Status Some OBD-II vehicles offer an ALL Powertrain Codes option. Selecting All Powertrain Codes displays any DTC stored in the PCM. 128 GM Testing Testing Control Systems Freeze Frame/Failure Records Selecting Freeze Frame/Failure Records displays freeze frame and failure records associated with a particular DTC. These records include stored values of selected data parameters at the time a DTC sets. Selecting this mode displays a list of all DTCs in PCM memory. A DTC followed by (Freeze Frame) indicates an emissions-related DTC that meets OBD-II freeze frame requirements. A DTC not followed by (Freeze Frame) indicates that the DTC is either non-emissions related or is emissions-related but has not yet met the OBD-II freeze frame requirements. The GM failure records may include more data than OBD-II freeze frames. The scan tool displays both a freeze frame and a failure record selection for emissions-related DTCs. Selecting Freeze Frame/Failure Record displays a “please wait” message while the data is loading, then the freeze frame and failure record displays. History The History selection displays any history DTCs that are stored in PCM memory since the last time DTCs were cleared. MIL SVS or Message Requested The MIL SVS or Message Requested selection displays DTCs that are currently turning on the MIL, SVS lamp, or displaying a message on the message console. Last Test Failed The Last Test Failed selection displays DTCs that were detected when the last test ran. Test Failed Since Code Cleared The Test Failed Since Code Cleared selection displays DTCs that set since the last time codes were cleared. Failed This Ignition The Failed This Ignition selection displays DTCs that set during the current ignition cycle. DTC Status The DTC Status selection offers a way to quickly check on the status of the OBD-II tests associated with a particular DTC and verify related repairs. z To check DTC status: 1. Select DTC Status. The display prompts you to enter the DTC. 129 GM Testing Testing Control Systems 2. Select each correct number for the position indicated by the cursor. Once all characters are selected, the screen automatically updates to show the DTC status. If a DTC supported by the vehicle is entered, the first line of the display shows the DTC definition. The next three lines include five information fields: • This Ignition Cycle—indicates the OBD-II test status related to the selected DTC. There are four possible results: Ran & Failed, Ran & Passed, Not Run, and Ran & INT. Ran & INT (intermittent) means the test was inconclusive and must be repeated. • Last Test—indicates the results of the last DTC-related tests. The results are either Passed or Failed. • Since Clear—indicates the test status since the DTC was last cleared. The results are Passed, Failed, or Not Run. • History—indicates whether the PCM stored a history code. The display reads Yes or No. Typically, a freeze frame or failure record is available for a DTC when Yes displays. • MIL or SVS REQ—indicates the PCM command status to the malfunction indicator lamp (MIL) or service vehicle soon request (SVS Req) lamp the last time the DTC set. The displays reads Yes or No. Yes means the PCM commanded the lamp to turn on. Codes (Airbag) Some older models display DTCs for the supplemental inflatable restraint (SIR), or airbag, system. However, the airbag control module does not display data parameters. Therefore, Codes is the only selection available on the Main Menu GM Airbag. Selecting Codes displays the airbag codes. Any codes currently present display toward the top of the code list. When a current code is set, it gets added to the list of history codes. See “Codes and Data Selections” on page 124 for 1994 and later models, and for 1993 and later Saturn airbag testing. 8.1.3 Functional Tests—1995 and Earlier i NOTE: Operations described in this section are not available on all tool platforms. All functional tests for 1995 and earlier models are described below. Not all tests are available for every model; only those tests available from each specific test vehicle display. Following is a complete listing of functional tests for 1995 and earlier models: • • • • • • Field Service Mode Access Onboard Diagnostics AIR Solenoid (Force AIR to Exhaust) TPS Check and Adjustment Specifications Backup Fuel Full Lean (FL) Mixture 130 GM Testing Testing Control Systems • Full Rich (FR) Mixture • Backup Spark and Fuel • Fixed 10° Spark ! WARNING Do not enter any functional test while driving on a road test. During some functional tests, the PCM makes changes to ignition timing, fuel delivery, and other engine functions, which may affect engine operation and vehicle control. Field Service Selecting Field Service on 1993 and earlier models grounds Pin B of the ALDL connector to enter Field Service mode. The PCM does not transmit data and the vehicle does not set new codes in Field Service mode. On some vehicles, field service is used to check or adjust ignition timing and the idle minimum air rate. With the key on and the engine off, the check engine lamp flashes DTCs if any are present, or code 12 if there are no codes. The PCM also energizes all solenoids with the key on and the engine off, so Field Service mode may be used to test solenoid operation. • On a carbureted engine running in the Field Service mode, the check engine lamp stops flashing code 12 and new trouble codes cannot set. The PCM also sets timing to a fixed degree of advance, which allows for checking and adjusting ignition timing for some engines. Field Service mode may also be used to conduct a system performance check on carbureted engines. See the vehicle service manual for details. • On a fuel-injected engine running in the Field Service mode, the check engine lamp flashes rapidly when the engine is running in open loop and slowly when in closed loop. The length of the check engine lamp flash indicates whether the exhaust is rich or lean in closed loop. The flash is longer if rich. Access On-board Diagnostics The Access On-board Diagnostics selection creates an open circuit between the ALDL diagnostic and ground pins, or pins A and B. This selection is available on the following systems: • 1981 and later Cadillac • 1986 and later Buick Riviera, Buick Riatta, Oldsmobile Toronado and Oldsmobile Trofeo This allows access to the onboard diagnostics without disconnecting the scan tool. Refer to GM service procedures to enter and use the onboard diagnostic program. Air Solenoid The AIR Solenoid selection energizes the air switching solenoid to direct air into the exhaust manifold. Use this test to check the operation of the O2S and the response of the MC solenoid or the fuel integrator, block learn, and injector pulse width. 131 GM Testing Testing Control Systems i z NOTE: The engine must be warmed up and operating in closed loop for this test to be valid. The PCM must be directing air downstream to the catalytic converter. This test cannot be performed reliably when the PCM is directing the air-divert solenoid to route air to the atmosphere. To perform an air solenoid test: 1. Select AIR Solenoid. A caution message now displays. 2. Select to continue. The air solenoid test screen displays, which is the standard Codes and Data display. 3. Activate the test and the air switching solenoid directs air to the exhaust manifold. The scan tool automatically turns off air switching after 20 seconds of continuous operation. The AIR switch solenoid parameter value on the screen does not simultaneously switch from off to on when the test is activated. Be aware that the parameter on the screen is the PCM solenoid command. The test grounds the solenoid independently of the PCM. TPS Check and Adjustment Specifications The TPS Check And Adjustment selection on the Functional Tests menu allows you to check and adjust the operation of the throttle position sensor. The display varies for different vehicles, but each gives the current TPS reading and the test or adjustment specification. If engine speed is part of the adjustment specification, a live RPM reading appears on the top line of the display. If the TPS is not adjustable, the voltage should be measured at curb idle or closed throttle, and the scan tool displays allowable TPS voltage range. IMPORTANT: To avoid incorrect TPS adjustment or component damage, be sure to follow the on-screen instructions. Refer to a vehicle service manual for complete test or adjustment procedures. Full Lean (FL) Mixture The Full Lean (FL) Mixture selection on the Functional Tests menu is available only for a minimum-function system, which is used on carbureted T-body models: • Chevette • Acadian • T-1000 In this mode, the PCM commands the MC solenoid to a fixed 54° dwell, or 90% duty cycle, condition. This mode is used to check O2S operation and other engine operating conditions while the fuel system is held in a full-lean condition. During the full lean (FL) mixture test, the standard diagnostic data list for a minimum-function system displays. • “FL” appears at the top left to indicate the system is in the Full Lean (FL) Mixture mode. 132 GM Testing Testing Control Systems • The Vote parameter, which indicates a rich or lean exhaust, should be negative during full-lean operation. • The MC dwell reading should remain fixed at 54°. The data list is the same list seen in the Codes and Data mode. The vehicle should not be driven while the test is active. Line 1 is fixed and displays the RPM, Vote, and MC dwell. Full Rich (FR) Mixture The Full Rich (FR) Mixture selection on the Functional Tests menu is available only for a minimum-function system, which is used on carbureted T-body models: • Chevette • Acadian • T-1000 In this mode, the PCM commands the MC solenoid to a fixed 6° dwell, or 10% duty cycle, condition. Use this mode to check O2S operation and other engine operating conditions while the fuel system is held in a full-rich condition. During the full rich (FR) mixture test, the standard diagnostic data list for a minimum-function system displays. • “FR” at the top left indicates the system is in the Full Rich (FR) Mixture mode. • The Vote parameter, which indicates a rich or lean exhaust condition, should be a positive, high number in full-rich mode. • The MC dwell reading should remain fixed at 6°. The data list is the same list seen in the Codes and Data mode. The vehicle should not be driven while the test is active. Line 1 is fixed and displays the RPM, Vote, and MC dwell. Backup Fuel The Backup Fuel selection on the Functional Tests menu lets you check the operation of the backup fuel program of the PCM on some fuel-injected vehicles. The backup fuel program is a fail-safe, or limp-in, program that sets a fixed injector pulse width. This allows the vehicle to be driven to a shop for repair in case of a major system failure. The backup fuel test verifies that the PCM backup program is operational, but may also be used for checking the operation of the fuel injection system. If a vehicle with a driveability problem seems to run better in Backup Fuel mode than in normal operation, fuel metering and air intake parameters should be checked carefully. Selecting Backup Fuel displays the Backup Fuel Active screen. No data is available during this test. The scan tool ends the test automatically after 120 seconds to avoid catalytic converter overheating and returns to the Functional Tests menu. The backup fuel test for 1982–85 Cadillac models with onboard diagnostics is slightly different. Press and hold INST/AVG on the fuel panel to activate. 133 GM Testing Testing Control Systems Backup Spark & Fuel The Backup Spark And Fuel selection on the Functional Tests menu checks operation of the PCM backup spark and fuel program on some fuel-injected vehicles. Backup spark and fuel is a fail-safe, or limp-in, program that sets base timing and a fixed fuel injector pulse width. This allows the vehicle to be driven in case of a major system failure. This test verifies that the PCM backup program is operational, but may also be used to double-check the operation of the fuel injection system. If a vehicle with a driveability problem seems to run better in Backup Spark and Fuel mode than in normal operation, check fuel metering, ignition, and air intake parameters carefully. Selecting Backup Spark And Fuel displays the Backup Spark and Fuel screen. The scan tool does not display data during this test. This is a timed test that automatically ends after 120 seconds to avoid catalytic converter overheating. Fixed 10° Spark The Fixed 10° Spark selection on the Functional Tests menu is available on 1985 and later Cadillac C-body models with a 4.1L engine. In this test mode, the PCM sets a fixed 10° of spark advance, which is the base timing setting, and disables EGR. The following conditions must be met for the PCM to maintain 10° of spark advance during this test: • Engine temperature must be above 85°C (185°F). • Engine speed must be under 900 RPM. • The transmission must be in park. Selecting Fixed 10° Spark displays the Fixed Spark screen. Follow instructions on the vehicle emission control information (VECI) decal to adjust timing. When this test is active, the standard data list displays and 10° appears at the top left to indicate the system is in the Fixed 10° Spark mode, and the vehicle should not be driven. 8.1.4 Functional Tests—1996 and Later i NOTE: Operations described in this section are not available on all tool platforms. Beginning with the 1996 model year, interactive bidirectional functional tests were added to OBD-II vehicles. Because there are more than 250 of these tests, it is not practical to describe them all. However, they may be grouped into the following general categories: • • • • • • • Adaptive memory resets Gauge, lamp, and relay on/off tests Engine operating mode tests (Loop Status and Cruise mode) Injector tests Spark, EGR, and timing tests Torque converter tests Transmission shift tests 134 GM Testing Testing Control Systems • Valve and solenoid on/off tests For bidirectional tests, the scan tool displays a message if a device control, or functional test, limit is exceeded. Device control limits are specific to each PCM, and to each test, making it impractical to list the limit criteria for all tests. The device control limit message is specific to the conditions at the time the test was requested. If a device control limit message displays while performing a functional test, it means the test aborted due to an internal function of the PCM. This does not indicate a problem with the scan tool. Safety limits are engineered into the PCM to prevent a functional test from enabling under inappropriate conditions, such as turning off a cooling fan relay when engine coolant temperature is hot enough to cause overheating or turning on an air conditioning clutch when the PCM detects low refrigerant pressure. Functional Test Selection i NOTE: Operations described in this section are not available on all tool platforms. Selecting Functional Tests from the main menu opens menu of test options. ! WARNING Do not enter a functional test while conducting a road test unless the road test requires it. The PCM makes changes to the ignition timing, fuel delivery, and other vehicle functions, which may affect engine operation and vehicle control. Functional Test Operation Functional test operation varies depending on the test. There are four general types of functional test operation: • Information Tests—These are read-only types of tests. For instance, select VIN from the functional tests and the scan tool displays the VIN number. • Toggle Tests—These tests switch a component, such as a solenoid, relay, or switch, between two operating states. The terms “on/off,” “open/clsd” (open/closed),” “enab/disa” (enable/ disable), “excd/norm” (exceeded/normal), “pass/fail,” “lean/rich,” “high/norm,” or “rev/fwd” (reverse/forward) may be used to name states. • Variable Control Tests—These tests command a certain value for a system or component. For instance, the “delta spark retard(°)” test allows the scan tool to vary spark timing in one-degree increments up to ten degrees. Similarly, the “EGR(%)” test allows varying the EGR valve duty cycle from zero to 100 percent. • Reset Tests—These tests reset the adaptive, or learned, values stored in the PCM. The toggle tests, variable control tests, and reset tests all look very similar on the scan tool display. 135 GM Testing Testing Control Systems Variable Control Test During a variable control test, scroll to increase or decrease the variable control value. For example, during a canister purge test, scrolling instantaneously changes the purge solenoid opening by varying the duty cycle in increments of 10%. The duty cycle commanded by the scan tool also appears on the screen. Other variable control tests act similarly. EGR Control i NOTE: Since a proper Exhaust Gas Recirculation (EGR) system operation is crucial to preventing a vehicle from emitting high levels of NOx, the EGR control test is described in detail here. This bidirectional functional test is available on some 1996 and later engines. In this mode, the scan tool commands the PCM to cycle the EGR valve. The EGR valve opens and closes at fixed intervals to provide a functional test of EGR system operation. Tests vary slightly for each of the following three types of EGR valve: • Integrated electronic EGR valve • Digital EGR valve • Linear EGR valve Some engines that use these EGR valves do not have a PCM with the communication ability required to perform the functional test. The EGR control test selection only appears on the Functional Tests menu for those vehicles with the necessary capability. The scan tool displays the standard Codes and Data list during the EGR control tests. However, there are slight differences. These differences are explained below. Integrated Electronic EGR Valve An integrated electronic EGR valve has a built-in solenoid controlled by the PCM. The solenoid opens and closes a vacuum vent for the valve. When the vacuum vent is opened, The EGR valve is closed. When the vacuum vent is closed, The EGR valve opens. Selecting EGR Control from the Functional Tests menu displays the EGR Control Test screen. On-screen instructions guide you to the EGR Control data list. While the test is active, the EGR valve cycles on and off at regular intervals, as indicated by Off or ON in the display. ON means the integral solenoid in the valve should be energized to close the vacuum vent, which opens the EGR valve. Engine speed should drop as the valve opens. Digital EGR Valve A digital EGR valve has three solenoids that open and close different sized orifices in the valve. This EGR control tests for these systems allows each of the solenoids to be operated independently. 136 GM Testing Testing Control Systems z To test the digital EGR valve solenoids: 1. Select EGR Control. The EGR Control Test screen displays. 2. Select to continue. A data list similar to that for Codes and Data displays. When the test begins, solenoid 1 cycles at regular intervals. The value in the upper left corner of the display changes between Off and On1 to indicate the status of solenoid one. On indicates the solenoid is energized to open the first valve orifice. Engine speed should drop as the EGR valve opens in response to solenoid one. 3. Select to test each solenoid in succession. Linear EGR Valve A linear EGR valve is a single orifice valve with a variable opening controlled by a stepper motor. The PCM controls valve opening in 10% increments by commanding the stepper motor position. A variable control test routine is used to test a linear EGR valve. See “Variable Control Test” on page 136 for testing information. EVAP Purge/Seal Test The evaporative emissions system (EVAP) Purge/Seal tests may be used for: • Checking for an EVAP system leak. • Checking the integrity of the fuel tank pressure (FTP) sensor. i NOTE: The fuel level in the tank must be between 15% and 85% of tank capacity (about 0.75 to 4.25 volts) when performing EVAP tests. An incorrect fuel level may produce inaccurate results. IMPORTANT: If the onboard EVAP diagnostic is running at the time of testing, the EVAP bidirectional controls will not function correctly. During a purge or seal test, live data displays on the screen along with a series of test commands. The commands are on the second line of the display and offer the following choices: – – – – – z Purge—controls the purge solenoid and closes the vent solenoid. Seal—sets the purge solenoid to a 0% duty cycle and closes the vent solenoid. Scroll—lets you scroll through the data list. Change List—opens the Data Menu so you can switch to a different data list. Exit—cancels the test and returns you to the Output Controls menu. To check for an EVAP system leak: 1. From the Functional Tests menu, select Output Controls > EVAP Purge/Seal. 2. Press Y to continue when the test information screen displays. 3. Select Change List > EGR, EVAP, ACC. 137 GM Testing Testing Control Systems 4. Select Scroll, then move the EVAP parameters into the viewing area. 5. Select Seal. The Scanner maintains a 0% purge rate and closes the vent solenoid to seal the fuel tank and trap vacuum. 6. Monitor the vacuum decay rate over time to determine if there is a system leak. 7. Select Exit to end the test. Repair leaks as needed and retest. z To check the FTP sensor integrity: 1. Start the engine and allow it to run at idle. 2. From the Functional Tests menu, select Output Controls > EVAP Purge/Seal. 3. Press Y to continue when the test information screen displays. 4. Select Change List > EGR, EVAP, ACC. 5. Select Scroll, then move the EVAP parameters into the viewing area. 6. Select Purge. 7. Adjust the purge solenoid duty cycle to 30%. This setting causes vacuum in the tank to increase until the FTP sensor reaches a predetermined abort level. When this level is reached, the PCM cancels the test and opens the vent valve to release vacuum. The Scanner simultaneously displays a message indicating purge system vacuum is too high. Suspect a faulty FTP sensor if the PCM does not cancel the test or a “high vacuum” message does not display. EVAP Service Bay Test The evaporative emissions system (EVAP) Service Bay Test may be used to run the I/M EVAP diagnostic monitor on some General Motors OBD-II vehicles. This test allows the technician to identify an EVAP failure or to verify repairs to the system. Not all OBD-II vehicles have the ability to perform the service bay test. The EVAP Service Bay Test procedures vary slightly, depending upon whether or not the vehicle has an engine off natural vacuum (EONV) system. Pre-test conditions, which must be met for the test to run properly and provide accurate results, are listed below. General enable conditions for all vehicles: • Place transmission in Park (AT) or Neutral (MT) • Set the parking brake • Turn all accessories off Enable conditions for models without EONV: • • • • • • Ignition switch must be in the On position Battery voltage must be in the 9 to 18 volt range Engine coolant temperature must be below 158°F (70°C) Fuel level must be between 15 and 85 percent of tank capacity (about 0.75 to 4.25 volts) Vehicle speed must be below 2 mph (3 kph) All DTC must be cleared 138 GM Testing Testing ABS Systems Enable conditions for models with EONV: • • • • Battery voltage must be in the 11 to 18 volt range • • • • All DTC must be cleared Engine coolant temperature must be below 158°F (70°C) The I/M EVAP monitor status must be “not complete” Fuel level must be between 15 and 85 percent of tank capacity (about 0.75 to 4.25 volts), do not refuel during test Ambient air temperature must be in the 32 to 104°F (0 to 40°C) range The vehicle must be driven for the time and distance specified on the scan tool Ignition switch must remain off during the engine off portion of the test, and the vehicle must remain at rest. All systems begin with an engine running test that outputs a DTC in the event of a failure. This completes the procedure for models without EONV. For models with EONV, the technician is prompted to drive the vehicle a specific distance and allow the engine to run a specified amount of time to initiate the engine off portion of the test. During the engine off portion of the test, the system monitors vacuum decay in the fuel tank after the ignition is switched off. This monitor may be active for up to 40 minutes. The I/M EVAP monitor should indicate “complete” following the engine off portion of the test. If a test aborts for some reason, check the service information to make sure the vehicle specific enable conditions are met. Clear DTC memory to reset the monitors in order to retest. 8.1.5 Clear Codes Most GM vehicles allow clearing DTC records from the selected ECM memory through the scan tool. If the option is not available, the choice does not appear on the menu. If code clearing was successful, a “no codes present” message appears. If code clearing fails for any reason, previous codes reappear when the display returns to the Data Viewing mode. In this case, repeat the code-clearing procedure. 8.2 Testing ABS Systems Four-wheel antilock brake systems (4WAL) are available on most 1986 and later GM cars and trucks, and rear-wheel antilock (RWAL) brake systems are available on 1988–95 2-wheel drive light trucks. On most 1988 and later systems, the antilock brake system (ABS) electronic brake control module/electronic brake traction control module (EBCM/EBTCM) lights an ABS indicator lamp on the instrument panel when a problem occurs. Most systems store diagnostic trouble codes (DTCs) and either flash them on the warning lamp or transmit them to the scan tool. Most systems also transmit serial data, which is displayed by the scan tool. 139 GM Testing Testing ABS Systems 8.2.1 ABS Codes and Data The ABS Codes and Data selection is available on the Main Menu GM ABS for most ABS systems. This ABS selection operates similarly to that for engine testing. In this mode, the scan tool reads DTCs and all data available on the ABS data stream. The ABS Codes and Data displays and menus vary slightly depending on the system. Selecting ABS The ABS tests include trouble code reading and code clearing for most systems, plus the ability to read data and brake bleed for most systems. Use the application tables on the following pages to identify the type of ABS used on a particular vehicle. Table 8-3 lists key questions for identifying systems. Table 8-4 through Table 8-11 list applications for the different divisions: • • • • • • • • “Buick applications” on page 141 “Cadillac applications” on page 142 “Chevrolet (except trucks and vans) applications” on page 143 “Chevrolet and GMC trucks and vans applications” on page 143 “Geo and GM import applications” on page 144 “Oldsmobile applications” on page 144 “Pontiac applications” on page 145 “Saturn applications” on page 145 ! WARNING ABS diagnosis with the scan tool does not require opening the hydraulic system or disassembling any mechanical parts. However, complete ABS service may require opening the hydraulic system. ABS hydraulic systems operate on pressures of 2000 psi or higher. Always completely depressurize the system before opening any hydraulic connection. Most systems are depressurized by applying and releasing the brake pedal at least 25 times. Refer to the GM service manual instructions for complete information on hydraulic system service and safety. Refer to the appropriate GM service manual for procedures and complete test and repair information for these systems. Table 8-3 Key questions for identifying systems (part 1 of 2) Question Help IS It RWAL? Vehicles with 4-wheel antilock brakes have a large underhood hydraulic control unit attached with steel lines to the brake master cylinder. To distinguish 4WAL from RWAL, see Figure 8-1. With Traction Control? The vehicle may have a switch on the console or dash to activate the system. Common badges are ASR and TCS. Manual trans with a VCM? The electronic control unit is located inside VCM (vehicle control module). The vehicle also has a hydraulic control unit underhood. For 1999–2006 vehicles only: With ETS? Vehicles (4th VIN W, N-Alero, and N-Grand Am) with Enhanced Traction System (ETS), have a traction off button on the dash or console. 140 GM Testing Testing ABS Systems Table 8-3 Key questions for identifying systems (part 2 of 2) Question Help With Magnasteer (MSVA)? Vehicles with Magnetic Steering Variable Assist (MSVA or Magnasteer) have a 2-wire subharness from the steering rack assembly. With electronic variable orifice (EVO)? Vehicles with electronic variable orifice have wires going to the power steering pump. With tire inflation monitor (TIM)? Vehicles (4th VIN N) with Tire Inflation Monitors (TIM) have a reset switch located inside the fuse panel at the left side of the dash and a “low tire” lamp in the instrument cluster that comes on during a key on bulb check. With Active Handling? Vehicles with Active Handling have a suspension control switch in the center console. With traction control? Vehicles (4th VIN C) with traction control have a switch located at the end of the shift lever. Vehicles (4th VIN H-Pontiac) with traction control have a switch in the center front of the passenger compartment, under the console. Vehicles (4th VIN H-Oldsmobile) with traction control have a disable switch under the left side of the instrument panel, on the knee bolster. 1— 4WAL hydraulic control unit 2— 4WAL hydraulic control unit 3— RWAL control valve assembly Figure 8-1 Difference between 4WAL and RWAL Table 8-4 Buick applications (part 1 of 2) Model Century Electra LeSabre Park Avenue Reatta Year System 1994–98 Delphi ABS VI (non-integral) 1999–2004 DBC 7 (non-integral) 1986–90 Teves Mark II (integral) 1991–95 Teves Mark IV (non-integral) 1996–99 Delco/Bosch 5 (non-integral) 2000–04 Delco/Bosch 5.3 Hybrid (non-integral) 1986–90 Teves Mark II (integral) 1991–95 Teves Mark IV (non-integral) 1996–99 Delco/Bosch 5 (non-integral) 2000–04 Delco/Bosch 5.3 Hybrid (non-integral) 1988–90 Teves Mark II (integral) 141 GM Testing Testing ABS Systems Table 8-4 Buick applications (part 2 of 2) Model Regal Riviera Roadmaster Skylark Wagon Year System 1989–91 Delco Moraine III (integral) 1992–98 Delphi ABS VI (non-integral) 1999–2004 DBC 7 (non-integral) 1988–90 Teves Mark II (integral) 1992–93 Bosch 2 (non-integral) 1995–99 Teves Mark IV (non-integral) 1993–94 Bosch 2 (non-integral) 1995–96 Bosch 5 (non-integral) 1991–98 Delphi ABS VI (non-integral) 1991–94 Bosch 2 (non-integral) 1995–96 Bosch 5 (non-integral) Table 8-5 Cadillac applications (part 1 of 2) Model Allante Catera Concours CTS DeVille El Dorado Fleetwood Seville Year 1987–92 System Bosch 3 (integral) 1993 Bosch 2 (non-integral) 1997 1998–2001 Bosch 5.3 (non-integral) 1994 Bosch 2 (non-integral) 1995–96 Bosch 5 (non-integral) 1997–99 Delco/Bosch 5 (non-integral) 2000–01 Delco/Bosch 5.3 Hybrid (non-integral) 2003 DBC 7 (non-integral) 2004 DBC 7.2 (non-integral) 1986–90 Teves Mark II (integral) 1991–93 Teves Mark IV (non-integral) 1995–96 Bosch 5 (non-integral) 1997–99 Delco/Bosch 5 (non-integral) 2000–04 Delco/Bosch 5.3 Hybrid (non-integral) 1988–90 Teves Mark II (integral) 1991–94 Bosch 2 (non-integral) 1995–96 Bosch 5 (non-integral) 1997–2001 Delco/Bosch 5 (non-integral) 1986–90 Teves Mark II (integral) 1990–94 Bosch 2 (non-integral) 1995–96 Bosch 5 (non-integral) 1988–90 Teves Mark II (integral) 1995–96 Bosch 5 (non-integral) 1997–99 Delco/Bosch 5 (non-integral) 2000–04 Delco/Bosch 5.3 Hybrid (non-integral) 142 GM Testing Testing ABS Systems Table 8-5 Cadillac applications (part 2 of 2) Model Year SRX 2004 XLR 2004 System DBC 7.2 (non-integral) Table 8-6 Chevrolet (except trucks and vans) applications Model Beretta Year 1991–96 Delphi ABS VI (non-integral) 1993–97 Camaro Caprice Cavalier Corsica Corvette Impala SS System 1998–2002 Bosch 5.3 (non-integral) 1991–94 Bosch 2 (non-integral) 1995–96 Bosch 5 (non-integral) 1992–99 Delphi ABS VI (non-integral) 2000–04 DBC 7 (non-integral) 1991–96 Delphi ABS VI (non-integral) 1986–95 Bosch 2 (non-integral) 1995–96 Bosch 5 (non-integral) 1997–2000 Delco/Bosch 5 (non-integral) 2001–04 Delco/Bosch 5.3 Hybrid (non-integral) 1994 Bosch 2 (non-integral) 1995–96 Bosch 5 (non-integral) Impala 2000–01 Lumina 1992–2001 Delphi ABS VI (non-integral) 1997–99 Malibu Monte Carlo Prizm 2000–04 DBC 7 (non-integral) 1997–99 Delphi ABS VI (non-integral) 2000–04 DBC 7 (non-integral) 1998–2002 Lucas/Sumitomo Hybrid (non-integral) Table 8-7 Chevrolet and GMC trucks and vans applications (part 1 of 2) Model Year System Aztek 2001–04 Bosch 5.3 (non-integral) C/K Series, R/V Series 1988–93 Kelsey-Hayes RWAL 1992–2004 Kelsey-Hayes 4WAL Colorado/Canyon 2004 Advics 3-channel (non-integral) 1990–92 Kelsey-Hayes RWAL G Series Van 1993–2000 Kelsey-Hayes 4WAL Hummer H2 2003–04 Bosch 5.3 (non-integral) Lumina APV, Venture 1992–99 Delphi ABS VI (non-integral) 143 GM Testing Testing ABS Systems Table 8-7 Chevrolet and GMC trucks and vans applications (part 2 of 2) Model M/L Series Van Year 1990–92 System Kelsey-Hayes RWAL 1990–2004 P Series 1998–99 P Series (Workhorse) 2000–2004 Rendezvous 2002–04 Bosch 5.3 (non-integral) 1989–95 Kelsey-Hayes RWAL 1991–2004 Kelsey-Hayes 4WAL 1992–99 Delphi ABS VI (non-integral) 2000–04 DBC 7 (non-integral) 1992–99 Delphi ABS VI (non-integral) S/T Series Silhouette Trans Sport, Montana Venture Kelsey-Hayes 4WAL 2000–04 DBC 7 (non-integral) 2000–04 Table 8-8 Geo and GM import applications Model Year Metro 1995–2001 Prizm 1993–97 Tracker System Delphi ABS VI (non-integral) 1991–95 Kelsey-Hayes RWAL 1996–98 Delphi ABS VI (non-integral) 1999–2004 DBC 7 (non-integral) Table 8-9 Oldsmobile applications (part 1 of 2) Model 88, Delta 88, LSS 98, 98 Regency Achevia Alero Aurora Year System 1987–90 Teves Mark II (integral) 1991–95 Teves Mark IV (non-integral) 1996–99 Delco/Bosch 5 (non-integral) 1986–90 Teves Mark II (integral) 1991–95 Teves Mark IV (non-integral) 1996 Delco/Bosch 5 (non-integral) 1992–98 1999–2000 Delphi ABS VI (non-integral) 2001–04 DBC 7 (non-integral) 1995–99 Teves Mark IV (non-integral) 2000–03 Delco/Bosch 5.3 Hybrid (non-integral) Calais 1991 Cutlass (N) 1997–99 Cutlass Ciera 1994–96 Delphi ABS VI (non-integral) 144 GM Testing Testing ABS Systems Table 8-9 Oldsmobile applications (part 2 of 2) Model Cutlass Supreme Year 1989–91 Delco Moraine III (integral) 1992–97 Delphi ABS VI (non-integral) 1999 Intrigue Toronado, Trofeo System 1999–2001 Bosch 5.3 (non-integral) 1988–90 Teves Mark II (integral) 1991–93 Bosch 2 (non-integral) Table 8-10 Pontiac applications Model 6000 STE, STE/AWD Year 1986–91 Teves Mark II (integral) 1989–90 Bonneville Bonneville SSE Firebird Grand Am Grand Prix Sunbird 1991–95 Teves Mark IV (non-integral) 1996–99 Delco/Bosch 5 (non-integral) 2000–04 Delco/Bosch 5.3 Hybrid (non-integral) 1988–90 Teves Mark II (integral) 1991–95 Teves Mark IV (non-integral) 1993–97 Delphi ABS VI (non-integral) 1998–2002 Bosch 5.3 (non-integral) 1991–2000 Delphi ABS VI (non-integral) 2001–04 DBC 7 (non-integral) 1989–91 Delco Moraine III (integral) 1992–97 Delphi ABS VI (non-integral) 1998–2001 Bosch 5.3 (non-integral) 1992–94 Delphi ABS VI (non-integral) 1995–99 Sunfire Vibe System 2000–04 DBC 7 (non-integral) 2003–04 Lucas/Sumitomo Hybrid (non-integral) Table 8-11 Saturn applications Model Year System Ion 2003–04 Bosch 8.0 (non-integral) Vue 2002–04 Bosch 5.3 (non-integral) Vehicles without ABS Communication Some GM vehicles have an ABS that cannot transmit codes or other data to the scan tool. Most of these vehicles do indicate system problems by flashing codes on the ABS warning lamp in the instrument cluster. A few models neither transmit codes nor flash them on a lamp. 145 GM Testing Testing ABS Systems The scan tool provides valuable diagnostic assistance for these vehicles by supplying code definitions through “Display ABS Codes” and by supplying troubleshooting tips. Enter the ID for one of these vehicles and a notification displays on the main menu. Communication With the ABS Module (EBCM) The ABS Codes and Data selection from the Main Menu GM ABS requires the scan tool to communicate with the EBCM through the ALDL connector. The following conditions must be met in order to establish communication: • The scan tool must be connected to power. • The data cable must be connected to the ALDL. • The ignition switch must be on. When ABS Codes and Data is selected, a “waiting for communication” message displays. After about 3 seconds, “waiting for brake module to respond” should appear on the fourth line of the display. A counter at the end of the fourth line to counts seconds as communication with the EBCM is established. The time required to establish communication depends on the EBCM, not on the scan tool. Communication can take up to 45 seconds on some systems. When the scan tool establishes communication, the ABS Codes and Data display appears. ABS Codes and Data Communication Guidelines To ensure efficient communication with the EBCM, follow these steps: 1. Be sure the ignition is switched off when entering the vehicle ID. 2. Switch the ignition on before selecting Codes and Data. 3. Switch the ignition off when ABS Codes and Data testing is complete. 4. To test the engine control system, leave the ignition off while changing the ALDL test adapters, then enter the vehicle ID for engine testing. Fault Codes Diagnostic trouble codes (DTCs) may be “hard” codes, indicating a problem is continuous, or “soft” codes, indicating a problem that occurred in the past but is not present now. See “Current (Hard) Codes and History (Soft) Codes” on page 125 for a complete explanation. Diagnostic Trouble Codes with Multiple Definitions A few 1996 and later GM vehicles output OBD-II style DTCs that have varying definitions. The correct DTC definition cannot be determined by the VIN characters entered during the vehicle 146 GM Testing Testing ABS Systems identification sequence. In these instances, the display shows the DTC followed by a message that refers you to this manual. Use Table 8-1 to determine the DTC definition. Table 8-12 Passenger car DTCs with multiple definitions DTCs with Multiple Definitions—Cars DTC Year 4th VIN 5th VIN E, K 1998–99 C1252 ICCS2 data link left fault W, J, N U, X If ABS channel in release too long G Right rear outlet valve circuit fault E ICCS2 data link left fault W, N If ABS channel in release too long 2000–01 K Left front normal force circuit fault 2001 W If ABS channel in release too long E, K ICCS2 data link right fault 2000 1998–99 C1253 Definition 2000 W, J, N U, X RF ABS channel in release too long E ICCS2 data link right fault W, N RF ABS channel in release too long 2000–01 K RF normal force circuit fault 2001 W RF ABS channel in release too long 1997 H Stabilitrac/active handling sensors uncorrelated 1997 All others RF solenoid circuit shorted to battery 1997–99 Y Steering sensors uncorrelated G Brake thermal model exceeded 1998–99 C1281 2000 2001 W, N, J U, X RF solenoid circuit shorted to battery E, K Stabilitrac/active handling sensors uncorrelated E Stabilitrac/active handling sensors uncorrelated W, N RF solenoid circuit shorted to battery H, C, K Steering sensors uncorrelated W RF solenoid circuit shorted to battery H, G, Y, E, K, V, C Steering sensors uncorrelated Clearing Codes from ABS Codes and Data The Clear ABS Codes selection appears on a menu only if the scan tool is able to clear codes from the system being tested. After repairs are made, clear the codes and return to the previous ABS Codes and Data display. If the faults are repaired, the display indicates “no codes present.” If the code-clearing operation fails for any reason, previous codes reappear in the ABS Codes and Data display. Repeat the clear ABS codes operation. 147 GM Testing Testing ABS Systems 8.2.2 Bosch 2 Codes and Data—1990–97 An ABS Codes and Data mode is available for 1990 and later Bosch 2 systems. In this diagnostic mode, the antilock functions of the Bosch 2 system are disabled by the EBCM, and new trouble codes cannot be set. However, the service brakes operate normally and the vehicle can be driven safely for testing. In ABS Codes and Data mode the top line of the display is fixed. It displays the EBCM part number and the current position of the brake light switch, followed by the test mode and the ABS Codes and Data list. Select Codes and Data on a Bosch 2 system and the EBCM enters a diagnostic state. The EBCM remains in the diagnostic state after exiting Codes and Data. The ABS is disabled until the ignition is switched off. z To restore the ABS to normal operation: 1. Switch the ignition off. 2. Disconnect the scan tool. The Bosch 2 EBCM enters the diagnostic state only once for each ignition cycle. During ABS testing in Codes and Data mode, other vehicle components may seem to operate abnormally (i.e., the instrument panel may appear to stop working or the gauge readings may change randomly). This is normal and stops when the EBCM is taken out of the diagnostic state. i NOTE: ABS testing may cause false DTCs to appear on the engine code list. After ABS testing, reenter vehicle ID for engine testing and check the engine code list. Clear any codes that may be present and recheck to be sure they were false. Bosch 2 Trouble Codes The 1992–94 Corvette uses a Bosch 2 ABS that provides code history information separately from the ABS data. For these vehicles, Code History is a Main Menu GM ABS selection. New codes cannot be set while the system is in diagnostic mode. If codes are present, the third line changes to read “scroll down for ABS codes.” Scrolling reveals a code number and description, along with certain conditions that relate to the code. When a code sets, the EBCM records three operating conditions: • Brake switch state to indicate if the brakes were applied. • ABS state to indicate if ABS was operational. • Vehicle speed. The also EBCM records the number of times the engine was started since the fault occurred. If the fault is an intermittent problem, or soft code, the EBCM counts the number of starts since the code last occurred. If the problem is continuous, a hard code, the code resets each time the necessary conditions occur. The “strts since code” value is 0 if the code is present at the time of testing. z To determine whether a fault is continuous or intermittent: • Clear the code. 148 GM Testing Testing ABS Systems If the code reappears when the necessary conditions occur, the fault is continuous (see “Clear Codes” on page 139). 8.2.3 Bosch and Delco Bosch 5.0/5.3 Codes and Data—1995–2004 This section describes testing Bosch 5.0 and 5.3 ABS and Delco Bosch 5.0 and 5.3 ABS used on 1995–2004 models. During ABS tests in Codes and Data mode, other vehicle components may seem to operate abnormally. The instrument panel may appear to stop working, gauge readings may change randomly, or LEDs may light up. This is normal and stops when the EBCM is taken out of the diagnostic state. Bosch and Delco Bosch 5.0/5.3 Trouble Codes Codes for these systems are viewed in one of three ways, depending upon the vehicle. The main menu selections are: • Codes and Data • Codes • Code History If the test vehicle has a Codes Only selection on the Main Menu GM ABS, a list of codes is all that the scan tool displays. If the Code History selection is available, the DTC displays along with certain data parameters that reflect conditions present at the time the code set. Selecting Code History places the EBCM in diagnostic mode, and new codes cannot be set. The Code History selection works the same for Bosch 5 and Delco Bosch 5 as it does for Bosch 2, described on “Bosch 2 Trouble Codes” on page 148. 8.2.4 Delco-Moraine III Codes and Data—1988–91 The Delco-Moraine III system is fully functional in the Codes and Data mode. If faults are present, the EBCM may disable either just front ABS operation, or the entire system. Because problems may be present at the time of testing, the second line of the display advises ABS braking is off. The service brakes operate normally and the vehicle may be driven. The system does set new codes in this mode. Full ABS braking is available if no problems have disabled the system. On a Delco Moraine III system, the top line of the displays the current position of the brake light switch and the state of the ABS warning lamp when in the Codes and Data mode, followed by the test mode and the codes and data list. i NOTE: Vehicle components may seem to operate abnormally during testing in Codes and Data mode. A digital instrument panel may appear to stop working or analog gauge readings may change randomly. This is normal and stops once the EBCM is out of the diagnostic state. 149 GM Testing Testing ABS Systems Delco-Moraine III Trouble Codes The scan tool only displays codes for faults present at the time of testing for Delco-Moraine III systems. These are generally referred to as hard, or current, codes. The system does not display soft, or history, codes. When there are codes, or if a new code occurs during testing, the third line changes to display the code. If no ABS problems occur within 50 ignition cycles, the EBCM clears any codes stored in its memory. The scan tool cannot be used to clear codes from the Delco-Moraine III system. Capturing Intermittent Faults The EBCM only displays intermittent faults that occurred during the current ignition cycle. If the ignition is turned off, codes for recent intermittent faults are lost and not displayed. Follow the procedure below for a vehicle with a Delco-Moraine III system with the amber “antilock” warning lamp turned on. z To view intermittent faults: 1. Do not turn the ignition off. 2. Connect the scan tool to the vehicle with the engine running. 3. Enter the vehicle ID. 4. Select ABS Codes and Data from the Main Menu GM ABS. 8.2.5 Delco-Moraine VI Codes and Data—1991–2001 The ABS Codes and Data display for Delco-Moraine VI functions similarly to Delco-Moraine III systems. however, some of the displayed parameters differ. This system also provides code history data, or soft codes, in addition to the current code, or hard code, data. The Delco-Moraine VI system data display includes: • • • • • • • The last, or most recent, code that set The number of ignition cycles since the last code set The sensed vehicle speed at the time the last code set The first five codes set display from oldest to newest The number of times each code set The number of ignition cycles since each code last set The number of ignition cycles since each code first set In addition, brake switch and the ABS stop data parameters also display. The last code set data is not updated by the ABS system unless vehicle speed exceeds 10 MPH (16 KPH). Selecting Code History from the Main Menu GM ABS displays a data list. This list is fairly long, so make sure to view the entire list. 150 GM Testing Testing ABS Systems 8.2.6 VCM 4WAL Codes and Data—1994–97 The 1994–97 Kelsey-Hayes Vehicle Control Module (VCM) 4-Wheel Antilock Brake (4WAL) system integrates ABS with the engine controls in the VCM on some vehicles. This system has a red brake lamp and an amber antilock lamp on the instrument panel. When the ignition is turned on, both lamps light for about 2 seconds. The antilock lamp goes out if there are no ABS faults. If there is a fault, the lamp stays lit; or it lights when the fault occurs. 8.2.7 4WAL Codes and Data—1990 and Later Kelsey-Hayes 4WAL is used on 1990 and later trucks and vans. This system has both a red brake indicator lamp and an amber antilock indicator lamp on the instrument panel. When the ignition is turned on, both lamps light for about 2 seconds. The antilock lamp goes out if no ABS faults are present. If an ABS fault is present, the antilock lamp stays lit; or it lights as the ABS fault occurs. The 4WAL EBCM recognizes both current, hard, and intermittent faults and stores soft codes in memory for intermittent problems. The 4WAL EBCM transmits current codes and up to three history, or soft, codes in the Codes and Data mode. Data parameters for wheel speed sensors, brake switches, and other operating data are also provided. The MULTI-1 universal adapter is required for testing the Kelsey-Hayes 4WAL system with the 12-pin ALDL. Connect the adapter as shown in Figure 8-2. 1— Green 2— Black Figure 8-2 MULTI-1 adapter wire color codes for 4WAL testing For Kelsey-Hayes 4WAL systems with the 16-pin DLC, use the OBD-II connector (see “Connecting to the Vehicle” on page 119). 8.2.8 Rear-Wheel Antilock (RWAL) Brakes Some 1993–95 trucks and vans transmit data over a serial data stream. On these vehicles, ABS Codes and Data is an available menu selection. The Kelsey-Hayes RWAL brake system used on 1988 and later trucks and vans has a red brake indicator lamp that acts as a warning lamp for both the basic brake system and the RWAL system. The lamp lights for about 2 seconds when the ignition is turned on. It then goes off unless the parking brake is applied. The brake lamp remains on if the parking brake is applied or a if hydraulic brake problem exists. 151 GM Testing Testing ABS Systems The RWAL EBCM recognizes both current, or hard, and intermittent, or soft, faults and stores codes in memory for intermittent problems. In normal operation, the brake lamp is off if no faults are present. If a RWAL problem exists, the brake lamp stays on solidly or flashes a steady on-off sequence with no apparent code pattern. Selecting Display ABS Codes causes the brake lamp to begin flashing codes. The codes are displayed on the lamp in a distinct pattern of long and short flashes. z To read codes: • Select Display ABS Codes mode and count the first long flash and all short flashes. For example, one long flash followed by five short flashes is code 6. The long flash indicates that a code number is starting or repeating. The RWAL system flashes only one code at a time in the display ABS codes mode, but repeats that one code as long as the scan tool remains in this test mode. If multiple codes are present, the first code must be repaired before any other codes display. i NOTE: If no codes are present and the brake lamp is not lit, reading codes in the Display ABS Codes mode sets a false code 9, vehicle speed signal. The RWAL system does not display a system pass code. A code 9 is set if there are no other codes present in the system. This happens because the speed sensor circuit is the diagnostic circuit for the RWAL EBCM, and the RWAL EBCM receives an abnormal speed signal when in the diagnostic mode. Clear code 9 and any other codes. See “Display ABS Codes—RWAL & Teves II” on page 155 for more information. Clearing RWAL Codes To clear codes from the RWAL system, except on vehicles that transmit ABS Codes and Data, switch the ignition off and disconnect the main connector at the RWAL EBCM. Refer to “Clearing Codes from ABS Codes and Data” on page 147 for information on clearing codes on vehicles with ABS Codes and Data. 8.2.9 Rear-Wheel Antilock (RWAL) Codes and Data—Some 1993–95 The RWAL electronic control module for some 1993–95 trucks and vans monitors various brake and 4WD switch inputs to determine whether to prepare for ABS braking control. The RWAL EBCM operates the control valve assembly during antilock braking based on comparisons of data parameter values and programmed values stored in RWAL EBCM memory. The RWAL EBCM monitors system-related conditions and takes corrective action when necessary. 8.2.10 Teves II ABS Codes and Data—1986–91 The Teves II ABS displays codes by flashing the amber “antilock” lamp on the instrument panel. 152 GM Testing Testing ABS Systems These vehicles have both a red brake indicator lamp and an amber antilock indicator lamp on the instrument panel. The lamps light in various combinations to indicate normal and abnormal brake system conditions. Additionally, models with driver information center panels display warning messages as described in the following paragraphs. Normal Startup Messages and Lamp Operation On models without a driver information center, the brake and antilock lamps both light for 4 to 5 seconds when the ignition is first turned on. Both lamps go out while the engine is cranking. As the engine starts and the key returns to the run position, the antilock lamp may stay on for 3 or 4 seconds. If the vehicle was parked for a long period, such as overnight, both the brake and antilock lamps may stay lit for up to 30 seconds while the ABS pump recharges the system to normal pressure. When a model with a driver information center is started, the brake and antilock lamps both light as well, plus “antilock disabled” and “traction disabled” messages appear for a few seconds. The lamps turn off, and the messages change to “antilock OK” and “traction OK” once the ABS pump recharges the system to normal pressure. Again, if the vehicle was parked for a long time, such as overnight, the lamps may stay lit and the disabled messages may appear for up to 30 seconds. The antilock lamp should go out after no more than 30 seconds if there are no ABS faults present. If an ABS fault is present, the antilock lamp stays lit; or it lights when an ABS fault occurs. The brake lamp stays on if the parking brake is applied or if a basic hydraulic brake problem, such as low brake fluid level, exists. In normal operation, the antilock lamp is off when no faults are present, and lights continuously whenever a fault is present. The EBCM/EBTCM recognizes both current and intermittent (hard and soft) faults. The EBCM/EBTCM stores codes in memory for intermittent problems. Reading Teves II ABS Codes The Display ABS Codes selection on the scan tool causes the antilock lamp to flash codes. The lamp flashes up to seven codes that are currently present or stored in memory. However, the lamp flashes only one code at a time. To proceed to the next code, exit and then reenter the display ABS codes selection. If the antilock lamp is off before entering Display ABS Codes, any code that displays indicates an intermittent, or soft, fault. If the antilock lamp is on before entering Display ABS Codes, one or more displayed ABS codes indicate a current, or hard, fault. If two or more codes are present, there is no way to distinguish hard codes from soft codes. z To read the codes: 1. Switch the ignition on and allow the pump to establish system pressure. Note whether the antilock lamp turns off in 30 seconds or less. 2. With the scan tool connected, switch the ignition off. 3. Select Display ABS Codes. 4. Switch the ignition on and watch the antilock lamp. – If the lamp turns on and then off in about 4 seconds, no codes are present. The system does not have a “system pass” code. 153 GM Testing Testing ABS Systems – If the lamp turns on for 4 seconds and then starts flashing, codes are present. 5. If the lamp flashes, count the flashes until there is a 3-second pause. This is the first digit of the code. Count flashes after the 3-second pause, this is the second digit. Count only the number of times the lamp turns on and off for the second digit. After the second digit, the lamp lights constantly. Do not count this as a code digit. 6. After the antilock lamp stops flashing the code and stays on, exit from Display ABS codes. Without switching the ignition off, select Display ABS codes again to read additional codes. 7. Enter codes flashed by the antilock lamp into the scan tool as previously explained in the “How To Enter Codes” section. The antilock lamp remains on continuously in display ABS codes mode once all codes have been displayed. Clearing Teves II Codes The Teves II EBCM/EBTCM does not allow codes to be cleared until repairs have been made. Therefore, do not attempt to clear codes until repairs are complete. Disconnecting the battery or the EBCM/EBTCM connector does not clear Teves II ABS codes from the EBCM/EBTCM. After repairs, clear codes by driving at a speed above 18 MPH (29 KPH). Then repeat the code-reading sequence to make sure that all ABS problems were corrected. 8.2.11 Teves IV ABS Codes and Data—1990–99 The ABS Codes and Data display for Teves IV systems provides trouble code information only; data parameters are not displayed. In the ABS Codes and Data mode, the antilock functions of the Teves IV system are disabled by the EBCM. Be aware, new codes cannot be set in this mode, even if fault conditions are present. The service brakes operate normally and the vehicle can be driven safely for testing. When you select ABS Codes and Data for the Teves IV system, the scan tool establishes communication with the EBCM and puts the module in a diagnostic state. During ABS Codes and Data testing, the amber ABS lamp on the instrument panel flashes once per second. The EBCM returns to normal operation once you exit ABS Codes and Data. Unlike Bosch systems, the ignition does not need to be cycled or the scan tool disconnected to restore ABS functions. With Teves IV ABS, testing may cause false ECM codes to appear on the engine code list. After ABS testing, reenter the vehicle ID for engine testing and check for engine codes. Clear any codes that may be present and recheck to be sure they were false. If no codes are present in the system, a “no codes present” message displays on the third line. New codes cannot be set because the system is in diagnostic mode. If codes are present, the third line displays the code number and title. 8.2.12 Delphi Brake Controller 7 (DBC 7) Codes and Data—1999–2004 The DBC 7 brake system is used on some 1999–2004 models. This system does not flash codes on an instrument panel lamp. Codes must be read on the scan tool display. 154 GM Testing Testing ABS Systems The DBC 7 system has a red brake indicator lamp and an amber ABS warning lamp on the instrument panel. The DBC 7 system does not light the brake lamp. This warning lamp is only lit by a base braking system condition. The DBC 7 electronic control module monitors various brake inputs to determine whether to prepare for antilock braking. The ABS and traction control operations are combined in a single control unit, the Electronic Brake Traction Control Module (EBTCM), on DBC 7 systems. During ABS braking, the EBTCM operates the Electronic Brake Pressure Modulator Valve (BPMV) assembly based on the comparison of data parameter values to the programmed values stored in memory. The EBCM/EBTCM also monitors system-related conditions and takes corrective diagnostic action when necessary. ABS Warning Lamp Operation Under normal conditions, the ABS lamp lights for several seconds as a bulb check when the ignition is first switched on. If there are no ABS faults present, the lamp turns off while the engine is cranking. If an ABS fault is present, the lamp stays lit during cranking. When an ABS fault occurs while driving, the ABS lamp lights. The brake lamp only illuminates in the presence of a brake hydraulic system failure or when the parking brake is applied. DBC 7 Main Menu Options The DBC 7 system offers several main menu options for displaying information. The following menu choices are available: • Codes and Data • Codes • Data only In Codes and Data mode, any codes stored in memory display followed by a data list of ABS parameters. In Codes mode, a list of any codes in memory displays. Data parameters do not display. Similarly, in Data Only mode, the screen displays data parameters only. Codes do not display in this Data Only mode. 8.2.13 Display ABS Codes—RWAL & Teves II The Display ABS Codes selection on the Main Menu GM ABS provides a way to read codes flashed on the ABS warning lamp for these systems that cannot communicate with the scan tool. After reading the codes, enter the codes into the scan tool to get a code description and to record the codes for reference or printing. The Display ABS Codes function provides easy and quick access to code definitions, faster than looking them up in a service manual. If troubleshooter tips are available for the system being tested, Display ABS Codes fills in the code summary line that appears at the top of the troubleshooter menu. 155 GM Testing Testing ABS Systems Before using the Display ABS Codes function, be sure to read the “Read This First” instructions on the scan tool if working with a specific GM antilock brake system for the first time, or if it is a system worked on infrequently. See “Read This First (Instructions)” on page 156 for details. When Pin H of the ALDL is grounded, the indicator lamp on the instrument panel flashes codes. Codes display differently for RWAL and Teves II systems. z To display ABS codes: 1. Switch the ignition on. 2. When instructed, select Display ABS Codes. Selecting causes the scan tool to ground the ABS diagnostic terminal, Pin H, of the ALDL connector and displays a code summary screen. 3. Select the code flashed by the ABS lamp. An asterisk appears on the code line and the code number appears in the code summary on the top line. 4. Continue through the code list and enter all codes flashed by the ABS lamp. 5. Exit the code summary display and return to the code list. The code list contains all codes possible for the system being tested. Enter and exit the Display ABS Codes mode to mark or unmark codes as often as necessary when diagnosing a specific system. The selected codes are stored in scan tool memory until the list is changed, or until a new vehicle or system ID is entered. Clearing Codes From Display ABS Codes When available, the clear ABS codes selection for display ABS codes erases the records from the ABS module memory. It does not clear code selections from code summary line of the display ABS codes screen. After the display returns to ABS codes mode, manually unmark code selections as explained in earlier in this chapter. 8.2.14 Read This First (Instructions) i NOTE: This selection should always be opened and read before working with any GM antilock brake system for the first time. This selection contains specific information about ABS identification, control module communication, and reading and clearing codes. These instructions provide a reference for testing a new system or for reviewing facts for a system you work on infrequently. 156 Chapter 9 Jeep Operations This chapter explains how to begin using the scan tool’s basic setup and test functions. This information is specific to Jeep vehicles. For general scan tool functionality, refer to the manual for the diagnostic tool being used. For additional information on Jeep vehicles, see the following sections: • Jeep Testing, on page 163 • Chrysler and Jeep Data Parameters, on page 176 • Jeep Communications Problems, on page 679 Figure 9-1 Basic Jeep test routine 9.1 Identifying a Vehicle Many vehicles have an automatic vehicle identification (ID) function. For others, the vehicle must be manually identified by entering specific vehicle identification number (VIN) characters into the scan tool. 9.1.1 Manual Vehicle Identification The vehicle ID must be entered manually to test the control system on 1990 and earlier vehicles and may be entered manually for systems that are identified automatically. 157 Jeep Operations Identifying a Vehicle For instructions on identifying a vehicle, see the Scanner User Manual. i NOTE: Because of midyear manufacturing changes in engine computer systems, you should always enter a new identification when you test a different vehicle, even when two vehicles are the same year, model, and have the same engine and accessories installed. The vehicle ID process begins from the Software Confirmation menu. z To manually ID a vehicle: 1. Confirm the software selection. A vehicle ID request screen displays. 2. Enter all VIN characters and answer any questions. When you are finished, a Vehicle ID Confirmation screen displays. 3. Select to continue if the vehicle ID is correct. 9.1.2 Automatic Identification Automatic ID is available on 1996 and later Jeep models. z To automatically identify a vehicle: 1. Attach the test adapter to the data cable. 2. Connect the adapter to the vehicle. 3. Turn the ignition switch on. 4. Select Domestic > Jeep. 5. Select the year (10th VIN character) and follow any additional screen requests. The scan tool identifies the vehicle, then displays a vehicle identification screen. 6. Select to continue to the System Selection Menu. 9.1.3 Transmission System Identification The scan tool automatically identifies the vehicle for all OBD-II models. z To automatically ID 1991–95 models: 1. Connect the scan tool to the engine diagnostic connector to get vehicle information. 2. Disconnect, and hook up to the transmission diagnostic connector. After identifying the vehicle, the scan tool displays the System Selection screen. 158 Jeep Operations Selecting a System 9.2 Selecting a System Four control systems are generally available from the System Selection menu (Table 9-1). Table 9-1 Jeep test availability Control System z Description Engine Contains engine control tests from 1984 through the current model year. TRANS (Transmission) Transmission system tests include test programs for AW4, 42RE, 44RE, 45RFE, 46RE, and 545RFE transmissions. BODY Body system tests include actuator test mode tests as well as codes and data. ABS The ABS tests include test programs for all Jeep vehicles equipped with Bendix 9, and Teves Mark IV, IVg, and MK20 ABS control systems. To select a system: 1. Select an item from the menu. Selecting any one of these systems from the menu may cause additional vehicle identification menus to display. For instance, select Engine and a vehicle emissions selection screen often appears. 2. Select the line that describes the emissions specification on the vehicle emissions control identification (VECI) sticker. The next screen is usually the options menu, which describes whether the vehicle has an automatic or standard transmission, and if it has air conditioning. 3. Select an option. If Trans (transmission) is selected from the System Selection menu, the scan tool may indicate that this information is available through the Engine control module. If this message displays, return to the System Selection main menu and select Engine. Additional screens may display depending on the vehicle. All other screens are similar and require a selection to advance. 9.3 Connecting to the Vehicle Once a vehicle has been identified and a system has been selected, a scan tool connection message is shown, instructing you to use the vehicle test adapters supplied to connect the scan tool for testing. Each test adapter plugs into a specific vehicle diagnostic connector and attaches to one end of the data cable. The other end of the cable attaches to the scan tool. Captive screws secure both data cable ends. The following adapters are available to test Jeep vehicles: • • • • • JEEP-1—(Figure 9-2) test adapter for 1990 and earlier CHRY-1—(Figure 9-4) engine test adapter for 1991–95; ABS adapter for 1991 only CHRY-2—(Figure 9-5) transmission and ABS test adapter for 1991–95 models OBD-II—(Figure 9-3) test adapter for 1996 and later CAN-1B—(Figure 9-6) test adapter for CAN vehicles. 159 Jeep Operations Connecting to the Vehicle Figure 9-2 JEEP-1 Adapter Figure 9-3 OBD-II adapter with Personality Key™ Figure 9-4 CHRY-1 adapter Figure 9-5 CHRY-2 adapter Figure 9-6 CAN-1B adapter The CHRY-1 engine test adapter has a socket for connecting the battery power cable or the cigarette lighter power cable. A power cable is not required with the JEEP-1, CHRY-2, or the OBD-II test adapters. On 1987–90 Jeep models and 1996 and later models, the TCM or PCM communicates through the same diagnostic connector used for engine testing. On 1991–95 Jeep vehicles, the TCM communicates through a separate diagnostic connector. The scan tool connects to either a 6-pin or 8-pin diagnostic connector, which may be either black or blue in color. Use the CHRY-2 test adapter to connect to the black or blue connector. 160 Jeep Operations Connecting to the Vehicle Use Table 9-2 and the following figures to find the correct diagnostic connector location for the specific vehicle being tested. Table 9-2 Jeep diagnostic connector locations System Engine Transmission ABS Body computer Year Adapter Connector Location 1984–90 JEEP-1 Under hood (Figure 9-8) 1991–95 CHRY-1 Under hood (Figure 9-9) 1996–later OBD-II Under driver-side dash (Figure 9-7) 1987–90 JEEP-1 Under hood. For Cherokee and Comanche, see Figure 9-8. 1991–95 CHRY-2 Under dash 1996–later OBD-II Under driver-side dash (Figure 9-7) 1989–90 JEEP-1 Under hood (Figure 9-8) 1991 CHRY-1 Under hood 1992–95 CHRY-2 Under dash 1996–later OBD-II Under driver-side dash (Figure 9-7) 1996–later OBD-II Under driver-side dash (Figure 9-7) Figure 9-7 1996 and later OBD-II DLC Figure 9-8 1990 and earlier DLC (left)—use JEEP-1 adapter (right) Figure 9-9 1991–95 CHRY-1 DLC (left)—use CHRY-2 adapter (right) 161 Jeep Operations z Jeep Vehicles Without Self-Diagnostic Capability To connect the scan tool to the test vehicle: 1. Be sure the ignition switch is off. 2. Follow the on-screen instructions and connect the scan tool data cable to the test vehicle. a. Select the proper test adapter and attach it to the data cable. b. Connect the other end of the data cable to the scan tool data port. c. Connect the test adapter to the vehicle. Test adapters fit into the connectors only one way. Be sure the connector is installed securely. 3. Switch the ignition on. 4. Select to continue. The main menu for the selected system displays. 9.4 Jeep Vehicles Without Self-Diagnostic Capability The Jeep vehicles listed below either do not have electronic engine control systems, or they have systems without self-diagnostics capabilities. They will not communicate with a scan tool or scan tool programs are not available. Table 9-3 Jeep vehicles without self-diagnostics capability Year Models Pre–1984 All models 1984–86 2.8L carbureted, except with California emissions Pre–1992 Jeep Grand Wagoneer 162 Chapter 10 Jeep Testing This chapter explains how to use the scan tool on 1985 and later Jeep engine control systems. • • • • Engine Transmission Body ABS For additional information on Jeep vehicles, see the following sections: • Jeep Operations, on page 157 • Chrysler and Jeep Data Parameters, on page 176 • Jeep Communications Problems, on page 679 10.1 Testing Engine Systems Jeep has used four basic engine control systems since 1984: • Chrysler—the Chrysler Jeep/Truck Engine Controller (JTEC) system is used on 1996 and later Jeep vehicles, and the Chrysler Single-board Engine Controller Generation II (SBEC-II) is used on 1991–95 Jeep vehicles. These systems provide access to diagnostic trouble codes (DTCs) and serial data. • Renix—All 1986–90 fuel-injected engines use Renix engine control systems. These vehicles provide data but do not have the ability to store or transmit DTCs. • MCU—All 1984–90 carbureted engines, except 1984–86 models with the GM 2.8L V6, use a Microprocessor Control Unit (MCU) system. These do not store or transmit DTCs and do not transmit data, but do provide actual sensor readings on the diagnostic connector. • GM Delco—1984–86 Jeep models with a 2.8L V6 carbureted engine and California emissions use a GM Delco control system. This system provides access to DTCs and data. 10.1.1 Functional Tests i NOTE: Operations described in this section are not available on all tool platforms. Jeep functional tests do not distinguish between engine-off and engine-running conditions. When a particular test cannot be performed with the engine either off or running, the scan tool does not accept the test command. On some models, a “lost communication” message displays. If so, make another selection or switch off the ignition. Selecting Functional Tests from the Main Menu displays the Functional Tests menu. 163 Jeep Testing Testing Engine Systems ATM Tests Selecting ATM Tests initiates the actuator test mode (ATM) tests that energize certain system actuators—such as switches, solenoids, relays, valves, and lamps—to check their operation. The tests are performed with the engine off; the PCM does not accept ATM test commands with the engine running. Specific ATM tests vary for different systems but all operate in the same way. For most ATM tests, the PCM pulses the actuator regularly for five minutes or until the test is stopped. Actuator cycling times vary depending on the selected test. The important thing is whether the selected actuator responds to the PCM command. The ATM Exit menu offers two choices that require a selection to advance: • Exit ATM test mode and turn the actuator off. • Exit the ATM test mode and leave the actuator on. During troubleshooting, leaving the actuator on is useful when you want to exit an ATM test so the scan tool may be used to monitor related engine data parameters or check a signal. Making a selection returns you to the ATM test selection screen. Select a new ATM test to turn off an actuator that has been left on after exiting, or turn the ignition switch off. z To conduct ATM tests: 1. Select ATM Tests. The ATM tests menu now displays. 2. Select the desired ATM test. The selected actuator is energized. z To turn off an actuator that has been left on after exiting: • Select a new ATM test, or switch off the ignition. AIS Motor Test The AIS Motor Test commands the idle motor to obtain a desired RPM. The screen displays both desired RPM, which is user selectable, and actual idle speed (AIS). The engine must be running because the PCM does not actuate the AIS motor without an RPM signal. Read IGN (+) at DLC The Read IGN (+) At DLC test displays voltage on the PCM ignition supply circuit. This circuit runs from the battery, through the ignition switch, to the PCM. The reading shows supply, or battery, voltage at the diagnostic connector. Use this test to check for a faulty ignition switch, bad connections, open fusible links, and other voltage supply problems. 164 Jeep Testing Testing Engine Systems Module Info Selecting Module Info checks automatic vehicle ID at any time when testing a 1991 or later vehicle, or to verify an identification entered manually. Min Airflow RPM Select MIN Airflow RPM and the AIS motor retracts to obtain the minimum idle RPM. The air-fuel mixture also is enriched during the test. The scan tool displays engine RPM during the test. Refer to Jeep service manuals for specifications and test procedures. Fuel Pressure Test The Fuel Pressure Test selection energizes the auto shutdown (ASD) relay to operate the electric fuel pump. This pressurizes the system to allow fuel pressure testing. The fuel pressure is limited to the relief pressure of the fuel pressure regulator. When pressurized, the regulator should hold a specified pressure for a specified length of time. Connect a pressure gauge to the fuel rail or throttle body to read the regulated pressure or to test for a leaking pressure regulator. Refer to Jeep service manuals for specifications and procedures. Reset SRI Lamp Selecting Reset SRI Lamp resets the service reminder indicator (SRI) lamp on 1991–93 vehicles. The lamp comes on at about 82,500 miles to alert the driver that the vehicle is due for emission services. The Reset SRI Lamp selection is available for all 1991–95 vehicles, even though some models do not have an SRI lamp. The SRI memory exists in the PCM, even without a lamp, and the scan tool resets this memory. The SRI lamp cannot be turned off manually; it must be reset through the PCM. The reset SRI lamp functional test resets the lamp timer. 10.1.2 System Tests The System Tests selection is available for most 1991 and later engines, except diesels. This selection does not display if not available for the identified vehicle. System tests available vary by model. Most system tests display data parameters and allow manual control of system actuators. Each of the available system tests are explained in the following sections. Selecting Systems Tests opens the System Tests menu. 165 Jeep Testing Testing Engine Systems Purge Vapors Test The Purge Vapors Test is available on all 1996 and later models and on 1995 models with a 5.2L engine. This test displays various evaporative emissions data parameters and allows manual control of the purge valve operation. EGR Systems Test The EGR Systems Test is available on some 1995 models. This test displays various parameters related to EGR control and operation and allows manual control of the EGR valve. Generator Field Test The Generator Field Test, available on most 1996 and later models, displays various parameters related to the charging system and allows manual control of the generator field. Misfire Counters The Misfire Counters selection, available on 1996 and later models, displays the number of misfire occurrences for each individual cylinder. The PCM adaptive learn state for the present drive cycle is also shown. Set Sync Signal The Set Sync Signal test resets fuel injection synchronization on 1993 and later models. This procedure is necessary after certain repairs, such as cylinder head removal or timing belt replacement. The value displayed refers to fuel synchronization only. Ignition timing is PCM-controlled. Moving the distributor does not set ignition timing. Read VIN The Read VIN functional test displays the VIN stored in the PCM. If a replacement PCM has not yet been programmed with a VIN, the scan tool provides a guide for PCM VIN programming. IMPORTANT: Read this entire procedure before beginning. The PCM can only be programmed with a new VIN once! If a false VIN is programmed into the PCM, the PCM must be replaced with a new one. z To read the VIN stored in the PCM: 1. Select Read VIN. 2. If a VIN is already stored in the PCM, a “controller cannot be programmed” message appears, select cancel to exit. If a VIN is not stored in PCM memory, the VIN entry screen displays. 166 Jeep Testing Testing Engine Systems 3. Select the correct characters as requested until all 17 characters are selected. After the 17th character is selected, a confirmation screen displays. 4. Before confirming, carefully compare the VIN that appears on the screen to the characters on the VIN plate. Selecting permanently programs the VIN displayed into the PCM. For the vehicle to run properly, the programmed VIN must match the VIN plate. 5. Select to continue, or N to return to the VIN entry screen. The PCM checks to verify that the entered VIN is a valid DaimlerChrysler Motors VIN. – If the PCM does not recognize the VIN as valid, a “the VIN that was entered is not valid!” message displays. – If the VIN is valid, a “VIN program successful!” message displays. Speed Control The Speed Control Test, which is available on 1991–95 models, displays the present speed control operating mode and the reason for the last system disengagement, or cutout. Four additional speed control data parameters display on the screen. Other speed control related data parameters are also available in the Codes and Data mode for engine testing. Theft Alarm Status The Theft Alarm Status Test, available on 1991–95 models, displays the present engine control module communication link with the theft alarm module. Use this test to determine if a no-start condition is the result of an unauthorized attempt to start the engine. The vehicle theft alarm (VTA) monitors vehicle entry and the ignition. During unauthorized entry, the VTA notifies the PCM. The PCM responds by disabling the electronic fuel injection after the engine starts. EVAP Monitoring Test The EVAP MONITORING Test is available on most 2001 and later models. This test will force the PCM to run the evaporative system self test. The test can be used to confirm repairs made to the evaporative system without taking the vehicle on an EVAP drive cycle road test. If the system fails, the test DTCs will be set in Codes or 1 TRIP Codes. 10.1.3 Codes and Data Selections The Codes and Data selection from the Main Menu is available on all 1991 and later fuel-injected Jeep vehicles with Chrysler control systems. It is not available for carbureted engines with Chrysler control systems, but is available on 1984–86 California emissions models that have a 2.8L V6 carbureted engine and GM Delco control system. In the Codes and Data mode, the scan tool reads all data available on the PCM data stream, including any DTCs. When Codes and Data is selected, the scan tool displays the Codes and Data Menu that offers up to three choices: 167 Jeep Testing Testing Engine Systems • Codes & Data • Secondary Indicators • 1 Trip Codes i NOTE: These selections work the same for Jeep as they do for Chrysler. See “Codes and Data Selections” on page 20 for general procedures. The scan tool does not affect PCM or engine operation on 1991 and later fuel-injected models, so they can be driven in the Codes and Data mode. Models with a GM Delco control system, 1984–86 2.8L carbureted V6 engine, and California emissions cannot be driven in the Codes and Data mode. The Codes and Data mode on these vehicles may be called the “special,” “10K,” or “diagnostic mode” in some service manuals. In Codes and Data mode, the scan tool places a 10-kilohm resistive load across the diagnostic terminals. This causes the PCM to alter engine operation. 10.1.4 Data (No Codes) Data without codes is the only data viewing mode available on the Main Menu for all 1986–90 fuel-injected models with a Renix control system, and on 1984–90 models with a carbureted engine and MCU control system. The information displayed is different for the two systems. • On fuel-injected engines with a Renix control system, the scan tool displays data transmitted on the PCM data stream. • On carbureted engines with an MCU system, the scan tool displays the actual sensor values. On the MCU system, the sensors are hard wired to the diagnostic connector and the PCM does not transmit a data stream. The scan tool does not affect PCM or engine operation on these systems, so the vehicle may be driven in the data mode to test for intermittent problems. For 1991 and later fuel-injected engines and for 1984–86 models with a 2.8L V6 engine, a Data (No Codes) selection is available in addition to the Codes and Data selection. 10.1.5 Memory Resets This function clears adaptive, or learned, values from PCM memory and returns them to their factory preset values. i NOTE: Memory Resets work the same for Jeep as they do for Chrysler. See “Memory Resets” on page 22 for instructions. 168 Jeep Testing Testing Transmission Systems 10.2 Testing Transmission Systems This section describes how to test Jeep electronic transmissions that have a separate transmission control module (TCM). Included are: • 1987 and later with a AW4 transmission • 1993–95 with a 42RE transmission • 1999 and later with a 45RFE or 545RFE transmission All other Jeep electronic transmissions display codes and data through the powertrain control module (PCM). See “Testing Engine Systems” on page 163 for these models. 10.2.1 Codes and Data The transmission Codes and Data mode operates similarly to the Codes and Data mode for engine testing. See “Codes and Data Selections” on page 167 for procedures. A Codes and Data selection displays available switch and sensor readings and output commands, as well as any DTCs that may be present. The top line remains fixed and displays two principal items, followed by the test mode and the Codes and Data list. All sensor and switch readings in Codes and Data are “live” values, the TCM or PCM does not substitute default values in the data list for failed sensors or switches. Diagnostic Trouble Codes The DTC list appears below the mode name line. If there are no codes are present, the display reads “no codes present.” If DTCs are present, the scan tool displays them in the order in which they occurred. The first code that set is at the top of the list and the most recent code that occurred is at the end of the list. DTCs may be classified as either “hard” or “soft” codes. Some control modules indicate if a code is hard or soft on the screen, but many do not. • Hard codes—indicate a problem that exists at the time of testing. • Soft codes—indicate a problem that occurred in the past but is not present now. These may also be referred to as “history” codes or “continuous memory” codes. z To distinguish between hard and soft codes: 1. Clear the PCM memory and reenter Codes and Data. 2. Watch for codes to reappear: – A hard code reappears quickly, from immediately to a couple of minutes. – A soft code does not reappear until the problem that caused it reoccurs. 169 Jeep Testing Testing Body Systems 10.3 Testing Body Systems The Body selection is available on 1996 and later Jeep models. This selection allows communication with the body control module (BCM) and allows various body system tests. The BCM communicates and exchanges data with other modules over a multiplex network called a communication bus. When connected, the scan tool communicates on the bus for body testing. The BCM controls various driver information functions including door-ajar and lamp-failure indicators, fluid-level indicators, and seat belt lamps and chimes. 10.3.1 ATM Tests i NOTE: ATM tests with the BCM work the same as they do for the PCM. See “ATM Tests” on page 170 for information. 10.3.2 Codes and Data i NOTE: The Codes and Data selection operates the same for Jeep as is does for Chrysler. See “Codes and Data” on page 21 for information. The scan tool does not affect BCM operation, so the vehicle may be driven in the Codes and Data mode for testing. All sensor and switch readings in Codes and Data are “live” values, the BCM does not substitute default values for failed sensors or switches. BCM Trouble Codes All body DTCs are hard codes (the fault exists at the time of testing). If the fault is intermittent and goes away, the DTC is removed from the list. The BCM has no long-term memory to store intermittent codes. 10.4 Testing ABS Systems This section explains the scan tool functions available to test several brake systems on Jeep vehicles. Refer to Jeep service procedures for complete test and repair information. 10.4.1 ABS Control Systems Some ABS modules operate as part of a network while others operate as stand-alone units. Teves ABS modules communicate over a multiplex network called a communication bus and exchanges 170 Jeep Testing Testing ABS Systems data with other modules. The Bendix ABS module is a stand-alone system and does not use a communication bus. ! WARNING ABS diagnosis with the scan tool does not require opening the hydraulic system or disassembling mechanical parts. Complete ABS service, however, may require opening the hydraulic system. ABS hydraulic systems operate at pressures of about 2000 psi or higher. The system must be completely depressurized before opening any hydraulic connection. In most cases, apply and release the brake pedal at least 40 times to depressurize the system. Follow Jeep service instructions for information on system service and safety. The scan tool performs ABS diagnostic tests on many Jeep vehicles with ABS. These ABS models have wheel speed sensors, as well as red and yellow indicator lamps on the instrument panel. If ABS is present on the test vehicle, the indicator lamps light momentarily when the ignition is switched on. 10.4.2 Teves Functional Tests i NOTE: Operations described in this section are not available on all tool platforms. A Functional Tests selection is available on the ABS main menu for vehicles with Teves systems. Select to display the Functional Tests menu. ATM Tests ATM tests with the ABS module work the same as they do for the PCM. See “ATM Tests” on page 164 for information. When ATM Tests is selected for ABS systems, a menu with the following choices displays. • • • • • • • Left front inlet valve Right front inlet valve Left front outlet valve Right front outlet valve Pump motor Rear inlet valve Rear outlet valve ABS Simulated Stop The ABS Simulated Stop selection is available with Teves Mark IV and IVg systems. This mode simulates an ABS stop without driving the vehicle. 171 Jeep Testing z Testing ABS Systems To simulate an ABS stop: 1. Select ABS Simulated Stop. The simulated stop test displays. 2. Press and hold the brake pedal. The screen shows simulation is active and a pulsation should be felt in the brake pedal. Bleed Brakes The Bleed Brakes selection is used to bleed the hydraulic control unit (HCU). Always follow Jeep recommended brake bleeding procedures for these systems. Whenever the hydraulic control unit is removed, air enters the system. Proper brake bleeding on Teves Mark IV, Mark IVg, and Mark 20 ABS consists of three steps: 1. Manually bleeding the base brakes. 2. Bleeding the HCU. 3. Manually bleeding the base brakes again. ! CAUTION Failure to follow proper brake bleeding procedures may result in improper brake system operation or brake system failure. Refer to Jeep Service Manuals for proper brake bleeding procedures. After manually bleeding the base brakes, bleed the HCU using Jeep service instructions and the following procedure. z To bleed the HCU: • Select Bleed Brakes. An “Actuating Motor” message momentarily displays. After the ABS pump motor energizes, the screen updates to an “actuating motor/outlet valves” message. After the ABS module cycles the outlet valves, the “actuating motor” message again displays. A test complete message displays at the end of the sequence. Hydraulic Test The Hydraulic Test selection is available from the ABS Functional Tests menu for vehicles with Teves systems. This test cycles the pump motor and valves in the HCU. Components are activated in the following sequence: 1. Left front valves 2. Right front valves 3. Rear valves 4. Pump motor z To conduct a hydraulic test: 1. Select Hydraulic Test. The test initiation screen displays. 172 Jeep Testing Testing ABS Systems 2. Press the brake pedal and the active ABS component displays. A “Test complete” message displays at the end of the sequence. 10.4.3 Codes and Data The Codes and Data selection for ABS systems is available for 1989–91 models with Bendix 9 ABS and on 1992–01 models with Teves systems. The scan tool displays diagnostic trouble codes (DTCs) and data from the ABS module. i NOTE: The Codes and Data selection operates the same for Jeep as is does for Chrysler. See “1 Trip Codes” on page 22 for information. Bendix 9 The Bendix 9 ABS on 1989–90 models communicates data through the same diagnostic connector used for engine testing. However, on 1991 models with Bendix 9 ABS, the ECM transmits data through a special diagnostic connector, distinct from the engine connector. Two instrument panel indicator lamps are used on the Bendix 9 system, a red brake warning lamp, and a yellow check antilock lamp. When the ignition is switched on, both lamps illuminate for a bulb check. Once the ABS module performs a self-diagnostic check and determines ABS is operational, the lamps switch off. If an ABS problem is detected by the ECM, the lamps light in different combinations to identify the failure. The lamps display ABS failure information for three conditions: • Key-on and engine-off (KOEO) • Start, engine cranking • Key-on and engine-running (KOER) See Table 10-1 to identify ABS failures on the warning lamps. Table 10-1 Bendix 9 ABS instrument panel indicator lamp display (part 1 of 2) Condition KOEO Start KOER Normal Yellow on 2 seconds Yellow & red Off Low fluid or Parking Brake Red Yellow & red Yellow & red above 2.5 MPH Low Accumulator Yellow & red after 20 seconds Yellow & red Yellow & red Front-to-rear pressure differential Red Yellow & red Yellow & red above 3 MPH Low boost pressure Yellow & red Yellow & red Yellow & red Sensor faults Yellow on 2 seconds Yellow & red Yellow above 15 MPH Excess decay Yellow on 2 seconds Solenoid faults Yellow Yellow & red Yellow Pump fault Yellow on 2 seconds Yellow & red Red Low voltage Yellow Yellow & red Yellow 173 Jeep Testing Testing ABS Systems Table 10-1 Bendix 9 ABS instrument panel indicator lamp display (part 2 of 2) Condition Brake switch Relay Diagnostic mode KOEO Start KOER Yellow on 2 seconds Yellow & red Red during stop Yellow Yellow & red Yellow In the ABS Codes and Data mode, the antilock functions of the Bendix 9 system remain fully functional, and new trouble codes may set during testing. The vehicle may also be driven safely for testing. ! CAUTION Before driving a vehicle with an ABS complaint, especially if the red brake warning lamp is on, test the brakes at low speed to make sure the vehicle stops normally. An illuminated red brake warning lamp may indicate reduced braking ability. Teves Three Teves systems are currently used by Jeep: • Mark IV • Mark IVg • MK20 In addition to Codes and Data, Teves systems offer two alternate viewing modes on the menu: • Data (No Codes) • Codes Only The Data (No Codes) selection presents the data list only, DTCs do not display. Similarly, Codes Only displays just codes without data. 174 Chapter 11 Parameters Overview The following chapters provide definitions and operating ranges for the data parameters that display on the scan tool. The scan tool can display all of the operating parameters available from the electronic control module of the vehicle, which provides two basic kinds of parameters: • Digital (discrete) parameters are those that can be in only one of two states, such as on or off, open or closed, high or low, rich or lean, and yes or no. Switches, relays, and solenoids are examples of devices that provide discrete parameters on the data list. • Analog parameters are displayed as a measured value in the appropriate units such as voltage, pressure, temperature, time, and speed parameters. These displays as numbers that vary through a range of values in units, such as pounds per square inch (psi), kilopascal (kPa), degrees Celsius (°C) or Fahrenheit (°F), kilometers per hour (KPH), or miles per hour (MPH). The scan tool displays some data parameters in numbers that range from 0 to 100, 0 to 255, or 0 to 1800 because that is the maximum number range that the control module transmits for a given parameter. However, many parameter readings never reach the highest possible number. For example, you never see a vehicle speed parameter reading of 255 MPH. The range of a parameter often varies by year, model, and engine, but typical sampled values observed under actual test conditions are in the parameter description when available. Parameters may also be identified as input signals or output commands. • Input or feedback parameters are signals from various sensors and switches to the ECM. They may display as analog or discrete values, depending on the type of input device. • Output parameters are commands that the control module transmits to various actuators, such as solenoids and fuel injectors. They are displayed as discrete parameters, analog values, or as a pulse-width modulated (PWM) signal. In the following chapters, parameters are presented as they appear on the scan tool screen. Often, the same parameter goes by a different name when used on more than one model, engine, or control system. In these instances, all of the applicable parameter names displayed on the scan tool are listed before the description. i NOTE: The Snap-on® scan tool may display names for some data parameters that differ from names displayed by a factory tool and other scan tools. Data parameter descriptions in this manual were created from a combination of sources. For most parameters, basic information was provided by the respective manufacturers, then expanded through research and field testing. For some parameters, no information is currently available. Always use a power graphing meter, such as the Snap-on® Vantage PRO™ or a lab scope, to further validate the displayed values. If data is corrupted on multiple data parameters, do not assume that the control module may be faulty. This corrupt data may be caused by improper communication between the scan tool and the control module. See the troubleshooting sections of the user manual for the diagnostic tool you are using for more communication problem details. 175 Chapter 12 Chrysler and Jeep Data Parameters This chapter contains information for interpreting data parameters on Chrysler and Jeep vehicles. For additional information on Chrysler vehicles, see the following sections: • Chrysler Operations, on page 4 • Chrysler Testing, on page 10 • Chrysler Communications Problems, on page 646 For additional information on Jeep vehicles, see the following sections: • Jeep Operations, on page 157 • Jeep Testing, on page 163 • Jeep Communications Problems, on page 679 Alphabetical Parameter List Numerics #1 FUEL(%).................................................................................................................................................................. 190 #1 KNOCK(V) ............................................................................................................................................................... 195 #1 O2(V) ....................................................................................................................................................................... 201 #2 FUEL(%).................................................................................................................................................................. 190 #2 KNOCK (V) .............................................................................................................................................................. 195 #2 O2(V) ....................................................................................................................................................................... 201 1/1 Goal (0-1)(V)........................................................................................................................................................... 176 1/1 LP STATUS............................................................................................................................................................. 176 1/1 LT ADAP(%) ........................................................................................................................................................... 197 1/1 O2 HTR DC(%)....................................................................................................................................................... 176 1/1 O2 Sensor Goal(V) ................................................................................................................................................. 176 1/1 O2 Sensor(V).......................................................................................................................................................... 176 1/1 O2 Volts (0-1)(V)..................................................................................................................................................... 177 1/1 O2S DES(V) ........................................................................................................................................................... 176 1/1 Pulse Width O2 Heater(%) ..................................................................................................................................... 176 1/1 ST ADAP(%)........................................................................................................................................................... 197 1/2 O2 HTR DC(%)....................................................................................................................................................... 176 1/2 O2 Sensor(V).......................................................................................................................................................... 176 1/2 O2 Volts (0-1)(V)..................................................................................................................................................... 177 1/2 O2S(V).................................................................................................................................................................... 201 1/2 Pulse Width O2 Heater(%) ..................................................................................................................................... 176 10” MAN VAC ............................................................................................................................................................... 177 1-2 RANGE SW............................................................................................................................................................ 213 2/1 Goal (0-1)(V)........................................................................................................................................................... 176 2/1 O2 HTR DC(%)....................................................................................................................................................... 176 2/1 O2 Sensor Goal(V) ................................................................................................................................................. 176 2/1 O2 Sensor(V).......................................................................................................................................................... 176 2/1 O2 Volts (0-1)(V)..................................................................................................................................................... 177 2/1 O2S DES(V) ........................................................................................................................................................... 176 2/1 Pulse Width O2 Heater(%) ..................................................................................................................................... 176 2/2 O2 HTR DC(%)....................................................................................................................................................... 176 176 Chrysler and Jeep Data Parameters 2/2 O2 Sensor(V).......................................................................................................................................................... 176 2/2 O2 Volts (0-1)(V)..................................................................................................................................................... 177 2-3 LOCKOUT LMP...................................................................................................................................................... 213 2-3 LOCKOUT SOL...................................................................................................................................................... 213 2-4 PRESS SW ............................................................................................................................................................ 216 2WD/4WD..................................................................................................................................................................... 229 3 RANGE SW ............................................................................................................................................................... 213 3/4 SHIFT SOL ............................................................................................................................................................. 213 4 WHEEL DRIVE.......................................................................................................................................................... 223 4” PORT VAC ............................................................................................................................................................... 177 A A/C CLUTCH ................................................................................................................................................................ 177 A/C PRESS(V).............................................................................................................................................................. 177 A/C PRESSURE(kPa) .................................................................................................................................................. 177 A/C PRESSURE(psi) .................................................................................................................................................... 177 A/C REQUEST ............................................................................................................................................................. 177 A/C SELECT SW.......................................................................................................................................................... 177 A/C Select Switch ......................................................................................................................................................... 177 A/C SELECT................................................................................................................................................................. 177 A/C STATUS ................................................................................................................................................................. 223 A/C SWITCH ................................................................................................................................................................ 177 A/C SWITCH(V)............................................................................................................................................................ 224 A/T PRESS. SW ........................................................................................................................................................... 224 AC Hi-Side Pressure(kPa)............................................................................................................................................ 178 AC Hi-Side Pressure(psi) ............................................................................................................................................. 178 AC Hi-Side Voltage(V) .................................................................................................................................................. 178 ACCEL PEDAL(%) ....................................................................................................................................................... 178 ACCUMULATOR(V) ..................................................................................................................................................... 229 ACT LF DUMP SOL ..................................................................................................................................................... 229 ACT LF ISO SOL.......................................................................................................................................................... 229 ACT REAR DUMP........................................................................................................................................................ 229 ACT REAR ISO ............................................................................................................................................................ 229 ACT RF DUMP SOL..................................................................................................................................................... 229 ACT RF ISO SOL ......................................................................................................................................................... 229 ACTUAL ASD RELAY .................................................................................................................................................. 178 ADDED FUEL(µS) ........................................................................................................................................................ 178 AIR SOL ....................................................................................................................................................................... 178 AIR SWITCH SOL ........................................................................................................................................................ 179 AIS (STEPS)................................................................................................................................................................. 178 ALTERNATOR LAMP ................................................................................................................................................... 192 AMB TEMP(°C) ............................................................................................................................................................ 179 AMB TEMP(°F)............................................................................................................................................................. 179 AMB TEMP(V) .............................................................................................................................................................. 179 Ambient Temp(°C) ........................................................................................................................................................ 179 Ambient Temp(°F)......................................................................................................................................................... 179 Ambient Temp(V).......................................................................................................................................................... 179 AMBIENT/BATT(°C) ..................................................................................................................................................... 179 AMBIENT/BATT(°F)...................................................................................................................................................... 179 APP 1(V)....................................................................................................................................................................... 179 APP 2 (V)...................................................................................................................................................................... 179 APPS(%) ...................................................................................................................................................................... 180 ASD Relay Sense......................................................................................................................................................... 180 177 Chrysler and Jeep Data Parameters ASD RELAY.................................................................................................................................................................. 180 ASD RLY SENSE ......................................................................................................................................................... 180 AUTO DOOR LOCK ..................................................................................................................................................... 223 AUTO HDLMP(V) ......................................................................................................................................................... 224 AUTO SHUTDOWN ..................................................................................................................................................... 180 B B1 VOLTAGE................................................................................................................................................................ 180 BALLAST BYPASS....................................................................................................................................................... 180 BARO PRESS(”Hg) ...................................................................................................................................................... 180 BARO PRESS(kPa)...................................................................................................................................................... 180 BARO READ SOL ........................................................................................................................................................ 181 Barometric Pressure(“Hg)............................................................................................................................................. 180 Barometric Pressure(kPa) ............................................................................................................................................ 180 BASE SPARK(°) ........................................................................................................................................................... 181 BATT TEMP(°C) ........................................................................................................................................................... 181 BATT TEMP(°F)............................................................................................................................................................ 181 BATT TEMP(V) ............................................................................................................................................................. 181 Battery Temp(°C) .......................................................................................................................................................... 181 Battery Temp(°F) .......................................................................................................................................................... 181 Battery Temp(V)............................................................................................................................................................ 181 BATTERY VOLTS......................................................................................................................................................... 181 BATTERY VOLTS......................................................................................................................................................... 213 BATTERY(V)................................................................................................................................................................. 181 BATTERY(V)................................................................................................................................................................. 224 BATTERY1(V)............................................................................................................................................................... 224 BATTERY2(V)............................................................................................................................................................... 224 BLEND MOTOR ........................................................................................................................................................... 223 BLOWER MOTOR........................................................................................................................................................ 223 BODY TYPE ................................................................................................................................................................. 225 BOOST GOAL(kPa) ..................................................................................................................................................... 182 BOOST GOAL(psi) ....................................................................................................................................................... 182 BOOST PRESS(V) ....................................................................................................................................................... 230 BOOST(psi) .................................................................................................................................................................. 181 BOOST(V) .................................................................................................................................................................... 182 BR LAMP OUTAGE ...................................................................................................................................................... 223 BRAKE FLUID SW ....................................................................................................................................................... 224 BRAKE LAMP SW........................................................................................................................................................ 230 BRAKE PAD INP .......................................................................................................................................................... 224 BRAKE SW 1................................................................................................................................................................ 182 BRAKE SW 2................................................................................................................................................................ 182 BRAKE SW................................................................................................................................................................... 213 BRAKE SW................................................................................................................................................................... 230 BRAKE SW(V).............................................................................................................................................................. 230 BRAKE ......................................................................................................................................................................... 182 C C1 SWITCH.................................................................................................................................................................. 217 C2 SWITCH.................................................................................................................................................................. 217 C3 SWITCH.................................................................................................................................................................. 217 C3(V) ............................................................................................................................................................................ 213 C4 SWITCH.................................................................................................................................................................. 217 178 Chrysler and Jeep Data Parameters C4(V) ............................................................................................................................................................................ 213 CAL(V).......................................................................................................................................................................... 182 CALC LOAD VALUE..................................................................................................................................................... 182 CAM SENSOR ............................................................................................................................................................. 185 CAM SYNC START ...................................................................................................................................................... 182 CAM SYNC STATE....................................................................................................................................................... 182 CAM TIMING POS(°).................................................................................................................................................... 182 CAM/CRANK DIFF°...................................................................................................................................................... 183 CARGO LAMP.............................................................................................................................................................. 223 CAT MODEL ................................................................................................................................................................. 183 CAT Modeled Temp ...................................................................................................................................................... 183 CHARGE TEMP(°) ....................................................................................................................................................... 183 CHARGE TEMP(V) ...................................................................................................................................................... 183 CHECK ENG LAMP ..................................................................................................................................................... 198 CHECK GAGES LMP................................................................................................................................................... 223 CHIME .......................................................................................................................................................................... 223 CHK GAUGES LMP ..................................................................................................................................................... 183 CKP COUNT ................................................................................................................................................................ 183 CKP ENG RPM ............................................................................................................................................................ 183 CLNT LEVEL SW ......................................................................................................................................................... 224 Closed Loop Timer ....................................................................................................................................................... 183 CLSD LOOP TMR ........................................................................................................................................................ 183 CMP COUNT................................................................................................................................................................ 183 CMP ENG RPM............................................................................................................................................................ 184 CNG PRESSURE(kPa) ................................................................................................................................................ 184 CNG PRESSURE(psi) .................................................................................................................................................. 184 CNG PRESSURE(V) .................................................................................................................................................... 184 CNG TEMP(°C) ............................................................................................................................................................ 184 CNG TEMP(°F)............................................................................................................................................................. 184 CNG TEMP(V).............................................................................................................................................................. 184 Coil 1 Burn Time(µS) .................................................................................................................................................... 184 Coil 2 Burn Time(µS) .................................................................................................................................................... 184 COIL BRN 1(µS)........................................................................................................................................................... 184 COIL DWL(mS) ............................................................................................................................................................ 184 COMMON WIRE(V)...................................................................................................................................................... 225 COMP/TEMP................................................................................................................................................................ 226 COMPRESSR RELAY .................................................................................................................................................. 225 COOLANT SW(V)......................................................................................................................................................... 225 COOLANT TEMP(V) .................................................................................................................................................... 185 COOLANT(°C).............................................................................................................................................................. 185 COOLANT(°F) .............................................................................................................................................................. 185 COOLANT(V) ............................................................................................................................................................... 185 COURTESY LAMP ....................................................................................................................................................... 223 CRANK INJ(mS)........................................................................................................................................................... 185 CRANK SENSOR......................................................................................................................................................... 185 CRNK SYNC START .................................................................................................................................................... 186 Cruise Cancel Switch State .......................................................................................................................................... 185 Cruise On/Off Switch State ........................................................................................................................................... 185 Cruise Resume/Accel Switch State .............................................................................................................................. 185 Cruise Set Switch State ................................................................................................................................................ 185 Cruise Set/Coast Switch State...................................................................................................................................... 185 CTS .............................................................................................................................................................................. 186 CURRENT GEAR......................................................................................................................................................... 213 179 Chrysler and Jeep Data Parameters CURRENT SYNC ......................................................................................................................................................... 186 D DBL STRT OVRIDE ..................................................................................................................................................... 186 DCKLID REL SOL ........................................................................................................................................................ 223 DECKLID AJAR............................................................................................................................................................ 223 DECKLID SW ............................................................................................................................................................... 223 DES CHARGE SOL...................................................................................................................................................... 186 DES CHARGE(V) ......................................................................................................................................................... 186 DES GOV PR(psi) ........................................................................................................................................................ 215 DES IDLE RPM ............................................................................................................................................................ 186 DES LF DUMP SOL ..................................................................................................................................................... 229 DES LF ISO SOL.......................................................................................................................................................... 229 DES PURGE(mA)......................................................................................................................................................... 186 DES REAR DUMP........................................................................................................................................................ 229 DES REAR ISO ............................................................................................................................................................ 229 DES RF DUMP SOL..................................................................................................................................................... 229 DES RF ISO SOL ......................................................................................................................................................... 229 DES TPS(V) ................................................................................................................................................................. 186 DIFF PRESS ................................................................................................................................................................ 230 DISABLED.................................................................................................................................................................... 187 DISPLAY(V) .................................................................................................................................................................. 226 DOME LAMP ................................................................................................................................................................ 223 DOME SW(V) ............................................................................................................................................................... 224 DOOR AJAR SW.......................................................................................................................................................... 223 DOOR HANDL SW....................................................................................................................................................... 223 DOOR LOCK RLY ........................................................................................................................................................ 223 DOOR LOCK(V) ........................................................................................................................................................... 224 DOOR STALL ............................................................................................................................................................... 224 DOOR UNLOCK RLY ................................................................................................................................................... 223 DOWNSHIFT SW ......................................................................................................................................................... 214 DRVR DOOR AJAR ..................................................................................................................................................... 223 DRVR DOOR JAMB ..................................................................................................................................................... 223 DRVR DOOR UNLCK .................................................................................................................................................. 223 DWNSTRM EXH .......................................................................................................................................................... 189 DWNSTRM O2S(V)...................................................................................................................................................... 201 E E2(V) ............................................................................................................................................................................ 226 E-CELL EXPIRED ........................................................................................................................................................ 187 ECM BATTERY(V)........................................................................................................................................................ 187 ECM ENG RPM............................................................................................................................................................ 187 ECONOMY SWITCH.................................................................................................................................................... 226 EGR DC(%) .................................................................................................................................................................. 187 EGR DUTY CYC(%)..................................................................................................................................................... 187 EGR Duty Cycle(%)...................................................................................................................................................... 187 EGR FLOW(g/s) ........................................................................................................................................................... 187 EGR Flow(g/s) .............................................................................................................................................................. 187 EGR SENSE(V)............................................................................................................................................................ 187 EGR Sensed(V)............................................................................................................................................................ 187 EGR SENSOR(V)......................................................................................................................................................... 187 EGR SOLENOID .......................................................................................................................................................... 188 180 Chrysler and Jeep Data Parameters EGR.............................................................................................................................................................................. 188 EMR LAMP................................................................................................................................................................... 188 ENABLED..................................................................................................................................................................... 187 ENGAGED.................................................................................................................................................................... 187 Engine Coolant Temp(°C)............................................................................................................................................. 185 Engine Coolant Temp(°C)............................................................................................................................................. 188 Engine Coolant Temp(°F) ............................................................................................................................................. 185 Engine Coolant Temp(°F) ............................................................................................................................................. 188 Engine Coolant Temp(V) .............................................................................................................................................. 188 Engine RPM ................................................................................................................................................................. 188 Engine RPM ................................................................................................................................................................. 205 Engine RPM ................................................................................................................................................................. 214 Engine Speed (RPM).................................................................................................................................................... 214 Engine TEMP(V)........................................................................................................................................................... 224 ETC DIRECT(%) .......................................................................................................................................................... 188 EVAPO TEMP(V).......................................................................................................................................................... 224 EXHAUST #1................................................................................................................................................................ 189 EXHAUST #2................................................................................................................................................................ 189 EXHAUST..................................................................................................................................................................... 189 EXHST SOL ................................................................................................................................................................. 225 F F BANK INJ(mS) .......................................................................................................................................................... 189 F BNK UP EXH............................................................................................................................................................. 189 F BNK UP EXH............................................................................................................................................................. 189 F DNSTM O2S(V)......................................................................................................................................................... 201 F EXHAUST ................................................................................................................................................................. 189 F LT ADAP(%) .............................................................................................................................................................. 197 F ST ADAP(%) ............................................................................................................................................................. 197 F UPSTM O2S(V)......................................................................................................................................................... 201 F WIPER SW(V) ........................................................................................................................................................... 225 FAN DUTY CYC(%)...................................................................................................................................................... 189 FLEX FUEL(V).............................................................................................................................................................. 189 FLS SW #2 ................................................................................................................................................................... 230 FLUID LEVEL SW ........................................................................................................................................................ 231 FOG LAMP RELAY ...................................................................................................................................................... 223 FOG LAMPS................................................................................................................................................................. 225 FRNT LT SNSR A......................................................................................................................................................... 226 FRNT LT SNSR B......................................................................................................................................................... 226 FRNT LT SNSR C ........................................................................................................................................................ 226 FRNT LT SOL ............................................................................................................................................................... 225 FRNT RT SNSR A ........................................................................................................................................................ 226 FRNT RT SNSR B ........................................................................................................................................................ 226 FRNT RT SNSR C........................................................................................................................................................ 226 FRNT RT SOL .............................................................................................................................................................. 225 FUEL ALLOWED.......................................................................................................................................................... 190 FUEL LEVEL (V) .......................................................................................................................................................... 224 FUEL LEVEL ................................................................................................................................................................ 190 FUEL LEVEL(%)........................................................................................................................................................... 190 FUEL LEVEL(V) ........................................................................................................................................................... 190 FUEL LEVEL(V) ........................................................................................................................................................... 226 FUEL LVL(GAL)............................................................................................................................................................ 190 FUEL PUMP RLY ......................................................................................................................................................... 190 181 Chrysler and Jeep Data Parameters FUEL SHUTOFF .......................................................................................................................................................... 190 FUEL SWITCH ............................................................................................................................................................. 226 FUEL SYNC ................................................................................................................................................................. 191 FUEL SYS .................................................................................................................................................................... 191 FUEL TEMP(°C) ........................................................................................................................................................... 191 FUEL TEMP(°F) ........................................................................................................................................................... 191 FUEL(%)....................................................................................................................................................................... 190 G G SW #1 ....................................................................................................................................................................... 191 G SW #2 ....................................................................................................................................................................... 191 GATE AJAR SW ........................................................................................................................................................... 223 GATE AJAR .................................................................................................................................................................. 223 GEAR ........................................................................................................................................................................... 214 GENERATOR DC(%) ................................................................................................................................................... 191 Generator Duty Cycle(DC%) ........................................................................................................................................ 191 GENERATOR FIELD .................................................................................................................................................... 191 GENERATOR LAMP .................................................................................................................................................... 192 GLOW PLUG RELAY ................................................................................................................................................... 192 GOV PR DUTY CYC .................................................................................................................................................... 215 GOV PR SNSR(V)........................................................................................................................................................ 215 GOV PRESS SOL ........................................................................................................................................................ 214 GOV PRESS(psi) ......................................................................................................................................................... 215 GOV PRESS(V)............................................................................................................................................................ 215 G-SWITCH ................................................................................................................................................................... 191 H H2O IN FUEL LMP ....................................................................................................................................................... 192 H2O IN FUEL ............................................................................................................................................................... 192 H2O IN FUEL(V)........................................................................................................................................................... 192 HAZARD SW ................................................................................................................................................................ 223 HEADLAMP DELAY ..................................................................................................................................................... 223 HEADLAMP SW(V) ...................................................................................................................................................... 225 HEADLAMPS ............................................................................................................................................................... 223 HEADLMP OUTAGE .................................................................................................................................................... 223 HI LOW BEAM.............................................................................................................................................................. 223 HI SPD GND RLY ......................................................................................................................................................... 192 HIGH ALT ..................................................................................................................................................................... 192 HIGH BEAM SW(V)...................................................................................................................................................... 223 HIGH BEAM SW(V)...................................................................................................................................................... 225 HIGH BEAMS ............................................................................................................................................................... 223 HIPRES FUEL CUT...................................................................................................................................................... 192 HOOD AJAR................................................................................................................................................................. 223 HORN ........................................................................................................................................................................... 223 I IAC AIRFLW(g/s) .......................................................................................................................................................... 193 IAC CURRENT(mA) ..................................................................................................................................................... 193 IAC Pulse Width(%) ...................................................................................................................................................... 193 IAC PWM(%) ................................................................................................................................................................ 193 IAC(STEPS) ................................................................................................................................................................. 178 IAT(°) ............................................................................................................................................................................ 183 182 Chrysler and Jeep Data Parameters IAT(V) ........................................................................................................................................................................... 183 IDLE ADAP(µS) ............................................................................................................................................................ 178 IDLE ADAP(µS) ............................................................................................................................................................ 193 IDLE SELECT............................................................................................................................................................... 193 IDLE SOLENOID .......................................................................................................................................................... 193 IDLE SWITCH #1 ......................................................................................................................................................... 193 IDLE SWITCH #2 ......................................................................................................................................................... 193 IG DWL CYL1(mS) ....................................................................................................................................................... 194 IG DWL CYL2(mS) ....................................................................................................................................................... 194 IGN CYCLES 1............................................................................................................................................................. 194 IGN CYCLES 2............................................................................................................................................................. 194 IGN CYCLES 3............................................................................................................................................................. 194 IGN CYCLES................................................................................................................................................................ 194 IGN CYCLES................................................................................................................................................................ 217 IGN RUN SW................................................................................................................................................................ 194 IGN RUN/START .......................................................................................................................................................... 223 IGN START SW ............................................................................................................................................................ 194 IGN(V) .......................................................................................................................................................................... 194 IGN/RUN(V).................................................................................................................................................................. 224 Ignition Dwell Cylinder 1(µS) ........................................................................................................................................ 194 Ignition Dwell Cylinder 2(µS) ........................................................................................................................................ 194 Ignition Run Switch Sense............................................................................................................................................ 194 IGNITION SENSE ........................................................................................................................................................ 194 IGNITION STATUS ....................................................................................................................................................... 226 IGNITION SW............................................................................................................................................................... 194 IGNITION SW(V) .......................................................................................................................................................... 225 IGNITION(V)................................................................................................................................................................. 224 IGNITION(V)................................................................................................................................................................. 226 IGNITION(V)................................................................................................................................................................. 234 INFO. SWITCH............................................................................................................................................................. 226 INJ CYL 1(mS) ............................................................................................................................................................. 195 INJ CYL 2(mS) ............................................................................................................................................................. 195 INJ TEMP(°C)............................................................................................................................................................... 195 INJ TEMP(°F) ............................................................................................................................................................... 195 INJ TEMP(V) ................................................................................................................................................................ 195 INJ(mS) ........................................................................................................................................................................ 194 INJ1(mS) ...................................................................................................................................................................... 194 INJ2(mS) ...................................................................................................................................................................... 194 INLET AIR TEMP(°)...................................................................................................................................................... 183 INLET AIR TEMP(V)..................................................................................................................................................... 183 INPUT RPM.................................................................................................................................................................. 214 Intake Air Temp(°)......................................................................................................................................................... 183 Intake Air Temp(V) ........................................................................................................................................................ 183 INTAKE HEATR #1 ....................................................................................................................................................... 195 INTAKE HEATR #2 ....................................................................................................................................................... 195 INTAKE HTR(°C) .......................................................................................................................................................... 195 INTAKE HTR(°F) .......................................................................................................................................................... 195 INTER WIPER (V) ........................................................................................................................................................ 227 I-WIPE DELAY(V) ......................................................................................................................................................... 225 I-WIPE ENABLE(V) ...................................................................................................................................................... 225 J J2 CIRCUIT(V) ............................................................................................................................................................. 215 183 Chrysler and Jeep Data Parameters K KEY IN IGN SW............................................................................................................................................................ 223 KNK RTD CYL 1(°) ....................................................................................................................................................... 209 KNK RTD CYL 2(°) ....................................................................................................................................................... 209 KNK RTD CYL 3(°) ....................................................................................................................................................... 209 KNK RTD CYL 4(°) ....................................................................................................................................................... 209 Knock Sensor 1 Volts(V)............................................................................................................................................... 195 Knock Sensor 2 Volts(V)............................................................................................................................................... 195 KNOCK SENSOR(V).................................................................................................................................................... 195 KNOCK......................................................................................................................................................................... 195 L L ADDED FUEL(µS) ..................................................................................................................................................... 178 L BANK INJ(mS)........................................................................................................................................................... 189 L BNK DN EXH............................................................................................................................................................. 189 L BNK UP EXH............................................................................................................................................................. 189 L B-PILLAR SW(V) ....................................................................................................................................................... 225 L DNSTM O2S(V)......................................................................................................................................................... 201 L DR KEY SW(V).......................................................................................................................................................... 225 L DR LCK SW(V).......................................................................................................................................................... 225 L EXHAUST.................................................................................................................................................................. 189 L FUEL SYS ................................................................................................................................................................. 191 L IDLE ADAP(µS) ......................................................................................................................................................... 178 L LT ADAP(%) .............................................................................................................................................................. 197 L O2S(V)....................................................................................................................................................................... 201 L OPEN/CLSD LP ........................................................................................................................................................ 202 L ST ADAP(%).............................................................................................................................................................. 197 L TURN SIGNAL .......................................................................................................................................................... 223 L UPSTMO2S(V) .......................................................................................................................................................... 201 L17 SIGNAL ................................................................................................................................................................. 227 LAST CUTOUT............................................................................................................................................................. 196 LF CONTINUITY .......................................................................................................................................................... 231 LF DUMP SOL.............................................................................................................................................................. 231 LF ISO SOL .................................................................................................................................................................. 231 LF ISOL CYCLE ........................................................................................................................................................... 231 LF SOL ......................................................................................................................................................................... 196 LF SOL ......................................................................................................................................................................... 232 LF SOL(V) .................................................................................................................................................................... 232 LF VALVE ..................................................................................................................................................................... 232 LF WHEEL(MPH) ......................................................................................................................................................... 232 L-FUEL SY ................................................................................................................................................................... 202 LGATE HNDL SW(V).................................................................................................................................................... 225 LGATE KEY SW(V) ...................................................................................................................................................... 225 LIFT GATE AJAR ......................................................................................................................................................... 223 LIMP IN......................................................................................................................................................................... 215 LIMP-IN ........................................................................................................................................................................ 196 LK DET PMP SOL ........................................................................................................................................................ 197 LK DET PMP SW ......................................................................................................................................................... 197 LK DET PMP ................................................................................................................................................................ 197 LOCKUP SOL............................................................................................................................................................... 197 LOCK-UP...................................................................................................................................................................... 216 LOOP STATUS ............................................................................................................................................................. 197 184 Chrysler and Jeep Data Parameters LOW ACCUM ............................................................................................................................................................... 232 LOW BEAMS................................................................................................................................................................ 223 LOW FLUID SW ........................................................................................................................................................... 233 LOW OIL PR................................................................................................................................................................. 228 LR CONTINUITY .......................................................................................................................................................... 231 LR DOOR AJAR ........................................................................................................................................................... 223 LR ISOL CYCLE........................................................................................................................................................... 231 L-R PRESS SW............................................................................................................................................................ 216 LR SOL......................................................................................................................................................................... 232 LR SOL(V) .................................................................................................................................................................... 232 LR VALVE ..................................................................................................................................................................... 232 LR WHEEL(MPH)......................................................................................................................................................... 232 LT ADAP(%) ................................................................................................................................................................. 197 LT FUEL TRIM.............................................................................................................................................................. 198 M MALFUNCTION LMP ................................................................................................................................................... 198 MAN AC BLND(V) ........................................................................................................................................................ 227 MAN VAC(“Hg) ............................................................................................................................................................. 199 MAN VAC(kPa) ............................................................................................................................................................. 199 MAP SNR(“Hg) ............................................................................................................................................................. 199 MAP SNR(kPa)............................................................................................................................................................. 199 MAP SNSR(V) .............................................................................................................................................................. 200 MAP Vacuum(“Hg)........................................................................................................................................................ 199 MAP Vacuum(kPa) ....................................................................................................................................................... 199 Map Volts(V) ................................................................................................................................................................. 200 MAP/BARO RATIO ....................................................................................................................................................... 199 MC SOLENOID ............................................................................................................................................................ 200 METHANOL(%) ............................................................................................................................................................ 189 MIN TPS (V) ................................................................................................................................................................. 200 Minimum TPS(V) .......................................................................................................................................................... 200 MODE DOOR(V) .......................................................................................................................................................... 224 MODE SW MUX(V) ...................................................................................................................................................... 227 MODE........................................................................................................................................................................... 216 MODULATOR RLY ....................................................................................................................................................... 233 MODULE ID.................................................................................................................................................................. 216 MOTOR SPEED ........................................................................................................................................................... 233 MP COIL(V) .................................................................................................................................................................. 233 MP MONITOR(V) ......................................................................................................................................................... 234 MP RELAY COIL .......................................................................................................................................................... 233 MTR PMP CONTROL .................................................................................................................................................. 234 MTR PUMP RELAY ...................................................................................................................................................... 234 MTV Output State ......................................................................................................................................................... 200 MTV SOLENOID .......................................................................................................................................................... 200 MTV Valve State ........................................................................................................................................................... 200 N NEUTRAL SW 1 ........................................................................................................................................................... 217 NEUTRAL SW 2 ........................................................................................................................................................... 217 NVLD SOLENOID ........................................................................................................................................................ 201 NVLD SWITCH............................................................................................................................................................. 201 185 Chrysler and Jeep Data Parameters O O2 ADAP CELL ID ....................................................................................................................................................... 202 O2 CROSSCOUNTS.................................................................................................................................................... 202 O2(mV) ......................................................................................................................................................................... 201 O2(V) ............................................................................................................................................................................ 201 O2HTR DTY CYC(%) ................................................................................................................................................... 202 OD INHIBIT .................................................................................................................................................................. 216 OD OFF LAMP ............................................................................................................................................................. 216 OD OVERRIDE LMP .................................................................................................................................................... 217 O-D OVERRIDE ........................................................................................................................................................... 216 OD PRESS SW ............................................................................................................................................................ 216 OD RANGE SW............................................................................................................................................................ 213 OD SWITCH ................................................................................................................................................................. 217 OH L-GATE SW(V) ....................................................................................................................................................... 225 OH PWR DR SW(V) ..................................................................................................................................................... 225 OIL LEVEL SW............................................................................................................................................................. 224 OIL PRESS (V)............................................................................................................................................................. 224 OIL PRESS(kPa) .......................................................................................................................................................... 202 OIL PRESS(psi)............................................................................................................................................................ 202 OIL PRESS(V).............................................................................................................................................................. 202 OPEN/CLSD LOOP...................................................................................................................................................... 202 OPTICAL HORN........................................................................................................................................................... 227 OUT AMB TMP(V)........................................................................................................................................................ 225 OUT SHAFT(RPM)....................................................................................................................................................... 217 OUTPUT RPM.............................................................................................................................................................. 214 OUTPUT RPM.............................................................................................................................................................. 217 Output Speed(RPM) ..................................................................................................................................................... 214 OUTSIDE TEMP (V)..................................................................................................................................................... 227 OVERALL KNK RTD(°) ................................................................................................................................................ 209 OVERDRIVE SOL ........................................................................................................................................................ 217 P PANEL (V) .................................................................................................................................................................... 224 PARK LAMPS............................................................................................................................................................... 225 PART NO. ..................................................................................................................................................................... 217 PASS DOOR AJAR ...................................................................................................................................................... 223 P-BRK/LO FLU ............................................................................................................................................................. 227 PCM ODO(mi) .............................................................................................................................................................. 203 PCV VALVE .................................................................................................................................................................. 203 PED TRVL SNS............................................................................................................................................................ 233 POSTCAT O2S(V) ........................................................................................................................................................ 201 POWER RELAY ........................................................................................................................................................... 234 Power Steering Switch.................................................................................................................................................. 204 PR SENS OFF(V)......................................................................................................................................................... 218 P-Ratio MAP/BARO...................................................................................................................................................... 203 PRECAT O2S(V) .......................................................................................................................................................... 201 PRESENT GEAR ......................................................................................................................................................... 213 PRESS SENS OFF ...................................................................................................................................................... 218 PRESSURE(V) ............................................................................................................................................................. 230 PRGE ADAPTIVE(%) ................................................................................................................................................... 203 PRGE DUTY CYC(%) .................................................................................................................................................. 203 PRGE FEDBCK(mA) .................................................................................................................................................... 204 186 Chrysler and Jeep Data Parameters PRGE FLOW(g/s)......................................................................................................................................................... 204 PRGE VAPOR(%) ........................................................................................................................................................ 204 PRNDL ......................................................................................................................................................................... 203 PRNODDL .................................................................................................................................................................... 217 PROM........................................................................................................................................................................... 204 PROPER SUPPLY V .................................................................................................................................................... 227 PS SWITCH.................................................................................................................................................................. 233 PUMP MOTOR ............................................................................................................................................................. 234 PUMP MOTOR(V) ........................................................................................................................................................ 234 PUMP ........................................................................................................................................................................... 234 PUMP(V) ...................................................................................................................................................................... 234 Purge AirFlow(g/s)........................................................................................................................................................ 204 PURGE CURR(mA)...................................................................................................................................................... 204 PURGE DC(%) ............................................................................................................................................................. 203 Purge Duty Cycle(%) .................................................................................................................................................... 203 PURGE SOL FLW(%)................................................................................................................................................... 204 PURGE SOL................................................................................................................................................................. 204 PURGE(mA) ................................................................................................................................................................. 204 PWR STEER SW ......................................................................................................................................................... 204 R R ADDED FUEL(µS) .................................................................................................................................................... 178 R BANK INJ(mS) .......................................................................................................................................................... 189 R BNK DN EXH ............................................................................................................................................................ 189 R BNK UP EXH ............................................................................................................................................................ 189 R B-PILLAR SW(V) ...................................................................................................................................................... 225 R DEFOG SW .............................................................................................................................................................. 223 R DNSTM O2S(V) ........................................................................................................................................................ 201 R DR KEY SW(V) ......................................................................................................................................................... 225 R DR LCK SW(V) ......................................................................................................................................................... 225 R EXHAUST ................................................................................................................................................................. 189 R FUEL SYS................................................................................................................................................................. 191 R IDLE ADAP(µS) ........................................................................................................................................................ 178 R LT ADAP(%).............................................................................................................................................................. 197 R O2S(V) ...................................................................................................................................................................... 201 R OPEN/CLSD LP........................................................................................................................................................ 202 R RANGE SW .............................................................................................................................................................. 213 R ST ADAP(%) ............................................................................................................................................................. 197 R TURN SIGNAL.......................................................................................................................................................... 223 R UPSTM O2S(V) ........................................................................................................................................................ 201 R WIPER SW(V)........................................................................................................................................................... 225 RAD FAN DC(%) .......................................................................................................................................................... 205 RAD FAN HI RLY.......................................................................................................................................................... 205 RAD FAN HI2 RLY........................................................................................................................................................ 205 RAD FAN LOW RLY ..................................................................................................................................................... 205 RAD FAN RELAY ......................................................................................................................................................... 205 RADIO SW(V)............................................................................................................................................................... 225 REAR DUMP SOL........................................................................................................................................................ 231 REAR HT SNSR A ....................................................................................................................................................... 226 REAR HT SNSR B ....................................................................................................................................................... 226 REAR HT SNSR C ....................................................................................................................................................... 226 REAR ISO SOL ............................................................................................................................................................ 231 REAR SOL ................................................................................................................................................................... 196 187 Chrysler and Jeep Data Parameters REAR SOLENOID ........................................................................................................................................................ 225 REAR WHEELS ........................................................................................................................................................... 232 RED BRAKE LAMP ...................................................................................................................................................... 234 REFERENCE(V)........................................................................................................................................................... 234 RESET SWITCH .......................................................................................................................................................... 226 RETARD CYL #1(°) ...................................................................................................................................................... 205 RETARD CYL #2(°) ...................................................................................................................................................... 205 RETARD CYL #3(°) ...................................................................................................................................................... 205 RETARD CYL #4(°) ...................................................................................................................................................... 205 REV LIGHT 1(V)........................................................................................................................................................... 215 REV LIGHT 2(V)........................................................................................................................................................... 215 REV LIGHT SW 1......................................................................................................................................................... 217 REV LIGHT SW 2......................................................................................................................................................... 217 REV LOCKOUT SOL.................................................................................................................................................... 219 RF CONTINUITY.......................................................................................................................................................... 231 RF DUMP SOL ............................................................................................................................................................. 231 RF ISO SOL ................................................................................................................................................................. 231 RF ISOL CYCLE........................................................................................................................................................... 231 RF SOL......................................................................................................................................................................... 196 RF SOL......................................................................................................................................................................... 232 RF SOL(V).................................................................................................................................................................... 232 RF VALVE..................................................................................................................................................................... 232 RF WHEEL(MPH)......................................................................................................................................................... 232 R-FUEL SY................................................................................................................................................................... 202 RPM.............................................................................................................................................................................. 205 RR CONTINUITY ......................................................................................................................................................... 231 RR DOOR AJAR .......................................................................................................................................................... 223 RR ISOL CYCLE .......................................................................................................................................................... 231 RR SOL ........................................................................................................................................................................ 232 RR SOL(V) ................................................................................................................................................................... 232 RR VALVE .................................................................................................................................................................... 232 RR WHEEL(MPH) ........................................................................................................................................................ 232 S S/C CANCEL ................................................................................................................................................................ 205 S/C COAST .................................................................................................................................................................. 205 S/C ENGAGED LMP .................................................................................................................................................... 205 S/C LAMP..................................................................................................................................................................... 205 S/C ON/OFF ................................................................................................................................................................. 205 S/C POWER RELAY .................................................................................................................................................... 205 S/C RESUME ............................................................................................................................................................... 205 S/C SET SPD ............................................................................................................................................................... 206 S/C SET SW................................................................................................................................................................. 205 S/C SW 1(V) ................................................................................................................................................................. 206 S/C SW 2(V) ................................................................................................................................................................. 206 S/C SW INPUT(V) ........................................................................................................................................................ 206 S/C SWITCH(V)............................................................................................................................................................ 206 S/C Switch(V) ............................................................................................................................................................... 206 S/C TARGET (KPH) ..................................................................................................................................................... 206 S/C TARGET (MPH) ..................................................................................................................................................... 206 S/C VAC SOL ............................................................................................................................................................... 206 S/C VENT SOL............................................................................................................................................................. 206 SEAT BELT SW ............................................................................................................................................................ 223 188 Chrysler and Jeep Data Parameters SEC AIR SOL ............................................................................................................................................................... 179 SENSED TIP ................................................................................................................................................................ 206 SET SWITCH ............................................................................................................................................................... 226 SHIFT IND LAMP ......................................................................................................................................................... 206 SHIFT LEVER .............................................................................................................................................................. 219 SNSR SUPPLY(V) ........................................................................................................................................................ 219 SOL UNDERVOLT........................................................................................................................................................ 234 SOLENOID 1 ................................................................................................................................................................ 219 SOLENOID 2 ................................................................................................................................................................ 219 SOLENOID 3 ................................................................................................................................................................ 219 SPARK ADV(°BTC) ...................................................................................................................................................... 206 Spark Advance(°).......................................................................................................................................................... 206 SPEED CNTRL ............................................................................................................................................................ 207 SRI(EMR) LAMP .......................................................................................................................................................... 188 SRV Output State ......................................................................................................................................................... 207 SRV SOLENOID........................................................................................................................................................... 207 SRV Valve State ........................................................................................................................................................... 207 ST ADAP(%)................................................................................................................................................................. 197 ST FUEL TRIM ............................................................................................................................................................. 207 ST RETARD(°).............................................................................................................................................................. 207 STARTER(V) ................................................................................................................................................................ 229 STATUS ........................................................................................................................................................................ 207 STEP EXTEND............................................................................................................................................................. 207 STEP RETRACT .......................................................................................................................................................... 207 STEP SWITCH ............................................................................................................................................................. 228 STOP LAMP SW .......................................................................................................................................................... 235 SUNLOAD(V) ............................................................................................................................................................... 228 SURGE VALVE............................................................................................................................................................. 208 SWITCH BATT(V)......................................................................................................................................................... 215 SY RLY COIL(V) ........................................................................................................................................................... 235 SYS RELAY COIL ........................................................................................................................................................ 235 SYSTEM RELAY .......................................................................................................................................................... 235 SYSTEM RLY(V) .......................................................................................................................................................... 235 T TABLE ID ...................................................................................................................................................................... 219 TARGET IAC ................................................................................................................................................................ 208 Target Idle Speed(RPM) ............................................................................................................................................... 208 T-BODY TEMP(°C)....................................................................................................................................................... 208 T-BODY TEMP(°F) ....................................................................................................................................................... 208 T-BODY TEMP(V) ........................................................................................................................................................ 208 TC SWITCH.................................................................................................................................................................. 233 TCC FULL LOCK.......................................................................................................................................................... 208 TCC FULL LOCK.......................................................................................................................................................... 223 TCC INHIBIT ................................................................................................................................................................ 219 TCC LOCKED .............................................................................................................................................................. 220 TCC P-EMCC ............................................................................................................................................................... 208 TCC SOL ...................................................................................................................................................................... 197 TCC SOL ...................................................................................................................................................................... 220 TCC UNLOCKED ......................................................................................................................................................... 208 TEMP SWITCH ............................................................................................................................................................ 226 THROTTLE POS(%) .................................................................................................................................................... 209 THROTTLE POS(V) ..................................................................................................................................................... 209 189 Chrysler and Jeep Data Parameters THROTTLE POS(V) ..................................................................................................................................................... 220 Throttle Position Sensor(%).......................................................................................................................................... 209 THROTTLE SW............................................................................................................................................................ 209 THROTTLE(%) ............................................................................................................................................................. 209 THROTTLE(%) ............................................................................................................................................................. 220 THROTTLE(°)............................................................................................................................................................... 220 TIME SW ...................................................................................................................................................................... 226 TIP(V) ........................................................................................................................................................................... 209 TMP AIR DR(V) ............................................................................................................................................................ 224 TOTAL ADV(°BTC) ....................................................................................................................................................... 209 TOTAL KNK RTD (°)..................................................................................................................................................... 209 TPS 1 MIN(V) ............................................................................................................................................................... 210 TPS 1(V)....................................................................................................................................................................... 210 TPS 2 MIN(V) ............................................................................................................................................................... 210 TPS 2(V)....................................................................................................................................................................... 210 TPS ANGLE(°).............................................................................................................................................................. 220 TPS CALC(V) ............................................................................................................................................................... 210 TPS STEPS.................................................................................................................................................................. 210 TPS(%) ......................................................................................................................................................................... 209 TPS(V).......................................................................................................................................................................... 220 TPS(V)Throttle Position Sensor(V)............................................................................................................................... 209 TRAC SW ..................................................................................................................................................................... 223 TRANS OVRHT LMP ................................................................................................................................................... 220 TRANS PWR RLY ........................................................................................................................................................ 220 TRANS STATE ............................................................................................................................................................. 220 TRANS TEMP LMP ...................................................................................................................................................... 220 TRANS TEMP(°C) ........................................................................................................................................................ 220 TRANS TEMP(°F) ........................................................................................................................................................ 220 TRANS TEMP(V).......................................................................................................................................................... 221 Trans Temperature Voltage(V)...................................................................................................................................... 221 TRANSFER PUMP....................................................................................................................................................... 210 TRD LINK ..................................................................................................................................................................... 210 TRIP RESET SW.......................................................................................................................................................... 228 TRIP/ODOM SW .......................................................................................................................................................... 228 TRNSDCR OFF SET.................................................................................................................................................... 218 TURBINE RPM............................................................................................................................................................. 214 Turbine Speed(RPM) .................................................................................................................................................... 214 TURBO BARO.............................................................................................................................................................. 210 TURN SGNL SW(V) ..................................................................................................................................................... 225 U UPSHIFT SW ............................................................................................................................................................... 221 UPSTRM EXH .............................................................................................................................................................. 189 UPSTRM O2S(V) ......................................................................................................................................................... 201 US/METRIC SW ........................................................................................................................................................... 226 US/METRIC SW ........................................................................................................................................................... 226 US/METRIC SW ........................................................................................................................................................... 228 US/METRIC SW ........................................................................................................................................................... 228 V VEH SPEED ................................................................................................................................................................. 210 VEH THEFT STATE...................................................................................................................................................... 211 190 Chrysler and Jeep Data Parameters VEH THEFT.................................................................................................................................................................. 211 VERSION NO. .............................................................................................................................................................. 217 VERSION NO. .............................................................................................................................................................. 228 VNT SOL #1 ................................................................................................................................................................. 211 VNT SOL #2 ................................................................................................................................................................. 211 VNT SOL #3 ................................................................................................................................................................. 211 W WAIT TO START .......................................................................................................................................................... 211 WARN LAMP INP ......................................................................................................................................................... 235 WARN LAMP(V) ........................................................................................................................................................... 235 WARNING LAMP.......................................................................................................................................................... 235 WASHER LVL(V) .......................................................................................................................................................... 225 WASHER SWITCH....................................................................................................................................................... 223 WASTEGATE SOL ....................................................................................................................................................... 211 WASTEGATE SOL(%).................................................................................................................................................. 211 WASTEGATE(%).......................................................................................................................................................... 211 WATER IN FUEL(V) ..................................................................................................................................................... 212 WIDE OPEN THROT.................................................................................................................................................... 212 WIPER MODE(V) ......................................................................................................................................................... 225 WIPERS PARKED ........................................................................................................................................................ 223 WOT DIVERT ............................................................................................................................................................... 212 WR TOP SW(V)............................................................................................................................................................ 225 Y YEL ABS LAMP............................................................................................................................................................ 235 Z Z1 VOLTAGE ................................................................................................................................................................ 212 191 Chrysler and Jeep Data Parameters Engine Parameters Engine Parameters This section defines data parameters available from the engine control module or the powertrain control module (PCM) on Chrysler and Jeep vehicles. 1/1 Goal (0-1)(V) 2/1 Goal (0-1)(V) Range: ______________________________________________________ 0.00 to 1.00 V Indicates the filtered O2S voltage that the PCM is trying to maintain. Next Generation Controllers (NGC) provides a bias voltage of 2.5 V to sensor. Voltage levels with the engine running will fluctuate around 2.5 V. Actual sensor voltage output range is about 1 V. Displayed is the desired sensor output with the voltage bias filtered out. 1/1 LP STATUS Range: _______________________________________________________ OPEN/CLSD Displays the bank 1 O2S control status. 1/1 O2 HTR DC(%) 1/2 O2 HTR DC(%) 2/1 O2 HTR DC(%) 2/2 O2 HTR DC(%) 1/1 Pulse Width O2 Heater(%) 1/2 Pulse Width O2 Heater(%) 2/1 Pulse Width O2 Heater(%) Range: _________________________________________________________ 0 to 100% Next Generation Controllers (NGC) provide voltage to O2S heater circuit as needed. Ground is hardwired to the chassis. The PCM duty cycles voltage between 0 and 100%. 1/1 O2S DES(V) 2/1 O2S DES(V) 1/1 O2 Sensor Goal(V) 2/1 O2 Sensor Goal(V) Range: ________________________________________________________ 2.5 to 5.0 V The ideal O2S voltage that the PCM is trying to maintain. The value changes based on downstream O2S switch rate to allow the catalyst to operate at its most efficient level. It should read between 2.8 and 3.3 V, which includes the ground bias voltage of 2.5 V. 1/1 O2 Sensor(V) 1/2 O2 Sensor(V) 2/1 O2 Sensor(V) 2/2 O2 Sensor(V) Range: ______________________________________________________ 2.00 to 3.00 V Next Generation Controllers (NGC) provides a bias voltage of 2.5 V to sensor. Voltage levels with the engine running will fluctuate around 2.5 V at the sensor. This parameter displays the actual sensor reading. Actual sensor voltage output is about 1V, sensor voltage reading will be shifted up by the bias. 192 Chrysler and Jeep Data Parameters Engine Parameters 1/1 O2 Volts (0-1)(V) 1/2 O2 Volts (0-1)(V) 2/1 O2 Volts (0-1)(V) 2/2 O2 Volts (0-1)(V) Range: ______________________________________________________ 0.00 to 1.00 V Displays the sensor output with the bias voltage filtered out. Next Generation Controllers (NGC) provides a bias voltage of 2.5 V to sensor. Voltage levels with the engine running will fluctuate around 2.5 V at the sensor. Actual sensor voltage output range is about 1 V. 4” PORT VAC 10” MAN VAC Range: _____________________________________________________ OVER/UNDER The four inches of mercury (4”) and ten inches of mercury (10”) vacuum switches are used on most 1984–90 carbureted vehicles. The 10” Hg switch monitors intake manifold vacuum and the 4” Hg switch monitors ported vacuum. These parameters read as follows: • OVER when vacuum is at or greater than the switch setting • UNDER when vacuum is lower than the switch setting Ported vacuum should be low at idle, manifold vacuum should be high at idle. A/C CLUTCH Range: __________________________________________________________ ON/OFF Shows if the PCM energized the relay to engage the air conditioning compressor clutch. This parameter indicates the PCM command has been given, it is not a feedback signal to indicate that the A/C clutch has actually engaged. A/C PRESS(V) Range: _________________________________________________________ 0 to 5.0 V A/C PRESSURE(psi) Range: ________________________________________________________0 to 500 psi A/C PRESSURE(kPa) Range: _____________________________________________________ 0 to 3,450 kPa The A/C pressure transducer senses the refrigerant pressure in the discharge line of the air conditioning system. The voltage parameter is the sensor input signal to the PCM. The PCM uses this signal to cycle the A/C clutch on and off, and to control dual cooling fan operation. The pressure parameter is a value internally calculated by the PCM. A/C REQUEST Range: __________________________________________________________ ON/OFF Used on some 1991 and later vehicles, indicates the status of the PCM command to the air conditioning compressor. This is the actual PCM command—it is not the switch position. The position of the instrument panel switch is the A/C SWITCH parameter. A/C SWITCH Range: __________________________________________________________ ON/OFF A/C SELECT A/C SELECT SW A/C Select Switch Range: __________________________________________________________ YES/NO Should read as follows: • ON or YES when the A/C switch is on and all other in-series switches are closed. • OFF or NO when any A/C series switch is open. 193 Chrysler and Jeep Data Parameters Engine Parameters AC Hi-Side Voltage(V) Range: _________________________________________________________ 0 to 5.0 V AC Hi-Side Pressure(psi) Range: ________________________________________________________0 to 500 psi AC Hi-Side Pressure(kPa) Range: _____________________________________________________ 0 to 3,450 kPa The A/C pressure transducer senses the refrigerant pressure in the Hi pressure line of the air conditioning system. The voltage parameter is the sensor input signal to the PCM. The PCM uses this signal to cycle the A/C clutch on and off. The pressure parameter is a value internally calculated by the PCM. ACCEL PEDAL(%) Range: _________________________________________________________ 0 to 100% The position of the accelerator pedal in percentage based on the APP sensor reading. ACTUAL ASD RELAY Range: __________________________________________________________ ON/OFF When the auto shutdown (ASD) relay energizes, a special circuit sends a signal to the PCM. This parameter indicates the status of this signal. ACTUAL ASK RELAY reads ON when the relay is energized. ADDED FUEL(µS) L ADDED FUEL(µS) R ADDED FUEL(µS) IDLE ADAP(µS) L IDLE ADAP(µS) R IDLE ADAP(µS) Range: __________________________________________________ 1024 to + 1016 µS The adaptive adjustment made by the PCM to fuel injector pulse width at idle. • A negative number means that the PCM is decreasing the pulse width. • A positive number means the PCM is increasing the pulse width. On some 1992 and later engines, such as the 1993 3.3L and 3.5L, the oxygen sensors for the left and right cylinder banks are separately controlled by the PCM and have separate adaptive injector strategies. These parameters display in microseconds (µS). A microsecond equals 0.000001 second, or 1/ 1000-millisecond. AIS (STEPS) IAC(STEPS) Range: ___________________________________________________________1 to 255 The position of the automatic idle speed (AIS) or idle air control (IAC) motor as stepper-motor position counts. • A low number indicates the motor is retracted to maintain a low idle speed. • A high number indicates that the motor is extended further to maintain the required idle speed. AIR SOL Range: __________________________________________________________ ON/OFF Displays the status of the downstream pulse air solenoid on most 1984–90 carbureted engines and reads as follows: • ON when the solenoid routes air to the second bed of the catalytic converter 194 Chrysler and Jeep Data Parameters Engine Parameters • OFF when air is being routed to the upstream solenoid or vented to atmosphere The upstream and downstream solenoids distribute air to the exhaust pipe and catalytic converter (pulse air system). Both solenoids are controlled by the PCM. • The upstream solenoid distributes air into the exhaust pipe, just below the O2S. • The downstream solenoid distributes air to the catalytic converter. AIR SWITCH SOL Range: _______________________________________________________ OPEN/CLSD SEC AIR SOL Range: __________________________________________________________ ON/OFF Shows if the PCM energized the air switching solenoid to direct air injection into the manifold during engine warm-up and read as follows: • OPEN or ON during warm-up • CLSD or OFF when the engine is at operating temperature Parameters indicate if PCM command has been given. It is not a feedback signal to indicate that the solenoid is operating or responding to the command. AMBIENT/BATT(°C) Range: _______________________________________________________ -45 to 243°C AMBIENT/BATT(°F) Range: _______________________________________________________ -49 to 469°F Used on some diesel engines and indicates either the under-hood ambient temperature or the temperature of the battery. AMB TEMP(°F) Ambient Temp(°F) Range: ________________________________________________________-40° to 389° Ambient Temp(°C) AMB TEMP(°C) Range: ________________________________________________________-40° to 199° The temperature of the ambient air in the engine compartment on some vehicles. The PCM converts voltage to air temperature readings. AMB TEMP(V) Ambient Temp(V) Range: _________________________________________________________ 0 to 5.1 V A direct voltage reading from the ambient air temperature sensor. Sensor voltage and temperature are inversely related: • Low temperature produces a high voltage signal • High temperature produces a low voltage signal APP 1(V) APP 2 (V) Range: ___________________________________________________________ 0 to 5 V APP 1 and APP 2 represent two sensors in one housing that provide the PCM with two separate voltage signals in proportion to accelerator pedal position. APP 1(V) will increase at twice the rate of APP 2(V) as the throttle is opened. 195 Chrysler and Jeep Data Parameters Engine Parameters APPS(%) Range: _________________________________________________________ 0 to 100% The position of the accelerator pedal based on the signal from the accelerator pedal position sensor and reads 100% when the accelerator pedal is fully pressed. ASD RELAY AUTO SHUTDOWN Range: __________________________________________________________ ON/OFF Indicates whether the PCM has ordered the auto shutdown relay to turn on. The auto shutdown relay provides power to the fuel pump, the ignition coil, and the fuel injectors. • ASD RELAY should read ON whenever the actual state of the ASD relay is commanded on. • AUTO SHUTDOWN should read ON whenever the engine is running. ASD RLY SENSE Range: __________________________________________________________ ON/OFF ASD Relay Sense Range: _________________________________________________________ Low/High The state of the ASD Sense Switch. B1 VOLTAGE Range: ___________________________________________________ ACTIVE/INACTV B1 circuit voltage is active, or high, with the ignition switch in the run position. It is inactive, or low, with the ignition switch in start when the engine is cranking. BALLAST BYPASS Range: __________________________________________________________ ON/OFF The ballast bypass relay for the ignition starting circuit on some 1991 and later vehicles and should read as follows: • ON during cranking • OFF for normal engine operation BARO PRESS(”Hg) Barometric Pressure(“Hg) Range: ________________________________________________________ 0 to 60 “Hg BARO PRESS(kPa) Barometric Pressure(kPa) Range: ______________________________________________________ 10 to 200 kPa Chrysler systems do not have a barometric pressure (BARO) sensor, however, the PCM provides these internally-calculated BARO values. The PCM first samples the MAP sensor signal with the key on and the engine off, just before cranking. At this point, manifold pressure should be equal to, or be very close to, atmospheric pressure. Since 1985, Chrysler turbo systems have a “baro read” solenoid that switches the MAP sensor inlet between atmospheric pressure and the intake manifold. The PCM updates BARO readings when the engine is running by switching the baro-read sensor to atmosphere on deceleration for some vehicles. Early 1985 systems updated the BARO readings by switching the MAP sensor to atmospheric pressure at idle. The PCM uses the BARO pressure value along with the MAP value to calculate manifold vacuum and absolute pressure. Actual readings are typically from about 29.6 InHg (100 kPa) at sea level to 17.8 InHg (60 kPa) at 14,000 feet. 196 Chrysler and Jeep Data Parameters Engine Parameters BARO READ SOL Range: __________________________________________________________ ON/OFF Shows if the PCM has energized the BARO read solenoid. The solenoid momentarily switches the MAP sensor inlet from manifold pressure to atmospheric pressure to update the barometric pressure reading for the PCM. BARO READ SOL reads as follows: • ON only when the PCM is sampling barometric pressure • OFF at all other times BASE SPARK(°) Range: _______________________________________________________ -64° to 63.5° The base spark advance. BATT TEMP(°F) Battery Temp(°F) Range: ________________________________________________________-40° to 389° BATT TEMP(°C) Battery Temp(°C) Range: ________________________________________________________-40° to 199° An approximation of the temperature of the vehicle battery. The PCM uses this parameter to regulate the computer-controlled charging system. A cold battery is charged at a higher rate than a warm battery. BATT TEMP(V) Battery Temp(V) Range: _________________________________________________________ 0 to 5.1 V A direct voltage reading from the battery temperature sensor. The battery temperature sensor is a variable resistor in parallel with a 5 V reference signal to the PCM. Sensor voltage and temperature are inversely related. Low temperature produces high voltage; high temperature, low voltage. BATTERY(V) Range: _______________________________________________________ 0.0 to 16.0 V The battery voltage sent from the fuel pump control module (FPCM) to the injector pumps in diesel engines. BATTERY VOLTS Range: ________________________________________________________ 0 to 15.7 V Chrysler charging systems are controlled by the PCM, and the voltage regulator is part of the control system. Therefore, the PCM receives a direct input signal to indicate battery, or system, voltage at all times. Although the measurement range is 0 to 15.7 V, the reading should be close to normal charging system regulated voltage with the engine running, which is typically 13.0 to 15.0 V at idle. Check the reading against actual voltage measured at the battery or alternator. Check vehicle specifications for exact values. BOOST(psi) Range: ________________________________________________________0 to 512 psi The intake manifold boost pressure from the MAP sensor on some diesel engines. 197 Chrysler and Jeep Data Parameters Engine Parameters BOOST GOAL(psi) Range: _________________________________________________________1 to 30 psi BOOST GOAL(kPa) Range: ______________________________________________________ 10 to 200 kPa The level above barometric pressure at which the PCM is attempting to maintain manifold pressure on some turbocharged engines. It indicates the amount of desired turbocharger boost above atmospheric pressure. Typical readings vary by model and should be much less than the maximum range. BOOST(V) Range: _________________________________________________________ 0 to 5.0 V Intake manifold boost pressure voltage from the MAP sensor. The greater the voltage, the higher the boost pressure on some diesel engines. BRAKE Range: __________________________________________________________ ON/OFF State of the brake switch, which is an input signal to the PCM. The brake switch contacts used to signal the PCM for speed control and torque converter clutch operation are normally closed. When the brake pedal is pressed, the PCM receives a high-voltage, open-circuit signal and disengages the speed control. This parameter should read ON when the brake pedal is pressed and OFF at all other times. BRAKE SW 1 BRAKE SW 2 Range: __________________________________________________________ ON/OFF State of two separate switches that are located in one housing near the brake pedal. These redundant switches actuate in parallel when the brake pedal is pressed. CAL(V) Range: ________________________________________________________ 0 to 5.10 V Appears only on early-model turbocharged vehicles sold in Mexico. These control systems do not have oxygen sensors. Instead, the PCM calculates fuel metering based on input signals from other engine sensors and a calibration potentiometer. The display shows the input value from the calibration potentiometer. Low voltage indicates a lean condition that requires increased fuel metering. High voltage indicates a rich condition that requires less fuel. CALC LOAD VALUE Range: _________________________________________________________ 0 to 100% Relative engine load. The value is PCM-calculated based on engine speed, number of cylinders, and manifold air flow. High numbers indicate heavy loads; low numbers indicate light loads. CAM SYNC START Range: __________________________________________________________ YES/NO Reads YES when the camshaft is locked and NO at all other times. CAM SYNC STATE Range: __________________________________________________________ YES/NO Indicates whether the PCM sees cam and crank signals during startup and normal operation. CAM TIMING POS(°) Range: _________________________________________________________ 0° to 127° Variations from the learned camshaft timing position in degrees. 198 Chrysler and Jeep Data Parameters Engine Parameters CAM/CRANK DIFF° Range: ___________________________________________________________ 0 to 17° Amount of change in phase between cam and crank signals from initial set. This is an indicator of timing belt stretch. A code will set at approximately 17 degrees or less than 1 tooth of the belt. CAT MODEL CAT Modeled Temp Range: ______________________________________________________ not available Indicates PCM-estimated temperature of the catalyst. CHARGE TEMP(°) Intake Air Temp(°) IAT(°) INLET AIR TEMP(°) Range: ________________________________________________________-40° to 199° Indicates the temperature of the air-fuel charge inside the intake manifold on models with port-fuel injected engines. The PCM converts voltage signals from a thermistor sensor in the manifold to charge temperature or inlet air temperature (IAT) readings. Charge temperature and IAT sensors are the same type of thermistor as the engine coolant temperature (ECT) sensor. If the ECT sensor fails, the engine control module substitutes the charge temperature or IAT readings for coolant temperature. This occurs in the “limp-in” mode. CHARGE TEMP(V) IAT(V) INLET AIR TEMP(V) Intake Air Temp(V) Range: _________________________________________________________ 0 to 5.1 V A direct voltage reading from the air-fuel charge temperature sensor. Sensor voltage and temperature are inversely proportional. Low temperature produces a high voltage reading and high temperature produces a low voltage reading. CHK GAUGES LMP Range: __________________________________________________________ ON/OFF The check gauges lamp status on the instrument panel. This parameter should read ON if the lamp is on and OFF if the lamp is off. CKP COUNT CMP COUNT Range: ___________________________________________________________0 to 255 Count of the crankshaft position (CKP) sensor and camshaft position (CMP) sensor pulses. CKP ENG RPM Range: __________________________________________________________0 to 8192 Engine RPM as reported by the crankshaft sensor to the ECM on some diesel trucks. CLSD LOOP TMR Closed Loop Timer Range: _____________________________________________________ 0 to 13:41 min At engine startup, displays the total time necessary until the engine enters closed-loop operation. The timer then counts down to zero. The PCM calculates this time at each engine start based on inputs from coolant and air intake temperature sensors. 199 Chrysler and Jeep Data Parameters Engine Parameters CMP ENG RPM Range: __________________________________________________________0 to 8192 Engine RPM as reported by the camshaft sensor to the ECM on some diesel trucks. CNG PRESSURE(V) Range: _________________________________________________________ 0 to 5.0 V CNG PRESSURE(psi) Range: ________________________________________________________0 to 150 psi CNG PRESSURE(kPa) Range: ______________________________________________________ 0 to 1035 kPa Compressed natural gas vehicles use a pressure regulator to regulate the fuel pressure from approximately 3000 psi to the 90–140 psi needed for engine operation. A low pressure sensor is located on the fuel injector rail inlet block. The pressure parameter is a value internally calculated by the PCM based on the input signal from the sensor. The low pressure sensor uses three circuits: • 5 V reference • Ground • Signal The sensor input signal to the PCM. The PCM uses this signal for fuel injector timing calculations. Normal range for the signal is 0.5 V at 0 psi to 4.5 V at 150 psi. Zero (0) V indicates a short and 5.0 V indicates an open circuit. CNG TEMP(V) Range: _________________________________________________________ 0 to 5.0 V CNG TEMP(°F) Range: ________________________________________________________-40° to 248° CNG TEMP(°C) Range: ________________________________________________________-40° to 120° Used only on compressed natural gas vehicles. The voltage parameter is the fuel temperature sensor input signal to the PCM. The fuel temperature sensor is located on the fuel injector rail. The PCM uses this signal along with other data parameters to calculate fuel injector timing. Sensor voltage and temperature are inversely related. • Low temperature produces a high voltage signal. • High temperature produces low voltage. The degree (°) parameter is a PCM-calculated value based on the voltage input signal from the fuel temperature sensor. COIL BRN 1(µS) Coil 1 Burn Time(µS) Coil 2 Burn Time(µS) Range: __________________________________________________________0 to 4080 Displays ignition coil burn time. COIL DWL(mS) Range: ______________________________________________________ not available The ignition coil is supplied 12 V from the ASD relay. The PCM controls the primary circuit that fires the coil. Dwell time is based on crankshaft speed and camshaft position. 200 Chrysler and Jeep Data Parameters Engine Parameters COOLANT(°F) Engine Coolant Temp(°F) Range: ________________________________________________________-40° to 389° COOLANT(°C) Engine Coolant Temp(°C) Range: ________________________________________________________-40° to 199° The engine coolant temperature parameter is supplied to the PCM by the engine coolant temperature (ECT) sensor. The ECT sensor is a thermistor installed in the engine coolant passages. The PCM converts ECT sensor voltage signals to temperature readings. Reads as follows: • 185° to 220°F (85° to 105°C) on a vehicle with a fully warmed engine running at idle. • -40°F or -40°C may indicate an open in the sensor or the circuit. • Above 366°F (185°C) may indicate a short in the sensor or the sensor circuit. COOLANT TEMP(V) COOLANT(V) Range: _________________________________________________________ 0 to 5.1 V The engine coolant temperature (ECT) sensor voltage signal is available on most vehicles. Temperature and ECT sensor voltage are inversely related: • Low temperature produces a high voltage signal. • High temperature produces a low voltage signal. CRANK INJ(mS) Range: ________________________________________________________0 to 524280 Indicates the fuel injector pulse width at start-up. CRANK SENSOR Range: __________________________________________________________ YES/NO Cruise Cancel Switch State Cruise Set/Coast Switch State Cruise On/Off Switch State Cruise Resume/Accel Switch State Cruise Set Switch State Range: _______________________________________________ Not Pressed, Pressed Indicate the following: • • • • • Cruise Cancel Switch State = whether the cruise cancel switch is pressed. Cruise Set/Coast Switch State = whether the cruise coast switch is pressed. Cruise On/Off Switch State = whether the cruise on/off switch is pressed. Cruise Resume/Accel Switch State = whether the cruise resume/accel switch is pressed. Cruise Set Switch State = whether the cruise set switch is pressed. CAM SENSOR Range: ______________________________________________________ not available These direct ignition systems (DIS) parameters show the status of the crankshaft position (CKP) and camshaft position (CMP) sensors. The CMP signal is used for injection timing and cylinder identification and the CKP sensor signal is used to control fuel injection quantity and to determine engine speed and spark advance. Both parameters must read YES with the engine cranking or running. 201 Chrysler and Jeep Data Parameters Engine Parameters CRNK SYNC START Range: __________________________________________________________ YES/NO This parameter reads YES when the crank is locked and NO at all other times. CTS Range: ______________________________________________________ COLD/WARM The coolant temperature switch (CTS) used on most 1984–90 carbureted engines reads as follows: • COLD when the engine temperature is below 135°F (57°C) and the switch is open • WARM if temperature is 135°F (57°C) or above and the switch is closed CURRENT SYNC Range: _________________________________________________________ OK/LOST Whether the camshaft position (CMP) and crankshaft position (CKP) sensor signals are synchronous. CURRENT SYNC reads as follows: • OK when the signals are synchronous • LOST when the signals are not synchronous DBL STRT OVRIDE Range: __________________________________________________________ ON/OFF Reads as follows: • ON whenever the engine is running • OFF at all other times DES CHARGE(V) Range: ________________________________________________________ 0 to 15.7 V Desired charging voltage that the PCM is trying to maintain on 1990 and later vehicles with PCM-controlled charging systems. Compare this parameter reading to the BATTERY VOLTS parameter and actual voltage to help troubleshoot electrical problems. DES CHARGE SOL Range: __________________________________________________________ ON/OFF The purge valve solenoid. This device allows high pressure between the turbo and the throttle body to be vented to reduce surge and noise on deceleration. DES IDLE RPM Range: ____________________________________________________ see description Desired idle speed the PCM is attempting to maintain. Desired idle is computed by the PCM. Normally, actual and desired idle RPM readings should be equal or close to each other. DES PURGE(mA) Range: _______________________________________________________ 0 to 670 mA Desired current that the PCM is trying to maintain to the proportional purge solenoid. The PCM calculates this desired amount based on what is needed to achieve the correct amount of vapor flow from the evaporative canister. DES TPS(V) Range: _____________________________________________________________0 to 5 Final set-point for the electronic throttle control. 202 Chrysler and Jeep Data Parameters Engine Parameters DISABLED ENABLED ENGAGED Range: ____________________________________________________ see description Current status of the speed control system. The parameter name changes as the speed control system status changes. When speed control is disabled, this parameter indicates the current reason the system was disabled. These parameters read the same as the LAST CUTOUT parameter (see “LAST CUTOUT” on page 212). When the speed control system is turned on, this parameter becomes enabled. E-CELL EXPIRED Range: __________________________________________________________ YES/NO Internal state of the PCM. The E-cell is used to modify the fuel metering and spark timing calculations for a new, or “green,” engine. The E-cell is an electrolytic cell that contains a silver cathode and a gold anode. As current passes through it, the silver gradually depletes to the anode. After a specified time, the anode is completely depleted; and the E-cell becomes an open circuit. The PCM then adjusts its fuel and spark calculations for a broken-in engine. E-CELL EXPIRED should read as follows: • YES after a few thousand miles, though exact mileage varies by vehicle and engine • NO on a new vehicle ECM BATTERY(V) Range: _______________________________________________________ 0 to 16.00 V Battery voltage received by the ECM on some diesel engines. ECM ENG RPM Range: ____________________________________________________ 0 to engine max Engine RPM as reported by the ECM on some diesel trucks. EGR DUTY CYC(%) EGR DC(%) EGR Duty Cycle(%) Range: _________________________________________________________ 0 to 100% Pulse width modulated output signal from the PCM to the EGR valve solenoid, and EGR DC(%) indicates the duty cycle command for the LSEGR PWM port. read as follows: • 0% indicates a closed valve • 100% indicates a fully open valve EGR FLOW(g/s) EGR Flow(g/s) Range: ____________________________________________________________0 to 30 Mass flow rate from the EGR system to the intake manifold. EGR SENSOR(V) EGR SENSE(V) EGR Sensed(V) Range: _________________________________________________________ 0 to 5.0 V Input signal from the EGR valve position (EVP) sensor to the PCM and reads as follows: • 0 V indicates the valve is closed • 5.0 V indicates the valve is open 203 Chrysler and Jeep Data Parameters Engine Parameters EGR SOLENOID EGR Range: __________________________________________________________ ON/OFF PCM command to an EGR valve vacuum control solenoid. This is not a feedback signal from the solenoid. Reads as follows: • ON when the solenoid is energized to turn off EGR • OFF when the solenoid is off to allow EGR EMR LAMP SRI(EMR) LAMP Range: __________________________________________________________ ON/OFF PCM output signal to the instrument panel Emission Maintenance Reminder or Service Reminder Indicator (EMR or SRI) lamp. Read ON when the panel lamp is lit to indicate the need for scheduled emission service. Engine Coolant Temp(V) Range: _________________________________________________________ 0 to 5.0 V The voltage signal of the engine temperature (ECT) sensor is available on most vehicles. Temperature and ECT sensor voltage are inversely related: • Low temperature produces a high voltage signal. • High temperature produces a low voltage signal Engine Coolant Temp(°F) Range: ________________________________________________________-40° to 389° Engine Coolant Temp(°C) Range: ________________________________________________________-40° to 199° The engine coolant temperature parameter is supplied to the PCM by the engine coolant temperature (ECT) sensor. The ECT sensor is a thermistor installed in the engine coolant passages. The PCM converts ECT sensor voltage signals to temperature readings. Normal readings are 185° to 220°F (85° to 105°C) with a fully warmed engine running at idle. Engine RPM Range: ______________________________________________________ 0 to 8192 rpm Engine RPM as reported from the injection pumps to the fuel pump control module (FPCM) for diesel engines. ETC DIRECT(%) Range: ____________________________________________________ -100 to 99.9969 Desired electronic throttle control pulse width modulation. 204 Chrysler and Jeep Data Parameters Engine Parameters EXHAUST EXHAUST #1 EXHAUST #2 F EXHAUST F BNK UP EXH L EXHAUST R EXHAUST F BNK UP EXH R BNK UP EXH L BNK DN EXH L BNK UP EXH R BNK DN EXH UPSTRM EXH DWNSTRM EXH Range: ________________________________________________RICH/LEAN/CENTER General rich or lean exhaust gas condition as measured by the oxygen sensor (O2S). The exhaust oxygen content is related to the oxygen content of the intake air-fuel mixture, and thus indicates intake air-fuel ratio. The O2S must be hot (above 500°F/260°C), and the PCM must be in closed loop before the PCM responds to the sensor input. Some V-type engines have separate O2Ss for the left and right cylinder banks, or for front and rear banks on transverse engines. In addition, OBD-II vehicles have an additional downstream sensor mounted below each catalyst. FAN DUTY CYC(%) Range: _________________________________________________________ 0 to 100% Pulse width modulated fan circuit signal used to vary the fan speed and reads as follows: • 0% indicates that the fan is off • 100% indicates that the fan is running at high speed F BANK INJ(mS) L BANK INJ(mS) R BANK INJ(mS) Range: _______________________________________________________ 0 to 99.9 mS Average fuel injection pulse width, or PCM commanded on-time, for a bank of cylinders in milliseconds. • The “F” parameter is the front bank of cylinders on a transverse engine. • The “L” parameter is the left bank on a longitudinal engine. • The “R” parameter is the rear bank on a transverse engine and the right bank on a longitudinal engine. FLEX FUEL(V) Range: _________________________________________________________ 0 to 5.0 V METHANOL(%) Range: _________________________________________________________ 0 to 100% PCM input signal from a thermistor-type sensor that measures methanol in the fuel for flexible fuel vehicles. The percentage parameter is calculated by the PCM based on the voltage signal from the sensor. 205 Chrysler and Jeep Data Parameters Engine Parameters FUEL(%) #1 FUEL(%) #2 FUEL(%) Range: ____________________________________________________ see description Adaptive adjustment made by the PCM to the fuel injector pulse width at idle as a percentage. Readings range from -25 to +25% on all models except trucks with EFI. For EFI trucks, readings range from -50 to +50%. A negative percentage means the PCM is decreasing pulse width, and a positive percentage means the PCM is increasing injector pulse width. On some engines, the oxygen sensors for the left and right cylinder banks have separate adaptive injector strategies. FUEL ALLOWED Range: __________________________________________________________ YES/NO The vehicle theft alarm (VTA) system monitors vehicle entry and the ignition. During unauthorized entry, the VTA sends a message to the engine control module to disable the engine. The PCM responds by disabling electronic fuel injection after the engine starts. The parameter shows the present communication link with the alarm module. FUEL LEVEL(V) Range: _________________________________________________________ 0 to 8.7 V FUEL LEVEL(%) Range: _________________________________________________________ 0 to 100% FUEL LEVEL Range: __________________________________________________________ 0 to 1.00 FUEL LVL(GAL) Range: __________________________________________________________ 0 to 31.9 These fuel level input signals are provided to the PCM by the body computer. FUEL LEVEL(V) and FUEL LEVEL(%) represent the fuel level in the tank as voltage and as percentage, respectively. The actual voltage range varies, depending on fuel tank capacity. FUEL LEVEL displays a decimal measurement of the fuel level: • 0.00 = empty tank • 0.50 = ½ tank • 1.00 = full tank The PCM calculates this value, and then rounds it up. FUEL LVL(GAL) is the PCM-calculated amount of fuel in gallons remaining in the tank. FUEL PUMP RLY Range: __________________________________________________________ ON/OFF PCM command status for the fuel pump relay and reads ON if the PCM energized the fuel pump relay solenoid to close the fuel pump relay contacts. FUEL SHUTOFF Range: __________________________________________________________ ON/OFF ECM command status to the fuel pump relay, which controls power to the fuel pump control module (FPCM) on some diesel engines. This parameter only reads ON when the fuel pump relay contacts are open to prevent current to the FPCM. 206 Chrysler and Jeep Data Parameters Engine Parameters FUEL SYS L FUEL SYS R FUEL SYS Range: ____________________________________________________ see description Shows whether the vehicle is operating in closed or open loop, and if any diagnostic trouble codes (DTCs) are in memory. Theses parameters read as follows: • • • • • CLSD LOOP during closed-loop operation without DTCs CL FLT during closed-loop operation with DTCs OPEN LOOP during open-loop operation without DTCs OL FLT during open-loop operation with DTCs OL/DRIVE (no information available at time of publication) FUEL SYNC Range: _______________________________________________________ OPEN/CLSD Used only on turbocharged engines. It is a synchronizing pulse from the ignition system that the PCM uses as one of the input signals to control fuel injector timing. The value should switch steadily between OPEN and CLSD on a running engine. FUEL TEMP(°C) Range: _____________________________________________________ -18 to 2,254°C FUEL TEMP(°F) Range: _______________________________________________________ 0 to 4,089°F Fuel temperature inside the fuel injector pump. G SW #1 G SW #2 Range: ____________________________________________________ OPEN/CLOSED On Teves systems the deceleration switch assembly provides the ABS control module with three different deceleration rates, two for forward braking, and one for rearward braking. The switch assembly is under the rear seat. The assembly contains three normally-open mercury switches that monitor vehicle deceleration. G-SWITCH Range: _______________________________________________________ OPEN/CLSD This Bendix 9 parameter indicates the status of the deceleration switch. The deceleration switch is a mercury switch mounted in the ECM at a specific angle. When deceleration occurs, the switch closes and this parameter reads CLSD. It reads OPEN at all other times. GENERATOR DC(%) Generator Duty Cycle(DC%) Range: ____________________________________________________ see description NGC controllers duty cycle voltage to the generator field coil based on sensed battery voltage. Ground is hardwired to the chassis. A normal reading is approximately 15% at idle. GENERATOR FIELD Range: __________________________________________________________ ON/OFF The PCM regulates charging voltage within a range of 12.9 to 15.0 V. The reading is ON when the PCM is commanding the generator field to energize. 207 Chrysler and Jeep Data Parameters Engine Parameters GENERATOR LAMP ALTERNATOR LAMP Range: __________________________________________________________ ON/OFF PCM output signal to the instrument panel charging system warning lamp. These parameters read as follows: • ON when the panel lamp is on • OFF during normal operation GLOW PLUG RELAY Range: __________________________________________________________ ON/OFF Displays glow plug relay status. Reads ON when the relay is energized and the contacts are closed for diesel engines. H2O IN FUEL(V) Range: _________________________________________________________ 0 to 5.0 V H2O IN FUEL Range: __________________________________________________________ ON/OFF Signal input to the diesel engine control module of a thermistor-type sensor that measures water in the fuel. The engine control module monitors this signal when the ignition key is put in the on position, and at the end of the intake heater post-heat cycle. If the signal indicates that the water present is above acceptable limits, the control module turns the water-in-fuel indicator lamp on. H2O IN FUEL LMP Range: __________________________________________________________ ON/OFF PCM command status to the water-in-fuel indicator lamp located on the instrument panel in diesel engines. The reading is ON when the indicator lamp is lit and there is water in the fuel. HI SPD GND RLY Range: __________________________________________________________ ON/OFF PCM ground circuit for the high speed radiator fan relay. The reading is ON when the PCM has closed this ground circuit to allow fan operation. HIGH ALT Range: __________________________________________________________ YES/NO Altitude jumper wire status on most 1984–90 carbureted engines. Typically, the altitude jumper wire is taped to the computerized emission control (CEC) wire harness, either in the engine compartment or under the dash. HIGH ALT reads as follows: • YES for vehicles operated above 4,000 feet (6,400 meters) when the altitude jumper wire is grounded • NO for vehicles operated below 4,000 feet when this wire should be open HIPRES FUEL CUT Range: __________________________________________________________ ON/OFF Used on compressed natural gas vehicles to indicate the status of the high pressure fuel shut-off solenoid relay. This relay controls the operation of the high-pressure fuel shut-off solenoid in the fuel pressure regulator. The reading is ON when the PCM-controlled ground is open to disable fuel injection. 208 Chrysler and Jeep Data Parameters Engine Parameters IAC AIRFLW(g/s) Range: ____________________________________________________ see description Idle air control (IAC) air flow measured in grams per second. • A 4-cylinder engine should read approximately 30–40 g/s at idle. • A 6-cylinder engine should read approximately 350 g/s at idle with no load. IAC CURRENT(mA) Range: ____________________________________________________ see description Idle air control motor amperage. The PCM pulse width modulates power and ground to open or close air passage for idle control. More amperage increases air flow and RPM. • A 4-cylinder engine should read approximately 400 mA at warm idle. • A 6-cylinder engine should read approximately 350–600 mA at idle. IAC PWM(%) IAC Pulse Width(%) Range: _________________________________________________________ 20 to 50% Idle air control motor pulse width modulation percentage. IDLE ADAP(µS) Range: __________________________________________________ -1024 to +1016 µS Adaptive adjustment made by the PCM to fuel injector pulse width in microseconds. • A negative value means the PCM is decreasing the pulse width from its programmed value. • A positive value means the PCM is increasing the pulse width from its programmed value. A microsecond is 1/1000-millisecond or 0.000 001 second. IDLE SELECT Range: __________________________________________________________ ON/OFF ECM output command to the fuel pump control module status on some diesels. IDLE SOLENOID Range: __________________________________________________________ ON/OFF Idle relay status on most 1984–90 carbureted engines. The idle relay energizes the idle solenoid, which allows vacuum to operate the vacuum actuator. The actuator opens the throttle to increase engine RPM. This occurs during deceleration, when the A/C is turned on for models with a 4.2L 6-cylinder engine, or when the steering wheel is turned to full stop on 1984–85 models with a 2.5L 4-cylinder engine. IDLE SWITCH #1 IDLE SWITCH #2 Range: __________________________________________________________ ON/OFF Status of the two idle switches. The switches are built into the accelerator pedal position sensor (APPS) on some models. At idle speed, switch #1 should read ON and switch #2 should read OFF. 209 Chrysler and Jeep Data Parameters Engine Parameters IG DWL CYL1(mS) IG DWL CYL2(mS) Range: ______________________________________________________ 0.5 to 2.0 mS Ignition Dwell Cylinder 1(µS) Ignition Dwell Cylinder 2(µS) Range: _______________________________________________________ 0 to 4000 µS Ignition dwell for cylinder banks 1 and 2. The PCM can alter the duty cycle to each bank of the engine based on emission requirements. For 3.5L models, NGC controllers use six coil-on-plug units but adjusts the dwell bank to bank. IGN(V) Range: ________________________________________________________ 0 to 12.0 V Key-on voltage at the ignition switch. IGN CYCLES Range: ____________________________________________________________0 to 50 Number of engine starts since the last fault code set, or codes were cleared. IGN CYCLES 1 IGN CYCLES 2 IGN CYCLES 3 Range: ___________________________________________________________0 to 127 Number of times the engine has been started since the last three faults were set or codes were cleared. • IGN CYCLES 1 pertains to the most recent fault. • IGN CYCLES 2 pertains to the second-most recent. • IGN CYCLES 3 pertains to the third-most recent. IGN START SW Range: __________________________________________________________ ON/OFF Ignition start switch state. IGNITION SENSE Ignition Run Switch Sense Range: ___________________________________________________________ HI/LOW Ignition switch to the PCM and reads as follows: • HI when the switch is in the crank position • LOW when the switch is in the run position IGNITION SW IGN RUN SW Range: __________________________________________________________ ON/OFF Read as follows: • ON when the ignition switch is in the on position • OFF at all other times INJ(mS) INJ1(mS) INJ2(mS) Range: _______________________________________________________ 0 to 99.9 mS Displays fuel injection pulse width in milliseconds. Pulse width is the PCM commanded on-time for the fuel injectors. 210 Chrysler and Jeep Data Parameters Engine Parameters A high pulse width indicates more on-time and a richer mixture. A low pulse width indicates less on-time and a leaner mixture. There are no definite specifications for injector pulse width, but the reading should change as engine speed and load changes: • About 1 to 4 mS at idle • Up to 12 mS or more at wide open throttle Expect readings to be a little higher for some engines. The throttle-body injection systems on 1988 and later V6 and V8 truck engines have two fuel injectors, and the PCM sends separate commands to each injector. These display as INJ1(mS) and INJ2(mS). INJ CYL 1(mS) INJ CYL 2(mS) Range: ______________________________________________________ not available Injector pulse width in milliseconds for cylinder banks 1 and 2. The PCM grounds the control side for the injector for the desired amount of time based on engine operating parameters. Pulse width is adjusted for each bank of cylinders based on feedback from that bank’s oxygen sensors. INJ TEMP(°F) Range: ________________________________________________________-40° to 389° INJ TEMP(°C) Range: ________________________________________________________-40° to 199° INJ TEMP(V) Range: _________________________________________________________ 0 to 5.1 V Direct voltage from the fuel temperature sensor in the throttle body on V6 and V8 truck engines with TBI. Sensor voltage and temperature are inversely proportional. Low temperature equals high voltage, and high temperature low voltage. INTAKE HEATR #1 INTAKE HEATR #2 Range: __________________________________________________________ ON/OFF This Diesel engine parameter displays intake air heater status. INTAKE HTR(°C) Range: ______________________________________________________ -45 to 243 °C INTAKE HTR(°F) Range: _______________________________________________________-49 to 469 °F displays intake heater temperature on diesel engines. This is an ECM-calculated value based on the ambient temperature at startup, coolant temperature, and engine run time. KNOCK Range: ____________________________________________________ 0 to 255 counts Intensity of the vibrations that the knock sensor (KS) is detecting. The KS is a piezoelectric sensor is on the left side of the engine block, adjacent to cylinder number five on 1987–90 4.0L MPI engines. When the PCM detects knock it retards ignition timing. KNOCK SENSOR(V) #1 KNOCK(V) #2 KNOCK (V) Knock Sensor 1 Volts(V) Knock Sensor 2 Volts(V) Range: _________________________________________________________ 0 to 5.0 V Actual voltage sent to the PCM by the knock sensor or sensors. When voltage readings are high, the knock retard parameters should show some timing retard. 211 Chrysler and Jeep Data Parameters Engine Parameters Some 1992 and later engines have separate knock sensors for the left and right banks; these display as #1 KNOCK and #2 KNOCK or Knock Sensor 1 and Knock Sensor 2. LAST CUTOUT Range: ____________________________________________________ see description Most recent reason for speed control disengagement and reads as follows: • • • • • • • • ON/OFF = the ON/OFF speed control switch was turned off SPEED = the speed sensor detected a vehicle speed that was below 35 MPH (56 KPH) RPM = engine RPM was excessive BRAKE = the brake was pressed P/N = the park/neutral switch was engaged RPM/SPD = the RPM speed ratio was not constant CLUTCH = the clutch was disengaged (manual transmission) SOL FLT = a fault occurred in either the servo vent or the vacuum solenoid circuit LF SOL RF SOL REAR SOL Range: ________________________________________ OFF/ISO/BDL/DCY/BLD&DCY These Bendix 9 parameters indicate the status of the pressure modulator solenoid valves. The pressure modulator provides three-channel pressure control to the front and rear brakes. Two channels, LF and RF, control the front brakes, and one channel controls the rear brakes. Three solenoid valves control each channel—isolation, decay, and build—for a total of nine solenoid valves. The three solenoids in each channel have separate functions and are individually controlled by the ECM. These parameters read as follows: • ISO means that an isolation valve is actuated. The isolation solenoid valves in each channel isolate the master-cylinder line pressure from a wheel cylinder or caliper during antilock operation. • DEC means that a decay valve is actuated. The decay solenoid valves provide a controlled decrease, or drop, in pressure to the wheel brakes during antilock operation. • BLD means that a build valve is actuated. The build solenoid valves provide a controlled pressure increase to the wheel brakes during antilock operation. • BLD&DCY means that the build and decay solenoids are both energized. • OFF means that none of the valves for a particular channel are energized. LIMP-IN Range: ____________________________________________________ see description Indicates if and why the PCM has placed the engine in limp-in mode and reads as follows: • • • • • • NONE = Not in limp-in mode IAT FLT = IAT circuit fault TPS FLT = TP sensor circuit fault MAP ELC FLT = MAP sensor circuit fault MAP VAC FLT = MAP vacuum sense fault ECT FLT = ECT sensor circuit fault 212 Chrysler and Jeep Data Parameters Engine Parameters LK DET PMP LK DET PMP SOL LK DET PMP SW Range: __________________________________________________________ ON/OFF Leak detection pump circuit components status. The leak detection pump is used to detect a leak in the evaporative system. A solenoid opens and closes the pump switch as commanded by the PCM to cycle the pump on and off. LOCKUP SOL TCC SOL Range: __________________________________________________________ ON/OFF Shows whether the PCM enabled the torque converter clutch (TCC) to engage. Enabling criteria are gear selection, speed, engine temperature, and throttle position. When these parameters read ON, the PCM has completed one side of the circuit that energizes the solenoid. The circuit must also be completed by various transmission, speed, and brake switches to open the transmission hydraulic line and engage the TCC. This parameter indicates that the PCM command has been given. It is not a feedback signal to indicate that the clutch has actually engaged. LOOP STATUS Range: ______________________________________________OPEN/CLOSED/DECEL Indicates whether the PCM is using open or closed loop operation to control the air-fuel ratio. During open loop operation, the PCM uses MAP, coolant temperature, engine speed, throttle position, and intake air temperature values to control air-fuel ratio. During closed-loop operation, the PCM uses feedback signals from the O2Ss to control the air-fuel ratio. LOOP STATUS reads as follows: • OPEN during warm-up • CLSD when the engine reaches normal operating temperature • DECEL when the PCM senses a closed-throttle condition and an engine speed above 1200 RPM, which signals the PCM to begin a fuel-cutoff strategy. LT ADAP(%) L ST ADAP(%) L LT ADAP(%) R LT ADAP(%) F LT ADAP(%) ST ADAP(%) R ST ADAP(%) F ST ADAP(%) 1/1 LT ADAP(%) 1/1 ST ADAP(%) Range: ____________________________________________________0.6699 to 1.3301 The ST (short-term) and LT (long-term) parameters show the PCM adaptive adjustment to fuel injector pulse width as a percentage. A negative value means the PCM is decreasing the pulse width, a positive value means the PCM is increasing the pulse width from its programmed value. Any operating condition that requires an immediate fuel correction for a temporary situation is controlled short-term adaptive parameters. Short-term adaptive is only active when the engine is running in closed-loop. Adjustments to correct for variations in engine build and wear are controlled by the long-term adaptive parameters. 213 Chrysler and Jeep Data Parameters Engine Parameters The Long-term adaptive values are stored in nonvolatile PCM memory. As long-term adaptive values change, they establish a new baseline reference for the short-term adaptive values. Note the following regarding these parameters: • F, L, and R stand for Front, Left, and Rear or Right fuel banks, respectively. • 1/1 LT ADAP(%) indicates the PCM correction to bank 1 to account for fueling errors. • 1/1 ST ADAP(%) indicates the bank 1 O2S control factor. LT FUEL TRIM Range: ___________________________________________________________0 to 255 This long-term (LT) fuel trim number represents the operation and long-term correction of the fuel metering of a fuel-injected engine. LT FUEL TRIM indicates whether the PCM is commanding a rich or a lean air-fuel mixture. Jeep manuals refer to this parameter as adaptive gain. The LT fuel trim values range from 0 to 255 with a midpoint of 128. LT fuel trim values higher than 128 indicates the PCM is commanding a long-term rich mixture correction. LT fuel trim values lower than 128 indicate the PCM is commanding a lean mixture (Figure 12-1). Figure 12-1 Rich/lean correction from base midpoint (0) The LT fuel trim value follows the ST fuel trim value. That is, it makes long-term corrections to fuel metering in response to short-term fuel changes. For example, ST and LT trims may both start at 128. The ST number may move up toward or above 130. At that point, the LT value may move up to 129. The ST then will return to 128 to indicate that it is controlling fuel metering at the midpoint of an overall richer operating condition. A similar action occurs when the PCM commands a leaner mixture and the values move downward. Compare LT fuel trim value to injector on-time. An LT value above 128 indicates increased on-time. A value below 128 indicates decreased on-time. The LT fuel trim correction operates only in closed loop. In open loop, the display goes to a fixed value, usually 128. MALFUNCTION LMP CHECK ENG LAMP Range: __________________________________________________________ ON/OFF PCM output signal to the instrument panel warning lamp and reads as follows: • ON when the panel lamp is on • OFF when the system is operating normally and the lamp is off 214 Chrysler and Jeep Data Parameters Engine Parameters MAN VAC(“Hg) Range: ________________________________________________________ 0 to 60 “Hg MAN VAC(kPa) Range: ______________________________________________________ 10 to 200 kPa The PCM calculates this manifold vacuum value based on the MAP sensor voltage signal. The calculation compares a barometric pressure reading taken from the MAP sensor before startup to the MAP voltage while the engine is running. The PCM converts the difference between these two voltage signals to a value equivalent to manifold vacuum. The reading should be about 0 inHg or 0 kPa with the engine off and the manifold close to atmospheric pressure. When the engine is running with high manifold vacuum, the vacuum reading increases. Although the display values range up to 60 inHg or 200 kPa, typical vacuum readings at idle are about 18 to 21 inHg or 60 to 70 kPa. Compare MAP and vacuum readings as follows: • MAP voltage and pressure are high when vacuum is low. • MAP voltage and pressure are low when vacuum is high. Table 12-1 Pressure/voltage conversion Voltage Unit Of Measure High Low VACUUM (kPa) 70 60 50 40 30 20 10 VACUUM (inHg) 21 18 15 12 9 6 3 MAP/BARO RATIO Range: _____________________________________________________________0 to 7 Boost level. Any value greater than 1 indicates boost from the turbo. The PCM logs the barometric pressure when the key is turned on (engine off) with the MAP sensor and compares it with Manifold Absolute Pressure to determine air density and O2 content for proper fuel ratio. MAP SNR(“Hg) MAP Vacuum(“Hg) Range: ________________________________________________________ 0 to 60 “Hg MAP SNR(kPa) MAP Vacuum(kPa) Range: ______________________________________________________ 10 to 200 kPa The PCM calculates manifold absolute pressure (MAP) from the MAP sensor voltage signal. A typical MAP SNR reading at sea level is 29.9 inHg or 102 kPa with the engine off and the manifold close to atmospheric pressure. When the engine is running, the MAP reading drops. On a normally aspirated engine running at full throttle and full load, manifold pressure is close to atmospheric pressure. The MAP reading should be lower than 29.9 inHg or 100 to 102 kPa. On turbocharged engines, the reading rises above 30 inHg or 100 kPa as boost is applied. See Table 12-1 on page 215 for reading interpretations. Compare the MAP voltage and MAP pressure readings. Pressure should be high when voltage is high, low when voltage is low. If the readings appear abnormal for the apparent engine load, the sensor signal to the PCM may be inaccurate or the PCM calculations may be incorrect. 215 Chrysler and Jeep Data Parameters Engine Parameters MAP SNSR(V) Map Volts(V) Range: _________________________________________________________ 0 to 5.1 V The manifold absolute pressure sensor is an analog voltage parameter that varies with manifold pressure. The MAP is intake manifold pressure relative to zero. The MAP and manifold vacuum are related inversely: • MAP voltage is low when absolute pressure is low (vacuum is high), such as during idle or deceleration. • MAP voltage is high when absolute pressure is high (vacuum is low), such as during heavy-load operation, or with the key on and the engine off. With the key on and engine off, the MAP sensor provides a barometric pressure reading. The PCM uses this barometric pressure reading, along with the engine running MAP sensor voltage, to calculate manifold vacuum and true absolute pressure. The PCM also uses MAP voltage and engine speed to calculate engine load. MC SOLENOID Range: __________________________________________________________ ON/OFF Mixture control (MC) solenoid status on 1984–85 models with a 2.5L carbureted engine. The PCM controls the air-fuel mixture by cycling the MC solenoid on and off in response to the O2S and throttle position sensor. • • • • When the air-fuel mixture is rich, the MC solenoid cycles on longer to add more air. When the air-fuel mixture is lean, the MC solenoid cycles off longer. During open loop operation, the MC solenoid cycle-time supplies a fixed volume of air. During closed loop operation, the MC solenoid cycle-time varies with the air-fuel mixture. MIN TPS (V) Minimum TPS(V) Range: _________________________________________________________ 0 to 5.1 V The PCM interprets the lowest voltage signal received from the throttle position sensor (TPS) as the closed-throttle position. When the throttle closes, TPS voltage must return to ±20 millivolts (±0.02 V on the display) of the previous signal to actuate the AIS motor and control timing. If not, the engine may idle poorly or stall. If the throttle is opened during starting, the PCM receives a higher than expected minimum TPS voltage. The PCM then uses internal values in its programs to recognize the lower signal as the throttle returns to idle after starting at the displayed value. MTV SOLENOID Range: __________________________________________________________ ON/OFF MTV Output State Range: _____________________________________________ Deenergized/Energized MTV Valve State Range: ____________________________________________________ OPEN/CLOSED The manifold tuning valve (MTV) optimizes intake manifold tuning by opening and closing a passage connecting the left and the right intake manifold plenums. The PCM-controlled MTV solenoid activates the valve. MTV SOLENOID reads as follows: • ON when the solenoid energizes to close the valve, which is at wide open throttle and engine speed below 3008 RPM • OFF when the solenoid de-energizes to open the MTV valve, which is when engine RPM reaches 3008 RPM 216 Chrysler and Jeep Data Parameters Engine Parameters MTV Valve State reads as follows: • Closed when the solenoid energizes the valve, which is at wide open throttle and engine speed below 3008 RPM. • Open when the solenoid de-energizes the MTV valve, which is when engine RPM reaches 3008 RPM The PCM energizes the solenoid again when engine speed exceeds 4288 RPM. NVLD SOLENOID Range: __________________________________________________________ ON/OFF Condition of the Natural Vacuum Leak Detection (NVLD) solenoid. This solenoid is normally closed and activates a valve inside the NVLD unit to vent the charcoal canister during normal operation and seals the vent during leak detection. NVLD SWITCH Range: ____________________________________________________ OPEN/CLOSED The NVLD switch is inside the NVLD assembly and attached to a diaphragm. As the tank cools on a hot shutdown, a natural vacuum is created if the system has no leaks. A vacuum of 1 “H2O pressure will close the switch. O2(V) O2(mV) #1 O2(V) #2 O2(V) DWNSTRM O2S(V) F DNSTM O2S(V) F UPSTM O2S(V) L O2S(V) L UPSTMO2S(V) L DNSTM O2S(V) PRECAT O2S(V) POSTCAT O2S(V) R O2S(V) R UPSTM O2S(V) R DNSTM O2S(V) UPSTRM O2S(V) 1/2 O2S(V) Range: ________________________________________________________ 0 to 5.20 V The exhaust O2S signal indicates whether the engine is running rich or lean. An O2S is capable of generating a signal ranging from 0 to a little over 1 V (0 to 1000 mV). The display is in decimal fractions of a volt, such as 0.75 V, which is 750 mV. A normal O2S signal ranges from about 0.10 to 1.00 V: • A high signal indicates rich exhaust. • A low signal indicates lean exhaust. Although the display ranges to just over 5.0 V, the sensor cannot generate more than about 1 V. You should not see O2S voltage go much above 1.0 or 1.1 V in fully rich conditions. i NOTE: The O2S must be hot (above 500°F/260°C) to generate a reliable signal, and the PCM must be in closed loop before it responds to the sensor signal. 217 Chrysler and Jeep Data Parameters Engine Parameters Some V-type engines have separate oxygen sensors for the left and right (longitudinal engine) or front and rear (transverse engine) cylinder banks. In addition, OBD-II vehicles have oxygen sensors mounted below, or downstream of, each catalytic converter. Most 1992 and later engines may output 4.5 to 5.2 V with the key on and engine off due to the O2S heater circuit. This is normal. O2 ADAP CELL ID Range: _____________________________________________________________ ±33% NGC controllers have 26 long-term cells based on MAP and RPM. Each cell can adapt the pulse width plus or minus 33%. The cell ID is the one that is currently being used. Positive numbers indicate more fuel is needed and negative numbers indicate that less fuel is needed. Values will be updated once the PCM is in long-term closed loop. O2 CROSSCOUNTS Range: ___________________________________________________________0 to 255 This value is the number of times that the O2S voltage crossed from the lean region, which is below 450 mV, to the rich region, which is above 450 mV within the last second. When the engine is warmed up and running in closed loop, the O2S voltage changes constantly. A counter in the PCM records the number of times the signal crosses between rich and lean. The crosscounts indicate how well the O2S is responding to changes in fuel metering and exhaust oxygen content. It does not indicate how well the O2S is performing. It shows that the sensor varies its voltage in response to exhaust oxygen content. On some engines, the O2S may cool off at idle, and the system may go to open loop. In this case, the sensor is not providing a varying voltage to the PCM and the value reads zero. Run the engine at fast idle for a few seconds to return to closed loop, and restore the crosscount reading. O2HTR DTY CYC(%) Range: _________________________________________________________ 0 to 100% Oxygen heater duty cycle in percentage. Bank 1, Sensor 1 O2 heater ground is duty cycled in the PCM between 0 and 100%. This allows the PCM to turn off current flow through the heater element when engine heat is high enough to maintain O2 operation. OIL PRESS(psi) Range: ___________________________________________________________0 to 128 OIL PRESS(kPa) Range: ___________________________________________________________0 to 885 Oil pressure. They rely on an oil pressure transducer that sends an analog voltage signal to the PCM. The PCM calculates the oil pressure from this signal. OIL PRESS(V) Range: ___________________________________________________________ 0 to 5 V Oil pressure in the form of voltage from the oil pressure sending unit. The greater the voltage, the lower the oil pressure. OPEN/CLSD LOOP L-FUEL SY R-FUEL SY L OPEN/CLSD LP R OPEN/CLSD LP Range: _______________________________________________________ OPEN/CLSD Loop operating status of the PCM. In open loop, the PCM uses throttle position, coolant temperature, and engine speed to control the air-fuel ratio. During closed-loop, the PCM uses feedback signals from the oxygen sensors to control the air-fuel ratio. 218 Chrysler and Jeep Data Parameters Engine Parameters These parameters read as follows: • OPEN during warm-up • CLSD when the engine reaches normal operating temperature Parameters that begin with L or R refer to the left or right cylinder bank. P-Ratio MAP/BARO Range: _____________________________________________________________0 to 7 The PCM logs the barometric pressure when the key is turned on (engine off) with the MAP sensor and compares it with Manifold Absolute Pressure to determine air density and O2 content for proper fuel ratio. PCM ODO(mi) Range: ____________________________________________________ see description This parameter indicates the mileage in PCM memory, which is updates every six miles. PCV VALVE Range: _______________________________________________________ OPEN/CLSD Displays PCV valve status on most 1984–90 carbureted engines. The normally-open PCV valve is controlled by the PCV shutoff solenoid. The value should read CLSD when running at idle (the solenoid is energized to close the valve and stop PCV flow) and OPEN at all other times (the solenoid is de-energized to open the valve and allow PCV flow). On 2.5L engines, an anti-diesel relay momentarily energizes the PCV solenoid when the engine is shut off to prevent dieseling. PRGE ADAPTIVE(%) Range: __________________________________________________________ 0 to 33% Fuel correction as a result of the amount of HC stored in the canister. PRGE DUTY CYC(%) PURGE DC(%) Purge Duty Cycle(%) Range: _________________________________________________________ 0 to 100% Displays the pulse-width-modulated PCM command signal to the evaporative purge valve and reads as follows: • 0% indicates that the valve is not energized • 100% indicates that the valve is fully energized PRNDL Range: ___________________________________________________ 1-2/3/PRND/???? Displays the neutral safety switch status, which is activated by the position of the gear selector lever. Reads as follows: • • • • PRND when the selector lever is in park, reverse, neutral, or drive 1-2 when the selector lever is in the 1-2 position 3 when the selector lever is in the 3 position ???? when the shift lever is between positions 219 Chrysler and Jeep Data Parameters Engine Parameters PURGE(mA) PRGE FEDBCK(mA) Range: _______________________________________________________ 0 to 670 mA PURGE CURR(mA) Range: _______________________________________________________(range 0 to 2 PURGE(mA) and PRGE FEDBCK(mA) indicate the amount of PCM-controlled current to the proportional purge solenoid. The PCM varies the current to achieve the correct amount of vapor flow from the evaporative canister. PURGE CURR(mA) indicates the proportional purge solenoid current sense. PRGE FLOW(g/s) Purge AirFlow(g/s) Range: __________________________________________________________ 0 to 63.9 Actual flow through the purge solenoid in grams per second. PRGE VAPOR(%) Range: _____________________________________________________________0 to 1 Percentage of fuel in the purge airflow. PROM Range: _________________________________________________________0 to 99999 Identification numbers of the programmable read-only memory (PROM) in the PCM. The PROM is a replaceable electronic device that contains the operating programs and calibration values for a specific vehicle, engine, and accessory combination. Often, a PROM is revised, or there is a new PROM issued to cure a driveability problem or to improve operation. Also, the PROMs are interchangeable, so it is possible for the wrong PROM to be installed. PURGE SOL Range: _______________________________________________________ OPEN/CLSD The PCM sends output commands to the fuel vapor solenoid in order to control vapor canister purging. The displayed value reads as follows: • OPEN when the solenoid is de-energized to allow vapor purging • CLSD when the solenoid is energized to block the canister vacuum line and prevent the canister from purging PURGE SOL FLW(%) Range: __________________________________________________________ 0 to 99% Amount of time the PCM is commanding the purge solenoid to energize as a percentage. The PCM calculates this value using the purge feedback circuit amperage. The purge solenoid regulates the rate of vapor flow from the EVAP canister to the throttle body. A reading of 99% indicates the valve is fully open to allow maximum purge. PWR STEER SW Range: _______________________________________________________ OPEN/CLSD Power Steering Switch Range: _________________________________________ Low Pressure/High Pressure During tight turns at low speed, high pressures generated in the power steering system cause the steering pump to load the engine enough to stall it. To prevent this, many late-model vehicles have a power steering fluid pressure sensing switch. The switch opens when pressure rises above 400 psi (2758 kPa). An open switch signals the PCM to raise idle speed to prevent the engine from stalling. 220 Chrysler and Jeep Data Parameters Engine Parameters RAD FAN DC(%) Range: _________________________________________________________ 0 to 100% Displays the duty cycle of the signal delivered to the fan relay. RAD FAN RELAY RAD FAN LOW RLY RAD FAN HI RLY RAD FAN HI2 RLY Range: __________________________________________________________ ON/OFF PCM has commanded the engine cooling fan to turn on. Some vehicles have high-speed and low-speed fans, and two parameters are used indicate the state of the fan relays. The PCM controls relays based on coolant temperature and compressor head pressure. These parameters should read ON whenever the air conditioning is operating or the coolant temperature is high enough to require fan operation to cool the engine. RETARD CYL #1(°) RETARD CYL #2(°) RETARD CYL #3(°) RETARD CYL #4(°) Range: _________________________________________________________ 0° to 127° Displays the amount of ignition retard the PCM is commanding to each cylinder. Readings are relative to base timing. RPM Engine RPM Range: ____________________________________________________ 0 to engine max The RPM value is engine speed and is always on the top line of the display. On 1988 and earlier models, RPM is internally computed by the PCM based on ignition reference pulses. On 1989 and later vehicles, the PCM computes RPM using the crankshaft position (CKP) sensor signals. S/C CANCEL S/C COAST S/C ON/OFF S/C RESUME S/C SET SW Range: ______________________________________________ PRESSED/RELEASED Indicates cruise control status as follows: • • • • • S/C CANCEL = whether the cruise cancel switch is pressed. S/C COAST = whether the cruise coast switch is pressed. S/C ON/OFF = whether the cruise on/off switch is pressed. S/C RESUME = whether the cruise resume/accel switch is pressed. S/C SET SW = whether the cruise set switch is pressed. S/C LAMP S/C ENGAGED LMP S/C POWER RELAY Range: __________________________________________________________ ON/OFF Speed control lamp and speed control power relay. The relay provides battery voltage to the servo solenoids. These parameters read ON when speed control is enabled. 221 Chrysler and Jeep Data Parameters Engine Parameters S/C SET SPD Range: _________________________________________________________ 0 to 127.5 Displays the cruise control set speed. S/C SW INPUT(V) S/C SW 1(V) S/C SW 2(V) S/C SWITCH(V) S/C Switch(V) Range: _________________________________________________________ 0 to 5.1 V Displays the speed control switch voltage. S/C TARGET (MPH) S/C TARGET (KPH) Range: ___________________________________________________ 0 to vehicle max Displays the speed at which the driver set the control on some 1990 and later vehicles. S/C VAC SOL Range: _______________________________________ OPEN/CLSD or BLOCK/APPLY S/C VENT SOL Range: ________________________________________ OPEN/CLSD or BLEED/HOLD The PCM sends output commands to the speed control (S/C) vacuum and vent solenoids to control the servo. The vacuum and vent solenoid readings usually have the following relationships with throttle position control. Table 12-2 S/C VAC SOL and S/C VENT SOL readings and throttle position S/C Vacuum Solenoid Open S/C Vent Solenoid Closed Throttle Position Accelerate Open or Closed Open Decelerate Closed Closed Steady SENSED TIP Range: _________________________________________________________0 to 10 psi Displays the intake pressure reading from the TIP sensor. SHIFT IND LAMP Range: __________________________________________________________ ON/OFF Displays the PCM output command to the instrument panel lamp on some trucks with a manual transmission. The PCM determines whether to light the lamp based on engine speed, vehicle speed, and engine load. When this parameter displays ON, the panel lamp should be on. If not, there is a problem in the circuit or with the PCM command. SPARK ADV(°BTC) Spark Advance(°) Range: _______________________________________________________ -90° to +90° This is a PCM output parameter that indicates the total amount of spark advance or retard being commanded, not including base timing. 222 Chrysler and Jeep Data Parameters Engine Parameters SPEED CNTRL Range: ______________________________________________ ON/OFF/SET/RESUME Displays the PCM input signal that indicates the position of the speed control switch. Be aware, this parameter displays on some vehicles that do not have speed control, however, it continuously displays OFF. SRV SOLENOID Range: __________________________________________________________ ON/OFF SRV Output State Range: _____________________________________________ Deenergized/Energized SRV Valve State Range: ______________________________________________________ Open/Closed Displays the current state of the short runner valve. ST FUEL TRIM Range: ___________________________________________________________0 to 255 Displays the short-term (ST) fuel trim value represents the operation and the short-term correction to the fuel metering of a fuel-injected engine. ST FUEL TRIM indicates whether the PCM is commanding a rich or a lean mixture. Jeep manuals refer to this parameter as ALFACL. The ST fuel trim value ranges from 0 to 255 with a midpoint of 128. A value higher than 128 indicates a PCM command for a short-term rich mixture, a value lower than 128 indicates a short-term lean mixture (see Figure 12-1 on page 214). Compare ST FUEL TRIM numbers to injector on-time. A value above 128 indicates increased on-time. A value below 128 indicates a decrease to on-time. The ST fuel trim correction operates only in closed loop. In open loop, the ST fuel trim goes to a fixed value, usually 128. ST RETARD(°) Range: _________________________________________________________ 0 to 63.5° Displays the short-term knock spark retard. STATUS Range: ____________________________________________________ see description The slash in the displayed value of this parameter divides the reading into two sections. The value to the left of the slash indicates transmission solenoid faults, and the value to the right of the slash indicates throttle position (TP) sensor faults. • 0 = no faults have occurred • A number greater than 0 to the left of the slash = transmission solenoid faults • A number greater than 0 to the right of the slash = TP sensor faults STEP EXTEND STEP RETRACT Range: __________________________________________________________ YES/NO Displays the stepper-motor status used to control the air-fuel mixture on 1984–90 models with a 4.2L carbureted engine. The stepper-motor moves metering pins in the carburetor throat to control airflow. Readings indicate if the PCM is commanding the stepper motor to extend or retract: • With a rich fuel mixture, the extend value reads NO and the retract value reads YES. • With a lean fuel mixture, the extend value reads YES and the retract value reads NO. 223 Chrysler and Jeep Data Parameters Engine Parameters SURGE VALVE Range: _______________________________________________________ CLSD/OPEN Indicates whether the PCM has energized the surge valve to bypass the turbocharger and reduce boost on turbocharged vehicles. The parameter shows the PCM command has been given. It does not indicate the valve is operating. TARGET IAC Range: ___________________________________________________________1 to 255 Displays the PCM desired position of the idle air control (IAC) motor in step counts. Target Idle Speed(RPM) Range: ____________________________________________________ see description Displays the desired speed the PCM is attempting to maintain. Desired idle is computed by the PCM. Normally, actual and desired idle RPM readings should be equal or close to each other. T-BODY TEMP(°F) Range: ________________________________________________________-40° to 389° T-BODY TEMP(°C) Range: ________________________________________________________-40° to 199° Displays fuel temperature in the throttle body on low-pressure throttle body injection systems. A thermistor sensor is installed in the throttle body fuel passage, and the PCM converts the sensor voltage signals to the fuel temperature readings. With a low-pressure throttle body injection (TBI) system, fuel may boil in the throttle body during a hot-soak period. At engine startup, the PCM compares the engine coolant temperature to throttle body fuel temperature. If the fuel temperature is above a programmed value, the PCM increases injector pulse width during starting to purge fuel vapors from the injectors. The throttle body temperature affects injector pulse width only during starting, not at any other time. T-BODY TEMP(V) Range: _________________________________________________________ 0 to 5.1 V The throttle body temperature voltage is a direct reading from the fuel temperature sensor in the throttle body low-pressure throttle body injection systems. Sensor voltage and temperature are inversely related. Low temperature produces a high voltage signal; high temperature produces low voltage. TCC FULL LOCK Range: __________________________________________________________ ON/OFF Displays the low/reverse solenoid status. With the transmission above first gear, the transmission controller turns on the low/reverse solenoid to provide the hydraulic flow and pressure to the valve body allowing full engagement of the torque converter. TCC P-EMCC Range: __________________________________________________________ ON/OFF Displays the low/reverse solenoid status. With the transmission above first gear, the transmission controller duty cycles the low/reverse solenoid providing a reduced amount of pressure to the valve body and partially engaging the torque converter lockup clutch. TCC UNLOCKED Range: __________________________________________________________ ON/OFF Indicates whether the transmission controller turned off the low/reverse solenoid to prevent torque converter lockup. 224 Chrysler and Jeep Data Parameters Engine Parameters THROTTLE(%) THROTTLE POS(%) TPS(%) Throttle Position Sensor(%) Range: _________________________________________________________ 0 to 100% Some vehicles transmit a throttle position sensor (TPS) information as a percentage of full-throttle opening, instead of a voltage signal. These parameters read as follows: • From 0 to 10% at idle • Above 90% at wide open throttle Readings should change smoothly as the throttle moves through its full range. THROTTLE POS(V) TPS(V)Throttle Position Sensor(V) Range: _________________________________________________________ 0 to 5.1 V The throttle position (TP) sensor produces a signal that is proportional to the throttle position. The PCM uses this voltage signal to determine how wide the throttle is open: low voltage at closed throttle, and high voltage at wide open throttle. The TPS voltage available to the PCM ranges from 0 to approximately 5.1 V. For most Chrysler engines, expect the following readings: • About 1.0 V at idle • About 3.5 V at wide open throttle Voltage should change smoothly as the throttle moves through its full range. THROTTLE SW Range: _______________________________________________________ OPEN/CLSD Displays the throttle switch status. Reads as follows on 1989 fuel-injected truck engines: • OPEN when the throttle is off idle • CLSD when the throttle is closed TIP(V) Range: ___________________________________________________________ 0 to 5 V Displays the throttle inlet pressure (TIP) voltage. The TIP sensor is used in place of MAP. The TIP/BARO solenoid switches back and forth between intake manifold and atmospheric pressure. This allows for the BARO reading to update during turbo boost. TOTAL ADV(°BTC) Range: ________________________________________________________-90° to +90) On some 1990 and later models, this parameter displays the total spark advance or retard commanded by the PCM, including base timing. TOTAL KNK RTD (°) OVERALL KNK RTD(°) KNK RTD CYL 1(°) KNK RTD CYL 2(°) KNK RTD CYL 3(°) KNK RTD CYL 4(°) Range: __________________________________________________________ 0° to 90° Displays the amount of spark advance removed by the PCM when the detonation sensor senses knock. Timing is retarded from the optimum advance for existing speed and load. Knock retard 225 Chrysler and Jeep Data Parameters Engine Parameters does not indicate that timing is retarded after top dead center. It shows the amount of advance that has been taken away. Typically, the logic module retards timing from maximum advance in 5-degree increments until detonation stops or until 15 degrees have been removed. Advance is then restored at about 2 degrees per second. Knock retard is cancelled below 1000 RPM. On non-turbocharged engines, the total or overall knock retard for all cylinders displays, for turbocharged engines, knock retard for individual cylinders displays. TPS 1(V) TPS 2(V) Range: _____________________________________________________________0 to 5 Indicates the voltage signals from two TPS units built into the electronic throttle control (ETC) throttle body. Each sensor outputs a voltage signal in proportion to the throttle plate position. As the throttle is opened, voltage from TPS 1 increases while TPS 2 decreases. TPS 1 MIN(V) TPS 2 MIN(V) Range: _____________________________________________________________0 to 5 Displays the learned lower limits for TPS 1 and TPS 2 respectively. TPS CALC(V) Range: _________________________________________________________ 0 to 5.0 V This calculated value for throttle position is what the PCM expects to see from the TPS based on RPM and MAP. The value should be close to actual and will be used in the event of a TPS failure. TPS STEPS Range: ____________________________________________________ see description Displays the throttle position sensor step count. This parameter should read as follows: • 0 when the throttle is fully closed • Increases to 7 as throttle is pressed to WOT TRANSFER PUMP Range: __________________________________________________________ ON/OFF Displays the transfer pump status on some diesel engines. The transfer pump delivers fuel from the fuel tank to the fuel-injection pump. TRD LINK Range: __________________________________________________________ ON/OFF When the transmission shifts gears, the transmission control module (TCM) signals the PCM so it momentarily shuts off a number of fuel injectors. This signal, called the torque reduction link, smooths shifting and decreases transmission wear. Reading is ON if the PCM is cutting fuel delivery as instructed by the TCM signal. TURBO BARO Range: ______________________________________________________ not available Displays the BARO reading from the TIP sensor. VEH SPEED Range: ___________________________________________________ 0 to vehicle max Displays the measurement provided by the vehicle speed sensor (VSS) pulses to the PCM. On late-model vehicles, the VSS signal also controls torque converter clutch (TCC) engagement. 226 Chrysler and Jeep Data Parameters Engine Parameters VEH THEFT Range: __________________________________________________________ ON/OFF Indicates whether Vehicle Theft Security System (VTSS) is engaged. The signal is sent to the PCM from the BCM. VEH THEFT STATE Range: _________________________________________ fuel allowed/fuel not allowed Indicates whether the BCM is allowing the PCM to turn the fuel pump on or not. VNT SOL #1 Range: __________________________________________________________ ON/OFF VNT SOL #2 VNT SOL #3 Range: _________________________________________________________ 0 to 100% Chrysler variable nozzle turbo (VNT) engines do not have a wastegate, but have three computer-controlled solenoids to control turbo nozzle opening. These parameters indicate whether the PCM has turned the solenoids on or off. Solenoid 1 is turned either fully on or fully off; it is not pulse-width modulated. Both Solenoids 2 and 3 are pulse-width modulated. These parameters display the percentage of on-time. WAIT TO START Range: __________________________________________________________ ON/OFF Wait to start lamp status on the instrument panel for diesel engines. The engine control module turns the lamp on and off based on charge air temperature sensor input. When the ignition is first turned on, the lamp illuminates for a 2-second bulb check. If the intake manifold air temperature is below 59°F (15°C), the wait to start lamp illuminates and the intake heater preheat cycle begins. The lamp stays on until the preheat cycle is complete. During engine operation, the wait to start lamp flashes if the charge air temperature sensor input is below minimum or above maximum value. A fault is stored when this occurs. WASTEGATE(%) Range: _________________________________________________________ 0 to 100% On some 1990 and later models with turbocharged engines, the PCM controls the wastegate actuator with a pulse-width-modulated (PWM) solenoid. The solenoid modulates pressure applied to the actuator and thus controls the wastegate opening. The display indicates on-time for the solenoid as a percentage. It also indicates the amount of wastegate opening: • Readings should be low at idle, part throttle, or other low-boost conditions. • Readings should be high under high boost pressure conditions. WASTEGATE SOL Range: __________________________________________________________ ON/OFF On some 1990 and later turbocharged engines, this parameter displays the status of the wastegate solenoid. WASTEGATE SOL(%) Range: _________________________________________________________ 0 to 100% The turbo wastegate is controlled by the PCM duty cycling a 12V signal to the solenoid. Ground is hardwired to the chassis. An increase in duty cycle increases boost. 227 Chrysler and Jeep Data Parameters Engine Parameters WATER IN FUEL(V) Range: _________________________________________________________ 0 to 5.0 V Displays the signal voltage from the water in fuel sensor on some models with diesel engines. The higher the voltage, the greater the amount of water in the fuel. WIDE OPEN THROT Range: __________________________________________________________ YES/NO Reads YES to indicate maximum throttle opening on many engines and reads NO at all other times. The engine must be running for this parameter value to change. With the key on and the engine off, a fully open throttle produces maximum TP sensor voltage; but this parameter should read NO. WOT DIVERT Range: __________________________________________________________ YES/NO On some engines, the air injection diverter solenoid is switches off at full throttle to avoid catalytic converter overheating, which diverts air pump output to the atmosphere and results in a YES reading. Z1 VOLTAGE Range: ___________________________________________________ ACTIVE/INACTV Voltage on circuit Z1 is active, or high, when the auto shutdown relay is energized. 228 Chrysler and Jeep Data Parameters Transmission Parameters Transmission Parameters This section defines data parameters available from the transmission or transaxle control module (TCM) on Chrysler and Jeep vehicles. 1-2 RANGE SW 3 RANGE SW OD RANGE SW R RANGE SW Range: __________________________________________________________ ON/OFF Displays the range switch selected by the PRNDL. Reads ON if the switch is on and OFF if off. The AW4 transmission has six shift lever positions and ranges: Park, Reverse, Neutral, Drive, 1-2, and 3. Drive, 1-2, and 3 provide electronically-controlled shifting. The D range provides 1st through 4th (OD) gear. Park, reverse, and neutral are mechanical only. Reverse activates a range switch only to turn on the brake lamps. 2-3 LOCKOUT LMP 2-3 LOCKOUT SOL Range: __________________________________________________________ ON/OFF Displays the skipshift feature status on Viper models. The PCM controls lockout based on engine running conditions. Under light to moderate throttle, the lockout solenoid blocks the 2nd and 3rd shift gates. During a skipshift, the solenoid energizes and both of the parameters read ON. Once a skipshift completes, both read OFF. 3/4 SHIFT SOL Range: __________________________________________________________ ON/OFF Displays the 3/4 shift solenoid status. BATTERY VOLTS Range: ________________________________________________________ 0 to 15.7 V Displays the direct input signal to the PCM that indicates current battery voltage. The reading should be close to normal charging system regulated voltage with the engine running. BRAKE SW Range: __________________________________________________________ ON/OFF Displays the brake switch signal to the transmission control module (TCM) status. The TCM relies on this input to turn off the torque converter clutch when the brakes are applied. It reads ON when the brake switch contacts are closed. C3(V) C4(V) Range: ________________________________________________________ 0 to 25.6 V Displays inputs from manual valve lever position (MVLP) sensor or transmission range sensor (TRS) switches. A voltage reading indicates the switch is open. • C3 should read 0 V when the gear selector is in park, 3rd gear, or low. • C4 should read 0 V when the gear selector is in neutral, low, or overdrive. If C3 or C4 do not display 0 V under these conditions, inspect the switch and circuitry. CURRENT GEAR PRESENT GEAR Range: ____________________________________________________ see description Displays the forward gear that is currently engaged—it is not the shift lever position—and reads as follows: 229 Chrysler and Jeep Data Parameters • • • • • Transmission Parameters 1ST when operating in first gear or with the shift lever in P-R-N 2ND in second gear 3RD in third gear 4TH in fourth gear ???? during a shift DOWNSHIFT SW Range: __________________________________________________________ ON/OFF Displays the status of a normally open downshift switch that is operated by moving the gear shift lever to the left. The display only reads ON when the switch contacts are closed to complete the circuit and allow current. When the system functions properly, each time the switch contacts close, the transmission downshifts one gear. Engine RPM Range: ____________________________________________________ 0 to engine max TURBINE RPM Engine Speed (RPM) Turbine Speed(RPM) INPUT RPM OUTPUT RPM Output Speed(RPM) Range: _____________________________________________________ 0 to trans max Three sensors provide engine speed, turbine acceleration, and output shaft speed data to the TCM. The engine parameter is provided by the ignition system. Engine speed is used for controlling torque converter lockup and to determine torque capacity. For diagnostics, the engine parameter is also compared to an engine speed signal from the engine control module. The TCM receives engine RPM signals on both the CCD data bus from the engine computer and directly from the ignition system. The turbine and input parameters are the same, the vehicle has one or the other. The PCM compares this reading to the engine and output parameters to determine operating ratio, clutch and torque converter slippage, and torque capacity. In addition, turbine or input change information is used to control shifts. The TCM compares the output parameter to the turbine parameter for determining gear ratio and detecting clutch slippage. In addition, the output parameter is compared to throttle data to determine shift points. GEAR Range: ____________________________________________________ see description Displays the selected gear. The TCM looks at the PRNODDL, hydraulic pressure, and speed sensors to determine automatic gear selection. Depending on selector position, the display reads REV, NEUT, 1ST, 2ND, 3RD, or 4TH. GOV PRESS SOL Range: ________________________________________________________ LOW/HIGH Displays the governor pressure solenoid valve state. 230 Chrysler and Jeep Data Parameters Transmission Parameters GOV PRESS(psi) DES GOV PR(psi) Range: ____________________________________________________ see description The governor pressure parameter is the actual transmission fluid line pressure. The governor pressure sensor measures the solenoid valve output pressure and provides this feedback to the PCM. The desired parameter is the line pressure the PCM is attempting to maintain. Governor pressure should increase approximately 1 psi per vehicle MPH. The governor pressure solenoid valve controls governor pressure by regulating the transmission line pressure. The PCM applies a pulse-width-modulated signal to the valve to generate the governor pressure needed for upshifts and downshifts. GOV PR DUTY CYC Range: ________________________________________________________ 0 to 100%) Displays the duty cycle of the governor pressure solenoid valve. The valve controls governor pressure by regulating transmission line pressure. The TCM outputs a pulse width modulated signal to the valve to generate the pressure needed for upshifts and downshifts. GOV PR SNSR(V) GOV PRESS(V) Range: ________________________________________________________ 0 to 5.00 V Displays the feedback signals from the governor pressure sensor to the TCM. The governor pressure solenoid valve regulates transmission line pressure to develop governor pressure. The pressure sensor measures the solenoid valve output and provides feedback. J2 CIRCUIT(V) SWITCH BATT(V) REV LIGHT 1(V) REV LIGHT 2(V) Range: ________________________________________________________ 0 to 25.6 V Displays TCM control voltages. The J2 circuit is the battery voltage feed to the TCM. Voltage is present at all times, even with the ignition turned off, to supply power for TCM memory. The SWITCH BATT parameter is the ignition voltage that turns on the TCM. The REV LIGHT 1 and REV LIGHT 2 parameters display the supply voltage on either side of the backup lamp relay. LIMP IN Range: __________________________________________________________ YES/NO The TCM continually checks for electrical and internal transmission problems. When a problem is sensed, a fault code sets. Most fault codes cause the TCM to go into the limp-in mode. In this mode, electrical power is removed and transmission operation is limited to the following: • • • • Neutral Park Reverse Second gear Upshifts and downshifts are not allowed. The vehicle may still be driven in for service. 231 Chrysler and Jeep Data Parameters Transmission Parameters LOCK-UP Range: __________________________________________________________ ON/OFF Displays the TCC lockup relay valve status. The lockup relay valve controls fluid flow to the converter lockup clutch. The lockup relay valve is operated by line pressure from the 1-2 shift valve and controlled by solenoid no. 3. This parameter should read ON only when the lockup clutch is engaged. L-R PRESS SW 2-4 PRESS SW OD PRESS SW Range: _______________________________________________________ OPEN/CLSD These three pressure switches, L-R, 2-4, and OD, are built into the transmission solenoid assembly. During automatic shifting, the TCM uses this pressure switch data to verify proper solenoid operation and gear selection. The TCM recognizes each gear selected as a specific combination of open and closed pressure switches. MODE Range: _________________________________________________ POWER/COMFORT Displays the shift mode selection switch status. The switch is located on the instrument panel. The Comfort mode provides normal shift speeds and points, and the Power mode provides higher shift speeds and points. The reading should match the switch setting. This switch was eliminated in 1992, and this parameter always reads POWER on 1992 and later vehicles. MODULE ID Range: ____________________________________________________________ 1 or 2 Displays the TCM identification number. Use this parameter to determine if the correct module is installed in the vehicle. Modules are not interchangeable. MODULE ID reads as follows: • 1 for vehicles with the AW4 transmission and a 4.0L engine • 2 for vehicles with the AW4 transmission and a 2.5L engine OD INHIBIT Range: __________________________________________________________ YES/NO Displays the inhibit switch status. Reads YES if the PCM is preventing the transmission from shifting into overdrive. OD OFF LAMP Range: __________________________________________________________ ON/OFF Displays the status of a momentary switch on the instrument panel that enables or disables the PCM-controlled overdrive. OD OFF LAMP reads as follows: • ON = automatic shifts into 4th gear overdrive are prevented • OFF = automatic shifts into 4th gear overdrive occur An indicator lamp in the switch illuminates when the switch is ON. When the ignition is turned off, the switch resets. When a transmission overheating occurs, the TCM automatically inhibits overdrive operation, the indicator lamp illuminates, and this parameter reads ON. O-D OVERRIDE Range: __________________________________________________________ ON/OFF Displays the status of a momentary push-button switch located in the instrument panel that switches the PCM-controlled overdrive override mode on and off. 232 Chrysler and Jeep Data Parameters Transmission Parameters O-D OVERRIDE reads as follows: • ON = automatic shifts into overdrive occur • OFF = shifts into overdrive are prevented OD OVERRIDE LMP Range: __________________________________________________________ ON/OFF Reads ON when the PCM has commanded the overdrive override indicator lamp to light. On a properly functioning system, an illuminated lamp indicates that overdrive operation is inhibited. OD SWITCH Range: __________________________________________________________ ON/OFF Displays the dash-mounted push button overdrive switch status and reads as follows: • ON when the switch contacts are closed to prevent shifting into overdrive • OFF when the contacts are open to allow shifting into overdrive OUT SHAFT(RPM) OUTPUT RPM Range: ___________________________________________________ 0 to vehicle max Displays the transmission output shaft speed. OVERDRIVE SOL Range: __________________________________________________________ ON/OFF This parameter, used on rear-wheel-drive trucks, shows if the TCM has energized the overdrive solenoid for the transmission. It reads as follows: • YES when all requirements to allow overdrive engagement are met • NO when they are not This parameter indicates that the PCM command has been given. It is not a feedback signal to indicate that overdrive has actually engaged or responded to the command. PART NO. Range: __________________________________________________________ variable VERSION NO. Range: __________________________________________________________0.0 to F.F IGN CYCLES Range: ___________________________________________________________0 to 255 Displays the TCM part number and revision, as well as the number of ignition cycles since the transaxle memory was last reset. PRNODDL NEUTRAL SW 1 REV LIGHT SW 1 NEUTRAL SW 2 REV LIGHT SW 2 C1 SWITCH C2 SWITCH C3 SWITCH C4 SWITCH Range: _______________________________________________________ OPEN/CLSD For the A604 (41TE) transaxle, the TCM monitors four inputs from the PRNODDL and neutral-start switches. For the 42LE transaxle, the TCM monitors four inputs from the manual valve lever position sensor (MVLPS) sensor. These inputs indicate what gear has been selected by the driver. 233 Chrysler and Jeep Data Parameters Transmission Parameters The TCM uses this information to determine the gear range and shift pattern to use. The TCM recognizes each shift lever selection as a specific combination of open (off) and closed (on) contacts in the switches. The combinations are shown in the following two tables: Table 12-3 Shift lever position and switch state combinations Switch State PRNODDL Display PARK NS1 RL1 NS2 RL2 Closed Open Closed Open REV Open Closed Open Closed NEUT Closed Open Open Closed OD Open Closed Open Open DRIVE Open Open Open Closed LOW Open Open Closed Open Table 12-4 Shift lever position and switch state combinations PRNODDL Display Switch State RL1 (C1) RL2 (C2) NS1 (C3) NS2 (C4) PARK Closed Closed Closed Open REV Open Closed Open Open NEUT Closed Closed Open Closed OD Open Closed Open Closed DRIVE (3) Open Open Closed Open LOW Open Closed Closed Closed The parameters are abbreviated as follows: C1 = C1 SWITCH C2 = C2 SWITCH C3 = C3 SWITCH C4 = C4 SWITCH NS1 = NEUTRAL SWITCH 1 NS2 = NEUTRAL SWITCH 2 RL1 = REVERSE LIGHT SWITCH 1 RL2 = REVERSE LIGHT SWITCH 2 For the 1995 and earlier A604 (41TE), the PRNODDL, NS1, NS2, RL1, and RL2 parameters display. The PRNODDL, C1, C2, C3, and C4 parameters display for the 1993 and later 42LE and for the 1996 and later 41TE. Chrysler may refer to the PRNODDL position switch as the MVLPS or TRS sensor. PR SENS OFF(V) TRNSDCR OFF SET PRESS SENS OFF Range: ________________________________________________________ 0 to 5.00 V The pressure sensor offset voltage is used internally by the PCM to calculate actual governor pressure. The governor pressure transducer reads absolute pressure. This offset value is used to compensate for barometric pressure and correct the governor pressure reading. 234 Chrysler and Jeep Data Parameters Transmission Parameters REV LOCKOUT SOL Range: __________________________________________________________ ON/OFF Displays the PCM command status for the reverse lockout solenoid and reads as follows: • ON when vehicle speed is below 5 MPH (8 KPH) and the TCM energizes the solenoid, which completes a ground path that allows the transmission to shift into reverse. • OFF when vehicle speed is above 5 MPH (8 KPH) and the ground is open, which prevents the transmission from shifting into reverse. SHIFT LEVER Range: ________________________________________________________ P-N–/-R-DL This park/neutral switch parameter indicates whether an automatic transmission is in park, neutral, or one of the drive ranges. SHIFT LEVER reads as follows: • P-N– if the transmission is in either park or neutral • -R-DL if the transmission is in any forward gear or reverse SNSR SUPPLY(V) Range: ________________________________________________________ 0 to 5.00 V This parameter displays voltage available to the transmission sensors. SOLENOID 1 SOLENOID 2 SOLENOID 3 Range: __________________________________________________________ ON/OFF Displays the shift solenoids 1, 2 and 3 status. • Shift solenoid 1 controls line pressure for 2-3 upshifts and 3-2 downshifts. • Shift solenoid 2 controls line pressure for 1-2 and 3-4 upshifts and 4-3 and 2-1 downshifts. • Shift solenoid 3 controls line pressure to the TCC lockup relay valve. SOLENOID 1 should read as follows: • ON whenever the vehicle is not moving and the transmission is in either 1st or 2nd gear • OFF whenever the transmission is in 3rd or 4th gear SOLENOID 2 should read as follows: • ON whenever the transmission is in either 2nd or 3rd gear • OFF whenever the vehicle is not moving or the transmission is in low (1st) or 4th gear SOLENOID 3 should read as follows: • ON when the TCC is engaged • OFF whenever the vehicle is not moving, and should remain OFF until torque converter clutch lockup is wanted For additional information, see the “LOCK-UP” on page 232. TABLE ID Range: ___________________________________________________________0 to 255 No definition is currently available for this parameter. TCC INHIBIT Range: __________________________________________________________ YES/NO Reads YES when a PCM command is preventing torque converter clutch engagement. 235 Chrysler and Jeep Data Parameters Transmission Parameters TCC LOCKED Range: _________________________________________________ FULL/PARTIAL/NO Displays the torque converter clutch (TCC) status. The hydraulically applied TCC is controlled electronically through the solenoid assembly. TCC SOL Range: __________________________________________________________ ON/OFF Displays the PCM command status for the torque converter clutch (TCC) solenoid and reads ON when the PCM is energizing the TCC solenoid. THROTTLE(°) Range: __________________________________________________________ 0 to 161° THROTTLE(%) Range: _________________________________________________________ 0 to 100% THROTTLE POS(V) Range: _________________________________________________________ 0 to 5.0 V TPS(V) Range: _________________________________________________________ 0 to 5.0 V TPS ANGLE(°) Range: __________________________________________________________ 0 to 135° The TCM uses a signal from the throttle position (TP) sensor to help determine shift points and shift quality. The TCM receives the throttle position sensor voltage signal from the engine computer on the CCD data bus, and directly from the TP sensor. For self-diagnostic purposes, the transmission controller compares these signals. TRANS OVRHT LMP TRANS TEMP LMP Range: __________________________________________________________ ON/OFF Displays the PCM command signal to the transmission temperature indicator on the instrument cluster and read as follows: • ON indicates that the transmission is overheating and the lamp should be lit • OFF indicates normal operation TRANS PWR RLY Range: __________________________________________________________ ON/OFF Displays the ON and OFF status of the transmission power relay. The transmission power relay provides battery voltage to the overdrive solenoid, the torque converter clutch solenoid, and the variable force, or governor pressure, solenoid. TRANS STATE Range: _____________________________________ COLD/COLD!/COLD!/WARM/HOT Displays the temperature of the transmission fluid. The TCM uses this input to change shift characteristics based on fluid temperature. TRANS TEMP(°F) Range: _____________________________________________________ –83.2 to 376°F TRANS TEMP(°C) Range: _______________________________________________________–64 to 191°C Displays the automatic transmission fluid temperature. The TCM internally calculates this value on 1989–95 vehicles. For 1996 and later models, the TCM relies on the signal from the transmission fluid temperature (TFT) sensor. The engine must be running in order for an accurate value to display. 236 Chrysler and Jeep Data Parameters Transmission Parameters TRANS TEMP(V) Range: ________________________________________________________ 0 to 5.00 V Displays the temperature of the automatic transmission fluid as voltage. As fluid temperature increases, so does the voltage. Trans Temperature Voltage(V) Range: _________________________________________________________ 0 to 5.0 V Displays the output voltage from the transmission fluid temperature (TFT) sensor. UPSHIFT SW Range: __________________________________________________________ ON/OFF Displays the normally open upshift switch status, which is operated by moving the gear selector lever to the right. UPSHIFT SW reads ON if the switch contacts are closed to complete the circuit and allow current. When the system functions properly, the transmission upshifts one gear each time the switch contacts close. 237 Chrysler and Jeep Data Parameters Body Parameters Body Parameters This section defines data parameters available from various electronic control modules that regulate body systems on Chrysler and Jeep vehicles. Available systems include: • • • • • • • • Body Control Module (BCM) Engine Control Node (ECN) Electronic Instrument Cluster (EIC) Stand-Alone Serial Bus Traveler (SASBT) Serial Bus Traveler (SBT) Electronic Vehicle Information Center (EVIC) Electronic Temperature and Compass (ETC) Air Suspension (AS) Many of the parameters in this section are listed in groups because they all perform a similar function, though for different circuits in the system. To find the description of a specific parameter, locate the parameter name in the Chrysler parameter list on “Alphabetical Parameter List” on page 176. 238 Chrysler and Jeep Data Parameters Body Parameters 4 WHEEL DRIVE A/C STATUS AUTO DOOR LOCK BLEND MOTOR BLOWER MOTOR BR LAMP OUTAGE CARGO LAMP CHECK GAGES LMP CHIME COURTESY LAMP DCKLID REL SOL DECKLID AJAR DECKLID SW DOME LAMP DOOR AJAR SW DOOR LOCK RLY DOOR HANDL SW DOOR UNLOCK RLY DRVR DOOR AJAR DRVR DOOR JAMB DRVR DOOR UNLCK FOG LAMP RELAY GATE AJAR GATE AJAR SW HAZARD SW HEADLAMP DELAY HEADLMP OUTAGE HEADLAMPS HIGH BEAMS HIGH BEAM SW(V) HI LOW BEAM HOOD AJAR HORN IGN RUN/START KEY IN IGN SW LIFT GATE AJAR L TURN SIGNAL LOW BEAMS LR DOOR AJAR PASS DOOR AJAR R DEFOG SW R TURN SIGNAL RR DOOR AJAR SEAT BELT SW TCC FULL LOCK TRAC SW WASHER SWITCH WIPERS PARKED Range: ____________________________________________________ see description Displays the various switches operated by the body control module (BCM). Most display OPEN or CLSD (closed). However, a few display YES or NO, ON or OFF, HI (high) or LOW, PRSD (pressed) or RLSD (released), or some other variation. 239 Chrysler and Jeep Data Parameters Body Parameters These switch parameters may either display the electrical state of the switch, or the mechanical state of the component the switch services. Switch states may not match the state of their associated components. For example, the driver door ajar parameter may indicate switch state and read OPEN when the door is actually closed on some models. On others, the same parameter may read OPEN, indicating mechanical state, when the door is actually open. Generally, it is adequate to verify that a switch state alternates between states. A/T PRESS. SW BRAKE FLUID SW BRAKE PAD INP CLNT LEVEL SW OIL LEVEL SW Range: _______________________________________________________ OPEN/CLSD Displays the various engine control node (ECN) switches. The ECN collects input data from the switches and sensors in the front area of the vehicle. The engine node transmits data to the electronic vehicle information center (EVIC). AUTO HDLMP(V) DOOR STALL MODE DOOR(V) TMP AIR DR(V) Range: _______________________________________________________ 0 to 327.7 V PANEL (V) A/C SWITCH(V) BATTERY(V) Range: ________________________________________________________ 0 to 18.9 V BATTERY1(V) BATTERY2(V) IGN/RUN(V) Range: __________________________________________________________ 0 to 16 V IGNITION(V) Range: ________________________________________________________ 0 to 16.6 V FUEL LEVEL (V) Range: _________________________________________________________ 0 to 8.7 V DOME SW(V) Range: ___________________________________________________________ 0 to 5 V DOOR LOCK(V) Range: _________________________________________________________ 0 to 9.9 V OIL PRESS (V) Range: _________________________________________________________ 0 to 9.2 V Engine TEMP(V) Range: ________________________________________________________ 0 to 15.6 V EVAPO TEMP(V) Range: ___________________________________________________ off 1.2, on 2.65 V Displays the various body control module (BCM) control voltages. The BCM communicates over the CCD or PCI bus network. The BCM transmits data to the electronic vehicle information center (EVIC) and to the electronic instrument cluster (EIC). The BCM receives data from the engine control node (ECN), powertrain control module (PCM), transmission control module (TCM), and air suspension control module. 240 Chrysler and Jeep Data Parameters Body Parameters COOLANT SW(V) FOG LAMPS F WIPER SW(V) HEADLAMP SW(V) HIGH BEAM SW(V) IGNITION SW(V) I-WIPE DELAY(V) I-WIPE ENABLE(V) L B-PILLAR SW(V) L DR KEY SW(V) L DR LCK SW(V) LGATE HNDL SW(V) LGATE KEY SW(V) OH L-GATE SW(V) OH PWR DR SW(V) OUT AMB TMP(V) PARK LAMPS WR TOP SW(V) RADIO SW(V) R B-PILLAR SW(V) R DR KEY SW(V) R DR LCK SW(V) R WIPER SW(V) TURN SGNL SW(V) WASHER LVL(V) WIPER MODE(V) Range: ________________________________________________________ 0 to 5.00 V Displays the various body control module (BCM) control voltages. The BCM communicates over the CCD or PCI bus network. The BCM transmits data to the electronic vehicle information center (EVIC) and to the electronic instrument cluster (EIC). The BCM receives data from the engine control node (ECN), powertrain control module (PCM), transmission control module (TCM), and air suspension control module. BODY TYPE Range: _________________________________________________________G/J or C/Y This parameter displays vehicle body type as identified by the BCM. COMMON WIRE(V) Range: ________________________________________________________ 0 to 4.92 V Displays the common wire voltage shared by all air conditioning system door motors. COMPRESSR RELAY EXHST SOL FRNT LT SOL FRNT RT SOL REAR SOLENOID Range: __________________________________________________________ ON/OFF These air suspension (AS) control module parameters display the state of various air suspension solenoids and relays. 241 Chrysler and Jeep Data Parameters Body Parameters COMP/TEMP US/METRIC SW Range: _______________________________________________________ OPEN/CLSD These electronic temperature and compass (ETC) parameters display the state of the electronic temperature and compass switches. DISPLAY(V) Range: ________________________________________________________ 0 to 69.0 V IGNITION(V) E2(V) Range: ________________________________________________________ 0 to 16.9 V FUEL LEVEL(V) Range: _________________________________________________________ 0 to 8.9 V Displays the control voltage of the various stand-alone serial bus traveler (SASBT) circuits. The SASBT is only installed in a vehicle when there are no other body modules. The SASBT shares some serial data with the PCM. The display parameter reading is the voltage that actually illuminates the vacuum fluorescent display (VFD). The E2 parameter is the voltage that drives the digital readouts on the traveler. The fuel level parameter displays a voltage representing the fuel level in the fuel tank, the actual voltage range varies according to tank capacity. The ignition parameter shows the ignition primary voltage. ECONOMY SWITCH FUEL SWITCH INFO. SWITCH RESET SWITCH SET SWITCH TIME SW TEMP SWITCH US/METRIC SW Range: _______________________________________________________ OPEN/CLSD These electronic vehicle information center (EVIC) parameters display the various switch states. The EVIC displays body and engine information that is based on data received from the BCM. Although the information is displayed on the EVIC, the BCM actually calculates and stores the information. FRNT RT SNSR A FRNT RT SNSR B FRNT RT SNSR C FRNT LT SNSR A FRNT LT SNSR B FRNT LT SNSR C REAR HT SNSR A REAR HT SNSR B REAR HT SNSR C Range: _______________________________________________________ OPEN/CLSD These air suspension (AS) control module parameters display the state of suspension sensors. IGNITION STATUS Range: __________________________________________________________ ON/OFF This electronic instrument cluster (EIC) parameter displays the status of the ignition switch. 242 Chrysler and Jeep Data Parameters Body Parameters INTER WIPER (V) Range: ________________________________________________________ 0 to 17.6 V Displays the position of the wiper switch. When the switch is closed, wipers off, the display reads 0 V. As the switch opens, voltage and wiper speed increases. L17 SIGNAL Range: _______________________________________________________ OPEN/CLSD Displays the headlamp switch status. MAN AC BLND(V) Range: _______________________________________________________ 0 to 327.7 V Displays the voltage that indicates the position of the temperature control knob. When set to cold, voltage is low. When set to warm, voltage is high. MODE SW MUX(V) Range: _______________________________________________________ 0 to 327.7 V Displays the voltage that indicates the position of the air climate mode switch. For each setting, such as air conditioning, heat, and defrost, this parameter displays a unique voltage. OPTICAL HORN Range: _______________________________________________________ OPEN/CLSD Displays the momentary flash-to-pass headlamp switch status. OUTSIDE TEMP (V) Range: _________________________________________________________ 0 to 5.0 V This electronic temperature and compass (ETC) parameter shows the voltage output from the temperature sensor in the engine control node (ECN). This data is sent on the data bus to the BCM for conversion to an actual temperature value. Sensor voltage and temperature are inversely related: • Low temperature produces high voltage—5.0 V represents the maximum cold • High temperature produces low voltage—0 V represents the maximum hot temperature P-BRK/LO FLU Range: ______________________________________________________ TRUE/FALSE A fluid level switch is located in the master cylinder reservoir. If a low fluid condition occurs, the switch closes and the ECM turns on the red brake warning lamp. The display reads TRUE when the switch is closed. A parking brake switch is connected to the low fluid input to the ECM. When the parking brake is applied, the switch is closed to ground, and the low fluid circuit becomes grounded. The grounded circuit causes the red brake warning lamp to illuminate. If the vehicle is driven with the parking brake applied, the amber check antilock lamp illuminates and a low fluid fault sets. PROPER SUPPLY V Range: __________________________________________________________ YES/NO This electronic instrument cluster (EIC) parameter displays the status of the supply voltage to the vacuum fluorescent display (VFD) and reads as follows: • YES if the supply voltage is adequate • NO if voltage is too low to power the VFD i NOTE: A NO reading may also indicate a power supply failure or low battery voltage at the cluster. 243 Chrysler and Jeep Data Parameters Body Parameters STEP SWITCH US/METRIC SW Range: _______________________________________________________ OPEN/CLSD Displays the serial bus traveler switch states. SUNLOAD(V) Range: ________________________________________________________ 0 to 5.00 V Displays the signal voltage from the sunlight sensor. This sensor measures light intensity, not temperature. The greater the voltage, the greater the light intensity. TRIP RESET SW TRIP/ODOM SW US/METRIC SW LOW OIL PR Range: _______________________________________________________ OPEN/CLSD These electronic instrument cluster (EIC) parameters displays various electronic instrument cluster switch states. VERSION NO. Range: __________________________________________________________0.0 to F.F Displays the version of the vehicle electronic control modules. Version numbers are available for the BCM, electronic instrument cluster (EIC) module, engine control node (ECN) module, serial bus traveler or stand-alone serial bus traveler (SASBT), electronic vehicle information center (EVIC), air suspension (AS) module, and electronic temperature and compass (ETC) module. 244 Chrysler and Jeep Data Parameters Antilock Brake System (ABS) Parameters Antilock Brake System (ABS) Parameters This section defines data parameters available from the ABS electronic control module (ECM) on Chrysler and Jeep vehicles. 2WD/4WD Range: _________________________________________________________ 2WD/4WD Controller Antilock Brake (CAB) from the transfer case switch as to which state the ABS is in. ACCUMULATOR(V) Range: ___________________________________________________________ 0 to 5 V STARTER(V) Range: ________________________________________________________ 0 to 13.5 V These Bendix 10 ABS parameters are voltage signals provided by the dual function pressure switch (DFPS) and read as follows: • 0 V when accumulator pressure rises above 1000 psi and the DFPS accumulator warning contacts close • 5 V when accumulator pressure is below 1000 psi and the DFPS accumulator warning contacts open, which disables antilock operation and the amber ABS warning lamp lights i NOTE: If the switch is open for two minutes, a diagnostic trouble code (DTC) sets. The DFPS also provides a ground for the ABS pump motor, and this ground circuit is opened to prevent the pump motor from running during engine cranking. On 1990 and early 1991 Bendix 10 systems, the DFPS grounds through the starter solenoid. On these early vehicles, the starter parameter should read battery voltage during engine cranking, and 0 V at all other times. For late 1991 to 1993 models with Bendix 10 ABS, the DFPS grounds through the switch casing and this parameter is not functional. ACT LF DUMP SOL ACT LF ISO SOL ACT REAR DUMP ACT REAR ISO ACT RF DUMP SOL ACT RF ISO SOL DES LF DUMP SOL DES LF ISO SOL DES REAR DUMP DES REAR ISO DES RF DUMP SOL DES RF ISO SOL Range: ____________________________________________________ OPEN/CLOSED Dodge trucks and full-size vans use a Kelsey-Hayes ABS. It is available in both rear wheel and four wheel systems. The rear wheel only system has one channel and both rear wheels are controlled together. The four wheel system adds a separate channel for each front wheel that are controlled independently for a total of three channels. There are two solenoids per channel, a normally open isolation solenoid and a normally closed dump solenoid. The actual, desired, and electrical state of each can be monitored. Under normal conditions, all solenoids should be off, all isolation solenoids should open, and all dump solenoids should be closed. When the CAB detects a lockup condition through the wheel speed sensors, the pump motor is activated and the affected channel goes into antilock mode. 245 Chrysler and Jeep Data Parameters Antilock Brake System (ABS) Parameters The isolation valve is energized closing off any additional hydraulic pressure from reaching the wheel. The dump solenoid is then energized releasing existing pressure and stopping the lockup condition. The two valves cycle back and forth applying and releasing pressure until the pedal is released or the lockup stops. BOOST PRESS(V) PRESSURE(V) Range: ___________________________________________________________ 0 to 5 V These Bendix 10 parameters display the output signals from the boost pressure and primary pressure transducers. • The boost pressure transducer senses the boost servo pressure. • The primary pressure transducer senses the master cylinder primary pressure. Both transducers convert measured pressure into a 0.25 to 5.0 V linear scale. The ABS ECM compares these two signals to determine proper operation. Both readings should be close to equal. However, boost pressure is typically a few hundredths of a volt higher due to frictional loss in the master cylinder piston seals. BRAKE LAMP SW Range: __________________________________________________________ ON/OFF BRAKE SW(V) Range: _________________________________________________________ 0 to Batt+ These Bendix ABX-4 ABS parameters indicate the position of the brake switch. Either one or the other displays, depending on the vehicle. For the antilock system to operate, the brake lamp switch parameter must read ON, or the brake switch parameter must read battery voltage. BRAKE SW Range: ____________________________________________________ OPEN/CLOSED This Teves ABS parameter is the state of the normally-open brake switch and reads as follows: • OPEN when the pedal is released • CLOSED when the brake pedal is pressed DIFF PRESS Range: ____________________________________________________ OPEN/CLOSED This Bendix 9 parameter indicates the status of the pressure differential switch, which is built into the proportioning valve. DIFF PRESS reads as follows: • OPEN indicates pressure between the front and rear fluid channels is balanced. • CLOSED indicates a pressure difference greater than 70 psi exists between the front and rear brake channels. If this occurs, the red brake warning lamp on the instrument panel turns on. The differential pressure switch is active in both normal and ABS braking modes. FLS SW #2 Range: ____________________________________________________ OPEN/CLOSED Monitors the brake fluid level switch and reads as follows: • OPEN when the fluid is low • CLOSED when the brake reservoir is full 246 Chrysler and Jeep Data Parameters Antilock Brake System (ABS) Parameters FLUID LEVEL SW Range: __________________________________________________________ OK/LOW The fluid level switch is mounted in the master cylinder and sends a signal to the CAB if the fluid level is too low to run the ABS. LF CONTINUITY RF CONTINUITY LR CONTINUITY RR CONTINUITY Range: __________________________________________________________ YES/NO These Bendix ABX-4 parameters monitor the four wheel speed sensor circuits for continuity and read as follows: • YES during normal operation • NO if a wheel speed sensor circuit is open for the related continuity parameter LF DUMP SOL LF ISO SOL REAR DUMP SOL REAR ISO SOL RF DUMP SOL RF ISO SOL Range: __________________________________________________________ ON/OFF Dodge trucks and full-size vans use a Kelsey-Hayes ABS. It is available in both rear wheel and four wheel systems. The rear wheel only system has one channel and both rear wheels are controlled together. The four wheel system adds a separate channel for each front wheel that are controlled independently for a total of three channels. There are two solenoids per channel, a normally open isolation solenoid and a normally closed dump solenoid. The actual, desired, and electrical state of each can be monitored. Under normal conditions, all solenoids should be off, all isolation solenoids should open, and all dump solenoids should be closed. When the CAB detects a lockup condition through the wheel speed sensors, the pump motor is activated and the affected channel goes into antilock mode. The isolation valve is energized closing off any additional hydraulic pressure from reaching the wheel. The dump solenoid is then energized releasing existing pressure and stopping the lockup condition. The two valves cycle back and forth applying and releasing pressure until the pedal is released or the lockup stops. LF ISOL CYCLE LR ISOL CYCLE RF ISOL CYCLE RR ISOL CYCLE Range: __________________________________________________________ ON/OFF The Bendix 10 ABS system includes three build valves, three decay valves, and four isolation valves. Each front wheel has independent build and decay valves, while the rear wheels share a common build valve and a common decay valve. An isolation valve at each wheel is used to isolate the calipers and wheel cylinders from the master cylinder during ABS operation. When an isolation valve parameter reads ON, pressure at the wheel is modulated through the build and decay valves. 247 Chrysler and Jeep Data Parameters Antilock Brake System (ABS) Parameters LF SOL RF SOL LR SOL RR SOL Range: _____________________________________________________ BUILD/DECAY LF SOL(V) RF SOL(V) LR SOL(V) RR SOL(V) Range: _______________________________________________________0 to battery+ These Bendix ABX-4 parameters indicate the status of the build and decay solenoids. There are four build and decay solenoids, one for each wheel. The solenoids are spring-loaded in the released position during normal braking and the parameters read BUILD and 0 V. The ABS control module sends a 12 V signal to actuates each valve, then the parameters read DECAY and 12 V. When a solenoid parameter reading is BUILD and 0 V, the valve for that wheel directs fluid from the master cylinder to the wheel brakes. When a solenoid parameter reading is DECAY and 12 V, the valve for that wheel directs fluid from the wheel brakes to the sump. LF VALVE RF VALVE LR VALVE RR VALVE Range: _____________________________________________________ BUILD/DECAY These Bendix 4 and 6 ABS parameters indicate the status of the build and decay valves. There are four valves, one for each wheel. When BUILD displays, the valve for that wheel directs fluid from the wheel brake to the isolation valve. When DECAY displays, that wheel valve directs fluid from the wheel brake to the sump. LF WHEEL(MPH) LR WHEEL(MPH) RF WHEEL(MPH) RR WHEEL(MPH) REAR WHEELS Range: ___________________________________________________ 0 to vehicle max Used on all Bendix and Teves systems, indicate the speed signals transmitted by each of the wheel sensors to the PCM. Wheel speeds should be equal to each other, as well as to vehicle speed as the vehicle is driven in a straight line without braking. Wheel speeds vary as the vehicle turns a corner, and they vary during braking without ABS operation as well. During ABS braking, wheels speeds should remain close to equal. LOW ACCUM Range: ______________________________________________________ TRUE/FALSE This Bendix 9 parameter indicates the accumulator circuit pressure switch status. The switch is mounted next to the master-cylinder and power booster assembly. LOW ACCUM reads as follows: • TRUE means that the pressure in the accumulator circuit has dropped below approximately 1050 psi. When this occurs, the amber check antilock lamp on the instrument cluster illuminates. Approximately 20 seconds later, the red brake warning lamp illuminates as well. • FALSE means that the pressure in the accumulator circuit is within acceptable limits, or above 1050 psi. 248 Chrysler and Jeep Data Parameters Antilock Brake System (ABS) Parameters LOW FLUID SW Range: __________________________________________________________ ON/OFF This Bendix 10 ABS parameter shows the state of the low fluid switch, which is located in the hydraulic fluid reservoir. When the brake fluid level is low, the switch closes and the display reads ON. The reading is OFF during normal operation. With the switch closed, the red brake warning lamp on the instrument panel lights and the parameter reads ON. When the switch is closed at speeds above 3 MPH (5 KPH), the antilock warning lamp also lights and ABS braking is disabled as well. MODULATOR RLY Range: ______________________________________________________ TRUE/FALSE This Bendix 9 parameter indicates the status of the modulator power relay. Two seconds after engine startup, the modulator power relay is energized to supply 12 V to the solenoids in the pressure modulator. In addition, when the modulator power relay closes, the amber check antilock lamp on the instrument cluster shuts off. MOTOR SPEED Range: __________________________________________________________ ON/OFF This Teves ABS parameter indicates the status of the ABS pump motor. When the pump motor runs, a rotation sensor transmits an AC signal to the ABS control module. To determine when the pump is on, the ABS control module compares the rotation sensor signal frequency to an internal reference frequency. MP COIL(V) Range: ______________________________________________________ zero to 13.5 V MP RELAY COIL Range: __________________________________________________________ ON/OFF The Bendix 4 and Bendix ABX-4 ABS motor pump relay turns the pump motor on and off. The voltage parameter indicates the control voltage applied to the coil side of the motor pump relay. The ON/OFF parameter is a pump motor feedback signal to the ABS module. The ABS control module actuates the motor pump relay by internally grounding the circuit. When displayed voltage reaches approximately 12 V, the relay is de-energized and the relay coil parameter should read OFF. When coil voltage reads zero, the relay is energized and the relay coil parameter should read ON. PED TRVL SNS Range: ____________________________________________________ see description This Teves ABS parameter monitors the position of the brake pedal. The sensor consists of a moveable plunger and a variable resistor with seven steps of resistance. Step 1 represents the brake pedal is completely released, step 7 represents the brake pedal fully pressed. The ABS control module uses this input as an actuator for the pump motor. The sensor is mounted in the power brake booster. PS SWITCH Range: ____________________________________________________ OPEN/CLOSED TC SWITCH Range: ______________________________________________ PRESSED/RELEASED These Teves ABS parameters are used only on vehicles with traction control. The pressure switch, which is located in the hydraulic control unit (HCU), is normally-closed and opens when the brakes are applied. The ABS controller uses the pressure switch input to determine when to deactivate the traction control. The traction control (TC) switch is driver activated. The switch must be pressed for 0.25 seconds to disable traction control. 249 Chrysler and Jeep Data Parameters Antilock Brake System (ABS) Parameters PUMP PUMP MOTOR MTR PMP CONTROL MTR PUMP RELAY Range: __________________________________________________________ ON/OFF POWER RELAY Range: __________________________________________________________ ON/OFF PUMP(V) MP MONITOR(V) Range: ________________________________________________________ 0 to 13.5 V These Kelsey-Hayes, Bendix 4, Bendex 9, ABX-4, and 6 ABS parameters indicate the status of the hydraulic pumps and motor. The hydraulic control unit (HCU) on these systems contains two pump assemblies, a primary pump and a secondary pump. A single electric motor, which only runs during an ABS stop, drives both pumps. The motor pump relay supplies power to the motor. The motor pump relay parameter is the ABS ECM command to the motor pump relay. All of the other parameters display feedback signals from the pump motor. Bendix 4 and 6 systems use the PUMP parameter and ABX-4 uses the MTR PMP CONTROL (motor pump control) parameter. Bendix 4 and ABX-4 systems display the MP MONITOR(V) (monitor voltage) parameter and Bendix 6 displays PUMP(V). When the motor pump relay value is ON, the pump or motor pump control values should also be ON. At the same time, the monitor or pump voltage parameter should display battery voltage. When the motor pump relay reads OFF, the pump or motor pump control parameter should read OFF, and the monitor or pump voltage parameter should read approximately 0 V. RED BRAKE LAMP Range: __________________________________________________________ ON/OFF This Bendix ABX-4 parameter indicates the ON/OFF status of the red brake warning lamp on the instrument panel. Two switches wired in parallel turn on this lamp. One is a mechanical switch in the parking brake and the other is a pressure switch in the hydraulic system. Both switches are normally open. The display reads OFF when the parking brake is released and there is pressure in the hydraulic system. REFERENCE(V) PUMP MOTOR(V) IGNITION(V) Range: _______________________________________________________0 to battery+ These Teves parameters display various system voltages. The reference parameter displays the power feed to the pump motor relay. The pump motor parameter is a feedback signal from the ABS pump motor. The ignition parameter displays the switched battery (B+) voltage. When the pump motor is energized the pump motor parameter should read battery voltage. Due to electromotive induction (EMI) during an ABS stop, the control module expects to monitor battery voltage from the pump motor for about 400 milliseconds to 3.3 seconds. Then, the reading should go to 0 V. SOL UNDERVOLT Range: ______________________________________________________ TRUE/FALSE This Bendix 9 parameter monitors the status of the 12 V power circuit to the pressure modulator solenoids and reads as follows: • TRUE when an under-voltage condition occurs • FALSE when there is 12 V on the circuit 250 Chrysler and Jeep Data Parameters Antilock Brake System (ABS) Parameters STOP LAMP SW Range: __________________________________________________________ ON/OFF This Bendix 4, 6, and 10 ABS parameter indicates the position of the brake switch. This parameter must read ON for the ABS to operate. SYSTEM RELAY Range: __________________________________________________________ ON/OFF SYSTEM RLY(V) Range: ________________________________________________________ 0 to 13.5 V On Bendix 4, 6, and 10 systems, the system relay energizes at vehicle startup to supply voltage to the ABS. When the relay state parameter reads ON, the relay voltage parameter should display battery voltage. When the relay state parameter reads OFF, the relay voltage parameter should read close to 0 V. After vehicle startup, if voltage drops below 9 V, a DTC is set and ABS is disabled. SY RLY COIL(V) Range: ________________________________________________________ 0 to 13.5 V SYS RELAY COIL Range: __________________________________________________________ ON/OFF On Bendix ABX-4 systems, the ABS control module actuates the system relay by internally grounding the circuit. The displayed voltage is the control voltage signal to the coil side of the system relay. The relay coil state parameter is a feedback signal. When battery voltage displays, the relay is de-energized and the relay coil state should read OFF. When the display reads 0 V, the relay is energized and the relay coil state parameter should read ON. WARNING LAMP WARN LAMP INP YEL ABS LAMP Range: __________________________________________________________ ON/OFF WARN LAMP(V) Range: ________________________________________________________ 0 to 13.5 V Bendix 4, ABX-4, 6, and 10 ABS control modules supply a ground to the antilock warning lamp circuit during engine cranking and when a fault is detected. WARNING LAMP is the output command to the lamp. WARN LAMP INP (warning lamp inoperative) and WARN LAMP(V) (warning lamp voltage) are the feedback signals. Whenever the lamp is off, both state parameters should read OFF and battery voltage should display. When the lamp is on, both state parameters should read ON and the voltage parameter should display about 0 V. Some vehicles do not display the voltage parameter. YEL ABS LAMP is the desired state of the yellow ABS lamp. 251 Chapter 13 Ford Data Parameters This chapter contains information for interpreting data parameters on Ford vehicles. For additional information on Ford vehicles, see the following sections: • Ford Operations, on page 40 • Ford Testing, on page 54 • Ford Communications Problems, on page 655 Alphabetical Parameter List Numerics 3/2 SHIFT SOL ............................................................................................................................................................. 269 4/3 SHIFT SOL ............................................................................................................................................................. 269 4_LOW_LED ................................................................................................................................................................ 265 4WD CLUTCH .............................................................................................................................................................. 265 4WD_FrShftSp.............................................................................................................................................................. 350 4WD_RrShftSp ............................................................................................................................................................. 350 4WD_Switch ................................................................................................................................................................. 351 4WDClutch(%).............................................................................................................................................................. 350 4WDClutchElec ............................................................................................................................................................ 350 4WDClutchPWM........................................................................................................................................................... 350 4WDClutchStat ............................................................................................................................................................. 350 4WDCPWMOU............................................................................................................................................................. 265 4WDCPWMST(%) ........................................................................................................................................................ 265 4WDHigh ...................................................................................................................................................................... 350 4WDHIGLMP................................................................................................................................................................ 265 4WDINP_SW................................................................................................................................................................ 265 4WDINP_SW_ABS....................................................................................................................................................... 334 4WDLOLED.................................................................................................................................................................. 350 4WDLow ....................................................................................................................................................................... 350 4WDLOWLMP .............................................................................................................................................................. 265 4WDMODE_L............................................................................................................................................................... 265 4WDPlate_A ................................................................................................................................................................. 351 4WDPlate_B ................................................................................................................................................................. 351 4WDPlate_C................................................................................................................................................................. 351 4WDPlate_D................................................................................................................................................................. 351 4WDPlatePwr ............................................................................................................................................................... 351 4X4_BOO ..................................................................................................................................................................... 265 4X4_CWRLY ................................................................................................................................................................ 265 4X4CCWRLY................................................................................................................................................................ 265 4X4Low......................................................................................................................................................................... 269 A A/C BLndoorPos........................................................................................................................................................... 351 A/CClutchSw ................................................................................................................................................................ 269 A/CPrs(V) ..................................................................................................................................................................... 269 252 Ford Data Parameters Alphabetical Parameter List A_CT(°C/°F) ................................................................................................................................................................. 269 A_CT(V)........................................................................................................................................................................ 269 AAT(°C/°F).................................................................................................................................................................... 269 ABagCHIME ................................................................................................................................................................. 351 ABBRGR ...................................................................................................................................................................... 333 ABPROS....................................................................................................................................................................... 334 ABS PLS....................................................................................................................................................................... 334 ABS_ACTIVE ............................................................................................................................................................... 265 ABS_ACTIVE ............................................................................................................................................................... 334 ABS_LAMP................................................................................................................................................................... 334 ABS_MSG .................................................................................................................................................................... 265 ABS_MSG_TCM .......................................................................................................................................................... 334 ABS_MTR..................................................................................................................................................................... 334 ABS_partbaseno .......................................................................................................................................................... 334 ABS_PartNoIdSuffix ..................................................................................................................................................... 334 ABS_POWER............................................................................................................................................................... 334 ABS_PWR_R ............................................................................................................................................................... 265 ABS_PWR_R ............................................................................................................................................................... 334 ABS_SoftVerNo ............................................................................................................................................................ 334 ABS_TCS_WIN126_SELTESTDTC ............................................................................................................................. 334 ABSLAMP..................................................................................................................................................................... 334 ABSLF I ........................................................................................................................................................................ 335 ABSLF O ...................................................................................................................................................................... 335 ABSLR I........................................................................................................................................................................ 335 ABSLR O ...................................................................................................................................................................... 335 ABSPMPRLY................................................................................................................................................................ 335 ABSR I.......................................................................................................................................................................... 335 ABSR O ........................................................................................................................................................................ 335 ABSRF I........................................................................................................................................................................ 335 ABSRF O...................................................................................................................................................................... 335 ABSRR I ....................................................................................................................................................................... 335 ABSRR O ..................................................................................................................................................................... 335 ABSVLVRLY ................................................................................................................................................................. 335 AC_RC_SW.................................................................................................................................................................. 270 ACC DeLaY .................................................................................................................................................................. 351 ACC_Pos...................................................................................................................................................................... 351 AccessoryDly................................................................................................................................................................ 351 ACCLUTCH_TCM ........................................................................................................................................................ 358 ACClutchHEV ............................................................................................................................................................... 270 ACCR_TEMP (°C/°F) ................................................................................................................................................... 335 ACCR_TRAV ................................................................................................................................................................ 335 ACCS............................................................................................................................................................................ 270 ACCS=A/C ................................................................................................................................................................... 270 ACDS1.......................................................................................................................................................................... 270 ACDS2.......................................................................................................................................................................... 270 ACFD_BAT ................................................................................................................................................................... 269 ACFD_PAS................................................................................................................................................................... 270 ACL=ACCEL ................................................................................................................................................................ 270 AclPedl(V)..................................................................................................................................................................... 270 ACP .............................................................................................................................................................................. 270 ACP .............................................................................................................................................................................. 270 ACP .............................................................................................................................................................................. 270 ACRDV ......................................................................................................................................................................... 270 253 Ford Data Parameters Alphabetical Parameter List ACRDV_F..................................................................................................................................................................... 271 ACT_MNT..................................................................................................................................................................... 271 ACTF ............................................................................................................................................................................ 271 ACTMNT_F .................................................................................................................................................................. 271 ACU_CHK .................................................................................................................................................................... 335 AFT_ADDS................................................................................................................................................................... 271 AFT2_ADDS................................................................................................................................................................. 271 AIR A ............................................................................................................................................................................ 271 AIR B ............................................................................................................................................................................ 271 AIR D ............................................................................................................................................................................ 272 AIR................................................................................................................................................................................ 271 AIR_FLT ....................................................................................................................................................................... 271 AIRBA........................................................................................................................................................................... 271 AIRBypass .................................................................................................................................................................... 271 AIRCON_SW_STATUS ................................................................................................................................................ 272 AIRD ............................................................................................................................................................................. 272 AIRDA........................................................................................................................................................................... 272 AIRDivert ...................................................................................................................................................................... 272 AIREVAL_DC_MODE1................................................................................................................................................. 272 AIRFault........................................................................................................................................................................ 272 AIRFLOW(g/S) ............................................................................................................................................................. 306 AIRM............................................................................................................................................................................. 272 AIRMonitor.................................................................................................................................................................... 272 ALarm EVent1-8 ........................................................................................................................................................... 352 ANTISCAN ................................................................................................................................................................... 272 AntiScan ....................................................................................................................................................................... 348 AP(%) ........................................................................................................................................................................... 272 AP(V) ............................................................................................................................................................................ 273 AP_MODE_TCM .......................................................................................................................................................... 273 AP_PER_TCM.............................................................................................................................................................. 358 AP_PER_TCM(%) ........................................................................................................................................................ 273 APP_F .......................................................................................................................................................................... 273 APP_LOW(V) ............................................................................................................................................................... 273 APP_MODE.................................................................................................................................................................. 273 APP1(V)........................................................................................................................................................................ 273 APP1(V)........................................................................................................................................................................ 273 APP1_FN_TCM............................................................................................................................................................ 358 APP1_TCM................................................................................................................................................................... 358 APP2(V)........................................................................................................................................................................ 273 APP2_TCM................................................................................................................................................................... 358 APP3(V)........................................................................................................................................................................ 273 APP3_TCM................................................................................................................................................................... 358 ARCFault ...................................................................................................................................................................... 335 ARPMDES(RPM) ......................................................................................................................................................... 273 AST............................................................................................................................................................................... 273 AST2............................................................................................................................................................................. 273 AUTOLMP .................................................................................................................................................................... 352 AutoRideCtrl ................................................................................................................................................................. 335 AWD_MSG ................................................................................................................................................................... 335 AWD_MSG_ABS_MZ................................................................................................................................................... 335 AXLE ............................................................................................................................................................................ 273 254 Ford Data Parameters Alphabetical Parameter List B BALVLV1....................................................................................................................................................................... 336 BALVLV2....................................................................................................................................................................... 336 BARO(Hz)..................................................................................................................................................................... 274 BARO(V)....................................................................................................................................................................... 274 BARO_TCM.................................................................................................................................................................. 358 BATSAV ........................................................................................................................................................................ 352 BATT_I_REC ................................................................................................................................................................ 358 BATT_V_REC............................................................................................................................................................... 358 BattSaver...................................................................................................................................................................... 352 BLD_STAT .................................................................................................................................................................... 336 BLoWerMoToR ............................................................................................................................................................. 274 BLSHORT BATT........................................................................................................................................................... 274 BLSHORT GND............................................................................................................................................................ 274 BOO ABS ..................................................................................................................................................................... 336 BOO SW....................................................................................................................................................................... 352 BOO.............................................................................................................................................................................. 274 BOO=BRAKE SW ........................................................................................................................................................ 274 BOO_GEM ................................................................................................................................................................... 352 BOO_TCM.................................................................................................................................................................... 358 BP=BARO (”HG) .......................................................................................................................................................... 274 BP=BARO (kPa) ........................................................................................................................................................... 274 BP_CALST ................................................................................................................................................................... 336 BPA............................................................................................................................................................................... 275 BPA_SW ....................................................................................................................................................................... 275 BPO .............................................................................................................................................................................. 275 BPO_Hz........................................................................................................................................................................ 275 BPP_BOO .................................................................................................................................................................... 275 BPTSCAL ..................................................................................................................................................................... 336 Bracket().................................................................................................................................................................... 333 BRAKE_LMP ................................................................................................................................................................ 336 BrakeOnOff................................................................................................................................................................... 275 BrakePrsApply.............................................................................................................................................................. 336 BRAKPRES(KPA/PSI) .................................................................................................................................................. 336 BRK_CHK..................................................................................................................................................................... 336 BRK_FLUID.................................................................................................................................................................. 336 BRK_MSIG(KPA/PSI) ................................................................................................................................................... 336 BRK_RSIG ................................................................................................................................................................... 337 BRK_WARN ................................................................................................................................................................. 337 BRKLAMP .................................................................................................................................................................... 337 BRKPEDSW ................................................................................................................................................................. 358 BSTLRNCYC................................................................................................................................................................ 337 BSTR_BSWF................................................................................................................................................................ 337 BSTR_LCCS ................................................................................................................................................................ 337 BSTR_LERN ................................................................................................................................................................ 337 BSTR_MECH ............................................................................................................................................................... 337 BSTR_SOL................................................................................................................................................................... 337 BSTR_SOL1................................................................................................................................................................. 337 BSTR_SW_T ................................................................................................................................................................ 337 BSTRBP_FSNC ........................................................................................................................................................... 337 BSTRBP_FSNO ........................................................................................................................................................... 337 255 Ford Data Parameters Alphabetical Parameter List C C KEYMD ..................................................................................................................................................................... 348 CAMDC 1 ..................................................................................................................................................................... 275 CAMDC 2 ..................................................................................................................................................................... 275 CAMDCR...................................................................................................................................................................... 275 CAMERR1 .................................................................................................................................................................... 275 CAMERR2 .................................................................................................................................................................... 275 CANP=PURGE............................................................................................................................................................. 275 CASeGND(V) ............................................................................................................................................................... 276 CAT mon ready............................................................................................................................................................. 276 CAT MONITOR............................................................................................................................................................. 276 CATCAL1(Hz) ............................................................................................................................................................... 276 CATCAL2(Hz) ............................................................................................................................................................... 276 CATEVAL_DC_MODE1................................................................................................................................................ 276 CATTST1(Hz) ............................................................................................................................................................... 276 CATTST2(Hz) ............................................................................................................................................................... 276 CCB_LCCS .................................................................................................................................................................. 337 CCB_LCTF ................................................................................................................................................................... 338 CCC=TCC .................................................................................................................................................................... 276 CCL .............................................................................................................................................................................. 276 CCLAS_ICS.................................................................................................................................................................. 338 CCLAS_ITF .................................................................................................................................................................. 338 CCLF ............................................................................................................................................................................ 277 CCMSTAT_DC_MODE1............................................................................................................................................... 277 CCNT............................................................................................................................................................................ 266 CCNT_TCM.................................................................................................................................................................. 358 CCNT_TPMS................................................................................................................................................................ 370 CCNTABS..................................................................................................................................................................... 338 CCS .............................................................................................................................................................................. 277 CCS_FLT ...................................................................................................................................................................... 277 CCSA............................................................................................................................................................................ 277 CCSFault ...................................................................................................................................................................... 277 CCSWA_TPS ............................................................................................................................................................... 338 CCW_Shift_Mtr............................................................................................................................................................. 352 CCYR_ICS ................................................................................................................................................................... 338 CCYR_ITF .................................................................................................................................................................... 338 ChimeReq..................................................................................................................................................................... 352 CHIMERQ..................................................................................................................................................................... 352 CHT SENSOR(°) .......................................................................................................................................................... 277 CHT(°C/°F) ................................................................................................................................................................... 277 CHT_COLD(°C/°F) ....................................................................................................................................................... 277 CHT_HOT(°C/°F).......................................................................................................................................................... 277 CHT_V(°C/°F)............................................................................................................................................................... 277 CHTFM ......................................................................................................................................................................... 277 CHTIL ........................................................................................................................................................................... 277 CHTIL_FLT ................................................................................................................................................................... 277 CHTILFault ................................................................................................................................................................... 277 CKP_PROF .................................................................................................................................................................. 278 CLCH_SOL (%) ............................................................................................................................................................ 266 CLRDIST_NOMIL......................................................................................................................................................... 278 CLTCHAMP_CMD ........................................................................................................................................................ 358 ClutchLock.................................................................................................................................................................... 352 CMPFM ........................................................................................................................................................................ 278 256 Ford Data Parameters Alphabetical Parameter List CMPFM ........................................................................................................................................................................ 278 CMPFM2 ...................................................................................................................................................................... 278 CmprCompMon rdy ...................................................................................................................................................... 278 CMPS_lp_Lev............................................................................................................................................................... 278 CMPS_Status ............................................................................................................................................................... 278 COAST ......................................................................................................................................................................... 278 CoastClSol.................................................................................................................................................................... 278 CoastClSol(%) .............................................................................................................................................................. 278 CoastClSol(mA)............................................................................................................................................................ 278 CONPROV ................................................................................................................................................................... 338 CONTRACTOR ............................................................................................................................................................ 358 COOLANT .................................................................................................................................................................... 352 COPENPLAT ................................................................................................................................................................ 266 CPC_AMP .................................................................................................................................................................... 279 CPC_AMP .................................................................................................................................................................... 358 CPP .............................................................................................................................................................................. 279 CPP/TCS ...................................................................................................................................................................... 279 CPP_ST........................................................................................................................................................................ 279 CRaSHSN1()............................................................................................................................................................. 333 CRaSHSN2()............................................................................................................................................................. 333 CRSHSN1()............................................................................................................................................................... 333 CRSHSN2()............................................................................................................................................................... 333 CRUISE ........................................................................................................................................................................ 279 CRUISE_SW ................................................................................................................................................................ 279 CSEGND(V) ................................................................................................................................................................. 279 CUTVLV1...................................................................................................................................................................... 338 CUTVLV2...................................................................................................................................................................... 338 CW_CCW ..................................................................................................................................................................... 266 CW_Shift_Mtr ............................................................................................................................................................... 352 CylHdTemp(V) .............................................................................................................................................................. 279 D D DR SW ...................................................................................................................................................................... 353 D SBELT ....................................................................................................................................................................... 353 D_Airbag()................................................................................................................................................................. 333 D_AirBAG2() ............................................................................................................................................................. 333 D_AirBAGLoop2() ..................................................................................................................................................... 333 D_Preten()................................................................................................................................................................. 333 D_PRETNR() ............................................................................................................................................................ 333 DCDC_ENA.................................................................................................................................................................. 279 DCDC_F ....................................................................................................................................................................... 279 DECKLID ...................................................................................................................................................................... 353 DIM DEC ...................................................................................................................................................................... 353 DIM INC........................................................................................................................................................................ 353 DISTDIG_TCM ............................................................................................................................................................. 359 DoorAjarLamp .............................................................................................................................................................. 353 DoorAJR L .................................................................................................................................................................... 353 DoorLocK...................................................................................................................................................................... 353 DoorUnlock................................................................................................................................................................... 353 DPFE(V) ....................................................................................................................................................................... 279 DPFEGR....................................................................................................................................................................... 280 257 Ford Data Parameters Alphabetical Parameter List Dr DR SW..................................................................................................................................................................... 353 Dr SBELT...................................................................................................................................................................... 353 DRIVE CounT............................................................................................................................................................... 280 Drive_COUNT .............................................................................................................................................................. 280 DRIVECNT ................................................................................................................................................................... 280 DRIVECNT_TCM ......................................................................................................................................................... 359 DRIVEPOS_TCM ......................................................................................................................................................... 359 DSBELTR ..................................................................................................................................................................... 333 DSBL_TOG .................................................................................................................................................................. 338 DSD .............................................................................................................................................................................. 280 DTC CouNT (AIRBAG)................................................................................................................................................. 333 DTC CouNT (PCM) ...................................................................................................................................................... 280 DTC CouNT.................................................................................................................................................................. 353 DTC .............................................................................................................................................................................. 280 DTC_CNT..................................................................................................................................................................... 280 DTC_CNT_TCM ........................................................................................................................................................... 359 DYNOMODE ................................................................................................................................................................ 338 E EBP(V).......................................................................................................................................................................... 281 ECT .............................................................................................................................................................................. 281 ECT(°C) ........................................................................................................................................................................ 281 ECT(°F) ........................................................................................................................................................................ 281 ECT(V).......................................................................................................................................................................... 281 ECT_FF (°C/°F) ............................................................................................................................................................ 281 ECT_TCM (°C/°F)......................................................................................................................................................... 359 ECT_TCM_DI (°C/°F) ................................................................................................................................................... 359 ECTF ............................................................................................................................................................................ 281 EFTA............................................................................................................................................................................. 281 EGR MONITOR EGR mon ready............................................................................................................................................................ 282 EGR_EVAL................................................................................................................................................................... 281 EGR_Fault.................................................................................................................................................................... 282 EGRBARO.................................................................................................................................................................... 282 EGRCFault ................................................................................................................................................................... 282 EGRCvacsol ................................................................................................................................................................. 282 EGRDC(%) ................................................................................................................................................................... 282 EGRDtyCycl(%)............................................................................................................................................................ 282 EGREVAL_DC_MODE1 ............................................................................................................................................... 282 EGRFOpen................................................................................................................................................................... 282 EGRFShort ................................................................................................................................................................... 282 EGRMC1 ...................................................................................................................................................................... 283 EGRMC1F .................................................................................................................................................................... 283 EGRMC2 ...................................................................................................................................................................... 283 EGRMC2F .................................................................................................................................................................... 283 EGRMC3 ...................................................................................................................................................................... 283 EGRMC3F .................................................................................................................................................................... 283 EGRMC4 ...................................................................................................................................................................... 283 EGRMC4F .................................................................................................................................................................... 283 EGRMDSD ................................................................................................................................................................... 283 EGRTP(V) .................................................................................................................................................................... 283 EGRTPDC(%) .............................................................................................................................................................. 283 EGRVentsol .................................................................................................................................................................. 283 258 Ford Data Parameters Alphabetical Parameter List EGRVFault ................................................................................................................................................................... 283 EGRVP(V) .................................................................................................................................................................... 283 EGRVPDES.................................................................................................................................................................. 283 EGRVR(%) ................................................................................................................................................................... 283 EGRVR_FLT................................................................................................................................................................. 283 ElecPrsCtrl.................................................................................................................................................................... 284 ENABLE S .................................................................................................................................................................... 348 ENG LOAD(%) ............................................................................................................................................................. 303 ENG_CTO .................................................................................................................................................................... 359 ENG_TORQ ................................................................................................................................................................. 359 EngFuelTA(V) ............................................................................................................................................................... 284 EngFuelTB(V)............................................................................................................................................................... 284 Engine_STAT................................................................................................................................................................ 359 EngOilTemp(°) .............................................................................................................................................................. 284 EOT(°) .......................................................................................................................................................................... 284 EOT(V) ......................................................................................................................................................................... 284 EOT_DEG(°C/°F) ......................................................................................................................................................... 284 EOT_M(°C/°F) .............................................................................................................................................................. 284 EOTF ............................................................................................................................................................................ 284 EOTM ........................................................................................................................................................................... 284 EPC(psi) ....................................................................................................................................................................... 284 EPC(V) ......................................................................................................................................................................... 284 EPCV(V) ....................................................................................................................................................................... 284 EPR(%)......................................................................................................................................................................... 285 ETC_ACT ..................................................................................................................................................................... 285 ETC_CTRL ................................................................................................................................................................... 285 ETC_DSD..................................................................................................................................................................... 285 EVACFILL ..................................................................................................................................................................... 338 EVAP mon ready .......................................................................................................................................................... 285 EVAPC.......................................................................................................................................................................... 285 EVAPCP ....................................................................................................................................................................... 285 EVAPCP_FLT ............................................................................................................................................................... 285 EVAPCPFault ............................................................................................................................................................... 285 EVAPCV ....................................................................................................................................................................... 285 EVAPCV(%).................................................................................................................................................................. 285 EVAPCVA ..................................................................................................................................................................... 285 EVAPCVF1 ................................................................................................................................................................... 285 EVAPCVFault ............................................................................................................................................................... 286 EVAPCVFLT ................................................................................................................................................................. 286 EVAPEVAL_DC_MODE1 ............................................................................................................................................. 286 EVAPPrgFlw(V) ............................................................................................................................................................ 286 EVAPSTA...................................................................................................................................................................... 286 EVAPVM(%) ................................................................................................................................................................. 286 EVAPVM_Fault............................................................................................................................................................. 286 EVAPVMA .................................................................................................................................................................... 286 EVMV ........................................................................................................................................................................... 286 EVP(V).......................................................................................................................................................................... 286 EVR(%)......................................................................................................................................................................... 286 ExhBackPrs .................................................................................................................................................................. 287 EXTCRSH .................................................................................................................................................................... 333 F FAILSAF ....................................................................................................................................................................... 348 259 Ford Data Parameters Alphabetical Parameter List FAN Monitor.................................................................................................................................................................. 287 FAN............................................................................................................................................................................... 287 FAN_FLT ...................................................................................................................................................................... 287 FAN_REQ..................................................................................................................................................................... 287 FANM(HIGH) ................................................................................................................................................................ 287 FANSS.......................................................................................................................................................................... 287 FANSSM....................................................................................................................................................................... 287 FDSP_ESCS_GPL ....................................................................................................................................................... 287 FFINF(%)...................................................................................................................................................................... 288 FFLRND ....................................................................................................................................................................... 288 FICM_LPWR ................................................................................................................................................................ 288 FICM_MPWR ............................................................................................................................................................... 288 FICM_VPWR ................................................................................................................................................................ 288 FICMSYNC................................................................................................................................................................... 288 FIRMSHFT ................................................................................................................................................................... 288 FIRMSHFT ................................................................................................................................................................... 359 FlexFuel(Hz) ................................................................................................................................................................. 288 FLG_MLUSFM ............................................................................................................................................................. 288 FLG_MLUSFM ............................................................................................................................................................. 359 FLG_OTLK ................................................................................................................................................................... 288 FLG_OTLK ................................................................................................................................................................... 359 FLG_SS4...................................................................................................................................................................... 288 FLI(V)............................................................................................................................................................................ 289 FLI_PERCENT(%)........................................................................................................................................................ 288 FLI_SG(V) .................................................................................................................................................................... 289 FLIFM ........................................................................................................................................................................... 288 FLInput(%).................................................................................................................................................................... 289 FLInput(V)..................................................................................................................................................................... 289 FP ................................................................................................................................................................................. 288 FP=FUEL PUMP .......................................................................................................................................................... 289 FP_FLT ......................................................................................................................................................................... 289 FPA STATE................................................................................................................................................................... 289 FPFault ......................................................................................................................................................................... 289 FPM .............................................................................................................................................................................. 289 FPM(%) ........................................................................................................................................................................ 289 FPMode ........................................................................................................................................................................ 290 FPMonitor ..................................................................................................................................................................... 290 FR_OUTSHA................................................................................................................................................................ 266 FRP(psi) ....................................................................................................................................................................... 290 FRP(V).......................................................................................................................................................................... 290 FRP_DSD..................................................................................................................................................................... 290 FRP_FAULT ................................................................................................................................................................. 290 FRP_PRESS ................................................................................................................................................................ 290 FRPFM ......................................................................................................................................................................... 290 FRT1FM ....................................................................................................................................................................... 290 FrWiperMd.................................................................................................................................................................... 353 FRZ_DTC ..................................................................................................................................................................... 359 FSVFault....................................................................................................................................................................... 290 FSVMonitor................................................................................................................................................................... 290 FTIV_F.......................................................................................................................................................................... 290 FTIV_HEV(%)............................................................................................................................................................... 290 FTP(KPA/PSI)............................................................................................................................................................... 290 FTP_FAULT .................................................................................................................................................................. 291 260 Ford Data Parameters Alphabetical Parameter List FUEL mon ready .......................................................................................................................................................... 291 FUEL STATUS.............................................................................................................................................................. 292 FUEL SYS .................................................................................................................................................................... 292 FUEL SYS1 .................................................................................................................................................................. 292 FUEL SYS2 .................................................................................................................................................................. 292 FUEL_CUT ................................................................................................................................................................... 359 FUEL_RAIL_TEMP(°C/°F) ........................................................................................................................................... 291 FuelPumpA................................................................................................................................................................... 291 FUELPW....................................................................................................................................................................... 291 FUELPW(mS)............................................................................................................................................................... 291 FUELPW1(mS)............................................................................................................................................................. 291 FUELPW2(%) ............................................................................................................................................................... 291 FUELPW2(mS)............................................................................................................................................................. 291 FuelRailPrs(V) .............................................................................................................................................................. 291 FuelSolVlv .................................................................................................................................................................... 290 FUELSYS ..................................................................................................................................................................... 292 FuelTankPrs(V)............................................................................................................................................................. 292 FueLvlimput(%) ............................................................................................................................................................ 289 FueLvlinput(V) .............................................................................................................................................................. 289 G G_INPUT ...................................................................................................................................................................... 339 G_SDN ......................................................................................................................................................................... 292 G_SDN_A..................................................................................................................................................................... 360 G_SDN_B..................................................................................................................................................................... 360 G_SDN_C..................................................................................................................................................................... 360 G_SENSOR.................................................................................................................................................................. 339 GEAR ........................................................................................................................................................................... 292 Gear.............................................................................................................................................................................. 360 GEAR_MAX.................................................................................................................................................................. 292 GEAR_MAX.................................................................................................................................................................. 360 Gear_OSC.................................................................................................................................................................... 292 Gear_OSCIP ................................................................................................................................................................ 360 GEAR_RAT .................................................................................................................................................................. 292 GEAR_RAT .................................................................................................................................................................. 360 GEN_BRK_CMD .......................................................................................................................................................... 360 GEN_COILTEMP (°C)/(°F) ........................................................................................................................................... 360 GEN_CTRL .................................................................................................................................................................. 360 GEN_FAULT ................................................................................................................................................................. 292 GEN_INV_V ................................................................................................................................................................. 360 GEN_LAMP .................................................................................................................................................................. 292 GEN_MON ................................................................................................................................................................... 293 GEN_MON(%).............................................................................................................................................................. 293 GEN_SPEED................................................................................................................................................................ 360 GEN_TEMPHI (°C)/(°F)................................................................................................................................................ 360 GEN_TORQ_CMD ....................................................................................................................................................... 360 GENB_F ....................................................................................................................................................................... 293 GENB_FAULT .............................................................................................................................................................. 293 GENF............................................................................................................................................................................ 293 GENFDC(%)................................................................................................................................................................. 293 GENFIL......................................................................................................................................................................... 293 GENLMP ...................................................................................................................................................................... 292 GENVDSD.................................................................................................................................................................... 293 261 Ford Data Parameters Alphabetical Parameter List GlowPlugCtrl(%) ........................................................................................................................................................... 293 GPC(%) ........................................................................................................................................................................ 293 GPC_L.......................................................................................................................................................................... 293 GPC_R ......................................................................................................................................................................... 293 GPCoilTiMe .................................................................................................................................................................. 294 GPCTM......................................................................................................................................................................... 294 GPLampTiMe................................................................................................................................................................ 294 GPLTM ......................................................................................................................................................................... 294 GR_RATIO ................................................................................................................................................................... 294 GR_RATIO ................................................................................................................................................................... 361 GTQ_OUT .................................................................................................................................................................... 361 GTQ_OUT_ENG .......................................................................................................................................................... 294 H HALLPOWER ............................................................................................................................................................... 266 HallPwr ......................................................................................................................................................................... 354 HatchUnlkSw ................................................................................................................................................................ 354 HCATEVAL_DC_MODE1 ............................................................................................................................................. 294 HDLMPSW ................................................................................................................................................................... 354 HeaDLaMP ................................................................................................................................................................... 354 HFC .............................................................................................................................................................................. 294 HFC=HI FAN ................................................................................................................................................................ 302 HFC_FLT ...................................................................................................................................................................... 294 HFCA............................................................................................................................................................................ 294 HFCFault ...................................................................................................................................................................... 294 HIGH_LAMP................................................................................................................................................................. 266 HighFanCtrl .................................................................................................................................................................. 302 HO2S mon ready.......................................................................................................................................................... 295 HO2S MONITOR .......................................................................................................................................................... 295 HO2S11(mA) ................................................................................................................................................................ 295 HO2S12(mA) ................................................................................................................................................................ 295 HO2S21(mA) ................................................................................................................................................................ 295 HO2S22(mA) ................................................................................................................................................................ 295 HORN SW .................................................................................................................................................................... 354 HORN_TPM ................................................................................................................................................................. 370 HPRC_ENA .................................................................................................................................................................. 295 HPRC_F ....................................................................................................................................................................... 295 HTR11 .......................................................................................................................................................................... 295 HTR11A ........................................................................................................................................................................ 295 HTR11F ........................................................................................................................................................................ 295 HTR11Fault .................................................................................................................................................................. 295 HTR12 .......................................................................................................................................................................... 295 HTR12A........................................................................................................................................................................ 295 HTR12F ........................................................................................................................................................................ 295 HTR12Fault .................................................................................................................................................................. 295 HTR13 .......................................................................................................................................................................... 296 HTR21 .......................................................................................................................................................................... 295 HTR21A........................................................................................................................................................................ 295 HTR21F ........................................................................................................................................................................ 295 HTR21F ........................................................................................................................................................................ 296 HTR21Fault .................................................................................................................................................................. 295 HTR22 .......................................................................................................................................................................... 295 HTR22A........................................................................................................................................................................ 295 262 Ford Data Parameters Alphabetical Parameter List HTR22F ........................................................................................................................................................................ 295 HTR22Fault .................................................................................................................................................................. 295 HTR23 .......................................................................................................................................................................... 296 HTRCM11 ..................................................................................................................................................................... 296 HTRCM12..................................................................................................................................................................... 296 HTRCM21..................................................................................................................................................................... 296 HTRCM22..................................................................................................................................................................... 296 HTREVAL_DC_MODE1 ............................................................................................................................................... 296 HTRX1.......................................................................................................................................................................... 296 HTRX2.......................................................................................................................................................................... 296 I I_SDN_1 ....................................................................................................................................................................... 361 I_SDN_2 ....................................................................................................................................................................... 361 IAC(%) .......................................................................................................................................................................... 296 IAC=IDLE AIR(%) ......................................................................................................................................................... 296 IAC_CELL0................................................................................................................................................................... 297 IAC_CELL1................................................................................................................................................................... 297 IAC_CELL2................................................................................................................................................................... 297 IAC_CELL3................................................................................................................................................................... 297 IAC_FLT ....................................................................................................................................................................... 297 IAC_MODE................................................................................................................................................................... 297 IAC_TRIM..................................................................................................................................................................... 297 IACDTCY(%) ................................................................................................................................................................ 297 IACF ............................................................................................................................................................................. 297 IACFault........................................................................................................................................................................ 297 IAT ................................................................................................................................................................................ 297 IAT(°C).......................................................................................................................................................................... 297 IAT(°F) .......................................................................................................................................................................... 297 IAT(V) ........................................................................................................................................................................... 298 IAT=ACT(°C)................................................................................................................................................................. 298 IAT=ACT(°F) ................................................................................................................................................................. 298 IAT=ACT(V) .................................................................................................................................................................. 298 IAT_C............................................................................................................................................................................ 297 IAT_FAULT ................................................................................................................................................................... 298 IAT_T ............................................................................................................................................................................ 297 IAT_TCM (°C)/(°F) ........................................................................................................................................................ 361 IAT2 .............................................................................................................................................................................. 297 IAT2(V) ......................................................................................................................................................................... 298 IAT2_TEMP .................................................................................................................................................................. 297 IAT2_VOLTS................................................................................................................................................................. 297 IC_MSG........................................................................................................................................................................ 339 IC_MSG_ABS_MZ ....................................................................................................................................................... 339 ICP(V)........................................................................................................................................................................... 298 ICP_DES ...................................................................................................................................................................... 298 ICP_PRESS ................................................................................................................................................................. 298 IGN ADVANCE(°) ......................................................................................................................................................... 320 IGN O/L ........................................................................................................................................................................ 351 IGN Run........................................................................................................................................................................ 351 IGN_RUN_PCM ........................................................................................................................................................... 298 IGN_SW ....................................................................................................................................................................... 266 IGNITION(V)................................................................................................................................................................. 266 IGNITION(V)................................................................................................................................................................. 339 263 Ford Data Parameters Alphabetical Parameter List ILINE_V ........................................................................................................................................................................ 298 IllumEntry...................................................................................................................................................................... 354 IMAN_DN_TCM............................................................................................................................................................ 361 IMIN_UP_TCM ............................................................................................................................................................. 361 IMRC ............................................................................................................................................................................ 298 IMRC1M(V)................................................................................................................................................................... 299 IMRC2M(V)................................................................................................................................................................... 299 IMRCFault .................................................................................................................................................................... 299 IMRCFLT ...................................................................................................................................................................... 299 IMRCM(V)..................................................................................................................................................................... 299 IMS_SRC...................................................................................................................................................................... 299 IMS_SRC...................................................................................................................................................................... 361 IMTV ............................................................................................................................................................................. 299 IMTV(%) ....................................................................................................................................................................... 299 IMTV_FLT ..................................................................................................................................................................... 299 IMTV1 ........................................................................................................................................................................... 299 IMTV1_PER(%) ............................................................................................................................................................ 299 IMTV2 ........................................................................................................................................................................... 299 IMTV2_FLT ................................................................................................................................................................... 299 IMTV2_PER(%) ............................................................................................................................................................ 299 IMTVF........................................................................................................................................................................... 299 IMTVFault ..................................................................................................................................................................... 299 INJ PW1(mS)................................................................................................................................................................ 299 INJ PW2(mS)................................................................................................................................................................ 299 INJ ................................................................................................................................................................................ 299 INJ_TIM ........................................................................................................................................................................ 300 INJ1 .............................................................................................................................................................................. 300 INJ10 ............................................................................................................................................................................ 300 INJ2 .............................................................................................................................................................................. 300 INJ3 .............................................................................................................................................................................. 300 INJ4 .............................................................................................................................................................................. 300 INJ5 .............................................................................................................................................................................. 300 INJ6 .............................................................................................................................................................................. 300 INJ7 .............................................................................................................................................................................. 300 INJ8 .............................................................................................................................................................................. 300 INJ9 .............................................................................................................................................................................. 300 INJnFault ...................................................................................................................................................................... 300 InjPrsReg(%) ................................................................................................................................................................ 300 InManRunCtrl ............................................................................................................................................................... 301 InManRunCtrl(%).......................................................................................................................................................... 300 IPR(%) .......................................................................................................................................................................... 301 ISS................................................................................................................................................................................ 361 ISS(RPM) ..................................................................................................................................................................... 301 ISS_DIR........................................................................................................................................................................ 301 ISS_DIR........................................................................................................................................................................ 361 ISS_F............................................................................................................................................................................ 301 ISS_F............................................................................................................................................................................ 361 ISS_FAULT ................................................................................................................................................................... 301 ITS1 .............................................................................................................................................................................. 301 ITS2 .............................................................................................................................................................................. 301 ITSD ............................................................................................................................................................................. 301 ITSR ............................................................................................................................................................................. 301 IVD_R_IN ..................................................................................................................................................................... 339 264 Ford Data Parameters Alphabetical Parameter List IVD_R_OUT ................................................................................................................................................................. 339 IVS................................................................................................................................................................................ 301 IWE_SOL...................................................................................................................................................................... 266 IWE_SOLST ................................................................................................................................................................. 266 K KAMFUSE .................................................................................................................................................................... 301 KeyInIgn ....................................................................................................................................................................... 354 KEYPOS....................................................................................................................................................................... 302 KNOCK_1..................................................................................................................................................................... 302 KNOCK_2..................................................................................................................................................................... 302 L L_ACCEL_EPB ............................................................................................................................................................ 339 LAS_ICS....................................................................................................................................................................... 339 LAST_ID ....................................................................................................................................................................... 370 LATACCEL.................................................................................................................................................................... 339 LATACCL ...................................................................................................................................................................... 339 LATACINPT .................................................................................................................................................................. 339 LCF_FLT....................................................................................................................................................................... 302 LCP_AMP..................................................................................................................................................................... 361 LF WSPD(MPH/KPH)................................................................................................................................................... 341 LF_FAIL ........................................................................................................................................................................ 339 LF_ID............................................................................................................................................................................ 370 LF_IN(AMP).................................................................................................................................................................. 339 LF_INLET ..................................................................................................................................................................... 340 LF_LRN ........................................................................................................................................................................ 370 LF_MES........................................................................................................................................................................ 370 LF_NORM .................................................................................................................................................................... 370 LF_OUT(AMP).............................................................................................................................................................. 340 LF_OUTLET ................................................................................................................................................................. 340 LF_PRES...................................................................................................................................................................... 340 LF_PRIME .................................................................................................................................................................... 340 LF_PSI.......................................................................................................................................................................... 370 LF_PwrWndw ............................................................................................................................................................... 354 LF_REC........................................................................................................................................................................ 370 LF_SWITCH ................................................................................................................................................................. 340 LF_TC_PRV ................................................................................................................................................................. 340 LF_TC_SWV ................................................................................................................................................................ 340 LF_UnlockSw ............................................................................................................................................................... 354 LF_WSPD..................................................................................................................................................................... 266 LF_WSPD(KPH/MPH).................................................................................................................................................. 341 LF_WSPD_TCM........................................................................................................................................................... 361 LFAWAKE..................................................................................................................................................................... 370 LFBeltFstnd .................................................................................................................................................................. 354 LFC............................................................................................................................................................................... 302 LFC=LO FAN ................................................................................................................................................................ 302 LFCFault....................................................................................................................................................................... 302 LFDoorAjar ................................................................................................................................................................... 354 LFDR_SW .................................................................................................................................................................... 266 LFIDPRG ...................................................................................................................................................................... 370 LFLOBAT ...................................................................................................................................................................... 370 265 Ford Data Parameters Alphabetical Parameter List LFT1(%)........................................................................................................................................................................ 303 LFTRIM 1(%) ................................................................................................................................................................ 303 LFTRIM 2(%) ................................................................................................................................................................ 303 LFWindowDn ................................................................................................................................................................ 355 LFWindowMotr(A)......................................................................................................................................................... 355 LFWndwPeak(A) .......................................................................................................................................................... 355 LGATESW .................................................................................................................................................................... 353 LOAD(%) ...................................................................................................................................................................... 303 LOAD_FF(%)................................................................................................................................................................ 303 LOAD_TCM .................................................................................................................................................................. 361 LONG_ACCL................................................................................................................................................................ 340 LONGFT1(%) ............................................................................................................................................................... 303 LONGFT2(%) ............................................................................................................................................................... 303 LOOP............................................................................................................................................................................ 311 LOS_BRAK................................................................................................................................................................... 303 LOS_ENG..................................................................................................................................................................... 303 LOS_EQ ....................................................................................................................................................................... 303 LOS_ETC ..................................................................................................................................................................... 303 LOS_GEN..................................................................................................................................................................... 304 LOS_HV ....................................................................................................................................................................... 304 LOS_IPC ...................................................................................................................................................................... 304 LOS_KEY ..................................................................................................................................................................... 304 LOS_LV ........................................................................................................................................................................ 304 LOS_MOT .................................................................................................................................................................... 304 LOS_OWC.................................................................................................................................................................... 304 LOS_TCM..................................................................................................................................................................... 304 LOSSTRT ..................................................................................................................................................................... 304 LOW_LAMP.................................................................................................................................................................. 266 LowFanCA.................................................................................................................................................................... 304 LowFanCtrl ................................................................................................................................................................... 304 LowFPumpFault ........................................................................................................................................................... 304 LPC_AMP..................................................................................................................................................................... 304 LR TURN ...................................................................................................................................................................... 355 LR WSPD(MPH/KPH) .................................................................................................................................................. 341 LR_FAIL........................................................................................................................................................................ 341 LR_ID ........................................................................................................................................................................... 370 LR_IN(AMP) ................................................................................................................................................................. 341 LR_INLET..................................................................................................................................................................... 341 LR_LRN........................................................................................................................................................................ 371 LR_MES ....................................................................................................................................................................... 371 LR_NORM .................................................................................................................................................................... 371 LR_OUT(AMP) ............................................................................................................................................................. 341 LR_OUTLET................................................................................................................................................................. 341 LR_PRES(KPA/PSI) ..................................................................................................................................................... 340 LR_PRIME.................................................................................................................................................................... 340 LR_PRIME.................................................................................................................................................................... 341 LR_REC ....................................................................................................................................................................... 371 LR_SWITCH................................................................................................................................................................. 340 LR_SWITCH................................................................................................................................................................. 341 LR_TC_PRV................................................................................................................................................................. 341 LR_TC_SWV ................................................................................................................................................................ 340 LR_TC_SWV ................................................................................................................................................................ 341 LR_TC_VLV.................................................................................................................................................................. 340 266 Ford Data Parameters Alphabetical Parameter List LR_TC_VLV.................................................................................................................................................................. 342 LR_WSPD .................................................................................................................................................................... 266 LR_WSPD(KPH/MPH) ................................................................................................................................................. 341 LRAWAKE .................................................................................................................................................................... 371 LRDoor SWitch............................................................................................................................................................. 353 LRDoorAjar................................................................................................................................................................... 354 LRDR SW ..................................................................................................................................................................... 353 LRDR Switch ................................................................................................................................................................ 353 LRIDPRG...................................................................................................................................................................... 371 LRLOBAT ..................................................................................................................................................................... 371 LRO_PSI ...................................................................................................................................................................... 371 LT TRIM B1(%) ............................................................................................................................................................. 305 LT TRIM B2(%) ............................................................................................................................................................. 305 LTRL_ACC ................................................................................................................................................................... 342 M M KEY .......................................................................................................................................................................... 348 M_DPFE ....................................................................................................................................................................... 305 M_IAT ........................................................................................................................................................................... 305 M_LOAD(%) ................................................................................................................................................................. 305 M_PNP ......................................................................................................................................................................... 305 M_RPM......................................................................................................................................................................... 305 M_RUN......................................................................................................................................................................... 305 M_SDN ......................................................................................................................................................................... 309 M_SDN_A..................................................................................................................................................................... 362 M_SDN_B..................................................................................................................................................................... 362 M_SDN_C .................................................................................................................................................................... 362 M_SOAK....................................................................................................................................................................... 305 M_TP ............................................................................................................................................................................ 305 M_TRIP ........................................................................................................................................................................ 305 M_VSS ......................................................................................................................................................................... 306 M_WHEEL.................................................................................................................................................................... 306 MAF(gm/S) ................................................................................................................................................................... 306 MAF(V .......................................................................................................................................................................... 306 MAF=MASS AIR(V) ...................................................................................................................................................... 306 MAF_Fault .................................................................................................................................................................... 306 MAF_RATE................................................................................................................................................................... 306 MAFF............................................................................................................................................................................ 306 MAN LEV POS ............................................................................................................................................................. 306 MAN LEV POS(V) ........................................................................................................................................................ 306 MAN VAC ..................................................................................................................................................................... 307 MANSW_TCM .............................................................................................................................................................. 362 MAP(Hz) ....................................................................................................................................................................... 307 MAP(psi) ....................................................................................................................................................................... 307 MAP_DI2 ...................................................................................................................................................................... 307 MAP_F.......................................................................................................................................................................... 307 MAP_PCM.................................................................................................................................................................... 307 MAP_V ......................................................................................................................................................................... 307 MAP2............................................................................................................................................................................ 307 MASS AIR FLOW_STATUS ......................................................................................................................................... 306 MASS AIR(gm/sec) ...................................................................................................................................................... 306 Master KEY .................................................................................................................................................................. 348 MASTERKEY ............................................................................................................................................................... 307 267 Ford Data Parameters Alphabetical Parameter List MAT .............................................................................................................................................................................. 308 MC_PT_1 ..................................................................................................................................................................... 342 MC_PT_2 ..................................................................................................................................................................... 342 MECH_TCM (°C/°F) ..................................................................................................................................................... 362 MECP_ENA.................................................................................................................................................................. 308 MECP_F ....................................................................................................................................................................... 308 MECT_V(V) .................................................................................................................................................................. 308 MFC.............................................................................................................................................................................. 308 MFC_FLT...................................................................................................................................................................... 308 MFDES ......................................................................................................................................................................... 308 MGP ............................................................................................................................................................................. 308 MIL................................................................................................................................................................................ 308 MIL_DIS........................................................................................................................................................................ 342 MIL_DIS_TCM.............................................................................................................................................................. 362 MIL_FLT ....................................................................................................................................................................... 308 MILFault........................................................................................................................................................................ 308 MIN_KEY...................................................................................................................................................................... 308 MISF_EVAL .................................................................................................................................................................. 308 MISFEVAL_DC_MODE1 .............................................................................................................................................. 309 MISFire ......................................................................................................................................................................... 309 MN_PR_TRN................................................................................................................................................................ 342 MNC_VEL_1................................................................................................................................................................. 342 MNC_VEL_2................................................................................................................................................................. 342 MODSTATE .................................................................................................................................................................. 342 MPLRN ......................................................................................................................................................................... 309 MTQ_OUT .................................................................................................................................................................... 362 MTQ_OUT_ENG .......................................................................................................................................................... 309 MTR_CCW ................................................................................................................................................................... 267 MTR_COILTEMP (°C)(°F) ............................................................................................................................................ 362 MTR_CW...................................................................................................................................................................... 267 MTR_INV_V ................................................................................................................................................................. 362 MTR_SPEED................................................................................................................................................................ 362 MTR_TEMPHI (°C)/(°F)................................................................................................................................................ 362 MTR_TORQ_CMD ....................................................................................................................................................... 362 N N_KEYCODE ............................................................................................................................................................... 309 NeuSafetySw................................................................................................................................................................ 355 NeuTowFcnLmp............................................................................................................................................................ 355 NEUTPOS_TCM .......................................................................................................................................................... 362 NeutTowFcn.................................................................................................................................................................. 355 NM ................................................................................................................................................................................ 309 NSAFETYSW ............................................................................................................................................................... 267 NTF_4X4M ................................................................................................................................................................... 267 NTF_CMD .................................................................................................................................................................... 267 NTF_LAMP................................................................................................................................................................... 267 NTRL SW ..................................................................................................................................................................... 355 NUMKEYS.................................................................................................................................................................... 309 NUMKEYS.................................................................................................................................................................... 348 O O2 B1-S1(V) ................................................................................................................................................................. 309 268 Ford Data Parameters Alphabetical Parameter List O2 B1-S2(V) ................................................................................................................................................................. 309 O2 B2-S1(V) ................................................................................................................................................................. 309 O2 B2-S2(V) ................................................................................................................................................................. 309 O2OEVAP..................................................................................................................................................................... 310 O2OTEST..................................................................................................................................................................... 310 O2S1(mV)..................................................................................................................................................................... 310 O2S11(mV) ................................................................................................................................................................... 310 O2S11(V) ...................................................................................................................................................................... 311 O2S11FM ..................................................................................................................................................................... 310 O2S12(mV)................................................................................................................................................................... 310 O2S12(V)...................................................................................................................................................................... 311 O2S12FM ..................................................................................................................................................................... 310 O2S13(V)...................................................................................................................................................................... 311 O2S2(mV)..................................................................................................................................................................... 310 O2S21(mV)................................................................................................................................................................... 310 O2S21(V)...................................................................................................................................................................... 311 O2S22(mV)................................................................................................................................................................... 310 O2S22(V)...................................................................................................................................................................... 311 O2S23(V)...................................................................................................................................................................... 311 O2SEVAL_DC_MODE1 ............................................................................................................................................... 311 OCT ADJ ...................................................................................................................................................................... 311 OCTADJ ....................................................................................................................................................................... 311 OCTANE ADJ ............................................................................................................................................................... 311 OCTANE ....................................................................................................................................................................... 311 ODOMETER_TCM ....................................................................................................................................................... 362 ODS(RPM) ................................................................................................................................................................... 311 OFF/LOCK_Pos ........................................................................................................................................................... 351 OFMFLG....................................................................................................................................................................... 311 OFMFLG....................................................................................................................................................................... 363 OIL_TMP ...................................................................................................................................................................... 267 OILPRES ...................................................................................................................................................................... 267 OPEN/CLSD LOOP...................................................................................................................................................... 311 OSFMFLG .................................................................................................................................................................... 312 OSS .............................................................................................................................................................................. 363 OSS(RPM).................................................................................................................................................................... 312 OSS=TSS(RPM) .......................................................................................................................................................... 312 OSS_DIR...................................................................................................................................................................... 312 OSS_DIR...................................................................................................................................................................... 363 OSS_F.......................................................................................................................................................................... 312 OSS_F.......................................................................................................................................................................... 363 OSS_FAULT ................................................................................................................................................................. 312 OSS_TCM .................................................................................................................................................................... 363 OTEMP_FMFLG........................................................................................................................................................... 312 OTEMP_FMFLG........................................................................................................................................................... 363 OUT_CODE.................................................................................................................................................................. 312 OUTCODE_BIT ............................................................................................................................................................ 312 OutShftSp(RPM)........................................................................................................................................................... 312 OverdriveCancel........................................................................................................................................................... 312 OverdriveCancel........................................................................................................................................................... 363 OverSpdWarn ............................................................................................................................................................... 355 P P DR SW ...................................................................................................................................................................... 353 269 Ford Data Parameters Alphabetical Parameter List P/S PRESS(HIGH) ....................................................................................................................................................... 312 P_Airbag() ................................................................................................................................................................. 333 P_AirBAG2() ............................................................................................................................................................. 333 P_AirBAGLoop2() ..................................................................................................................................................... 333 P_Preten()................................................................................................................................................................. 333 P_PRETNR()............................................................................................................................................................. 333 PARK/NEU POS........................................................................................................................................................... 313 PARK_INPT .................................................................................................................................................................. 313 ParkBrakeApply............................................................................................................................................................ 313 ParkLmpSw .................................................................................................................................................................. 355 ParkNeuPos ................................................................................................................................................................. 313 PART#PRE_ABS.......................................................................................................................................................... 342 Pass DR SW................................................................................................................................................................. 353 PATS_TYPE ................................................................................................................................................................. 313 PATSENABL ................................................................................................................................................................. 313 PBA .............................................................................................................................................................................. 313 PCA .............................................................................................................................................................................. 313 PCA .............................................................................................................................................................................. 363 PCA_FAULT ................................................................................................................................................................. 314 PCA_FLT ...................................................................................................................................................................... 363 PCA_FLT2 .................................................................................................................................................................... 314 PCA_MES .................................................................................................................................................................... 363 PCAA............................................................................................................................................................................ 314 PCAA............................................................................................................................................................................ 363 PCAAMP_MES............................................................................................................................................................. 363 PCB .............................................................................................................................................................................. 313 PCB .............................................................................................................................................................................. 363 PCB_FLT ...................................................................................................................................................................... 314 PCBA............................................................................................................................................................................ 314 PCBA............................................................................................................................................................................ 363 PCBAMP_MES............................................................................................................................................................. 364 PCC .............................................................................................................................................................................. 313 PCC .............................................................................................................................................................................. 364 PCC_FLT ...................................................................................................................................................................... 314 PCC_MES .................................................................................................................................................................... 364 PCCA............................................................................................................................................................................ 314 PCCA............................................................................................................................................................................ 364 PCCAMP_MES ............................................................................................................................................................ 364 PCD .............................................................................................................................................................................. 313 PCD .............................................................................................................................................................................. 364 PCD_AMP .................................................................................................................................................................... 314 PCD_AMP .................................................................................................................................................................... 364 PCD_FAULT ................................................................................................................................................................. 314 PCD_FLT ...................................................................................................................................................................... 314 PCD_FLT ...................................................................................................................................................................... 364 PCE .............................................................................................................................................................................. 313 PCE .............................................................................................................................................................................. 364 PCE_AMP .................................................................................................................................................................... 364 PCE_FAULT ................................................................................................................................................................. 314 PCE_FLT ...................................................................................................................................................................... 314 PCF .............................................................................................................................................................................. 313 PCF .............................................................................................................................................................................. 364 270 Ford Data Parameters Alphabetical Parameter List PCF_FAULT ................................................................................................................................................................. 314 PCF_FLT ...................................................................................................................................................................... 314 PCF_FLT ...................................................................................................................................................................... 364 PCG.............................................................................................................................................................................. 313 PCG.............................................................................................................................................................................. 364 PCG_FAULT ................................................................................................................................................................. 314 PCG_FLT...................................................................................................................................................................... 314 PCG_FLT...................................................................................................................................................................... 364 PCLowOSM.................................................................................................................................................................. 314 PCM ID ......................................................................................................................................................................... 348 PCM VFY...................................................................................................................................................................... 348 PCM_MSG ................................................................................................................................................................... 267 PCM_MSG ................................................................................................................................................................... 342 PCM_MSG_TCM.......................................................................................................................................................... 365 PERDEL1(%)................................................................................................................................................................ 314 PERDEL2(%)................................................................................................................................................................ 314 PERDEL3(%)................................................................................................................................................................ 314 PERDEL4(%)................................................................................................................................................................ 314 PERDEL5(%)................................................................................................................................................................ 314 PERDEL6(%)................................................................................................................................................................ 314 PERDEL7(%)................................................................................................................................................................ 314 PERDEL8(%)................................................................................................................................................................ 314 PEVAP_TMP(°C/°F)(V) ................................................................................................................................................ 314 PFE(V).......................................................................................................................................................................... 315 PinInputLevel................................................................................................................................................................ 315 PIP................................................................................................................................................................................ 315 PLATE A ....................................................................................................................................................................... 351 PLATE B ....................................................................................................................................................................... 351 PLATE C ....................................................................................................................................................................... 351 PLATE D ....................................................................................................................................................................... 351 PLATE_A ...................................................................................................................................................................... 267 PLATE_B ...................................................................................................................................................................... 267 PLATE_C ...................................................................................................................................................................... 267 PLATE_D ...................................................................................................................................................................... 267 PLATE_PWR ................................................................................................................................................................ 267 PMP_AMP .................................................................................................................................................................... 267 PMP_MOTOR .............................................................................................................................................................. 342 PMPSTAT ..................................................................................................................................................................... 343 PNP .............................................................................................................................................................................. 315 PNP_ONLY................................................................................................................................................................... 315 PRE_CHK..................................................................................................................................................................... 342 PRIM_VLV .................................................................................................................................................................... 342 PS1............................................................................................................................................................................... 315 PSBELTR ..................................................................................................................................................................... 333 PSP .............................................................................................................................................................................. 315 PSP(KPA/PSI) .............................................................................................................................................................. 315 PSP(V).......................................................................................................................................................................... 315 PSR .............................................................................................................................................................................. 316 PTO .............................................................................................................................................................................. 316 PUMP ........................................................................................................................................................................... 343 PUMPEFF .................................................................................................................................................................... 343 PWM STATUS .............................................................................................................................................................. 265 PWR RLY ..................................................................................................................................................................... 343 271 Ford Data Parameters Alphabetical Parameter List PwrStrPrs...................................................................................................................................................................... 312 PwTakeOff .................................................................................................................................................................... 316 R R WSPD(MPH/KPH) .................................................................................................................................................... 341 R_DIF_SPD.................................................................................................................................................................. 343 R_INLET....................................................................................................................................................................... 343 R_OUTLET................................................................................................................................................................... 343 R_PUTSHA .................................................................................................................................................................. 267 RCAM ........................................................................................................................................................................... 316 RCL_F .......................................................................................................................................................................... 316 RCL_F .......................................................................................................................................................................... 365 RCL_FAULT ................................................................................................................................................................. 316 RearDefRly ................................................................................................................................................................... 355 RearDefSw ................................................................................................................................................................... 356 RearPosSense ............................................................................................................................................................. 356 RearWasher.................................................................................................................................................................. 356 RearWASHSW ............................................................................................................................................................. 356 RearWiper .................................................................................................................................................................... 356 RearWiperDn................................................................................................................................................................ 356 RearWiperMd ............................................................................................................................................................... 353 RearWiperUp................................................................................................................................................................ 356 RearWPRUN ................................................................................................................................................................ 356 RESET.......................................................................................................................................................................... 371 RESPOS_TCM............................................................................................................................................................. 365 RESUME ...................................................................................................................................................................... 316 REV_SW ...................................................................................................................................................................... 316 RevSel .......................................................................................................................................................................... 356 RF WSPD(MPH/KPH) .................................................................................................................................................. 341 RF_FAIL ....................................................................................................................................................................... 343 RF_ID ........................................................................................................................................................................... 371 RF_IN(AMP) ................................................................................................................................................................. 343 RF_INLET..................................................................................................................................................................... 343 RF_LRN........................................................................................................................................................................ 371 RF_MES ....................................................................................................................................................................... 371 RF_NORM.................................................................................................................................................................... 371 RF_OUT(AMP) ............................................................................................................................................................. 343 RF_OUTLET................................................................................................................................................................. 343 RF_PRES(KPA/PSI) ..................................................................................................................................................... 343 RF_PRIME ................................................................................................................................................................... 344 RF_PSI ......................................................................................................................................................................... 372 RF_REC ....................................................................................................................................................................... 371 RF_SWITCH................................................................................................................................................................. 344 RF_TC_PRV................................................................................................................................................................. 344 RF_TC_SWV................................................................................................................................................................ 344 RF_UnlockSw............................................................................................................................................................... 354 RF_WSPD .................................................................................................................................................................... 267 RF_WSPD(KPH/MPH) ................................................................................................................................................. 341 RF_WSPD_TCM .......................................................................................................................................................... 365 RFAWAKE .................................................................................................................................................................... 372 RFDoorAjar................................................................................................................................................................... 354 RFIDPRG ..................................................................................................................................................................... 372 RFLOBAT ..................................................................................................................................................................... 372 272 Ford Data Parameters Alphabetical Parameter List ROLLRAT ..................................................................................................................................................................... 344 ROLLRATE................................................................................................................................................................... 344 RPM.............................................................................................................................................................................. 316 RPM_DSD_TCM .......................................................................................................................................................... 365 RPM_ENG_E4WD ....................................................................................................................................................... 268 RPM_TCM.................................................................................................................................................................... 365 RPM_TCM_HEV .......................................................................................................................................................... 365 RPMDES ...................................................................................................................................................................... 316 RR TURN ..................................................................................................................................................................... 355 RR WSPD(MPH/KPH).................................................................................................................................................. 341 RR/SlidDr_Ajar ............................................................................................................................................................. 354 RR_FAIL ....................................................................................................................................................................... 344 RR_ID........................................................................................................................................................................... 372 RR_IN(AMP)................................................................................................................................................................. 344 RR_INLET .................................................................................................................................................................... 344 RR_LRN ....................................................................................................................................................................... 372 RR_MES....................................................................................................................................................................... 372 RR_NORM ................................................................................................................................................................... 372 RR_OUT(AMP)............................................................................................................................................................. 344 RR_OUTLET ................................................................................................................................................................ 344 RR_PRES(KPA/PSI) .................................................................................................................................................... 344 RR_PRIME ................................................................................................................................................................... 344 RR_REC....................................................................................................................................................................... 372 RR_SWITCH ................................................................................................................................................................ 344 RR_TC_VLV ................................................................................................................................................................. 344 RR_WSPD.................................................................................................................................................................... 268 RR_WSPD(KPH/MPH)................................................................................................................................................. 341 RRAWAKE.................................................................................................................................................................... 372 RRDoor SWitch ............................................................................................................................................................ 353 RRIDPRG ..................................................................................................................................................................... 372 RRLOBAT ..................................................................................................................................................................... 372 RRO_PSI...................................................................................................................................................................... 372 RUN_Pos...................................................................................................................................................................... 351 S SAS_CAL ..................................................................................................................................................................... 345 SBB_SS2...................................................................................................................................................................... 316 SC VAC SW.................................................................................................................................................................. 317 SC VENT SW ............................................................................................................................................................... 317 SC_OFF ....................................................................................................................................................................... 316 SC_ON ......................................................................................................................................................................... 317 SCBC............................................................................................................................................................................ 317 SCBCF ......................................................................................................................................................................... 317 SCCS............................................................................................................................................................................ 317 SCCS(V)....................................................................................................................................................................... 317 SCCS_CANCEL ........................................................................................................................................................... 317 SCCS_NULL ................................................................................................................................................................ 317 SCCS_OFF_PID .......................................................................................................................................................... 318 SCCS_ON_PID ............................................................................................................................................................ 318 SCCS_RESUME .......................................................................................................................................................... 318 SCCS_TAP_DN............................................................................................................................................................ 318 SCCS_TAP_UP............................................................................................................................................................ 318 SCICP........................................................................................................................................................................... 318 273 Ford Data Parameters Alphabetical Parameter List SCICPF ........................................................................................................................................................................ 318 SCP_PARK_BRAKE .................................................................................................................................................... 318 SeatBeltLamp ............................................................................................................................................................... 356 SEC_ACCES................................................................................................................................................................ 318 SecAIR mon rdy ........................................................................................................................................................... 318 SECND_VLV ................................................................................................................................................................ 345 SECPR_TRN................................................................................................................................................................ 345 SELTESTDTC .............................................................................................................................................................. 268 SELTESTDTC .............................................................................................................................................................. 345 SEN_CAL ..................................................................................................................................................................... 345 SENVBAT(V) ................................................................................................................................................................ 345 SERV_MOD ................................................................................................................................................................. 318 SET_ACL...................................................................................................................................................................... 318 SFT1(%) ....................................................................................................................................................................... 319 SFT2(%) ....................................................................................................................................................................... 319 SFTRIM 1(%)................................................................................................................................................................ 319 SFTRIM 2(%)................................................................................................................................................................ 319 SHFT_TYP ................................................................................................................................................................... 319 SHIFT_POS.................................................................................................................................................................. 365 ShiftSol1 ....................................................................................................................................................................... 319 ShiftSol1A ..................................................................................................................................................................... 319 ShiftSol1Fault ............................................................................................................................................................... 319 ShiftSol2 ....................................................................................................................................................................... 319 ShiftSol2A ..................................................................................................................................................................... 319 ShiftSol2Fault ............................................................................................................................................................... 319 ShiftSol3 ....................................................................................................................................................................... 319 ShiftSol3A ..................................................................................................................................................................... 319 ShiftSol3Fault ............................................................................................................................................................... 319 SHMOTCCLO............................................................................................................................................................... 268 SHMOTCLOC............................................................................................................................................................... 268 SHRTFT1(%) ................................................................................................................................................................ 319 SHRTFT2(%) ................................................................................................................................................................ 319 SLIP_DES_SCP ........................................................................................................................................................... 319 SLIP_DES_SCP ........................................................................................................................................................... 365 SP_LRN........................................................................................................................................................................ 372 SP_MES ....................................................................................................................................................................... 373 SP_NORM.................................................................................................................................................................... 373 SP_REC ....................................................................................................................................................................... 373 SPAREKEY_PCM ........................................................................................................................................................ 319 SPAREKY..................................................................................................................................................................... 349 SPARK ADV(°) ............................................................................................................................................................. 320 SPARK_ACT ................................................................................................................................................................ 320 SPARKADV(°) .............................................................................................................................................................. 320 SPARKDUR1 ................................................................................................................................................................ 320 SPARKDUR2 ................................................................................................................................................................ 320 SPARKDUR3 ................................................................................................................................................................ 320 SPARKDUR4 ................................................................................................................................................................ 320 SPARKDUR5 ................................................................................................................................................................ 320 SPARKDUR6 ................................................................................................................................................................ 320 SPARKDUR7 ................................................................................................................................................................ 320 SPARKDUR8 ................................................................................................................................................................ 320 SPAWAKE .................................................................................................................................................................... 373 SpdSensWipr................................................................................................................................................................ 356 274 Ford Data Parameters Alphabetical Parameter List SPIDPRG ..................................................................................................................................................................... 373 SPLOBAT ..................................................................................................................................................................... 373 SPR_ID......................................................................................................................................................................... 373 SPR_PSI ...................................................................................................................................................................... 373 SPRKADV(°)................................................................................................................................................................. 320 SRC_CAN .................................................................................................................................................................... 320 SSA_AMP..................................................................................................................................................................... 320 SSA_AMP..................................................................................................................................................................... 365 SSA_SS1...................................................................................................................................................................... 320 SSA_SS1_FLT ............................................................................................................................................................. 320 SSAFM ......................................................................................................................................................................... 365 SSB_AMP..................................................................................................................................................................... 320 SSB_AMP..................................................................................................................................................................... 365 SSB_SS1...................................................................................................................................................................... 365 SSB_SS2...................................................................................................................................................................... 320 SSB_SS2...................................................................................................................................................................... 365 SSB_SS2_FLT ............................................................................................................................................................. 320 SSBFM ......................................................................................................................................................................... 365 SSC(%)......................................................................................................................................................................... 320 SSC_AMP .................................................................................................................................................................... 320 SSC_AMP .................................................................................................................................................................... 366 SSC_SS3 ..................................................................................................................................................................... 320 SSC_SS3_FLT ............................................................................................................................................................. 320 SSD(%)......................................................................................................................................................................... 320 SSD_SS4 ..................................................................................................................................................................... 320 SSE .............................................................................................................................................................................. 366 SSE(%)......................................................................................................................................................................... 320 SSPCA ......................................................................................................................................................................... 321 SSPCA ......................................................................................................................................................................... 366 SSPCA_FLT ................................................................................................................................................................. 321 SSPCA_FLT ................................................................................................................................................................. 366 SSPCB ......................................................................................................................................................................... 321 SSPCB ......................................................................................................................................................................... 366 SSPCB_FLT ................................................................................................................................................................. 321 SSPCB_FLT ................................................................................................................................................................. 366 SSPCC ......................................................................................................................................................................... 321 SSPCC ......................................................................................................................................................................... 366 SSPCC_FLT ................................................................................................................................................................. 321 SSPCC_FLT ................................................................................................................................................................. 366 ST TRIM B1(%) ............................................................................................................................................................ 321 ST TRIM B2(%) ............................................................................................................................................................ 321 ST_WH_ANG ............................................................................................................................................................... 345 START_Pos .................................................................................................................................................................. 351 STATUS B1................................................................................................................................................................... 321 STE=EVP(V) ................................................................................................................................................................ 286 STEER_ANGL.............................................................................................................................................................. 345 SW_TEST..................................................................................................................................................................... 345 SWA_CCW ................................................................................................................................................................... 345 SWA_CW...................................................................................................................................................................... 345 SWA_LPS..................................................................................................................................................................... 345 SWA_POS(°) ................................................................................................................................................................ 345 SWA1_CIR ................................................................................................................................................................... 345 SWA1_INPT ................................................................................................................................................................. 345 275 Ford Data Parameters Alphabetical Parameter List SWA2_CIR ................................................................................................................................................................... 346 SWA2_INPT ................................................................................................................................................................. 346 SYNC_DI ...................................................................................................................................................................... 321 T TA_LVAL ....................................................................................................................................................................... 346 TA_RVAL ...................................................................................................................................................................... 346 TC_RVAL...................................................................................................................................................................... 346 TC_SLIP ....................................................................................................................................................................... 321 TC_SLIP ....................................................................................................................................................................... 366 TCC SOL ...................................................................................................................................................................... 322 TCC SOL(%) ................................................................................................................................................................ 323 TCC .............................................................................................................................................................................. 322 TCC .............................................................................................................................................................................. 366 TCC(%)......................................................................................................................................................................... 322 TCC_FLT ...................................................................................................................................................................... 322 TCC_FLT ...................................................................................................................................................................... 366 TCC_OSC .................................................................................................................................................................... 322 TCC_OSC .................................................................................................................................................................... 366 TCC_SLIP_DSD........................................................................................................................................................... 366 TCCA............................................................................................................................................................................ 322 TCCA(V) ....................................................................................................................................................................... 322 TCCAMP_MES............................................................................................................................................................. 366 TCCF ............................................................................................................................................................................ 322 TCCFault ...................................................................................................................................................................... 322 TCCMACT(RPM).......................................................................................................................................................... 322 TCIL.............................................................................................................................................................................. 323 TCIL.............................................................................................................................................................................. 367 TCIL_FAULT ................................................................................................................................................................. 323 TCIL_FLT...................................................................................................................................................................... 323 TCIL_FLT...................................................................................................................................................................... 367 TCILFault...................................................................................................................................................................... 323 TCM_CAUTION............................................................................................................................................................ 367 TCM_HAZ..................................................................................................................................................................... 367 TCS .............................................................................................................................................................................. 323 TCS .............................................................................................................................................................................. 367 TCSLAMP..................................................................................................................................................................... 327 TCYC_FS ..................................................................................................................................................................... 268 TCYC_FS ..................................................................................................................................................................... 346 TCYC_SW .................................................................................................................................................................... 346 TDPT_COMP ............................................................................................................................................................... 346 TDPT_PASS................................................................................................................................................................. 346 TFT (°C/°F) ................................................................................................................................................................... 367 TFT(V)(°C/°F) ............................................................................................................................................................... 323 TFT=TOT(V) ................................................................................................................................................................. 323 THEFT_LMP................................................................................................................................................................. 323 ThrPosMODE ............................................................................................................................................................... 325 THTRC(%).................................................................................................................................................................... 323 THTRCF ....................................................................................................................................................................... 323 TIP_MIN_TCM.............................................................................................................................................................. 367 TIP_PL_TCM................................................................................................................................................................ 367 TIRESIZE ..................................................................................................................................................................... 323 TORQ_DSD.................................................................................................................................................................. 367 276 Ford Data Parameters Alphabetical Parameter List TorqConvCl................................................................................................................................................................... 324 TORQUE ...................................................................................................................................................................... 324 TORQUE ...................................................................................................................................................................... 367 TORQUE(lb-ft) .............................................................................................................................................................. 323 TORQUE_DSD............................................................................................................................................................. 367 TORQUE_TCM ............................................................................................................................................................ 367 TOT_ENG (°C/°F)......................................................................................................................................................... 367 TOTF ............................................................................................................................................................................ 324 TOTF ............................................................................................................................................................................ 367 TOW_LAMP ................................................................................................................................................................. 267 TOWHAUL.................................................................................................................................................................... 324 TOWHAUL.................................................................................................................................................................... 367 TP MODE ..................................................................................................................................................................... 324 TP MODE ..................................................................................................................................................................... 325 TP(V) ............................................................................................................................................................................ 324 TP=TPS(%) .................................................................................................................................................................. 324 TP=TPS(V) ................................................................................................................................................................... 324 TP_FAULT .................................................................................................................................................................... 324 TP_PER........................................................................................................................................................................ 367 TP_REL_TCM .............................................................................................................................................................. 368 TP1 ............................................................................................................................................................................... 324 TP2 ............................................................................................................................................................................... 324 TPCT(V) ....................................................................................................................................................................... 325 TPF............................................................................................................................................................................... 325 TPI ................................................................................................................................................................................ 268 TPREL(V) ..................................................................................................................................................................... 325 TQ_CNTL ..................................................................................................................................................................... 325 TQ_CNTL ..................................................................................................................................................................... 368 TR................................................................................................................................................................................. 325 TR................................................................................................................................................................................. 368 TR=GEAR .................................................................................................................................................................... 328 TR_DC(%) .................................................................................................................................................................... 325 TR_FAULT .................................................................................................................................................................... 325 TR_FREQ(Hz) .............................................................................................................................................................. 325 TR_FREQ(Hz) .............................................................................................................................................................. 368 TR_V ............................................................................................................................................................................ 327 TR_V ............................................................................................................................................................................ 368 TR1............................................................................................................................................................................... 325 TR2............................................................................................................................................................................... 325 TR3............................................................................................................................................................................... 325 TR3_MODE .................................................................................................................................................................. 325 TR4............................................................................................................................................................................... 325 TRAC SW ..................................................................................................................................................................... 346 TRAC_ACT................................................................................................................................................................... 325 TRACtionassist............................................................................................................................................................. 346 TRAN_OT_FAULT ........................................................................................................................................................ 326 TRAN_TEMP (°C/°F).................................................................................................................................................... 367 TRANSMIT ................................................................................................................................................................... 326 TransRange_D ............................................................................................................................................................. 326 TRCASEGND ............................................................................................................................................................... 268 TRFM............................................................................................................................................................................ 326 TRFM............................................................................................................................................................................ 368 TRIM B1-S1(%) ............................................................................................................................................................ 326 277 Ford Data Parameters Alphabetical Parameter List TRIM B2-S1(%) ............................................................................................................................................................ 326 TRIP CounT.................................................................................................................................................................. 327 TRIP ............................................................................................................................................................................. 327 TRIP_CNT .................................................................................................................................................................... 327 TrnCtrlIndLamp............................................................................................................................................................. 327 TrnCtrlSw...................................................................................................................................................................... 327 TrnFluidTmp(V)............................................................................................................................................................. 328 TrnRange...................................................................................................................................................................... 328 TRO_N_F ..................................................................................................................................................................... 368 TRO_N_FAULT ............................................................................................................................................................ 368 TRO_P_F ..................................................................................................................................................................... 368 TRS1(V)........................................................................................................................................................................ 327 TRS2(V)........................................................................................................................................................................ 327 TRS3(V)........................................................................................................................................................................ 327 Trunk/Htch_Ajar............................................................................................................................................................ 354 TSES_TCM .................................................................................................................................................................. 368 TSFMFLG..................................................................................................................................................................... 328 TSFMFLG..................................................................................................................................................................... 368 TSFMFLG_TCM ........................................................................................................................................................... 368 TSLIPRAT..................................................................................................................................................................... 328 TSLIPRAT..................................................................................................................................................................... 368 TSS............................................................................................................................................................................... 368 TSS(rpm) ...................................................................................................................................................................... 328 TSS_F .......................................................................................................................................................................... 328 TSS_F .......................................................................................................................................................................... 368 TSS_FAULT.................................................................................................................................................................. 328 TSS_TCM..................................................................................................................................................................... 368 TTR_DC ....................................................................................................................................................................... 368 TurbSpdS(RPM) ........................................................................................................................................................... 329 U UNLIMITED_KEY ......................................................................................................................................................... 329 V V ENABLE .................................................................................................................................................................... 349 V_4X4L......................................................................................................................................................................... 329 V_OCTADJ ................................................................................................................................................................... 329 V_TCASE ..................................................................................................................................................................... 329 VALVCAL ...................................................................................................................................................................... 346 VALVE_CAL.................................................................................................................................................................. 346 VAR_CMD .................................................................................................................................................................... 368 VAR_MES..................................................................................................................................................................... 369 VBAT(V)........................................................................................................................................................................ 329 VBATT .......................................................................................................................................................................... 268 VBATT(V) ..................................................................................................................................................................... 333 VBatt(V) ........................................................................................................................................................................ 356 VBatt_GEM(V).............................................................................................................................................................. 356 VBATT_PCM(V) ........................................................................................................................................................... 329 VBatt_REM(V) .............................................................................................................................................................. 357 VCT 1_FAULT .............................................................................................................................................................. 329 VCT 2_FAULT .............................................................................................................................................................. 329 VCT1 ............................................................................................................................................................................ 329 278 Ford Data Parameters Alphabetical Parameter List VCT1F .......................................................................................................................................................................... 329 VCT2 ............................................................................................................................................................................ 329 VCT2F .......................................................................................................................................................................... 329 VCTA ............................................................................................................................................................................ 329 VCTADV(°) ................................................................................................................................................................... 329 VCTADV2(°) ................................................................................................................................................................. 329 VCTADVERR................................................................................................................................................................ 330 VCTADVERR2.............................................................................................................................................................. 330 VCTDC(%).................................................................................................................................................................... 330 VCTDC2(%).................................................................................................................................................................. 330 VCTSYS ....................................................................................................................................................................... 330 VEH_CTRL................................................................................................................................................................... 369 VehSpdSensr................................................................................................................................................................ 330 VFC(%)......................................................................................................................................................................... 330 VFCDC(%).................................................................................................................................................................... 330 VFCF ............................................................................................................................................................................ 330 VFDES.......................................................................................................................................................................... 330 VGT_F .......................................................................................................................................................................... 330 VGT_FAULT ................................................................................................................................................................. 330 VGTDC(%) ................................................................................................................................................................... 330 VLV_AMP ..................................................................................................................................................................... 268 VLVCHAR ..................................................................................................................................................................... 268 VOLT_SENSR .............................................................................................................................................................. 369 VPoWeR ....................................................................................................................................................................... 331 VPoWeR(V) .................................................................................................................................................................. 331 VPWR........................................................................................................................................................................... 369 VPWR(V) ...................................................................................................................................................................... 331 VPWR=BATT(V) ........................................................................................................................................................... 331 VPWR_TCM ................................................................................................................................................................. 369 VREF(V) ....................................................................................................................................................................... 331 VS SET......................................................................................................................................................................... 331 VS_SRC ....................................................................................................................................................................... 331 VS_SRC ....................................................................................................................................................................... 369 VSFMFLG..................................................................................................................................................................... 331 VSFMFLG..................................................................................................................................................................... 369 VSS(KPH)..................................................................................................................................................................... 331 VSS(KPH/MPH)............................................................................................................................................................ 268 VSS(MPH) .................................................................................................................................................................... 331 VSS_F .......................................................................................................................................................................... 369 VSS_FAULT ................................................................................................................................................................. 331 VSS_FF ........................................................................................................................................................................ 346 VSS_GEM .................................................................................................................................................................... 357 VSS_TCM..................................................................................................................................................................... 369 VSS_TCM_HEV ........................................................................................................................................................... 369 VSS_TCM_HR ............................................................................................................................................................. 369 VSS_TPM..................................................................................................................................................................... 373 W WAC ............................................................................................................................................................................. 332 WAC=WOT A/C............................................................................................................................................................ 332 WAC_FLT ..................................................................................................................................................................... 332 WACA ........................................................................................................................................................................... 332 WACFault ..................................................................................................................................................................... 332 279 Ford Data Parameters Alphabetical Parameter List WAKESIG ..................................................................................................................................................................... 347 WARM_NOMIL ............................................................................................................................................................. 332 WARMUPDTC_TCM .................................................................................................................................................... 369 WARN_1....................................................................................................................................................................... 373 WARN_2....................................................................................................................................................................... 373 WARN_3....................................................................................................................................................................... 373 WARN_4....................................................................................................................................................................... 373 WARN_5....................................................................................................................................................................... 373 WasherPumpRly........................................................................................................................................................... 357 WasherPumpSw ........................................................................................................................................................... 357 WASHRLY .................................................................................................................................................................... 357 WASTEGATE ............................................................................................................................................................... 332 WEAR OK..................................................................................................................................................................... 357 WFLUID........................................................................................................................................................................ 357 WFS.............................................................................................................................................................................. 332 Wiper2SpdRly............................................................................................................................................................... 357 WiperPk-Pk(mS)........................................................................................................................................................... 357 WiperRunRly ................................................................................................................................................................ 357 WotA/Ccutoff................................................................................................................................................................. 332 X XDCR_ACCR(KPA/PSI) ............................................................................................................................................... 347 XDCR_LFW(KPA/PSI).................................................................................................................................................. 347 XDCR_LRW(KPA/PSI) ................................................................................................................................................. 347 XDCR_RFW(KPA/PSI) ................................................................................................................................................. 347 XDCR_RRW(KPA/PSI)................................................................................................................................................. 347 XDCR_TMC(KPA/PSI) ................................................................................................................................................. 347 XDUCERCAL ............................................................................................................................................................... 347 Y YAW_INPUT ................................................................................................................................................................. 347 YAW_RATE(°)............................................................................................................................................................... 347 YAWRATE .................................................................................................................................................................... 347 YAWRTSEN(°).............................................................................................................................................................. 347 YR_ICS......................................................................................................................................................................... 347 280 Ford Data Parameters 4x4 Parameters 4x4 Parameters 4_LOW_LED Range: __________________________________________________________ ON/OFF Displays the 4x4 low status. 4WDCPWMST(%) Range: _________________________________________________________ 0 to 100% 4WDCPWMOU 4WD CLUTCH PWM STATUS Range: __________________________________________________________ ON/OFF Displays the 4WD clutch PWM status. 4WDHIGLMP Range: __________________________________________________________ ON/OFF Displays the 4WD HIGH indicator lamp status. 4WDINP_SW Range: ________ 2-W DRIVE, GND, OPEN, 4-W LOW, NEUTRAL, A4WD, 4W AUTO/HI Displays the 4WD switch status. 4WDLOWLMP Range: __________________________________________________________ ON/OFF Displays the 4WD LOW warning indicator. 4WDMODE_L Range: __________________________________________________________ ON/OFF Displays the 4WD mode lamp status. 4X4_BOO Range: __________________________________________________________ ON/OFF Brake ON/OFF status. 4X4CCWRLY Range: __________________________________________________________ ON/OFF Displays the transfer case shift relay (L2H) counterclockwise control status. 4X4_CWRLY Range: __________________________________________________________ ON/OFF Displays the transfer case shift relay clockwise control status. ABS_ACTIVE Range: __________________________________________________________ ON/OFF Displays the 4WD HIGH indicator LED. ABS_MSG Range: ___________________________________________ PRESENT/NOT PRESENT Displays the CAN message from the ABS status. ABS_PWR_R Range: __________________________________________________________ ON/OFF Displays the antilock braking system power relay output status. 281 Ford Data Parameters 4x4 Parameters CCNT Range: ____________________________________________________________ actual Displays the number of continuous codes present. CLCH_SOL (%) Range: _________________________________________________________ 0 to 100% Displays the PWM Output control command #1 status. COPENPLAT Range: ____________________________________________________________ actual Displays the currently open contact plates status. CW_CCW Range: ____________________________________________________________ actual Displays the clockwise relay control status. FR_OUTSHA Range: ____________________________________________________________ actual Displays the front shaft speed status. HALLPOWER Range: __________________________________________________________ ON/OFF Displays the hall-effect sensor power status. HIGH_LAMP Range: __________________________________________________________ ON/OFF Displays the 4WD HIGH indicator LED status. IGN_SW Range: _______________________________________________________ START/RUN Displays the ignition switch status. IGNITION(V) Range: ____________________________________________________________ actual Displays the ignition status. IWE_SOL IWE_SOLST Range: __________________________________________________________ ON/OFF Displays the integrated wheel ends solenoid status. LF_WSPD Range: ____________________________________________________________ actual Displays the left front wheel speed sensor speed. LR_WSPD Range: ____________________________________________________________ actual Displays the left rear wheel speed sensor speed. LFDR_SW Range: ____________________________________________________ AJAR/CLOSED Displays the left front door ajar switch status. LOW_LAMP Range: __________________________________________________________ ON/OFF Displays the 4WD Low indicator status. 282 Ford Data Parameters 4x4 Parameters MTR_CCW Range: __________________________________________________________ ON/OFF Displays the counterclockwise shift motor driver output state. MTR_CW Range: __________________________________________________________ ON/OFF Displays the clockwise shift motor driver output state. NSAFETYSW Range: _____________________________________________________NEUTRAL/OFF Displays the neutral safety switch state. NTF_4X4M NTF_CMD Range: __________________________________________________________ ON/OFF Displays the neutral tow function state. NTF_LAMP TOW_LAMP Range: __________________________________________________________ ON/OFF Displays the neutral tow light state. OILPRES Range: ____________________________________________________________ actual Displays the all-wheel drive oil pressure before any FMEM substitution. OIL_TMP Range: ____________________________________________________________ actual Displays the all-wheel drive oil temperature before any FMEM substitution. PCM_MSG Range: ___________________________________________ PRESENT/NOT PRESENT Indicates if a CAN message is missing from the PCM. PLATE_A PLATE_B PLATE_C PLATE_D Range: ____________________________________________________ OPEN/CLOSED Displays the transfer case contact plate switch state for switches A, B, C, and D. PLATE_PWR Range: __________________________________________________________ ON/OFF Displays the contact plate power state. PMP_AMP Range: ____________________________________________________________ actual Displays the pump current, actual amperage. R_PUTSHA Range: ____________________________________________________________ actual Displays the rear shaft speed. RF_WSPD Range: ____________________________________________________________ actual Displays the right front wheel speed sensor speed. 283 Ford Data Parameters 4x4 Parameters RR_WSPD Range: ____________________________________________________________ actual Displays the right rear wheel speed sensor speed. RPM_ENG_E4WD Range: ____________________________________________________________ actual Displays the engine speed. SELTESTDTC Range: ____________________________________________________________ actual Displays the diagnostic trouble codes state. SHMOTCCLO Range: __________________________________________________________ ON/OFF Displays the counterclockwise shift motor driver short to ground status. SHMOTCLOC Range: __________________________________________________________ ON/OFF Displays the clockwise shift motor driver short to ground status. TCYC_FS Range: ___________________________________________________ACTIVE/PASSIVE Displays the traction control system state. TPI Range: ___________________________________________________________ 0 to 5V Displays the throttle position state. TRCASEGND Range: _______________________________________________________________ 0V Displays the transfer case contact plate ground return. VBATT Range: __________________________________________________________ 0 to 15V Displays the battery positive voltage. VLV_AMP Range: ____________________________________________________________ actual Displays the valve current an actual amperage. VLVCHAR Range: ______________________________________________________ not available Displays the valve characteristic signal. VSS(KPH/MPH) Range: ____________________________________________________________ actual Displays the vehicle speed. 284 Ford Data Parameters Powertrain Control Module (PCM) Parameters Powertrain Control Module (PCM) Parameters This section defines data parameters available from the engine control module or the powertrain control module (PCM) on Ford vehicles. 3/2 SHIFT SOL 4/3 SHIFT SOL Range: __________________________________________________________ ON/OFF Displays the state of the two solenoids used to activate the 3-2 and 4-3 downshift valves during deceleration. It reads ON when the solenoids are energized. 4X4Low Range: __________________________________________________________ ON/OFF Displays the state of the 4-wheel drive low switch on the instrument panel. The switch sends a signal to the PCM when 4x4 low is ON, which is used to adjust the transmission shift schedule. 4x4Low reads as follows: • ON when the switch circuit is closed • OFF when the switch is open A_CT(°C/°F) Range: ____________________________________________________________ actual Displays the evaporator temperature state. A_CT(V) Range: ______________________________________________________ not available Displays the evaporator temperature signal voltage. A/CClutchSw Range: __________________________________________________________ ON/OFF Displays the state of the A/C cycling switch. The PCM uses this parameter to adjust engine speed for added load. A/CClutchSw reads as follows: • ON when the switch is closed • OFF when the switch is open A/CPrs(V) Range: ________________________________________________________ 0.0 to 5.0 V Displays the condition of the air conditioning pressure (ACP) switch and reads as follows: • 0 V when the switch is closed • 4.0–5.0 V when the switch is open On some models, the PCM turns on the high-speed cooling fan if ACP readings indicate A/C compressor head pressure is over 325 psi. The PCM may also use the signal to control idle speed and the A/C clutch. AAT(°C/°F) Range: ____________________________________________________________ actual Displays the ambient air temperature. ACFD_BAT Range: __________________________________________________________ ON/OFF Displays the A/C full demand switch for the battery area status. 285 Ford Data Parameters Powertrain Control Module (PCM) Parameters ACFD_PAS Range: __________________________________________________________ ON/OFF Displays the A/C full demand switch for the passenger area status. AC_RC_SW Range: __________________________________________________________ ON/OFF Displays the A/C recirculation switch status. ACCS Range: __________________________________________________________ ON/OFF Displays the air conditioning compressor cycling switch status. ACCS=A/C Range: __________________________________________________________ ON/OFF Displays the position of the air conditioning cycle switch (ACCS). It reads ON if the A/C switch on the instrument panel is on, or the PCM is commanding A/C on. In some cases, the A/C compressor may not turn on even though the switch is closed. Several other switch or sensor signals may prevent the PCM from engaging the A/C compressor clutch. ACClutchHEV Range: __________________________________________________________ ON/OFF Displays the air conditioning clutch status ACDS1 Range: _________________________________________________ ENABLE/DISABLE Displays the air conditioning diagnostic switch 1 status. ACDS2 Range: _________________________________________________ ENABLE/DISABLE Displays the air conditioning diagnostic switch 2. status ACL=ACCEL Range: __________________________________________________________ ON/OFF Displays the accelerometer status. AclPedl(V) Range: ________________________________________________________ 0.0 to 5.0 V Displays the accelerator pedal (AP) sensor signal voltage to the PCM on diesel control systems. The AP sensor is similar to the throttle position sensor on a gasoline engine. The AP sensor signal is used to calculate the fuel injection quantity and to control the exhaust backpressure regulator. The MIL lights if the AP sensor signal does not match the IVS signal at idle. A faulty AP sensor allows the engine to run at low idle speed only. ACP Range: __________________________________________________________ ON/OFF ACP Range: ____________________________________________________ OPEN/CLOSED ACP Range: ____________________________________________________________ actual Displays the air conditioning pressure switch. status ACRDV Range: __________________________________________________________ ON/OFF Displays the A/C refrigerant distribution valve command. 286 Ford Data Parameters Powertrain Control Module (PCM) Parameters ACRDV_F Range: ______________________________________________ YES FAULT/NO FAULT Displays the A/C refrigerant distribution valve status. ACT_MNT Range: __________________________________________________________ ON/OFF Displays the active mount control command. ACTF Range: __________________________________________________________ YES/NO Displays the inlet air temperature status. ACTMNT_F Range: ______________________________________________ YES FAULT/NO FAULT Displays the active mount control status. AFT_ADDS Range: ______________________________________________________ not available Displays the passenger side power sliding door module status. AFT2_ADDS Range: ______________________________________________________ not available Displays the adaptive fuel table 2 status. AIR Range: __________________________________________________________ ON/OFF PCM command to the electric air pump and reads ON when the PCM has commanded the air pump on. The parameter also indicates the secondary air injector. The AIR and AIRMonitor parameters should read the same. AIR A Range: __________________________________________________________ ON/OFF Displays the PCM command to the secondary air relay. It reads ON when the PCM is energizing the relay solenoid to close the relay contacts and run the air pump. AIR_FLT Range: ______________________________________________ YES FAULT/NO FAULT Displays the secondary air injection status. AIRBA Range: __________________________________________________________ ON/OFF Displays the secondary air bypass actual status. AIRBypass AIR B Range: __________________________________________________________ ON/OFF Displays the air bypass solenoid, which controls vacuum to the air bypass valve, status. If bypass is activated, air is directed to either the catalyst or an upstream-downstream valve. When the system is deactivated, air is blocked from the catalyst or routed to atmosphere. These parameters read as follows: • ON when the air bypass solenoid is on and air bypass voltage is low • OFF if the solenoid is off and air bypass voltage is high 287 Ford Data Parameters Powertrain Control Module (PCM) Parameters AIRCON_SW_STATUS Range: __________________________________________________________ ON/OFF Displays the air conditioning switch status. AIRD Range: __________________________________________________________ ON/OFF Displays the secondary air injection divert state. AIRDA Range: __________________________________________________________ ON/OFF Displays the secondary air divert actual status. AIRDivert AIR D Range: __________________________________________________________ ON/OFF Displays the state of the air diverter solenoid, which controls vacuum to the air diverter valve. When the air diverter system is activated, air is routed upstream on many systems. These parameters read as follows: • ON when the air diverter solenoid is on and air bypass voltage is low • OFF when the solenoid is off and voltage is high AIREVAL_DC_MODE1 Range: __________________________________________________________ YES/NO Displays whether the secondary air system was evaluated. AIRFault Range: __________________________________________________________ YES/NO Displays the secondary air injection system condition and reads YES when a fault is present. AIRM Range: __________________________________________________________ ON/OFF Displays the status of the secondary air monitor. AIRMonitor Range: __________________________________________________________ ON/OFF Displays the status for the electric air pump based on a PCM feedback signal and reads ON if the PCM detects a voltage change when the pump is commanded on. The AIR and AIRMonitor parameters should read the same. ANTISCAN Range: _______________________________________________________ACTIVE/OFF Displays the anti-scan function status. AP(%) Range: _________________________________________________________ 0 to 100% Displays the accelerator pedal position. 288 Ford Data Parameters Powertrain Control Module (PCM) Parameters AP(V) APP1(V) APP2(V) APP3(V) Range: ________________________________________________________ 0 to 5.00 V Displays the voltage signal of the accelerator pedal position on a diesel engine control system. The accelerator position (AP) sensor is a three-wire potentiometer. Table 13-1 Normal AP sensor voltage readings SENSOR CLOSED THROTTLE WIDE OPEN THROTTLE APP1 3.9–4.2 V 0.7–1.2 V APP2 1.4–1.6 V 3.6–4.1 V APP3 0.8–1.1 V 3.1–3.5 V AP_MODE_TCM Range: _______________________________________________________ PT/WOT/CT AP_PER_TCM(%) Range: ________________________________________________________ l0 to 100% Displays the accelerator pedal position. APP_MODE Range: _______________________________________________________ CT/PT/WOT Indicates whether the APP sensor mode is closed throttle (CT), partial throttle (PT), or wide open throttle (WOT). APP_F Range: __________________________________________________ NO FAULT/FAULT Displays the accelerator pedal position status. APP1(V) Range: ___________________________________________________________ 0 to 5V Displays the accelerator pedal position sensor 1 status. APP_LOW(V) Range: ___________________________________________________________ 0 to 5V Displays the closed throttle status. ARPMDES(RPM) Range: ______________________________________________________ not available Displays the ancillary RPM desired, which is the engine speed required to maintain the vehicle speed being commanded by the speed control system. AST AST2 Range: ______________________________________________________ not available Displays the time since start in seconds. AXLE Range: ______________________________________________________ not available This parameter indicates the axle ratio. 289 Ford Data Parameters Powertrain Control Module (PCM) Parameters BARO(Hz) Range: _____________________________________________________ 125 to 160 Hz) Displays the barometric pressure in cycles per second, or Hertz (Hz) and should read as follows: • 160 Hz at sea level • 125 Hz at an elevation of 10,000 feet BARO(V) Range: ________________________________________________________ 2.6 to 4.6 V Displays the barometric pressure as voltage and should read as follows: • 4.6 V at sea level • 2.6 V at an elevation of 10,000 feet BLoWerMoToR Range: __________________________________________________________ ON/OFF Displays the blower motor status. BLSHORT BATT Range: __________________________________________________________ YES/NO Displays the presence of a short to battery positive in the blower motor circuit. A YES reading means that a short exists. BLSHORT GND Range: __________________________________________________________ YES/NO Displays the presence of a short to ground in the blower motor circuit. A YES reading means that a short exists. BOO Range: __________________________________________________________ ON/OFF Displays the brake ON/OFF switch status. BOO=BRAKE SW Range: __________________________________________________________ ON/OFF Displays the brake pedal switch status. Whenever the brake pedal is pressed, the brake ON/OFF (BOO) switch sends a battery voltage signal to the PCM. The BOO=BRAKE SW value should read as follows: • ON when the brake pedal is pressed • OFF at all other times Depending on the vehicle, the PCM may adjust engine idle speed with the brakes applied and the A/C turned on, or may turn the A/C off after a preset time. On vehicles with locking torque converters, the PCM may unlock the torque converter when the brakes are applied. BP=BARO (kPa) BP=BARO (”HG) Range: ____________________________________________________ see description Displays the barometric pressure, which is calculated by the PCM based on the frequency of the barometric pressure (BP) sensor signal. This parameter reads as follows: • 102 kPa (30.1 inHG at sea level). • 78 kPa (23 inHG at 7,000 feet). Actual readings vary with weather conditions that cause barometric pressure to change. 290 Ford Data Parameters Powertrain Control Module (PCM) Parameters BPA Range: __________________________________________________________ ON/OFF Displays the brake pressure applied switch status. BPA_SW Range: __________________________________________________________ ON/OFF Displays the brake pedal position status. BPO Range: __________________________________________________________ YES/NO Displays the battery power off request status. BPO_Hz Range: ______________________________________________________ not available Displays the battery power off signal. BPP_BOO Range: __________________________________________________________ ON/OFF Displays the brake pedal position. BrakeOnOff Range: __________________________________________________________ ON/OFF Displays the brake pedal switch state and reads as follows: • ON when the brakes are applied • OFF when the brakes are not applied This parameter should read the same as the BOO=BRAKE SW parameter. CAMDC 1 CAMDC 2 Range: __________________________________________________________ 0 to 99% Displays the duty cycle of the variable cam timing solenoids. • CAMDC 1 = bank 1 • CAMDC 2 = bank 2 CAMDCR Range: __________________________________________________________ 0 to 99% Displays the “On” time of the variable camshaft timing (VCT) solenoid as requested by the PCM. CAMDCR should read as follows: • Near 0% with the engine running at a warm idle, camshaft fully advanced with no EGR • Near 50% with a warm engine and the vehicle operating at a steady cruise speed CAMERR1 CAMERR2 Range: __________________________________________________________ 0 to 360° Displays the variable cam timing error in crankshaft degrees. • CAMERR 1 = bank 1 • CAMERR 2 = bank 2 CANP=PURGE Range: __________________________________________________________ ON/OFF Displays the canister purge solenoid state. The solenoid opens the canister purge (CANP) valve to regulate the flow of fuel vapors from the EVAP canister to the intake manifold. 291 Ford Data Parameters Powertrain Control Module (PCM) Parameters • When the engine is at operating temperature, the solenoid turns ON. This opens the canister purge valve and purging occurs. • When the engine is at idle or below operating temperature, the solenoid turns OFF. The valve closes and purge stops. CASeGND(V) Range: _____________________________________________________ -16.0 to 16.0 V Displays the voltage difference between the PCM case ground and the hardwired Fuel Level Input from the fuel pump driver module. • Above 0.050 V indicates high resistance • 0.027 V is a typical reading CAT MONITOR CAT mon ready Range: __________________________________________________________ YES/NO Indicates whether the Catalyst Efficiency Monitor has completed and read as follows: • YES if the monitor completed • NO if it did not CATCAL1(Hz) CATCAL2(Hz) Range: __________________________________________________________ 1 to 4 Hz Displays the catalyst calibrated frequency for each cylinder bank, which is determined by the PCM based on engine load and RPM. See CATTST for further information. CATEVAL_DC_MODE1 Range: __________________________________________________________ YES/NO Displays the catalyst monitor evaluated status. CATTST1(Hz) CATTST2(Hz) Range: __________________________________________________________ 1 to 4 Hz Displays the Steady State CAT monitor measured frequency for banks 1 and 2. These parameters are only used in 1996 OBD-II vehicles. The reading is the frequency of the rear O2S during a catalyst efficiency monitor test. This number is compared to a calibrated frequency number determined by the PCM (CATCAS) based on engine load and RPM. If the CATTST value is greater than CATCAL, a Diagnostic Trouble Code (DTC) is stored. The DTCs associated with this test are DTCs P0420 and P0430. The MIL is activated after a fault is detected on two consecutive drive cycles. If the CATTST value is less than CATCAL the catalyst monitor will indicate YES or passed. CCC=TCC Range: ______________________________________________________LOCKED/OFF Displays the PCM command to the torque converter clutch control (TCC) solenoid and reads: • LOCKED when the TCC is engaged • OFF when the TCC is disengaged CCL Range: __________________________________________________________ ON/OFF Displays the fuel cap off indicator lamp state. 292 Ford Data Parameters Powertrain Control Module (PCM) Parameters CCLF Range: ______________________________________________ YES FAULT/NO FAULT Displays the fuel cap off indicator lamp fault state. CCMSTAT_DC_MODE1 Range: __________________________________________________________ YES/NO Displays the comprehensive components monitor evaluated state. CCS Range: __________________________________________________________ ON/OFF Displays the coast clutch solenoid state. CCS_FLT Range: ______________________________________________ YES FAULT/NO FAULT CCSFault Range: __________________________________________________________ YES/NO Displays the presence of a fault in the coast clutch solenoid circuit. Reads YES or YES FAULT when a circuit fault is present. CCSA Range: __________________________________________________________ ON/OFF Displays the PCM feedback signal indicating the actual state of the coast clutch solenoid. When activated, fourth gear is disabled to allow engine braking in third gear. CCSA and the CoastClSol readings should simultaneously display ON or OFF. CHT(°C/°F) CHT SENSOR(°) Range: __________________________________________________________ ON/OFF Displays the cylinder head temperature. CHT_COLD(°C/°F) Range: ____________________________________________________________ actual Displays the cylinder head temperature cold value. CHT_HOT(°C/°F) Range: ____________________________________________________________ actual Displays the cylinder head hot value. CHT_V(°C/°F) Range: ______________________________________________________ not available Displays the cylinder head temperature. CHTFM Range: ______________________________________________ YES FAULT/NO FAULT Displays the cylinder head temperature status. CHTIL Range: __________________________________________________________ ON/OFF CHTILFault Range: __________________________________________________________ YES/NO CHTIL_FLT Range: __________________________________________________ FAULT/NO FAULT Displays the operating status of the Cylinder Head Temperature Indicator Lamp (CHTIS). • CHTIL reads ON when the lamp is on. • CHTILFault reads YES if a fault was detected. 293 Ford Data Parameters Powertrain Control Module (PCM) Parameters CKP_PROF Range: __________________________________________________________ YES/NO Displays the learned misfire correction profile state. CLRDIST_NOMIL Range: ____________________________________________________________ actual Displays the distance since the last time diagnostic trouble codes were cleared. CMPFM Range: __________________________________________________________ YES/NO CMPFM Range: ______________________________________________ YES FAULT/NO FAULT Displays the camshaft position (CMP) failure mode, which indicates if a fault was detected in the camshaft position (CMP) sensor circuits. Reads YES if a fault occurred. When the engine is cranking, or if operating in CMPFM mode, two spark plugs fire simultaneously until the CMP is determined by the PCM. This allows the engine to run even though the PCM is unable to determine if cylinder number 1 is on compression. CMPFM2 Range: ______________________________________________ YES FAULT/NO FAULT Displays the camshaft position sensor 2 status. CmprCompMon rdy Range: __________________________________________________________ YES/NO Indicates whether the Component monitor has successfully completed and reads as follows: • YES if the monitor completed • NO if it did not CMPS_lp_Lev Range: ________________________________________________________ HIGH/LOW Displays the camshaft position sensor level state. CMPS_Status Range: ________________________________________________________ OK/FAULT Displays the camshaft position sensor state. COAST Range: __________________________________________________________ ON/OFF Displays the speed control actuator coast switch state. CoastClSol Range: __________________________________________________________ ON/OFF Displays the PCM command to the coast clutch solenoid, which allows engine braking in third gear when fourth gear is disabled by the transmission control switch. Reads ON when the coast clutch solenoid is activated. CoastClSol(mA) Range: ______________________________________________________ 0 to 1000 mA CoastClSol(%) Range: _________________________________________________________ 0 to 100% Displays the PCM command to the coast clutch solenoid. When activated, coast clutch solenoid allows engine braking in third gear if fourth gear is disabled by the transmission control switch. The milliamp parameter displays the coast clutch solenoid current, and the percent parameter displays the duty cycle of the pulse width modulated solenoid signal. 294 Ford Data Parameters Powertrain Control Module (PCM) Parameters CPC_AMP Range: ______________________________________________________ not available Displays the converter pressure control state. CPP Range: __________________________________________________________ ON/OFF Displays the clutch pedal position switch state. CPP_ST Range: ______________________________________ NOT DEPRESSED/DEPRESSED Displays the clutch pedal position switch state. CPP/TCS Range: __________________________________________________________ ON/OFF Indicates the following: • Manual transmission vehicles—the status of the clutch pedal position switch (CPP) • Automatic transmission vehicles—the status of the transmission control switch (TCS) CCP/TCS reads as follows: • ON when the switch is closed • OFF when the clutch pedal or TCS is pressed and the switch opens CRUISE Range: __________________________________________________________ ON/OFF Displays the cruise control status. Reads ON if the driver selectable cruise control switch is on. CRUISE_SW Range: __________________________________________________________ ON/OFF Displays the speed control command switch state. CSEGND(V) Range: _____________________________________________________ -16.0 to 16.0 V Displays the voltage difference between the PCM case ground and signal return. • Above 0.050 V indicates high resistance • 0.027 V is a typical reading CylHdTemp(V) Range: ______________________________________________________ 0.25 to 4.75 V Displays the cylinder head temperature as voltage. The higher the voltage, the lower the temperature. DCDC_ENA Range: __________________________________________________________ ON/OFF Displays the DC to DC converter enabled status. DCDC_F Range: ______________________________________________ YES FAULT/NO FAULT Displays the DC to DC converter status. DPFE(V) Range: ______________________________________________________ 0.45 to 4.60 V Displays the differential pressure feedback EGR (DPFE) sensor signal, which displays exhaust pressure to the PCM. The PCM uses DPFE to compute optimum EGR flow. 295 Ford Data Parameters Powertrain Control Module (PCM) Parameters Pressure feedback EGR systems control EGR flow rate by monitoring pressure drop across a remotely located sharp-edged orifice. There are several sensor designs, some have an aluminum housing and use a 0.55 V offset, others have aluminum or plastic housings and use a 1.0 V offset. Typically, sensor output should be as shown in Table 13-2. Table 13-2 Outputs for DPFE sensors with 0.55 V and 1.0 V offsets 0.55 V Offset inHg kPa 1.0 V Offset Volts inHg kPa Volts 8.83 29.81 4.66 8.56 28.9 4.95 6.62 22.36 3.64 4.3 14.4 2.97 4.41 14.90 2.61 0 0 1.0 2.21 7.46 1.58 0 0 0.55 DPFEGR Range: ______________________________________________________ not available Displays the delta feedback pressure exhaust gas recirculation state. DRIVE CounT Range: ___________________________________________________________0 to 255 Displays the number of times the engine has been started since the last DTC P1000 (monitor readiness set). DRIVECNT Drive_COUNT Range: ____________________________________________________________ actual Displays the valid drive counters. DSD Range: ______________________________________________________ not available Displays the desired idle speed (rpm). DTC Range: ____________________________________________________________ actual Displays the number of diagnostic trouble codes stored. DTC_CNT Range: ____________________________________________________________ actual Displays the DTC count and includes DTCs needing no action. DTC CouNT (PCM) Range: ____________________________________________________ see description Displays the number of continuous or pending codes that have set. The number changes each time a new code sets. 296 Ford Data Parameters Powertrain Control Module (PCM) Parameters EBP(V) Range: ___________________________________________________________ 0 to 5 V Displays the voltage signal from the exhaust backpressure sensor, which is used by the PCM to control the exhaust backpressure regulator (EPR). As voltage increases, so does pressure: Table 13-3 Outputs for exhaust backpressure sensor Volts psi kPa 0.00 0.00 0.00 0.25 8.00 55.1 1.45 20.0 137 4.45 50.0 344 4.75 53.0 365 5.00 60.0 413 ECT(°C) Range: ECT(°F) Range: ECT(V) Range: ECT Range: _________________________________________________________–40 to 199 _________________________________________________________–40 to 389 __________________________________________________________0.0 to 5.0 __________________________________________________ NORM/COLD/HOT Displays the engine coolant temperature (ECT) sensor signal as temperature or voltage. The ECT is a thermistor installed in the engine coolant passages. A 5 V reference signal is applied to the ECT. As temperature increases, sensor resistance decreases to provide a variable voltage signal to the PCM. The PCM converts ECT sensor voltage to temperature. These parameters read as follows: • • • • The temperature parameter reads 185° to 220°F (85° to 105°C) on a warm engine at idle. A temperature reading of –40°C or –40°F may indicate an open sensor or circuit. A temperature reading above 185°C or 366°F may indicate a short in the sensor or circuit. The voltage parameter reads 0.70 to 0.40 V on a warm engine at idle. ECT_FF (°C/°F) Range: ____________________________________________________________ actual Displays the engine coolant temperature. ECTF Range: ______________________________________________ YES FAULT/NO FAULT Displays the engine coolant temperature state. EFTA Range: ______________________________________________________ not available Displays the fuel rail pressure state. EGR_EVAL Range: __________________________________________________________ YES/NO Displays whether the exhaust gas recirculation system has been evaluated. 297 Ford Data Parameters Powertrain Control Module (PCM) Parameters EGR_Fault Range: ______________________________________________ YES FAULT/NO FAULT Displays the exhaust gas recirculation state. EGR MONITOR EGR mon ready Range: __________________________________________________________ YES/NO Displays whether the EGR system monitor has successfully completed. EGRBARO Range: ___________________________________________________________ 0 to 5 V Displays the EGR Baro sensor voltage signal. The signal is used by the PCM to control EGR flow. The greater the EGR flow, the lower the voltage. EGRCFault Range: __________________________________________________________ YES/NO Indicates if the PCM has detected a fault in the EGR control solenoid circuit and reads YES when a fault is present. EGRCvacsol Range: __________________________________________________________ ON/OFF Displays the state of a normally closed solenoid that regulates vacuum to the EGR valve with a variable duty cycle. Reads as follows: • ON when the solenoid is enabled • OFF when it is disabled EGRDC(%) Range: _________________________________________________________ 0 to 100% Displays the exhaust gas recirculation valve duty cycle. EGRDtyCycl(%) Range: _________________________________________________________ 0 to 100% Displays the duty cycle of the EGR vacuum regulator valve or EVR. The EVR controls the amount of EGR flow. EGRDtyCycl reads as follows: • 0% when the EVR is fully open and allowing vacuum to vent to atmosphere • 100% when the EVR is fully closed allowing vacuum to open the EGR valve EGREVAL_DC_MODE1 Range: __________________________________________________________ YES/NO Indicates if the exhaust gas recirculation system has been evaluated. EGRFOpen Range: __________________________________________________________ YES/NO Indicates whether the PCM has detected an open circuit in the EGR vacuum regulator valve or EVR circuit and reads YES when a fault is present. EGRFShort Range: __________________________________________________________ YES/NO Indicates whether the PCM has detected a short circuit in the EGR vacuum regulator valve or EVR circuit and reads YES when a fault is present. 298 Ford Data Parameters Powertrain Control Module (PCM) Parameters EGRMC1 EGRMC2 EGRMC3 EGRMC4 Range: __________________________________________________________ ON/OFF Displays the EGR motor control state for the indicated EGR motor control number. EGRMC1F EGRMC2F EGRMC3F EGRMC4F Range: ______________________________________________ YES FAULT/NO FAULT Displays the EGR motor control fault state for the indicated EGR motor control number. EGRMDSD Range: ______________________________________________________ not available Displays the EGR motor position desired. EGRTPDC(%) Range: _________________________________________________________ 0 to 100% Displays the EGR throttle position. EGRVP(V) EGRTP(V) Range: ______________________________________________________ 0.30 to 4.50 V Displays the voltage signal sent to the PCM by the EGR valve position sensor, which indicates the position of the EGR valve pintle. • A low reading indicates low EGR flow • A high reading indicates high EGR flow EGRVPDES Range: __________________________________________________________ 0 to 14% Displays the desired EGR. EGRVR(%) Range: __________________________________________________________ 0 to 90% Displays the signal sent to the PCM by the EGR valve position sensor as a percentage. A low reading indicates low EGR flow, while a high reading indicates high EGR flow. EGRVR_FLT Range: __________________________________ No fault/Short/Open/Yes Fault/Invalid Displays the exhaust gas recirculation vacuum regulator fault state. EGRVentsol Range: __________________________________________________________ ON/OFF Displays the PCM command to the EGR vent solenoid. Reads ON when the solenoid is energized to bleed vacuum from the EGR valve and close it. EGRVFault Range: __________________________________________________________ ON/OFF Indicates whether the PCM has detected a fault in the EGR vent solenoid circuit. Reads YES when a fault is present. 299 Ford Data Parameters Powertrain Control Module (PCM) Parameters ElecPrsCtrl Range: ________________________________________________________0 to 100 psi Displays the PCM commanded electronic control pressure for the transmission. This is a calculated parameter based on PCM-controlled pulse-width output. EngFuelTA(V) EngFuelTB(V) Range: ________________________________________________________ 0 to 5.00 V Displays the engine fuel temperature sensor voltage on diesel, flexible-fuel, and natural-gas powered vehicles. • EngFuelTA = bank 1 • EngFuelTB = bank 2 EOT(V) Range: ___________________________________________________________ 0 to 5 V EOT(°) EngOilTemp(°) EOT_DEG(°C/°F) Range: __________________________________________ 0 to 212°F or -17.8 to 100°C Displays the engine oil temperature (EOT) in volts and degrees. EOT_M(°C/°F) Range: ____________________________________________________________ actual Displays the engine oil temperature. EOTF Range: ______________________________________________ YES FAULT/NO FAULT Displays the engine oil temperature state. EOTM Range: ______________________________________________ HOT/COLD/NORM/DEF Displays the general state, or mode, of the engine oil temperature (EOT) on diesel powertrain control systems. Possible states are HOT, COLD, NORM (normal), and DEF (default). If the engine oil temperature is out of range, EOTM reads DEF. EPC(psi) Range: ________________________________________________________0 to 100 psi Displays the PCM commanded transmission electronic control pressure (EPC). This is a calculated parameter base on PCM-controlled Pulse-Width output. EPC(V) Range: _______________________________________________ 2 V to battery voltage Displays the average operating voltage of the pulse-width-modulated electronic pressure control solenoid. A low average voltage reading indicates a higher EPC pressure; a higher reading indicates a lower EPC pressure. EPCV(V) Range: ______________________________________________________ not available Displays the electronic pressure control voltage. 300 Ford Data Parameters Powertrain Control Module (PCM) Parameters EPR(%) Range: _________________________________________________________ 0 to 100% Displays the position of the exhaust pressure regulator (EPR) as a percentage. ETC_ACT Range: ____________________________________________________ Actual degrees ETC_DSD Range: ___________________________________________________ Desired degrees Displays the actual (ACT) and desired (DSD) electronic throttle control position. ETC_CTRL Range: ______________________________________________________ not available Displays the throttle control for drive shaft balance. EVAP mon ready Range: __________________________________________________________ YES/NO Indicates whether the evaporative monitor has successfully completed and reads as follows: • YES if the monitor completed. • NO if it did not complete. EVAPC EVAPCV(%) Range: _________________________________________________________ 0 to 100% Displays the PCM-commanded canister purge valve duty cycle. Reads 100% when the canister purge valve is closed and not allowing fuel vapors from the evaporative canister. EVAPCPFault Range: __________________________________________________________ YES/NO Indicates whether the PCM detects a fault in the canister purge solenoid circuit and reads YES when a fault is present. EVAPCP Range: __________________________________________________________ ON/OFF Indicates whether the canister purge solenoid is on (ON) or off (OFF). EVAPCP_FLT Range: ______________________________________________ YES FAULT/NO FAULT Indicates whether an evaporative emission canister purge fault exists. EVAPCV Range: _________________________________________________________ 0 to 100% Displays the duty cycle of the EVAP canister vent solenoid, which controls the amount of air entering the EVAP system. EVAPCV reads as follows: • 0% when the solenoid is fully open • 100% when the solenoid is fully closed EVAPCVA Range: __________________________________________________________ ON/OFF Displays the evaporative emission canister vent valve status. EVAPCVF1 Range: ______________________________________________ YES FAULT/NO FAULT Displays the evaporative emission canister vent valve status. 301 Ford Data Parameters Powertrain Control Module (PCM) Parameters EVAPCVFault Range: __________________________________________________________ YES/NO EVAPCVFLT Range: ______________________________________________ YES FAULT/NO FAULT Indicates whether the PCM detects a fault in the canister vent solenoid circuit. EVAPEVAL_DC_MODE1 Range: __________________________________________________________ YES/NO Displays the evaporative system monitor evaluated status. EVAPPrgFlw(V) Range: ___________________________________________________________ 0 to 5 V Indicates the presence of purge flow from the canister to the engine. Voltage should increase as purge flow increases. EVAPPrgFlw reads as follows: • 0.4 to 1.3 V at idle • 0.4 to 4.0 V at steady cruise EVAPSTA Range: ______________________________________________________ not available Displays the evaporative emissions monitor status. EVAPVM(%) Range: _________________________________________________________ 0 to 100% Displays the evaporative emission vapor management valve status command. EVAPVM_Fault Range: ______________________________________________ YES FAULT/NO FAULT Displays the evaporative emission vapor management fault status. EVAPVMA Range: __________________________________________________________ ON/OFF Displays the commanded state of the EVAPVM. EVMV Range: __________________________________________________ OFF/ON/VARYING Displays the evaporative emission vapor management valve status. EVP(V) STE=EVP(V) Range: ______________________________________________________ 0.30 to 4.50 V Displays the EGR valve position (EVP) sensor signal, which reflects EGR valve pintle position. The EVP sensor is mounted on the EGR valve. The spring-loaded EGR valve is operated by a vacuum signal from the EGR vacuum regulator solenoid. As supply vacuum overcomes spring force, the diaphragm moves. This lifts the pintle off of its seat and allows exhaust gas to recirculate. The amount of flow is proportional to the pintle position. Specifications are model dependant. EVR(%) Range: _________________________________________________________ 0 to 100% Displays the duty-cycle of the signal output by the PCM to operate the EGR vacuum regulator (EVR) solenoid. 302 Ford Data Parameters Powertrain Control Module (PCM) Parameters The EVR solenoid is a pulse-width-modulated (PWM) device that controls manifold vacuum to the EGR valve. The PCM outputs to the EVR regulates the vacuum output to the EGR valve. As the duty-cycle is increased, so is the vacuum output to the EGR valve. EVR(%) reads as described in Table 13-4. Table 13-4 EVR(%) readings EVR(%) inHg Range kPa Range 0% 0 to 0.75 0 to 2.53 33% 0.55 to 2.05 1.86 to 6.9 90% 5.69 to 6.95 19.2 to 23.47 ExhBackPrs Range: _______________________________________________________0 to 2368 psi Displays the exhaust back pressure sensor as determined by a variable-capacitor type sensor in the right exhaust manifold on diesel powertrain control systems. FAN Range: ____________________________________________________ LOW/HIGH/OFF Displays the operational status of the engine cooling fan. FAN_FLT Range: _______________________________________ No Fault/LFC Fault/HFC FAULT Displays the engine cooling fan operation status. FAN Monitor Range: __________________________________________________________ ON/OFF Displays the feedback signal that determines if the fan has been successfully commanded on or off by the PCM. The PCM monitors the fan side of the CCRM (or IRCM). • ON indicates high input voltage • OFF indicates low input voltage FAN_REQ Range: __________________________________________________________ ON/OFF Displays the cooling fan state requested. FANM(HIGH) Range: __________________________________________________________ ON/OFF Indicates whether the PCM is commanding the fan to run at high speed and reads ON when the fan is running at high speed. FANSSM Range: ________________________________________________________ HIGH/LOW Displays the fan speed sensor monitor state. FANSS Range: ______________________________________________________ not available Displays the electronic cooling fan speed sensor status. FDSP_ESCS_GPL Range: __________________________________________________________ ON/OFF Displays the glow plug lamp state. 303 Ford Data Parameters Powertrain Control Module (PCM) Parameters FFINF(%) Range: ______________________________________________________ not available Displays the inferred flex fuel. FFLRND Range: __________________________________________________________ YES/NO Displays the flex fuel learned status. FICM_LPWR FICM_VPWR Range: ______________________________________________________ 10.5 to 15.5 V FICM_MPWR Range: _________________________________________________________ 40 to 52 V Displays the voltage readings from the fuel injector control module (FICM). • LPWR = Logic power • MPWR = Main power • VPWR = Vehicle power FICMSYNC Range: __________________________________________________________ YES/NO Displays the synchronization from the FICM (Fuel Injector Control Module) status. FIRMSHFT Range: __________________________________________________________ ON/OFF Displays the firm shift status. FLIFM Range: __________________________________________________________ YES/NO Displays the fuel level input FMEM flag. FLI_PERCENT(%) Range: ______________________________________________________ not available Displays the fuel level state. FP Range: __________________________________________________________ ON/OFF Displays the fuel pump status. FlexFuel(Hz) Range: ___________________________________________________–32,512 to 32,768 Displays the flexible fuel output frequency. FLG_MLUSFM Range: ______________________________________________ YES FAULT/NO FAULT Indicates whether the torque converter is unlocking due to slipping. FLG_OTLK Range: ______________________________________________ YES FAULT/NO FAULT Indicates whether the transmission is in over temperature lock up mode. FLG_SS4 Range: __________________________________________________________ ON/OFF Displays the shift solenoid 4 state. 304 Ford Data Parameters Powertrain Control Module (PCM) Parameters FLI(V) Range: ___________________________________________________________ 0 to 5V Displays the fuel level input voltage. FLInput(V) FueLvlinput(V) Range: ________________________________________________________ 0 to 32.0 V FLInput(%) FueLvlimput(%) Range: _________________________________________________________ 0 to 100% Displays the fuel level in the fuel tank as a voltage. A voltage or percentage at the high end of the sensor range indicates a high fuel level. The PCM must receive a signal of 25–75% before beginning the evaporative emission monitor. FLI_SG(V) Range: ___________________________________________________________ 0 to 5V Displays the fuel level input voltage. FPA STATE Range: __________________________________________________________ ON/OFF Displays the actual state of the fuel pump power circuit and reads as follows: • ON when the pump is running • OFF when it is not FP=FUEL PUMP Range: __________________________________________________________ ON/OFF Displays the status of the fuel pump relay. • The fuel pump turns ON when the ignition switch is turned on and the fuel pump relay is energized. • The fuel pump shuts OFF if the ignition switch is not turned to the start position and the PCM de-energizes the fuel pump relay after approximately one second. The PCM operates the fuel pump when the ignition is in the start position to provide fuel while the engine is cranking. Once the engine starts the PCM continues operating the fuel pump unless the engine speed drops below 120 RPM or the inertia fuel switch (IFS) is activated. FP_FLT Range: ______________________________________________ YES FAULT/NO FAULT Displays the fuel pump fault status. FPFault Range: __________________________________________________________ YES/NO Indicates whether the PCM has detected a fault in the fuel pump circuit and reads YES when a fault is present. FPM Range: __________________________________________________________ ON/OFF FPM(%) Range: ______________________________________________________ not available Displays the fuel pump monitor status. 305 Ford Data Parameters Powertrain Control Module (PCM) Parameters FPMode FPMonitor Range: __________________________________________________________ ON/OFF Indicates whether the fuel pump has turned on or off in response to a command from the PCM. FRP(psi) Range: _______________________________________________________37 to 150 psi Displays the fuel rail pressure (FRP) in psi on natural gas powered vehicles. FRP(V) Range: ___________________________________________________________ 0 to 5V Displays the fuel rail pressure as voltage. FRP_DSD Range: ______________________________________________________ not available Displays the fuel pressure desired. FRP_FAULT Range: ______________________________________________ YES FAULT/NO FAULT Displays the fuel rail pressure status. FRP_PRESS Range: ______________________________________________________ not available Displays the fuel rail pressure. FRPFM Range: ______________________________________________ YES FAULT/NO FAULT Displays the fuel rail pressure transducer status. FRT1FM Range: ______________________________________________ YES FAULT/NO FAULT Displays the fuel rail temp sensor #1 status. FSVFault FuelSolVlv Range: __________________________________________________________ YES/NO Indicates whether the PCM detects a fault in the fuel solenoid valve circuit on flexible-fuel vehicles and reads YES when a fault is present. FSVMonitor Range: __________________________________________________________ ON/OFF Displays the fuel solenoid valve (FSV) circuit state on flexible-fuel vehicles. Reads ON when the PCM has turned on the fuel solenoid valve. FTIV_HEV(%) Range: ______________________________________________________ not available Displays the fuel tank isolation valve status as a percentage. FTIV_F Range: ______________________________________________ YES FAULT/NO FAULT Displays the fuel tank isolation valve status. FTP(KPA/PSI) Range: ____________________________________________________________ actual Displays the fuel tank pressure transducer status. 306 Ford Data Parameters Powertrain Control Module (PCM) Parameters FTP_FAULT Range: ______________________________________________ YES FAULT/NO FAULT Displays the fuel tank pressure transducer status. FUEL mon ready Range: __________________________________________________________ YES/NO Indicates whether the Fuel monitor has successfully completed and reads as follows: • YES if the monitor completed • NO if it did not FUEL_RAIL_TEMP(°C/°F) Range: ____________________________________________________________ actual Displays the fuel rail temperature. FuelPumpA Range: __________________________________________________________ ON/OFF Displays the actual state of the commanded fuel pump output and should read the same as the fuel pump monitor and fuel pump command output displays. All three should be ON or OFF at the same time. FUELPW(mS) Range: __________________________________________________________ 0 to 99.9 Displays the time in milliseconds (mS) that the PCM commands the fuel injectors to turn on for diesel powertrain control systems. • A high reading indicates more on-time. • A low reading indicates less on-time. FUELPW Range: ______________________________________________________ not available Displays the fuel-injection pulse width. FUELPW1(mS) FUELPW2(mS) Range: __________________________________________________________ 0 to 99.9 Displays the current commanded pulse width of the injectors affected by O2S1 and O2S2. The displayed value is the pulse width that was commanded at the time of the last update. On some vehicles, updating may occur only when a PIP signal is being received, and the last updated value is retained after the PIP signal stops. In these cases, a value greater than zero may display during KOEO. FUELPW2(%) Range: __________________________________________________________ 0 to 99.9 Displays the fuel pulse width #2 as a percentage. FuelRailPrs(V) Range: _________________________________________________________ 0 to 4.5 V Displays the fuel rail pressure in volts on natural gas powered vehicles. As voltage increases, so does pressure. • 0 V = 37.6 psi (260 kPa) • 4.5 V = 150 psi (1034 kPa) 307 Ford Data Parameters Powertrain Control Module (PCM) Parameters FUEL STATUS FUEL SYS FUEL SYS1 FUEL SYS2 FUELSYS Range: ____________________________________________________ see description Indicates whether the vehicle is operating in open or closed loop. It is similar to the OPEN/CLSD LOOP but provides more information about the cause of the open- or closed-loop condition. FUEL SYS1 and FUEL SYS2 refer to bank 1 and 2. Interpret readings as follows: • • • • • CL = normal closed loop CL FLT = One O2S is not switching and the PCM is using the other one for feedback OL = normal open loop OL DRV = Open loop because of driver action or other special circumstances OL FLT = Open loop with O2S problem or primary side coil failure FuelTankPrs(V) Range: _________________________________________________________ 0 to 5.0 V Displays the signal voltage from the fuel tank pressure sensor. The Evaporative Emissions Monitor requires input from this sensor. With the gas cap removed, signal voltage should range between 2.4 and 2.8 V. During an EVAP emissions test, expect voltage to decrease while the PCM applies vacuum to the fuel tank. G_SDN Range: __________________________________________________________ YES/NO Displays the generator shutdown request status. GEAR Range: __________________________________________ 1st/2nd/3rd/4th/5th/6th/REV Displays the PCM/TCM commanded gear position on vehicles with electronic transmissions. GEAR_MAX Range: ____________________________________________________________ actual Displays the highest gear allowed. Gear_OSC Range: ____________________________________________________________ actual Displays the gear command by output state control. GEAR_RAT Range: ____________________________________________________________ actual Displays the gear ratio. GENLMP GEN_LAMP Range: __________________________________________________________ ON/OFF Displays the generator lamp circuit status. GEN_FAULT Range: __________________________________________________________ YES/NO Displays the generator status. Reads YES when the PCM detects a generator output fault. 308 Ford Data Parameters Powertrain Control Module (PCM) Parameters GEN_MON Range: ________________________________________________________ LOW/HIGH GEN_MON(%) Range: _________________________________________________________ 0 to 100% Displays the generator monitor status. GENB_F Range: ______________________________________________ YES FAULT/NO FAULT Indicates whether a fault is present in the generator B circuits. GENB_FAULT Range: __________________________________________________________ YES/NO Indicates whether a fault is present in the generator B+ circuit. Reads YES when there is a fault. GENF Range: ______________________________________________ YES FAULT/NO FAULT Indicates whether a generator output fault exists. GENFDC(%) Range: _________________________________________________________ 0 to 100% Displays the generator field duty cycle. GENFIL Range: __________________________________________________________ YES/NO Indicates whether a fault exists in the generator lamp circuit. GENVDSD Range: ______________________________________________________ not available Displays the generator voltage desired. GlowPlugCtrl(%) Range: _________________________________________________________ 0 to 100% Displays the glow plug control (GPC) duty cycle on diesel truck powertrain control systems. At high battery voltage, the PCM cycles the current on and off to prevent damage to the glow plugs. GlowPlugCtrl reads as follows: • 0% = the glow plug circuit is off • 100% = the circuit is on continuously Related parameters that may display are GPCTM and GPLTM. GPC(%) Range: ______________________________________________________ not available Displays the glow plug control percentage. GPC_L Range: ______________________________________________________ not available Displays the glow plug current, left bank. GPC_R Range: ______________________________________________________ not available Displays the glow plug current, right bank. 309 Ford Data Parameters Powertrain Control Module (PCM) Parameters GPCoilTiMe Range: __________________________________________________ 10 to 120 seconds Displays the glow plug control time on diesel powertrain control systems, which shows the actual time the glow plugs would be switched on for if the engine were started under current conditions. The time interval is based on engine oil temperature and reads as follows: • About 10 seconds on a warm engine • 120 seconds on a cold engine GPCTM Range: ______________________________________________________ not available Displays the glow plug coil on time. GPLTM Range: ______________________________________________________ not available Displays the glow plug lamp time if active. GPLampTiMe Range: ____________________________________________________ 2 to 10 seconds Displays the glow plug lamp time on diesel powertrain control systems, which shows the length of time that the “wait to start” lamp would be illuminated if the ignition was switched on under current conditions. The lamp comes on every time a key reset occurs, and it remains on from 2 to 10 seconds depending upon engine temperature. GR_RATIO Range: ____________________________________________________________ actual Displays the transmission gear ratio. GTQ_OUT_ENG Range: ______________________________________________________ not available Displays the measured generator torque. HCATEVAL_DC_MODE1 Range: __________________________________________________________ YES/NO Indicates whether the heated catalyst monitor was evaluated. HFC Range: __________________________________________________________ ON/OFF Displays the fan control high speed state. HFC_FLT Range: ______________________________________________ YES FAULT/NO FAULT Displays the fan control high fault status. HFCA Range: __________________________________________________________ ON/OFF Displays the actual state of the commanded output to the fan. It should be the same as the fan monitor and fan command output displays; all three should display ON or OFF at the same time. HFCFault Range: __________________________________________________________ YES/NO Indicates whether the PCM detects a fault with the high speed cooling fan circuit and reads YES if a fault is present. 310 Ford Data Parameters Powertrain Control Module (PCM) Parameters HO2S11(mA) HO2S12(mA) HO2S21(mA) HO2S22(mA) Range: ______________________________________________________ 0 to 1000 mA Displays the actual current in the heated oxygen sensor (HO2S) heater circuit in milli-amps. The two-digit numbers after HTR in the parameter refer to the HO2S position: • • • • 11—Bank 1, Upstream 12—Bank 1, Downstream 21—Bank 2, Upstream 22—Bank 2, Downstream HO2S MONITOR HO2S mon ready Range: __________________________________________________________ YES/NO Indicates whether the heated oxygen sensor (HO2S) monitor has successfully completed. HPRC_ENA Range: __________________________________________________________ ON/OFF Displays the heater pump command. HPRC_F Range: ______________________________________________ YES FAULT/NO FAULT Displays the heater pump status. HTR11Fault HTR11F HTR12Fault HTR12F HTR21Fault HTR21F HTR22Fault HTR22F Range: __________________________________________________________ YES/NO Indicates whether the PCM detects a fault in the oxygen sensor (O2S) heater circuit. Reads YES when a fault is present. The numbers after HTR in the parameter refer to the O2S position: • • • • 11—Bank 1, Upstream 12—Bank 1, Downstream 21—Bank 2, Upstream 22—Bank 2, Downstream HTR11A HTR11 HTR12A HTR12 HTR21A HTR21 HTR22A HTR22 Range: __________________________________________________________ ON/OFF Displays the O2S heater state. The state should be the same as for the corresponding HTRX data parameter; both should read ON or OFF at the same time. For example: 311 Ford Data Parameters • • • • Powertrain Control Module (PCM) Parameters HTR11/HTR11A = bank 1 upstream O2S, should read the same as HTRX1 HTR12/HTR12A = bank 1 downstream O2S, should the same as HTRX2 HTR21/HTR21A = bank 2 upstream O2S, should read the same as HTRX1 HTR22/HTR22A = bank 2 downstream O2S, should read the same as HTRX2 HTR13 Range: __________________________________________________________ ON/OFF Displays the heated exhaust gas oxygen sensor heater (bank 1, sensor 3) state. HTR21F Range: ______________________________________________ YES FAULT/NO FAULT Displays the heater control for O2S21 fault status. HTR23 Range: __________________________________________________________ ON/OFF Displays the heated exhaust gas oxygen sensor heater (bank 2, sensor 3) state. HTRCM11 Range: ______________________________________________________ not available Displays the heater current monitor for heated exhaust oxygen sensor 11 status. HTRCM12 Range: ______________________________________________________ not available Displays the heater current monitor for heated exhaust oxygen sensor 12 status. HTRCM21 Range: ______________________________________________________ not available Displays the heater current monitor for heated exhaust oxygen sensor 21 status. HTRCM22 Range: ______________________________________________________ not available Displays the heater current monitor for heated exhaust oxygen sensor 22 status. HTREVAL_DC_MODE1 Range: __________________________________________________________ YES/NO Indicates whether the heated exhaust oxygen sensor heater system was evaluated. HTRX1 HTRX2 Range: __________________________________________________________ ON/OFF Displays the PCM-command to the upstream (HTRX1) or downstream (HTRX2) O2S heater. IAC(%) IAC=IDLE AIR(%) Range: _________________________________________________________ 0 to 100% Displays the PCM output command to the idle air bypass solenoid. The percentage displayed corresponds to the IAC valve amperage (current and voltages in Table 13-5.) Table 13-5 IAC(%) and IAC=IDLE AIR(%) readings Percentage Reading IAC Valve Voltage IAC Valve Amperage 10% 1V 0.1 A 50% 5V 0.5 A 80% 8V 0.8 A 100% 10–12 V 1.0 A 312 Ford Data Parameters Powertrain Control Module (PCM) Parameters The idle air control (IAC) solenoid is used to regulate the amount of air that bypasses the throttle at idle, and thus the idle speed. A lower number indicates the valve is open for a shorter period, providing less idle air. A higher number indicates that the valve is open longer, providing more idle air. An adaptive IAC strategy is used by the PCM to compensate for wear, vacuum leaks, and throttle plate coking. When engine conditions meet IAC adaptive strategy learning requirements, the PCM monitors and determines the values for ideal idle calibration. These values are stored in PCM memory as a correction factor for controlling idle speed. IAC_CELL0 IAC_CELL1 IAC_CELL2 Range: _____________________________________________________DRIVE/AC OFF Displays the airflow time learned for cells 0, 1, and 2. IAC_CELL3 Range: _________________________________________________ NEUTRAL/AC OFF Displays the airflow time learned for cell 3. IAC_MODE Range: ______________________________________________________ not available Displays the idle air control status. IAC_TRIM Range: ______________________________________________________ not available Displays the short term airflow trim before KAM was learned. IACDTCY(%) Range: _________________________________________________________ 0 to 100% Displays the idle air control valve duty cycle. IACF IACFault Range: __________________________________________________________ YES/NO IAC_FLT Range: ______________________________________________ YES FAULT/NO FAULT Indicate whether the PCM detects a fault in the idle air control (IAC) system and reads YES if a fault is present. IAT IAT(°C) IAT(°F) IAT_C IAT2 IAT2_TEMP IAT_T IAT2_VOLTS Range: ____________________________________________________ 0 to 255°C or °F Displays the intake air temperature. The IAT2 sensor provides a manifold air temperature signal to the PCM and is located in the intake manifold. 313 Ford Data Parameters Powertrain Control Module (PCM) Parameters IAT(V) IAT2(V) Range: ________________________________________________________ 0.0 to 5.0 V Displays the voltage signal from the intake air temperature sensor. A 5 V reference signal is applied to the IAT. As temperature increases, the sensor resistance decreases, which provides a variable intake air voltage signal to the PCM. IAT=ACT(°C) Range: _______________________________________________________–40 to 199°C IAT=ACT(°F) Range: _______________________________________________________ –40 to 389°F IAT=ACT(V) Range: ________________________________________________________ 0.0 to 5.0 V Displays the intake air temperature (IAT) sensor signal as temperature or voltage. The IAT is a thermistor that is typically installed in the air cleaner. A 5 V reference signal is applied to the IAT. As temperature increases, the sensor resistance decreases, which provides a variable intake air voltage signal to the PCM. The PCM converts IAT voltage signals to temperature readings. IAT readings, along with MAF or MAP, are primary parameters used by the PCM to calculate the amount of air entering the engine, which is critical for determining the amount of fuel required. The IAT reading should be close to the ambient air temperature on a cold engine and should rise steadily as the engine warms up. Readings on a warm engine differ greatly between vehicles because of under-hood temperature variations and hot-soak conditions. IAT_FAULT Range: ______________________________________________ YES FAULT/NO FAULT Indicates the inlet air temperature status. ICP(V) Range: ________________________________________________________ 0.0 to 5.0 V Displays the injector control pressure (ICP) sensor signal, which indicates absolute pressure for the fuel injection on a diesel engine. The ICP sensor is mounted on the left cylinder bank. The display may be the unconverted voltage signal, or it may be the PCM converted equivalent pressure in psi or megapascal (MPa). On any of these scales, a low reading indicates low injection pressure and a high reading indicates higher injection pressure. ICP_DES Range: ____________________________________________________________ actual Displays the injector control pressure desired. ICP_PRESS Range: ____________________________________________________________ actual Displays the injector control pressure. IGN_RUN_PCM Range: ____________________________________________________________ actual Displays the ignition key status. ILINE_V Range: ____________________________________________________________ actual Displays the generator command. IMRC Range: __________________________________________________________ ON/OFF Displays the intake manifold runner control state. 314 Ford Data Parameters Powertrain Control Module (PCM) Parameters IMRCM(V) Range: ___________________________________________________________ 0 to 5V Displays the intake manifold runner control monitor voltage. IMRC1M(V) IMRC2M(V) Range: ______________________________________________________ not available Displays the position of the intake manifold runner control valves on cylinder Bank 1 (IMRC1M) and Bank 2 (IMRC2M). Depending on the vehicle, a high voltage may mean that the valve is open or that the value is shut. IMRCFault Range: __________________________________________________________ YES/NO IMRCFLT Range: ______________________________________________ YES FAULT/NO FAULT Indicates whether the PCM detected a fault in the intake manifold runner control system and reads YES when a fault is present. IMS_SRC Range: ____________________________________________________________ actual Displays the intermediate shaft speed. IMTV(%) IMTV1_PER(%) IMTV2_PER(%) Range: _________________________________________________________ 0 to 100% Displays the PCM-command status for the intake manifold tuning valves. IMTV1 is bank 1 and IMTV2 is bank 2. At 100% the valve should be fully open. IMTVF IMTV_FLT IMTV2_FLT Range: ______________________________________________ YES FAULT/NO FAULT IMTVFault Range: __________________________________________________________ YES/NO Displays the intake manifold tuning valve fault status. IMTV IMTV1 IMTV2 Range: __________________________________________________________ ON/OFF Displays the intake manifold tuning valve state for the indicated cylinder bank. INJ Range: ______________________________________________ YES FAULT/NO FAULT Indicates the injector fault status. INJ PW1(mS) INJ PW2(mS) Range: __________________________________________________________ 0 to 99.9 Displays the length of time in milliseconds (mS) that the PCM commands the fuel injectors to energize. These parameters are used on multiport fuel injection systems. 315 Ford Data Parameters Powertrain Control Module (PCM) Parameters On Electronic Fuel Injection (EFI) systems, the PCM simultaneously pulses half of the fuel injectors at a time. INJ PW1(mS) refers to those injectors installed in bank #1, and INJ PW2(mS) refers to the injectors in bank #2. Depending on the engine, banks #1 and #2 may be staggered. These parameters read as follows: • A high pulse width indicates more on-time and a richer mixture. • A low pulse width indicates less on-time and a leaner mixture. There are no definite specifications for injector pulse width, but the reading should change as engine speed and load change. On EFI systems, these parameters read as follows: • 1 to 5 mS at idle • About 18 mS at wide open throttle (a little higher for some engines) Since the PCM on SEFI systems pulses each injector individually, the readings represent, at best, the “average” injector pulse width for each bank. Ford SEFI systems use these parameters to allow the PCM to conduct rationality tests on the fuel delivery, the mass airflow (MAF) sensor, and the throttle position (TP) sensor. INJ_TIM Range: ____________________________________________________________ actual Displays the injector timing before top dead center. INJ1 INJ2 INJ3 INJ4 INJ5 INJ6 INJ7 INJ8 INJ9 INJ10 Range: ______________________________________________ YES FAULT/NO FAULT Indicates whether there is an injector fault according to injector number. INJnFault Range: __________________________________________________________ YES/NO Indicates whether there is an injector fault according to injector number.The “n” in INJnFault is a variable from 1 to 10, depending on the indicated cylinder. InjPrsReg(%) Range: _________________________________________________________ 0 to 100% Displays the on-time of the pulse-width-modulated injector pressure regulator on a diesel engine as a percentage. The PCM uses the injector pressure regulator to vary the injection oil pressure and control fuel volume. The injector pressure regulator is a 12 V ground-side controlled device. InManRunCtrl(%) Range: _________________________________________________________ 0 to 100% Displays the PCM-command status for the intake manifold runner control valve. At 100% the pulse-width-modulated valve should be fully open. 316 Ford Data Parameters Powertrain Control Module (PCM) Parameters InManRunCtrl Range: __________________________________________________________ ON/OFF Displays the intake manifold runner control valve status. Reads as follows: • ON = the valve is open • OFF = the valve is close Normally this valve is closed when the engine speed is below 3000 RPM. IPR(%) Range: _________________________________________________________ 0 to 100% Displays the injector control pressure regulator position. ISS(RPM) Range: ____________________________________________________________ actual Displays the input shaft speed. ISS_DIR Range: _______________________________________________ FORWARD/REVERSE Displays the input shaft direction. ISS_F Range: ______________________________________________ YES FAULT/NO FAULT Indicates whether the input shaft speed signal is reliable. ISS_FAULT Range: __________________________________________________________ YES/NO Indicates whether a fault is detected in the input shaft speed (ISS) circuit. ITS1 Range: ________________________________________________ GEAR1/NOT GEAR1 Displays the 1st gear indicator. ITS2 Range: __________________________________________________ NOT GEAR/GEAR Displays the 2nd gear indicator. ITSD Range: _________________________________________________ DRIVE/NOT DRIVE Displays the drive status. ITSR Range: _________________________________________ REVERSED/NOT REVERSED Displays the reverse indicator. IVS Range: __________________________________________________________ YES/NO Displays the idle validation switch (IVS) state, which verifies that the accelerator pedal (AP) is in the idle position on diesel powertrain control systems. The IVS provides a check on the AP sensor. The MIL lights if the IVS signal does not match the AP sensor signal. A faulty IVS or AP sensor allows the engine to run at low idle speed only. KAMFUSE Range: ________________________________________________________ ON/FAULT Displays the keep alive memory power status. 317 Ford Data Parameters Powertrain Control Module (PCM) Parameters KEYPOS Range: ____________________________________________________________ actual Displays the ignition key status. KNOCK_1 Range: ______________________________________________________ not available Displays the knock sensor 1 status. KNOCK_2 Range: ______________________________________________________ not available Displays the knock sensor 2 status. LCF_FLT Range: ______________________________________________ YES FAULT/NO FAULT Indicates whether there is a fan control low fault. LFC Range: __________________________________________________________ ON/OFF Displays the fan control low speed status. LFC=LO FAN HFC=HI FAN HighFanCtrl Range: __________________________________________________________ ON/OFF Displays the fan relay status. Some engines have a two-speed electric fan, which the PCM controls through LFC and HFC outputs to the fan relays. The high speed relay is a normally open for all models. However, the low speed fan relay is normally closed for Escort and Tracer, and normally open for Probe. When the fan is off: • HFC should read OFF. • LFC should read OFF for Probe and ON for Escort and Tracer. With the low speed fan on: • HFC should read OFF. • LFC should read ON for Probe and OFF for Escort or Tracer. When the high speed fan is on: • HFC should read ON. • LFC should read OFF for all models. LFCFault Range: __________________________________________________________ YES/NO Indicates whether the PCM has detected a low speed fan control module fault. 318 Ford Data Parameters Powertrain Control Module (PCM) Parameters LFT1(%) LFTRIM 1(%) LONGFT1(%) LFTRIM 2(%) LONGFT2(%) Range: _____________________________________________________ –35% to +35% The long-term fuel trim (LFTRIM) numbers represent the operation and long-term correction of fuel-metering on a fuel-injected engine. The value shows if the PCM is commanding a rich or a lean mixture. Similar to short-term fuel trim (SFTRIM), the LF TRIM number can range from -35% to +35%, with 0% as the midpoint. A number above zero percent indicates the PCM has commanded a long-term rich mixture correction. A number below zero percent indicates the PCM is commanding a lean mixture. The LF TRIM number follows the short-term fuel (ST FUEL) number and makes long-term corrections to the fuel-metering in response to a pattern or trend of short-term fuel changes. Compare LF TRIM numbers to injector on-time. Numbers above zero percent indicate increased on-time. Numbers below zero percent indicate decreased on-time. LF TRIM corrections operate only in closed loop. In open loop, the number goes to a fixed value. LOAD(%) LOAD_FF(%) ENG LOAD(%) Range: _________________________________________________________ 0 to 100% Displays the engine load as calculated by the PCM based on engine speed (RPM), number of cylinders, airflow, and cylinder air charge compared to the theoretical air charge that occurs at standard PCM temperature and pressure (volumetric efficiency). The resulting ratio—called engine load—is expressed as a percentage. The engine load parameters read as follows: • 20–40% = a normal load at idle • Less than 80% = normal driving • More than 100% = under hard acceleration in cold temperatures or high barometric pressure, or on supercharged vehicles LOS_BRAK Range: __________________________________________________________ YES/NO Indicates if a hybrid is operating in limited mode due to the regenerative braking system. LOS_ENG Range: __________________________________________________________ YES/NO Indicates if a hybrid is operating in limited mode due to an engine condition. LOS_ETC Range: __________________________________________________________ YES/NO Indicates if a hybrid is operating in limited mode due to the electronic throttle control. LOS_EQ Range: __________________________________________________________ YES/NO Indicates if a hybrid is operating in limited mode due to the E-quizzer. 319 Ford Data Parameters Powertrain Control Module (PCM) Parameters LOS_GEN Range: __________________________________________________________ YES/NO Indicates if a hybrid is operating in limited mode due to the generator. LOS_HV Range: __________________________________________________________ YES/NO Indicates if a hybrid is operating in limited mode due to the high voltage battery. LOS_IPC Range: __________________________________________________________ YES/NO Indicates if a hybrid is operating in limited mode due to the independent plausibility checker. LOS_KEY Range: __________________________________________________________ YES/NO Indicates if a hybrid is operating in limited mode due to the key position. LOS_LV Range: __________________________________________________________ YES/NO Indicates if a hybrid is operating in limited mode due to the 12-Volt battery. LOS_MOT Range: __________________________________________________________ YES/NO Indicates if a hybrid is operating in limited mode due to the electric motor. LOS_OWC Range: __________________________________________________________ YES/NO Indicates if a hybrid is operating in limited mode due to the one way clutch. LOS_TCM Range: __________________________________________________________ YES/NO Indicates if a hybrid is operating in limited mode due to the transmission control module. LOSSTRT Range: __________________________________________________________ YES/NO Indicates if a hybrid is operating in limited mode due to the engine no start. LowFanCA Range: __________________________________________________________ ON/OFF Displays the actual state of the commanded output to the fan. It should read the same as the fan monitor and fan command output; that is, all three should be ON or OFF at the same time. LowFanCtrl Range: __________________________________________________________ ON/OFF Displays the state of the low-speed fan control on vehicles with multiple fan speed control. LowFPumpFault Range: __________________________________________________________ YES/NO Indicates whether the PCM has detected a fault in the low speed fuel pump circuit. LPC_AMP Range: ______________________________________________________ not available Displays the transmission line pressure. 320 Ford Data Parameters Powertrain Control Module (PCM) Parameters LT TRIM B1(%) LT TRIM B2(%) Range: _______________________________________________________ –20 to +20% Long-term fuel trim (LT TRIM B1 or B2 = BANK 1, or BANK 2) numbers represent the operation and long-term correction of fuel-metering on a fuel-injected engine. The value shows if the PCM is commanding a rich or a lean mixture. Similar to short-term fuel trim (“ST TRIM B1(%)” on page 337), the LT TRIM parameter ranges from –20% to +20% with 00% as the midpoint: • A number above zero percent indicates the PCM has commanded a long-term rich mixture correction. • A number below zero percent indicates the PCM is commanding a lean mixture. LT TRIM follows the short-term fuel (ST FUEL) number and makes long-term corrections to the fuel-metering in response to a pattern or trend of short-term fuel changes. Compare LT TRIM numbers to injector on-time. Numbers above zero percent indicate increased on-time. Numbers below zero percent indicate decreased on-time. LT TRIM corrections operate only in closed loop. In open loop, the number goes to a fixed value. M_DPFE Range: ____________________________________________________________ actual Displays the EGR sensor input at the time of a misfire. M_IAT Range: ____________________________________________________________ actual Displays the intake air temperature (IAT) at the time of a misfire. M_LOAD(%) Range: ____________________________________________________________ actual Displays the engine load at the time of a misfire. M_PNP Range: ____________________________________________________________ actual Displays the Park/Neutral Position (PNP) at the time of a misfire. M_RPM Range: ____________________________________________________________ actual Displays the engine speed at the time of a misfire. M_RUN Range: ____________________________________________________________ actual Displays the engine running time at the time of a misfire. M_SOAK Range: ____________________________________________________________ actual Displays the engine-off soak time in minutes prior to a misfire. M_TP Range: ____________________________________________________________ actual Displays the throttle position at the time of a misfire. M_TRIP Range: ____________________________________________________________ actual Displays the number of trips since the time of a misfire. 321 Ford Data Parameters Powertrain Control Module (PCM) Parameters M_VSS Range: ____________________________________________________________ actual Displays the vehicle speed at the time of a misfire. M_WHEEL Range: ____________________________________________________________ actual Displays the learned misfire correction profile at the time of a misfire. MAF(gm/S) AIRFLOW(g/S) Range: ___________________________________________________________0 to 255 Displays the amount of air flowing into the engine in grams per second. It is the same as the MAF=MASS AIR(gm/sec) parameter. Reading should be low at idle and higher at high RPM. MAF(V Range: _________________________________________________________ 0 to 5.0 V Displays the voltage signal from the mass airflow (MAF) sensor to the PCM. It is the same as the MAF=MASS AIR(V) parameter. The reading should be low at idle and higher at high RPM. MAF_Fault MASS AIR FLOW_STATUS Range: __________________________________________________________ YES/NO Indicates whether a fault has occurred in the MAF circuit. MAF_RATE Range: ______________________________________________________ not available Displays the mass airflow rate. MAF=MASS AIR(V) Range: ________________________________________________________ 0.5 to 5.0 V MASS AIR(gm/sec) Range: ___________________________________________________________0 to 255 The MAF=MASS AIR value is the MAF sensor output voltage, which is used on EEC-IV systems with DCL. The MASS AIR value displays a PCM calculated intake air voulme as grams per second based on the MAF sensor signal. It is used on EEC-V (OBD-II) systems. The MAF sensor, which is located between the air cleaner and the throttle body, measures the mass of air flowing to the engine. The PCM uses this value to calculate the injector pulse width needed to obtain an optimal air-fuel ratio. MAF sensor readings should be low at idle and should increase as the throttle opens. MAFF Range: ______________________________________________ YES FAULT/NO FAULT Displays the mass airflow status. MAN LEV POS Range: ____________________________________________________ see description Displays the position of the gear selector lever. Reads PARK, REV, NEUT, O/D, DRIVE, MAN1, or MAN2 depending on position. MAN LEV POS(V) Range: ____________________________________________________ see description Displays the status of the manual lever position (MLP) sensor, which is a ratiometric sensor with six resistors in series. The PCM looks at the voltage for each shift lever position. 322 Ford Data Parameters Powertrain Control Module (PCM) Parameters Typical readings are: • • • • • • Park = 4.41 V Reverse = 3.60 V Neutral = 2.83 V Drive = 2.09 V 2nd = 1.37 V 1st = 0.68 V MAN VAC Range: _______________________________________________________ 0 to 35 “HG Displays the PCM calculated value that indicates engine manifold vacuum as determined by inputs from various system sensors. Values should equal actual vacuum gauge readings. MAP(Hz) Range: ____________________________________________________ see description Displays the manifold absolute pressure (MAP) sensor output signal frequency, which is relative to intake manifold vacuum. The MAP sensor frequency increases as vacuum decreases. MAP(Hz) reads as follows: • 80 Hz at 101.6 kPa (30 inHG of manifold vacuum) • 159 Hz at zero manifold vacuum The PCM uses the MAP signal to determine engine load and regulate the air-fuel ratio, ignition timing, and EGR flow, and to compensate for altitude. MAP(psi) Range: _________________________________________________________0 to 30 psi Displays the manifold absolute pressure on turbocharged diesel powertrain systems in pounds per square inch (psi). The PCM uses the MAP sensor signal to decrease fuel during acceleration until reaching a specified boost pressure. This decreases tailpipe smoke. MAP_DI2 Range: ___________________________________________________________ 0 to 5V Displays the manifold absolute pressure sensor status. MAP_F Range: ______________________________________________ YES FAULT/NO FAULT Displays the manifold absolute pressure sensor status. MAP_PCM Range: ____________________________________________________________ actual Displays the manifold absolute pressure sensor status. MAP_V Range: ___________________________________________________________ 0 to 5V Displays the manifold absolute pressure sensor status. MAP2 Range: ____________________________________________________________ actual Displays the manifold absolute pressure sensor status. MASTERKEY Range: ___________________________________________ PRESENT/NOT PRESENT Displays the master key present status. 323 Ford Data Parameters Powertrain Control Module (PCM) Parameters MAT Range: ____________________________________________________________ actual Displays the input signal from the manifold air temperature sensor to the PCM on diesel systems. The PCM uses this signal and other sensor signals to determine fuel injection rate. MECP_ENA Range: __________________________________________________________ ON/OFF Displays the motor electronics coolant pump state. MECP_F Range: ______________________________________________ YES FAULT/NO FAULT Displays the motor electronics coolant pump status. MECT_V(V) Range: ______________________________________________________ not available Displays the motor electronics coolant temperature. MIN_KEY Range: ____________________________________________________________ actual Displays the minimum number of keys required. MFC Range: __________________________________________________________ ON/OFF Displays the medium fan control state. MFC_FLT Range: ______________________________________________ YES FAULT/NO FAULT Displays the medium fan control status. MFDES Range: _______________________________________________________ 0 to 255 mG Displays the PCM calculation of the mass fuel desired (MFDES) per stroke of the injection pump to operate the engine under the current speed, load, and temperature conditions on diesel powertrain systems. The readings are in milligrams (mG): • 8 to 10 mg at idle • About 60 mg at full throttle MGP Range: ______________________________________________________ –10 to 30 psi) Displays the manifold gauge pressure (MGP). MIL Range: __________________________________________________________ ON/OFF MILFault Range: __________________________________________________________ YES/NO Indicates whether a fault has occurred in the MIL circuit: MIL_FLT Range: ______________________________________________ YES FAULT/NO FAULT Indicates whether a MIL driver fault exists. MISF_EVAL Range: __________________________________________________________ YES/NO Indicates whether the misfire monitor was evaluated. 324 Ford Data Parameters Powertrain Control Module (PCM) Parameters MISFEVAL_DC_MODE1 Range: __________________________________________________________ YES/NO Indicates whether the misfire monitor evaluation is complete. MISFire Range: __________________________________________________________ YES/NO Indicates whether a misfire has occurred. Crankshaft acceleration is measured for each cylinder firing event. Should the acceleration drop below a specified threshold, a misfire is deemed to have occurred. MPLRN Range: __________________________________________________________ YES/NO Displays the learned status of the misfire wheel. Reads as follows: • YES if the PCM has learned and stored the misfire wheel profile • NO if the profile has not been learned M_SDN Range: __________________________________________________________ YES/NO Displays the electronic motor shutdown request. MTQ_OUT_ENG Range: ____________________________________________________________ actual Displays the total number of misfires. N_KEYCODE Range: ____________________________________________________________ actual Displays the number of keys stored. NM Range: ____________________________________________________________ actual Displays the total number of misfires. NUMKEYS Range: ____________________________________________________________ actual Displays the number of keys stored in the module. O2 B1-S1(V) O2 B1-S2(V) O2 B2-S1(V) O2 B2-S2(V) Range: ________________________________________________________ 0 to 1.800 Displays the voltage signal of the various system oxygen sensors. EEC-V systems have additional oxygen sensors after each catalyst. Ford calls these downstream sensors catalyst monitor sensors (CMS). Therefore, an EEC-V vehicle with dual exhaust has four sensors: • • • • B1-S1—The upstream sensor for bank 1 B1-S2—The downstream sensor for bank 1 B2-S1—The upstream sensor for bank 2 B2-S2—The downstream sensor for bank 2 Oxygen sensors (O2SS) are the primary sensors used to determine if the engine is running rich or lean. The O2S generate a voltage signal ranging from 0 to a little over 1 V: • 0.800 V or higher signal indicates a rich exhaust • 0.200 V or lower signal indicates a lean exhaust 325 Ford Data Parameters Powertrain Control Module (PCM) Parameters An O2S must be hot (above 500°F/260°C), and the PCM must be operating in closed loop before the PCM responds to the sensor signal. EEC-IV V-type engines have separate sensors for the left and right banks, or for the front and rear banks on a transverse engine. O2OEVAP Range: __________________________________________________________ YES/NO Indicates whether the EVAP purge leak check monitor has completed. • YES indicates the leak check was performed and the PCM can run a purge monitor idle test. • NO indicates that the purge monitor is being prevented because the leak check failed. O2OTEST Range: __________________________________________________________ YES/NO Indicates whether the minimum soak time has elapsed to enable an EVAP monitor test. • YES indicates the purge monitor test is enabled. • NO indicates the purge monitor is being prevented due to insufficient soak time. O2S1(mV) O2S2(mV) O2S11(mV) O2S12(mV) O2S21(mV) O2S22(mV) Range: __________________________________________________________0 to 1800 Displays the voltage signal of the various system oxygen sensors. EEC-V systems have additional oxygen sensors after each catalyst. Ford calls these downstream sensors catalyst monitor sensors (CMS). Therefore, an EEC-V vehicle with dual exhaust has four sensors: • • • • O2S11 — The upstream sensor for bank 1 O2S12 — The downstream sensor for bank 1 O2S21 — The upstream sensor for bank 2 O2S22 — The downstream sensor for bank 2. The oxygen sensors (O2SS) are the primary sensors used to determine if the engine is running rich or lean. The O2S generate a voltage signal ranging from 0 to a little over 1 V (0 to 1000 mV). • A high millivolt signal indicates a rich exhaust. • A low signal indicates a lean exhaust. An O2S must be hot (above 500°F/260°C), and the PCM must be operating in closed loop before the PCM responds to the sensor signal. EEC-IV V-type engines have separate sensors for the left and right banks, or for the front and rear banks on a transverse engine. O2S11FM O2S12FM Range: ______________________________________________ YES FAULT/NO FAULT Displays the heated exhaust oxygen sensor status for the indicated sensor. 326 Ford Data Parameters Powertrain Control Module (PCM) Parameters O2S11(V) O2S12(V) O2S13(V) O2S21(V) O2S22(V) O2S23(V) Range: ___________________________________________________________ 0 to 1V Displays the heated exhaust oxygen sensor voltage for the indicated sensor: • • • • • • O2S11 — bank 1 sensor 1 O2S12 — bank 1 sensor 2 O2S13 — bank 1 sensor 3 O2S11 — bank 2 sensor 1 O2S12 — bank 2 sensor 2 O2S13 — bank 2 sensor 3 O2SEVAL_DC_MODE1 Range: __________________________________________________________ YES/NO Displays the oxygen sensor monitor evaluated status. OCTANE Range: ____________________________________________________________ actual Displays the octane of the fuel. OCTANE ADJ Range: __________________________________________________________ ON/OFF OCT ADJ OCTADJ Range: __________________________________________________________ YES/NO Displays the status of the octane adjust shorting bar, which is used to retard spark. Reads ON when the bar is removed, and OFF at all other times. i NOTE: Removing the shorting bar retards spark about 3 degrees. ODS(RPM) Range: ____________________________________________________________ actual Displays the overdrive drum speed. OFMFLG Range: ______________________________________________ YES FAULT/NO FAULT Displays the pressure control failure mode status. OPEN/CLSD LOOP LOOP Range: _______________________________________________________ OPEN/CLSD Indicates whether the PCM is operating the engine in open or closed loop and read as follows: • OPEN during warm-up • CLSD when the engine is at operating temperature and the PCM responds to O2S voltage Some failure conditions (many associated with trouble codes) will cause the PCM to return to open-loop operation. Additionally, some vehicles normally return to open-loop operation at idle. This occurs because the O2S cools off at idle, and the PCM returns to open loop because the 327 Ford Data Parameters Powertrain Control Module (PCM) Parameters signal is no longer reliable. To restore closed-loop operation, accelerate and hold engine speed at a high idle to warm the sensor. OSFMFLG Range: ______________________________________________ YES FAULT/NO FAULT Displays the output-shaft speed failure mode status. OSS(RPM) Range: ____________________________________________________________ actual Displays the output shaft speed. OSS_DIR Range: _______________________________________________ FORWARD/REVERSE Displays the output shaft direction. OSS_F Range: ______________________________________________ YES FAULT/NO FAULT Displays the EGR motor position desired. OSS_FAULT Range: __________________________________________________________ YES/NO Indicates whether a fault is detected in the output shaft speed (OSS circuit). OSS=TSS(RPM) Range: ___________________________________________________ 0 to vehicle max Displays the PCM calculated RPM value for the transmission turbine shaft. The turbine speed sensor (TSS) is a voltage-generating magnetic pickup. The processor converts the voltage signal of the TSS to an RPM value. OTEMP_FMFLG Range: ______________________________________________ YES FAULT/NO FAULT Displays the transmission over temperature status. OUT_CODE OUTCODE_BIT Range: ____________________________________________________________ actual Displays the outcode status. OutShftSp(RPM) Range: ____________________________________________________________ actual Displays the PCM calculated RPM value for the transmission output shaft. The output shaft speed sensor (OSS) is a voltage-generating magnetic pickup. The processor converts the voltage signal of the OSS to an RPM value. OverdriveCancel Range: ______________________________________ NOT DEPRESSED/DEPRESSED Displays the overdrive cancel switch/Hold switch state. P/S PRESS(HIGH) PwrStrPrs Range: __________________________________________________________ YES/NO Displays the status of the power steering pressure (PSP) switch, which closes under high pressure and read as follows: • YES when the steering wheel is turned right or left to full lock • NO at all other times 328 Ford Data Parameters Powertrain Control Module (PCM) Parameters If it does not change between NO and YES as the wheel turns through its full range, there may be a problem with the switch or other component in the power steering system. PARK_INPT Range: ___________________________________________________PARK/NOT PARK Displays the Park position input state. ParkBrakeApply Range: __________________________________________________________ YES/NO Displays the state of the parking brake applied switch on diesel powertrain control systems. The parking brake applied switch is located under the instrument panel. ParkBrakeApply reads as follows: • YES with the brake applied • NO with the brake not applied This switch disables speed control when it is applied and it also prevents operation of the power take off (PTO) when it is not applied. ParkNeuPos PARK/NEU POS Range: _______________________________________________________ P-N—/-R-DS Indicates whether an automatic transmission is in park or neutral or in one of the drive ranges: • P-N— if the transmission is in either park or neutral • -R-DL if the transmission is in any forward gear or reverse The park/neutral switch is a grounding switch that is closed in park or neutral and open in any forward gear or reverse. PATS_TYPE Range: _____________________________________________________ TIMED/CODED Displays the security access type. PATSENABL Range: _________________________________________________ ENABLE/DISABLE Displays the vehicle enable status. PBA Range: __________________________________________________________ ON/OFF Displays the parking brake switch status. PCA PCB PCC PCD PCE PCF PCG Range: ____________________________________________________________ actual Displays the status of pressure control solenoids A, B, C, D, E, F, and G respectively. Solenoid F regulates line pressure, and solenoid G regulates torque converter clutch operation. 329 Ford Data Parameters Powertrain Control Module (PCM) Parameters PCA_FAULT PCD_FAULT PCE_FAULT PCF_FAULT PCG_FAULT Range: __________________________________________________________ YES/NO Indicates whether a fault is detected in pressure control solenoids A, D, E, F, and G respectively. PCA_FLT2 Range: __________________________________________________ NO FAULT/FAULT Indicates whether a fault is detected in pressure control solenoid A. PCAA PCBA PCCA Range: __________________________________________________________ 0 to 1.2A Displays amperage for pressure control solenoids A, B, and C respectively. PCB_FLT PCC_FLT PCD_FLT PCE_FLT PCF_FLT PCG_FLT Range: __________________________________________________ NO FAULT/FAULT Indicates whether a fault is detected in pressure control solenoids B, C, D, E, F, and G respectively. Solenoid F regulates line pressure, and solenoid F regulates torque converter clutch operation. PCD_AMP Range: __________________________________________________________ 0 to 1.2A Displays shift solenoid pressure control D amperage. PCLowOSM Range: __________________________________________________________ ON/OFF Displays the low speed engine cooling fan monitor. PERDEL1(%) PERDEL2(%) PERDEL3(%) PERDEL4(%) PERDEL5(%) PERDEL6(%) PERDEL7(%) PERDEL8(%) Range: _________________________________________________________ 0 to 100% Displays the percent delta for the indicated cylinder. PEVAP_TMP(°C/°F)(V) Range: ____________________________________________________________ actual Displays the post evaporator temperature sensor input. 330 Ford Data Parameters Powertrain Control Module (PCM) Parameters PFE(V) Range: ______________________________________________________ 0.25 to 4.75 V Displays the pressure feedback EGR (PFE) sensor signal voltage, which determines exhaust system pressure. The PCM uses this signal to compute optimum EGR flow. PFE systems control EGR flow rate by monitoring pressure drop across a remotely located sharp-edged orifice. Typically, sensor output should be as described in Table 13-6. Table 13-6 PFE sensor outputs inHg kPa Volts 3.70 12.5 4.75 2.79 9.42 4.38 1.85 6.25 4.0 0.94 3.17 3.82 0 0 3.25 –5.03 –17.0 1.22 –7.40 –25.0 0.25 The PFE pressure transducer is a feedback device. Pressure is varied by valve modulation. The vacuum output of the EGR vacuum regulator (EVR) solenoid modulates the valve. With PFE, the EGR valve serves as a pressure regulator, rather than a metering device. PinInputLevel Range: __________________________________________________________ ON/OFF Displays the profile ignition pick-up state. PIP Range: __________________________________________________________ YES/NO Displays the status of the profile ignition pickup (PIP) and reads as follows: • YES when the PIP is switching between low and high voltage • NO when there are no PIP signal transitions PNP Range: ___________________________________________________ NEUTRAL/DRIVE Displays the neutral switch circuit status. PNP_ONLY Range: ___________________________________________________ NEUTRAL/DRIVE Displays the park/neutral position switch status. PS1 Range: ____________________________________________________ OPEN/CLOSED Displays the pressure switch 1 status. PSP Range: ________________________________________________________ HIGH/LOW PSP(V) PSP(KPA/PSI) Range: ______________________________________________________ not available Displays the power steering pressure switch status. 331 Ford Data Parameters Powertrain Control Module (PCM) Parameters PSR Range: __________________________________________________________ ON/OFF Displays the power sustained relay commanded status. PTO Range: __________________________________________________________ ON/OFF Displays the power take off status. PwTakeOff Range: __________________________________________________________ ON/OFF Displays the status of the driver-operated power take off (PTO) switch on diesel powertrain control systems. RCAM Range: _______________________________________________________ –15° to +45° Displays the actual position of the camshaft in relation to the crankshaft in degrees of rotation and reads as follows: • Near –15° with the engine running at a warm idle, camshaft fully advanced with no EGR • Near 40° with a warm engine and the vehicle operating at a steady cruise speed RCL_F Range: ______________________________________________ YES FAULT/NO FAULT Displays the cooling fan state. RCL_FAULT Range: __________________________________________________________ YES/NO Indicates whether a fault is detected in the reverse control lamp (RCS) circuit. RESUME Range: __________________________________________________________ ON/OFF Displays the speed control actuator switch resume status. REV_SW Range: __________________________________________________________ ON/OFF Displays the reverse switch status. RPM Range: ____________________________________________________ 0 to engine max Displays the engine speed and is always shown at the left of the top line on the display. RPM is internally computed by the PCM based on ignition reference pulses or a crankshaft sensor. RPMDES Range: ____________________________________________________ 0 to engine max Displays the desired engine speed as calculated by the PCM for base idle. This reading should always be close to actual idle RPM. SBB_SS2 Range: __________________________________________________________ ON/OFF Displays the shift solenoid 2 state. SC_OFF Range: __________________________________________________________ ON/OFF Displays the speed control actuator switch off status. 332 Ford Data Parameters Powertrain Control Module (PCM) Parameters SC_ON Range: __________________________________________________________ ON/OFF Displays the speed control actuator switch on status SCBC Range: __________________________________________________________ ON/OFF Displays the super charger bypass control status. SCBCF Range: ______________________________________________ YES FAULT/NO FAULT Displays the super charger bypass control fault status. SC VAC SW SC VENT SW Range: __________________________________________________________ ON/OFF Displays the PCM output commands to the speed control (SC) vacuum and vent solenoids, which control the speed control servo. The SC VAC SW and SC VENT SW readings have the following relationships with throttle position control: Table 13-7 S/C VAC SW and S/C VENT SW readings and throttle position SC Vacuum Switch SC Vent Switch Throttle ON OFF Accelerate OFF ON Decelerate OFF OFF Steady SCCS Range: ____________________________________________________ see description Displays the position of the driver-operated speed control command switch (SCCS). The SCCS parameter displays several range states according to which SCCS button is pressed: • • • • • OFF COAST ACCEL RESUME ON Two hyphens (--), the default range state, indicates that none of the speed control switch buttons are pressed. SCCS(V) Range: _________________________________________________________ 0 to 10.00 Displays the speed control command switch (SCCS) voltage. SCCS_CANCEL Range: __________________________________________________________ ON/OFF Displays the speed control cancel switch status. SCCS_NULL Range: __________________________________________________________ ON/OFF Displays the speed control no switch input status. 333 Ford Data Parameters Powertrain Control Module (PCM) Parameters SCCS_OFF_PID Range: __________________________________________________________ ON/OFF Displays the speed control actuator switch off status. SCCS_ON_PID Range: __________________________________________________________ ON/OFF Displays the speed control actuator switch on status. SCCS_RESUME Range: __________________________________________________________ ON/OFF Displays the speed control actuator switch Resume status. SCCS_TAP_DN Range: __________________________________________________________ ON/OFF Displays the speed control actuator switch coast status. SCCS_TAP_UP Range: __________________________________________________________ ON/OFF Displays the speed pressure actuator switch SET/ACCEL status. SCICP Range: __________________________________________________________ ON/OFF Displays the super charger intercooler pump status. SCICPF Range: ______________________________________________ YES FAULT/NO FAULT Displays the supercharger intercooler pump fault status. SCP_PARK_BRAKE Range: __________________________________________________________ ON/OFF Displays the parking brake applied status. SEC_ACCES Range: _________________________________________ Denied/In Progress/GrantED Displays the vehicle security access status. SecAIR mon rdy Range: __________________________________________________________ YES/NO Displays the secondary air monitor status and reads YES if the monitor completed. SERV_MOD Range: __________________________________________________________ YES/NO Displays the passive anti theft system (PATS) service module status. SET_ACL Range: __________________________________________________________ ON/OFF Displays the speed control actuator switch SET/ACCEL status. 334 Ford Data Parameters Powertrain Control Module (PCM) Parameters SFT1(%) SFTRIM 1(%) SHRTFT1(%) SFT2(%) SFTRIM 2(%) SHRTFT2(%) Range: _____________________________________________________ –25% to +35% The short-term fuel (ST FUEL) numbers are short-term fuel-metering corrections on a fuel-injected engine). It indicates whether the PCM is commanding a rich or a lean mixture. The SFTRIM parameter ranges from –25% to +35% with 0% as the midpoint: • A number above zero indicates a PCM command for a short-term rich mixture correction. • A number below zero indicates a PCM command for a short-term lean mixture correction. The ST FUEL value leads the long-term fuel (LT FUEL) value. When a pattern or trend of short-term fuel-metering corrections occur, long-term fuel responds with a similar correction. Compare ST FUEL numbers to injector on-time. Numbers above zero indicate increased on-time, below zero indicates decreased on-time. The ST FUEL corrections operate only in closed loop. In open loop, it goes to a fixed value. ShiftSol1 ShiftSol2 ShiftSol3 Range: __________________________________________________________ ON/OFF Displays the PCM commands for the 1, 2, and 3 shift solenoids and reads ON when the PCM has commanded the shift solenoid to energize. ShiftSol1A ShiftSol2A ShiftSol3A Range: __________________________________________________________ ON/OFF Displays the shift solenoid 1, 2, and 3 feedback status to the PCM. When the solenoid circuits and PCM function properly, the command parameter, such as ShiftSol1, and the feedback parameter, such as ShiftSol1A, should both display ON or OFF. ShiftSol1Fault ShiftSol2Fault ShiftSol3Fault Range: __________________________________________________________ YES/NO Indicates whether a shift solenoid circuit fault is present. SHFT_TYP Range: ______________________________________________________ not available Indicates the shift type. SLIP_DES_SCP Range: _____________________________________________________ 0 to 1200 RPM Displays the torque converter slip desired in rpm. SPAREKEY_PCM Range: _______________________________________________ ENABLED/DISABLED Displays the spare key programming status. 335 Ford Data Parameters Powertrain Control Module (PCM) Parameters SPARK_ACT Range: ____________________________________________________________ actual Displays the actual spark advance applied by the PCM. SPARKADV(°) Range: _________________________________________________ –54 to +54 degrees Displays the amount of spark advance in degrees. An advance of more than 54 degrees shows as a negative value; this is normal. SPARK ADV(°) SPRKADV(°) IGN ADVANCE(°) Range: _______________________________________________________ –90° to +90° Displays total spark advance or retard, including the base timing, that the PCM is commanding. SPARKDUR1 SPARKDUR2 SPARKDUR3 SPARKDUR4 SPARKDUR5 SPARKDUR6 SPARKDUR7 SPARKDUR8 Range: ____________________________________________________________ actual Displays the spark duration of the indicated cylinder. SRC_CAN Range: _________________________________________________ ENABLE/DISABLE Displays the starter motor relay enable status. SSA_AMP SSB_AMP SSC_AMP Range: __________________________________________________________ 0 to 1.2A Displays the shift solenoid pressure control amperage for solenoids A, B, and C respectively. SSA_SS1 SSB_SS2 SSC_SS3 SSD_SS4 Range: __________________________________________________________ ON/OFF Displays the state of shift solenoids 1, 2, 3, and 4 respectively. SSA_SS1_FLT SSB_SS2_FLT SSC_SS3_FLT Range: ______________________________________________ YES FAULT/NO FAULT Displays the fault status for shift solenoids 1, 2, and 3 respectively. SSC(%) SSD(%) SSE(%) Range: _________________________________________________________ 0 to 100% Displays the status of shift pressure control solenoids C, D and E respectively. 336 Ford Data Parameters Powertrain Control Module (PCM) Parameters SSPCA Range: __________________________________________________________ 0 to 1.2A Displays the shift solenoid pressure control A amperage. SSPCA_FLT SSPCB_FLT SSPCC_FLT Range: ______________________________________________ YES FAULT/NO FAULT Displays the fault status of shift pressure control solenoids A, B, and C respectively. SSPCB SSPCC Range: ____________________________________________________________ actual Displays the shift pressure control for solenoids B and C respectively as kilopaschal or pounds per square inch. STATUS B1 Range: ____________________________________________________ see description Displays the operating status of fuel bank 1 and reads as follows: • • • • • CL (closed-loop) OL (open-loop) OL DRIVE OL FAULT CL FAULT ST TRIM B1(%) ST TRIM B2(%) Range: ___________________________________________________ –100% to +100% The short-term fuel (ST TRIM) numbers are short-term fuel-metering corrections for a fuel-injected engine. It indicates whether the PCM is commanding a rich or a lean mixture. Similar to long-term fuel trim (“LT TRIM B1(%)” on page 321), the ST TRIM parameter ranges from –100% to +100% with 000% as the midpoint: • A number above zero percent indicates the PCM has commanded a short-term rich mixture correction. • A number below zero percent indicates the PCM is commanding a short-term lean mixture correction. The ST TRIM number leads the long-term fuel (LT TRIM) number. When a pattern or trend of short-term corrections to fuel-metering occur, long-term fuel responds with a similar correction. Compare ST TRIM numbers to injector on-time. Numbers above zero indicate increased on-time, below zero indicates decreased on-time. The ST TRIM corrections operate only in closed loop. In open loop, it goes to a fixed value. SYNC_DI Range: __________________________________________________________ YES/NO Indicates if the CMP and CKP are synchronized. TC_SLIP Range: _____________________________________________________ 0 to 1200 RPM Displays the actual RPM of the torque converter slippage. 337 Ford Data Parameters Powertrain Control Module (PCM) Parameters TCC Range: ____________________________________________ Engaged/Modulated/OFF Displays the torque converter clutch (modulated) state. TCC(%) Range: _________________________________________________________ 0 to 100% Displays the pulse-width-modulated (PWM) signal to the torque converter clutch (TCC) solenoid and reads as follows: • 0% with exhaust solenoid (TCC solenoid) closed, TCC not applied • 100% with exhaust solenoid fully open, TCC applied TCC_FLT Range: ______________________________________________ YES FAULT/NO FAULT Displays the torque converter clutch fault status. TCC_OSC Range: ____________________________________________________________ actual Displays the output state control of the torque converter. TCCA Range: __________________________________________________________ ON/OFF Displays the torque converter clutch actual (TCCA) feedback signal to the PCM indicating the status of the torque converter clutch. Normally, the TCC SOL and TCCA parameters should both read ON or OFF simultaneously. TCCA(V) Range: ______________________________________________________ not available Displays the voltage signal to the torque converter clutch (TCC) solenoid. Information on this parameter is not available at this time. TCCF Range: ______________________________________________ YES FAULT/NO FAULT Displays the torque converter clutch fault status. TCCFault Range: __________________________________________________________ YES/NO Displays the presence of a PCM detected fault in the torque converter clutch circuit and reads YES when a fault is present. TCCMACT(RPM) Range: ___________________________________________________ 0 to vehicle max Displays the PCM calculated value of torque converter slippage. The value is derived by subtracting the turbine speed from the engine RPM. TCCMACT(RPM) reads less than 50 RPM when TCC(%), TCC SOL(%) reads 95% or greater or when TCC SOL reads ON. TCC SOL Range: __________________________________________________________ ON/OFF Displays the PCM command for the torque converter clutch. When the system functions properly, ON means the torque converter clutch solenoid is energized to lock the converter. 338 Ford Data Parameters Powertrain Control Module (PCM) Parameters TCC SOL(%) Range: _________________________________________________________ 0 to 100% Displays the pulse-width-modulated (PWM) signal to the torque converter clutch (TCC) solenoid and reads as follows: • 0% with exhaust solenoid (TCC solenoid) closed, TCC not applied • 100% with exhaust solenoid fully open, TCC applied TCIL Range: __________________________________________________________ ON/OFF Displays the transmission control indicator lamp (TCIS) command status. TCIL reads ON when the TCIL in the dash or shifter should be on. TCILFault TCIL_FAULT TCIL_FLT Range: __________________________________________________________ YES/NO Indicates if a fault has occurred in the Transmission Control Indicator Lamp circuit. TCS Range: ______________________________________ DEPRESSED/NOT DEPRESSED Displays the overdrive cancel switch/hold switch state. THEFT_LMP Range: ______________________________________________ YES FAULT/NO FAULT Displays the antitheft indicator lamp control fault status. TIRESIZE Range: ______________________________________________________ not available Displays the tire size. TFT(V)(°C/°F) TFT=TOT(V) Range: ________________________________________________________ 0 to 5.10 V Displays the transmission fluid temperature (TFT), which is also referred to by Ford as the transmission oil temperature (TOT), as voltage. The TFT sensor is a thermistor that changes resistance in response to temperature changes. Resistance decreases as temperature increases to provide a variable voltage signal to the PCM. Voltage values typically read as follows: • 0.60 V at 194°F (90°C) • 3.88 V at 32°F (0°C) THTRC(%) Range: _________________________________________________________ 0 to 100% Displays the thermostat heater control position. THTRCF Range: ______________________________________________ YES FAULT/NO FAULT Displays the thermostat heater control fault status. TORQUE(lb-ft) Range: ___________________________________________________________0 to 999 Displays the engine torque as calculated by the PCM. 339 Ford Data Parameters Powertrain Control Module (PCM) Parameters TORQUE Range: ____________________________________________________________ actual Displays the PCM calculated engine torque in Nm or ft-lb on diesel powertrain control systems. The torque reading indicates how much load is placed on the engine. TorqConvCl Range: __________________________________________________________ ON/OFF Displays the output used by the PCM to control the converter clutch by way of a solenoid. ON or OFF displays as the PCM commands the solenoid on or off. TOTF Range: ______________________________________________ YES FAULT/NO FAULT Displays the transmission fluid temperature fault status. TOWHAUL Range: __________________________________________________________ ON/OFF Displays the tow haul switch state. TP(V) Range: ________________________________________________________ 0.0 to 5.0 V Displays the voltage signal from the throttle position (TP) sensor to the PCM. TP_FAULT Range: ______________________________________________ YES FAULT/NO FAULT Displays the throttle position sensor status. TP MODE Range: _______________________________________________________ PT/WOT/CT Displays the position of the accelerator pedal based on accelerator position sensor readings on diesel powertrain systems. TP=TPS(V) Range: _________________________________________________________ 0 to 5.1 V Displays the throttle position (TP) sensor voltage signal, which is in proportion to the throttle position. The TP signal allows the PCM to determine throttle opening: low voltage at closed throttle and high voltage at wide open throttle. TP=TPS(V) reads as follows: • About 0.5 V at idle • 4.5 V at WOT TP=TPS(%) Range: ____________________________________________________range 0 to 100% Displays the throttle position (TP) as calculated by the PCM based on TP sensor voltage on models with an autoranging TP sensor. The PCM resets the 0 to 100% range in relation to TP sensor voltage as it senses new minimum and maximum voltages. TP1 Range: ___________________________________________________________ 0 to 5V Displays the throttle position sensor 1 voltage. TP2 Range: ___________________________________________________________ 0 to 5V Displays the throttle position sensor 2 voltage. 340 Ford Data Parameters Powertrain Control Module (PCM) Parameters TP MODE ThrPosMODE Range: ____________________________________________________ see description Displays the throttle position (TP) as calculated by the PCM based on the TP sensor signal and read as follows: • C/T - closed throttle at idle and during deceleration • P/T - part throttle at cruise or during moderate acceleration • WOT - wide open throttle at de-choke on crank, A/C cutout, or during maximum acceleration TPCT(V) TPREL(V) Range: ___________________________________________________________ 0 to 5V Throttle position closed throttle (TPCT) indicates the most recent throttle position (TP) sensor voltage reading at closed throttle. This parameter updates each time the throttle is fully closed. TPF Range: __________________________________________________________ YES/NO Displays the throttle position sensor status. TQ_CNTL Range: ______________________________________________________ not available Displays the torque fuel/spark limiting status. TR Range: _____________________________________________ Man1/Man2/D/OD/N/R/P Displays the selected transmission range. TR_DC(%) Range: _________________________________________________________ 0 to 100% Displays the transmission range as a percentage. TR_FAULT Range: __________________________________________________________ YES/NO Indicates whether a fault is detected in the Transmission Range (TR) circuit. TR_FREQ(Hz) Range: ________________________________________________________ 0 to 200 Hz Displays the transmission range as frequency. TR1 TR2 TR3 TR4 Range: ____________________________________________________ OPEN/CLOSED Displays the digital transmission range switch status for the indicated switch. TR3_MODE Range: ____________________________________________________ OPEN/CLOSED Displays the digital transmission range switch 3 status. TRAC_ACT Range: __________________________________________________________ ON/OFF Displays the traction control system modulating status. 341 Ford Data Parameters Powertrain Control Module (PCM) Parameters TRAN_OT_FAULT Range: __________________________________________________________ YES/NO Indicates whether a fault is detected in the transmission over temperature circuit. TRANSMIT Range: __________________________________________________________ ON/OFF Displays the anti-theft enabled and transmit command status. TransRange_D Range: ____________________________________________________ see description Displays the four possible switch states of the transmission range switches TR1 through TR4 and reads as follows: • 0 indicates the switch is closed • 1 indicates the switch is open Typical readings are as follows • • • • • • • • • • • PARK POSITION = 0000 Between P & R = 0100 REVERSE POSITION = 1100 Between R & N = 0100 NEUTRAL POSITION = 0110 Between N & O/D = 1100 O/D POSITION = 1111 Between O/D & 2 = 1011 MANUAL 2 POSITION = 1001 Between 1 & 2 = 1011 MANUAL 1 POSITION = 0011 TRFM Range: ______________________________________________ YES FAULT/NO FAULT Displays the transmission range fault status. TRIM B1-S1(%) TRIM B2-S1(%) Range: _____________________________________________________ –55% to +55% Displays fuel trim status. The trim bank x – sensor x (TRIM Bx-Sx) numbers are short-term fuel-metering corrections for a fuel-injected engine. It indicates whether the PCM is commanding a rich or a lean mixture. The TRIM parameters range from –45% to +35% with 000% as the midpoint: • A number above zero indicates a PCM command for a short-term rich mixture correction. • A number below zero indicates a PCM command for a short-term lean mixture correction. The TRIM Bx-Sx number leads the long-term fuel (LT TRIM) number. When a pattern or trend of short-term corrections to fuel-metering occur, long-term fuel responds with a similar correction. Compare ST TRIM numbers to injector on-time. Numbers above zero indicate increased on-time, below zero indicates decreased on-time. The ST TRIM corrections operate only in closed loop. In open loop, it goes to a fixed value. TRIM B1-S1 should read the same as ST TRIM B1. TRIM B2-S1 should read the same as ST TRIM B2. 342 Ford Data Parameters Powertrain Control Module (PCM) Parameters TRIP Range: __________________________________________________________ YES/NO Indicates whether an On-Board diagnostic trip has occurred. A trip is a complete ignition on, engine run, ignition off cycle that tests all components and systems on an OBD-II vehicle. TRIP_CNT Range: ____________________________________________________________ actual Displays the number of on board diagnostic trips completed. TRIP CounT Range: ___________________________________________________________0 to 255 Displays the number of OBD-II drive cycles completed since the last DTC P1000 monitor readiness set. TRS1(V) Range: ___________________________________________________________ 0 to 5V Displays the transmission range selector 1 voltage. TRS2(V) Range: ___________________________________________________________ 0 to 5V Displays the transmission range selector 2 voltage. TRS3(V) Range: ___________________________________________________________ 0 to 5V Displays the transmission range selector 3 voltage. TR_V Range: ____________________________________________________ see description Displays the voltage at processor pin 64 (signal return). Voltage for a digital transmission range (DTR) should match the examples in Table 13-8 below ± 0.3 V. Table 13-8 Sample TR_V readings TR_V Reading Gear 0.0 V PARK 1.5 V REVERSE 1.5 V NEUTRAL 1.5 V ODRIVE 0.0 V MAN2 0.0 V MAN1 TrnCtrlIndLamp Range: __________________________________________________________ ON/OFF Displays the transmission control indicator lamp status. Reads ON and the indicator lamp is lit when “Overdrive Cancel” is requested. TrnCtrlSw TCSLAMP Range: __________________________________________________________ ON/OFF Displays the state of the transmission control switch (TCS) and reads as follows: • OFF = the switch is open • ON = the driver requests overdrive cancellation and the switch closes 343 Ford Data Parameters Powertrain Control Module (PCM) Parameters TrnFluidTmp(V) Range: ________________________________________________________ 0.0 to 5.0 V Displays the voltage signal from the transmission fluid temperature (TFT) sensor to the PCM. A low voltage reading indicates a high fluid temperature, while a high voltage reading indicates a low fluid temperature. TrnRange Range: ________________________________________________________ 0.0 to 5.0 V Displays the voltage at PCM pin 64 to signal return, or ground. This voltage indicates the position of the gear selector lever. Each position has a typical range, as follows: • • • • • • L = 0.29 to 0.79 V D2 = 1.29 to 1.53 V OD = 1.88 to 2.29 V N = 2.53 to 3.04 V R = 3.43 to 3.78 V P = 4.30 to 4.73 V TR=GEAR Range: ____________________________________________________ see description Shows the driver demanded gear selection from the transmission range sensor. Possible readings are: • • • • • • MAN1 MAN2 DRIVE ODRIVE REVERSE PARK/NEUTRAL TSFMFLG Range: ______________________________________________ YES FAULT/NO FAULT Displays the turbine speed sensor failure mode status. TSLIPRAT Range: _____________________________________________________ 0 to 1200 RPM Displays the transmission slip ratio. TSS(rpm) Range: ____________________________________________________________ actual Displays the turbine shaft speed. TSS_F Range: ______________________________________________ YES FAULT/NO FAULT Indicates whether the turbine shaft speed signal is reliable. TSS_FAULT Range: __________________________________________________________ YES/NO Indicates whether a fault is detected in the turbine shaft speed (TSS) circuit. 344 Ford Data Parameters Powertrain Control Module (PCM) Parameters TurbSpdS(RPM) Range: __________________________________________________________0 to 8192 Displays the speed of the transmission turbine shaft. UNLIMITED_KEY Range: _______________________________________________ ENABLED/DISABLED Displays the unlimited key mode status. V_4X4L Range: ___________________________________________ PRESENT/NOT PRESENT Displays the 4x4 low range input. V_OCTADJ Range: __________________________________________________ ACTIVE/INACTIVE Displays the Octane Adjust/Spark Retard state. V_TCASE Range: ___________________________________________ PRESENT/NOT PRESENT Indicates whether a manual shift on the fly system is installed on the vehicle. VBAT(V) VBATT_PCM(V) Range: __________________________________________________________ 0 to 15V Displays the battery positive voltage. VCT 1_FAULT VCT 2_FAULT Range: __________________________________________________________ YES/NO Indicates whether a fault has occurred in the VCT circuit. VCT1 VCT2 Range: __________________________________________________________ 7.5 to B+ Displays the variable valve timing status. VCT1F Range: ______________________________________________ YES FAULT/NO FAULT Displays the variable cam timing fault status. VCT2F Range: ______________________________________________ YES FAULT/NO FAULT Displays the variable cam timing 2 status. VCTA Range: __________________________________________________________ ON/OFF Displays the variable cam timing solenoid actual state. VCTADV(°) Range: _______________________________________________________ –60° to +60° Displays the variable cam timing actual advance status. VCTADV2(°) Range: _______________________________________________________ –60° to +60° Displays the variable cam timing 2 actual advance. 345 Ford Data Parameters Powertrain Control Module (PCM) Parameters VCTADVERR Range: ____________________________________________________________ actual Displays the variable cam timing advance error status. VCTADVERR2 Range: ____________________________________________________________ actual Displays the variable cam timing 2 advance error status. VCTDC(%) Range: _________________________________________________________ 0 to 100% Displays the variable camshaft timing duty cycle. VCTDC2(%) Range: _________________________________________________________ 0 to 100% Displays the variable cam timing 2 duty cycle. VCTSYS Range: _______________________________________________OPEN/CLOSED LOOP Displays the variable cam timing system status. VehSpdSensr Range: ___________________________________________________________0 to 255 Displays the vehicle speed in miles per hour or kilometers per hour. VFC(%) Range: _________________________________________________________ 0 to 100% Displays the fan speed monitor status. VFCDC(%) Range: _________________________________________________________ 0 to 100% Displays the variable fan duty cycle. VFCF Range: ______________________________________________ YES FAULT/NO FAULT Displays the cooling fan driver fault status. VFDES Range: ______________________________________________________ 0 to 255 mm3 Displays the internal PCM calculation of the volume of fuel desired (VFDES) per stroke from the injection pump to operate the engine for current speed, load, and temperature conditions on diesel powertrain systems. Readings are in cubic millimeters (mm3) and 10–15 mm3 at idle. VGTDC(%) Range: _________________________________________________________ 0 to 100% Displays the variable geometry turbocharger status. VGT_F Range: _______________________________________________YES FAULT/NOFAULT Displays the EGR motor position desired. VGT_FAULT Range: __________________________________________________________ YES/NO Indicates whether a fault is detected in the variable geometry turbo (VGT) circuit. 346 Ford Data Parameters Powertrain Control Module (PCM) Parameters VPoWeR Range: _______________________________________________________ 0.0 to 24.0 V Displays the vehicle battery voltage. Some vehicles may normally read lower (8 V) or higher (16 V) than expected. Verify system voltage with a DVOM. VPWR(V) Range: _______________________________________________________________ B+ Displays the module supply voltage. VPWR=BATT(V) VPoWeR(V) Range: ________________________________________________________ 0 to 25.5 V Displays the vehicle battery voltage. The powertrain control system has no specific sensor to measure battery voltage, but some PCMs calculate this parameter from a sensing circuit on the supply voltage circuit. The reading should be close to normal charging system regulated voltage, or about 13.5 to 14.5 V, at idle. Check against actual voltage measured at the battery or alternator. This parameter is principally for PCM self-diagnostics. Some PCM functions are modified if voltage is out of range. For example, if voltage drops below a minimum, the PCM may try to recharge the battery by running the engine at a higher idle. This may affect the idle control, fuel metering, and ignition timing parameters. VREF(V) Range: ________________________________________________________ 0 to 5.12 V Displays the reference voltage that system sensors operate on for some vehicles. The PCM monitors this voltage and provides the parameter. Nominal reference voltage is 5.0 V. Depending on system calibration and charging system voltage, readings may vary a few tenths of a volt. Some models normally read about 6.5 V. Verify voltage with a DVOM. VS SET Range: ____________________________________________________ see description Displays the set speed of the speed control system. VS_SRC Range: ____________________________________________________________ actual Displays the transfer case speed sensor speed. VSS(MPH) VSS(KPH) Range: ___________________________________________________ 0 to vehicle max Displays the measurement provided by the vehicle speed sensor (VSS) pulses to the PCM. The PCM calculates the actual speed. The PCM uses vehicle speed to control fuel injection, ignition timing, and transmission and trans-axle shift timing. VSS_FAULT Range: ______________________________________________ YES FAULT/NO FAULT Indicates whether the vehicle speed sensor signal is reliable. VSFMFLG Range: ______________________________________________ YES FAULT/NO FAULT Displays the vehicle speed sensor signal status. 347 Ford Data Parameters Powertrain Control Module (PCM) Parameters WAC Range: __________________________________________________________ ON/OFF Displays the air conditioning clutch at wide open throttle status. Should only read ON during full-throttle acceleration or other heavy-load conditions with the A/C turned on. WAC_FLT Range: ______________________________________________ YES FAULT/NO FAULT Indicates whether a wide open throttle A/C cutoff fault is detected. WACA Range: __________________________________________________________ ON/OFF Indicates whether a wide open throttle A/C cutoff fault is detected. WAC=WOT A/C Range: __________________________________________________________ ON/OFF Indicates whether the PCM is preventing the A/C system from operating due to undesirable engine conditions. These include operation during engine cranking and wide open throttle. On almost all vehicles, WAC=WOT A/C reads as follows: • OFF when the PCM senses undesirable conditions and is currently preventing the A/C clutch from energizing • ON when the PCM is allowing the A/C clutch to energize WACFault Range: __________________________________________________________ YES/NO Indicates whether the PCM has set a wide open throttle A/C cutout fault. WARM_NOMIL Range: ___________________________________________________ 0 to vehicle max Displays the number of warm-ups since the DTCs were cleared. WASTEGATE Range: _________________________________________________________ 0 to 100% Displays the PCM input that indicates the position of the wastegate as a percentage on diesel powertrain control systems. WFS Range: __________________________________________________________ YES/NO Indicates whether there is water in the fuel. WotA/Ccutoff Range: __________________________________________________________ ON/OFF Displays the air conditioning clutch at wide open throttle status. Reads ON when the wide open throttle (WOT A/C) cutoff has been activated and the A/C has been switched off. 348 Ford Data Parameters Airbag Parameters Airbag Parameters ABBRGR Bracket() Range: ________________________________________________________ 0 to 25.5 Displays the resistance of the airbag mounting bracket to chassis ground. CRaSHSN1() CRSHSN1() CRaSHSN2() CRSHSN2() Range: ________________________________________________________ 0 to 25.5 Displays the resistance of the crash sensors. • CRaSHSN1 = the resistance of sensor number 1 • CRaSHSN2 = the resistance of sensor number 2 D_Airbag() D_AirBAG2() D_AirBAGLoop2() P_Airbag() P_AirBAG2() P_AirBAGLoop2() Range: ________________________________________________________ 0 to 25.5 Displays the resistance between the two contacts of the airbag. • “D” = driver side airbag • “P” = passenger side airbag D_Preten() D_PRETNR() P_Preten() P_PRETNR() Range: ________________________________________________________ 0 to 25.5 Displays the resistance in the shoulder belt pre-tensioner circuit. • D_Preten refers to the driver side pre-tensioner. • P_Preten refers to the passenger side pre-tensioner. DSBELTR PSBELTR Range: ________________________________________________________ 0 to 25.5 Displays the driver side seat belt buckle switch resistance. DTC CouNT (AIRBAG) Range: ____________________________________________________________ actual Displays the number of diagnostic trouble codes (DTCS) in the airbag module memory. EXTCRSH Range: __________________________________________________________ 0 to 18V Information on this External Crash Sensor Test Voltage parameter is not available at this time. VBATT(V) Range: __________________________________________________________ 0 to 25 V Displays the battery voltage being supplied to the airbag electronic control module (ECM). 349 Ford Data Parameters Antilock Brake Parameters Antilock Brake Parameters 4WDINP_SW_ABS Range: _________________________________________________________ 2WD/4WD Displays the 4WD switch status. ABPROS Range: __________________________________________________________ ON/OFF Displays the antilock braking system power relay output status. ABS_ACTIVE Range: __________________________________________________ NORMAL/ACTIVE Displays the antilock braking system. status ABS_MSG_TCM Range: ___________________________________________ PRESENT/NOT PRESENT Indicates whether a CAN message is missing from the ABS module. ABS_MTR Range: __________________________________________________ ACTIVE/INACTIVE Displays the status of the ABS pump motor. ABS PLS Range: __________________________________________________________ ON/OFF Information on this parameter is not available at this time. ABS_POWER Range: __________________________________________________________ ON/OFF Displays the status of the ABS power relay. ABS_PWR_R Range: __________________________________________________________ ON/OFF Displays the antilock braking system power relay output status. ABS_partbaseno Range: ______________________________________________________ not available Displays the module part base number. ABS_PartNoIdSuffix Range: ____________________________________________________________ actual Displays the module part version suffix. ABS_SoftVerNo Range: ____________________________________________________________ actual Displays the software version number. ABS_TCS_WIN126_SELTESTDTC Range: ____________________________________________________________ actual Displays the DTC count. The count includes those needing no action. ABSLAMP ABS_LAMP Range: __________________________________________________________ ON/OFF Displays the PCM command status to the ABS indicator lamp, reads ON when the Lamp is lit. 350 Ford Data Parameters Antilock Brake Parameters ABSLF I ABSLF O ABSLR I ABSLR O ABSRF I ABSRF O ABSRR I ABSRR O Range: __________________________________________________________ ON/OFF Displays the state of the PCM commands to the ABS inlet (I) and outlet (O) valves. • • • • LF = left front LR = left rear RF = right front RR = right rear ABSR I ABSR O Range: __________________________________________________________ ON/OFF Displays the PCM commanded status to the rear ABS inlet (I) or outlet (O) valves. This parameter is only used on 4WABS with a rear differential speed sensor instead of a sensor at both rear wheels. In an ABS stop this system controls both rear wheels at the same time. ABSPMPRLY Range: __________________________________________________________ ON/OFF Displays the ABS pump motor relay state. ABSVLVRLY Range: __________________________________________________________ ON/OFF Displays the status of the ABS valve control relay. ACCR_TEMP (°C/°F) Range: ____________________________________________________________ actual Displays the brake accumulator temperature. ACCR_TRAV Range: ________________________________