1
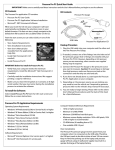
—Our Promise—
—Warranty—
Whether you have a question about service or parts
from Hickok or Waekon, we are ready to provide
an answer. Options for reaching us include or 24/7
accessibility by fax or the World Wide Web. Or
contact us by telephone during standard business
hours EST.
Subject to the conditions that follow and are noted below, this
product is warranted to be free from defects in material and
workmanship, under proper use and in accordance with the
manufacturer’s written recommendation and specifications,
for a period designated below on all products:
www.hickok-inc.com
www.waekon.com
www.quick-n-ezparts.com
Fax: (216) 761-9879
Customer Care & Tech Support:
(800) 342-5080
•
This product carries a limited lifetime warranty.
The manufacturer’s obligation under this warranty is limited
to unaltered products returned to the manufacturer by the
initial end user of the new products. Therefore, this warranty
does not cover any products resold by the end user to
third parties, nor any reconditioned products sold as such,
by the manufacturer. The sole remedy for any such defect
shall be the repair, or replacement, of the product at the
sole discretion of the manufacturer. This warranty does not
cover expendable parts, such as batteries, nor does it cover
shipping or handling. In addition, manufacturer is not liable
for any loss or damage to product during shipping.
In the event it is determined that the product has been
tampered with, or altered in any way, this warranty is void
and all claims against the product will not be honored.
All warranty claims must be submitted as outlined by the
manufacturer and shall be processed in accordance with
the manufacturer’s established warranty claim procedures.
These procedures include provisions that proof of purchase
must be established (by either warranty card from the seller
or by point of purchase receipt) and that the manufacturer
will make every attempt to return ship the product within
one business day from receipt of the returned product,
freight prepaid.
In addition, all maintenance procedures, as outlined by the
product manuals, should be followed for the warranty to be
kept in force. Should the product not be used in accordance
with procedures as specified, or if the product otherwise fails
outside of the warranty, the manufacturer reserves the right
to make such judgment and the party returning the product
will be notified that written notification will be necessary to
repair the product at a cost which the manufacturer deems
as reasonable. The product will then be shipped back to the
customer, COD; or as the manufacturer deems appropriate.
This is the only authorized manufacturer’s warranty and
is in lieu of all other expressed, or implied, warranties or
representations, including but not limited to any implied
warranties of merchantability or fitness or any other
obligations on the part of the manufacturer. In no event will
the manufacturer be liable for business interruptions, loss of
profit, personal injury, costs of delays, or any special, indirect,
incidental or consequential damages, costs or losses.
© 2007, Hickok Inc. All rights reserved.
19120-932
The Coil On Plug (COP) Ignition Quick Probe is a
battery-operated, hand-held tester designed to
easily and quickly determine if a COP is producing a
proper spark for the plug.
The tester works by receiving a signal from the
secondary ignition coil. Once the signal is received,
the tester determines if the COP is producing the
correct amount of voltage and the duration of the
arc. If the voltage is correct, the tester beeps and the
red LED headlamp flashes; and if the duration of the
arc is correct, the green LED will also flash.
Note: Using this tester on non-COP vehicles may result
in inaccurate results.
—Assembling the Tester—
1. Attach the extension probe onto the tester’s
probe tip.
2. Press fit the signal receiver pad onto the
extension probe.
—Using the Tester—
1. Turn on the tester by firmly tapping the handle
of the tester on a hard surface. To indicate the
tester is on, the red and green LEDs rapidly flash
alternately, and the tester emits an ascending
beeping sound for a short period. Afterwards,
until the tester turns off, the green LED continues
to slowly flash to indicate the tester is on.
signal. Then test each COP with the signal
receiver pad in the same relative position.
When the Red and Green LEDs begin to flash
and the tester beeps simultaneously, stop
turning the dial.
• At the current probe setting, continue to
another COP. If the Red and Green LEDs do
not begin to flash when the probe tip is
applied, move to another COP. Repeat 2–3
times.
• Adjust the dial and repeat the above steps
until a consistent response is achieved over
several COPs.
3. Continue testing each COP and compare the
results.
• It is important to test all of the vehicle’s
COPs and compare results. An inconsistent
response from the majority of the COPs
may be a normal condition for that engine.
However, additional testing is recommended
to verify results.
• It is possible that a misfire may not develop
while the engine is operating at low-speed,
so it may be necessary to test the COP with
the engine heated, under load, or brake
torque (increased RPMs).
The tester works by receiving a signal from the
secondary ignition coil. Once the signal is received,
the tester determines if the COP is producing the
correct amount of voltage and the duration of the
arc. If the voltage is correct, the tester beeps and the
red LED headlamp flashes; and if the duration of the
arc is correct, the green LED will also flash.
Note: Using this tester on non-COP vehicles may result
in inaccurate results.
—Assembling the Tester—
1. Attach the extension probe onto the tester’s
probe tip.
2. Press fit the signal receiver pad onto the
extension probe.
—Using the Tester—
1. Turn on the tester by firmly tapping the handle
of the tester on a hard surface. To indicate the
tester is on, the red and green LEDs rapidly flash
alternately, and the tester emits an ascending
beeping sound for a short period. Afterwards,
until the tester turns off, the green LED continues
to slowly flash to indicate the tester is on.
• Faulty coil, or control module
Green LED
Consistent and steady flashing indicates the
duration of the arc is correct.
No response or an inconsistent response indicates
the duration of the arc is NOT correct. This may be
caused by one of the following:
• Shorted windings inside the coil
• Resistance or bad connections in the
primary/secondary connections
• Faulty coil
Please refer to the vehicle’s shop manual for
instructions on troubleshooting and repairing/
replacing defective COPs.
3. Place the new battery in the handle, positive (+)
side facing up.
—Turning the Tester Off—
The tester automatically turns off after
approximately 2 minutes of non-use. Before
shutting off, both LEDs fl ash and the tester emits a
descending beeping sound for a short period.
signal. Then test each COP with the signal
receiver pad in the same relative position.
When the Red and Green LEDs begin to flash
and the tester beeps simultaneously, stop
turning the dial.
• At the current probe setting, continue to
another COP. If the Red and Green LEDs do
not begin to flash when the probe tip is
applied, move to another COP. Repeat 2–3
times.
• Adjust the dial and repeat the above steps
until a consistent response is achieved over
several COPs.
3. Continue testing each COP and compare the
results.
• It is important to test all of the vehicle’s
COPs and compare results. An inconsistent
response from the majority of the COPs
may be a normal condition for that engine.
However, additional testing is recommended
to verify results.
• It is possible that a misfire may not develop
while the engine is operating at low-speed,
so it may be necessary to test the COP with
the engine heated, under load, or brake
torque (increased RPMs).
4. Reassemble and tighten the screws.
The Signal Receiver Pad
It is recommended to visually inspect the signal
receiver pad for any cracks or tears before every use.
If damaged, replace the pad.
—Test Results—
Red LED Headlamp
Consistent, steady flashing and beeping indicates
the COP is producing the correct amount of voltage.
No response or an inconsistent response indicates
the COP is NOT producing the correct amount of
voltage. This may be caused by one of the following:
• Fouled spark plug, or incorrect gap
• Damaged/corroded wires or connectors
• Faulty coil, or control module
Green LED
Consistent and steady flashing indicates the
duration of the arc is correct.
No response or an inconsistent response indicates
the duration of the arc is NOT correct. This may be
caused by one of the following:
• Shorted windings inside the coil
• Resistance or bad connections in the
primary/secondary connections
• Faulty coil
Please refer to the vehicle’s shop manual for
instructions on troubleshooting and repairing/
replacing defective COPs.
—Maintenance—
Replacing the Battery
The Coil On Plug (COP) Quick Ignition Probe uses a
3-volt CR2032 lithium battery.
1. Remove the two screws from the handle.
2. Carefully separate the handle and remove the
old battery.
2. Adjust the probe for the test vehicle:
• Turn the adjustment dial to zero for minimum
sensitivity.
• Because the tester relies on a signal emitted
from the COP body, it may be necessary to
move the signal receiver pad around until the
pad is in a position to pick up the strongest
• Damaged/corroded wires or connectors
2. Carefully separate the handle and remove the
old battery.
Note: Firmly tapping the handle while the
tester is turned on initiates a self-test, in
which the both LEDs flash simultaneously
and the tester beeps for a short period.
• With the engine running, firmly place the
tester’s signal receiver pad against the COP’s
body (see figure 1). Make sure the marked
side of the pad is towards the COP.
• Fouled spark plug, or incorrect gap
1. Remove the two screws from the handle.
• Turn the adjustment dial to zero for minimum
sensitivity.
The Coil On Plug (COP) Ignition Quick Probe is a
battery-operated, hand-held tester designed to
easily and quickly determine if a COP is producing a
proper spark for the plug.
No response or an inconsistent response indicates
the COP is NOT producing the correct amount of
voltage. This may be caused by one of the following:
Replacing the Battery
The Coil On Plug (COP) Quick Ignition Probe uses a
3-volt CR2032 lithium battery.
2. Adjust the probe for the test vehicle:
• Because the tester relies on a signal emitted
from the COP body, it may be necessary to
move the signal receiver pad around until the
pad is in a position to pick up the strongest
Red LED Headlamp
Consistent, steady flashing and beeping indicates
the COP is producing the correct amount of voltage.
—Maintenance—
Note: Firmly tapping the handle while the
tester is turned on initiates a self-test, in
which the both LEDs flash simultaneously
and the tester beeps for a short period.
• With the engine running, firmly place the
tester’s signal receiver pad against the COP’s
body (see figure 1). Make sure the marked
side of the pad is towards the COP.
—Test Results—
3. Place the new battery in the handle, positive (+)
side facing up.
—Turning the Tester Off—
The tester automatically turns off after
approximately 2 minutes of non-use. Before
shutting off, both LEDs fl ash and the tester emits a
descending beeping sound for a short period.
4. Reassemble and tighten the screws.
The Signal Receiver Pad
It is recommended to visually inspect the signal
receiver pad for any cracks or tears before every use.
If damaged, replace the pad.