1
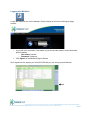
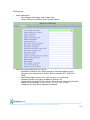
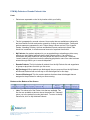
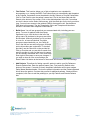
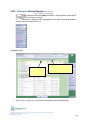
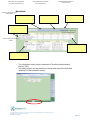
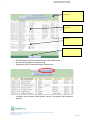
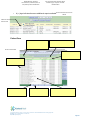
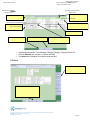
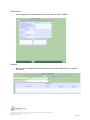
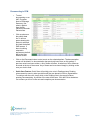
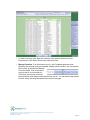
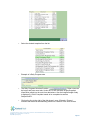
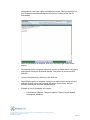
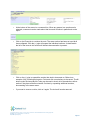
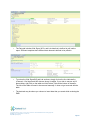
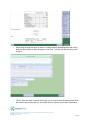
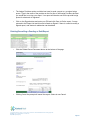
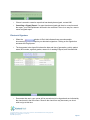
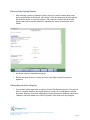
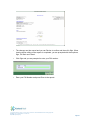
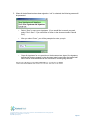
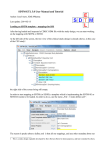
Physician Care Manager - Documenting User Manual Prepared by: Training and Communications Kootenai Health Information Technology March 2014 Table of Contents Physician Care Manager 2 Logging into Meditech 2 Preferences 3 PCM Rounds Patients or My Patients Lists 4 Selecting a Patient 6 Buttons on the Right Hand Side of Screen (My Notices to Preferences) 7 Enterprise Medical Record (EMR) 8 EMR Summary 8 Review Visits 10 New Results 11 Viewing a Lab Report 13 Clincal Panels 14 Vital Signs 17 Input & Output (I&O’s) 18 Medications 18 MAR 19 Laboratory 21 Microbiology 22 Blood Bank 23 Transfusion Flowsheet and Comments 24 Reports 25 Patient Care 26 Notes 28 PCI link 28 PCM/EMR Preferences 29 Notices 29 Documenting in PCM 30 Datasaver and Graphing 36 Deleting/Cancelling a Pending Draft or Report 45 Electronic Signature 46 Electronically Signing a Report 47 Editing Reports Before Signing 47 Esigning of Scanned Document Deficiencies 49 Report Statuses 53 Logging into Meditech Locate the Meditech Icon on the desktop. Double clicking on this icon will bring up a login window. • • Log in with your user name. User name is your first and last name in lower case with a period between. o User Name: first.last o Password: Password Click Signon at the Meditech Signon Screen. Once signed into the system you will enter PCM and you can set up your preferences. This material is the intellectual property of Kootenai Health. Do not download, share or redistribute without prior permission. With questions about any projects or services, please contact the 24/7 Kootenai Health Information Technology Help Desk. By Phone: 855-554-4440 (toll free) or 208-625-5555; By Email: [email protected] Page 2 Preferences • Under Defaults tab o Care Manager Initial Page: select Patient Lists o Patient Selection List Default: select Rounds Patients • Defitions of some preferences you can set: o Medication Frequency Sort: Allows the user to choose the behavior of the Frequency sort, either direction (DAILY, BID) or schedule (STA, ONE, SCH, PRN). o New Results Default: New to You, Last 24 hours, or Last 48 hours. o Laboratory Default: New option available to default to “All.” o Laboratory All Panel Default Time Period: Define the time frame utilized for initial display. Will use settings: 15 min, 30 min, 1 hr, 4 hr, 12 hr, or 24 hr. o Laboratory All Panel Start: Expanded or Collapsed This material is the intellectual property of Kootenai Health. Do not download, share or redistribute without prior permission. With questions about any projects or services, please contact the 24/7 Kootenai Health Information Technology Help Desk. By Phone: 855-554-4440 (toll free) or 208-625-5555; By Email: [email protected] Page 3 PCM My Patients or Rounds Patients Lists Lists: • Patients are separated on the list by location within your facility. • The list is separated by several columns. New results that are available are indicated in the New Results Column and can be opened by clicking on the description. Facility and patients names are separated by unit. Patient name is shown as Last, First. Age and Gender, Attending Provider, Account and Medical Record numbers are listed. If the check box is selected, it will allow manual removal of a patient from the list. • My Patients: Any patient registered to you as an admitting or attending provider or any patients you have added manually via the Add Patients routine. If an order for a consultation has been entered in OM, that patient will also be on this list. The words “consult ordered” will be listed under the attending physician’s name if an order has been entered through OM for you to consult this patient. • Rounds Patients: The list includes all patients from the My Patients list and any patients of groups or physicians for which you can cover. • My Discharged: When patients are discharged, they are removed from the My Patients and Rounds Patients lists and will stay on the discharged list for four days. • Covered Discharged: This list contains patients that have been discharged that are assigned to the providers for which you were covering. Buttons at the Bottom of the Screen: • Lists: This shows all of the Patient Lists that are available. The first four are available as buttons above the patient list. These will return you to the patient list under that button. To return to the My Patients list, click on My Admitted Patients. questions about any projects or services, please contact the 24/7 Kootenai Health Information Technology Help Desk. With By Phone: 855-554-4440 (toll free) or 208-625-5555 By Email: [email protected] Page 4 • Find Patient: This function allows you to find an inpatient or an outpatient for documenting on or viewing the EMR. Find Patient does not automatically add the patient to My Patients. Outpatients cannot be added to the My Patients or Rounds Patients lists. Click on Find Patient, enter the patient’s name Last, First in the Name field and click Search at the bottom of the screen. Click on the desired patient in the list. If more than one visit is shown on the Select Visits screen, click the check box for the visit you wish to view. You now have access to the patients EMR for that specific visit. See details on EMR later in this manual. The Anti Coagulation Clinic and Therapies will also have access to Document their templates in this manner. • Build Cover: You will see groups that you are associated with, including your own group. To cover for patients other than those registered to you, click the box to the left of the group name. All providers in the group are visible and checked. Uncheck providers you do not wish to cover for, or leave all checked. If multiple groups are associated with you, the Check All icon in the title bar can select all groups. With this option all providers are unchecked. To check all providers, use the Check All on the provider list. Click on Provider and you are able to search for a specific provider to cover for that is not in a group you are already associated with. Click Save in the lower right of the screen to save your changes. If you wish to clear all of the cover settings, the Reset Patient List button at the bottom of the screen will clear all of the cover settings. • Add Patients: This allows for finding a specific patient to add to your My Patients or Rounds Patients lists. Enter the patients name (Last, First) and click Search at the bottom of the screen. If a match is found, the patient information will be seen under a Partial Name Matches header. Click on the patient information and the Patients Selected list will show the patient. Continue this process for additional patients, if desired. When completed, click Save to add the patient(s) to your My Patients and Rounds Patients lists. questions about any projects or services, please contact the 24/7 Kootenai Health Information Technology Help Desk. With By Phone: 855-554-4440 (toll free) or 208-625-5555 By Email: [email protected] Page 5 • Remove: This is available only if the box in the column to the right of the patient name is checked. This allows removing selected patient(s) from your My Patients and Rounds Patients lists. • Add to Personal List: This is available only if the box in the column to the right of the patient name is checked. This is available from the My Patients and Rounds Patients lists as well. This allows adding the selected patient(s) to your personal list. This will not add a patient to your My Patients or Rounds Patients lists. You can view your Personal List by clicking on the List button and choosing the Personal List option. Patients must be removed manually from the Personal List. • Report: Allows printing of the My Patients and Rounds Patients lists. If no patients are selected in the right column, the entire list will be printed. If patients are selected, only these patients will be printed. There is also an option to select a specific facility which is available on the Select Report Parameters page. Default is All. • Refresh: Manually refreshes any list. Selecting a Patient • To select a patient, click the empty space in the first column. • The default screen is the New Results screen in the Enterprise Medical Record (EMR). This can be changed in Preferences. • Notice the header at the top of the screen, it includes information on the patient’s name, age, date of birth, admit location, registration status, height and weight, a limited amount of allergies, resuscitation status, and account numbers. • The little “i”: This area has a complete list of allergies, resuscitation status, height, weight, and isolation precautions. • The buttons on the right are now available. questions about any projects or services, please contact the 24/7 Kootenai Health Information Technology Help Desk. With By Phone: 855-554-4440 (toll free) or 208-625-5555 By Email: [email protected] Page 6 Buttons on the Right of the Screen My Notices: Currently we are not using notices unless they are setup in Preferences. Patient Lists: Returns to the Patients lists screen. Next Patient: Moves to the next patient on the list. Select Visits: Look at previous visits and select ones that you want to view. Link to PCI. Summary through Notes: This is all information from the Enterprise Medical Record or EMR. Detailed information is in an appendix of this manual. Any of these buttons that are red indicates new information since it was last reviewed by you. Summary: Shows Problems, Allergies, Active Medications and Home Medications, etc. Review Visit: Provides admitting information. Notices: Notices only related to the selected patient. New Results: Shows any new results on the patient. Vital Signs: Review vital signs entered by nursing. I & O: Review I&O’s entered by nursing. Medications: Review medications ordered. Laboratory: Review lab results. Microbiology: Review micro results. Blood Bank: Review blood administration. Reports: Review any reports, dictated, radiology, pathology, Pdoc, etc. Patient Care: Review nursing documentation and therapies. Notes: Notes from other disciplines (nursing, therapies). Orders: Access to Order Management for viewing all orders. Amb Orders: Used by ED physicians to prescribe discharge medications. Document: Used for Pdoc physicians. Sign: When highlighted in red, this indicates that there are orders and/or documents (reports) that require your electronic signature. Preferences: Allows modification of default settings. With questions about any projects or services, please contact the 24/7 Kootenai Health Information Technology Help Desk. By Phone: 855-554-4440 (toll free) or 208-625-5555 By Email: [email protected] Page 7 This tab is used to view information EMR – Enterprise Medical Record about providers associated with this This tab contains patient linformation Access from particular information within the EMR by using the tabs on the right of the admitting screen (From Summary to Notes) l If the text on a particular tab is highlighted in Red, New Information has been updated since you last clicked on it. Summary Tab • Click on the (+) sign next to any items on the page to get more information. With questions about any projects or services, please contact the 24/7 Kootenai Health Information Technology Help Desk. By Phone: 855-554-4440 (toll free) or 208-625-5555 By Email: [email protected] Page 8 Allergies: Blue Edit Button allows you to add new or edit existing allergies Legal Indicators: Scanned legal documents can be viewed here. These include POLST forms and Advanced Directives Medical Summary: documents from other facilities that M are scanned nto the MR any Active eds: Click oin the + bEeside active medication to see additional information Patient Pharmacy: Use the blue Edit Button to edit or add a pharmacy to the patient’s pharmacy list Substance Use: this information comes from nursing admission Home Meds: Use the blue Edit Button to add or history edit the existing home medication list With questions about any projects or services, please contact the 24/7 Kootenai Health Information Technology Help Desk. By Phone: 855-554-4440 (toll free) or 208-625-5555 By Email: [email protected] Page 9 Review Visits More Detail: Provides view otabs nly sto creen ith all Click on the aa bove view wthe the admitting i nformation o n y our p atient corresponding admitting information • More Detail Screen With questions about any projects or services, please contact the 24/7 Kootenai Health Information Technology Help Desk. By Phone: 855-554-4440 (toll free) or 208-625-5555 By Email: [email protected] Page 10 New Results • • • • • • New Results displays any New Labs and/or Reports on your patient. You can view your results by clicking on the tabs New to You, Last 24 Hours, or Last 48 Hours. You can either scroll down your page to view everything, or you can click on the (-) at the top left of the main panel to collapse your menus. You can then use the (+) next to each lab category to expand results. You have two footer buttons at the bottom of the screen - Graph and Graph Vitals. o The Graph button allows you to choose a lab value and graph it to see trends. o The Graph Vitals button allows you to see how vital signs are trending. To Graph results, right click on the result name. o This will bring up a drop down box with Graph highlighted in green. You need to left click on the word Graph. § Under the word Graph that is highlighted in green, you will see a list of any results you have already chosen to graph. § Repeat the above steps to choose as many results as you would like to graph. Click Graph at the bottom of your screen. With questions about any projects or services, please contact the 24/7 Kootenai Health Information Technology Help Desk. By Phone: 855-554-4440 (toll free) or 208-625-5555 By Email: [email protected] Page 11 • If you right click on the name of the lab, you will be given three options. 1. Reorder Lab: Sends that lab to your orders screen immediately. 2. Queue for Reorder: Allows you to queue more than one order to reorder. When you go to the ordering screen these orders will already be queued to reorder. 3. Queue for References: Takes you to the reference link to search for information about that lab. (example: Google, Web MD). § Results highlighted in Yellow are Low or High § Results in Red are Critical Values § The Delta Symbol indicates change in results • You can then select the information you would like to view by clicking on the + sign to the left of the heading. • To view an Exam/Report you would click on the Clipboard icon under the report. With questions about any projects or services, please contact the 24/7 Kootenai Health Information Technology Help Desk. By Phone: 855-554-4440 (toll free) or 208-625-5555 By Email: [email protected] Page 12 Select the Lab Report tab to view the report Viewing a Lab Report From the Laboratory tab, click on the date and time of the report to be viewed • • The “Labs” button has an option to exclude Point of Care tests such a glucose and urine tests. The “Most Recent/All Visits” button gives you a quick view of the most recent lab results of all prior visits. With questions about any projects or services, please contact the 24/7 Kootenai Health Information Technology Help Desk. By Phone: 855-554-4440 (toll free) or 208-625-5555 By Email: [email protected] Page 13 “Labs” Window Allows you to select from your favorite list of panels you previously chose in Manage Favorites All Visits/Most Recent button gives quick view of the most recent lab results of all visits Exclude POC button means no point of care tests (finger stick blood sugars, urine dips, Allows you to choose panels to etc.) add two ill display. YOUR Favorites if your access allows you to do so Clinical Panels • The Clinical Panels tab will bring you to the list (shown above) where you select a specific Clinical Panel (shown below). With questions about any projects or services, please contact the 24/7 Kootenai Health Information Technology Help Desk. By Phone: 855-554-4440 (toll free) or 208-625-5555 By Email: [email protected] Page 14 • • Clinical Panels contain clinical information specific to the clinical panel name. From the above screen you can choose to Manage Favorites, or you can choose a panel from the list to view by clicking on it. This view is an open Clinical Panel: With questions about any projects or services, please contact the 24/7 Kootenai Health Information Technology Help Desk. By Phone: 855-554-4440 (toll free) or 208-625-5555 By Email: [email protected] Page 15 • • • Clicking a number value will give you a normal range for that test. Clicking a bubble, next to a number value, will give you more information about that test. To Graph results, Right click on the text name. o This will bring up a drop down box with Graph highlighted in green. You need to left click the word Graph. § Under the word graph that is highlighted in green you will see a list of any results you have already chosen to graph. o Repeat the above steps to choose as many results as you would like to graph. o Click on Graph at the bottom of your screen to view the graph. • • • Under Active Medications, left click on a particular medication to view additional information about the medication. “All Visits – Most Recent” is also available within Clinical Panels. This allows users to view the panel across multiple visits. After selecting a Clinical Panel to view, click on the “Visits” footer button. With questions about any projects or services, please contact the 24/7 Kootenai Health Information Technology Help Desk. By Phone: 855-554-4440 (toll free) or 208-625-5555 By Email: [email protected] Page 16 • You will then be able to select the “All Visits – Most Recent”. Each column contains the most recent panel data for each visit. Vital Signs • • • Displays vital signs for the patient. Scroll left and right at the top of the page to see more days and times. Clicking on a particular vital sign result will provide: o The normal range of the vital sign. With questions about any projects or services, please contact the 24/7 Kootenai Health Information Technology Help Desk. By Phone: 855-554-4440 (toll free) or 208-625-5555 By Email: [email protected] Page 17 Scrolling feature allows you to scroll between dates o • The person who entered the vital sign. If you click on the name of the results, like Blood Pressure, it will give you a list of all the blood pressures of the patient for that visit. o This works for all vital signs. I&O • • Scroll left and right at the top of the I&O screen to view additional dates and times. Left click on the type of I&O to view additional information about that particular item. Medications Medication List displays the patient’s current, active, and discontinued medications. With questions about any projects or services, please contact the 24/7 Kootenai Health Information Technology Help Desk. By Phone: 855-554-4440 (toll free) or 208-625-5555 By Email: [email protected] Page 18 Click to tsoggle between List and View pecific drug classes Detail View Access archived data View medications currently Active, on Hold, or Discontinued within the last 24 hours • Left click on • the medication, anywhere in the row, to see additional information about a particular medication. Below are the Footer Buttons and their functions: MAR This view allows you to see the patient’s current Medication Administration Record (MAR). With questions about any projects or services, please contact the 24/7 Kootenai Health Information Technology Help Desk. By Phone: 855-554-4440 (toll free) or 208-625-5555 By Email: [email protected] Page 19 Medication Snapshot • • Displays the list of Home Medications on Admission, Admission Medications, and Discharge Medications. Clicking on a medication, anywhere in that row, will give you a new screen with more detailed information about that medication (see below). With questions about any projects or services, please contact the 24/7 Kootenai Health Information Technology Help Desk. By Phone: 855-554-4440 (toll free) or 208-625-5555 By Email: [email protected] Page 20 Header Buttons: View results from multiple categories Laboratory Scroll Arrows: Browse data by date Click a test name to view the History of that item Click a cell to view the detail of a test result Right click a test to select it to graph or add to a reference list Graph results from the selected test Access archived data With questions about any projects or services, please contact the 24/7 Kootenai Health Information Technology Help Desk. By Phone: 855-554-4440 (toll free) or 208-625-5555 By Email: [email protected] Page 21 Click on Collected or Source headers to change the specimen sort method Click to view a list of organisms found within all specimens Microbiology Click # to view the Susceptibilities Grid Click the Clipboard to view the specimen report Organisms appear with a red background With questions about any projects or services, please contact the 24/7 Kootenai Health Information Technology Help Desk. By Phone: 855-554-4440 (toll free) or 208-625-5555 By Email: [email protected] Page 22 View results of all blood bank tests for the selected visits Blood Products ordered during the selected visits View all blood bank products in Transfused status View blood bank reports for the selected visit Bank Click a number in these rows to access product details Relevant tests when ordering blood • • This information comes from the Lab and the Transfusion Administration Record (TAR). This allows users to access the history of blood bank items from all facilities including TAR documentation history. With questions about any projects or services, please contact the 24/7 Kootenai Health Information Technology Help Desk. By Phone: 855-554-4440 (toll free) or 208-625-5555 By Email: [email protected] Page 23 Click on the comment bubble for additional information Transfusion Flowsheet and Comments In the Transfusions button view, clicking on the comment bubble in the far column allows the user to view the TAR documentation of reactions. Other TAR documentation is available as well, including vitals, etc. in flow sheet or comment format. Vitals Signs Format Comments Format With questions about any projects or services, please contact the 24/7 Kootenai Health Information Technology Help Desk. By Phone: 855-554-4440 (toll free) or 208-625-5555 By Email: [email protected] Page 24 Reports Header Buttons: Click to view reports from different categories Clipboard: Click to view report Camera: Click to view scanned document Archive: Access archived data • • • The information below is an enhancement to the “Reports” tab. All Visits button allows for quicker sorting. Displays the LAST documented report from any visit. • In addition, there is a new “More Reports” column. This groups “like” documents together. With questions about any projects or services, please contact the 24/7 Kootenai Health Information Technology Help Desk. By Phone: 855-554-4440 (toll free) or 208-625-5555 By Email: [email protected] Page 25 Header Buttons: View the Interventions, Outcomes, Plans of Care, History and scanned forms • Sort the assessments by Date, Name, Provider Type, or by the user that recorded them Click an assessment to view its details A (+) sign indicates there are additional reports available. Check the assessment you want to view Patient Care Access archived data List assessments from earlier or later dates, if available View the details of the selected assessments, or all assessments of the selected type With questions about any projects or services, please contact the 24/7 Kootenai Health Information Technology Help Desk. By Phone: 855-554-4440 (toll free) or 208-625-5555 By Email: [email protected] Page 26 • Header Buttons: o Patient Care: Assessments § (Above screen shot). Use this screen to view a list of the assessments documented for a patient, and to access the details of those assessments. o Patient Care: Interventions § Use this screen to view a list of the interventions already documented for a patient o Patient Care: Outcomes § Use this screen to view a list of the outcomes documented for a patient, and to access the details of those outcomes. o Patient Care: Plans of Care § Use this screen to view a list of the plans of care documented for a patient, and to access the details of those plans of care. § Click the (+/-) buttons to expand or contract. § Click on a plan of care item to view details. § “I” or “P” indicate text or protocol information. § The buttons above the table allow you to restrict the view to different components of a plan of care (the Problems, Outcomes, and Interventions). § The Overview page displays all components of the patient’s plans of care. o Patient Care: History § Use this screen to view a list of queries documented for patient and family history, and to access the details of those queries. § The Positives box will display only abnormal charted in the Admission Assessment. § The All Responses box will display normal and abnormal from the Admission Assessment. § Click on the query name to view information history. § Click the Recorded date to view the query details. o Patient Care: Scanned Forms § This screen lists scanned Patient Care forms for the selected visits. Click a report in the list to view it. o Patient Care: Surgery Assessments § Use this screen to view a list of the assessments documented for a patient in Operating Room Management or Surgery, and to access the details of those assessments. With questions about any projects or services, please contact the 24/7 Kootenai Health Information Technology Help Desk. By Phone: 855-554-4440 (toll free) or 208-625-5555 By Email: [email protected] Page 27 Click to view notes from other Click on Select Visits to view categories patient information in PCI Click to select all notes View the first line of text for simple notes Click the box to select or Notes deselect a note Click to view Cancel reason Includes patient information prior to View September the selected 2011 notes if records exist View (you all notes from the selected dates may need authorization) • • • Click to view the assessment the note is linked to Includes Nursing Notes, Care Manager, Physical Therapy, Progress Notes, Etc. Click the Refresh tab, anytime, to refresh the EMR. The Notes tab will appear in red when notes are filed. PCI Link With questions about any projects or services, please contact the 24/7 Kootenai Health Information Technology Help Desk. By Phone: 855-554-4440 (toll free) or 208-625-5555 By Email: [email protected] Page 28 Preferences • Allows physicians to customize where they will default in PCM and EMR. Notices • Notices can be configured for individual facilities and types of patients for Lab, Mic and ITS results. With questions about any projects or services, please contact the 24/7 Kootenai Health Information Technology Help Desk. By Phone: 855-554-4440 (toll free) or 208-625-5555 By Email: [email protected] Page 29 Documenting in PCM • To start documenting on an H&P, Progress Note or Discharge Summary, first select a patient from the My Patients or Rounds Patients lists. • Click anywhere on the patient data line. It will turn green showing this patient is selected and load the default EMR screen. If there is nothing selected in preferences, default will be the New Results screen. • Click on the Document button to start a note on the selected patient. The documentation screen will be blank if no documentation has previously been done on this patient. If previous notes have been written, a list of these will show. A selection of All or Mine can be made at the top of the screen. Any of these can be reviewed simply by clicking on the note you wish to read. • Quick Save Feature: Quick Save will quickly put a note in Pending status. Pending notes cannot be seen by other providers until they are placed in Draft or Signed status. To continue with the note, simply click on the Pending note in the report list when entering Documentation. A preview of the note will be seen. Click the Edit at the bottom. Go to where you left off in the note and complete your documentation. With questions about any projects or services, please contact the 24/7 Kootenai Health Information Technology Help Desk. By Phone: 855-554-4440 (toll free) or 208-625-5555 By Email: [email protected] Page 30 • To start a new note, click New at the bottom of the screen. Neither the Code Encounter nor Visit Report buttons are used at this time. • Manage Favorites: If no favorites are et up, a list of standard progress notes (Reports) and nursing notes are available. Adding specific notes to your favorites list can be done by clicking the Manage Favorites button. Click to check the notes to add to your favorites list. Click Save and only the notes you selected will be seen when you document from now on. You can select other reports from the list by selecting Standard at the bottom of the page. With questions about any projects or services, please contact the 24/7 Kootenai Health Information Technology Help Desk. By Phone: 855-554-4440 (toll free) or 208-625-5555 By Email: [email protected] Page 31 • Select the desired template from the list. • Example of a Daily Progress note • The Daily Progress Note has five tabs. . Other notes can be longer and have more tabs. Under the CC/HPI tab there is specific patient information pulled into the note from admissions. Also the hospital length of stay is displayed. A Chief Complaint needs to be completed as well as Subjective/HPI. • Click on the line to the right of the title where it says <Entered>. Entered indicates that data has automatically pulled into a section of the note such as With questions about any projects or services, please contact the 24/7 Kootenai Health Information Technology Help Desk. By Phone: 855-554-4440 (toll free) or 208-625-5555 By Email: [email protected] Page 32 demographics, vital signs, I&O’s and laboratory results. This is a large free text area so when documenting Subjective/HPI there is no limit to what can be documented. • When documentation is complete, click OK in the lower right corner for this section. • Documenting within a template is done by free text as noted above or by simply pointing and clicking on the answer desired. This places an oval around the selection. • Continue documenting by clicking on the ROS tab. • Report/Denies option is available, clicking on an option places a oval around it and right clicking puts a slash through the option. On the report, the oval indicates reports and the slash indicates denies. • Example of how it will display in the report: o Constitutional: Reports: Change in appetite. Denies: Fatigue/Malaise, Generalized Weakness With questions about any projects or services, please contact the 24/7 Kootenai Health Information Technology Help Desk. By Phone: 855-554-4440 (toll free) or 208-625-5555 By Email: [email protected] Page 33 • At the bottom of the screen is a comment line. When any answer in a question set is selected, a comment can be made about that item and will show in parenthesis on the report. • Click on the Exam tab to continue the note. The exam section has been set up with all items collapsed. Click the (+) sign will expand the individual sections. A checkmark to the left of the items in this section will indicate documentation is present. • Click on the (+) sign to expand the section that wish to document on. Below is an example of the Constitutional section. Point and click on selections to document. The All button under Reviewed By Me Today can be used to check all of the selections in that section if they have all been reviewed. Continue by expanding additional sections, documenting in the same manor. • If you want to remove a circle, click on it again. The circle will now be removed. With questions about any projects or services, please contact the 24/7 Kootenai Health Information Technology Help Desk. By Phone: 855-554-4440 (toll free) or 208-625-5555 By Email: [email protected] Page 34 • The Data tab includes Vital Signs, I&O’s, and Lab data that is defined to pull into the report. Different templates have different data elements defined to be pulled in. • To review the Vital Signs/I&O and Lab sections, simply click on the line indicated by <Entered>. Vital signs and I&O data are shown in tables. If you wish to remove any of these tables, right click on the table and click Delete Table at the bottom of the menu. The title of the table will need to be removed manually. It does not get removed with the table. • The data tab may be where you choose to insert data that you saved while reviewing the EMR. With questions about any projects or services, please contact the 24/7 Kootenai Health Information Technology Help Desk. By Phone: 855-554-4440 (toll free) or 208-625-5555 By Email: [email protected] Page 35 Datasaver and Graphing • Data from the EMR can be saved and pasted into any free text area of a note. Data must be selected before entering a free text screen. The EMR is not available while in a free text screen. Notice the example above with the side buttons grayed out. While in a section of the template, click on the EMR button to collect data from or graph within the EMR by right clicking data. The example shown below is laboratory and glucose data. Click Laboratory then Chemistry. Note the Document button is green indicating an active note is open and active. With questions about any projects or services, please contact the 24/7 Kootenai Health Information Technology Help Desk. By Phone: 855-554-4440 (toll free) or 208-625-5555 By Email: [email protected] Page 36 • Clicking on Glucose will show only glucose results for the patient. To select data, right click on the values. Selected data is indicated by a black diamond. • Glucose values have now been selected and saved in the datasaver. • Return to your note with the captured data by clicking the green Document button. Click in the Results section by the drop down field to enter free text. By default, the cursor falls to the bottom of the automatically pulled data. To insert the glucose results into the note, click on Saved Data at the bottom of the screen. A screen showing what data has been saved in the Datasaver will display. Checks on the left indicate that all data selected will be inserted into the note. To remove any of these items uncheck the unwanted data. With questions about any projects or services, please contact the 24/7 Kootenai Health Information Technology Help Desk. By Phone: 855-554-4440 (toll free) or 208-625-5555 By Email: [email protected] Page 37 • To remove all of the data, click Remove at the bottom of the screen. To continue to insert into the note, click the Insert button instead. • Inserted data is seen in the table format in the note. Click OK to save the inserted data. • Click on the A/P tab to document Problems and the Assessment and Plan. The Problem List uses SNOMed as the list of problems, or problems can be entered via free text. Problems present for this patient appear in the column next to Patient Problems. • Click on the Problem, or the blank line if no problems exist, to enter Patient Problems. Existing problems will be listed or be blank if there are none. With questions about any projects or services, please contact the 24/7 Kootenai Health Information Technology Help Desk. By Phone: 855-554-4440 (toll free) or 208-625-5555 By Email: [email protected] Page 38 • Click the Edit button at the bottom of the screen to add a problem. Problem list defaults, in Edit. Current problems can be unchecked as not pertinent to the current visit. Click New to enter a new problem. With questions about any projects or services, please contact the 24/7 Kootenai Health Information Technology Help Desk. By Phone: 855-554-4440 (toll free) or 208-625-5555 By Email: [email protected] Page 39 • Current problems are listed. Click in the Search field and type the problem that is required. You can search by “starts with” or “any word.” Hit enter to display results. • If matches are found in the dictionary, a list of matches will be displayed. Click the appropriate match to select the entry desired. Click Save to save the new problem. With questions about any projects or services, please contact the 24/7 Kootenai Health Information Technology Help Desk. By Phone: 855-554-4440 (toll free) or 208-625-5555 By Email: [email protected] Page 40 • Note the new problem has now been added to the list. • If there is no match to the search, the system will prompt you to enter the selection as free text. Click on the search type option of Add as Free Text. • Click Save to add the free text option to the Problem List. With questions about any projects or services, please contact the 24/7 Kootenai Health Information Technology Help Desk. By Phone: 855-554-4440 (toll free) or 208-625-5555 By Email: [email protected] Page 41 • Click OK to return to the note. • Estimated Date of Discharge is a date field. Clicking on the down arrow brings up a calendar. • Click by Assessment and Plan. This is a free text box. The cursor will default by the second arrow. With questions about any projects or services, please contact the 24/7 Kootenai Health Information Technology Help Desk. By Phone: 855-554-4440 (toll free) or 208-625-5555 By Email: [email protected] Page 42 • When the Assessment and Plan is completed, click OK to save. Click on View/Save to preview and sign the report. With questions about any projects or services, please contact the 24/7 Kootenai Health Information Technology Help Desk. By Phone: 855-554-4440 (toll free) or 208-625-5555 By Email: [email protected] Page 43 • Scroll down through the report to review. Clicking the blue highlighted titles will quickly take you that location to make changes in your note. To Esign and file the report, click on Save. • The CC lines are used to send a faxed copy of your note to the indicated provider. Enter the name of the provider that you would like the note faxed to (First Name Last Name). With questions about any projects or services, please contact the 24/7 Kootenai Health Information Technology Help Desk. By Phone: 855-554-4440 (toll free) or 208-625-5555 By Email: [email protected] Page 44 • The Assign Providers option would be best used to send a report to a co-signer’s sign queue. Type in the name of the provider on the first line of the Assign Providers box that you would like to co-sign your report. Your report will then be sent tot the provider’s sign queue for electronic co-signature. • Click on the Signed status and enter your PIN and click Save to file the report. You are returned to the Report List and this note is listed as Signed. If there is a need to modify a Signed report, and electronic addendum can be added. Deleting/Cancelling a Pending or Draft Report • Click the Delete/Cancel Document button at the bottom of the page. • Clicking Yes at the prompt will cancel the report. Status is now Cancel. With questions about any projects or services, please contact the 24/7 Kootenai Health Information Technology Help Desk. By Phone: 855-554-4440 (toll free) or 208-625-5555 By Email: [email protected] Page 45 • If there is a need to cancel a report that has already been signed, contact HIM. • Cancelling a Signed Report: If a report has been signed and there is a need to cancel the report, your HIM Department will need to be contacted. There is no way for a user to cancel a signed report. Electronic Signature • When the button is Red, this indicates there are orders and/or documents (reports) that require your electronic signature. Clicking on the Sign button accesses the Esign queue. • The documents to be signed list shows the date and time of generation, priority, patient name, MR number, age and gender, reason for it needing Esigned, and document title. • Documents that are in your queue will be pre-selected to be signed and are indicated by the check mark in the left column. Remove the check from any document you do not wish to sign at this time. With questions about any projects or services, please contact the 24/7 Kootenai Health Information Technology Help Desk. By Phone: 855-554-4440 (toll free) or 208-625-5555 By Email: [email protected] Page 46 Electronically Signing Reports • After selecting a report by placing a check in the box in the left column there is one option at the bottom of the screen, View & Sign. Click this button and the first report in the list will be shown in a preview window. The numbers of reports that need to be signed, and number that are marked for signature are shown at the bottom of the screen. • All reports must be viewed before signing. • Review the report for errors. If there are none, click Sign to mark this report for signature. Editing Reports before Signing • If you need to edit a report prior to signing, click the Edit Document button. The report is seen in a window similar to the original preview, except it is now editable like a Word document. Now any errors from transcription can be corrected or additions made. Here “diabetes” has been added to the Chief Complaint. Click Save to file any changes. With questions about any projects or services, please contact the 24/7 Kootenai Health Information Technology Help Desk. By Phone: 855-554-4440 (toll free) or 208-625-5555 By Email: [email protected] Page 47 • The changes are then saved and you can Review to confirm and then click Sign. When viewing and/or editing of the reports is completed, you are prompted with three options: Sign, Go Back and Cancel. • Click Sign and you are prompted to enter your PIN number. • Enter your PIN Number and press Enter to the reports. With questions about any projects or services, please contact the 24/7 Kootenai Health Information Technology Help Desk. By Phone: 855-554-4440 (toll free) or 208-625-5555 By Email: [email protected] Page 48 Meditech, Esigning of Scanned Document Deficiencies • Scanned documents tagged with signature deficiencies will display in a Provider's Sign Queue under the Documents Tab like electronic reports currently do. • The name of the document will display along with the patient. When the document is check marked and "View and Sign" is selected the Provider is then able to review the scanned document and proceed with electronic signing using your pin. • Once the document is signed, the signature deficiency that was tagged on the document gets burned onto the image itself which will be reflected whenever the document is viewed going forward. Steps 1. Mark items to be signed using the check mark and then select view and sign. With questions about any projects or services, please contact the 24/7 Kootenai Health Information Technology Help Desk. By Phone: 855-554-4440 (toll free) or 208-625-5555 By Email: [email protected] Page 49 Number of pages in the 2. The scanned document deficiencies document will be presented. 3. Select one of the footer buttons: • Prev Document: navigate to the previous document in your sign queue • Next Document: navigate to the next document in your sign queue • Prev Page: navigate to the previous page within the current document you are viewing • + Zoom -: Zoom in and out of the document • Opt.: Define preferences on how the document will display. The following options are available • Sign: sign, date and time the deficiency that is currently selected With questions about any projects or services, please contact the 24/7 Kootenai Health Information Technology Help Desk. By Phone: 855-554-4440 (toll free) or 208-625-5555 By Email: [email protected] Page 50 • • • Prev Unsigned: navigate to the previously unSigned deficiency Next Unsigned: navigate to the next unSigned deficiency Reject: allow the provider to reject the deficiency. A rejection comment is required, this field is a free text • Exit:Allows you to leave the document you are currently viewing. You may select: 4. You may note the following when Esigning a deficiency: • Red: The selected deficiency for the provider • Yellow: Other deficiencies for the provider • Blue: Deficiencies for another provider • Green: A deficiency that has been signed, but the document is has missing signatures for the provider • Purple: A deficiency that has been rejected, but the document is has missing signatures for the provider • Once all signatures for one provider on the document are signed, those signatures will be burned to the image With questions about any projects or services, please contact the 24/7 Kootenai Health Information Technology Help Desk. By Phone: 855-554-4440 (toll free) or 208-625-5555 By Email: [email protected] Page 51 5. When all the deficiencies have been signed or “exit” is selected, the following screen will be presented. • Select “Save” to save your signatures. (If you would like to cancel your work, select “Don’t Save”. If you would like to return to the document select “Cancel Exit”). • After you select “Save”, you will be prompted to enter your pin. • Once all signatures for one provider on the document are signed, the signature deficiencies that are tagged on the document gets burned onto the image itself which will be reflected whenever the document is viewed going forward. With questions about any projects or services, please contact the 24/7 Kootenai Health Information Technology Help Desk. By Phone: 855-554-4440 (toll free) or 208-625-5555 By Email: [email protected] Page 52 Meditech EMR – Report Statuses • Report status is located in the 4th column • A Report may be listed in one of the following report statuses: PENDING: • Applies to PDOC only • Does not flow to ITS so will not display in the reports tab EMR • Only available for viewing by the initiating provider in the Document tab of EMR • Initialized and saved • Awaiting signature • Once placed in DRAFT or SIGNED status will be available in EMR • Pending reports can display on the documents list for any provider assigned to the document. With questions about any projects or services, please contact the 24/7 Kootenai Health Information Technology Help Desk. By Phone: 855-554-4440 (toll free) or 208-625-5555 By Email: [email protected] Page 53 • PDOC will display in the documents list for any provider assigned, not just the originator DRAFT: • Initialized and saved • Awaiting signature • Available in reports tab of EMR ISIGNED: • Multiple signers on document • Report is awaiting signature from at least one provider • Similar to DRAFT status • Available in reports tab of EMR SIGNED: • All signatures have been obtained • Report is in a RESULTED status • Edits must be made via an addendum ADDENDUM: • Additional information has been added by a user after it has reached a signed status • Awaiting signature on Addendum • Available in reports tab of EMR • Ability to change the service date and time of document: • The PDOC will file to the identified date and time in the EMR and documents list. • The date and time will default to the date and time there PDOC report was initialized and may be changed to the service date and time if needed. ***Do not remove the date and time and save, if this occurs your note will not save to the Document List*** With questions about any projects or services, please contact the 24/7 Kootenai Health Information Technology Help Desk. By Phone: 855-554-4440 (toll free) or 208-625-5555 By Email: [email protected] Page 54 • Files to this date and time in the Documents List and EMR The service date is reflected on the Report in the Document List in the “Date” field. Initialized date will display as well and will reflect the date and time the PDOC was initialized. With questions about any projects or services, please contact the 24/7 Kootenai Health Information Technology Help Desk. By Phone: 855-554-4440 (toll free) or 208-625-5555 By Email: [email protected] Page 55 • Click reduction: User Preferences will be enhanced to allow user to select a default for the Sign Status within PDOC. Users may select Pending, Draft or Signed. • Click reduction: When saving PDOC, the document preview screen includes the option to save the document, add additional copies, and assign additional providers to the report. With questions about any projects or services, please contact the 24/7 Kootenai Health Information Technology Help Desk. By Phone: 855-554-4440 (toll free) or 208-625-5555 By Email: [email protected] Page 56 • Upon Clicking Save, the provider will be presented with a split screen. This screen will allow the provider to both view and sign and sign the document. Users will no longer be presented with a seperated doucment preview screen. • Provider may select Expand View for an expanded preview of the document With questions about any projects or services, please contact the 24/7 Kootenai Health Information Technology Help Desk. By Phone: 855-554-4440 (toll free) or 208-625-5555 By Email: [email protected] Page 57 • Selecting the collapse Preview Button will collapse the Document Preview into the spilt screen view. With questions about any projects or services, please contact the 24/7 Kootenai Health Information Technology Help Desk. By Phone: 855-554-4440 (toll free) or 208-625-5555 By Email: [email protected] Page 58 With questions about any projects or services, please contact the 24/7 Kootenai Health Information Technology Help Desk. By Phone: 855-554-4440 (toll free) or 208-625-5555 By Email: [email protected] Page 59