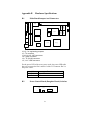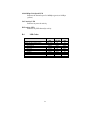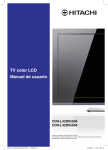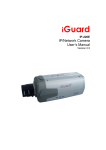
1
Document Number: 105-01-0001 Revision History: Revision Date Author Description A0 2002/2/19 Leo Chan/ Henry Ho FISC CDH English User’s Guide v4.10 A1 2002/8/7 Henry FISC CDH English User’s Guide v4.20 FISC CDH Versatile Network Attached Storage Server User’s Guide Version 4.20 Part Number: 5019.14016 2 Important Notice Trademarks FISC CDH and Ingrasys are trademarks of Ingrasys Technology Inc. Microsoft® is a registered trademark. DOS, Windows 95, Windows 98 and Windows NT are the registered trademarks of Microsoft Corporation. NetWare is the registered trademarks of Novell Inc. Macintosh and AppleShare are the registered trademarks of Apple Computer Inc. All other company and product names are trademarks of their respective owners. Licensing No part of this publication may be reproduced, transmitted, transcribed, stored in a retrieval system or translated into any languages in any forms or by any means without prior written permission from Ingrasys Technology Inc. The Embedded Software included with the product is composed of multiple separately written and copyrighted modular software programs. Various Embedded Software programs (the “Public Software”) are copyrighted and made available under the GNU General Public License or other licenses that permit copying, modification and redistribution of source code (which licenses are referred to as “Public Licenses”). The Public Software is licensed pursuant to (i) the terms of the applicable Public License located in the related software source code file(s), and/or in its online documentation; and (ii) to the extent allowable under the applicable Public License. The source code of the Public Software can be requested from Ingrasys Technology Inc. All other Embedded Software programs and Utilities Software are copyrighted by Ingrasys. You may not copy, modify, sell, lease, sublease, or otherwise transfer these software programs, or any copy or modification, in whole or in part. Disclaimer Ingrasys makes no representations or warranties with respect to the contents of this publication and specifically disclaims any implied i warranties, merchantability, or fitness for any particular purpose. Ingrasys reserves the right to revise this publication without notice. Copyright © 2002 Ingrasys Technology Inc. All rights reserved. First Edition, August, 2000 Updated in August, 2002 Printed in Taiwan ii Electronic Emission Notice Federal Communications Commission (FCC) This equipment has been tested and found to comply with the limits for a Class B digital device, pursuant to Part 15 of the FCC Rules. These limits are designed to provide reasonable protection against harmful interference when the equipment is operated in a residential environment. CE Notice This device complies with the EMC directive of the European Community and meets or exceeds the following technical standard: EN 55022 ~ “Limits and Methods of Measurement of Radio interference Characteristics of information Technology Equipment.” This device complies with CISPR Class B standard. EN 50082-1~ “EMC - Generic immunity standard -- Part 1: Residential, commercial and light industry” EN 61000-4-2 ~ “EMC -- Part 4-2: Testing and measurement techniques - Electrostatic discharge immunity test” EN 61000-4-3 ~ “EMC -- Part 4-3: Testing and measurement techniques - Radiated, radio-frequency, electromagnetic field immunity test” EN 61000-4-4 ~ “EMC -- Part 4-4: Testing and measurement techniques - Electrical fast transient/burst immunity test” iii Safety Information To reduce the risk of fire or electric shock, install the unit in a temperature-controlled indoor area free of conductive contaminants. Do not place the unit near liquids or in an excessively humid environment. Do not allow liquids or foreign objects to enter the unit. All servicing of this equipment must be performed by qualified service personnel. Remove rings, watches and other jewelry before servicing the unit. Before maintenance, repair or shipment, the unit must be completely switched off and unplugged and all connections must be removed. iv TABLE OF CONTENT CHAPTER 1 1.1 CD SERVER AND FILE SERVER BUILT IN ONE.......................1 CHAPTER 2 2.1 2.2 2.3 2.4 2.5 2.6 CONFIGURING THE FILE SERVER 30 INITIALIZING A HD FOR FILE SHARING ..............................30 CREATING PARTITION(S) AND SHARING FILE VOLUMES ....30 LIMITING USER ACCESS TO FILE VOLUMES .......................32 RENAMING VOLUME LABEL AND VOLUME NAME .............35 CHAPTER 5 5.1 5.2 5.3 5.4 5.5 5.6 5.7 CONFIGURING THE CD/DVD SERVER 17 CONFIGURING NETWORK SETTINGS ...................................17 DIRECT CD ACCESSING ......................................................19 CD IMAGE SHARING ...........................................................20 COPYING CD INTO A FILE VOLUME ....................................23 LIMITING USER ACCESS TO CD VOLUMES.........................24 USER LICENSE CONTROL ....................................................27 RENAMING THE CD/DVD...................................................28 MIRROR PASSWORD ............................................................29 CHAPTER 4 FUNCTIONS 4.1 4.2 4.3 4.4 INSTALLING THE FISC CDH ............................3 CONNECTING THE FISC CDH...............................................3 INSTALLING THE RACK-MOUNT MODELS.............................5 CONFIGURING FISC CDH................................................... 11 FIRMWARE UPGRADE ..........................................................13 EVENT NOTIFICATION .........................................................14 MULTI-LANGUAGE SUPPORT ..............................................15 CHAPTER 3 FUNCTIONS 3.1 3.2 3.3 3.4 3.5 3.6 3.7 3.8 INTRODUCTION ..................................................1 ACCESSING FROM DIFFERENT CLIENTS .37 ACCESSING THROUGH WEB BROWSERS .............................37 USING THE FISC CDH UNDER WINDOWS 95/98................39 USING THE FISC CDH UNDER WINDOWS NT/2000...........40 USING THE FISC CDH UNDER NETWARE CLIENTS............41 USING THE FISC CDH UNDER MACOS .............................43 USING THE FISC CDH UNDER NFS CLIENTS ....................45 ACCESSING THE FISC CDH USING FTP ............................47 CHAPTER 6 RECORDING CDS ..............................................50 v 6.1 RECORDING MIRRORED IMAGE ONTO CD-R/RW DISC .....50 CHAPTER 7 7.2 7.3 7.4 7.5 ADDING A RAID GROUP AND UNGROUPING IT ..................53 INITIALIZING RAID ............................................................55 WHAT IF HARD DRIVES FAIL ..............................................55 THINGS YOU SHOULD KNOW .............................................58 CHAPTER 8 8.1 8.2 8.3 TAPE BACKUP....................................................59 GETTING TASK STATUS .......................................................59 BACKUP VOLUMES .............................................................60 RESTORE VOLUMES ............................................................61 CHAPTER 9 9.1 9.2 9.3 9.4 9.5 RAID CONFIGURATION ..................................53 ARCHIVE .............................................................64 TASK LIST ...........................................................................64 ADDING ARCHIVE TASK ......................................................65 MODIFY / DELETE DATA ARCHIVING TASK ..........................66 IMAGE SUBSTITUTION ........................................................67 EXAMPLE OF USING DATA ARCHIVING ................................68 APPENDIX A GLOSSARY ......................................................71 APPENDIX B HARDWARE SPECIFICATIONS..................72 B.1 B.2 B.3 B.4 MAIN BOARD JUMPERS AND CONNECTORS .......................72 POWER CONTROL BOARD (DAUGHTER BOARD) SWITCHES 72 LED INDICATORS ................................................................73 LED CODES ........................................................................74 vi Chapter 1 Introduction 1.1 CD Server and File Server Built In One FISC CDH is a versatile NAS (Network Attached Storage) server performing both CD and file sharing with multiple data security designs. It is the only NAS server on the market able to host all sorts of data files and CD/DVD information. Unrivaled Storage Power Equipped with four independent UDMA-100 IDE channels, the FISC CDH enables extraordinarily high efficiency of data processing. Its four powerful EIDE channels allow the FISC CDH controller to host eight CD/DVD devices or ATA-100 hard drives, depending on your task requirements. FISC CDH gives you the flexibility you need to share a large quantity of CD information. Empowered by super high speed CD caching and mirroring functions, you can benefit from the smooth and immediate CD sharing. FISC CDH supports almost all CD formats such as music CD, CDR, VCD and DVD. Utilizing FISC CDH to store data files is a pleasant experience just like using a quality file server. FISC CDH provides you with full function file management such as file opening, duplicating, backup and RAID. In addition, FISC CDH gives you hundreds of GB space with 1,000volume storage capacity, while allowing the co-existence of CD/DVD information and data files. Invulnerable Data Safety and Security FISC CDH features a shutdown protection circuit that coordinates the ATX power system to protect your data. When receiving your shutdown command, FISC CDH automatically saves data, and then turns off power with all files safe and sound. In addition to the advanced power management function, FISC CDH is equipped with share and user level security control to prevent illegal access of data. That is not all. FISC CDH uniquely provides you with system 1 operating information and issues warning messages about system status on LCD panel. To keep server from being over-heated, FISC CDH reminds you of the server temperature collected from a built-in thermal sensing circuit. Universal Utilization Fitting in a variety of network environments has always been the focus of the FISC CD family of products. The FISC CDH functions perfectly under most of the network environments such as Microsoft Windows, Novell NetWare, Apple Macintosh, UNIX and Web browsers. Meanwhile, the FISC CDH features all convenience and utilization NAS server should contain. Imagine the server being ready in three minutes: you hook it up, plug in the power and input the IP address directly on the LCD control panel. 2 Chapter 2 Installing the FISC CDH 2.1 2.1.1 Connecting the FISC CDH Connecting cables within a tower case After you take a FISC CDH controller out of the box, please follow the steps below to connect all the cables. 1. Fix the power control board on the back of the tower case. 2. Connect the UTP cable to both the controller and the power control board (DBrd). 3. Connect the I2C cable to both the controller and the power control board (DBrd). 4. Connect the power cable from the ATX power supply to the controller. 5. Connect the power LED cable of the tower case to Pin 1&2 of the controller’s J17 connector. * DBrd means the small daughter board, which is the power control board 2 I C Cable from the DBrd UTP Cable from the DBrd Power Cable from the ATX power supply Power LED Cable from the tower case Figure 2-1 Connecting cables to the controller 3 6. Connect the supplied ATX power cable with the power control board (DBrd) and the ATX power supply. 7. Connect the power switch (trigger switch) cable of the tower case to the power control board. I2C cable from the controller power switch cable from the tower case ATX power cable from the ATX power supply UTP cable from the controller Figure 2-2 Connecting cables to the power control board (DBrd) 8. Connect IDE cables with the controller and the storage devices (hard drives, CD/DVD drives, ...). Figure 2-3 Connecting IDE cables to the controller 4 Caution: On the daughter board (power control board) is a coin-cell style lithium battery of type CR2302. Danger of explosion if battery is incorrectly replaced. Replace only with the same or equivalent type recommended by the manufacturer. Dispose of used batteries according to the manufacturer’s instructions. 2.1.2 Connecting the cables onto the tower case After you are done with the previous steps, or if you have a FISC CDH pre-installed in a tower case, only two more steps are required to finish the cabling. 1. Connect a UTP cable to an Ethernet or Fast Ethernet hub/switch. 2. Connect the power cord to a power outlet. Please check the voltages of your ATX power supply and the power outlet. 2.2 2.2.1 Installing The Rack-mount Models Setup and inspection procedure After you take a FISC CDH chassis out of the box, please verify the following items: 1. Loosen the screws in front and at the back of the chassis and remove the top cover of it. Store screws in a safe place. 2. Inspect the contents of the package to ensure that everything that should be with it: • • • • • FISC CDH chassis w/ power supply installed FISC CDH Main Board (Installed) FISC CDH Power Control Board (Installed) 3 Hard Disk Drive Trays for PRO model / 4 Hard Disk Drive Trays for SMART model Manual and Utilities CD 5 • • • Accessory Box (contains screws and cable accessory) 4 IDE cables with label sticker near both ends Power Cord 3. Make sure the power supply; the main board and the power board are tightly attached to the chassis. 4. Make sure that the power I/O switch is mounted securely to the front of the case and the wire going back to the power board is intact. 6 2.2.2 Connecting the CD-ROM/R/RW or DVD drive onto the chassis (FISC CDH PRO) 1. FISC CDH uses removable metal rails that are mounted to the drive, attach the rails to both side of the drive using two screws per rail as shown. 2. Then secure the drive onto the chassis as shown. Make sure the drive is not free to move around when you are done. 7 2.1.3 Connecting the hard drive onto the chassis This procedure provides instructions for installing hard disk drives into the FISC CDH system. 1. FISC CDH uses removable metal box into which hard disk drives are mounted. You have to remove the metal box first, place the hard disk drive on the metal box, and then use four screws to mount the drive on the metal box. 8 2. Finally, sliding the metal box on the chassis as shown. Use two screws to mount the metal box on the chassis to ensure that it fits properly. 9 2.2.3 Connecting the cables to the FISC CDH main board 1. Determine which end of the interface connector is PIN 1. Hard disks usually have PIN 1 of the connector next to the drive’s power connector. 2. Connect the IDE cables as indicated on the label, which is located at the inner face of the top cover. 10 2.2.4 Post-assembly check procedure 1. Make sure the power switch on the power supply at the back of the chassis is ON. 2. Make sure all you drives and the FISC CDH main board have a power connector attached to them correctly. 3. Check the IDE cables going to all the drives to make sure that you have lined up the red edge to PIN 1 of each device. Usually PIN 1 of the connector is next to the drive’s power connector. 5. Make sure that all the drives are properly physically secured in their exact position. Make sure there are no loose wires in the chassis that may interfere with the fans in the chassis. 2.3 2.3.1 Configuring FISC CDH Setting the IP address by means of the LCD panel The FISC CDH is equipped with a LCD panel for simple configuration and displaying system information. The default IP address is 192.168.1.1. If you want to assign a different IP address manually, the LCD panel is an easy way of doing it. If you want to get an IP address automatically via DHCP, BOOTP or RARP protocols, please refer to page 17, Getting the IP address automatically. The following steps describe how to configure fundamental parameters through the LCD panel. 1. Turn on the power. The LCD panel will display “System Ready” after the POST (power-on self-test). System Ready 2. Press the right button. The LCD will display “Enter Config?” as shown below. Press the middle button to enter the config mode for setting IP address, subnet mask, gateway 11 IP address, etc. Enter Config? _ 3. In the config mode, there is a cursor on the LCD screen. Press the left or right button to move the cursor. Press the middle button to change the digit. IP Address: 192.168.1.1 4. Press the right button until “Exit Config?” appears on the LCD panel. Press the middle button to exit the config mode. Exit Config? _ 5. Move the cursor to Yes and press the middle button to save the changes. Save Change? Yes/No 2.3.2 Going to the Administration Page After setting an IP address on the LCD panel, open a web browser and go to http://x.x.x.x/admin/ (x.x.x.x is the set IP address), which will open the Administration Page where you 12 can perform advance configuration. For more details, please read the following chapters, or invoke the on-line help window. 2.3.3 Invoking the on-line help window The following chapters describe the basics of the FISC CDH configuration and usage. There is also a brief help information on the User Page and the Administration Page. To open the on-line help window, please click the Help button on the tool-bar on either the User Page or the Administration Page. 2.4 Firmware Upgrade The flash memory stores the operation system and all the functions of the FISC CDH. You can upgrade the FISC CDH by writing the firmware image to the flash memory. Please follow the next steps to upgrade the firmware: 1. Go to the Server Settings on the Administration Page. 2. Click the F/W Upgrade button on the left. 3. Input the full path name of the firmware image (.BIN file) in the Upgrade File field or use the Browse button to find the location of the firmware image file. 4. Last, click the Upgrade button to begin to upgrade the firmware. It will reboot the FISC CDH after the upgrade is completed. 13 2.5 Event Notification The FISC CDH can notify the user of system events via event logs, LCD panel, and buzzer in the FISC CDH controller and/or email. To configure the settings related to the system event notification, please go to Server Settings on the Administration Page, and click the Event Log Setting button. To configure which level of messages will display on the LCD panel, select among Info, Warning, Error and Emergency in the LCD log level pull-down menu. (Info means general system events such as "Start mirroring". Warning means some action fails such as "Remote mirror fails". Error means the FISC CDH is in dangerous state such as "Temperature is too high". Emergency means fatal errors such as "Firmware upgrade fails".) To notify the users of system events via email, please select Mail log level as Info, Warning, Error or Emergency. Next, specify the IP address of the mail server in the SMTP server IP field. Then specify the user's email address in the Admin email address field. 14 2.6 Multi-Language Support The FISC CDH has built in multi-language support of the web pages in the firmware, including both the Administration Page and the User Page. You only have to change the settings of their Internet browsers to see different languages of web pages instantly. Also, to solve some localization issues, the FISC CDH allows you to select the code-page. Please read the following sections for details. 2.6.1 The administration page and the user page Total 9 languages of the web pages are included – English, French, German, Italian, Spanish, Japanese, Korean, Simplified Chinese and Traditional Chinese. You can configure your web browser to specify the language of the web page. Take Microsoft Internet Explorer 5 for example. Open IE 5 and go to the Administration Page. Click Tools from the file menu of IE 5 and choose Internet Options. From the pop-up dialog box, click the Languages… button close to the bottom. You will see: From the dialog box, click the Add button and choose a language that you want to use, like French (France) [fr]. Select this item and use the Move Up button to move it to the top position. Click the OK button to return to the browser. Click the F5 key to refresh the window. You will see the Administration Page in French. 15 2.6.2 Code-page selection To make the FISC CDH operate more smoothly under the OS platform other than English, it is suggested to adjust the codepage according to different OS platforms. To change the code-page setting, go to the Administration Page and enter the Server Settings page. Click the Others button on the left. On this page, please select a code-page and click the Apply button. Below is for your reference. CP437-DOSLatinUS: for English OS CP850-DOSLatin1: for OS of west European languages Mac Roman: for Mac OS CP950-Chinese BIG5: for Traditional Chinese OS CP936-Chinese GB: for Simplified Chinese OS CP932-Shift JIS: for Japanese OS CP949-Unified Hangul: for Korean OS 16 Chapter 3 Configuring The CD/DVD Server Functions After performing the basic installation described in the previous chapter, you can go on for further configuration if necessary. This chapter describes the basics and steps of how to configure and use FISC CDH as a CD/DVD server. 3.1 3.1.1 Configuring Network Settings Enabling the network protocol support FISC CDH works perfectly in a heterogeneous network environment. It supports user access from different operating systems. The following steps describe how to configure the network settings for Windows users. Steps for other network protocols are similar. 1. Please go to the Administration Page and click Network Settings. To the left side of the page are the buttons: TCP/IP, Windows, NetWare, Macintosh, Web and UNIX. 2. Click the Windows button. Make sure that the check-box besides Enable Microsoft Network is checked (default setting). 17 3. Enter the server and domain/workgroup names. These names specify what the users see from Network Neighborhood under Windows. 4. Under the Protocol(s) item, select Both if you are not sure which one to select. 5. Select a security policy between Share Level Security and User Level Security. The default setting is Share Level Security. 6. Click the Apply button. 3.1.2 Getting the IP address automatically In addition to assigning an IP address manually, FISC CDH can use some standard protocols to get an IP address automatically. To enable this function, please go to the Administration Page, and select Network Settings*TCP/IP. Select the item - “Obtain an IP address automatically” and choose which protocol(s) to use. Click the Apply button to confirm and apply the changes. There must be an active DHCP server on the LAN if FISC CDH is using the DHCP protocol to get an IP address. It is the same for BOOTP and RARP. 18 3.2 Direct CD Accessing By default, the functions of all the CD/DVD devices are set as direct access. Users can access all the CD/DVD devices in the system folder /CDROM. If you want to promote a CD/DVD to the root directory instead of /CDROM, please follow the steps. 1. Please go to the Administration Page and click Device Manager. The first page of Device Manager is Device List. It lists all devices, including CD/DVD drives, hard disk drives, and tape drives. 2. Click the device link in the CD Name column. It brings you to the CD Settings page. 3. The Function section specifies the role of the CD drive. Select Direct Access, which means you can access the disc in the CD device directly. CD Mirror means any disc inserted into the CD drive will be copied into a hard disk automatically and is not for user access; CD Record, which appears only if the CD drive is a CD-R or CD-RW device, means the device is used as an output device for burning CD-R or CD-RW discs out of the mirrored images in the FISC CDH. 19 4. Select Share Manager from the Administration Page. Click Share a Volume. 5. Click the Share Enable check-box of the CD/DVD. It takes effect immediately. Now the CD/DVD is shared under the root directory of the server and can be assigned access rights. 3.3 CD Image Sharing If the FISC CDH is equipped with hard drives, it can duplicate CD/DVD discs into its hard drives in the form of CD/DVD images and share them as actual CD/DVD discs. To make a CD/DVD image, please follow the steps. 1. Configure a hard drive as a mirror device for storing mirrored images. Go to Device Manager of the Administration Page, and click a hard drive name. 2. On the HD Settings page, click the HD Initialize button to the left. 20 3. On the HD Initialize page, select Mirror Device and click the OK button. 4. To set a CD/DVD device as a mirroring source, go to Device Manager of the Administration Page, and click the CD/DVD device. 5. Select CD Mirror as the Function setting. Mirror Options will appear immediately next to the Function setting. Specify the options properly. 21 6. Specify Launch Target. i. Auto & Smart: checks if the CD/DVD image already exists when copying CD/DVD image. It will skip if an identical CD/DVD image already exists. ii. Auto & Force: do not check if there exists an identical CD image. It will copy the CD/DVD image anyway. iii. Manual Mode: lets the user to choose which disk volume to store the CD/DVD image. iv. Replace Mode: lets the user to choose the existing CD/DVD image to be overwritten by the next inserted CD/DVD disc. 7. Insert a CD/DVD disc into the CD/DVD device 22 you configured as the CD Mirror source to start a mirroring job. If the mirroring is successful, a CD volume will appear in Share Manager*Share a Volume. Click the Share Enable check-box of the mirrored CD/DVD image to share it to network users. 3.4 Copying CD into a File Volume “CD Mirror” is used to copy a CD in the form of CD images. The CD images are stored in a “Mirror Device”, which is always read-only. Whereas, the “CD Restore” function is used to copy a CD file by file to a file volume. To make a CD device as a “CD Restore” device, 1. Go to the Device Manager of the Administration Page. 2. Click a CD name to enter the CD Settings page. 3. Click CD Restore. 4. If you want to copy the CD to a folder in the file volume, please specify the folder name in the First Level Folder field. Otherwise, you can leave it blank. 5. Specify whether to overwrite files in Restore Options. And click the Apply button. 23 3.5 Limiting User Access To CD Volumes For security reasons, administrators can limit user access on FISC CDH. For Windows, Macintosh and web users, either share or user level security applies. For NetWare and NFS users, user level security is supported. Share Level Security control for Windows users (SMB/CIFS protocol): 1. Go to Network Settings*Windows of the Administration Page. Make sure that the checkbox of Enable Microsoft Network is checked. 2. Select Share Level Security under the Security Policy item. Click the Apply button. 3. Go to Share Manager*Share List. Click the Set button in the Security column of the share that you would like to limit user access. 24 4. On the Share Password page, set the share password. Click the OK button. 5. Now users have to enter the share password if they try to access the share via Network Neighborhood under Windows. User Level Security control for Windows users (SMB/CIFS protocol): 1. Go to Network Settings*Windows of the Administration Page. Check the check-box of Enable Microsoft Network. 2. Select User Level Security under the Security Policy item. Click the Apply button. 3. FISC CDH can authenticate users by the user accounts stored in its local user database or the PDC server on LAN. 4. To add users to the local user database, go to User 25 Manager*Local User. Click the Add User button. On the Add New User dialog window, enter user name/password and click the Add button. 5. Repeat the previous step if you want to add more user accounts to the local user database. Click the Close button when you are done. 6. Assign users to the permission list of a share. Go to Share Manager*Share List. Click the Set button in the Security column of the share that you would like to limit user access. 26 3.6 7. On the page, click the Local User button. (If you want to add PDC users, click Windows.) 8. Select users from the left-hand pane, and click the Add-> button to add users to the permission list. To remove users, select users from the right-hand pane, and click the <-Remove button. When you are done with assigning users, click the Apply button. 9. Now only those users who are granted access rights are able to read or write the share via Network Neighborhood under Windows. User License Control Administrators can control how many users are accessing a share at the same time by limiting the maximum concurrent network connections of that share. To limit the maximum connections, go to Administration Page and enter the Share Manager page. Click the Set button in the Security column against the share of which you want to control the access. Then you enter a page where you can configure the access control of the share. Click the Maximum Connections button on the left. 27 Enter a number for specifying how many concurrent connections are allowed to the share. Then click the Apply button. If you set the number to 0, the FISC CDH will set no limit on the maximum connections to that share. 3.7 Renaming the CD/DVD To rename a CD disc or a CD image, please go to the Share Manager page and select Share List. 28 Click the hyperlink of the share in the Share Name column to go to a dialog window. Enter a new name and click the Apply button. Press the Close button to go to the upper menu. 3.8 Mirror Password The bundled software, eConsole, is for remotely building and burning CD images into the storage server via the network. It also has some basic server management capability. For doing any modifications on FISC CDH via eConsole, one must provide a password for authentication. From server management point-of-view, there are two levels of privileges, i.e., two kinds of passwords. A person knowing the admin password can do all actions, (for example, remote mirroring, deleting CD images and changing server IP addresses). With the mirror password, only remote mirroring/recording and (optional) image deletion are permitted. To set the passwords mentioned above, please go to the Administration Page. Click into the Server Settings page. Click the Password button on the left to enter the page for modifying the administrator’s password. Click the Mirror Password button on the left to enter the page for modifying the mirror password. 29 Chapter 4 Configuring The File Server Functions FISC CDH functions as a file server and a CD server at the same time. Each hard drive can be configured to contain either CD/DVD images (which is read-only), or files (which can be read only or read/write). This chapter describes how to configure and use the file server functions. 4.1 Initializing a HD for File Sharing This section describes how to prepare a HD for file sharing. Prior to that, if you have not enabled network protocol support, refer to section 3.1Configuring Network Settings on page 17. 4.2 1. Go to Device Manager on the Administration Page, and click a hard drive of your choice. 2. On the page, click the HD Initialize button. 3. On the HD Initialize page, select File Drive and click the OK button to initialize the chosen hard drive. Creating Partition(s) and Sharing File Volumes To use the file sharing function of the FISC CDH, you must create at least one file partition on a file device (hard disk drive). A file partition is also referred as a file volume. A volume is a basic unit for sharing and security purpose. It means only volumes can be shared to network users. Network users view a volume as a folder or a directory in the root directory of the FISC CDH. 30 1. After a hard drive is initialized as a Files Device, the HD Partition button appears just below the HD Initialize button. Click the HD Partition button. 2. On the HD Partition page, select the size of the partition and assign a name for it (default name will be like F1001). Click the OK button. 3. Repeat step 2 if you want to create more partitions. 4. Now go to the Share Manager page of the Administration Page. 5. Click the Share a Volume button on the left. You can see that the Share Enable check-box of the just-created file volume is checked. 31 4.3 Limiting User Access To File Volumes For security reasons, administrators can limit the user access for each CD/file volume. The security controls for different network protocols are different. For Windows, Macintosh and web clients, both share- and user-level security are supported. For NetWare and NFS users, only user-level security is supported. The security controls for different network protocols are independent. Let us take Windows as an example. Steps for other protocols are similar. Share Level Security control for Windows users (SMB/CIFS protocol): 1. Go to the Network Settings page on the Administration Page and click the Windows button. Make sure that the check-box of Enable Microsoft Network is checked (default setting). 2. Select Share Level Security under the Security Policy item. Click the Apply button. 3. Go to the Share Manager page and click the Share List button on the left. Click the Set 32 button in the Security column next to the share of which you would like to limit the user access. 4. On the Share Password page, select either Read Only or Full Control, and set the Share Password. Click the OK button to confirm the changes. 5. Now users have to enter the share password if they want to access the share via Network Neighborhood under Windows. User Level Security control for Windows users (SMB/CIFS protocol): 1. Go to the Network Settings page on the Administration Page and click the Windows button. Make sure that the check-box of Enable Microsoft Network is checked (default setting). 2. Select User Level Security under the Security 33 Policy item. Click the Apply button. 3. FISC CDH can authenticate users by the user accounts stored in its local user database or the PDC server on the LAN. 4. To add users to the local user database, go to the User Manager page and click the Local User button on the left. Then click the Add User button on that page. 5. On the Add New User dialog window, enter a user name and a password. Then click the Add button to add a user account. 6. Repeat the previous step if you want to add more user accounts to the local user database. Click the Close button when you are done. 7. Assign users to the permission list of a share. Go to Share Manager*Share List. Click the Set button in the Security column of the share that you would like to limit user access. 8. On the page, click the Local User button. (If you want to add PDC users, click Windows.) 9. Select users from the left-hand pane, and click the Add-> button to add users to the permission list. To remove users, select users from the right- 34 hand pane, and click the <-Remove button. 10. Assign a user’s access right by selecting RO (Read only) or RW (Read/Write) below the Privileged groups/users pane. When done with assigning users, click the Apply button. 11. Now only those users who are granted access rights are able to read or write the share via Network Neighborhood under Windows. 4.4 Renaming Volume Label and Volume Name To rename a CD disc or a CD image, please go to the Share Manager page and click the Share List button on the left. 35 Click the hyperlink of the share in the Share Name column to go to a dialog window. Enter a new name and click the Apply button. Press the Close button to go to the previous menu. 36 Chapter 5 Accessing From Different Clients The FISC CDH integrates itself into your network once the setup and configuration are completed. You can access the FISC CDH by means of the browsing and mapping tools coming with your network operating system. The following sections describe how to access the FISC CDH from your desktop in various client environments. For technical support, please consult your network administrator or dealer. 5.1 Accessing Through Web Browsers To access the FISC CDH through a web browser, simply type in the IP address of the server and press Enter to go to the user page as shown below. 5.1.1 FISC CDH User Page Server Names Tool-bar Content Page This page shows the content of the server. You can click on any folder to display its content or on any file to download it. Default Folders: there are four default folders – SYS provides access to system information files, CACHE to all cached CD images, CDROM to all CD devices and MIRROR to all mirrored images. The icons of default folders are different from 37 other folder icons. Server Names: from left to right on the top column, it shows the server names under Windows, NetWare and MacOS, respectively. Path: this list-box provides a listing of the hierarchy of the folder you are currently browsing and allows the user to quick jump to any one of the sub-directories by simply selecting a particular path name link in the list. Find: to search for a specific item in the current folder, enter the name in the field and click the "Find" button. The find result appears in the content page. Search Server: this function finds all FISC CDH servers on LAN in a pop-up window as shown below. Change Password: to change a local user password for accessing the user page. External Link: to go to the configurable web site. 5.1.2 Disabling the user access from web In case the administrator would like to prohibit users from accessing the FISC CDH via the web, he can disable this function. To do so, go to Network Settings on the Administration Page and click Web. 38 Next, un-check the Enable User Access from Web check-box and click the Apply button. 5.2 Using the FISC CDH Under Windows 95/98 From the user side, FISC CDH servers act like any computer or server on LAN. To use FISC CDH in Windows 95/98, first make sure that Windows Network support of FISC CDH is enabled. To do so, go to Network Settings on the Administration page and click Windows. Make sure that the Enable Microsoft Network check-box is checked. Click the Apply button if you make any changes. 39 5.2.1 Reading and writing from/to the FISC CDH First, make sure that the TCP/IP protocol is installed under Windows. Next, start Windows Explorer or Network Neighborhood. The FISC CDH appears as a computer icon in its workgroup. Double click the icon representing the FISC CDH. You will find all the shared folders in the FISC CDH. You can access any folders (if you have the access rights). It will prompt for user name and password if required. For example, you can write to F2001 if it is a file volume of which you have full-control access right (please see p.32 Limiting User Access To File Volumes for information about assigning access rights). 5.3 Using the FISC CDH Under Windows NT/2000 The way to use the FISC CDH under Windows NT 4.0/2000 is similar as in a Windows 95/98 environment. Double click Network Neighborhood on Desktop. Find and double click the FISC CDH server. All shared folders of the server will appear. 40 5.4 Using the FISC CDH Under NetWare clients First of all, enable the NetWare support of the FISC CDH by checking the Enable NetWare Network check-box and subsequently click Apply. You can also change the FISC CDH’s server name used under the NetWare network environment. Only user level security is available under NetWare. You must have a user account to log on to the FISC CDH and thus be able to access its content. User accounts are stored either in the local user database or in a bindery server. Also, note that you must assign user access rights for each share. If you want to add a local user account, go to the User Manager page on the Administration Page and click the Local User button on the left. If you want to authenticate by a bindery server, check the Authenticated By Bindery Server check-box on the above page, enter the name of the bindery server, username and password for logging on to that bindery server. After the FISC CDH is configured, install the appropriate protocols and clients for your platform. The network components to be installed are somewhat different on different operation systems. For example, you should installed “IPX/SPX Compatible Protocol” and “Client for NetWare Networks” in Windows 98 to access NetWare servers. Please refer to NetWare documentation for detailed information. 41 Please note that, in the NetWare network environment, there must be at least one NetWare server other than the FISC CDH on the LAN. 5.4.1.1 Network Neighborhood under Windows Open Entire Network in Network Neighborhood. Find and double click the FISC CDH server. It will prompt for a user name and a password. Enter the user name and password in either the local user database or the bindery server for authentication. Once authenticated, all shared folders of the server will appear. You can now enter those folders of which you have access rights. 5.4.1.2 DOS command line To access the FISC CDH under DOS with NetWare, you have to map the FISC CDH to a drive letter first: Syntax: Map <logical drive letter:>=<FISC CDH's NetWare server name>\<Share Name>: Example 1: To map the share "MIRROR" of a FISC CDH with server name "NCPD8FF8508" as next available drive letter, type: map n NCPD8FF8508/MIRROR: The FISC CDH will prompt you to enter your user name and password. Enter the user name and password in either the local user database or the bindery server. Then the share “MIRROR” will be mapped to a drive letter of a local machine. 42 5.5 Using The FISC CDH Under MacOS To use the FISC CDH under MacOS, first enable the Macintosh protocol support of the FISC CDH. Go to Network Settings on the Administration Page and click the Macintosh button on the left. Check the Enable Macintosh Network check-box and click the Apply button. There are two ways under MacOS to access a network server – Chooser and Network Browser. Please check the above page about the server name and the zone of the FISC CDH under Macintosh Network. 5.5.1 Accessing through Chooser The following example describes how to access the FISC CDH via Chooser of MacOS 8.6. 1. Run Chooser and click AppleShare. 43 2. Select a zone out of the AppleTalk Zones: pane. Select a server and click OK. 3. Click Connect. A dialog box as below will pop up. 4. Select a share item and click OK. A network folder will appear on Desktop. Then you can read or write to the folder depending on your access right. 44 5.5.2 Accessing through Network Browser The following example describes how to access the FISC CDH via the Network Browser of MacOS 8.6. 5.6 1. Run Network Browser. It will display all zones. 2. Click the zone where the FISC CDH is located. Double click the server. A window will pop up to display the content of the server. 3. Double click any share item that you want to access. Using The FISC CDH Under NFS Clients To use the FISC CDH under NFS clients, first enable the NFS protocol support on the FISC CDH Administration Page. Please go to the Network Settings page and click the UNIX button on the left. Check the Enable NFS check-box and click the Apply button. 45 5.6.1 How to use the FISC CDH under NFS clients The FISC CDH can export all NFS-mountable CD and file volumes to any NFS client. Below is a sample procedure of exporting a volume to a NFS client. 1. Add a routing entry in the UNIX client host table: In order to avoid the inconvenience of typing the IP address of the CD server when mounting the CD, you can add one line in "/etc/hosts" file as follows: Syntax: <FISC CDH IP Address> <FISC CDH Server Name> Example: 192.132.253.123 FISC 2. Add the mount point at the UNIX client, usually named mnt under the root directory: cd / mkdir mnt 3. Mount the FISC CDH on a UNIX client mount point A UNIX client can mount any exported volume(s) of the FISC CDH using the "mount" command. Please refer the following example for mounting "CD1" of the FISC CDH (server name FISC, IP address 192.132.253.123) on the /mnt directory of the client: # mount -o ro FISC:/cd1 /mnt (if the routing entry has been configured) or, 46 # mount -o ro 192.132.253.123:/cd1 /mnt (if the routing entry has not been configured) 4. To find out which are the exported volumes from FISC In order to find out what volumes are exported for mounting through NFS, you can issue the following command on a UNIX client: # showmount -e FISC Here is a snapshot from the FISC CDH of which the IP address is 164.164.67.2 and with 7 NFS mounted volumes. # showmount -e 164.164.67.2 Export list for 164.164.67.2: /SYS (everyone) /CACHE (everyone) /MIRROR (everyone) /CDROM (everyone) /cd01 (everyone) /cd6 (everyone) /cd7 (everyone) 5. The command to show the FISC CDH server's mount information # showmount -a FISC 6. The command to remove a mounted volume # umount /mnt 5.7 Accessing The FISC CDH Using FTP The FISC CDH supports the FTP protocol after firmware version 2.0. It can use either share level security or user level security for user authentication. The behaviors are somewhat different. To configure the security policy of FTP, go to the Network Settings page under the Administration Page and enter the FTP page where you can choose the security policy. 47 5.7.1 FTP access with share level security First, set the share password of a share. Second, use a FTP client to log on to the FISC CDH server. Use the share name as the user name, and the share password as the password. After logon, you can only see the content of the share, but not other shares. For example, assume that the FISC CDH server has an IP address of 192.168.1.2, the share name is abc and the share password is 123. We use the FTP command under DOS prompt. C:>ftp 192.168.1.2 Connected to 192.168.1.2 220 FISCCDH FTP server ready. User (192.168.1.2:none)): abc 331 Password required for abc. Password: 123 230 User abc logged in. ftp>ls 200 PORT command successful. 150 Opening ASCII mode data connection for file list. 123folder 456folder 226 Transfer complete. ftp: 15 bytes received in 0.00Seconds 15000Kbytes/sec. 48 ftp>_ 5.7.2 FTP access with user level security First, configure the user access rights of a share by assigning users to it. You can assign local users and/or remote users retrieved from the Primary Domain Controller (PDC). Second, use a FTP client to log on to the FISC CDH server. Input the user name you just assigned and its user password. After logon, you are in the root directory /. You can see all shares, but you can only enter those of which you have access rights. For example, assume that the FISC CDH server has an IP address of 192.168.1.2, and the user gary was given access right to the share abc. His user password is 123. We use the FTP command under DOS prompt. C:>ftp 192.168.1.2 Connected to 192.168.1.2 220 FISCCDH FTP server ready. User (192.168.1.2:none)): gary 331 Password required for gary. Password: 123 230 User 123 logged in. ftp>pwd 257 “/” is current directory. ftp>ls 200 PORT command successful. 150 Opening ASCII mode data connection for file list. abc CACHE CDROM MIRROR SYS 226 Transfer complete. ftp: 114 bytes received in 0.0065 Seconds 1.90Kbytes/sec. ftp>_ 49 Chapter 6 Recording CDs With a supported CD-R/RW device attached, the FISC CDH can record mirrored images into CD-R/RW discs. 6.1 Recording Mirrored Image Onto CD-R/RW Disc If connected with a supported CD-R/RW device, the FISC CDH can record (burn) a mirrored image onto a CD-R or CD-RW disc. By default, a CD-R/RW device functions as a “CD Record” device, such as the cd08 device shown below. To use cd08 to record a CD-R/RW disc, please follow the next steps. 1. Click the hyperlink cd08 to enter the CD Settings page. Please select CD Record as the Function setting. 50 2. In the Record Setting section, select one or more mirrored images in the Source sub-window. Multiple selection are permitted. 3. Select Speed. If the selected speed is higher than the capability of the CD-R/RW device, the FISC CDH will change the speed automatically. 4. Specify Number of Copies if you want burn the image onto several CD-R discs. Then choose one of the Launch Schedule items. 5. Options: “Erase CD-RW disc before recording” – if this check-box is checked, the inserted CD-RW disc will be quickly before actually going on the recording process. 6. Click now the Apply button. If you set a Launch Schedule later than the current time, the screen will show the schedule. You can click the Delete Schedule button to cancel the scheduled launch. 51 7. If the Launch Schedule is Immediately or the schedule is over due, the screen will show the CD recording progress. After the CD recording process is finished, the FISC CDH returns to the normal CD Settings page. 52 Chapter 7 RAID Configuration RAID (Redundant Array of Independent Disks) is a group of hard disks that act as one, providing fault tolerance and/or increasing performance. Although hot-swap function is not available, FISC CDH supports RAID 0, RAID 1 and RAID 5. 7.1.1.1 RAID 0 RAID level 0 is disk striping only, which interleaves data across multiple disks for better performance. It does not provide safeguards against failure. 7.1.1.2 RAID 1 RAID level 1 uses two hard drives. It keeps identical copies of data on the two hard drives. If one hard drive fails, the RAID can still operate without data loss. It offers the highest reliability, but doubles storage cost. Two hard drives can only have the capacity of one. 7.1.1.3 RAID 5 RAID level 5 uses three or more hard drives. Data, together with the parity bits, are striped across the hard drives. It is a tradeoff between fault tolerance and storage cost. RAID 5 can operate normally with one hard drive corrupted, but only have the capacity of (N-1) hard drives, where N is the number of hard drives being grouped. 7.2 Adding a RAID Group And Ungrouping It The first thing to do is to assign several hard drives as a RAID group. After being grouped, RAID acts like a normal hard drive. You can initial it as either a mirror device or a file device. A file device must be partitioned so that it can store data. Below is an example of two RAID groups. The first RAID group contains 3 hard drives; the second contains 2 hard drives. 53 To add or delete RAID groups, please go to the Administration Page and enter Device Manager. Click the Config RAID button to the left. You should see the page below. This page lists all RAID groups and their configuration. To add a RAID group, first choose its RAID level. Next, choose its RAID group members in the left sub-window – Available HD(s) and click the Add-> button. Only those hard drives with “no init” status (not initialized yet) will appear in the Available HD(s) sub-window. Last click the Setup button to create a RAID group. 54 To ungroup a RAID, click the Ungroup check-box of the RAID to be dismissed. It will prompt for confirmation. NOTE that all data in the RAID group will vanish when the RAID is ungrouped. Its RAID group members will become separate hard drives with “no init” status and appear in the device list after being ungrouped. 7.3 Initializing RAID Once created, a RAID group must be initialized as either a file device or a mirror device for operation. To initialize a RAID group, go to the Administration Page and enter Device Manager. Click the hyperlink of the RAID name that designates the RAID group, like RAID-A or RAID-B. Then click the RAID Initialize button on the left. On this page, click either Mirror Device or File Device. Click the OK button to initialize the RAID. If you choose to initialize the RAID group as a File Device, you should create partitions next by clicking the RAID Partition button on the left. 7.4 7.4.1 What If Hard Drives Fail RAID level 0 RAID level 0 only combines several hard drives as a single device (offers larger capacity) and provides no fault tolerance. A RAID group configured as RAID 0 cannot function any more if any of its hard drives fails. When any one of the hard drives of RAID 0 group is failed, the RAID group will be marked “Faulty”. In this case, it is recommend that all the content in the 55 RAID group should be backup immediately to prevent further data lost. Then replace the failed hard drive. 7.4.2 RAID level 1 & 5 RAID level 1 can still operate if one of the two hard drives fails. If that happens, the RAID group is marked “Degraded” and does not provide data protection any more. To restore a “Degraded” RAID back to the normal status, you have to replace the failed hard drive with a good one and enter the Recover page to choose this hard drive for recovering. For how to recover a RAID, please read the next section. RAID level 5 contains 3 to 8 hard drives. If one hard drive fails, the RAID group is marked “Degraded” and needs to be recovered. If two or more hard drives fail, the RAID group fail. For RAID recovering, please read the following section. 7.4.3 RAID Recovering If a hard drive of RAID 1 or RAID 5 group is corrupted, the RAID group can still function well but provides no fault tolerance. To recover a RAID group, please follow the steps as below: 1. Shut down the FISC CDH, replace the failed hard drive with a new one, and then power on the FISC CDH. 2. Go to the Administration Page and enter Device Manager. Click the hyperlink of the RAID name that is “Degraded”. 56 3. On the page, click the Recover button on the left. 4. On the Recover page, choose a hard drive in the HD List and click the Recover button. The server will start recovering data of the RAID into the selected hard drive. If two or more hard drives of RAID 1 or RAID 5 group is corrupted, the RAID group will be marked “Faulty”. It is recommend that all the content in the RAID group should be backup immediately to prevent further data lost. Then, replace the failed hard drive. 57 7.5 Things You Should Know Only “no init” hard drives can be configured as a RAID group. “no init” means “not initialized”. If you want to group an initialized hard drive, you have to go to the HD Initialized page of the hard drive to set its function back to “no init”. 58 Chapter 8 Tape Backup The FISC CDH supports ATAPI tape drives for data backup and restore. The basic unit for backup and restore is a volume. When you select a volume for backup, all folders and files in it will be backed up. There are two kinds of volumes in the FISC CDH – mirror volumes and file volumes. Each tape can store one kind of volumes, but not both. Note that the FISC CDH only supports full backup. Whenever it backs up data to a tape, any old data in that tape will be overwritten and lost. Incremental backup has not been implemented yet. 8.1 Getting Task Status To see whether the FISC CDH has any backup or restore tasks, go to the Backup page of the Administration Page. You will see the View Status page. Device Name means the name of the tape drive. Tape Label means the label of the tape inserted in the tape drive. All backup or restore tasks are shown below. The FISC CDH also keeps the event logs relating to backup or restore tasks. To see the log, go to Administration Page and enter the Event Log page. Backup events are kept in the Device Log. Here is an example. 59 8.2 Backup Volumes To back up data to a tape, click the Backup Volumes button on the left of the Backup page. 1. 2. 3. 4. 5. 6. Select a tape drive as the backup device in the Target Device list-box. Choose to back up mirror volumes or file volumes in the Source Type field. Assign the tape label for later identification. Choose the volumes to be backed up in the left sub-window. Click the Add-> button. They will appear in the right subwindow and be removed from the left sub-window. Set the backup schedule in the Launch Schedule section. Click the Apply button. 60 8.3 Restore Volumes To restore the data on the tape to the FISC CDH, click the Restore Volumes button on the left of the Backup page. 8.3.1 Restore file volumes If the tape contains files volumes, the page will be like the picture below. The default setting is to restore the volumes to their original locations. Choose the volumes to be restored in the left sub-window and click the Add-> button. Last, click the Begin Restore button. 61 To restore the volume to a location other than the original one, click the Alternative button. You will see a page as below. On this page, choose the volume to be restored in the Source Volume field. Choose the volume to restore to in the Target Volume field. Last, click the Begin Restore button. Behavior: All files in the source volume will be copied to the target volume. Files with the same name will be overwritten. 8.3.2 Restore mirror volumes If the tape stores mirror volumes, the page will be like the picture below. 62 First, choose the volumes to be restored in the left sub-window. Click the Add-> button. They will appear in the right subwindow. Next, select a hard drive the data being restored to in the Target Drive list-box. Last, click the Begin Restore button. 63 Chapter 9 Archive The FISC CDH supports both Tape Backup and Data Archiving. It is important to understand the difference between them. A backup keeps a snapshot of the hard disk or network volume. If the working copy of an important file is lost, then in the worst case, one can go back to the backup version (usually stored in tape) and retrieve the file. Note that the frequency of the backup will determine how useful the backup copy is. For example, backing up on a daily basis is a good approach if you are frequently changing the content of the hard disk or network volume. An archive stored files or volumes that are no longer need on a shortterm basis. By putting them in an archive (store in the local hard drive or CD-R/DVD disc), more free space can be released on the hard disk or network volume for other application that is frequently accessed. One can always track and find the files or volumes from the archive if the need arises. 9.1 Task List The FISC CDH can archive the data stored in either the mirror Volume or File Volume. In the Task List page of the Administration Page, information of all the on-going or scheduled data archiving tasks is displayed here. Source Volume – indicate the source volume name where the data need to be archived is located. Schedule – the starting time of the archiving task. Attribute – T = Filtered by file modified time A = Filtered by file archive bit S = Filtered by free space left C = Clear archive bit of file(s) D = Delete source file(s) B = Burn CD/DVD immediately x = Substitute only X = Substitute and delete E = Delete the image after burning successfully Status – indicate what is the status of the archiving task in progress. Delete – delete the corresponding archiving task. 64 9.2 Adding archive task To add an archive task, go to the Administration Page and enter Archive page. Click the Add Task button. The following page will be shown. This page contains all the parameters that need to be configured for FISC CDH to perform the archiving task in a proper way. 65 First, select the volume need to be archived either from the Mirror Volume or the File Volume. Note that volume selected from File Volume will be initially built into a mirrored image prior to being recorded onto a CD/DVD. Self-explanatory Filter Options are available to specify what kind of data and when the data is going to be archived. Check the Burn CD/DVD immediately after image(s) built option in the Miscellaneous field to record the archived image onto a CD/DVD disc. Specify the schedule to perform the data archiving task and choose the target CD/DVD recorder. You can split a large file into either 650MB or 4.7GB depend on the type of the media use for archive using the Split Image By option. Click Apply when finished. 9.3 Modify / Delete data archiving task To modify an archive’s task, click the ID number of the corresponding archiving task in the first column. The detail task information such as the filter option and miscellaneous selection will be shown. Click the Modify Task button and make changes. Click Apply when finished. Data archiving task can be deleted by click on the checkbox at the last column on the Task List page. 66 9.4 Image Substitution There are three options you can choose from Image Substitution – None, Substitute only and Substitute and delete. Note that Image Substitution can only operate under two conditions: 1. Volume Label Extension must be set to None 2. Archive task must be set to According to schedule Assuming the source file volume name is ABC and three consecutive archive has been done. The following images file would be created when Image Substitution is set to: None - ABC ABC001 ABC002 Å most updated image Substitute only - ABC Å most updated image ABC001 ABC002 Substitute and delete - ABC 67 Å most updated image 9.5 Example of using data archiving Here is the scenario: ACME is a graphic design house carry out business for more then 5 years. Its clients spread from local small business firm to Government agency. In order to maintain the Intellectual property right for all the design they have created during the past year, ACME keeps all their designs in their main file server for reference. Due to the nature of the graphic design that it tends to be very big in term of file size, the demand of additional storage space of the file server are tremendous. This situation has been improved significantly by purchasing a FISC CDH server in the network although demand of extra storage space is still exist. However, MIS manager in ACME found that half of the data store in the FISC CDH server are mostly being read only by looking at the log provided by the combo server. Despite the fact that ACME do perform type backup for all the data store in the server, retrieve a specific historical file can be a nightmare. Therefore, Data Archive would be the best solution for situation like this. 68 9.5.1 Archive data from File Volume MIS manager from ACME have come out a data archive scheme as follow: Archive all the files in the first level folder name PM in the source file volume name Doc_Center which is later than December 31st , 2001 Volume Label is old_doc Set Image Substitution to Substitute only Perform archive every Friday at 10:00pm Split the large image into 650MB and burn it onto a CD-R Delete source file after image of the file volume has been built Burn CD/DVD immediately after images are built Following is the configure procedure: 1. Select the source file volume contain the design files need to be archived. Note that volume selected from File Volume will be initially built into a mirrored image. 2. Enter the First level folder name - PM 3. User can let the system to determine which image drive in the system the image should be built. Default is Auto. 4. Type in the volume label – old_doc 5. Assign a volume name of the archive image as the volume label. 6. Set the Image Substitution to Substitute only 7. Set the Filter Options so that only the file later than December 31st , 2002 will be archived. 8. Check the Delete source files after archived options in Miscellaneous. 9. Check the Burn CD/DVD immediately after the image(s) are built option in Miscellaneous. 10. When you set the Image Substitution to Substitute only, archive task will be set to According to schedule automatically. Click Weekly and set the archive task to start every Friday at 10:00pm. 11. Select a CD-R device from the system. Note that, if available, multiple CD/DVD recorder can be selected from the list to perform split image archive task. 69 12. Configure to split the large image into 650MB in order to burn onto a CD-R. 13. When finish, click Apply. 70 Appendix A Glossary CD Image: a copy of a CD/DVD disc on a hard disk CD Mirror: to copy a CD image into a hard disk CD Record: to burn (record) a CD-R/RW disc from a mirrored image CD Volume: either a CD/DVD disc existing in a CD/DVD device or a CD/DVD image on a hard disk File Volume: a file partition on a hard disk drive Files Device: a hard disk configured for file reading and writing I2C Cable: a cable designed for carrying I2C signals. (I2C is a serial signal standard.) Local User Database: user accounts kept in FISC CDH locally Mirror Device: a hard disk drive configured for storing CD/DVD images (for reading purpose or recording) Share: a representation of a CD volume or a file volume when it is shared to network users Share/Volume Name: name of a shared volume or a grouping share known to network users. UTP Cable: Unshielded Twisted Cable, used to transmit signals in (Fast) Ethernet network environment Volume Label: label name of a CD/DVD disc or file partition 71 Appendix B Main Board Jumpers And Connectors J11 J14 J15 J12 GXm 21143 J13 6698 J2, J5 – for engineering purposes J3 – I2C connector J7,J8,J14,J15 - IDE connectors J12 - power connector J13 - TP (RJ-45) connector J17, J18 – LED connectors For the power LED of the tower case to work, the power LED cable has to be connected to Pin 1 and Pin 2 of the J17 connector. Pin 2 is the power source. J17 Pin 1 Pin 2 B.2 Function Power LED VCC Power Control Board (Daughter Board) Switches S2 J2 S1 ON 12 72 J16 J17 J5 5530 Flash ROM SDRAM Flash ROM SDRAM J4 J7 J8 J2 J3 J18 DIMM RTC SDRAM SDRAM B.1 Hardware Specifications DIP switch Recovery mode MFG mode S2 - 1 Down Up S2 - 2 Up Down Button S1 Pushed Reset system OFF Normal * The DIP switches S2-1 and S2-2 are mainly for manufacturing and engineering purposes. Press the S1 button to reset the server immediately. B.3 LED Indicators IDE Activity Red LAN Activity Green 10/100Mb Link Yellow / Green Power/ Fault Green / Yellow Power / Fault LED The power LED indicator (green) informs that the server power status is ON. The power LED will flash when booting up the FISC CDH. After the FISC CDH has mounted all the devices, the power LED will keep the ON status. The fault LED (yellow) indicates any system fault. 73 10/100 Mbps Link Speed LED Indicates the network speed is 100Mbps (green) or 10Mbps (yellow) LAN Activity LED Indicates any network activity IDE Activity LED Indicates any IDE channel(s) activity B.4 LED Codes Status Power/Fault LED green flash green POWER ON POWER ON SELF TEST (POST) POST ERROR Memory Error Flash Memory Checksum Error RTC Error Network Error IDE Error LOAD DEFAULT FIRMWARE UPGRADE READY orange orange orange orange orange green flash green green 74 10/100 Mb LAN Activity Link LED LED off off off off green orange off off green flash green normal normal green green green off off flash green flash green normal