1
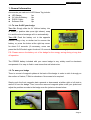
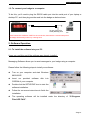
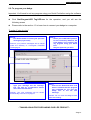
Messaging Software
User Manual
FOR
PC OPERATIONS
( Revision 2.0 )
Notes: 2 August 2004
This manual is applied to the model of
LED Name Tag only.
Caution: This product uses a magnet. People
using pacemakers or who are sensitive to magnets
should not use this device.
Programming Manual
1: General Information
Accessories per each set of LED Name Tag include:
z
z
z
z
LED Badge:
3V Lithium Battery:
RS232 Cable:
Software Disk:
1pc
1pc
1pc
1pc
1.1: To turn On/Off your badge
Turn On: Simply slide the 3V Lithium battery into
its holder (+ positive side up as right shown), snap
it in and the stored message will run automatically.
Turn Off: Push the battery out in the opposite
manner using a key or similar tool to remove the
battery, or, press the button at the right top corner
for about 2-3 seconds. (If necessary, users can
press the On/Off switch again for about 2-3 seconds to turn on the badge)
P.S: Please remove the battery out of the badge for the energy saving during a long time
off operation.
The CR2032 battery included with your name badge is very widely used for electronic
components. It is easy to find in most stores that sell electronics.
1.2: To wear your badge
There is one set of magnetic plates at the back of the badge in order to stick it strongly on
the surface of Jacket, T-Shirt or elsewhere. No screws to be required.
Simply push the front magnetic plate upwards or downwards at either right or left side to
remove it from the badge. Then, move the removed magnetic plate under your jacket and
adjust the position accords to the badge over the jacket as shown below.
- Page 2-
Programming Manual
1.3: To connect your badge to a computer
To do this, you’ll need to plug the RS232 cable port into the serial port of your laptop or
desktop PC, and then plug another end into the badge as below shown
LED Badge
Signal Cable
To one of the PC’s
COM (RS232) ports
PC
Note: Please PAY SPECIAL CARE for the connection, because the communicate port on
the badge will be easily broken by a strong force
2: Software Operation
2.1: To install the software into your PC
Users can omit this part if the software was already installed.
Messaging Software allows you to send messages to your badge using a computer.
Please follow the following steps to install your software:
z
Turn on your computer and start Windows
98/2000/XP.
z
Insert
our
provided
software
disk
into
CDROM of your computer
z
Double click the SETUP.EXE icon to start the
software installation.
z
Follow the on screen instructions to finish the
installation.
z
The operating software will be installed under the directory of “C:\Program
Files\LED TAG\”.
- Page 3-
Programming Manual
2.2: To program your badge
Important: You'll need to exit any program using your Serial Port before using the software
z
Click Star\Program\LED Tag\LED.exe for the operation, and you will see the
following screen
z
Please refer to the section 1.3 to learn how to connect your badge to a computer
To make it “step by step”
Step 2:
Pull down the bar to select your previous
messages (if you want)
Remark: your previous messages will be stored
under the directory of “C:\Program Files\LED
TAG\mytag.txt”
Step 3
Type your message into the message
box. The total no. of characters cannot
more than 120 characters.
Remark: your new messages will be stored
automatically in the file of “mytag.txt”
Step 1:
Select your COM PORT position
for the connection between PC
& the badge. You’ll need to exit
any program using your Serial
Port
Set your speed as you wish
Step 4
Click on the “Download Here” and
when it indicates that the program
has completed its run, turn the
badge over to see the new
message.
Remark: Do not move the badge around
while downloading.
- THANKS AGAIN FOR PURCHASING OUR LED PRODUCT - Page 4-