1
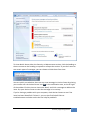
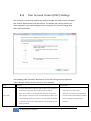
JetBox 8180 User Manual WES7E www.korenix.com 0.0.1 Copyright Notice Copyright© 2012 Korenix Technology Co., Ltd. All rights reserved. Reproduction without permission is prohibited. Information provided in this manual is intended to be accurate and reliable. However, the original manufacturer assumes no responsibility for its use, or for any infringements upon the rights of third parties that may result from its use. The material in this document is for product information only and is subject to change without notice. While reasonable efforts have been made in the preparation of this document to assure its accuracy, Korenix assumes no liabilities resulting from errors or omissions in this document, or from the use of the information contained herein. Korenix reserves the right to make changes in the product design without notice to its users. Acknowledgments Korenix is a registered trademark of Korenix Technology Co., Ltd. All other trademarks or registered marks in the manual belong to their respective manufacturers. 2 Table of Content | Korenix Table of Content Copyright Notice ............................................................................................ 2 Acknowledgments .......................................................................................... 2 Table of Content ............................................................................................................. 3 Chapter 1 Overview ................................................................................................ 4 Chapter 2 WES7E Software Specification ............................................................... 4 Chapter 3 Supporting Service ................................................................................. 7 3-1 Administrative Tools ............................................................................... 7 3-2 Network and Security............................................................................. 9 3-3 User Account Control (UAC) Settings ................................................... 12 3-4 Windows Firewall ................................................................................. 14 3-5 Device and Printer ................................................................................ 16 3-6 Serial Port Operation Mode ................................................................. 18 Chapter 4 Software Configuration ........................................................................ 18 4-1 WES7E Firmware Version ..................................................................... 19 4-2 4-3 Chapter 5 Chapter 6 File-based Write Filter (FBWF) ............................................................. 19 Recovery CD ......................................................................................... 23 Customer Service ................................................................................. 25 Revision History.................................................................................... 25 Korenix | Table of Content 3 Chapter 1 Overview The JetBox 8180 is a ready-to-use Intel Atom 1.6GHz based computer with system memory 1GB DDRII RAM and system chipset 945GSE + ICH7M. Korenix, devoted to improve the usability of embedded computer in industrial domain, integrates device drivers, protocol stacks, system utilities, supporting services for WES7E in a CompactFlash card or in a 2.5” HD and installed in the JetBox 8180 to let users experience the computer in a simple way. Combining all major interfaces, such as one Gigabit Ethernet port, four USB2.0 ports, one RS-232/422/485 port, one DVI (dual display option), and high definition audio into its compact design with DIN-rail type mounting, the JetBox 8180 communication computer provides flexible connectivity, as a result becoming a perfect front-end device for industrial applications. Chapter 2 WES7E Software Specification WES7E(Windows Embedded Standard 7 Enterprise) brings Windows 7 features to an x86 or AMD64 embedded device. With WES7E, you can build a small operating system (OS) without the features you do not need. WES7E also contains all the security, entertainment, and ease-of-use improvements found in Windows 7. Windows Embedded Standard 7 is an OS and development platform that you can use to incorporate up to 200 individual feature packages in a reduced footprint. Standard 7 takes advantage of existing development and deployment models in Windows 7 along with powerful tools in the Windows OEM Pre-installation Kit (OPK). The WES7E OS consists of the Windows Embedded Core and more than 200 packages that contain the functionality available in the Windows 7 Ultimate operating system. Each of the 200 packages in Standard 7 belongs to a category and sub-category that describe the type of functionality those packages provide, for example, the Multimedia category or the Drivers category. Each package may also belong to a dependency group. 4 Overview | Korenix Remote Desktop Protocol 7 Remote Desktop Connection is a technology that allows you to sit at a computer (sometimes called the client computer) and connect to a remote computer (sometimes called the host computer) in a different location. For example, you can connect to your work computer from your home computer and have access to all of your programs, files, and network resources as though you were in front of your computer at work. You can leave programs running at work and then, when you get home, you can see your work computer's desktop displayed on your home computer, with the same programs running. Internet Explorer 8 The Internet Explorer Web browser allows customers to connect to the Internet or to an intranet. Windows Media Player 12 Windows Media Player provides an intuitive, easy-to-use interface to play digital media files, organize your digital media collection, burn CDs of your favorite music, rip music from CDs, sync digital media files to a portable device, and shop for digital media content from online stores. DirectX 11 DirectX is a suite of multimedia technologies required by many Windows games. If your computer doesn't have the right version of DirectX installed (the product box should tell you which one you need), your game might not work properly. Data Access Components Microsoft Data Access Components .Net Framework 3.5 Includes the common language runtime (CLR) and the .NET Framework class Library. Application Support COM OLE Application Support、COM+、Win32 Application Runtime and Libraries File Based Write Filter Allows WES7E to maintain the appearance of read and write access to write sens itive or read only storage. FBWF makes read and write access transparent to app lications. Internet Information Services Technologies (IIS) 7.0 IIS 7.0 has been designed to be the most secure and flexible web and application platform from Microsoft. Microsoft has redesigned IIS from the ground and during this process the IIS team has focused on 5 major areas: Korenix | WES7E Software Specification 5 Security Extensibility Configuration and Deployment Administration and Diagnostics Performance Generic USB Input Device Support Standard USB Stack Windows Management Power Management、Group Policy Management、System Management Utilities、Windows Application Compatibility Netwroking Network and Share Center、Bluetooth、Domain Services、Telnet Server、Quality of Service、Windows Firewall Security Active Directory Right Management、Windows Security Center、Credential and Certificate Management、Windows Authorization Manager System Services Windows Installer、Remote Procedure Call、File Compression Utility User Interface Accessibility、Help and Support Engine、Speech and Text、Remote Assistance、 Search Indexing、Windows Shell Fonts Support English(UI)、Simplified Chinese、Traditional Chinese、Japanese、Western Fonts 6 WES7E Software Specification | Korenix Chapter 3 Supporting Service 3-1 Administrative Tools Administrative Tools is a folder in Control Panel that contains tools for system administrators and advanced users. The tools in the folder might vary depending on which version of Windows you are using. Click to open Administrative Tools. Many of the tools in this folder, such as Computer Management, are Microsoft Management Console (MMC) snap-ins that include their own help topics. To view specific help for an MMC tool, or to search for an MMC snap-in that you don't see in the following list, open the tool, click the Help menu, and then click Help Topics. Some common administrative tools in this folder include: Component Services Configure and administer Component Object Model (COM) components. Component Services is designed for use by developers and administrators. Korenix | Supporting Service 7 Computer Management Manage local or remote computers by using a single, consolidated desktop tool. Using Computer Management, you can perform many tasks, such as monitoring system events, configuring hard disks, and managing system performance. Data Sources (ODBC) Use Open Database Connectivity (ODBC) to move data from one type of database (a data source) to another Event Viewer View information about significant events, such as a program starting or stopping, or a security error, which are recorded in event logs. iSCSI Initiator Configure advanced connections between storage devices on a network. Local Security Policy View and edit Group Policy security settings. Performance Monitor View advanced system information about the central processing unit (CPU), memory, hard disk, and network performance. Print Management Manage printers and print servers on a network and perform other administrative tasks. Services Manage the different services that run in the background on your computer. System Configuration Identify problems that might be preventing Windows from running correctly. Task Scheduler Schedule programs or other tasks to run automatically. Windows Firewall with Advanced Security. Configure advanced firewall settings on both this computer and remote computers on your network. Windows Memory Diagnostic Check your computer's memory to see if it's functioning properly. 8 Supporting Service | Korenix 3-2 Network and Security NETWORKING Microsoft has tried simplifying its networking solutions overall in Windows 7, added more home-user features, and redesigned certain basic networking interfaces so that they actually kindly make sense. Wireless Networking Connecting to new wireless networks is something that has been made significantly easier in WES7E. In the taskbar's notifications tray, there is a wireless signal icon just like in past Windows versions. But clicking on it now brings up a list of available networks around you. You can connect to an unsecure network, or enter in your security code on a secure network and hit the Connect button. Disconnecting is just as easy. Korenix | Supporting Service 9 SECURITY WES7E ramps up security options. Vista users will still identify the mostly painless Windows Firewall and Windows Defender mainstays, but Microsoft threw in some new security features—native biometric support. Let people pick their level of User Account Control alert messages, WES7E aims for a safe but more user-friendly experience. However, by attempting to be more user-friendly, they may have inadvertently compromised some security. Action Center Action Center lists important messages about security and maintenance settings that need your attention. Red items in Action Center are labeled Important, and indicate significant issues that should be addressed soon, such as an outdated antivirus program that needs updating. Yellow items are suggested tasks that you should consider addressing, like recommended maintenance tasks. 10 Supporting Service | Korenix To view details about either the Security or Maintenance section, click the heading or the arrow next to the heading to expand or collapse the section. If you don’t want to see certain types of messages, you can choose to hide them from view. You can quickly see whether there are any new messages in Action Center by placing your mouse over the Action Center icon in the notification area, at the far right of the taskbar. Click the icon to view more detail, and click a message to address the issue. Or, open Action Center to view the message in its entirety. If you’re having a problem with your computer, check Action Center to see if the issue has been identified. If it hasn’t, you can also find helpful links to troubleshooters and other tools that can help fix problems. Korenix | Supporting Service 11 3-3 User Account Control (UAC) Settings User Account Control (UAC) notifies you before changes are made to your computer that require administrator-level permission. The default UAC setting notifies you when programs try to make changes to your computer, but you can change how often UAC notifies you. The following table provides a description of the UAC settings and the potential impact of each setting on the security of your computer. Setting Description Always notify You'll be notified before programs make changes to your computer or to Windows settings that require administrator permissions. This is the most secure setting. When you're notified, your desktop will be dimmed, and you must When you're notified, you should carefully either approve or deny the request in the UAC dialog box before you read the contents of each dialog box before can do anything else on your computer. The dimming of your desktop allowing changes to be made to your is referred to as the secure desktop because other programs can't run computer. while it's dimmed. 12 Security impact Supporting Service | Korenix Setting Description Security impact It's usually safe to allow changes to be made to Windows settings without you being Notify me only when programs try to make changes to my computer You'll be notified before programs make changes to your computer notified. However, certain programs that that require administrator permissions. come with Windows can have commands or You won't be notified if you try to make changes to Windows settings data passed to them, and malicious software that require administrator permissions. can take advantage of this by using these You'll be notified if a program outside of Windows tries to make programs to install files or change settings changes to a Windows setting. on your computer. You should always be careful about which programs you allow to run on your computer. This setting is the same as "Notify me only when programs try to make changes to my Notify me only when programs try to make that require administrator permissions. changes to my computer (do not dim computer," but you're not notified on the You'll be notified before programs make changes to your computer secure desktop. You won't be notified if you try to make changes to Windows settings secure desktop with this setting, other that require administrator permissions. my desktop) Because the UAC dialog box isn't on the programs might be able to interfere with the You'll be notified if a program outside of Windows tries to make visual appearance of the dialog box. This is a changes to a Windows setting. small security risk if you already have a malicious program running on your computer. This is the least secure setting. When you set UAC to never notify, you open up your You won't be notified before any changes are made to your computer. If you're logged on as an administrator, programs can make changes to your computer without you knowing about it. Never notify If you're logged on as a standard user, any changes that require the permissions of an administrator will automatically be denied. If you select this setting, you'll need to restart the computer to complete the process of turning off UAC. Once UAC is off, people that log on as administrator will always have the permissions of an administrator. computer to potential security risks. If you set UAC to never notify, you should be careful about which programs you run, because they'll have the same access to the computer as you do. This includes reading and making changes to protected system areas, your personal data, saved files, and anything else stored on the computer. Programs will also be able to communicate and transfer information to and from anything your computer connects with, including the Internet. Korenix | Supporting Service 13 3-4 Windows Firewall A firewall is software or hardware that checks information coming from the Internet or a network, and then either blocks it or allows it to pass through to your computer, depending on your firewall settings. Even if you think there's nothing on your computer that would interest anyone, a worm could completely disable your computer, or someone could use your computer to help spread worms or viruses to other computers without your knowledge Allow a program to communicate through Windows Firewall By default, most programs are blocked by Windows Firewall to help make your computer more secure. To work properly, some programs might require you to allow them to communicate through the firewall. Here's how to do that: Click to open Windows Firewall In the left pane, click Allow a program or feature through Windows Firewall. 14 Supporting Service | Korenix Left pane of Windows Firewall Click Change settings. If you are prompted for an administrator password or confirmation, type the password or provide confirmation. Select the check box next to the program you want to allow, select the network locations you want to allow communication on, and then click OK. Warning Before allowing a program through the firewall, make sure you understand the risks involved. Korenix | Supporting Service 15 3-5 Device and Printer Install, view, and manage your devices When you want to see all the devices connected to your computer, use one of them, or troubleshoot one that isn't working properly, open the Devices and Printers folder To open the Devices and Printers folder What’s in the Devices and Printers folder Devices displayed in the Devices and Printers folder are typically external devices you can connect to or disconnect from your computer through a port or network connection. Your computer is also displayed. Devices listed include: Portable devices you carry with you and occasionally connect to your computer, such as mobile phones, portable music players, and digital cameras. All devices you plug into a USB port on your computer, including external USB hard drives, flash drives, webcams, keyboards, and mice. All printers connected to your computer, which include printers connected by 16 Supporting Service | Korenix USB cable, the network, or wirelessly. Wireless devices connected to your computer, including Bluetooth devices and Wireless USB devices. Your computer. Compatible network devices connected to your computer, such as network-enabled scanners, media extenders, or Network Attached Storage devices (NAS devices). Note: The Devices and Printers folder can only display network devices that are able to connect to your computer. To check the compatibility of a network device, try adding it to your computer from the Devices and Printers folder. If it doesn't appear in the list of devices you can connect to, check the information that came with the device or go to the manufacturer's website. What’s not in the Devices and Printers folder The Devices and Printers folder doesn't display: Devices installed inside your computer case, such as internal hard drives, disc drives, sound cards, video cards (graphics cards), memory (RAM), processors, and other internal computer components. Speakers connected to your computer with conventional speaker wires. (USB and wireless speakers can be displayed.) Certain older devices, such as keyboards and mice connected through a PS/2 or serial port. Note: To find devices that are connected to your computer but aren't listed in the Devices and Printers folder, look in Device Manager. Device Manager lists all the hardware installed inside your computer as well as devices connected externally. Device Manager is primarily for advanced computer users and does not display icons for your devices. You must be logged on as an administrator to make any changes to device settings in Device Manager. What you can do with the Devices and Printers folder The Devices and Printers folder allows you to perform many tasks, which vary depending on the device. Here are the main tasks you can do: Add a new wireless or network device or printer to your computer. View all the external devices and printers connected to your computer. Check to see if a specific device is working properly. View information about your devices, such as make, model, and manufacturer, including detailed information about the sync capabilities of a mobile phone or Korenix | Supporting Service 17 other mobile device. Perform tasks with a device. When you right-click a device icon in the Devices and Printers folder, you can select from a list of tasks that vary depending on the capabilities of the device. For example, you might be able to see what's printing on a network printer, view files stored on a USB flash drive, or open a program from the device manufacturer. For mobile devices that support the new Device Stage feature in Windows, you can also open advanced, device-specific features in Windows from the right-click menu, such as the ability to sync with a mobile phone or change ringtones. Take steps to fix devices that aren't working properly. Troubleshoot a device with a problem Right-click a device or computer with the yellow warning icon , click Troubleshoot, wait while the troubleshooter tries to detect problems (this may take several minutes), and then follow the instructions. 3-6 Serial Port Operation Mode Please refer to the HW manual for serial port setting. Chapter 4 Software Configuration For WES7E details, you can go to Microsoft online resources for more information. The Windows Embedded Developer Center, supported by the Microsoft Developer Network (MSDN), provides detailed technical information, training, and community support: http://msdn.microsoft.com/en-US/library/ff795586(v=winembedded.0) For general product information, please visit http://www.microsoft.com/windowsembedded/en-us/default.mspx 18 Software Configuration | Korenix 4-1 WES7E Firmware Version Go to StartRun and type regedit You can check the WES7E firmware version under the directory HKEY_LOCAL_MACHINE\SOFTWARE\Korenix 4-2 File-based Write Filter (FBWF) File-Based Write Filter (FBWF) allows WES2009 to maintain the appearance of read and write access to write sensitive or read only storage. FBWF makes read and write access transparent to applications. FBWF manager The FBWF Manager is a command line tool for embedded developers to quickly integrate and prototype the FBWF. FBWF Manager is intended primarily for design time use. Korenix | Software Configuration 19 The FBWF Manager command line syntax follows: fbwfmgr [/? | /help /[switch] | /displayconfig | /overlaydetail | /enable | /disable | /addvolume [volumename] | /removevolume [volumename] [1|0] | /addexclusion [path] | /removeexclusion [path] | /setthreshold [threshold] | /setcompression [1|0] | /setpreallocation [1|0] /commit [volumename] [filepath] /restore [volumename] [filepath] ] The following table describes the command line switches. Switch Description displayconfig Displays all configuration information for the write filter including protected volumes list, overlay configuration and write through paths. The command returns: State—Indicating current filter state (enable or disable) and state for next boot. Protected Volumes—List of protected volumes including the current and next boot state. Compression—Current and next boot state for cache compression. Threshold—Current and next boot values for the overlay cache threshold. Write Through Paths—Displays a complete list of active and next boot write through paths. Pre-allocation Status—Displays current and next boot status for cache pre-allocation. overlaydetail Displays detail on the current overlay contents for all protected volumes. The command returns: Contents—Files and folders currently in the overlay for all protected volumes including sizes (size of data in overlay) and open file handles. Memory Usage—Total amount of memory being consumed by the overlay. enable Enables the write filter on the next restart. disable Disables the write filter on the next restart. addvolume Adds a volume to the protected volume list for next boot. removevolume Removes a volume from the protected volume list for next boot. addexclusion Adds a write through path to the exclusion list for next boot. 20 Software Configuration | Korenix Switch Description removeexclusion Removes a write through path from the exclusion list for next boot. setthreshold Sets the overlay threshold value for next boot. setcompression Sets overlay compression as enabled (1) or disabled (0) for next boot. setpreallocation Sets cache pre-allocation as enabled (1) or disabled (0) for next boot. commit Commits the changes made to the file to the underlying media. The volume name can either be a case-insensitive volume device name (for example, "\\Device\\HarddiskVolume1"), or a drive letter (for example, "C:" or "D:"). Note that the name is not the volume label that Windows Explorer displays before the drive letter. The file path must be an absolute path starting with "\". Note that the volume must currently be protected. Otherwise, the error message "The system cannot find the drive specified" is displayed. restore Discards the changes made to the file, that is, restores the files to its original contents from the underlying media. The volume name can either be a case-insensitive volume device name (for example, "\\Device\\HarddiskVolume1"), or a drive letter (for example, "C:" or "D:"). Note that the name is not the volume label that Windows Explorer displays before the drive letter. The file path must be an absolute path starting with "\". It must be a file. It is acceptable that the file was deleted, in which case it is recovered. Note that the volume must currently be protected. Otherwise, the error message "The system cannot find the drive specified" is displayed. ? Displays usage and help. help / [switch] Displays help information for a specific FBWF Manager switch. If no switch is provided the FBWF Manager displays all the configuration information, just like the DisplayConfig switch. Korenix | Software Configuration 21 The following table describes the input parameters. Input field Meaning volumename Full path to a volume 1 Remove exclusion list 0 Preserve exclusion list path Full file or directory path, including the drive letter. Please note that file names are passed to fbwfmgr as a command line argument, which means backslashes and double quotes are interpreted differently. For example, \”file name” becomes simply ”file name” because the first backslash acts as an escape character. To get \”file name”, specify \\”file name” on the command line. threshold Overlay threshold in MB FBWF does not resolve substituted paths, use complete file names instead. 22 Software Configuration | Korenix 4-3 Recovery CD In some severe circumstances, such as when a run-time image is corrupted, it may be necessary to start your device from a bootable CD (recovery CD). Korenix provides the recovery CD of the JetBox to install a new copy of the run-time image that was installed onto the JetBox before it left the factory. Following is the step by step to use the recovery CD: 1. Plug a USB keyboard into the JetBox 2. Plug a USB CD/DVD-ROM into the JetBox and Insert the recovery CD into the USB CD/DVD-ROM 3. Change the BIOS boot device setting of the JetBox 3.1 When the JetBox boots up, press the "Delete" key on the keyboard to enter the BIOS setting. 3.2 Choose the "Boot Device Priority" item from the "Boot" menu. 3.3 Change the "1st Boot Device" to USB CD/DVD-ROM, then save and exit BIOS setting. 4. The JetBox is booted from the USB CD/DVD-ROM and the recovery procedure runs automatically. The Recovery CD runs recovery procedure as following step Figure 1. Start Recovery Korenix | Software Configuration 23 Figure 2. Format damage Operation System Disk Figure 3. Recover Windows Embedded Standard 7 operation system 24 Software Configuration | Korenix Figure 4. Complete Recovery Procedure Chapter 5 Customer Service Korenix Technologies Co., Ltd. Business service: [email protected] Customer service: [email protected] Chapter 6 Revision History V0.0.1 by 2012/10/24 1. Modify the content of recovery CD. 2. Add WES7E software specification. Korenix | Customer Service 25