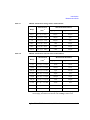
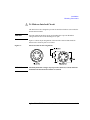
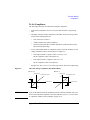
1
Agilent E5260 Series
High Speed Measurement
Solutions
Agilent E5270 Series
Precision Measurement
Solutions
User’s Guide
Agilent Technologies
Notices
© Agilent Technologies, Inc. 2004, 2005,
2007, 2009, 2011
No part of this manual may be reproduced
in any form or by any means (including
electronic storage and retrieval or translation into a foreign language) without prior
agreement and written consent from Agilent Technologies, Inc. as governed by
United States and international copyright
laws.
Manual Part Number
E5260-90000
Edition
Edition 1, October 2004
Edition 2, July 2005
Edition 3, July 2007
Edition 4, September 2009
Edition 5, August 2011
Agilent Technologies, Inc.
5301 Stevens Creek Blvd
Santa Clara, CA 95051 USA
Warranty
The material contained in this document is provided “as is,” and is subject to being changed, without notice,
in future editions. Further, to the maximum extent permitted by applicable
law, Agilent disclaims all warranties,
either express or implied, with regard
to this manual and any information
contained herein, including but not
limited to the implied warranties of
merchantability and fitness for a particular purpose. Agilent shall not be
liable for errors or for incidental or
consequential damages in connection
with the furnishing, use, or performance of this document or of any
information contained herein. Should
Agilent and the user have a separate
written agreement with warranty
terms covering the material in this
document that conflict with these
terms, the warranty terms in the separate agreement shall control.
Technology Licenses
The hardware and/or software described in
this document are furnished under a
license and may be used or copied only in
accordance with the terms of such license.
Restricted Rights Legend
If software is for use in the performance of
a U.S. Government prime contract or subcontract, Software is delivered and licensed
as “Commercial computer software” as
defined in DFAR 252.227-7014 (June 1995),
or as a “commercial item” as defined in
FAR 2.101(a) or as “Restricted computer
software” as defined in FAR 52.227-19
(June 1987) or any equivalent agency regulation or contract clause. Use, duplication
or disclosure of Software is subject to Agilent Technologies’ standard commercial
license terms, and non-DOD Departments
and Agencies of the U.S. Government will
receive no greater than Restricted Rights as
defined in FAR 52.227-19(c)(1-2) (June
1987). U.S. Government users will receive
no greater than Limited Rights as defined in
FAR 52.227-14 (June 1987) or DFAR
252.227-7015 (b)(2) (November 1995), as
applicable in any technical data.
DECLARATION OF CONFORMITY
According to EN ISO/IEC 17050-1:2004
Manufacturer’s Name:
Manufacturer’s Address:
Agilent Technologies Singapore (International) Pte. Ltd.
No. 1 Yishun Ave 7
SINGAPORE 768923 Singapore
Declares under sole responsibility that the product as originally delivered
Product Name:
Model Number:
Product Options:
8 Slot High Speed Measurement Mainframe
High Speed High Power SMU Module(Plug-in Module)
High Speed Medium Power SMU Module(Plug-in Module)
2 Channel (Medium Power, Medium Power)Source/Monitor Unit
2 Channel (High Power, Medium Power)Source/Monitor Unit
8 Slot High Speed Measurement Mainframe
Shared Source Measure Unit Mainframe
Agilent E5260A
Agilent E5290A, Agilent E5291A
Agilent E5262A, Agilent E5263A
Agilent N9200-61010, N9200-61013, Agilent P9002-61102
This declaration covers all related options of the above product(s)
complies with the essential requirements of the following applicable European Directives, and carries
the CE marking accordingly:
Low Voltage Directive (2006/95/EC)
EMC Directive (2004/108/EC)
and conforms with the following product standards
EMC
Standard
IEC 61326-1:2005 / EN 61326-1:2006
CISPR 11:2003 / EN55011:1998+A1:1999+A2 :2002
IEC 61000-4-2:2001 /EN 61000-4-2:1995+A1:1998+A2:2001
IEC 61000-4-3:2002+A1:2002/EN 61000-4-3:2002+A1:2002
IEC 61000-4-4:2004 / EN 61000-4-4:2004
IEC 61000-4-5:2001/EN 61000-4-5:1995+A1:2001
IEC 61000-4-6:2003 / EN 61000-4-6:1996+A1:2001
IEC 61000-4-11:2004 / EN 61000-4-11:2004
Limit
Group 1 Class A
4 kV CD, 8 kV AD
3 V/m / 80 MHz-1 GHz / 1.4-2 GHz, 1 V/m / 2-2.7 GHz
0.5 kV signal lines, 1 kV power lines
0.5 kV line-line, 1 kV line-ground
3 V, 0.15-80 MHz
Voltage Dip: 0 % for 1/0.5 cycle, 70 % for 25/30 cycles
Short Interruptions: 0 % for 250/300 cycles
Canada: ICES/NMB-001:2004
Australia/New Zealand: AS/NZS CISPR 11:2004
Safety
IEC 61010-1:2001 / EN 61010-1:2001
Canada: CAN/CSA-C22.2 No. 61010-1-04, NRTL/C
Supplementary Information:
The product was tested in a typical configuration with Agilent Technologies test systems.
This DoC applies to above-listed products placed on the EU market after:
Year of the CE marking ‘04
February 22, 2013
Date
Toshiyuki Kawaji
QA Manager
Agilent Technologies Hachioji Semiconductor Test Division
For further information, please contact your local Agilent Technologies sales office, agent or distributor,
or Agilent Technologies Deutschland GmbH, Herrenberger Straße 130, 71034 Böblingen, Germany.
DECLARATION OF CONFORMITY
According to EN ISO/IEC 17050-1:2004
Manufacturer’s Name:
Manufacturer’s Address:
Agilent Technologies Singapore (International) Pte. Ltd.
No. 1 Yishun Ave 7
SINGAPORE 768923
Singapore
Declares under sole responsibility that the product as originally delivered
Product Name:
Model Number:
Product Options:
8 Slot Precision Measurement Mainframe
High Power Source/Monitor Unit Module
Medium Power Source/Monitor Unit Module
Atto Level High Resolution Source/Monitor Unit Module
Atto Sense and Switch Unit
Agilent E5270B
Agilent E5280B
Agilent E5281B
Agilent E5287A
Agilent E5288A
This declaration covers all related options of the above product(s)
complies with the essential requirements of the following applicable European Directives, and carries
the CE marking accordingly:
Low Voltage Directive (2006/95/EC)
EMC Directive (2004/108/EC)
and conforms with the following product standards
EMC
Standard
IEC 61326-1:2005 / EN 61326-1:2006
CISPR 11:2003 / EN55011:1998+A1:1999+A2 :2002
IEC 61000-4-2:2001 /EN 61000-4-2:1995+A1:1998+A2:2001
IEC 61000-4-3:2002+A1:2002/EN 61000-4-3:2002+A1:2002
IEC 61000-4-4:2004 / EN 61000-4-4:2004
IEC 61000-4-5:2001/EN 61000-4-5:1995+A1:2001
IEC 61000-4-6:2003 / EN 61000-4-6:1996+A1:2001
IEC 61000-4-11:2004 / EN 61000-4-11:2004
Limit
Group 1 Class A
4 kV CD, 8 kV AD
3 V/m / 80 MHz-1 GHz / 1.4-2 GHz, 1 V/m / 2-2.7 GHz
0.5 kV signal lines, 1 kV power lines
0.5 kV line-line, 1 kV line-ground
3 V, 0.15-80 MHz
Voltage Dip: 0 % for 1/0.5 cycle, 70 % for 25/30 cycles
Short Interruptions: 0 % for 250/300 cycles
Canada: ICES/NMB-001:2004
Australia/New Zealand: AS/NZS CISPR 11:2004
Safety
IEC 61010-1:2001 / EN 61010-1:2001
Canada: CAN/CSA-C22.2 No. 61010-1-04, NRTL/C
Supplementary Information:
The product was tested in a typical configuration with Agilent Technologies test systems.
This DoC applies to above-listed products placed on the EU market after:
Year of the CE marking ‘04
February 22, 2013
Date
Toshiyuki Kawaji
QA Manager
Agilent Technologies Hachioji Semiconductor Test Division
For further information, please contact your local Agilent Technologies sales office, agent or distributor,
or Agilent Technologies Deutschland GmbH, Herrenberger Straße 130, 71034 Böblingen, Germany.
•
Herstellerbescheinigung
GERÄUSCHEMISSION
Lpa < 70 dB
am Arbeitsplatz
normaler Betrieb
nach DIN 45635 T. 19
•
Manufacturer’s Declaration
ACOUSTIC NOISE EMISSION
Lpa < 70dB
operator position
normal operation
per ISO 7779
NOTE
This ISM device complies with Canadian ICES-001.
Cet appareil ISM est conforme à la norme NMB-001 du Canada.
South Korean Class A EMC declaration
This equipment is Class A suitable for professional use and is for use in
electromagnetic environments outside of the home.
Korea’s safety and EMC mark
This product complies with the WEEE Directive (2002/96/EC) marking requirements.
The affixed label indicates that you must not discard this electrical/ electronic product
in domestic household waste.
Product Category: With reference to the equipment types in the WEEE Directive
Annex I, this product is classed as a “Monitoring and Control instrumentation”
product.
Do not dispose in domestic household waste.
To return unwanted products, contact your local Agilent office, or see
www.agilent.com/environment/product/ for more information.
Safety Summary
The following general safety precautions must be observed during all phases of
operation, service, and repair of this instrument. Failure to comply with these
precautions or with specific warnings elsewhere in this manual may impair the
protections provided by the equipment. In addition, it violates safety standards of
design, manufacture, and intended use of the instrument. Agilent Technologies, Inc.
assumes no liability for customer’s failure to comply with these requirements.
NOTE
Agilent E5260/E5270 complies with INSTALLATION CATEGORY II for mains
input and INSTALLATION CATEGORY I for measurement input terminals, and
POLLUTION DEGREE 2 defined in IEC 61010-1.
Agilent E5260/E5270 is an INDOOR USE product.
•
GROUND THE INSTRUMENT
This is Safety Class I instrument. To minimize shock hazard, the instrument
chassis and cabinet must be connected to an electrical ground. The power
terminal and the power cable must meet International Electrotechnical
Commission (IEC) safety standards.
•
DO NOT OPERATE IN AN EXPLOSIVE ATMOSPHERE
Do not operate the instrument in the presence of flammable gases or fumes.
Operation of any electrical instrument in such an environment constitutes a
definite safety hazard.
•
KEEP AWAY FROM LIVE CIRCUITS
Operation personnel must not remove instrument covers. Component
replacement and internal adjustments must be made by qualified maintenance
personnel. Do not replace components with power cable connected. Under
certain conditions, dangerous voltages may exist even with the power cable
removed. To avoid injuries, always disconnect power and discharge circuits
before touching them.
•
DO NOT SERVICE OR ADJUST ALONE
Do not attempt internal service or adjustment unless another person, capable of
rendering first aid and resuscitation, is present.
•
DO NOT SUBSTITUTE PARTS OR MODIFY INSTRUMENT
Because of the danger of introducing additional hazards, do not install substitute
parts or perform any unauthorized modification to the instrument. Return the
instrument to a Agilent Technologies Sales and Service Office for services and
repair to ensure that safety features are maintained.
•
DANGEROUS PROCEDURE WARNINGS
Warnings, such as example below, precede potentially dangerous procedures
throughout this manual. Instructions contained in the warnings must be
followed.
WARNING
Dangerous Voltage, capable of causing death, are present in this instrument.
Use extreme caution when handling, testing, and adjusting.
Safety Symbols
The general definitions of safety symbols used on equipment or in manuals are
listed below.
Instruction manual symbol: the product will be marked with this symbol when it is
necessary for the user to refer to the instruction manual in order to protect against
damage to the instrument.
Indicates dangerous voltage and potential for electrical shock. Do not touch
terminals that have this symbol when instrument is on.
Protective conductor terminal. For protection against electrical shock in case of a
fault. Used with field wiring terminals to indicate the terminal which must be
connected to ground before operating equipment.
Frame or chassis terminal. A connection to the frame (chassis) of the equipment
which normally includes all exposed metal structures.
Indicates earth (ground) terminal.
Alternating current.
Direct current.
ON (Supply).
OFF (Supply).
STANDBY (Supply).
CAT 1 Means INSTALLATION CATEGORY I. Measurement terminals on the rear panel
comply with INSTALLATION CATEGORY I.
WARNING
The warning sign denotes a hazard. It calls attention to a procedure, practice,
condition or the like, which, if not correctly performed or adhered to, could result in
injury or death to personal.
CAUTION
The caution sign denotes a hazard. It calls attention to an operating procedure,
practice, condition or the like, which, if not correctly performed or adhered to, could
result in damage to or destruction of part or all of the product.
HIGH VOLTAGE SHOCK HAZARD
The Agilent E5260/E5270 can force dangerous voltages (200 V for HPSMU, and
100 V for MPSMU) at the force, guard, and sense terminals. To prevent electric
shock hazard, the following safety precautions must be observed during the use of
the Agilent E5260/E5270.
•
Use a three-conductor AC power cable to connect cabinet (if used) and Agilent
E5260/E5270 to an electric ground (safety ground).
•
If you do not use Agilent 16442 Test Fixture, make sure to connect the INTLK
terminal to a switch that turns off when the shielding box access door is opened.
•
Confirm periodically that INTLK function works normally.
•
Before touching the connections of the force, guard, and sense terminals, turn
the Agilent E5260/E5270 off and discharge any capacitors whenever possible. If
you do not turn the Agilent E5260/E5270 off, complete “all” of the following
items, regardless of any Agilent E5260/E5270 settings.
•
•
Terminate measurement by pressing Output key, confirm that the Output
status indicator is not lit.
•
Confirm that the HIGH VOLTAGE indicator is not lit.
•
Open the shielding box access door (open the INTLK terminal).
•
Discharge any capacitors if the capacitance is connected to an SMU.
Warn workers in the vicinity of the Agilent E5260/E5270 about dangerous
conditions.
高電圧感電注意
Agilent E5260/E5270 のフォース、ガード、センス端子には、危険電圧が出力される
ことがあります(HPSMU の場合は最大± 200 Vdc、MPSMU の場合は最大± 100
Vdc)
。感電事故防止のため、必ず以下の事柄を守ってください。
•
3 極電源ケーブルを使用して Agilent E5260/E5270 を接地すること。
•
Agilent 16442 テスト・フィクスチャ以外のフィクスチャ、あるいはプローバを
使用する場合には、シールド・ボックスにインターロック回路を接続すること。
インターロック回路とは、シールド・ボックスの蓋を開けた時に Agilent
E5260/E5270 の INTLK 端子を開放にすることができる回路のことをいいます。
•
インターロック機能が正常であることを定期的に確認すること。
•
フォース、ガード、センス端子に繋がる接続部に触れる前には、測定器の電源
を切ること。また、測定系にキャパシタが接続されている場合は、キャパシタ
を放電すること。電源を切らない場合は、以下の事項を全て実施すること。
•
•
Output キーを押して Output インジケータが消灯したことを確認すること。
•
高電圧警告(HIGH VOLTAGE)インジケータが消灯していることを確認す
ること。
•
シールド・ボックスの蓋を開ける(INTLK 端子を開放する)こと。
•
キャパシタが SMU に接続されているならば、キャパシタを放電すること。
周囲のほかの作業者に対しても、高電圧危険に対する注意を徹底すること。
PRECAUTIONS POUR COMMOTION A HAUTE TENSION
Une tension dangereuse (max. ± pour HPSMU; 200 Vdc, max. ± pour MPSMU;
100 Vdc) émanant du dispositif Agilent E5260/E5270 peut être sortie aux bornes de
force, d'appareil de protection ou de détection. Les précautions suivantes doivent
être obserées contre commotion électrique accidentelle:
•
Mettre à la terre le dispositif Agilent E5260/E5270 au moyen du câble
d'alimentation tripolair.
•
En cas de hors service du dispositif d'essai, FIXTURE Agilent 16442, connecter
les bornes de verrouillage (INTLK) de façon à ce que soit ouverte lorsque le
couvercle de la boîte de blindage est ouvert.
•
Essayer périodiquement le fonctionnement normal de verrouillage.
•
Avant de toucher la partie connexion à partir des bornes de force, d'appareil de
protection et de détection, mettre hors tension le dispositif Agilent
E5260/E5270. Et, en cas de condensateurs connectés au circuit de mesure,
décharger ces condensateurs. Lorsque l'alimentation n'est pas mise hors tension,
les 4 instructions suivantes doivent être exécutées:
•
•
Finir la mésure en appuyant sur la touche “Output”; verifier que l'indicateur
“Output” n'est pas allumé.
•
S'assurer que soit allumé l'indicateur d'alarme de la haute tension.
•
Ouvrir le convercle de la boîte de blindage (Ouvrir les bornes de
verrouillage).
•
En cas de condensateurs connectés à SMU, décharger les condensateurs.
Alerter d'autres personnes autour de vous contre le danger de haute tension.
Achtung! Gefährliche Spannung
Von den Geräten Agilent E5260/E5270 können Spannungen an den Anschlüssen
“Force, Guard und Sense” von bis zu 200 V ausgehen. Um elektrischem Schlag vorzubeugen, ist bei der Benützung der Geräte Agilent E5260/E5270 folgendes zu
beachten:
•
Erden Sie das Kabinett (falls verwendet) sowie die Geräte Agilent E5260/E5270
mittels dreiadriger Netzleitungen.
•
Wenn die Meßfassung, Agilent 16442, zwar angeschlossen, jedoch nicht
verwendet wird, schließen Sie die Verriegelungsklemme (INTLK) so an, daß bei
geöffnetem Deckel die Stromzuführung zu Agilent 16442 auf jeden Fall
unterbrochen wird.
•
Vergewissern Sie sich regelmäßig daß die Verriegelungsfunktion korrekt
arbeitet.
•
Schalten Sie die Geräte Agilent E5260/E5270 aus, und entladen Sie alle
Kapazitäten bevor Sie die Anschlüsse “Force, Guard und Sense” berühren. Falls
Sie die Geräte Agilent E5260/E5270 nicht ausschalten, führen Sie unabhängig
von den Geräteeinstellungen folgende Schritt durch:
•
•
Beenden Sie die gegenwärtige Messung durch Drücken der Output Taste
(die Output Leuchtdiode erlischt).
•
Vergewissern Sie sich daß die Hochspannungswarnlampe erloschen ist.
•
Öffnen Sie den Deckel der Meßfassung Agilent 16442 (die
Verriegelungsklemme (INTLK) öffnen).
•
Entladen Sie alle an SMUs angeschlossenen Kondensatoren (falls
vorhanden).
Informieren Sie Personen in unmittelbarer Nähe der Geräte Agilent
E5260/E5270 über die Gefährlichkeit der bestehenden Hochspannung, und
sichern Sie den Zugang zum Prüfplatz zum Schutz Dritter.
In This Manual
This manual describes the front panel operation, installation, and functions of the
Agilent Technologies E5270B/E5260A/E5262A/E5263A (Agilent E5260/E5270
series). This manual consists of the following chapters:
•
Chapter 1, “Getting Started”
This chapter briefly explains how to use the Agilent E5260/E5270 by the front
panel operation.
•
Chapter 2, “Introduction”
This chapter describes overview, specifications, accessories and options of the
Agilent E5260/E5270.
•
Chapter 3, “Installation”
This chapter explains how to install the Agilent E5260/E5270, and how to
connect the device under test to a test fixture.
•
Chapter 4, “Front Panel Reference”
This chapter provides the reference information of the Agilent E5260/E5270
front panel keys.
•
Chapter 5, “Front Panel Operations”
This chapter explains how to use the Agilent E5260/E5270 in the local
condition.
•
Chapter 6, “Function Details”
This chapter explains the several functions and initial settings of the Agilent
E5260/E5270.
•
Chapter 7, “If You Have a Problem”
This chapter explains how to solve a problem if you encounter any problem, and
describes error codes.
Contents
1. Getting Started
2. Introduction
Agilent E5260/E5270 Series . . . . . . . . . . . . . . . . . . . . . . . . . . . . . . . . . . . . . . . . . 2-3
Front View . . . . . . . . . . . . . . . . . . . . . . . . . . . . . . . . . . . . . . . . . . . . . . . . . . . . . . . 2-4
. . . . . . . . . . . . . . . . . . . . . . . . . . . . . . . . . . . . . . . . . . . . . . . . . . . . . . . . . . . . 2-5
Rear View. . . . . . . . . . . . . . . . . . . . . . . . . . . . . . . . . . . . . . . . . . . . . . . . . . . . . . . . 2-7
Measurement Units . . . . . . . . . . . . . . . . . . . . . . . . . . . . . . . . . . . . . . . . . . . . . . . . 2-8
Compliance. . . . . . . . . . . . . . . . . . . . . . . . . . . . . . . . . . . . . . . . . . . . . . . . . . . . . 2-8
GNDU - Ground Unit. . . . . . . . . . . . . . . . . . . . . . . . . . . . . . . . . . . . . . . . . . . . . 2-9
E5280B Precision HPSMU . . . . . . . . . . . . . . . . . . . . . . . . . . . . . . . . . . . . . . . 2-10
E5281B Precision MPSMU . . . . . . . . . . . . . . . . . . . . . . . . . . . . . . . . . . . . . . . 2-13
E5287A Atto Level HRSMU . . . . . . . . . . . . . . . . . . . . . . . . . . . . . . . . . . . . . . 2-16
E5290A High Speed HPSMU . . . . . . . . . . . . . . . . . . . . . . . . . . . . . . . . . . . . . 2-20
E5291A High Speed MPSMU . . . . . . . . . . . . . . . . . . . . . . . . . . . . . . . . . . . . . 2-23
Specifications . . . . . . . . . . . . . . . . . . . . . . . . . . . . . . . . . . . . . . . . . . . . . . . . . . . 2-26
Introduction . . . . . . . . . . . . . . . . . . . . . . . . . . . . . . . . . . . . . . . . . . . . . . . . . . . 2-26
Hardware . . . . . . . . . . . . . . . . . . . . . . . . . . . . . . . . . . . . . . . . . . . . . . . . . . . . . 2-28
Functions . . . . . . . . . . . . . . . . . . . . . . . . . . . . . . . . . . . . . . . . . . . . . . . . . . . . . 2-45
General Specifications . . . . . . . . . . . . . . . . . . . . . . . . . . . . . . . . . . . . . . . . . . . 2-49
Accessories and Options . . . . . . . . . . . . . . . . . . . . . . . . . . . . . . . . . . . . . . . . . . . 2-50
3. Installation
. . . . . . . . . . . . . . . . . . . . . . . . . . . . . . . . . . . . . . . . . . . . . . . . . . . . . . . . . . . . 3-2
Requirements . . . . . . . . . . . . . . . . . . . . . . . . . . . . . . . . . . . . . . . . . . . . . . . . . . . . 3-3
Power Requirements . . . . . . . . . . . . . . . . . . . . . . . . . . . . . . . . . . . . . . . . . . . . . 3-3
Operating Environment . . . . . . . . . . . . . . . . . . . . . . . . . . . . . . . . . . . . . . . . . . . 3-3
Storaging/Shipping Environment . . . . . . . . . . . . . . . . . . . . . . . . . . . . . . . . . . . 3-3
Agilent E5260/E5270 User’s Guide, Edition 5
Contents
Ventilation Requirements . . . . . . . . . . . . . . . . . . . . . . . . . . . . . . . . . . . . . . . . . 3-4
Power Cable . . . . . . . . . . . . . . . . . . . . . . . . . . . . . . . . . . . . . . . . . . . . . . . . . . . 3-4
Inspection and Installation. . . . . . . . . . . . . . . . . . . . . . . . . . . . . . . . . . . . . . . . . . .
To Inspect the Agilent E5260/E5270 and Accessories . . . . . . . . . . . . . . . . . . .
To Check the Agilent E5260/E5270 Operation . . . . . . . . . . . . . . . . . . . . . . . .
To Execute Diagnostics and Self-calibration . . . . . . . . . . . . . . . . . . . . . . . . . .
To Remove or Install Plug-in Module . . . . . . . . . . . . . . . . . . . . . . . . . . . . . . . .
3-6
3-6
3-7
3-7
3-8
Installing Accessories . . . . . . . . . . . . . . . . . . . . . . . . . . . . . . . . . . . . . . . . . . . . .
To Connect 16442B Test Fixture . . . . . . . . . . . . . . . . . . . . . . . . . . . . . . . . . . .
To Connect Connector Plate . . . . . . . . . . . . . . . . . . . . . . . . . . . . . . . . . . . . . .
...........................................................
To Connect ASU . . . . . . . . . . . . . . . . . . . . . . . . . . . . . . . . . . . . . . . . . . . . . . .
To Connect GNDU Adapter. . . . . . . . . . . . . . . . . . . . . . . . . . . . . . . . . . . . . . .
3-10
3-11
3-13
3-15
3-16
3-20
Mounting Connectors . . . . . . . . . . . . . . . . . . . . . . . . . . . . . . . . . . . . . . . . . . . . .
To Make an Interlock Circuit . . . . . . . . . . . . . . . . . . . . . . . . . . . . . . . . . . . . .
To Connect the GNDU Output . . . . . . . . . . . . . . . . . . . . . . . . . . . . . . . . . . . .
To Connect the SMU Output . . . . . . . . . . . . . . . . . . . . . . . . . . . . . . . . . . . . . .
3-21
3-23
3-26
3-27
Connecting Measurement Devices . . . . . . . . . . . . . . . . . . . . . . . . . . . . . . . . . . . 3-29
Using Test Fixture . . . . . . . . . . . . . . . . . . . . . . . . . . . . . . . . . . . . . . . . . . . . . . 3-30
Using Connector Plate . . . . . . . . . . . . . . . . . . . . . . . . . . . . . . . . . . . . . . . . . . . 3-32
Maintenance. . . . . . . . . . . . . . . . . . . . . . . . . . . . . . . . . . . . . . . . . . . . . . . . . . . . .
Calibration . . . . . . . . . . . . . . . . . . . . . . . . . . . . . . . . . . . . . . . . . . . . . . . . . . . .
Cleaning . . . . . . . . . . . . . . . . . . . . . . . . . . . . . . . . . . . . . . . . . . . . . . . . . . . . .
Self-test and Diagnostics . . . . . . . . . . . . . . . . . . . . . . . . . . . . . . . . . . . . . . . . .
3-36
3-36
3-36
3-37
4. Front Panel Reference
Display and Front Panel Keys . . . . . . . . . . . . . . . . . . . . . . . . . . . . . . . . . . . . . . . . 4-3
Display Images. . . . . . . . . . . . . . . . . . . . . . . . . . . . . . . . . . . . . . . . . . . . . . . . . . 4-3
Front Panel Key Locations. . . . . . . . . . . . . . . . . . . . . . . . . . . . . . . . . . . . . . . . . 4-5
Agilent E5260/E5270 User’s Guide, Edition 5
Contents
Channel Status Area . . . . . . . . . . . . . . . . . . . . . . . . . . . . . . . . . . . . . . . . . . . . . . 4-6
Setup Data Area . . . . . . . . . . . . . . . . . . . . . . . . . . . . . . . . . . . . . . . . . . . . . . . . . 4-7
Measurement Data Area . . . . . . . . . . . . . . . . . . . . . . . . . . . . . . . . . . . . . . . . . . . 4-8
Status Data Area . . . . . . . . . . . . . . . . . . . . . . . . . . . . . . . . . . . . . . . . . . . . . . . . . 4-9
Front Panel Key Details . . . . . . . . . . . . . . . . . . . . . . . . . . . . . . . . . . . . . . . . . . . . 4-10
Measure key group . . . . . . . . . . . . . . . . . . . . . . . . . . . . . . . . . . . . . . . . . . . . . . 4-11
Output key group . . . . . . . . . . . . . . . . . . . . . . . . . . . . . . . . . . . . . . . . . . . . . . . 4-14
Edit key group . . . . . . . . . . . . . . . . . . . . . . . . . . . . . . . . . . . . . . . . . . . . . . . . . 4-17
Setup Menus. . . . . . . . . . . . . . . . . . . . . . . . . . . . . . . . . . . . . . . . . . . . . . . . . . . . . 4-18
Setup Menu. . . . . . . . . . . . . . . . . . . . . . . . . . . . . . . . . . . . . . . . . . . . . . . . . . . . 4-18
Calibration and Test Menu . . . . . . . . . . . . . . . . . . . . . . . . . . . . . . . . . . . . . . . . 4-25
Measurement Range Setup Menu. . . . . . . . . . . . . . . . . . . . . . . . . . . . . . . . . . . 4-31
Output Range Setup Menu . . . . . . . . . . . . . . . . . . . . . . . . . . . . . . . . . . . . . . . . 4-32
5. Front Panel Operations
Available Functions . . . . . . . . . . . . . . . . . . . . . . . . . . . . . . . . . . . . . . . . . . . . . . . . 5-3
Setting Up Agilent E5260/E5270 . . . . . . . . . . . . . . . . . . . . . . . . . . . . . . . . . . . . . 5-4
To Set Line Frequency . . . . . . . . . . . . . . . . . . . . . . . . . . . . . . . . . . . . . . . . . . . . 5-5
To Initialize Agilent E5260/E5270. . . . . . . . . . . . . . . . . . . . . . . . . . . . . . . . . . . 5-5
To Set Beeper . . . . . . . . . . . . . . . . . . . . . . . . . . . . . . . . . . . . . . . . . . . . . . . . . . . 5-5
To Apply Default Value . . . . . . . . . . . . . . . . . . . . . . . . . . . . . . . . . . . . . . . . . . . 5-5
To Select Monitor Items . . . . . . . . . . . . . . . . . . . . . . . . . . . . . . . . . . . . . . . . . . . 5-6
To Perform Self-test . . . . . . . . . . . . . . . . . . . . . . . . . . . . . . . . . . . . . . . . . . . . . . 5-7
To Perform Self-Calibration . . . . . . . . . . . . . . . . . . . . . . . . . . . . . . . . . . . . . . . . 5-8
To Perform Diagnostics . . . . . . . . . . . . . . . . . . . . . . . . . . . . . . . . . . . . . . . . . . . 5-9
To Set Auto-Calibration . . . . . . . . . . . . . . . . . . . . . . . . . . . . . . . . . . . . . . . . . . 5-11
To Set ADC Zero Function. . . . . . . . . . . . . . . . . . . . . . . . . . . . . . . . . . . . . . . . 5-11
To Read Error Message . . . . . . . . . . . . . . . . . . . . . . . . . . . . . . . . . . . . . . . . . . 5-12
To Display Firmware Revision. . . . . . . . . . . . . . . . . . . . . . . . . . . . . . . . . . . . . 5-12
To Display Module Information . . . . . . . . . . . . . . . . . . . . . . . . . . . . . . . . . . . . 5-13
Agilent E5260/E5270 User’s Guide, Edition 5
Contents
To Display Module Serial Number . . . . . . . . . . . . . . . . . . . . . . . . . . . . . . . . .
To Set GPIB Address . . . . . . . . . . . . . . . . . . . . . . . . . . . . . . . . . . . . . . . . . . . .
To Set Remote Display Mode . . . . . . . . . . . . . . . . . . . . . . . . . . . . . . . . . . . . .
To Return to Local Mode . . . . . . . . . . . . . . . . . . . . . . . . . . . . . . . . . . . . . . . . .
5-13
5-14
5-14
5-14
Applying Source Output . . . . . . . . . . . . . . . . . . . . . . . . . . . . . . . . . . . . . . . . . . .
To Apply DC Current/Voltage . . . . . . . . . . . . . . . . . . . . . . . . . . . . . . . . . . . . .
To Set Output/Compliance Value. . . . . . . . . . . . . . . . . . . . . . . . . . . . . . . . . . .
To Set Source Output to Zero. . . . . . . . . . . . . . . . . . . . . . . . . . . . . . . . . . . . . .
To Set Output Range . . . . . . . . . . . . . . . . . . . . . . . . . . . . . . . . . . . . . . . . . . . .
To Use Series Resistor . . . . . . . . . . . . . . . . . . . . . . . . . . . . . . . . . . . . . . . . . . .
To Use Filter. . . . . . . . . . . . . . . . . . . . . . . . . . . . . . . . . . . . . . . . . . . . . . . . . . .
To Switch ASU Internal Connection . . . . . . . . . . . . . . . . . . . . . . . . . . . . . . . .
5-15
5-16
5-17
5-18
5-18
5-19
5-19
5-20
Making Measurement . . . . . . . . . . . . . . . . . . . . . . . . . . . . . . . . . . . . . . . . . . . . .
To Measure DC Current/Voltage . . . . . . . . . . . . . . . . . . . . . . . . . . . . . . . . . . .
To Abort Measurement . . . . . . . . . . . . . . . . . . . . . . . . . . . . . . . . . . . . . . . . . .
To Select Measurement Item . . . . . . . . . . . . . . . . . . . . . . . . . . . . . . . . . . . . . .
To Select Measurement Range. . . . . . . . . . . . . . . . . . . . . . . . . . . . . . . . . . . . .
To Set A/D Converter. . . . . . . . . . . . . . . . . . . . . . . . . . . . . . . . . . . . . . . . . . . .
To Set Wait Time . . . . . . . . . . . . . . . . . . . . . . . . . . . . . . . . . . . . . . . . . . . . . . .
To Set Data Display Format. . . . . . . . . . . . . . . . . . . . . . . . . . . . . . . . . . . . . . .
5-21
5-22
5-23
5-23
5-24
5-25
5-27
5-28
6. Function Details
Measurement Mode . . . . . . . . . . . . . . . . . . . . . . . . . . . . . . . . . . . . . . . . . . . . . . . . 6-3
Measurement Mode in Local Condition . . . . . . . . . . . . . . . . . . . . . . . . . . . . . . 6-3
Measurement Mode in Remote Condition . . . . . . . . . . . . . . . . . . . . . . . . . . . . . 6-4
Ranging Mode . . . . . . . . . . . . . . . . . . . . . . . . . . . . . . . . . . . . . . . . . . . . . . . . . . . .
To Set the Ranging Mode. . . . . . . . . . . . . . . . . . . . . . . . . . . . . . . . . . . . . . . . . .
Auto Ranging . . . . . . . . . . . . . . . . . . . . . . . . . . . . . . . . . . . . . . . . . . . . . . . . . .
Limited Auto Ranging . . . . . . . . . . . . . . . . . . . . . . . . . . . . . . . . . . . . . . . . . . . .
Fixed Range . . . . . . . . . . . . . . . . . . . . . . . . . . . . . . . . . . . . . . . . . . . . . . . . . . . .
6-5
6-5
6-6
6-7
6-7
Agilent E5260/E5270 User’s Guide, Edition 5
Contents
Compliance Range . . . . . . . . . . . . . . . . . . . . . . . . . . . . . . . . . . . . . . . . . . . . . . . 6-7
Enhanced Auto Ranging for Current Measurement . . . . . . . . . . . . . . . . . . . . . . 6-8
Compliance . . . . . . . . . . . . . . . . . . . . . . . . . . . . . . . . . . . . . . . . . . . . . . . . . . . . . . 6-9
Polarity and Output Area . . . . . . . . . . . . . . . . . . . . . . . . . . . . . . . . . . . . . . . . . . 6-9
Power Compliance . . . . . . . . . . . . . . . . . . . . . . . . . . . . . . . . . . . . . . . . . . . . . . 6-11
To Set Compliance . . . . . . . . . . . . . . . . . . . . . . . . . . . . . . . . . . . . . . . . . . . . . . 6-13
SMU Pulse . . . . . . . . . . . . . . . . . . . . . . . . . . . . . . . . . . . . . . . . . . . . . . . . . . . . . . 6-15
To Set Pulse Output . . . . . . . . . . . . . . . . . . . . . . . . . . . . . . . . . . . . . . . . . . . . . 6-15
Measurement Time . . . . . . . . . . . . . . . . . . . . . . . . . . . . . . . . . . . . . . . . . . . . . . . 6-16
Integration Time . . . . . . . . . . . . . . . . . . . . . . . . . . . . . . . . . . . . . . . . . . . . . . . . 6-16
Overhead Time . . . . . . . . . . . . . . . . . . . . . . . . . . . . . . . . . . . . . . . . . . . . . . . . . 6-18
To Specify Source Output Time . . . . . . . . . . . . . . . . . . . . . . . . . . . . . . . . . . . . 6-18
Wait Time . . . . . . . . . . . . . . . . . . . . . . . . . . . . . . . . . . . . . . . . . . . . . . . . . . . . . 6-19
Atto Sense and Switch Unit . . . . . . . . . . . . . . . . . . . . . . . . . . . . . . . . . . . . . . . . . 6-20
Filter . . . . . . . . . . . . . . . . . . . . . . . . . . . . . . . . . . . . . . . . . . . . . . . . . . . . . . . . . . 6-22
Series Resistor . . . . . . . . . . . . . . . . . . . . . . . . . . . . . . . . . . . . . . . . . . . . . . . . . . . 6-23
Interlock Function . . . . . . . . . . . . . . . . . . . . . . . . . . . . . . . . . . . . . . . . . . . . . . . . 6-24
Auto Power Off Function. . . . . . . . . . . . . . . . . . . . . . . . . . . . . . . . . . . . . . . . . . . 6-25
Initial Settings . . . . . . . . . . . . . . . . . . . . . . . . . . . . . . . . . . . . . . . . . . . . . . . . . . . 6-26
7. If You Have a Problem
When You Install the E5260/E5270. . . . . . . . . . . . . . . . . . . . . . . . . . . . . . . . . . . . 7-3
If the E5260/E5270 cannot be Powered on . . . . . . . . . . . . . . . . . . . . . . . . . . . . 7-3
To Simplify the Connections . . . . . . . . . . . . . . . . . . . . . . . . . . . . . . . . . . . . . . . 7-3
When You Make a Measurement . . . . . . . . . . . . . . . . . . . . . . . . . . . . . . . . . . . . . . 7-4
If Leaving Connections Damages Devices after Measurement . . . . . . . . . . . . . 7-4
If Measured Value Oscillates when Measuring High-Frequency Devices. . . . . 7-5
If Measured Value Oscillates when Measuring Negative Resistance . . . . . . . . 7-6
Agilent E5260/E5270 User’s Guide, Edition 5
Contents
If Noise Affects the Measured Values . . . . . . . . . . . . . . . . . . . . . . . . . . . . . . . .
If Measured Voltage has some Error when Forcing a Large Current. . . . . . . . .
If Large Current Causes High Temperature (Thermal Drift) . . . . . . . . . . . . . . .
If Measurement Takes More Time than Specified . . . . . . . . . . . . . . . . . . . . . . .
If Measurement Damages the Device under Test . . . . . . . . . . . . . . . . . . . . . . .
7-7
7-8
7-8
7-8
7-9
Channel Status Code . . . . . . . . . . . . . . . . . . . . . . . . . . . . . . . . . . . . . . . . . . . . . . 7-10
Error Codes . . . . . . . . . . . . . . . . . . . . . . . . . . . . . . . . . . . . . . . . . . . . . . . . . . . . . 7-11
Operation Error . . . . . . . . . . . . . . . . . . . . . . . . . . . . . . . . . . . . . . . . . . . . . . . . 7-11
Self-test/Calibration Error . . . . . . . . . . . . . . . . . . . . . . . . . . . . . . . . . . . . . . . . 7-20
Agilent E5260/E5270 User’s Guide, Edition 5
1
Getting Started
Getting Started
This chapter describes the basic operations of the Agilent E5260/E5270. Before
learning details of the Agilent E5260/E5270, let’s try to use the Agilent
E5260/E5270 briefly. The operations need the Agilent E5260/E5270 and power
cable only. During the operations, open the measurement terminals.
Basic Operations:
1. “Turning on the Agilent E5260/E5270”
2. “Setting up SMU1, forcing DC voltage, and measuring DC current”
3. “Setting up SMU2, forcing DC voltage, and measuring DC current”
4. “Stopping measurement”
5. “Executing a spot measurement, and starting repeat measurement”
6. “Changing source output value during repeat measurement”
7. “Changing measurement item during repeat measurement”
8. “Stopping source output and measurement”
1-2
Agilent E5260/E5270 User’s Guide, Edition 5
Getting Started
Agilent E5260/E5270 Front Panel:
NOTE
Front Panel Keys
The Agilent E5260/E5270 has 24 front panel keys. The front panel keys are located
as shown below. Front panel operation is available when the Agilent E5260/E5270
is in the local condition.
Local
Cal/ Test
Menu
Restore
Zero
Volt
Output
Measure
Reset
Meas
Ch
Meas
Range
Out
Ch
Single
OUT
Value
AD
Meas
Item
Exit
Shift
SerRes
IntegTime Abort
Integ
Out
Range
Edit
Repeat
On/
Off
AUX On/Off Filter
CPL
V/ I
Value
Fast
Def
Value
Enter
The Agilent E5260A/E5262A/E5263A do not have the “AD” and “AUX On/Off”
shift keys.
Agilent E5260/E5270 User’s Guide, Edition 5
1-3
Getting Started
Step 1. Turning on the Agilent E5260/E5270
Connect the power cable from the Agilent E5260/E5270 to an AC power outlet, and
press the Line switch.
After the self-calibration, the LCD shows the following display:
Stat
Meas Value #1
OFF
Meas Value #2
A
Remote Lock Meas Trigger Error Integ Output Repeat
1
1
M- ch
S- ch
Setting Parameter
Shift
OUT: 0.00 V
CPL: 100.0uA
Step 2. Setting up SMU1, forcing DC voltage, and measuring DC current
1. Press the CPL Value key. A cursor appears on the lowest digit of the integral part
of the CPL value. The CPL shows the compliance value.
2. Press the Right arrow key to move the cursor on the arithmetic point.
3. Press the Up arrow key to set the CPL value to 100 mA, and press the Enter key
to fix the value. Then press the Enter key again. The cursor disappears.
4. Press the On/Off key. The SMU1 starts voltage output.
5. Press the Repeat key. The SMU1 starts current measurement.
In the following example, the measured data is just an example. During the repeat
measurement, you may not be able to read the measured data.
Stat
NOTE
Meas Value #1
Meas Value #2
0.00020nA
A
1
1
Remote Lock Meas Trigger Error Integ Output Repeat
M- ch
S- ch
Setting Parameter
Shift
OUT: 0.00 V
CPL: 100.0mA
The Output indicator shows that DC voltage or current is applied by the channel
specified by the S-ch indicator.
The Repeat indicator shows that the repeat measurement mode is set.
The Meas indicator shows that the measurement channel is performing the
measurement. You will see the indicator if the measurement time is long enough to
display the indicator. Even if the channel performs repeat measurement, you will not
see the indicator if the time to measure one data item is too short to display the
indicator.
1-4
Agilent E5260/E5270 User’s Guide, Edition 5
Getting Started
Step 3. Setting up SMU2, forcing DC voltage, and measuring DC current
1. Press the OutCh key until the S-ch status area displays 2. The SMU2 setup
information is displayed in the Setting Parameter area.
2. Press the MeasCh key until the M-ch status area displays 2. The Meas Value area
displays ------ (no data to display status).
3. Press the CPL Value key. The cursor appears on the lowest digit of the integral
part of the CPL value. The CPL shows the compliance value.
4. Press the Right arrow key to move the cursor on the arithmetic point.
5. Press the Up arrow key to set the CPL value to 100 mA, and press the Enter key
to fix the value. Then press the Enter key again. The cursor disappears.
6. Press the On/Off key. The SMU2 starts voltage output and current measurement.
In the following example, the measured data is just an example. During the repeat
measurement, you may not be able to read the measured data.
Stat
Meas Value # 1
Meas Value # 2
0.00010nA
A
2
2
Remote Lock Meas Trigger Error Integ Output Repeat
M- ch
S- ch
Setting Parameter
Shift
OUT: 0.00 V
CPL: 100.0mA
Step 4. Stopping measurement
Press the Single key. The SMU2 stops the measurement. However, the source output
is still effective.
The LCD changes the display as shown below. The following data is just an
example.
Stat
Meas Value #1
Meas Value #2
0.00015nA
A
2
2
Remote Lock Meas Trigger Error Integ Output Repeat
M- ch
S- ch
Agilent E5260/E5270 User’s Guide, Edition 5
Setting Parameter
Shift
OUT: 0.00 V
CPL: 100.0mA
1-5
Getting Started
Step 5. Executing a spot measurement, and starting repeat measurement
1. Press the Single key to execute the spot measurement.
2. Press the Repeat key to start the repeat measurement again.
The LCD changes the display as shown below. The following data is just an
example.
Stat
Meas Value #1
Meas Value #2
0.00025nA
A
2
2
Remote Lock Meas Trigger Error Integ Output Repeat
M- ch
S- ch
Setting Parameter
Shift
OUT: 0.00 V
CPL: 100.0mA
Step 6. Changing source output value during repeat measurement
1. Press the OUT Value key. The cursor appears on the lowest digit of the integral
part of the OUT value. OUT shows the source output value.
2. Press the arrow keys and set the OUT value to 1.500 V. The value is applied to
the output immediately. Then press the Enter key. The cursor disappears.
Use the Up or Down arrow key to change the output value, and use the Left or
Right arrow key to change the digit the cursor specifies.
The LCD changes the display as shown below. The following data is just an
example.
Stat
Meas Value #1
Meas Value #2
0.00010nA
A
2
2
Remote Lock Meas Trigger Error Integ Output Repeat
M- ch
S- ch
1-6
Setting Parameter
Shift
OUT: 1.500 V
CPL: 100.0mA
Agilent E5260/E5270 User’s Guide, Edition 5
Getting Started
Step 7. Changing measurement item during repeat measurement
1. Press the MeasItem key. The voltage measurement data is also displayed as
shown below. The following data is just an example.
Stat
Meas Value # 1
0.00015nA
A
Meas Value # 2
1.50020 V
2 2
Remote Lock Meas Trigger Error Integ Output Repeat
M- ch
Setting Parameter
Shift
OUT: 1.500 V
CPL: 100.0mA
S- ch
2. Press the MeasItem key. The measurement data is changed to the calculated
resistance value (= Measured Voltage / Measured Current) as shown below.
The following data is just an example.
Stat
Meas Value #1
Meas Value #2
1.000E+13Ω
A
Remote Lock Meas Trigger Error Integ Output Repeat
2
2
M- ch
S- ch
Setting Parameter
Shift
OUT: 1.500 V
CPL: 100.0mA
3. Press the MeasItem key. The measurement data is changed to the calculated
power value (= Measured Voltage × Measured Current) as shown below.
The following data is just an example.
Stat
Meas Value #1
Meas Value #2
2.250E-13W
A
Remote Lock Meas Trigger Error Integ Output Repeat
2
2
M- ch
S- ch
Agilent E5260/E5270 User’s Guide, Edition 5
Setting Parameter
Shift
OUT: 1.500 V
CPL: 100.0mA
1-7
Getting Started
Step 8. Stopping source output and measurement
1. Press the On/Off key. The SMU2 stops source output and measurement.
Stat
Meas Value # 1
Meas Value # 2
OFF
A
Remote Lock Meas Trigger Error Integ Output Repeat
2
2
M- ch
S- ch
Setting Parameter
Shift
OUT: 1.500 V
CPL: 100.0mA
2. Press the OutCh key repeatedly until the S-ch status area displays 1. The SMU1
setup information is displayed in the Setting Parameter area.
Stat
Meas Value #1
OFF
Meas Value #2
A
Remote Lock Meas Trigger Error Integ Output Repeat
2
1
M- ch
S- ch
Setting Parameter
Shift
OUT: 0.00 V
CPL: 100.0mA
3. Press the MeasCh key repeatedly until the M-ch status area displays 1. The
SMU1 measurement data is displayed in the Meas Value area.
The LCD changes the display as shown below. The following data is just an
example.
Stat
Meas Value #1
Meas Value #2
0.00030nA
A
1
1
Remote Lock Meas Trigger Error Integ Output Repeat
M- ch
S- ch
Setting Parameter
Shift
OUT: 0.00 V
CPL: 100.0mA
4. Press the On/Off key. The SMU1 stops source output and measurement.
Stat
Meas Value #1
OFF
Meas Value #2
A
Remote Lock Meas Trigger Error Integ Output Repeat
1-8
1
1
M- ch
S- ch
Setting Parameter
Shift
OUT: 0.00 V
CPL: 100.0mA
Agilent E5260/E5270 User’s Guide, Edition 5
2
Introduction
Introduction
This chapter describes the basic functions and features of the Agilent E5270B/
E5260A/E5262A/E5263A (Agilent E5260/E5270 series), and consists of the
following sections:
•
“Agilent E5260/E5270 Series”
•
“Front View”
•
“Rear View”
•
“Measurement Units”
•
“Specifications”
•
“Accessories and Options”
2-2
Agilent E5260/E5270 User’s Guide, Edition 5
Introduction
Agilent E5260/E5270 Series
Agilent E5260/E5270 Series
The Agilent E5260/E5270 series is an electronic instrument for the semiconductor
DC parametric measurement. The Agilent E5260/E5270 provides the LCD and front
panel keys for applying/measuring DC voltage or current. The Agilent
E5260/E5270 also provides several functions, such as sweep output, pulse output,
and trigger functions, in the GPIB remote condition. For these functions, refer to
Programming Guide.
The Agilent E5260/E5270 series distributes the following products:
•
Agilent E5270B 8 Slot Precision Measurement Mainframe
Equipped with a ground unit (GNDU) and eight empty slots for the following
modules:
•
Agilent E5280B Precision High Power Source/Monitor Unit Module
High power SMU module for the E5270B. Occupies two slots.
•
Agilent E5281B Precision Medium Power Source/Monitor Unit Module
Medium power SMU module for the E5270B. Occupies one slot.
•
Agilent E5287A Atto Level High Resolution Source/Monitor Unit Module
High resolution SMU module for the E5270B. Occupies one slot. Needs
Agilent E5288A Atto Sense and Switch Unit (ASU) to perform atto level
current measurement.
•
Agilent E5260A 8 Slot High Speed Measurement Mainframe
Equipped with a GNDU and eight empty slots for the following modules:
•
Agilent E5290A High Speed High Power Source/Monitor Unit Module
High power SMU module for the E5260A. Occupies two slots.
•
Agilent E5291A High Speed Medium Power Source/Monitor Unit Module
Medium power SMU module for the E5260A. Occupies one slot.
•
Agilent E5262A 2 Channel (MP/MP) Source/Monitor Unit
Equipped with two high speed MPSMUs and a GNDU.
•
Agilent E5263A 2 Channel (HP/MP) Source/Monitor Unit
Equipped with a high speed HPSMU, a high speed MPSMU, and a GNDU.
Agilent E5260/E5270 User’s Guide, Edition 5
2-3
Introduction
Front View
Front View
This section describes the front view of the Agilent E5260/E5270 series.
•
Line switch
Use the Line switch to turn the E5260/E5270 on and off.
•
LCD
Displays the status information, measurement data, source output data, and so
on. For details, refer to Chapter 4, “Front Panel Reference.”
•
Front panel keys
Use the front panel keys to set the source output, to perform measurement, and
so on. For details, refer to Chapter 4, “Front Panel Reference.”
•
HIGH VOLTAGE indicator
This indicator lights when a channel applies more than ± 42 V.
•
GNDU terminal
0 V constant voltage source. Used for the reference of measurement ground.
Triaxial connector. Refer to “GNDU - Ground Unit” on page 2-9.
2-4
Agilent E5260/E5270 User’s Guide, Edition 5
Introduction
Front View
•
Zero Check terminal
Ground reference point of the E5260/E5270.
CAUTION
The Zero Check terminal can be used for the service purpose only. For the normal
operation, leave this terminal open and do not connect anything to this terminal.
Connecting anything can damage the E5260/E5270.
•
Circuit Common (
) and Frame ground (
) terminals
Normally, connect the terminals together by using the shorting bar (Agilent part
number 5000-4206). For floating measurement, remove the shorting bar.
CAUTION
For floating measurement, do not apply voltage more than ± 42 V to the Circuit
Common terminal. Failure to heed this caution may result in damage to the Agilent
E5260/E5270.
WARNING
If the Circuit Common terminal is not connected to the frame ground terminal
(for floating measurement), a potential shock hazard may present. Do not
touch any of measurement circuit at any time while a floating measurement is
in progress.
•
Interlock terminal
Used in conjunction with the interlock function of the E5260/E5270. If the
Interlock terminal is open, maximum SMU output is limited to ± 42 V. Be sure
to connect this terminal to the 16442B test fixture or connector plate before
performing measurement. If you use a connector plate, you must install an
interlock circuit. For details on how to install the interlock circuit, see “To Make
an Interlock Circuit” on page 3-23.
WARNING
Dangerous voltage of up to the maximum voltage of SMUs may be present at
force, guard, and sense terminals if the Interlock terminal is closed.
•
SMU terminals
The source/monitor unit (SMU) has two triaxial connectors, force and sense, for
the Kelvin connections. When you use the 16442B test fixture and Kelvin
connections, up to 3 SMUs can be connected to the 16442B test fixture.
Agilent E5260/E5270 User’s Guide, Edition 5
2-5
Introduction
Front View
The medium power source/monitor unit (MPSMU) and the high resolution
source/monitor unit (HRSMU) occupy one slot. Hence, the MPSMU and
HRSMU can be installed in any slot. Also, the channel number is same as the
slot number.
The high power source/monitor unit (HPSMU) occupies two slots. Thus, the
HPSMU can be installed in slots 1 to 2, 2 to 3, 3 to 4, 5 to 6, 6 to 7, or 7 to 8.
The channel number is the larger slot number for the slots the HPSMU occupies.
For example, if a HPSMU occupies slots 5 and 6, the channel number for the
module must be 6. Channel numbers 1 and 5 are not available for the HPSMU.
NOTE
The Agilent E5270B shown above installs two HPSMUs in slots 1 to 4, and two
MPSMUs in slots 5 to 6. Then the available channel numbers are 2 and 4 for the
HPSMUs and 5 and 6 for the MPSMUs.
2-6
Agilent E5260/E5270 User’s Guide, Edition 5
Introduction
Rear View
Rear View
This section describes the rear view of the Agilent E5260/E5270 series.
Line
Serial Number
In
•
Out
Ext Trig
Digital I/O
GPIB
Ext Trig terminals
Two BNC connectors, one for trigger input, and one for trigger output. For
details about the trigger function, refer to Programming Guide. The trigger
function is available for the Agilent E5260/E5270 in the GPIB remote condition.
•
Digital I/O terminal
DSUB 25 pin connector. Can be used for the trigger input/output terminals or an
interface to control an external relay circuit and so on. For details, refer to
Programming Guide. The Digital I/O terminal can be used when the Agilent
E5260/E5270 is in the GPIB remote condition.
•
GPIB interface
Use an Agilent 82357A USB/GPIB interface or Agilent 10833A/B/C/D GPIB
cable to connect to an external computer or equipment.
•
LINE input receptacle
AC power cable is connected to this receptacle.
•
Serial number
You need this serial number when using the Agilent Technologies telephone
assistance program.
Agilent E5260/E5270 User’s Guide, Edition 5
2-7
Introduction
Measurement Units
Measurement Units
The source/monitor unit (SMU) can force a constant voltage or current, and can
measure a DC current or voltage.
Figure 2-1 is a simplified SMU circuit diagram. The SMU can perform the
following operations:
•
Apply voltage and measures current
•
Apply current and measures voltage
•
Apply voltage and measures voltage
•
Apply current and measures current
NOTE
To select the SMU operation mode in the GPIB remote condition, enter the CMM
command.
Figure 2-1
Simplified SMU Circuit Diagram
+
A
SMU
Force
V
+
-
COMMON
Compliance
The SMU has a compliance feature that limits output voltage or current to prevent
damage to the device under test. When the SMU applies voltage, you can specify
current compliance. When the SMU applies current, you can specify voltage
compliance. For details about the compliance, refer to “Compliance” on page 6-9.
2-8
Agilent E5260/E5270 User’s Guide, Edition 5
Introduction
Measurement Units
GNDU - Ground Unit
The Agilent E5260/E5270 is equipped with the ground unit (GNDU). The GNDU is
a 0 V constant voltage source, and used for the reference of measurement ground.
Also the GNDU can sink up to ± 4 A (E5260A/E5270B) or ± 2.2 A
(E5262A/E5263A), so it is effective for using the HPSMU (high power SMU).
Figure 2-2 is a simplified circuit diagram of GNDU.
Figure 2-2
Simplified GNDU Circuit Diagram
0V
GNDU
Force
COMMON
Agilent E5260/E5270 User’s Guide, Edition 5
2-9
Introduction
Measurement Units
E5280B Precision HPSMU
This section describes typical specification of the high power source/monitor unit
(HPSMU) for the Agilent E5270B. The E5280B cannot be used with the E5260A.
Figure 2-3
•
Maximum voltage, current, output power: ± 200 V, ± 1 A, 20 W
•
Minimum range: 2 V, 1 nA
•
Output/measurement value and resolution: see Table 2-1 to Table 2-4.
HPSMU Output and Measurement Ranges
Current (mA)
1000
500
125
50
-40 -20 20
-200
-100
Voltage (V)
40
-125
200
100
-500
-1000
2-10
Agilent E5260/E5270 User’s Guide, Edition 5
Introduction
Measurement Units
Table 2-1
Table 2-2
HPSMU Output Voltage Ranges and Resolutions
Range
Output Value
Setting
Resolution
Maximum
Current
2V
0 ≤ |V| ≤ 2 V
100 μV
± 1000 mA
20 V
0 ≤ |V| ≤ 20 V
1 mV
± 1000 mA
40 V
0 ≤ |V| ≤ 40 V
2 mV
± 500 mA
100 V
0 ≤ |V| ≤ 100 V
5 mV
± 125 mA
200 V
0 ≤ |V| ≤ 200 V
10 mV
± 50 mA
HPSMU Output Current Ranges and Resolutions
Range
Output Value
Setting
Resolution
Maximum
Voltage
1 nA
0 ≤ |I| ≤ 1.15 nA
50 fA
± 200 V
10 nA
0 ≤ |I| ≤ 11.5 nA
500 fA
± 200 V
100 nA
0 ≤ |I| ≤ 115 nA
5 pA
± 200 V
1 μA
0 ≤ |I| ≤ 1.15 μA
50 pA
± 200 V
10 μA
0 ≤ |I| ≤ 11.5 μA
500 pA
± 200 V
100 μA
0 ≤ |I| ≤ 115 μA
5 nA
± 200 V
1 mA
0 ≤ |I| ≤ 1.15 mA
50 nA
± 200 V
10 mA
0 ≤ |I| ≤ 11.5 mA
500 nA
± 200 V
100 mA
0 ≤ |I| ≤ 50 mA
5 μA
± 200 V
50 mA < |I| ≤ 115 mA
5 μA
± 100 V
0 ≤ |I| ≤ 50 mA
50 μA
± 200 V
50 mA < |I| ≤ 125 mA
50 μA
± 100 V
125 mA < |I| ≤ 500 mA
50 μA
± 40 V
500 mA < |I| ≤ 1 A
50 μA
± 20 V
1A
Agilent E5260/E5270 User’s Guide, Edition 5
2-11
Introduction
Measurement Units
Table 2-3
HPSMU Measurement Voltage Values and Resolutions
Table 2-4
Measurement Resolutions
Measurement
Value a
High Speed ADC
High Resolution ADC
2V
0 ≤ |V| ≤ 2.2 V
100 μV
2 μV
20 V
0 ≤ |V| ≤ 22 V
1 mV
20 μV
40 V
0 ≤ |V| ≤ 44 V
2 mV
40 μV
100 V
0 ≤ |V| ≤ 110 V
5 mV
100 μV
200 V
0 ≤ |V| ≤ 200 V
10 mV
200 μV
Range
HPSMU Measurement Current Values and Resolutions
Measurement Resolutions
Range
Measurement Value a
High Speed ADC
High Resolution ADC
1 nA
0 ≤ |I| ≤ 1.15 nA
50 fA
10 fA
10 nA
0 ≤ |I| ≤ 11.5 nA
500 fA
10 fA
100 nA
0 ≤ |I| ≤ 115 nA
5 pA
100 fA
1 μA
0 ≤ |I| ≤ 1.15 μA
50 pA
1 pA
10 μA
0 ≤ |I| ≤ 11.5 μA
500 pA
10 pA
100 μA
0 ≤ |I| ≤ 115 μA
5 nA
100 pA
1 mA
0 ≤ |I| ≤ 1.15 mA
50 nA
1 nA
10 mA
0 ≤ |I| ≤ 11.5 mA
500 nA
10 nA
100 mA
0 ≤ |I| ≤ 115 mA
5 μA
100 nA
1A
0 ≤ |I| ≤ 1 A
50 μA
1 μA
a. This column is applied to the auto ranging or the limited auto ranging. For
fixed ranging, maximum measurement value is Range column value.
2-12
Agilent E5260/E5270 User’s Guide, Edition 5
Introduction
Measurement Units
E5281B Precision MPSMU
This section describes typical specification of the medium power source/monitor
unit (MPSMU) for the Agilent E5270B. The E5281B cannot be used with the
E5260A.
Figure 2-4
•
Maximum voltage, current, output power: ± 100 V, ± 100 mA, 2 W
•
Minimum range: 0.5 V, 1 nA
•
Output/measurement value and resolution: see Table 2-5 to Table 2-8.
MPSMU Output and Measurement Ranges
Current (mA)
100
50
20
Voltage (V)
-40
-100
-20
20
40
-20
100
-50
-100
Agilent E5260/E5270 User’s Guide, Edition 5
2-13
Introduction
Measurement Units
Table 2-5
MPSMU Output Voltage Ranges and Resolutions
Range
Output Value
Setting
Resolution
Maximum
Current
0.5 V
0 ≤ |V| ≤ 0.5 V
25 μV
± 100 mA
2V
0 ≤ |V| ≤ 2 V
100 μV
± 100 mA
5V
0 ≤ |V| ≤ 5 V
250 μV
± 100 mA
20 V
0 ≤ |V| ≤ 20 V
1 mV
± 100 mA
40 V
0 ≤ |V| ≤ 20 V
2 mV
± 100 mA
20 V < |V| ≤ 40 V
2 mV
± 50 mA
0 ≤ |V| ≤ 20 V
5 mV
± 100 mA
20 V < |V| ≤ 40 V
5 mV
± 50 mA
40 V < |V| ≤ 100 V
5 mV
± 20 mA
100 V
Table 2-6
MPSMU Output Current Ranges and Resolutions
Range
Output Value
Setting
Resolution
Maximum
Voltage
1 nA
0 ≤ |I| ≤ 1.15 nA
50 fA
± 100 V
10 nA
0 ≤ |I| ≤ 11.5 nA
500 fA
± 100 V
100 nA
0 ≤ |I| ≤ 115 nA
5 pA
± 100 V
1 μA
0 ≤ |I| ≤ 1.15 μA
50 pA
± 100 V
10 μA
0 ≤ |I| ≤ 11.5 μA
500 pA
± 100 V
100 μA
0 ≤ |I| ≤ 115 μA
5 nA
± 100 V
1 mA
0 ≤ |I| ≤ 1.15 mA
50 nA
± 100 V
10 mA
0 ≤ |I| ≤ 11.5 mA
500 nA
± 100 V
100 mA
0 ≤ |I| ≤ 20 mA
5 μA
± 100 V
20 mA < |I| ≤ 50 mA
5 μA
± 40 V
50 mA < |I| ≤ 100 mA
5 μA
± 20 V
2-14
Agilent E5260/E5270 User’s Guide, Edition 5
Introduction
Measurement Units
Table 2-7
MPSMU Measurement Voltage Values and Resolutions
Table 2-8
Measurement Resolutions
Measurement
Value a
High Speed ADC
High Resolution ADC
0.5 V
0 ≤ |V| ≤ 0.55 V
25 μV
0.5 μV
2V
0 ≤ |V| ≤ 2.2 V
100 μV
2 μV
5V
0 ≤ |V| ≤ 5.5 V
250 μV
5 μV
20 V
0 ≤ |V| ≤ 22 V
1 mV
20 μV
40 V
0 ≤ |V| ≤ 44 V
2 mV
40 μV
100 V
0 ≤ |V| ≤ 100 V
5 mV
100 μV
Range
MPSMU Measurement Current Values and Resolutions
Measurement Resolutions
Measurement
Value a
High Speed ADC
High Resolution ADC
1 nA
0 ≤ |I| ≤ 1.15 nA
50 fA
10 fA
10 nA
0 ≤ |I| ≤ 11.5 nA
500 fA
10 fA
100 nA
0 ≤ |I| ≤ 115 nA
5 pA
100 fA
1 μA
0 ≤ |I| ≤ 1.15 μA
50 pA
1 pA
10 μA
0 ≤ |I| ≤ 11.5 μA
500 pA
10 pA
100 μA
0 ≤ |I| ≤ 115 μA
5 nA
100 pA
1 mA
0 ≤ |I| ≤ 1.15 mA
50 nA
1 nA
10 mA
0 ≤ |I| ≤ 11.5 mA
500 nA
10 nA
100 mA
0 ≤ |I| ≤ 100 mA
5 μA
100 nA
Range
a. This column is applied to the auto ranging or the limited auto ranging. For
fixed ranging, maximum measurement value is Range column value.
Agilent E5260/E5270 User’s Guide, Edition 5
2-15
Introduction
Measurement Units
E5287A Atto Level HRSMU
This section describes typical specification of the high resolution source/monitor
unit (HRSMU) for the Agilent E5270B. The E5287A and the E5288A Atto Sense
and Switch Unit (ASU) cannot be used with the E5260A.
Figure 2-5
•
Maximum voltage, current, output power: ± 100 V, ± 100 mA, 2 W
•
Minimum range: 0.5 V, 10 pA (1 pA when the E5288A ASU is used)
•
Output/measurement value and resolution: see Table 2-5 to Table 2-8.
HRSMU Output and Measurement Ranges
Current (mA)
100
50
20
Voltage (V)
-40
-100
-20
20
40
-20
100
-50
-100
2-16
Agilent E5260/E5270 User’s Guide, Edition 5
Introduction
Measurement Units
Table 2-9
HRSMU Output Voltage Ranges and Resolutions
Range
Output Value
Setting
Resolution
Maximum
Current
0.5 V
0 ≤ |V| ≤ 0.5 V
25 μV
± 100 mA
2V
0 ≤ |V| ≤ 2 V
100 μV
± 100 mA
5V
0 ≤ |V| ≤ 5 V
250 μV
± 100 mA
20 V
0 ≤ |V| ≤ 20 V
1 mV
± 100 mA
40 V
0 ≤ |V| ≤ 20 V
2 mV
± 100 mA
20 V < |V| ≤ 40 V
2 mV
± 50 mA
0 ≤ |V| ≤ 20 V
5 mV
± 100 mA
20 V < |V| ≤ 40 V
5 mV
± 50 mA
40 V < |V| ≤ 100 V
5 mV
± 20 mA
100 V
Table 2-10
HRSMU Output Current Ranges and Resolutions
Range
Output Value
Setting
Resolution
Maximum
Voltage
1 pA a
0 ≤ |I| ≤ 1.15 pA
1 fA
± 100 V
10 pA
0 ≤ |I| ≤ 11.5 pA
5 fA
± 100 V
100 pA
0 ≤ |I| ≤ 115 pA
5 fA
± 100 V
1 nA
0 ≤ |I| ≤ 1.15 nA
50 fA
± 100 V
10 nA
0 ≤ |I| ≤ 11.5 nA
500 fA
± 100 V
100 nA
0 ≤ |I| ≤ 115 nA
5 pA
± 100 V
1 μA
0 ≤ |I| ≤ 1.15 μA
50 pA
± 100 V
10 μA
0 ≤ |I| ≤ 11.5 μA
500 pA
± 100 V
100 μA
0 ≤ |I| ≤ 115 μA
5 nA
± 100 V
1 mA
0 ≤ |I| ≤ 1.15 mA
50 nA
± 100 V
10 mA
0 ≤ |I| ≤ 11.5 mA
500 nA
± 100 V
100 mA
0 ≤ |I| ≤ 20 mA
5 μA
± 100 V
20 mA < |I| ≤ 50 mA
5 μA
± 40 V
50 mA < |I| ≤ 100 mA
5 μA
± 20 V
a. Available when the E5288A Atto Sense and Switch Unit (ASU) is used.
Agilent E5260/E5270 User’s Guide, Edition 5
2-17
Introduction
Measurement Units
Table 2-11
Table 2-12
HRSMU Measurement Voltage Values and Resolutions
Measurement Resolutions
Range
Measurement
Value a
High Speed ADC
High Resolution ADC
0.5 V
0 ≤ |V| ≤ 0.55 V
25 μV
0.5 μV
2V
0 ≤ |V| ≤ 2.2 V
100 μV
2 μV
5V
0 ≤ |V| ≤ 5.5 V
250 μV
5 μV
20 V
0 ≤ |V| ≤ 22 V
1 mV
20 μV
40 V
0 ≤ |V| ≤ 44 V
2 mV
40 μV
100 V
0 ≤ |V| ≤ 100 V
5 mV
100 μV
HRSMU Measurement Current Values and Resolutions
Measurement Resolutions
Range
Measurement
Value a
High Speed ADC
High Resolution ADC
1 pA b
0 ≤ |I| ≤ 1.15 pA
100 aA
100 aA
10 pA
0 ≤ |I| ≤ 11.5 pA
1 fA
1 fA
100 pA
0 ≤ |I| ≤ 115 pA
5 fA
2 fA / 1 fA b
1 nA
0 ≤ |I| ≤ 1.15 nA
50 fA
10 fA
10 nA
0 ≤ |I| ≤ 11.5 nA
500 fA
10 fA
100 nA
0 ≤ |I| ≤ 115 nA
5 pA
100 fA
1 μA
0 ≤ |I| ≤ 1.15 μA
50 pA
1 pA
10 μA
0 ≤ |I| ≤ 11.5 μA
500 pA
10 pA
100 μA
0 ≤ |I| ≤ 115 μA
5 nA
100 pA
1 mA
0 ≤ |I| ≤ 1.15 mA
50 nA
1 nA
10 mA
0 ≤ |I| ≤ 11.5 mA
500 nA
10 nA
100 mA
0 ≤ |I| ≤ 100 mA
5 μA
100 nA
a. This column is applied to the auto ranging or the limited auto ranging. For
fixed ranging, maximum measurement value is Range column value.
b. Available when the E5288A Atto Sense and Switch Unit (ASU) is used.
2-18
Agilent E5260/E5270 User’s Guide, Edition 5
Introduction
Measurement Units
NOTE
To connect ASU
The specifications are satisfied and guaranteed for the exclusive combination of the
ASU and the HRSMU. So confirm the serial number of the ASU and connect it to
the dedicated HRSMU properly.
To connect the ASU, see “To Connect ASU” on page 3-16.
To confirm the serial number, see “To Display Module Serial Number” on page
5-13.
NOTE
Before using 1 pA range
The measurement channel connected to the ASU supports the 1 pA range. To use the
1 pA range, set the 1 pA fixed range or the 1 pA limited auto ranging.
The E5270B automatically performs the compensation of the data measured by the
1 pA range and returns the compensated data. You can use either the pre-stored
offset data or the pre-measured offset data.
To measure the offset data, perform the self-calibration before starting the
measurement for a DUT. This offset data is temporarily memorized until the
E5270B is turned off. See “To Perform Self-Calibration” on page 5-8.
Agilent E5260/E5270 User’s Guide, Edition 5
2-19
Introduction
Measurement Units
E5290A High Speed HPSMU
This section describes typical specification of the high power source/monitor unit
(HPSMU) for the Agilent E5260A. The E5290A cannot be used with the E5270B.
Figure 2-6
•
Maximum voltage, current, output power: ± 200 V, ± 1 A, 20 W
•
Minimum range: 2 V, 100 nA
•
Output/measurement value and resolution: see Table 2-1 to Table 2-4.
HPSMU Output and Measurement Ranges
Current (mA)
1000
500
125
50
-40 -20 20
-200
-100
Voltage (V)
40
-125
200
100
-500
-1000
2-20
Agilent E5260/E5270 User’s Guide, Edition 5
Introduction
Measurement Units
Table 2-13
Table 2-14
HPSMU Output Voltage Ranges and Resolutions
Range
Output Value
Setting
Resolution
Maximum
Current
2V
0 ≤ |V| ≤ 2 V
100 μV
± 1000 mA
20 V
0 ≤ |V| ≤ 20 V
1 mV
± 1000 mA
40 V
0 ≤ |V| ≤ 40 V
2 mV
± 500 mA
100 V
0 ≤ |V| ≤ 100 V
5 mV
± 125 mA
200 V
0 ≤ |V| ≤ 200 V
10 mV
± 50 mA
HPSMU Output Current Ranges and Resolutions
Range
Output Value
Setting
Resolution
Maximum
Voltage
100 nA
0 ≤ |I| ≤ 115 nA
5 pA
± 200 V
1 μA
0 ≤ |I| ≤ 1.15 μA
50 pA
± 200 V
10 μA
0 ≤ |I| ≤ 11.5 μA
500 pA
± 200 V
100 μA
0 ≤ |I| ≤ 115 μA
5 nA
± 200 V
1 mA
0 ≤ |I| ≤ 1.15 mA
50 nA
± 200 V
10 mA
0 ≤ |I| ≤ 11.5 mA
500 nA
± 200 V
100 mA
0 ≤ |I| ≤ 50 mA
5 μA
± 200 V
50 mA < |I| ≤ 115 mA
5 μA
± 100 V
0 ≤ |I| ≤ 50 mA
50 μA
± 200 V
50 mA < |I| ≤ 125 mA
50 μA
± 100 V
125 mA < |I| ≤ 500 mA
50 μA
± 40 V
500 mA < |I| ≤ 1 A
50 μA
± 20 V
1A
Agilent E5260/E5270 User’s Guide, Edition 5
2-21
Introduction
Measurement Units
Table 2-15
Table 2-16
HPSMU Measurement Voltage Values and Resolutions
Range
Measurement Value a
Measurement Resolutions
2V
0 ≤ |V| ≤ 2.2 V
100 μV
20 V
0 ≤ |V| ≤ 22 V
1 mV
40 V
0 ≤ |V| ≤ 44 V
2 mV
100 V
0 ≤ |V| ≤ 110 V
5 mV
200 V
0 ≤ |V| ≤ 200 V
10 mV
HPSMU Measurement Current Values and Resolutions
Range
Measurement Value a
Measurement Resolutions
100 nA
0 ≤ |I| ≤ 115 nA
5 pA
1 μA
0 ≤ |I| ≤ 1.15 μA
50 pA
10 μA
0 ≤ |I| ≤ 11.5 μA
500 pA
100 μA
0 ≤ |I| ≤ 115 μA
5 nA
1 mA
0 ≤ |I| ≤ 1.15 mA
50 nA
10 mA
0 ≤ |I| ≤ 11.5 mA
500 nA
100 mA
0 ≤ |I| ≤ 115 mA
5 μA
1A
0 ≤ |I| ≤ 1 A
50 μA
a. This column is applied to the auto ranging or the limited auto ranging.
For fixed ranging, maximum measurement value is Range column
value.
2-22
Agilent E5260/E5270 User’s Guide, Edition 5
Introduction
Measurement Units
E5291A High Speed MPSMU
This section describes typical specification of the medium power source/monitor
unit (MPSMU) for the Agilent E5260A. The E5291A cannot be used with the
E5270B.
Figure 2-7
•
Maximum voltage, current, output power: ± 100 V, ± 200 mA, 4 W
•
Minimum range: 2 V, 100 nA
•
Output/measurement value and resolution: see Table 2-5 to Table 2-8.
MPSMU Output and Measurement Ranges
Current (mA)
200
50
20
-40
-100
-20
20
Voltage (V)
40
-20
100
-50
-200
Agilent E5260/E5270 User’s Guide, Edition 5
2-23
Introduction
Measurement Units
Table 2-17
MPSMU Output Voltage Ranges and Resolutions
Range
Output Value
Setting
Resolution
Maximum
Current
2V
0 ≤ |V| ≤ 2 V
100 μV
± 200 mA
20 V
0 ≤ |V| ≤ 20 V
1 mV
± 200 mA
40 V
0 ≤ |V| ≤ 20 V
2 mV
± 200 mA
20 V < |V| ≤ 40 V
2 mV
± 50 mA
0 ≤ |V| ≤ 20 V
5 mV
± 200 mA
20 V < |V| ≤ 40 V
5 mV
± 50 mA
40 V < |V| ≤ 100 V
5 mV
± 20 mA
100 V
Table 2-18
MPSMU Output Current Ranges and Resolutions
Range
Output Value
Setting
Resolution
Maximum
Voltage
100 nA
0 ≤ |I| ≤ 115 nA
5 pA
± 100 V
1 μA
0 ≤ |I| ≤ 1.15 μA
50 pA
± 100 V
10 μA
0 ≤ |I| ≤ 11.5 μA
500 pA
± 100 V
100 μA
0 ≤ |I| ≤ 115 μA
5 nA
± 100 V
1 mA
0 ≤ |I| ≤ 1.15 mA
50 nA
± 100 V
10 mA
0 ≤ |I| ≤ 11.5 mA
500 nA
± 100 V
100 mA
0 ≤ |I| ≤ 20 mA
5 μA
± 100 V
20 mA < |I| ≤ 50 mA
5 μA
± 40 V
50 mA < |I| ≤ 115 mA
5 μA
± 20 V
0 ≤ |I| ≤ 20 mA
10 μA
± 100 V
20 mA < |I| ≤ 50 mA
10 μA
± 40 V
50 mA < |I| ≤ 200 mA
10 μA
± 20 V
200 mA
2-24
Agilent E5260/E5270 User’s Guide, Edition 5
Introduction
Measurement Units
Table 2-19
Table 2-20
MPSMU Measurement Voltage Values and Resolutions
Range
Measurement Value a
Measurement Resolutions
2V
0 ≤ |V| ≤ 2.2 V
100 μV
20 V
0 ≤ |V| ≤ 22 V
1 mV
40 V
0 ≤ |V| ≤ 44 V
2 mV
100 V
0 ≤ |V| ≤ 100 V
5 mV
MPSMU Measurement Current Values and Resolutions
Range
Measurement Value a
Measurement Resolutions
100 nA
0 ≤ |I| ≤ 115 nA
5 pA
1 μA
0 ≤ |I| ≤ 1.15 μA
50 pA
10 μA
0 ≤ |I| ≤ 11.5 μA
500 pA
100 μA
0 ≤ |I| ≤ 115 μA
5 nA
1 mA
0 ≤ |I| ≤ 1.15 mA
50 nA
10 mA
0 ≤ |I| ≤ 11.5 mA
500 nA
100 mA
0 ≤ |I| ≤ 115 mA
5 μA
200 mA
0 ≤ |I| ≤ 200 mA
10 μA
a. This column is applied to the auto ranging or the limited auto ranging.
For fixed ranging, maximum measurement value is Range column
value.
Agilent E5260/E5270 User’s Guide, Edition 5
2-25
Introduction
Specifications
Specifications
This chapter lists specifications and supplemental information for the Agilent
E5260/E5270 and its associated modules. The specifications are the standards
against which the E5260/E5270 and its associated modules are tested. When the
E5260/E5270 or any of its associated modules are shipped from the factory, they
meet the specifications.
The “supplemental” information and “typical” entries in the following
specifications are not warranted, but provide useful information about the functions
and performance of the instruments.
NOTE
Never remove/install modules by yourself
Before the Agilent E5260/E5270 is shipped from the factory, the measurement
modules (SMUs) are installed in the mainframe, and are tested to confirm that the
Agilent E5260/E5270 satisfies the specifications.
If you remove/install the module, the specifications of the Agilent E5260/E5270
will not be guaranteed. For verifying the specifications, contact your nearest Agilent
Technologies Service Center.
Introduction
The Agilent E5260A/E5270B a 8-Slot Parametric Measurement Mainframe is
completely user-configurable. You can install up to eight single-slot modules (such
as the medium power source monitor unit, MPSMU), up to four dual-slot modules
(such as the high power source monitor unit, HPSMU), or any physically allowable
combination thereof.
The Agilent E5262A and E5263A are fixed-configuration dual SMU instruments.
The E5262A contains two MPSMUs, and the E5263A contains one MPSMU and
one HPSMU.
2-26
Agilent E5260/E5270 User’s Guide, Edition 5
Introduction
Specifications
Basic Features
•
Performs high-speed, DC parametric measurements
•
Eight slots for plug-in modules (E5260A/E5270B)
•
User interface allows spot measurements to be made from the front panel
•
High-resolution analog-to-digital converter (ADC) available to all installed
modules (E5270B)
•
High-speed analog-to-digital converter (ADC) present on each installed SMU
•
Ground unit (E5260A/E5270B: 4 A, E5262A/E5263A: 2.2 A)
•
SMU/AUX path switching on the Atto Sense and Switch Unit (ASU)
•
BNC trigger-in and trigger-out connectors
•
16 general-purpose digital I/Os
•
Program memory
•
GPIB port for instrument control
•
Self-test, self-calibration, diagnostics
Measurement Modes
The Agilent E5260/E5270 supports the following measurement modes:
•
Spot
•
Staircase Sweep
•
Multi-Channel Sweep
•
Pulsed Spot
•
Pulsed Sweep
•
Staircase Sweep with Pulsed Bias
•
Quasi-pulsed Spot
•
Linear Search
•
Binary Search
Agilent E5260/E5270 User’s Guide, Edition 5
2-27
Introduction
Specifications
Hardware
•
“Mainframe”
•
“E5280B HPSMU”
•
“E5281B MPSMU”
•
“E5287A HRSMU and E5288A ASU”
•
“E5290A HPSMU”
•
“E5291A MPSMU”
•
“E5280B / E5281B / E5287A / E5290A / E5291A Supplemental Information”
Specification Conditions
The measurement and output accuracies are specified at the module connector
terminals when referenced to the Zero Check terminal under the following
conditions:
1. Temperature: 23 °C ± 5 °C (double for 5 to 18 °C, and for 28 to 40 °C if not
noted otherwise)
2. Humidity (condition for E5270B): 15 % to 60 % (double for 60 % to 70 %)
3. After 40 minutes warm-up
4. Ambient temperature changes less than ± 1 °C after auto calibration execution
5. Measurement made within one hour after auto calibration execution
6. Averaging (high-speed ADC): 128 samples in 1 PLC
Integration time (high-resolution ADC, condition for E5270B):
1 PLC (1 nA to 1 A range)
10 PLC (100 pA range)
50 PLC (1 pA to 10 pA range)
7. Filter: ON
8. Kelvin connection
9. Calibration period: 1 year
2-28
Agilent E5260/E5270 User’s Guide, Edition 5
Introduction
Specifications
Mainframe
•
E5260A
The E5260A supports eight slots for plug-in modules.
•
Module
Slots
occupied
E5290A HPSMU
2
-200 V to 200 V,
-1A to 1 A
100 μV, 5 pA
E5291A MPSMU
1
-100 V to 100 V,
-200 mA to 200 mA
100 μV, 5 pA
Range of operation
Measurement
resolution
E5262A
The E5262A supports two high speed medium power SMUs (MPSMUs).
•
Module
Range of operation
E5291A MPSMU
-100 V to 100 V,
-200 mA to 200 mA
Measurement
resolution
100 μV, 5 pA
E5263A
The E5263A supports one high speed medium power SMU (MPSMU) and one
high speed high power SMU (HPSMU).
Measurement
resolution
Module
Range of operation
E5290A HPSMU
-200 V to 200 V,
-1A to 1 A
100 μV, 5 pA
E5291A MPSMU
-100 V to 100 V,
-200 mA to 200 mA
100 μV, 5 pA
Agilent E5260/E5270 User’s Guide, Edition 5
2-29
Introduction
Specifications
•
E5270B
The E5270B supports eight slots for plug-in modules.
Module
Slots
occupied
E5280B HPSMU
2
-200 V to 200 V,
-1A to 1 A
2 μV, 10 fA
E5281B MPSMU
1
-100 V to 100 V,
-100 mA to 100 mA
0.5 μV, 10 fA
E5287A HRSMU
1
-100 V to 100 V,
-100 mA to 100 mA
0.5 μV, 1 fA
E5288A ASUa
-
-100 V to 100 V,
-100 mA to 100 mA
0.5 μV, 0.1 fA
Range of operation
Measurement
resolution
a. The E5288A Atto Sense and Switch Unit (ASU) is connected to the
E5287A Atto Level High Resolution SMU (HRSMU).
•
Maximum Output Power
•
E5260A/E5270A
The total module power consumption cannot exceed 80 W. Note: Using the
HPSMU, MPSMU, and HRSMU, it is impossible to create a combination
that exceeds the 80 Watt limit.
•
E5262A/E5263A
There are no power restrictions. Both mainframes support having both of
their modules simultaneously output maximum voltage or current.
•
Maximum Voltage between Common and Ground
≤ 42 V
•
Pulse Measurement
Width
500 μs to 2 s
Period
5 ms to 5 s
Period ≥ Width+2 ms (when Width ≤ 100 ms)
Period ≥ Width+10 ms (when Width > 100 ms)
Resolution
2-30
100 μs
Agilent E5260/E5270 User’s Guide, Edition 5
Introduction
Specifications
•
Ground Unit (GNDU)
The GNDU is furnished with the mainframe.
Output voltage
0 V ± 100 μV
Maximum sink current
E5260A/E5270B: 4 A
E5262A/E5263A: 2.2 A
Output terminal / connection
Triaxial connector, Kelvin (remote sensing)
Load capacitance
1 μF (supplemental information)
Cable resistance
Terminal
Cable resistance
(supplemental information)
Sense
≤ 10 Ω
Force
< 1 Ω (Is ≤ 1.6 A)
< 0.7 Ω (1.6 A < Is ≤ 2.0 A)
< 0.35 Ω (2.0 A < Is )
Is is the current being sunk by the GNDU.
Agilent E5260/E5270 User’s Guide, Edition 5
2-31
Introduction
Specifications
E5280B HPSMU
•
Voltage Range, Resolution, and Accuracy
Refer to Table 2-21.
•
Current Range, Resolution, and Accuracy
Refer to Table 2-22.
•
Power Consumption
Voltage source mode:
Voltage Range
Power Consumption a
2V
Ic × 20 W
20 V
Ic × 20 W
40 V
Ic × 40 W
100 V
Ic × 100 W
200 V
Ic × 200 W
a. Ic is the current compliance setting.
Current source mode:
Voltage Compliance a
Power Consumption b
Vc ≤ 20 V
Io × 20 W
20 V < Vc ≤ 40 V
Io × 40 W
40 V < Vc ≤ 100 V
Io × 100 W
100 V < Vc ≤ 200 V
Io × 200 W
a. Vc is the voltage compliance setting.
b. Io is the output current.
•
Output terminal/connection: Triaxial connector, Kelvin (remote sensing)
•
Voltage/Current Compliance (Limiting)
Voltage Compliance
0 V to ± 200 V
Current Compliance
± 1 pA to ± 1 A
Compliance Accuracy
Same as the current or voltage set accuracy.
2-32
Agilent E5260/E5270 User’s Guide, Edition 5
Introduction
Specifications
Table 2-21
Voltage Range, Resolution, and Accuracy (E5280B)
Measurement Accuracy
± (% + mV) a
Measurement Resolution
Voltage
Force
Range Resolution
High
High Speed
Resolution
ADC
ADC
Force Accuracy
± (% + mV) a
High Speed
ADC
High Resolution
ADC
Maximum
Current
±2V
100 μV
100 μV
2 μV
± (0.03 + 0.9)
± (0.03 + 0.7)
± (0.02 + 0.7)
1A
± 20 V
1 mV
1 mV
20 μV
± (0.03 + 4)
± (0.03 + 4)
± (0.02 + 2)
1A
± 40 V
2 mV
2 mV
40 μV
± (0.03 + 7)
± (0.03 + 8)
± (0.02 + 3)
500 mA
± 100 V
5 mV
5 mV
100 μV
± (0.04 + 15)
± (0.03 + 20)
± (0.03 + 5)
125 mA
± 200 V
10 mV
10 mV
200 μV
± (0.045 + 30)
± (0.035 + 40)
± (0.035 + 10)
50 mA
a. ±(% of output/measured value + offset value in mV)
Table 2-22
Current Range, Resolution, and Accuracy (E5280B)
Measurement Resolution
Current
Force
High
Range Resolution High Speed
Resolution
ADC
ADC
Force Accuracy
± (%+A+A)a
Measurement Accuracy Maximum
Voltage
± (%+A+A)a
± 1 nA
50 fA
50 fA
10 fA
± (0.5+3E-12+Vo×2E-15)
± (0.5+3E-12+Vo×2E-15)
200 V
± 10 nA
500 fA
500 fA
10 fA
± (0.5+7E-12+Vo×2E-14)
± (0.5+5E-12+Vo×2E-14)
200 V
± 100 nA
5 pA
5 pA
100 fA
± (0.12+5E-11+Vo×2E-13)
± (0.1+3E-11+Vo×2E-13)
200 V
± 1 μA
50 pA
50 pA
1 pA
± (0.12+4E-10+Vo×2E-12)
± (0.1+2E-10+Vo×2E-12)
200 V
± 10 μA
500 pA
500 pA
10 pA
± (0.12+5E-9+Vo×2E-11)
± (0.1+3E-9+Vo×2E-11)
200 V
± 100 μA
5 nA
5 nA
100 pA
± (0.12+4E-8+Vo×2E-10)
± (0.1+2E-8+Vo×2E-10)
200 V
± 1 mA
50 nA
50 nA
1 nA
± (0.12+5E-7+Vo×2E-9)
± (0.1+3E-7+Vo×2E-9)
200 V
± 10 mA
500 nA
500 nA
10 nA
± (0.12+4E-6+Vo×2E-8)
± (0.1+2E-6+Vo×2E-8)
200 V
± 100 mA
5 μA
5 μA
100 nA
± (0.12+5E-5+Vo×2E-7)
± (0.1+3E-5+Vo×2E-7)
b
±1A
50 μA
50 μA
1 μA
± (0.5+5E-4+Vo×2E-6)
± (0.5+3E-4+Vo×2E-6)
a. ±(% of output/measured value + fixed offset in A + proportional offset in A), Vo is the output voltage in V.
b. 200 V (Io ≤ 50 mA), 100 V (50 mA < Io ≤ 125 mA), 40 V (125 mA < Io ≤ 500 mA),
20 V (500 mA < Io ≤ 1 A), Io is the output current.
Agilent E5260/E5270 User’s Guide, Edition 5
2-33
Introduction
Specifications
E5281B MPSMU
•
Voltage Range, Resolution, and Accuracy
Refer to Table 2-23.
•
Current Range, Resolution, and Accuracy
Refer to Table 2-24.
•
Power Consumption
Voltage source mode:
Voltage Range
Power Consumption a
0.5 V
Ic × 20 W
2V
Ic × 20 W
5V
Ic × 20 W
20 V
Ic × 20 W
40 V
Ic × 40 W
100 V
Ic × 100 W
a. Ic is the current compliance setting.
Current source mode:
Voltage Compliance a
Power Consumption b
Vc ≤ 20 V
Io × 20 W
20 V < Vc ≤ 40 V
Io × 40 W
40 V < Vc ≤ 100 V
Io × 100 W
a. Vc is the voltage compliance setting.
b. Io is the output current.
•
Output terminal/connection: Triaxial connector, Kelvin (remote sensing)
•
Voltage/Current Compliance (Limiting)
Voltage Compliance
0 V to ± 100 V
Current Compliance
± 1 pA to ± 100 mA
Compliance Accuracy
Same as the current or voltage set accuracy.
2-34
Agilent E5260/E5270 User’s Guide, Edition 5
Introduction
Specifications
Table 2-23
Voltage Range, Resolution, and Accuracy (E5281B)
Measurement Accuracy
± (% + mV) a
Measurement Resolution
Voltage
Force
Range Resolution
High
High Speed
Resolution
ADC
ADC
Force Accuracy
± (% + mV) a
High Speed
ADC
High Resolution
ADC
Maximum
Current
± 0.5 V
25 μV
25 μV
0.5 μV
± (0.03 + 0.35)
± (0.03 + 0.25)
± (0.02 + 0.25)
100 mA
±2V
100 μV
100 μV
2 μV
± (0.03 + 0.9)
± (0.03 + 0.7)
± (0.02 + 0.7)
100 mA
±5V
250 μV
250 μV
5 μV
± (0.03 + 2)
± (0.03 + 2)
± (0.02 + 1)
100 mA
± 20 V
1 mV
1 mV
20 μV
± (0.03 + 4)
± (0.03 + 4)
± (0.02 + 2)
100 mA
± 40 V
2 mV
2 mV
40 μV
± (0.03 + 7)
± (0.03 + 8)
± (0.02 + 3)
b
± 100 V
5 mV
5 mV
100 μV
± (0.04 + 15)
± (0.03 + 20)
± (0.03 + 5)
a. ±(% of output/measured value + offset value in mV)
b. 100 mA (Vo ≤ 20 V), 50 mA (20 V < Vo ≤ 40 V), 20 mA (40 V < Vo), Vo is the output voltage.
Table 2-24
Current Range, Resolution, and Accuracy (E5281B)
Measurement Resolution
Current
Force
High
Range Resolution High Speed Resolution
ADC
ADC
Force Accuracy
± (%+A+A)a
Measurement Accuracy Maximum
Voltage
± (%+A+A)a
± 1 nA
50 fA
50 fA
10 fA
± (0.5+3E-12+Vo×2E-15)
± (0.5+3E-12+Vo×2E-15)
100 V
± 10 nA
500 fA
500 fA
10 fA
± (0.5+7E-12+Vo×2E-14)
± (0.5+5E-12+Vo×2E-14)
100 V
± 100 nA
5 pA
5 pA
100 fA
± (0.12+5E-11+Vo×2E-13)
± (0.1+3E-11+Vo×2E-13)
100 V
± 1 μA
50 pA
50 pA
1 pA
± (0.12+4E-10+Vo×2E-12)
± (0.1+2E-10+Vo×2E-12)
100 V
± 10 μA
500 pA
500 pA
10 pA
± (0.12+5E-9+Vo×2E-11)
± (0.1+3E-9+Vo×2E-11)
100 V
± 100 μA
5 nA
5 nA
100 pA
± (0.12+4E-8+Vo×2E-10)
± (0.1+2E-8+Vo×2E-10)
100 V
± 1 mA
50 nA
50 nA
1 nA
± (0.12+5E-7+Vo×2E-9)
± (0.1+3E-7+Vo×2E-9)
100 V
± 10 mA
500 nA
500 nA
10 nA
± (0.12+4E-6+Vo×2E-8)
± (0.1+2E-6+Vo×2E-8)
100 V
± 100 mA
5 μA
5 μA
100 nA
± (0.12+5E-5+Vo×2E-7)
± (0.1+3E-5+Vo×2E-7)
b
a. ±(% of output/measured value + fixed offset in A + proportional offset in A), Vo is the output voltage in V.
b. 100 V (Io ≤ 20 mA), 40 V (20 mA < Io ≤ 50 mA), 20 V (50 mA < Io), Io is the output current.
Agilent E5260/E5270 User’s Guide, Edition 5
2-35
Introduction
Specifications
E5287A HRSMU and E5288A ASU
•
Voltage Range, Resolution, and Accuracy
Refer to Table 2-25.
•
Current Range, Resolution, and Accuracy
Refer to Table 2-26. For the measurement resolution, minimum 1 aA display
resolution at 1 pA range by 6 digits. Specified measurement resolution is limited
by fundamental noise limits.
•
Power Consumption
Voltage source mode:
Voltage Range
Power
Consumptiona
Voltage Range
Power
Consumptiona
0.5 V
Ic × 20 W
20 V
Ic × 20 W
2V
Ic × 20 W
40 V
Ic × 40 W
5V
Ic × 20 W
100 V
Ic × 100 W
a. Ic is the current compliance setting.
Current source mode:
Voltage Compliance a
Power Consumption b
Vc ≤ 20 V
Io × 20 W
20 V < Vc ≤ 40 V
Io × 40 W
40 V < Vc ≤ 100 V
Io × 100 W
a. Vc is the voltage compliance setting.
b. Io is the output current.
•
Output terminal/connection: Triaxial connector, Kelvin (remote sensing)
•
Voltage/Current Compliance (Limiting)
Voltage Compliance
0 V to ± 100 V
Current Compliance
± 10 fA to ± 100 mA (with ASU)
± 100 fA to ± 100 mA (without ASU)
Compliance Accuracy
2-36
Same as the current or voltage set accuracy.
Agilent E5260/E5270 User’s Guide, Edition 5
Introduction
Specifications
Table 2-25
Voltage Range, Resolution, and Accuracy (E5287A)
Measurement Accuracy
± (% + mV) a
Measurement Resolution
Voltage
Force
Range Resolution
High
High Speed
Resolution
ADC
ADC
Force Accuracy
± (% + mV) a
High Speed
ADC
High Resolution
ADC
Maximum
Current
± 0.5 V
25 μV
25 μV
0.5 μV
± (0.02 + 0.15)
± (0.01 + 0.25)
± (0.01 + 0.15)
100 mA
±2V
100 μV
100 μV
2 μV
± (0.02 + 0.4)
± (0.01 + 0.7)
± (0.01 + 0.2)
100 mA
±5V
250 μV
250 μV
5 μV
± (0.02 + 0.75)
± (0.01 + 2)
± (0.01 + 0.25)
100 mA
± 20 V
1 mV
1 mV
20 μV
± (0.02 + 3)
± (0.01 + 4)
± (0.01 + 1)
100 mA
± 40 V
2 mV
2 mV
40 μV
± (0.025 + 6)
± (0.015 + 8)
± (0.015 + 2)
b
± 100 V
5 mV
5 mV
100 μV
± (0.03 + 15)
± (0.02 + 20)
± (0.02 + 5)
a. ±(% of output/measured value + offset value in mV)
b. 100 mA (Vo ≤ 20 V), 50 mA (20 V < Vo ≤ 40 V), 20 mA (40 V < Vo), Vo is the output voltage.
Table 2-26
Current Range, Resolution, and Accuracy (E5287A)
Measurement Resolution
Force Accuracy
± (%+A+A)a
Current
Force
High
Range Resolution High Speed Resolution
ADC
ADC
Measurement Accuracy Maximum
Voltage
± (%+A+A)a
± 1 pAb
± 10 pA
1 fA
100 aA
100 aA
± (1.8+15E-15)
± (1.8+12E-15)
100 V
5 fA
1 fA
1 fA
± (0.5+40E-15+Vo×1E-17)
± (0.5+15E-15+Vo×1E-17)
100 V
± 100 pA
5 fA
5 fA
± (0.5+12E-14+Vo×1E-16)
± (0.5+4E-14+Vo×1E-16)
100 V
± 1 nA
50 fA
50 fA
2 fA / 1 fAb
10 fA
± (0.25+4E-13+Vo×1E-15)
± (0.25+3E-13+Vo×1E-15)
100 V
± 10 nA
500 fA
500 fA
10 fA
± (0.25+4E-12+Vo×1E-14)
± (0.25+2E-12+Vo×1E-14)
100 V
± 100 nA
5 pA
5 pA
100 fA
(0.12+4E-11+Vo×1E-13)
±
(0.1+2E-11+Vo×1E-13)
100 V
± 1 μA
50 pA
50 pA
1 pA
±
(0.1+2E-10+Vo×1E-12)
100 V
± 10 μA
500 pA
500 pA
10 pA
±
(0.07+4E-9+Vo×1E-11)
± (0.05+2E-9+Vo×1E-11)
100 V
± 100 μA
5 nA
5 nA
100 pA
± (0.07+4E-8+Vo×1E-10)
± (0.05+2E-8+Vo×1E-10)
100 V
± 1 mA
50 nA
50 nA
1 nA
± (0.06+4E-7+Vo×1E-9)
± (0.04+2E-7+Vo×1E-9)
100 V
± 10 mA
500 nA
500 nA
10 nA
± (0.06+4E
-6+Vo×1E-8)
(0.04+2E-6+Vo×1E-8)
100 V
± 100 mA
5 μA
5 μA
100 nA
± (0.12+4E
-5+Vo×1E-7)
(0.1+2E-5+Vo×1E-7)
c
±
± (0.12+4E
-10+Vo×1E-12)
±
±
a. ±(% of output/measured value + fixed offset in A + proportional offset in A), Vo is the output voltage in V.
b. Available when the Agilent E5288A Atto Sense and Switch Unit (ASU) is used.
c. 100 V (Io ≤ 20 mA), 40 V (20 mA < Io ≤ 50 mA), 20 V (50 mA < Io), Io is the output current.
Agilent E5260/E5270 User’s Guide, Edition 5
2-37
Introduction
Specifications
E5288A Atto Sense and Switch Unit (ASU).
AUX Path Specification
•
Maximum Voltage
100 V (AUX input to AUX common)
100 V (AUX input to circuit common)
42 V (AUX common to circuit common)
•
Maximum Current
0.5 A (AUX input to Force output)
ASU Supplemental Information
•
Band width (at -3 dB):
< 30 MHz (AUX port)
NOTE
Connect ASU to dedicated HRSMU
The specifications are satisfied and guaranteed for the exclusive combination of the
ASU and the HRSMU. So confirm the serial number of the ASU and connect it to
the dedicated HRSMU properly.
2-38
Agilent E5260/E5270 User’s Guide, Edition 5
Introduction
Specifications
E5290A HPSMU
•
Voltage Range, Resolution, and Accuracy
Refer to Table 2-27.
•
Current Range, Resolution, and Accuracy
Refer to Table 2-28.
•
Power Consumption
Voltage source mode:
Voltage Range
Power Consumption a
2V
Ic × 20 W
20 V
Ic × 20 W
40 V
Ic × 40 W
100 V
Ic × 100 W
200 V
Ic × 200 W
a. Ic is the current compliance setting.
Current source mode:
Voltage Compliance a
Power Consumption b
Vc ≤ 20 V
Io × 20 W
20 V < Vc ≤ 40 V
Io × 40 W
40 V < Vc ≤ 100 V
Io × 100 W
100 V < Vc ≤ 200 V
Io × 200 W
a. Vc is the voltage compliance setting.
b. Io is the output current.
•
Output terminal/connection: Triaxial connector, Kelvin (remote sensing)
•
Voltage/Current Compliance (Limiting)
Voltage Compliance
0 V to ± 200 V
Current Compliance
± 100 pA to ± 1 A
Compliance Accuracy
Same as the current or voltage set accuracy.
Agilent E5260/E5270 User’s Guide, Edition 5
2-39
Introduction
Specifications
Table 2-27
Voltage Range, Resolution, and Accuracy (E5290A)
Voltage Range
Force/Measurement
Resolution
Force Accuracy
± (% + mV) a
Measurement Accuracy
± (% + mV) a
Maximum
Current
±2V
100 μV
± (0.03 + 0.9)
± (0.03 + 0.7)
1A
± 20 V
1 mV
± (0.03 + 4)
± (0.03 + 4)
1A
± 40 V
2 mV
± (0.03 + 7)
± (0.03 + 8)
500 mA
± 100 V
5 mV
± (0.04 + 15)
± (0.03 + 20)
125 mA
± 200 V
10 mV
± (0.045 + 30)
± (0.035 + 40)
50 mA
a. ±(% of output/measured value + offset value in mV)
Table 2-28
Current Range, Resolution, and Accuracy (E5290A)
Current
Range
Force/Measurement
Resolution
Force Accuracy
± (%+A+A) a
Measurement Accuracy
± (%+A+A) a
Maximum
Voltage
± 100 nA
5 pA
± (0.12+5E-11+Vp×5E-12)
± (0.1+3E-11+Vp×5E-12)
200 V
± 1 μA
50 pA
± (0.12+4E-10+Vp×5E-11)
± (0.1+2E-10+Vp×5E-11)
200 V
± 10 μA
500 pA
± (0.12+5E-9+Vp×5E-10)
± (0.1+3E-9+Vp×5E-10)
200 V
± 100 μA
5 nA
± (0.12+4E-8+Vp×5E-9)
± (0.1+2E-8+Vp×5E-9)
200 V
± 1 mA
50 nA
± (0.12+5E-7+Vp×5E-8)
± (0.1+3E-7+Vp×5E-8)
200 V
± 10 mA
500 nA
± (0.12+4E-6+Vp×5E-7)
± (0.1+2E-6+Vp×5E-7)
200 V
± 100 mA
5 μA
± (0.12+5E-5+Vp×5E-6)
± (0.1+3E-5+Vp×5E-6)
b
±1A
50 μA
± (0.5+5E-4+Vp×5E-5)
± (0.5+3E-4+Vp×5E-5)
a. ±(% of output/measured value + fixed offset in A + proportional offset in A), Vo is the output voltage in V,
Vp is Vo/25. For the Vp value, the decimal point must be rounded out.
b. 200 V (Io ≤ 50 mA), 100 V (50 mA < Io ≤ 125 mA), 40 V (125 mA < Io ≤ 500 mA),
20 V (500 mA < Io ≤ 1 A), Io is the output current.
2-40
Agilent E5260/E5270 User’s Guide, Edition 5
Introduction
Specifications
E5291A MPSMU
•
Voltage Range, Resolution, and Accuracy
Refer to Table 2-29.
•
Current Range, Resolution, and Accuracy
Refer to Table 2-30.
•
Power Consumption
Voltage source mode:
Voltage Range
Power Consumption a
2V
Ic × 20 W
20 V
Ic × 20 W
40 V
Ic × 40 W
100 V
Ic × 100 W
a. Ic is the current compliance setting.
Current source mode:
Voltage Compliance a
Power Consumption b
Vc ≤ 20 V
Io × 20 W
20 V < Vc ≤ 40 V
Io × 40 W
40 V < Vc ≤ 100 V
Io × 100 W
a. Vc is the voltage compliance setting.
b. Io is the output current.
•
Output terminal/connection: Triaxial connector, Kelvin (remote sensing)
•
Voltage/Current Compliance (Limiting)
Voltage Compliance
0 V to ± 100 V
Current Compliance
± 100 pA to ± 200 mA
Compliance Accuracy
Same as the current or voltage set accuracy.
Agilent E5260/E5270 User’s Guide, Edition 5
2-41
Introduction
Specifications
Table 2-29
Voltage Range, Resolution, and Accuracy (E5291A)
Voltage Range
Force/Measurement
Resolution
Force Accuracy
± (% + mV) a
Measurement Accuracy
± (% + mV) a
Maximum
Current
±2V
100 μV
± (0.03 + 0.9)
± (0.03 + 0.7)
200 mA
± 20 V
1 mV
± (0.03 + 4)
± (0.03 + 4)
200 mA
± 40 V
2 mV
± (0.03 + 7)
± (0.03 + 8)
b
± 100 V
5 mV
± (0.04 + 15)
± (0.03 + 20)
a. ±(% of output/measured value + offset value in mV)
b. 200 mA (Vo ≤ 20 V), 50 mA (20 V < Vo ≤ 40 V), 20 mA (40 V < Vo), Vo is the output voltage.
Table 2-30
Current Range, Resolution, and Accuracy (E5291A)
Current
Range
Force/Measurement
Resolution
Force Accuracy
± (%+A+A) a
Measurement Accuracy
± (%+A+A) a
Maximum
Voltage
± 100 nA
5 pA
± (0.12+5E-11+Vp×5E-12)
± (0.1+3E-11+Vp×5E-12)
100 V
± 1 μA
50 pA
± (0.12+4E-10+Vp×5E-11)
± (0.1+2E-10+Vp×5E-11)
100 V
± 10 μA
500 pA
± (0.12+5E-9+Vp×5E-10)
± (0.1+3E-9+Vp×5E-10)
100 V
± 100 μA
5 nA
± (0.12+4E-8+Vp×5E-9)
± (0.1+2E-8+Vp×5E-9)
100 V
± 1 mA
50 nA
± (0.12+5E-7+Vp×5E-8)
± (0.1+3E-7+Vp×5E-8)
100 V
± 10 mA
500 nA
± (0.12+4E-6+Vp×5E-7)
± (0.1+2E-6+Vp×5E-7)
100 V
± 100 mA
5 μA
± (0.12+5E-5+Vp×5E-6)
± (0.1+3E-5+Vp×5E-6)
b
± 200 mA
10 μA
± (0.12+1E-4+Vpx×1E-5)
± (0.1+6E-5+Vpx×1E-5)
a. ±(% of output/measured value + fixed offset in A + proportional offset in A), Vo is the output voltage in V,
Vp is Vo/25, Vpx is Vo/50. For the Vp and Vpx values, the decimal point must be rounded out.
b. 100 V (Io ≤ 20 mA), 40 V (20 mA < Io ≤ 50 mA), 20 V (50 mA < Io), Io is the output current.
2-42
Agilent E5260/E5270 User’s Guide, Edition 5
Introduction
Specifications
E5280B / E5281B / E5287A / E5290A / E5291A Supplemental
Information
•
Maximum allowable cable resistance (Kelvin connection)
Terminal
Cable resistance
Sense
10 Ω
Force
10 Ω ( I ≤ 100 mA)
1.5 Ω (100 mA < I )
•
Voltage source output resistance (Force line, Non-Kelvin connection)
0.2 Ω (E5280B/E5290A)
0.3 Ω (E5281B/E5287A/E5291A)
•
Voltage measurement input resistance: ≥ 1013 Ω
•
Current source output resistance: ≥ 1013 Ω (1 nA range)
•
Current compliance setting accuracy (for opposite polarity)
Current range
•
Accuracy
1 pA to 10 nA
Setting accuracy ± 12 % of range
≥ 100 nA
Setting accuracy ± 2.5 % of range
Maximum capacitive load
Current range
•
Maximum capacitive load
1 pA to 10 nA
1000 pF
100 nA to 10 mA
10 nF
≥ 100 mA
100 μF
Maximum guard capacitance:
900 pF (E5280B/E5281B/E5287A/E5290A/E5291A)
660 pF (E5287A with ASU)
Agilent E5260/E5270 User’s Guide, Edition 5
2-43
Introduction
Specifications
•
Maximum shield capacitance:
5000 pF (E5280B/E5281B/E5287A/E5290A/E5291A)
3500 pF (E5287A with ASU)
•
Maximum guard offset voltage:
± 1 mV (E5280B/E5290A/E5291A)
± 3 mV (E5281B/E5287A)
± 4.2 mV (E5287A with ASU, Iout ≤ 100 μA)
•
Noise characteristics (filter ON)
Voltage source: 0.01 % of V range (rms.)
Current source: 0.1 % of I range (rms.)
•
Overshoot (filter ON)
Voltage source: 0.03 % of V range
Current source: 1 % of I range
•
Range switching transient noise (filter ON)
Voltage ranging: 250 mV
Current ranging: 10 mV
•
Slew rate: 0.2 V/μs (maximum)
•
SMU pulse setting accuracy (fixed measurement range)
•
Width
0.5 % + 50 μs
Period
0.5 % + 100 μs
Trigger output delay (pulsed measurements)
0 to 32.7 ms with 100 μs resolution
Trigger output delay must be less than pulse width.
2-44
Agilent E5260/E5270 User’s Guide, Edition 5
Introduction
Specifications
Functions
•
Front Panel Operations
•
•
•
Display
•
Display error messages
•
Display spot measurement set value
•
Display spot measurement result
Keypad Operations
•
Set GPIB address
•
Set local/remote mode
•
Select measurement channel
•
Set spot measurement set value
•
ASU input (SMU/AUX) switching (E5270B)
•
Start calibration/diagnostics
MPSMU and HPSMU Measurement Mode Details
•
Spot Measurement
Applies voltage or current, then measures voltage or current. A maximum of
eight measurement channels can be used.
•
Staircase Sweep Measurement
Applies staircase sweep voltage or current, and measures voltage or current
at each sweep step. A maximum of eight measurement channels can be used,
and an extra sweep source forces the staircase sweep output synchronized to
the primary sweep output.
Number of Steps: 1 to 1,001
Hold Time: 0 to 655.35s, 1 ms resolution
Delay Time: 0 to 65.5350s, 100 μs resolution
Agilent E5260/E5270 User’s Guide, Edition 5
2-45
Introduction
Specifications
•
Multi Channel Sweep Measurement
Applies staircase sweep voltage or current using multiple sweep sources, and
performs staircase sweep measurement. A maximum of eight sweep sources
and eight measurement channels can be used.
Number of Steps: 1 to 1,001
Hold Time: 0 to 655.35s, 1 ms resolution
Delay Time: 0 to 65.5350s, 100 μs resolution
•
Pulsed Spot Measurement
Applies pulsed voltage or current, and measures voltage or current.
Pulse Width: 500 μs to 2 s, 100 μs resolution
Pulse Period: 5 ms to 5 s, 100 μs resolution.
•
Period ≥ Width+2 ms (when Width ≤ 100 ms)
•
Period ≥ Width+10 ms (when Width > 100 ms)
Maximum Pulse Duty: 50%
•
Pulsed Sweep Measurement
Applies pulsed sweep voltage or current, and measures voltage or current at
each sweep step. An extra sweep source can be used to force the staircase
sweep output synchronized to the pulsed sweep output.
•
Staircase Sweep with Pulsed Bias Measurement
Applies pulsed voltage or current, and performs staircase sweep
measurement. The staircase sweep output is synchronized to the pulsed bias.
A synchronous staircase sweep source is also available.
•
Quasi-pulsed Spot Measurement
Applies quasi-pulsed voltage or current, and measures voltage or current.
•
Search Measurement (linear search and binary search)
Applies voltage or current, and measures voltage or current. Repeats this for
various output values until the search stop condition is satisfied.
Synchronous output is available.
2-46
Agilent E5260/E5270 User’s Guide, Edition 5
Introduction
Specifications
•
Time Stamp
The E5260/E5270 supports a time stamp function utilizing an internal quartz
clock.
Resolution: 100 μs
•
Program Memory
The E5260/E5270 mainframe contains (volatile) memory that can be used to
increase test measurement throughput. Program memory allows the storage of
program code in the E5260/E5270, eliminating the need to communicate over
the GPIB interface. In addition, input data can be passed to code sequences
stored in program memory.
•
•
Maximum lines of Storable Code: 40,000
•
Maximum number of program sequences: 2,000
Output Data Buffer
The number of data points that can be stored in the data buffer varies with the
choice of the output data format.
Minimum number of Storable Data Points: 34,034
•
Trigger I/O
Trigger in/out synchronization pulses before and after setting and measuring DC
voltage and current. Arbitrary trigger events can be masked or activated
independently.
•
Input
Input Level: TTL level, negative or positive edge trigger, or TTL level,
negative or positive gate trigger.
An external trigger input signal can be used to do any of the following:
1. Start a measurement.
2. Start a measurement at each sweep step for a staircase sweep or multi
channel sweep measurement.
3. Start the source output at each sweep step for a staircase sweep, pulsed
sweep, staircase sweep with pulsed bias, or multi channel sweep
measurement.
4. Start the pulsed output for a pulsed spot measurement.
5. Recover from a wait state.
Agilent E5260/E5270 User’s Guide, Edition 5
2-47
Introduction
Specifications
•
Output
Output Level: TTL level, negative or positive edge trigger, or TTL level,
negative or positive gate trigger.
An output trigger signal can be sent when one of the following events
occurs:
1. The end of a measurement is reached.
2. The end of a measurement at each sweep step for a staircase sweep or
multi channel sweep measurement is reached.
3. Completion of the source output setup at each sweep step for a staircase
sweep, pulsed sweep, staircase sweep with pulsed bias, or multi channel
sweep measurement.
4. Completion of the pulsed output setup for a pulsed spot measurement.
5. A trigger command is issued.
•
Trigger Terminals
Ext Trig In/Out (BNC) and Digital I/O port can be used for trigger I/O.
•
General Purpose Digital I/O
16 general-purpose digital I/O signals are available via a 25-pin DIN connector.
These pins can be used as an alternative to the BNC trigger-in and trigger-out
lines to synchronize the E5260/E5270 with other instruments. They can also be
used as output and input ports for digital signals. The user can selectively assign
pins to trigger mode or digital I/O mode.
•
Furnished Software
•
VXIplug&play driver
•
TIS library (only for E5270B)
Supported operating systems:
Microsoft Windows 7 Professional and Windows XP Professional
NOTE
For the latest system requirements, go to www.agilent.com and type in E5270B or
E5260A in the Search field at the top of the page.
2-48
Agilent E5260/E5270 User’s Guide, Edition 5
Introduction
Specifications
General Specifications
•
•
•
Temperature Range
Operating
+5 °C to +40 °C
Storage
-20 °C to +60 °C
Humidity
Operating
15 % to 80 %RH (E5260)
15 % to 70 %RH (E5270B)
non-condensing
Storage
5 % to 90 %RH (E5260)
5 % to 80 %RH (E5270B, at 50 °C)
non-condensing
Altitude
Operating
0 to 2,000 m (6,561 ft.)
Storage
0 to 4,600 m (15,092 ft.)
•
Power Requirement: 90 to 264 V, 47 to 63 Hz
•
Maximum Volt-Amps (VA):
600 VA (E5260A/E5270B), 400 VA (E5262A/E5263A)
•
Regulatory Compliance
EMC
IEC 61326-1 / EN 61326-1
AS/NZS CISPR 11
Safety
IEC 61010-1 / EN 61010-1
CAN/CSA-C22.2 No. 61010-1-04, NRTL/C
•
Certification: CE, cCSAus, C-Tick
•
Dimensions
E5260A/E5270B: 426 mm (W) × 235 mm (H) × 575 mm (D)
E5262A/E5263A: 426 mm (W) × 150 mm (H) × 575 mm (D)
•
Weight
17 kg (E5260A/E5270B mainframe), 15 kg (E5262A), 16 kg (E5263A),
2.5 kg (E5280B/E5290A), 1.4 kg (E5281B), 1.5 kg (E5287A), 0.5 kg (E5288A),
1.6 kg (E5291A)
Agilent E5260/E5270 User’s Guide, Edition 5
2-49
Introduction
Accessories and Options
Accessories and Options
The Agilent E5260/E5270 is furnished with the following accessories.
•
Power Cable, 1 ea.
•
Operation Summary Sheet, 1 ea.
•
Software CD, 1ea.
Table 2-31 lists the options and the available accessories for the Agilent
E5260/E5270.
2-50
Agilent E5260/E5270 User’s Guide, Edition 5
Introduction
Accessories and Options
Table 2-31
Model
Number
Options and Accessories
Option Item
E5260A
Description
8 Slot High Speed Measurement Mainframe
E5260A-050
50 Hz power line frequency
E5260A-060
60 Hz power line frequency
E5260A-A6J
ANSI Z540 compliant calibration
E5260A-UK6
Commercial cal. certificate w/ test data
E5260A-ABA
Manual set, English
E5260A-ABJ
Manual set, Japanese
E5262A
2 Channel Source/Monitor Unit (MPSMU/MPSMU)
E5262A-050
50 Hz power line frequency
E5262A-060
60 Hz power line frequency
E5262A-A6J
ANSI Z540 compliant calibration
E5262A-UK6
Commercial cal. certificate w/ test data
E5262A-ABA
Manual set, English
E5262A-ABJ
Manual set, Japanese
E5263A
2 Channel Source/Monitor Unit (HPSMU/MPSMU)
E5263A-050
50 Hz power line frequency
E5263A-060
60 Hz power line frequency
E5263A-A6J
ANSI Z540 compliant calibration
E5263A-UK6
Commercial cal. certificate w/ test data
E5263A-ABA
Manual set, English
E5263A-ABJ
Manual set, Japanese
Agilent E5260/E5270 User’s Guide, Edition 5
2-51
Introduction
Accessories and Options
Model
Number
Option Item
E5270B
Description
8 Slot Precision Measurement Mainframe
E5270B-050
50 Hz power line frequency
E5270B-060
60 Hz power line frequency
E5270B-A6J
ANSI Z540 compliant calibration
E5270B-UK6
Commercial cal. certificate w/ test data
E5270B-ABA
Manual set, English
E5270B-ABJ
Manual set, Japanese
E5280B
Precision High Power Source/Monitor Unit Module for Agilent E5270B
E5281B
Precision Medium Power Source/Monitor Unit Module for Agilent
E5270B
E5287A
Atto Level High Resolution Source/Monitor Unit Module for Agilent
E5270B
E5288A
Atto Sense and Switch Unit for Agilent E5287A
E5290A
High Speed High Power Source/Monitor Unit Module for Agilent E5260A
E5291A
High Speed Medium Power Source/Monitor Unit Module for Agilent
E5260A
N1253A
Digital I/O accessories
N1253A-100
Digital I/O T-cable
N1253A-200
Digital I/O BNC Box
N1254A
Accessories
N1254A-100
GNDU to Kelvin Adapter
N1254A-107
Triax(m)-Triax(f) Adapter
N1254A-108
ASU Magnetic Stand
2-52
Agilent E5260/E5270 User’s Guide, Edition 5
Introduction
Accessories and Options
Model
Number
Option Item
16442B
Description
Test Fixture
16442B-010
Add 1.5 m triaxial cables, 4 ea.
16442B-011
Add 3.0 m triaxial cables, 4 ea.
16442B-800
Extra blank PTFE board
16442B-801
Universal socket module, 0.1 inch pitch, with 10 pins
16442B-802
Universal socket module, 0.075 inch pitch, with 10 pins
16442B-803
Universal socket module, 0.05 inch pitch, with 10 pins
16442B-810
Extra pin set (for universal socket module, 10 pins.)
16442B-811
Extra wire set (mini banana to pin plug, 6 ea.)
16442B-812
Extra wire set (pin plug to pin plug, 6 ea.)
16442B-813
Extra wire set (mini banana to mini clip, 6 ea.)
16442B-814
Extra wire set (mini banana to mini banana, 6 ea.)
16442B-821
Socket module, 4-pin TO package
16442B-822
Socket module, 18-pin DIP package
16442B-823
Extra socket module, 28-pin DIP package
16442B-890
Extra accessory case
16493G
Digital I/O Connection Cable
16493G-001
1.5 m length
16493G-002
3.0 m length
16493J
Interlock Cable
16493J-001
1.5 m length
16493J-002
3.0 m length
16493K
Kelvin Triaxial Cable (E5260/E5270 Kelvin to E5260/E5270 Kelvin)
16493K-001
1.5 m length
16493K-002
3.0 m length
16493L
GNDU Cable for E5260/E5270 series
16493L-001
1.5 m length
16493L-002
3.0 m length
Agilent E5260/E5270 User’s Guide, Edition 5
2-53
Introduction
Accessories and Options
Model
Number
Option Item
16493M
Description
Triaxial and D-sub Cable for ASU
16493M-001
1.5 m length
16493M-002
3.0 m length
16494A
Triaxial Cable
16494A-001
1.5 m length
16494A-002
3 m length
16494A-003
80 cm length
16494B
Kelvin Triaxial Cable (E5260/E5270 to E5250 input)
16494B-001
1.5 m length
16494B-002
3 m length
16494B-003
80 cm length
16495F
Connector plate w/ 12×triax., Interlock, GNDU
16495F-001
Bulkhead feedthrough connectors (female to female)
16495F-002
Connectors to contacts for soldering
16495G
Connector plate w/ 24×triax., Interlock, GNDU
16495G-001
Bulkhead feedthrough connectors (female to female)
16495G-002
Connectors to contacts for soldering
16495H
Connector plate w/ 6×triax., 6×coax., Interlock, GNDU
16495H-001
Bulkhead feedthrough connectors (female to female)
16495H-002
Connectors to contacts for soldering
16495J
Connector plate w/ 8×triax., 4×coax., Interlock, GNDU
16495J-001
Bulkhead feedthrough connectors (female to female)
16495J-002
Connectors to contacts for soldering
16495K
Connector Plate with Universal Cable Holder
16495K-001
2-54
Connector Plate with Rubber Holder
Agilent E5260/E5270 User’s Guide, Edition 5
3
Installation
Installation
This chapter describes how to install Agilent E5260/E5270 and accessories.
WARNING
•
“Requirements”
•
“Inspection and Installation”
•
“Installing Accessories”
•
“Mounting Connectors”
•
“Connecting Measurement Devices”
•
“Maintenance”
There are potentially hazardous voltages (200 V for HPSMU, and 100 V for
MPSMU) present at the Force, Guard, and Sense terminals of the Agilent
E5260/E5270. To prevent electrical shock, the following safety precautions
must be observed during the use of the Agilent E5260/E5270.
•
Use a three-conductor AC power cable to connect the cabinet (if used)
and the Agilent E5260/E5270 to an electrical ground (safety ground).
•
If you do not use the 16442B test fixture, you must install and connect an
interlock circuit that opens the Interlock terminal when the shielding box
access door is opened.
•
Confirm periodically that the interlock function works normally.
•
Before touching the connections on the Force, Guard, and Sense
terminals, turn the Agilent E5260/E5270 off and discharge any
capacitors. If you do not turn the Agilent E5260/E5270 off, complete all of
the following items, regardless of the Agilent E5260/E5270 settings.
•
3-2
•
Press the OutCh and On/Off keys, and confirm that the Output status
indicator is not lit for all source channels.
•
Confirm that the HIGH VOLTAGE indicator is not lit.
•
Open the shielding box access door (open the Interlock terminal).
•
Discharge any capacitors connected to an SMU.
Warn persons working around the Agilent E5260/E5270 about dangerous
conditions.
Agilent E5260/E5270 User’s Guide, Edition 5
Installation
Requirements
Requirements
This section contains information on:
•
“Power Requirements”
•
“Operating Environment”
•
“Storaging/Shipping Environment”
•
“Ventilation Requirements”
•
“Power Cable”
Power Requirements
The Agilent E5260/E5270 can operate from any single-phase AC power source
supplying 90 to 264 V at 47 to 63 Hz. The maximum power consumption is 600 VA
for the Agilent E5260A/E5270B, and 400 VA for the Agilent E5262A/E5263A. For
details, see “Specifications” on page 2-26.
Operating Environment
The Agilent E5260/E5270 is specified to operate within the following
environmental conditions:
Temperature:
5 °C to 35 °C
Humidity:
5 % to 70 % RH, non-condensing
Altitude:
0 to 2,000 m (6,561 ft.)
Storaging/Shipping Environment
The Agilent E5260/E5270 is specified to store/ship within the following
environmental conditions:
Temperature:
-20 °C to 60 °C
Humidity:
< 80 % RH, non-condensing
Altitude:
0 to 15,240 m (50,000 ft.)
Agilent E5260/E5270 User’s Guide, Edition 5
3-3
Installation
Requirements
Ventilation Requirements
The Agilent E5260/E5270 has cooling fans. To ensure adequate airflow, make sure
that there is sufficient clearance around the cooling fans: 6 inches (150 mm) behind,
3 inches (70 mm) on the sides, and 0.5 inch (12 mm) above and below.
If the airflow is restricted, the internal operating temperature will be higher. This
may reduce the instrument's reliability, or cause the thermal-protection circuits to
turn the instrument off.
Power Cable
CAUTION
Before applying AC line power to the Agilent E5260/E5270, ensure that the correct
power cable is used.
In accordance with international safety standards, this instrument is equipped with a
three-prong power cable. When connected to an appropriate AC power outlet, this
cable grounds the instrument frame. The type of power cable shipped with each
instrument depends on the country of destination. Refer to the following table for
the Agilent part numbers of the power cables available.
If the plug on the cable does not fit the power outlet, or the cable is to be attached to
a terminal block, cut the cable at the plug end and re-wire it. This work should be
performed by a qualified electrician, observing all local electrical codes.
The color coding used in the cable will depend on the cable supplied. If a new plug
is to be connected, it must meet local safety requirements and include the following
features:
WARNING
•
adequate load-carrying capacity (see “Specifications” on page 2-26.)
•
ground connection
•
cable clamp
For protection from electrical shock, do not interrupt the power cable ground.
3-4
Agilent E5260/E5270 User’s Guide, Edition 5
Installation
Requirements
•
•
•
•
•
•
•
•
•
•
Plug: BS 1363/A,
250 V, 10 A
PN: 8120-4420
•
Plug: NEMA 6-15P,
250 V, 10 A
PN: 8120-3996,
8120-0698
•
Plug: JIS C 8303,
125 V, 12 A
PN: 8121-0743
•
Plug: GB 1002
figure 3 , 250 V, 10 A
PN: 8120-8376
•
Plug: CNS 10917-2,
125 V, 10 A
PN: 8120-6825,
8121-1635
•
•
•
•
•
•
Plug: AS 3112,
250 V, 10 A
PN: 8120-4419
•
Plug: SEV 1011,
250 V, 10 A
PN: 8120-2104
•
Plug: Israel SI 32,
250 V, 10 A
PN: 8120-5182
•
Plug: SANS 164-1,
250 V, 10 A
PN: 8120-4211,
8121-0564
•
•
•
•
•
Plug: CEE 7 sheet
VII, 250 V, 10 A
PN: 8120-4519
•
Plug: SR 107-2-D1,
250 V, 10 A
PN: 8120-2956
•
Plug: IRAM 207310A, 250 V, 10 A
PN: 8120-6870
•
Plug: TISI 166, 250 V,
10 A
PN: 8121-1866
•
•
•
•
•
Plug: NEMA 5-15P,
125 V, 10 A
PN: 8120-6825
Plug: IS 1293 and
IS 6538, 250 V, 10 A
PN: 8120-4211
Plug: CEI 23-16,
250 V, 10 A
PN: 8120-6978
Plug: NBR 14136,
250 V, 10 A
PN: 8121-1809
Plug: CS 0017:2003,
250 V, 10 A
PN: 8120-8871,
8121-1638
Agilent E5260/E5270 User’s Guide, Edition 5
3-5
Installation
Inspection and Installation
Inspection and Installation
This section describes what to do when you receive the Agilent E5260/E5270 and
accessories.
1. Inspect the shipment. See “To Inspect the Agilent E5260/E5270 and
Accessories”.
2. Verify the Agilent E5260/E5270 operation. See “To Check the Agilent
E5260/E5270 Operation” and “To Execute Diagnostics and Self-calibration”.
After the normal condition and operation are confirmed, install the Agilent
E5260/E5270 in the place that satisfies the requirements described in the previous
section.
To Inspect the Agilent E5260/E5270 and Accessories
Perform the following inspections when the Agilent E5260/E5270 and accessories
arrive at your site.
1. Before unpacking any components, inspect all boxes for any signs of damage
that might have occurred during shipment, such as:
•
dents
•
scratches
•
cuts
•
water marks
If you suspect any damage, notify your local Agilent Technologies sales or
service office.
2. When you open the boxes that contain the Agilent E5260/E5270 and
accessories, check the components against the contents lists attached to the
boxes.
If anything is missing, notify your local Agilent Technologies sales or service
office.
3-6
Agilent E5260/E5270 User’s Guide, Edition 5
Installation
Inspection and Installation
To Check the Agilent E5260/E5270 Operation
1. Make sure that the Line switch is set to off.
2. On the Agilent E5260/E5270 front panel, connect the Circuit Common terminal
to the frame ground terminal by using a shorting-bar.
WARNING
If the Circuit Common terminal is not connected to the frame ground terminal
(for floating measurement), a potential shock hazard may present. Do not
touch any of measurement circuit at any time while a floating measurement is
in progress.
3. Connect the power cable from the Agilent E5260/E5270 to an AC power outlet.
4. Press the Line switch to turn on the Agilent E5260/E5270.
The initialization screen will appear on the display of the Agilent E5260/E5270.
And the power-on self-test is automatically executed.
If the Agilent E5260/E5270 is operating correctly, the LCD displays as shown in
Figure 3-1.
If a problem occurs, see If You Have a Problem manual.
5. Press the Menu key, and select CONFIG and UNIT menu. Then make sure that
the units displayed match the units installed.
6. Press the Exit key three times to close the setup menu.
Figure 3-1
LCD Display Example
Stat
Meas Value # 1
Setting Parameter
Meas Value # 2
OFF
A
Remote Lock Meas Trigger Error Integ Output Repeat
1
1
M- ch
S- ch
Shift
OUT: 0.00 V
CPL: 100.0uA
To Execute Diagnostics and Self-calibration
Perform the following functions as necessary.
Self-test
See “To Perform Self-test” on page 5-7.
Self-calibration
See “To Perform Self-Calibration” on page 5-8.
Diagnostics
See “To Perform Diagnostics” on page 5-9.
Agilent E5260/E5270 User’s Guide, Edition 5
3-7
Installation
Inspection and Installation
To Remove or Install Plug-in Module
This section provides the plug-in module removal and installation instructions.
WARNING
To prevent electrical shock, turn off the mainframe and remove the power
cable before starting the instruction.
CAUTION
Be careful about the interconnection connector and use clean handling and
anti-static procedures when unpacking or doing the following procedure to prevent
damage.
NOTE
Plug-in module is shipped from the factory after the specifications are confirmed.
Agilent can guarantee that the modules will function and that the module
performance is designed to meet its specifications. However, if you have any
trouble, contact your nearest Agilent Technologies service center.
If you require that the modules be guaranteed to their specifications (for ISO
compliance, etc.), then you must perform a calibration on the instrument (modules
and mainframe together). This requirement arises because the mainframes contain
both a Ground Unit and an A/D converter, which define the specification. Therefore,
to guarantee the specifications it is necessary to take compensation data for the
combination of mainframe and modules.
For calibration, you need the dedicated equipment and accessories. Prepare the all
required items or contact your nearest Agilent Technologies service center.
Removal
1. Turn off the mainframe, then wait at least 10 seconds. See Figure 3-2.
2. Disconnect the power cable from rear panel.
3. Disconnect all cables from the modules.
4. Loosen the screws on the plate.
5. Remove the plate.
6. Set the module extractor to the knob position. The extractors are located at the
left and right on the module front panel
7. Hold the module extractor and gently pull out the module.
3-8
Agilent E5260/E5270 User’s Guide, Edition 5
Installation
Inspection and Installation
Installation
1. Align the module with the left and right slot guide rails in the mainframe.
2. Hold the extractor at the left and right on the module front panel.
3. Gently push the module into the slot until you feel it contacts the connector of
the slot.
4. Set the module extractor to the lock position.
5. Replace the plate by using the screws.
6. Check the operation of the mainframe with the modules as follows.
a. Connect the power cable and turn on the mainframe.
b. After the self-test is completed, check the front panel LCD. No mark must be
set to the Error indicator.
Figure 3-2
Plug-in Module Removal and Installation
Agilent E5260/E5270 User’s Guide, Edition 5
3-9
Installation
Installing Accessories
Installing Accessories
This section describes how to install the Agilent E5260/E5270 and accessories.
Additional information regarding airflow can be found in the “Ventilation
Requirements” on page 3-4.
This section describes how to:
•
“To Connect 16442B Test Fixture”
•
“To Connect Connector Plate”
•
“To Connect ASU”
•
“To Connect GNDU Adapter”
WARNING
There are potentially hazardous voltages of up to ± 100 V (MPSMU) or ± 200 V
(HPSMU) at the Force, Sense, and Guard terminals. To prevent electrical
shock, do not expose these lines.
WARNING
To prevent electrical shock during use, install and connect an interlock circuit
that opens the Interlock terminal when the shielding box access door is opened.
Use the Agilent 16493J Interlock cable to connect the interlock circuit.
CAUTION
The GNDU can sink current of up to 4 A (E5260A/E5270B) or 2.2 A
(E5262A/E5263A). Use Agilent 16493L GNDU cable to connect the GNDU to a
test fixture or a connector plate.
Do not use normal triaxial cable (16494A) because the maximum current rating of
the cable is 1 A.
CAUTION
Never connect the Guard terminal to any output, including circuit common, chassis
ground, or any other guard terminal. Doing so will damage the SMU.
3-10
Agilent E5260/E5270 User’s Guide, Edition 5
Installation
Installing Accessories
To Connect 16442B Test Fixture
See this section if you use the Agilent 16442B Test Fixture. This section describes
how to set up the 16442B and how to connect the E5260/E5270 to the 16442B.
To Set up 16442B
You can stabilize the 16442B as shown in the figure below.
1. Put a stabilizer on both sides of the test fixture.
2. Attach each stabilizer to the unit with a flathead screw.
Agilent E5260/E5270 User’s Guide, Edition 5
3-11
Installation
Installing Accessories
To Connect 16442B
Use the following cables to connect from the E5260/E5270 connectors to the
16442B’s relative connectors.
Cables
16442B
Terminals
E5260/E5270
Terminals
Agilent 16493J Interlock Cable, 3 m or 1.5 m
Intlk
Interlock
Agilent 16493L GNDU Cable, 3 m or 1.5 m
GNDU
GNDU
For Kelvin connection:
SMU1
Agilent 16493K Kelvin Triaxial Cable, 3 m
or 1.5 m
SMU2
Up to 3 SMUs can be connected to the
16442B by the Kelvin connection.
SMU3
SMU
Sense
SMU
SMU4
SMU5
Force
Sense
SMU
SMU6
NOTE
Force
Force
Sense
For non-Kelvin connection:
SMU1
SMU
Force
Agilent 16494A Triaxial Cable, 3 m or 1.5 m
SMU2
SMU
Force
Up to 6 SMUs can be connected to the
16442B by the non-Kelvin connection.
SMU3
SMU
Force
SMU4
SMU
Force
SMU5
SMU
Force
SMU6
SMU
Force
Making non-Kelvin connection
The Force terminals can be used to force and measure DC voltage or current. If you
want to simplify the cable connections, open the Sense terminals and connect the
Force terminals only to the test fixture by using the triaxial cables.
If you make the kelvin connection, use both Force and Sense terminals. Connecting
the Force and Sense lines together at the terminal of the device under test minimizes
the measurement error caused by the residual resistance of the connection cables.
The kelvin connection is effective for the low resistance measurement and the high
current measurement.
3-12
Agilent E5260/E5270 User’s Guide, Edition 5
Installation
Installing Accessories
To Connect Connector Plate
The connector plates available are listed in Table 3-1. For connector plate
installation information, refer to Agilent 16495 Installation Guide.
Table 3-1
Connector Plates
Model
Option Item
16495F
16495F-001
Triax. (f-f) ×12, GNDU (f-f) ×1, Interlock (f) ×1
16495F-002
Triax. (f) ×12, GNDU (f) ×1, Interlock (f) ×1
16495G-001
Triax. (f-f) ×24, GNDU (f-f) ×1, Interlock (f) ×1
16495G-002
Triax. (f) ×24, GNDU (f) ×1, Interlock (f) ×1
16495H-001
Triax. (f-f) ×6, Coax. (f-f) ×6, GNDU (f-f) ×1,
Interlock (f) ×1
16495H-002
Triax. (f) ×6, Coax. (f) ×6, GNDU (f) ×1, Interlock
(f) ×1
16495J-001
Triax. (f-f) ×8, Coax. (f-f) ×4, GNDU (f-f) ×1,
Interlock (f) ×1
16495J-002
Triax. (f) ×8, Coax. (f) ×4, GNDU (f) ×1, Interlock
(f) ×1
16495K-001
Connector plate for ASU
16495G
16495H
16495J
16495K
Connectors
Option 001 provides the through connectors except for the Interlock connector that
provides the soldering patterns at the back side.
For the option 002, the back of each connector is designed for soldering.
NOTE
Making non-Kelvin connection
The Force terminals can be used to force and measure DC voltage or current. If you
want to simplify the cable connections, open the Sense terminals and connect the
Force terminals only to the connector plate by using the triaxial cables.
If you make the kelvin connection, use both Force and Sense terminals. Connecting
the Force and Sense lines together at the terminal of the device under test minimizes
the measurement error caused by the residual resistance of the connection cables.
The kelvin connection is effective for the low resistance measurement and the high
current measurement.
Agilent E5260/E5270 User’s Guide, Edition 5
3-13
Installation
Installing Accessories
Use the following cables to connect from the E5260/E5270 connectors to the
connector plate’s relative connectors.
Cables
Connector
Plate
E5260/E5270
Terminals
Agilent 16493J Interlock Cable, 3 m or 1.5 m
Intlk
Interlock
Agilent 16493L GNDU Cable, 3 m or 1.5 m
GNDU
GNDU
For Kelvin connection:
1
Agilent 16493K Kelvin Triaxial Cable, 3 m
or 1.5 m
2
Up to 4 SMUs can be connected to the
16495J by the Kelvin connection.
5
Up to 3 SMUs can be connected to the
16495H by the Kelvin connection.
Connectors 7 and 8 are not triaxial.
7
Force
Sense
SMU
4
Up to 6 SMUs can be connected to the
16495F by the Kelvin connection.
Force
Sense
SMU
6
Force
Sense
SMU
8
Force
Sense
For non-Kelvin connection:
1
SMU
Force
Agilent 16494A Triaxial Cable, 3 m or 1.5 m
2
SMU
Force
Up to 8 SMUs can be connected to the
16495J by the non-Kelvin connection.
3
SMU
Force
4
SMU
Force
5
SMU
Force
6
SMU
Force
7
SMU
Force
8
SMU
Force
Up to 6 SMUs can be connected to the
16495H by the non-Kelvin connection.
Connectors 7 and 8 are not triaxial.
NOTE
3
SMU
Use the Agilent 16494B Kelvin Triaxial Cable to connect to the Agilent E5250A
Low Leakage Switch Mainframe or the connector plate for the Agilent 4142B
Modular DC Source/Monitor by the kelvin connection.
3-14
Agilent E5260/E5270 User’s Guide, Edition 5
Installation
Installing Accessories
Connecting the interlock terminal
The Agilent E5260/E5270 provides the Interlock connector to prevent you from
receiving an electrical shock from high voltage (more than ± 42 V). If the Interlock
connector is open, the Agilent E5260/E5270 cannot force high voltage more than ±
42 V.
When using the 16442B test fixture, connect the Interlock connectors together using
the 16493J interlock cable.
If you use the 16495F/G/H/J connector plate, your own connector plate, or your own
test fixture, make an interlock circuit as shown in “To Make an Interlock Circuit” on
page 3-23. Then connect the Agilent E5260/E5270 Interlock connector to the
external interlock connector by using the 16493J interlock cable.
Agilent E5260/E5270 User’s Guide, Edition 5
3-15
Installation
Installing Accessories
To Connect ASU
The Agilent E5288A Atto Sense and Switch Unit (ASU) will add the 1 pA range to
the high resolution SMU (HRSMU) when it is connected between the HRSMU and
the device under test (DUT). And the ASU provides the input selection function
when instruments are connected to the SMU input and the AUX input.
NOTE
For the installation of the ASU and the connection to the DUT interface (probe card,
manipulators, and so on), contact your favorite prober vender. The prober vender
will have the solutions. Dimensions of the ASU are 132 mm (W) × 88.5 mm (H) ×
50 mm (D) excluding the connectors.
Figure 3-3
Image of ASU Installation
Shielding box
CMU Return
16495K
DUT interface
ASU
CMU Return
16495K
ASU
Prober
To E5270B/4284A
Required parts
To install 16495K
•
Agilent 16495K Connector plate
•
Agilent 16493M ASU cable
•
Agilent 16048D/E test leads
•
Agilent N1254A-108 Magnet stand
•
BNC cable, coaxial cable, manipulator, wire and so on
Fix the 16495K plate to the shielding box or something that will cover the DUT
interface. See Agilent 16495 Installation Guide. The 16495K is the plate that has the
mechanism to block the light from the cable hole used to pass the cables in the
shielding box.
3-16
Agilent E5260/E5270 User’s Guide, Edition 5
Installation
Installing Accessories
To install ASU
1. Fix the ASU in the shielding box. The ASU must be fixed to the best position for
accessing its connectors. The Agilent N1254A-108 Magnetic Stand will be
useful for fixing the ASU.
2. Pass the 16493M (D-sub cable, triaxial cable), 16048D/E test leads, BNC cable
and so on through the cable hole of the 16495K. They will be connected between
the ASU and the instruments
3. Connect the D-sub cable to the ASU D-sub connector.
Connect the triaxial cable to the ASU Force terminal.
Connect the cable to the ASU CMU-cur/AUX In terminal. See Figure 3-4.
•
For the Agilent 4284A LCR meter, connect the Agilent 16048D/E test leads.
•
For the instrument other than the 4284A, connect the BNC cable to the
CMU-cur/AUX In terminal. And open the CMU-pot terminal or cover it by
using the BNC open cap.
4. Adjust the cable length in the shielding box, and catch in the cables by using the
cover of the 16495K.
5. Connect the cable extended from the DUT interface to the ASU output terminal.
For the non Kelvin connection, open the Sense terminal or cover it by using the
triaxial open cap.
To connect
E5270B
1. Turn the Agilent E5270B off.
2. Connect the D-sub cable from the ASU to the HRSMU D-sub connector.
3. Connect the triaxial cable from the ASU to the HRSMU Force terminal.
NOTE
The specifications of the ASU are guaranteed while it is connected to the exclusive
HRSMU. Confirm the serial number of the HRSMU and the ASU, and connect
them properly. See “To Display Module Serial Number” on page 5-13.
To connect other
1. Turn the instrument off.
instrument to AUX
2. Connect the BNC cable from the ASU CMU-cur/AUX In terminal to the
instrument. Prepare an adapter if the instrument’s input/output connector is not
BNC.
Agilent E5260/E5270 User’s Guide, Edition 5
3-17
Installation
Installing Accessories
Figure 3-4
To Connect ASU
ASU #1
To CMU
To SMU
Hc
CMU-cur/AUX In
Hp
CMU-pot
Force/CMU/AUX
Sense
Force
Force
D-sub
From SMU
To DUT
CMU Return/AUX Common
ASU #2
To CMU
To SMU
Figure 3-5
Lc
CMU-cur/AUX In
Lp
CMU-pot
CMU Return/AUX Common
Force/CMU/AUX
Sense
Force
Force
D-sub
From SMU
To DUT
To Set Shorting Bar
3-18
Agilent E5260/E5270 User’s Guide, Edition 5
Installation
Installing Accessories
To connect 4284A
to AUX
Perform the following procedure to connect the Agilent 4284A. See Figure 3-4 and
Figure 3-5.
Prepare a shorting bar furnished with the ASU. The shorting bar is effective for
reducing the offset capacitance caused by connecting a measurement terminal to the
chuck of a wafer prober.
1. Turn the instrument off.
2. Prepare two ASUs (#1 and #2) and two shorting bar. And perform the following
procedure for each ASU.
a. Disconnect the triaxial cable from the ASU if it is connected to the ASU
Force terminal.
b. Face the concave side of the shorting bar to front.
c. Slide the shorting bar from the right side of the connectors.
3. Connect the 16048D/E test leads to the 4284A.
4. Connect the high potential (Hp) cable of the test leads to the ASU #1 CMU-pot
terminal.
5. Connect the high current (Hc) cable to the ASU #1 CMU-cur/AUX In terminal.
The shorting bar is fixed to the ASU #1 by the step 5 and 6.
6. Connect the triaxial cable from the HRSMU #1 Force terminal to the ASU #1
Force terminal.
7. Connect the low potential (Lp) cable to the ASU #2 CMU-pot terminal.
8. Connect the low current (Lc) cable to the ASU #2 CMU-cur/AUX In terminal.
The shorting bar is fixed to the ASU #2 by the step 8 and 9.
9. Connect the triaxial cable from the HRSMU #2 Force terminal to the ASU #2
Force terminal.
10. Prepare the connection wire (both pin terminals) furnished with the ASU and
connect it between the CMU Return terminals of the ASU #1 and ASU #2
together.
NOTE
About ASU output cables
To perform capacitance measurements accurately, the cable length between DUT
and the ASU output must be as short as possible.
Agilent E5260/E5270 User’s Guide, Edition 5
3-19
Installation
Installing Accessories
To Connect GNDU Adapter
The ground unit (GNDU) output is the single triaxial connector. The Agilent
N1254A-100 GNDU to Kelvin Adapter enables to change it to the dual triaxial
connector. Connect the adapter to the GNDU connector on the front panel, then
connect a Kelvin triaxial cable to extend the GNDU terminal. Maximum current is
restricted when the Kelvin triaxial cable is used. See Table 3-2.
Figure 3-6
Agilent N1254A-100 GNDU to Kelvin Adapter
Agilent N1254A-100 GNDU to Kelvin Adapter
Force
Dual Triaxial (female)
Triaxial (male)
Common
Sense
To GNDU connector
Table 3-2
To 16493K Kelvin triaxial cable
Kelvin Triaxial Cable and Maximum Current
Model No. or
Option Item
Description
Maximum
Current
16493K-001
1.5 m Kelvin Triaxial Cable
3.0 A
16493K-002
3 m Kelvin Triaxial Cable
2.6 A
3-20
Agilent E5260/E5270 User’s Guide, Edition 5
Installation
Mounting Connectors
Mounting Connectors
Previous sections described how to install the available accessories, and Agilent
16495 Installation Guide provides the information on how to install connector
plates on the shielding box. However, you may choose to mount connectors directly
on your own connector plate or test fixture.
To do this, you will need to make connector holes and mount the connectors
yourself. This section contains information on connector hole dimensions.
To mount connectors:
1. Select the appropriate parts for your application. See Table 3-3.
2. Make the holes and mount the connectors. See Table 3-4.
For Kelvin connections, use the Agilent 16493K Kelvin triaxial cable. The
Kelvin triaxial cable requires a Kelvin triaxial connector, which has two
connector holes and three screw holes.
3. Build the interlock circuit shown in “To Make an Interlock Circuit” on page
3-23.
4. Attach cables from the connectors to the DUT (device under test). Refer to “To
Connect the GNDU Output” on page 3-26, “To Connect the SMU Output” on
page 3-27.
Table 3-3
Recommended Parts
Usage
Making an interlock
circuit
Agilent Part No.
Description
1252-1419
Interlock Connector (6 pin, female)
3101-0302 or 3101-3241
Switch
1450-0641
LED (VF ≅ 2.1 V @ IF = 10 mA)
8150-5680
Wire (24 AWG, 600 V, 150 °C)
Connecting GNDU
to DUT
1250-2457
Triaxial Connector (female)
8121-1189 or 8150-2639
Coaxial Cable or Wire
Connecting SMU to
DUT
1250-2457
Triaxial Connector (female)
8121-1191
Low Noise Coaxial Cable
Agilent E5260/E5270 User’s Guide, Edition 5
3-21
Installation
Mounting Connectors
Dimensions of Connector Holes
Kelvin Triaxial Connector (in mm)
14
11
11
14
2.8
10.3
2 − ∅11.3
∅3.2
2 − M3 x 0.5
Triaxial Connector (in mm)
10.3
∅11.3
Interlock Connector (in mm)
1.8
8.2
5.1
Table 3-4
3-22
Agilent E5260/E5270 User’s Guide, Edition 5
Installation
Mounting Connectors
To Make an Interlock Circuit
The interlock circuit is designed to prevent electrical shock when a user touches the
measurement terminals.
CAUTION
You must install an interlock circuit on a shielding box to prevent hazardous
voltages when the door of the shielding box is open.
Figure 3-7 shows the pin assignments of the interlock connector that should be
mounted on a connector plate or test fixture.
Figure 3-7
Interlock Connector Pin Assignments
WARNING
Potentially hazardous voltages may be present at the Force, Guard, and Sense
terminals when the interlock terminals are shorted.
Agilent E5260/E5270 User’s Guide, Edition 5
3-23
Installation
Mounting Connectors
Installing the interlock circuit
Install the interlock circuit as follows:
1. Mount two mechanical switches on your shielding box, so that the switches
close when the door of the shielding box is closed, and open when the door is
opened. For the dimensions of the switch, see Figure 3-9 and Figure 3-10 below.
2. Mount an LED on your shielding box. For the dimensions of the LED, see
Figure 3-8.
3. Use wire to connect the two switches in series between pin number 1 and 2 (or
3) of the interlock connector. See Figure 3-7.
4. Use wire to connect the LED between pin number 4 and 5 (or 6) of the interlock
connector. See Figure 3-7.
If the Agilent E5260/E5270 Interlock connector is connected to the interlock circuit,
the Agilent E5260/E5270 SMU cannot force more than ± 42 V when the door is
open. When the door is closed, it can force more than ± 42 V.
When more than ± 42 V is forced from an SMU, the LED lights to indicate high
voltage output.
Dimensions of the LED (Agilent part number 1450-0641)
11
5
Anode(+)
10
6
Cathode(-)
Figure 3-8
5
5.6
Units: mm
UGI01013,50x50
3-24
Agilent E5260/E5270 User’s Guide, Edition 5
Installation
Mounting Connectors
Dimensions of the Interlock Switch (Agilent part number 3101-0302)
4.75
4.3
10.3
2.8
Figure 3-9
2.8
6.35
3.1
6.5
18.8
5.5
10.3
NC
NO
15.9
Max 9
15.2
2.8
8.1
2.8
Switch off
Switch on
59.4
COM
3.1
22.2
27.8
Units: mm
Figure 3-10
10
37.8
UGI01011,85x60
Dimensions of the Interlock Switch (Agilent part number 3101-3241)
10.2
4.3
27.5
10.9
3.1
3.2
Switch off
Switch on
2.0
15.9
3.4
Units: mm
27.8
6.8
UGI01012,85x60
Agilent E5260/E5270 User’s Guide, Edition 5
3-25
Installation
Mounting Connectors
To Connect the GNDU Output
The following figures show connection examples for the GNDU output.
Kelvin connections
non-Kelvin connections
Use a low-noise coaxial cable (Agilent part
number 8121-1189) from the connector to the
prober, socket, or DUT as shown.
Short the Sense and Force on the connector as
shown below. Measurement data will include the
residual resistance of the connection wire.
To cancel the effects of cable resistance, connect
the Sense line and Force line as close as possible to
the terminal of the DUT.
Use AWG 22 single-strand insulated wire (Agilent
part number 8150-2639) from the connector plate
to the prober, socket, or DUT.
For a quick connection where measurement
accuracy is not critical, connect only Force to the
DUT, without shorting the Sense and Force. With
this connection, the measurement data will include
residual resistance from the connection cable
between the GNDU and the connector plate.
Common
Force
Sense
Common
Force
Sense
to
DUT
to
DUT
Insulator
Plate
Coaxial cable
Triaxial connector
CAUTION
Insulator
Plate
Wire
Triaxial connector
Use Agilent 16493L GNDU cable to connect the GNDU to your connector plate or
test fixture. Do not use the triaxial cable. The GNDU is rated for up to 4 A
(E5260A/E5270B) or 2.2 A (E5262A/E5263A), while the maximum current rating
of the triaxial cable is 1 A.
3-26
Agilent E5260/E5270 User’s Guide, Edition 5
Installation
Mounting Connectors
To Connect the SMU Output
The following figures show connection examples for the SMU output.
Kelvin connections
non-Kelvin connections
Use low-noise coaxial cable (Agilent part number
8121-1191) from the connector to the prober,
socket, or DUT as shown.
The following figure is for the connection using
Kelvin triaxial cable. For the connection using
triaxial cable, connect the cable to the Force
terminal only. Measurement data will include
residual resistance from the connection cable.
To cancel the effects of cable resistance, connect
the Sense line and Force line as close as possible to
the DUT terminal.
To prevent oscillations, do not use cables longer
than 1.5 m.
To make accurate measurements when applying
high currents, extend the guard as far as possible
from the front panel connector to the DUT.
Physically stabilize the cables with tape.
Use low-noise coaxial cable (Agilent part number
8121-1191).
To make accurate measurements when applying
high currents, extend the guard as far as possible
from the front panel connector to the DUT.
Common
Guard
Force
Common
Guard
Force
to
DUT
Triaxial
connector
Common
Guard
Sense
Coaxial cable
to
DUT
Triaxial
connector
Common
Guard
Sense
Coaxial cable
Wire
Insulator
Plate
Insulator
Plate
Agilent E5260/E5270 User’s Guide, Edition 5
3-27
Installation
Mounting Connectors
NOTE
Low-Noise Coaxial Cable
For the extended measurement paths over the connector plate, use low-noise coaxial
cable (Agilent part number 8121-1191). This cable can maximize the guard effects
and minimize the impression of the external noise.
Following figure shows the cutting example of this cable. Key point is the isolation
between the conductive layer and the center conductor. So, cut and trim the end of
the cable as shown in this figure by using a cutter and so on.
Cover here using sleeve
Insulator (black)
min 2 mm
Center conductor
(for Force/Sense signal)
approx. 10 to 15 mm
Outer conductor
(for Guard signal)
Insulator (clear)
Conductive layer (black)
CAUTION
Never connect the Guard terminal to any output, including circuit common, chassis
ground, or any other guard terminal. Doing so will damage the SMU.
WARNING
Potentially hazardous voltages, up to ± 100 V (MPSMU) or ± 200 V (HPSMU),
are present at the Force, Sense, and Guard terminals.
To prevent electrical shock, do not expose these lines.
Before turning the Agilent E5260/E5270 on, connect the Interlock terminal to
an interlock circuit.
Before you touch any connections to these terminals, turn the Agilent
E5260/E5270 off, disconnect the power cable, and discharge any capacitors.
3-28
Agilent E5260/E5270 User’s Guide, Edition 5
Installation
Connecting Measurement Devices
Connecting Measurement Devices
This section describes how to connect device under test (DUT) to the 16442B test
fixture, and how to connect cables to the connector plate.
If you use a wafer prober, see wafer prober manuals.
Note that you must set the module output off when connecting or disconnecting
DUTs. If not, the DUTs may be damaged.
To set the module output off, press OutCh and On/Off keys and confirm that the
Output status indicator shows the off status for the all channels.
This section has the following descriptions:
NOTE
•
“Using Test Fixture”
•
“Using Connector Plate”
Kelvin connection and non-Kelvin connection
To make the Kelvin connection, use both Force and Sense terminals. Connecting the
Force and Sense lines together at the terminal of the DUT (device under test)
minimizes the measurement error caused by the residual resistance of the
connection cables. The Kelvin connection is effective for the low resistance
measurement and the high current measurement.
If you want to simplify the cable connections, open the Sense terminals and use the
Force terminals only. This is the non-Kelvin connection. The Force terminals can be
used to force and measure dc voltage or current.
Agilent E5260/E5270 User’s Guide, Edition 5
3-29
Installation
Connecting Measurement Devices
Using Test Fixture
1. Press the OutCh and On/Off keys, and confirm that the Output status indicator
shows the off status for the all channels.
2. Select a proper socket module for your DUT, then set the socket module on the
test fixture.
3. Mount your DUT on the socket module.
4. Connect between the socket module and the test fixture by using the proper test
leads.
5. Close the lid of the test fixture.
To force more than ± 42 V, close the lid of the test fixture. Otherwise, the
interlock function will stop the Agilent E5260/E5270 output.
To connect between the socket module and the test fixture, you can use test leads
that have the following terminals:
•
Miniature banana-to-miniature banana
•
Miniature banana-to-pin plug
•
Miniature banana-to-miniature clip
CAUTION
Do not connect or disconnect your DUT while the Agilent E5260/E5270 is forcing
voltage or current. Otherwise, your DUT may be damaged.
CAUTION
Do not touch the terminals of the test leads. Oil, perspiration, and dirt prevent good
electrical contact, deteriorate insulation, and degrade measurement accuracy.
3-30
Agilent E5260/E5270 User’s Guide, Edition 5
Installation
Connecting Measurement Devices
Connections for High Current Measurements
When you force or measure a large current, you may want to use a Kelvin (4-wire)
connection to eliminate the residual resistance effects of test leads and contacts. For
example, you can use the following connections as Kelvin connections on the test
fixture.
Examples: Kelvin Connection
SMU(±200V= 1A Max)
1
2
3 (Selected)
Force
Sense
Force
Sense
Force
Sense
Guard
Guard
Guard
Guard
Guard
Guard
Drain
Gate
Substrate
Source
To cancel the effects of the residual resistance, test leads must be connected as close
as possible to the DUT.
Agilent E5260/E5270 User’s Guide, Edition 5
3-31
Installation
Connecting Measurement Devices
Using Connector Plate
This section provides the information useful for connecting cables and probing
needles to a connector plate.
•
“To Reduce Leakage Current”
•
“To Measure Low Resistance”
To Reduce Leakage Current
To reduce the leakage current caused by connection cables, the guard technique is
effective. Connect the probing needles to the terminals of the connector plate by
using coaxial cables as shown below:
1. At end of cable, connect coaxial center conductor to force terminal of connector
plate, and connect coaxial outer conductor to guard terminal of connector plate.
2. At another end, connect coaxial center conductor to tail of the probing needle.
Never connect the outer conductor at this cable end.
Extend the outer conductor as close as possible to the probing needle.
Example
The following example connection can be used to reduce the leakage current.
Extend the outer conductor as close as possible to the probing needle. This also
reduces the induced noise.
WARNING
Do not touch the guard terminal with bare hands because you may be shocked
by high voltage. The potential of the guard terminal is equal to the output
voltage.
3-32
Agilent E5260/E5270 User’s Guide, Edition 5
Installation
Connecting Measurement Devices
CAUTION
Never connect the guard terminal to any other output, including circuit common,
frame ground, or the terminals of any other unit. Doing so may damage the unit.
Guarding
Guarding reduces the leakage current between the measurement points and
instrument. This is important when you measure low current.
The following figure shows the theory of guarding. The buffer amplifier (×1) keeps
the potential of the guard conductor at the same potential as the force conductor, so
current does not flow between the force and guard conductors. Therefore, the
current measured by SMU is same as current at measurement point because no
current is leaked.
Agilent E5260/E5270 User’s Guide, Edition 5
3-33
Installation
Connecting Measurement Devices
To Measure Low Resistance
When you measure a low resistance, high current flows through the DUT. This high
current increases the measurement error caused by the residual resistance of cables.
To cancel the effect of this resistance, you can use Kelvin connections (4-wire),
which means the force and sense lines are extended separately to the DUT.
Connect the probing needles to the terminals of the connector plate by using test
leads or coaxial cables. Following instruction uses the coaxial cables:
1. At end of cable, connect coaxial center conductor to force terminal of connector
plate, and connect coaxial outer conductor to guard terminal of connector plate.
2. At another end, connect coaxial center conductor to tail of the probing needle.
Never connect the outer conductor at this cable end.
Extend the outer conductor as close as possible to the probing needle.
3. Repeat 1 and 2 for the sense terminal of connector plate.
4. Contact the probing needles from force and sense terminals as close as possible
to the DUT.
Example
The following example connection can be used to measure low resistance. The sense
line is extended to the probing pad, and contacts the force line through the pad, so
the voltage drop due to the residual resistance caused by cables and test leads is
canceled.
This example uses test leads. To reduce the leakage current, use coaxial cables.
3-34
Agilent E5260/E5270 User’s Guide, Edition 5
Installation
Connecting Measurement Devices
Kelvin Connection
Kelvin connections give good measurement results when you force high-current.
The following figure shows the equivalent circuits for Kelvin and non-Kelvin
connections.
•
For the non-Kelvin connection, the voltmeter measures the voltage drop of
resistances rF1, RDUT, and rF2.
•
For the Kelvin connection, the voltmeter measures the voltage drop of resistance
RDUT only. The impedance of the voltmeter is very high, so the voltage drop of
resistances rS1 and rS2 can be ignored.
R DUT
r F1
R DUT
r F2
r F1
V
(a) non-Kelvin connection
r S1
r S2
V
r F2
V
(b) Kelvin connection
The Kelvin connection is effective even when forcing voltage. The voltage drop due
to the residual resistance of the force line wiring is fed back to the voltage source via
a comparator in the sense line. The input impedance of comparator is high, and
current flow into the sense line is very low. So output error is not significant if the
sense line wiring has a residual resistance of 10 Ω or less. Therefore, the specified
voltage appears at the sense point (point where sense line contacts force line)
Agilent E5260/E5270 User’s Guide, Edition 5
3-35
Installation
Maintenance
Maintenance
Maintenance should be performed periodically to keep the Agilent E5260/E5270 in
good condition.
Calibration
Calibration and adjustments must be performed periodically so that the instruments
satisfy the specifications, and keep a good condition. It is recommended to perform
the calibration once a year at least. For the calibration and adjustments, contact your
nearest Agilent Technologies Service Center. Trained service personnel will perform
the calibration and adjustments.
NOTE
When shipping the Agilent E5260/E5270 to the service center
When you ship the Agilent E5260/E5270 to the Agilent Technologies service center,
do not remove the source monitor unit (SMU) from the mainframe, and ship the
mainframe with all SMU modules.
When you ship the Agilent E5270B used with the atto sense/switch unit (ASU),
disconnect the connection cables between the ASU and the high resolution source
monitor unit (HRSMU), and ship the ASU, connection cables, and the mainframe.
Then do not remove any module from the mainframe. The ASU can be used with
the dedicated HRSMU. So check the serial number, and ship the proper ASU.
Cleaning
Before performing cleaning, turn off the instrument, and disconnect power cable
from the rear panel. Use a dry cloth to clean the external case parts.
To prevent electrical shock, do not perform cleaning when the instrument is turned
on, and do not use a wet cloth.
3-36
Agilent E5260/E5270 User’s Guide, Edition 5
Installation
Maintenance
Self-test and Diagnostics
Agilent E5260/E5270 provides the following functions to check the operation.
Perform the following functions as necessary.
•
Self-test
Refer to “To Perform Self-test” on page 5-7.
•
Self-calibration
Refer to “To Perform Self-Calibration” on page 5-8.
•
Diagnostics
Refer to “To Perform Diagnostics” on page 5-9.
Agilent E5260/E5270 User’s Guide, Edition 5
3-37
Installation
Maintenance
3-38
Agilent E5260/E5270 User’s Guide, Edition 5
4
Front Panel Reference
Front Panel Reference
This chapter provides the reference information of the Agilent E5260/E5270 front
panel keys and display.
•
“Display and Front Panel Keys”
•
“Front Panel Key Details”
•
“Setup Menus”
4-2
Agilent E5260/E5270 User’s Guide, Edition 5
Front Panel Reference
Display and Front Panel Keys
Display and Front Panel Keys
The Agilent E5260/E5270 provides an LCD and 24 front panel keys for front panel
operation. This section explains the user interface.
•
“Display Images”
•
“Front Panel Key Locations”
•
“Channel Status Area”
•
“Setup Data Area”
•
“Measurement Data Area”
•
“Status Data Area”
Display Images
The LCD displays the measurement data, the setup information, and the status
information as shown in the following example.
Stat
C
Meas Value #1
1.23456mA
A
Meas Value #2
1.23456mV
1 1
Remote Lock Meas Trigger Error Integ Output Repeat
M- ch
Setting Parameter
Shift
OUT: 1.234mV
CPL: 1.234mA
S- ch
This example notifies you that channel 1 applies 1.234 mV with 1.234 mA
compliance setting and executes repeat measurement with the integration time auto
mode. It also shows the measurement results, 1.23456 mA and 1.23456 mV, and
notifies you that channel 1 reaches its compliance setting.
Agilent E5260/E5270 User’s Guide, Edition 5
4-3
Front Panel Reference
Display and Front Panel Keys
The display area consists of the following sub areas that have the meanings
described below.
•
In normal operation, or when changing source output or compliance value:
A
Meas Data 1
Meas Data 2
Status Data
•
Setup Data 1
B
Setup Data 2
When changing measurement setup or source setup:
A
Meas Data 1
Meas Data 2
Setup Data 1
B
Change Setup
A
Channel status T, C, V, X, or blank. See “Channel Status Area”
on page 4-6.
B
Shift key status on (triangle mark) or off (blank). The Shift key
toggles the mark. While the mark appears, you can use the sub
key function instead of the original key function.
Setup Data 1, 2
Source output setting, source compliance setting, measurement
range setting, or error code. See “Setup Data Area” on page
4-7.
Meas Data 1, 2
Measured value, calculated power value, or calculated
resistance value. See “Measurement Data Area” on page 4-8.
Status Data
Status information, measurement channel number, and source
channel number. See “Status Data Area” on page 4-9.
Change Setup
Displays a setup menu or a setup message when you change any
setup. For details, see “Front Panel Key Details” on page 4-10
and “Setup Menus” on page 4-18.
4-4
Agilent E5260/E5270 User’s Guide, Edition 5
Front Panel Reference
Display and Front Panel Keys
Front Panel Key Locations
The following 24 front panel keys are available.
Output
Measure
Reset
Meas
Ch
Local
Cal/ Test
Menu
Restore
Out
Ch
Single
OUT
Value
AD
Meas
Item
Out
Range
Exit
Shift
SerRes
IntegTime Abort
Integ
Zero
Volt
Meas
Range
Edit
Repeat
On/
Off
AUX On/Off Filter
CPL
V/ I
Value
Fast
Def
Value
Local
key sets the Agilent E5260/E5270 to the local condition.
Menu
key displays a setup menu. See “Setup Menu” on page 4-18.
ZeroVolt
Enter
key stores the present source settings and changes the output to 0 V.
Measure key group is used to set up the measurement condition and start
measurement. See “Measure key group” on page 4-11.
Output key group is used to set up the source condition and apply the source output.
See “Output key group” on page 4-14.
Edit key group is used to move the cursor in the display, make the setup effective,
return to the previous menu or display, and so on.
key enables use of the sub key function. The sub key label has been printed on
the front panel above the key. The label color is blue.
Shift
DefValue key applies the default value to the setup item specified by the cursor in the
display area.
key is used with the arrow key. Pressing the Fast key and an arrow key speeds
up changing the setting value.
Fast
Exit
key returns to the previous menu or display without making the setup effective.
Enter
key makes the setup effective, and returns to the previous menu or display.
For details of the front panel keys, see “Front Panel Key Details” on page 4-10.
Agilent E5260/E5270 User’s Guide, Edition 5
4-5
Front Panel Reference
Display and Front Panel Keys
Channel Status Area
This area displays one of the following status codes that indicate the status of the
measurement channels. If some status errors are detected, the most serious status
code is displayed in this area.
Table 4-1
Channel Status Code
Display
Description
Level of
importance
Blank means no status error occurred.
4-6
T
Another channel reached its compliance setting.
1 (low)
C
This channel reached its compliance setting.
2
V
Measurement data is over the measurement range.
3
X
One or more channels are oscillating.
4 (high)
Agilent E5260/E5270 User’s Guide, Edition 5
Front Panel Reference
Display and Front Panel Keys
Setup Data Area
The Setup Data 1 and Setup Data 2 areas display the source output setting, the
source compliance setting, the measurement range setting, or the error code. The
display item can be selected by the MON_ITEM menu, displayed by pressing the
Menu key. The item for the Setup Data 1 area can be specified by the ITEM1
parameter, and the item for the Setup Data 2 area can be specified by the ITEM2
parameter. Table 4-2 shows the display format in the setup data area.
Table 4-2
Setup Data Area
Display Example
OUT:-123.4mV
Description
Source output setting. Four-digit numeric value with
arithmetic point, and unit.
Pulse base value will be displayed for the pulse source.a
CPL:-12.34mA
Source compliance setting. Four-digit numeric value with
arithmetic point, and unit.
VMR: 2V
Range value used for the voltage measurement.
Available range values depend on the module.
IMR: 10uA
Range value used for the current measurement.
Available range values depend on the module.
where uA means μA.
ERR: No Err
Error code.
a. A pulse source is available for the pulsed spot measurement, pulsed
sweep measurement, staircase sweep with pulsed bias measurement, or
quasi- pulsed spot measurement when the E5260/E5270 is in the remote
condition.
NOTE
If you press the OUT Value or CPL Value key, this area displays the following items:
•
Setup Data 1: OUT (source output setting)
•
Setup Data 2: CPL (source compliance setting)
Then, press the Exit or Enter key to return to the previous items.
Agilent E5260/E5270 User’s Guide, Edition 5
4-7
Front Panel Reference
Display and Front Panel Keys
Measurement Data Area
The Meas Data 1 and Meas Data 2 areas can display the following items. The
display item can be selected by pressing the MeasItem key. Table 4-3 shows the
display format in the measurement data area.
For Voltage Output Channel
For Current Output Channel
Meas Data 1
Meas Data 1
Meas Data 2
Case 1
Current
Case 2
Current
Case 3
Power
Power
Case 4
Resistance
Resistance
Meas Data 2
Voltage
Voltage
Voltage
Current
where power and resistance are given by the following formulas.
Power = Measured Voltage × Measured Current
Resistance = Measured Voltage / Measured Current
Table 4-3
Measurement Data Area
Display
Description
Example:
-123.456pA
Engineering display format.a Six-digit numeric value with
arithmetic point, and unit.
Example:
-1.234E-10A
Scientific display format.a Four-digit numeric value with
arithmetic point, exponential part (E, +/- sign, and one- or
two-digit numeric value), and unit.
OFF
Output off status. Source output is disabled. To perform
measurement, set the output ON.
--------
No data to display.
Overflow
Overflow. Use higher measurement range.
a. The display format, engineering or scientific, can be selected by the
DSPL_FRMT menu displayed by pressing the Menu key.
4-8
Agilent E5260/E5270 User’s Guide, Edition 5
Front Panel Reference
Display and Front Panel Keys
Status Data Area
C
Remote
Lock
Meas
Trigger
A
Error
Integ
Output
Repeat
1
1
M- ch
S- ch
The Status data area shows the following statuses.
Label
Remote
Remote status indicator. The triangle mark appears when the Agilent
E5260/E5270 is in the remote condition.
Lock
Key status indicator. The triangle mark appears when the front panel keys are
locked by an external computer.
Meas
Measurement status indicator. The triangle mark appears when the measurement
has been performed. Then you cannot change the channel setup. If the time to get
one measurement data item is too short, the triangle mark is not displayed.
Trigger
NOTE
Description
Trigger wait mode. C: GPIB command, S: Step source start, or M: Step
measurement start. The trigger function is available for the GPIB remote
condition. See Programming Guide.
Error
Error status indicator. The triangle mark appears when any error has occurred.
Integ
A/D converter operation mode. A: Auto, M: Manual, or P: PLC. For details, see
“Measure key group” on page 4-11.
Output
Output status indicator. The triangle mark appears while the source output is
being applied by the channel specified by S-ch. For the Agilent E5270B, if ASU
(Atto Sense and Switch Unit) connects to the AUX side, not SMU side, the
reversed triangle mark appears.
Repeat
Repeat measurement status indicator. The triangle mark appears when the repeat
measurement mode is selected.
M-ch
Measurement channel number effective for the data displayed in the Meas Data
area. 1 or 2 for 2-ch, one of 1 to 8 for 8-ch mainframe.
S-ch
Source channel number effective for the data displayed in the Setup Data area. 1
or 2 for 2-ch, one of 1 to 8 for 8-ch mainframe.
In the remote mode and the default setting, the statuses of Output, Repeat, M-ch,
and S-ch are not displayed. To display all information, set the RMT_DSPL function
ON. Refer to “RMT_DSPL” on page 4-24.
Agilent E5260/E5270 User’s Guide, Edition 5
4-9
Front Panel Reference
Front Panel Key Details
Front Panel Key Details
The front panel keys are used to change the instrument settings, apply DC bias,
measure DC current or voltage, and so on.
Meas
Ch
Local
Meas
Range
Out
Ch
Single
OUT
Value
AD
Cal/ Test
Meas
Item
Menu
Restore
Output
Measure
Reset
Integ
Exit
Shift
SerRes
IntegTime Abort
Zero
Volt
Out
Range
Edit
Repeat
On/
Off
AUX On/Off Filter
CPL
V/ I
Value
Fast
Def
Value
Enter
When the Change Setup area is displayed, only the Edit keys except for the Shift key
are available.
Local
Sets the Agilent E5260/E5270 to the local condition.
Reset
(Shift+Local)
Displays the following message. Press the arrow key to set YES, and then press the
Enter key to reset the instrument.
Reset: NO
Menu
Displays the setup menu in the Change Setup area. See “Setup Menu” on page 4-18.
Cal/Test
(Shift+Menu)
Displays the calibration and test menu in the Change Setup area. See “Calibration
and Test Menu” on page 4-25.
ZeroVolt
Displays the following message. Press the arrow key to set YES, and then press the
Enter key to store the present source settings and change the source output to 0 V. If
the message shows No enabled channel, press the Exit key.
0 V Output: NO
Restore
(Shift+ZeroVolt)
Displays the following message. Press the arrow key to set YES, and then press the
Enter key to restore the source settings stored by the ZeroVolt key operation. If the
message shows No stored data, press the Exit key.
Restore: NO
4-10
Agilent E5260/E5270 User’s Guide, Edition 5
Front Panel Reference
Front Panel Key Details
Measure key group
The Measure key group is used to set up the measurement condition and start
measurement.
Local
Meas
Ch
Cal/ Test
AD
Menu
Restore
Zero
Volt
Output
Measure
Reset
Meas
Item
Meas
Range
Out
Ch
Single
OUT
Value
Exit
Shift
SerRes
IntegTime Abort
Integ
Out
Range
Edit
Repeat
On/
Off
AUX On/Off Filter
CPL
V/ I
Value
Fast
Def
Value
Enter
MeasCh
Selects the measurement channel effective for the data displayed in the Meas Data
area. Press the MeasCh key repeatedly until the desired channel number appears in
the M-ch status area.
MeasItem
Selects the measurement item, DC voltage or current, both DC voltage and current,
resistance, or power.
Press the MeasCh key to specify the measurement channel, and press the MeasItem
key repeatedly until the desired measurement item appears in the Meas Data area.
The measurement item can be specified for each measurement channel.
AD
(Shift+MeasItem)
The Agilent E5260 series does not have this shift key. Available only for the Agilent
E5270B. This shift key operation displays the following message.
[M-ch #] AD Type: H-SPEED or H-RESOLN
where # is 1 or 2 for the 2-ch mainframe, 1, 2, ... or 8 for the 8-ch mainframe.
Press the MeasCh key to specify the measurement channel, and press the arrow key
to select the A/D converter type, H-SPEED or H-RESOLN. Then, press the Enter
key to make the setup effective, or press the Exit key to cancel changing the setup.
H-SPEED
Selects the high-speed A/D converter that is mounted on each
module. For high speed measurement.
H-RESOLN
Selects the high-resolution A/D converter that will be shared by
multiple measurement modules. For reliable and accurate
measurement.
The AD type can be specified for each measurement channel.
Agilent E5260/E5270 User’s Guide, Edition 5
4-11
Front Panel Reference
Front Panel Key Details
Integ
Selects the A/D converter (ADC) operation mode (A: auto, M: manual, or P: PLC).
Refer to Table 4-4. For the Agilent E5260, see the description of the H-SPEED.
Press the MeasCh key to specify the measurement channel, and press the Integ key
repeatedly until the desired mode appears in the Integ status area.
The setup value is effective for the channels that use the same AD type.
IntegTime
(Shift+Integ)
Displays one of the messages shown in Table 4-4. The message depends on the AD
and Integ settings. For the Agilent E5260, see the description of the H-SPEED.
This function sets the number of averaging samples of the high-speed A/D converter
or the integration time of the high-resolution A/D converter. The value should be
increased for reliable and accurate measurement, or decreased for high speed
measurement. The meaning of the setting value depends on the settings of the A/D
converter type and the ADC operation mode. Refer to Table 4-4.
Press the MeasCh key to specify the measurement channel, and press the arrow key
to set the integration time or the number of averaging samples. Then, press the Enter
key to make the setup effective, or press the Exit key to cancel changing the setup.
The setup value is effective for the channels that use the same settings of the AD
type and the ADC operation mode.
MeasRange
Displays the measurement range setup menu in the Change Setup area. See
“Measurement Range Setup Menu” on page 4-31.
Single
Selects the spot measurement mode and performs measurement using the channel
specified by the channel number displayed in the M-ch status area. If measurement
is in progress, stops measurement and performs spot measurement.
Note that the channel can perform measurement when its Output status is ON.
Repeat
Selects the repeat measurement mode and performs measurement using the channel
specified by the channel number displayed in the M-ch status area. If measurement
is in progress, stops measurement and starts repeat measurement.
Note that the channel can perform measurement when its Output status is ON.
Abort
(Shift+Repeat)
Displays the following message. Press the arrow key to set YES, and then press the
key to stop measurement.
Enter
Abort: NO
NOTE
Perform the Abort operation if the Agilent E5260/E5270 still continues the previous
operation even though the condition was changed from remote to local.
4-12
Agilent E5260/E5270 User’s Guide, Edition 5
Front Panel Reference
Front Panel Key Details
Table 4-4
AD, Integ, and IntegTime Values
AD
Integ
H-SPEED
A
IntegTime message a and description
[M-ch #] H-SPEED A N*Ref[pt], N=
Specify the N value shown in the following formula.
Available values are 1 to 1023. Initial value is 1.
Number of averaging samples = N × reference
M
where reference is the number of averaging samples automatically
set by the Agilent E5260/E5270 and cannot be changed.
[M-ch #] H-SPEED M N[pt], N=
P
Specify the number of averaging samples (N). Available values are
1 to 1023. Initial value is 1.
[M-ch #] H-SPEED P N*128[pt], N=
Specify the N value shown in the following formula.
Available values are 1 to 100. Initial value is 1.
Number of averaging samples = N × 128
H-RESOLN
A
The Agilent E5260/E5270 gets 128 samples in a power line cycle.
Hence, the N value is equal to the number of power line cycles.
[M-ch #] H-RESOLN A N*Ref[s], N=
Specify the N value shown in the following formula.
Available values are 1 to 127. Initial value is 6.
Integration time = N × reference
M
where reference is the integration time automatically set by the
Agilent E5270B and cannot be changed.
[M-ch #] H-RESOLN M N*80[us], N=
Specify the N value shown in the following formula.
Available values are 1 to 127. Initial value is 3.
P
Integration time = N × 80 μsec
[M-ch #] H-RESOLN P N/Freq[s], N=
Specify the N value shown in the following formula.
Available values are 1 to 100. Initial value is 1.
Integration time = N / power line frequency
The N value means the number of power line cycles.
a. # is 1 or 2 for the 2-ch mainframe, 1, 2, ... or 8 for the 8-ch mainframe.
Agilent E5260/E5270 User’s Guide, Edition 5
4-13
Front Panel Reference
Front Panel Key Details
Output key group
The Output key group is used to set up the source condition and apply the source
output.
Local
Cal/ Test
Menu
Restore
Zero
Volt
Output
Measure
Reset
Meas
Ch
Meas
Range
Out
Ch
Single
OUT
Value
AD
Meas
Item
Exit
Shift
SerRes
IntegTime Abort
Integ
Out
Range
Edit
Repeat
On/
Off
AUX On/Off Filter
CPL
V/ I
Value
Fast
Def
Value
Enter
OutCh
Selects the source channel effective for the data displayed in the Setup Data area.
Press the OutCh key repeatedly until the desired channel number appears in the S-ch
status area.
OUT Value
Displays the source output setting (OUT) and the source compliance setting (CPL)
in the Setup Data area. Then the cursor appears on the last digit of the integral part
of the OUT value.
If the Output status indicator shows the source output ON status, the source channel
applies the OUT value. Then, if you change the OUT value, the source channel
changes the output value too.
To set the source output value, see “To Apply DC Current/Voltage” on page 5-16.
CPL Value
Displays the source output setting (OUT) and the source compliance setting (CPL)
in the Setup Data area. Then the cursor appears on the last digit of the integral part
of the CPL value.
The CPL value is current for voltage output, or voltage for current output.
To set the compliance value, see “To Apply DC Current/Voltage” on page 5-16.
4-14
Agilent E5260/E5270 User’s Guide, Edition 5
Front Panel Reference
Front Panel Key Details
AUX On/Off
(Shift+CPL Value)
The Agilent E5260 series does not have this function. This function is available for
the Agilent E5270B installed with the high resolution SMU (HRSMU).
To use the ASU (Atto Sense and Switch Unit), connect the ASU to the HRSMU
properly. The ASU adds the 1 pA range to the HRSMU. Connection must be
performed before the Agilent E5270B is turned on.
If you use other instrument such as C meter, connect the instrument to the AUX
input of the ASU. The ASU provides the input selection function.
This shift key operation is available when you are setting the HRSMU connected to
the ASU, and switches the ASU input resource (HRSMU or the instrument
connected to the AUX input) to be connected to the ASU output. When the E5270B
is turned on, the SMU side is connected to the ASU output.
When the AUX side is connected to the ASU output, the HRSMU cannot be used.
Then the Output indicator displays the reversed triangle mark.
The ASU is equipped with two LEDs that show which input is internally connected
to the output.
OutRange
Displays the output range setup menu in the Change Setup area. See “Output Range
Setup Menu” on page 4-32.
On/Off
Enables or disables the source output of the channel specified by the S-ch status
indicator. Then the Output status indicator shows the source output ON or OFF
status.
SerRes
(Shift+On/Off)
Displays the following message.
[S-ch #] Series Resistor: ON or OFF
where # is 1 or 2 for the 2-ch mainframe, 1, 2, ... or 8 for the 8-ch mainframe.
Press the OutCh key to specify the source channel, and press the arrow key to
connect the series resistor (ON) to the channel or to disconnect it (OFF). Then press
the Enter key to make the setup effective, or press the Exit key to cancel changing the
setup.
A series resistor (1 MΩ) is mounted on each module. If you use a series resistor, the
voltage you set is applied to the near side of the series resistor. Consequently, the
voltage will be divided by the series resistor and the device under test.
The series resistor cannot be used for the measurements that use the high resolution
SMU (HRSMU) connected to the Atto Sense and Switch Unit (ASU) or the
measurements that use 1 A range of the high power SMU (HPSMU).
Agilent E5260/E5270 User’s Guide, Edition 5
4-15
Front Panel Reference
Front Panel Key Details
V/I
Switches the source output mode, voltage output or current output.
Pressing the V/I key changes the output mode immediately. It also changes the
measurement item as shown below:
Source Output Mode
V (voltage output)
OUT
CPL
Meas Data 1
Voltage
Current
Current
Current
Meas Data 2
Voltage
Power
Resistance
I (current output)
Current
Voltage
Voltage
Voltage
Current
Power
Resistance
Filter
(Shift+V/I)
Displays the following message.
[S-ch #] Filter: ON or OFF
where # is 1 or 2 for the 2-ch mainframe, 1, 2, ... or 8 for the 8-ch mainframe.
Press the OutCh key to specify the source channel, and press the arrow key to
connect the filter (ON) to the channel or disconnect it (OFF). Then, press the Enter
key to make the setup effective, or press the Exit key to cancel changing the setup.
A filter is mounted on each module. It assures clean source output with no spikes or
overshooting.
4-16
Agilent E5260/E5270 User’s Guide, Edition 5
Front Panel Reference
Front Panel Key Details
Edit key group
The Edit key group is used to move the cursor in the display area, make the setup
value effective, return to the previous menu or display, and so on.
Local
Cal/ Test
Menu
Restore
Zero
Volt
Output
Measure
Reset
Meas
Ch
Meas
Range
Out
Ch
Single
OUT
Value
AD
Meas
Item
Exit
Shift
SerRes
IntegTime Abort
Integ
Out
Range
Edit
Repeat
On/
Off
AUX On/Off Filter
CPL
V/ I
Value
Fast
Def
Value
Enter
Shift
Enables the sub key function. The sub key label has been printed on the front panel
above the key. The label color is blue.
DefValue
Applies the default value to the setup item specified by the cursor in the display
area.
Fast
Used with the arrow key. Pressing the Fast key and an arrow key speeds up changing
the setting value.
Exit
Returns the display to the previous menu or display without making the setup
effective.
Enter
Makes the setup effective, and returns the display to the previous menu or display.
Up arrow
Increases the value of the digit specified by the cursor, displays another selection for
a setup message, or moves the cursor to the left on a setup menu.
Down arrow
Decreases the value of the digit specified by the cursor, displays another selection
for a setup message, or moves the cursor to the right on a setup menu.
Left arrow
Moves the cursor to the left or displays another selection for a setup message.
Right arrow
Moves the cursor to the right or displays another selection for a setup message.
Agilent E5260/E5270 User’s Guide, Edition 5
4-17
Front Panel Reference
Setup Menus
Setup Menus
This section explains the following setup menus displayed in the Change Setup area.
•
“Setup Menu”
•
“Calibration and Test Menu”
•
“Measurement Range Setup Menu”
•
“Output Range Setup Menu”
Setup Menu
Press the Menu key. The setup menu is displayed in the Change Setup area as shown
in the following example. The setup menu is used to change the GPIB address,
power line frequency, monitor items, data display format, and so on.
-123.456mA -1.23456mV OUT:-123.4mV
CONFIG MON_ITEM DSPL_FRMT
>
-123.456mA -1.23456mV OUT:-123.4mV
<WAIT_TIME ERROR RMT_DSPL BEEP
Press the arrow key to move the cursor to the desired function name. Then, press the
key. The setup message or the sub menu will be displayed. To return to the
previous menu, press the Exit key.
Enter
4-18
Agilent E5260/E5270 User’s Guide, Edition 5
Front Panel Reference
Setup Menus
Function Tree
The setup menu provides the following functions.
•
•
CONFIG
•
ADDRESS
•
LINEFREQ Sets the power line frequency.
•
REVISION Displays the firmware revision.
•
UNIT
Displays the module information of each slot.
•
SERIAL
Displays the serial number of each module.
MON_ITEM
•
ITEM1
Selects the item displayed in the Setup Data 1 area.
•
ITEM2
Selects the item displayed in the Setup Data 2 area.
•
DSPL_FRMT
•
WAIT_TIME
•
Sets the GPIB address.
Selects the data display format, engineering or scientific.
•
SOURCE
Sets the source wait time.
•
MEASURE
Sets the measurement wait time.
ERROR
•
DISPLAY
Displays the error code and error message.
•
CLEAR
Clears the error buffer.
•
RMT_DSPL
Selects on or off for the remote display mode.
•
BEEP
Selects on or off for the beeper.
Agilent E5260/E5270 User’s Guide, Edition 5
4-19
Front Panel Reference
Setup Menus
CONFIG
Displays the sub menu that provides the following functions.
•
ADDRESS
Displays the following message.
GPIB Address = Address
Press the arrow key to set the desired GPIB address. Then, press the Enter key to
make the setup effective, or press the Exit key to cancel changing the setup.
•
LINEFREQ
Displays the following message.
Line Frequency: 50Hz or 60Hz
Press the arrow key to select the power line frequency, 50 Hz or 60 Hz. Then
press the Enter key to make the setup effective, or press the Exit key to cancel
changing the setup.
•
REVISION
Displays the following message.
FW: X.XX.XX AD: YY.YY
where X.XX.XX shows the firmware revision and YY.YY shows the revision
number of the A/D converter (ADC) controller.
To return to the previous menu, press the Exit key.
•
UNIT
Displays the following message.
Slot#: model, n, description
where # is 1 or 2 for the 2-ch mainframe, 1, 2, ... or 8 for the 8-ch mainframe,
model is the model number, n is the revision number, and description is the
module description.
To display another message, press the arrow key.
To return to the previous menu, press the Exit key.
4-20
Agilent E5260/E5270 User’s Guide, Edition 5
Front Panel Reference
Setup Menus
•
SERIAL
Displays the following message.
Slot#: xxxxxxxxxx
where # is 1 or 2 for the 2-ch mainframe, 1, 2, ... or 8 for the 8-ch mainframe,
xxxxxxxxxx is the serial number of the module installed in the slot #.
If the atto sense and switch unit (ASU) is connected to the high resolution SMU
(HRSMU), the following message will be displayed.
Slot#: xxxxxxxxxx yyyyyyyyyy
where xxxxxxxxxx is the serial number of the HRSMU, yyyyyyyyyy is the serial
number of the ASU.
To display the serial number of the other module, press the arrow key.
To return to the previous menu, press the Exit key.
NOTE
If the incorrect ASU is connected to the HRSMU
The ASU can be used with only the HRSMU that was connected to it when the
performance verification was performed. If the incorrect ASU is connected,
“ERROR” will be displayed right of the serial number.
If “ERROR” is displayed, confirm the serial number of the ASU, turn the Agilent
E5270B off, and connect the correct ASU.
Agilent E5260/E5270 User’s Guide, Edition 5
4-21
Front Panel Reference
Setup Menus
MON_ITEM
Displays the sub menu that provides the following functions.
•
ITEM1
Selects the item displayed in the Setup Data 1 area.
•
ITEM2
Selects the item displayed in the Setup Data 2 area.
Move the cursor to the function you want to set, and press the Enter key. Then the
following message will be displayed.
Monitor Item #: Item
where # is 1 for ITEM1 or 2 for ITEM2, and Item is one of the items listed below.
•
OUT
Source output setting of the output channel
•
CPL
Compliance setting of the output channel
•
VMR
Range value for the voltage measurement
•
IMR
Range value for the current measurement
•
ERR
Error code
Press the arrow key to select the item you want to display. Then, press the Enter key
to make the setup effective, or press the Exit key to cancel changing the setup.
DSPL_FRMT
Displays the following message.
Display Format: ENGINEERING or SCIENTIFIC
Press the arrow key to select the data display format, ENGINEERING or
SCIENTIFIC. Then, press the Enter key to make the setup effective, or press the Exit
key to cancel changing the setup.
Display Format
Description
ENGINEERING
Six-digit numeric value with arithmetic point, and unit.
Example: -123.456pA
SCIENTIFIC
Four-digit numeric value with arithmetic point, exponential
part (E, +/- sign, and one- or two-digit numeric value), and
unit.
Example: -1.234E-10A
4-22
Agilent E5260/E5270 User’s Guide, Edition 5
Front Panel Reference
Setup Menus
WAIT_TIME
Displays the sub menu that provides the following functions.
•
SOURCE
Sets the source wait time.
•
MEASURE
Sets the measurement wait time.
Move the cursor to the function you want to set, and press the Enter key. Then the
following message will be displayed.
Wait Time =N*Ref [s]: N =
The source wait time is the time the source channel always waits after it starts the
output and until it changes the output value. The measurement wait time is the time
the measurement channel always waits after the source channel starts the output
until the measurement channel starts the measurement. Refer to Figure 4-1. The wait
time is given by the following formula:
wait time = N × reference
where reference is the wait time the Agilent E5260/E5270 automatically sets
according to the present settings; this wait time cannot be changed. Available N
values are 0 to 10, 0.1 step. The initial value is 1. If you specify it too short, the
measurement may start before device characteristics stable; if too long, time will be
wasted.
Press the arrow key to set the N value. Then, press the Enter key to make the setup
effective, or press the Exit key to cancel changing the setup. The settings are
effective for all modules.
Figure 4-1
Source/Measurement Wait Time
(1) Local mode
(2) Remote mode
Measurement wait time
Source wait time
Source wait time
: Measurement
Delay time
Measurement wait time
NOTE
Hold time
Step delay time
Time
In the local mode, you cannot set the hold time, delay time, and step delay time.
They are automatically set to 0 s.
In the remote mode, if the delay time is longer than the wait time, the wait time can
be ignored.
Agilent E5260/E5270 User’s Guide, Edition 5
4-23
Front Panel Reference
Setup Menus
ERROR
Displays the sub menu that provides the following functions.
•
DISPLAY
Displays the error code and error message, or No Error. A maximum of four
error messages can be stored.
To return to the previous menu, press the Exit key.
•
CLEAR
Displays the following message. Then, press the Enter key to clear the error
buffer, or press the Exit key to cancel this operation.
Clear Error Buffer: YES
RMT_DSPL
Displays the following message.
Display in Remote Mode: OFF or ON
Press the arrow key to set the remote display mode ON or OFF. Then, press the Enter
key to make the setup effective, or press the Exit key to cancel changing the setup.
This function changes the display items in the remote mode. If it is ON, the LCD
displays the measured data, setup data, and all status information. If it is OFF
(default setting), the LCD displays only a part of the status information. See
“Display Images” on page 4-3 and “Status Data Area” on page 4-9.
Note that setting this function ON may adversely affect the performance such as the
measurement speed.
BEEP
Displays the following message.
BEEP: ON or OFF
Press the arrow key to set the beeper ON or OFF. Then, press the Enter key to make
the setup effective, or press the Exit key to cancel changing the setup.
4-24
Agilent E5260/E5270 User’s Guide, Edition 5
Front Panel Reference
Setup Menus
Calibration and Test Menu
Press the Shift key and the Menu key. The calibration and test menu is displayed in
the Change Setup area as shown below. The menu is used to set the auto-calibration,
to execute the self-calibration, self-test, and diagnostics, and so on.
-123.456mA -1.23456mV
AUTO_CAL ADC_ZERO CAL
OUT:-123.4mV
SELFTEST
>
-123.456mA -1.23456mV
<ADC_ZERO CAL SELFTEST
OUT:-123.4mV
DIAG
Press the arrow key to move the cursor to the desired function name. Then, press the
key. The setup message or the sub menu will be displayed. To return to the
previous menu, press the Exit key.
Enter
Function Tree
This menu provides the following functions.
•
AUTO_CAL
Sets auto-calibration on or off.
•
ADC_ZERO
Only for the E5270B. Sets the ADC zero function on or off.
•
CAL
•
•
•
EXECUTE
Executes self-calibration.
•
RESULT
Displays the self-calibration result message.
SELFTEST
•
EXECUTE
Executes self-test.
•
RESULT
Displays the self-test result message.
•
RECOVER
Enables or disables use of the failed module.
DIAG
•
EXECUTE
Executes diagnostics.
•
RESULT
Displays the diagnostics result message.
Agilent E5260/E5270 User’s Guide, Edition 5
4-25
Front Panel Reference
Setup Menus
AUTO_CAL
Displays the following message.
Auto Calibration: ON or OFF
Press the arrow key to set auto-calibration ON or OFF. Then, press the Enter key to
make the setup effective, or press the Exit key to cancel changing the setup.
The auto-calibration function automatically starts calibration for all modules every
30 minutes if the output switches of all modules are off for 30 minutes.
NOTE
To perform calibration correctly, the measurement terminals should be opened
before starting calibration.
If auto-calibration is enabled, open the measurement terminals or disconnect the
device under test from the measurement terminals after measurement.
ADC_ZERO
This function is not available for the Agilent E5260. Available only for the Agilent
E5270B.
Displays the following message.
ADC Zero: ON or OFF
Press the arrow key to set the ADC zero function ON or OFF. Then, press the Enter
key to make the setup effective, or press the Exit key to cancel changing the setup.
The ADC zero function is available for the high-resolution A/D converter (ADC)
and not available for the high-speed ADC. This function measures the internal offset
of the high-resolution ADC and compensates it automatically. The measurement
data displayed on the LCD will be the data after compensation.
NOTE
This function is especially effective for low voltage measurements. Disable the
function in cases where measurement speed is more important than measurement
accuracy. This approximately halves integration time.
4-26
Agilent E5260/E5270 User’s Guide, Edition 5
Front Panel Reference
Setup Menus
CAL
Displays the sub menu that provides the following functions.
•
EXECUTE
Displays the following message.
Calibration: ALL
Press the arrow key to select the slot to calibrate. Then, press the Enter key to
start self-calibration, or press the Exit key to return to the previous menu without
performing self-calibration.
During self-calibration, the following message will be displayed.
Press [Exit] to abort
Then, press the Exit key to abort self-calibration, or wait until self-calibration is
completed and the following message is displayed:
Calibration: Pass or Fail
Press the Exit key to return to the previous menu.
•
RESULT
Displays the following message.
FRAME: Pass or Fail Error No.
Press the arrow key to display the result of another slot as shown below:
Slot#: Pass or Fail Error No.
where # is 1 or 2 for the 2-ch mainframe, 1, 2, ... or 8 for the 8-ch mainframe,
and Error No. is the error number.
Press the Exit key to return to the previous menu.
NOTE
To execute CAL of Agilent E5270B installed with ASU
If you execute the CAL of the E5270B installed with the ASU (Atto Sense and
Switch Unit), the E5270B executes the self-calibration and the 1 pA range offset
measurement for the measurement channels connected to the ASUs. The offset data
is temporarily memorized until the E5270B is turned off, and is used for the
compensation of the data measured by the 1 pA range of the channels. The E5270B
performs the data compensation automatically and returns the compensated data.
Since the E5270B is turned on, if you do not execute the CAL, the E5270B performs
the data compensation by using the pre-stored offset data.
Agilent E5260/E5270 User’s Guide, Edition 5
4-27
Front Panel Reference
Setup Menus
SELFTEST
Displays the sub menu that provides the following functions.
•
EXECUTE
Displays the following message.
Selftest: ALL
Press the arrow key to select the test item. Then, press the Enter key to start the
self-test, or press the Exit key to return to the previous menu without performing
the self-test.
During the self-test, the following message will be displayed.
Press [Exit] to abort
Then, press the Exit key to abort the self-test. Or wait until the self-test is
completed and the following message is displayed.
Selftest: Pass or Fail
Press the Exit key to return to the previous menu.
•
RESULT
Displays the following message.
FRAME: Pass or Fail Error No.
Press the arrow key to display the result of another slot as shown below.
Slot#: Pass or Fail Error No.
where # is 1 or 2 for the 2-ch mainframe, 1, 2, ... or 8 for the 8-ch mainframe,
and Error No. is the error number.
Press the Exit key to return to the previous menu.
•
RECOVER
Displays the following message.
Recover Module: YES
Then, press the Enter key to use the failed modules, or press the Exit key to
cancel this operation.
4-28
Agilent E5260/E5270 User’s Guide, Edition 5
Front Panel Reference
Setup Menus
DIAG
Displays the sub menu that provides the following functions.
•
EXECUTE
Displays the following message.
DIAG: Item
where Item is one of the following:
•
GPIB
GPIB diagnostics
•
TRIGGER (BNC)
Trigger In/Out diagnostics
•
KEY
Front panel key diagnostics
•
HV-LED
High voltage LED diagnostics
•
DGTL-I/O
Digital I/O diagnostics
•
BEEPER
Beeper diagnostics
Press the arrow key and the Enter key to select the diagnostics item, and refer to
Table 4-5 to perform the diagnostics; or press the Exit key to return to the
previous menu without performing diagnostics.
After the diagnostics, the following message is displayed:
DIAG: Pass or Fail or Aborted
Press the Exit key to return to the previous menu.
•
RESULT
Displays the following message.
DIAG: Item Pass or Fail Error No. or Not performed yet
where Item is the diagnostics item and Error No. is the error number.
Press the arrow key to display the result of another item.
Press the Exit key to return to the previous menu.
Agilent E5260/E5270 User’s Guide, Edition 5
4-29
Front Panel Reference
Setup Menus
Table 4-5
To Perform Diagnostics
Item
GPIB
Description
For the next message, disconnect the GPIB cable from the GPIB connector. Then, press
the Enter key to start diagnostics or the Exit key to return to the previous menu.
Open GPIB, then press [Enter].
Press [Exit] to abort
TRIGGER
(BNC)
For the next message, connect the BNC cable between the Ext Trig In and Out connectors.
Then, press the Enter key to start diagnostics or the Exit key to return to the previous menu.
Connect In to Out, then press [Enter].
Press [Exit] to abort
KEY
For the next message, press any front panel key.
DIAG:KEY
Press any key.
OK: [Enter] twice or NG: [Exit] twice
Then, the message will be changed as shown below:
DIAG:KEY
[label]
OK: [Enter] twice or NG: [Exit] twice
where label must be the name of the key you pressed.
Press another key to continue the key diagnostics. Press the Enter key twice if all responses
were good, or press the Exit key twice if any response was bad.
HV-LED
For the next message, press the Enter key if the High Voltage LED is blinking, or press the
key if the LED does not blink.
Exit
DIAG:HV-LED
Is the LED blinking?
YES: [Enter] or NO: [Exit]
DGTL-I/O
For the next message, disconnect any cable from the digital I/O port. Then, press the Enter
key to start the diagnostics, or press the Exit key to return to the previous menu.
Open DGTL-I/O, then press [Enter].
Press [Exit] to abort
BEEPER
For the next message, press the Enter key to hear two types of beep sounds every second,
or press the Exit key for no beep sounds.
DIAG:BEEP
Is beeper making 2 sounds?
YES: [Enter] or NO: [Exit]
4-30
Agilent E5260/E5270 User’s Guide, Edition 5
Front Panel Reference
Setup Menus
Measurement Range Setup Menu
Press the MeasRange key to display the measurement range setup menu. The
measurement range setup menu is displayed in the Change Setup area as shown
below. The menu is used to set the voltage measurement ranging mode (V_RANGE)
or the current measurement ranging mode (I_RANGE).
-123.456mA -1.23456mV
V_RANGE I_RANGE
OUT:-123.4mV
Press the arrow key to move the cursor to the desired function name. Then, press the
key.
Enter
V_RANGE
Displays the following message.
[M-ch #] Meas Range: Mode
where # is 1 or 2 for the 2-ch mainframe, 1, 2, ... or 8 for the 8-ch mainframe, and
Mode is the measurement ranging mode, AUTO, FIX xV, or LIM xV. Then, x
indicates the range value. Available values depend on the module.
AUTO means auto ranging, FIX means fixed range, and LIM means limited auto
ranging.
Press the arrow key to select the measurement ranging mode. Then, press the Enter
key to make the setup effective, or press the Exit key to cancel changing the setup.
I_RANGE
Displays the following message.
[M-ch #] Meas Range: Mode
where # is 1 or 2 for the 2-ch mainframe, 1, 2, ... or 8 for the 8-ch mainframe, and
Mode is the measurement ranging mode, AUTO, FIX xA, or LIM xA. Then, x
indicates the range value. Available values depend on the module.
AUTO means auto ranging, FIX means fixed range, and LIM means limited auto
ranging. Also, uA means μA.
Press the arrow key to select the measurement ranging mode. Then, press the Enter
key to make the setup effective, or press the Exit key to cancel changing the setup.
NOTE
Before using 1 pA range (only for E5270B)
The measurement channel connected to the ASU (Atto Sense and Switch Unit)
supports the 1 pA range. To use the 1 pA range, set the 1 pA fixed range or the 1 pA
limited auto ranging.
Agilent E5260/E5270 User’s Guide, Edition 5
4-31
Front Panel Reference
Setup Menus
Output Range Setup Menu
Press the OutRange key to display the output range setup menu. The output range
setup menu is displayed in the Change Setup area as shown below. The menu is used
to set the voltage output ranging mode (V_RANGE) or the current output ranging
mode (I_RANGE).
-123.456mA -1.23456mV
V_RANGE I_RANGE
OUT:-123.4mV
Press the arrow key to move the cursor to the desired function name. Then, press the
key.
Enter
V_RANGE
Displays the following message.
[S-ch #] Output Range: Mode
where # is 1 or 2 for the 2-ch mainframe, 1, 2, ... or 8 for the 8-ch mainframe, and
Mode is the output ranging mode, AUTO, FIX xV, or LIM xV. Then, x indicates the
range value. Available values depend on the module.
AUTO means auto ranging, FIX means fixed range, and LIM means limited auto
ranging.
Press the arrow key to select the output ranging mode. Then, press the Enter key to
make the setup effective, or press the Exit key to cancel changing the setup.
I_RANGE
Displays the following message.
[S-ch #] Output Range: Mode
where # is 1 or 2 for the 2-ch mainframe, 1, 2, ... or 8 for the 8-ch mainframe, and
Mode is the output ranging mode, AUTO, FIX xA, or LIM xA. Then, x indicates the
range value. Available values depend on the module.
AUTO means auto ranging, FIX means fixed range, and LIM means limited auto
ranging. Also, uA means μA.
Press the arrow key to select the output ranging mode. Then, press the Enter key to
make the setup effective, or press the Exit key to cancel changing the setup.
4-32
Agilent E5260/E5270 User’s Guide, Edition 5
5
Front Panel Operations
Front Panel Operations
This chapter explains how to use the Agilent E5260/E5270 in the local mode.
NOTE
•
“Available Functions”
•
“Setting Up Agilent E5260/E5270”
•
“Applying Source Output”
•
“Making Measurement”
Local Key
Front panel operation is available when the Agilent E5260/E5270 is being set to
local mode. Press the Local key to change the condition to local.
NOTE
Measurement Mode
The Agilent E5260/E5270 supports the following measurement mode:
•
High Speed Spot Measurement
•
Spot Measurement
•
Staircase Sweep Measurement
•
Multi Channel Sweep Measurement
•
1 Channel Pulsed Spot Measurement
•
Pulsed Sweep Measurement
•
Staircase Sweep with Pulsed Bias Measurement
•
Quasi-pulsed Spot Measurement
•
Linear Search Measurement
•
Binary Search Measurement
The measurement modes are available when the Agilent E5260/E5270 is being set
to GPIB remote condition.
In local mode, the Agilent E5260/E5270 just applies DC voltage or current, and then
measures DC voltage or current like the high speed spot measurement.
5-2
Agilent E5260/E5270 User’s Guide, Edition 5
Front Panel Operations
Available Functions
Available Functions
Table 5-1 lists the typical functions of the Agilent E5260/E5270.
Table 5-1
Typical Functions
Operating Condition/Mode
Function
Local
Remote
Available
Available
Not available
Available
To apply DC voltage or DC current
Available
Available
To apply DC voltage and measure DC current
Available
Available
To apply DC current and measure DC voltage
Available
Available
To apply DC voltage and measure DC voltage
Available
Available
To apply DC current and measure DC current
Available
Available
To display measurement, source, status data
Available
Available a
To calculate power and display the value
Available
Not available
To calculate resistance and display the value
Available
Not available
To set GPIB Address
Available
Not available
To set power line frequency
Available
Not available
To execute self-test
Available
Available
To execute self-calibration
Available
Available
To execute diagnostics
Available
Available
To use trigger input/output
Not available
Available
To use digital interface
Not available
Available
To use multiple source channels
To use multiple measurement channels
a. In the remote mode and the default setting, only a part of the status
information is displayed. See “Status Data Area” on page 4-9.
Agilent E5260/E5270 User’s Guide, Edition 5
5-3
Front Panel Operations
Setting Up Agilent E5260/E5270
Setting Up Agilent E5260/E5270
This section describes the following tasks of setting up the Agilent E5260/E5270.
•
“To Set Line Frequency”
•
“To Initialize Agilent E5260/E5270”
•
“To Set Beeper”
•
“To Apply Default Value”
•
“To Select Monitor Items”
•
“To Perform Self-test”
•
“To Perform Self-Calibration”
•
“To Perform Diagnostics”
•
“To Set Auto-Calibration”
•
“To Set ADC Zero Function”
•
“To Read Error Message”
•
“To Display Firmware Revision”
•
“To Display Module Information”
•
“To Display Module Serial Number”
•
“To Set GPIB Address”
•
“To Set Remote Display Mode”
•
“To Return to Local Mode”
5-4
Agilent E5260/E5270 User’s Guide, Edition 5
Front Panel Operations
Setting Up Agilent E5260/E5270
To Set Line Frequency
1. Press the Menu key.
2. Move the cursor to CONFIG, then press the Enter key.
3. Move the cursor to LINEFREQ, then press the Enter key.
4. Press the arrow keys to select the line frequency 50 Hz or 60 Hz.
5. Press the Enter key to make the setup effective, or press the Exit key to cancel
changing the setup.
6. Press the Exit key twice to close the setup menu.
To Initialize Agilent E5260/E5270
1. Press the Shift key and the Local key.
2. Press the Enter key for the message Reset:YES to initialize the Agilent
E5260/E5270, or press the Exit key to cancel initialization.
To Set Beeper
1. Press the Menu key.
2. Move the cursor to BEEP, then press the Enter key.
3. Press the arrow keys to select the beep ON or OFF.
4. Press the Enter key to make the setup effective, or press the Exit key to cancel
changing the setup.
5. Press the Exit key to close the setup menu.
To Apply Default Value
Specify a setup item by using the cursor, then press the DefValue key to apply the
default value to the setup item.
Agilent E5260/E5270 User’s Guide, Edition 5
5-5
Front Panel Operations
Setting Up Agilent E5260/E5270
To Select Monitor Items
The following procedure selects the items displayed in the Setup Data area.
1. Press the Menu key.
2. Move the cursor to MON_ITEM, then press the Enter key.
3. Move the cursor to ITEM1 for the Setup Data 1 area, then press the Enter key.
4. Press the arrow keys to select the monitor item; OUT (source output value),
CPL (compliance value), VMR (voltage measurement range setting), IMR
(current measurement range setting), or ERR (error number).
5. Press the Enter key to make the setup effective, or press the Exit key to cancel
changing the setup.
6. Move the cursor to ITEM2 for the Setup Data 2 area, then press the Enter key.
7. Perform 4 and 5 to set the item for ITEM2.
8. Press the Exit key twice to close the setup menu.
5-6
Agilent E5260/E5270 User’s Guide, Edition 5
Front Panel Operations
Setting Up Agilent E5260/E5270
To Perform Self-test
1. Open the measurement terminals of the Agilent E5260/E5270.
2. Press the Shift key and the Menu key.
3. Move the cursor to SELFTEST, then press the Enter key.
4. Move the cursor to EXECUTE, then press the Enter key.
5. Press the arrow keys to select the self-test item; ALL, FRAME, or Slot n (n: 1 or
2 for 2-ch mainframe, 1 to 8 for 8-ch mainframe).
6. Press the Enter key to start the self-test, or press the Exit key to cancel it.
During the self-test, press the Exit key to abort the self-test.
7. Press the Exit key three times to close the setup menu.
To display test results
1. Press the Shift key and the Menu key.
2. Move the cursor to SELFTEST, then press the Enter key.
3. Move the cursor to RESULT, then press the Enter key.
4. Press the arrow keys to select the self-test item; FRAME or Slot n (n: 1 or 2 for
2-ch mainframe, 1 to 8 for 8-ch mainframe). The test result is displayed for each
item.
5. Press the Exit key three times to close the setup menu.
To use modules that failed self-test
The following procedure enables you to use a module that failed self-test or
self-calibration.
1. Press the Shift key and the Menu key.
2. Move the cursor to SELFTEST, then press the Enter key.
3. Move the cursor to RECOVER, then press the Enter key.
4. Press the arrow keys to select YES for the message Recover Module:.
5. Press the Enter key to perform this operation, or press the Exit key to cancel the
operation.
6. Press the Exit key twice to close the setup menu.
Agilent E5260/E5270 User’s Guide, Edition 5
5-7
Front Panel Operations
Setting Up Agilent E5260/E5270
To Perform Self-Calibration
1. Open the measurement terminals of the Agilent E5260/E5270.
2. Press the Shift key and the Menu key.
3. Move the cursor to CAL, then press the Enter key.
4. Move the cursor to EXECUTE, then press the Enter key.
5. Press the arrow keys to select the slot to calibrate; ALL or Slot n (n: 1 or 2 for
2-ch mainframe, 1 to 8 for 8-ch mainframe).
6. Press the Enter key to start calibration, or press the Exit key to cancel calibration.
During calibration, press the Exit key to abort it.
7. Press the Exit key three times to close the setup menu.
To display calibration results
1. Press the Shift key and the Menu key.
2. Move the cursor to CAL, then press the Enter key.
3. Move the cursor to RESULT, then press the Enter key.
4. Press the arrow keys to select the calibration item; FRAME or Slot n (n: 1 or 2
for 2-ch mainframe, 1 to 8 for 8-ch mainframe). The calibration result is
displayed for each calibration item.
5. Press the Exit key three times to close the setup menu.
NOTE
To use a module that failed self-calibration, refer to “To use modules that failed
self-test” on page 5-7. The procedure also applies to modules that failed
self-calibration.
NOTE
If you execute the CAL of the E5270B installed with the ASU (Atto Sense and
Switch Unit), the E5270B executes the self-calibration and the 1 pA range offset
measurement for the measurement channels connected to the ASUs. The offset data
is temporarily memorized until the E5270B is turned off, and is used for the
compensation of the data measured by the 1 pA range of the channels. The E5270B
performs the data compensation automatically and returns the compensated data.
Since the E5270B is turned on, if you do not execute the CAL, the E5270B performs
the data compensation by using the pre-stored offset data.
5-8
Agilent E5260/E5270 User’s Guide, Edition 5
Front Panel Operations
Setting Up Agilent E5260/E5270
To Perform Diagnostics
1. Press the Shift key and the Menu key.
2. Move the cursor to DIAG, then press the Enter key.
3. Move the cursor to EXECUTE, then press the Enter key.
4. Press the arrow keys to select the diagnostics item; GPIB, TRIGGER (BNC),
KEY, HV-LED, DGTL-I/O, or BEEPER.
Before starting the diagnostics, perform the following:
•
For GPIB, disconnect the GPIB cable.
•
For TRIGGER (BNC), connect a BNC cable between the Ext Trig In and
Out connectors.
•
For DGTL-I/O, disconnect any cable from the digital I/O port.
•
For other diagnostics, no action is required.
5. Press the Enter key to start diagnostics, or press the Exit key to cancel
diagnostics.
After starting the diagnostics, perform the following, or press the Exit key to
abort the diagnostics.
•
For KEY, press any front panel key; then the LCD displays the key name.
Repeat this for all front panel keys.
If all responses were good, press the Enter key twice to stop.
If any response was bad, press the Exit key twice to stop.
•
For HV-LED, confirm that the LED blinks.
If the LED is blinking, press the Enter key to stop.
If the LED does not blink, press the Exit key to stop.
•
For BEEPER, confirm that the beeper makes two sounds every second.
If you hear it, press the Enter key to stop.
If you do not hear it, press the Exit key to stop.
•
For other diagnostics, no action is required.
6. Press the Exit key three times to close the setup menu.
Agilent E5260/E5270 User’s Guide, Edition 5
5-9
Front Panel Operations
Setting Up Agilent E5260/E5270
To display diagnostics results
1. Press the Shift key and the Menu key.
2. Move the cursor to DIAG, then press the Enter key.
3. Move the cursor to RESULT, then press the Enter key.
4. Press the arrow keys to select the diagnostics item; GPIB, TRIGGER (BNC),
KEY, HV-LED, DGTL-I/O, or BEEPER. The diagnostics result is displayed for
each diagnostics item.
5. Press the Exit key three times to close the setup menu.
5-10
Agilent E5260/E5270 User’s Guide, Edition 5
Front Panel Operations
Setting Up Agilent E5260/E5270
To Set Auto-Calibration
1. Press the Shift key and the Menu key.
2. Move the cursor to AUTO_CAL, then press the Enter key.
3. Press the arrow keys to select the auto-calibration ON or OFF.
4. Press the Enter key to make the setup effective, or press the Exit key to cancel
changing the setup.
5. Press the Exit key to close the setup menu.
NOTE
The auto-calibration function automatically starts calibration for all modules every
30 minutes if the output switches of all modules are off for 30 minutes.
If auto-calibration is enabled, open the measurement terminals or disconnect the
device under test from the measurement terminals after measurement. To perform
calibration properly, the measurement terminals should be opened before starting
calibration.
To Set ADC Zero Function
This function is not available for the Agilent E5260. Available only for the Agilent
E5270B.
1. Press the Shift key and the Menu key.
2. Move the cursor to ADC_ZERO, then press the Enter key.
3. Press the arrow keys to select the ADC zero function ON or OFF.
4. Press the Enter key to make the setup effective, or press the Exit key to cancel
changing the setup.
5. Press the Exit key to close the setup menu.
NOTE
The ADC zero function is available for the high-resolution A/D converter (ADC)
but not available for the high-speed ADC. This function measures the internal offset
of the high-resolution ADC and compensates it automatically. The measurement
data displayed on the LCD will be the data after compensation.
This function is especially effective for the low voltage measurement. Disable the
function in cases where measurement speed is more important than measurement
accuracy. This approximately halves the integration time.
Agilent E5260/E5270 User’s Guide, Edition 5
5-11
Front Panel Operations
Setting Up Agilent E5260/E5270
To Read Error Message
1. Press the Menu key.
2. Move the cursor to ERROR, then press the Enter key.
3. Move the cursor to DISPLAY, then press the Enter key to display the message.
4. Press the arrow keys to read another error message. A maximum of four error
messages can be stored.
5. Press the Exit key three times to close the setup menu.
To clear error buffer
1. Press the Menu key.
2. Move the cursor to ERROR, then press the Enter key.
3. Move the cursor to CLEAR, then press the Enter key.
4. Press the arrow key to select YES for the message Clear Error Buffer:.
5. Press the Enter key to clear the error buffer, or press the Exit key to cancel
operation.
6. Press the Exit key twice to close the setup menu.
To Display Firmware Revision
1. Press the Menu key.
2. Move the cursor to CONFIG, then press the Enter key.
3. Move the cursor to REVISION, then press the Enter key. The firmware revision
is displayed.
4. Press the Exit key three times to close the setup menu.
5-12
Agilent E5260/E5270 User’s Guide, Edition 5
Front Panel Operations
Setting Up Agilent E5260/E5270
To Display Module Information
1. Press the Menu key.
2. Move the cursor to CONFIG, then press the Enter key.
3. Move the cursor to UNIT, then press the Enter key. The module information is
displayed.
4. Press the arrow keys to display another module information item.
5. Press the Exit key three times to close the setup menu.
To Display Module Serial Number
1. Press the Menu key.
2. Move the cursor to CONFIG, then press the Enter key.
3. Move the cursor to SERIAL, then press the Enter key. The module serial number
is displayed.
For the HRSMU (high resolution SMU) calibrated with the ASU (atto sense and
switch unit), two serial numbers will be displayed. Then the HRSMU serial
number is left and the ASU serial number is right. They always show the correct
combination regardless of the ASU connection status. The HRSMU and the
ASU are available only for the Agilent E5270B.
4. Press the arrow keys to display the serial number of the other module.
5. Press the Exit key three times to close the setup menu.
NOTE
Incorrect combination of HRSMU and ASU
The combination of HRSMU and ASU is important. The specifications of the ASU
are guaranteed while it is connected to the exclusive HRSMU.
If the combination is incorrect, “ERROR” will be displayed right of the serial
number. If “ERROR” is displayed, note the ASU serial number, turn the Agilent
E5270B off, and connect the correct ASU.
Agilent E5260/E5270 User’s Guide, Edition 5
5-13
Front Panel Operations
Setting Up Agilent E5260/E5270
To Set GPIB Address
1. Press the Menu key.
2. Move the cursor to CONFIG, then press the Enter key.
3. Move the cursor to ADDRESS, then press the Enter key.
4. Press the arrow keys to set the GPIB address.
5. Press the Enter key to make the setup effective, or press the Exit key to cancel
changing the setup.
6. Press the Exit key twice to close the setup menu.
To Set Remote Display Mode
This instruction enables or disables the data display in the GPIB remote condition.
See “RMT_DSPL” on page 4-24.
1. Press the Menu key.
2. Move the cursor to RMT_DSPL, then press the Enter key.
3. Press the arrow keys to set the remote display mode ON or OFF.
4. Press the Enter key to make the setup effective, or press the Exit key to cancel
changing the setup.
5. Press the Exit key to close the setup menu.
To Return to Local Mode
Press the Local key. If the front panel keys are locked, send the KLC command from
an external computer, then press the Local key.
5-14
Agilent E5260/E5270 User’s Guide, Edition 5
Front Panel Operations
Applying Source Output
Applying Source Output
This section describes the following tasks to apply DC current or DC voltage.
•
“To Apply DC Current/Voltage”
•
“To Set Output/Compliance Value”
•
“To Set Source Output to Zero”
•
“To Set Output Range”
•
“To Use Series Resistor”
•
“To Use Filter”
•
“To Switch ASU Internal Connection”
Agilent E5260/E5270 User’s Guide, Edition 5
5-15
Front Panel Operations
Applying Source Output
To Apply DC Current/Voltage
The following procedure applies a DC bias using a source channel. To use multiple
source channels, perform the procedure for all source channels.
1. Press the OutCh key repeatedly to specify the source channel.
The channel number must appear in the S-ch status area.
2. Confirm that the Output status indicator does not show the output enable status.
If the source output has been enabled, press the On/Off key. This disables the
source output.
3. Press the OutRange key to select the output range.
See “To Set Output Range” on page 5-18.
4. Press the Shift key and the On/Off key if you are using a series resistor.
See “To Use Series Resistor” on page 5-19.
5. Press the Shift key and the V/I key if you are using a filter.
See “To Use Filter” on page 5-19.
6. If you are using the Agilent E5270B installed with the high resolution SMU
(HRSMU) and if you want to change the internal connection of the ASU (Atto
Sense and Switch Unit), see “To Switch ASU Internal Connection” on page
5-20.
7. Press the OUT Value key or the CPL Value key to set the source output value or the
compliance value.
See “To Set Output/Compliance Value” on page 5-17.
8. Press the On/Off key to enable the source output.
NOTE
To change the source output value or the compliance value during source output, see
“To Set Output/Compliance Value” on page 5-17.
To stop source output of the channel specified by the S-ch status, press the On/Off
key.
5-16
Agilent E5260/E5270 User’s Guide, Edition 5
Front Panel Operations
Applying Source Output
To Set Output/Compliance Value
This instruction sets the source output or compliance value of the specified source
channel.
1. Press the OUT Value key to set the output (OUT) value.
Or press the CPL Value key to set the compliance (CPL) value.
2. Press the V/I key to select the output mode; V (voltage output) or I (current
output).
3. Press the Left or Right arrow key to move the cursor to the digit whose value
you want to change.
4. Press the Up or Down arrow key to change the value. Pressing the Fast key and
the arrow key speeds up changing the value.
If the source output has been enabled (Output ON status), the new value will be
applied to the output immediately.
5. Repeat 3 and 4 until the required OUT or CPL value is displayed on the LCD.
6. To set the value of another channel, press the OutCh key to select the channel,
and perform 2 to 5.
7. Press the Enter key or the Exit key to end the output/compliance setup operation.
To multiply the value by 10 or 0.1
Move the cursor to the arithmetic point, and press the Up or Down arrow key. The
Up arrow key will multiply the value by 10. The Down arrow key will multiply the
value by 0.1.
Pressing the Up or Down arrow key changes the cursor condition from blink to
inversion. This means the value is not effective yet. Then, press the Enter key to
make the value effective, or press the Exit key to cancel multiplication.
This function is not effective for 0.0.
To set the digit over the highest digit
Move the cursor to the + or - sign, and press the Up or Down arrow key.
The Up/Down arrow key will add/subtract the value given by setting 1 instead of the
sign and setting 0 to the other digits, to/from the present value. For example, if the
present value is +0.100, the Up arrow key will set +10.10 (=0.100+10.000), and the
Down arrow key will set -9.900 (=0.100-10.000).
Agilent E5260/E5270 User’s Guide, Edition 5
5-17
Front Panel Operations
Applying Source Output
To Set Source Output to Zero
This instruction stores the present source setup of all channels, and changes the
output value to 0 V.
1. Press the ZeroVolt key.
2. Press the Enter key for the message 0 V Output:YES to perform this
operation, or press the Exit key to cancel operation.
To restore the source setup
This instruction restores the source setup stored by the ZeroVolt key function.
1. Press the Shift key and the ZeroVolt key.
2. Press the Enter key for the message Restore:YES to perform this operation,
or press the Exit key to cancel operation.
To Set Output Range
This instruction sets the output range of the specified source channel.
1. Press the OutRange key.
2. For voltage output, move the cursor to V_RANGE, then press the Enter key.
For current output, move the cursor to I_RANGE, then press the Enter key.
3. Press the arrow keys to select the output range.
4. Press the OutCh key if you are setting the output range of the same output mode
(voltage or current) channels, and perform 3.
5. Press the Enter key to make the setup effective, or press the Exit key to cancel
changing the setup.
6. Press the Exit key to close the setup menu.
5-18
Agilent E5260/E5270 User’s Guide, Edition 5
Front Panel Operations
Applying Source Output
To Use Series Resistor
This instruction connects the series resistor to the specified channel internally.
1. Press the Shift key and the On/Off key.
2. Press the arrow keys, and select ON to connect the series resistor.
3. Press the OutCh key if you are setting the resistor for another channel, and
perform 2.
4. Press the Enter key to make the setup effective, or press the Exit key to cancel
changing the setup.
NOTE
A series resistor is mounted on each module. If you use a series resistor, the voltage
you set is applied to the near side of the series resistor. Thus, the voltage will be
divided by the series resistor and the device under test.
The series resistor cannot be used for the measurements that use the high resolution
SMU (HRSMU) connected to the Atto Sense and Switch Unit (ASU) or the
measurements that use 1 A range of the high power SMU (HPSMU).
To Use Filter
This procedure connects the filter to the specified channel internally.
1. Press the Shift key and the V/I key.
2. Press the arrow keys, and select ON to connect the filter.
3. Press the OutCh key if you are setting the filter for another channel, and perform
2.
4. Press the Enter key to make the setup effective, or press the Exit key to cancel
changing the setup.
NOTE
A filter is mounted on each module. It assures clean source output with no spikes or
overshooting.
Agilent E5260/E5270 User’s Guide, Edition 5
5-19
Front Panel Operations
Applying Source Output
To Switch ASU Internal Connection
The Agilent E5260 series does not have this function. This function is available for
the Agilent E5270B installed with the high resolution SMU (HRSMU).
To use the ASU (Atto Sense and Switch Unit), connect the ASU to the HRSMU
properly. The ASU adds the 1 pA range to the HRSMU. Connection must be done
before the Agilent E5270B is turned on.
If you use other instrument such as C meter, connect the instrument to the AUX
input of the ASU. The ASU provides the input selection function.
The following procedure switches the ASU input resource (HRSMU or the
instrument connected to the AUX input) to be connected to the ASU output.
1. Press the Shift key and the CPL Value key.
The input resource will be switched. If you perform this key operation again, the
connection will be switched to the previous resource. This key operation is
available when you are setting the HRSMU connected to the ASU.
2. Press the OutCh key if you are setting the ASU for another channel, and perform
1.
NOTE
The ASU can be used with only the HRSMU that was connected to it when the
performance verification was performed. To confirm if the ASU is the correct one,
see “To Display Module Serial Number” on page 5-13.
When the E5270B is turned on, the SMU side is connected to the ASU output.
When the AUX side is connected to the ASU output, the HRSMU cannot be used.
Then the Output indicator displays the reversed triangle mark.
5-20
Agilent E5260/E5270 User’s Guide, Edition 5
Front Panel Operations
Making Measurement
Making Measurement
This section describes the following tasks to measure DC current or DC voltage.
•
“To Measure DC Current/Voltage”
•
“To Abort Measurement”
•
“To Select Measurement Item”
•
“To Select Measurement Range”
•
“To Set A/D Converter”
•
“To Set Wait Time”
•
“To Set Data Display Format”
Agilent E5260/E5270 User’s Guide, Edition 5
5-21
Front Panel Operations
Making Measurement
To Measure DC Current/Voltage
The following procedure performs DC current or voltage measurement using the
specified measurement and source channel.
1. Press the OutCh key repeatedly to specify the source and measurement channel.
The channel number must appear in the S-ch status area.
2. Confirm that the Output status indicator does not show the output enable status.
If the source output has been enabled, press the On/Off key. This disables the
source output.
3. Press the MeasCh key repeatedly to specify the source and measurement
channel. The channel number displayed in the M-ch status area must be same as
the channel number displayed in the S-ch status area.
4. Press the MeasItem key repeatedly to select the measurement item. See “To
Select Measurement Item” on page 5-23.
5. Press the MeasRange key to set the measurement range. See “To Select
Measurement Range” on page 5-24.
6. Press the Integ key repeatedly to select the A/D converter operation mode. See
“To Set A/D Converter” on page 5-25.
7. Change the source output value if necessary. See “To Apply DC
Current/Voltage” on page 5-16.
8. Press the On/Off key to enable the source output. The measurement channel
Output status must be ON to perform the measurement.
9. Press the Single key to execute a spot measurement.
Or press the Repeat key to execute repeat measurements.
NOTE
To stop the repeat measurement, press the Single key.
To change the source output value or the compliance value during measurement, see
“To Set Output/Compliance Value” on page 5-17.
To stop source output and measurement of the channel specified by the S-ch status,
press the On/Off key.
5-22
Agilent E5260/E5270 User’s Guide, Edition 5
Front Panel Operations
Making Measurement
To Abort Measurement
This instruction aborts measurement by all measurement channels.
1. Press the Shift key and the Repeat key.
2. Press the Enter key for the message Abort:YES to abort measurement, or
press the Exit key to cancel the abort operation.
To Select Measurement Item
1. Press the MeasCh key repeatedly to specify the measurement channel. The
channel number must appear in the M-ch status area.
2. Press the MeasItem key repeatedly to select the measurement item; voltage (V) or
current (A), both voltage and current, resistance (Ω), or power (W).
Agilent E5260/E5270 User’s Guide, Edition 5
5-23
Front Panel Operations
Making Measurement
To Select Measurement Range
This procedure sets the measurement range of the specified measurement channel.
1. Press the MeasRange key.
2. For voltage measurement, move the cursor to V_RANGE, then press Enter.
For current measurement, move the cursor to I_RANGE, then press Enter.
3. Press the arrow keys to select the measurement range.
4. If you set the measurement range of the same measurement mode (voltage or
current) channels, press the MeasCh key to select the channel, and perform 3.
5. Press the Enter key to make the setup effective, or press the Exit key to cancel
changing the setup.
6. Press the Exit key to close the setup menu.
NOTE
Before using 1 pA range (only for E5270B)
The measurement channel connected to the ASU (Atto Sense and Switch Unit)
supports the 1 pA range. To use the 1 pA range, set the 1 pA fixed range or the 1 pA
limited auto ranging.
The E5270B automatically performs the compensation of the data measured by the
1 pA range and returns the compensated data. You can use either the pre-stored
offset data or the pre-measured offset data.
To measure the offset data, perform the self-calibration before starting the
measurement for a DUT. This offset data is temporarily memorized until the
E5270B is turned off.
5-24
Agilent E5260/E5270 User’s Guide, Edition 5
Front Panel Operations
Making Measurement
To Set A/D Converter
The A/D converter (ADC) is set by the procedures below.
To select A/D converter
This function is not available for the Agilent E5260. Available only for the Agilent
E5270B. This procedure selects the ADC type used by the specified measurement
channel.
1. Press the Shift key and the MeasItem key.
2. Press the arrow keys to select the ADC type; H-SPEED (high-speed ADC) or
H-RESOLN (high-resolution ADC, only for E5270B).
3. Press the MeasCh key if you are setting the ADC type of another channel, and
perform 2.
4. Press the Enter key to make the setup effective, or press the Exit key to cancel
changing the setup.
To select ADC operation mode
Press the Integ key repeatedly to select the ADC operation mode. There are three
modes as below. The Integ status area shows the present setting. The setup is
effective for all channels that use the same ADC type.
•
A: auto mode
•
M: manual mode
•
P: PLC (power line cycle) mode
Agilent E5260/E5270 User’s Guide, Edition 5
5-25
Front Panel Operations
Making Measurement
To set integration time
This procedure sets the number of averaging samples of the high-speed A/D
converter or the integration time of the high-resolution A/D converter. The meaning
of the setting value depends on the ADC type and ADC operation mode settings.
The value should be increased for reliable and accurate measurement, or decreased
for high speed measurement. Refer to Table 4-4 on page 4-13. The setup is effective
for all channels that use the same ADC type.
1. Press the Shift key and the Integ key. The setup message shown in Table 4-4 is
displayed. The message depends on the Integ and AD settings.
2. Press the arrow keys to set the N value for the message.
3. Press the MeasCh key if you are setting the value for measurement channels that
use another ADC type, and perform 2.
4. Press the Enter key to make the setup effective, or press the Exit key to cancel
changing the setup.
5-26
Agilent E5260/E5270 User’s Guide, Edition 5
Front Panel Operations
Making Measurement
To Set Wait Time
This instruction sets the source wait time and the measurement wait time. The wait
time settings are effective for all modules. Refer to “WAIT_TIME” on page 4-23.
1. Press the Menu key.
2. Move the cursor to WAIT_TIME, then press the Enter key.
3. Move the cursor to SOURCE to set the source wait time, then press the Enter
key.
4. Press the arrow keys to set the N value shown in the formula below.
5. Press the Enter key to make the setup effective, or press the Exit key to cancel
changing the setup.
6. Move the cursor to MEASURE to set the measurement wait time, then press the
Enter key.
7. Press the arrow keys to set the N value shown in the formula below.
8. Press the Enter key to make the setup effective, or press the Exit key to cancel
changing the setup.
9. Press the Exit key twice to close the setup menu.
Wait Time
The measurement wait time is the time the measurement channel always waits
before starting measurement. The source wait time is the time the source channel
always waits before changing the output value. Each wait time is given by the
following formula:
wait time = N × reference
where reference is the wait time the Agilent E5260/E5270 automatically sets; this
wait time cannot be changed. Available N values are 0.0 to 10.0. The initial value is
1.0.
NOTE
It is not easy to determine the best wait time. If you specify it too short, the
measurement may start before device characteristics stable. If too long, time will be
wasted.
The initial wait time may be too short for measurements of high capacitance or slow
response devices. Then set the wait time longer.
For measurements of low capacitance or fast response devices, if measurement
speed has top priority or is more important than reliability and accuracy, set the wait
time shorter.
Agilent E5260/E5270 User’s Guide, Edition 5
5-27
Front Panel Operations
Making Measurement
To Set Data Display Format
This instruction selects the display format of the measurement data displayed in the
Measurement Data area.
1. Press the Menu key.
2. Move the cursor to DSPL_FRMT, then press the Enter key.
3. Press the arrow keys to select the format ENGINEERING or SCIENTIFIC.
Display Format
Description
ENGINEERING
Six-digit numeric value with arithmetic point, and unit.
Example: +123.456pA
SCIENTIFIC
Four-digit numeric value with arithmetic point,
exponential part (E, +/- sign, and one- or two-digit
numeric value), and unit.
Example: +1.234E-10A
4. Press the Enter key to make the setup effective, or press the Exit key to cancel
changing the setup.
5. Press the Exit key to close the setup menu.
5-28
Agilent E5260/E5270 User’s Guide, Edition 5
6
Function Details
Function Details
This chapter explains the following measurement functions of the Agilent
E5260/E5270, and the initial settings.
•
“Measurement Mode”
•
“Ranging Mode”
•
“Compliance”
•
“SMU Pulse”
•
“Measurement Time”
•
“Atto Sense and Switch Unit”
•
“Filter”
•
“Series Resistor”
•
“Interlock Function”
•
“Auto Power Off Function”
•
“Initial Settings”
6-2
Agilent E5260/E5270 User’s Guide, Edition 5
Function Details
Measurement Mode
Measurement Mode
The Agilent E5260/E5270 provides different measurement functions for each
operation mode; local and remote.
Measurement Mode in Local Condition
You can select one from the following measurement items:
•
Current (when applying voltage) or voltage (when applying current)
•
Current and voltage
•
Power (=voltage×current)
•
Resistance (=voltage/current)
Press the Single key to perform one point measurement, or the Repeat key to perform
repeat measurement.
Agilent E5260/E5270 User’s Guide, Edition 5
6-3
Function Details
Measurement Mode
Measurement Mode in Remote Condition
You can select one of the following measurement modes:
•
Spot Measurement
Applies voltage or current, then measures voltage or current. A maximum of
eight measurement channels can be used.
•
Staircase Sweep Measurement
Applies staircase sweep voltage or current, and measures voltage or current at
each sweep step. A maximum of eight measurement channels can be used, and
an extra sweep source forces the staircase sweep output synchronized to the
primary sweep output.
•
Multi Channel Sweep Measurement
Applies staircase sweep voltage or current using multiple sweep sources, and
performs staircase sweep measurement. A maximum of eight sweep sources and
eight measurement channels can be used.
•
Pulsed Spot Measurement
Applies pulsed voltage or current, and measures voltage or current.
•
Pulsed Sweep Measurement
Applies pulsed sweep voltage or current, and measures voltage or current at each
sweep step. An extra sweep source can be used to force the staircase sweep
output synchronized to the pulsed sweep output.
•
Staircase Sweep with Pulsed Bias Measurement
Applies pulsed voltage or current, and performs staircase sweep measurement.
The staircase sweep output is synchronized to the pulsed bias. A synchronous
staircase sweep source is also available.
•
Quasi-pulsed Spot Measurement
Applies quasi-pulsed voltage or current, and measures voltage or current.
•
Search Measurement (linear search and binary search)
Applies voltage or current, and measures voltage or current. Repeats this for
various output values until the search stop condition is satisfied. Synchronous
output is available.
To perform measurement, refer to Programming Guide.
6-4
Agilent E5260/E5270 User’s Guide, Edition 5
Function Details
Ranging Mode
Ranging Mode
The Agilent E5260/E5270 provides the following operation modes for the
measurement range and the output range. The ranging mode must be set for each
channel.
•
“Auto Ranging”
•
“Limited Auto Ranging”
•
“Compliance Range”
•
“Fixed Range”
To Set the Ranging Mode
The following points must be noted when setting the ranging mode.
For measurement
channels
For output
channels
•
If you do not specify the ranging mode, the auto ranging mode is set
automatically.
•
For the channels that perform Vf/Vm (voltage force and voltage measurement)
or If/Im (current force and current measurement), the measurement range is
always the same as the output range.
•
For measurement with pulse output, the measurement channel uses the
compliance range or the specified fixed range. The channel cannot perform the
auto ranging operation or the limited auto ranging operation.
•
If the voltage output range is changed when the DV, DI, XE, or CL command is
executed, the voltage measurement range is automatically set to the voltage
output range or the compliance range.
•
If the current output range is changed when the DV, DI, XE, DZ, or CL
command is executed, the current measurement range is automatically set to the
current output range or the compliance range.
•
The auto ranging mode and the limited auto ranging mode are available for the
output channels.
•
When the voltage output range or the voltage compliance range is changed, the
channel forces 0 V at that moment.
Agilent E5260/E5270 User’s Guide, Edition 5
6-5
Function Details
Ranging Mode
Auto Ranging
Range changing is performed as below.
For measurement
channels
The measurement channel automatically searches for and measures at the range that
provides the best resolution as follows:
•
For current measurement, the measurement channel uses the present range if the
following formula is satisfied; otherwise, the channel changes the range.
Range × 0.1 ≤ Measurement value ≤ Range × X/100
where X=115, or 100 at the maximum range.
See also “Enhanced Auto Ranging for Current Measurement” on page 6-8.
•
For voltage measurement, the measurement channel uses the present range if the
following formula is satisfied; otherwise, the channel changes the range.
Next lower range value ≤ Measurement value ≤ Range × X/100
where X=110, or 100 at the maximum range.
For output
channels
The output channel automatically searches for and forces at the lowest range that
covers the output value as follows:
•
For staircase sweep output, the output channel uses the lowest range that covers
the start and stop values. However, it uses the lowest range that covers the step
output value for the logarithmic current sweep. For the voltage sweep that sets
the power compliance, the channel uses the lowest range (20 V range or more)
that covers the step output value.
•
For pulsed bias output, the output channel uses the lowest range that covers the
base and peak values.
•
For pulsed sweep output, the output channel uses the lowest range that covers
the base, start, and stop values.
•
For quasi-pulsed output and search source output, the output channel uses the
lowest range that covers the start and stop values.
The maximum output value is as follows:
•
Maximum current output value = Range × X/100
where X=115, or 100 at the maximum range.
•
Maximum voltage output value = Range value
6-6
Agilent E5260/E5270 User’s Guide, Edition 5
Function Details
Ranging Mode
Limited Auto Ranging
Limited auto ranging is similar to auto ranging. However, limited auto ranging does
not use the range(s) less than what you specified. For example, if you select 10 mA
limited auto ranging, the measurement unit does not use the 1 mA range or less.
Consequently, the measurement time for limited auto ranging is less than for auto
ranging.
Fixed Range
The channel uses the specified range only.
For the current measurement channel, if you specify a range higher than the
compliance range, the measurement channel uses the compliance range. See
“Compliance Range” on page 6-7.
Compliance Range
The compliance range is effective for the Vf/Im (voltage output and current
measurement) or If/Vm (current output and voltage measurement) channel. The
measurement channel automatically selects and uses the lowest range that covers the
specified compliance value.
For the measurement channel that performs source output set by the DI or DV
command, you can set the compliance ranging type. If you set it to limited auto
ranging, the channel does not use a range less than the specified range.
For the measurement channel that performs sweep output, you can set the power
compliance value. If you set the power compliance value, the channel uses the
lowest range that covers the lower value of either the specified compliance value or
the compliance value given by the following formula:
Current compliance = Specified power compliance value / Step voltage
Voltage compliance = Specified power compliance value / Step current
For details about setting compliance, refer to “Compliance” on page 6-9.
NOTE
Range change is performed when the compliance value is set, not when the
measurement is performed.
Agilent E5260/E5270 User’s Guide, Edition 5
6-7
Function Details
Ranging Mode
Enhanced Auto Ranging for Current Measurement
Expanded functions are available for the auto ranging operation of the current
measurement channel. To use the functions, execute the RM command. The RM
command selects the following operation mode and the rate value. The rate value
defines the boundary of ranging.
•
Mode 1:
Performs normal auto ranging operation. If a condition shown below is satisfied,
the range changes immediately, even during measurement.
Measurement value > Range × X/100
Measurement value ≤ Range × 0.1
where X=115, or 100 at the maximum range.
•
Mode 2:
If the following condition is satisfied, the range changes up after measurement.
Measurement value ≥ current1
•
Mode 3:
If the following condition is satisfied, the range changes down immediately,
even during measurement.
Measurement value ≤ current2
If the following condition is satisfied, the range changes up after measurement.
Measurement value ≥ current1
where current1 and current2 are given by the following formula. Then rate must be
an integer, 11 to 100.
current1 = Range × rate/100
current2 = Range × rate/1000
For 200 mA, they must be:
current1 = 200 mA × rate/100
current2 = 100 mA × rate/100
For example, if the range value is 10 mA and rate is 90, they are:
current1 = 9 mA
current2 = 0.9 mA
6-8
Agilent E5260/E5270 User’s Guide, Edition 5
Function Details
Compliance
Compliance
Compliance is the output limiter to prevent damage to the test device from
overcurrent, overvoltage, or overpower. Voltage compliance is for the current output
channels, and current compliance is for the voltage output channels.
When a channel reaches compliance, the channel acts as a constant voltage source or
a constant current source. The channel keeps the output value when reaching
compliance.
Compliance can be set with the same resolution and accuracy as output current or
output voltage. For the values, refer to “Specifications” on page 2-26.
Polarity and Output Area
•
Polarity of current compliance
The Agilent E5260/E5270 automatically sets current compliance for both
positive and negative polarity. For opposite polarity as the output voltage, the
compliance value is increased by an amount that is 2.5 % to 12 % of the range
value in the lowest range that covers the specified compliance value. See Figure
6-1.
•
Polarity of voltage compliance
The Agilent E5260/E5270 automatically sets voltage compliance to the same
polarity as the output current. There is no compliance for opposite polarity.
Figure 6-1
Relation of Compliance and Output
Voltage
Current
+|Compliance|
V< 0
V>=0
0
Output Voltage
+|Compliance|
I<0
-|Compliance|
Agilent E5260/E5270 User’s Guide, Edition 5
I >=0
0
Output Current
-|Compliance|
6-9
Function Details
Compliance
Polarity of DV/DI
output
DV and DI commands enable you to specify the polarity mode, auto or manual.
Auto
Sets the compliance as described above. Initial setting.
Manual
Sets the compliance as described below.
•
Polarity of current compliance
The Agilent E5260/E5270 automatically sets current compliance for both
positive and negative polarity. For opposite polarity as the specified compliance
value, the compliance value is increased by an amount that is 2.5 % to 12 % of
the range value in the lowest range that covers the specified compliance value.
See Figure 6-2.
•
Polarity of voltage compliance
If the output current is the same polarity as the specified compliance value, the
compliance works as the maximum voltage limiter for the same direction as the
compliance polarity. For opposite polarity, the compliance works as the
minimum voltage limiter. See Figure 6-3.
Figure 6-2
Relation of Compliance and Output (DV, Manual Mode)
When Compliance >= 0:
When Compliance < 0:
Current
Current
Compliance
V< 0
V>=0
0
Output Voltage
-Compliance
V< 0
V>=0
0
-Compliance
Figure 6-3
Output Voltage
Compliance
Relation of Compliance and Output (DI, Manual Mode)
When Compliance >= 0:
When Compliance < 0:
Voltage
Voltage
I<0
Compliance
0
I<0
Output Current
Output Current
I >=0
0
6-10
Compliance
I >=0
Agilent E5260/E5270 User’s Guide, Edition 5
Function Details
Compliance
Power Compliance
In addition to V compliance or I compliance, you can set power compliance for the
staircase sweep source. Power compliance is set by the WI, WV, WSI, WSV, or
WNX command.
If you specify power compliance, the source/monitor unit (SMU) changes the
current or voltage compliance value every sweep step. The value is the lower value
of either the specified compliance value or the compliance value given by the
following formula. See Figure 6-4.
Current compliance = Specified power compliance value / Step voltage
Voltage compliance = Specified power compliance value / Step current
Figure 6-4
Power Compliance Output Area
For voltage sweep:
For current sweep:
Current
Voltage
Specified power compliance
Specified power compliance
Specified current compliance value
Specified voltage compliance value
Actual current compliance
Actual voltage compliance
Voltage
Available values
Conditions after
compliance
Current
The following values are available for the power compliance:
MPSMU
1 mW to 4 W
HPSMU
1 mW to 20 W
When a channel reaches compliance, the staircase sweep source automatically stops
the sweep and forces the start value. For the measurement data after reaching the
compliance, the dummy data 199.999E+99 will be returned.
Agilent E5260/E5270 User’s Guide, Edition 5
6-11
Function Details
Compliance
SMU output values If you specify power compliance, the SMU changes the current or voltage
compliance every sweep step. Hence, the SMU can apply voltage or current with the
maximum power. Figure 6-5 shows the differences between the output with power
compliance and the output without power compliance, for MPSMU.
Figure 6-5
Allowable Current in Voltage Sweep (0 V to 100 V, MPSMU)
When power compliance is set:
When power compliance is not set:
Current (mA)
Current (mA)
200
200
For the sweep 0 V to 20 V
For the sweep 0 V to 40 V
50
20
20
20
NOTE
For the sweep 0 V to 100 V
50
40
100
Voltage (V)
20
40
100
Voltage (V)
If you specify power compliance, the measurement time increases slightly because
the E5260/E5270 adjusts the compliance for every sweep step.
6-12
Agilent E5260/E5270 User’s Guide, Edition 5
Function Details
Compliance
To Set Compliance
The following points must be noted when setting the compliance.
•
If the current compliance value is too low, the SMU will take a long settling
time.
•
The SMU will reach voltage compliance if the SMU cannot force the specified
current for the following reasons:
•
•
Over current for test device.
•
Another channel has reached compliance.
•
Current measurement data of another channel has reached the limit for the
present measurement range.
If you set the manual mode for compliance polarity of the DI command, set the
voltage compliance value as shown below. See Figure 6-6.
•
If the output current is a positive value or zero (Iset ≥ 0):
Set the compliance value to more than Vref.
•
If the output current is a negative value (Iset < 0):
Set the compliance value to less than Vref.
In Figure 6-6, ΔI is 2.5 % to 12 % of the range value in the current output range.
Figure 6-6
Allowable Voltage Compliance (DI, Manual Mode)
When Iset < 0:
When Iset >=0:
Output Voltage
Output Voltage
Characteristics of DUT
Characteristics of DUT
Vrev
ΔI
Irev
-Iset
0
Iset
Output Current
Iset
Vrev
NOTE
0
-Iset
Irev
Output Current
ΔI
If you set the manual mode for compliance polarity of the DI command, and if you
do not set the allowable compliance value, the SMU may force Irev, not Iset. Refer
to “Operation of SMU in Current Output” on page 6-14.
Agilent E5260/E5270 User’s Guide, Edition 5
6-13
Function Details
Compliance
Operation of SMU in Current Output
The I/V characteristics of the SMU in current output is determined by the current
output value (Iset) and the voltage compliance value. Refer to Figure 6-7.
The SMU output depends on the SMU I/V characteristics and the characteristics of
the test device (DUT). The output value will be Iset, Vcomp, or Irev. To force the
Iset value, the voltage compliance must be set to the allowable value shown in
Figure 6-6. If you do not set the allowable compliance value, the SMU forces the
Irev value as shown in Figure 6-8.
In Figure 6-7, ΔI is 2.5 % to 12 % of the range value in the current output range.
Figure 6-7
SMU I/V Characteristics
When Iset >= 0:
When Iset < 0:
Voltage
Voltage
ΔI
Vcomp
ΔI
Output
Current
Iset
Irev -Iset
0
Output
Current
Iset
Irev -Iset
0
Vcomp
SMU Output Transition (Iset ≥ 0, resistance load)
Figure 6-8
When Vcomp >= Vrev:
When Vcomp < Vrev:
Voltage
Voltage
Characteristics of DUT
Voltage
Characteristics of DUT
Characteristics of DUT
Vcomp
Output=Iset
Irev
Iset
0
Vrev
Output
Current
Output=Vcomp
Vcomp
Iset
Irev
0
Output
Current
Iset
Irev
0
Vrev
Vrev
Output
Current
Vcomp
Output=Irev
6-14
Agilent E5260/E5270 User’s Guide, Edition 5
Function Details
SMU Pulse
SMU Pulse
The source/monitor unit (SMU) can apply voltage or current pulse. The PI, PV,
PWI, or PWV command is used to set the pulse output. The PT command is used to
set the pulse timing parameters.
The following values are available for the pulse width and pulse period:
Pulse width
0.5 ms to 2 s, 0.1 ms resolution
Pulse period
5 ms to 5 s, 0.1 ms resolution
where the parameters must satisfy the following conditions:
•
period ≥ width + 2 ms (for pulse width ≤ 100 ms)
•
period ≥ width + 10 ms (for pulse width > 100 ms)
To Set Pulse Output
The following points must be noted when setting the pulse output.
•
The 1 nA range cannot be used.
•
Multiple measurement channels cannot be used.
•
The measurement channel uses the compliance range or the specified fixed
range. The channel cannot perform the auto ranging operation or the limited auto
ranging operation.
•
If the measurement range differs from the compliance range, the SMU might not
perform the pulsed output specified.
Agilent E5260/E5270 User’s Guide, Edition 5
6-15
Function Details
Measurement Time
Measurement Time
Measurement time depends on integration time, measurement range, and other
measurement conditions, and can be expressed by the following formula:
Measurement time = Integration time + Overhead time
Integration time is the time required for measurement, and does not include such
factors as range changing or data compensation, which would be the overhead time.
Integration Time
Integration time is the time required to get measurement data. For accurate and
reliable measurement, integration time should be increased. Integration time can be
set for each type of A/D converter (ADC) used by the measurement channel.
For the Agilent E5260, see the description of the high-speed ADC. The
high-resolution ADC is equipped with the Agilent E5270B only.
•
High-speed ADC
You can adjust the number of averaging samples instead of the integration time.
For high speed measurement. Installed in each measurement module.
•
High-resolution ADC
Available only for the Agilent E5270B. You can adjust the integration time
directly. For high accuracy and high resolution measurement. This ADC is
mounted on the mainframe, and used by the multiple modules alternately.
To set the integration time or the number of averaging samples, select the mode and
set the value as shown in Table 6-1. For the Agilent E5260, see the description of
High Speed ADC.
ADC Zero
Function
Available only for the E5270B. The ADC zero function is available for the
high-resolution A/D converter (ADC) and not available for the high-speed ADC.
This function measures the internal offset of the high-resolution ADC and
compensates it automatically. The measurement data displayed on the LCD will be
the data after compensation.
NOTE
This function is especially effective for the low voltage measurement. Disable the
function in cases where measurement speed is more important than measurement
accuracy. This approximately halves integration time.
6-16
Agilent E5260/E5270 User’s Guide, Edition 5
Function Details
Measurement Time
Table 6-1
Integration Time and Number of Samples
ADC
Mode
High Speed Auto
ADC
Description
Number of averaging samples = N × reference
where reference is the number of averaging samples
automatically set by the Agilent E5260/E5270; this cannot
be changed.
Specify the N value shown above. Available values are 1 to
1023. Initial value is 1.
Manual Specify the number of averaging samples (N).
Available values are 1 to 1023. Initial value is 1.
PLC
Number of averaging samples = N × 128
Specify the N value shown above. Available values are 1 to
100. Initial value is 1.
The Agilent E5260/E5270 gets 128 samples in a power line
cycle. Hence, the N value is equal to the number of power
line cycles.
High
Resolution
ADC
Auto
Integration time = N × reference
where reference is the integration time automatically set by
the Agilent E5270B; it cannot be changed.
Specify the N value shown above. Available values are 1 to
127. Initial value is 6.
Manual Integration time = N × 80 μsec
Specify the N value shown above. Available values are 1 to
127. Initial value is 3.
PLC
Integration time = N / power line frequency
Specify the N value shown above. Available values are 1 to
100. Initial value is 1.
The N value means the number of power line cycles.
Agilent E5260/E5270 User’s Guide, Edition 5
6-17
Function Details
Measurement Time
Overhead Time
The overhead time is the time required for range changing and so on. This time
depends on the measurement condition, and cannot be specified. Major elements of
the overhead time are:
•
Range changing time during measurement (when measurement ranging mode is
set to auto or limited auto)
•
Range changing time at measurement start (when the measurement range is less
than the compliance value)
To Specify Source Output Time
As shown in the discussion of the overhead time, you cannot specify the
measurement time. However, in sweep measurement mode, you can specify a
source output time that includes the measurement time. To specify the source output
time, set the delay time and the step delay time. The step delay time is defined as the
time from the measurement trigger up to the trigger for changing the source output
value. See the figure below.
Td
Source output time
Step delay time (Tsd)
Td
Tsd
Tsd
Delay time (Td)
Measurement time
Vstart
Hold time
The step delay time must cover the measurement time to keep the source output time
constant.
These values can be set by the WT command.
6-18
Agilent E5260/E5270 User’s Guide, Edition 5
Function Details
Measurement Time
Wait Time
Wait time is the time after starting source output until changing the source output
value or until starting measurement. You can set the source wait time and the
measurement wait time individually.
The source wait time is the time the source channel always waits after it starts output
until it changes the output value. The measurement wait time is the time the
measurement channel always waits after the source channel starts output until the
measurement channel starts measurement. Refer to Figure 6-9. The wait time is
given by the following formula:
wait time = N × reference
where reference is the wait time the Agilent E5260/E5270 automatically sets
according to the present settings; this wait time cannot changed. Available N values
are 0 to 10, 0.1 step. Initial value is 1.
It is not easy to determine the best wait time. If you specify it too short, the
measurement may start before device characteristics stable. If too long, time will be
wasted. For measurements of low capacitance or fast response devices, if
measurement speed has top priority or is more important than reliability and
accuracy, set the wait time shorter.
The initial wait time may be too short for measurements of high capacitance or slow
response devices. Then set the wait time longer.
Figure 6-9
Source/Measurement Wait Time
(1) Local mode
(2) Remote mode
Measurement wait time
Source wait time
Source wait time
: Measurement
Delay time
Measurement wait time
NOTE
Hold time
Step delay time
Time
In the local mode, you cannot set the hold time, delay time, and step delay time.
They are automatically set to 0 s.
In the remote mode, if the delay time is longer than the wait time, the wait time can
be ignored.
Agilent E5260/E5270 User’s Guide, Edition 5
6-19
Function Details
Atto Sense and Switch Unit
Atto Sense and Switch Unit
The Agilent E5260 series cannot use the Atto Sense and Switch Unit (ASU). The
ASU is available for the Agilent E5270B installed with the high resolution SMU
(HRSMU). To use the ASU, connect the ASU to the HRSMU properly. The ASU
adds the 1 pA range to the HRSMU. If you use other instrument such as C meter,
connect the instrument to the AUX input. The ASU provides the input selection
function.
The internal connection can be controlled by the AUX On/Off shift key. See Setup 1
and 2 of Figure 6-10. When the E5270B is turned on, the connection will be the
Setup 1. To use the HRSMU, the connection must be the Setup 1. To use the
instrument connected to the AUX input, change the connection to the Setup 2. In
this condition, the Output indicator in the front panel LCD displays the reversed
triangle mark, and the HRSMU cannot be used. The ASU is equipped with the
connection status indicator (LED) that shows which input is internally connected to
the output.
Figure 6-10
Internal Connection of ASU
Setup 1: AUX Off ( SMU input to ASU output )
Force
Force
From SMU
Sense
D-sub
Circuit common
Setup 2: AUX On ( CMU/AUX input to ASU output )
CMU-cur/AUX In
CMU/AUX
CMU-pot
Circuit common
CMU Return
6-20
Agilent E5260/E5270 User’s Guide, Edition 5
Function Details
Atto Sense and Switch Unit
NOTE
Before using ASU
Instrument connection must be done before the Agilent E5270B is turned on.
The ASU can be used with only the HRSMU that was connected to it when the
performance verification was performed. See “To Display Module Serial Number”
on page 5-13 and confirm that the ASU is the correct one. If it is not correct, get the
correct one and connect it to the HRSMU properly.
The CMU-pot connector is for the LCR meter such as the Agilent 4284A that uses
the four-terminal-pairs. For the other instrument, connect a BNC open connector or
nothing to there. The line will be internally connected to the CMU-cur/AUX-in line.
It is unavailable to use the series resistor in the HRSMU connected to the ASU.
NOTE
Before using 1 pA range
The measurement channel connected to the ASU supports the 1 pA range. To use the
1 pA range, set the 1 pA fixed range or the 1 pA limited auto ranging.
The E5270B automatically performs the compensation of the data measured by the
1 pA range and returns the compensated data. You can use either the pre-stored
offset data or the pre-measured offset data.
To measure the offset data, perform the self-calibration before starting the
measurement for a DUT. This offset data is temporarily memorized until the
E5270B is turned off.
Agilent E5260/E5270 User’s Guide, Edition 5
6-21
Function Details
Filter
Filter
The filter is mounted on each source/monitor unit (SMU) module. It assures clean
source output with no spikes or overshooting. However, using a filter may increase
the SMU settling time.
To set the filter, refer to “To Use Filter” on page 5-19.
In remote mode, use the FL command to set the filter ON or OFF.
6-22
Agilent E5260/E5270 User’s Guide, Edition 5
Function Details
Series Resistor
Series Resistor
The series resistor (approx. 1 MΩ) is mounted on each source/monitor unit (SMU)
module. The series resistor may be used for the device protection, negative
resistance measurement, and so on. It depends on the characteristics of test device
and measurement environment.
If you use a series resistor, the voltage you set is applied to the near side of the series
resistor. Thus, the voltage will be divided by the series resistor and the device under
test. Then, the measurement data is not compensated.
To set the series resistor, refer to “To Use Series Resistor” on page 5-19.
In remote mode, use the SSR command to set the series resistor ON or OFF.
NOTE
Restrictions
The series resistor cannot be used for the measurements that use the high resolution
SMU (HRSMU) connected to the Atto Sense and Switch Unit (ASU) or the
measurements that use 1 A range of the high power SMU (HPSMU).
Agilent E5260/E5270 User’s Guide, Edition 5
6-23
Function Details
Interlock Function
Interlock Function
The interlock function is designed to prevent electrical shock when a user touches
the measurement terminals. If the Interlock terminal is open, maximum output is
limited to ± 42 V.
To perform high voltage measurement more than ± 42 V, connect the Interlock
terminal to an interlock circuit of test fixture or connector plate. The interlock circuit
must have one LED and two mechanical switches placed near the shielding box
opening doors. And they must be connected together. For details on how to install
the interlock circuit, see “To Make an Interlock Circuit” on page 3-23.
The interlock function works as shown below.
•
When the interlock circuit is open, maximum output is limited to ± 42 V.
•
When the interlock circuit is close, source channel can force its maximum output
value.
•
When the interlock circuit is opened in the high voltage condition more than
± 42 V, output voltage is set to 0 V immediately.
CAUTION
If the actual output value is not set to 0 V within 120 msec, the Agilent
E5260/E5270 automatically performs the initialization. Then perform self-test. Any
module may be defective.
WARNING
Dangerous voltage of up to the maximum voltage of SMUs may be present at
force, guard, and sense terminals if the Interlock terminal is closed.
6-24
Agilent E5260/E5270 User’s Guide, Edition 5
Function Details
Auto Power Off Function
Auto Power Off Function
If an abnormal voltage or current is detected in the Agilent E5260/E5270, the
Agilent E5260/E5270 automatically turns off to prevent damage.
If this function is activated, the Agilent E5260/E5270 is turned off, but the Line
switch is left ON. Perform the following steps to turn the Agilent E5260/E5270 on
again.
1. Press the Line switch to set it to the OFF position.
2. Wait for 10 seconds or more.
3. Press the Line switch to set it to the ON position.
Abnormal voltage or current can be caused by incorrect connections of the Agilent
E5260/E5270 to the test device, excess voltage or current input, momentary power
loss, defects of the instrument, and so on.
If no cable is connected to the measurement terminals of the Agilent E5260/E5270,
and the line voltage is correct, the Agilent E5260/E5270 may have a defect. Contact
the nearest Agilent Technologies Service Center for assistance.
Agilent E5260/E5270 User’s Guide, Edition 5
6-25
Function Details
Initial Settings
Initial Settings
Agilent E5260/E5270 is initialized by turning the E5260/E5270 on, the *RST
command, or the device clear. Initial settings of the Agilent E5260/E5270 are shown
in Table 6-2 and Table 6-3. Table 6-3 fits into one page, and lists all initial settings.
Table 6-2
Initial Settings
Setup Item
Initial Setting
Commands
Measurement channel
Channel assigned the lowest number.
MCH
Measurement data to be displayed
Data 1
Compliance side data
MPA
Data 2
none
MPA
Output channel
Channel assigned the lowest number.
SCH
Output data to be displayed
Data 1
OUT
SPA
Data 2
CPL
SPA
Data display format
ENGINEERING
DFM
Remote mode data display
off
RED
Remote mode key lock/unlock
unlock
KLC
Auto calibration
on
CM
ADC zero function (for E5270B)
off
AZ
SMU output switch
open
CN, CL
ASU path/1 pA auto range/indicator
SMU side/disabled/enabled
SAP/SAR/SAL
Filter
off
FL
Series resistor
off
SSR
A/D converter
High speed ADC
AAD
Integration time (High resolution
ADC is available for E5270B)
High speed ADC: auto
AIT
High resolution ADC: auto
AIT
6-26
Agilent E5260/E5270 User’s Guide, Edition 5
Function Details
Initial Settings
Setup Item
Initial Setting
Commands
AV command parameter
number=1, mode=0
AV
Current measurement range
with pulse
Compliance range
RI
without pulse
auto
with pulse
Compliance range
without pulse
auto
Voltage measurement range
RV
Sweep source parameters
cleared
WV, WSV, WI, WSI
Automatic sweep abort function
off
WM
Output after sweep measurement
Start value
WM
Pulse source parameters
cleared
PV, PI
Pulse sweep source parameters
cleared
PWV, PWI
Pulse width
0.001 s
PT
Pulse period
0.01 s
PT
Search source parameters
cleared
BSV, BSSV, BSI,
BSSI, LSV, LSSV,
LSI, LSSV
Search monitor parameters
cleared
BGV, BGI, LGV,
LGI
Output after search measurement
Start value
BSM, LSM
Search measurement data
Source output value only
BSVM, LSVM
Quasi-pulse source parameters
cleared
BDV
Quasi-pulsed spot measurement mode
Voltage
BDM
Quasi-pulse settling detection interval
Short
BDM
Hold time
0s
WT, PT, BDT, BST,
LSTM
Agilent E5260/E5270 User’s Guide, Edition 5
6-27
Function Details
Initial Settings
Setup Item
Initial Setting
Commands
Delay time
0s
WT, PT, BDT, BST,
LSTM
Step delay time
0s
WT
Trigger delay time
0s
WT, PT
Trigger mode
XE, TV, TI, or GET
TM
Trigger port
Ext Trig In
Start Measurement
trigger input
TGP
Ext Trig Out
Measurement
Completion trigger
output
TGP
Digital I/O
cleared
TGP
Trigger condition of
Start Step Output Setup trigger
with trigger for first sweep step
TGSI
Type of output trigger
Edge trigger
TGXO, TGSO,
TGMO
Digital I/O port
Output for all port
ERM
Program memory
cleared a
SCR
Value of internal variable (%In, %Rn)
0
VAR
Data output format
ASCII with header, CR/LF^EOI
FMT
Data output buffer
cleared
BC
Status byte
Only bit 6 is enabled.
*SRE
Error code register
cleared
ERR?
a. Program memory is not cleared by the *RST command or the device clear.
6-28
Agilent E5260/E5270 User’s Guide, Edition 5
Function Details
Initial Settings
Table 6-3
Initial Settings
Setup Item
Initial Setting
Measurement channel
Measurement data to be displayed
Channel assigned the lowest number.
Data 1
Compliance side data
Data 2
none
Output channel
Channel assigned the lowest number.
Output data to be displayed
Data 1
OUT
Data 2
CPL
Data display format
ENGINEERING
Remote mode data display
off
Remote mode key lock/unlock
unlock
Auto calibration
on
ADC zero function (for E5270B)
off
SMU output switch
open
ASU path/1 pA auto range/indicator
SMU side/disabled/enabled
Filter/Series resistor
off/off
A/D converter
High speed ADC
Integration time (High resolution
High speed ADC: auto
ADC is available for E5270B)
High resolution ADC: auto
AV command parameter
number=1, mode=0
Current measurement range
with pulse
Compliance range
without pulse auto
Voltage measurement range
with pulse
Compliance range
without pulse auto
Sweep source parameters
cleared
Automatic sweep abort function
off
Output after sweep measurement
Start value
Pulse source parameters
cleared
Pulse sweep source parameters
cleared
Pulse width
0.001 s
Pulse period
0.01 s
Search source parameters
cleared
Search monitor parameters
cleared
Output after search measurement
Start value
Search measurement data
Source output value only
Quasi-pulse source parameters
cleared
Quasi-pulsed spot measurement mode Voltage
Quasi-pulse settling detection interval Short
Hold time
0s
Delay time
0s
Step delay time
0s
Trigger delay time
0s
Trigger mode
XE, TV, TI, or GET
Trigger port
Ext Trig In
Start Measurement trigger input
Ext Trig Out Measurement Completion trigger output
Digital I/O
cleared
Trigger condition of
with trigger for first sweep step
Start Step Output Setup trigger
Type of output trigger
Edge trigger
Digital I/O port
Output for all port
Program memory
cleared. Not cleared by *RST command or device clear.
Value of internal variable (%In, %Rn) 0
Data output format
ASCII with header, CR/LF^EOI
Data output buffer
cleared
Status byte
Only bit 6 is enabled.
Error code register
cleared
Commands
MCH
MPA
MPA
SCH
SPA
SPA
DFM
RED
KLC
CM
AZ
CN, CL
SAP/SAR/SAL
FL/SSR
AAD
AIT
AIT
AV
RI
RV
WV, WSV, WI, WSI
WM
WM
PV, PI
PWV, PWI
PT
PT
BSV, BSSV, BSI, BSSI, LSV, LSSV, LSI, LSSV
BGV, BGI, LGV, LGI
BSM, LSM
BSVM, LSVM
BDV
BDM
BDM
WT, PT, BDT, BST, LSTM
WT, PT, BDT, BST, LSTM
WT
WT, PT
TM
TGP
TGP
TGP
TGSI
TGXO, TGSO, TGMO
ERM
SCR
VAR
FMT
BC
*SRE
ERR?
Agilent E5260/E5270 User’s Guide, Edition 5
6-29
Function Details
Initial Settings
6-30
Agilent E5260/E5270 User’s Guide, Edition 5
7
If You Have a Problem
If You Have a Problem
This chapter explains how to solve a problem or how to read status and error codes,
if you encounter some problem, and consists of the following sections:
•
“When You Install the E5260/E5270”
This section explains how to solve the problems that may occur when installing
the Agilent E5260/E5270.
•
“When You Make a Measurement”
This section explains how to solve the problems that may occur when making a
measurement.
•
“Channel Status Code”
This section lists channel status codes that may be displayed on the LCD when
operating the Agilent E5260/E5270.
•
“Error Codes”
This section lists codes and messages of errors that may cause when operating
the Agilent E5260/E5270.
Error causes if the Agilent E5260/E5270 is not operated correctly, or it fails
self-test or calibration.
If error occurs, find solutions in the following sections and solve problems.
However, if problems still remain, perform self-test.
If the E5260/E5270 fails self-test, contact your nearest Agilent Technologies
Service Center.
NOTE
When shipping the Agilent E5260/E5270 to the service center
When you ship the Agilent E5260/E5270 to the Agilent Technologies service center,
do not remove the source monitor unit (SMU) from the mainframe, and ship the
mainframe with all SMU modules.
When you ship the Agilent E5270B used with the atto sense/switch unit (ASU),
disconnect the connection cables between the ASU and the high resolution source
monitor unit (HRSMU), and ship the ASU, connection cables, and the mainframe.
Then do not remove any module from the mainframe. The ASU can be used with
the dedicated HRSMU. So check the serial number, and ship the proper ASU.
7-2
Agilent E5260/E5270 User’s Guide, Edition 5
If You Have a Problem
When You Install the E5260/E5270
When You Install the E5260/E5270
This section covers the following basic problems that you may encounter when you
install the E5260/E5270, and the solutions.
•
“If the E5260/E5270 cannot be Powered on”
•
“To Simplify the Connections”
If the E5260/E5270 cannot be Powered on
•
Check that the power cable is firmly connected to the E5260/E5270 and to
power outlet.
•
Check that the front-panel Line switch is on.
To Simplify the Connections
If you want to simplify the measurement connections, use the triaxial cables instead
of the kelvin triaxial cables, and connect the triaxial cables between the Force
terminals and the test fixture or the connector plate. Then the Sense terminals must
be opened.
NOTE
The Agilent E5260/E5270 has the Force and Sense terminals to make the kelvin
connection. And the kelvin triaxial cables are effective to extend the measurement
terminals near by the device under test. Connecting the Force and Sense lines
together at the device terminals can minimize the measurement error caused by the
residual resistance of the connection cables. The kelvin connection is effective for
the low resistance measurement and the high current measurement. Also it is one of
the conditions to satisfy the measurement specifications of the Agilent
E5260/E5270.
Agilent E5260/E5270 User’s Guide, Edition 5
7-3
If You Have a Problem
When You Make a Measurement
When You Make a Measurement
This section covers the following basic problems that you may encounter when you
making a measurement, and the solutions.
•
“If Leaving Connections Damages Devices after Measurement”
•
“If Measured Value Oscillates when Measuring High-Frequency Devices”
•
“If Measured Value Oscillates when Measuring Negative Resistance”
•
“If Noise Affects the Measured Values”
•
“If Measured Voltage has some Error when Forcing a Large Current”
•
“If Large Current Causes High Temperature (Thermal Drift)”
•
“If Measurement Takes More Time than Specified”
•
“If Measurement Damages the Device under Test”
If Leaving Connections Damages Devices after
Measurement
After the measurements, open the measurement terminals or disconnect the device
under test from the measurement terminals. If you leave the connection with the
device, the device may be damaged by unexpected operations.
Do not leave the connection over 30 minutes after the measurement if the auto
calibration is set to ON. Then, the E5260/E5270 performs the self-calibration
automatically every 30 minutes after the measurement. The calibration requires to
open the measurement terminals.
7-4
Agilent E5260/E5270 User’s Guide, Edition 5
If You Have a Problem
When You Make a Measurement
If Measured Value Oscillates when Measuring
High-Frequency Devices
When measuring parameters of high-frequency devices, such as GaAs MESFETs or
high-frequency bipolar transistors, oscillation may cause measurement problems.
Normal measurement cannot be performed because of oscillation.
To solve this problem:
•
For FETs, add resistive ferrite beads as close as possible to the gate.
•
For bipolar transistors, add resistive ferrite beads as close as possible to the base
or emitter.
•
Make connection cables as short as possible. Long wires cause oscillation
because of their large inductance.
Test Device
To unit
To Unit
Ferrite
Beads
Agilent E5260/E5270 User’s Guide, Edition 5
U GT06002, 90x40
7-5
If You Have a Problem
When You Make a Measurement
If Measured Value Oscillates when Measuring Negative
Resistance
If the DUT has negative resistance characteristics, SMUs may oscillate. Because
SMUs operate as negative feedback amplifier.
To solve this problem:
•
For voltage controlled negative resistance device
•
Connect G in parallel with your DUT to cancel negative resistance. To
obtain an output I-V curve, use the following equation.
IY = I - G × V
•
For current controlled negative resistance device
•
Connect R in series with your DUT to cancel negative resistance. To obtain
an output I-V curve, use the following equation.
VZ = V - R × I
•
7-6
If the resistance of the DUT is less than 1 MΩ, you can use a series resistor
built into the SMU.
Agilent E5260/E5270 User’s Guide, Edition 5
If You Have a Problem
When You Make a Measurement
If Noise Affects the Measured Values
When you measure low current of a DUT, the measured values may not be stable.
To solve this problem:
•
Set the power line frequency correctly. The value affects the integration time. So
the wrong value causes the measurement error by the power line noise.
•
Use guarding to reduce the leakage current between your prober and the
E5260/E5270. Note that long wires cause oscillation because of their large
inductance.
•
If some high-power electric machines are operating around the E5260/E5270,
turn off the machines, then perform the measurements. The machines affect the
power line waveform.
•
Shut the lid of test fixture or shield box to prevent effects of light.
•
If these are vibrations due to nearby machines or due to air flow, put cushioning
material under prober, cable, and the E5260/E5270; install stabilizer on the
prober; and make the cables stable by taping.
•
Wait several minutes after connecting cables or moving probe needles. Because
these operations cause electromotive force.
•
If you use only Force terminal and triaxial cables, connect an open cap to Sense
terminal.
•
Keep constant temperature in the room when you use the E5260/E5270. Shift of
1 °C may shift the measurement values. Temperature change causes the
following.
•
Offset current in the E5260/E5270.
•
Thermoelectromotive force in DUT, which causes low current.
•
Expansion and contraction of cables, which causes noise.
Agilent E5260/E5270 User’s Guide, Edition 5
7-7
If You Have a Problem
When You Make a Measurement
If Measured Voltage has some Error when Forcing a
Large Current
Voltage measurement may have some error because of the effects of the cable
resistance when forcing a large current.
To solve this problem:
•
Use kelvin connections between SMUs and DUT. To cancel the effects of cable
resistance, connect the sense line as close as possible to the terminal of the DUT.
If Large Current Causes High Temperature (Thermal
Drift)
If a large current is forced to a DUT, the temperature of the DUT may increase,
which may cause characteristics to drift.
To solve this problem:
•
Use the pulse output mode of the SMU.
For large currents, the SMU should be set to pulse output mode. This decreases
the average power output to prevent temperature rise of DUT.
If Measurement Takes More Time than Specified
If you set many measurement channels, auto ranging mode, or too long integration
time, measurement takes a longer time.
To solve this problem:
Depending on your measurement requirements, perform following:
•
Decreases measurement channels.
•
Uses limited auto ranging mode.
•
Uses fixed range.
•
Decreases averaging samples of the high-speed A/D converter.
•
Decreases integration time of the high-resolution A/D converter (for E5270B).
•
Disables the ADC zero function (for E5270B).
7-8
Agilent E5260/E5270 User’s Guide, Edition 5
If You Have a Problem
When You Make a Measurement
If Measurement Damages the Device under Test
When performing breakdown measurements, DUTs may be damaged.
When voltage is forced from an SMU, the current is limited by the compliance
setting, which prevents the DUT from being damaged by a large current. But when
the current rapidly increases, the current limiter in the SMU cannot follow the rapid
current increase, so a large amount of current may flow through the DUT for a
moment, which may damage the DUT.
To solve this problem:
•
Insert a protecting resistor as close as possible to DUT. You can also use a series
resistor built into the SMU.
Agilent E5260/E5270 User’s Guide, Edition 5
7-9
If You Have a Problem
Channel Status Code
Channel Status Code
The channel status code indicates the following statuses of the measurement
channel, and is displayed in the channel status area on the LCD. No status code is
displayed if the Agilent E5260/E5270 is in the normal condition.
X
One or more channels are oscillating.
V
Measurement data exceeds the measurement range.
C
This channel reached its compliance setting.
T
Another channel reached its compliance setting.
The status priority is:
X>V>C>T
7-10
Agilent E5260/E5270 User’s Guide, Edition 5
If You Have a Problem
Error Codes
Error Codes
If errors occur, error codes are stored in the error buffer. To read the error code,
execute the “ERR?” command. To read the error message, execute the “EMG?”
command.
The output of the error codes is in the order that they occurred, and the first four
error codes are stored in the buffer. If no errors occurred, ”0, 0, 0, 0” is returned.
Operation Error
100
Undefined GPIB command.
Send the correct command.
102
Incorrect numeric data syntax.
Correct the data syntax.
103
Incorrect terminator position.
Correct the command syntax. The number of parameters will be
incorrect.
120
Incorrect parameter value.
Correct the parameter value.
121
Channel number must be 1 to 2, or 1 to 8.
Correct the channel number. The channel number must be 1 to 2 for the
Agilent E5262A/E5263A, or 1 to 8 for the Agilent E5260A/E5270B.
122
Number of channels must be corrected.
Check the MM, FL, CN, CL, IN, DZ, or RZ command, and correct the
number of channels.
123
Compliance must be set correctly.
Incorrect compliance value was set. Set the compliance value correctly.
124
Incorrect range value for this channel.
Check the range value available for the channel, and correct the range
value.
Agilent E5260/E5270 User’s Guide, Edition 5
7-11
If You Have a Problem
Error Codes
126
Pulse base and peak must be same polarity.
The polarity of the base and peak values must be the same in the PI
command. Also the polarity of the base, start, and stop values must be
the same in the PWI command.
130
Start and stop must be same polarity.
For a log sweep, the polarity of the start and stop values must be the
same in the WV, WI, WSV, WSI, or WNX command. Also, 0 is not
allowed for the start and stop values.
150
Command input buffer is full.
The Agilent E5260/E5270 can receive 256 characters maximum
including the terminator at one time.
152
Cannot use failed module.
The channel number specifying the module failed the self-test or
calibration. Specify another module that passed the self-test or
calibration. For the service purpose, execute the RCV command to
enable the module.
153
No module for the specified channel.
Module is not installed in the slot specified by the channel number.
160
Incorrect ST execution.
The internal memory programming can be started by the ST command
and completed by the END command. Do not enter the ST command
between the ST command and the END command.
161
Incorrect END execution.
The internal memory programming can be started by the ST command
and completed by the END command. Do not send the END command
before starting the programming.
162
Incorrect command for program memory.
Specified command cannot be stored in the program memory. For the
incorrect commands, refer to Table 2-1 in Programming Guide.
7-12
Agilent E5260/E5270 User’s Guide, Edition 5
If You Have a Problem
Error Codes
170
Incorrect usage of internal variable.
The internal variable must be %In for integer data, or %Rn for real
data. where n is an integer, 0 to 99. Use %In for the integer type
command parameters; and use %Rn for the real type command
parameters. For the internal variables, refer to “VAR” command in
Programming Guide.
171
Internal variable is not allowed.
The internal variables %In and %Rn are not available for the ACH,
VAR, and VAR? commands. Do not use the internal variables for the
commands.
200
Channel output switch must be ON.
To enter the specified command, set the channel output switch to ON.
201
Compliance must be set.
To change the source output mode (voltage or current), set the
compliance value.
202
Interlock circuit must be closed.
To set the output voltage or the voltage compliance to more than ±42 V
(high voltage state), close the interlock circuit. If the interlock circuit is
opened in the high voltage state, outputs of all units will be set to 0 V.
203
Cannot enable channel.
The channel output switch cannot be set to ON in the high voltage state.
Set the output voltage or the voltage compliance to ±42 V or less to set
the switch to ON.
204
Cannot disable channel.
The channel output switch cannot be set to OFF in the high voltage
state. Set the output voltage or the voltage compliance to ±42 V or less
to set the switch to OFF. Or send the CL command with no parameter to
set switches of all channels to OFF immediately.
205
DZ must be sent before RZ.
The RZ command is effective for the channels set to 0 V output by the
DZ command.
Agilent E5260/E5270 User’s Guide, Edition 5
7-13
If You Have a Problem
Error Codes
206
Do not specify the channel recovered by RZ.
Specify the channels that have not been recovered yet by the RZ
command after the DZ command. The RZ command cannot be
executed if the specified channels include a channel that has already
been recovered by the RZ command.
210
Ext trigger could not start measurement.
External trigger cannot start measurement because of busy condition.
211
TM1 must be sent to use GET.
Send the TM1 command to use the GPIB GET command (TRIGGER
statement in HP BASIC).
212
Compliance must be set correctly.
Compliance was not set or an incorrect compliance value was set in the
DV, DI, PV, PI, PWV, PWI, TDV, TDI, LSV, LSI, LSSV, LSSI, BSV,
BSI, BSSV, or BSSI command. Set the compliance value correctly.
213
Cannot perform self-test or calibration.
Self-test and calibration cannot be performed in the high voltage state.
Set the output voltage or the voltage compliance to ±42 V or less to
perform the self-test or calibration.
214
Send MM before measurement trigger.
Before sending the measurement trigger, the MM command must be
sent to set the measurement mode.
220
Send WV or WI to set primary sweep source.
Before triggering the staircase sweep measurement, triggering the
staircase sweep with pulsed bias measurement, or sending the WSV,
WSI, or WNX command to set the synchronous sweep source, send the
WV or WI command to set the primary sweep source.
221
Send PWV or PWI to set pulse sweep source.
Before triggering the pulsed sweep measurement, or sending the WSV
or WSI command to set the synchronous sweep source, send the PWV
or PWI command to set the pulse sweep source.
222
Send PV or PI to set pulse source.
Before triggering the staircase sweep with pulsed bias measurement,
send the PV or PI command to set the pulse source.
7-14
Agilent E5260/E5270 User’s Guide, Edition 5
If You Have a Problem
Error Codes
223
Compliance must be set correctly.
Compliance was not set or an incorrect compliance value was set in the
WV, WI, WSV, WSI, WNX, or BDV command. Set the compliance
value correctly.
224
Sweep and sync output modes must be the same.
The primary sweep channel and the synchronous sweep channel must
be different, and they must be set to the same output mode (voltage or
current).
225
Send WSV, WSI, or WNX to get sync sweep data.
If you enable data output of the synchronous sweep source, do not
forget to set the synchronous sweep source by the WSV, WSI, or WNX
command. For data output, refer to “FMT” command in Programming
Guide.
226
Set linear sweep for MM4 or MM5.
Only the linear sweep is available for the PWV or PWI command for
the pulsed sweep measurement (MM4) or the WV or WI command for
the staircase sweep with pulsed bias measurement (MM5).
227
Sweep measurement was aborted.
Sweep measurement was aborted by the automatic sweep abort
function or the power compliance.
230
Pulse source must be set.
To perform the pulsed spot measurement (MM3), send the PV or PI
command to set the pulse source.
231
Compliance must be set correctly.
Compliance was not set or an incorrect compliance value was set in the
PV, PI, PWV, or PWI command. Set the correct compliance value
effective for the pulse output.
238
Too large pulse width (max. 2 s).
The maximum value of the pulse width is 2 s. And the available value
depends on the pulse period value. Refer to “PT” command in
Programming Guide.
239
Pulse width must be 0.5 ms or more.
Set the pulse width to 0.5 ms or more. Refer to “PT” command in
Programming Guide.
Agilent E5260/E5270 User’s Guide, Edition 5
7-15
If You Have a Problem
Error Codes
253
Program memory is full.
Maximum of 2000 programs or 40000 commands can be stored in the
program memory. Refer to “ST” command in Programming Guide.
254
Invalid input for a memory program.
The GPIB GET command (TRIGGER statement in HP BASIC) and an
external trigger input are not allowed in a memory program (between
the ST and END commands).
255
Maximum nesting level is eight.
Nesting (one program calling another) of a memory program must be
eight levels or less.
260
Data output buffer is full.
Maximum 34034 measurement data items can be stored in the data
output buffer.
270
Search source channel must be set.
Before triggering the search measurement or sending the LSSV, LSSI,
BSSV, or BSSI command to set the synchronous search source, send
the LSV, LSI, BSV, or BSI command to set the primary search source.
271
Search monitor channel must be set.
Before triggering the search measurement, send the LGV, LGI, BGV, or
BGI command to set the search monitor channel.
273
Search and sync output modes must be the same.
The primary search source channel and the synchronous source channel
must be different, and they must be set to the same output mode
(voltage or current).
274
Search sync source is overflow.
Set the search sources so that the same output range is set to both
primary and synchronous search sources.
275
Search target must be compliance value or less.
The search target value must be less than or equal to the compliance
value of the search monitor channel. Correct the search target value or
the compliance value.
276
Start and stop must be different.
Set different values for the search start and stop values.
7-16
Agilent E5260/E5270 User’s Guide, Edition 5
If You Have a Problem
Error Codes
277
Step must be output resolution or more.
Set the search step value to the output resolution or more.
278
Search and sync channels must be different.
Set the search source and the synchronous source to different channels.
279
Search monitor mode must be compliance side.
Send the LGI/BGI command to set the voltage source search monitor
channel, or send the LGV/BGV command to set the current source
search monitor channel.
303
Excess voltage in MPSMU.
Voltage that exceeds maximum voltage at the present current range was
detected by a MPSMU. All output switches were set to OFF.
305
Excess current in HPSMU.
Current that exceeds maximum current at the present voltage range was
detected by a HPSMU. All output switches were set to OFF.
307
Unsupported module.
This module is not supported by this firmware version. Until you
update the firmware, use the Agilent E5260/E5270 with this module
removed.
310
Interlock open operation error. Initialized.
Initialization was automatically performed because the E5260/E5270
failed to set its output to 0 V when the interlock circuit was opened in
the high voltage condition. Any module may be defective. Perform
self-test.
311
ASU control cable was connected/disconnected.
The E5270B must be turned off when the Atto Sense and Switch Unit
(ASU) is connected/disconnected.
603
Sweep and pulse channels must be different.
Set the sweep source and the pulse source to different channels for the
staircase sweep with pulsed bias measurement (MM5).
610
Quasi-pulse source channel must be set.
Before triggering the quasi-pulsed spot measurement, send the BDV
command to set the quasi-pulse source.
Agilent E5260/E5270 User’s Guide, Edition 5
7-17
If You Have a Problem
Error Codes
620
TGP specified incorrect I/O port.
Specify trigger input for the Ext Trig In port, or trigger output for the
Ext Trig Out port by the TGP command. Refer to “TGP” command in
Programming Guide.
621
Specify trigger input port for PAX/WSX.
No trigger input port was specified for the PAX or WSX command.
Specify the trigger input port, or set the port as the trigger input port.
Refer to “TGP” command in Programming Guide to set trigger port.
622
Specify trigger output port for OSX.
No trigger output port was specified for the OSX command. Specify the
trigger output port, or set the port as the trigger output port. Refer to
“TGP” command in Programming Guide to set trigger port.
630
Incorrect polarity of search step value.
For the linear search measurement. The step value must be positive if
start<stop, or negative if start>stop.
631
Number of search steps must be 1001 or less.
For the linear search measurement. The number of search steps
between start and stop must be 1001 or less. This means the |step| value
must be |stop-start|/1001 or more.
632
Search measurement was aborted.
Search measurement was aborted by the automatic abort function.
640
Search limits must be range/20000 or more.
For the binary search measurement. The limit value for the search
target must be range/20000 or more. where range means the
measurement range actually used for the measurement.
650
Data format must be ASCII to get time data.
The time stamp function is not available for the binary data output
format. To use the time stamp function, set the data output format to
ASCII.
655
Cannot connect/disconnect series resistor.
The series resistor status cannot be changed in the high voltage state.
Set the output voltage or the voltage compliance to ±42 V or less to
connect or disconnect the series resistor.
7-18
Agilent E5260/E5270 User’s Guide, Edition 5
If You Have a Problem
Error Codes
656
Series resistor must be OFF for 1 A range.
The series resistor cannot be set to ON for the measurement channels or
the output channels that use 1 A range.
657
Series resistor cannot be used with ASU.
The series resistor is not available for the channel connected to the Atto
Sense and Switch Unit (ASU).
670
Specified channel does not have ASU.
Specify the module that can be used with the ASU.
Agilent E5260/E5270 User’s Guide, Edition 5
7-19
If You Have a Problem
Error Codes
Self-test/Calibration Error
When the Agilent E5260/E5270 fails the self-test or self-calibration, the Agilent
E5260/E5270 returns the following error code and error message.
In the error code, N indicates the slot number. If the module is installed in slot 1, and
it fails the function test, the error code will be 1760.
700
CPU failed NVRAM read/write test.
701
CPU failed FPGA read/write test.
702
CPU failed H-RESOLN ADC end signal test.
703
CPU failed H-RESOLN ADC start signal test.
704
CPU failed emergency status signal test.
705
CPU failed SRQ status signal test.
706
CPU failed high voltage status signal test.
707
CPU failed low voltage status signal test.
708
CPU failed DAC settling status signal test.
709
CPU failed measure ready status signal test.
710
CPU failed set ready status signal test.
711
CPU failed measure end status signal test.
712
CPU failed measure trigger signal test.
713
CPU failed pulse trigger signal test.
714
CPU failed abort trigger signal test.
715
CPU failed DAC set trigger signal test.
716
CPU failed LCD read/write test.
720
H-RESOLN ADC is not installed.
721
H-RESOLN ADC failed ROM/RAM test.
722
H-RESOLN ADC failed B-COM offset DAC test.
723
H-RESOLN ADC failed sampling ADC test.
724
H-RESOLN ADC failed integrating ADC test.
725
H-RESOLN ADC failed bus function test.
740
GNDU failed calibration.
7-20
Agilent E5260/E5270 User’s Guide, Edition 5
If You Have a Problem
Error Codes
N760
SMU failed function test.
N761
SMU failed VF/VM function test.
N762
SMU failed IF/IM function test.
N763
SMU failed loop status test.
N764
SMU failed temperature sensor test.
N765
SMU failed CMR amplifier calibration.
N766
SMU failed CMR amplifier adjustment.
N767
SMU failed CMR 100 V range full output test.
N768
SMU failed VF/VM calibration.
N769
SMU failed VM offset calibration.
N770
SMU failed VM gain calibration.
N771
SMU failed VF offset calibration.
N772
SMU failed VF gain calibration.
N773
SMU failed VF gain calibration at 20 V range.
N774
SMU failed VF filter offset calibration.
N775
SMU failed H-SPEED ADC self-calibration.
N776
SMU failed H-SPEED ADC VM offset calibration.
N777
SMU failed H-SPEED ADC VM gain calibration.
N778
SMU failed IF/IM calibration.
N779
SMU failed calibration bus test.
N780
SMU failed IM offset calibration.
N781
SMU failed IM gain calibration.
N782
SMU failed IF offset calibration.
N783
SMU failed IF gain calibration.
N784
SMU failed IDAC filter offset calibration.
N785
SMU failed oscillation detector test.
N786
SMU failed I bias test.
N787
SMU failed common mode rejection test.
Agilent E5260/E5270 User’s Guide, Edition 5
7-21
If You Have a Problem
Error Codes
N789
SMU failed high voltage detector test.
N790
SMU failed zero voltage detector test.
N791
SMU failed V hold test.
N792
SMU failed V switch test.
7-22
Agilent E5260/E5270 User’s Guide, Edition 5