1
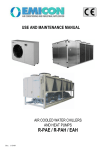
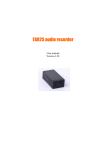
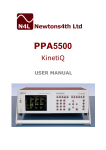
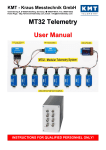
Opera AVX - module
User manual
Version 1.01
Wireless Connection Manager AV v. 3.15
Firmware version 4.01
Opera AVX is a device containing audio and video recorder with an integrated WiFi interface
that is used for very fast downloading all records and online streaming with the remote control
of the recorder. Connection should be direct via WiFi with the computer or over Internet. Due
to very optimized power consumption Opera AVX can run on a battery very long time, up to
250 hours (over 10 days) of continuous recording and downloading all the audio records with
900mAh battery. All records are stored to its internal memory which should record up to
several days continuous recording and may start at any time download to the user side. Data
transfer to the computer is very fast and takes about 5-30 minutes on each recorded 24 hours.
Recordings can be played back and edited by using supplied software for Windows. Each
record is marked with precision time line, which allows a very clear focus for very long
recordings. Opera AVX itself does not transmit until the user initiate transfer from computer
to establish the connection. This mode of operation is virtually undetectable. Recording
should be controlled by user or it should be scheduled for selected periods for each day of a
week.
Basic parameters of Opera AVX module
Technical data - general:
Module dimensions:
Module thickness:
Power supply:
Battery charger:
Record scheduling:
Memory capacity:
Medium for storing data:
Export records:
30x37mm
5mm
3.3 to 6.0V
integrated Li-on battery charger
selectable periods for each day of a week
16GB
integrated microSD card
AVI or WAV format
Audio:
Format of stored data:
Sampling frequency:
The ratio of signal to noise:
Sensitivity of microphone:
Integrated microphone type:
Voice activated recording:
AGC
External input:
16bit
22kHz, 16kHz or 8kHz
75 dB
8-10 m
Knowles EK23 series
yes
yes
3 wire or 2 wire input via micro USB connector
Video:
Compression format:
Video frame rate:
Sensitivity:
Resolution:
VAS mode:
Video data rate:
Camera connection:
Dimensions:
MJPEG
selectable 1-5fps
<0.3lux with night mode enabled
640x480 or 320x240
supported to activate video only when audio is detected
selectable 48kbit - 1280kbit
via 0.8m long video link cable
18x20x6mm
Wifi and network:
Data transfer rate
Output power of WiFi:
11Mbit
20dB
Antenna:
WiFi modes:
Network configuration:
Security:
Scan mode:
Downloading speed:
integrated or external U.FL connector
802.11n, 802.11g or 802.11b in client mode
static IP or DHCP
optional WPA2/PSK, WEP-128, WEP-64
passive
depends on mode (24h audio at 16kHz takes
approximaltelly 10 minutes to download)
Current supply in selected operation modes (all values are valid in case of 3.7V power supply,
for higher voltage the currents are lower and vice versa):
Power switch in OFF position
70uA
Stand-by current – wifi in passive scan mode, period 5min, recording OFF
900uA
Recording 8kHz, wifi in passive scan mode, period 5min
2,9mA
Recording 16kHz, wifi in passive scan mode, period 5min
3,8mA
Recording 22kHz, wifi in passive scan mode, period 5min
4,1mA
WiFi ON, online streaming audio only
140mA
WiFi ON, download at maximum speed
205mA
Recording in voice voice activated mode (waiting for voice trigger), wifi in
passive scan mode, period 5min
1,9mA
Current supply in selected modes with video recording (all values are valid in case of 3.7V
power supply, for higher voltage the currents are lower and vice versa):
16kHz audio, video 1fps, 640x480
15mA
16kHz audio, video 2fps, 320x240
22mA
16kHz audio, video 3fps, 640x480
33mA
16kHz audio, video 5fps, 640x480
47mA
According the values above you can estimate a very long battery operation. For example with
900mAh Li-on battery the recorder can run 185hours recording continuously at 16kHz
(including all downloads over WiFi) or 250hours if the audio is in 8kHz mode.
Basic settings (initial factory values)
The following settings are the production values. If you don't know the stored configuration,
you must connect directly via tp-link adapter to your computer and run Quick setup wizard,
which will restore the configuration and save your new paramaters.
IP address of a recorder:
Net mask:
Default gateway:
WiFi ESSID:
WiFi security:
DHCP:
IP address of user’s PC:
UDP port:
192.168.2.35
255.255.255.0
192.168.2.1
wifirec
disabled
disabled
192.168.2.2
2000
Hardware description
The pictures above shows the layout of the module from both sides (left – top side, right –
bottom side).
The Opera-AVX has a two micro USB connectors, one slide switch and two indication LEDs.
There is U.FL connector for connecting the whip antenna or any external WiFi antenna. The
slide switch is used to power up the recorder or to put the recorder into stand-by mode, when
all the functions are off and only battery charger is available. The first USB connector above
the slide switch is used only for external microphone connection. The second USB connector
is common for the USB charger and the camera module. The power supply must be connected
to the pads shown on the picture. Be aware of a correct supply voltage and the polarity.
The supply voltage must not exceed 6.0V and must have a correct polarity otherswise it
will cause a pernament damage to the recorder. You can connect to those pads Li-on
battery with capacity between 500-1500mAh. In this case the battery can be charged via
micro USB connector by using any USB power source. The charger is independent from the
recorder operation and the slide switch position.
Two status LEDs are having a following indications depending on a recorder state:
Slide switch in OFF position
Every 4 seconds both LEDs flashes shortly
together when the battery is charging via
micro USB
Slide switch moved to ON
LED2 flashes 1 to 4 times indicating the
battery status (1 – battery weak, 4 – battery
fully charged)
Recorder is ON – LED 2 indication
During recording LED 2 flashes shortly every
2 seconds – indicates recording mode (this
can be disabled by software and LED2 is also
off during voice activated recording waiting
for the voice trigger)
Recorder is ON – LED 1 indication
LED 1 comes on every time the WiFi is
turned ON and performing a scan or it's
connected with the user
Slide switch moved to OFF
LED 2 flashes quickly for a few seconds
indicating a transition to the shut down state
Opera AVX is using a micro USB connector for recharging the internal battery. When the
battery is fully charged, this USB power is used as a main power source. Full battery recharge
may require up 2 hours (for batteries with capacity over 900mAh could be more), when the
battery was fully discharged before.
If you power the recorder from any power source connected to the pads show above, the care
must be taken to the length of the wires and also the layout of the wires. Long thin wires in
length over 20cm are not recommended. The layout of the wires and the power supply should
be in opposite direction than the antenna. If you don't meet this criteria, there could be a little
audible noise in the recording during the high speed WiFi operation. The recorder must be
powered via power pads, not via micro USB if the battery is not connected to the
recorder.
Quick Start and setup
The recorder allows the user to make easy configuration by using a Quick setup wizard. This
program guiedes you thru the major part of the configuration step by step. You need the
recorder, tp-link adapter connected to your computer and run the application Quick setup
wizard from the software package. The preconfigured tp-link adapter has a DHCP server,
which assigns to your local network interface at your computer address 192.168.2.2. If in any
case this does not work or you can not connect with the recorder, you must set the address
manually. This step is described later.
This following procedure describes the way how to quickly configure the recorder or restore
the configuration. Every time you move the slide switch from OFF to ON position, the
recorder will try to make a single scan for connection with the Quick setup wizard. This scan
period lasts only a few seconds after you move the slide switch to ON and will not repeat
anymore until you turn the recorder OFF and try to turn it ON again. The following steps
work any time regardless of the previously saved configuration. You must have the original
settings of the tp-link adapter. If you don't have it, you must have preconfigured WiFi
network with essid “wifirec” and have the network security disabled.
1) Connect the TP-link acces point to your computer via LAN and USB cable together and
connect the antenna to the TP-link.
2) You may need to set your local area network adapter the following static IP address:
192.168.2.2, mask 255.255.255.0
Remark: The preconfigured tp-link adapter has a DHCP server. For most of the cases you do
not need to modify your local IP address as described above, but it's recommended step to set
the static IP address.
3) Run the program Quick setup wizard and go step by step thru all pages and fill in required
information for the configuration. After you get to the last page, press the button “Save
configuration”. Until this time the recorder must be OFF. Now the software is ready to
connect with the recorder.
4) Move the slide switch to ON. After a few seconds if the connection was successful, you'll
get the confirmation screen with the serial number of the recorder. After this step, you should
note the recorder's serial number and close the Quick setup wizard. Now the recorder is ready
and it has a configuration according you settings.
5) Once the configuration is done, you can start using the recorder. The application Wireless
connection manager AV is used to handle all the functions. Run this application on your
computer and wait for the recorder to connect. It will connect according your selected period
time. For the first time if you don't like to wait, move the slide switch to OFF and back to ON.
After this the recorder will connect after a few seconds. All software functions are described
later.
Configure the recorder to connect over Internet
The quick setup let you to configure the recorder to connect over Internet. This option is
selected on the top of the first page of this application. The recorder can be located anywhere,
where is Internet available over WiFi network (public, office, or anywhere else). You will be
able to connect with this recorder from any place, where your computer will be connected to
Internet. You will need to know only the unique serial number of the recorder and your access
password.
When this setup is done, you can access the recorder by using Wireless Connection Manager
AV. Run this application on your computer, which is connected to Internet. You’ve to press
button “Internet Connect” and enter the serial number of the recorder and your access
password. The message “Waiting for connection…” will appear after you press the button
“Connect”. You’ve to wait until the recorder will try to connect with you. This depends on a
selected connection period, which should be 1 minute or much more (depending on your
option).
Connection modes and settings
Opera AVX should work in 3 different modes. Every time Opera is trying to find the user at
the specific place according the configuration. You must run the Wireless Connection
Manager AV and wait for the recorder, when it will try to connect with you. This period
might be set to 1 minute or even several hours. Short time is recommended in case, when the
user comes in the range of Opera AVX once in a long time to download all records and the
user wants to connect at any time. In this case, when selecting for example one minute, you
need to wait up to one minute to establish the connection with Opera AVX. When the
connection manager is closed or the connection is lost, you can’t reconnect with Opera AVX
until the next selected period is elapsed. The recorder will disconnect automatically if the
connection manager is closed or the connection is lost for more than 15 seconds. If you want
to extend this time and you are experiencing some connection problems for example due to a
poor connection, you can check the box “Stay online” on the main screen of the Wireless
Connection Manger. This is not a part of saved configuration, it will only tell to the recorder,
which is connected to stay online longer (around 2 minutes) if the connection is lost. Selecting
short period time consumes much more power, when the battery is used as power source. For
periods 5 minutes or more the the power consumption is not critical. If you are connecting
with Opera AVX via Internet, using much longer time is recommended with automatic
download active on user’s side. In this case Opera AVX will connect always after selected
period and uploads all recordings. This option is recommended in case when the longest
battery operation is required.
Direct connection with computer via WiFi using tp-link adapter
The most common mode of operation is direct connection with user’s computer by using tplink adapter. This has been already described above. Run the Wireless Connection Manager
AV on your computer and wait for the recorder to connect. It will connect according your
selected period time. For the first time if you don't like to wait, move the slide switch to OFF
and back to ON. After this the recorder will connect after a few seconds.
Direct connection with computer via WiFi using your office network
Second is connection for example via your office WiFi. It's almost the same like a previous
step, you'll only use your office network instead of tp-link adapter connected to your
computer. During the setup via Quick setup wizard you have to fill in all information about
your office network, which is the WiFi network name (essid) and the security option with
password (most common today is WPA2/PSK). This mode of operation is different only in IP
address settings in comparing the previous step. If you don't know how to make a correct
network setup, we recommend to use the Quick setup wizard one more time. First as
described above you've connected and configured Opera by using the tp-link, however you've
saved configuration to connect to your office WiFi. The next step will make a correct IP
address settings. Run the Quick setup wizard again at the computer at your office, which you
will use to connect with Opera and use the procedure described above in the same way like
connection directly via tp-link. The only exception from this procedure is that you've to enter
one more time the name and security of your office WiFi. Once it's done, you're ready to
connect the same way, but the connection will be made by using your office WiFi.
Connection via Internet
In this case Opera AVX connects to any local WiFi access point (which you've specified
during the configuration), which is providing internet connectivity. Your computer should be
anywhere else with internet connection and you need to know only the serial number of your
recorder and access password. Use button “Internet Connect” on the main screen of
cntmgrAV. The message “Waiting for connection…” will appear after you press the button
“Connect”. You’ve to wait until the recorder will try to connect with you. This depends on a
selected connection period, which should be 1 minute or much more (depending on your
option).
Connecting more than one Opera AVX recorder to the same computer
It is possible to connect more recorders at the same time with one computer. It's not
recommended to do the download at the same time, because the bandwidth of the network
will be shared between the recorders and this may slow down the downloading speed. When
you need to connect more Opera AVX recorders with the same computer, use different UDP
port for each Opera AVX. UDP port, which is used by connection manager is set to default
2000 and if you need different port, use this port number as a parameter when starting
cntmgrAV.exe, for example „cntmgrAV.exe 2500“. You also need a different IP address for
each recorder. There can not be two or more recorders with the same IP address or with the
same UDP port.
Description of controls
For the entire control of the recorder, the program cntmrgAV.exe (Wireless Connection
Manager AV) is used together with a Record Manager, which is used for viewing recordings
and raw2avi tool for converting the RAW files into AVI or WAV file format. Never leave
recorder connected to your computer via WiFi for a long time, unless the connection is
necessary, because power consumption in this mode is much higher, which is important when
the battery is used as power source.
Opera AVX can work in several different recording modes. The selected source for recording
should be internal or external microphone selected in the connection manager. To start and
stop recording you can use control buttons, when the connection with the computer is
established. To save the recording time and also battery power, you can use voice-activated
recording and scheduled recording. For voice activated recording is selected threshold and
time. When this selected threshold is reached by the recorded sound, recording will start for
selected period (delay time). If there is no audio signal detected reaching this threshold in
selected time, the recording is stopped. The precision timeline keeps the information about
each audio section, so all pauses are removed, but can be viewed in timeline, when the record
is open in recording manager. Scheduled recording allows the user to select 7 different
periods of each day of a week to start and stop recording. When this event is activated by
current time, it simulates pressing the start/stop button in the connection manager. Selecting
time to 00:00 means, that this time is not used for activating/deactivating recording mode.
All actions are controlled easily with a few buttons in the Wireles Connection Manager AV.
All control actions can be performed only if the status is displayed as "connected". Buttons
start / stop recording and online streaming directly control the state of recorder. For online
streaming it's possible to enable the high pass filter to remove the unwanted environmental
noise during the online streaming. This will not affect the recorded audio. Use button “Filter”
to enable or disable this function. Automatic synchronization will download all new
recordings that are not yet stored on your computer. Data transfer can be done simultaneously
while recording and even an online listening, however online streaming is not recommended
during data transfer, because it reduces the download speed. Disconnect from the recorder
takes place automatically when the program is terminated, or „terminate connection“ button is
pressed. If you need to stay online for a live streaming, you can use option “Stay online”.
When this box is checked, the recorder will not close the WiFi connection in a short time after
you close the cntmgr-AV or lose temporarly the connection for example due to a poor WiFi
signal. Connection manager should run in automatic mode, where it automatically starts
download of all new records, when the connection is established and disconnects immediately
after each synchronization is completed. For this case press button „automatic download“ and
the message „automatic download active“ indicates, that this mode is active. The
configuration can’t be modified in this mode. Pressing this button again deactivates this mode.
The automatic download and automatic synchronization is sensitive on a selected record
period for download. For example, if you don't like to download all the records by using this
function, select the period you're interested in by selecting the option “All records in period”
or “Not older than”. All records are stored at the same folder according the serial number of
the recorder. All those folders are located at the same place like cntmgrAV software or at
your onw place shown on a gray label below the recorder status. You can modify it by
clicking on this label and selecting a different place for data storage. All downloaded files are
having a specific name in a format: recorder serial number + unique record ID + date and time
of the record. You can use utility raw2avi to convert the RAW files to AVI or WAV file.
When you want to open any record, double click on the selected record you wish to open from
the list or run rcman – Record manager and open any *.raw downloaded file. You can use the
icon on the tool bar to convert the record to AVI or WAV format. There is also possible to
select timestamp in the exported video. If you want to use the timestamp, the export will be
much slower. When the record is opened by Record manager, it can’t be used for the
synchronization at the same time. For this case it’s not recommended to leave opened several
records, when the synchronization is in progress. The memory usage status is informational
only. When the memory is full, the oldest records are automatically deleted and recording is
not terminated. This can be disabled by unsing an option “Don't overwrite old records”. The
maximum number of records in the list is 256. The records will split automatically after each
1 hour of recording or 4 hours of recording in case of audio only. The preview function is
available to let you see about 5 seconds of a video at any selected time to let you decide if you
want to download it or not. You can select any of the record in the list, select the time for the
preview which is selected on a track bar or by using a time input, which specifics the number
of minutes and seconds counted from the beginning time of a record. Then you can click on a
preview icon on a tool bar above the recording list to start the preview.
Configuration
Any configuration which is is selected by the user must be first saved to the recorder by using
the button „Save settings“ followed by the automatic restart of the recorder with new
configuration.
All configuration is stored in the recorder and all changes should be made in the program.
Part of the WiFi interface settings is not recommended to change if it is not possible to
directly access the recorder, because in the case of incorrect settings, the recorder may not be
able to establish connection with user anymore. Each configuration requires to restart the
recorder, which is done automatically after the confirmation of the configuration save.
WiFi settings:
ESSID:
WiFi essid, where Opera AVX is trying to connect. Must be the same with the
computer, which is used for connection or the same with local access point,
when connecting via Internet.
IP settings:
IP address, mask, default gateway and DHCP function are the settings of Opera
network interface, which is connecting to the user.
Network security:
For WiFi connection are available 3 different security levels. This security type
and password must be the same with the selected security and password in the
user’s computer or in the local access point for connecting to the Internet.
Connection with the user:
Period for creating connection with the user:
This period should be selected in range from 1 minute up to 6 hours. This
periods indicates the time, when the WiFi is turned on and trying to connect
with the user. When this period is elapsed, it is followed by a few seconds
during which Opera is trying to connect with the user. If this connection is not
successful, it waits again of this preselected time. Short period up to 15 minutes
is having significant impact on power consumption, when the unit is powered
from battery.
Connect only in following period:
This option is used for power optimization, when you want to power Opera
from battery only and you don’t need to connect over WiFi at any time. If you
need to connect with Opera only in specified time frame every day, you can
select this option and set time frame from (hours: minutes) to (hours: minutes).
In this case, when this option is enabled, Opera is using WiFi connection only
inside this period and tries to connect according the previous settings selected
on previous step. For example, you want to connect with Opera every day only
between 18:00 and 19:00. In this case you select this option, set time from
18:00 and to 19:00 with period for creating connection set to 2 minutes. In this
case, Opera will try to connect with the user every second minute between
18:00 and 19:00.
IP address of user:
This option must contain the IP address of user’s computer in case when you
connect directly over WiFi to the recorder. In case when you connect over
Internet, select this option. For this case “Use DHCP to get IP address” is
recommended, because most of the networks today supports this function.
UDP port:
This option specifies the UDP port, which is used for connection with the user.
The main reason for using this option is in case, when you want to connects
several Opera recorders with the same computer.
Audio settings
Enable LED indication:
This options enables flashing LED, when the recording in in progress
Voice activated recording:
When this option is enabled, Opera starts recording only when the sound level
is detected above selected sensitivity threshold. Delay time indicates for how
long the recording continue after the last detection of sound above selected
threshold. When you use a video mode, it's recommended to have this time at
least 15 seconds, because the camera needs a few seconds to power up after the
sound is detected.
Sample rate:
Selects sample rate for recording and online listening of 8kHz,16kHz or 22kHz
Start recording immediately after power up:
When this option is enabled, recording starts when Opera is turned on.
Use external audio input:
This option is used to switch between internal microphone or external audio
input used for recording and listening.
Use preset volume instead of automatic control:
When you require to use fixed gain of microphone or external audio input, use
this option. Preferred option is disable this function, because automatic gain
control is more efficient in most of the environments.
Scheduled recording
:
This page is used for scheduling recording during the week. If you don’t require to record all
24 hours, you can specify period of a each day, when recording should start or stop. Every
specified time simulates pressing the start/stop recording button. The time which is set to
00:00 is ignored for this start/stop function. In this case you specify recording over the
midnight. Internal real time clocks are always synchronized automatically with the user’s
computer, when the connection is established.
Other:
This page is used for handling configuration and uploading new firmware. The current
firmware version is displayed each time, when the recorder is connected with the user.
Enable sound alert, when download is finished:
This option is designed for case when you want to come discretely in reach of a
recorder and use automatic download function. When all recordings are
downloaded, short sound alert from the computer’s sound card is activated.
Start following, application when download is finished:
This option is designed to run any external program, which is executed each
time, when the download is finished.
Load from card:
This function is used when you want to read the configuration stored at the
recorder. You must have Opera recorder which will let you to remove the
microSD card. The removable microSD card hold all configuration in file
rcimage.raw, which may by loaded directly by inserting this card to your reader
and opening this file.
Save to card:
This function is used when you want to save the configuration to the recorder
by using microSD card instead of saving it over WiFi link. You must have
Opera recorder which will let you to remove the microSD card.
Camera connection and settings:
The Opera AVX can operate in audio mode only or in a combined audio/video mode. The
camera module is connected via video link cable with the micro USB connector at the end.
Please note, the camera is using micro USB connector however there is no USB
compatibility. It is designed to connect with the recorder and has a specific hardware
configuration. At the end of a micro USB cable is a splitter used for case when you need to
recharge Opera AVX at the same time, when the camera is connected. For this case, connect
the USB power to the micro USB receptacle which is a part of a camera cable.
Camera configuration:
It's very important to understand the correct settings of a video format to get the best result
you want. The camera is highly optimized for a low power operation and can operate on a
battery for a very long time. Please remind the following rules – selecting the higher frame
rate will proportionally increase the power consumption. Increasing the picture quality and the
resolution will produce much more data, which means a longer time to download the records.
All the video settings is done by pressing the button “Camera settings” in a configuration
section of cntmgr-AV. Only some options can be modified, when the recording is in progress
or a video streaming is active. If you need to modify all settings, first stop the recording and
stop the video streaming. This configuration window can be opened when you press the right
mouse button over the video window during a live video streaming (in this case only some
options can be modified).
Frame rate – selects the video frame rate from 1-5fps.
Resolution – selects the video resolution
Compression – selects the compression level of a video images. Higher compression level
means less data produced by the video record, that means it takes a shorter time to download
the record, but the images are less sharp and some image details can disappear. Higher
compression can result a bit lower power consumption when you operate the recorder from
the battery.
White balance – the drop down list can select the preselected settings of a white balance. The
camera supports only a fixed white balance settings when it operates in an optimized power
saving mode. It's important to have a correct settings to get a correct real colors of the video.
Low light mode – this enables the low light mode in a dark environment. When the ambient
light is too low, the camera will increase the exposure time, which could result a picture to be
less sharp, when there are a moving objects.
Black and white – turns the camera to run in a black and white mode only
Flip over – this option will let you to rotate the video captured by the camera by 180 degrees.
Mirror image – makes a mirror view of the image
Disable power saving mode – when this option is enabled, the camera is in a full automatic
mode with automatic white balance correction. This mode is not recommended with the
battery power source. It takes significantly more power and the battery operation will be much
shorter.
Update – this button is used when you want to change some parameters during the time when
you use online video streaming. This is very efficient way how to modify the video
parameters when the camera is placed in a real environment and before you start recording.
FAQ:
Q: Recorder connects to the PC, but suddenly disconnects without any user’s action.
A: When the user is very near of a recorder, the battery is probably discharged and doesn’t
provide enough power to keep the connection. If the recorder is powered from external power
source, the power is probably not stable. Keep the recorder connected via USB with external
power source (with computer) and don’t connect with the recorder for at least 10 minutes to
precharge the battery.
Q: Recorder has very low download speed (300kb/sec or lower)
A: The distance between the recorder and user’s computer is too long or there is another WiFi
network operating on the same channel. Use different channel, or use high gain antenna at the
user’s side to increase the range.
Q: I’ve saved the new settings to the recorder and it doesn’t reconnect with the computer.
A: Probably wrong network or WiFi settings was saved. Restore default configuration by
using the Quick setup wizard. Check the local area network adapter configuration for TCP/IP
protocol if it has a following configuration: Static IP address option selected, IP address:
192.168.2.2, netmask: 255.255.255.0
Q: There is a background noise in the recorded audio, when the WiFi is on.
A: This is caused by a wrong cable layout or the power source is placed at or in the near of the
antenna.
Q: The LED 2 flashes 5 times in a sequence and the recorder doesn’t connect to WiFi.
A: It indicates the failure in the micro SD card. Try to remove and insert back the card or
check by using your computer if it contains file rcimage.raw and FAT32 file system. You can
format the card in your computer with FAT32 file system and try it again. The recorder will
need about 20 seconds to setup the files on the card, which is indicated by a very quick
flashing of LED.