1
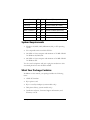
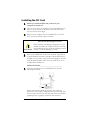
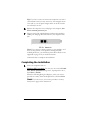
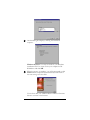
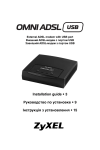
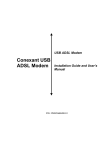
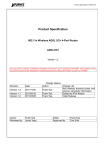
ADSL Modem
U S E R ’ S
M A N U A L
PCI
NOTICE
This document contains proprietary information protected by copyright, and
this Manual and all the accompanying hardware, software, and
documentation are copyrighted. All rights are reserved. No part of this
document may be photocopied or reproduced by mechanical, electronic, or
other means in any form.
The manufacturer does not warrant that the hardware will work properly in
all environments and applications, and makes no warranty or representation,
either expressed or implied, with respect to the quality, performance,
merchantability, or fitness for a particular purpose of the software or
documentation. The manufacturer reserves the right to make changes to the
hardware, software, and documentation without obligation to notify any
person or organization of the revision or change.
All brand and product names are the trademarks of their respective owners.
© Copyright 2002
All rights reserved.
Contents
GETTING STARTED .......................................................... 4
IMPORTANT! BEFORE YOU BEGIN ............................................... 4
SYSTEM REQUIREMENTS ........................................................... 5
WHAT YOUR PACKAGE CONTAINS ............................................... 5
IF YOU NEED HELP ................................................................. 6
INSTALLATION ................................................................ 7
INSTALLING THE SOFTWARE ...................................................... 7
INSTALLING THE PCI CARD ....................................................... 8
COMPLETING THE INSTALLATION ................................................ 9
CONNECTING TO THE INTERNET ............................................... 11
MONITORING YOUR DSL CONNECTION ...................................... 12
REMOVING YOUR MODEM ............................................. 13
APPENDIX A CUSTOM INSTALLATION INSTRUCTIONS 14
APPENDIX B INSTALLING PHONE FILTERS................... 18
APPENDIX C TROUBLESHOOTING ................................. 20
APPENDIX D REGULATORY INFORMATION................... 22
Getting Started
Congratulations on purchasing your Zoom ADSL PCI modem.
This Manual is organized as follows:
• Getting Started
• Installation
• Troubleshooting
• Regulatory Information.
Important! Before You Begin
Before installing your modem, you must have DSL service enabled
on your telephone line. To do this, you need to sign up with a DSL
service provider. They will arrange to have DSL enabled, and
provide you with a Username and Password (if required) and the
Communications Settings necessary to log on to their network.
You will need your Username and Password to complete the
installation, so please make sure you have them at hand.
Username _________________________
Password _________________________
The following table lists some of the more common DSL
broadband communications settings. This table is intended for
reference only. Typically you should not need to enter this
information; it should be automatically supplied if needed as part
of your service provider’s installation procedure.
4
Zoom ADSL Modem User’s Manual
Service Provider
VPI
VCI
Protocol (Encapsulation)
France (1)
8
35
PPPoA LLCSNAP (RFC 2364)
France (2)
8
67
PPPoA VCMUX (RFC 2364)
Portugal
0
35
PPPoE LLCSNAP (RFC 2516)
Spain—Telefonica
8
32
PPPoE LLCSNAP (RFC 2516)
Spain—Tiscali
1
32
PPPoA VCMUX (RFC 2364)
U.K.
0
38
PPPoA VCMUX (RFC 2364)
U.S.A.
0
35
PPPoE LLCSNAP (RFC 2516)
System Requirements
•
Windows 98/98SE, 2000, Millennium (Me), or XP operating
system.
•
PC-compatible with an available PCI slot
•
266 MHz or faster computer and minimum of 32 MB of RAM
for Windows 98/2000/Me
•
400 MHz or faster computer and minimum of 64 MB of RAM
for Windows XP.
You also need a telephone wall jack to plug the modem into. The
associated phone line must be DSL enabled.
What Your Package Contains
In addition to this manual, your package includes the following
items:
•
ADSL PCI modem.
•
RJ-11 phone cord.
•
RJ-11-to-wall-jack adapter (certain models only).
•
DSL phone filter(s) (certain models only).
•
Installation software, Customer Support information, and
Warranty on CD.
Getting Started
5
If You Need Help
•
If you have hardware installation problems, our Technical
Support Staff will be happy to assist you. Please see the
Customer Support portion of the CD for contact information.
•
If you have DSL service problems, you should contact your
DSL service provider.
6
Zoom ADSL Modem User’s Manual
Installation
Setting up the Zoom ADSL PCI modem involves the following
tasks:
• Installing the software
• Installing the PCI hardware and installing phone filters (if
applicable)
• Connecting to the Internet.
Installing the Software
Note: The dialog boxes shown here are typical of Windows 98.
Depending on your computer’s operating system, your
dialog boxes may look slightly different.
1
Insert the supplied CD into your CD-ROM drive. The CD
should start automatically after a few seconds. If it doesn’t,
from the desktop click Start | Run and type E:\setup.exe,
where E is the letter of your CD-ROM drive. Click OK.
2
When the Main Menu displays, click ADSL Modem
Installation Wizard.
3
Click the PCI option. The software installation proceeds
automatically.
4
When the process is complete, you will be prompted to click
Finish and then OK to shut down your computer.
IMPORTANT: Be sure to remove the CD from the CDROM drive after clicking OK. Continue below to install the
PCI card hardware.
Installation
7
Installing the PCI Card
1
Before you install the PCI card, make sure your
computer is turned off.
2
Take the cover off your computer. You will probably have to
remove several screws on the back of the case; most likely,
they are near the outer edges.
3
Remove the cover plate from an available PCI slot. (You’ll
have to remove another couple of screws.)
Electrostatic Discharge Protection
CAUTION
4
Static electricity can damage components on your
modem or inside your computer. Before removing
the board from its bag, touch the computer’s metal
chassis to statically discharge yourself.
Remove the ADSL PCI card from its antistatic bag and note
its Serial Number (located on the side of the bracket) below:
(Should you ever need to contact Customer Support, you will
need this Serial Number and it won’t be visible once you’ve
completed the installation.)
PCI Serial Number____________________________
5
Insert the card firmly into an available PCI slot. See the
following illustration:
PCI Slot
Be sure the bracket is lined up properly, then screw the
bracket into the computer using the screw you removed with
the cover plate. Be sure that the back end of the card (smaller
gold finger area) is properly seated into the connector.
8
Zoom ADSL Modem User’s Manual
Tip: If you have a tower or mini-tower computer case with a
vertical main board, you may want to lay the computer down
on its side so you can push straight down on the PCI card to
seat it firmly in its slot.
6
Replace the computer cover, and plug in the computer, but
do not turn the power on yet.
7
Plug one end of the supplied phone cord into the modem’s
ADSL port and plug the other end into your telephone wall
jack.
Note: If you want to connect a phone to your modem—or if
there are any phones on the premises sharing this DSLenabled phone line, you should use phone filters. Refer to the
Appendix on page 18 if you need instructions.
Continue below to complete the installation.
Completing the Installation
1
Turn your computer back on.
Windows XP Users Only: You may see one or more Found
New Device Hardware dialog boxes; if prompted to do so,
click Next or Finish.
When the following dialog box displays, select your service
provider or country from the dropdown list, and click Next.
Note! If you do not see your service provider or country
listed, turn to page 14 for instructions.
Installation
9
2
Another dialog box displays, tracking the installation
sequence.
Windows 98 Users: You may be asked for your Windows
installation CD. If so, insert it into your computer’s CDROM drive and click OK.
3
When the process is complete, you will be prompted to click
Finish and the computer will automatically restart itself so
the new settings can take effect.
You’re done with your ADSL modem installation! Continue
below to connect to the Internet.
10
Zoom ADSL Modem User’s Manual
Connecting to the Internet
If You Don’t Have a Username or Password:
If your DSL service provider told you that you do not need a
Username or Password, skip the steps below. To connect to the
Internet, simply double-click your desktop’s Web browser icon.
Once your computer is back on, you will notice a Zoom PPP DSL
icon on the desktop.
•
Double-click this icon.
•
Enter the Username and Password that your service provider
has given you and click Dial or Connect.
Your Username and Password will be verified and your modem
will be registered on the service provider’s network.
You are now connected to the Internet! To verify that you’re
successfully connected, click the DSL icon that resides in your
system tray.
You can start or stop your DSL connection by clicking the Start or
Stop button, respectively.
Installation
11
Monitoring Your DSL Connection
You can review or monitor your DSL connection and setup via the
Zoom PCI ADSL Control Panel.
From the desktop, select Start | Programs | Zoom PCI ADSL |
Control Panel. The following dialog box displays.
In addition, you can click on several other tabs that provide details
about your DSL connection, including
•
ATM Link Statistics
•
AAA Link Statistics
•
Connection
•
Protocol Setup.
12
Zoom ADSL Modem User’s Manual
Removing Your
Modem
If you ever want to remove your ADSL modem—for instance, if
you move your computer to a location without ADSL service—
you should remove the software before disconnecting the
hardware. Follow the steps below.
1
From the computer desktop, select Start | Programs |
Zoom PCI ADSL | Uninstall.
2
When prompted to confirm your choice of action, click Yes.
3
When the software removal process is complete, you will be
prompted to restart your computer. Ignore this prompt and
click Cancel. Shut down your computer and then remove the
PCI modem hardware. Refer to the Installing the PCI Card
section on page 8 if you need to.
Removing Your Modem
13
Appendix A
Custom Installation
Instructions
Most users will follow the installation instructions in the main
manual. Follow these instructions only if you do not see your
service provider or country listed in the Zoom PCI DSL Wizard
box depicted on page 10.
1
When you turn the computer back on after installing the PCI
Card, the Zoom PCI DSL Wizard dialog box displays.
You have two basic choices:
•
Custom PPPoA or PPPoE
•
Custom Bridged IP or Routed IP or Classical IP.
Your service provider should have provided you with your
protocol type, if you don’t know your protocol type, you will
have to request it. Note: There are several protocol
variations, but they fall into two categories: PPP (Point-toPoint Protocol) and IP (Internet Protocol). We have included
the table below for reference.
Once you make your selection, click Next.
14
Zoom ADSL Modem User’s Manual
If your provider specified one
of these protocols, select
PPPoA or PPPoE
If your provider specified one of these
protocols, select Bridged IP or
Routed IP or Classical IP
PPPoA LLC RFC 2364
Bridged IP over ATM LLCSNAP RFC 1483
PPPoA VCMUX RFC 2364
Bridged IP over ATM VCMUX RFC 1483
PPPoE LLCSNAP RFC 2516
Classical IP over ATM RFC 1577
PPPoE VCMUX RFC 2516
Routed IP over ATM LLCSNAP RFC 1483
2
A dialog box displays, tracking the installation sequence.
3
When the process is complete, you will be prompted to click
Finish and the computer will automatically restart itself so
the new settings can take effect.
4
From the desktop, select Start | Programs | Zoom PCI
ADSL | Control Panel and click the Protocol Setup tab.
Appendix A: Custom Installation Instructions
15
5
If you selected Custom PPPoA or PPPoE in Step 1 on
page 14:
You’ll see a dialog box with choices like those below.
•
Select the Encapsulation Mode.
•
Enter the VPI and VCI numbers.
Note: Your provider should have supplied you with this
information. If not, you will need to request it. You
may also refer to the tables on page 5 and 15.
•
16
Click Apply and then OK.
Zoom ADSL Modem User’s Manual
6
If you selected Custom Bridged IP or Routed IP or
Classical IP in Step 1 on page 14:
You’ll see a dialog box with choices like those below.
•
Select the Encapsulation Mode.
•
Enter the VPI and VCI numbers.
Note: Your provider should have supplied you with this
information. If not, you will need to request it. You
may also refer to the tables on page 5 and 15.
•
7
Click Apply and then OK.
You’re done with your ADSL modem installation! Now turn
to page 11 to connect to the Internet.
Appendix A: Custom Installation Instructions
17
Appendix B
Installing Phone
Filters
Phone filters prevent noise and interference if you are speaking
on the telephone or otherwise using the phone line while your
ADSL modem is on. Your modem package may include one or
more filters. If not, you may need to purchase your own. Filters
come in two types—with one jack or two. Follow the
instructions below that match your filter type.
If you have a filter with one jack:
To connect a phone directly to your modem, attach the filter as
shown below.
P C I M odem B racket
A DSL
Jack
P hone
Jack
Filter
P hone
Cable
P hone
Cable
1
2
3
4
5
6
7
8
9
*
8
#
P hone,
Fax M achine, etc.
Telephone
Jack w ith
A D SL
S ervice
1: Plug the filter’s LINE end into the modem’s telephone jack.
2: Plug the telephone’s cord into the filter’s PHONE end.
18
Zoom ADSL Modem User’s Manual
If you have a filter with two jacks:
To use a phone near your modem, you can connect the filter as
shown below.
PC I M odem Bracket
A DSL
Jack
P hone
Cord
Filter
1
2
3
4
5
6
7
8
9
*
8
#
P hone
Cord
Telephone
W all Jack
with ADSL
Service
Phone,
Fax M achine, etc.
1: Plug the filter’s LINE end into the phone wall jack.
2: Plug the telephone’s cord into the filter’s PHONE end.
3: Plug one end of the supplied phone cord into the filter’s DSL
jack and the other end into the modem’s ADSL jack.
Note: In addition to the filter used in conjunction with your
modem, you should install a filter on each phone on the
premises that is sharing the DSL-enabled line. Plug the
phone’s cord into the filter’s PHONE end and plug the
filter’s LINE end into the wall jack.
Appendix B: Installing Phone Filters
19
Appendix C
Troubleshooting
Our Technical Support staff is ready to help with any questions
you may have about your ADSL modem. You may, however,
find an easy solution to your problem by referring to this
troubleshooting section.
You should also refer to the Frequently Asked Questions
(FAQs) on the CD (click on Support),
Support and visit our web site for
the latest tips: www.zoom.com.
PROBLEM: I installed the software and connected the
DSL modem to my phone line, but I cannot
connect to the Internet.
SOLUTION: Make sure you’ve securely connected the RJ-11
phone cord from the wall jack to the DSL modem
connector on the back of your computer.
SOLUTION: Make sure you’ve connected the RJ-11 phone cord
to a DSL line, not a standard telephone jack. You
cannot use a standard telephone jack for DSL service
unless that phone line has been enabled for DSL by
your phone service provider.
SOLUTION: Make sure, if you are using phone filters, that they
are installed correctly (see page 18 for instructions if
necessary).
SOLUTION: Make sure you have typed your Username and
Password correctly.
SOLUTION: Contact your service provider to ensure that the DSL
connection is functioning properly.
20
Zoom ADSL Modem User’s Manual
PROBLEM: Why do I hear static or noise when I’m using
my telephone?
SOLUTION: If that phone does not have its own filter, you may
hear static or high-pitched noise if you make a phone
call while your ADSL modem is on. A filter also
prevents a phone from interfering with, or dropping,
your DSL connection.
Appendix C: Troubleshooting
21
Appendix D
Regulatory
Information
E.U. Declaration of Conformity
The manufacturer declares under sole responsibility that this equipment is
compliant to Directive 1999/5/EC (R&TTE Directive) via the following.
Directive
Standard
Test Report Issued
73/23/EEC – Low Voltage
EN 60950:1992,
A1-A4, A11
ed
EN 55024:1998
ed
EN 55022:1998
electrical safety
89/336/EEC – EMC
EMC – immunity
EMC – emissions
This product is CE Marked.
Electrostatic Discharge Statement
This unit may require resetting after a severe electrostatic discharge event.
Additional compliance information is included on the CD.
22
Zoom ADSL Modem User’s Manual
2762-A
27261
©2001