1
Product descript∶ on:
VVire丨
ess FPV mon比 or with dua|recell/er(bu"d-in DVR)LCD
monitoris o neW multi亻 unction product,adopt advanced
circu"s and high-quaⅡ ty new HD LCD monltor"
integr臼 ted
integrates a high¨ sensitivity duo丨 58GHZ AV wlreless receivers,
AerlaI receiver,、 /丨 deo recorders,high-de△ nition rnonitor:not on|y
can oonduct on-slte Wire丨
ess receiVer,Video,but also can
seamIess video,rea14irne iImage snapping and Video playback
The rnonitor buⅡ
d¨ in
battery,if you don’
£jnsta"the ba廿 ery,you C台 n
use the9~18V power supply or use the battery p|ato for eXternol
power supp丨 y The MonⅡ orcasing compac1easy to operate,can
be used for FP\/ground station,car video monllors(fna°
r° graph〉
security rnonkoring,baby rnonitors,photography vieWf nder,
oonstruction s"e video surVe"Iance,adve反
〓
.£ |、
T。
ising and other Venues
hsure best use ofthe un",pb臼 se read the user’ s
manuaI carefu"y.
CAuTloN
1 Do notuse any damaged or!eaking ba‖
ery and p丨ease rep丨 贫ce
the battery immediately ifits Working Ⅱ
fe be¢
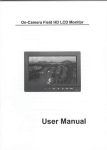
User Manual
omes shon
slgniflcantly
2 Do not eXρ ose this productt°
direct sun"ght,heat or humid
cond"ions
ght whⅡ e using this product so os to
3 Keep avvay from strong Ⅱ
obtain the c丨
32Channel Auto searchinε
Wkdess FPV
_____~ˉ
Ⅳ1onitor With DuaI ReceⅡ er
LCD ⅣⅠonitor(Build4n DⅤ R)
earest and the most colorful pict1,re PIease use sun
shade forthe outdoor necessary
4 PIease avoid heavy impact or drop on the ground
5 Do not use Chemica丨
solutions to o!ean this unit P丨 ease sirnp丨 y
wipe with a cIean so付 Cloth to keep the brightness ofthe surface
6 W1hout adlustab|e componentin the unit,pIease do nottake
apart or repairthe unit by yourse忏
,to aVoid damage the pΓ
odud
,
ProduCt feature:
● Dual antenna reCeiver,highˉ sensitiv"y,strong
antiˉ interference
● set DVR,WireIess receiver,a Fnonitor for the∶ n始 grauon
CONTENTs
of Mu"iˉ function a c° binationmachinecompacts1;itabIe
for a varie″ °f
purposes
● rea卜 time image snapping, keeping the beautiful
Memory^
1,Product desc"ption
2,DVR(Vide° )instruction
DVR seamless Video,saVe the Iatest data
Ⅲotion detecti° n recording,save memory space
3.WiroIess transm∶ t receiver operationˉ ¨ˉ17
5,8G WireIess receiˇ er,32Channel Auto searching
4.0peration instruction
22
effectively avoid signaIinterference
5.poWθ r supply
27
High brightness,Contrast,antiˉ gIare screen with a sun
shade,sun cleady visible
With VlDE0input,output,HDMIinput,suitabIe for a
variety of sources.Can be used as video,ph° tography
ˉ¨¨¨…¨¨…¨………¨¨…ˉˉ31
6 Parameters¨ ¨¨¨ˉ
…ˉ
…ˉ
ˉ
ˉ
ˉ
……32
¨ˉ
7.Trouble shooting~¨ ¨~¨ ¨¨¨…ˉ
VieⅥ 亻:nder,adve吐 ising maChine.
● Color ControI systems support,enterthe menu to
manuaⅡ yseIect the appropriate fo"η at,and adaptabIe
● Front headphone rnonitor playbaCk audio effects
●Buildˉ in battery and rear batteη
`pIate,can be equipped
w"h a vaoety of battery,No poWerto fac""ate use ofthe
site in country
●VVith、
`IDEO signal outputfunctIon,can be used as Video
PIaybaCk DVR h0s1c° nnecting muItipIe monitors,
● CheCk Field
● PiCture sCreen markers and Center Marker
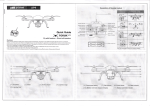
1. Product desCription:
9、
+/cH′ q: MuⅡ |button for
UP/CHANNELsEARCHA/o|ume up Press this button
1,1Front paneIinstruction:
for channel selection Long pressing for oh日 nnel auto
searohing ln OSD for“ UP” bu廿onVo丨 ume
10、
up
丬BAND: Muki bu廿 onfor DOWN`Channel
seIection卩 ˇoIume downPress this bu扌 on for channel
seleouon from“
A、
B、 E、 F"ln OsD for“
DOWN”
button
Volume down
11、
MENu:Monit° r
menu key,under a signa丨
input mode,
press this bu廿 on to Ca"upthe menu,and the current
menu and subˉ menu"em to conⅡ rm lhe adlustment
876543
12、
、
/ideo lndicator
130∶
Powerlndicator
14
★ 3~8DVR opera刂 on button
3
sC SHOT∶
4
REC/○ K∶
5
MODE∶
6
MENU∶ Menu key to enter/e× 时the DVR(Vide° )menu
lη
7
Reo卜 刂me images snapping
Recording sta戒 ,stop/fundion conirm
Mode button to ente〃
e× itthe
playback mode
ode
UP∶
UP bu廿 on,up an opu° n
8 D0V√ N∶ DoNvn bu杖 on,doWn one opuon
★ 9-12monitor operation bu仗 on
sOURCE/EXlT∶
lnρ ut
signa!se丨 ection or eXltthe menu
;srereo earphone jack
LED screen
Rear ba“ ery plate instruction:
A: Ba廿
θ
eIγ plate丨 ocking
M3× 50mm
sIze∶
B∶
screW ho|e,4h° 丨
es, Copper scre、 ″
75x75mm VEsA, screW size∶ M4× 5omm
1
2
4
6
3
1.3TF Card sIot:
5
1、
VIDEo ouT∶
2、
HDMl:HD HDM丨
C° mposⅡ e video signaI output
3、
VIDEO tN:Composite Video signa"nput
4、
UsB data ungrade po汁
5、
AVD∶ 0IN∶
6、
PoWer nputjack
7
Audio signalinput
PoWer sˇ vitch“
ˉ—C。 一 艹
~” lndicates
thatthe poweris
Disc° nnectthe p° wer
turned“ 0” means
Ba枝 ery Pack
8、
Antenna
9、
10
signaI input
11∶ itis a soreW ho|e for ba廿 ery plate, when you use
ba廿ery eXterna|,10is“
sIze∶
M3×
+”
, 11is“ ˉ
∴Copper
screw
95mm
2,2Recording sta仗
2,DVR(Vide° )0perati° n instruction:
Whenthe mon"ors・ γIDEo刂 N"and"AVDIoˉ lN"has ac∞ ss
to
:
The mon"orinput signa卜 se edionˉ iDVR"(vide° signal)channel,
the appropriate signals° r"RF"Wireless receiver transmltter has
the monitor screen wⅡ 丨
disp丨 ay the“ RF” channe|ofthe screen1
been re"ab|y received video signaltransn1i廿 ed oVer and cheCk the
press the"REC/oK"bu‖ on
TF card has been re"ably into the s丨
ot(mon"°
rˇ
呐thoutthe HDMI
w‖ appear when the red】 ashingO,
meaning that sta"recording begins,the D、
input there is no video function)
tto RF channe丨
`R defau丨
Anerthe device is turned on,press“
soVRCE丿 EXIT"to
・
DVR・ channel press“ REC`0K"∴ henthe mon1or wⅡ
select
I be on“ RF”
channel r you w° uld Ⅱ
ke to“ VIDEo” ,press“ s0URCE`EXIT"again
fyou w° u|d Ⅱ
ke
to“
V|DEO” channel,press“ souRCE/EX丨 T”
t°
sWitCh(HDMhnput w1hout rec° rding fundon)fy° u wantto stop
the rec° Γ
ding
and press"REC/oκ "button Recording°
r recording
to change to VlDEo
by tirne period paragraphs packaged storage
21DVR(Vide° )butt° n
instruction:
23 Video pIayback:
、
^/hen the video for some time1you need to playback video
efects observed,press"mODE"bu△ on乩 the top eft appear逦
彐
,
because the video store is paokaged stored by tirne period,can use
4
5
1 sC,sH0T∶
2 REC`0K∶
3
Rea丨
3
ⅡUP`D0WN"keysto go f°
mard or backward t°
2
+imeimages snapping
the device begins t°
,DoVˇ
’
Recording sta",stop/funct∶ °n con】 rm
MODE∶ Mode button to enter/ex"the playback rnode
4 MENV∶
Menu key to enter/eX沈
se{ect playbaCk
币le package,se丨 ect and press the’ tREC`(冫 KⅡ button to confirm,
the DVR(Vide°
)menu
N’
enterthe playback rnode P丨 ayback with the
・
button to seIectthe playback speed,return fast pIay with
"uP99key in orderto eXit When fa$tp丨
ayback is muted trumpet,
playing at normal rate for a Voice broadcast
mode
UP:
UP bu求 on,up an opu° n
DOWN: DoWn button,down one opuon
24screen shot(sC,sH0T funct∶ o")
Under V|DE⊙ or RF,Press the“ sC.sHOT” ,then Can be store the
rea"imeimages(make sure TF cardinsed)‘
r wantt° revleW these
,
image⒐ pease press MODE b mter h』 囤亘】,then use uP/Dowot b
se{ectthe医 Σ
f。 ldert。
p mc。 咖g
囵 。
L。
see them
2.5DVR Menu oper臼 刂on
sD card is fu",it wⅡ
|°
system uses a unique a丨
g°
venvrite the oIdest仔 丨
es cycle,and the
"thm,SD card DVR longer"fe than
ordinary
Video se仗 ing∶
Press"MENU"button to enterthe video se廿 ing$menu
匡习M。 】
。
n Detect∶ on
After opened,the moving° bJectis deteCted,twⅢ
回
Automa日 Ca"y rec° rd
Resdutlon
D1(720× s7θ ),VGA(640k480)QVGA(320x240、 The h丨 gher
resokltion,the sharperi the|arger ofthe fⅡ
e slze
Date stamp
国
囹
Moflon detec"on sensⅢ
Can be adlusted aocoFd,l
Date and tirne can be superimposed onto the video,you can not
V∶
″
σto
lhe aclual s忙 uaⅠ on
stack
2‘
曰
Recording Video
You can choose to reCord Video directly to a f"e or not record
6Adˇ an¢ ed settings
Con钔 nuous twice press the"MENU” bu∮ on to enterthe MENu
in the advanced settings opti° n
Date/Time
Auto Powef off
Beep souhd
厘圜Image
quaIity
The higherthe i丨 ηage quality,image clearer,the f"e wi"be bigger
匾囵
F。
maⅢ ng
F"st use,in orderto opfmize tho fⅡ e system,VCR wilI
Require customers to format again.Once formatted f"es wiII
be Iost.
After ente"ng foninat mode.press"REC/oK"bu廿
the rnenu prompts
on to Conirm,
圃
:eep s。 und
翻
Language setting
s⑾ t
σⅡ
wlthom抵
Press the"REC/oK"button to c°
D○WN” keys to se|ectthe desired nati°
"REC/OK"butt° n
to o° n币 rm
幻 ⑴
n硒
nCtl。
rm,wⅡ h the"UP/
nal丨
angIJage,then press
There are nine na‖ °nallanguages
ChoiGe
Pressthe REC/OK巛 button again,ohoose cance|or con】 rm
Whetherthe memory card is formatted
EngⅡsh
Por(ugⅡ
Deutsch
es
Francois
繁髅 中文
EspanoI
简体 中文
It・
aIiaⅡ o
日本 鼯
囤 Da侄 Ⅲme
"REC/○ κ饣bu廿on
to Con币 rm seledlon and adlustment,"UP/
D0WN"keys to change the date ortime,”
MENU” to
eX改
匮圃L闸
ht s。
urce frequency(Th‘
un"⒗ not used)
nd me】 me taken b setthe gⅡ d秆 equen叩
胃尼
:1呈 帮
γ
加 ot∷
` 5/1
1 : 3s :22v
W MM/DD
匝l
Au圮 power o仃
σh⒗
un1Mthod th s fun曲 on)
TV mode
y
Outputformats PAL/NTSC for option depends on country to set
蒇 程
黠
营氍
觜 耦
⒊驱
峨叽
menu se廿 ings(Atthis point f you pres$the"REC/0KⅡ
enterthe pIayback,unab丨
synchronized,or even can:t br∶ ng upthe DVR menu,is the
DVR outputfonnats are not synchronized to the monitor
Delete,delete the unwanted content
on两 or menu,
enterthe menu of"function"to set"Formaf’ ∶
n the
corresp° nding f° rmat optiom
瓯
e佰 毗 浼 Ⅲ 啊 s
Restore the factory defau陡 setting$
De丨 ete sing丨 e
1描
bu扌on to
e to enterthe playback rnenu se求 ings)
Note:If aRer setthe TV outputformats,image cann° t be
foⅡ ηat due,:fthis occurs,you can call up tho r”
莒 谳
Delete AⅡ
3Wireless transmission receive operat∶ on
Ⅱ
三
E1 Pr。 tecton,to saVe lhe contents ofthe lock protectlon to
prevent misuse deIeted and lost
Take the form a complete set ofthe antenna assemb|e on the unⅡ
antenna input ports,the assemb|y shou丨
d secure,|ooked on the
buckle
3.1ChanneI seIection
WiroIess transmitter channet and rece∶ Ver channe1rnust bo
strictly consistent,othen″ ise it Wi"not rθ
ce∶ ve
a transmitter
signaI,
This unit can臼 uto searching for32receiVer channel$,a{so oan
accept simuⅡ aneousIy muⅡ itransnη 廿ers and receiVe灬 toge】 her
Work,to avoid co-channelinterference
Frequency range of each region are di矸
〈
the unit’ s paste instruct∶
erent,pleast,¢
heck
screen Press“
V/BAND"t。
receiVer and transn】
VVireIess5~8GHz Dll/ersity Receiver
BAND CH1
A
CHΞ
CH3
CH彳
CH5 CH6 CH7 3H8
578∈
5765 5745 5725
5733 5752 5771 5790
580ξ
5828 5847 5866
56δ 5
5665 5645
5740
5800
i廿
channe!A/B/E/F Press
π th诌 刂me transm lter has Worked,
erfrequency in agreement,the receiVer w"丨
receiVe the signa|sent from the transmitter and displayed on the
5865 5845 5825 5805
5705
sw趾 ch
“
▲/CH殷 ”t。 seIed1~8ChaF+ml
ons),
monitor
Note:The effect of receiv∶ ng the distance has a great
reIationship w"h the reception power ofthe transmitter and
the receiVer Venues,Ifthe recept∶
588t 5905 5925 5g45
582( 5g0o 5860
tˉ
on is poor,the antenna can
be repIacθ d W∶ th three IeaVes,fourIeaf antenna or paneI
880
antenna RepIace the antenna should pay attention to the
△
跏
dD咖
猁 姒
山 帅
b must№
剔
ppoⅢ 四
antenna and receiving the same frequency.
the transn1itter
4.0peraung instructions:
This mon忙 or W1h HDMI,VIDE0,AUDI0jnput arld VlDE0outpklt
22Auto searching:
port,suⅡ ab|e for a vaHety of usage environments From VΙ
AUDl0DVR Video nput can be entered recording(HDM丨
Confrm that the transnnitter ha$entered a normaI working
condⅡion and then turn on the monitor,press“ MENV” 臼nd select
“
RF’
signo"nPut L° ng pressing“ ▲/CHyq”
/‘ Aψ t° searchjng” wⅡ
recording funct on),V|DE○
l
display on the top丨 eft Corner ofthe screen means the machine start
to auto searching
Ⅵ
`hen the screen on the upperIoft corner sho~Vs
the BAND∶ X CH:X,images,said that inished searclling noW oan
be received the signal
23Ⅲ anua{searching and se钬
ing:
Con】 rm thatthe transmitter has entered a norma|Working condition
and then turn on the rnonitor,press“
MENU”
and select饣 RF” signaI
input“ BAND:X CH:X” WⅡ I display° n the top{eft corner ofthe
°utput
signal oan be stra呛
DEo,
w"hout
ht4hrough
Video signal,can also be the D\/R replay video signal(consisten丨
With the image displayed°
n】 he
screen)
)s
0pera犭 on
4,1BuⅡ on imstructions:
P1ess button4(sOURCE/EXΠ 9to seleot HDMI,"deo,RF,DVR
input$廴
羿aIs
select
4
3
1
ⅡDMI,IID mul刂 medh dlgttal∮ gnal iom the IIDWu mput
port;
: Mu丨 ti
select tbc Video,ol din刚
button for
UP/CHANNELlsEARCHⅣ
o丨
ume up∶ Press this bu廿 on
se∶
γvideo signal△ om the video input po竹
;
ed RF,⒌ 8G RF∶ nput slgnal曲 eotIy,血 age dlsplγ more clearly
sclect DVR to enter into DVR video channc1dIsplayed on the soreen
for channel seIeotion Long pressing for channe丨 auto
searching ln OsD for“ UP” button Volume up
for0o仃 esp0nding anctl。 ns
丬BAND∶ MuⅢ bu廿 on for D0WN`Channel
2、
A、
B、
E、
F”
TF oald in the channel(DVRl
new TF cald,should fom缸
ln OsD for“ DOWN” bu廿 on
Vo|ume doWn
4,2menu instructi0ns
3 MENU ; Press"MENU"bu廿
on,p° p
up0sD menu,
Press"mENU"to enterthe menu,use the"+rCH投
"。 r
Ⅱand press"Ⅲ ENV"
press this button again to enter the sub-menu,then
"ˉVBAND"butt。 n to seIed"CoIor1select
ρress once adlusted forthe sub-menu"em to con硒 rm,
bu住 on to con1rmi enterthe"Color"sublη enu OpeΓ ation1use
then,you can press】 he bu廿 on"☆ /C‖ /q"。 r"^/BAN0"
to adlustthe Va|ue adlustment or s引
eCuon,press MENU
to connrm
4s0URCE`EXIT:The input signa丨
5 When Record∶ ng sta砣 to begin,the indicatorˇ
With b丨
viⅡ
`hen
be f丨
轧泛
the"炜
"。 r"丬 BAND"bu廿 on se丨 eCtthe
adlusfment kem
'¢
emi press the"Ⅲ ENV"0nce ogaln to
After selected adlustment Ⅱ
∞ nΠ rm,then use the"+"0r"ˉ "button to adlust or ch00se speClic
sw忖 ch button Ⅵ
entering the menu operation for menu eXit buIton
Ⅱ c。
When曲 e DVR vid∞ reoordhg,video
lndi∞ ωr llght5lbhe)aaslles In thc£ rst use of△ F card or ssvItch to a
selection/`/olume down Press this button for channe|
seledion from“
at t"s dmc怂 images佥 om the DⅤ R vIdeo output,acoess DVR ohall,lel
ash
parameters After adJustlng the value or setting,press"Ⅲ
∞ nfrm,press"s0uRCE`EXIT"key
ENV"t0
to ex"the0sD menu
ue colour
l。 r
。sD
囤
osD
Color
Bf ght"ogs
-‘
ContrasI
-so
-50
"uθ
s钿 ra"on -50
°
0b"
^0o
"po●
铷
V PoB0,on
一
ⅡTsC.
※Brightness:To adlustthe imagds b"ghtness
※
Lang"age:
EngIisⅡ
※ Contrast:To adjustthe b"ghtest and darkest rauo ofthe
Languages for0sD as below∶
os、
、简 体 中文 、 Fra△ ¢
EspaioI、
日本斋 、
爸号 q、
Italia no、
Deu饴 ch
Pycc、 Po“uguesa
image,创 ease note the sense of picture When adlust,
pr° p° rtion
too lorge or sma",wⅡ
丨make the picture
lose the color of showy
※Hue∶ On NTsC Video mode,the image oolor"nt
dlfferen∞ is a哟 ustable by】 nt
※ saturat∶ on:To adlust color conCentrau° n
※Check FieId:sW沈 Ch
B丨 ue、
on/o仟 Cheok Field(Red、
Monochromatic and Color)
Green、
口: To adjustthe OsD posltion in horizontal
※H
positi°
※V
Posit∶ on: To adJust the0sD pos"ion in Ve衬 icaI
※ 0sD Timeout: To adJustthe cIoCk
※ Transparent: TO adlustthe|eVel of transparent
曰
Func刂 om
iound
sound
FunctioⅡ
VoI"me
-50
※ Volume∶ To adJustthe volume
※Reset: Back to originaI setting
※systom:To adjust color
※ Focus∶ As an auxⅡ lary functlons Cn HDMl mode)When
Ⅵdeo format
used as the Camera vievvfinder
※ VeⅡ 1,0: software Version number
Function
5.PoWer supply
There are three verson for power suppIy:
5.1suρ
ply by ci】
y eIeCtJci1y Ⅵoth poWer adaρ ter
When tIle mon"or oonnectthe electocily by DC poWer adapter,
"TsC.
※ E)isplay Ratio: to change the display ratio16∶
※ scree"markers: TO adJu哎
s。 reen
ghtis"丨 un、 inated1rneans is charging,after fu"y charged,then
red Ⅱ
3
9/4∶
marker(o矸 , 96%,
93%, 90%, 85%, 80%)
sWitch to green"ghl
Whenthe p° wers、″ltCh
※ Centre Markers: TO sek∞ ntre mark〈 cr° ss mark〉
is on“
~∴ the m° nk° ris in operation mode,
green lightis i"uminated lfthe bu"△ in battery is not fu"y charged,it
display
※ Camera∶ Use the Canon5d ll or sim"ar camera,the
mon忙 or Video ha$real忄 imeimages N0bIack screen氵
still cont∶
NO
delay,pefect wⅡ hout disto砖 ion
To use power adaptersupply,it can choose the power
e cu哎 omer
adapter(opu° naD,whi。 h matchesto the mon忙 or亻 廿、
need to use the other p°wer adapter,please usθ
power supplyin DC9-18V,≡
nue to charge the battery,untⅡ the battery is fuⅡ
the quali币
ed
15A
Aocording to the different requirements of ba仗 elγ for the customers
attached dlferent battery udo siotsrNO requirements,the factory
defaults assembIy F970ba杖 ery plate
Bu"tˉ in Ba伍 ery Power supply
5.2
F970battery slot for battery of sony DV
This rnodeIis buⅡ ⒈in Li-ion battery capacity∶
(2Hours) ,a】 er
nJ丨
74V~2200mA/h
5.3External Batte冂
QM91D QM91QM90DQM90QM71DQM71QM70D
QM70QM51D QM51FM71FM70se"es
ry
LPˉ E6ba仗 e” r sI° tf° r ba廿 θry° f
`Plate to insta"battθ
When no e|edrioity,in orderto|ongerthe battery w°
rking hour,
the user can insta"the externa|battery plate(° ptiona|)Wlth ba廿 eγ
to suρ
sony F970F960F950T930F770T750F730F570F550F530
ly-charged,∶ tIasts to work2hours
ply the rnonitor poWer
Canon DV
Canon LPˉ E6
D28battery slot for ba廿 ery of Panasonic DV
Panasonic D55D54sD54sE D40D35D33D32D28D25D22
VVhen instaⅡ the eXternaI ba廿 ery plate,please fo"ow“ 12rean`∶ ew”
P|ease use the M3×
95mm∞ pper
screW to fasten the加 op° wer
output cab丨 es into NC)1213atthe back of rnonitor
When scre、 ″ing,please pay attention to the po丨
Then match the4screW holes of plates t°
Three types of ba佼 eries correspomd∶ ngt° the upρ erthree
sIots
arity,10is+;11is~
Ap° int atthe bock of
蛳
monIor,
And u$eM3x50mm Copper screW to fasten the plate and monitor
LP-E6
F970
PIate:
Remark:DifFerent specifications of the battery,capabⅡ
■
di仟 erent
D28
lty is
The Working t"η e forthe mon汰 or W"|be differθ nt Higher
capabiⅡ ty(w° rking刂 me〉 wⅢ be丨 °nger
●The working temperature of Li¨ ion ba‖ ery is-20~60℃ ,please
m羽
咖
s.5Liˉ ion Ba∮ ery
don’ t use ba廿
ery in the pIace Wlth temperature too IoW orto high
6、
The poWer of ba仗 ery w"|be reduCe ifitisˇ Vorking in|ow
Parameters
temperature environment Please don’ t use the battery in high
temperature environ}η ent,may oause batteIγ
swe"then Πre
1024× 600× RGB
=1843200PiXels
Please check the temperature of ba扌 ery When;t Working in high
temperature enVironment
o2088(W)X02175
●OVerˉ oharge and over- dischange, it w"| cause permanenl
da丨
ηage to the p° sitive pole and negative po丨 e of batteries
No need over disoharge then reohargeab|e eveγ time
●Period oftime to do a deep charge and discharge the ba仗
eIγ
underthe proteotion circuit contro{to correotthe consumption
statistics.butit Wi"notirnprove y°
ur ba廿 e卩 s actua丨 capaclty
r’
●p丨 ease be p丨 aced in a cool p|ace to Xn/eaken the p臼
PAL丬 43/NTSCˉ 358
ssiVation speed
480i/480p/576i/576p
of ba扌 ery,if you don’ t use the ba廿 ery f° rlong tirne
●Please charge poWer stored in the ba廿
sel仁 discharge
if you don’ t
ery t°
,ne output_ ~__⊥
prevent
~ˉ
___~
of excessiVe丨 ead to eXcessive discharge damage
use the battery forlong time
悭
叩
唑ng resd岘 _
_ˉ i~2ilT90×
s
58G broadband FM audi0and Vldeo
| synchlon⒓ at on rece"ing lother仔 equenoes
32channel auto searching(different frequency
range f0r diferent region,see speoflC0fthe
maChinds oaste instruCtions〉
《
少Check slgnal cab|e connecting,and rnake sure use the
st臼
ndard adapter connectthe rnon tor lf poWer supp丨
ba廿 ery please check the ba杖
eryˇ vhether
y by
fu"y ch0nged
790g(lnc丨 uding the battery but Without antenna
7‘
1/+-20 thread mounting holes in the monitor
easy to instaⅡ on the tripod
75X75cm VESA
3Images are not synchronized,DVR can’ t enter the:nenu
0The DVR playback system and monⅡ or system are d仟
erent,
can enterthe rnon"0rifunction"rnenu,and selectthe right
vldeo formatin the‘ formar opti° n
②The RF。 gn创 ls to0Weak
74Playback the video with0ut sound
0No open the audio recording in the DVR menu settings
7^TroubIe shootimg
哐
少Volume control did not open‘
7.10"ly bIack and wh"e or monochromθ
can press the Volun∩ e bu廿 on” +",
try increasing the V0lume
picture
0P|ease cheok satura"on、 bHghtness&oonl「 ast adlustment
③Rec° rding underthe’ ⅤlDE0"input state,but"AUDl0"is not
哐≥Please cheok mon"or、 ℃olo卩 from the menu"monochrome"
AUDl0input signal atthe same刂
me
is in black and white or monoohrome irnage or other
7.50pen thθ R弓 no signaI detected
condition
③ Check whether"is caused by the disCrepancy forthe DVR
p|aybaok of video system and monitor system fthat,pIease
⊙Transml△ eris workng propedy or not
② f廿 ansmi救 er仃 equency matches w th the reCoVerfrequency
band
enterlnto the monⅡ or"Functlon"menu for"FOrmar° ptlon to
select the corresponding standard
(少
盱customer change the rec画 ving antenna,创 ease note that
must be matched with the transnη
i扌
er,othemise rnay cause
receiVing sensⅡ iVity is loW,eVen Can’ t receiVe signals
72NO p∶ cture after put on the power
炬0Check signal cable Contact are in good condition,a rnonltor is
synohronized With the input signa1and can press the
”
s0URCE/EXlT"glVe仗
a try lfin the RF channe丨
check to see fthe transmi∮ er has been work
,please
口Remark∶
lf there are stiⅡ other proble!η s,pIease
related de白 |s
★ Ifthere are changes without prior no刂 ce
contact With our