1
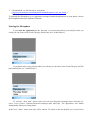
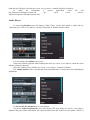
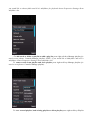
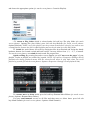
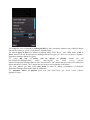
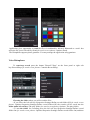
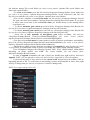
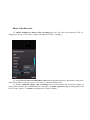
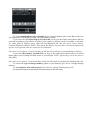
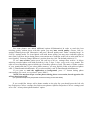
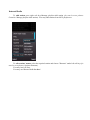
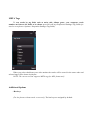
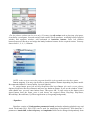
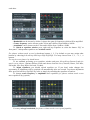
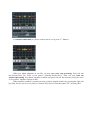
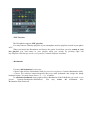
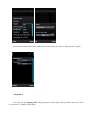
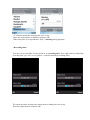
ALON MP3 Dictaphone for S60
User's manual
Thanks for choosing ALON MP3 Dictaphone for S60! We hope you will like our product and it will
be useful for you. We’ll be happy to receive any feedback from you for improving ALON MP3
Dictaphone. Please, contact our support at [email protected]
1. Introduction
2. Installation
3. Starting the Dictaphone
4. Audio Player
5. Voice Dictaphone
6. Phone calls recorder
7. Internet Radio
8. Meta tags
9. Additional options
10. Registration
11. Customer support
Introduction
ALON MP3 Dictaphone consists of four components:
• Audio player allows listening MP3, OGG, AAC/MP4/M4A, WMA, AMR, WAV files and
supports 3-Band Parametric Equalizer, hot buttons, M3U playlists, bookmarks and many other.
• Voice dictaphone is the first high-quality MP3 dictaphone which also allows to record in
AMR and WAV audio formats. You may easily turn your smartphone into advanced digital
dictaphone and start to record lectures, conversations, interviews and then send the records to your PC.
• Phone calls recorder records phone calls without beeps in MP3, AMR and WAV formats.
You'll to save lots of memory space by keeping you records in MP3 - the most popular audio format.
(for Symbian^3 beeps may be present for the time being on the both sides)
• You may use Internet radio for free.
Installation
To install the Dictaphone to your phone choose the appropriate way:
1. - Download the .sis file to your PC
(http://www.alonsoftware.com/downloads/ALONMP3Dictaphone_s60_3rd_5th.sis)
- Send the file to your phone via Bluetooth or infrared, etc.
- Choose Messages>Inbox on your phone and open the message with .sis file.
- Follow the instructions.
2. - Download the .sis file to your PC
(http://www.alonsoftware.com/downloads/ALONMP3Dictaphone_s60_3rd_5th.sis)
- Open file manager, select the Dictaphone file>Open with>Nokia OVI Suite (the old version is
PC Suite).
- Press OK in the “Install application” window.
- Follow the instructions.
3. - Download the .sis file directly to your phone
( http://www.alonsoftware.com/downloads/ALONMP3Dictaphone_s60_3rd_5th.sis )
- Follow the instructions.
To uninstall the Dictaphone go to Application manager>Installed applications on your phone, choose
the Dictaphone and select Options>Uninstall.
Starting the Dictaphone
If you start the application for the first time or you haven't tracks at your playlist when you
exited you can choose from Load>The play folder/None (see "Audio Player").
If you had tracks at your playlist when you exited you can choose from Load>The play list/The
play folder/None (see "Audio Player").
To activate “Auto start” option select left soft key>Properties>Settings>Auto start>On (for
touch screen phones: Options>Properties>Settings>Auto start>On). The application will launch
automatically when you restart phone.
In this case “None” menu item only will be shown. To return to the last playlist you’ve used select
right soft key>Playlist>Load last (for touch screen phones: Controls>Playlist>Load last).
To
make
the
Dictaphone
a
system
application
select
left
soft
key>Properties>Settings>System>On
(for
touch
screen
phones:
Options>Properties>Settings>System>On).
Audio Player
To start/stop playback press the buttons "Play"/"Stop" on the front panel or right soft key
>Play/Stop (for touch screen phones: Controls>Play/Stop or double click the track).
You can change the volume in two ways:
• Press the Joystick right/left while listening the track (for touch screen phones: touch the clock
and the volume bar appear).
• Press the right soft key>Volume (for touch screen phones: Controls>Volume).
The volume window will be opened and closed automatically 2 seconds later after finishing the
adjustment.
To choose files for playback use several options:
• To choose folder for playback: press left soft key>The play folder (for touch screen phones:
Options>The play folder) and choose the required folder from any location at your phone. NOTE: if
you would like to choose folder and all it's subfolders for playback choose Properties>Settings>Scan
subfolder>On.
• To add track or folder to playlist or add a play list press right soft key>Manage playlist (for
touch screen phones: Controls>Manage playlist). NOTE: if you would like to add folder and all it's
subfolders choose Properties>Settings>Scan subfolder>On.
To remove track from playlist and clear playlist press right soft key>Manage playlist (for
touch screen phones: Controls>Manage playlist).
To save created playlist, load existing playlist or delete playlist press right soft key>Playlist
and choose the appropriate option (for touch screen phones: Controls>Playlist).
• To return to Play folder which is selected under left soft key>The play folder (for touch
screen phones: Options>The play folder) press left soft key>Refresh (for touch screen phones:
Options>Refresh). NOTE: save your playlist (see the previous item) before refresh if you want to use
created playlist, because the files in edited playlist may not be the same as in the Play folder.
To rewind the track choose left soft key>Properties>Hot keys>Rewind and assign the handy
hardware buttons for forward rewind and back rewind. You may choose from 1, 2, ... 9, *, # buttons.
For touch screen phones: to rewind the track touch file progress bar.
Quick scrolling. By pressing forward or reverse buttons you will "turn over the pages" of your
playlist. Tracks at playlist are scrolled by joystick. NOTE: left soft key>Properties>Settings>Scroll
playback>On during playback means that the selected track starts to play back when you scroll
playlist by joystick (for touch screen phones: Options>Properties>Settings>Scroll playback>On).
To rename, move or delete tracks press left soft key>Rename/Move/Delete (for touch screen
phones: Options> Rename/Move/Delete).
You may mark/unmark several or all files and then move or delete them: press left soft
key>Mark/Unmark (for touch screen phones: Options> Mark/Unmark).
To change the view of playlist by sorting the files by title, extension, duration, size of the file choose
left soft key>Sort (for touch screen phones: Options>Sort).
To choose types of files to be shown at playlist: MP3, OGG, WAV, AAC, MP4, M4A, AMR or
WMA choose left soft key>Properties>Settings>Show file types (for touch screen phones: Options>
Properties>Settings>Show file types).
To select the way of tracks will be shown at playlist: choose left soft
key>Properties>Settings>Show
tracks’
end>On/Off
(for
touch
screen
phones:
Options>Properties>Settings>Show tracks’ end>On/Off). “On” means that you will see the end of the
tracks and theirs’ formats. “Off” means that you will see the beginning of the tracks.
For some phones you may select play mode in order to change performance of playback:
Properties>Settings>Play mode>Main or additional.
To customize colors of playlist press left soft key>Colors (for touch screen phones:
Options>Colors).
Application gives opportunity to send the files via multimedia, Infrared, Bluetooth or e-mail. Just
select the file, press left soft key>Send (for touch screen phones: Options>Send).
The Dictaphone supports phone garniture. You may manage the application using garniture.
Voice Dictaphone
To start/stop record press the button "Record"/"Stop" on the front panel or right soft
key>Record/Stop (for touch screen phones: Controls>Record/Stop).
Choosing the folder where you will record the files.
• If you select the left soft key>Properties>Settings>Define record folder>Off (for touch screen
phones: Options>Properties>Settings>Define record folder>Off) the records will be saved into the
folder under left soft key>The play folder (for touch screen phones: Options> The play folder).
• To set the folder for recording press the left soft key>Properties>Settings>Define record
folder>On (for touch screen phones: Options>Properties>Settings>Define record folder>On) and then
left software button>The record folder (for touch screen phones: Options>The record folder) and
choose the required folder.
• To create a new folder press the left soft key>Properties>Settings>Define record folder>On
(for touch screen phones: Options>Properties>Settings>Define record folder>On) and left soft
key>New record folder (for touch screen phones: Options>New record folder).
• You can set a template of a record file name via left soft key> Properties>Settings> Record
file name (for touch screen phones: Options>Properties>Settings>Record file name. If you want
to add a start record time to the record file name you should choose in the Settings>Show
record time>On.
• To choose automatic gain control press left soft key >Properties>Settings>Auto Record>On
(for touch screen phones: Options>Properties> Settings>Auto record Gain>On).
• To choose manual gain control press left soft key >Properties>Settings>Auto Record>Off
(for touch screen phones: Options> Properties>Settings>Auto Record Gain>Off).
• Select one of four positions of microphone gain before recording: left soft key
>Properties>Settings>Record Gain>Low/Normal/High/Highest (for touch screen phones:
Options>Properties>Settings> Record Gain>Low/Normal/High/Highest).
• You may select record mode for some phones in order to improve performance and stability:
press left soft key>Properties>Settings>Record mode>Main/Additional (for touch screen phones:
Options> Properties>Settings>Record mode>Main/Additional).
• During the recording you may adjust the recording level manually by using Joystick (for touch
screen phones: by touching the clock) as well as you change the volume during listening to music.
Voice Dictaphone supports the following formats: MP3, WAV (8kbps-96kbps, 8kHz-48kHz
depending on phone model) and AMR. The record formats you can choose from:
Properties>Settings>Record formats.
In order to append a record to the end of track you should press right soft key and select
Append. NOTE: you can append records to the files which are supported by Voice Dictaphone.
If you need only part of some track you may cut the track and put away the middle of file or
beginning and end of file. To set the time to start cutting you may use bookmarks or timer. Press right
soft key>Cutting track (for touch screen phones: Controls>Cutting track).
NOTE: now supported mp3 files only.
Phone Calls Recorder
To adjust settings for phone calls recording press the left soft key>Properties>Call rec.
settings (for touch screen phones: Options>Properties>Call rec. settings).
To see the list of your recorded phone calls both from phone memory and memory card press
left soft key>Phone calls (for touch screen phones: Options>Phone calls).
To choose automatic phone calls recording select Actions>Auto call record. Recording of
phone calls will start after establishment of connection. To make a pause during recording phone call
press "Pause" button. To resume recording press "Record" button.
To select manual phone calls recording choose Actions>Manual call record. But in this case
you should start recording by pressing "Record" button yourself.
If you select an option Rec/Stop by Joystick>On you’ll go to the folder where phone calls are
recorded according to your choice of memory type (phone or memory card) if recording is activated.
To return back to Playlist select right soft key>Playlist>Load last (for touch screen phones:
Controls>Playlist>Load last). NOTE: if the option Rec/Stop by Joystick>On is selected the application
appears in foreground when the connection is established.
(For touch screen phones: If you select Stay at calls list>On, you'll stay in recorded phone calls list.)
If you select Rec/Stop by Joystick>Off you’ll go to the folder where phone calls are recorded
during phone call recording and then return to your Playlist. NOTE: playlist may not be the same as
Play folder.
(For touch screen phones: If you select Stay at calls list>Off you'll see playlist after finishing the call).
To choose the type of storage memory (phone or card memory) go Call rec. settings>Storage
memory.
To record phone calls without beeps select Call rec. settings>Warning beep>Off.
(for Symbian^3 beeps may be present for the time being on the both sides)
For some phones was added additional option Off(alternative).In order to reach the best
recoding quality without beeps with this option you may tune record quality. Choose Call rec.
settings>Warning beep>Off (alternative) and press “Record quality tune” under “warning beeps” in
Call rec. settings menu. To record phone calls with better quality you may move indicator right (to
max). But if you hear beeps during phone conversation move indicator to the left (to min) with loss of
record quality. You may change indicator’s position from 0 to 100. The default position is 93.
To use Auto archive option press left soft key>Call rec. settings>Auto archive. It allows
archiving recorded phone calls with periodicity 1 day, 2 days, 3 days, every week, every month. The
calls are saved depending upon selected type of memory (phone or card). The name of folder consists
of year, month and date. If you select phone memory, you may find the folder with achieved phone
calls: C:/Data/Sounds/AlonPhoneAr. If you select memory card: E:/Data/Sounds/AlonPhoneAr.
If you want to send the application to background, press “C” button during phone
conversation (For touch screen phones: press “Hide”).
NOTE: You may hear beeps on some phones during phone conversation, but the opposite side
will not hear beeps at all.
(for Symbian^3 beeps may be present for the time being on the both sides)
If you would like always add a phone number to the play list you should press the left soft
key>Properties>Call rec. settings (for touch screen phones: Options>Properties>Call rec. settings) and
set to “On” “Always show phone number” option.
Internet Radio
To add station press right soft key>Manage playlist>Add station (for touch screen phones:
Controls> Manage playlist>Add station). You may add stations from M3U playlist too.
To edit stations' names select the required station and choose "Rename" under left soft key (for
touch screen phones: Options>Rename).
You may load .pls lists.
You may use Internet Radio for free!
META Tags
To sort tracks by tag fields such as artist, title, album, genre, year, composer, track
number and choose the fields to be shown press left soft key>Properties>Settings>Tag fields (for
touch screen phones: Options> Properties>Settings>Tag fields).
When you select checkboxes one after another the tracks will be sorted in the same order and
selected tags will be shown in playlist.
NOTE: The current version supports META tags for MP3 format only!
Additional Options
• Hot keys
(For the phones without touch screen only.) The hot keys are assigned by default:
(For the phones without touch screen only.) You may sign all actions such as play/stop, play/pause,
record/stop, record/pause, forward rewind, back rewind, on/off equalizers, switching between playlist
window and equalizer window, add bookmark to hardware buttons. Press left software
button>Properties>Hot keys and assign the handy hardware buttons for the required actions. You may
choose from 1, 2,..9, *, # buttons.
NOTE: in the current version the program should be in foreground to use hot keys option.
Button mapping. You may sign actions to phone hardware buttons depending on phone model.
Recommended buttons: Camera button, Joystick right/left.
To assign button press left soft key>Properties>Hot keys>Button (for touch screen phones:
Options>Properties>Hot keys>Button) and press any hardware button. If you see the window “Name”
with editable text, you may enter button name. Then press OK. To sign action to the button select
signed button from the menu, press it and choose the required action: Play/Stop, Play/Pause,
Record/Stop, Record/Pause, Up/Down application (to foregroung/background),
• Equalizer
Equalizer consists of 3 independent parametric bands and makes adjusting playback easy and
visual. Each band (EQ1, EQ2, EQ3) can be used for amplifying all frequencies. Each band has 3
parameters: bandwidth, center frequency and amplitude which can be changed independently from
each other.
• Bandwidth can be chosen by sliders. It shows the span of frequencies which will be amplified.
• Center frequency can be chosen on the X-line and it differs from 200Hz to 16kHz.
• Amplitude can be chosen on the Y-line and it differs from -20dB to +20dB.
To switch to equalizer window press right soft key>Equalizer or select the button “EQ” at
front panel. 3 independent equalizers are switched on/off:
For phones without touch screen: by hardware buttons 1, 2, 3 by default or you may assign other
buttons by choosing left soft key>Hot keys>EQ1/EQ2/EQ3. You may choose from 1, 2, ... 9, *, #
buttons.
For touch screen phones: by check boxes.
To use standard presetting go to equalizer window and press left soft key>Presets>Load (for
touch screen phones: Options>Presets>Load) and choose form the list (Classical, Dance, Full bass,
Full treble, Jazz, Pop, Rock, Soft rock, Techno).
To adjust equalizers you should switch equalizer on. If you don’t make changes the
opportunity of adjustment will be switched off automatically after one second. To activate adjustment
state: press left soft key>Eq1/Eq2/Eq3 edit, or simply by switching the equalizer off and on.
To change center frequency or amplitude move equalizer (for phones without touch screen
move equalizers by joystick).
You may enlarge bandwidth (for phones without touch screen: press joystick);
or constrict bandwidth (for phones without touch screen press “C” button).
When you adjust playback as you like you may save your own presetting. Press left soft
key>Presets>Save (for touch screen phones: Options>Presets>Save). Then you may load the
required presetting. Just choose equalizer window and press left soft key>Presets>Load (for touch
screen phones: Options> Presets>Load).
When equalizer window is opened you may switch to playlist window by pressing the right soft
key>Play list (for touch screen phones: Controls> Play list) or select the button “PL” at front panel.
• M3U Playlists
The Dictaphone supports M3U playlists.
You may both use Winamp playlists at your smartphone and use playlists created at your phone
at PC.
When you launch the Dictaphone and choose the option Load>None you may return to your
last playlist (you had tracks at your playlist when you exited) by pressing right soft
key>Playlist>Load last (for touch screen phones: Controls>Playlist>Load last).
• Bookmarks
You may add bookmark in two ways:
• Choose right soft key>Bookmarks>Add (for touch screen phones: Controls>Bookmarks>Add).
• Choose left software button>Properties>Hot keys>Add bookmark and assign the handy
hardware button. You may choose from 1, 2, ... 9, *, # buttons.
To edit/delete bookmark choose right soft key>Bookmarks>Edit>Edit/Delete (for touch screen
phones: Controls>Bookmarks>Edit/Delete). You may delete all bookmarks also:
Bookmarks>Edit>Delete all.
If you need to repeat some place of the track several times you can use “Repeat place” option.
• Sleep timer
You may set up sleeping time during playback. Press right soft key>Sleep time (for touch
screen phones: Controls>Sleep time).
“0” minutes means that sleeping time isn’t set up.
Enter the required time (in minutes) and press OK.
When sleep time is set up indicator “Play” is flashing during playback.
• Recording timer
You may set up scheduler for the period of an recording time. Press right soft key>Start/Stop
recording time (for touch screen phones: Controls>Start/Stop recording time).
The equal start time and stop time means that recording time isn't set up.
Enter the required times and press OK.
Registration
Downloadable version of ALON MP3 Dictaphone for S60 3rd Edition has limited functionality:
• 120 minutes tracks playback;
• 60 minutes voice recording;
• you may record 20 phone calls.
If you want to abolish all restrictions and purchase ALON MP3 Dictaphone we invite you to
our web-site http://www.alonsoftware.com.
During purchase procedure you'll be asked to enter IMEI of your smartphone which can be
obtained by entering *#06# on your phone keypad. Then you'll receive an activation key.
When you receive an activation key please register the application. Press left soft
key>Registration>Registration key (for touch screen phones: Options> Registration>Registration
key), enter the key and select "OK".
Customer support
If you have questions, please, contact our support at [email protected]