1
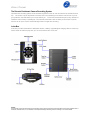
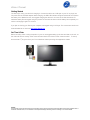
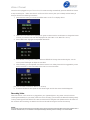
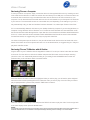
zDive-i Manual
Auto Car Dash Cam
zDrive-i
User Manual
NOTICE
The information in this manual is subject to change without notice. Zetronix Corporation shall not be liable for technical or editorial errors or
omissions contained herein; nor for incidental or consequential damages furnishing from the furnishing or use of this material.
zDive-i Manual
The Zetronix Dashboard Camera Recording System
This dash cam recording system can be mounted anywhere on the car and connected to the included suction
cup. The suction cup can be placed in the front, side or rear window(s) to record the road in front of you for
your protection, the road behind you or to the side of you.
The unit can be swiveled to point in any direction to
record the road, scenery or passengers. The cameras comes with a built in battery to record with no power
from the car for up to 4 hours and has IR Night Vision for night time recording.
In the Box
In the box you will find the zDrive-I dashboard camera, a battery, cigarette lighter charging cable, a suction cup
mount and an AV Cable to play from your TV and to set the time on the unit.
NOTICE
The information in this manual is subject to change without notice. Zetronix Corporation shall not be liable for technical or editorial errors or
omissions contained herein; nor for incidental or consequential damages furnishing from the furnishing or use of this material.
zDive-i Manual
Getting Started
The first step in using your device is charging it. Connect the device to a USB port on your PC or plug it into
Car power with the included adapter. While charging, the RED LED indicator will glow red and will turn off when
the battery is full. Before first use, we suggest charging the device for 12 hours for the first three times. To
maximize battery life we suggest using the product for the first three times until the battery has completely run
out then recharging it again for 12 hours
If you plan on viewing your files on your computer, we suggest using VLC Player. The most recent version can
be downloaded at no cost from http://www.videolan.org.
Set Time & Date
Before recording video or using the product in your car we suggest setting up the time and date on the unit, so
the video will have an overlay of the correct time and date in the video on when it was recorded.
time and date
1st
To set up
plug the unit to your TVs or Monitors Video Input using the supplied AV Cables.
NOTICE
The information in this manual is subject to change without notice. Zetronix Corporation shall not be liable for technical or editorial errors or
omissions contained herein; nor for incidental or consequential damages furnishing from the furnishing or use of this material.
zDive-i Manual
Once the unit is plugged into your TV turn it on, if it starts recording automatically press the REC/PLAY button
to stop recording first.
Make sure there is an SD card in the memory slot (not included) and the battery is
charged. Perform the following instructions:
1. Press the time button you should a time/date menu on the TV or display device
2. When The YYYY/ MM / DD is highlighted in green as above use the mode button to change the format
in which you want the time and date displayed E.G. (DD / MM / YYYY, MM / DD / YYYY)
3. Press TIME button highlight the adjustable date below.
4. Press MODE to change the number smaller and REC/PLAY change the numbers higher, once its
correct press TIME again to adjust the next field.
5. When selecting your time please note that the camera is in military time which is suggested by courts
and for evidence in case of accident so the time is on a 24 hour base.
(This was recorded at 3:53PM on March 13th of 2013)
6. To set and finalize the time press the time button again and the time menu should disappear.
Recording Video
When the zDrive-I unit is turned on or plugged into your cigarette lighter or any power source it will start
recording automatically for your safety. When the unit is recording you will notice the Blue LED blinking slowly.
To stop recording press the REC/PLAY button and the blue LED will glow solid. (Make sure the SD Card is in
the unit flush when recording, the label for the SD card should be facing the back of the camera)
NOTICE
The information in this manual is subject to change without notice. Zetronix Corporation shall not be liable for technical or editorial errors or
omissions contained herein; nor for incidental or consequential damages furnishing from the furnishing or use of this material.
zDive-i Manual
Reviewing Files on a Computer
To view your files on a computer, simply connect the device via the supplied USB cord or by inserting one end
of the cable into the devices 2.5” USB Port and the other end directly into a USB port, to connect the device as
an external drive to watch and copy recorded video make sure the devices is off when connection to your
computer. You can also take remove the SD card from the unit and inserted into your Computer’s SD Card slot
if you have one. The camera will connect as a removable drive, and depending on the settings on your PC, it
may automatically notify you that new hardware has been detected. If so, select Open Folder to View Files.
If it is not automatically detected, click Start on your desktop. Select My Computer if you are using Windows, or
Computer if using Windows Vista or Windows 7or 8. The device should be listed as a Removable Disk under
the Devices with Removable Storage section. Open that drive, there should be a subfolder called DCIM double
click on it, in there should be another subfolder called 100DSCIM all the files will be stored in that subfolder.
As mentioned earlier, we suggest using VLC Player to play back video files.
On a Mac OS X System open the finder icon, the pen will be listed under devices in the left hand side on the
bottom of the finder menu with an eject button next to it. As mentioned earlier, we suggest using VLC Player to
play back video files in Mac.
Reviewing Files on TV/Monitor with AV Cables
Plug the device to your TV/Monitor with the supplied AV Cables in TVs AV input. Yellow is the video and white
is the audio. Turn the device on with the AV Cables and press the REC button so the unit stops recording.
(Once the unit is on it automatically starts recording for your safety) Press the MODE button to enter into
preview mode, you should see a matrix of recorded videos.
Press the REC/PLAY button to select the highlighted video you wish to play, you will see the yellow heighted
frame move around when pressing REC/PLAY, select the video you want to play. Once the video you want to
play is highlighted with a yellow frame press the TIME button to select it.
When the video you want to play is selected press the REC/PLAY button to play the video. To exit and go back
to the video display screen press the MODE button.
NOTICE
The information in this manual is subject to change without notice. Zetronix Corporation shall not be liable for technical or editorial errors or
omissions contained herein; nor for incidental or consequential damages furnishing from the furnishing or use of this material.
zDive-i Manual
Troubleshooting
Problem: I plugged the unit to my TV but I do not see a picture or anything
Solution: Make sure you plug the unit to an RCA Composite input that usually consist of (Yellow, White and
Red) if there are more colors like green and purple that means it’s a component HD input and will not work.
Also to change your TVs Input to whichever you connected the cables to, you can select it on the TV or
Remote by pressing the INPUT button.
Problem: When playing back my video, I can hear audio, but have no video.
Solution: This most often occurs if your computer’s media player is having trouble with your files. Try using
VLC player, which can be downloaded for free at http://www.videolan.org.
Problem: My video playback is “choppy” or “stuttering.”
Solution: If this is occurring, try copying the video files to your PC. This happens when the file is too large to be
played back using your USB connection Copy the files to your computer first them play them again.
Technical Specifications
Physical Dimensions
3” H x 2 .44” W x .875” D
Physical Weight
2.8 Oz
Video Resolution
640x480
Video Format
AVI
Aspect Ratio
4:3
Audio
8 bit data sample
Interface
USB 2.0 + TV output (PAL/NTSC)
Storage Memory
None SD Card Input
Power Supply
Lithium Polymer Rechargeable 800mAh 3.7V
Power Adapter
5V DC / 500mAh
Power Duration
3-4 Hours
Operating Temp
0 C – 70 C
Storage Temp
-20 C – 80 C
Player
Common Video Player or VLC Player
Operating System
Windows ME, 2000, XP, Vista, 7, 8 / Max OS X
To download a PDF version of this manual or to receive addition technical support of please go to
http://help.zetronix.com
NOTICE
The information in this manual is subject to change without notice. Zetronix Corporation shall not be liable for technical or editorial errors or
omissions contained herein; nor for incidental or consequential damages furnishing from the furnishing or use of this material.
zDive-i Manual
Limited Warranty from Zetronix Corp.,
Zetronix Corporation (“Zetronix”) warrants this product against defects in material or workmanship as follows:
PRODUCT: Zetronix will repair this product with new or refurbished parts, free of charge, for a period of one (1) year from the date of
original purchase in the event of a defect in materials or workmanship. REPAIRS: Zetronix will repair or replace defective parts used in the
repair or replacement of this product with new or refurbished parts, free of charge, for a period equal to the remainder of the original limited
warranty period on the original product, or for 60 days after the date of the repair or replacement, whichever is longer. This warranty is
extended only to the original purchaser. Proof of purchase in the form of a bill of sale or receipted invoice, which is evidence that the unit is
within the warranty period, must be presented to obtain warranty service. To obtain warranty service, you must take this product, or deliver
the product freight prepaid, in either its original packaging or packaging affording an equal degree of protection, to Zetronix Corporation.
See below for additional information. This warranty only covers failures due to defects in materials and workmanship, which occur during
normal use. The warranty does not cover damages which occurred in shipment, cosmetic damage, damage that is attributable to acts of
God, failures which are caused by products not supplied by the warrantor, or failures which result from accident, misuse, abuse, neglect,
mishandling, faulty installation, misapplication, improper installation, operation or maintenance, alteration, modification, introduction of
sand, humidity or liquids, line power surge, improper voltage supply, lightning damage, or subjecting the product to
operating/environmental conditions in excess of the maximum values or below the minimum values set forth in the applicable
specifications, or products serviced by anyone other than Zetronix. This warranty is invalid if the factory-applied serial number has been
altered or removed from the product. This warranty does not cover products sold AS IS or WITH ALL FAULTS. This warranty excludes
consumable parts such as batteries and power supplies.
THERE ARE NO EXPRESS WARRANTIES EXCEPT AS LISTED ABOVE. REPAIR OR REPLACEMENT AS PROVIDED UNDER THIS
WARRANTY IS THE EXCLUSIVE REMEDY OF THE PURCHASER. MYVU SHALL NOT BE LIABLE FOR LOST PROFITS, LOST
SALES, LOSS OF USE OF THE PRODUCT, OR OTHER INCIDENTAL OR CONSEQUENTIAL DAMAGES RESULTING FROM THE
USE OF THIS PRODUCT, OR ARISING OUT OF ANY BREACH OF THIS WARRANTY. ALL EXPRESS AND IMPLIED WARRANTIES,
INCLUDING THE WARRANTIES OF MERCHANTABILITY, FITNESS FOR A PARTICULAR PURPOSE AND TITLE, ARE LIMITED TO
THE APPLICABLE WARRANTY PERIOD SET FORTH ABOVE.
Limitation of liability
SELLER SHALL HAVE NO LIABILITY FOR ANY CLAIM, LOSS, DAMAGE OR EXPENSE OF ANY KIND, INCLUDING FOR LOST
PROFITS, SPECIAL, INDIRECT, CONSEQUENTIAL, EXEMPLARY OR INCIDENTAL DAMAGES, WITH RESPECT TO THE
SELECTION, QUALITY, CONDITION, MERCHANTABILITY, SUITABILITY, FITNESS, OPERATION, PERFORMANCE, OR THE USE,
MAINTENANCE OR REPAIR OF THE PRODUCTS EVEN IF SELLER OR BUYER HAS BEEN ADVISED OF THE POSSIBILITY
THEREOF. THE PRICE STATED HEREIN WAS ARRIVED AT IN CONSIDERATION FOR LIMITING SELLERS WARRANTIES AND
LIABILITY AS PROVIDED HEREIN.
Some states do not allow the exclusion or limitation of incidental or consequential damages, or allow limitations on how long an implied
warranty lasts, so the above exclusions or limitations may not apply to you. This warranty gives you specific legal rights and you may also
have other rights, which vary from state to state.
If a problem with this product develops during or after the warranty period, please contact: Zetronix Corporation,
NOTICE
The information in this manual is subject to change without notice. Zetronix Corporation shall not be liable for technical or editorial errors or
omissions contained herein; nor for incidental or consequential damages furnishing from the furnishing or use of this material.