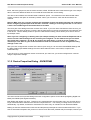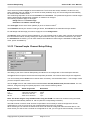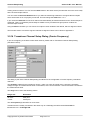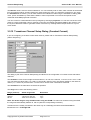
1
Autosoft NT
User Manual
Version number
Release date
Author
1.0.2
12-06-2002
A. Cosman
Copyright notice:
The Autosoft NT software package as distributed by Peekel Instruments for the control of the Autolog and
Unilog is property of:
PEEKEL INSTRUMENTS B.V.
Industrieweg 161
NL 3044 AS Rotterdam
The Netherlands
which company possesses all rights to distribute and supply Autosoft NT.
It is not allowed to copy, distribute or sell the programs or any material originating from it such as listings, disks,
diskettes or any other medium to copy the program or part thereof to any party, company, organisation,
institution or person without written permission of the proprietor.
Any violation of this shall be brought to lawsuit and prosecution. In accepting and receiving this document the
recipient automatically agrees to act conform the requirements stated above.
PEEKEL INSTRUMENTS B.V
INDUSTRIEWEG 161
3044 AS ROTTERDAM
TEL: (010)-415 27 22
FAX: (010)-437 68 26
EMAIL: [email protected]
PEEKEL INSTRUMENTS GMBH
BERGMANNSTRASSE 43
44809 BOCHUM
TEL: 0234/904 1603
FAX: 0234/904 1605
EMAIL: [email protected]
Introduction
Autosoft NT User Manual
Table of Contents:
1.
Introduction.......................................................................................................................................................... 4
1.1
Introduction................................................................................................................................................4
1.2
Commands ................................................................................................................................................4
2.
File menu commands.......................................................................................................................................... 5
2.1
New command (File menu) .......................................................................................................................5
2.2
Open command (File menu) .....................................................................................................................5
2.2.1
File Open dialog box ..........................................................................................................................5
2.3
Close command (File menu) .....................................................................................................................6
2.4
Save command (File menu) ......................................................................................................................6
2.5
Save As command (File menu).................................................................................................................6
2.5.1
File Save As dialog box .....................................................................................................................6
2.6
Export as Text command (File menu) .......................................................................................................7
2.7
1, 2, 3, 4 command (File menu) ................................................................................................................7
2.8
Exit command (File menu) ........................................................................................................................7
3.
Insert menu commands ...................................................................................................................................... 8
3.1
New Device command (Insert menu)........................................................................................................8
3.1.1
Communication Settings Dialog.........................................................................................................8
3.1.2
Device Properties Dialog ...................................................................................................................9
3.1.3
Device Properties Dialog - Overview .................................................................................................9
3.1.4
Device Properties Dialog - Contents................................................................................................10
3.1.5
Device Properties Dialog - IDVM/FDVM..........................................................................................11
3.1.6
Device Properties Dialog - Delays ...................................................................................................12
3.1.7
Device Properties Dialog - Expansion .............................................................................................13
3.1.8
Card Selection Dialog ......................................................................................................................13
3.1.9
List of available Cards......................................................................................................................14
3.2
New Channels command (Insert menu) .................................................................................................16
3.3
New Virtual Channel command (Insert menu) ........................................................................................16
3.4
New Rosette Channel command (Insert menu)......................................................................................16
3.4.1
Select Channels to Create Dialog....................................................................................................16
3.5
Channel Setup Dialog .............................................................................................................................17
3.5.1
Channel Alarms Setup Dialog..........................................................................................................19
3.5.2
Analog Output Channel Setup Dialog..............................................................................................20
3.5.3
Counter Channel Setup Dialog ........................................................................................................21
3.5.4
DC Channel Setup Dialog................................................................................................................22
3.5.5
Digital Output Channel Setup Dialog ...............................................................................................23
3.5.6
Graphic Channel Setup Dialog ........................................................................................................24
3.5.7
LVDT Channel Setup Dialog............................................................................................................24
3.5.8
Numeric Channel Setup Dialog .......................................................................................................25
3.5.9
Pt-100 Channel Setup Dialog ..........................................................................................................26
3.5.10 Rosette Channel Setup Dialog ........................................................................................................26
3.5.11 Strain Channel Setup Dialog (Carrier Frequency) ...........................................................................29
3.5.12 Strain Channel Setup Dialog (Constant Current) ............................................................................30
3.5.13 ThermoCouple Channel Setup Dialog .............................................................................................31
3.5.14 Transducer Channel Setup Dialog (Carrier Frequency) ..................................................................32
3.5.15 Transducer Channel Setup Dialog (Constant Current)....................................................................33
3.5.16 Virtual Channel Setup Dialog...........................................................................................................34
3.5.17 2-Point Calibration Dialog ................................................................................................................36
3.6
New Measurement Group command (Insert menu) ...............................................................................37
3.7
New Numerical Group command (Insert menu) .....................................................................................38
3.7.1
Numerical Output View ....................................................................................................................39
3.7.2
File Format Dialog (Numerical Group).............................................................................................39
3.7.3
Numeric Output Settings Dialog ......................................................................................................40
3.7.4
Numerical Output Header Dialog.....................................................................................................41
3.8
New Graphical Group command (Insert menu) ......................................................................................41
3.8.1
Graphical Output View .....................................................................................................................43
3.8.2
X Axis Setup Dialog (Graphical Group) ...........................................................................................43
3.8.3
Y Axis Setup Dialog (Graphical Group) ...........................................................................................44
3.8.4
Line Settings Dialog (Graphical Group) ...........................................................................................44
Copyright 2001 by Peekel Instruments
Page 2 of 74
Introduction
Autosoft NT User Manual
4.
Edit menu commands ....................................................................................................................................... 46
4.1
Cut command (Edit menu) ......................................................................................................................46
4.2
Copy command (Edit menu) ...................................................................................................................46
4.3
Paste command (Edit menu)...................................................................................................................46
4.4
Delete command (Edit menu) .................................................................................................................47
4.5
Autobalance command (Edit menu)........................................................................................................47
4.6
Outputs command (Edit menu) ...............................................................................................................48
4.7
Simultaneous Measurement command (Edit menu)...............................................................................50
4.8
Lock Configuration command (Edit menu)..............................................................................................50
4.9
Preferences Alarms command (Edit menu) ............................................................................................51
4.10 Preferences Warnings command (Edit menu) ........................................................................................52
5.
View menu commands...................................................................................................................................... 53
5.1
Devices command (View menu) .............................................................................................................53
5.2
Groups command (View menu) ..............................................................................................................54
5.3
Channels command (View menu)...........................................................................................................54
5.4
Alarm Window command (View menu)...................................................................................................55
5.5
Toolbar command (View menu) ..............................................................................................................56
5.5.1
Toolbar .............................................................................................................................................56
5.6
Status Bar command (View menu) .........................................................................................................56
5.6.1
Status Bar ........................................................................................................................................57
6.
Window menu commands ................................................................................................................................ 58
6.1
Cascade command (Window menu) .......................................................................................................58
6.2
Tile command (Window menu) ...............................................................................................................58
6.3
Window Arrange Icons Command ..........................................................................................................58
7.
Help menu commands ...................................................................................................................................... 59
7.1
Index command (Help menu)..................................................................................................................59
7.2
Using Help command (Help menu).........................................................................................................59
7.3
About command (Help menu) .................................................................................................................59
7.4
Context Help command...........................................................................................................................59
7.5
Warning Dialog........................................................................................................................................59
8.
Appendix A: Formulas used............................................................................................................................. 61
8.1
Formulas used for Pt-100........................................................................................................................61
8.2
Formulas used for Thermocouples .........................................................................................................61
8.2.1
ITS90 Type B: Platinum-30% Rhodium versus Platinum-6% Rhodium ..........................................61
8.2.2
ITS90 Type E: Nickel-Chromium versus Copper-Nickel..................................................................62
8.2.3
ITS90 Type J: Iron versus Copper-Nickel........................................................................................62
8.2.4
ITS90 Type K: Nickel-Chromium versus Nickel-Aluminum .............................................................63
8.2.5
ITS90 Type N: Nickel-Chromium-Silicon versus Nickel-Silicon-Magnesium...................................63
8.2.6
ITS90 Type R: Platinum-13% Rhodium versus Platinum ................................................................63
8.2.7
ITS90 Type S: Platinum-10% Rhodium versus Platinum ................................................................64
8.2.8
ITS90 Type T: Copper versus Copper-Nickel..................................................................................65
8.3
Formulas used for Straingauges .............................................................................................................65
8.4
Formulas used for 0°/90° Rosettes .........................................................................................................65
8.5
Formulas used for 0°/45°/90° Rosettes ..................................................................................................66
8.6
Formulas used for 0°/60°/120° Rosettes ................................................................................................67
9.
Appendix B: IEEE-488 Software Configuration.............................................................................................. 69
9.1
Windows NT driver configuration ............................................................................................................69
9.2
Windows 98 driver configuration .............................................................................................................70
10.
Appendix C: Automatic start of Autosoft NT .............................................................................................. 74
Copyright 2001 by Peekel Instruments
Page 3 of 74
Introduction
Autosoft NT User Manual
1. Introduction
1.1 Introduction
Autosoft NT is a software package designed to configure and control Autolog and Unilog data
acquisition systems produced by Peekel Instruments B.V. It can control multiple Autolog 2005, Autolog
2100 and/or Unilog 2500 devices with BASE controller connected to the same PC using serial ports or
National Instruments GPIB-cards (IEEE-488). Using the appropriate hardware it can measure up to
2000 channels per second. To run Autosoft NT, you need at least Windows 98 or Windows NT 4.0.
Make sure you install a recent Service Pack (at least Service Pack 3) on Windows NT 4.0.
To measure data using Autosoft NT, first configure one or more measurement devices. After that,
create channels to measure. Depending on the hardware, Autosoft NT can measure DC Voltage,
Thermocouples, Pt-100, Straingauges, Transducers, Counters, LVDT's, Analog Outputs and Digital
Inputs and Outputs.
In addition, you can create Rosette channels for combinations of two or three straingauges. Virtual
channels allow you to perform complex calculations on the measured data on-line.
After your devices and channels are configured, you can create measurement groups in which you can
place any collection of channels to be measured. Numerical groups allow you to show measurement
data on screen in numerical form, and also store measured data. Online graphics are supported using
graphical groups, which can show up to 16 channels in a single graphical display.
In addition to all of this, Autosoft NT also supports autobalance measurements, alarms (which can not
only be displayed, but can also trigger output relays and the start or stop of measurements) and the
manual setting of output channels.
Throughout the use of the program you can press the F1 key to obtain context sensitive online help.
1.2 Commands
File menu
Edit menu
Insert menu
View menu
Window menu
Help menu
Copyright 2001 by Peekel Instruments
Page 4 of 74
New command (File menu)
Autosoft NT User Manual
2. File menu commands
The File menu offers the following commands:
New
Open
Close
Save
Save As
Export As
Text
Print
Print Preview
Print Setup
Exit
Creates a new configuration.
Opens an existing configuration.
Closes an opened configuration.
Saves an opened configuration using the same file name.
Saves an opened configuration to a specified file name.
Exports all configuration information in a tabbed text file.
Prints the active view.
Displays the active view on the screen as it would appear printed.
Selects a printer and printer connection.
Exits Autosoft NT.
2.1 New command (File menu)
Use this command to create a new configuration in Autosoft NT.
You can open an existing configuration with the Open command.
Shortcuts
Toolbar:
Keys:
CTRL+N
2.2 Open command (File menu)
Use this command to open an existing configuration.
You can create new configurations with the New command.
Shortcuts
Toolbar:
Keys:
CTRL+O
2.2.1 File Open dialog box
The following options allow you to specify which file to open:
File Name
Type or select the filename you want to open. This box lists files with the extension you select in the List
Files of Type box.
Drives
Select the drive in which Autosoft NT stores the file that you want to open.
Directories
Select the directory in which Autosoft NT stores the file that you want to open.
Network...
Copyright 2001 by Peekel Instruments
Page 5 of 74
Close command (File menu)
Autosoft NT User Manual
Choose this button to connect to a network location, assigning it a new drive letter.
2.3 Close command (File menu)
Use this command to close all windows containing the active configuration. Autosoft NT suggests that you save
changes to your configuration before you close it. If you close a configuration without saving, you lose all
changes made since the last time you saved it. Before closing an untitled configuration, Autosoft NT displays
the Save As dialog box and suggests that you name and save the configuration.
You can also close a configuration by using the Close icon on all of the configuration's windows, as shown
below:
2.4 Save command (File menu)
Use this command to save the active configuration to its current name and directory. When you save a
configuration for the first time, Autosoft NT displays the Save As dialog box so you can name your configuration.
If you want to change the name and directory of an existing configuration before you save it, choose the Save
As command.
Shortcuts
Toolbar:
Keys:
CTRL+S
2.5 Save As command (File menu)
Use this command to save and name the active configuration. Autosoft NT displays the Save As dialog box so
you can name your configuration.
To save a configuration with its existing name and directory, use the Save command.
2.5.1 File Save As dialog box
The following options allow you to specify the name and location of the file you are about to save:
File Name
Type a new filename to save a configuration with a different name. Autosoft NT adds the extension you
specify in the Save File As Type box.
Drives
Select the drive in which you want to store the configuration.
Directories
Select the directory in which you want to store the configuration.
Network...
Choose this button to connect to a network location, assigning it a new drive letter.
Copyright 2001 by Peekel Instruments
Page 6 of 74
Export as Text command (File menu)
Autosoft NT User Manual
2.6 Export as Text command (File menu)
This option allows you to store all parameters of a measurement configuration in a text file. Only parameters,
which are crucial for the measurement itself, are stored.
Items that are not stored include the exact configuration of graphic displays and the number of digits shown in
numeric outputs.
The text file contains items separated by tabs and is best viewed using a spreadsheet like Excel.
You can use this file as a reference, or to find anomalies in your measurement configuration.
The configuration file generated when you check the 'Store configuration in separate file' in the Numerical
Group Settings has the same format as the 'Export as Text' file.
2.7 1, 2, 3, 4 command (File menu)
Use the numbers and filenames listed at the bottom of the File menu to open the last four configurations you
closed. Choose the number that corresponds with the configuration you want to open.
2.8 Exit command (File menu)
Use this command to end your Autosoft NT session. You can also use the Close command on the application
Control menu. Autosoft NT prompts you to save configurations with unsaved changes.
Shortcuts
Mouse:
Keys:
Double-click the application's Control menu button.
ALT+F4
Copyright 2001 by Peekel Instruments
Page 7 of 74
New Device command (Insert menu)
Autosoft NT User Manual
3. Insert menu commands
The Insert menu offers the following commands:
New Device
New Channels
New Virtual Channel
New Rosette Channel
New Measurement Group
New Graphical Group
New Numerical Group
Adds a new Autolog or Unilog device to the
configuration.
Adds new channels to an existing Autolog or Unilog
device.
Creates a new virtual channel.
Creates a new rosette channel.
Creates a new measurement group.
Creates a new graphical group.
Creates a new numerical group.
3.1 New Device command (Insert menu)
Use this command to add a new Autolog or Unilog device to the configuration. When you add a new device, the
first thing you will be presented with is the Communication Settings Dialog. When the communications are
established (or skipped, if the device is not connected), you can configure the device using the Device
Properties Dialog.
3.1.1 Communication Settings Dialog
This dialog allows you to determine the means of communication between an Autolog or Unilog device and the
PC. You can select between serial communication (RS-232) or GPIB communication (IEEE-488).
For RS-232 you need to select the COM-port from the list of available ones. If the COM-port you want to select
is currently not available, you can directly type its name instead of selecting from the list. You will also need to
select the proper baudrate. Parity should be set to 'none' unless you have a very specific reason to change it.
For IEEE-488 you need to select the card number and device address. We advise the use of an ISA GPIB-card
from National Instruments. Cards from other manufacturers as well as PCI cards from National Instruments are
not guaranteed to communicate properly with the Autolog/Unilog devices and driver. Be sure you have proper
and recent drivers installed if you have trouble with the IEEE communication. Check Appendix B for the
software configuration of your National Instruments IEEE-488 card.
Copyright 2001 by Peekel Instruments
Page 8 of 74
New Device command (Insert menu)
Autosoft NT User Manual
You will also need to provide a timeout time for communications with the device. The best value depends on the
longest scantime of the device. If you do not know how to choose a timeout value, use 1 second for every 15
channels in the device (count channels including all extension boxes), with a minimum of 1 second. For
example, if you want to scan 300 channels, use a timeout of 20 seconds.
The 'device is currently connected' checkbox should be switched off if you are configuring a device without it
being connected. If you leave it checked the software will attempt to poll the device to learn about its type and
configuration.
After you press 'OK' Autosoft NT will attempt to connect to the device and will present the Device Properties
Dialog to allow detailed configuration of the device.
Note: The Autolog or Unilog device should also be configured for correct type of communication.
Check your hardware manual to find how to set the dipswitches inside the device to the proper position.
Retrieving Device Information...
This dialog shows that the software is trying to communicate with the device to obtain information about its type
and configuration. If the software fails to connect, you can press the 'Cancel' button to go back to
Communication Settings Dialog.
If you know the device is currently not connected, you may want to clear the 'device is currently connected'
checkbox in that dialog.
After the connection has been made, or the connection attempt has been canceled, the Device Properties
Dialog appears to allow detailed configuration of the device.
3.1.2 Device Properties Dialog
This dialog contains a number of tabs, which allow you to completely configure a device including expansion
boxes and the cards they contain.
Use the tab
Overview
Contents
IDVM/FDVM
Delays
Expansion
to configure
Device name, type and communication.
Cards contained in the device (main unit).
DVM Autozero interval and count and FDVM filter.
Delay setttings.
Contents and availability of expansion boxes.
After you have configured the device and the cards it contains, you can configure the channels. Use the New
Channels on the Insert menu to do this.
3.1.3 Device Properties Dialog - Overview
Copyright 2001 by Peekel Instruments
Page 9 of 74
New Device command (Insert menu)
Autosoft NT User Manual
This tab in the Device Properties Dialog shows the device name, type and communication settings.
Items, which are grayed out, like the device type and processor speed in the sample above, cannot be altered
because the connected device dictates the correct setting.
If no device is connected, you can select the device type yourself. The selected device type will influence the
available choices in other parts of the configuration, so make sure you choose the correct one.
The device name can be set to anything you like, although the software will automatically impose some
restrictions on the length and characters you can use.
This view also shows if the device is connected. If it is not, you can use the 'Change Settings' button to go back
to the Communication Settings Dialog.
After you have done basic configuration of device name and type, you should proceed to the Contents tab to
configure the contents of the device (main unit).
3.1.4 Device Properties Dialog - Contents
This tab in the Device Properties Dialog shows the contents of the device (main unit).
Copyright 2001 by Peekel Instruments
Page 10 of 74
New Device command (Insert menu)
Autosoft NT User Manual
Items, which are grayed out, like the mode controller, IDVM, FDVM and strain measurement type in the sample
above, cannot be altered because the connected device dictates the correct setting.
The device cannot detect the 'CA532/CA542 Conditioner' option. As most devices are delivered with either
CA532 or CA542, this option is checked by default. When you are unsure, check the device itself for its
contents.
Beware: Make sure you correctly configure the availability of items like mode controller and conditioner,
before configuring input/output cards and their channels. Adding or removing them later on can cause
a shift in slot numbering and should therefore be avoided.
The lower part of this dialog shows the contents of the slots. If you look at the actual device from the rear, you
should match this list to the device contents, with the topmost item in the list corresponding to the leftmost card
in the device. Use the 'Modify' button to open the Card Selection Dialog, which allows you to add or remove
input/output cards.
Note: If you are configuring an Autolog 20xx (for example a 2005) you must check the Expansion tab to
see the correct CA-512 settings for the contents you configured. On the CA-512 card you can find 4
hex-coded rotary switches: 'A' and 'B' are used for the start adress, 'C' and 'D' for the number of
channels per slot. Refer to your CA-512 hardware manual for information on how to adjust the rotary
settings on the card.
After you have configured the contents of the device (main unit) you can check the IDVM/FDVM Settings and
the Delay Settings (the default settings for both of these tabs will work in most cases, except for fast
measurements).
If you have one or more expansion boxes connected to your main unit, you should configure their contents
using the Expansion Settings.
3.1.5 Device Properties Dialog - IDVM/FDVM
This tab in the Device Properties Dialog shows the configuration options for the IDVM (Integrating Digital Volt
Meter) and FDVM (Fast Digital Volt Meter).
Both DVM's drift slightly over time. Therefore, zero measurements must be made every now and then during
longer measurements to determine the drift and compensate for it. The Autolog or Unilog device can do this
automatically. By default, an autozero measurement is done every 10 minutes for both IDVM and FDVM.
Making an autozero measurement costs time and temporarily interrupts the normal measurement flow. If you
want to avoid this interruption and you do not care too much about the possible drift (for example, because your
Copyright 2001 by Peekel Instruments
Page 11 of 74
New Device command (Insert menu)
Autosoft NT User Manual
measurement only lasts a few minutes), you can switch the autozero measurement off by setting both the
interval and the count to 0.
Note: During continuous measurements autozero measurements are automatically switched off
(Continuous means, in this context: a special measurement mode where the device measures as fast as
possible, without any interruption).
The autozero count gives the option to increase the number of zero measurements made during each autozero
measurement. The measurements will be averaged to measure the zero value more accurately. This option is
very useful for the FDVM, which is very sensitive to noise, but less so for the IDVM, which already integrates the
signal over a period of time (about 20 msec.).
The autobalance count has the same use as the autozero count, but this time for autobalance measurements,
which can be made using the Autobalance Dialog. Autobalance measurements allow you to set the input signal
to zero and have the software measure. The measured value will be subtracted from all further measurements
so the measured autobalance value effectively becomes the zero value for that channel.
The FDVM filter option allows for a 20 kHz, 8 kHz, 1 kHz or no filter at all to be used for FDVM measurements.
The default 8 kHz filter should suffice in most situations.
Beware: Setting the filter to none will cause an inordinate amount of noise to be measured by the FDVM.
3.1.6 Device Properties Dialog - Delays
This tab in the Device Properties Dialog shows a list of delay settings for the Autolog or Unilog device. By
default, these delays are configured for use with relay input cards. If you want to perform fast measurements,
using an FDVM and solid state input cards (CA528), you can press the 'Solid State' button to decrease the
FDVM delay times.
To modify an individual delay, first select it from the list (click on it), then enter the new value in milliseconds.
The default delay times in milliseconds for the different items are:
Item
IDVM DC Range
IDVM strain range
IDVM break before make
Debounce for digital I/O
Copy pulse for digital I/O
FDVM DC Range
FDVM strain range
Relays
15 ms
25 ms
0.5 ms
0.5 ms
10 ms
15 ms
25 ms
Copyright 2001 by Peekel Instruments
Solid State
15 ms
25 ms
0.5 ms
0.5 ms
10 ms
0.3255 ms
0.3255 ms
Page 12 of 74
New Device command (Insert menu)
FDVM break before make
0.5 ms
Autosoft NT User Manual
0.0016 ms
The Solid State default delay times assume that no filter is used. If you select another filter setting you should
modify the 'FDVM DC Range' and 'FDVM Strain Range' to match the following table:
Filter Setting
none
20 kHz
8 kHz
1 kHz
Solid State delay
0.3255 ms (Solid State default)
at least 0.4 ms
at least 0.5 ms
at least 4 ms
3.1.7 Device Properties Dialog - Expansion
In this tab in the Device Properties Dialog, you can configure the input/output cards of the main device and all
expansion units. On the left side is a list on all available units. To configure a new expansion box, click on the
first unused one in the list and check the 'Active' box to activate it. A default start address for the unit will be
filled in, but you can change it to your liking, as long as the address range does not overlap with one of the other
units.
The right part of this dialog shows the contents of the slots for the currently selected unit. If you look at the
actual device or expansion box from the rear, you should match this list to the contents of the device or
expansion box, with the topmost item in the list corresponding to the leftmost card in the device. On expansion
boxes, the leftmost slots containing the CA-512 and CA-532/542 cards should be ignored. Slot 00 is the slot to
the right of the CA-532/542 card. Use the 'Modify' button to open the Card Selection Dialog, which allows you to
add or remove input/output cards.
Note: After configuring the contents of an expansion box or the main unit of an Autolog 20xx (for
example a 2005) you must adjust the settings of the CA-512 card contained therein to match those
shown on the top right of this dialog. On the CA-512 card you can find 4 hex-coded rotary switches:
'SA' and 'SB' are used for the start adress, 'SC' and 'SD' for the number of channels per slot. Refer to
your CA-512 hardware manual for information on how to adjust the rotary settings on the card.
3.1.8 Card Selection Dialog
Copyright 2001 by Peekel Instruments
Page 13 of 74
New Device command (Insert menu)
Autosoft NT User Manual
The right part of this dialog shows the contents of the slots for the currently selected unit. If you look at the
actual device or expansion box from the rear, you should match this list to the contents of the device or
expansion box, with the topmost item in the list corresponding to the leftmost card in the device. On expansion
boxes, the leftmost slots containing the CA-512 and CA-532/542 cards should be ignored. Slot 00 is the slot to
the right of the CA-532/542 card.
To place new cards in the slots, first select the type of card from the list on the left side. Then select one or
more slots from the list on the right and press the 'Select' button to place the card.
To remove cards from the slots, select the cards in the list on the right and press the 'Remove' button.
When placing cards with different numbers of channels in the device, you should place cards with a low
numbers of channels in the first slots and cards with higher numbers of channels in higher slot numbers. That
means: put 20 channel cards to the right of 10 channel cards and 30 channel cards to the right of 20 channel
cards.
The software will automatically determine how many slots have 10 channel cards, 20 channel cards and 30
channel cards, which you can see on the bottom right of the dialog. These values determine the settings of the
CA-512 card (in the Autolog 2100 and Unilog base devices these settings are controlled by software). You can
manually control these values, but you should only take manual control if you have a very specific reason for it.
3.1.9 List of available Cards
The following cards are available for configuration in Autolog or Unilog devices:
CA522/14
Card for 10 analog inputs using up to 4 wires per input, specifically
designed for ThermoCouple measurements. Usually the first 9
channels are connected to thermocouples (channels 0...8) and the
th
10 channel is used for CJC with a Pt-100 (channel 9).
CA522/22
Card for 20 analog inputs using 2 wires per input, specifically
designed for ThermoCouple measurements. Usually 18 channels
are connected to thermocouples (channels 0...8 and 10...18), the
th
th
10 channel is used for CJC with a Pt-100 (channel 9) and the 20
channel is reserved (internally also used by the Pt-100).
Copyright 2001 by Peekel Instruments
Page 14 of 74
New Device command (Insert menu)
Autosoft NT User Manual
CA523/16
Card for 16 digital inputs, grouped in 2 channels containing 8 bits
each. The input channels will measure values between 0 and 255.
CA523/32
Card for 32 digital inputs, grouped in 4 channels containing 8 bits
each. The input channels will measure values between 0 and 255.
CA2523/32
Card for 32 latched digital inputs, grouped in 4 channels containing
8 bits each. The input channels will measure values between 0 and
255.
CA524/5
Card for 5 16-bit counters. These counters can be set to
frequency/interval or totalyzer using jumpers on the card.
CA524/10
Card for 10 16-bit counters. These counters can be set to
frequency/interval or totalyzer using jumpers on the card.
CA525/14
Card for 10 analog relay inputs using up to 4 wires per input.
Suitable for DC, ThermoCouple, Pt-100 and 4-wire Quarter Bridge
strain measurements.
CA525/22
Card for 20 analog relay inputs using up to 2 wires per input.
Suitable for DC and ThermoCouple measurements.
CA525/16
Card for 10 analog relay inputs using up to 6 wires per input.
Suitable for DC, ThermoCouple, Pt-100 and strain measurements.
CA525/23
Card for 20 analog relay inputs using up to 3 wires per input.
Suitable for DC, ThermoCouple and 3-wire Pt-100 measurements.
CA525/32
Card for 30 analog relay inputs using up to 2 wires per input.
Suitable for DC and ThermoCouple measurements.
CA527-5k
Card for 10 analog LVDT inputs using a 5 kHz carrier frequency.
CA528/14
Card for 10 analog solid state inputs using up to 4 wires per input.
Suitable for DC, ThermoCouple, Pt-100 and 4-wire Quarter Bridge
constant current strain measurements.
CA528/22
Card for 20 analog solid state inputs using up to 2 wires per input.
Suitable for DC and ThermoCouple measurements.
CA528/16
Card for 10 analog relay inputs using up to 6 wires per input.
Suitable for DC, ThermoCouple, Pt-100 and constant current strain
measurements.
CA528/23
Card for 20 analog solid state inputs using up to 3 wires per input.
Suitable for DC, ThermoCouple and 3-wire Pt-100 measurements.
CA528/32
Card for 30 analog solid state inputs using up to 2 wires per input.
Suitable for DC and ThermoCouple measurements.
CA574
Card for 32 digital outputs, grouped in 4 channels containing 8 bits
each.
CA575/10
Card for 10 digital relay outputs, 1 output per channel.
CA575/20
Card for 20 digital relay outputs, 1 output per channel.
CA576
Card for 8 8-bit analog outputs. The output channels can be set to
values between 0 and 255. Values from 0 to 127 correspond to 0 to
+10 Volts, 128 to 255 correspond to -10 to 0 Volts.
Copyright 2001 by Peekel Instruments
Page 15 of 74
New Channels command (Insert menu)
Autosoft NT User Manual
CA577
Card for 2 14-bit analog outputs. The output channels can be set to
values between 0 and 16383. The corresponding output voltage
range can be set using jumpers on the card.
CA591
Card for miscellaneous purposes. Although the program allows the
placement of this card in the device, it will not be able to control it
in any way. No channels can be assigned to this card.
CA592
AC to DC converter card. Although the program allows the
placement of this card in the device, it will not be able to control it
in any way. No channels can be assigned to this card.
CA593
Internal resistance and isolation measurement card. This card is
only allowed in the first available slot in the main unit of a device.
Although the program allows the placement of this card in the
device, it will not be able to control it in any way. No channels can
be assigned to this card.
3.2 New Channels command (Insert menu)
This command is only available if the 'Device Overview' window is active. To show or activate the Device
Overview window, use the 'View' menu, option 'Devices'.
If the currently selected device in the device overview is the virtual device, the Channel Setup dialog appears,
allowing you to create a new virtual channel.
If the currently selected device in the device overview is an Autolog or Unilog device, the Select Channels to
Create dialog appears, allowing you to select unused channel positions in the selected device, unit or slot for
creating new channels.
3.3 New Virtual Channel command (Insert menu)
Use this command to create a new virtual channel. The Channel Setup dialog will appear, showing the Virtual
Channel Settings and allowing you to configure the virtual channel.
3.4 New Rosette Channel command (Insert menu)
Use this command to create a new rosette channel. The Channel Setup dialog will appear, showing the Rosette
Channel Settings and allowing you to configure the rosette channel.
3.4.1 Select Channels to Create Dialog
(If you are creating a rosette array, please refer to the Rosette Input Channel Selection dialog for hints)
Copyright 2001 by Peekel Instruments
Page 16 of 74
Channel Setup Dialog
Autosoft NT User Manual
This dialog allows you to select any number of channels to create (or overwrite) simultaneously. The list shows
all the channels available in the device that you selected. All channels in the device, unit or slot you chose are
preselected.
You can make a selection of channels in the list by clicking and dragging, or by shift-clicking. You can select a
collection of separate channels by ctrl-clicking. If you double-click on the (last) channel you select, the Channel
Setup Dialog appears, allowing you to configure those channels.
You can use the 'Select All' or 'Select None' buttons to select all channels at once or clear the current
selection.
When you press 'OK' this dialog will close and the Channel Setup Dialog appears, allowing you to configure the
selected channels.
If you select one or more channels which are already in use, you will receive a warning before the Channel
Setup Dialog opens.
3.5 Channel Setup Dialog
Copyright 2001 by Peekel Instruments
Page 17 of 74
Channel Setup Dialog
Autosoft NT User Manual
The channel setup dialog allows you to configure a channel.
On the top left the dialog shows the number of channels you are modifying or creating. Be careful when
modifying more than one channel: all settings for all channels will be overwritten, even if you change only a
single parameter. Exception: the balance value will not be overwritten. The initial values displayed in the dialog
correspond to the settings of the first channel.
The name of the channel is set to '*' for new channels. You can change this name, but it should be no longer
than 15 characters and may only contain letters, digits and underscores. The software will automatically enforce
these rules. Channel names must be unique, if you choose an existing name it will automatically be changed
upon storing the channel in the database. If you create more than one channel at the same time, sequential
numbering will be appended to the name to ensure uniqueness.
The description of the channel is a free-form text, limited to a maximum of 127 characters. You can use this
text for any details you want to keep with the channel.
The connection shows where the current channel is positioned (device and channel number, for existing
channels only). You can use the arrow buttons to step through the consecutive channels in the device. Beware:
when you press the arrow buttons the settings for the current channel(s) will automatically be saved, as if you
pressed the 'OK' button.
The sensor field shows the type of channel. When configuring a measurement channel, you can use the
dropdown list to select the type of channel. Only channel types, which can actually be measured using the
selected card and device, will be shown in the list.
The list on the top right of the dialog shows where the channel is located. In the example above, the channels
are located in Device 1. If the channel is placed in one or more groups, these will show up as well, allowing you
to switch between the groups and configure the settings related to each group. Beware: when you select a new
group the settings for the current group or device will automatically be saved, as if you pressed the 'OK' button.
Copyright 2001 by Peekel Instruments
Page 18 of 74
Channel Setup Dialog
Autosoft NT User Manual
The 'Off' checkbox determines whether the channel is active or not. If you check this box, the channel will be
disabled and will no longer be measured.
Pressing the 'Alarms' button will make the Alarm settings for the current channel appear.
The bottom left side of the dialog is reserved for specific settings. The contents depend on the type of channel.
The following specific settings are available:
Name
Alarms
Analog Output
Counter
DC
Digital Output
Graphic
LVDT (5K)
Numeric
Pt-100 (or Pt-xxx)
Rosette
Strain
Thermocouple
Transducer
Virtual
Description
Alarm settings, for measurement channels and virtual channels.
Settings for analog outputs
Settings for counters
Settings for DC Voltage measurements
Settings for digital outputs
Settings related to a graphical group
Settings for LVDT measurement
Settings related to a numerical group
Settings for Pt-100 measurements
Settings for rosette channels
Settings for Straingauge measurements
Settings for Thermocouple measurements
Settings for Transducer measurements
Settings for virtual channels
3.5.1 Channel Alarms Setup Dialog
This dialog is part of the Channel Setup dialog and allows for the configuration of the channel parameters
related to alarms.
You can individually switch the HH (HighHigh or Very High), H (High), L (Low) and LL (LowLow or Very Low)
alarms on or off and set their limit values. The limit values must be increasing from LL to HH.
'Control measurement group' allows you to start and stop a measurement group based on the alarm state of
the channel. The selected measurement group will be started when the channel goes into alarm and it will be
stopped when the channel drops out of alarm. If you need the reverse logic you will need to either change the
alarm limits or create a virtual channel, have it check the alarms and set its alarm control measurement group.
Beware: it is possible to have more than one channel control the same measurement group. The group will be
started when any of the channels goes into alarm and stopped when any of the channels drops out of alarm. If
Copyright 2001 by Peekel Instruments
Page 19 of 74
Channel Setup Dialog
Autosoft NT User Manual
this is not the logic you require, you will need to use a virtual channel and implement the logic you need
yourself.
'Control relay' allows you to control a relay based on the alarm state of the channel. The selected relay will be
set when the channel goes into alarm and it will be reset when the channel drops out of alarm. The dropdown
list shows all available relay outputs, but you can also manually type the name of another channel, for example
a virtual channel. This will then be set to 1 for alarm and 0 for no alarm.
Beware: it is possible to have more than one channel control the same relay channel. The relay will be set
when any of the channels goes into alarm and reset when any of the channels drops out of alarm. If this is not
the logic you require, you will need to use a virtual channel and implement the logic you need yourself.
'Sound new alarm': check this to have the channel make an audible sound whenever the channel goes into
alarm. You will need a soundcard and speakers attached to your PC. The exact sound to be made can be set
using the Edit menu, option Preferences, suboption Alarms.
'Sound every alarm': check this to have the channel make an audible sound every time the channel is
measured and in alarm. You will need a soundcard and speakers attached to your PC. The exact sound to be
made can be set using the Edit menu, option Preferences, suboption Alarms.
'File': check this to log all changes in alarm status for this channel in a file. To select the location of this file, use
the Edit menu, option Preferences, suboption Alarms.
'Screen': check this to show the alarm status on screen, in the Alarm Window which can be shown using the
View menu, option Alarm Window.
3.5.2 Analog Output Channel Setup Dialog
This dialog is part of the Channel Setup dialog and allows for the configuration of analog output channels.
You can select whether the analog output value in the software should be presented as a raw value (0...255
for 8-bit outputs or 0...16383 for 14-bit outputs) or as an output voltage.
For 14-bit outputs, there are 4 different ways in which the raw value can be converted to an output voltage. The
setting you choose here should match the one configured by jumpers on the card.
If you choose one of the Voltage ranges on the 14-bit output, please refer to the table and picture below to set
the jumpers on the CA-577 analog output card.
Copyright 2001 by Peekel Instruments
Page 20 of 74
Channel Setup Dialog
Jumper
JP1
JP2
JP3
JP4
JP5
-10 - +10 V
2' complement
2-3
2-1
2-1
2-3
2-3
Autosoft NT User Manual
-10 - +10 V
offset binary
2-1
2-1
2-1
2-3
2-3
0 - +10 V
0 - -10 V
2-1
2-1
2-1
2-1
2-1
2-1
2-3
2-3
2-1
2-1
'Source Channel': If you leave this field blank, the output can only be set manually, from the menu item Edit>Outputs. You can also select a channel from the list, which contains suitable virtual channels, or type the name
of any channel. If you select a valid source channel, the output will be set to match the source channel as soon
as a new value for the source arrives. Note that the output relay for analog outputs is switched on immediately
after the first value is set. This ensures that the signal is available on the output.
3.5.3 Counter Channel Setup Dialog
Copyright 2001 by Peekel Instruments
Page 21 of 74
Channel Setup Dialog
Autosoft NT User Manual
This dialog is part of the Channel Setup dialog and allows for the configuration of counter channels.
The counters can be configured in two ways: frequency/interval or totalyzer. Jumpers on the card do the
actual configuration; the selected counter type should match the card's configuration.
Frequency/interval is used to either measure the frequency in which pulses arrive, or the interval between the
pulses, depending on the hardware setting.
The totalyzer is used to keep a running count of the number of pulses, using a 16-bit counter. If the count goes
over 65535 it rolls back to 0. For this type of counter, you can choose a special mode 'totalyzer with latch'.
Choose this option to speed up measurement when a large number of counters are measured in a single
measurement group, together with only a small amount (or none) of other types of channels. When in doubt,
choose the normal totalyzer, without latch.
You can convert the count (or frequency) to a more meaningful value by entering a polynome and setting
appropriate units for the channel. Use the '2-point calibration' button to generate a linear conversion by entering
desired output values for any two counts (frequencies).
Beware: counters do not start automatically. Apart from measuring them, you must also start them. To start or
stop a counter, use the Set Output dialog ('Edit' menu, option 'Outputs').
3.5.4 DC Channel Setup Dialog
Copyright 2001 by Peekel Instruments
Page 22 of 74
Channel Setup Dialog
Autosoft NT User Manual
This dialog is part of the Channel Setup dialog and allows for the configuration of DC voltage channels or
resistance measurement channels.
The range of the DC measurement can have the following values:
Range
10 V
1V
100 mV
25 mV
Actual measured range
-13 V to 13 V
-1300 mV to 1300 mV
-130 mV to 130 mV
-32.5 mV to 32.5 mV
Resolution
400 µV
40 µV
4 µV
1 µV
Note: The 25 mV range is only available when using the FDVM. If a channel is measured using the IDVM,
the range will automatically fall back to 100 mV (with the corresponding resolution).
You can manually set the mode for this channel when necessary. Use the default value '1 = DC-Voltage' to
measure DC voltage.
For resistance measurements, use mode '5 = Resistance 4-wire' or '6 = Resistance 3-wire'. When measuring
resistance you should be aware that 1 mV corresponds to 1 Ohm, since a constant current source of 1 mA is
used to perform the measurements.
Note: Mode setting by software is only possible if the Autolog or Unilog has a CA-2568 mode selection
card. If your device does not have this card, you must manually set the dip-switches on the cards to match the
software mode setting. In this case, the software mode setting is only used as a reminder and for documentation
purposes.
The balance value is used to set the nullbalance. You can manually enter a value, which will then be subtracted
from all measured values, thereby making the output 0 when the value you entered is measured. If you check
the 'Autobalance' checkbox, you can later measure the nullbalance value using the Autobalance dialog ('Edit'
menu, option 'Autobalance'). Note that the balance value is expressed in mV and corresponds to the measured
value without polynomial correction.
You can correct for nonlinearitaries in the input signal by entering a polynome. You can also convert the mV
output to a more meaningful value by entering a polynome and setting appropriate units for the channel. Use
the '2-point calibration' button to generate a linear conversion by entering desired output values for any two mV
values.
3.5.5 Digital Output Channel Setup Dialog
Copyright 2001 by Peekel Instruments
Page 23 of 74
Channel Setup Dialog
Autosoft NT User Manual
This dialog is part of the Channel Setup dialog and allows for the configuration of digital output channels.
'Source Channel': If you leave this field blank, the output can only be set manually, from the menu item Edit>Outputs. You can also select a channel from the list, which contains suitable virtual channels, or type the name
of any channel. If you select a valid source channel, the output will be set to match the source channel as soon
as a new value for the source arrives.
3.5.6 Graphic Channel Setup Dialog
This dialog is part of the Channel Setup dialog and allows for the configuration of graphic settings for channels
in a graphical group.
You can select whether the channel is shown relative to the left y-axis or the right y-axis.
The line style determines what the line drawn in the graphic for the channel will look like. A sample of the
current line style is shown against a black and white background.
Press the change button to open the Line Settings dialog and change the current line style.
3.5.7 LVDT Channel Setup Dialog
Copyright 2001 by Peekel Instruments
Page 24 of 74
Channel Setup Dialog
Autosoft NT User Manual
This dialog is part of the Channel Setup dialog and allows for the configuration of LVDT channels.
The sensitivity of the LVDT measurement is a factory setting made by Peekel Instruments on the card. You
should match this factory setting in the software. The default value for the sensitivity is 100.
The mode setting is not used for LVDT measurements and therefore can not be altered.
The balance value is used to set the nullbalance. You can manually enter a value, which will then be subtracted
from all measured values, thereby making the output 0 when the value you entered is measured. If you check
the 'Autobalance' checkbox, you can later measure the nullbalance value using the Autobalance dialog ('Edit'
menu, option 'Autobalance'). Note that the balance value is expressed in mV/V and corresponds to the
measured value without polynomial correction.
You can correct for nonlinearitaries in the input signal by entering a polynome. You can also convert the mV/V
output to a more meaningful value by entering a polynome and setting appropriate units for the channel. Use
the '2-point calibration' button to generate a linear conversion by entering desired output values for any two
mV/V values.
3.5.8 Numeric Channel Setup Dialog
This dialog is part of the Channel Setup dialog and allows for the configuration of numeric settings for channels
in a numeric group.
You can set the total amount of digits shown in the numeric output for this channel (add 1 for the decimal point,
if there is one). If the actual value contains less digits than specified, spaces will be added in front of the
number. If the actual value contains more digits than specified (before the decimal point), they will all show, but
the formatting may go awry.
The post comma digits determine the maximum number of digits that will show behind the decimal point. If you
enter 0 here, no decimal point is shown.
When you add a channel to a numeric group, the default number of digits will be 9, and the number of post
comma digits is based on the expected accuracy of the measured value.
Copyright 2001 by Peekel Instruments
Page 25 of 74
Channel Setup Dialog
Autosoft NT User Manual
Beware: the software cannot guarantee that all digits shown by default are relevant.
3.5.9 Pt-100 Channel Setup Dialog
This dialog is part of the Channel Setup dialog and allows for the configuration of Pt-100 channels.
The DC range of the Pt-100 measurement should be set to 1 V (default value) for best results. You can,
however, change the range for special purposes. A 100 mV range could be used to measure temperatures up to
about 75 °C, for instance. The range setting can have the following values:
Range (nominal)
10 V
1V
100 mV
25 mV
Actual range ends
-13 V to 13 V
-1300 mV to 1300 mV
-130 mV to 130 mV
-32.5 mV to 32.5 mV
Resolution
400 µV
40 µV
4 µV
1 µV
Note: The 25 mV range is only available when using the FDVM. If a channel is measured using the IDVM,
the range will automatically fall back to 100 mV (with the corresponding resolution).
You can manually change the R0 value for the Pt-100 (R0 = resistance in Ohms at 0 °C). There are two
possible reasons to do this. First, if you have a special sensor like a Pt-60, Pt-200 or Pt-1000, you can enter 60,
200 or 1000 for the R0 value. Second, if you know your Pt-100 has a slight imperfection and measures 100.5
Ohms instead of 100 Ohms at 0 °C, you can enter 100.5 for the R0 value.
You can select between 3-wire or 4-wire measurement using the checkboxes. This will automatically update
the mode for the channel. If the 4-wire checkbox is grayed, you are probably configuring this channel on a card,
which cannot do 4-wire measurements.
Note: Mode setting by software is only possible if the Autolog or Unilog has a CA-2568 mode selection
card. If your device does not have this card, you must manually set the dip-switches on the cards to match the
software mode setting. In this case, the software mode setting is only used as a reminder and for documentation
purposes.
Using the Kelvin-checkbox you can choose for output in Kelvin instead of the default, which is degrees Celsius.
The formulas used to convert the signal in Ohms to degrees Celsius can be found in Appendix A.
3.5.10 Rosette Channel Setup Dialog
Copyright 2001 by Peekel Instruments
Page 26 of 74
Channel Setup Dialog
Autosoft NT User Manual
This dialog is part of the Channel Setup dialog and allows for the configuration of rosette channels.
The rosette channel calculates strains and stresses for rosettes made from two or three straingauges.
First you must specify the type of rosette, determined by the amount and placing of the individual straingauges:
Type 0° / 90°: Two straingauges, S/G A for 0° and S/G B for 90°.
Type 0° / 45° / 90°: Three straingauges, S/G A for 0°, S/G B for 45° and S/G B for 90°.
Type 0° / 60° / 120°: Three straingauges, S/G A for 0°, S/G B for 60° and S/G B for 120°.
You can select the individual inputs for the straingauge from the listboxes S/G A, S/G B and S/G C or type the
channel names yourself. If you want to create a series of rosettes, you can leave these fields blank and check
the 'Create Rosette Array' checkbox (see below). Before clicking OK, you must still configure the rosette output
channels.
You should set the output of the individual straingauges to 'strain' (not 'stress'), because the rosette calculations
use strain values as input.
The constants Poisson (ref.), Poisson (spec.), Kt (transverse sensitivity) and E-modulus can also be entered.
Note that the Poisson (spec.) and E-modulus are only used for stress calculations and are not needed or used
for strain results.
The rosette channel itself does not generate any output value. To have the calculations stored you will need to
create one or more rosette output channels. You can select any output you want to have from the listbox under
'Output Channels' and press the 'Modify' button to create a new output channel for it.
A dialog box will appear allowing you to type a name and description for this specific output channel. Suitable
default values will be provided. If you use these defaults, it is advisable to give your rosette channel a
(preferably short) name first. The name of the rosette channel is used as a basis for the output channel name
and description.
You remove output channels from the list by selecting one and pressing the 'Delete' button.
Copyright 2001 by Peekel Instruments
Page 27 of 74
Channel Setup Dialog
Autosoft NT User Manual
Depending on the type of rosette, you can create the following output channels:
Strain A
Strain for straingauge A after transverse sensitivity correction.
Strain B
Strain for straingauge B after transverse sensitivity correction.
Strain C
Strain for straingauge C after transverse sensitivity correction.
Major Strain
Major strain, angle Alpha to strain A.
Minor Strain
Minor strain, perpendicular to the major strain.
Alpha
Angle in degrees (-90 … 90) between Strain A and Major Strain.
Major Stress
Major stress, angle Alpha to strain A.
Minor Stress
Minor stress, perpendicular to the major stress.
Stress 0°
Stress in the direction of strain A
Stress 90°
Stress perpendicular to strain A
Shear Stress
Shear stress belonging to Stress 0° and Stress 90°
Equivalent Stress
Equivalent uniaxial stress for the major/minor stresses (von Mises).
For further information on the rosette outputs and the corresponding calculations, refer to the Formulas section.
If you check the 'Create Rosette Array' checkbox (only available when creating new rosettes), you can make a
large number of rosettes at once. The input channels 'S/G A', 'S/G B' and 'S/G C' will be ignored and you will be
presented with the 'Rosette Input Channel Selection' dialog.
Rosette Input Channel Selection Dialog
This dialog allows you to select any number of channels to use as input for rosette channels.
Note: The dialog only shows channels, which are configured as quarter bridge straingauge. You cannot create
arrays of rosettes using any other type of input channels.
You can make a selection of channels in the list by clicking and dragging, or by shift-clicking. You can select a
collection of separate channels by ctrl-clicking.
After you have selected all channels to be used as input for the rosettes, press the 'OK' button. Rosettes will
now be generated using the following rules:
•
•
•
•
•
The list of selected input channels as shown in this dialog is traversed from top to bottom.
For 0/90 rosettes, the first two channels are used as input for rosette #1, the next two channels as input for
rosette #2, and so on.
For 0/45/90 and 0/60/120 rosettes, the first three channels are used as input for rosette #1, the next three
channels as input for rosette #2, and so on
Within each set of inputs, the first one will be used for S/G A, the second one for S/G B and the third (if
applicable) for S/G C.
If you select a number of input channels not evenly dividable by the number of rosette inputs, the last one or
two selected channels will not be coupled to a rosette.
Copyright 2001 by Peekel Instruments
Page 28 of 74
Channel Setup Dialog
•
Autosoft NT User Manual
If one or more selected inputs are already used as input for existing rosettes, a dialog will appear, asking
you if you want to remove the existing rosettes. You can use this feature to change an existing set of
rosettes simply by creating a new set using the same input channels.
Tip: If you want to create 0/45/90 or 0/60/120 using three rosettes per card of 10 strain channels, you can do
two things:
1) You can select only 9 channels for every card in this dialog.
2) You can make sure you define only 9 channels on each card as quarter bridge straingauge.
3.5.11 Strain Channel Setup Dialog (Carrier Frequency)
If you are configuring a constant current straingauge channel, please refer to Strain Channel Setup Dialog
(Constant Current).
This dialog is part of the Channel Setup dialog and allows for the configuration of carrier frequency straingauge
channels.
First select the bridge type you want to measure: quarter bridge, half bridge or full bridge.
For half bridge and full bridge, the correct mode will automatically be chosen. For quarter bridge, make sure
you choose the correct mode. Modes 8, 9 and 10 will use 120 Ohms, 240 Ohms and 350 Ohms resistance for
internal bridge completion. Modes 11 to 15 will use 1 of 5 common dummies. To use a common dummy mode,
you must connect an external common dummy resistor of an appropriate value.
Note: Mode setting by software is only possible if the Autolog or Unilog has a CA-2568 mode selection
card. If your device does not have this card, you must manually set the dip-switches on the cards to match the
software mode setting. In this case, the software mode setting is only used as a reminder and for documentation
purposes.
The excitation voltage for the bridge can be 1 Volts or 5 Volts. In general, 5 Volts will give a better signal-tonoise ratio. If you are using small straingauges or apply them on materials that don't conduct heat very well, you
should choose 1 Volts to avoid overheating the straingauge.
The range can be set to the following values:
Range (nominal)
300000 µm/m
30000 µm/m
3000 µm/m
Range end
600000 µm/m
60000 µm/m
6000 µm/m
Copyright 2001 by Peekel Instruments
Resolution
5 µm/m
0.5 µm/m
0.05 µm/m
Page 29 of 74
Channel Setup Dialog
Autosoft NT User Manual
The default phase (R) will suffice in most cases.
2
The result type can be set to Strain (default) in µm/m or Stress in N/mm .
The E-modulus will only be used for result type Stress, the k-factor for the material is always needed.
For half bridge and full bridge you need to enter the correct bridge factor.
The balance value is used to set the nullbalance. You can manually enter a value, which will then be subtracted
from all measured values, thereby making the output 0 when the value you entered is measured. If you check
the 'Autobalance' checkbox, you can later measure the nullbalance value using the Autobalance dialog ('Edit'
menu, option 'Autobalance'). Note that the balance value is expressed in µm/m and corresponds to the
measured strain value, regardless of the 'result type' setting.
For quarter bridges, the non linearity of the Wheatstone Bridge is automatically corrected. The formula used to
do this can be found in Appendix A.
3.5.12 Strain Channel Setup Dialog (Constant Current)
If you are configuring a carrier frequency straingauge channel, please refer to Strain Channel Setup Dialog
(Carrier Frequency).
This dialog is part of the Channel Setup dialog and allows for the configuration of constant current straingauge
channels.
First select the bridge type you want to measure: quarter bridge, half bridge or full bridge.
For half bridge and full bridge, the correct mode will automatically be chosen. For quarter bridge, make sure
you choose the correct mode. Modes 8, 9 and 10 will use 120 Ohms, 240 Ohms and 350 Ohms resistance for
internal bridge completion. Modes 11 to 15 will use 1 of 5 common dummies. To use a common dummy mode,
you must connect an external common dummy resistor of an appropriate value.
The resistance for the bridge must also be specified. Where possible, the software will choose the correct
mode for the given resistance and vice versa.
The excitation current for the bridge can be 20.833 mA, 10.416 mA, 5.208 mA, 7.143 mA, 3.571 mA or 1.786
mA. The first three values (20.8, 10.4 and 5.2) are usually used for 120 or 240 Ohms resistance, the last three
values (7.1, 3.5 and 1.8) for 350 Ohms. You are free to choose other combinations if desired.
Copyright 2001 by Peekel Instruments
Page 30 of 74
Channel Setup Dialog
Autosoft NT User Manual
There are three possible ranges for the measurement. The first two are always available, the last one only
when measuring using an FDVM. If you choose the third (smallest) range, the second range will automatically
be used for IDVM measurements.
The actual range depends on the chosen excitation and resistance. The presented ranges are nominal ranges
and are automatically updated when excitation or resistance is changed.
The following equations apply to all ranges:
Range end = 1.3 x nominal range
Resolution = 0.00004 x nominal range
2
The result type can be set to Strain (default) in µm/m or Stress in N/mm .
The E-modulus will only be used for result type Stress, the k-factor for the material is always needed.
For half bridge and full bridge you need to supply the correct bridge factor.
The balance value is used to set the nullbalance. You can manually enter a value, which will then be subtracted
from all measured values, thereby making the output 0 when the value you entered is measured. If you check
the 'Autobalance' checkbox, you can later measure the nullbalance value using the Autobalance dialog ('Edit'
menu, option 'Autobalance').
3.5.13 ThermoCouple Channel Setup Dialog
This dialog is part of the Channel Setup dialog and allows for the configuration of ThermoCouple channels.
The type of thermocouple is the first and most important parameter. All common thermocouple are supported.
You can manually set the mode for this channel when necessary. Use the default value '1 = DC-Voltage' unless
you have a specific reason not to.
The DC range of the Pt-100 measurement should be set to 100 mV (default value) for best results. You can,
however, change the range for special purposes. It can have the following values:
Range (nominal)
10 V
1V
100 mV
25 mV
Actual range ends
-13 V to 13 V
-1300 mV to 1300 mV
-130 mV to 130 mV
-32.5 mV to 32.5 mV
Resolution
400 µV
40 µV
4 µV
1 µV
Note: The 25 mV range is only available when using the FDVM. If a channel is measured using the IDVM,
the range will automatically fall back to 100 mV (with the corresponding resolution).
The CJC channel is used for Cold Junction Compensation and is usually a channel configured for Pt-100
measurement. If you do not use CJC your measurements will not be very accurate.
When selecting a CJC channel the list will show all Pt-100 channels configured within the same device. If for
some reason you want to use a channel not configured for Pt-100, you can type its name manually, or fill in its
Copyright 2001 by Peekel Instruments
Page 31 of 74
Channel Setup Dialog
Autosoft NT User Manual
Autolog channel number. The CJC channel must reside in the same device (and will often be on the same card)
as the ThermoCouple channel.
You can check the burn-out detection box if you want the measuring hardware to recognize thermocouples
which are burned out or not properly connected. This will change the mode from 1 to 3.
If you check the Autoscan box the CJC channel will automatically be measured whenever the ThermoCouple is
measured. That is, it will silently and invisibly be added to every measurement group which contains the
ThermoCouple channel.
Using the Kelvin-checkbox you can choose for output in Kelvin instead of the default, which is degrees Celsius.
The formulas used to convert the signal in millivolts to degrees Celsius can be found in Appendix A.
3.5.14 Transducer Channel Setup Dialog (Carrier Frequency)
If you are configuring a constant current strain channel, please refer to Transducer Channel Setup Dialog
(Constant Current).
This dialog is part of the Channel Setup dialog and allows for the configuration of carrier frequency transducer
channels.
The excitation voltage for the transducer can be 1 Volts or 5 Volts. Be careful not to choose the excitation
voltage too high! The measurement value is normalized, so the choice between 1 and 5 Volts does not influence
the measurement value.
The range can be set to the following values:
Range end
300 mV/V
30 mV/V
3 mV/V
Resolution
2.5 µV/V
0.25 µV/V
0.025 µV/V
The default phase (R) will suffice in most cases.
Transducers are normally connected in the same way as a full bridge, therefore the default mode for
transducers is 7 = 1/1 Bridge S/G.
Copyright 2001 by Peekel Instruments
Page 32 of 74
Channel Setup Dialog
Autosoft NT User Manual
The balance value is used to set the nullbalance. You can manually enter a value, which will then be subtracted
from all measured values, thereby making the output 0 when the value you entered is measured. If you check
the 'Autobalance' checkbox, you can later measure the nullbalance value using the Autobalance dialog ('Edit'
menu, option 'Autobalance'). Note that the balance value is expressed in mV/V and corresponds to the
measured value after polynomial correction.
You can correct for nonlinearitaries in the input signal by entering a polynome. You can also convert the mV/V
output to a more meaningful value by entering a polynome and setting appropriate units for the channel. Use
the '2-point calibration' button to generate a linear conversion by entering desired output values for any two
mV/V values.
3.5.15 Transducer Channel Setup Dialog (Constant Current)
If you are configuring a constant current strain channel, please refer to Transducer Channel Setup Dialog
(Carrier Frequency).
This dialog is part of the Channel Setup dialog and allows for the configuration of constant current transducer
channels.
The excitation current for the bridge can be 20.833 mA, 10.416 mA, 5.208 mA, 7.143 mA, 3.571 mA or 1.786
mA. The first three values (20.8, 10.4 and 5.2) are usually used for 120 or 240 Ohms resistance, the last thee
values (7.1, 3.5 and 1.8) for 350 Ohms. You are free to choose other combinations if desired.
The resistance for the transducer must also be specified.
The range can be set to the following values:
Range (nominal)
1V
100 mV
25 mV
Actual range ends
-1300 mV to 1300 mV
-130 mV to 130 mV
-32.5 mV to 32.5 mV
Resolution
40 µV
4 µV
1 µV
Note: The 25 mV range is only available when using the FDVM. If a channel is measured using the IDVM,
the range will automatically fall back to 100 mV (with the corresponding resolution).
Transducers are normally connected in the same way as a full bridge, therefore the default mode for
transducers is 7 = 1/1 Bridge S/G.
Copyright 2001 by Peekel Instruments
Page 33 of 74
Channel Setup Dialog
Autosoft NT User Manual
The balance value is used to set the nullbalance. You can manually enter a value, which will then be subtracted
from all measured values, thereby making the output 0 when the value you entered is measured. If you check
the 'Autobalance' checkbox, you can later measure the nullbalance value using the Autobalance dialog ('Edit'
menu, option 'Autobalance'). Note that the balance value is expressed in mV/V and corresponds to the
measured value after polynomial correction.
You can correct for nonlinearitaries in the input signal by entering a polynome. You can also convert the mV/V
output to a more meaningful value by entering a polynome and setting appropriate units for the channel. Use
the '2-point calibration' button to generate a linear conversion by entering desired output values for any two
mV/V values.
3.5.16 Virtual Channel Setup Dialog
This dialog is part of the Channel Setup dialog and allows for the configuration of virtual channels.
A virtual channel can combine the results of any number of other channels (including other virtual channels)
using a user specified formula.
If you add a virtual channel to one or more measurement groups, it will be evaluated for every measurement
(measurement mode). If you do not add a virtual channel to any measurement groups, it will automatically be
evaluated as soon as the value of any of the channels used in its formula changes (automatic mode).
To create a formula for the virtual channel, you can use the dropdown list to select from the available functions,
and press the Insert button to insert it into the current formula. You can also directly type the formula if you
wish.
To refer to an existing channel, you must type its name. If you want to refer to a specific channel number in a
device, you can use the connection notation as shown in the channel view. For example, a channel named 'M1'
connected as channel #5 in the first device (connection '#1.5') can be entered in a virtual formula as either 'M1'
or '#1.5'. Autosoft NT will automatically replace the connection notation by the actual name of the channel when
you press the 'Check Formula' button.
To refer to the previous value of a channel, type the channel name followed by a backquote (`). You can use
this feature to monitor changes in a value.
Some example formulas, where M1 and M2 are the names of two existing channels:
2 * M1
Multiply M1 by a factor 2
max(M1, M2)
Determine the maximum of channel M1 and M2
(M1 + 2) * M2
Multiply M1+2 by M2
M1 - M1`
Calculates the difference between the current and previous value of M1
Copyright 2001 by Peekel Instruments
Page 34 of 74
Channel Setup Dialog
Autosoft NT User Manual
You can set the units of the virtual channel to any value that is appropriate.
Press the simplify button to simplify the current formula. This will remove all extraneous brackets and evaluate
constant expressions. For example, the formula 'SQRT(4) +1' will reduce to '3'.
Functions for Virtual Channels
This list shows all functions that can be used in the formulas of virtual channels with a short explanation. For all
functions based on boolean logic, the result is 1 for true and 0 for false.
+
*
/
^
?:
<
>
<=
>=
=
<>
<<
>>
ABS
ACOS
AND
ASIN
ATAN
ATAN2
AVG
BIT
BITAND
BITNOT
BITOR
BYTE
CEIL
COS
COSH
DATE(0)
DATE(1)
DATE(2)
DATE(3)
DATE(4)
DATE(5)
EXP
FLOOR
LOG
LOG10
MAX
MIN
Subtraction, for example 3-2 = 1
Addition, for example 3+2 = 5
Multiplication, for example 3*2 = 6
Division, for example 3/2 = 1.5
Power, for example 3^2 = 9
'if-then', as used in the C programming language. For example, 'a ? b : c'
should be read as 'if a is nonzero then b else c'. Therefore '0 ? 3 : 2' = 2,
'1 ? 3 : 2' = 3.
Less than, for example 3 < 2 = 0 (false), 2 < 3 = 1 (true)
Greater than, for example 2 > 3 = 0 (false), 3 > 2 = 1 (true)
Less than or equals
Greater than or equals
Equals, for example '2 = 3' = 0 (false), '2 = 2' = 1 (true)
Does not equal, for example '2 <> 3' = 1 (true), '2 <> 2' = 0 (false)
Bit shift left. For integers: 'a << b' = 'a * (2^b)'
Bit shift right. For integers: 'a >> b' = 'a / (2^b)'
Absolute value, for example ABS(3) = 3, ABS(-2) = 2.
Arccosine in radians, output range 0 ... PI.
Logical and, for example 1 AND 1 = 1 (true), 1 AND 0 = 0 (false)
Arcsine in radians, output range -PI/2 ... PI/2.
Arctangent in radians, output range -PI/2 ... PI/2.
Arctangent in radians, output range -PI/2 ... PI/2, for example ATAN2(a,
b) = arctangent of a/b
Average of any number of values, for example AVG(1) = 1, AVG(1, 2, 3,
4) = 2.5
Value of a specific bit in a number, eg BIT(5,0) = 1, BIT(5,1) = 0. The
value 5 has bitpattern 000101, therefore bit 0 (least significant bit) equals
1 and bit 1 equals 0
Bitwise and of two values, eg 5 BITAND 3 = 1. Bitpattern for 5 = 000101,
for 3 = 000011, therefore only bit 0 is 1 in both cases.
Bitwise negation of a value, using 32 bits (!)
Bitwise or of two values, eg 5 BITOR 3 = 7. Bitpattern for 5 = 000101, for
3 = 000011, therefore the output bit pattern is 000111 (equals 7).
Construct a byte from a bitpattern, for example BYTE(1, 0, 0) = 4,
BYTE(1, 0, 1) = 5.
Round a number up, for example CEIL(2.7) = 3, CEIL(2.1) = 3.
Cosine (radians)
Hyperbolic Cosine (radians)
Number of days since 1/1/1980 for current date
Day of month (1 ... 31) for current date
Month (1 ... 12) for current date
Year (for example 2000) for current date
Daynumber in current year (1 ... 366) for current date
Day of week (0 = Sunday, 1 = Monday, 2 = Tuesday, ..., 6 = Saturday)
Exponential, EXP(a) = E ^ a
Round a number down, for example FLOOR(2.7) = 2, FLOOR(2.1) = 2.
Natural logarithm (base E)
Logarithm (base 10)
Maximum of any number of values, for example MAX(1) = 1, MAX(1, 4, 3,
2) = 4
Minimum of any number of values, for example MIN(1) = 1, MIN(1, 4, 3,
Copyright 2001 by Peekel Instruments
Page 35 of 74
Channel Setup Dialog
MOD
NOT
OR
RAND()
ROUND
SIN
SINH
SQRT
TAN
TANH
TIME(0)
TIME(1)
TIME(2)
TIME(3)
TIME(4)
XOR
Autosoft NT User Manual
2) = 1
Modulo (remainder after division), for example 7 MOD 3 = 1 (remainder of
7 after division by 3 equals 1)
Logical not, for example 'NOT 0' = 1 (true), 'NOT 5' = 0 (false)
Logical or, for example 1 OR 1 = 1 (true), 1 OR 0 = 1 (true)
Random number between 0 and 1.
Round a number to the nearest integer, for example ROUND(2.7) = 3,
ROUND(2.1) = 2
Sine (radians)
Hyperbolic sine (radians)
Square root, for example SQRT(4) = 2
Tangent (radians)
Hyperbolic tangent (radians)
Current time in milliseconds since midnight (0 ... 86400000)
Milliseconds (0 ... 999) for current time
Seconds (0 ... 59) for current time
Minutes (0 ... 59) for current time
Hours (0 ... 23) for current time
Exclusive or, eg 5 XOR 3 = 6. Bitpattern for 5 = 000101, for 3 = 000011,
therefore the output bit pattern is 000110 (equals 6).
The following functions are special, because they are based on a number of consecutive measurements from a
single source. Their output changes each time this number of measurements has been made and remains
constant in between. The number of measurements specified in the function must a constant between 1 and
100.
T_AVG
T_MAX
T_MIN
Average over a number of measurements. For example: T_AVG(CHN, 5)
will produce the average for each group of 5 measurements for CHN.
Maximum over a number of measurements. For example: T_MAX(CHN,
5) will produce the maximum value for each group of 5 measurements for
CHN.
Minimum over a number of measurements. For example: T_MIN(CHN, 5)
will produce the minimum value for each group of 5 measurements for
CHN.
3.5.17 2-Point Calibration Dialog
This dialog can be accessed from the Channel Setup dialog for various types of channels and allows for the
calculation of a simple 2 point calibration.
To use this dialog, simply enter two input values and the expected corresponding output values. The software
will calculate the line through these points and enter the parameters for it in the polynome after you press the
'OK' button.
Copyright 2001 by Peekel Instruments
Page 36 of 74
New Measurement Group command (Insert menu)
Autosoft NT User Manual
3.6 New Measurement Group command (Insert menu)
Use this command to create a new Measurement Group.
You can assign a name to this group to make it easier to find it later on.
The 'autostart' checkbox allows you to start a measurement on a specified date and time. You can fill in any
date and time (as long as it is in the future) in the entrybox. The date/time format is based on the Regional
Settings in Windows.
New feature: if autostart is enabled for a measurement group and the specified date and time is in the past, the
measurement will start automatically when the settings file is loaded. You can use this feature to run a
measurement immediately after starting Autosoft NT.
The dropdown list below autostart (showing 'Unlimited' in the picture above) determines the type of
measurement that will be made. The following types are available:
Type
Unlimited
Until time:
Number of Measurements:
Loadstep
Loadstep + manual entry
Continuous
Continuous, duration:
Meaning
The measurement will not stop automatically, and can only be stopped by the
user.
The measurement runs until the specified date and time.
The measurement runs until the specified number of measurements has been
made.
A loadstep measurement is a single measurement. A loadstep measurement is
comparable to a 'number of measurements' measurement with the number set to
1.
A loadstep measurement, with the option of filling in a value for a virtual channel
for every loadstep. A listbox appears, allowing you to select a virtual channel. A
value for this channel can be entered in the entry field below the listbox. This value
will be stored when the loadstep measurement is made. You can use this feature
to store the loadstep number or the force used during the loadstep. If you do not
select a channel to store loadstep information, a new virtual channel will be
created for this purpose as soon as you perform the first loadstep. This channel
will also be added as the first channel in all available numeric groups.
A continuous measurement is a special type of unlimited measurement. All
devices for which channels have been added to this measurement group will
enter a special state once this measurement starts, and will not be able to make
any other measurements. In this state, the devices will measure the channels as
fast as the hardware allows. You can not measure virtual channels using
continuous mode.
Same as a continuous measurement, but for a specified number of seconds.
Copyright 2001 by Peekel Instruments
Page 37 of 74
New Numerical Group command (Insert menu)
Loadstep + text entry
Autosoft NT User Manual
A loadstep measurement, with the option of filling in a value fora virtual channel
and/or the header text for a numeric group. You can select an existing virtual
channel and/or numeric group for this purpose. For every loadstep you perform, a
dialog will appear. In this dialog, you can enter the numeric value and/or text. Only
after completing this dialog, the actual measurement is performed. Note: if you use
the header text for a numeric group to enter comments, you should make sure that
the numeric group creates a new file for every measurement. Otherwise, the
header text will not be stored after each change.
The measurement interval can be specified if the measurement is not a loadstep or continuous measurement.
You can enter any interval with a minimum of 0.001 seconds (1 millisecond). If the hardware cannot keep up
with the specified measurement interval, the actual scanning speed will be as fast as possible.
The 'Use FDVM' checkbox determines whether the measurement should be made using the FDVM (if checked)
or IDVM (otherwise). If the device used for the measurement does not have both an IDVM and an FDVM, it will
use whatever is available. In that case, the FDVM checkbox has no influence on the measurement.
The 'SHUNT' checkbox allows you to activate the parallel calibration in the signal conditioner.
Press the 'Start' button to start the measurement. When the measurement is running, the button changes to a
'Stop'-button. You can also start or stop the measurement using the system menu, which can be accessed by
clicking on the icon on the titlebar of the Measurement Group window. This allows easy access when the
window is minimized. The icon also shows whether the measurement is running (green) or not (red).
The 'Channels' box shows all channels in the measurement group. To add new channels to the group, either
drag them from the Channels View or Device View and drop them on this box, or use the Edit menu (Copy and
Paste).
3.7 New Numerical Group command (Insert menu)
Use this command to create a new Numerical Group.
You can assign a name to this group to make it easier to find it later.
You can store numeric output in a file by checking the File checkbox. You should first configure the location of
the file and its format by pressing the 'Setup' button.
Copyright 2001 by Peekel Instruments
Page 38 of 74
New Numerical Group command (Insert menu)
Autosoft NT User Manual
If you want to store the measurement configuration with every numeric output file, check the 'store
configuration in separate file'. The filename of the configuration file is equal to the numeric output filename,
with '.cfg' appended. By default, no measurement configuration information is stored. The file format of the
configuration file is described under the 'Export As Text' option on the File menu.
You can also show the current (numeric) value of all channels in the numerical group on screen, by checking
the 'Screen' checkbox or pressing the 'Open Numeric Screen'. You can select any font you like for screen
presentation, using the 'Font' button.
The 'Settings' button allows you to configure some extra settings for the numeric group, like the output interval.
The 'Header' button allows the entry of a header, which will be stored at the top of the numeric output file.
3.7.1 Numerical Output View
This view shows the actual output of the numeric group and can be activated by pressing the 'Open Numeric
Screen' button in the Numeric Group Settings.
When you change the size of this window, the number of columns shown will automatically adapt.
You can also print the contents of this window. The printer output will be formatted to match the size of the
paper, showing as many columns as will fit on a page and using as many pages as needed to print all items.
If you change the screen font, using the 'Font' button in the Numeric Group Settings, the font used for printed
output will change as well.
If a channel and its value are shown in red, this indicates the value can not be trusted. There are several
reasons this to happen:
•
•
•
•
•
The channel has not been measured yet.
The channel is in overload (measured value is outside the range)
For virtual channels: the calculation produced an invalid result (division by zero, for example).
For virtual channels: the calculation is based on one or more channels which do not contain trusted results.
3.7.2 File Format Dialog (Numerical Group)
Copyright 2001 by Peekel Instruments
Page 39 of 74
New Numerical Group command (Insert menu)
Autosoft NT User Manual
This dialog allows you to choose a name for the numeric output file. You can also determine the maximum
number of scans to store in a single file. If this maximum number is reached, the program will start writing in the
next file. A new filename is generated automatically by numbering.
The 'Do not overwrite files' checkbox can be used to prevent existing files from being overwritten accidentally.
It is checked by default. If an existing file is encountered, a new filename is generated automatically by
numbering.
The output format determines how the data is stored in the file. The 'Table' format can use either tabs or
commas to separate fields. Beware: .the actual separator may not be a comma. The 'correct' characters for the
list separator and decimal point are determined by checking the Regional Settings in Windows.
You can select the way time is displayed in the file. By default, the time is stored in seconds and milliseconds
counting from the start of the measurement. For long duration measurements, you can store time as an
absolute date and time. The date/time format is again determined by checking the Regional Settings in
Windows.
3.7.3 Numeric Output Settings Dialog
Copyright 2001 by Peekel Instruments
Page 40 of 74
New Graphical Group command (Insert menu)
Autosoft NT User Manual
In this dialog, you can select which measurements the numeric group should actually process. Measurements
made by group which are not checked in the Measurement Groups Selection, will not be displayed or processed
by the numeric group.
th
For file output, you can determine whether you want to store all measurements (default), every n
measurement, or only store the value of the channels each time a specified time interval has elapsed.
If you check the 'create new file after each measurement start' checkbox, a new file will be created for each
measurement. This is useful for normal measurements, but less practical for loadstep measurements (where
each loadstep would be stored in a separate file).
3.7.4 Numerical Output Header Dialog
In this dialog, you can enter a free-form text, which will be stored at the top of each numeric output file. The text
is limited to a maximum of 512 characters.
3.8 New Graphical Group command (Insert menu)
Copyright 2001 by Peekel Instruments
Page 41 of 74
New Graphical Group command (Insert menu)
Autosoft NT User Manual
Use this command to create a new Graphical Group.
You can assign a name to this group to make it easier to find it later on.
In the title-bar section you can determine whether you want to see date and time or a title. You can enter any
text you want for the title. Use the 'Font' to select a font for the title.
In the legend section you can switch the legend on or off, and select a font for the legend text.
In the grid-lines section you can turn the grid-lines on or off and select the line style to be used for the grid-lines
using the 'Line Type'.
In the axes section you can control the settings for the x and y axes. You can configure the X-Axis, Left Y-Axis
and Right Y-Axis separately. If you check the 'XY-plot' box, you can plot one or more channels on the y axis
versus a single channel on the x axis. You must specify the channel to be used on the x axis in the 'X Channel'
field. You can do this either by dragging a channel to the field or by entering the channel name manually.
The miscellaneous section contains the background color selection, label font selection and the axis setup
buttons.
If you check the 'Synchronize X-Axis to measurement start' box, the graphical display will set the displayed
range during measurements in such a way that no data prior to the latest measurement start is displayed. This
ensures that the data you see during a measurement does not belong to older measurements. While the
measurement runs, you will not be able to access prior measurement graphics. After the measurement stops,
however, you can change the x axis to see whatever measurement you want.
For xy-plots, you can use this feature to show only data from the latest measurement. As soon as you switch it
off, all data is shown once again.
Pressing the 'Clear Graph' removes all historical data for this specific graphical group, allowing you to remove
data from previous measurements. This is especially useful for xy-plots, where all data is plotted regardless of
the measurement time.
Pressing the 'Show Graph' shows the window containing the actual graphics.
The 'Channels' box shows all channels in the graphical group. To add new channels to the group, either drag
them from the Channels View or Device View and then drop them on this box, or use the Edit menu (Copy and
Paste).
Copyright 2001 by Peekel Instruments
Page 42 of 74
New Graphical Group command (Insert menu)
Autosoft NT User Manual
3.8.1 Graphical Output View
This view shows the actual output of the graphical group and can be activated by pressing the 'Open Graphics
Window' button in the Graphical Group Settings.
You can zoom in on a specific part of the graphical view by pressing the left mouse button and dragging around
the area you want to zoom in on.
You can also use the right mouse button to access a context menu to quickly configure some of the most
important settings of the view, zoom in or out, or print the view directly to the default printer.
The latest 10000 measurement values are stored in memory for each channel in the graphical group to make it
possible to show historical data.
3.8.2 X Axis Setup Dialog (Graphical Group)
If you are configuring the x-axis for xy-plots, you should refer the Y Axis Setup Dialog.
The x-axis can either be moving or fixed. If it is moving, the displayed time will automatically be adjusted to
make sure the most recent measurement is shown. You can enter the displayed time range.
Copyright 2001 by Peekel Instruments
Page 43 of 74
New Graphical Group command (Insert menu)
Autosoft NT User Manual
If the x axis is fixed, you can enter the start time (lower limit, on the left of the graphic) and the end time (upper
limit, on the right of the graphic).
3.8.3 Y Axis Setup Dialog (Graphical Group)
You can enter the upper limit and lower limit for the y-axis (or x-axis for xy-plots) here. If you specify an upper
limit lower than the lower limit, the display is flipped upside down (or mirrored, in case you are configuring the xaxis). Alternatively, you can check the 'automatic scaling' checkbox in which case these limits are determined
'on-the-fly' based on the measurement values.
3.8.4 Line Settings Dialog (Graphical Group)
You can pick a color for the line from the dropdown list or use the 'Pick' button to visually select any color you
want. The selected color is displayed directly below the Pick button.
The width determines the thickness of the line.
Copyright 2001 by Peekel Instruments
Page 44 of 74
New Graphical Group command (Insert menu)
Autosoft NT User Manual
The style determines whether the line is solid, dotted or dashed. For dotted or dashed lines, you should set the
width to 0. If you do not, the line may appear as a solid line regardless of the style settings.
Beneath the settings, a sample line is displayed against a black and white background.
Copyright 2001 by Peekel Instruments
Page 45 of 74
Cut command (Edit menu)
Autosoft NT User Manual
4. Edit menu commands
The Edit menu offers the following commands:
Cut
Copy
Paste
Delete
Autobalance
Outputs
Simultaneous
Measurement
Lock Configuration
Preferences
Deletes data from the configuration and moves it to
the clipboard.
Copies data from the configuration to the clipboard.
Pastes data from the clipboard into the configuration.
Deletes data from the configuration.
Select channels and perform autobalance or zero
balance.
Set output value for a channel.
Start or stop several measurement groups at the
same instant.
Lock the current configuration.
Set preferences for the program. Preferences for
Alarms and for Warnings can be set separately.
4.1 Cut command (Edit menu)
Use this command to remove the currently selected data from the configuration and put it on the clipboard. This
command is unavailable if there is no data currently selected.
Cutting data to the clipboard replaces the contents previously stored there.
Shortcuts
Toolbar:
Keys:
CTRL+X
4.2 Copy command (Edit menu)
Use this command to copy selected data onto the clipboard. This command is unavailable if there is no data
currently selected.
Copying data to the clipboard replaces the contents previously stored there.
Shortcuts
Toolbar:
Keys:
CTRL+C
4.3 Paste command (Edit menu)
Use this command to insert a copy of the clipboard contents at the insertion point. This command is unavailable
if the clipboard is empty.
Shortcuts
Toolbar:
Keys:
CTRL+V
Copyright 2001 by Peekel Instruments
Page 46 of 74
Delete command (Edit menu)
Autosoft NT User Manual
4.4 Delete command (Edit menu)
Use this command to remove the currently selected data from the configuration. This command is unavailable if
there is no data currently selected.
Shortcut
Keys:
Del
4.5 Autobalance command (Edit menu)
Use this command to perform autobalance measurements.
When the dialog opens, the lower part of the dialog shows all channels for which autobalance is allowed (that is,
the autobalance checkbox is checked in the Channel Setup dialog).
If you want to measure all channels simultaneously, you can use the following buttons to do so immediately:
Zero: Set the nullbalance value for all selected channels to 0 (clears any previous nullbalance setting or
measurement). A warning will be displayed to make sure the values are not accidentally changed.
Autobalance: Make a measurement on all selected channels and use the measured value as nullbalance.
When you perform this measurement, make sure the input for all selected channels is set to an appropriate nullvalue. A warning will be displayed to make sure the values are not accidentally changed.
Note: an autobalance measurement will temporarily interrupt the normal flow of measurements during a running
measurement.
The 'Use FDVM' checkbox determines whether the autobalance measurement should be made using the FDVM
(if checked) or IDVM (otherwise). If the device used for the measurement does not have both an IDVM and an
FDVM, it will use whatever is available. In that case, the FDVM checkbox has no influence on the measurement.
If you do not want to measure all autobalance channels simultaneously, you can remove channels from the list
by selecting them and pressing the <Delete> key. To add new channels to the list, drag and drop them from the
Channels View or Device View.
You can save a particular set of channels for future autobalance measurements by typing a name for it in the
'Current Selection' entry box and pressing the 'Save' button. The selection set will be listed in the listbox under
Copyright 2001 by Peekel Instruments
Page 47 of 74
Outputs command (Edit menu)
Autosoft NT User Manual
'Autobalance Selection Sets'. Next time you want to use the same selection, simply clicking on its name in the
list will retrieve these channels.
You can remove stored sets by selecting one and pressing the 'Delete' button. You can undo an accidental
delete by pressing the 'Save' button again. A maximum of 10 selection sets can be stored.
4.6 Outputs command (Edit menu)
Use this command to set output values for specific channels. First select the channel from the listbox shown on
the top of the dialog, then set its output value. The actual meaning of the output and the possible values depend
on the type of channel.
Relay Output:
A relay output can have only two states: on or off. Select the proper state using the checkbox.
Digital Output:
A digital output is always a combination of 8 separate outputs, each of which can be set to 0 or 1. You can set
all outputs together by entering a value between 0 and 255, or use the checkboxes to switch individual outputs
on or off.
Analog Output:
Copyright 2001 by Peekel Instruments
Page 48 of 74
Outputs command (Edit menu)
Autosoft NT User Manual
An analog output can be set to any value. The range depends on the type of output and its configuration. For
instance, if you configured an analog output as having range 0 ... 10 Volts, you will need to enter a value
between 0 and 10 in this dialog.
Analog outputs will not be set immediately. To activate the output, you need to press the 'Set Output Relay ON'
button. This will switch the relay and sets the entered Voltage at the output.
Press the 'Set Output Relay OFF' to switch the output off. You can now change the output value without
directly setting the output Voltage.
Counters:
Counters are a special case: although they are inputs, you will need to start (or stop) them to make them
function. The output dialog provides you with the necessary buttons.
When you press the 'Start Counter' button, the counter is reset and will start counting. When you press the
'Stop Counter' button, the counter stops.
Other types of channels:
Copyright 2001 by Peekel Instruments
Page 49 of 74
Simultaneous Measurement command (Edit menu)
Autosoft NT User Manual
You can also set the value for other types of channels, for instance, virtual channels. Simply enter the new value
in the engineering units configured for the channel.
4.7 Simultaneous Measurement command (Edit menu)
Use this command to start or stop several measurement groups at the same time.
The window shows a list of available measurement groups. You can select them by clicking on individual lines in
the list, or use the 'Select None' and 'Select All' buttons.
Press the 'Start Now' to send a start command to all selected measurement groups. Measurement groups
which are already running will not be affected.
Press the 'Stop Now' to send a stop command to all selected measurement groups.
Press 'OK' to close the dialog.
4.8 Lock Configuration command (Edit menu)
Use this command to lock the current configuration. When the configuration is locked, you can no longer
accidentally change the measurement parameters.
Copyright 2001 by Peekel Instruments
Page 50 of 74
Preferences Alarms command (Edit menu)
Autosoft NT User Manual
When you lock the configuration, you are given the option to enter a reason. This reason will be displayed
every time someone tries to change the locked configuration or attempts to unlock it. You can use this text to
alert other users and keep them from interfering during a crucial measurement.
4.9 Preferences Alarms command (Edit menu)
Use this dialog to change the global alarm settings.
The 'Alarm Logging File' field indicates the location of the file where alarms are logged, if alarm logging to file
is turned on in the Channel Alarm Setup.
The 'Sound New Alarm' box allows you to set the sounds for the different new alarm types individually. For
each entry (Very High, High, Low and Very Low) you can select a Wave-file (".wav") to play when this alarm
occurs.
The 'Sound Every Alarm' box allows you to set the sounds for the different repeated alarm types individually.
For each entry (Very High, High, Low and Very Low) you can select a Wave-file (".wav") to play every time this
alarm repeats. Make sure you choose a short sound if you are measuring at relatively high speeds.
Bonus feature: For the 'New Alarm' entries (not for 'Every Alarm') you can also enter other types of files. The
software will then start the associated program to open the file. You can also run executable files on alarm
using this feature.
Copyright 2001 by Peekel Instruments
Page 51 of 74
Preferences Warnings command (Edit menu)
Autosoft NT User Manual
Caveat 1: Use double quotes (") when the path to the executable file contains spaces.
Caveat 2: If an alarm reoccurs regularly, the executable will be started multiple times. If the application you start
allows this, your system resources will drain. Use with care!
4.10 Preferences Warnings command (Edit menu)
Use this dialog to determine when a warning should be displayed. By default, each time you do something
which may cause a lot of damage to your software setup, a warning dialog is issued. The warning dialog allows
you to switch the warning off, this preferences dialog allows you to switch it back on.
Copyright 2001 by Peekel Instruments
Page 52 of 74
Devices command (View menu)
Autosoft NT User Manual
5. View menu commands
The View menu offers the following commands:
Devices
Groups
Channels
Alarm
Window
Toolbar
Status Bar
Shows or activates the Device View.
Shows or activates the Group View.
Shows or activates the Channels View.
Shows or activates the Alarm Window.
Shows or hides the toolbar.
Shows or hides the status bar.
5.1 Devices command (View menu)
Use this command to display or activate the Device view, which contains an overview of all devices and their
contents.
To add a new device to the configuration, use the New Device option on the Insert menu. To add new virtual
channels or rosette channels, use New Virtual Channel or New Rosette Channel on the Insert menu.
Each Autolog or Unilog device contains one or more units. Each of these units contains a number of cards and
each card can contain a number of channels. The virtual device is a special case; it contains only virtual
channels and rosette channels.
The icon shown with each Autolog/Unilog device displays its current status:
Icon
Meaning:
Device is currently connected.
No connection to the device can be established.
The driver is currently trying to establish connection.
You can doubleclick on any of the items listed in this window to modify its properties. This will display,
depending on the selected item, one of the following dialog boxes:
Item
Device
Unit
Slot
Channel
Dialog displayed
Device Configuration Dialog
Device Configuration Dialog
Create Channels
Channel Setup Dialog
Other things you can do in this view:
• Drag items to group views to add the contents to a group. For example, you can drag a device to a
measurement group to add all configured channels in the device to the measurement group.
Copyright 2001 by Peekel Instruments
Page 53 of 74
Groups command (View menu)
•
Autosoft NT User Manual
Overwrite channel settings by pasting a channel from the clipboard. For example, if you paste a channel
into a device, for example, all channels in the device will be configured using the same parameters as the
channel on the clipboard, as long as the card type for each of the individual slots allows for that type of
channel.
•
5.2 Groups command (View menu)
Use this command to display or activate the Group view, which contains an overview of all groups and their
contents.
To add a new group to the configuration use New Measurement Group, New Graphical Group or New
Numerical Group on the Insert menu.
The icon shown with each group displays its current status. The actual meaning of the status depends on the
type of group:
Icon
Meaning for Measurement Groups:
Measurement is running and contains channels.
Measurement is not running or does not contain any channels.
Measurement is in loadstep-mode.
Icon
Meaning for Numerical Groups:
Numerical group is logging data to disk.
Numerical group is not logging or does not contain any channels.
Numerical group show values on screen, but does not save data to disk.
Icon
Meaning for Graphical Groups:
Graphic contains one or more channels.
Graphic does not contain any channels.
You can doubleclick on any of the groups displayed in this list to activate the corresponding settings window.
You can also doubleclick on any of the channels inside the groups to modify the settings for this channel,
specific for the group it is in.
To copy all of the channels in a specific group to another group (say you want all of the channels in your
measurement group displayed in a numerical group), drag the source group to the view of the destination group
and drop it there. All channels available in the source group will be added to the destination group.
5.3 Channels command (View menu)
Copyright 2001 by Peekel Instruments
Page 54 of 74
Alarm Window command (View menu)
Autosoft NT User Manual
Use this command to display or activate the Channels view, which contains an overview of all channels
(including virtual and rosette channels) and their most important properties.
In this view you can:
•
•
•
•
•
Doubleclick on any of the channel names to modify the settings for that channel.
Select more than one channel by holding down <SHIFT> or <CTRL> while clicking on channels.
Add channels to any group by dragging them from this view and dropping them on the group.
Sort the channels by any of the columns by clicking on the column headers.
Overwrite the settings of one or more channels by pasting data from the clipboard or by dragging one
channel to another.
The following information is shown in the columns of this display:
Column
Name
Sensor Type
Status
Connection
Description
Meaning:
Name of the channel. Single click on the name twice to modify it, or doubleclick on it to open the
Channel Setup Dialog and modify other parameters of this channel.
Shows the type of sensor configured for this channel.
Shows the status of the channel. The first character is either a '_' for active (on) or 'X' for
disabled (off). The other characters show 'AB' if this is an autobalance channel, or '--' if it is not.
Shows how the channel is connected. For channels in Autolog/Unilog devices, the connection
should be read as '#device.channel', where 'device' is the number of the device and channel is
the Autolog/Unilog channel number (0 ... 999). For virtual and rosette channels, this is simply a
unique number without any special meaning.
Shows a short description of the channel, if configured.
5.4 Alarm Window command (View menu)
Use this command to display or activate the Alarm Window. If a channel has alarm limits set and the 'Screen'
button is checked in Channel Alarms Setup, alarms for the channel will be shown in this window. The Alarm
Window has two display modes:
•
•
Active Alarm Overview: Shows all channels currently in alarm, using a short notation. This notation shows
the name of the channel, the alarm level triggered (HH = Very High, H = High, L = Low or LL = Very Low)
and the corresponding alarm limit value.
Alarm History: Shows a history of recent alarms. Each line shows an alarm, including the channel name,
date and time it occurred, which alarm was triggered and the value for the channel. As soon as a channel is
no longer in alarm, a line will be generated in the history as well.
Copyright 2001 by Peekel Instruments
Page 55 of 74
Toolbar command (View menu)
Autosoft NT User Manual
You can change the display type by clicking the right mouse button in the Alarm Window to access the context
menu, or by using the View menu, option Alarm Window.
You can also print the contents of the alarm window.
To store alarm history in a file, you can check if 'File' button in the Channel Alarms Setup and specify a file
name using the menu option Preferences, suboption Alarms. Alarms are stored in this file in the same way they
are shown in the alarm window, using the 'Alarm History' style.
5.5 Toolbar command (View menu)
Use this command to display and hide the Toolbar, which includes buttons for some of the most common
commands in Autosoft NT, such as File Open. A check mark appears next to the menu item when the Toolbar
is displayed.
See Toolbar for help on using the toolbar.
5.5.1 Toolbar
The toolbar is displayed across the top of the application window, below the menu bar. The toolbar provides
quick mouse access to many tools used in Autosoft NT,
To hide or display the Toolbar, choose Toolbar from the View menu (ALT, V, T).
Click
To
Open a new configuration.
Open an existing configuration. Autosoft NT displays the Open dialog box, in which you can locate
and open the desired file.
Save the active configuration or template with its current name. If you have not named the
configuration, Autosoft NT displays the Save As dialog box.
Print the contents of the active window.
Remove selected data from the configuration and stores it on the clipboard.
Copy the selection to the clipboard.
Insert the contents of the clipboard at the insertion point.
5.6 Status Bar command (View menu)
Use this command to display and hide the Status Bar, which describes the action to be executed by the
selected menu item or depressed toolbar button, and keyboard latch state. A check mark appears next to the
menu item when the Status Bar is displayed.
Copyright 2001 by Peekel Instruments
Page 56 of 74
Status Bar command (View menu)
Autosoft NT User Manual
See Status Bar for help on using the status bar.
5.6.1 Status Bar
The status bar is displayed at the bottom of the Autosoft NT window. To display or hide the status bar, use the
Status Bar command in the View menu.
The left area of the status bar describes actions of menu items as you use the arrow keys to navigate through
menus. This area similarly shows messages that describe the actions of toolbar buttons as you depress them,
before releasing them. If after viewing the description of the toolbar button command you wish not to execute
the command, then release the mouse button while the pointer is off the toolbar button.
The right areas of the status bar indicate which of the following keys are latched down:
Indicator
CAP
Description
The Caps Lock key is latched down.
NUM
The Num Lock key is latched down.
OVR
The Insert key is latched down (overwrite mode).
LOCK
Indicates a locked configuration.
Disk Icons
The disk icons show if data is saved to disk for all numeric groups. The sample statusbar above
shows that numeric group 1 is storing measurement data on disk, while numeric group 2 is not
storing measurement data. You can doubleclick on any of the icons to activate the associated
numeric group (that is, show its settings window).
Copyright 2001 by Peekel Instruments
Page 57 of 74
Cascade command (Window menu)
Autosoft NT User Manual
6. Window menu commands
The Window menu offers the following commands, which enable you to arrange multiple views of multiple
configurations in the application window:
Cascade
Tile
Arrange Icons
Window 1, 2, ...
Arranges windows in an overlapped fashion.
Arranges windows in non-overlapped tiles.
Arranges icons of closed windows.
Goes to specified window.
6.1 Cascade command (Window menu)
Use this command to arrange multiple opened windows in an overlapped fashion.
6.2 Tile command (Window menu)
Use this command to arrange multiple opened windows in a non-overlapped fashion.
6.3 Window Arrange Icons Command
Use this command to arrange the icons for minimized windows at the bottom of the main window. If there is an
open configuration window at the bottom of the main window, then some or all of the icons may not be visible
because they will be underneath this configuration window.
1, 2, ... command (Window menu)
Autosoft NT displays a list of currently open windows at the bottom of the Window menu. A check mark
appears in front of the window name of the active window. Choose a window from this list to make it active.
Copyright 2001 by Peekel Instruments
Page 58 of 74
Index command (Help menu)
Autosoft NT User Manual
7. Help menu commands
The Help menu offers the following commands, which provide you assistance with this application:
Help Topics
About Autosoft
NT
Offers you an index to topics on which you can get help.
Displays version number and general information on Autosoft
NT.
7.1 Index command (Help menu)
Use this command to display the opening screen of Help. From the opening screen, you can jump to step-bystep instructions for using Autosoft NT and various types of reference information.
Once you open Help, you can click the Contents button whenever you want to return to the opening screen.
7.2 Using Help command (Help menu)
Use this command for instructions about using Help.
7.3 About command (Help menu)
Use this command to display the copyright notice and version number of your copy of Autosoft NT. You can also
find information on the amount of devices, channels and groups in your current configuration and the maximum
amount of devices, channels and groups allowed in Autosoft NT.
7.4 Context Help command
Use the Context Help command to obtain help on some portion of Autosoft NT. When you choose the Toolbar's
Context Help button, the mouse pointer will change to an arrow and question mark. Then click somewhere in
the Autosoft NT window, such as another Toolbar button. The Help topic will be shown for the item you clicked.
Shortcut
Keys:
SHIFT+F1
7.5 Warning Dialog
Copyright 2001 by Peekel Instruments
Page 59 of 74
Warning Dialog
Autosoft NT User Manual
A warning box like the one shown above can appear when you try to do something, which has serious impact
on your software configuration.
If you do not want to receive the message in future for similar occasions, you can check the 'Don't show this
message again' checkbox. This setting will be stored and no further warnings will appear for that kind of action.
If you want to turn the warnings back on, you can do so using the Preferences, Warnings option on the Edit
menu.
Copyright 2001 by Peekel Instruments
Page 60 of 74
Formulas used for Pt-100
Autosoft NT User Manual
8. Appendix A: Formulas used
The formulas used to calculate the following channels types are documented here:
•
•
•
•
•
•
•
Pt-100
Thermocouples
Straingauges
Rosettes (0/90)
Rosettes (0/45/90)
Rosettes (0/60/120)
8.1 Formulas used for Pt-100
For Pt-100 channels, the following formulas are used to convert the input signal in Ohms to the output in
degrees Celsius.
Input range (Ohms): 18 ... 391
Output range (°C): -200 ... 850:
18 <= Ohms < 100 (-200
°C to 0 °C)
Celsius = -241.801785984373 + Ohms * (2.20988141824334
+ Ohms * (2.95384267291581e-3 + Ohms * (1.06576196498251e-5 + Ohms * 1.93461347561497e-8)))
100 <= Ohms <= 391 (0
°C to 850 °C)
Celsius = -247.662176333752 + Ohms * (2.46319897832119
+ Ohms * (-1.52891333213348e-3 + Ohms *
(3.40062062617462e-5 + Ohms * (-2.80314519254078e-7 +
Ohms * (1.45588665350652e-9 + Ohms * (4.74313834752117e-12 + Ohms * (9.47314186591109e-15
+Ohms * (-1.05994823878819e-17 + Ohms *
5.09461509269188e-21))))))))
8.2 Formulas used for Thermocouples
For Thermocouple channels, the following formulas are used to convert the input signal in mV to the output in
degrees Celsius.
8.2.1 ITS90 Type B: Platinum-30% Rhodium versus Platinum-6% Rhodium
Input range (mV): 0.291 ... 13.820
Output range (°C): 250 ... 1820
0.291 <= mV < 2.431 (250 °C to 700 °C)
Celsius = 9.8423321e+1 + mV * (6.9971500e+2 + mV * (8.4765304e+2 + mV * (1.0052644e+3 + mV * (-8.3345952e+2
+ mV * (4.5508542e+2 + mV * (-1.5523037e+2 + mV *
(2.9886750e+1 + mV * (-2.4742860))))))))
2.431 <= mV <= 13.820
(700 °C to 1820 °C)
Celsius = 213.15071 + mV * (2.8510504e+2 + mV * (5.2742887e+1 + mV * (9.9160804 + mV * (-1.2965303 + mV *
(1.1195870e-1 + mV * (-6.0625199e-3 + mV * (1.8661696e-4
Copyright 2001 by Peekel Instruments
Page 61 of 74
Formulas used for Thermocouples
Autosoft NT User Manual
+ mV * (-2.4878585e-6))))))))
CJC correction added to input value for Type B (0 °C ... 630 °C):
Correction = CJCCelsius * (-2.4650818346e-4 + CJCCelsius * (5.9040421171e-6 + CJCCelsius * (1.3257931636e-9 + CJCCelsius * (1.5668291901e-12 + CJCCelsius * (-1.6944529240e-15 + CJCCelsius *
(6.2990347094e-19))))))
8.2.2 ITS90 Type E: Nickel-Chromium versus Copper-Nickel
Input range (mV): -8.825 ... 76.373
Output range (°C): -200 ... 1000
-8.825 <= mV < 0 (-200
°C to 0 °C)
Celsius = mV * (1.6977288e+1 + mV * (-4.3514970e-1 + mV *
(-1.5859697e-1 + mV * (-9.2502871e-2 + mV * (-2.6084314e-2
+ mV * (-4.1360199e-3 + mV * (-3.4034030e-4 + mV * (1.1564890e-5))))))))
0 <= mV <= 76.373 (0 °C
to 1000 °C)
Celsius = mV * (1.7057035e+1 + mV * (-2.3301759e-1 + mV *
(6.5435585e-3 + mV * (-7.3562749e-5 + mV * (-1.7896001e-6
+ mV * (8.4036165e-8 + mV * (-1.3735879e-9 + mV *
(1.0629823e-11 + mV * (-3.2447087e-14)))))))))
CJC correction added to input value for Type E (0 °C ... 1000 °C):
Correction = CJCCelsius * (5.8665508710e-2 + CJCCelsius * (4.5032275582e-5 + CJCCelsius *
(2.8908407212e-8 + CJCCelsius * (-3.3056896652e-10 + CJCCelsius * (6.5024403270e-13 + CJCCelsius * (1.9197495504e-16 + CJCCelsius * (-1.2536600497e-18 + CJCCelsius * (2.1489217569e-21 + CJCCelsius * (1.4388041782e-24 + CJCCelsius * 3.5960899481e-28)))))))))
8.2.3 ITS90 Type J: Iron versus Copper-Nickel
Input range (mV): -8.095 ... 69.553
Output range (°C): -210 ... 1200
-8.095 <= mV < 0 (-210
°C to 0 °C)
Celsius = mV * (19.528268 + mV * (-1.2286185 + mV * (1.0752178 + mV * (-5.9086933e-1 + mV * (-1.7256713e-1 +
mV * (-2.8131513e-2 + mV * (-2.3963370e-3 + mV * 8.3823321e-5)))))))
0 <= mV <= 42.919 (0 °C
to 760 °C)
Celsius = mV * (19.78425 + mV * (-2.001204e-1 + mV *
(1.036969e-2 + mV * (-2.549687e-4 + mV * (3.585153e-6 +
mV * (-5.344285e-8 + mV * 5.09989e-10))))))
42.919 <= mV <= 69.553
(760 °C to 1200 °C)
Celsius = -3.113581e3 + mV * (3.00543684e+2 + mV * (9.94773230 + mV * (1.7027663e-1 + mV * (-1.43033468e-3 +
mV *4.73886084e-6))))
CJC correction added to input value for Type J (0 °C ... 70 °C):
Correction = -3.42189283286958e-5 + CJCCelsius * (50.3917670948465e-3 + CJCCelsius *
(2.97699827978468e-5 + CJCCelsius * -6.92590934405273e-8))
Copyright 2001 by Peekel Instruments
Page 62 of 74
Formulas used for Thermocouples
Autosoft NT User Manual
8.2.4 ITS90 Type K: Nickel-Chromium versus Nickel-Aluminum
Input range (mV): -5.891 ... 54.886
Output range (°C): -200 ... 1372
-5.891 <= mV < 0 (-200
°C to 0 °C)
Celsius = mV * (2.5173462e+1 + mV * (-1.1662878 + mV * (1.0833638 + mV * (-8.9773540e-1 + mV * (-3.7342377e-1 +
mV * (-8.6632643e-2 + mV * (-1.0450598e-2 + mV * 5.1920577e-4)))))))
0 <= mV <= 20.644 (0 °C
to 500 °C)
Celsius = mV * (2.508355e+1 + mV * (7.860106e-2 + mV * (2.503131e-1 + mV * (8.315270e-2 + mV * (-1.228034e-2 + mV
* (9.804036e-4 + mV * (-4.413030e-5 + mV * (1.057734e-6 +
mV * -1.052755e-8))))))))
20.644 <= mV <= 54.886
(500 °C to 1372 °C)
Celsius = -1.318058e+2 + mV * (4.830222e+1 + mV * (1.646031 + mV * (5.464731e-2 + mV * (-9.650715e-4 + mV *
8.802193e-6 + mV * -3.110810e-8)))))
CJC correction added to input value for Type K (0 °C ... 70 °C):
Correction = -6.11053935922907e-6 + CJCCelsius * (39.4533818469946e-3 + CJCCelsius *
(2.40423569466323e-5 + CJCCelsius * (-6.51590136125687e-8 + CJCCelsius * -2.47299023308676e-10)))
8.2.5 ITS90 Type N: Nickel-Chromium-Silicon versus Nickel-SiliconMagnesium
Input range (mV): -3.990 ... 47.513
Output range (°C): -200 ... 1300
-3.990 <= mV < 0 (-200
°C to 0 °C)
Celsius = mV * (3.8436847e+1 + mV * (1.1010485 + mV *
(5.2229312 + mV * (7.2060525 + mV * (5.8488586 + mV *
(2.7754916 + mV * (7.7075166e-1 + mV * (1.1582665e-1 +
mV * (7.3138868e-3)))))))))
0 <= mV <= 20.613 (0 °C
to 600 °C)
Celsius = mV * (3.86896e+1 + mV * (-1.08267 + mV *
(4.70205e-2 + mV * (-2.12169e-6 + mV * (-1.17272e-4 + mV *
(5.39280e-6 + mV * (-7.98156e-8)))))))
20.613 <= mV <= 47.513
(600 °C to 1300 °C)
Celsius = 1.972485e+1 + mV * (3.300943e+1 + mV * (3.915159e-1 + mV * (9.855391e-3 + mV * (-1.274371e-4 +
(mV * 7.767022e-7)))))
CJC correction added to input value for Type N (0 °C ... 1300 °C):
Correction = CJCCelsius * (2.592939460e-2 + CJCCelsius * (1.5710141880e-5 + CJCCelsius *
(4.3825627237e-8 + CJCCelsius * (-2.5261169794e-10 + CJCCelsius * (6.4311819339e-13 + CJCCelsius * (1.0063471519e-15 + CJCCelsius * (9.9745338992e-19 + CJCCelsius * (-6.0863245607e-22 + CJCCelsius *
(2.0849229339e-25 + CJCCelsius * -3.0682196151e-29)))))))))
8.2.6 ITS90 Type R: Platinum-13% Rhodium versus Platinum
Input range (mV): -0.226 ... 21.103
Output range (°C): -50 ... 1768.1
-0.226 <= mV < 1.923 (50 °C to 250 °C)
Celsius = mV * (1.8891380e+2 + mV * (-9.3835290e+1 + mV *
(1.3068619e+2 + mV * (-2.2703580e+2 + mV *
Copyright 2001 by Peekel Instruments
Page 63 of 74
Formulas used for Thermocouples
Autosoft NT User Manual
(3.5145659e+2 + mV * (-3.8953900e+2 + mV * 2.8239471e+2
+ mV * (-1.2607281e+2 + mV * (3.1353611e+1 + mV * (3.3187769))))))))))
1.923 <= mV <= 11.361
(250 °C to 1064 °C)
Celsius = 1.334584505e+1 + mV * (1.472644573e+2 + mV * (1.844024844e+1 + mV * (4.031129726 + mV * (6.249428360e-1 + mV * (6.468412046e-2 + mV * (4.458750426e-3 + mV * (1.994710149e-4 + mV * (5.313401790e-6 + mV * (6.481976217e-8)))))))))
11.361 <= mV <= 19.739
(1064 °C to 1664.5 °C)
Celsius = -8.199599416e+1 + mV * (1.553962042e+2 + mV *
(-8.342197663 + mV * (4.279433549e-1 + mV * (1.191577910e-2 + mV * (1.492290091e-4)))))
19.739 <= mV <= 21.103
(1664.5 °C to 1768.1 °C)
Celsius = 3.406177836e+4 + mV * (-7.023729171e+3 + mV *
(5.582903813e+2 + mV * (-1.952394635e+1 + mV *
(2.560740231e-1))))
CJC correction added to input value for Type R (-50 °C ... 1064 °C):
Correction = CJCCelsius * (5.28961729765e-3 + CJCCelsius * (1.39166589782e-5 + CJCCelsius * (2.38855693017e-8 + CJCCelsius * (3.5691601063e-11 + CJCCelsius * (-4.62347666298e-14 + CJCCelsius
*(5.00777441034e-17 + CJCCelsius * (-3.73105886191e-20 + CJCCelsius *(1.57716482367e-23 + CJCCelsius
* (-2.81038625251e-27)))))))))
8.2.7 ITS90 Type S: Platinum-10% Rhodium versus Platinum
Input range (mV): -0.235 ... 18.693
Output range (°C): -50 ... 1768.1
-0.235 <= mV < 1.874 (50 °C to 250 °C)
Celsius = mV * ( 1.84949460e+2 + mV * (-8.00504062e+1 +
mV * (1.02237430e+2 + mV * (-1.52248592e+2 + mV * (
1.88821343e+2 + mV * (-1.59085941e+2 + mV * (
8.23027880e+1 + mV * (-2.34181944e+1 + mV *
2.79786260))))))))
1.874 <= mV <= 11.950
(250 °C to 1200 °C)
Celsius = 1.291507177e+1 + mV * ( 1.466298863e+2 + mV *
(-1.534713402e+1 + mV * (3.145945973 + mV * (4.163257839e-1 + mV * (3.187963771e-2 + mV * (1.291637500e-3 + mV * (2.183475087e-5 + mV * (1.447379511e-7 + mV * 8.211272125e-9))))))))
11.950 <= mV <= 17.536
(1200 °C to 1664.5 °C)
Celsius = -8.087801117e+1 + mV * ( 1.621573104e+2 + mV *
(-8.536869453 + mV * (4.719686976e-1 + mV * (1.441693666e-2 + mV * 2.081618890e-4))))
17.536 <= mV <= 18.693
(1664.5 °C to 1768.1 °C)
Celsius = 5.333875126e+4 + mV * (-1.235892298e+4 + mV *
(1.092657613e+3 + mV * (-4.265693686e+1 + mV *
6.247205420e-1)))
CJC correction added to input value for Type S (0 °C ... 70 °C):
Correction = -8.61838794792875e-6 + CJCCelsius * (5.40579212101081e-3 + CJCCelsius *
(1.24166233625116e-5 + CJCCelsius * -1.9163457510135e-8))
Copyright 2001 by Peekel Instruments
Page 64 of 74
Formulas used for Straingauges
Autosoft NT User Manual
8.2.8 ITS90 Type T: Copper versus Copper-Nickel
Input range (mV): -5.603 ... 20.872
Output range (°C): -200 ... 400
-5.603 <= mV < 0 (-200
°C to 0 °C)
Celsius = mV * (2.5949192e+1 + mV *(-2.1316967e-1 + mV *
(7.9018692e-1 + mV * (4.2527777e-1 + mV * (1.3304473e-1 +
mV * (2.0241446e-2 + mV * 1.2668171e-3))))))
0 <= mV <= 20.872 (0 °C
to 400 °C)
Celsius = mV * (2.592800e+1 + mV * (-7.602961e-1 + mV *
(4.637791e-2 + mV * (-2.165394e-3 + mV * (6.048144e-5 +
mV * -7.293422e-7)))))
CJC correction added to input value for Type T (0 °C ... 70 °C):
Correction = 2.18031481725975e-6 + CJCCelsius * (38.746564651674e-3 + CJCCelsius *
(3.35256077037807e-5 + CJCCelsius * (1.9229303001792e-7 + CJCCelsius * (-1.79865206510148e-9 +
CJCCelsius * 5.70614795196761e-12))))
8.3 Formulas used for Straingauges
For Carrier Frequency straingauge measurements, the non linearity of the Wheatstone Bridge makes a
correction necessary when measuring 1/4 bridges. The correction formula used in Autosoft NT is:
CorrectedValue = 1e6 · (1 - sqrt(1 - 2 · MeasuredValue / 1e6))
To obtain the 'Stress' value in N/mm² from the 'Strain' value in µm/m, the following formula is used:
Stress = E-modulus · Strain / 1e6
8.4 Formulas used for 0°/90° Rosettes
Variables used:
EPSa' = strain input at 0°
EPSb' = strain input at 90°
V0 = Poisson (ref.)
Vs = Poisson (spec.)
Emod = E-modulus
Kt = Transverse sensitivity
(Note: Kt is specified in % in the rosette configuration dialog, the value of Kt used in the formulas below is
therefore 1/100 of this value. For example: Kt specified in dialog = 2, then Kt used in formulas = 0.02)
Calculation of strain after correction for transverse sensitivity:
EPSa = ((1 - V0 · Kt) / (1 - Kt²)) · (EPSa' - Kt · EPSb')
EPSb = ((1 - V0 · Kt) / (1 - Kt²)) · (EPSb' - Kt · EPSa')
EPSa is called 'Strain A' or 'EPS_A' in the software.
EPSb is called 'Strain B' or 'EPS_B' in the software.
Calculation of stress:
SIGx = (Emod / (1 - Vs²)) · (EPSa + Vs · EPSb)
SIGy = (Emod / (1 - Vs²)) · (EPSb + Vs · EPSa)
Copyright 2001 by Peekel Instruments
Page 65 of 74
Formulas used for 0 /45 /90 Rosettes
Autosoft NT User Manual
SIGx is called 'Stress 0°' or 'SIG_X' in the software.
SIGy is called 'Stress 90°' or 'SIG_Y' in the software.
8.5 Formulas used for 0°/45°/90° Rosettes
Variables used:
EPSa' = strain input at 0°
EPSb' = strain input at 45°
EPSc' = strain input at 90°
V0 = Poisson (ref.)
Vs = Poisson (spec.)
Emod = E-modulus
Kt = Transverse sensitivity
(Note: Kt is specified in % in the rosette configuration dialog, the value of Kt used in the formulas below is
therefore 1/100 of this value. For example: Kt specified in dialog = 2, then Kt used in formulas = 0.02)
Calculation of strain after correction for transverse sensitivity:
EPSa = ((1 - V0 · Kt) / (1 - Kt²)) · (EPSa' - Kt · EPSc')
EPSb = ((1 - V0 · Kt) / (1 - Kt²)) · (EPSb' - Kt · (EPSa' + EPSc' - EPSb'))
EPSc = ((1 - V0 · Kt) / (1 - Kt²)) · (EPSc' - Kt · EPSa')
EPSa is called 'Strain A' or 'EPS_A' in the software.
EPSb is called 'Strain B' or 'EPS_B' in the software.
EPSc is called 'Strain C' or 'EPS_C' in the software.
Calculation of the principal strains:
EPSmaj = (EPSa + EPSc) / 2 + sqrt( ( ( EPSa - EPSb)² + (EPSc - EPSb)² ) / 2 )
EPSmin = (EPSa + EPSc) / 2 - sqrt( ( ( EPSa - EPSb)² + (EPSc - EPSb)² ) / 2 )
EPSmaj is called 'Major Strain' or 'EPS_MAJ' in the software.
EPSmin is called 'Minor Strain' or 'EPS_MIN' in the software.
Calculation of angle:
This is the angle between the major strain (or stress) and the first strain filament (0°), expressed as a number
between -90 and +90 degrees.
ALPHA = arctan( (2 · EPSb - EPSa - EPSc) / (EPSa - EPSc) ) / 2
ALPHA is called 'Angle' or 'ALPHA' in the software.
Calculation of the principal stresses:
SIGmaj = (Emod / (1 - Vs²)) · (EPSmaj + Vs · EPSmin)
SIGmin = (Emod / (1 - Vs²)) · (EPSmin + Vs · EPSmaj)
SIGmaj is called 'Major Stress' or 'SIG_MAJ' in the software.
SIGmin is called 'Minor Stress' or 'SIG_MIN' in the software.
Calculation of the stress:
These calculations determine the stress in the direction of the first strain filament (0°) and in the direction
perpendicular to the first strain filament (90°), as well as the shear stress.
SIGx = ( (SIGmaj + SIGmin) + (SIGmaj - SIGmin) · cos(2 · ALPHA) ) / 2
Copyright 2001 by Peekel Instruments
Page 66 of 74
Formulas used for 0 /60 /120 Rosettes
Autosoft NT User Manual
SIGy = ( (SIGmaj + SIGmin) - (SIGmaj - SIGmin) · cos(2 · ALPHA) ) / 2
TAUxy = (SIGmaj - SIGmin) · sin(2 · ALPHA) / 2
SIGx is called 'Stress 0°' or 'SIG_X' in the software.
SIGy is called 'Stress 0°' or 'SIG_Y' in the software.
TAUxy is called 'Shear Stress' or 'TAU_XY' in the software.
Calculation of the equivalent stress:
The equivalent stress for the principal stresses (von Mises criterion):
SIGe = sqrt( SIGmaj² + SIGmin² - SIGmaj · SIGmin )
8.6 Formulas used for 0°/60°/120° Rosettes
Variables used:
EPSa' = strain input at 0°
EPSb' = strain input at 60°
EPSc' = strain input at 120°
V0 = Poisson (ref.)
Vs = Poisson (spec.)
Emod = E-modulus
Kt = Transverse sensitivity
(Note: Kt is specified in % in the rosette configuration dialog, the value of Kt used in the formulas below is
therefore 1/100 of this value. For example: Kt specified in dialog = 2, then Kt used in formulas = 0.02)
Calculation of strain after correction for transverse sensitivity:
EPSa = ((1 - V0 · Kt) / (1 - Kt²)) · ( (1 + Kt / 3) · EPSa' - (2 / 3) · Kt · (EPSb' + EPSc') )
EPSb = ((1 - V0 · Kt) / (1 - Kt²)) · ( (1 + Kt / 3) · EPSb' - (2 / 3) · Kt · (EPSa' + EPSc') )
EPSc = ((1 - V0 · Kt) / (1 - Kt²)) ( (1 + Kt / 3) · EPSc' - (2 / 3) · Kt · (EPSa' + EPSb') )
EPSa is called 'Strain A' or 'EPS_A' in the software.
EPSb is called 'Strain B' or 'EPS_B' in the software.
EPSc is called 'Strain C' or 'EPS_C' in the software.
Calculation of the principal strains:
EPSmaj = (EPSa + EPSb + EPSc) / 3 + sqrt( ( ( 2 EPSa - EPSb - EPSc )² + 3 · (EPSb - EPSc)² ) / 9 )
EPSmin = (EPSa + EPSb + EPSc) / 3 - sqrt( ( ( 2 EPSa - EPSb - EPSc )² + 3 · (EPSb - EPSc)² ) / 9 )
EPSmaj is called 'Major Strain' or 'EPS_MAJ' in the software.
EPSmin is called 'Minor Strain' or 'EPS_MIN' in the software.
Calculation of angle:
This is the angle between the major strain (or stress) and the first strain filament (0°), expressed as a number
between -90 and +90 degrees.
ALPHA = arctan( (sqrt(3) · (EPSb - EPSc)) / ( 2 EPSa - EPSb - EPSc ) ) / 2
ALPHA is called 'Angle' or 'ALPHA' in the software.
Calculation of the principal stresses:
SIGmaj = (Emod / (1 - Vs²)) · (EPSmaj + Vs · EPSmin)
SIGmin = (Emod / (1 - Vs²)) · (EPSmin + Vs · EPSmaj)
Copyright 2001 by Peekel Instruments
Page 67 of 74
Formulas used for 0 /60 /120 Rosettes
Autosoft NT User Manual
SIGmaj is called 'Major Stress' or 'SIG_MAJ' in the software.
SIGmin is called 'Minor Stress' or 'SIG_MIN' in the software.
Calculation of the stress:
These calculations determine the stress in the direction of the first strain filament (0°) and in the direction
perpendicular to the first strain filament (90°), as well as the shear stress.
SIGx = ( (SIGmaj + SIGmin) + (SIGmaj - SIGmin) · cos(2 · ALPHA) ) / 2
SIGy = ( (SIGmaj + SIGmin) - (SIGmaj - SIGmin) · cos(2 · ALPHA) ) / 2
TAUxy = (SIGmaj - SIGmin) · sin(2 · ALPHA) / 2
SIGx is called 'Stress 0°' or 'SIG_X' in the software.
SIGy is called 'Stress 0°' or 'SIG_Y' in the software.
TAUxy is called 'Shear Stress' or 'TAU_XY' in the software.
Calculation of the equivalent stress:
The equivalent stress for the principal stresses (von Mises criterion):
SIGe = sqrt( SIGmaj² + SIGmin² - SIGmaj · SIGmin )
Copyright 2001 by Peekel Instruments
Page 68 of 74
Windows NT driver configuration
Autosoft NT User Manual
9. Appendix B: IEEE-488 Software Configuration
This appendix describes how to configure a National Instruments GPIB card for use with Autosoft NT.
Prerequisites:
• A National Instruments GPIB Card (ISA). Autosoft NT was tested using a National Instruments ATGPIB/TNT (Plug and Play) ISA card, running under Windows NT as well as Windows 98.
• The latest NI-488.2 drivers. As of this writing the latest version of these drivers is v1.60. You can download
this software from National Instruments at http://www.ni.com.
This appendix describes both the Windows NT and the Windows 98 driver configuration.
9.1 Windows NT driver configuration
After installing the drivers, you need to check the following configuration issues.
First, open the GPIB configuration by double-clicking on the 'GPIB' icon in the 'Control Panel', which can be
opened from the 'Settings' selection of the 'Start menu'.
Select the GPIB card you want to configure (GPIB0 in most cases) and press 'Configure'. In the window that
appears, press the 'Software>>>' button to show all available options. Compare the settings to the ones
displayed below and make adjustments as needed. Specifically make sure 'Enable Auto Polling' is switched
off.
When you are satisfied with the settings click on the 'Controller Resources' button to check which resources the
card uses. It should at least have a valid 'Input/Output Range' and 'Interrupt Request'! 'Direct Memory
Access' is an optional extra, which will decrease the load on your PC's CPU. Windows normally show if there
are any conflicts with other devices in your system.
Copyright 2001 by Peekel Instruments
Page 69 of 74
Windows 98 driver configuration
Autosoft NT User Manual
9.2 Windows 98 driver configuration
After installing the drivers, you need to check the following configuration issues.
First, open the System configuration by double-clicking on the 'System' icon in the 'Control Panel', which can be
opened from the 'Settings' selection of the 'Start menu'.
Click on the 'Device Manager' tab and find and select the 'National Instruments GPIB Interfaces' icon. Click on
the 'Properties' button to open its properties and choose the 'Device Templates' tab on the window that appears.
Compare the settings to the ones displayed below and make adjustments as needed.
Copyright 2001 by Peekel Instruments
Page 70 of 74
Windows 98 driver configuration
Autosoft NT User Manual
Click on 'OK' when you are satisfied with these settings and, from the Device Manager, select the icon for the
GPIB card itself, which resides directly under the 'National Instruments GPIB Interfaces' icon. Click on the
'Properties' button and select the 'NI-488.2 Settings' tab. Compare the settings to the ones displayed below and
make adjustments as needed.
Copyright 2001 by Peekel Instruments
Page 71 of 74
Windows 98 driver configuration
Autosoft NT User Manual
Now click on the 'Advanced...' button. Again, compare the settings to the ones displayed below and make
adjustments as needed. Specifically make sure 'Automatic Serial Polling' is switched off.
Click on 'OK' when you are satisfied with these settings. Last but not least, select the 'Resources' tab on the
device properties dialog and check the resources used by the card. It should at least have a valid
Copyright 2001 by Peekel Instruments
Page 72 of 74
Windows 98 driver configuration
Autosoft NT User Manual
'Input/Output Range' and 'Interrupt Request'! 'Direct Memory Access' is an optional extra, which will
decrease the load on your PC's CPU. Windows normally show if there are any conflicts with other devices in
your system.
Copyright 2001 by Peekel Instruments
Page 73 of 74
Windows 98 driver configuration
Autosoft NT User Manual
10. Appendix C: Automatic start of Autosoft NT
If you want to start Autosoft NT automatically when the PC starts, you should prepare your PC using the
following steps:
1. Create a configuration to use. If you want one or more measurement groups to start measuring immediately
after starting Autosoft NT and loading the configuration, make sure you check their 'autostart' checkbox.
2. Add a shortcut to the AutosoftNT.exe program in the Startup folder of the Start menu. Modify the shortcut and
add the name of the settings file to load to the 'target' line. For example, if you have a settings file called
'autoload.set', make sure the target line reads 'C:\AutosoftNT\AutosoftNT.exe autoload.set'.
3. Make sure your PC does not wait for a password during startup. Under Windows NT, you can create a file
containing the following lines and name it 'logon.reg':
REGEDIT4
[HKEY_LOCAL_MACHINE\SOFTWARE\Microsoft\Windows NT\CurrentVersion\Winlogon]
"AutoAdminLogon"="1"
"DefaultUserName"="yourname"
"DefaultPassword"="yourpassword"
"DefaultDomainName"="yourdomain"
Make sure you fill in the correct name and password. Also, if your computer should not log on to a domain,
remove the last line, or fill in the name of your computer instead of the domainname.
After creating this file, double-click on it from the explorer to enter the data in the Windows registry. The next
time you restart the computer, it does not show the 'Ctrl-Alt-Del' logon prompt, but immediately logs on using the
information from the registry.
If you need to log on as a different user, you should press and hold the SHIFT-key during Windows startup.
Copyright 2001 by Peekel Instruments
Page 74 of 74