1
FT= 2400 Η
2- m, 50-Watt Mob ile
Paging Transceiver
Table o f Conte nts
Sρec ifτcat i o ns . . . . . . . . . . . . . 2
Accessor ies
2
Co n tr o ls & Conn ectors . . . . . . . . 3
In sta llat i on . . . . . . . . . . . . .
An te nna
Conside rati o ns
Mo bile In stallati on
B ase Stati on In stallatio n
External Sp eake r s
Mi c ropho nes
Operatio n
8
8
10
10
10
. . . . . . . . . . . . . . .11
25
11
Pre limin
ary Set up
S qu elc12
h Setup
12
Fr eque n cy Sel ecti on Mo d es
13
Fre que n c y & Step Sel ecti o n
Tra n smitting
Re peate r Splits
Au to matic Re peate r Shift
Memory Storage & Recall
Recallin g Me mories
Simpl e
14
14
16
16
18
Odd -S plit Me mori es
Na ming M emor i es
18
18
CALL Cha nnel Me mory
19
Sep arate Tra ns mi t
Fr eque nc y Memori es
19
Memory Tunin g
20
Hidin g a nd Erasin g Memori es
Sca nnin g
21
21
Progr ammable Subb and Limits
Pri o rity Ch a nne l Moni tor ing
C TCSS Op er at ion
τιΤΜΣ P aging & Code Squ el ch
22
24
(ω /FR C-6) 27
In Case of Prob le ms . . . . . . . . . 34
Me mory B ac kup
Memo ry Cl oning
Pack et Radi o
Inte rn a l Adjust ments
In sta llat i o n ofOpt i ons
36
36
37
37
. . . . . . . 38
FT-2400H
F eat ur es
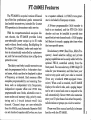
The FT-2400H is α s peci al ve r s io n ofYaes u 's
to α rep eate r s ubband. Α 1750- Hz to n e ge nertop-of-the-line
professi onal gra d e co mmerci a l
ato
r i s in cluded in Eur o pean ve r s i ons .
land mo bile t r a n sce ive rs, inte nde d for 2-mete r
ρ 38-tone pr ogramma bl e C T CSS e ncode r i s
FM op eratio n in th e amateur r adi o ser vi ce.
built-in as sta n dard, a n d th e FT S- 17A CT CSS
Wi th its co mp ar tme ntaliz ed one- piece di ed eco de r unit can be insta ll ed to prov id e to ne
cast chassi s, the FT-2400H pro vides 3-ste p
sque lched p riv ate channel s an d α CT CSS pagi ng
user-sel ectable p owe r output up to 50 watts
be ll feature to sound α p ag in g ale r t tone whe n
easily witho u t force d coo ling. B ackligh tin g for
the to ne s que lc h ope n s.
the large L C D (di s pl a y), knob s and maj or bu tRev olu ti on ary DTMF (Dual-Tone, Mul ti-Fretons i s a utomati ca lly co ntroll ed by α photosenquen cy ) -b ase d sel ective callin g and private
sor, and the l ess-use d butto n s h a v e α flip-d own
p
aging capabilities can b e eas ily adde d wi th the
protectiv e cover.
o p t io n al FRC-6, co ntrolle d e ntire ly fro m the
The thirty-on e fr ee ly tunable me mori es can
fro nt p ane l. You can se lect any of 999 3- di git ID
each be p rogr a mme d wi th α 4-c h a racte r c h a nco des fo r y our t ran sceiv er, a nd the n h av e yo ur
n el n a me, whi ch can then be di spl aye d in pl ace
receiver stay quiet un til yo ur co d e i s rece ive d
of fr eque ncy, as des ire d. E ach me mory offers
(fr o m any sta nd a r d DTMF -e quipped t r anscompl ete pr ogra mmability a nd sca nnin g fun cceive r). Whe n α call is r ece ive d , the FT-2400H
too n s, suc h as ind ep endent tx/rx fre que n c ies,
displ ays t h e call e r 's co d e, a nd α p aging b eep er
in dep end en t re p eate r offset and C TCSS to ne,
can b e set to so und and eve n to r esp ond to t h e
programma bl e scan l imi ts, sel ectabl e scan r ecall au to mati ca lly. Se v en D TMF co de memories
sum e modes a n d memory
ory s kip, p riorit y mo nistore yo ur ID plu s th ose o f six ot he r frequentlyca ll ed stati ons or gro up s yo u wi s h to monito r.
channel . Chann e l step s a re user -se lecta bl e
fro m 5 to 50 kHz, a nd Auto mat ic R ep eate r Shift
Pl ease read t hi s manu a l ca r efully to b eco me
can set sta nd ard re peater shifts whe n y ou tun e
fam ili ar wit h th e FT-2400H .
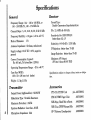
Sp ec ifi cation s
Receiver
Gen e ra l
Frequency Range: 144 -- 146 or 148 MHz, or
140 -- 150 MHz Τχ, 140 - 174 MHz Rx
Channel Ste ps: 5, 10, 12.5, 15, 20, 25 & 50 kHz
Frequency Stability: < 10 ppm (-20 to +60 °C)
Mode of Emission:
F3
Impe dance: 50 ohms, unbal anced
Supply voltage: 13.8V DC ± 10%, negative
ground
Current Consumption (typical):
Rx: 400 mA, Τχ hi/med/1οω: 12/9/5Α
Operating Temperature Range: -20 to +60 °C
Case Size (WHD):
160 χ 50 χ 180 mm (w/o knobs)
Weight: 1.5 kg (3 .31b)
Transm itter
Output
Powe r (high/med/1οω): 50/25/5W
Modulation Type: Vari able Reactance
Maximum Deviation: ± 5 kHz
Spurious Radiation: less than -60 dB
Microphone Impedance: 2kΩ
Circuit Type :
Double Conversion Superheterodyn e
IFs: 21.4 MHz & 455 kHz
Sensitivity (for 12dB 5 ΙΝΆD):
better than 0.2 μV
Selectivity
electivi ty (-6/-60 dB) : 12/30 kHz
IF Rej ection: better than 70 dB
Image Rej ection: better than 70 dB
Maximum AF Output:
2W in to 8 ohms @10%ο ΤΗD
Sp ecifications s u bject to change wi thou t notice or ob ligαt i on.
Accessori es
FTS-17A CTCSS Unit
FRC-6 DTMF Pager Unit
ρ/η- Α03700002
ΜΗ-26G8i Hand Mic wBurst
ΜΗ-27Α8α DTMF Keypad Mic
SP-7 External Loudspeake r
Α03740001
Α04290001
Α04270001
Α03590001
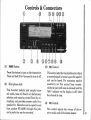
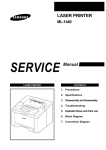
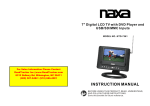
Controls & Conn ectors
Ο
© 0 (D©
(1)
P OWER
Butto n
(3)
Press thi s butto n to turn on the t r a n sceiv er .
Press and h ol d i t for 1/2-second to turn it off.
®ο
SQ L Co ntrol
Thi s co n tro l sets the t hr esho ld leve l at which
α r eceive d s ignal (o r no i se) o pe n s the s que lch
and can be heard. Fo r maximum s que l ch
(2) Mi cr ophse
on e Jack
n s i tivi ty set thi s co n tro l fr om coun te r cl oc kwi se j u st unt il n o i se i s s il ence d (and th e
Thi s 8-co n tact mo du l a r j ac k acce pts tran s" BUSY" indi cato r on th e di s pl ay i s off) whe n
mit audio, ton e call (burst) or di al/memo ry
t h e ch ann e l is cl ear.
se lectio n a nd sca n nin g co n trol fr om the mic r o pho n e, and provides rece iv er a udi o for α
(4) VO L Co ntro l
s pea ker/mic. M emories can b e copi e d to a nd
fr om an ot h e r FT-2400H t hro u g h thi s j ack ,
Thi s co n t r ol a dj u sts the v ol ume o f th e r ea nd α p acket tn c can b e conn ected .
ceiv er a udio and of the bu tto n b ee pe r.
Fun ctio n Bu tto n s (be hind flip- down door)
To open the flip-down door, p ry the right edge (next to the selecto r knob) out gently with α
fingertip . To close the d oor, press u p wards on the bπttοητ edge of the d oo r at its center. Do n ot
try to close the door by p ushing front th.e fron t .
The five butto n s behind the door control m ost of the ρrοg r ατιιιτια b1e feat ur es. If the beeper Is
ena bled, one or more b eeps will sουτιd wh e n α bu tto n is p ressed, if the resulting command is
accepted . T he white label sho ws the primary fιιτι ct ίοη of eac h button . H owever, if you press t he
F / W butto n first, these b uttons w ill ρerforτn alternate functions . On three of these, th e altern ate
functi on is in dicated by t he blue label on or beneath the button . These are describe d in t h e
Operation chapter.
For descriptions in this manual, we refer to alternate butto n functions by preceding the button
n ame with "Σ/ W -~" to rετηίηd you to press th e F /W button first. For example, " F /W
ιΟCΚ indicates
that you should press the F /W butto n followed by the ιLow button (within five seconds)_
(5)
RP T
17Α Tone Squelch Unit is n ot installed, only
encode and off m odes are available. The alternate function displays the CTCSS tone frequ ency and button beeper status.
Butto n
This button toggles repeate r shift: + (up), (down) or off. The alternate function displays
shift offset and AR S status.
(6)
ΤΟΝΕ Butto n
(7)
PAG E B
CODE
utton
This
button activates DTMF paging (or code
This
button toggles the CTCSS (s ubaudible
squelch) if the FRC-6 P aging/Code Squelch
tone) features : en code (on tr ans mission
o pti on is installed. The alternate function
only), encode/deco de (on b oth t r a nsmission
displays DΤΜF Code Memories.
and recepti on), and off. If the optional FTS-
(8)
BA LL
Button
Press thi s butto n to j ump to a nd from your
CALL c h anne l memory. The a l ternate function toggl es the CT CSS p aging b ell, d escri be d
l ater .
(9)
ΑΤΡ Butto n
While r ece iving on α me mory, pr essin g this
bu tton togg l es 4-1, e di s p1 a y b et wee n fr eque ncy and a lph anumeric n a me. The al ter n ate fun ct io n dis pl a y s (and all ows changing)
the tunin g step s iz e, and t h e sca n - res um e
m ode, as desc rib ed l ater .
(10) Se lector Kn ob
Th i s 24-posi ti on d etented rotary switch i s
use d for tunin g, me mory sel ectio n a n d m ost
functio n settings. Th e DW N a nd UP buttons on
the mi c r oph one duplicate the functi ons of
thi s kno b.
(11) LOCK
Low Button
Press t his butto n whil e receiving to togg l e
hi gh/me dium and l o w tra n s mi tter po we r
(50/25 a nd 5 watts, res pectiv ely ). The di splay s h o ws "LOW" (a bo v e the S-mete r ) whe n
ei t h er l ow or me dium p owe r i s selected . The
alte rn ate fun ctio n of th is button di sabl es the
selecto r kn ob an d m ost of the fro nt p a n e l
buttons (exce pt itself, F/ W and P OWER, an d the
micro pho ne bu tton s). Press F/W and thi s button aga in to unlock the p ane l .
(12) ΡΗτ Button
This butto n all o ws tuning in 1-MHz step s
(the kHz di gits bl ank on the di s pl ay) . If rece iving on α m emory, pr essin g thi s bu tto n
the fir st t ime act iv ates the Me mo ry Tun e (MT)
m o d e, and press ing it again en abl es 1-MHz
ste p s. Th e altern ate fun cti on of this butto n
activ ates p riori ty monito rin g, describ ed in
th e Operat i o n cha pte r (" Ρ" di spl ayed in stea d
of th e me mory number to t he uppe r l eft of
th e fr eque n cy) .
(13) SKIP Button
Durin g s pli t- fr equ ency ope rat ion , s u c h as
thro u gh α re p eate r, thi s bu tto n re v e rses
tr a n s mi t a nd r ece iv e fre qu e n c i es. Durin g
m emo ry o p eratio n, th e altern ate funct io n
sets th e curr e nt m e mo ry to b e skippe d durin g scannin g.
(14)
Me
is a l so u sed to sto re curre nt o p erating d ata
into α me mory (by holding it down fo r 1/2-seco nd, r el eas in g and pressing aga in), a n d to
toggl e seve r al progr ammabl e features.
Butto n
Thi s bu tto n switches op eratio n between t he
two m a in tuning m od es: di a l a nd me mory.
The a lternate functi o n ma rks the curre nt
memory to be s kipped during scanning. Thi s
bu tto n is d uplicated by α button on the micropho ne in non-European versi ons.
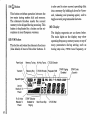
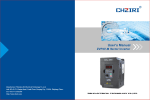
(16) Dis pl ay
The d i s pl ay segme nts are as sho wn be low.
The m ain di gits on th e di s pl ay ma y sho w
op erat in g fre qu ency, m emo ry n ame, o r any of
ma ny par a mete rs d uring settin g, such as
tunin g step siz e, CTCSS to n e fre quency, or
(15) F /W Button
This bu tton activ ates the alternate fun ction s
(blu e lab el s) o f most o f the othe r butto ns. It
Panel Lock
Memory Tuning
Alt . Key Funcs.
CTCSS Deco d e
Repeater Shift
`® LO W
IOU
)FιιιιιιιNΊ%ι%;
Rx S-Units/
Relative Τχ
Powe r
DTMF Decode r
Enable d for
Paging
'
ι0
sκιΡ
EN C DE C =+
ιη1
Mem Scan Skip
13F
DTMF Paging
/ E nabled
PAG E
.~ .~~
CTCSS B ell
COD E -
DT M F Code
/ S q uel ch
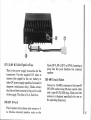
(17) 13 .8Υ DC Ca bl e Pigtail ω/Fu se
Thi s is the power supply conn ecti on fo r th e
tra n sce ive r. U se the s uppli e d DC cabl e to
connect thi s pigta il to t h e ca r b atte ry o r
othe r DC po wer s upply cap abl e o f at least 12
Ampe r es (co n tinu ous du ty) . M ake ce r tain
t h at t h e re d l ea d conn ects to the p os i tiv e s id e
o f th e supply . Th e fu se is 15-Α, fast-blo w.
(18) ΕΧΤ S P Jac k
Thi s 2-con tact mini ph on e j ack accep ts α 4to 16-o hm ex te rn a l s p ea k e r s u c h as t h e
Yaes u SP-3,
SP -4, SP -7 o r SP -55. In serting α
plu g in to th e j ack di sa bl es the in te rn a l
s pea ker .
(19) ΑΝΤ Coa xi a l Socket
Con n ect α 144-MHz antenn a to t hi s typ e-Μ
(SO-239) socket u s in g 50-o hm coaxial ca bl e
a n d α typ e-M (PL-259) plug. M ak e sure t he
a n te nna is des i gne d s p ec ifi cally for u se on
t h e o p e rat ing fr equ e ncy.
Install at i o n
Also for best performance u se the shortest
This chapter describes installation o f the FTp ossible l ength of thi ck, top-quality coaxial ca2400Ηwith typical s upplied accessor ies . InstalDTMF
ble for your fee dlin e. Be sure to u se α matching
l
options
(the
FRC-6
lation of interna
TCSS
type-Μ plug for th e j ack on the transceiver.
Paging/Se lCall Unit and the FTS- 17A C
Decoder Unit) ar e described at the back of thi s
Mobi l e In stallation
manual. If you have any of these options, turn
at i o n of Opti on s at the back before
to In stallTh
e FT-2400H must o nly be in stalled in cars
installing the transceiver as described below.
havin g α negative gro und electrical system.
Mount the transce ive r where the di splay, conAn te nn a Co ns ideration s
trols and microphone, are easily accessible, u s
in g the supplied ΜΜΒ-48 mobi le mount ing
The ET-2400H is des igned for use only with
bracket. The transceiver may be instal led in
an antenna having an impedance nea r 50 ohms
any position, but should not be near α heater
on the 2-meter band. For optimum performance
vent or where i t could i nterfere with driving.
u se α high quality, ca refully designed a ntenna.
M ake sure to provide pl enty of s pace at the top
The antenna should always be co nnecte d when
a nd rear so that air can flow freely through the
operating the transceiver, to avoid damage that
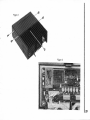
heatsink. Refer to the diagra ms on the next
could otherwise resul t if transmi ss ion occurs
page for in stallation.
accide ntally without an antenna.
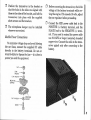
Ο D ecide the mounting locat ion w ith s ufficient
Make sure your antenna is designed to hanclearance for the transceiv er, plus space for
dle 50 watts co ntinuous transmitter power.
ventilation above and behind the set. Use
the mounting brack et as α template to mark
For best performance and safety in mobile
the l ocations of the mo unting holes. Use α
installations, mount the antenna in the center
4.8-mm (3/ι6") bit to drill the holes, and seof α flat surface, out of reach o f human hands:
cure the bracket with the four s upplie d long
50 watts can cause an RF burn to anyone touchscrews, w ashers and nuts (see diagram).
ing the antenna during transmission!
Ο P osition the transceiver in the br acket so
that the holes in the sid es are aligned with
those in the sides of the br acket, and bolt the
transce iver into pl ace with the supplied
s hort scre ws and flat w as hers.
Ο The microphone hanger may be installed
wherever convenient.
Mob ile Powe r Connections
To minimize voltage drop a nd avoid blowing
the car fu ses, connect the supplied DC ca ble
directly to the battery te rminals. D o n ot atte mpt to defeat o r bypass t h e fu se - i t i s th e re to
protect y o u a nd
th e equip ment.
Ο Before co nnecting the transceiver, chec k the
voltage at the battery terminals while revving the engine. Ifit exceed s 15 volts, a dj ust
the car regul ator before proceeding.
Ο Connect the RED power cable lead to the
POSITIVE (+) b attery te rmin al, and the
BLA CK lead to the NEGATIVE (-) terminal. If y ou need to extend the power cable
use #14 AWG or larger insul ated, stra nded
co pper wire. Connect the cable to the transce iver pigtail only after connecting to the
battery.
Wa rn ing!
Exte rn a l Sp eak e rs
U s in g
an e x te rn al s p eak er wi th t h e FT2400H lets yo u p os it io n the so urce of audi o
the traι-τ sceiι,e r, rτπr m ore than 15 ν o lts DC .
Wheιτ rep lacίιτg the fiιse, τ,ι,se οιιl ν α 15-Α
whe re it is most co nv eni ent to o v e rco me back. Dαιηιτge r es r.dtiιτgfrπτιτ fαίlιτre
fαst- blow type
ground n o i se in a nd a r oun d the car. The opί
s
ιτταy
ιτοt
be
to
these
precaτct
oιτ
to adhere
tional S P-7 Exte rn a l Speak e r inc lud es its own
covered by ωαrr αιτly.
s wive l -typ e m ounting br ac k et, a nd i s a v a il a bl e
fro m yo ur Yaes u d eale r. Of co ur se t h e o ld er
S P-3, SP-4 o r SP-55 Ex ternal Spea k ers may
sta at o
Base Stat o
also be u sed . Plu gging in an e xte rn al s p eak er
we r
Op e r ati on fr om the A C lin e re quires α p ocons u pply cap able o f providin g at least 12 Α
tinuously at 13.8 V D C . We r eco mm end u sin g
Mic o o es
an ex ternal sp eake r, s in ce the internal sp ea ke r
is m ounte d on th e botto m of the tran sce iver .
The ΜΗ-26G8J h andi e mi cr o pho ne fo r th e
The FP-700 A C p o we r supply/l oud sp eake r i s
Eur op ea n ve r s io n Β FT-2400H in c lud es α butavail able from your Y aesu d eal er to meet th ese
ton on th e fr ont for tr a n s mitt in g α 1750- Hz
n eeds. se the DC po wer ca bl e s uppli ed with
burst tone, to access re peaters t h at re quire it.
the transce ive r for making p ower co nnecti on s,
The ΜΗ-27Α 8J DTMF ke yp a d micro pho n e al so
and co nnect t h e e xternal sp eake r cabl e to t h e
includes α button on the fro nt, whi ch, whe n
sp ea k e r j ack on the r ear p ane l.
u se d w ith α v ersio n Α FT-2400H, duplicates the
button on the fro nt p a ne l of the tr ansceiver .
N ever apply AC powe r to the power cable of
i n In
ll i n
r ph n
U
MR
Both mi c r oph on e m o d els include
α PTT (Push-
To-Talk) s wi tc h to act iv ate the trans mitte r, a nd
DWN and U Ρ buttons fo r t unin g and me mo ry sel ect io n .
T
Operation
hi s c hapter d escrib es t h e tr a n sce ive r fun cti on s in deta il . Afte r stu dyin g th ese d escrip
t i o n s, k ee p th e FT-2400H Operato r's Quick
Reference Card h a ndy in case y o u nee d to r e-
fres h yo ur me mory.
Prelim in ary Setup
B e for e o p er atin g the t r ansceiv er, r echeck
p o we r supply and a n te nn a connect i ons, a nd
co nnect y our mi c r o pho n e to th e fr on t p an e l
j ac k . N eve r op e r ate t h e t r a nsce iv er wit h o u t α
pr o p e r a n te nn a fo r t he o p er atin g b and. Al so,
please rea d the earli er Con trol s & Connectors
secti o n , if y ou ha ve n ot a lr ea dy, to famili ariz e
y o urself wi th t h e co n tro l s.
As me n ti one d b efo re, re fe re nces to a lte rn ate
button functi o ns h a v e "F / W -~" in fro nt of t h e
button name to remind yo u to p ress t h e F/W
bu tton first mome n ta rily, and th en the ot he r
bu tton wi thin fi v e seco n ds (whil e "F" app ea r s (in
reve rse) ab ove the leftmost fr eque n cy di g it on
t h e di s pl ay). D o n 't h ol d the F / W butto n down, as
t h at will give y o u α d i ffe re nt r esul t, a nd do n 't
pr ess two bu ttons as th e same tim e (ex ce p t t h e
PTT s witch, wh en storing α se p arate t r a n s mi t
fre qu e n cy). Whe n α butto n s h oul d b e h eld d own
To turn t h e tr ansce ive r off, yo u mu st press
and hold th e P O W E R bu tto n fo r 1/2-seco n d.
(as opp osed to j u st pr essed mo men tarily) the
in stru cti on s will say so.
Α five-seco nd t ime r starts whe n y ou press F /μ ,
and cl ea r s whe n y ou press ing α b utton to make
α n ew sel ect io n . If yo u d on 't m ak e α se lecti on in
five second s, t h e butto n functi ons r et urn to norma l (whi te lab el s).
Α button b ee pe r p rov i des u seful au dibl e feedback whe n buttons are presse d , at α leve l dete r mined by th e vo lume co n t ro l . E ac h button h as
α differ e n t b ee p pi tch, a nd each fun ctio n h as α
uniqu e beep co mbin ati o n. F or e x a mpl e, wh e n
y ou press the ΟιΚ button, y ou will h ea r α p ai r o f
l o w-, m e dium- or hi g h-pitc h e d b ee p s co rresp ondin g with t h e RF p owe r le v el selecte d . You
can d i sabl e t h e beep er as d escrib e d in th e b ox
on the n ext p age, but we r eco mme nd y ou kee p
it enabl e d w hil e gettin g to kno w the contro l s.
Beeper Di sabling
If y ou want to turn th e b eepe r off (or bac k
on .), yo u can pr ess F/ W -4 TONE--4 F/W -> TONE
(each b utto n t wi ce,, a l ter τiate ly). If yo u l ock
the controls ( p age 14) and h a v e th e b ee p er
enabled, p r ess in g α button w ill sound α di ffe r e n t mu sica l note fo r as lo n g as it i s held .
Ify ou hav e tro ubl e getting the tra n sceiv e r to
wo rk as desc ribed , see In Case of Prob lems on
p age 34.
Squelch Set up
Before tu(
rnin g on th e tra n sceiv er fo r the first
time:
0
0
12
0
Preset the VO L and SQ L co ntr ols fully countercl ockwise.
Th en press th e P OW ER butto n (if th e tran s-
ce iv er i s off) a nd adj ust the V O L co n t r o l fo r
comfortabl e vo lume on the no i se or any re
ce iv ed si g n al . "BUSY" s h ould be di s pl ay e d in
r eve r se letters at th e far l eft .
If y ou hea r α s i gn al, turn th e sel ector kn ob
to α cl ea r c hann el (o nly no i se) .
0
Turn th e SQ L kno b c lock wi se j ust to s ilence
the no ise. The "BUSY" indicator will disappear. Settin g the SQ L furth er clockwise re
duces se n si tivi ty to weak s ignal s. Wh en eve r
α si g nal reac h es th e receiv er that i s st r on g
e n ou gh to o p e n the squ el ch, "BUSY" will be
di s pl ayed.
Note that whil e recei ving, o ne or mo re b arg r aph seg ments ma y a pp ea r at th e lower left
co rn er of the display, in dicatin g s i g n a l str e n gth
of r ece ive d sign als. This i s not affecte d by the
s qu e l ch settin g, so e v en s qu el ch e d s i gnal s ca n
g iv e some in di cat io n. If more t ha n two b argr a ph segme nts app ear while the s qu el ch i s
cl osed , try r educ ing t h e s qu elc h co n tro l settin g
y°υ wa nt to hear weak s ign als).
Fre que ncy Se lect i o n Modes
Di al Mode
Thi s mo de i s for tuning o r scannin g the b a nd
whe n l ooking fo r α c h ann el on whi c h to op e r ate,
wh e n y ou do n 't h a v e α specific fre qu enc y in
mind. In t hi s mo d e, t h e sel ecto r knob a nd mic r o pho ne bu tto n s eac h tun e the b a nd in t h e
sel ecte d ste p siz e, or in 1- MHz step s, a nd the
sca nnin g funct io n t unes in t he se lecte d ste p
s iz e.
Memo ry Mod e
This mode i s mainly for operatin g only on
specific frequ ency channels known in a dvance
(and programmed in to the memories). F or example, after storing the frequen cies of your local repeaters into memories , you can confine
operation to those channels by se lectin g the
memory mode. In this mod e, th e selecto r knob,
microphone b uttons and scanning function select sequentially from the stor ed memories . The
FT-2400H giv es you 31 memories, each of which
can store repeate r shift and direction, CTCSS
settings, a nd separate r eceive and transmit frequencies. There i s also α Me mory Tun e mode, in
which you can tune just like the dial mode, and
store the resulting retuned memory into the
same or another memory. This and ot her special
memory mode functions are describ ed later, but
you will wan t to keep these terms in mind.
You can tell at α glance which channelling
mode i s in by looking in the shaded memory b ox
a bove and to the left of the fre quency display. If
the box is empty, y ou are in the dial mode. Ify ou
see α number or an "L", "U' or "C" in the b ox, you
a re in the memory mode.
Th e ΜΒ button near the to p righ t corner of the
display (and the button on the front of the ΜΗ-
27A8 J microphone) toggles betwee n the dial a nd
memory mod es . While in t he memory mode,
y our previous dial mode selections are preserved. Also, wh en you switch from the dial to
the memory mode, the l ast-selected memory is
recalled .
Freq uency & Step Sel ection
You can se lect α new operatin g frequency
from either t h e dial mode or by retuning α
me mory. F or now, we suggest u sing the dial
mode. If you see α memory number in the memory box, press the MR button to switch to dial
mode. There are two w ays to se lect your operating frequency: by the selector kn ob, or with the
microphone button s. H owever, holding one of
the microphone buttons for more than 1/2-second starts th e scanner. This i s described l ater,
but if you've already starte d it, just press α
micro phone button again to sto p.
To select the MHz range in which you wish to
operate: first press the ΡάΖ butto n above the
se lector knob so that the kHz digi ts are
blanked, and then t urn the knob. To return to
normal tu ning and display, just w ait five seconds, or press MRi again to redisplay the kHz
digits, and t hen turn the sel ector knob.
Locked Controls
I f n othing happ ens wh e n y o u press α button
or turn the sel ecto r kno b , t he co nt r ol s may
be locked . C heck for " L OCI' at th e top le ft
corner o f th e di spl a y , an d ifyo u see it, press
F /W ---> 0CK to u nlock the con trols . ater you
wil l wan t to enable the loc k ( wi th th e sa me
b u tto n seque n ce) to pr event h aving yo ur
settings di stu rbe d . Pr essing butto n s whil e
loc k ed sound s different mu si ca l notes for as
long as α butto n i s h e ld, but only t h e unlocking sequ ence affects o p eratio n .
L
De faul t c h a nnel (tunin g) ste p s are 5 kHz in
ve r s i on Α, and 12.5 kHz in ve rsi on Β (fo r Ευro pe). Zb sel ect anoth er ste p s iz e, press F /W-4
ΑΙrι ,
STEP turn the se lecto r kn ob fo r the des ire d ste p s,
and press sτ/έr again . See t he b ox abo v e if the
buttons o r kno b fa il to oper ate.
Transmitting
Pr ess the LOCK button at th e uppe r ri g h t, se v e ra l times, if necessary, to se lect lo w p owe r
o u tput.ce
The di s pl a y will r eturn to no rm a l afte r
α few second s, and "LOW' is displ ay ed to t h e left
of t h e me mory b ox (when eith er l ow or medium
po we r i s
sel ected ). When yo u wi s h to t r a n smi t,
wait un til the c h ann el i s cl ear ("BUSY" not di spl ay e d), a nd s qu ee z e th e PTT s witch on th e
micro pho n e w hile ta lking ac r oss th e fro nt of i t.
Duri ng transmi ss io n , "TX" appears at t h e left
s ide o f t h e di s pl ay, a nd t he S&ΡΟ b argraph
s h ows relativ e transmitte r p ower out put (4 segments fo r lo w power, 8 for med ium, and fullsca l e fo r hi g h) . Re l ease t h e PTT s wi tc h to
r ece iv e.
~ bu
buttIf y ou re quire more p o we r press th e LOCK
to n again (to s witc h to m ed ium or high p ower).
H o we v e r, we r eco mmend us in g low p o we r
whe n eve r p oss ibl e to minimiz e p oss ibl e in terfe re nce, curre nt con s ump tio n and h eating.
Ifus ing α Euro p ean ve r s io n , press the button
on the fr ont o f th e mi cro phone to transmit α
1750-Hz Bur st To ne to access re peaters t h at
require it.
Repeater Splits
The FT-2400H offe rs se v e ral methods to set
up spli t fre qu enc y op e r ati on for re peaters: manυαl (ba nd, a nd me mo ry -s pec ific), automati c
( AR S) a nd inde pe n de ntly stored tr a n s mit/r eive fre qu e n c ies. The m a nu al and auto mati c
m etho ds shift the t r an s mit fr eque n cy ab ove o r
b el ow the receiv e fre qu ency by α progr a mmable
offset . This offset is p reset at th e factory to 600
kHz, bu t can b e eas ily change d as d escrib e d in
the b ox at the ri ght.
Wh en in t h e dial mo de, onl y on e offset at α
t im e ca n b e u se d . Thi s offset can o nly b e
chan ge d while in th e di al mod e, and i s ap p li e d
any tim e r ep eater sh ift i s activ ate d (m a nually,
o r by ΑR.S) in the di al mode . F o r r ep eaters that
r equi re an od d s plit, y ou ca n e it h er progr am α
me mory -sp ecific offset, o r store an indep e nd ent
tr a n s mit fre qu e ncy in th e sa me memo ry. These
meth o d s are described l ate r in t he di sc u ss io n on
memori es.
To activate the stand a rd s hift manu ally , j ust
press th e RΡτ button: once fo r minu s s hift, again
fo r plu s s h ift, a nd aga in to ret urn to s impl ex. Α
s mall "-" or "+" s ign app ear s at the top ce n te r of
t he display wh en minus or plu s s hift i s se lecte d ,
res pectiv ely .
Ex a mpl e: To ope r ate t hro u g h α 146.34/146 .94
MHz re p eate r :
'rune th e di s pl ay to 146 .94 MHz (to r eceiv e
on th e o u tput fre qu e n cy) .
D Press RΡτ on ce . Α " (minu s) sh ould appear
at t h e top ce n te r of th e di s pl ay (if n ot k ee p
pr essin g RP T until it d oes).
Ο
Ch a ng ing Repeate r Offset
To dis pl a y the c u rre n trepeate r o ffset, press
F /W-4 RP T. Th e offset i s d ispl ayed in MHz, to
t hree decimal pl aces. You can c han ge th e
offset i η 50- kHz ste p s with th e selecto r k n ob
o r mi c ro ph o n e DWN an d U P buttons . In most
cases y o u will want to kee p th e rep eate r
offset programmed to the most com mo n l y
u sed split in your area.
Also, yo u ca n en ab le/disab l e ARS (Au to mati c Rep eate r Sh ift), by p ress ing F/W at a ny
time w hi le the offset i s disp l ay ed. An "Α"
a pp ear s in the me mo ry b ox wh e n ARS is
en abl e d .
When set as des i re d , press the RP T button to
return the d is pl a y to th e o p e r ating fr equ e ncy.
Q When the chann e l is clear, press the PTT
swi tc h on th e microph one a nd send y our
cal lsi gn . The displ ay s h ould s hift to 146 .34
MHz whil e y ou tr ansmit.
O f cou rse this e xampl e only wo rk s if the
offset i s set to 600 kHz, as s upplied from the
You can change i t as describ e d in th e
box on the previo u s page .
factory.
t iv e, a nd c l os in g t h e pu s h -to-ta lk s wi tc h
changes to th e (shi fte d ) t r a n s mit fre qu ency.
With rep eater spli t activate d , y ou ca n rever se t h e t r a n s mit a nd r ece ive fre qu en c ies by
pressing the sκiΡ butto n abo v e the se l ector kn ob.
Use thi s to di s play t h e t ran smit freque n cy wi tho ut t r a n s mitting, a nd to c h eck the stre ngt h of
si g n al s on α re p eater uplink fre que nc y. Th e rep eater shift sign blink s whil e reve rse split i s
se lecte d . Pr ess SKIP
aga in to return to the n ormal
RE V
Th e ARS fun ct ion i s di sabl ed at the factory.
See th e b ox on the previo us p age to en abl e i t.
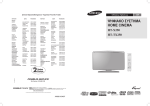
Au tomatic Repeate r Shifi
Th e Fr-2400H offer s 31 me mori es, lab elle d 1
_ 28, C, L a nd U. E ach can init i ally store t he
curre nt op e ratin g d ata fr om the dial mo de o r α
r etun e d memor y. O n ce α memo ry h as b ee n
stor e d , its r epeate r s hift a nd offset, CT CSS to n e
d ata and settin gs for t h e DTMF Paging a nd
CT CSS o pti ons can be mo difi e d, α 4-c h aracte r
n a me ca n b e assi g ne d , a nd α sep arate tra n smi t
shift dir ect io n .
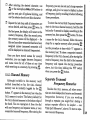
Th e ARS ( Au to mati c R ep eate r Shift) featur e
activates re peate r offset a u to matically whe neve r you tune to th e standard re p eate r s ubb a nd s (see c h a rt below) . Wit h thi s featur e
enabl e d, α sma ll "-" or "+" at t h e top ce nter o f
the di s pl a y indicates th at re p eater shi ft i s ac-
As alr eady me ntio n ed, y ou can use t h e manual s hift meth o d (RΡτ bu tton ) at a ny tim e to
select α n ew s hift state, whethe r ARS i s activated or n ot. H oweve r, if you ch ange freque n c y
inside α re p eater subband wi th ARS activate d ,
manu a l repeater shi ft select io n s are cance ll e d .
Simpl e Mem ory Storage & R ecall
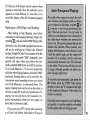
Au to mat i c Repeate r Shift - Repeater Su bbands
Version Α
Version Β
145.1
145.5
146.0
145.6 145.85
146.4 146.6
147.0
+
147.4 147.6
1
F_-
148.0
Ι
fre qu e nc y ca n b e sto r ed . M emo ry C (t he C ALL
channel memory ) ca n be recall e d in stantly by
th e CALL butto n, and me mori es L and U store
progr ammable s ubb a nd limi ts, d escr ibed later ,
in additio n to ge ne r a l purp ose op eratio n.
Ο
Ο
To store α freque nc y in me mory:
Ο
Se lect the desired freque n cy (a nd re peate r
spli t dir ecti on, if d esi red ) in the di al mo de as
already describ ed, or by retunin g α me mory.
Ο
Ο
P ress and ho ld t he
Ο
butto n for 1/2-seco nd ,
un til α second beep so und s. Α m emo ry nume r or l ette r appear s bli nking in the m emory
bo x.
F/ W
Ο Within fiv e seco nds of pr ess in g F/ W , u se the
se l ector kno b o r mi c ro pho n e DWN and UP butto n s to sel ect th e d esir ed memo ry fo r sto r
age (in t he me mory bo x). If you sel ect o n e
that was alrea dy be in g u sed , it will be ove rwritten with ne w d ata in the n ext step .
First perform the ste ps in the e xampl e on
15 to set up th e desire d fre que ncy a nd
offset on the di al.
p age
Press and ho ld the F / W button fo r 1/2-seco nd
to di s pl ay α m emory labe l in the m emory
b ox, th en do th e ne xt step wi thin 5 seco nd s.
Tu rn th e selector knob so that "5" (th e m emory numbe r to sto r e) shows in th e m e mory
b o x.
P ress
F/ W again, m omentarily. That's it. The
dial data has been store d in memory 5. Afte r
α fe w seco nd s th e me mory b ox will c lear, and
yo u are left op eratin g on th e di al.
To co nfirm that thi s wo rke d, tu rn t h e se l ector kn ob to ch an ge t he di al fr eque n c y (to anything), t h en press MR to c h a n ge fro m di a l to
me mory mod e. The num eral 5 should app ear in
the memory b ox, an d 146 .94 (t he receive freque n cy) shoul d app ea r on t h e di splay. Press
SKIP to confirm the tr a n s mi t fr e que n cy of 146 .34
Press F/ W m o me n ta rily to stor e the di splaye dMHz.
d ata into the se lecte d memory. Th e
me mory l a b el will stop blinkin g fo r α seco nd ,
You can u se a ny me mory (excep t C, the CALL
a nd the n di sapp ear as o p erati o n co n tinu es
chann el) with the same res ul t. Me mory C rein th e di al mod e.
quires α s lightly differe nt proce dur e. N ot ice
th at pressing MR fro m the dial mo d e alw ay s r eExample : Store the 146 .34/146 .94 re p eate r d ata
in me mory 5.
ca ll s th e last store d or u sed me mory.
Ο
Recalling Memo ries
In confirming the res ults of the l ast example,
we used the MR button to change from the dial
mode to the memories after they were stored.
The memory label appea r s in the memory box
at the upper left corne r of the frequency display
whenever operating on α memory.
When mo re than one memo ry has been
stored, you can select α memo ry for operation
with either the selector knob or the mi crophone
D WN and UP bu ttons. If you use the microphone
buttons, press and release the button for each
memory: if you hold the button down for '/,-second, memory scanning will sta rt.
Odd -Spli t Memories
storing α frequency, with or without
shift, from the dial, you can mo dify t he
repeater shift and offset of that memory only.
Just recall the memory, press RPT as necessa ry
to set the shift direction, and then follow the
steps in the "Ch a nging Repeate r Offset" box on
page 15. If you want to make the new offset
permanent for that memory, re membe r to press
and hold the F / W butto n for 1/2-second, until the
seco nd beep sounds and then press it again
momentarily. Of course you could also store α
separate transmit freque ncy in t he me mory
( describe d later) to obtain the same result, but
you may find this more straightforw ard when
dealing with repeate rs.
Nami ng Me mories
Once y ou have stored α memory, you can
assign it α name to be displayed when it i s
recalled, in place o f the frequency. Na mes can
be up to four characte rs long, using capital Α
Ζ, 0 --- 9 and an un derline. To store α n ame, fir st
store the memory and then recall ' it as already
described.
Ο Press and hold the F/ W button for 1/2-second,
until the second beep sounds and th e memory numb er starts blinking in the memory
οr~
box..
Ο Within five seco nds o f pressin g F / W , press
the STEP button: Unless α n ame was previou sly stored for this memory, the frequency
will be repl aced by ("-- -- -- --", with the
first pair of hyphens blin king.
Ο You can now use th e selector knob to choose
t he first character of the name to be displayed.
Ο After sel ecting the desired ch aracter , u se
Ρ or th e mi c r opho n e DWNand UP bu ttons to
get the nex t pai r of hy ph en s blinkin g, and
u se the sel ecto r kn ob to set thi s character .
fr e que n cy, yo u can a l so set a n d cha nge repeate r
settings, an d giv e it α name to di s pl ay in place
offre qu ency, j u st by r ecalling it b efo re fo llowing
those proce dures.
Rep eat the last step until all characters are
To sto re the curre nt di al fre que ncy/r epeater
set as desired , an d th en press ΑΙΝ twi ce. At
state in the CALL chann el me mory, h old the F/ W
STEP
bu tto n for 1/2-seco nd to di s pl ay something in th e
the first pr ess, the displ ay will return to th e
me mory bo x, then p ress the BB ALL
memory freque ncy. Afte r th e seco nd pr ess,
bu tton. To sto re
E LL
th e m e mory name will be displ ay ed - fo r
α name fo r th e CALL c h a nn el, ollow th e same
thi s aste
nd any oth er memori es th at h a v e b ee n
p s for α reg ul ar me mory a fte r pressing CALL
BELL
ass ign ed names (unn ame d memories will
(so th e pr ocedure is d one whil e "C" a ppears in
still be displ aye d as ch a nne l fre que n c i es) .
the m e mo ry b ox). To store α sep a rate transmi t
O nce yo u h a ve stor ed n ames for se vera l
fr equ en cy in the CALL cha nn el, after storing the
m emori es, yo u can togg le betwee n fre qu ency
receiv e fre qu enc y, tune t he dial to the tran smit
and na me vi efr
ws for all o f the m at any tim e
equ ency and re p eat th e sto rin g proce dure
whil e r eceiving on α m e mory, by pressing
a bo v e, bu t this tim e ho l d in g t h e PTT s wi tch
ST E P
wh e n y ou press the 1ΕL button.
Ο
f
CALL
Cha nn e l Mem ory
Al t h o u gh invi sibl e to the m emory reca ll
metho d d esc ribe d so far, th e CALL c h anne l
memory can b e in stantly toggl ed by the
ΒΕ LL
butto n. "C" a pp ears in the me mory b o x wh en t h e
CALL me mo ry i s activ e. The factory defaul t for
the CALL c h ann el memory i s th e bottom e dge of
th e ba nd. You can reprogram i t fr om th e dial
wi th any fre qu e n cy and rep eate r state, or eve n
α se parate tran smit freque ncy. After storing th e
Separate Tran s mi t
Frequency Me mori es
B es id es the
CALL memory, all oth er me moties can store in de p enden t rece ive a nd transmit
fr e qu e n c i es ( ho we v er, if yo u a r e wo rkin g
thro ugh α rep eater, y ou might find storing α
uniqu e re p eater offset to b e simpl er - see
"Odd-Spli t Memories", ab ove). Το store α sep arate transmit fre qu ency,
Ο
Sto r e the rece iv e fr e qu e n c y u s in g the
meth o d alrea dy d escrib e d und e r Simpl e
Memory Stor age ( i t d oes n 't matte r if α rep eate r offset is active).
Ο
Tune to t h e d esir e d t ran s mit fre qu ency.
Ο
Ο
Pr ess and ho ld the F/ W button fo r 1/2-second
to di s pl ay the me mory labe l b ox again .
Press a nd h old the PTT switch while pressin g F/ W once mo re mo mentarily (this will not
k ey t he transmitte r ).
Wh en eve r yo u reca ll α se p a r ate tr a n s mit frequ ency memory, "- + " appear toget h er at the
to p cente r of the dis play. As with r egul a r rep eate r offset o pe r ati on, y ou can press t he SKIP
bu tton to di splay the tr a n smit fre que ncy, bu t in
thi s case both shift s ymbo l s will blink.
Afte r sto rin g α me mory wi t h α sep ar ate
transmit fre qu e ncy, if y ou r ewrite t h e r ece ive
fr e que ncy, the sep a r ate tran smi t fr eque n cy i s
de l ete d .
Memo ry
Tuning
While recei vin g on α r ecall ed me mory, y o u
are free to change settin gs suc h as re peate r
s hift and offset as a lr ea dy describ ed, as wel l as
C TCSS and DTMF P aging settings, describ ed
l ater. H oweve r, in t h e me mory mo d e, the
se lector kn o b and mi cropho ne butto ns n orm ally j ust
sel ect fro m amo ng th e stored memori es . To
ch ange the functi on of th ese con tro l s so that yo u
can retune t h e curre nt memory, press the PRi
bu tton mo men tarily. "MT" appears to the l eft o f
th e me mory labe l in the me mory b ox, a nd yo u
can t une in th e same way s as describ e d be fore
for t he di al mode (inc luding MHz steps). If yo u
a r e di s pl aying the me mory name in stead of
fr e que ncy, the di s play will c h an ge to fr e qu e n c y
while you tun e, and the n auto mati ca lly back to
the n ame afte r α fe w second s.
You can store th e ne w fr e que n cy and settin gs
in the curre nt, o r another, me mory. Just p ress
a nd h old F / W fo r 1/2-secon d, se l ect the new memory (ifd es ir e d), a nd pr ess F /W again mome n tarily. Op eratio n r e ma in s on t h e (ne w) me mory as
the ol d me mory r e verts to its original state .
Note
Na mes sto r ed in memo ries always stay with
th e me mo ry τιυτη ber - t lιe y are not co pi ed o r
overwritten w hen sto rin g α ret un ed memory into ατιοthe r zne τn n ry .
Afte r retunin g α me mory, ifyo u d on't wa nt to
sa ve your cha nges, j u st p ress MR
: once to return
D'
to the original memory data, o r twi ce if yo u
want to l ea v e th e me mories and ret urn to the
dial mode .
Hiding and Eras ing Mem o ries
A s a l rea dy me n tio n ed, sto rin g d ata in α
memory au to mati ca lly ov e rwri tes pr evi ou s ly
sto re d d ata (e xcep t the me mory n a me). Howeve r, if you reg ul a rly mo ve fro m o ne area to
a n othe r, yo u may n ot alw a y s want to use th e
sa me memori es. With th e FT-2400H, y ou can
se l ect a n d alter whi ch me mories are available
durin g memory sel ectio n a nd scan nin g without
having to r ewr ite th em from scr atc h . Thi s i s
d one by masking certain me mori es so th at they
ar e hidd e n fro m op e r atio n , and unm asking
the m only whe n des ir e d.
To mas k α me mory,
Ο
Recall the memory to be masked .
Press the F/ W bu tto n fo r 1/2-second (unt il th e
second b eep and t h e memory l a b el blinks).
Ifyo u we r e displ ayin g the me mo ry n a me, it
will re vert to fre qu enc y at this point.
Ο
Press the SKIP
bu tton. Thi s cau ses th e dis play
R EY
to c h a n ge to the n ext l ower sto r e d memory,
a nd the previ ously se lecte d me mory to b e no
l onge r se lectable manu ally , or by scannin g
(desc rib ed late r) .
To unm ask α hidd en memory for op eration ,
Ο
Ο
Recall any memory.
Pr ess and ho ld th e F/W bu tto n for 1/2-second .
Ο
Sel ect th e me mory numb er to be r estore d.
Ο
Press the SKIP
REV butto n ( n ot F /W!) .
Wh en y o u h a ve hi dde n some me mori es, be
ca reful n ot to ov erwr ite t h em acc id en tally. If
you do, yo u will l oose all previo u s co n tents e xce pt th e na me.
Scanning
Be fore y ou start sca nning, mak e s ur e th e SQ L
cont ro l i s set to s qu e lch off th e n oi se on α c l ear
c h a nne l. You start a nd stop scanning wi th t h e
D WN a nd UP butto n s on the mi c r o pho n e. Just
press a nd ho ld th e bu tto n fo r more than 1/2-seca nd to sta rt scanning. If t h e tra n sceiv er i s in the
d i a l mod e, band scanni ng will result. Othe rwi se, if α me mory l a b el i s di s pl ay ed, o nly the
me mori es w ill be scanned.
The scanner pa u ses when α signal opens the
sque lch, and the decimal point on the display
blinks. You can also stop th e scanner manually
by press ing MR'
Me mory Skip
Scanning
When you have some very active channels
stored in memories you may wish to skip them
ca n R es um e Mo de. Se lect i o n
You h ave α choice of two sca n-resume
m odes: either Pa u se mode, i n which t he
scanner p auses for as long as the car rier
keeps the squelch open; or the 5-seco n d
mode, i n which the sca nner pauses for five
secon ds and then resum es sca nni ng
wh eth er t h e sig n al is still prese nt or not .
The 5-second mode i s the factory d efault.
To c hange the scan-resume mode (when not
Α/ Ν
υΡ"
_ Α
scanning), press F/W --->
or υ 5 ιι in the
STEP
memory box indicates the cut-rent mode. If
you w a n t to change it, press F /W mπητeηtαri ly. P ress sτέΡ again to return to th e freque ncy di splay when the scan- res τι nie mode
is set t h e way you want it.
when scanning, but still have them a vailable
for manual select ion. You can mark α memory
to b e skipped by pressing F / W -> τιΕαΥΡ whil e receiving on the memory. "SKIP" appears in tiny
letters j ust to the right of the memory number
box to show that this memory will be skipped
during scanning (although you can still reca ll it
manually). Once set, the scan skip state remains with the memory until it i s specifically
cancelled.
To to this and re-e nable the memory fo r scannin g, j ust repeat the steps you took to disable it:
select the me mory manually, and press F / W -4
REV
S K I P'
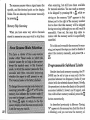
Progra mm ab le Su bband Limits
Besides b and and memory scanning, the FT2400H can be set to tune or scan o nly the frequencies between t wo frequency limits of your
choice (with the selected channel ste p s). Briefly,
the procedure i s to sto re the limits in the special
memories l abelled L (lower) and U (uppe r), and
then with either memory recalled, press the MHz
PRI
butto n momentarily.
As described previously in Me m o ry nning,
"Μ1" appears in the memory box (but this time i t
i s blinking), and you can tune the memory, α1-
tho u gh th e fr equ e n c i es
store d in me mories L
a nd U now limi t the tunin g a nd scanning r a n ge
to the resul ting su bband. If th e e ith er ARS o r
manu a l rep eate r shift is activ ate d, r ep eater offset is a ppli ed automatica lly wh en yo u tran s mit
(eve n if the resul ting tran smi t frequ e ncy i s o ut
s i de the s ubb and limi ts). If yo u sto r e an o dd
r ep eater offset (this is, o ne di ffe re nt fr om th e
di al mode's r ep eate r offset) in on e o f th e limi ts,
the odd offset will b e applied.
The frequ en cy resolu tio n of s ubband lim
i ts is 100 kHz, a lt h ou gh th e channel resolu ti on
o f memories L an d U is the sel ecte d chann el ste p
s iz e. There fo re th e frequ e nci es stored in both
m emo ries L and U are ro unde d do wn to the
n earest 100 kHz to d etermine the actua l s ubb and limits. S in ce th ey - are not limited to α
s pec ifi c fre qu e ncy, you ca n st ill u se t he L and U
m emori es for othe r p urp oses on any fre qu ency
wi thin t h e 100- kHz ran ge a bo v e th e inte nde d
subb a nd limit.
F/W bu tto n for 1/2-seco nd, tun e th e
se l ecto r knob so th at L app ears in th e m e mory b o x, and the n press F / W again momen
ta rily. The di s pl a yed fr e que n cy i s now
stored to pro v i d e an effective l o we r subb a nd
limit of 146 .000 MHz.
Ο
Tun e the di a l to a ny ch a nn el b et wee n
148 .000 and 148 .095 MHz.
Ο
Note :
Ex a mpl e: To limit recep ti o n to 146 .0 -- 148 .0
MHz (o nly a ppli cabl e to certa in tr a n sceiver ve rsi ons)
any ch a nn e l
146.000 a nd 146.095 MHz .
Tune the di a l to
betwee n
Hold the
Ο
Ο
Ο
Rep eat the second ste p , sel ecting U in th e
m emory box. Thi s sto r es the effective upp er
s ubb and li m it of 148 .000 MHz.
Press Dl to change to me mory ope r at ion.
P ress the ΜΗ ' butto n mome ntarily to activ ate
t h e 146 .000 - 148 .000 subb a nd limits for
tuning and scanning.
To ca nce l your s ubband limi ts and return to
me mory ope r ati on, press M e (if you are sca nnin g,
or wa nt to return to dial ope r ati on, you must
press it twi ce) . Pr ess ing the CALL bu tton al so
ca n cel s subb and limits as op erati on s wi tches to
the C ALL chann e l.
Once y ou h ave stored t h e L and U m emories,
you ca n reactivate the s ubb a nd j u st by recall
in g ei the r memo ry a nd press ing PRI
o we ve r,
Μ.
H
you ca nn ot activate the s ubb a nd whe n the L or
memori es are marked for s kip-sca nning
(you'll get ordin ary memory tuning), or if e it her
of these memories are masked (hidde n) .
U
Pri o ri ty Cha nn e l Mo ni to ring
Priori ty moni to ring pr ovides auto mat i c
checking for activity on α priority c hannel
(me mory) every five seconds whil e ope ratin g on
the dial or othe r memories . When the receiver
detects α signal on the priority channel, operation auto matically shifts to that memory while
the signal is present (plus α few seco nds). Ifyou
transmit while pause d on the priority channel,
priority monitoring ceases and operation stay s
on the priority memory.
To set up for priority monitoring:
Ο Preset the squelch, and store the frequency
to be monitored in α memory (this must be
memory 1 if you will be operatin g on other
me mories durin g p riority monitoring).
Ο
Press MR to oper ate in the dial mode, or else
select the me mory you want to operate on,
and then press F/ ω -4'ΡRΊΙ
Α "Ρ" appears in the memory box, and about
e very five seco nds the displ ayed frequency
shifts to the priority memory briefly while the
receiver check s for α s ignal.
While no signal a ppears on the priority channe l to open the squelch, you ca n tune, transmit
a nd receive on the di al, or se lect and operate on
other memories (but not scan them). If α stat ion
you wish to ta lk with appears on the priority
memory, press the FIT switch mo mentarily
while r ece iving their signal, to stop priority
chec king. Otherw ise, when α s ignal appears on
the priority memory, priority c heckin g will
pause and the decimal on the di splay will bli nk.
Priority monitoring will resume acco rdin g to
how you set the sca n-resume mode - either after
α 5-second pause, or after the ca rrier drops (see
page 22). To cancel priority monitoring m anually, press MRNote that you can u se any other me mory as
α priority c hannel in the above procedure when
you a re going to be operatin g in dial mode. You
cannot, however, switch from memory to dial
operati on or vice-versa without first cance llin g
priority monitoring (pr essing M R cancels priority
monitoring) . You also cannot scan during priority monitorin g.
C TCSS Ope r ati on
in g fr e que ncy display after c hec kin g or selectin
g the tone frequency.
Th e built-in tone enco de r fun cti on can b e
To activate CT CSS o pe r ati on ju st press TONE
use d to access r e p eaters a nd stat io n s that rewh e n the o p e rati n g fr e que n cy i s di s pl aye d.
quire α CT CSS (s ub audibl e) tone, by sending α
"εΝC" (e ncode) app ea r s at the top of the di s pl a y
ton e wh ene v er yo u t r a n smi t. Al so, if yo u hav e
and the ton e ge ne rato r i s activ ate d fo r tran st he FTS-17A CTCSS Decode r Uni t op ti on inmi ss io n. If y ou press TONE again wi thout the
stall ed , yo u can s ilent ly moni to r fo r call s on
FT S-17A op ti o n, th e e ncode r turns off. If the
busy c h ann el s. Th e e n cod e fun cti on s uperimFT S-17A i s in stall ed, both "εινC" and "DEC" ( d ep oses α sub audible to ne (at α fr equ en cy too l ow
co de) are di s pl ayed togethe r as tone sque l ch is
to be heard) on th e tra n smi tted carri er . The
act ivate d for b oth transmi ss ion an d recep tio n
o p ti onal (FTS- 17A) deco de fun ct i on mo ni to r s
(requiring α matchin g to n e fr e qu enc y to op e n
receive r audi o through α narrow fil te r at the
the s qu elc h) . P ressi ng TONE on ce more di sa bl es
sa me s ub a udibl e fre qu e n c y, k ee pin g t h e
to n e sque lch.
s qu el ch c l ose d until y o u r ece iv e α matchin g
tone. In sta llat ion of Opt i on s at the back o f thi s
You can store d i ffe r e nt C TCSS to n es (a n d e nmanual d escrib es insta llati o n of the FT S-17A.
cod e/d eco de states) in each me mory in th e sa me
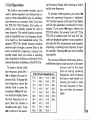
To chec k or set t h e CTCSS
ton e fre quen cy, p ress F/W -4
TONE to d i s play th e to ne freque n cy in Hz. To change th e
tone fr e q ue n cy, rotate the
se l ector knob or press th e
mi cropho n e DWNand UP butto n s un til the displ ay s h ows
the to ne fre qu enc y y ou r eq ui re (from t h e cho ices in
the table at t h e ri ght) . Press
TONE to return to t h e o p e r at-
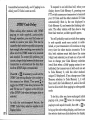
FΤS-17Α Tone F req uencies
67.0
141 .3
100 .0
71 .9
103 .5
146 .2
74.4
107 .2
151 .4
77.0
110 .9
156 .7
79.7
114.8
162 .2
82.5
118.8
167 .9 ~
85.4
123.0
173 .8
88.5
127 .3
179 .9
91 .5
131 .8
186 .2
94.8
136 .5
192.8
(Hz)
203 .5
210 .7
218 .1
225 .7
233 .6
241 .8
250 .3
ma nn e r (a nd at the sa me
tim e) as sto rin g o p e r at in g
fre qu encies. Late r, to change
the tone o r state sto r ed in α
memory, j ust r eca ll i t, reset
th e tone fre qu e ncy o r fun c
t i o n, and sto r e the me mory
again .
"CTCSS Bell" Paging w i t h th e
FTS- 17A
Bell o peration is v ery s imilar to the
CTCSS encode/decode operation just d escribed,
CTCSS
in that subaudible to n es open the squelch . However, ifyou are wa iting for α call, it i s sometimes
convenient to h ave the transceiver "ring" to get
your attention. The CTCSS Bell mode displays α
small bell above the 10's-of-MHz freque ncy
digit on the display (or to the l eft of the name,
if displaying α memory by name) . When you
receive α matc hing CTCSS call, the s mall bell on
the display bli nks to indicate y ou rece ived α
call, and the transceiver rings lik e α teleph one
if you have the ringer e nabled (see b ox be low).
To activate the CTCSS B ell:
0
Tune to the desired frequency or memory.
0
Se lect α CTCSS tone frequency using the F / W
and TONE butto ns as d escribed on the previ ous p age, ifyou have not already.
Ringe r Ale rt ing To ne
You can control the way the transce iver rings when either α selective ca ll (CTCSS B el l, or DTM F
P age) i s received. You can set the ringer to sound differently for eac h of these modes. To check
o r c hange the state o f t h e rin ger, press and hold F/ W for 1/2-second, then press έύύέ . The numbe r
in the center of t he display indicates the length o f each ri ng, and can be set to 0, 1, 3, 5 or 8
(ringing tone p airs) wit h the selector knob or m ic buttons (0 = no ringing).
The disp lay also shows either "Ρ" (for DTMF page r) or "b" (for CTCSS Bell) in the me m ory box,
indicating to which response mode th e dis play ed rin ger length setti ng appli es .
and allow changing the other τηοde's ringe r setti ng.
P ress ρ"R Ι to display
There may also be α lette r "S" displayed just above th e VOL control. If present, the ringer is set to
ring only once (single ring) when α call is received. If i t i s n ot displaye d, the ringer will sound
when α call i s received, an d every 2 minutes thereafte r until reset by the PTT, or corresponding
tone button . P ress the F/ W button to toggle betw ee n single and mul tiple ringing.
0 Wh en yo u e xpect to receiv e call s fro m stati ons usin g to n e s qu el ch (decodin g, o r CTCSS
Bell at the ir end), activate ton e s qu el c h e n
code/deco d e o p erati o n as describe d ab ove, so
they will not mi ss your sign al whe n y ou turn
off th e CT CSS B ell l ate r to re ply.
0
Press F/W -i BELL to activ ate C TCSS Be ll p aging (the s mall b ell i con will appear).
As wit h C TCSS decodin g, all ca ll s witho u t α
matching CT CSS tone will be igno r e d by y our
r eceiver , bu t th ose with the matching ton e w ill
ca u se the t ra nsce iver to ring and the s qu el ch to
op en while the call er transmi ts. The be ll i co n
b egins to blink, a nd con tinu es until yo u ma nua lly reset it (by pressin g the PTT s wi tch to
t r a n smi t, retuning, or pressing MR) . Note th at
the oth er statio n does n ot n ee d to be usin g the
C TCSS Bell fun ct i on to ca ll y ou: th ey can u se
normal
fun ctio n s of th eir tra nsce iv er.
Whe n yo u receive α call , if y ou h ave the
ringer en abl ed, you will n ee d to di sable the
CT CSS Bell feature to pre ve nt rin gin g ev ery
time the othe r stati o n tr ans mi ts: press F/ W -i
CALL to tu rn i t off.
CAL
Th e CT CSS Bell sy ste m i s not memo ry -s pec ifi c : turning it on or off affects the di al a nd all
me mori es.
Note: If y o u activate the Bell wi thout havin g an
FT S- 17A insta ll ed, i t will ring ev ery t ime t he
s qu elc h op e ns.
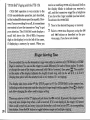
D TMF Paging & Code Squ e lch
(with the FRC-6 Option)
Th e FRC-6 op ti on in c ludes α DTMF tone en code r/deco d e r a nd α d e dicated mi crop rocessor
pr ovi ding p aging and se l ective callin g featur es
und e r DTMF co n t ro l . Th e p agin g a n d co d e
sque lch sy stems use 3- digi t numeri c codes (000
999), tran s mitte d as DTMF (Du al-To ne, Mul tiFr e que ncy) to n e pairs. The FR C-6 h as ei gh t
Code M e mori es in whi c h to store 3- digit DTMF
p agin g co d es.
The p rim ary fun ct ion of the DTMF si gn a lling s yste m allo ws y ou r receiv er to re ma in silent until i t rece ives one of the stored 3- di git
cod es. Then t h e s que l ch ope n s so the calle r i s
heard , and in th e p aging mo de, the tran sceiv e r
also rin gs like α te leph one (if des ire d - see th e
box on the previ ous page). Whe n y o u c l ose th e
PTT to trans mi t, the sa me t hree pr esto re d
DTMF code digi ts a r e se n t automati cally. In t h e
p aging mo de, three more DTMF digits a re also
se n t, re prese n ting y our pe r sona l statio n id e ntificati on.
Th e DTMF p aging and co d e s qu e lch s y stems
are sel ected by the CODE button . Ei th er "PAGE" or
app ea r s at t h e top of the di s pl a y whe n
DTMF pagin g o r code s qu el c h i s activ ated , resp ective ly.
"CODE"
In ei the r co de s quelch or paging m od es, a ny
DTMF -equippe d statio n ca n call y ou (t he y ca n
use α DTMF k eyp ad to se nd the th r ee digits if
y ou are in co de s qu el ch mod e, o r six digits ifyou
ar e in p aging mo d e).
DTMF Paging
In th e DTMF p aging mo de, y ou can receiv e
signal s t h at a r e pr efix ed with a ny o f υρ to seve n
DTMF Co de S qu e lch
diffe r ent pre-stored 3-digit codes, acco rding to
t
h e way y ou prog r a m th e Code M e mories. Whe n
l
m
v
y
s
impl
e.
B
ot
h
Th e co d e squ e ch o de is er
y ou rece iv e α p agin g call, the se lecte d Cod e
you and the other stat ion co mmuni cate u sin g
Me mory c ha nges a utomatically, a nd the display
the sa me 3-d igi t DTMF seque nce, sent a uto matr esp ond s by di splayin g α Co de e mory numb er
i ca lly by the FT-2400H at the star t of e ve ry
nkin g) in t h e me mory bo x, and with th e
(bli
t ra n smi ssion. Yo ur r ece iver no rm a lly re main s
di
3- git DTMF code of t he call er in place of th e
sile n t to all si g n als th at are not prefixed by yo ur
fre qu e ncy di s play. The m ea nin g of the Cod e
sel ected 3-digit co d e . Afte r y o u recei v e th e
Me mo ry numb er a nd 3-di git co d e di spl aye d deto n es, y our s qu el ch ope n s a nd stay s o p en durp e n ds on h ow y ou store d the p aging code:
in g the i r transmi ss io n .
M
To u se the co de s qu e l ch mo de, y ou mu st first
store and t he n manually se l ect t h e o n e Co de
Memory ho lding the 3- digit DTMF co de r e quired
to op en both your s que lc h and t h at o f th e ot he r
stati o n (as d escribed on the fo ll owing p ages) .
Al so, in the co d e sque lch mo d e, Code emories
1 -- 7 a lw a ys funct io n th e same - t h e distinct i on s an d s p ecial settin gs d esc rib ed be l ow fo r
t h e pagin g mo de do n ot apply .
M
In divid ual Codes
Th ese are pe r sonal ID co des to i dentify each
stati on uniqu ely. You stor e o n e of th ese for y o ur
ID, in Co de M e mory 1. You ca n sto re up to s ix
ot h e r Indivi d u a l Codes o f stati ons y ou ca ll
often, in Cod e Me mori es 2 -- 7. Whe n so meo n e
else t r a n s mits y o ur Indi v idu al Code y our displ ay sho ws Co d e Memory "0" bli nking in th e
m emory b ox, with th e othe r stat i o n's Individu al
Code appearin g in pl ace of the op e r ating fr eque ncy, so y o u can see who calle d .
Group Cod es
Thi s type of co d e id e ntifies α g r oup of stati on s. You wo uld ge n era lly sh are α Group Co de
wi th other c lub me mb ers or fri end s. Wh e n yo u
receive α call wi th α Gro up Code t h e Co d e Memory numbe r (2 - 7) in which y o u stored th at
3- di g it Group Cod e a pp ea rs blinkin g in th e
me mory b ox, wit h t h e corres p on d ing 3-d igi t
Code number (in whi c h y ou sto r ed th at co de) to
the righ t.
Note th at for α Gro up
Re me mber, wi th code sque lch op eratio n (bu t
not wi th p aging), yo u can only r ece ive α ca ll on
th e curre ntly-se lecte d Code M emory, a nd th e
di s pl ay does not ch ange, n o r the ringe r soun d,
whe n α call i s received . So for code s que lch, as
mentio n ed be fore, t h e Ind i v i du al/G ro up distincti on d oes not a pply (al th ou gh y ou mu st still
store th e 3- digit Code M e mori es) .
Sto ring Co de
Memories
Th e fir st thing to d o befo r e usin g the pagin g
o r co de sque lch sy ste ms i s to sto re y our Individual Cod e in Code M emory 1.
Activ ate the DTMF Co d e M emo ry displ ay
Code, th e d is pl ay d oes
n ot sho w the ID and code o f the caller, bu t those
o f the gro up in stea d . Co d e M emo ries 2 -- 7 can
be used to sto r e e it h er Indi vidu al Codes (fo r
calling purp oses o nly) o r Gro up Co des (for both
calling a nd receiving), as yo u desir e .
Ο
Wh en e it h er an indiv idu a l p age directe d to
y ou, o r α call to α gro up is receiv ed, th e PAGE
in di cato r starts bl inking, a nd continu es until
y ou reset i t (unl ess you h a v e activated the αυtοt ran s po nd feat ur e, desc rib e d in th e bo x on p age
31). This i s conve nie nt to l et y ou know if someon e ca ll ed whil e y our attenti on was e lse whe re .
Also, the ringe r sound s o nce, or e ve ry two minutes, acco rd i ng to how yo u h ave i t set (page 26) .
0 T urn th e se lector kn ob to se l ect Cod e M emory 1 (the Co de M emory di g it can be set to 0
--- 7, wi th 0 be ing "read-o nly ", an d 2 -- 7 pr o
gr ammabl e wi th g roup or other individu al's
IDs) . Code Me mory 1 is fo r y our p e r son a l
DTMF paging ID Code.
Ο
.
by pr essing F /W -)~ "
CODE The c urre nt Code
M emory numbe r appea r s blin kin g in th e
me mory b ox, an d th e fr eque ncy di s pl ay i s
repl aced by the co rr espo nding 3-d igit DTMF
Code ("000", ifnot used b efo re).
Pr ess ei th er th e Ρ"τ button or th e UP butto n
on th e mi cro ph on e. The Co d e M e mory num-
her will
Ge
sto p blinkin g, and the first di git o f
the 3- digi t DΤΜΣ Co d e will start bli nking.
13
Turn the se lector knob to sel ect α DTMF Co de
d igit bet ween 0 and 9, corres po ndin g to the
fir st dig it of the p erso nal ID co de for yo ur
stati on (wh atev er you wish to use) .
Ο Pr ess Ρά' or the micro ph one UP button again
to cause the next di git to th e ri ght to blink,
and again turn th e se lector kno b to sel ect
the ne x t di g it of your ID code.
Ο
Re peat th e ab ove ste p to set th e last di g it.
At t hi s p oin t, if y ou wan t to go b ac k and
change one of the three co d e digi ts, y ou ca n
p ress th e DWN butto n on the microph on e.
co d e i s now stored in Code Me mory
1. You can press PAGE' to r eturn to the fre que n cy
Your ID
di spl ay now, or yo u can sto r e oth e r co de memori es in the sa me way : p ress pl, Ζ or the micro-
ph o ne butto n s again to get th e Co d e Me mory
numb er in the memory bo x blinkin g, turn the
se l ecto r knob, a nd re p eat the ab ove ste p s. However, b efore sto ring mo re Co d e M emori es, yo u
w ill nee d to co n sider an addit i o nal feature for
30 Α Co de Me mori es 2 - 7, d escrib e d next.
ne rally, y ou store a n other stat io n 's ID
Cod e so y o u can p age th em, but y o u pr obably d o
not wa nt to h a v e your transce ive r rin ging e ve ry
t ime someon e el se ca ll s th em. On th e othe r
ha nd, yo u store grou p codes wi th th e in te nt io n
ofreceiving any p ages to th e g roup (so y ou want
y our s quel ch to op e n and t h e transceive r to
rin g, if p aging) .
Durin g the Co de M emo ry storage p roce dure
describ e d ab ove, wh e n storing Co de M e mori es
2 - 7, y o u h a v e an o pp or t uni t y to d ec i de
whether yo ur transce iver s ho uld resp ond to incom ing p ag in g ca ll s on α p arti c ular Me mory
Code. At a ny t ime whe n α Co d e M emory is
dis pl ay e d, yo u can pr ess the F / W button to toggl e
DTMF s qu e lc h pag in g cap ability on and off.
Whe n on, t h at is, wh e n the decod er i s enable d
to rece ive p aging calls with thi s Co d e Me mory,
an un derba r a ppear s b eneath the memory box.
Ther e fore, if yo u are settin g α Gro up Co d e,
yo u wa n t to ha ve t h e und erb ar on, a nd if sett ing
an other stat io n's Indiv idu a l Cod e, you wan t i t
off. As alr ea dy ment io n ed, thi s di stincti on d oes
not apply to co d e s que lc h only (non-paging) operation : code squ e l ch be h avio r is the sa me, r ega r dless of thi s setting.
Note that the underba r i s d i s pl aye d p ermane n tly on Code Me mo ry 1, s ince this is yo u r own
ID (that y ou will always want to r eceive when
paging i s activated) . Also, the und erbar never
appears on Code M e mory 0, since this i s reserved for display of the ID o f incoming p aging
calls.
R ep lying to α DTMF Page,
After setting α Code
and R esetting
Memory, even before
r eturning to the frequency/memory di splay (by
pressing PAGE)
, you can receive DTMF Paging calls
CODE
directed to you. Any DTMF-equipped station can
call y ou by sending your 3-digi t code, followed
by their 3-digit ID Code. Ifyou monitor with the
code squelch activate d ("CODE" displayed), your
squelch will o pen when you r eceive th e currently-se lected DTMF Co de - even ifit i s n ot your
ID in Code Memory 1 . If y ou are monitoring
with t he DTMF Paging feature activated ("PAGE"
displayed, bli nking after α call i s rece ived), the
transceiver reacts according to h ow you stored
your Code M emories, as described above. The
p aging ringing tones can be set as d escribed in
t he b ox on p age 26, to suit y our p reference. For
paging, y ou can al so h a ve your t ransceiver respond automatically when you are p age d, as
described in t he box at righ t.
If you press y our PTT switch after receiving
α call, the Code (eith e r Individual o r Group) i s
to-7 i- a n sp o nd Pag ing
Normally, after α p age i s received, the indicator bli nks on the display until y ou t ran smit to r espond to the p age, or press PAGE
CODE
MR to return to the frequency/memory dis. Thi s l ets you know if a cal l came in
play
while you w e re distracted, but It does not let
the caller know whether you received his
call, o r not . The auto-tran spond feature addresses thi s problem . Wheτi enabled, your
display still changes to show M emo ry Code
0 and the call er's code, and the ringer still
sounds ( ί f I t I s enabled), but the r adio also
auto matically t rans m its your 11) Code back
to the caller. Thus he can tell t h at you a re
ίη r ange, although possibly riot ab l e to answer his page right away.
'1' ο activate auto-transpo nd, j u st p ress th e
RP T button while the DTMF Code setting
d isplay is active. An "R" appears to the right
of the displayed Memory Code when the
feature i s enabled.
Note that αυtο-tr anspot d is not Code M emo ry-specifιc. it i s either e n ab led or disabled
for a ll pagi ng calls (includί ng groups).
transmi tted a uto matically , a nd if p aging i s ena bl ed, y our ID Co d e i s sent as well.
DΤΜF Co de De lay
Wh en tai ling oth e r statio n s with DTMF
paging o r co d e s qu e l c h, p a r t i c ul a rly
thro ugh r ep eate r s, yo u ma y find so me are
un ab l e to receiv e yo ur call s_ Thi s ca n be
cau sed by th e ir r eceiv e r squ e l ch n ot opening
fast e n o u g h (afte r r ece i ving your carrier) to
allow all o f the DTMF co d es to be rece iv e d
an d decoded . To corr ect thi s pr obl e m, yo u
ca n set α longer de l ay betwee n the time yo ur
tr a n smi tte r i s act i vated a nd th e t im e t h at
.
t h e fi rst DΤΜ F di git i s transmitted
PAGE
P ress F/W -i CODE,
if necessary , toach v atet h e
DTΜ F Co d e setting d is pl a y (the n um be r ill
the memory box b li n ks). Then press MR to
toggl e t h e DΤΜF Co d e delay between 250
a nd 750 ms (an "C" appears at tlιe left side
of th e DTMF Code When the lotiget- delay Is
se l ecte d .
As wi th t he au to-tia n spn ττ d featιτ re, t he
DTMF Co d e De l ay sel ε ctίoυ app lies to al l
Pagi ng Codes.
To r es po nd to an indi vidu a l call, wh e n y our
di s pl ay sho ws Cod e Memory 0, press ing y our
PTT s wi tch cau ses y our tr ansceiv e r to tra n s mi t
y our ID Cod e a n d the othe r statio n's ID Code
a utomati cally (th at i s, t h e o n e di spl a y ed in
Code M e mory 0), and resets the blinkin g in d icator . The othe r statio n will then h ea r α ring
fr o m t h e ir rece iv er, as th eir s que l ch op e ns .
You will pr o ba bly want to s witc h fr om p agin g
to co de s que lch mo de once co ntact i s estab lishe d, o r y our tran sceiv er will co ntinu e to r ing
e v ery tim e t he oth e r statio n transmits. To do
this, b ot h statio ns must both have t he same
3- digi t co de sel ecte d , so at l east o n e of y ou will
h ave to cha nge y our Cod e Me mory sel ect i on
(recall th at when α DTMF pagin g con tact i s establi she d, the tra n sceiv e r s at b oth e n ds a r e set
to Co d e M e mory 0, wit h t h e oth e r stati o n's
uniqu e ID di spl a y e d). If you c h a n ge y our Co d e
M e mo ry sel ection to Co de M emory 1, it will
t h en match hi s Co d e Me mo ry 0, a nd all h e will
hav e to do i s s witch fr o m p aging to co de s que lch
mo d e .
To d o t hi s, after y ou h ave e xch ange d ini ti a l
p aging cal l s, pr ess Cοήέ twice (to cha nge fr om
paging to cod e s que lch mo de), t h e n F / W -i PAGE
CODE to
brin g up th e co de sett in g d i splay, a nd the n t urn
th e se lecto r kn ob o n e c li c k cl ockwi se (to di s pl a y
α blinking 1 in t h e memory b ox). If, whil e you
wer e do in g thi s, he j u st change d fro mp agin g to
co de squ e lch mod e, wh en y o u aga in tra n s mit h e
sho uld h ea r yo u, a nd yo u h ear him, witho u t t h e
ringing.
With Co de S quel ch activ ate d in t his ma nner,
yo u will hear three DTMF code digits at the start
o f eac h of hi s tra n s missi ons, and y our set will
al so tra nsmi t the same three digi ts wh en y ou
press y our PTT sw itch. These d i gits a re t hose
sto re d in t he c urre nt Co d e M emory, a nd they
will o pe n t h e s qu e lch of both stati ons. Th erefo r e, at t he start ofeach t ransmi ssi o n, yo u mu st
wai t α seco nd or two a fter press ing the PTT
s wi tc h for the DTMF code to b e sen t a nd hi s
sque lch to op en be fore yo u start s peakin g.
Whe n you fini s h yo u r conve rsat io n , to reactivate DTMF Co de P aging, press PAGE
CODE t wi ce so
that " PAG" i s again di spl aye d.
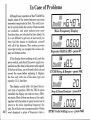
In Case of Problems
Although b asic op er ati o n of the FT-2400H is
s imple, so me o f the ne we r feat ures may seem
so me wh at compli cate d at fir st. The sma ll numbe r of control s b el i es th e v ariety o f feat ur es t h at
are av a il abl e, and so me bu tto n s h a ve mo r e
functi ons t h a n a re indi cate d by th eir l ab e ls. So
it i s not difficul t to get l ost, at l east until y ou
h a v e had the c ha nce to fa mili ari z e yo urself
wi th all o f th e featur es. Thi s secti on p rovides
so me tip s to he lp yo u n a vigate th e v ar io u s displ a y and butto n mo des.
IN
Ι_Ι"
1 Ι
ΙS
M ain Fre qu e nc y Displ ay
f-1 r-1
U. Γ11-1 Ι-1
Repeate r Shift & AR S - press RPT
If t h e display s h ows nothin g at all, push t h e
power switch, and check the p ower s upply con-
nections and the fuse in the power cable pigtail .
If the fuse i s blown, y ou will need to find out and
correct the cause b efore replacing it. R eplace
the fuse only with one of the same type and
capacity : 15-Α, fast-blow .
C TCSS Freq . & Beeper - press ΤΟΝΕ
SP
-
Ι" F.9
Ι
Th e dis play usually tells α l ot abo u t the curre nt state
o f oper at io n . With th e FR C-6 o p ti o n
Ste
p & Scan Res ume - press Α/Ν
in stall e d, th e di spl a y can take on ma ny differ _
e n t states. M ost of these are sh o wn at t he ri gh t,
toget h er with th e bu tto n to press in eac h case to
retu r n to the ma in (o p erati n g fr e qu en c y) di sί Ι"Ι ~Ι Ι
E
play. You will a l so see α (pr ogra mm a ble) 4-l ette r
DTMF Co d e Setti ng (op ti o n) - pr ess PAGE
word di spl aye d in pl ace o f fre qu e nc y wh en α
n amed
memory i s di s pl a yed. Pressin g sτέΡ will
di spl ay the fre qu en c y. Ex cep t for th e m ain fr equ ency a nd t he me mory n ame di s plays, most o r
all of th e othe r buttons will b e di sabl e d a nyway.
I t is well worthw hil e to study the m ain fr equ en c y di s pl ay di agra m on page 6 ca re fully.
Thi s di s pl a y i s the basi s fo r b as ic op e r ation .
Fo r exampl e, if the fr eque ncy di splay changes
une xp ecte dly wh en yo u tran smi t (or if " E rr"
a pp ears), c heck for α sma ll " + " o r "-" at the top
ce n ter , indi cating t h at r ep eate r shift is activ e,
but that the r es ult in g t r a n s mit fre qu enc y is out
o f ra n ge.
If y ou st ill cannot en te r d ata, check to see i f
the "TX" indicator n ear the upp e r l eft of the
di spl ay i s on, indicating that the transce ive r i s
tr a n s mi tt ing. Re leasin g th e PTT switch s hould
retu rn t he set to rece iv e. If still nothing hap p ens, switch the tran sceiv er off, and th en b ac k
on.
If the di s play shows all segme nts at the sa me
tim e, o r sho ws "C- Rx" an d y ou ca nnot turn th e
set o ff, y ou may h a v e in adv ertent ly starte d
memory cl o nin g - press the ΡΤΤ switch (th e
di spl ay will cha nge to " E rr", and the n hit t h e
p o wer sw itc h to return to normal op eratio n .
As α last r eso r t, if y o u are unable to ga in
If t h e m a in fre qu en cy or memo ry na me di ssensible co ntrol of the tran sce ive r, r eset the
play i s visible, but pr ess ing α bu tton a pp ea r s to
CPU as described in th e ne xt secti on .
do nothing, first c h eck for "L OCI" at the top l eft
To a v oid confusi on res ul tin g fro m in advercorner o f the di splay. If y ou see it, pr ess F /W -4
nt bu tton presses, set th e keypad loc k on
9°Κ to unl oc kte
t h e buttons. Oth erwi se, y o u ca n
( Press F / W ~ Lόέκ) if y ou l ea ve the transceive r
p ress the Μπ bu tto n , whi ch will usually termi un attended whil e it is on. Re member to set th e
n ate any part ially entered co mm a n ds.
lock b ack off wh en yo u wi sh to ente r data .
If the numb er in th e me mory b ox is blink ing,
R esett ing the CPU
the di splay is s h owing α DTMF Memory Cod e.
Thi s occurs s po n tan eou s ly whe n α DTMF p age is
Th e FT-2400H has three le v el s of resetting:
r ece ive d. Press PAGE to return t he fre quency di sme mo ry -o nly, all-setting soft reset, and all-setplay to
n orm a l.
tin g
h a rd reset:
reset only the memories, hold the F/W and
uttons while switching the set on. Your step,
MR b
To
repeater s hift and other settin g will be retuaniend, while the memories will be cleared.
To clear all settin g to their factory de faults,
hold MR and sir w hile turning the transceiver
on. Then turn the transceiver off and hold only
while switc hing it back on again . If for so me
MR
reason this fails, you can perform α hard reset
by removing the top cover, and shorting ac ross
the split sol der pad on the circuit board exposed
on the inside of t he front p anel, j ust behind t he
top left corner of t he displ ay. Then hold MR while
switching on.
Memory Backup
Normally, α lithium b attery inside the trans-
ceiver retains all settin gs and memories while
power is off o r disconnecte d. If the transceiver
looses its memories (but still operates properly), this b attery s hould be replaced.
The front p anel must be removed to gain
access to the battery, which is on the insid e of
the front panel, just behind the memory box on
the display. It should be replaced o nly be an
Yaesu-authorized technician to ensur e that i t is
installed properly.
Memo ry Cloning
All memory data stored in one transceiver
ca n be moved to another by co nnectin g the microphone j acks together with the optional cloning cable, available from your Yaesu dealer.
Ο Turn both t ransceivers off, and connect the
mic j ac ks together. Press and hold the F/ W
buttons while turning the p ower switches
on. All segments of the displays will be on.
Ο Press the ~ιαΡ button on the destination
transceiver (the displ ay will show "C- Rx" in
place of frequency) .
Ο
Press the RP T bu tton on the source transceiver. The display will show "C- Τχ " while
the data i s being transfer red, and shou ld
then return to normal. If " E r r" app ears on
the destin ation display, turn both transceivers off and try again . If the display of the
destin ation transceiver remains all blank or
all on, and you cannot turn the transceiver
off, press the PTT switch (the display will
change to " Err", and then hit the power
switch to return to normal operation. Recheck your ca ble, and then try again.
Ο Turn both transceiv ers off and remove the
cloning cable.
Pac k et Radi o
P acket rad i o o p e ratio n wi th the
FT-2400H
re q uires α late r- mode l We with α PLL-tpe DC D
c irc ui t, since the re is no r ea dily -access ibl e
s qu el ch status o ut pu t fr o m the ra di o to te ll the
tn c wh en th e chan n e l i s clear . Co nnecti o ns between th e tn c a nd th e mi c r opho n e j ack of th e
FT-2400H can b e mad e as indicate d in t h e tabl e
b el ow.
You must use an 8- pin mo dula r tel epho netyp e plu g fo r the mi c jack connectio n s.
se
shie lded cable fo r the audi o lines, a nd keep i t as
s h ort as possibl e to avo id RF pi c kup.
U
In te rn a l Adjustments
In s id e the top cove r a re se v er a l a dj u st me n ts
to m atch th e tr ansce iv e r to y o ur op eratin g re quire ments (the top
cove r can b e r emoved as d escribe d on the next
p age). You can adj u st the v olume o f t h e bu tto n
b ee pe r ( r el ative to the fr on t pane l V O L co n tr ol )
by t h e BEEP t rimm er, a n d me dium and l o w
p o we r o u tp ut le v els by the MI D and LOW trimme r s if yo u h ave α VHF wattmeter . See t h e
Ca u ti o n b ox b e lo w.
that y o u may wi sh to ma ke
Digitally signed by
http://www.aa4df.com
"RADIO"
Jac k (
on TNC
R eceive r A ud io Ι
in
PTT o ut
Tr a n smit Au dio
o ut
Gro und
FT-2400H
M ic J ack
Comment
pin 2
8 o hms, de-emp h asize d
pi n 3
g ro u nd to tra nsmit
pin 4
400 ohms, p re-em ph asized
pi n 5
Audio signal g round
Ca u t i o n !
Th e oth e r trimmers inside the front
Ι?arae! s h ntι l λ tτπ t h e a djt ιsteλ l v ithntι t t h e
.Ππίιι ; so c οιι l d
proper test equipment
ι1e "" ιιι de peιfπrιιιαιι cc,
or
eTc ιι ιίαηιιι s?e
I lι e tι-ίιιτ s Cι1 ί ι c r, ιιιιι l ι1,ίΙ l ιοίιΙ vοιιι . wαι _
rιτιι t ι' . 1U'k vοιιr i 'α es ιι ιΙι°αΙ cι fιι r help ί1
1' Πιι ιι eίιΙ ίιιιι' othc ι- ιιιΙ jιι st ιι te ιι ts
made.
Installation o f Op tions
This section describes the installation procedures fo r the FRC-6 DTMF Pager and FTS- 17A
To ne Squelch Unit. These options are available
fr omy our Yaesu dealer.
The FRC-6 provides DTMF pagin g/se lcall feat u res u sing 3- di git DTMF stat ion ID codes.
Seven code me mories store your ID code plus
those of six frequently-called stations or groups .
Co ntro l is provided through the front panel of
the transceiver. See the "Operation" chapter for
operational details.
The FTS-17A inclu des α decoder for 38 ΕΙΑ.
standard s ubaudible CTCSS tones, programmable from the front panel of the FT-2400H. I t
provides silent moni toring of busy channel s
when activated by th e ENCode/DE Code Tone
Squelch functio n.
0 Disconnect the D C power cabl e, and referring to Figure 1, re mo v e th e four screws
affixing the top co ver (two on either side),
and loose n the o ne on top from the bac k by
se veral turns. Li ft th e r ear edge of the cover
s lightly, then remove it.
Referring to Fi gure 2, note the accessory
mountin g locat ions. If in stallin g the FTS17Α, remove the paper from the doublesided adhesive pad.
0 Carefully align the pins with the white connectors on the board, and press the u nit(s)
in to pl ace. The FTS- 17A goes o ver the
smaller connector, and the FRC-6 o ver the
l arger one.
0 The factory adj usts the output tone l evels
(the small trimmers access ible through the
option boards) for the prop er deviation, so
they s hould require no further adj ustment.
C3 Replace the top co ver an d four screws remo ved in the first step, and remember to
tighten the sc r e w at the back of the top
panel from the rear.
Tag
Figure 2
Π
YA E S U
YA ES U MUS EN CO., LTD .
C. P.O. BOX 1500, TOKYO, J AP AN
YAESU U.S.A .
17210
Edwards Rd .,
Cerritos, California 90701, U.S.A.
YAE SU EUR OPE B. V.
Snipweg 3. 1118ΑΑ Schiphol, Tie Netherlands
Ε03131000(108 0 - ΒΚ)