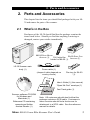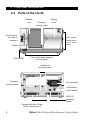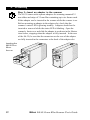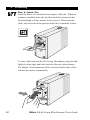
1
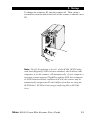
35 mm Film Scanner
LS-30
User's Guide
Cautions
•
•
•
•
The reproduction of this manual in whole or in part is prohibited
save in cases in which Nikon’s prior permission has been
obtained.
The information contained in this manual is subject to change
without notice.
Nikon has made every effort to produce a perfect manual, but
should you find any mistakes, we would be grateful if you would
kindly let us know. The address of Nikon’s representative in
your area is provided separately.
Nikon is not liable for damages resulting from the use of this
product.
Symbol
✔
The
symbols in this manual signify important safety precautions. All passages marked with this indication should be read prior
to installation to prevent injury to yourself or to others. These
indications are also placed in the table of contents to mark passages
that should be read before use.
Symbol
The ✔ symbols in this manual signify the need for caution when
using the product. These indications are placed in sections that
should be read before operation to prevent damage to the product.
Warning!
The CD-ROMs on which the software and manuals are distributed
should not be played back on audio CD equipment. Playing CDROMs on an audio CD player could cause hearing loss or damage
the equipment.
Trademark Information
Macintosh is a registered trademark of Apple Computer, Inc. Microsoft and
Windows are registered trademarks, and Windows NT a trademark, of Microsoft
corporation. IBM PC/AT is a trademark of International Business Machines
Corporation. i386, i486, Pentium, and Pentium II are trademarks of Intel Corporation, U.S.A. Adobe and Acrobat are registered trademarks, and Photoshop a
trademark, of Adobe Systems, Inc. The Clean Image function incorporated in the
LS-30 makes use of Digital ICE technology developed by Applied Science Fiction
Inc. Digital ICE and the Digital ICE logo are trademarks of Applied Science
Fiction Inc. All other trade-names mentioned in this manual are the trademarks or
registered trademarks of their respective holders.
ii
Nikon LS-30 35 mm Film Scanner User’s Guide
Federal Communications Commission (FCC) Radio
Frequency Interference Statement
This equipment has been tested and found to comply with the limits for a
Class B digital device, pursuant to Part 15 of the FCC Rules. These limits
are designed to provide reasonable protection against harmful interference
in a residential installation. This equipment generates, uses, and can
radiate radio frequency energy and, if not installed and used in accordance
with the instructions, may cause harmful interference to radio communications. However, there is no guarantee that interference will not occur in a
particular installation. If this equipment does cause harmful interference to
radio or television reception, which can be determined by turning the
equipment off and on, the user is encouraged to try to correct the interference by one or more of the following measures:
• Reorient or relocate the receiving antenna.
• Increase the separation between the equipment and receiver.
• Connect the equipment into an outlet on a circuit different from that to
which the receiver is connected.
• Consult the dealer or an experienced radio/television technician for help.
CAUTIONS
Modifications
The FCC requires the user to be notified that any changes or modifications
made to this device that are not expressly approved by Nikon Corporation
may void the user’s authority to operate the equipment.
SCSI Cable
Depending on your region, a SCSI cable or ferrite core is provided with
your scanner. The SCSI cable used with your scanner must be that
provided or must have the provided ferrite core attached. Using other
interface cables may exceed the limits of the class B Part 15 of FCC rules.
Notice for customers in Canada
CAUTION
This class B digital apparatus meets all requirements of the Canadian
Interference Causing Equipment Regulations.
ATTENTION
Cet appareil numérique de la classe B respecte toutes les exigences du
Règlement sur le matériel brouilleur du Canada.
Notice for customers in European countries
ACHTUNG
Dieses Gerät entspricht den Bestimmungen der EG-Direktive 87/308/EEC
zur Störungsunterdrückung. Lärmemission kleiner 70 dBA
Nikon LS-30 35 mm Film Scanner User’s Guide
iii
Safety Precautions
Observe the following safety precautions when installing and
operating the LS-30:
iv
•
Do not allow your fingers, hair, or clothing into the film
insertion slot
Do not insert your fingers, hair, or clothing into the film insertion slot on the front of the scanner when the power is on and a
film adaptor is in place. Doing so could result in injury.
•
Do not disassemble
The interior of the scanner contains areas of high voltage.
Removing the scanner’s cover could result in fire or electric
shock. Contact your dealer or Nikon service office for inspection or repair.
•
Do not modify
Do not modify the equipment. Doing so could cause fire or
electric shock.
•
Do not place heavy objects on the scanner
•
Place on a stable surface
Do not use the equipment on an unstable surface or on a surface
which is not horizontal. This could cause the equipment to fall,
resulting in injury.
•
Do not drop
Do not subject the equipment to strong shocks, as this could
cause malfunction or breakage. Note that the scanning unit
contains glass parts; if the scanner is dropped, care should be
taken to avoid contact with broken glass.
•
Keep clean
Use a dry cloth to remove any dirt from metal sections of the
scanner and their surroundings. Using the equipment when dirty
could cause fire.
Nikon LS-30 35 mm Film Scanner User’s Guide
•
Do not place foreign objects inside the scanner
Do not allow foreign objects of any kind into the unit. If
flammable objects, metal, or water come in contact with the
interior of the scanner, malfunction, fire, or electric shock could
result.
•
Do not place vases, flowerpots, cups, cosmetics, vessels containing chemicals or water, or small metal articles on top of the
equipment. Should such articles or their contents fall into the
equipment, fire, electric shock or malfunction could result.
•
Exposing the scanner to volatile substances such as alcohol,
benzine, thinner, or pesticides could cause malfunction, fire, or
electric shock.
•
If foreign substances or water should find their way into the
equipment, turn off the power immediately, unplug the power
cord and contact your dealer or nearest Nikon service office.
Continued use could result in fire, electric shock or malfunction.
Particular care is advised in households with small children.
•
When not using for an extended period
When not using the equipment for an extended period, remove
any film that may be in the adapters and take the adapters out of
the adapter slot. Turn off the equipment and unplug the power
cord. To prevent the accumulation of dust inside the equipment,
close the front cover.
•
When performing routine maintenance
Before performing maintenance, turn the equipment off and
unplug the power cord.
•
If you notice smoke or an unusual noise or smell from
the scanner, turn off the power immediately and then unplug
the power cord. Continued use could result in fire or electric
shock. After ensuring that the equipment has stopped smoking,
contact your dealer or Nikon service representative for information on replacement or repair. DO NOT attempt repairs yourself,
as this would be extremely dangerous.
Nikon LS-30 35 mm Film Scanner User’s Guide
v
When transporting the scanner
The LS-30 is for use only in the country of sale. Nikon will not be
held responsible for consequences resulting from use overseas.
The scanning mechanism must be locked in its home position for
transport within the country. To return the scanning mechanism to
its home position, remove any adapters from the adapter slot and
then turn the scanner on. The status LED will blink while the
scanning mechanism returns to the home position. Wait until the
status LED glows steadily, then turn off and unplug the scanner.
Place the guard in the adapter slot as shown below, sliding it in until
it contacts the back of the slot.
Remove the transport locking screws from the rear panel and screw
them into the holes provided in the side panel and the mouth of the
adapter slot (the hole in the mouth of the slot should align with the
hole in the guard). Close the front cover and pack the scanner and
adapters in the original packing material for transport.
✔
vi
Caution: Do not transport the scanner without first locking the
scanning mechanism with the transport lock screws. Moving the
scanner without the lock screws in place could damage the mechanism.
Nikon LS-30 35 mm Film Scanner User’s Guide
Notice concerning prohibition of copying or reproduction
Note that simply being in possession of material which has been
copied or reproduced by means of a scanner may be punishable by
law.
•
Items prohibited by law from being copied or reproduced
Do not copy or reproduce paper money, coins, securities,
government bonds, or local government bonds, even if such
copies or reproductions are stamped “Sample.”
The copying or reproduction of paper money, coins, or securities
which are circulated in a foreign country is prohibited.
Unless the prior permission of the government has been obtained, the copying or reproduction of unused postage stamps or
post cards issued by the government is prohibited.
The copying or reproduction of stamps issued by the government and certified documents stipulated by law is prohibited.
•
Cautions on certain copies and reproductions
The government has issued cautions on copies or reproductions
of securities issued by private companies (shares, bills, checks,
gift certificates, etc.), commuter passes, or coupon tickets,
except when a minimum of necessary copies are to be provided
for business use by a company. Also, do not copy or reproduce
passports issued by the government, licenses issued by public
agencies and private groups, ID cards, and tickets, such as
passes and meal coupons.
•
Comply with copyright notices
The copying or reproduction of copyrighted creative works such
as books, music, paintings, woodcut prints, maps, drawings,
movies, and photographs is prohibited except when it is done for
personal use at home or for similar restricted and non-commercial use.
Nikon LS-30 35 mm Film Scanner User’s Guide
vii
Contents
Contents
Safety Precautions ................................................................. iv
1.
Overview ............................................................... 1
2.
Parts and Accessories ......................................... 3
3.
4.
2.1
What’s in the Box .......................................................... 3
2.2
Parts of the LS-30......................................................... 4
Setup ..................................................................... 5
3.1
Setting up the LS-30 .....................................................5
3.2
Software Installation ...................................................16
Scanning ............................................................. 21
Appendix: Nikon Scan Controls ...................... 31
Menus, Tabs, and Information Displays ...............................31
Buttons ..................................................................................32
Control Drawers ....................................................................33
Preferences ..........................................................................35
viii
Nikon LS-30 35 mm Film Scanner User’s Guide
1. Overview
1. Overview
Thank you for your purchase of a Nikon LS-30 scanner for 35 mm
film. The LS-30 is a high-speed, high-resolution scanner capable of
producing images suited to a wide variety of tasks, including desktop publishing, design, and multi-media publishing. Its modular
design allows you to change from scanning 35 mm slides to scanning 35 mm strip film “on the fly.” An adapter for scanning IX240
film is available separately. The LS-30 uses a high-speed SCSI
interface for connection to computers running Mac OS System
Software 7.1 or later, Windows 95 or later, or Windows NT 4.0 or
later.
The scanner driver software provided with your scanner, Nikon Scan
2.1, offers sophisticated pre-scan editing of images, including
precise color correction, contrast, and brightness adjustment. Nikon
Scan can be launched from any TWAIN-compliant application
under Windows or from any application that supports Adobe
Photoshop plug-ins (version 4.0 or higher) on the Macintosh. Nikon
Scan can also be used as a “stand-alone” application, allowing you to
save scanned images to disk without the help of another application.
The user’s manuals for the LS-30 and Nikon Scan are divided into
three parts. This User’s Guide offers a brief introduction to setting
up the scanner and scanning images using Nikon Scan. More
detailed reference manuals for the scanner and for Nikon Scan are
provided on CD-ROM. To read these manuals you will need to
install the Adobe Acrobat Reader software included on the reference CD. In addition, a one-page Fast Track Guide is provided for
experienced users who want to get started with the minimum of
instruction. Where appropriate, this guide will refer readers to the
reference manuals or Fast Track Guide for more information.
References to the manuals on CD are indicated by a
icon in the
margin, references to the Fast Track Guide by a
icon.
Nikon LS-30 35 mm Film Scanner User’s Guide
1
1. Overview
The chapters that follow provide a step-by-step guide to installing
your scanner and using Nikon Scan to scan 35 mm slides or strip
film. The next chapter, Parts and Accessories, lists the things you
should find packaged with your LS-30 and names the parts of the
scanner. This is followed by “Setup,” which guides you through the
process of connecting your scanner to a computer and installing
Nikon Scan. “Scanning” outlines the steps involved in using Nikon
Scan to scan slides and strip film. A separate reference section lists
the controls available in Nikon Scan. We hope that you find this
manual useful.
2
Nikon LS-30 35 mm Film Scanner User’s Guide
2. Parts and Accessories
2. Parts and Accessories
This chapter lists the items you should find packaged with your LS30 and names the parts of the scanner.
2.1
What’s in the Box
Purchasers of the LS-30 should find that the package contains the
items listed below. Should you find that anything is missing or
damaged, contact your retailer immediately.
MA-20 SLIDE MOUNT
SA-20 STRIP FILM
FH-2 strip-film
ADAPTER (1)
ADAPTER (1)
holder for MA-20 (1)
LS-30 Scanner main
body (1)
Power cable (1)
(shape of cable depends on
country of sale)
Film tray for SA-20
(1)
User’s Guide (1) (this manual)
“Open Me First” envelope (1)
Fast Track guide (1)
Scanner software CD-ROM
for Windows and
Macintosh (1)
Reference CD containing
manuals and Adobe
Acrobat Reader (1)
Note: US customers should also find that the
package contains a SCSI cable. Customers in
other countries should find a ferrite core for
attachment to a SCSI cable. See the reference
manual for details.
Nikon LS-30 35 mm Film Scanner User’s Guide
3
2. Parts and Accessories
2.2
Parts of the LS-30
Adapter
slot
Sliding
cover
Transport
locking screw
On/off switch
(on side of
scanner)
Feet (used
when scanner is on its
side)
Guard
Feet (used when scanner
is on its base)
Status LED
Holders for
locking screws
100–240V~
0.3–0.2A
50/60 Hz
Transport
locking screw
AC connector
100098
MADE IN JAPAN
SCSI NB
TERMINATOR
4
1
6 7
2 3
5
0
SCSI
OFF
SCSI
ON
Termination
on/off switch
SCSI ID
selection
switch
Female half-pitch 50-pin
SCSI connectors (2)
4
Nikon LS-30 35 mm Film Scanner User’s Guide
3. Setup
3. Setup
This chapter takes you step-by-step through the process of setting
up the LS-30 and installing Nikon Scan.
3.1
Setting up the LS-30
This section outlines the steps involved in connecting the LS-30 to a
computer. Before using your scanner, you will need to complete the
following steps:
• select a suitable location for the scanner
• remove the transport locking screws
• connect the power and SCSI cables
• set the SCSI ID
Step 1—Choose a location for the scanner
Before connecting the LS-30 to your computer, choose a flat, stable
location for it, free from vibration and dust. Do not install your
scanner where:
• it would be exposed to direct or reflected sunlight
• it would be subject to condensation or drastic
changes in temperature
• it would be subject
to radio interference
from other electronic
devices
• the temperature
exceeds 35ºC (95ºF)
or falls below 10ºC
(50ºF)
•
other objects would block the scanner’s vents
Nikon LS-30 35 mm Film Scanner User’s Guide
5
3. Setup
The scanner has feet both on its base and on one side, making it
possible to place the scanner either on its base or on its side. When
installing the scanner, leave enough space free for ease of operation.
There should be at least 5 cm (2″ ) of space above the unit, and 10
cm (4″ ) behind. Space requirements are illustrated below.
When installing the scanner on its base
✔
6
Caution: The scanner must be installed with the feet down, as
shown in the illustrations on these pages. Do not store or operate
the scanner in any other orientation.
Nikon LS-30 35 mm Film Scanner User’s Guide
3. Setup
When installing the scanner on its side
Step 2—Remove the transport locking screws
Once the scanner is installed, slide the front cover open. Using a
coin, remove the transport locking screws from the adapter slot and
side panel and screw them into the holes provided on the rear panel.
The adapter slot contains a guard to prevent the transport screw
from falling into the scan mechanism when the transport screw is
removed. After removing the transport screw from the adapter slot
and screwing it into one of the holes on the rear of the scanner,
remove the guard and store it in a safe place.
✔
Caution: Never turn the scanner on with the locking screws in
place. Turning the power on in these circumstances could damage
the scanner.
Note: Replace the locking screws and guard when transporting the
scanner (see the “LS-30 Reference Manual”).
Nikon LS-30 35 mm Film Scanner User’s Guide
7
3. Setup
Step 3—Connect the power cable
Before connecting the power cable, confirm that the scanner is off
and that the transport locking screws have been removed from the
side of the scanner and adapter slot. The scanner is off when the
end of the power switch marked “0” is down.
Power switch off
Attach the female end of the power cable to the AC connector on
the rear of the scanner and insert the male end into a generalpurpose household outlet.
Safety Precautions
• Use an AC power supply of 50/60Hz and a voltage of from
100V–240V. Be sure to use a power cord rated for the appropriate voltage.
At voltages of more than AC 125V:
use a power cord that complies with the safety standards of the
country in which it is used, which has a plug rated for AC 250V,
15A (NEMA 6P-15) and insulation of SVT type or better, and
which is more than AWG18 in thickness.
At voltages of AC 125V or less:
use a power cord that complies with the safety standards of the
country in which it is used, which has a plug rated for AC 125V,
10A and insulation of SVT type or better, and which is more
than AWG18 in thickness.
•
8
Do not damage or modify the power cable. Fire or electric
shock may result if the cable is placed under heavy objects,
exposed to heat or flame, or forcibly tugged or bent.
Nikon LS-30 35 mm Film Scanner User’s Guide
3. Setup
•
Should the insulation become damaged and the wires become
exposed, contact your retailer or Nikon service office for
replacement. Continued use could cause fire or electric shock.
•
Do not handle the cable when your hands are wet. Doing so
could cause electric shock.
•
The outlet into which the power cable is plugged must be grounded.
Failure to ground the power supply could result in electric shock.
•
The scanner and all devices to which it is connected must be
connected to a common ground. If a common ground is not used,
a ground loop could occur, causing electric shock or static “noise.”
•
Do not plug the power cord into
an extension cord or multipleoutlet extension, as this could
result in fire or malfunction.
•
Use an independent outlet whenever possible. If the scanner is
plugged into an outlet to which a household appliance such as a
vacuum cleaner or air-conditioner is connected, the scanner’s
power supply may be subject to noise.
•
Unplug the power cable by
pulling on the plug, not on the
cable itself. Pulling directly
on the cord could result in
damage that could cause fire or
electric shock.
The shape of the cable
depends on the country of sale
•
Do not connect or disconnect the cable while the power is on.
Nikon LS-30 35 mm Film Scanner User’s Guide
9
3. Setup
Step 4—Connect the SCSI cable
The LS-30 connects to your computer by a Small Computer Systems Interface, or SCSI. To use a SCSI connection, you will need
an appropriate SCSI cable and, in the case of IBM PC/AT compatible computers, a SCSI extension board (“SCSI adapter”) or
PCMCIA card (see the Fast Track Guide and the LS-30 Reference
Manual for details). This section describes the procedure to connecting the LS-30 to a SCSI “chain” made up of your computer and
SCSI devices connected to it in a series.
SCSI devices cannot be connected while the power is on. Before
connecting the scanner to the SCSI chain, be sure that the computer
and all other devices in the chain, including the scanner, are off.
How the scanner should be connected to the chain depends on
whether it is to be located between other devices or attached at the
end of the chain.
10
Nikon LS-30 35 mm Film Scanner User’s Guide
3. Setup
When the scanner is the last device in the chain
1. Set the terminator switch on the rear of the scanner to ON
TERMINATOR
OFF
ON
2. Connect the SCSI cable to either of the two SCSI connectors on
the rear of the scanner and connect the other end to the next
device in the chain
Scanner only external
device in chain
100–240V~
0.3–0.2A
50/60 Hz
100098
MADE IN JAPAN
SCSI NB
TERMINATOR
4
1
6 7
2 3
5
0
SCSI
OFF
ON
SCSI
Scanner last of several
external devices
100–240V~
0.3–0.2A
50/60 Hz
Other SCSI device
Other SCSI device
100098
MADE IN JAPAN
SCSI NB
TERMINATOR
4
1
6 7
2 3
5
Nikon LS-30 35 mm Film Scanner User’s Guide
0
SCSI
OFF
ON
SCSI
11
3. Setup
When the scanner is between other devices
1. Set the terminator switch on the rear of the scanner to OFF
TERMINATOR
OFF
ON
2. Connect the SCSI cable from one of the devices in the chain to
either of the connectors on the rear of the scanner, then connect
a cable to the remaining connector and attach the other end to a
connector on the next device in the chain
100–240V~
0.3–0.2A
50/60 Hz
100098
MADE IN JAPAN
Other SCSI device
SCSI NB
TERMINATOR
4
1
6 7
2 3
5
0
SCSI
OFF
ON
SCSI
Terminator
3. Confirm that the last device in the chain is terminated
Note: If the last device in the chain has an unused SCSI connector,
a separate terminator should be attached to it, even if the device is
connected to the SCSI chain using a through terminator.
12
Nikon LS-30 35 mm Film Scanner User’s Guide
✔
3. Setup
SCSI connection checklist
• Turn off the computer, the LS-30, and all SCSI devices before
connecting the scanner.
•
Be sure that the devices at both ends of the SCSI chain are
terminated. If the host computer is a Macintosh, the chain will
already be terminated at the computer end. In the case of IBM
PC/AT compatibles in a chain which contains external devices
only, the chain should be terminated at the SCSI board. In the
case of a chain which includes internal devices, you may need to
remove termination from the board and terminate the last
internal device.
•
The maximum number of SCSI devices that can be connected in
a single chain is eight, including the computer and any internal
SCSI devices such as hard disks or CD-ROM drives.
•
The total length of cabling in the SCSI chain should be no more
than six meters (twenty feet). The longer the cabling, the less
reliable the connection.
Safety Precautions
•
Do not damage the SCSI cabling’s protective insulation. Do not
forcibly tug or bend SCSI cables, place cables under heavy
objects or expose them to heat or flame. When disconnecting
cables, handle the cable by the connector, not by the cable itself.
Should the insulation be damaged or the internal wiring exposed,
replace the cable immediately.
•
Do not handle SCSI cables or devices when your hands are wet.
Nikon LS-30 35 mm Film Scanner User’s Guide
13
3. Setup
Step 5—Set the scanner’s SCSI ID
Each device in the SCSI chain has a unique ID, which is a number
between zero and seven that the computer uses to distinguish
between different devices. When connecting the LS-30 to a SCSI
chain, the scanner’s SCSI ID must be set to a number that is not
shared by any of the other devices, including the computer itself.
The scanner’s SCSI ID is indicated by the SCSI ID dial on the rear
panel. Before the scanner leaves the factory, the ID is set to “2.”
SCSI ID
4
1
6 7
2 3
5
0
When choosing another ID for the scanner, bear in mind that the
computer will usually have an ID of either “0” or “7,” and that
internal hard disks often have IDs of “0” or “1.” In the case of
Macintosh computers, the computer will have an ID of “7,” while
the internal hard disk and CD-ROM drive often have IDs of “0” and
“3,” respectively. In general, it is recommended that you set the
scanner’s ID to any number other than zero, one, three, and seven
that is not used by another SCSI device.
✔
14
Caution: Assigning the same ID to two different devices could
render the computer system inoperable or result in important data
on a hard disk being lost or corrupted.
Nikon LS-30 35 mm Film Scanner User’s Guide
3. Setup
ON
OFF
SCSI
6
2
100098
SCSI
MADE IN JAPAN
1
3
0
4
5
7
SCSI NB
TERMINATOR
To change the scanner’s ID, turn the scanner off. Then, using a
screwdriver, turn the dial on the back of the scanner to choose a new
ID.
Note: The LS-30 conforms to Level 1 of the SCAM (SCSI Configured Auto-Magically) SCSI-selection standard, which allows some
computers to set the scanner’s ID automatically. If your computer’s
operating system supports Plug&Play and the SCSI host (computer
or SCSI extension board) conforms to SCAM, the scanner may be
automatically assigned an ID which differs from that set using the
SCSI ID dial. SCAM will not assign conflicting IDs to SCSI devices.
Nikon LS-30 35 mm Film Scanner User’s Guide
15
3. Setup
3.2
Software Installation
This section describes how to install the Nikon Scan software that
allows your computer to communicate with the LS-30. For reasons
of space, detailed installation instructions are not provided in this
user’s guide. Details may be found in the reference guides provided
separately on CD-ROM. Users who would like to review installation procedures should refer to these reference manuals, which can
be read using the Adobe Acrobat software provided on the reference
CD-ROM.
Step 1—Review the system requirements
To install and run Adobe Acrobat and Nikon Scan, your computer
system must meet the requirements given below.
Macintosh
• Macintosh or Power Macintosh with a 68030 CPU or better
16
•
MacOS System 7.1 or later
•
ColorSync
•
a minimum of 16 MB RAM available to Nikon Scan (24 MB or
more is recommended) and 5 MB RAM available to Adobe
Acrobat
•
28 MB or more free hard disk space (100 MB or more is recommended)
•
video system supporting a color depth of at least sixteen bits, or
32,000 colors (a color depth of twenty-four bits, or 16.7 million
colors, is recommended)
Nikon LS-30 35 mm Film Scanner User’s Guide
3. Setup
Windows
• IBM PC/AT or compatible with i486 or better CPU
•
Windows 95, Windows NT4.0 or later
•
a minimum of 16MB RAM when Nikon Scan is running (24 MB
or more is recommended) and 8 MB RAM for Adobe Acrobat
•
28 MB or more free hard disk space (100 MB or more is recommended)
•
DOS ASPI-compatible SCSI board with WINASPI.DLL (a list
of boards that have been tested and approved by Nikon is
provided separately)
•
video system supporting a color depth of at least sixteen bits, or
32,000 colors (a color depth of twenty-four bits, or 16.7 million
colors, is recommended)
Step 2—Install Adobe Acrobat Reader
Before turning on your scanner, you may wish to install Adobe
Acrobat Reader and read the on-line documentation provided on the
reference CD-ROM. To install Adobe Acrobat Reader, follow the
installation instructions for your platform given below.
Windows
With the scanner turned off, turn on
your computer and place the
reference CD in the drive. Doubleclick the My Computer icon and
then double-click the Nikon CD
icon. Open the folder for the
language of your choice and then
double-click setup.exe to start the
installer. Follow the on-screen
directions to install Adobe Acrobat
Reader in the location of your
choice.
Nikon LS-30 35 mm Film Scanner User’s Guide
17
3. Setup
Macintosh
With the scanner turned off, turn on your computer and place the
reference CD in the drive. The folder shown below will open on
the desktop.
Open the folder for the language of your choice and double-click
the installer icon. Follow the on-screen instructions to install
Adobe Acrobat Reader in the location of your choice.
Once you have installed Adobe Acrobat Reader, you are ready to
read the on-line documentation for the LS-30. To view the on-line
reference manuals, double-click the INDEX.pdf icon in the root
directory of the reference CD (see above). Before proceeding to the
next step, you may wish to read Before You Begin in the Nikon Scan
Reference Manual for your platform. After reviewing the reference
manuals, turn off your computer and proceed to Step 3.
Step 3—Install Nikon Scan
Once the scanner has been installed and connected to your computer, you are ready to install Nikon Scan and begin scanning
images. Before starting the installation process, turn on your
scanner and any other peripherals, then turn on your computer.
18
Nikon LS-30 35 mm Film Scanner User’s Guide
3. Setup
Windows
At start-up, Windows will detect the LS30 and display the dialog shown at left.
Insert the Nikon Scan CD in the computer’s
CD-ROM drive, confirm that the Driver
from disk provided by hardware
manufacturer radio button is selected,
and click OK. When the “Install from
Disk” dialog appears, enter the drive
letter of the CD-ROM drive in the Copy
manufacturer’s files from textbox
and click OK. Windows will then
register your scanner on the system.
Once the scanner has been registered, the Welcome dialog for the
Nikon Scan installer will appear on the desktop (the Welcome
dialog differs slightly depending on where your scanner was
purchased; see the reference manual for details).
Click Nikon Scan 2.1. You will be prompted to choose a language for Nikon Scan’s menus and dialogs. Installation can now be
completed by following the instructions provided by the installer
(see the Nikon Scan for Windows Reference Manual for details).
Nikon LS-30 35 mm Film Scanner User’s Guide
19
3. Setup
Macintosh
After turning on your computer, place the Nikon Scan CD in the
CD-ROM drive. The folder shown below will open on the desktop.
Double-click the installer for the desired language version of Nikon
Scan (EN for English or ES for Spanish). Follow the instructions
on the screen to complete installation. See the Nikon Scan for
Macintosh Reference Manual for details.
20
Nikon LS-30 35 mm Film Scanner User’s Guide
4. Scanning
4. Scanning
This chapter takes you step-by-step through the process using Nikon
Scan to scan images with your LS-30.
Step 1—Turn on your computer
After turning on the scanner and any other peripheral devices, turn
on your computer.
Step 2—Start Nikon Scan
Nikon Scan can be used to scan images into third-party host applications such as Adobe Photoshop, or it can be used as a “standalone” application for scanning images and saving them to disk. To
start Nikon Scan from another application, select Nikon Scan from
the application’s list of “acquire” or “import” sources. To use
Nikon Scan as a “stand-alone” application, select Nikon Scan from
the Start menu (Windows) or double-click the Nikon Scan icon in
the folder to which Nikon Scan has been installed. Whether Nikon
Nikon Scan
Scan is opened directly or from a host application, the Nikon Scan
icon
scan window will appear on the desktop after a brief pause while the
program locates and identifies the scanner.
The scan
window
Nikon LS-30 35 mm Film Scanner User’s Guide
21
4. Scanning
Step 3—Insert an adapter in the scanner
The LS-30 comes with separate adapters for scanning mounted 35
mm slides and strips of 35 mm film containing up to six frames each.
Either adapter can be inserted in the scanner while the scanner is on.
Before mounting an adapter in the adapter slot, check that the
scanner’s status LED is glowing steadily. Adapters should not be
inserted or removed while the status LED is blinking. Open the
scanner’s front cover and slide the adapter in as shown in the illustrations below, stopping when the adapter is fully inserted. In the case
of the SA-20, be sure that the connectors on the rear of the adapter
are fully inserted in the connectors at the back of the adapter slot.
Inserting the
MA-20 SLIDE
MOUNT
ADAPTER
22
Nikon LS-30 35 mm Film Scanner User’s Guide
4. Scanning
Inserting the SA-20 STRIP FILM
ADAPTER
A plastic tray is provided with the strip-film adapter to catch film
ejected from the scanner. This tray is attached to the adapter as
shown below.
2. Pull forward to latch
1. Insert hooks
✔
Cautions
• Wait until the status LED glows steadily or the scanner is off
before inserting or removing adapters. Do not replace adapters
while the scanner is operating.
•
If an adapter does not slide in smoothly, remove it from the
adapter slot and try again. Do not use force.
Nikon LS-30 35 mm Film Scanner User’s Guide
23
4. Scanning
Step 4—Insert film
Insert the film to be scanned into the adapter’s film slot. When the
scanner is installed on its side, the film should be oriented so that
the photograph or frame number is not reversed. When inserting
slides, the short side of the aperture should face toward the scanner.
To scan a film strip with the SA-20 strip-film adapter, grasp the film
lightly by both edges and slide it into the film slot a short distance.
The adapter’s feed mechanism will be activated and the film will be
fed into the scanner automatically.
24
Nikon LS-30 35 mm Film Scanner User’s Guide
✔
4. Scanning
Cautions
• Examine the film for use in the SA-20 carefully prior to scanning. Film must be flat or curl slightly towards the emulsion
surface (film should fit in the gauge on top of the adapter). Film
cannot be used in the adapter if:
• there is tape on the film
• the film has been folded
• the perforations have been torn
• the film has been cut on an angle or torn
Film that cannot be scanned in the SA-20 can be scanned in the
MA-20 slide adapter using the FH-2 film holder (see the LS-30
Reference Manual).
•
Film must be clean and free from fingerprints. In the case of the
SA-20, the presence of dirt could cause damage to the film.
Before scanning, remove dust with a blower and gently wipe off
any finger prints with a soft, dry cloth.
Detailed information on the kinds of film appropriate for use in the
LS-30 and on inserting film, see the LS-30 Reference Manual.
Step 5—Choose a film type
In the scan window, select a film type appropriate to the type of film (positive or negative)
inserted in the scanner.
Step 6—Choose a color space
Choose a color space from among those listed
in the color-space pop-up menu. The color
spaces available depend on whether Nikon
Color Management is used; see the software
reference manual for your platform for details.
By default, color spaces of calibrated RGB
(sRGB), CMYK, and HSL are available.
Nikon LS-30 35 mm Film Scanner User’s Guide
25
4. Scanning
Step 7—Choose a thumbnail (SA-20)
If you are using the SA-20 strip-film adapter to
scan film strips of two to six frames each, the
thumbnail drawer-tab will be available. Click
the drawer-tab to open the thumbnail drawer,
then click the frame you wish to scan. Thumbnail previews of all images in the strip can be
displayed by clicking the “display thumbnails”
button.
For more information on the thumbnail drawer, refer to the software
reference manual for your platform.
Step 8—Perform a preview scan
The current slide or currently selected thumbnail can be previewed in the scan window,
allowing you to choose the exact area for the
final scan and to adjust exposure and color
balance. To preview the current slide or the
currently selected thumbnail, click the preview button. The scanner will perform a rapid
preview scan, and a preview image will be
displayed in the scan window.
26
Nikon LS-30 35 mm Film Scanner User’s Guide
4. Scanning
Step 9—Select a crop
The area to be scanned when the image is passed to the host application is selected by dragging the mouse cursor over the preview
image. The selected area will be indicated by a dotted line, or
“marching ants” marquee.
The crop can be zoomed in or out, flipped, or
rotated using the buttons at the top left corner
of the scan window. The crop can be shifted to
a new part of the image by dragging, while the
dimensions of the crop can be changed by dragging its borders. The size of the crop can also be
adjusted using the crop size drawer, as described in
the software reference manual for your platform.
Step 10—Auto contrast adjustment
Nikon Scan can automatically adjust image
contrast to suit the color balance and tone range
of the original. Click the contrast button to
adjust contrast automatically.
Nikon LS-30 35 mm Film Scanner User’s Guide
27
4. Scanning
Step 11—Remove dust and scratches
Images can be treated digitally to remove dust and scratches. To do
so, open the “scanner extras” drawer tab and select “Clean Image”
from the options pop-up menu.
Select On (Normal) or On (Sharpen) from the Mode pop-up
menu to automatically process the image to remove defects. The
effects of Clean Image will be visible in the preview image in the
scan window.
Consult the software reference manual for your platform for more
information on the scanner extras available for the LS-30.
Step 12—Adjust color balance, contrast, and brightness
The controls in the color-balance drawer can be used to adjust RGB
color balance, contrast, and brightness. Click the color-balance
drawer-tab to open the color-balance drawer.
Adjust brightness, contrast, and color balance by dragging the
sliders. The effects of these adjustments will be visible in the scan
window.
28
Nikon LS-30 35 mm Film Scanner User’s Guide
4. Scanning
More precise control of brightness, contrast, and color balance is
available in the curves-and-levels drawer. Refer to the software
reference manual for your platform.
Step 13—Scan the selected crop
Once you have selected a crop and adjusted
scanner controls to your satisfaction, click the
scan button. The selected crop will be
scanned and transferred to the host application
or to an image window in Nikon Scan. Depending on the application used or Nikon Scan
Preference settings, the scan window may close
when scanning is complete. For information on
how to save and print scanned images using
Nikon Scan, refer to the software reference
manual for your platform.
Step 14—Scan additional images
When Nikon Scan is being used as a
“stand alone” application, the scan
window can be activated after an image
has been scanned by selecting the Open
Twain Source command from Nikon
Scan’s File menu (Windows) or by
selecting the scanner from the Device
submenu of the Nikon Scan menu
(Macintosh). To re-open the scan
window from another application, select
Nikon Scan from the application’s list of
“acquire” or “import” sources.
Nikon LS-30 35 mm Film Scanner User’s Guide
29
4. Scanning
Once the scan window has been re-opened, the current slide or film
strip can be previewed and a new crop selected as outlined in steps
5 through 12, or the current film can be ejected and new film
inserted and previewed. To eject a slide from the slide-mount
adapter, press the eject button and then pull the slide the rest of the
way out with your fingers.
To eject film from the SA-20, click the eject
button in the scan window.
Once the current film has been removed and the scanner’s status
LED is glowing steadily, new film can be inserted in the scanner
and previewed as described in steps 4 through 12. If there is no film
in the adapter and the scanner’s status LED is glowing steadily, the
current adapter can be removed and a new adapter inserted in the
scanner as described in Step 3.
30
Nikon LS-30 35 mm Film Scanner User’s Guide
Appendix: Nikon Scan Controls
Appendix: Nikon Scan Controls
Menus, Tabs, and Information Displays
Thumbnail drawer-tab
Click to open when film is inserted in the SA-20
strip-film adapter or optional IA-20 IX240 film adapter
Settings menu
Save current settings,
load saved settings,
restore factory defaults
Film-type menu
Choose the type of film you
want to scan
Color-space menu
Choose the color model
(color space) used to display
and store the image after
scanning
Crop information display
The height and width of the current crop and the
coordinates of its top left corner are displayed.
Units can be chosen from the crop-size drawer (see
below)
Pixel data display
The values for each color component are displayed
when the cursor is moved over a pixel in the
preview image
Progress indicator
Control drawer-tabs
Click to open, drag up or down to move (Windows).
The contents of each drawer are shown below.
Nikon LS-30 35 mm Film Scanner User’s Guide
31
Appendix: Nikon Scan Controls
Buttons
Eject film from the SA-20 or optional IA-20 adapter
Focus the scanner on the center of the preview image. Clicking this button
with the ctrl key (Windows) or option key (Macintosh) held down allows you
to focus the scanner on a point chosen by clicking anywhere within the
preview image.
Zoom out to the previous view after zooming in
Zoom in on the current crop
Rotate the preview image and/or currently selected thumbnails ninety
degrees to the right
Rotate the preview image and/or currently selected thumbnails ninety
degrees to the left
Flip the preview image and/or currently selected thumbnails horizontally
Flip the preview image and/or currently selected thumbnails vertically
Conduct a prescan to adjust scanner exposure settings
Perform automatic contrast adjustment
Open the Preferences dialog (see below)
Abort preview or main scan
Scan image into host application or Nikon Scan
image window.
Preview current slide, thumbnail, or crop
32
Nikon LS-30 35 mm Film Scanner User’s Guide
Appendix: Nikon Scan Controls
Control Drawers
The Scan-Size Drawer
Input lock
Fix crop at its
current dimensions
Input units menu
The units used in giving
the size of the current crop
Output units menu
The units used in
giving the size of
the image after
scanning
Scale
Amount crop will
be scaled when
scanned
Output lock
Fix size of final
scan to current
output dimensions Scan resolution
and file size Output resolution (units can be chosen
from pop-up menu). Resolution can be
entered directly in text-box or chosen to
match resolution of output devices in
device pop-up menu.
Resolution units
Device menu
The Scanner Extras Drawer
Scanner extras menu
Choose a scanner option from the
menu to make adjustments to settings
Clean Image: Remove dust and
scratches
Manual Focus Adjustment: Adjust
scanner focus using a slider
Analog gain: Adjust brightness of
scanner’s light source
Scanner Extras: Adjust interpolation,
sharpness, and prescan settings
Pixel Data Size: Set scan bit depth
Module extras: Special settings for
different adapters
Nikon LS-30 35 mm Film Scanner User’s Guide
33
Appendix: Nikon Scan Controls
The Curves-and-Levels Drawer
Channel menu
Select the color
curve to be edited
Select black
point
Select white
point
Display output
histogram
Auto contrast
Reset button
Reset curves to
linear. Ctrl-click
(Windows) or
option-click
(Macintosh) to
reset all channels
to linear.
Edit window
Edit the color
curve by dragging
points with the
mouse
Black-point slider
Gamma slider
White-point slider Gamma value
The Color-Balance Drawer
Adjust brightness,
contrast, and color
balance for the
entire preview
image by dragging
the sliders
34
Nikon LS-30 35 mm Film Scanner User’s Guide
Appendix: Nikon Scan Controls
Preferences
The Preferences dialog contains several tabs, which are detailed in
the software reference manual for your platform. A brief description of each tab is given below.
Gamma
Set base gamma values
for preview and final scan
Color management
Choose the color profiles
used in matching input
from the scanner to output
colors on a monitor or
other device
Device
Choose from among
multiple connected Nikon
scanners
Miscellaneous (shown)
Basic scan-window
settings
Scratch (Macintosh only)
Choose the disk used for
temporary storage
Nikon LS-30 35 mm Film Scanner User’s Guide
35
EC DECLARATION OF CONFORMITY
We
Name:
Address:
declare that the product
Product Name:
Nikon Europe BV
Schipholweg 321, 1171 PL Badhoevedorp, The Netherlands
Nikon Film Scanner LS-30, SLIDE MOUNT ADAPTER MA-20 , STRIP FILM
ADAPTER SA-20
Manufacturer’s Name:
Nikon Corporation
Manufacturer’s Address:
Fuji Bldg., 2-3, Marunouchi 3-chome, Chiyoda-ku, Tokyo 100-8331, Japan
is in conformity with the following Standards
Safety:
EN60950
EMC:
EN55022 Class B
EN61000-3-2 1995
EN61000-3-3 1995
EN50082-1
IEC801-2: 1991 4kV (direct discharge), 8kV (air discharge)
IEC801-3: 1984 3V/m
IEC801-4: 1988 1kVAC, (0.5kV, I/O)
following the provisions of the EMC Directive (89/336/EEC)
DECLARATION DE CONFORMITÉ DE LA CEE
Nous
Nom:
Adresse:
déclarons que ce produit
Nom du produit:
Nikon Europe BV
Schipholweg 321, 1171 PL Badhoevedorp, The Netherlands
Nikon Film Scanner LS-30, SLIDE MOUNT ADAPTER MA-20 , STRIP FILM
ADAPTER SA-20
Nikon Corporation
Fuji Bldg., 2-3, Marunouchi 3-chome, Chiyoda-ku, Tokyo 100-8331, Japon
Nom du fabricant:
Adresse du fabricant:
est conforme aux normes suivantes
Sécurité:
EN60950
CEE:
EN55022 Classe B
EN61000-3-2 1995
EN61000-3-3 1995
EN50082-1
IEC801-2: 1991 4kV (décharge par court-circuit), 8kV (décharge par amorçage)
IEC801-3: 1984 3V/m
IEC801-4: 1988 1kVAC, (0.5kV, I/O)
selon les dispositions de la directive de la CEE (89/336/EEC)
ERKLÄRUNG ÜBER EG-NORMENGERECHTHEIT
Wir
Name:
Nikon Europe BV
Schipholweg 321, 1171 PL Badhoevedorp, The Netherlands
Anschrift:
erklären hiermit, daß das folgende Produkt
Produktbezeichnung:
Nikon Film Scanner LS-30, SLIDE MOUNT ADAPTER MA-20 , STRIP FILM
ADAPTER SA-20
Name des Herstellers:
Nikon Corporation
Anschrift des Herstellers:
Fuji Bldg., 2-3, Marunouchi 3-chome, Chiyoda-ku, Tokyo 100-8331, Japan
den nachstehend aufgeführten Normen genügt:
Sicherheit:
EN60950
EMC:
EN55022 Klasse B
EN61000-3-2 1995
EN61000-3-3 1995
EN50082-1
IEC801-2: 1991 4kV (Direkt Entladung), 8kV (Raum Entladung)
IEC801-3: 1984 3V/m
IEC801-4: 1988 1kVAC, (0.5kV, I/O)
und zwar gemäß den Bestimmungen der EMC-Richtlinie (89/336/EEC)
DECLARACIÓN DE CONFORMIDAD DE LA CEE
Nosotros
Nombre:
Dirección:
declaramos que el producto
Nombre del producto:
Nikon Europe BV
Schipholweg 321, 1171 PL Badhoevedorp, The Netherlands
Nikon Film Scanner LS-30, SLIDE MOUNT ADAPTER MA-20 , STRIP FILM
ADAPTER SA-20
Nikon Corporation
Fuji Bldg., 2-3, Marunouchi 3-chome, Chiyoda-ku, Tokyo 100-8331, Japón
Nombre del fabricante:
Dirección del fabricante:
cumple las normas siguientes
Seguridad:
EN60950
EMC:
EN55022 Clase B
EN61000-3-2 1995
EN61000-3-3 1995
EN50082-1
IEC801-2: 1991 4kV (descarga directa), 8kV (descarga ambiental)
IEC801-3: 1984 3V/m
IEC801-4: 1988 1kVAC, (0.5kV, I/O)
según las disposiciones de la Directiva EMC (89/336/EEC)
Badhoevedorp, The Netherlands
Place
Lieu
Ort
Lugar
July 12th, 1998
Date
Date
Datum
Fecha
Signature/Managing Director
Signature/Directeur général
Unterschrift/Geschäftsführer
Firma/Director general