1
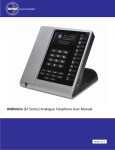
UNO MEDIA SERIES
TWO LINE GUESTROOM PHONE
USER MANUAL
FOR MODEL :HA9888(68)TSD-T10
:HA9888(68)TSD-T10(33)
Table of Contents
1. Introduction to Bittel UNO Media Guestroom Phone
1.1 Classical Features
1.2 Specifications
2
2
2
2. Installation
2.1 Install Telephone Cord
2.2. Install Power and Telephone cord
2
2
2
3. Operation
3.1 Placing a Call
3.2 Receiving New Call
3.3 Adjusting Volume
3.4 Three-Way Conference
3
3
3
3
3
3.5 Redial
3
3.6 Hold
3.7 Mute
3.8 Adjust Ringer Volume
3.9 Busy tone disconnectautomatically
3.10 Using Service Buttons
3.11 Store the memory number
3.12 Message Waiting Light
3.13 Play AUDIO
3.14 Play iPod/iPhone/MP3 input device
3.15 Play FM radio
3.16 Set Time
3.17 Set alarm
3.17.1 Set Alarm Time
3.17.2 Unlock the Alarm
3.18 Change clock’s battery
---- Page 1----
3
4
4
4
4
4
4
4
4
5
5
5
5
5
3.19 Remote Time Setting
3.19.1
3.19.2 Set time
3.19.3 Set DST area
3.19.4 Adjust Time
4. Matters Need Attention
5. Maintenance and Troubleshooting
6. Approval
7. SERVICE
8. Attachment: UNO Media Diagram
6
6
6
7
7
7
7
7
7
8
1. Introduction to the Bittel UNO Media
Guestroom Phone
UNO Media 3 is new generation of hospitality phone with
multimedia functionality which converges a guestroom
phone, alarm clock, radio, iPhone/iPod dock and high
fidelity speakers. Supporting the iPad and other leading
mobile phone brands guests can transform a telephone
into their own personal entertainment device.
1.1 Classical Features
►10 speed dial memory keys
►Program memory keys with R.P master cloner
and handheld cloner
►Push-draw style individuation faceplate ,easy
printing the hotel logo and user guide
►Message waiting light compatible with main PBX,
MWL indicator and withdraw feature
►Hearing aid compatible handset
►Busy tone disconnect automatically
►Redials the last number dialed and dialed
►Last dialed number disappearing after 5 minutes
to protect the pricacy for guests.
►Hold, Redia, Mute, Flash
►Speakerphone
►Alarm , Radio , audio , power charge in one
device
►Power charge for portable type iPod and mobile
device
Handset cord
cord:3.66m
Line cord:
cord:2.0m
Weight:
Weight:1700g
Color:
Color:Ivory, charcoal option
Flash time:
time:100ms,300ms,600ms optional;
standard 600ms
MWL Voltage:
Voltage:Standard 90~150V DC,
Customizedvarious MWL card
PBX: AVAYA, Siemens, Philips, Alcatel, NEC,
Nortel, Mitel, Panasonic, etc.
Operating Voltage:
Voltage:24V~60V DC
Quality Control System
ISO9001, ISO14001
Quality Approval:
Approval:CCC, FCC, CE, RoHS
FCC rules:
rules:The unit complies with part 15 and
part 68 of the FCC rules and regulations
Box Dimension:
Dimension:460*445*275(mm)
Package (set/carton):
(set/carton):8 Set/Carton
2. Installation
2.1 Install telephone cord
Insert the one end of the straight line cord into the jack
labeled “TO TEL” (marked 14 in below figure), then
insert the other end of the line cord into a telephone wall
jack.
2.2. Install Power and Telephone cord
First please connect the T-Cable’s power jack (Marked
1 in the below figure) with the power adaptor. Then
please connect the T-Cable’s RJ11 (4 pin. Marked 2 in
the below figure) with the telephone line jack in the
room. Finally please connect the T-Cable’s RJ11 port (6
pin. Marked 3 in the below figure) to telephone set’s
“TO TEL” port, which is on the back of the phone.
1.2 Specifications
Dimensions:
Dimensions:191*242*102(mm)
Handset cord:
cord:3.66m
Line cord:
cord:2.0m
---- Page 2----
Details see below picture
1
to low level and speaker stored the current level after the
telephone on-hook.
3
2
1 to connect the power adapter
2 to connect the RJ11 telephone line port
3 to connect the UNOMedia to Tel Port
3. Operation
3.1 Placing a Call
1) Lift the handset or press the SPEAKER key, then
dials the desired number or certain service button.
2) To end the call by putting the handset back to the
cradle or press SPEAKER button again.
3.2 Receiving New Call
1) When the phone rings, just please pick up the
handset or press Speaker button
2) when one line has a call and another new call coming,
just press the accordance line key to answer the new
call and another line hang up automatically.
Press the HOLD key if users like to hold the current
call, then press the accordance line key to resume.
3.3 Adjusting Volume
During the call, press VOL+/- key to adjust the volum
level of handset and Speaker. Handset volume resumes
3.3 Handset call and Speaker Call Inter-Converting
1) From handset to speaker
Just press SPKR key and put the handset on the cradle
2) From speaker to handset --Just lift handset
3.4 Three-Way Conference
1) Press HOLD key to hold the current line then
connect another line, after that please press
CONF key enter into three-way conference
mode.
2) In conference mode, press the accordance
LINE key to relieve the conference mode and
talk with one party. Or press HOLD key to hold
the two lines and then press the desired line key
to talk with the selected line, then press CONF
key to resume the conference mode.
3.5 Redial
Lift the handset or press Speaker button, then press
REDIAL key to dial the last number dialed but after five
minutes the number will disappear automatically, which is
in order well keep the guest’s privacy.
3.6 Hold
Off-hook mode, press HOLD key (the accordance LED
indicator light) and put the handset back, the current line
in hold mode, off-hook again can relieve the hold mode.
If paralleled telephone answer the call, the original phone
will detect the current status and relieve the hold mode
and realize on-hook.
---- Page 3----
3.7 Mute
During the call, press MUTE key once to stop the
sending for handset and speaker, press it again to
relieve the mute mode and resume the calling.
3.8 Adjust Ringer Volume
With the adjustment control which locate on the back
of the telephone to adjust the ringer to Low or Hi.
3.9 Busy tone disconnect automatically
If the handset not on cradle after a phone call, this
device can on-hook automatically after getting busy
signal within a definite time. Then the line will connect
accordingly.。
3.10 Using Service Buttons
Off-hook mode, press each memory keys to dial the
number directly.
3.11 Store the memory number
On-hook mode, press HOLD key+ desired number+
HOLD key+ memory key
3.12 Message Waiting Light
1) Off-hook mode, press this key can directly dial the
stored number, withdraw the message and other
service.
2) On-hook mode press this key can realize off-hook
and dial the stored number directly, Press it again can
realize on-hook mode.
3.13 Play AUDIO
Press AUDIO ON/OFF key to enter or exist audio play
mode, then press RADIO/LINE IN key to realized
cyclical selection of LINE IN and FM-RADIO mode.
3.14 Play iPod/iPhone/MP3 input device
1) Connect the iPod/iPhone/MP3 to LINE IN port
through the audio line, or
2) Connect the iPod/iPhone/MP3 with the fixed Audio
Cable, or
3) Connect the iPod/iPhone/MP3 with the fixed iPod
cable;
4) Connect the iPod/iPhone with the iPod dock.
Then press the LINE IN key to select the LINE IN
mode to realize the audio playing.
3.15 Play FM radio
Press RADIO/LINE IN key to select the FM-RADIO
mode, then press TUNING+/-select the needed
frequency. With each press the frequency changed
0.1MHz, press TUNING+/-for while to enter into
searching frequency forward or backward, it will stop
automatically after searching FM signal.
1) Press AUDIO ON/OFF to Pause or Play. Press
VOUME+/- to adjust the volume, total level 0-30,
factory default is 15.
2) AUDIO OFF mode, press TUNING+ for a while,
LCD display ON or OFF (ON or OFF the hotel mode)
ON: volume 0—20, OFF: volume 0-30.
3) AUDIO OFF mode, press RADIO/LINE IN not
release, LCD display Time, Month, Day , Year , DST
Zone and easy to view the setting parameters.
4) Detect the device mode intelligently
If telephone ringing or off-hook under FM-RADIO or
LINE IN mode, the telephone can PAUSE audio
playing , after the phone call finished or ringing
stopped it can resume to playing mode again.
---- Page 4----
3.16 Set Time
Under AUDIO OFF mode (not LINE IN or FM-RADIO
working mode) to set the time
1) Press VOLUME- key 1S,hour digit flashing on the
LCD , press TUNING+/- to adjust hour.
2) Press VOLUME- key, minute digit flashing, press
TUNING+/- to adjust minute.
3) Press VOLUME- key or no operation to finish the
setting.
4) Press VOLUME+ key to adjust 12 hour format and 24
hour format.
3.18 Change clock
clock’’s battery
Take off the battery from the battery cabinet on the back
of the phone. Then install new battery. The specification
of the battery is 3V, 50Mah.
Note: The anode of the battery should be toward outside.
The battery should be changed every two years
3.19 Remote Time Setting
3.19.1 First install two 7# 1.5V batteries into the before
using it. Pay attention to the polarity of the battery. Don’t
mix the old and new batteries.
3.17 Set alarm
3.17.1 Set Alarm Time
1) Press ALARM SET key, the hour digit display on the
LCD, press the VOLUME+/- to adjust the hour.
2) Then press the ALARM SET key, the minute display
on the CLD, press VOLUME+/- to adjust the minute.
3) Then press the ALARM SET key or no operation to
finish the setting.
3.17.2 Unlock the Alarm
Press ALARM key to start and close alarm. In start mode
the alarm and its mark on the top right corner, when in
close mode, the alarm and its mark disappear.
3.17.3 Alarm snooze feature
When alarm ringing, press any key and the alarm stop
ringing for 10 minutes. After 10 minutes it will ring again.
Pressing any other key except for ALARM key or
telephone off-hook can stop ringing.Alarm ringing during
Remote Time Control
1. LCD Display
2. DST SET key——Set DST
time.
3. TIME SET key——Set time
and date.
4. TIME PROG key——Adjust
time and date .
5. DST PROG key ——Adjust
DST time.
6. UP key —— Upward key.
7. DOWN key——Downward
key.
3.19.2 Set time with the Remote Time Control
1) Press TIME SET key, hour digits flashing, press
UP/DOWN key to adjust,
playing mode, it exist playing mode automatically. In
2) Press TIME SET key, press UP/DOWN key to adjust
AUDIO OFF mode, press ALARM VOLUME key to
minute,
adjust the alarm indicator volume, each press increase 5,
3) Press TIME SET key, press UP/DOWN key to adjust
the top level is 20. The default is 10.
---- Page 5---- month,
4) Press TIME SET key, press UP/DOWN key to adjust
day,
5) Press TIME SET key, press UP/DOWN key to adjust
year,
6) Press TIME SET key, LCD display the time, setting
finished.
3.19.3 Set DST area code with the Remote Time
Control
Press DST SET key, then press UP/DOWN key to set
the area code:
00= DST OFF, 01=USA/Canada,
02=Europe/Russia/Swiss;
03= Mexico, 04=New Zealand
3.19.4 Adjust Time
1) After above setting, press TIME PROG or DST
PROG at the right upper direction within 10cm near
the base LCD to adjust the TIME or DST Time.
Conversion of 12- Hour Format and 24- Hour Format
2) When LCD displays time, press TIME SET over 2
seconds to realize the conversion.
Note: If the attached Remote Time Control is different
than above image, please according to the attached
object.
►Do not use aerosol polish, abrasive cleaners.
►Do not tamper with or attempt to modify the phone,
it would make it unsafe to use.
►Handle with care, avoiding hard knocks and shocks.
►If there is any fault please contact your distributor
for repair and other service.
5 . Maintenance and Troubleshooting
5.1
5.1.. No dialing tone of handset
Check the telephone network,
Check the connection of handset cord and straight line
cord
2. No ringing or no continually ring
5.
5.2.
Check the telephone line
Check the quantity of parallel phone set
3. Noise during talk
5.
5.3.
Check the telephone line
Check the handset cord
4.
5.
5.4. Acoustics no sound
Check the device connect to power or not
Check the 10pins ribbon cable and Audio Connection
5 No signal or with sizzled noise after radio
5.
5.5
selected the channel
Adjust the direction of the radio antenna
No the selected channel in local
4 Matters Need Attention
6. Approval
►Adopt magnetic switch instead of traditional
mechanical switch, please far away from magnetic
field.
► Do not use it in extreme temperatures.
6.1 CE APPROVAL
Complies with CE approval.
---- Page 6----
6.2 JACKS
Use RJ11C USOC standard modular jacks.
6.3 FCC APPROVAL
Complies with Part 68 of the FCC rules. On the
bottom of this telephone is a label that contains,
among other information, the FCC registration
number and the ringer equivalence number (REN) for
this telephone. If requested, you must provide this
information to the Telephone Company.
7.2 FCC WARNING
This device complies with part 15 of the FCC Rules.
Operation is subject to the following two conditions:
(1) This device may not cause harmful interference,
and (2) this device must accept any interference
received, including interference that may cause
undesired operation.
7. SERVICE
7.3 CUSTOMER SERVICE CENTER
7.1 WARRANTY
This product is warranted for a period of 12 months
from the date of purchase against faulty materials or
workmanship. If during this period a defect arises,
we may repair or replace the product, at Bittel’s
discretion, provided that:
1) The product has not been used for any purpose
other than normal use,
2) Unauthorized product repair or modifications
have not been attempted.
3) The product has never been used in a harsh or
corrosive environment.
4) No damage in transit
Telephone:
(86) 633-2212119/2212113/2212103/2212125
Internet: www.bittelcom.com
Email: [email protected]
Address: No. 1 Rizhao North Road, Rizhao,
Shandong, 276800, China
Copyright © 2012 Bittel Inc. All rights reserved.
THIS LIMITED WARRANTY GIVES THE BUYER
SPECIFIC LEGAL RIGHTS. THE BUYER MAY
ALSO HAVE OTHER RIGHTS WHICH VARYFROM
JURISDICTION TO JURISDICTION.
This warranty is only valid for merchandise
purchased directly from Bittel or dealers or
distributors Bittel Co. authorized.
---- Page 7----
ATTACHMENT:
BITTEL UNO MEDIA
DIAGRAM
---- Page 8----