1
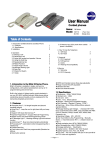
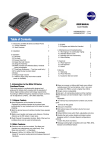
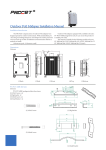
User Manual
Corded phones
48 Series
Table of Contents
1 NOTE
1.1 C+ series adopt membrane button just on handset
and double dialing.
1.2 B series no membrane button and no double dialing
function.
2 UNPACKING YOUR PHONE
This package should contain the following:
2.1 Regal star base unit
2.2 Faceplates
2.3 Handset
2.4 Coiled handset cord
2.5 Straight line cord
2.6 Movable special tray
2.7 Placard and placard stand
2.8 This manual
3.2 Insert the other end of the coiled handset cord
into the modular jack on the handset.
3.3 Turn the telephone so the back panel is facing
you. Insert either end of the line cord into the jack
on the upper side of the telephone labeled “TO
TEL”.
3.4 Insert the other end of the line cord into a
telephone wall jack.
4 CONTROLS, CONNECTIONS AND
FUNCTION KEYS
4.1 Handset Jack – Modular jack to connect coiled
handset cord from handset to telephone.
4.2 Flash Key on handset -- Enters a 600ms hook
switch flash for accessing special telephone system
3 INSTALLATION
features
4.3 Volume key -- Adjust phone volume with three level.
The Regal-star Series is designed for hotel
4.4 Redial key -- Redials the last number dialed.
applications and behind a registered PBX system in
4.5 On/Off key – Active phone on-hook or off-hook after
hotel. Determine you have the correct modular jack
pick up handset.
for connecting the telephone. If you do not have a
4.6 Digital keys on handset -- Keypad for dialing
modular jack, one may be obtained at minimal cost
numbers.
4.7 Data-port
Data-port-- Provides access to telephone line for
at a local hardware store, discount store or home
modem, fax, or answering machine.
center.
4.8 Telephone Jack -- Connect line cord from wall to
3.1 Located on the left side of the Regal-star phone
telephone.
is a modular jack. Insert one end of the coiled
4.9 Ringer Switch for Line 1 -- Adjusts LINE 1 ringer
handset cord into this jack (you will hear the coil
volume to LOW or HI.
cord click when properly inserted.)
4.10 Ringer Switch for Line 2 -- Adjusts LINE 2 ringer
volume to LOW or HI.
---- Page 2 of 10----
4.11 Movable paper faceplate.
4.12 Store -- Hidden button
4.13 Pause -- Hidden button
4.14 Memory Keys – Programmable for one touch dialing of
frequently used numbers or to add special features.
4.15 Vol+ Key
Key..
4.16 Vol- Key
4.17 Flash Key -- Enters a 600ms hook switch flash for
accessing special telephone system features
4.18 [SPKR] Key
Key*** – Activates speakerphone function.
4.19 [CONF] key - Makes three way conference call using
both line 1 and line 2.
4.20 Line2 key –Selects line 2 and activates speakerphone.
4.21 Message Waiting Light – Ringer and new message
indicator, also as a programmable memory key.
4.22 Line1 key –Selects line 1 and activates speakerphone.
4.23 Hold Key -- Places calling on the currently line on hold.
5 Note:
Location and controls refer to model HA9888(48)TSD-C+-T
of Pic. 1
---- Page 3 of 10----
7
8
9
10
DATA
11
12
13
1
2 ABC
3 DEF
4 GHI
5 JKL
6 MNO
7
8 TUV
9
0
#
L1/L2
R
6
14
5
4
3
2
15
6
16
17
4
18
1
23
22
( Pic. 1 )
---- Page 4 of 10----
21
20 19
6 SPEICAL FEATURES
8 RECEIVING A CALL
6.1 Handset and Base double dialing phone set.
6.2 Busy tone disconnect automatically.
6.3 Memory keys programming with Hand-Held memory
cloner or R.-P. master cloner.
6.4 Redialed number disappear within 5 minutes after
dialed.
6.5 Placard and bracket.
6.6 Movable special tray for handset cord.
8.1 Using the Handset
7 PLACING A CALL
8.2 Using the speaker phone.
7.1 Using the Handset
When the phone rings, the corresponding line’s indicator
flashes rapidly.
1) Press the [SPKR] key.
2) The speakerphone comes on automatically and
selects a line.
(Two Line models only)
3) Press [SPKR] when finished.
7.1.1 Lift the handset.
7.1.2 The Regalstar telephone or press the ON/OFF
button on handset will select the appropriate idle line.
(Two Line models only)
7.1.3 Listen for dial tone. Dial the desired number.
7.1.4 To end the call, hang up by replacing the handset
or press ON/OFF key.
7.2 Using the Speakerphone
Press the [SPKR] key and the phone will select a free line
(normal select LINE 1) OR With the handset in the cradle,
press the [LINE1] or [LINE2] keys. The telephone will go
off hook on the selected line with speakerphone active.
NOTE: The red SPKR LED will indicate that the
speakerphone is active.
(Two Line models only)
1) Wait for a dial tone.
2) Dial a phone number.
3) Press [SPKR] key when finished.
When the phone rings, the corresponding line’s indicator
flashes rapidly.
8.1.1 Pick up the handset.
The line is automatically selected. ((Two Line models
only)
8.1.2 To end the call, hang up by replacing the handset
or press ON/OFF key.
9 SPEAKERPHONE TIPS
9.1 To activate the handset from speakerphone mode:
Lif t the handset.
9.2 To activate the Speakerphone from handset mode:
9.2.1 Press the [SPKR] key.
9.2.2 Hang up the handset.
---- Page 5 of 10----
10 CONFERENCE (Two Line models only)
10.1 Making a conference call
The [CONF] key allows the user to originate, or
include two parties in, a three-way phone
conversation. Typical conference calls are:
• User initiates two calls.
• User initiates one call after receiving a call.
• User includes two callings.
10.1.1 User initiates two calls:
10.1.1.1 Place a call to first party.
10.1.1.2 Place the first party on hold.
10.1.1.3 Place another call to a second party.
10.1.1.4 Press the [CONF] key. All callings will be
connected.
10.1.2 User initiates one call:
10.1.2.1 Receive a call from first party.
10.1.2.2 Place the calling on hold.
10.1.2.3 Place a call to second party
10.1.2.4 Press the [CONF] key. All callings will be
connected.
10.1.3 User includes two callings:
10.1.3.1 Receive call from first party, place on hold.
10.1.3.2 Receive another call from second party.
10.1.3.3 Press the [CONF] key. All callings will be
connected.
10.2 Talking individually to one party without
exiting conference mode
10.3 To disconnect one of the two parties
In a three-way phone conversation, press [[LINE1]] or
[LINE 2] to reserve a call on the corresponding line , the
not pressed line will be automatically disconnected.
10.4 Change conference call from handset to
speaker mode
Press [SPKR] and put handset back to the cradle.
10.5 To end the conference call
Put handset to the cradle or press [SPKR] key
11 USING THE [HOLD] KEY
11.1 Place a call on hold
Press [HOLD] key to place the caller on hold. The indicator
for the line on hold will get red.
11.2 To remove a call from hold
11.2.1 On single line models(Single Line models only)
–To release hold, in handset mode, press [ SPKR] key or
lif t handset again. In speakerphone mode, press [SPKR]
key.
11.2.2 On two line models (Two Line models only)
– To release hold, press corresponding [LINE] key.
In case both two lines are in hold mode, lifting handset or
pressing [SPKR] will release [LINE1] priority.
11.3 To change phones after placing a call on hold
11.3.1 Place the caller on hold by pressing [HOLD] key.
11.3.2 Replace the handset in its cradle. When using
speakerphone, just press [HOLD] to place the caller on
hold.
11.3.3 Pick up the call at another telephone. The BITTEL
phone will detect the current status and remove the hold
condition at the original phone.
10.2.1 In a three-way phone conversation, press [HOLD]
key to hold both lines.
10.2.2 Press corresponding line key to talk to the party
on the line.
10.2.3 Press [CONF] key again to resume three way
conference.
---- Page 6 of 10----
11.4 Receiving a second call (Two Line models only)
11.4.1 Press [HOLD] key, the current call will be on hold.
11.4.2 Press the appropriate [LINE] key for the new incoming call.
11.4.3 After completing the new call, press the [LINE] key of the
call on hold to resume the call.
12 ADJUSTING
VOLUME
HANDSET
AND
SPEAKER
During calling mode, press [VOL] key to adjust the volume for
handset and speaker. With each press, it cycled as Low –medium
–high, total three level.
After on-hook, the handset volume resume to the low level;
Speaker volume keep the current level.
13 ADJUSTING RING VOLUME
Locate the adjustment controls on the back of the telephone labeled
RINGER1 and RINGER2 with LOW/HI.Slide the switch to the
desired LOW or HI ring volume for each line. (Two Line models
only).
For single line model, only one RIDNGER switch. Adjustment as
two line model.
14 PROGRAMMING MEMORY KEYS MANUALLY
To program the auto dial keys, the telephone must be connected to
a telephone line.
14.1 Lift handset or press [SPKR].
14.2 Press [STORE] Dial the number desired including [PAUSE]
and [FLASH] key where necessary, press [STORE] key again. The
sequence can be up to 16 digits in length.
14.3 Press a Memory key (including [MWL]) to finish.
14.4 Hang up the handset or press the [SPKR] key to disconnect
the telephone.
15 MESSAGE WAITING LIGHT
It is compatible high voltage neon/90V systems.
If there’s message waiting, just press [MWL] key to play
messages.
[MWL] functions also as ringing indicator. Note: Only in
On-hook mode, press MWL to turn on the phone, press
the MWL again can keep the phone resume to on-hook
mode.
16 MESSAGE
CLONER
PROGRAMMING
WITH
For initiative programming the one-touch memory keys
and MWL key with R.P. cloner, need do following to set
the “programming switch” :
16.1 Off-hook mode, press “*” key and last 5 seconds,
the phone set send out three dial tone continually and
Mute LED indicator flashing three times means this
device enter into programming mode if the phone set
with mute key.
16.2 Off-hook mode, press “#” key and last 5 seconds,
the phone set send out three dial tone continually and
Mute LED indicator flashing three times means this
device exit the programming mode if the phone set with
mute key.
16.3 When this device succeeds in programming, it will
exit the programming mode automatically. If the
programming fails and needs to quit the programming
mode. Just do as above 16.2 step. Programming again
need to open the programming device.
16.4 Passive programming and program with Hand-Held
cloner, no need to set the “ programming switch”. Detail
information for the cloner, please view their user manual
accordingly.
---- Page 7 of 10----
Note:
21 The Ringer Equivalence Number (REN)
1.If used Hand-Held cloner can not dial out and answer
incoming calls during
programming. Press VOL key or On-hook to stop
programming .
2.If using R.P. cloner can not dial out and answer
incoming calls during
programming, If a phone call come in, press [VOL] key
to pick up the phone call and will “PAUSE” the
programming , after the phone call then to continue the
programming again.
The Ringer Equivalence Number (REN) assigned to each
terminal device provides an indication of the maximum
number of terminals allowed to be connected to a telephone
interface. The termination on an interface may consist of any
combination of devices subject only to the requirement that
the sum of the Ringer Equivalence Numbers of all the
devices does not exceed 5.
17 DATA PORT
23 WARRANTY
This phone is equipped with a DATA PORT jack for
guests to connect an auxiliary phone device, such as a
computer modem or a fax machine.
Normally connect to LINE2. (Two Line models only).
This product is warranted for a period of 12 month from the
date of purchase against faulty materials or workmanship. If
during this period a defect arises, we may repair or replace
the product, at Bittel’s discretion, provided that:
23.1 The product has not been used for any purpose other
than normal use.
23.2 Unauthorized product repair or modifications have not
been attempted.
23.3 The product has never been used in a harsh or
corrosive environment.
23.4 No damage in transit.
22 Hearing Aid Compatibility
The Regal star Series is hearing aid compatible.
18 FCC APPROVAL
The Regal star telephone Series complies with Part 68 of
the FCC rules. On the bottom of this telephone is a label
that contains, among other information, the FCC
registration number and the ringer equivalence number
(REN) for this telephone. If requested, you must provide
this information to the Telephone Company.
19 CE APPROVAL
The Regal star series phone complies with CE approval.
20 JACKS
The Regal star series phone uses RJ11C USOC
standard modular jacks.
THIS LIMITED WARRANTY GIVES THE BUYER
SPECIFIC LEGAL RIGHTS. THE BUYER MAY
ALSO HAVE OTHER RIGHTS WHICH VARYFROM
JURISDICTION TO JURISDICTION.
This warranty is only valid for merchandise purchased
directly from Bittel or from dealers or distributors Bittel Co.
authorized .
---- Page 8 of 10----
24 FCC WARRNING
This device complies with part 15 of the FCC Rules. Operation is subject to the following two
conditions: (1) This device may not cause harmful interference, and (2) this device must
accept any interference received, including interference that may cause undesired operation
CONTACTING BITTEL
Telephone: (86) 633-2212177/2212103 /2212160
Internet: www.bittelgroup.com
Email:
[email protected]
Address: Shandong Bittel Electronics Co., Ltd.
No. 1 Rizhao North Road, Rizhao, Shandong
276800, China
Copyright © 2013 Bittel Inc. All rights reserved. V2.0
---- Page 9 of 10----