1
• Connect this equipment into an outlet on a circuit
different from that to which the receiver is
connected.
Warning
®
!ill
i¸
!,it
_'_
7¸¸¸¸¸
_!J!
_;P7
_c<_
_
_
TO REDUCE THE RISK OF ELECTRIC SHOCK, DO NOT
REMOVE THE COVER(OR BACK).
NO USER-SERVICEABLE PARTS ARE INSIDE. REFER
SERVICING TO QUALIFIED SERVICE PERSONNEL.
• Consult the dealer or an experienced radio/TV
technician for help.
This class B digital apparatus meets all
requirements of the Canadian Interference -Causing Equipment Regulations.
CAUTION
This symbol indicates "dangerous voltage"
THIS PRODUCT
inside the product that presents a risk of
CONTROLS
electric shock or personal injury.
PERFORMANCE
This symbol indicates important instructions
THOSE SPECIFIED HEREIN MAY RESULT IN
HAZARDOUS RADIATION EXPOSURE. DO NOT
accompanying the product.
UTILIZES A LASER, USE OF
OR ADJUSTMENTS
OR
OF PROCEDURES
OTHER THAN
OPEN COVER AND DO NOT REPAIR YOURSELF.
REFER SERVICING
Do not install this equipment in a confined space such
as a bookcase or similar unit.
TO QUALIFIED
PERSONNEL.
Note:
• This unit can be used only where the power supply is
WARNING
To prevent damage which may result in fire or electric
shock hazard, do not expose this appliance
moisture.
to rain or
Note to CATV system installer
This reminder is provided to can CATV system
installer's attention to Article 820-40 of the National
Electrical Code (Section 54 of Canadian
Electrical
Code, Part I) that provides guidelines for proper
grounding and, in particular, specifies that the cable
ground shall be connected
to the grounding system of
the building as cIose to the point of cabIe entry as
practical.
FCC NOTE (for U.S.A):
This equipment
has been tested and found to comply
with the limits for a Class B digital device, pursuant to
Part 15 of the FCC rules. These Iimits are designed to
provide reasonable
protection
AC 120V, 60Hz. It cannot be used elsewhere.
• This Blu-ray disc player is designed and
manufactured to respond to the Region Management
Information.
If the Region number of a BD/DVD disc does not
correspond
to the Region number of this Blu-ray disc
player, the Blu-ray disc player cannot play the disc.
• The product unit accompanying
this user manual is
licensed under certain intellectual
property rights of
certain third parties. In particular, this product is
licensed under the following US patents: 5,991,715,
5,740,317, 4,972,484, 5,214,678, 5,323,396,
5,539,829,
5,606,618,
5,530,655,
5,777,992,
6,289,308,
5,610,985,
5,481,643,
5,544,247,
5,960,037,
6,023,490,
5,878,080,
and under US
Published
Patent AppNcation No. 2001-44713-A1.
This Iicense is limited to private non-commercial
against harmful
interference in a residential installation. This equipment
generates, uses and can radiate radio frequency energy
by end-user consumers
and, if not installed
does not cover any product unit other than this
instructions,
and used in accordance
with the
may cause harmful interference
to radio or
television reception, which can be determined
turning the equipment off and on.
The user is encouraged
by
to try to correct the interference
by one or more of the following measures.
• Reorient
or relocate
• Increase the
and receiver.
2 - English
the receiving
separation between
antenna.
the
equipment
use
for licensed contents.
No rights are granted for commercial
use. The Ncense
product unit and the license does not extend to any
unlicensed product unit or process conforming to
ISO/IEC 11172-3 or ISO/IEC 13818-3 used or sold in
combination
with this product unit.
The Ncense only covers the use of this product unit to
encode and/or decode audio files conforming to the
ISO/IEC
11172-3 or ISO/IEC
13818-3. No rights are
granted under this license for product features or
functions that do not conform to the ISO/IEC 11172-3
or ISO/IEC 13818-3.
Handling Cautions
Precautions
• Before connecting
other components
to this Blu-ray
disc player, be sure to turn them all off.
• Do not move the Blu-ray disc player while a disc is
being played, or the disc may be scratched or broken,
the Blu-ray disc player internal parts may be
_2
damaged.
Important Safety Instructions
@
• Do not put a flower vase filled with water or any small
Read these operating
instructions
carefully before using
the unit. Follow all the safety instructions
Keep these operating instructions
reference.
listed below.
handy for future
metal objects on the BIu-ray disc player.
• Be careful not to put your hand into the disc tray.
• Do not place anything other than the disc in the disc
tray.
• Exterior interference
such as lightning and static
1)
Read these instructions.
2)
Keep these instructions.
disc player. If this occurs, turn the Blu-ray disc player
3)
Heed all warnings.
4)
Follow all instructions.
off and on again with the POWER button, or
disconnect and then reconnect the AC power cord to
5)
Do not use this apparatus near water.
6)
Clean only with dry cloth.
7)
Do not block any ventilation openings, Install in
accordance with the manufacturer's instructions.
8)
Do not install near any heat sources such as
electricity can affect normal operation of this Blu-ray
the AC power outlet. The Biu-ray disc player wiII
operate normaIly.
• Disconnect
the AC power cord from the AC outlet
when you don't intend to use the Blu-ray disc player
radiators, heat registers, or other apparatus
(including amplifiers) that produce heat.
9)
• Be sure to remove the disc and turn off the Blu-ray
disc player after use.
for long periods of time.
Do not defeat the safety purpose of the polarized or
• Clean the disc by wiping in a straight Iine from the
inside to the outside of the disc.
grounding- type plug. A polarized plug has two
blades with one wider than the other. A grounding
type plug has two blades and a third grounding
Maintenance of Cabinet
prong. The wide blade or the third prong are
provided for your safety. If the provided plug does
not fit into your outlet, consult an electrician for
For safety reasons, be sure to disconnect
cord from the AC outlet.
replacement
• Do not use benzene, thinner, or other solvents for
of the obsolete outlet.
10) Protect the power cord from being walked on or
pinched particularly
receptacles,
at plugs, convenience
the AC power
cleaning.
• Wipe the cabinet with a soft cIoth.
and the point where they exit from the
apparatus.
Restrictions on Playback
11) Only use attachments/
accessories specified by
the manufacturer.
• This player may not respond to all operating commends
12) Use only with cart, stand,
limited operation and feature during playback. Piease
because some BD, DVD or CD discs allow specific or
tripod, bracket, or table
specified
note that this is not a defect in the player.
by the manufacturer,
• Samsung cannot assure that this player will play every
disc bearing the BD, DVD and CD Iogos because disc
or sold with the apparatus.
13) Unplug this apparatus.
When a cart is used,
formats may evolve, and problems
and errors can
use caution when moving the cart/apparatus
occur during the creation of BD, DVD and CD
combination
software and/or the manufacture
to avoid injury from tip-over.
14) Refer all servicing to qualified service personnel.
Servicing is required when the apparatus has been
damaged
in any way, such as power-supply
ptug is damaged,
cord or
liquid has been spilled or objects
have fallen into the apparatus
the apparatus has
been exposed to rain or moisture,
normally, or has been dropped.
does not operate
of discs.
This player
also operates differently than a standard DVD player
or other AV equipment. Please contact SAMSUNG
customer care center if you have questions
or
encounter difficulty in playing BD, DVD or CD discs in
this player. Also, refer to the rest of this Manual for
additional
information
on playback
restrictions.
English - 3
#/¢?
GeneralFeatures
_;X7
E
7S_
Blu-ray Discs can store 25 GB (single layer) or 50 GB
(dual layer) on a single sided disc - about 5 to 10
times the capacity of a DVD.
Blu-ray Discs also support the highest quality HD
video available in the industry (up to 1920 x 1080 at
40 Mbit/sec) - Large capacity means no compromise
on video quality. Furthermore,
a Blu-ray Disc has the
same familiar size and look as DVD.
MP3 Playback
* The following Blu-ray Disc features are disc
dependant and will vary.
Appearance and navigation of features will also vary
from disc to disc.
Not all discs will have the features described below.
This unit can play mp3 files from CD-R/-RW, DVD-R/RW/-RAM, Memory Cards.
Video
Digital
Photo
Viewer
(JPEG)
You can enjoy digital photos on your TV.
HDMI (High Definition
Multimedia
Interface)
HDMI reduces picture noise by allowing a pure digital
video/audio signal path from the player to your TV.
highlights
The BD-ROM format for movie distribution
supports
three highly advanced video codecs, including
MPEG-2.
HD video resolutions are also available:
- 1920 x 1080 HD
- 1280 x 720 HD
Memory card capability
Compatible
with 10 types of popular memory cards:
Compact Flash, Micro Drive, Memory Stick, Memory
Stick PRO, Memory Stick Duo, Memory Stick Pro
Duo, Secure Digital, Multi Media, Mini SD, RS MMC.
For
High-Definition
Playback
To view high-definition
contents
HDTV is required.
Some discs
in BD discs, an
may require HDMt
OUT for viewing of high-definition
contents.
Ability to
view high-definition
contents in BD discs may be
limited depending on the resolution of your TV.
Graphic planes
Two individual, full HD resolution (1920x1080)
graphic
planes (layers) are available, on top of the HD video
layer. One plane is assigned to video-related,
frame
accurate graphics (like subtitles), and the other plane
is assigned
to interactive graphic elements, such as buttons or
menus.
For both planes, various wipes,
effects may be available.
fades and scroll
>Graphic
Planes
HD Video
Menu
graphics
Support 256 color full resolution graphics and
animation, thereby greatly surpassing the capabilities
of DVD-Video. Options can be accessed and
removed during video playback.
4 - English
Menu sounds
When you highlight or select a menu option, sounds
can be heard such as button clicks or a voice-over
explaining the highlighted menu choice.
Multi-page/PopUp
Menus
With DVD-Video, playback is interrupted each time a
new menu screen is accessed. Due to Blu-ray Disc's
ability to preload data from the disc without
interrupting playback, a menu can consist of several
pages.
You can browse through the menu pages or select
different menu paths, while the audio and video
remain playing in the background.
BeforeReadingthe
User's Manual
@
Makesureto checkthe followingtermsbeforereadingthe usermanual.
Icons that will be used in manual
Icon
Term
BD-ROM
BD-RE
BD-R
DVD-VtDEO
Interactivity
Certain Blu-ray Discs may contain Animated menus
and Trivia games.
User
Browsable
Slideshows
RAM
RW
With Blu-ray Discs, you can browse through various
still pictures while the audio remains playing.
R
Subtitles
Depending on what is contained on the Blu-ray Disc,
you may be able to select different font styles, sizes
and colors for the subtitles, Subtitles may also be
animated, scrolled or faded in and out.
Definition
This involves
a function
This involves
a function
available
a function
available
This involves
a function
available
on DVD-Video
or DVD-R/DVD-RW
on the BD-RE
This involves
on the BD-R.
discs that have been recorded
and finalized in Video Mode.
This involves a function available on
DVD-RAM.(VR
mode,StandardVersion2.00nly)
This involves a function available
This involves a function available on
BD-R(V mode and finalized only)
on a data
a function
CD (CD-R
This involves
JPEG
discs
or memory
Memory
Card
Note
One-Touch
button
available
DVD-R/-RW/
or memory
This involves
on the Memory
This involves
Caution
card.
a function
on CD-R/-RW,
discs
available
DVD-R/-RWi
This involves
-RAM
available
or CD-RW).
a function
on CD-R!-RW,
-RAM
MP3
on
DVD-RW.(VR
mode,or V modeandfinalized0nly)
This involves
Audio CD
available
on the BD-ROM.
card.
a function
available
Card.
a case
where
function
does not operate
settings
may be cancelled.
a
or
This involves tips or instructions on the
page that help each function operate.
A function that can be operated
by using only one button.
About the use of this user's manual
1) Be sure to be familiar with Safety Instructions before
using this product. (See pages 2~3)
2) Ifa problemoccurs,d_eekthe Troubleshooting.(Seepages 46~47)
Copyright
@2006
SarnsungElectronics
Co.,Ltd.
Allfightsreserved;
No partor wholeofthisuser'smanualmaybereproduced
or copiedwithoutthepriorwrittenpermission
of SamsengElectronics
Co,Ltd.
English - 5
_2
Contents
7
_!!i
i_
_;X7
E
ss_
Warning ....................................................................
2
Before Playing..........................................................
24
Precautions...............................................................
3
Playing a Disc...........................................................
25
ImportantSafety Instructions.................................
3
Using the Search & Skip Functions.....................
26
HandlingCautions..................................................
3
Slow MotionPlay/StepMotion Play......................
26
Maintenanceof Cabinet.........................................
3
Using the Scene Search Function........................
27
General Features......................................................
4
Using the Display Function....................................
28
BeforeReadingthe User'sManual.......................
5
Using the Disc Menu & Popup/TitleMenu ..........28
Disc Type and Characteristics...............................
8
Repeat Play...............................................................
29
Disc Storage& Management...............................
11
Selecting theAudio Language..............................
30
Description..............................................................
12
Selecting the Subtitle Language...........................
30
Front Panel ..........................................................
12
Changingthe CameraAngle..................................
31
Rear Panel ..........................................................
13
Using the Bookmark Function..............................
31
Front Panel Display.............................................
13
Playing an Audio CD/MP3 .....................................
33
Tourof the RemoteControl.................................
14
Viewing a Picture.....................................................
35
Unpacking...............................................................
15
Using a Mixed disc (JPEG+MP3)..........................
38
Quick Overview........................................................
17
TV OutputSelection Feature.................................
18
Choosinga Connection..........................................
18
6 - English
@
;451}_
8ys_@m8@_IP
On-ScreenMenu Navigation..................................
39
Setting up the LanguageOptions.........................
40
Setting up the Audio Options................................
40
Setting up the SpeakerOptions............................
41
Setting up the Video display/outputOptions....,.42
Setting up the ParentalLock .................................
44
Troubleshooting.......................................................
46
Specifications..........................................................
48
English - 7
Do not use the following
Disc Type
Characteri
discs!
• HD DVD discs cannot be played on this product.
• This product is not for playback of DVD+R and
DVD+RW discs.
• LD, CD-G, CD-I, CD-ROM,
DVD-ROM
and illegally
recorded discs should not be used in this product.
tW-'7
Disc types that can be played
[Note]
Disc types that can be played : BD-ROM/-RE/-R,
DVD-Video, DVD-RAM/-RW/-R,
CD, CD-RW/-R.
DVD-RW/-R discs that have been recorded in Video
E
7;5
DiscTypes DiscLogo Recorded
content
BD-ROM
BD-RE
4r=,;_
Max.Playing
minute
DiscShape
AUDIO+VIDEO
Mode(V mode) on other components
when finalized.
Singlesided
• Some commercial
BD-R
DVD-VIDEO ,gl=lI_,
_
AuDio-cD
_
AUDIO+VIDEO
Single
sided(5
inches)
240
Double
sided(5
inches
Single
sided(31/2
inches
480
80
3oubfe
sided{3
I/2inche_
160
AUDIOSinglesded(5inches:
74
Binge
sided(31/2
inches
20
Single-sided
480
DVD-RAM
AUDIO
+VIDEO
Double-sided
only)
960
Pla
5inches
(9.4GB)EX:Extended
DVD-RW
VRmode,or
Vmodeand
_
480
(4.7GB)
AUDIO+VIDEO 5inches
-'X:Extended
Play:
_
480
AUDIO+VIDEO 5inches
(4.7GB)
X: Extended
Play:
discs and DVD discs purchased
outside your region may not be playable with this
product. When these discs are played, either "No
disc." or "Please check the regional code of the disc."
will be displayed.
• If a DVD-R/-RW/-RAM
disc has not been recorded
properIy in DVD video format,
it will not be pIayabte.
Region code
5inches
(4.7GB)"X: Extended
Play:
(VRmode,
Standard
Vereion
2.0
can play only
Both the Blu-ray disc pIayer and the discs are coded by
region. These regional codes must match in order to play the
disc. If the codes do not match, the disc will not play. The
Region Number for this BIu-ray disc player is described on
the rear panel of the Blu-ray disc player.
Disc
Type
Blu-ray
DVD-Video
finalized
only)
DVD-R
(Vmode
andfinalized
0nly)
CD-R/-RW
DVD-RAMi
-RWi-R
Region
code
MP3
•
•
•
•
•
Logos of Discs that can be played
•
•
i:l#.,tayDist
SOU.D
DigitalAudio
DIGITAL
D I G I T A L
Dotby Digital
MP3
8 - English
Blu-ray Disc Compatibility
Blu-ray Disc is a new and evoIving format. Accordingly, disc
compatibility issues with new and existing format discs are
possible. Not atI discs are compatibIe and not every disc will
playback. For additional information, also refer to the
CompIiance and Compatibility Notice section of this Manual.
If you encounter compatibility problems, please contact
SAMSUNG customer care center.
NTSCbroadcast
systemin USA,
Canada,Korea,Japan
Stereo
HD DVDdiscs
DVD-Video with a region number other than "1" or "ALL"
5 inch 2.6 GB and 5.2 GB DVD-RAM
3.9 GB DVD-R Disc for Authoring.
DVD-RAM/-RW(VR mode) not recorded following the
Video Recording Standard
DVD-ROM/PD/MV-Disc, etc
CVD/CD-ROM/CDV/CD-G/CD-I
DTS
NTSC
STEREO
A
Discs that cannot be played
JPEG
This ptayer can play pictures of NTSC color system only.
Blu-ray Disc
Region
Java
Samsung Btu-ray disc player (BD-PIO00) supports only
BD-ROM Profile 1 version 1.0 specification.
In case of playing discs which has later version, you may
need to update player's firmware.
Please refer to http:t/w_#_v.samsung.com or contact
SAMSUNG customer care center.
Disc Type
_or+,
arecompatible
withDVD-RAM
Standard
Version
2.0.
• Playback
maynotworkforsome
types
of
discs,
orwhen
specific
operations,
suchas
angle
change
andaspect
ratioadjustment,
arebeing
performed.
Information
about
the
discs
iswritten
indetail
onthebox.Please
refertothisifnecessary.
• Donotallow
thedisctobecome
dirtyor
scratched.
Finger
prints,
dirt,dust,
scratches
ordeposits
ofcigarette
smoke
onthe
recording
surface
maymake
itimpossible
to
usethediscforplayback.
• Discs
withPALprograms
recorded
onthem
cannot
beplayed
using
thisproduct.
Blu-ray Disc Read Only Memory. A BD-ROM disc
contains pre-recorded data. Although a BD-ROM may
@
contain any form of data, most BD-ROM discs will
_2
contain movies in High Definition format, for playback
on Blu-ray disc players. This unit can play back
pre-recorded commercial BD-ROM discs with movies.
#/¢?
Blu-ray Disc Rewritable. A BD-RE disc can be recorded
over and over again. It offers extensive editing
functionality on the disc. BD-RE is the ideal format for
making sequential
backups, or recording video for time
shifting purposes.
This unit can play back BD-RE discs
with video recording for time shifting purposes.
•Because
AACS
(Advanced
Access
Content
System)
isapproved
ascontent
protection
system
forBD
format,
similar
touseofCSS(Content
Scramble
System)
forDVD
format,
certain
restrictions
are
imposed
onplayback,
analog
signal
output,
etc.,
of
AACS
protected
contents.
Theoperation
ofthis
product
andrestrictions
onthisproduct
may
vary
depending
onyourtimeofpurchase
asthose
restrictions
maybeadopted
and/or
changed
by
AACS
after
theproduction
ofthisproduct.
Furthermore,
BD-ROM
Mark
andBD+are
additionally
used
ascontent
protection
system
for
BDformat,
which
imposes
certain
restrictions
including
playback
restrictions
forBD-ROM
Mark
and/or
BD+
protected
contents.
Toobtain
additional
information
onAACS,
BD-ROM
Mark,
BD+,
orthis
product,
please
contact
SAMSUNG
customer
care
center.
•Many
BD/DVD
discs
areencoded
withcopy
protection.
Because
ofthis,
youshould
onlyconnect
yourBlu-ray
discplayer
directly
toyour
TV,nottoa
VCR.
Connecting
toaVCR
results
inadistorted
picture
from
copy-protected
BD/DVD
discs.
•Thisproduct
incorporates
copyright
protection
technology
thatisprotected
bymethods
claims
of
certain
U.S.patents
andother
intellectual
property
rights
owned
byMacrovision
Corporation
andother
rights
owners.
Useofthiscopyright
protection
technology
must
beauthorized
by
Macrovision
Corporation
andisintended
for
home
andother
limited
viewing
usesonly,
unless
otherwise
authorized
byMacrovision
Corporation.
Reverse
engineering
ordisassembly
isprohibited.
• Under
theU.S.
Copyright
lawsandCopyright
lawsofother
countries,
unauthorized
recording,
use,display,
distribution,
orrevision
oftelevision
programs,
videotapes,
BDs,
DVDs,
CDsand
other
materials
maysubject
youtociviland/or
criminaI
Iiability.
Blu-ray Disc Recordable.
A BD-R disc can be recorded
once, and cannot be accidentally
erased. BD-R is the
ideal format for archiving valuable data or storing and
distributing personal video material. This unit can play
back BD-R discs with video recording for time shifting
purposes.
• A digital versatile disc (DVD) can contain up to 135minutes of images, 8 audio languages and 32 subtitle
languages. It is equipped with MPEG-2 picture
compression
and Dolby Digital surround,
allowing you
to enjoy vivid and clear theatre quality images in the
comfort of your own home.
• When switching
of a dual-layered
from the first layer to the second layer
DVD Video disc, there may be
momentary distortion in the image and sound. This is
not a malfunction of the unit.
• Once a DVD-RW/-R
finalized,
recorded in Video Mode is
it becomes DVD-Video.
stamped) commercial
Pre-recorded
(pre-
DVDs with movies are also
referred to as DVD-Videos.
pre-recorded commercial
discs) with movies.
This unit can play back
DVD discs (DVD-Video
• An audio disc on which 44.1kHz PCM Audio is
recorded.
• This unit can play back CD-DA format audio CD-R
and CD-RW discs.
• The unit may not be able to play some CD-R or
CD-RW discs due to the condition of the recording.
English - 9
• Use a 700MB(80
minutes) CD-R/-RW
do not use a 800MB(90
disc. If possible,
minutes) or above disc, as the
disc may not play back.
c_,;_
.....
_;p7
_1_<_
_
_
t._
• CD-R/-RW,
DVD-RAM/-RW/-R
recorded with UDF,
ISO9660 or JOLIET format can be played back.
• Only JPEG files with the ".jpg", ".JPG", ".jpeg" or
, If the CD-R/-RW disc was not recorded as a closed
session, you may experience a delay in the early
"JPEG" extension
• Progressive
can be displayed.
JPEG is supported.
playback time, all recorded files may not play.
, Some CD-R/-RW discs may not be playable with this
unit, depending on the device which was used to burn
them. For contents recorded on CD-R/-RW media
from CDs for your personal use, playability
depending on contents and discs.
• Once a DVD-R recorded
it becomes DVD-Video.
may vary
in Video Mode is finalized,
• This is a format that is used for recording data on a
DVD-RAMI-RW disc.
• This is a format that is used for recording data on a
DVD-RW or DVD-R disc. The disc can be played by
• Playback may be impossible in some cases due to the
condition of recording.
• This unit can play back DVD-R discs recorded and
finalized with a Samsung DVD video recorder. It may
not be able to play some DVD-R discs depending on
the disc and the condition of the recording.
this Blu-ray disc player once it has been finalized.
• If a disc that has been recorded in Video Mode by a
different maker's recorder but has not been finalized,
it cannot be played by this Btu-ray disc player.
Compliance and Compatibility Notice
NOT ALL discs are compatible
• Playback can be performed with DVD-RW discs in
both the Video and VR Modes.
• Once a DVD-RW
recorded in Video Mode is finalized,
it becomes DVD-Video.
Ability to play back may
• Subject to the restrictions described below and those
noted throughout this Manual, including the Disc Type
and Characteristics section of this Manual, disc types that
can be played are: pre-recorded commercial BD-ROM,
DVD-Video, and Audio CD discs; BD-REt-R, DVD-RAM,
and DVD-RW / DVD-R discs; and CD-RW / CD-R discs.
• Discs other than the above cannot and/or is not intended
depend on recording conditions.
to be played by this player. And some of the above discs
• You cannot play a DVD-RAM
may not play due to one or more reasons provided below.
in most DVD
components due to compatibility issues.
•Oniy DVD-RAM standard Version 2.0. discs can be
played in this unit.
• For cartridge type DVD-RAM
discs, remove the
• HD DVD discs cannot be played in this player.
• Samsung cannot assure that this player will play every
disc bearing the BD-ROM, BD-RE, BD-R, DVD-Video,
DVD-RAM, DVD-RW I DVD-R and CD-RW I CD-R loges,
and this player may not respond to all operating
cartridge and use the disc only.
commends or operate all features of every disc. These
and other disc compatibility and player operation issues
Disc Format
• CD-R/-RW,
DVD-RAM/-RW/-R
with new and existing format discs are possible because:
recorded with UDF,
ISO9660 or JOLIET format can be played back.
• Only MP3 files with the ".rap3" or ".MP3" extension
can be played.
• Playable
bit-rate range is from 56 Kbps to 320 Kbps.
• Playable sample-rate
is only 32 KHz, 44.1 KHz and
48 KHz.
• The unit can handle a maximum of 1500 files and
folders under a parent folder.
For MP3 files recorded with a VBR(VariabIe
Rates), the sound may cut in and out.
10 - English
Bit
- BD format is a new and evolving format and this player may
not operate all features of BD discs because some features
may be optional, additional features may have been added to
the BD format after the productionof this player, and certain
available features may be subject to delayed availability;
- not all new and existing disc format versions are supported by
this player;
- new and existing disc formats may be revised, changed,
updated, improvedand/or supplemented;
- some discs are produced in a manner that allows specific or
limited operation and feature during playback;
- some features may be optional, additional features may have
been added after the production of this player or certain
available features may be subject to delayed availability;
- some discs bearingthe BD-ROM,BD-RE, BD-R, DVD-Video,
DVD-RAM, DVD-RW/ DVD-R and CD-RW / CD-R Iogos may
stili be non-standardizeddiscs;
-some
discs
may
notbeplayed
depending
ontheir
physical
state
orrecording
conditions;
-problems
and
error
can
occur
during
thecreation
ofBD,
DVD
and
CD
software
and/or
themanufacture
ofdiscs;
-thisplayer
operates
differently
than
astandard
DVD
player
or
other
AVequipment;
and/or
-forreasons
noted
throughout
this
Manual
and
forother
reason(s)
discovered
and
posted
bySAMSUNG
customer
care
center.
•Ifyouencounter
disc
compatibility
orplayer
operation
problems,
please
contact
SAMSUNG
customer
care
center.
Youmay
also
contact
SAMSUNG
customer
care
center
forpossible
updates
onthisplayer.
•ForadditionaI
information
onplayback
restrictions
and
disc
compatibility,
refer
tothePrecautions,
Before
Reading
the
User's
Manual,
Disc
Types
and
Characteristics,
and
Before
Playing
sections
ofthisManual.
Cautions on handling d!scs
• Do not write on the printed side with a
ball-point pen or pencil.
_.
• Do not use record cleaning sprays or
antistatic.
@
_2
Also, do not use volatile chemicals, such
as benzene or thinner.
• Do not apply labels or stickers to discs. (Do not use
discs fixed with exposed tape adhesive or leftover
peeled-off stickers.)
• Do not use scratch-proof
protectors
or covers.
• Do not use discs printed with Iabei printers available
on the market.
• Do not Ioad warped
or cracked discs.
Disc Storage
DiscStorage&
Management
Be careful not to harm the disc because the data on
these discs is highly vulnerable
to the environment.
• Do not keep under direct sunlight.
• Keep in a cool ventilated
• Store vertically.
• Keep in a clean protection
Disc Handling
area.
jacket.
• If you move your Blu-ray disc player suddenly from a
cold place to a warm place, condensation
generate on the operating
• Use discs with regular shapes.
abnormal disc playback.
a
special shape) is used, this
Ifanirregulardisc(adiscwith
Blu-ray disc player may be
G
may
parts and lens and cause
If this occurs, do not connect
the plug to the power outlet and wait for two hours.
Then insert the disc and try to play back again.
OX
damaged.
Ho!d!ng disc s
• Avoid touching the surface of a disc
where recording is performed.
B!u-ray Discs
• If the product is not used for a period of time, remove the
Blu-ray Disc from the product and store it in its case.
• Be careful not to leave fingerprints
or scratches
on the
surface of the Blu-ray Disc.
DVD-RAM, DVD'RW and DVD-R
• Clean with an optional
DVD-RAM/PD
disc cleaner
(LF-K2OODCA1 where available). Do not use cleaners or
cloths for CDs to clean DVD-RAMI-RW/-R
discs.
DVD-V!deo, AUd!O-CD
• Wipe off dirt or contamination
on the disc with a soft cloth.
English - 11
#/¢?
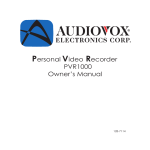
Description
_;X7
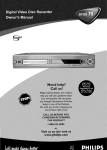
Front Panel
(2_,)
2
;_
POWER BUTTON
Turns the Blu-ray disc player on and off.
_J STOP BUTTON
Stops disc playback.
STANDBY INDICATOR
When the unit is first plugged
this indicator lights.
ri_ TV OUT SELECT BUTTON
Choose video output from HDMI or
COMPONENT
or VIDEO/S-VIDEO.
in,
DISC TRAY
Opens to accept
0
a disc.
4
OPEN/CLOSE
BUTTON
Opens and closes the disc tray.
5
DISPLAY
Displays the playing
¢_ SEARCH/SKIP
status,
7
12 - English
HDMI
- COMP INDICATOR
: Lights when
COMPONENT
OUT mode is selected.
- VIDEO INDICATOR
: Lights when VIDEO
S-VIDEO OUT mode is selected.
Remote
BUTTONS
PLAY/PAUSE
BUTTON
Plays a disc or pauses playback.
OUT INDICATORS
- HDMI INDICATOR : Lights when
OUT mode is selected.
time, etc.
Goes to the next title/chapter/track
or goes
back to the previous title/chapter/track.
VIDEO
2
Control
Sensor
MEMORY CARD SLOT
Insert a memory card here.
or
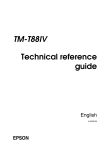
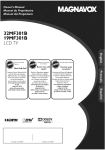
Rear Panel
o
#//?
/
Fall
The fan always revolves when the power is on.
Ensure a minimum of 4 inches of clear space on
all sides of the fan when installing the product.
/
5.1CH ANALOG
AUDIO OUT
_; COMPONENT
Connect to a 5.1CH analog input on an
A!V amplifier
AUDIO OUT
having Component
6 HDMI OUT
Connects to the audio input of external
equipment using audio cables•
Use the HDM! cable, connect this HDMI output
terminal to the HDMI input terminal on your TV
for the best quality picture.
_ VIDEO OUT
Connects the input of external equipment
video cable.
_ S-VIDEO
VIDEO OUT
Connects to equipment
video input.
using a
7 DIGITAL AUDIO OUT(COAXIAL)
Connects to an amplifier having a digital coaxial
audio input jack.
OUT
Connects the input of external equipment
an S-Video cable.
using
_ DIGITAL AUDIO OUT(OPTICAL)
Connects to an amplifier having a digital optical
audio input jack.
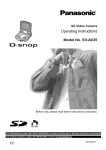
Front Panel Display
I Title/PlayList/Track
indicator
2, Playing time/clock/current
3 Playback indicator
status indicator
Video output resolution indicator
_; Disc type indicators.
Memory card indicator.
4 Pause indicator
English - 13
Tour of the Remote Control
/1
INFO Button
This will display current setting or disc status.
s2
.....
17
COLOR Button : RED(A), GREEN (B), YELLOW(C),
BLUE(D)
Allows access to common functions of the Btu-ray disc
player.
t;£7
13
E
AUDIO Button
Use this to access various audio functions on a disc
(BDIDVD).
s4
MARKER Button
Use this to bookmark a position while playing a disc.
/5
SUBTITLE Button
Press this to switch the BD/DVD's subtitle language.
%
OPEN/CLOSE Button
To open and close the disc tray.
/7
TV POWER Button
/8
INPUT SEL. Button
Select among input terminals of TV.
/9
REVERSE/FORWARD
STEP Buttons
Each time this button is pressed, a new frame will
appear.
20
PLAY/PAUSE Button
Press to play/pause a disc.
2
CHANNEL Button
Use this to select a TV program.
22
TV MUTE Button
Mutes the speakers of your TV.
1
POPUP MENU/TITLE MENU Button
Use this to enter the popup menu/titie menu.
3
SCENE SEARCH Button
REVERSE/FORWARD
2;_
5
REVERSE/FORWARD SEARCH Buttons
Press to search a disc backwards or forwards.
f_
STOP Button
Press to stop a disc.
VOL Button
TV volume adjustment
MENU Button
Brings up the BIu-ray disc player's setup menu.
ENTER/DIRECTION
DISC MENU Button
Use this to enter the disc menu.
14 - English
27
Buttons (iV<
ZOOM Button
Enlarge JPEG Picture.
Press to skip backwards or forwards.
10
Button
Allows you to repeat playback of the A-B section.
SKIP Buttons
9
CANCEL Button
2_5 REPEATA-B
Easily search for desired scenes during playback with
search categories such as Actor and Character.
8
24
25
NUMBER Buttons
7
RETURN Button
POWER Button
2
+_
23
• Buttons)
REPEAT Button
Allows you to repeat a titie, chapter, track or disc.
Unpacking
@
_2
Accessories
,Setting the Remote Control
Check for the supplied accessories belovv.
You can control certain functions of another
manufacturer's TV with this remote control.
Control function buttons include: TV POWER,
CH/X v,
Component Cable
(MD39-00107A)
Composite (Video),
Audio L/R Cable
VOL + -, TV MUTE, INPUT SEL button.
To determine whether your television is
compatible, follow the instructions below.
(MF39-00274A)
1. Switch your teIevision on.
2. Point the remote control towards the television.
3. Press and hold the TV POWER button and enter
the two-figure
HDMI Cable
code corresponding
to the brand of
your television, by pressing the appropriate
number buttons.
(MF39-00299A)
Batteries for Remote
Control (AAA Size)
Result: If your television is compatible
control, it will switch off.
Remote Control
it is now programmed
remote control.
(4301-001035)
Instruction Manual
(AK68-01091A)
NOIB
Quick Guide
(AK68-01118A)
to operate with the
you find one that works.
•
9
with the remote
If you replace the remote contro{'s batteries,
you must set the brand code again.
Preparing the Remote Control
Then you can control the television using the following
buttons after pressing the TV button.
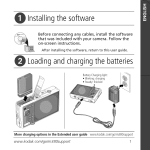
Install Batteries in the Remote Control
• Open the battery cover on the back of the remote control.
• insert two AAA batteries. Make sure that the polarities
(+ and -) are aligned correctly.
• Close the battery cover.
If the remote does not operate properly:
• Check the polarity + - of the batteries (Dry-Ceil)
• Check if the batteries are drained.
Button
Function
TV POWER
Usedto switchthe televisionon and off.
INPUTSEL.
Usedto select an externalsource.
VOL (+ -)
Usedto adjustthe volumeof the television.
CH (^ v )
Usedto select the desiredchannel.
TV MUTE
Usedto toggle thesound on andoff.
• Check if remote sensor is btocked by obstacles.
• Check if there is any fluorescent lighting nearby.
Dispose of batteriesaccordingto local environmental
regulations.Do not put them in the householdtrash.
Nor
_1-
problems, operate the television directly.
iI
il
il
/
English - 15
1,15]}_
Controllable
TV POWER+01, +02, +03, +04, +05, +06, +07, +08, +09
SAMSUNG
BANG
_;X7
E
TV Codes
AIWA
TV POWER+82
ANAM
TV POWER+10, +11, +t2, +13, +14, +15, +16, +17, +18
& OLUFSEN
TV POWER+57
BLAUPUNKT
TV POWER+71
BRANDT
TV POWER+73
BRtONVEGA
TV POWER+57
TV POWER+52
CGE
CONTINENTAL
EDISON
DAEWOO
TV POWER+75
TV POWER+19, +20, +23, +24, +25, +26, +27, +28, +29, +30, +31, +32, +33, +34
TV POWER+64
EMERSON
FERGUSON
TV POWER+73
TV POWER+06, +49, +57
FINLUX
FORMENTI
TV POWER+57
FUJITSU
TV POWER+84
GRADtENTE
GRUNDIG
TV POWER+49, +52, +71
HiTACHi
TV POWER+60, +72, +73, +75
TV POWER+52
IMPERIAL
JVC
TV POWER+61, +79
LG
TV POWER+06, +19, +20, +21, +22, +78
TV POWER+06, +69
LOEWE
LOEWE
TV POWER+70
OPTA
MAGNAV©X
TV POWER+06, +57
TV POWER+40
TV POWER+57
METZ
MITSUBISHI
MIVAR
TV POWER+06, +48, +62, +65
TV POWER+52, +77
TV POWER+83
NEC
NEWSAN
TV POWER+68
NOBLEX
TV POWER+66
NOKIA
TV POWER+74
NORDMENDE
PANASONtC
TV POWER+72, +73, +75
TV POWER+53, +54, +74, +75
TV POWER+06, +55, +56, +57
PHtLIPS
PHONOLA
TV POWER+06, +56, +57
PIONEER
TV POWER+58, +59, +73, +74
RADIOLA
TV POWER+06, +56
TV POWER+57
RADIOMARELLI
RCA
TV POWER+45, +46
TV POWER+74
REX
SABA
SALORA
TV POWER+57, +72, +73, +74, +75
TV POWER+74
SANYO
TV POWER+41, +42, +43, +44, +48
SCHNEIDER
TV POWER+06
SELECO
TV POWER+74
SHARP
TV POWER+36, +37, +38, +39, +48
TV POWER+71
SIEMENS
TV POWER+57
SINGER
TV POWER+57
SINUDYNE
SONY
TV POWER+35, +48
TV POWER+73
TELEAVA
TELEFUNKEN
THOMSON
TV POWER+67, +73, +75, +76
TV POWER+72, +73, +75
THOMSON
ASIA
TOSHIBA
TV POWER+80, +81
TV POWER+47, +48, +49, +50, +51, +52
WEGA
TV POWER+57
YOKO
TV POWER+06
ZENITH
TV POWER+63
16 - English
Quick Overview
ons
A Quick Overview presented in this guide will give you
enough information to start using the Blu-ray disc player.
This section involves various methods of
connecting
external
the BIu-ray disc player to other
components.
Quick Overview ..........................
17
TV Output Selection Feature ................
18
Choosing a Connection
18
....................
Before Connectingthe Blu-ray disc player
• Always turn off the Blu-ray disc player, TV and
other components before you connect or
disconnect any cables.
• Refer to the user's manual of additional
components (such as a TV) you are connecting
for more information on those particular
components.
English - 17
TVOutputSelection
Feature
.....
You may choose from VIDEO, S-VIDEO, COMPONENT
and HDMImode for video output.
Choosinga Connection
The following shows examples of connections commonly used to
connect the BIu-raydisc player with a TV and other components.
Connecting to a TV(Video)
1. Using video/audio cables, connect the VIDEO
(yellow)/AUDIO (red and white) OUT terminals on the rear
of the Blu-ray disc player to the VIDEO (yellow)/AUDIO
@
(red and white) IN terminals of your TV.
2. Turn on the Biu-ray disc player and TV.
3. Press the TV OUT SELECT button on the front panel
of the unit until the VIDEO indicator lights. Make sure
the unit is in Stop mode.
4. Press the input selector on your TV remote control
Use the TV OUT SELECT button on the front panel of the
unit to select the video output while the disc is stopped.
- Video Output mode changes as follows when the
TV OUT SELECT button is pressed: NDMI .-, VIDEO
COMP _ HDMI order.
until the Video signal from the Blu-ray disc player
appears on the TV screen.
• If you have set the remote controt to properly operate
with your TV (pages 15~16), press the INPUT SEL
button on the remote control and select VIDEO as the
external source of the TV.
- To select HDMI output, press the TV OUT SELECT
button until the HDMI indicator lights.
- To select COMPONENT output, press the TV OUT
SELECT button until the COMP indicator lights.
- To select VIDEO or S-VIDEO output, press the TV OUT
SELECT button until the VIDEO indicator lights.
_ii
•
If HDMI mode is selected for TVs providing
display information (EDID), the TV resolution
will be automatically changed to the best
quality supported by the TV.
•
If HDMI mode is selected for TVs that do not
_orr,
provide display information (EDID),
resolution will be adjusted to 720p.
•
If COMP (Component) mode is selected,
resolution will be adjusted to 480p.
•
If VIDEO mode is selected, resolution will be
adjusted to 480i.
•
Only resolutions
available.
•
Select the resolution from <Setup>
<Display Setup>. (See page 43.)
18 - English
supported by the TV are
NOT_
•
If you want to connect to an Amplifier,
please refer to the Amplifier connection
page. (See pages 21 to 22)
•
The number and position of terminals may
vary depending on your TV set. Piease refer
to the user's manual of your TV.
•
If there is one audio input terminal on the TV,
connect it to the [AUDIO OUT][left] (white)
terminal of the Biu-ray disc player.
•
If you set the TV Out Select to HDMI, the
Video/S-Video and Component Out
terminals will not output any signal.
•
Blu-ray Disc Playback is not availabie with
this connection.
Connecting to a TV (Component)
Connecting to a TV (S-Video)
- Connecting
to your TV using an S-Video cable.
- You will enjoy high quality images. S-Video separates
the picture element into black and white(Y)
and
color(C) signals to present clearer images than regular
video input mode.
(Audio signals are delivered through the audio output.)
1. Using an S-Video cable (not included),
connect the
S-VIDEO OUT terminal on the rear of the Blu-ray
disc player to the S-VIDEO IN terminal of your TV.
2. Using the audio cables, connect the AUDIO (red and
white)
OUT terminals on the rear of the Blu-ray disc
player to the AUDIO (red and white}
IN terminals of
your TV. Turn on the Blu-ray disc player and TV.
3. Press the TV OUT SELECT
button on the front panel
of the unit until the VIDEO indicator lights. Make sure
the unit is in Stop mode.
4. Press the input selector on your TV remote control
until the S-Video signal from the Blu-ray disc player
appears on your TV screen.
• If you have set the remote control to properly operate
with your TV (pages 15~16), press the INPUT SEL.
button on the remote control and select S-VIDEO as
the external source of the TV.
NO_E
connection.
- Connecting
to your TV using Component
- You will enjoy high quality and accurate
reproduction
images. Component
video cables.
color
video separates the
picture element into black and white(Y),
blue(PB),
red(PR) signals to present clear and clean images.
(Audio signals are delivered through the audio output.)
1. Using component video cables, connect the
COMPONENT VIDEO OUT terminals on the rear of
the Blu-ray disc player to the COMPONENT
IN
terminals of your TV.
2. Using the audio cables, connect the AUDIO (red and
white}
OUT terminals on the rear of the Blu-ray disc
player to the AUDIO (red and white)
IN terminals of
your TV. Turn on the Blu-ray disc player and TV.
3. Press the TV OUT SELECT button on the front panel
of the unit until the COMP indicator lights. Make sure
the unit is in Stop mode.
4. Press the input selector on your TV remote control
until the Component signal from the Btu-ray disc
player appears on the TV screen.
• If you have set the remote control to properly operate
with your TV (pages I5~16), press the INPUT SEL.
button on the remote control and select COMPONENT
as the external source of the TV.
NOS_
"PR, PB, Y" depending on the manufacturer.
The number and position of terminals may vary
depending on the TV set. Please refer to the
user's manual of your TV.
•
BIu-ray Disc Playback is available with this
connection in 720p or 1080i resolution.
English - 19
O
_s
Connecting to a TV with DVI Cable
1. Using the HDMI-DVI
cable, connect the HDMI OUT
terminal on the rear of the Blu-ray disc player to the
DVl IN terminal of your TV.
OUT terminals on the rear of the Blu-ray disc
player to the AUDIO (red and white)
IN terminals of
your TV.
Turn on the Blu-ray disc player and TV.
3. Press the TV OUT SELECT button on the front panel
of the unit until the HDMI indicator lights. Make sure
the unit is in Stop mode.
4. Press the input selector on your TV remote control
o
1. Using the HDMI-HDMI
until the DVI signal from the Blu-ray disc player
cabte connect the HDMI OUT
terminal on the rear of the Blu-ray disc player to the
HDMI IN terminal
2. Using the audio cables, connect the AUDIO (red and
white)
Connecting to a TV with HDMI Cable
of your TV.
2. Press the TV OUT SELECT button on the front panel
of the unit untiI the HDMI indicator lights. Make sure
the unit is in Stop mode.
3. Press the input selector on your TV remote control
until the HDM! signal from the BIu-ray disc player
appears on your TV screen.
• If you have set the remote control to properly operate
with your TV (pages 15~16), press the INPUT SEL.
button on the remote control and select HDMI as the
extemaI source of the TV.
appears on your TV screen.
• If you have set the remote control to properly operate
with your TV (pages 15~16), press the INPUT SEL.
button on the remote control and select HDMI as the
external source of the TV.
i
HOM_c_h_e
J..............
HDMI Auto Detection Function
Connecting
the HDMI cable while the unit power is on,
will automatically
HDM] mode.
NOTE
connection in 720p or 1080i or 1080p
resolution
20 - English
change the video output mode to
•
Please refer to the user's manual of your TV.
•
If an HDMI or HDMI-DVI cable is plugged into TV,
the Btu-ray disc player's output is set to HDMIIDVl
automatically about 10 seconds later.
•
If Component and HDMI are both connected,
HDMI mode is automatically selected.
(If HDMI is connected in Component mode or
video mode, the video output mode automatically
switches to HDMI mode.)
•
BIu-ray Disc Playback is available with this
connection in 720p or I080i or 1080p resolution
• HDMI (High Definition Multimedia Interface)
HDMI is an interface that enables the digital
transmission of video and audio data with just a
single connector.
Using HDMI, the Blu-ray disc player transmits a
digital video and audio signal and displays a vivid
picture on a TV having an HDMI input jack.
• HDMI connection description
HDMI connector - Supports video and digital audio
data (LPCM or Bit Stream).
- HDMI outputs only a pure digital signal to the TV.
- If TV does not support HDCP (High-bandwidth
Digital Content Protection), random noise
appears on the screen.
Connecting to an Audio System
(2 Channel Amplifier)
1. Using the audio cables, connect the AUDIO (red and
white) OUT terminals on the rear of the Blu-ray disc
player to the AUDIO (red and white)
IN terminals of
your Amplifier.
2. Using the video signal cable(s), connect the VIDEO,
S-VIDEO, COMPONENT or HDMI OUT terminals on
the rear of the Blu-ray disc player to the VIDEO,
S-VIDEO,
COMPONENT
or HDMI IN terminal
of your
TV as described on pages 18 to 20.
3.Turn on the Blu-ray disc player, TV and Amplifier.
4. Press the input select button of the Amplifier to select
external
input
in order to hear sound from the
Blu-ray disc player. Refer to your Amplifier's
manual to set the Amplifier's
user
audio input.
• Why does 8amsung use HDMI?
Analog TVs require an analog video/audio signal.
However, when playing a BD/DVD, the data
transmitted to a TV is digital. Therefore either a
digital-to-analog converter (in the Blu-ray disc
player) or an analog-to-digital converter (in the TV)
is required. During this conversion, the picture
quality is degraded due to noise and signal loss.
HDMI technology is superior because it requires no
D/A conversion and is a pure digital signal from the
player to your TV.
• What is the HDCP?
HDCP (High-band width Digital Content Protection)
is a system for protecting BD/DVD content
outputted via HDMI from being copied. It provides
a secure digital link between a video source (PC,
DVD. etc) and a display device (TV, projector.
etc). Content is encrypted at the source device to
prevent unauthorized copies from being made.
Laboratories.
"Dolby" and the double-D
are trademarks
of Dolby Laboratories.
symbol
English - 21
©
t_Jj;
Connecting to an Audio System
(5,1 Channel Amplifier)
1. Using the audio cables, connect the 5.1 ANALOG
AUDIO OUT (Front R, Front L, CENTER,
SUBWOOFER,
REAR L, REAR R) terminals on the
1. If using an optical cable (not included), connect the
DIGITAL AUDIO OUT (OPTICAL)
terminal on the
rear of the Blu-ray disc player to the 5.1 Channel
rear of the Blu-ray disc player to the DIGITAL AUDIO
ANALOG
IN (OPTICAL) terminaI of your Amplifier.
If using a coaxial cable (not included), connect the
AUDIO IN (Front
SUBWOOFER,
R, Front
L, CENTER,
REAR L, REAR R) terminals of your
Amplifier.
DIGITAL AUDIO OUT (COAXIAL)
2. Using the video signal cable(s), connect the VIDEO,
S-VIDEO,
COMPONENT
or HDMI OUT terminals on
the rear of the Blu-ray disc player to the VIDEO,
o
Connecting to an Audio System
(Dolby Digital, MPEG2 or DT8
Amplifier)
S-VIDEO, COMPONENT or HDMI IN terminal of your
TV as described on pages 18 to 20
3.Turn on the Blu-ray disc player, TV and Amplifier.
4. Press the input select button of the Amplifier to select
external input in order to hear sound from the
Blu-ray disc player. Refer to your Amplifier's
manual to set the Amplifier's
user
audio input.
terminal
IN (COAXIAL)
terminal of the Amplifier.
2. Using the video signal cable(s), connect the VIDEO,
S-VIDEO,
COMPONENT
or HDMI OUT terminals on
the rear of the Blu-ray disc player to the VIDEO,
S-VIDEO,
COMPONENT
your TV as described
or HDMI IN terminals of
on pages 18 to 20.
3. Turn on the Blu-ray disc player, TV, and Amplifier.
4. Press the input select button of the Amplifier to select
external
input in order to hear sound from the
Blu-ray disc player. Refer to your Amplifier's
manuaI to set the Amplifier's audio input.
i 1
L__
• J
or
NO_
cause damage to the speakers and your ears.
•
Please set the audio in the menu screen
according to the Amplifier. (See pages 40 to 41)
•
The position of terminals may vary
depending on the Amplifier. Please refer to
the user's manual of your Amplifier.
•
If you have the unit connected via the
5.1channel analog outputs and play a DVD
Dolby Digital disc, sound will only be heard
from the Front Left and Right speakers.
•
If you have the unit connected via any analog
output and play a DTS DVD disc, no sound wilt
be heard. To hear sound, the digitaI output
must be connected and set to Bitstream.
22 - English
on the
rear of the Blu-ray disc player to the DIGITAL AUDIO
ICAL
COAXI
user
Connecting to an Audio System
(HDMI supported Amplifier)
NOTE
may cause damage to the speakers and
your ears.
•
Please set the audio in the menu screen
according to the Amplifier.
(See pages 40 to 41)
•
The position of terminals may vary
depending on the Amplifier.
Please refer to the user's manual of your
Amplifier.
1. Using the HDM!-HDM!
cable, connect the HDMI OUT
terminal on the rear of the Btu-ray disc player to the
HDMI IN terminal of your Amplifier.
2. Using the HDM!-HDMI
cable connect the HDMI OUT
terminal of the Amplifier to the HDMI IN terminal
your TV.
of
3. Turn on the Blu-ray disc player, TV, and Amplifier.
4. Press the input select button of the Amplifier to select
external input in order to hear sound from the
Blu-ray disc player. Refer to your Amplifier's user
manual to set the Amplifier's audio input.
O
NOTE
may cause damage to the speakers
your ears.
•
and
Please set the audio in the menu screen
according to the Amplifier.
(See pages 40 to 41)
•
The position of terminals may vary
depending on the Amplifier.
Please refer to the user's manuaI of your
Amplifier.
English - 23
BeforePlaying
This section introduces
basic functions of
playback and playback by disc type.
a,,
•
Turn on your TV and set it to the correct Video
Input on the TV's remote control.
•
If you connected an external Audio System, turn
on your Audio System and set it to the correct
Audio Input.
After plugging in the player, the first time you
press the POWER button, this screen comes up:
If you want to select a language, press a
NUMBER button. (This screen will only appear
when you plug in the player for the first time.)
If the language for the startup screen is not set,
the settings may change whenever you turn the
power on or off. Therefore, make sure that you
select the language you want to use.
Once you select a menu language, you can
change it by pressing the _,4 button on the front
panel of the unit for more than 5 seconds with no
disc in the unit. Then the MENU LANGUAGE
SELECTION window appears again where you
can reset your preferred language.
M_
LAN_AG_ SEL_CTI_
L
(
)
Before Playing ..................................................................24
Playing a Disc ...................................................................25
•
D_scs whch
cannot be played
to be played with this player.
, DVD+RW
, DVD+R
, CVD
Using the Scene Search Function ..................................27
not intended
• HD DVD
• CD-ROM
• CD-I
Using the Display Function ..............................................28
• Super Audio CD(except CD layer)
• CDGs p(ay audio only, not graphics.
Using the Search & Skip Functions ................................26
Slow Motion Play/Step Motion Play ................................26
Using the Disc Menu & Popup/Title Menu ......................28
•
Repeat Play ......................................................................29
Selecting the Audio Language .........................................30
Changing the Camera Angle ...........................................31
Playing an Audio CD/MP3 ..............................................33
Viewing a Picture ..............................................................35
Using a Mixed disc (JPEG+MP3) ...................................38
24 - English
are
Abilityto playback may dependon recordingconditions.
• DVD-R
• CD-RW
• DVD-RW (V mode)
• The unit may not play certain CD-R,
CD-RW and DVD-R due to the disc type
or recording conditions.
Selecting the Subtitle Language ......................................30
Using the Bookmark Function .........................................31
and/or
•
Biu-ray Disc is a new and evolving format.
Acoordingiy, disc compatibility issues with new and
existing format discs are possible. Not a(I discs are
compatible and not every disc wiUplayback. For
additional information, also refer to the Disc Type
and Characteristics and Compliance and
Compatibility Notice sections of this Manual. (f you
encounter compatibility problems, please contact
SAMSUNG customer care center.
Reading the Memory Card
This product supports the following memory card types, insert
Playinga Disc
the memory card in the slot with the label facing upwards.
(The memory card wil not be read if the label is not facing up.)
• Memory cards that can be used in the left slot :
Playback
Compact Flash Card, Micro Drive
Press the OPEN/CLOSE ((_) button.
The STANDBY indicator light goes out and the
tray opens.
• Memory cards that can be used in the right slot :
Memory Stick, Memory Stick PRO, Memory Stick
Duo, Memory Stick Pro Duo, Secure Digital, Multi
Media, Mini SD, RS MMC
• Four card types, Memory Stick Duo, Memory Stick
Pro Duo, Mini SD and RS MMC, must be used with
an adapter. (Do not directly insert into the slot without
Place a disc gently into the tray with
the disc's label facing up.
an adapter.)
Press the OPEN part of the front cover of the unit to open.
• Open the front cover and the memory slot will appear.
Press the PLAY/PAUSE (_._) button or
OPEN/CLOSE ((_) button to close the disc tray.
2
Insert the memory card containing music, pictures and
other data, into the memory slot.
• If both slots are loaded and Memory Card is
selected, the left slot has priority.
• If Memory Card is selected, then both slots are
NOIB
you press PLAY/PAUSE (_"0) button again,
it will pick up where you left off.
•
Press the STOP ((_) button twice during
playback to disable the Resume function.
•
To pause the playback, press the
PLAY/PAUSE
(_)
loaded, the memory card inserted first wilt be played.
3
button during playback.
to select the Memory Card mode (if a BDtDVD disc is
in the unit, it must be stopped).
To resume, press the PLAY/PAUSE(_)
button once again.
•
Press the MENU button and then the RED(A) button
• To toggle between Disc and Memory Card, press the
MENU button, then the RED(A) button.
If the player is left in the stop mode for
more than 10 minutes without any user
interface, a screen saver will appear on
your TV. If the player is left in the screen
saver mode for more than 20 minutes, the
power will automatically
turn off except
during playback of an MP3 and/or JPEG.
(Automatic
Power-Off Function)
•
If the player is left for about 5 minutes in
pause mode, it will stop.
Select the folder you want to view or play.
• MP3 : (see pages 33-35)
• JPEG : (see pages 35_37)
Ca _tio_,
• Memory cards are only available for playback.
NOTE
English - 25
P
During play, you can search quickly through a
chapter or track, and use the skip function to
jump to the next selection.
Slow Motion Play
Searching through a Chapter or Track
In pause or step mode, press the SEARCH (_
_
)
button on the remote control for Slow Motion play.
• If you press the SEARCH ( _
During playback, press the SEARCH ( _
_
) button.
• If you want to search at a faster speed on the BD/DVD,
press this button.
button,
Fast 1 -.-, _
Fast 2 _ _
Fast 3
_Fast4_
_Fast5_
_Fast6
• If you press the SEARCH (_)
Fast 1 .-, _ Fast 2 _
_ Fast 4 _
) button,
I1_- Stow 3
button,
_1 Slow 2 _ _11 Slow 3
• To return to normal speed playback, press the
PLAY/PAUSE ((,_)
button.
button,
Nor
_ Fast 3
'_ Fast 5 _
I1_- Stow 2 _
• If you press the SEARCH (_)
_1 Stow 1 _
• if you press the SEARCH (_)
a,,
I1_- Stow 1 _
"_ Fast 6
direction.
•
This ( Q ) icon indicates
press.
an invalid button
•
No sound is heard during slow mode.
NOT
•
No sound is heard during search mode.
Skipping
Tracks
Step Motion Play
Press the STEP( _
_
) button on the remote control
during play for Step Motion play.
• Each time the button is pressed a new frame will appear.
During playback, press the SKIP ( _
_)
button.
When playing a BDtDVD, if you press the SKIP (_)
button, it moves to the next chapter. If you press the SKIP
(_
) button, it moves to the beginning of the chapter.
One more press makes it move to the beginning of
the previous chapter.
• When the step( _j_ ) button is pressed, the next frame
will be activated.
• When the step(_
) button is pressed, the previous
frame will be activated.
• Press the PLAY/PAUSE (_)
Nor
direction.
•
26 - English
button to resume
normal play.
No sound is heard during step mode.
Press the Ay•
1_ button to select the desired
scene, then press the ENTER button.
• The selected scene will be piayed.
If search functions such as Actor, Character,
Specific Scene and Special Search are provided in
the BD disc, select the desired search criteria to
easily search scenes.
Searching through a Scene
Ex) Searching
by Actor
To play another scene of the selected Actor, press
the • _- button to select another scene, then press
the ENTER button,
Press the SCENE SEARCH button during playback.
• The Scene Search screen will appear.
_2_#'
N©_E
Press
Ay button to select Actor, than press the
ENTERthe
button
• The Actor category screen wilt appear.
Press the Ay•
1_ button to select the desired Actor,
and then press the ENTER button.
• The selected Actor category screen wilt appear.
English - 27
Usingthe Display
Function
_o_
more than one in the disc. For example, if there
is mere than one movie on a BD/DVD, each
movie will be identified.
• Chapter: Most BD/DVD discs are recorded in
chapters so that you can quickly find a specific
passage.
• Audio : Refers to the film's soundtrack
language. ABD disc can contain up to 32 audio
languages and a DVD up to 8.
• Time :Allows
playback of the film from a
desired time. You must enter the starting time
as a reference. The time search function does
During
press the INFO button on the
remote playback,
control.
not operate on some discs.
Press the AT
• Subtitle : Refers to the subtitle languages
available in the disc. You will be able to choose
buttons to select the desired item.
the subtitle languages or, if you prefer, turn
them off from the screen. ABD disc can contain
up to 255 subtitle languages, and a DVD up to 32.
• Angle : When a BD/DVD contains multiple
angles of a particular
ANGLE function.
scene, you can use the
a,,
UsingtheDiscMenu&
Popup/TitleM
Using the Disc Menu
3
Press the • 1_ buttons to make the desired setup
z z z z z
z z z z z z
z z z z
and then press the ENTER button.
During
playback,
press the DISC MENU button
on
the remote
controt.
• You may use the number buttons of the remote
control to directly access a title, chapter or to start
the playback from a desired time.
Press the AT•
1_buttons to make the desired
setup, then press the 1_ or ENTER button.
• The Disc menu setup items may vary from disc to disc.
To make the screen disappear, press the INFO
button again.
C_ttt/m
on the title.
_ao-r
28 - English
not be available.
Using the Title Menu
RepeatPlay
During
playback,
press the TITLE MENU button
on the remote
control.
Repeat the current chapter or title.
Press the A._!'_I 1_buttons to make the desired
setup, then press the ENTER button.
• The Title menu setup options may vary from disc to disc.
Repeat playback
@
i_iiiiiiiiiiiiiiii_iiiiiiiiiii
.....................................................................................................................................................................................................................................
_iii:
.
Depending on the disc the Title Menu may
not be available.
•
Title Menu will only be displayed if there are
at least two titles in the disc.
N¢}
During
press the REPEAT button on the
remote playback,
control.
Repeat screen appears.
Using the Popup Menu
©
During
playback,
the remote
control.press the POPUP MENU button on
Press the AT buttons to seIect Chapter or Title.
• BD/DVD repeats ptay by chapter or title.
Press
the _._!'_1
the
desired
menu.1_buttons or ENTER button to select
To
returnagain,
to normal
the buttons
REPEATto
button
then play,
press press
the AV
select Off.
• The Popup menu setup options may vary from
disc to disc.
_OT_:
Using the A-B Repeat function
iii_iiiiiiiiiiiiiiiiiiiii_iiii
.....................................................................................................................................................................................................................................
ili_:'_!iiiiiiii•
Dependingonthedisc,
_ii_4ii_
_i _iii
may not be available.
thePopupMenu
1. Press the Repeat A-B button on the remote control.
2. Press the Repeat A-B button at the point
where you want repeat play to start (A).
3. Press the Repeat A-B button at the point where
you want the repeat play to stop (B).
4.To return to normalplay, press the CANCEL button.
English - 29
SelectingtheAudio
Language
.....
SelectingtheSubtitle
You can select a desired audio language quickly
and easily with the AUDIO button.
You can select a desired subtitle quickly and easily
with the SUBTITLE button.
Language
Using the AUDIO button
1
.....
Using the SUBTITLE button
Press the AUDIO button during playback. The Audio
changes when the button is pressed repeatedly.
Press the SUBTITLE button. The subtitle changes
when the button is pressed repeatedly. The subtitle
• The audio languages are represented by
abbreviations.
To
remove button.
the AUDIO icon, press the CANCEL
RETURN
languages are represented by abbreviations.
or
To
remove button.
the SUBTITLE icon, press the CANCEL or
RETURN
<Using the INFO button>
<Using the INFO button>
1. During playback, press the INFO button on the remote
control.
1. During playback, press the INFO button on the remote
control.
2. Press the
2. Press the AT
AT
buttons to select Audio.
3. Press the • 1_ buttons on the remote control to select
the desired audio.
NOT_
not be available.
•
A BD disc can contain up to 32 audio
languages and a DVD up to 8.
30 - English
buttons to select Subtitle,
3. Press the • 1_ buttons on the remote control to select the
desired subtitle language.
_'_O
the DISC MENU button.
•
This function depends on what subtitles are
encoded on the disc and may not be
available on all BD/DVDs,
•
A BD disc can contain up to 255 subtitle
languages and a DVD up to 32.
ChangingtheCamera
Angle
.....
When a BD/DVD contains multiple angles of a
particular scene, you can use the
_..,._,_
ANGLE function.
Using the ANGLE function
During
remote playback,
control.
Press the AT
press the INFO button on the
Usingthe
Function
The features lets you bookmarks sections of a
DVD so you can quickly find them
at a later time.
Using the MARKER button
During
playback,
press the MARKER
on
the remote
control.
button
buttons to select Angle.
D
Press the ENTER button when the desired scene
appears.
Press
1_ remote
buttons control
or you to
canselect
use the
buttonsthe
on • the
the number
desired
• The number 01 is displayed
memorized.
and the scene is
angle,
NOIB
this feature.
•
Depending on the disc, these functions
may not work.
Press the 1_ buttons to move to the next position.
English - 31
Clearing a bookmark
4
Press the ENTER button again when the desired
scene appears.
The number 02 is displayed and the scene is
memorized.
Using the MARKER button
During
playback,
press the MARKER button
on
the remote
control.
• Repeat above to bookmark other positions.
• You can bookmark up to 10 scenes.
_,_OTE
closed,
bookmarks
will disappear.
Press the • 1_ buttons to select a bookmarked
scene.
a,,
Playing back a bookmark
Using the MARKER button
1
During playback, press the MARKER button
on the remote control.
Press
the CANCEL button to delete the selected
bookmark.
Press
scene. the • 1_ buttons to select a bookmarked
Press the ENTER or PLAY/PAUSE(_
start playing from the selected scene.
32 - English
) button to
Audio CD(CD-DA)/MP3 Screen
Elements
Playingan Audi
MP3
<Audio CD(CD-DA)>
Playing an Audio CD(CD-DA)
2
3
Insert an audio CD (CD-DA) into the disc tray.
• The Music List screen is displayed
<MP3>
i
Press the AT buttons to seIect the track you want
to play, and then press the ENTER button.
1. Current track (song): Displays the number of the track
currently being piayed.
2. This shows the operating state of a disc and a playback
time corresponding to a portion that is currently played.
Playing an MP3
3. Displays the current folder, current file type and file name.
4. Displays available buttons.
5. Displays the current play index, total track number.
Insert an MP3 disc into the disc tray.
• The Menu screen is displayed.
6. Displays the track list (song list).
7. Display available COLOR buttons.
: RED(A), GREEN(B), YELLOW(C), BLUE(D)
Press the AT buttons to select Music,
press the ENTER button.
then
8. Displays the media type. (Ex: CD, DVD, Memory Card)
• The Music List is displayed.
Press the AT buttons to select the MP3 file you
want to play, and then press the ENTER button.
English - 33
Buttons on the Remote Control
used for Audio CD(CD-DA)/MP3
disc playback
1. AT
buttons
: Selects a track (song).
2. • • buttons: Move the page up/down.
3. ENTER button : Plays the selected track (song).
4. SKIP (®)
button:
Plays the next track.
5. SKIP ((_) button: Returns to the beginning of the
current track when pressed during playback. If pressed
again, your BIu-ray disc player moves to and plays the
previous track.
POWE_
TV
OPEN/CLOSE
POWER
If you press this button within three seconds after
playback starts, the previous track will be played.
If you press this button after three seconds, the current
track will be replayed from the beginning.
6. Press the SEARCH (®®)
buttons: Fast Play
7. STOP ((_) button: Stops a track(song).
8. PLAY/PAUSE (®)
button:
Plays the currently selected
track. If pressed during playback, the current track is
paused.
9. COLOR button: The RED(A), GREEN(B), YELLOW(C)
STOP
6
...............
7
...............
and BLUE(D) button is displayed.
• RED(A) button : Selects the Memory Card.
pLAy
• GREEN(B) button : Selects the Photo Mode.
• YELLOW(C) : Selects the Play Mode(Repeat).
• BLUE(D) button : Go to Ptaylist.
D,.
Repeat CD (CD-DA) & MP3
MENU
R_L_R_
Using the REPEAT button
3
During playback, press the REPEAT or YELLOW(C) button
repeatedly to select the repeat mode you want.
When playing an Audio
CD(CD-DA) :
Normal --* Q'3 "-' 6___--* C_
When playing an MP3 disc :
Normal --. CO "-* C_ "-' C_
• Normal (CD (CD-DA)/MP3):
SAMSUNG
00057A
Tracks on a disc are played
in the order in which they were recorded on the disc.
• Q:) Repeat Track (CD (CD-DA)/MP3)
\
/
• C="JRepeat Folder (MP3)
• C@ Random (CD (CD-DA)/MP3)
- When playing an Audio CD(CD-DA): The random
option plays a disc's track in random order.
- When playing an MP3 disc : The random option
plays a folder's file in random order.
• 6__ Repeat All (CD-DA)
- To return to normal playback Press the REPEAT,
repeatedly
34 - English
YELLOW(C)
to return to normal
or CANCEL
playback.
button
Playlist
You can create a playlist with up to 30 tracks.
Viewing a Picture
....
Press the BLUE(D) button during the Music List playback.
Viewing a Picture
_,
_;_
IJiC_
Insert a JPEG disc into the disc tray.
• The Menu screen is displayed.
Press
the ,&T
buttons to select Photo, then press
the
ENTER
button.
Press
theyou
AVwant
buttons
trackspress
in the
order
in which
them totoselect
play, then
the
ENTER button.
• The Photo List is displayed.
r;
i
"O
©
Press the ,&T_I • buttons to select a picture.
• To see the next 8 pictures,press the SKIP (_) button.
If
therebutton
is a undesired
tracktrack,
in theand
playlist,
_I_'
to select that
then press
press the
the
CANCEL button.
• The selected track will be deleted.
•To see the previous8 pictures,press the SKIP(_)
button.
Slide Show
r
i
Using the YELLOW(C)
button
To setup follow steps 1 and 2 above.
Press the YELLOW(C)
button.
Press the •&T
buttons
to select
desired
Track(song)
you want
to hear,
thenthe
press
the ENTER
button.
Press the AT buttons to select the slideshow speed
(Fast, Normal, Slow), then press the ENTER button.
• The Slide Show starts and plays at the selected speed.
To go Music List, press the RED(A) button.
- To stop the 81ide 8how Press the STOP or RETURN button.
English - 35
Rotate
<Using the INFO button>
Press the ENTER button to select the picture you
want to see, then press the INFO button.
Press the AT
buttons to select Slide Show.
Press the • • buttons to select the Slide Show
speed, then press the ENTER button.
• The Slide Show starts and plays at the selected
speed.
To setup, follow steps 1 to 2 in "Viewing a Picture" on page 35.
-1 Press the ENTER button to select the picture you
want to see, then press the INFO button.
Press the AT buttons to select Rotate.
Presspress
the • the
• ENTER
buttons button.
to select the rotate angle,
then
- To stop the Rotate - To stop the 81ide 8how Press the INFO button.
Press the INFO button.
Press the AT buttons to select Rotate,
Press the AT
buttons to select Slide Show.
Press
the ENTER
• • buttons
to select Rotate Off, then
press the
button.
Press the • • buttons to select the Slide Show Off,
then press the ENTER button.
not
•
button in the Photolist.
JPEG's smaller than 1920 x 1080 will be
displayed at normal resolution, They will not
fully fill the screen,
36 - English
Zoom
To setup, follow steps 1 to 2 in 'Mewing a Picture" on page 35.
-1 Press the ENTER button to select the picture you
want to see, then press the INFO button.
Move Photo/Go To Photo List
To setup, follow steps 1 to 2 in "Viewing a Picture" on page 35.
-1 Press
ENTER button to select the picture you
want tothe
see.
Press the AT buttons to select Zoom,
then press the • • buttons to select Zoom On.
Press the A_, buttons to move the previous or next
picture,
Each time the ENTER button is pressed, the picture
is enlarged up to 4x(four times the normal size).
To go Photo List, press the RETURN or STOP
button.
Zoom X2 -* Zoom X4 -* Zoom X2 -* Normal
- To stop the Zoom Press the INFO button.
Press
the ENTER
AT buttons
to select Zoom Off, then
press the
button.
English - 37
_
Usinga Mixed disc
(JPEG+MP3)
Example: Viewing JPEG pictures
Insert a Mixed disc(JPEG+MP3) into the disc tray.
• The Menu screen is displayed.
Press
the ATbutton.
buttons to select Photo, then press
the ENTER
• The Photo List is displayed.
Example: Playing MP3 music
Insert a Mixed disc(JPEG+MP3) into the disc tray.
• The Menu screen is displayed.
Press
the ATbutton.
buttons to select Music, then press
the ENTER
• The Music List is displayed.
Press the A_r< • buttons to select a picture.
a,,
- To go to the Music List Press the GREEN(B)button.
• Youcan go to the Music List screen.
Press the AT buttons to select the MP3 file you want
to play, and then press the ENTER button.
- To go to the Photo List Press the GREEN(B)button.
• Youcan go to the Photo List screen.
38 - English
On-ScreenMenu
Setup
Navigation
The on-screen menus allow you to enable or disable
various functions on your Blu-ray disc player.
Use the following buttons to open and navigate
through the on-screen menus.
MENU
Button
Press this button
the on-screen
on the remote control to open
menu.
Press again to exit the on-screen menu.
O
O
A_'< these
I_ Buttons
Press
buttons on the remote control to
move the selection bar AT<
1_to cycle through
the menu options.
ENTER
Button
Press this button on the
remote control to confirm any
new settings.
RETURN
Button
Press this button
on the
remote control to return to
the Previous menu screen displayed or to exit the
on-screen menu.
On-Screen
Menu Navigation
...............
Setting up the Language Options
Setting up the Audio Options
............
...............
Setting up the Speaker Options
.............
Setting up the Video displaytoutput
Options ....
Setting up the Parental Lock ................
39
40
40
41
42
44
English - 39
Settingupthe Language
Press
the AT
to select
desired
language,
then buttons
press the
ENTERthe
button.
Options
If you set the audio, subtitle, disc menu and player menu,
in advance, they will come up automatically every time you
watch a movie.
NOS_
to exit the menu.
•
The selected language
is supported
wi{I only appear if it
on the disc.
With
button.the unit in Stop mode, press the MENU
Press the AT buttons to select Setup,
then press the ENTER or • button.
Settingupthe Audio
Options
Allows you to setup the Audio device and sound status
depending on the audio system in use.
With
the unit in Stop mode, press the MENU
button.
@
_;:"_'#
_
@
3
Press the AT buttons to select Language Setup,
then press the ENTER or • button.
Language setup menu will be displayed.
Press
the ATor buttons
the ENTER
• button.to select Setup, then press
Press the AT buttons to select the desired
language option, press the ENTER or • button.
i
;
i
• Audio : For the disc audio language.
• Subtitle : For the disc subtitles.
• Disc Menu: For the disc menu contained on the disc
• Player Menu: For the on-screen menu of your
Btu-ray disc player.
40 - English
Press
the ENTER
AT buttons
select Audio
press the
or • tobutton.
Setup, then
Dynamic Compression
Press the AT buttons to select the desired audio
option from the options described below, then press
the ENTER or • button.
This is only active when a Dotby Digital signal is detected.
• Off : You can enjoy the movie with the standard
Dynamic Range.
Press the AT buttons to select the desired item,
then press the ENTER button.
NO l'I_
• On : When Movie soundtracks are played at
low volume or from smaller speakers, the
system can apply appropriate
compression to make low-level content
more intelligible and prevent dramatic
passages from getting too loud.
Press the MENU button to exit the menu.
Digital Output
SettinguptheSpeaker
• PCM : Select this when your equipment does not
decode Dolby Digital.
0ptions
• Bitstream : Outputs Dolby Digital or MPEG-2 or DTS
audio as bitstream. Select this when your
AV receiver or AV amplifier has a Dolby
Digital or MPEG-2 or DTS Decoder.
NOIi
•
Be sure to select the correct Digital Output or
you will hear no sound or a loud noise.
When playing a Dolby Digital movie make sure
the Digital Output is set to Bitstream.
With
the unit in Stop mode, press the MENU
button.
Press
the ATor •buttons
the
ENTER
button.to select Setup, then press
,,,>¢+
If you have the unit connected via the 5.1
channel analog outputs and play a DVD Dolby
Digital disc, sound will only be heard from the
Front Left and Right speakers.
ISl
If you have the unit connected via any analog
output and play a DTS DVD disc, no sound
will be heard. To hear sound, the digital output
must be connected and set to Bitstream.
PCM Down Sampling
Press the AT buttons to select Audio
press the ENTER or 1_ button.
Setup, then
• On : Select this when the Amplifier connected to the
player is not 96KHz compatible.
In this case, the 96KHz signals will be down
converted to 48KHz
• Off : Select this when the Amplifier connected to the
player is 96KHz compatible. In this case, all
signals wilt be output without any changes.
_,_ol
f_
audio though the digital outputs.
Press the A_' buttons to select Speaker
then press the ENTER or 1_ button.
Setup,
HDMI
• If yourTV is notcompatiblewith compressed
multi-channelformats (Dolby Digital, DTS,MPEG), you
should set DigitalAudio to PCM.
• If yourIV is not compatiblewith LPCMsamplingrates
over 48kHz,you shouldset PCMDownSamplingto On.
English - 41
Press the AV buttons to select Setup, then press
the ENTER or • button.
Press the then
AV_Ipress
• buttons
to select
the desired
Speaker,
the ENTER
button.
Press the MENU button to exit the menu.
Speaker Setup
Front (L,R)
Large, Small
Center (C)
Large, Small, Off
Surround (LS,RS)
Large, Small, Off
Subwoofer (SW)
LFE, Off
Press the ,&V buttons to select Display Setup, then
press the ENTER or • button.
Video setup menu will be displayed.
Speaker
• Large : Delivers a full band sound from bass below 100 Hz.
• Small : If LFE is on, bass below 100 Hz will outputted
through Subwoofer instead of the speakers. If LFE is off
and the Front Speaker is set to Large, sound will be
outputted through the Front Speaker.
• Off : Select to disable the speakers.
£s_
Subwoofer
Speaker
<S,_
• LFE : Select to use the subwoofer speaker.
@
• Off : Select to disable the subwoofer speaker. (This
option can only be selected when the Front (L+R)
Press the AV buttons to select the desired display
option, then press the ENTER or • button.
speakers are set to Large.)
Press the RED(A) button
• A test tone wilI be sent to L _ C _ R _
RS _ LS _ LFE
in order.
• During test tone, press the ENTER button to setup the
speaker. To end the test tone, press the RED(A) button again.
Presspress
the &V
select the desired item,
then
the buttons
ENTER to
button.
This function allows you to setup the TV screen settings.
This function depends on disc type. It may not work for
some disc types.
NO?_
42 - English
Press the MENU button to exit the menu.
TV Aspect
Depending on the type of television you have, you may
want to adjust the screen setting. (aspect ratio)
• 4:3 Letter Box:
Select when you want to see the total 16:9 ratio
screen BDtDVD supplies, even though you have a
TV with a 4:3 ratio screen. Black bars will appear at
the top and bottom of the screen.
• 4:3 Pan-Scan :
Select this for conventionaI size TV when you
want to see the centraI portion of the 16:9 screen.
(Extreme left and right side of movie picture will
be cut off.)
• 16:9 Wide :
You can view the full 16:9 picture on your
widescreen TV.
Black Level
Adjusts the screen brightness of the video signal.
• On : Select to increase the black level of the picture.
In HDMI mode
BD playback : 1080p, 1080i, 720p are available.
DVD playback : 1080p, 1080i, 720p and 480p are all
available.
However, resolutions not supported by the TV are
unavailable.
In COMPONENTmode
• BD playback
Manufacturers of Blu-ray Discs may restrict access to
certain video outputs and resolutions. These constraints
are referred to as "Tokens". There are three different
levels of permission possible, they are:
- TokenDisable: 1080p,1080i,720pare available.
- lOT Enable or DOT Enable : Component and all
analog outputs are disabled in this token.
HDMI must be connected to view a disc with this
token.
• DVD playback
Only 480p and 480i are available. (1080i and 720p will
be outputted as 480p even if selected.)
• Off : Select for the standard black level.
In VIDEO (S-VIDEO) mode
Resolution
BD playback is not available in this mode.
DVD playback: Cannot change resolution in VIDEO mode
and only 480i output is available.
Sets the output resolution of the Component and HDMI
video signal.
• Press the TV OUT SELECT button on the front panel
of the unit to select the HDMI mode, and then select
from 1080p, 1080i, 720p and 480p. Resolutions not
supported by your TV are unavailable.
• Press the TV OUT SELECT button on the front panel
of the unit to select the COMPONENT mode, and
then select from 1080i, 720p, 480p and 480i.
Resolutions are not supported by your TV are
unavailable.
• Please refer to page 18 for more information on
video output selection.
• The number in 480i, 480p, 720p, 1080p and 1080i
indicates the number of lines of video. The i and p
indicate interlace and progressive scan, respectively.
- 1080p : Outputs 1080 lines of progressive video.
- 1080i : Outputs 1080 lines of interlaced video.
- 720p : Outputs 720 lines of progressive video.
- 480p : Outputs 480 lines progressive video.
- 480i : Outputs 480 lines of interlaced video. 480i
resolution is not available for HDMI output.
Discs
HDMImode Component
mode Videom0de(S-Video, €/')
(HDMIoutput) (Component
output)
Vide0output)
BmrayDisc
Nopicture
BmrayDiscwith
10T(image
No picture
Nopicture
ConstraintToken)
1080p,1%0i,
............................................
720p
.................................................
...............................................
Do-rayDiscwith
DOT(Digital
Only
No picture
Nopicture
Token)
DVD
1080p,1080i
720p480p
480p,480i
480i
HDMI Format
You can choose from TV or Monitor for HDMI output.
• TV : Select if HDMI output is connected to the TV.
• Monitor : Select if HDMI output is connected to the
Monitor.
If the player is connected to a TV, the Monitor option
is unavailable.
Screen Message
NOTE
• On : Displays messages related to operation mode.
• Off : Does not display messages related to operation
mode.
Front Display
• Automatic : Display is dark during playback and
bright when the unit is in Stop mode.
• Dim : Select to dim the display window.
• Bright : Select to brighten the display window.
English - 43
Settingupthe Parental
Press the ENTER or • button to select Use Password.
Lock
The Parental Lock function works in conjunction with
BD/DVDs that have been assigned a rating which helps
you control the types of BD/DVDs that your family
watches. There are up to 8 rating levels on a disc.
Press
the ATbutton.
buttons to select On or Off, then press
the
ENTER
With
button.the unit in Stop mode, press the MENU
Press
the ATor buttons
the ENTER
• button.to select Setup, then press
_,_o_
the prewous menu.
Press the MENU button to exit the menu.
If you forgot your password
@
Remove the disc.
E
@
3
Press the AT buttons to select Parental Setup, then
press the ENTER or • button.
When you operate your Blu-ray disc player for the
first time, the "Enter New password" message will be
displayed.
Enter
4-digitcontrol.
password using the number buttons
on
the the
remote
The "Confirm the password" message will be
displayed. Enter your password again.
44 - English
Press and hold the _,t button on the front panel for
5 seconds or more.
• All settings wilt revert to the factory settings.
Setting the Rating Level
Press the AT buttons to select Rating Level, then
press the ENTER or • button.
2
Press the AT
Changing the Password
Press the &_' buttons to select New Password,
then press the ENTER or • button.
buttons to select the rating IeveI you
want, then press the ENTER button.
For exampte, if you select up to Level 6, discs that
contain Level 7, 8 will not play. A larger number
indicates that the program is intended for adutt use
only.
Enter the 4-digit password using the number buttons
on the remote control. The "Confirm the password"
message will be displayed.
Enter your
password
using the number
buttons
on the
remote again
control.
English - 45
Troubleshootinq
Before requesting service (troubleshooting),
the following.
No operations can be performed
remote control.
please check
with the
@
• Check the batteries in the remote control.
They may need replacing.
• Operate the remote control at a distance of no more
than 20 feet.
• Remove batteries and hold down one or more buttons
for several minutes to drain the microprocessor inside
the remote control to reset it. Reinstall batteries and try
to operate the remote control again.
Disc does not play.
• Ensure that the disc is installed with the label side
facing up.
• Check the region number of the BD/DVD.
@
©
/ ...................................................................................................................................................................................................................
@
5.1 channel
@
@
sound is not being reproduced.
@
• 5.1 channel sound is reproduced only when the
following conditions are met. :
1. The BIu-ray disc player is connected with the proper
Amplifier
2. The disc is recorded with 5.1 channel sound.
• Check whether the disc being played has the "5.1 ch"
mark on the outside.
• Check if your audio system is connected and working
properly.
• In a SETUP Menu, is the Audio Output set to Bitstream?
Disc Menu doesn't appear,
Troubleshooting
Specifications
46 - English
.........................
...........................
46
48
@
• Check if the disc has a Menu.
TheQ iconappears
onscreen.
If you experience other problems.
@
• The features or action cannot be completed at this
time because:
1. The BD/DVD's software restricts it.
2. The BD/DVD's software doesn't support the feature
(e.g., angles)
3. The feature is not available at the moment.
@
• Go to the contents and find the section of the
instruction book that contains the explanations
regarding the current problem, and follow the
procedure once again.
• If the problem still cannot be solved, please contact
your nearest Samsung authorized service center.
4. You've requested a title or chapter number or
search time that is out of range.
The picture is noisy or distorted
Play mode differs from the Setup Menu selection.
@
• Some of the functions selected in the Setup Menu may
@
• Make sure that the disc is not dirty or scratched.
• Clean the disc.
not work properly if the disc is not encoded with the
corresponding function.
No HDMI output.
@
The screen ratio cannot be changed.
@
• The Screen Ratio is fixed on your BD/DVDs.
• Check the Video output is set to HDMI.
• Check the connection between the TV and the HDMI
jack of BIu-ray disc player.
• Check if your TV supports 480p/720p/1080i/1080p
HDMI input resolution.
No audio.
@
• Make sure you have selected the correct Digital Output
in the Audio Options Menu.
Abnormal
HDMI output screen.
@
@
@
@
• If random noise appears on the screen, it means that
TV does not support HDCP (High-bandwidth
Content Protection).
The screen is blocked
Digital
@
• Press the t,M button (in front panel) for more than
5 seconds with no disc inside. All settings will revert to
the factory settings.
• Check video output mode.
@
• Press the _,_1button (in front panel) for more than
5 seconds with no disc inside. All settings including the
password will revert to the factory settings. Don't use
this unless absolutely necessary.
English - 47
©
@
Specifications
Power Requirements
AC 120V ~ 60Hz
Power Consumption
51 W
Weight
9.3 Ibs
General
Dimensions
Operating
Temperature
Operating
16.9 (W) x 12.8 (D) x 3.1 (H) inches
Range
Humidity Range
BD (Blu-ray Disc)
+41 ° F to +95 ° F
10 % to 75 %
Reading Speed : 4.917m/sec
Reading Speed : 3.49 ~ 4.06 m/sec.
avu
Approx. Play Time
(Digital Versatile Disc)
(Single Sided, Single Layer Disc) : 135 min.
CD : 12cm
Disc
(COMPACT
DISC)
CD : 8cm
(COMPACT
DISC)
Composite
Video
Reading Speed : 4.8 ~ 5.6 m/sec.
Maximum
Play Time : 74 min.
Reading Speed : 4.8 ~ 5.6 m/sec.
Maximum
1 channel
Blu-ray
Play Time : 20 min.
: 1.0 Vp-p (75 £_ load)
Disc : Not available
DVD : 480i
Y : 1.0 Vp-p (75 _-_load)
..............................................................................................................................................................................................................................
Video
Component
Video
Output
Pr : 0.70 Vp-p (75 £-_)load)
Pb : 0.70 Vp-p (75 _-_load)
.........................................................................................................................................................................................................
0
©
Blu-ray Disc : 1080i, 720p
0
Luminance
DVD : 480p, 480i
Signal : 1.0 Vp-p (75 £.) load)
S-Video
Chrominance
0
p,,,
Signal : 0.3 Vp-p (75 £.) load)
Blu-ray Disc : Not available
Blu-ray Disc : 1080p, 1080i, 720p
Video/Audio
2 Channel
5.1 Channel
Digitai Audio Output
Audio
*Frequency
L(I/L),
*SIN Ratio
*Dynamic
*Total Harmonic
Electronics
48 - English
audio, PCM audio
R(2/R)
F/L, F/R, R/L, R/R, C/T, S/W
Optical/Coaxiai
48 kHz Sampling
: 4 Hz to 22 kHz
96 kHz Sampling
: 4 Hz to 44 kHz
Range
Distortion
110 dB
100 dB
0.004%
*: Nominal
and dimensions
audio, bitstream
Response
Output
- Weight
DVD : 1080p, 1080i, 720p, 480_
HDMI
PCM multichannel
- Samsung
DVD : 480i
Co., Ltd reserves
are approximate.
specification
the right to change
the specifications
without
notice.
Warranty(forUSAusersonly)
This SAMSUNG brand product, as supplied and distributed by SAMSUNG ELECTRONICS AMERICA, iNC. (SAMSUNG) and delivered new,
in the original carton to the original consumer purchaser, is warranted by SAMSUNG against manufacturing defects in materials and
workmanship for the following limited warranty period:
One
(1) Year
Parts
/ Ninety
Days
(90)
Labor
This limited warranty begins on the original date of purchase, and is valid only on products purchased and used in the United States, and does
not include transportation, installation, removal or reinstallation. Warranty repairs must be performed by SAMSUNG's authorized service
center. To receive warranty service, the original dated bill of sale must be presented upon request as proof of purchase to SAMSUNG or
SAMSUNG's authorized service center. Transportation to and from the service center is the responsibility of the purchaser.
SAMSUNG will repair or replace this product, at our option and at no charge with new or reconditioned parts, if found to be defective during
the limited warranty period specified above. The product must be returned during the warranty period with transportation charges prepaid to
SAMSUNG's designated service center. Prior to returning any product for warranty service, the purchaser must contact SAMSUNG for
problem determination and service procedures. SAMSUNG does not warrant uninterrupted or error-free operation of the product.
All replaced parts and products become the property of SAMSUNG and must be returned to SAMSUNG. Replacement parts and products
assume the remaining original warranty, or ninety (90) days, whichever is longer.
This limited warranty covers manufacturing defects in materials and workmanship encountered in normal, noncommercial use of this product
and shall not apply to the following, including, but not limited to: damage which occurs in shipment; applications and uses for which this
product was not intended; failures or problems which are caused by products or equipment not supplied by SAMSUNG; accidents, misuse,
abuse, neglect, misapplication, fire, water, lightning or other acts of nature; incorrect electrical line voltage, fluctuations or surges; damage
caused by improper or faulty installation; improper connection with any peripheral; product alteration or modification; improper or unauthorized
repair; cosmetic damage or exterior finish; product with altered serial numbers; failure to follow operating instructions, customer adjustments,
maintenance and environmental instructions that are covered and prescribed in the instruction book; use of non-SAMSUNG or unauthorized
parts, supplies, accessories or equipment which damage this product or result in service problems; failures or problems due to incompatibility
with other equipment.
No person, agent, distributor, dealer or company is authorized to change, modify or extend the terms of these warranties in any manner
whatsoever. The time within which an action must be commended to enforce any obligations of SAMSUNG arising under the warranty or under
any statute, or law of the United States or of any state thereof, is hereby limited to ninety (90) days from the date you discovered or should have
discovered the defect. This limitation does not apply to implied warranties arising under state law, if any.
SAMSUNG does not warrant (i) disc compatibility with new and existing format discs or (ii) error free playback in full compliance with
specifications of the compatible disc formats, and SAMSUNG shall not be liable for any data loss recorded in your discs.
SAMSUNG's responsibility shall be limited to appropriate warranty services during the warranty period through SAMSUNG customer care center.
If you encounter compatibility or data loss problems, please contact SAMSUNG customer care center.
THERE ARE NO EXPRESS WARRANTIES OTHER THAN THOSE LISTED AND DESCRIBED ABOVE, AND NO WARRANTIES WHETHER
EXPRESS OR IMPLIED, INCLUDING, BUT NOT LIMITED TO, ANY IMPLIED WARRANTIES OF MERCHANTABILITY OR FITNESS FOR A
PARTICULAR PURPOSE, SHALL APPLY AFTER THE EXPRESS WARRANTY PERIODS STATED ABOVE, AND NO OTHER EXPRESS
WARRANTY OR GUARANTY GIVEN BY ANY PERSON, FIRM OR CORPORATION WITH RESPECT TO THIS PRODUCT SHALL BE
BINDING ON SAMSUNG. SAMSUNG SHALL NOT BE LIABLE FOR LOSS OF REVENUE OR PROFITS, FAILURE TO REALIZE SAVINGS
OR OTHER BENEFITS, OR ANY OTHER SPECIAL, INCIDENTAL OR CONSEQUENTIAL DAMAGES CAUSED BY THE USE, MISUSE OR
INABILITY TO USE THtS PRODUCT, REGARDLESS OF THE LEGAL THEORY ON WHICH THE CLAIM IS BASED, AND EVEN iF
SAMSUNG HAS BEEN ADVISED OF THE POSSIBILITY OF SUCH DAMAGES. NOR SHALL RECOVERY OF ANY KIND AGAINST
SAMSUNG BE GREATER iN AMOUNT THAN THE PURCHASE PRICE OF THE PRODUCT SOLD BY SAMSUNG AND CAUSING THE
ALLEGED DAMAGE. WITHOUT LIMITING THE FOREGOING, PURCHASER ASSUMES ALL RISK AND LIABILITY FOR LOSS, DAMAGE
OR INJURY TO PURCHASER AND PURCHASER'S PROPERTY AND TO OTHERS AND THEIR PROPERTY ARISING OUT OF THE USE,
MISUSE OR INABILITY TO USE THIS PRODUCT SOLD BY SAMSUNG NOT CAUSED DIRECTLY BY THE NEGLIGENCE OF SAMSUNG.
THIS LIMITED WARRANTY SHALL NOT EXTEND TO ANYONE OTHER THAN THE ORIGINAL
NONTRANSFERABLE AND STATES YOUR EXCLUSIVE REMEDY.
PURCHASER
OF THIS PRODUCT, iS
Some states do not altow limitations on how Iong an implied warranty lasts, or the exclusion or limitation of incidental or consequential
damages, so the above limitations or exclusions may not apply to you. This warranty gives you specific legal rights, and you may also have
other rights which vary from state to state.
To obtain warranty service, please contact SAMSUNG customer care center.
Contact
SAMSUNG
WORLD
WIDE
Blu-ray Disc is a new and evolving format. Accordingly,
are possible. Not all discs are compatible
disc compatibility
issues with new and existing format discs
and not every disc will playback.
the User's Manual, including the Disc Type and Characteristics
For detailed information,
and Compliance
and Compatibility
of the User's manual. If you encounter compatibility problems, have any questions
Samsung products, please contact the SAMSUNG customer care center.
Region
North America
Latin America
Europe
Country
Customer
Care
Center
or comments
_
Asia Pacific
Middle
East & Africa
relating to
Web
Site
CANADA
MEXICO
1-800-SAMSUNG (7267864)
01-800-SAMSUNG (7267864)
www.samsung.com/ca
www.samsungcom/mx
USA
ARGENTINE
BRAZIL
CHILE
COSTA RICA
0800-333-3733
0800-124-421
800-726-7864(SAMSUNG)
0-800-507-7267
www:samsung com
www.samsung,com/ar
www.samsung,com/br
www.samsung,com/cl
www.sa msu ng,com/latin
ECUADOR
EL SALVADOR
GUATEMALA
1-800-10-7267
800-6225
1-800-299-0013
www.sa msu ng.com/latin
www.sa msu ng.com/latin
www.samsu ng.com/latin
JAMAICA
PANAMA
PUERTO RICO
REP. DOMINICA
1-800-234-7267
800-7267
1-800-682-3180
1-800-751-2676
www.samsu ng.com/latin
www.sa msu ng.com/latin
www.samsung.com/latin
www.sa msu ng.com/latin
TRINIDAD & TOBAGO
1-800-7267-864
www.samsung.com/latin
VENEZUELA
_:8p0:_00:_03
www:s_msun_
_£_@t!!
_
BELGIUM
02 201 2418
www.samsung,com/be
CZECH REPUBLIC
DENMARK
FINLAND
844 0O0 844
38 322 887
09 693 79 554
www.samsung.com/cz
www.samsung,com/dk
www.samsung,com/fi
FRANCE
GERMANY
HUNGARY
ITALIA
08 25 08 65 65 (0,15/Min)
01805 - 121213 (0,12/Min)
06 40 985 985
199 153 153
www.samsung,com/fr
www.samsung,de
www.samsung,com/hu
www.samsung,com/it
LUXEMBURG
NETHERLANDS
NORWAY
02 261 03 710
0900 20 200 88 (0,10/Min)
231 627 22
www.samsung.tu
www.samsung,com/nl
www.samsung,com/no
POLAND
PORTUGAL
SLOVAKIA
SPAIN
0 801 801 881
80 8 200 128
0850 123 989
902 10 11 30
www.samsung,com/pl
www.samsung,com/pt
www.samsung,com/sk
www.samsung,com/es
SWEDEN
08 585 367 87
www.samsung,com/se
U:K
c!s
please refer to
Notice sections
www:s_msun_:com!_k
RUSSIA
8-800-200-0400
www.samsung,ru
UKRA!NE
_:_oo:_02:oooo
www:s_msu_:_om_[
AUSTRALIA
CHINA
1300 362 603
800-810-5858, 010- 6475 1880
www.samsung,com/au
www.samsung.comcn
HONG KONG
www:samsung:com!hk
INDIA
2862 6001
3030 8282
1600 1100 11
INDONESIA
JAPAN
MALAYSIA
PHILIPPINES
0800-112-8888
0120-327-527
1800-88-9999
1800-10-SAMSUNG
www.samsung.com/id
www:samsung:com/jp
www.samsung.com/my
www.samsung.com/ph
THAILAND
1800-29-3232
02-889-3232
TAIWAN
VIETNAM
0800-329-999
889
www.samsung.aom/tw
SOUTH AFRICA
0860 7267864 (SAMSUNG)
www.samsung.com/za
www.samsung.com/mea
www.samsung.com/in
(7267864)
www.samsung.aom/th