1
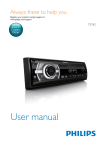
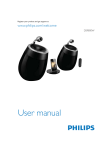
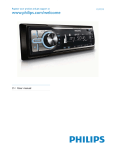
LD3288T USER’S MANUAL 32” LCD TELEVISION 012411 Safety Instructions CAUTION RISK OF ELECTRIC SHOCK DO NOT OPEN Safety: TO REDUCE THE RISK OF ELECTRICAL SHOCK DO NOT REMOVE COVER (OR BACK). NO USER SERVICEABLE PARTS ARE INSIDE. REFER TO QUALIFIED PERSONNEL ONLY. The lightning flash with arrowhead symbol, within an equilateral triangle, is intended to alert the user to the presence of uninsulated “dangerous voltage” within the product’s enclosure that may be of sufficient magnitude to constitute a risk of electric shock to persons. The exclamation point within an equilateral triangle is intended to alert the user to the presence of important operating and maintenance (servicing) instructions in the literature accompanying the television. WARNING: TO PREVENT FIRE OR SHOCK HAZARDS, DO NOT EXPOSE THIS PRODUCT TO RAIN OR MOISTURE. NOTE TO CABLE/TV INSTALLER: This reminder is provided to call the CATV system installer’s attention to Article 820-40 of the National Electric Code (U.S.A.). The code provides guidelines for proper grounding and, in particular, specifies that the cable ground shall be connected to the grounding system of the building, as close to the point of the cable entry as practical. FCC REGULATORY INFORMATION: This television has been tested and found to comply with the limits for a Class B digital device, pursuant to Part 15 of the FCC Rules. These limits are designed to provide reasonable protection against harmful interference in a residential installation. This television generates, uses and can radiate radio frequency energy and, if not installed and used in accordance with the instructions, may cause harmful interference to radio communications. However, there is no guarantee that interference will not occur in a particular installation. If this television does cause interference to other electronic equipment, which can be determined by turning the television off and on, then the user is encouraged to try to correct the interference by one or more of the following measures: - Reorient or relocate the receiving antenna. - Increase the separation between the equipment and television. - Connect the equipment into an outlet on a circuit different from that to which the television is connected. - Consult your dealer or an experienced radio/TV technician for assistance. 1 Any changes or modifications not expressly approved by the party responsible for compliance may void the user’s authority to operate the equipment. Safety Instructions 2 3 Safety Instructions Bass / Treble / Balance ......................................................................................... 19 Table of Contents ................................................................................................... 4 Surround................................................................................................................ 19 Introduction / What’s In the Box ............................................................................. 5 Audio Language .................................................................................................... 19 Remote Control Remote Control Battery Install ............................................................................... 6 Date & Time Settings ....................................................................................... 20 Remote Control Overview ...................................................................................... 7 TV Overview Setup Settings Front & Side Panel ................................................................................................. 8 Menu Language .................................................................................................... 21 Rear Panel ............................................................................................................. 9 Transparency.... .................................................................................................... 21 Pedestal Removal / Wall Mounting ........................................................................ 9 Zoom Mode .......................................................................................................... 21 Noise Reduction ................................................................................................... 21 XVS ...................................................................................................................... 21 Table of Contents Audio Settings Safety Instructions ..................................................................................................1-3 Restore Default .................................................................................................... 21 Installation Connection to Antenna & Cable / Satellite Box ..................................................... 10 Connection to HDMI Inputs ................................................................................... 11 Connection to Component (YPbPr) Inputs ........................................................... 12 Connection to AV Composite / S Video Inputs....................................................... 13 Connection to a Personal Computer ..................................................................... 14 Connection to a Receiver / Amp ........................................................................... 15 Initial TV Setup Initial Setup Wizard ............................................................................................... 16 TV Channel Setup & Channel Auto Scan ............................................................. 17 Closed Caption Settings .................................................................................... 22 Advanced Setting for PC ....................................................................................... 23 Parental Control - US ............................................................................................ 24 Parental Control - Canada .................................................................................... 25 TV Settings Favorite ................................................................................................................. 26 Add/Delete ............................................................................................................ 26 Channel Label ...................................................................................................... 26 DTV Signal ........................................................................................................... 26 Zoom Modes ........................................................................................................ 27 Picture Settings Contrast ................................................................................................................ 18 6SHFL¿FDWLRQV ..................................................................................................... 28 Brightness ............................................................................................................. 18 Troubleshooting .................................................................................................. 29 Color ..................................................................................................................... 18 Index .................................................................................................................... 30 Tint ........................................................................................................................ 18 Warranty .............................................................................................................. 31 Sharpness ............................................................................................................. 18 Color Temperature ................................................................................................ 18 Power Saving Mode .............................................................................................. 18 4 Introduction Thank you for purchasing the Apex LD3288T HD Television. It has been designed to HQMR\WRGD\¶VKLJKGH¿QLWLRQWHOHYLVLRQH[SHULHQFH:LWKDGLVSOD\UHVROXWLRQRI [S\RXDUHDVVXUHGRIRQHRIWKH¿QHVWTXDOLW\WHOHYLVLRQVDYDLODEOHWRGD\ View HDTV and digital broadcasts over-the-air when connected to an antenna. Choose an outdoor antenna for the best possible reception. Visit www.antennaweb.org. <RXU WHOHYLVLRQ RIIHUV PDQ\ GLJLWDO DQG DQDORJ LQSXWV 7KUHH +LJK 'H¿QLWLRQ Multimedia Interface (HDMI) interconnects offer the purest audio and video digital VLJQDOZKHQFRQQHFWHGWRFRPSDWLEOH+'VRXUFHVLH+'VHWWRSER[KLJKGH¿QLWLRQ blu-ray player, gaming console). Other video inputs include two (2) HD component, (2) composite, one (1) S-Video and one (1) VGA terminal for connection to a computer. A coaxial digital audio (SPDIF) jack is included to connect through your KRPHDPSOL¿HUUHFHLYHUWRSURYLGHDVSHFWDFXODUKRPHWKHDWHUVRXQGH[SHULHQFH What’s In The Box <RXU QHZ WHOHYLVLRQ LV DQ (1(5*< 67$5 FHUWL¿HG GHYLFH ZKLFK PHHWV HQHUJ\ saving standards to reduce power consumption and the associated cost of use. From the factory, the default picture setting is currently set in the Power Saving mode. 5 We recommend that you read the user manual thoroughly before use to familiarize yourself with the installation and adjustment options available to you, thereby enjoying all the features of the LD3288T for many years to come. 3HGHVWDO%DVH For peace of mind and valuable services, please take a moment to register your product at www.tmaxdigital.com. The LD3288T package includes the following items: 3HGHVWDO%DVH+DUGZDUH 3HGHVWDO,QVWUXFWLRQV 5HPRWH&RQWURO $$$%DWWHULHV $&3RZHU&RUG 4XLFN6WDUW*XLGH 8VHU0DQXDO USER’S MANUAL 32” LCD TELEVISION 1010803 QUICK START GUIDE 5HPRWH&RQWURO $$$%DWWHULHV[ $&3RZHU&RUG 8VHUPDQXDO 4XLFN6WDUW*XLGH Remote Control Your remote control handset is powered by two (2) AAA type batteries 3ODFHWZR$$$EDWWHULHVLQWRWKH compartment with correct polarity. When pointed towards the television, range is up to 16 feet from the front of the IR re- ceiver, 30° to the left and right, 20° up and down. To avoid damage from possible battery chemical leakage, remove the batteries if you do not plan to use the remote control handset for an extended period of time. Do not mix bat- teries of different age and/or type. Always discard used batteries safely. Do not expose remote control to liquids, direct sunlight or sources of excessive heat. The IR receiver will not work properly if TV is in direct sunlight, the remote control is pointed off-axis or an object is in the IR path. Battery Install 7RLQVHUWEDWWHULHVWXUQWKHUHPRWH control over and remove the battery cover. 5HSODFHWKHFRYHU 30° NOTE: Improper use of batteries can result in a chemical leakage or explosion. IR Receiver 30° 6 Remote Control Functions Using the Remote Control Handset 1. Power – Turn the LCD display ON or OFF (Standby). 2. Display – Provides program information currently viewed. 1 3. TV – Direct access to the television tuner. 3 4 5 4. HDMI – Press repeatedly to select HDMI 1, HDMI 2, HDMI 3. 6 7 8 5. COMP – Press repeatedly to select Component 1, Component 2. 6. AV – Press repeatly to select AV 1, AV 2, S-Video. 9 10 7. VGA – Direct access to the VGA (PC) input;; press again to return to the previously viewed input. 8. CH LIST – Press to display a list of channels saved in the TV tuner memory. 9. Guide – Press to review scheduled programming for the current channel viewed. FREEZE 12 11 13 14 10. FAV – Press to display a list of favorite TV channels you have added. (pg. 26) 11. Freeze – Pause and still-frame the current image on the display. Press again for live TV. 12. Picture – Select preset picture modes: Dynamic > Standard > Movie > Power Saving > Personal. (pg. 18) 13. Temp – Select the Color Temperature COOL > NORMAL > WARM. (pg. 18) 15 16. Return – Press to return to the previous menu displayed. 16 19 21 15. Exit – Press to exit a menu that is displayed. 18 17 14. TSW XArrows/ Enter – 1DYLJDWHPHQXVWRPDNHVHOHFWLRQV3UHVV(17(5WRFRQ¿UP Overview 2 20 22 23 17. Sleep – Press to activate the Sleep function to turn off the TV automatically;; 5 Min > 10 Min > 15 Min > 30 Min > 45 Min > 60 Min > 90 Min > 120 Min > 180 Min > 240 Min > OFF. 23 18. Menu – Press to display the Main menu. 19. Zoom – Select viewable display options: Normal > Wide > Zoom > Cinema. (pg. 27) 20. Volume (+/-) – Adjust volume up (+) or volume down (-). 21. Last – Press to select between the current and previously viewed TV channel. 22. Mute – Press to temporarily turn sound off. Press again to resume. 23. Channel – S / T scan channels up (S) or channels down (T). 24. Numbers / Dash – Select desired TV channel directly. For example: to select digital channel four, 24 25 26 28 27 press “4” “-” “1” (4-1). 25. Input – Press to display all input sources on screen. (pgs. 9-14) 26. Audio – Select preset sound modes: PERSONAL > STANDARD > MUSIC > MOVIE (pg. 19) 27. MTS – Press to select a program’s second audio channel (if available). (pg. 19) 7 28. CCD – Select closed caption subtitles (if available) OFF > ON. (pg. 22) NOTE: When using the remote control, point it directly at the TV. INPUT SOURCE NPUT I SOURCE A soft blue light illuminates when television is powered ON Remote control sensor TV AV1 AV2 S-Video Component 1 Component 2 +'0, +'0, +'0, VGA 2. Menu - Press the MENU button to display the menu screen. Press VOL+ to highlight a menu. Press CH+ / CH- to highlight a feature within the menu then press VOL+ to adjust setting. 4. Volume (VOL+ / VOL-) - Press the VOL+ / VOL- buttons to adjust volume up or down. 2 5. Power - Press the POWER button to turn the LCD display ON/ OFF (standby). When the power is on, a blue LED illuminates on the front panel. The screen image will appear within a few seconds. 3 4 NOTE: To turn OFF power completely, switch the Master Power button located on the rear of the television. When the Master Power switch is off, neither the remote control or television POWER button will function (see pg. 9 for details). 5 Front & Side Panel 3. Channel (CH+ / CH-) - Press the CH+ / CH- buttons to scan TV channels up or down. 1 TV Overview 1. Input - After connecting your DVD, cable box, etc., select the appropriate input source to view. Press the INPUT button to display input options. Press CH+ / CH- buttons to highlight an input. Press VOL+ to select. Side Panel 8 TV Overview Removal of TV Pedestal Wall Mounting It is recommended that you For Wall Mounting To remove the pedestal from the call your local TV dealer or a licensed contractor to WHOHYLVLRQOD\WKH79ÀDWXQVFUHZ secure the television to the the (6) Philips screws from underneath the pedestal base and wall using suitable VESA 400 x 200mm wall mount slide the bracket off. hardware. TV REAR PANEL 3 Rear Panel & Pedestal Removal 1 9 2 3 4 5 1. Master Power ON/OFF Switch - When the master power is switched OFF, the power button located on the remote control and right side of the television will not function. Make sure it is switched ON for regular TV viewing on a daily basis. 2. AC Power Plug - Insert power cord during initial setup. 3. USB Port - For service technician use only. 4. HDMI Inputs (3) - Connects to digital AV devices that feature +'0,FRQQHFWLYLW\+'0,VXSSRUWVHQKDQFHGKLJKGH¿QLWLRQYLGHR and two-channel digital audio all from one cable. Recommended for best performance. 5. PC IN - VGA/Audio Input (3.5mm) - Connect an optional VGA cable from your personal computer and a 3.5mm audio cable for sound. 6 7 8 9 10 6. Component Inputs and L/R Audio Inputs (2) - Connect up to two external devices that feature component (YPbPr) video and audio output jacks. 7. SPDIF - Connect an optional coaxial digital cable through a com- patible amp/receiver to enjoy superior audio sound. 8. S-Video - Connect to the S-Video output jack found on external devices. For audio, connect a separate AUDIO L/R cable to the L/R on AV1 adjacent to the S-Video input. 9. AV Inputs (2) - Connect up to two external devices to the composite VIDEO (Y) and AUDIO (L/R) output jacks found on most external video equipment. 10. RF Input - Connect antenna or cable for television reception. Roof Antenna / Cable Outlet Installation TV REAR PANEL +RZWRFRQQHFWZLWKDQLQGRRURUURRIWRSDQWHQQD Connect the RF coaxial (75 ohm) cable from your existing roof top an- tenna or wall outlet. Finger tighten the F-Connector end to the TV input on the rear panel. See pages 16-17 for TV setup and Channel Auto Scan. Tune to TV programming directly from the television tuner. Installation It is strongly recommended that the installation of a high quality roof top antenna, digital cable or satellite set top box be used LQFRQMXQFWLRQZLWK\RXUWHOHYLVLRQIRUEHVWEURDGFDVWUHFHSWLRQ)RULQGRRUXVHZHUHFRPPHQGDQ$SH['LJLWDODPSOL¿HG +'79DQWHQQD1RWHUHFHSWLRQLVGHWHUPLQHGE\\RXUUHJLRQDOORFDWLRQJHRJUDSKLFDOWHUUDLQGLVWDQFHIURPWKHORFDOEURDGFDVW transmitter and strength of antenna used. Ant./Cable Wall Outlet F - Connector Optional HDMI cable TV REAR PANEL Cable / Satellite set top box +RZWRFRQQHFWZLWK'LJLWDO&DEOH6DWHOOLWH6HW7RS%R[ Connect the RF coaxial (75 ohm) cable from the video outlet of your cable / Satellite box to the RF input on the TV’s rear panel. Select Ch. 3 or 4 on the TV and select a channel. For greater performance, use component video or an HDMI installation. (shown) Refer to your set top box user manual. See pages 16-17 for TV setup and Channel Auto Scan. F - Connector Connection to Antenna & Cable/Satellite Box Digital Cable / Satellite Set Top Box 10 Installation Connecting to an HD Set-Top Box, Game Console or Blu-ray Player Using HDMI TV REAR PANEL Digital set top box, gaming console, or blu-ray w/ HDMI interface HDMI Optional HDMI cable Connection to HDMI Inputs For BEST video performance 11 Connect to external devices that feature HDMI, an uncompressed, all digital YLGHRDXGLRLQWHUIDFHIRXQGRQWRGD\¶VKLJKGH¿QLWLRQGHYLFHV8VHRIWKLV SXUHGLJLWDOWHFKQRORJ\RIIHUVRSWLPDOKLJKGH¿QLWLRQYLGHRDQGGLJLWDODXGLRDOO via a single cable. There are three (3) HDMI inputs available for use with HD set top boxes, gaming consoles and blu-ray players. +RZWR&RQQHFW+'0, From your external device, connect an HDMI cable from the HDMI OUT- PUT to the HDMI INPUT on the TV’s rear panel. +RZ7R8VH Press the HDMI button on the remote control (repeatedly if necessary) or Press the INPUT button on the remote control. Use TS arrow buttons to highlight the input to view (HDMI 1, 2, 3) then press ENTER. INPUT SOURCE NPUT I SOURCE TV AV1 AV2 S-Video Component 1 Component 2 +'0, +'0, +'0, VGA TV REAR PANEL For BETTER video performance Optional Component cables Connect to external devices that feature component output jacks for great video performance. There are two (2) component video and audio inputs for use with devices such as a set top box, gaming console or DVD player. Connect optional component video cables (blue, green, red) from the video OUTPUT jacks (Y, Pb, Pr) on your external device to the Compo- nent 1 or Component 2 INPUT(s) on the TV’s rear panel. Connect white/red audio cables for sound from the audio (L/R) OUT- PUT jacks on your external device to the Component 1 or Component 2 INPUT(s) on the TV’s rear panel. +RZWR8VH Press the COMP button on the remote control (repeatedly if necessary) or Press the INPUT button on the TV remote control. Use TS arrow but- tons to highlight the input to view (Component 1, 2) then press ENTER. Set top box, gam- ing console or DVD INPUT SOURCE NPUT I SOURCE TV AV1 AV2 S-Video Component 1 Component 2 +'0, +'0, +'0, VGA Connection to Component Inputs +RZWR&RQQHFW&RPSRQHQW When connecting external devices to your television, match the colors of the connecting jacks (Video: Blue, Green, Red;; Audio: White/Red). Installation Connecting A/V Devices to Component Video IN on your television 12 Installation Connecting A/V Devices to Composite or S-Video IN on your television TV REAR PANEL For GOOD video performance Connect to external devices using optional video and audio cables. Composite and S-Video output jacks are available on most set top boxes, VCR and DVD players. Connection to Composite/S-Video Inputs +RZWR&RQQHFW&RPSRVLWH$9 When connecting external devices to your television, match the colors of the connecting jacks (Video: Yellow;; Audio: White/Red). 13 Connect the yellow video cable from the video OUTPUT jack on your external A/V equipment to AV1 / AV2 input on the TV’s rear panel. Connect the white/red audio cables for sound from the audio (L/R) OUTPUT jacks on your external A/V equipment to the AV1 / AV2 (L/R) jacks on the TV’s rear panel. +RZWR&RQQHFW69LGHR Connect an optional S-Video cable from the S-Video OUTPUT jack on your external A/V equipment to the S-Video INPUT on the TV’s rear panel. Connect the white/red audio cables for sound from the audio (L/R) OUTPUT jacks on your external device to the AV1 (L/R) INPUT on the TV’s rear panel. +RZWR8VH$9RU69LGHR Press the AV button on the remote control (repeatedly if necessary) or Press the INPUT button on the remote control. Use TS arrow buttons to high- light the input to view (AV1, AV2, S-Video) then press ENTER. Optional cables NOTE: An S-Video cable is for video only. You must connect audio cables for sound. DVD player, gaming console INPUT SOURCE NPUT I SOURCE TV AV1 AV2 S-Video Component 1 Component 2 +'0, +'0, +'0, VGA TV REAR PANEL Installation Connecting a Personal Computer with VGA to your television Optional cables Recommended computer display resolution:1,366 x 720 @ 60 HZ +RZWR&RQQHFW$XGLRVRXQG Connect an optional 3.5mm audio cable from the computer’s mini audio output jack to the audio input on the TV’s rear panel. +RZWR8VH Press the INPUT button on the remote control. Use TS arrow but- tons to highlight the input to view (VGA) then press ENTER. NOTE: If your PC uses a standard signal mode, the screen will adjust automatically. INPUT SOURCE NPUT I SOURCE TV AV1 AV2 S-Video Component 1 Component 2 +'0, +'0, +'0, VGA Connection to a Personal Computer +RZWR&RQQHFWD3& Connect using an optional male to male VGA cable from your PC to the VGA input on the TV’s rear panel. 14 Installation Connection to a Home Theater Audio System TV REAR PANEL TV REAR PANEL optional cables Optional digital cable Dolby Prologic Surround Receiver For BEST audio performance Connection to a Home Theater System &RQQHFWLQJWRD+RPH7KHDWHU6\VWHP Dolby Digital can deliver optimal 2 channel stereo or surround VRXQGZLWK¿YHGLVFUHWHIXOOUDQJHFKDQQHOVSOXVDVL[WKFKDQQHOIRU a subwoofer. Digital set top box, gam- ing console or DVD Center Channel Dolby Surround Connection Illustration Enjoy optimal sound reproduction from your system with a Dolby 'LJLWDODPSOL¿HUWKDWLQFRUSRUDWHVDGLJLWDOFRD[LDOLQSXW&RQQHFWDQ optional digital cable directly to the television’s SPDIF audio output to listen through all inputs except VGA. (VGA input does not support digital audio) Connecting to a Stereo 5HFHLYHU$PSOLÀHU +RZ7R6HWXS'LJLWDO2XWSXW Press the MENU button on the remote control. Example: Diagram illustrates the connection of audio cables from your external equipment to a stereo receiver instead of the audio (L/R) jacks on the TV’s rear panel. Press the right X arrow button to select AUDIO. Press the down T arrow button to highlight SPDIF type X Raw or PCM* Surround Left Speaker Surround Right Speaker (QMR\UHDOLVWLFVRXQGIURPDVWHUHRUHFHLYHUDPSOL¿HURU'ROE\3UR Logic sound system when connected to your AV equipment. Surround 15 Front Right Speaker Front Left Speaker NOTE: When audio cables are connected to a stereo / receiver DPSOL¿HUIRUDSDUWLFXODULQSXWQRDXGLRVRXQGFDQEHKHDUGIURPWKH TV’s built-in speakers. +RZWR8VH9LGHR Press the appropriate INPUT button on the remote control. Use TS arrow buttons to highlight the input to view then press ENTER. +RZWR8VH$XGLR Select the appropriate input from your audio equipment. 127(5HIHUWRWKH8VHU0DQXDOIURP\RXUKRPHWKHDWHUHTXLSPHQWIRUUHFRPPHQGHGDXGLRVHWWLQJV After connecting your TV antenna or cable wire, turn the television ON. The quick setup wiz- ard will display on-screen. Select your preferred Picture setting followed by antenna options if you will view local over-the-air TV broadcasts from an antenna. Theses channels will be stored in the TV tuner memory after performing Channel Auto Scan. TV Setup Initial Setup Wizard In +RPH0RGH, the television display meets Energy Star standards to reduce power consumption. In Retail Mode, the television provides a more dynamic picture that will increase power consumption beyond Energy Star standards. The wizard will direct you to the TV menu to select antenna options and perform Channel Auto Scan. Channels found will be stored into the TV tuner memory. How to Navigate: Press the W X arrow button to highlight CABLE or AIR based on your an- tenna connection. Press the T arrow button to select Auto Scan and press ENTER (when Cable is selected, ‘AUTO’ is recommended). Otherwise, press the X arrow button to select STD > IRC > HRC > Auto Highlight Start to Scan and press ENTER. Channel Auto Scan may take several minutes to complete. Initial Setup Wizard 16 16 TV Setup Select antenna options and perform Channel Auto Scan to receive television channels that will be stored into the TV tuner memory. To enter TV Mode: Press the MENU button Using the W X arrow buttons;; scroll to highlight TV mode Press the down T arrow button to highlight CABLE or AIR Cable Mode Select CABLE if you subscribe to a pay television service without the use of a set top box. Connect cable wire to the televi- sion (see page 10). Press the W X arrow button to highlight CABLE. TV Channel Setup & Channel Auto Scan 17 3UHVVWKH T arrow button to select AUTO SCAN. Press ENTER and the cursor will move up and CABLE SYSTEM will be displayed next. 3UHVVWKH X arrow button to select STD > IRC > HRC > Auto (Auto is recommended). 3UHVVWKHGRZQT arrow button to select Auto Scan and press ENTER. NOTE: Channel Auto Scan may take several minutes to com- plete. Air Mode Select AIR when connected to an indoor/outdoor antenna to receive local TV broadcasts. Connect an- tenna wire to the television. Press the W X arrow button to highlight AIR. Press the down T arrow button to select Auto Scan then press the X right arrow button twice to start Chan- nel Auto Scan. Channel Auto Scan may take several minutes to complete. NOTE: For cable or satellite users without an indoor/ outdoor TV antenna, there is no need to perform Channel Auto Scan. Connect your cable or satellite set top box to one of the available inputs on the TV for viewing. See pages 11-13 for connection details. How to Navigate: Press the MENU button on the remote control. Navigate using W X arrow buttons to select PICTURE. Press the down T arrow button to highlight PICTURE MODE, then press the X arrow button to select your viewing preference from 5 factory options: 67$1'$5'!'<1$0,&!029,(!32:(56$9,1*!3(5621$/The STANDARD setting is recommended for most brightly lit view- LQJHQYLURQPHQWV'HSHQGLQJRQWKHDPELHQWOLJKWOHYHOLQWKHURRP\RXPD\¿QGRQHRIWKHRWKHU3LFWXUHVHWWLQJVPRUHSOHDVLQJ To make more critical adjustments based on your own preferences in PERSONAL: 3UHVVGRZQT arrow button to highlight Contrast. Navigate using the W X arrow buttons to increase or decrease contrast intensity. Menu Adjustments The PICTUREPHQXRIIHUVRSWLRQVWRHQKDQFHDQGUH¿QHWKHSLFWXUHGLVSOD\HGRQ\RXU79EDVHGRQDPELHQWURRPOLJKWDQGSHUVRQDOSUHIHU- ences. Adjustment options include contrast, brightness, color, sharpness and color temperature. 3UHVVGRZQT arrow button to highlight Brightness. Navigate using the W X arrow buttons to increase or decrease overall brightness. 3UHVVGRZQT arrow button to highlight Tint. Navigate using the W X arrow buttons to adjust colors toward green or reddish tint. 3UHVVGRZQT arrow button to highlight Sharpness. Navigate using the W X arrow buttons to soften or view crisper edges in the picture. 3UHVVGRZQT arrow button to highlight your Color Temperature preference. Navigate using the W X arrow buttons to select COOL (more bluish tone), NORMAL or WARM settings. Picture Settings 3UHVVGRZQT arrow button to highlight Color. Navigate using the W X arrow buttons to increase or decrease color intensity. *The POWER SAVING mode adjusts the brightness of the TV in order to save energy and reduce power consumption. Note: When adjustments are complete, you may select another menu by pressing the Menu button. 18 Menu Adjustments The AUDIO menu offers options to make sound enhancements while listening through the built-in speakers or to select digital audio options when connected to a Dolby Digital receiver though a (SPDIF) coaxial digital output. How to Navigate: Press the MENU button on the remote control. Navigate using W X arrow buttons to select AUDIO. Press the T arrow button to highlight SOUND MODE, then press the X arrow button to select your sound preference from 4 factory options: PERSONAL > STANDARD > MUSIC > MOVIE. To make more critical sound adjustments based on your own preferences in PERSONAL: 3UHVVGRZQT arrow button to highlight Bass. Navigate using the W X arrow buttons to increase or decrease low frequency intensity. 3UHVVGRZQT arrow button to highlight Treble. Navigate using the W X arrow buttons to increase or decrease high frequency intensity. Audio Settings 3UHVVGRZQT arrow button to highlight Balance. Navigate using the W X arrow buttons to adjust sound towards the left or right speaker. Surround 3UHVVGRZQT arrow button to highlight Surround. Navigate us- ing the W X arrow buttons to turn surround sound effect from built-in speakers ON or OFF. 3UHVVGRZQT arrow button to highlight SPDIF type. Navigate using the W X arrow buttons to select between PCM (Analog Audio) > RAW (Digital Audio). See page 15. 3UHVVGRZQT arrow button to highlight Audio Language. Navigate using the W X arrow buttons to select to listen to an alternative lan- guage broadcast (if available) English > Spanish > French. NOTE: You may select an alternative language using the remote con- trol by pressing MTS). 19 Note: When adjustments are complete, you may select another menu by pressing the Menu button. How to Navigate: Press the MENU button on the remote control. Navigate using arrow W X buttons to select TIME. 3UHVVGRZQT arrow button to highlight Sleep Timer then press the X arrow button to select time to view before timer turns television off: 5 Min > 10 Min > 15 Min > 30 Min > 45 Min > 60 Min > 90 Min > 120 Min > 180 Min > 240 Min > OFF. 3UHVVGRZQT arrow button to highlight Time Zone then press the X arrow button to select between: EASTERN > CENTRAL > MOUN- 7$,1!3$&,),&!$/$6.$!+$:$,, Menu Adjustments The TIME menu includes adjustment of settings for your local time zone and daylight savings time. The clock will adjust automatically after the initial Channel Auto Scan of available broadcast channels in your area (see page 17 for TV Setup). Clock DQG'DWHDUHDXWRPDWLFDOO\VHWWKH¿UVWWLPHWKHWXQHUUHFHLYHV a broadcast channel. Note: When adjustments are complete, you may select another menu by pressing the Menu button. Date & Time Settings 3UHVVGRZQT arrow button to highlight Daylight Savings Time. Navigate using the W X arrow buttons to turn this feature on or off. 20 Menu Adjustments In the SETUP menu you may change the initial set up of preferences that include settings for language, menu display, computer monitoring, closed captions, enhancement of black detail in the picture and resetting your TV back to its factory default status. How to Navigate: Press the MENU button on the remote control. Navigate using arrow W X buttons to select SETUP. Gain access to display options by press- ing the down T arrow button to highlight Menu Language or other options, then press X arrow button on your remote to select. 2WKHUODQJXDJHVLQFOXGH Spanish and French. +LJKOLJKWNoise Reduction. Navigate using the W X ar- row buttons to reduce video noise: Off > Low > Medium > High (Default setting: Low) +LJKOLJKWTransparency. Navigate using the W X ar- row buttons to turn Off > On the translucent effect of the User menu. +LJKOLJKWXVS. Navigate using the W X ar- row buttons to select: Off > On. XVS provides noticeable black detail enhancement that may be preferred. +LJKOLJKWZoom Mode. Navigate using the W X arrow buttons to select the viewing mode displayed: Normal > Wide > Zoom > Cinema. +LJKOLJKWRestore Default. Press the X arrow button to automatically set all adjust- ments back to their original settings. Setup Settings (This feature is also available on the remote control. See page 27) :KHQSURPSWHG6HOHFW³<HV´WRFRQ¿UP 21 NOTE: Closed Caption and Advanced are features described on the following pages. How to Navigate: Press the MENU button on the remote control. Navigate using arrow W X buttons to select SETUP. 3UHVVGRZQT arrow but- ton to highlight Advanced Selection. Navigate using the W X arrow buttons to select Service 1-6. 1DYLJDWHXVLQJWKHW X arrow buttons to select Off > On > CC on Mute. 3UHVVGRZQT arrow button to highlight Option. Press the X arrow button to enter a menu with options to customize text fonts, colors and opacities. :KLOH&&0RGHLVRQ press down T arrow button to highlight Basic Selection. Navigate using the W X ar- row buttons to select CC 1-4, Text 1-4. Note: When adjustments are complete, you may select another menu by pressing the Menu button. Closed Captions 3UHVVWKHGRZQT arrow button to highlight Closed Caption then press the X arrow button to highlight CC Mode. Menu Adjustments The SETUP menu includes adjustments for activating the Closed Caption text feature for display on-screen and customizing CC display types and font styles. 22 PC Menu Adjustments Advanced Settings 23 In the SETUP menu you may adjust the position of images displayed on screen once you connect an input signal from your PC. Recommended resolution is 1,366 x 720. For use with a laptop computer, refer to your computer’s user manual on instruction for proper display output. If your PC system uses a standard signal mode, the screen will adjust automatically. Connect an optional 3.5mm audio cable for stereo sound. See page 14 for details. How to Navigate: After connecting to a PC, press the VGA button on your remote control. Press the MENU button on the remote control and navigate using arrow W X buttons to select SETUP. Gain access to position adjustment options by pressing the down T arrow button to highlight Advanced, then press X arrow button to select from the following options. +LJKOLJKWClock. Navigate using the W X arrow buttons to control the width of the image. +LJKOLJKW+3RV Navigate using the W X arrow but- tons to adjust the position of images displayed from side to side. +LJKOLJKWPhase. Navigate using the W X arrow buttons to improve focus and image stability. +LJKOLJKWV-Pos. Navigate using the W X arrow but- tons to adjust the position of images displayed up and down. +LJKOLJKWAuto. Press the X arrow button to automatically adjust the display to the best setting. When prompted, VHOHFW<HVWRFRQ¿UP :KHQSURPSWHG6HOHFW³<HV´WRFRQ¿UP How to Navigate: Press the MENU button on the remote control. Navigate using arrow W X buttons to select PARENTAL. Gain access to parental rating op- tions by pressing the down T arrow button to highlight ENTER PASSWORD. Enter your 4 digit code (factory default code is “0000”) unless previously changed. 7RVHWSDUHQWDOFRQWUROVIRU television programming or DVD movies, press the down/up TS arrow buttons to highlight US. Navigate using the W X buttons to highlight TV/MPAA menu. 7RFKDQJHWKHSDVVZRUG press X arrow button to display a screen to enter your QHZSDVVZRUGWKHQFRQ¿UP again. (not illustrated) +LJKOLJKW79WKHQSUHVVWKH X arrow button to enter the TV Ratings menu and select your preference. 7RPDNHFKDQJHVWR PARENTAL controls, high- light SYSTEM LOCK then press the X arrow button to ON. +LJKOLJKW03$$WKHQSUHVV the X arrow button repeat- edly to select your movie rating preference. NOTE: RRT Setting and Reset RRT are not user adjustable settings. TV -Y Appropriate for all children TV -Y7 Appropriate for all children over 7 TV -G General Audience TV - PG Parental Guidance Suggested TV - 14 Parents Strongly Cautioned TV - MA Mature Audience Only G General Audience PG Parental Guidance Suggested PG13 Parents Strongly Cautioned R Restricted NC17 No One Under 17 Permitted X Adults Only Parental Control Menu Adjustments In the PARENTAL menu, you may block television and movie programming based on TV ratings and Motion Picture Association guidelines. To gain access and select your preferences within the Parental menu make certain your input is set to TV. 24 Menu Adjustments Parental Control 25 In the PARENTAL menu, you may block television and movie programming based on Canadian TV and movie rating guidelines. To gain ac- cess and select your preferences within the Parental menu make certain your input is set to TV. How to Navigate: Press the MENU button on the remote control. Navigate using arrow W X buttons to select PARENTAL. Gain access to rating options by pressing the downT arrow button to highlight ENTER PASSWORD. Enter your 4 digit code (factory default code is “0000”) unless previously changed. See page 24 for information on how to change your password. 1DYLJDWHXVLQJGRZQT arrow but- ton to highlight &$1$'$(1*/,6+ then press the X arrow button repeatedly to select your ratings preference (shown on right side of illustration). 1DYLJDWHXVLQJGRZQT arrow but- ton to highlight &$1$'$)5(1&+ then press the X arrow button repeatedly to select your ratings preference (shown on right side of illustration). E C C8+ G PG 14+ 18+ Appropriate for everyone Appropriate for all children Appropriate for everyone 8 years old and up General Audience Parental Guidance Appropriate for Children over 14 years old Mature Audience Only E Appropriate for everyone G General Audience 8 ans+ Appropriate for Children 8 years old and up 13 ans+ Appropriate for Children 13 years old and up 16 ans+ Appropriate for Children 16 years old and up 18 ans+ Mature Audience Only Note: When adjustments are complete, you may select another menu by pressing the Menu button. How to Navigate: Press the MENU button on the remote control. Navigate using arrow W X buttons to select TV. Press the down T button to highlight your preferences. +LJKOLJKWFAVORITE to add channels to your Favorites List. Navigate using the W X TS arrow buttons to select channels to be added or deleted from your list. Press ENTER to add or delete a channel. A check- mark indicates a channel has been added. You may also display your FAVORITE list from the remote control by pressing FAV. Menu Adjustments The TV menu provides for the setup of your television to receive TV channels, store your favorites, add or skip channels and label them by their station call letters. (For antenna and Channel Auto Scan setup, please refer to page 17.) Press ‘ENTER’ To Change Press ‘ENTER’ To Change +LJKOLJKW&+$11(//$%(/ to name or rename a broadcast channel. Navigate using the X arrow button to enter the screen menu to re-label a channel. Use the TS arrow buttons to spell out each letter, number or character. Use W X arrow buttons to ad- vance to the next space. NOTE: The DTV SIGNAL is a measurement of signal strength for the current channel viewed. TV Settings +LJKOLJKWADD/DELETE to select or skip channels already in memory. Navigate using the W X TS arrow buttons to access the list of available channels. Press ENTER to change the channels status. A checkmark indicates a channel has been added. 26 Zoom Modes The ZOOM function offers several viewing display options on the 16:9 screen. Press ZOOM to cycle through the following widescreen settings. Press ZOOM to cycle through the following widescreen settings. 1. NORMAL Recommended for viewing native widescreen content and undistorted 4:3 images (with black bars). 2. WIDE Stretches certain 4:3 content and may reduce visible black bars. 3. ZOOM 6WUHWFKHVWKHLPDJHERWKYHUWLFDOO\DQGKRUL]RQWDOO\WR¿OOWKH screen when viewing widescreen content. The Zoom effect will crop images somewhat. 4. CINEMA :KHQYLHZLQJFRQWHQW&LQHPDPRGHZLOO¿OOWKHHQWLUH screen eliminating visible side black bars. It may also eliminate or reduce black bars on certain widescreen movies. 27 LCD TV 6L]HLQFK 31.5” Diagonal Aspect Ratio 16:9 Digital Compatibility 480i / 480p / 720p / 1080i / 1080p Resolution 1,366 x 768 %ULJKWQHVVFGP 400 Dynamic Contrast 30,000:1 9HUWLFDO9LHZLQJ$QJOHGHJUHHV 176° +RUL]RQWDO9LHZLQJ$QJOHGHJUHHV 176° 0D[LPXP&RORUVPLOOLRQV 16.7M 5HVSRQVH7LPHPV 8 ms Audio Power 2 X 7W Dimension with Pedestal Installed ´:[´+[´' Weight with Pedestal 20.8 lbs. &RPSRVLWH9LGHR$XGLR 69LGHR &RPSRQHQW9LGHR$XGLR/5 +'0, 5) 63',)&RD[LDO'LJLWDO2XWSXW 3&9*$ 3&$XGLR,1 Input Connections 6SHFLÀFDWLRQV Display 28 Troubleshooting 29 Check for a possible solution to a symptom before contacting a customer service representative. Symptom Remote codes for satellite/cable box users No color Cannot receive certain channels through the antenna TV signal blocked on certain channels Possible Solutions Call your satellite or cable provider to determine codes. &KHFNWKHYLGHRLQVWDOODWLRQRI\RXUH[WHUQDO$9HTXLSPHQW See pages 9-14. 3HUIRUP&KDQQHO6FDQWRDGGFKDQQHOVLQWRWKH79WXQHUPHPRU\ See page 17. 5HDGMXVW\RXUDQWHQQDDQGUHWU\$XWR&KDQQHO6FDQ 6LJQDOIURPWKH79VWDWLRQPD\EHZHDNLQ\RXUDUHD 3HUIRUP&KDQQHO6FDQWRDGGFKDQQHOVLQWRWKH79WXQHUPHPRU\ See page 17. &KHFNZKHWKHUWKHFKDQQHOZDVGHOHWHG6HHSDJH &KHFNSDUHQWDOFRQWUROVHWWLQJV6HHSDJHV 5HVWRUHGHIDXOWVHWWLQJV6HHSDJH Video noise or choppy picture 5HDGMXVWDQWHQQD.HHS79DZD\IURPQRLVHVRXUFHVQHRQOLJKWV and microwave appliances. No sound &KHFNWKDWFRQQHFWHGDXGLRFDEOHVDUHFRPSOHWHO\LQVHUWHG 9HULI\\RXKDYHVHOHFWHGWKHFRUUHFWDXGLRVRXUFHIURP\RXU amplifier. See page 15. 0XWHIXQFWLRQPD\EHHQDEOHGSUHVVPXWHRQWKHUHPRWH. Black box on screen 7KH³7H[W´RSWLRQLVHQDEOHGDQGQRWH[WLVDYDLODEOH 3UHVVWKH&&'EXWWRQRQWKHUHPRWHFRQWUROWRWXUQRII No power %DWWHULHVLQWKHUHPRWHFRQWUROPD\QHHGUHSODFLQJ 5HDWWDFK$&SOXJWRZDOORXWOHW &KHFNPDVWHUSRZHUVZLWFKRQ79¶VUHDUSDQHO6HHSDJHV. No picture 'LJLWDO79FKDQQHOVLJQDOPD\EHZHDNWU\DQRWKHUFKDQQHO. 3UHVV,1387EXWWRQWRYHULI\WKHGHVLUHGLQSXWVHOHFWHG 5HFRQQHFWWKHDQWHQQDRUFDEOHZLULQJ 5HVWRUHGHIDXOWVHWWLQJV6HHSDJH Remote control does not function 5HSODFHEDWWHULHVZLWKQHZRQHV &KHFNWKDWEDWWHU\SRODULW\LVFRUUHFW. 3RLQWUHPRWHGLUHFWO\DWWKH79¶V,5UHFHLYHU6HHSDJH AC power plug Add/Delete channels Advanced mode Advanced selection Air/Cable Antenna installation Arrow buttons Audio setup & adj. Audio Language 9 26 23 22 10, 16-17 10 7 7,15, 19 19 19 19 6, 29 18 C CCD (Closed Caption) Cable installation Canadian Ratings Channel Up/Down Channel Auto Scan Channel Label Channel List Clock Cinema Zoom Coaxial Digital Output Color adjustment Color Temperature Composite Input Component Input Computer connection Contrast adjustment 7, 22 10, 16-17 25 7-8 16-17 26 7 20, 23 27 15 18 18 13 12 14, 23 18 D Dash ( - ) Daylight Savings Time Default settings Digital cable Digital set top box Digital audio 7 20 21 10 10 15 7 14 E Exit Picture Modes Power 7, 18 7-9 R 7 F Favorite Channels 7, 26 G Guide B Balance adjustment Bass adjustment Batteries Brightness adjustment Display Display Modes for PC 7 11 15 6, 8 7-8, 11-14 19, 21 7 8 8-9 7-8, 16-26 7, 19 7 24-25 18 H HDMI Input Home Theater L Languages Last LED light M Master Power Menu MTS Mute Movie Ratings Movie mode 15 24-25 6-7 9, 10 21 24 10 S I IR Receiver Input RAW Ratings (TV, Movie) Remote Control RF Input Restore Default setting Reset Password Roof Antenna Index A N Normal Zoom Noise Reduction Number buttons 10-13 7, 20 9, 13 18 9, 15, 19 7-8 15, 19 T Time Zone Tint adjustment Treble adjustment Transparency 20 18 19 21 V Video adjustment Volume adjustment VGA installation & adj. 18 7-8 9, 14, 23 W 27 21 7 P Parental Control Password Pedestal stand removal PC PCM Phase Satellite installation Sleep timer S-Video Input Sharpness adjustment SPDIF Type Standby Speakers (built-in) 24-25 24-25 9 9, 14, 23 15 23 Wall Mounting Wide Zoom 9 27 XYZ XVS (Black detail enhancement) 21 YPbPr 9, 12 Zoom Modes 7, 21, 27 30 Warranty Limited North American Warranty LD3288T For peace of mind and valuable services, please take a moment to register your product at www.tmaxdigital.com. Tmax Digital, Inc. expresses the following non-transferable and limited warranty on a new Apex Digital LD3288T purchased from an authorized Apex Digital® U.S. retailer. Retain the original bill of sale for proof of purchase. Limited One (1) Year Warranty We warrant the parts in this product against defects in material or workmanship for a period of one (1) year from the date of original purchase from an Apex Digital® authorized retailer. We also warrant labor charges for a period of one (1) year from the date of original purchase. During the limited warranty period, we will provide a technician to service repairs in your home for a TV that is 32" and above, or you may bring it in to an Apex Digital authorized service center. For a list of Apex Digital authorized service centers, please call the Apex Digital customer support line. Service repairs may be made with new or recertified parts. Service that is provided is warranted for the duration of the original warranty or 45 days. If it is determined to have the unit to be sent in for service/replacement, it is customer’s responsibility to retain the original packaging or provide secure packaging in order to facilitate any warranty service. Your Responsibility The above warranty is subject to the following conditions: You must retain the original bill of sales to provide proof of purchase then call Customer Service for an assessment of the problem. Labor service charges for set installation, setup, adjustment of consumer controls and installation or repair of any type of antenna or cable systems are not covered by this warranty. Reception problems caused by inadequate antenna or cable systems are your responsibility. The warranty extends only to defects in materials or workmanship as limited above and does not extend to any other products or parts, accessories that have been lost, discarded, damaged by misuse, accident, neglect, acts of God such as lightning, voltage surges in the home, improper installation, rendered illegible. Warranty does not cover cosmetic damage. How to Obtain Warranty Service If after following the operating instructions and reviewing the FAQ pages for televisions at www.tmaxdigital.com, contact Customer Service directly at (877) 833-1888, Mon. - Fri. from 7 am to 9 pm (CST), Sat. - Sun. 7 am to 6 pm (CST). You will be instructed on how your claim will be processed. Have information available including date of purchase, serial number and the problem with the product. Should a problem be determined to be within the limits of the warranty you will be provided with covered by the limited warranty, you will be asked whether you wish to have service provided for a fee. We may charge the customer for any service call made for anything not covered by the limited warranty. Limitations Your LCD panel is an innovative device that is manufactured to precise tolerances with active performing pixels of at least 99.9%. As such, it is NOT a malfunction to view multiple nonperforming pixels on your screen. All warranties implied by state law are expressly limited to the duration of the limited warranty set forth above with the exception of warranties implied by state law. The foregoing warranty is exclusive and in lieu of all other warranties, guarantees, agreements etc., with respect to repair or replacement of any parts. We shall not be liable for consequential or incidental damage or exclusions and imitations of incidental or consequential damages, so the above may not apply to you. For our Pixel Policy, please refer to our website www.tmaxdigital.com. 31 This warranty gives you specific rights though these rights may vary from state to state. Some states do not allow limitations on the duration of the warranty or exclusions and limitations of incidental or consequential damages, so the above may not apply to you.