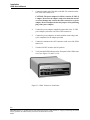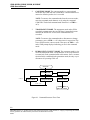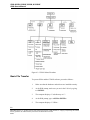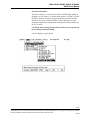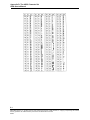
1
USER'S MANUAL Models : 6000N/6000NV/8000N/8000NV TM General Information GINA User’s Manual ‘General Information Introduction This document is the User’s Manual for the GINA transceiver and the GTALK communications software. NOTE: Read this manual completely before you try to use any GINA product. GINA Models GINA 6000N / 6000NV GINA 6000N is a stand-alone, high frequency data transceiver using spread spectrum technology. GINA 6000N has a standard RS-232 serial data interface that can be driven asynchronously at rates to 38.4 Kbps. GINA 6000N receives and transmits data in the frequency range of 902 to 928 MHz at air speeds of 128 Kbps. Communicating at this speed allows GINA 6000N to be a duplex link. GINA 6000N can be configured to be used as a point-to-point or point-to-multipoint communication device. GINA 6000N contains a packet controller module with a custom communication protocol that provides communications handshaking, error detection, retry, packet sequencing, flow control, and repeaters to extend the communication range. GINA 6000N implements a subset of standard packet framing with a built in Cyclic Redundancy Check (CRC) and High Level Data Link Control (HDLC). The protocol used is a modified X.25 protocol. GINA 6000N will automatically resend all information until it is completely received with no errors in the point-to-point mode. The pointto-point mode assures extremely accurate data transmission. GINA 8000N / 8000NV Model 8000N is a standard GINA transceiver. Model 8000NV has an additional voice handset for audio communication. GINA 8000N is a stand-alone, high frequency data transceiver using spread spectrum technology. GINA 8000N uses a standard RS-232 serial data interface that can be driven asynchronously at rates of to 38.4 Kbps. GINA 8000N receives and transmits data in the frequency range of 2.404 - 2.478 GHz at air speeds to 128 Kpbs. Communicating at air speeds of 128 Kbps allows GINA 8000N to be a full duplex unit. GINA can be configured to be used as a point-to-point or point-to-multipoint communication device. GINA 8000N contains a packet controller module with a custom communication protocol that provides communications handshaking, error detection, 1-1 ©2000 GRE America, Inc. All rights reserved. This material is the property of GRE America, Inc. Copying or reproducing this material is strictly prohibited. All violators shall be prosecuted to the fullest extent of the law. 5/2000 General Information GINA User’s Manual retry, packet sequencing, flow control, and repeater capability to extend the communication range. GINA 8000N implements a subset of standard packet framing with a built in Cyclic Redundancy Check (CRC) and High Level Data Link Control (HDLC). The protocol used is a modified X.25 protocol. GINA 8000N will automatically resend all information until it is completely received with no errors in the point-to-point mode. The pointto-point mode assures extremely accurate data transmission. System Requirements For all GINA models, the only system requirement is an EIA232 (RS-232) peripheral or a personal computer (PC). When using a PC, any communications software package such as BitCom©, Procomm©, Crosstalk©, or any compatible communications package can be used. DTE Requirements Data terminal equipment varies between manufacturers. DTEs can be: dumb terminal, dedicated terminal, personal computer (PC), PLC, RTU, etc. Refer to the manufacturers instructions and ensure that the following settings are used for initial start-up. FUNCTION SETTING Auto LF/CR OFF Keyboard OFF Duplex OFF Baud Rate 9600 Data Bits/Char 8 TX Parity Enable OFF RX Parity Sense OFF Parity Bit OFF Stop Bits 1 Using GINA with DTE To use GINA models 6000N, 6000NV, 8000N, and 8000NV with DTE equipment, proceed as follows: 1-2 ©2000 GRE America, Inc. All rights reserved. This material is the property of GRE America, Inc. Copying or reproducing this material is strictly prohibited. All violators shall be prosecuted to the fullest extent of the law. 5/2000 General Information GINA User’s Manual 1. Install the hardware and power it up as described in the Hardware Installation section for your particular model. 2. Enter the appropriate command. Refer to the Command section for your particular model for a description of commands. What is GINA? As shown in Figure 1-1, GINA is a high frequency data radio using spread spectrum technology. GINA receives and transmits data in the ISM band of 902-928 MHz or 2.404 - 2.478 GHz. GINA has standard data interfaces that can be driven at rates from 9.6 to 64 Kbps (Kilobits Per Second) depending on the model.GINA is a plug and play transparent link. There are no special setups required. GINA is a highly secure spread spectrum radio. GINA being transparent allows most custom communication protocols to be used. Figure 1-1. The GINA Transceiver Spread Spectrum Technology GINA uses spread spectrum technology, a technique originally developed by the U.S. military during World War II, to prevent the jamming of communications signals. Spread spectrum technology uses a narrow bandwidth radio frequency and spreads it over a wider portion of the bandwidth. Since the signal is spread out over the band, it renders narrow band jammers virtually ineffective. Additionally, the spread spectrum band can be used with low probability of interception, which is an ideal method of communication since it is ‘radio silent’ to a conventional receiver. Advantages of Spread Spectrum Technology 1-3 ©2000 GRE America, Inc. All rights reserved. This material is the property of GRE America, Inc. Copying or reproducing this material is strictly prohibited. All violators shall be prosecuted to the fullest extent of the law. 5/2000 General Information GINA User’s Manual Spread spectrum technology has many advantages. Among them are: • • • • • • System flexibility. Additions can be made easily. Interference immunity. Spread spectrum radios are immune to noise. Error-free communication. Automatic error detection is built into some models. Cost. Spread spectrum technology is inexpensive compared to an equivalent hard-wired installation. Data throughput. Spread spectrum technology is a transparent, real-time, point-to-point, and point-to-multipoint wireless network. Multi-channel. Spread spectrum radios have multiple channels that can be dynamically changed with software. It allows for repeaters, redundant base stations, and overlapping antenna cells. A great advantage is in the dynamic control of radio signal ‘peaks’ and ‘valleys.’ A typical spread spectrum radio signal is shown in Figure 1-2. Figure 1-2. Spread Spectrum Radio Signal A typical narrow band signal is shown in Figure 1-3. Figure 1-3. Narrow Band Radio Signal Definitions of Terms DATA INTERFACE — The asynchronous interface port provided for connectivity is a EIA-232 (RS232) standard. 1-4 ©2000 GRE America, Inc. All rights reserved. This material is the property of GRE America, Inc. Copying or reproducing this material is strictly prohibited. All violators shall be prosecuted to the fullest extent of the law. 5/2000 General Information GINA User’s Manual DIRECT SEQUENCE — Direct sequence is a technique that takes a narrow-band signal and spreads it over a broader portion of the radio frequency band. KEY-UP TIME — The time that a radio requires when switching from transmit to receive and vice-versa. There is no key-up time required due to an internal buffer. Data can be received and transmitted through the RS-232 port simultaneously in a full duplex mode using TDD (time division duplex). NOTE: Key-up time and spreading code length are interrelated. In a direct sequenced technique, the spread sequence system must (in real time) attempt to match its despreading code with the incoming radio signal in order to determine the validity of the data. The longer the spreading code, the longer the receiver must search before it can determine that a valid data signal is being transmitted. SYNCHRONIZATION — Applied each time that the radio switches between transmit and receive, synchronization produces direct overhead on each transmitted message, thereby reducing radio efficiency. In applications involving very long, constant messages (such as a large file transfer), synchronization time becomes less of a deciding factor. MULTIPATH — Radio signals may take several paths to reach the intended receiver. The receiver must sort out the main path from all the ‘ghost’ images. The longer the spreading factor and/or the faster the raw data rate, the more difficult (and eventually impossible) it is to sort out the signals, resulting in a loss of robust communication. NUMBER OF CHANNELS — The number of channels varies per GINA model. Models 6000N and 6000NV have 21 channels provided in the 902 - 928 MHz frequency range. Models 8000N and 8000NV have 37 channels provided in the 2.404 - 2.478 GHz frequency range. Note that the channels are overlapping and, depending on the unit separation, only one channel may be used. PROCESSING GAIN MEASUREMENTS — Since processing gain is a function of the RF bandwidth of the transmitted signal compared to the bit rate of the data, the theoretical calculation is: 10Log(Spreading Code Rate) x (Main Lobe Factor) RF Data Rate NOTE: Assuming that the RF main lobe of [sin x/]2 for direct sequence is 0.88 (main lobe factor) times the bandwidth spreading code clock rate. RANGE — The communication distance between GINA’s may vary according to environment and application. (Robustness and range are almost interchangeable terms; robustness and range vary according to the antenna system used.) 1-5 ©2000 GRE America, Inc. All rights reserved. This material is the property of GRE America, Inc. Copying or reproducing this material is strictly prohibited. All violators shall be prosecuted to the fullest extent of the law. 5/2000 General Information GINA User’s Manual RAW DATA RATE — Response time of data transmission/reception. The raw data rate is factory set to 128 Kbps. ROBUSTNESS — GRE America, Inc. believes that an RF link should be ‘as good as wire.’ Robustness is closely related to range. Variables for robustness and range include: • • • • • Transmitter Output Power Receiver Sensitivity Spreading Code Length Raw Data Rate Antenna Configuration NOTE: Spreading Code Length, Raw Data Rate, Robustness, and Multipath are interrelated; all terms are defined in this section. SPREADING CODE LENGTH — A shorter spreading code length results in better performance in measurable areas such as cost, actual data throughput, size, range, and robustness. A longer spreading code length reduces the possibility of unintended signal interruption and/or regulatory implications. GRE America has taken all the above criteria and used a spreading code length of 127 chip with four different codes selectable by channel. SYSTEM RESPONSE TIME — Raw data rate, reflected by transmission response time. The minimum response time is 12 msec. FCC Requirements The FCC has allocated the frequencies between 902 – 928 MHz and 2.404 and 2.478 GHz for use with spread spectrum technology and does not require the end user to obtain an FCC license to operate a GINA transceiver. NOTE: Professional installers who replace GRE-provided whip antennas with one not approved by GRE America, must obey FCC regulations concerning effective radiated power in the U.S. or the effective rules in the destination country relating to ERP. For detail specifications, refer to FCC Rules Part 15.247. FCC Statement This equipment has been tested and found to comply with the limits for a Class B digital device, pursuant to Part 15 of the FCC Rules. These limits are designed to provide reasonable protection against harmful interfer1-6 ©2000 GRE America, Inc. All rights reserved. This material is the property of GRE America, Inc. Copying or reproducing this material is strictly prohibited. All violators shall be prosecuted to the fullest extent of the law. 5/2000 General Information GINA User’s Manual ence in a residential installation. This equipment generates, uses, and can radiate radio frequency energy and, if not installed and used in accordance with the instructions, may cause harmful interference to radio communications. However, there is no guarantee that interference will not occur in a particular installation. If this equipment does cause harmful interference to radio or television reception (which can be determined by turning the equipment off and on) the user is encouraged to try to correct the interference by one or more of the following measures: • • • • Re-orient or relocate the transceivers. Increase the separation between equipment and transceivers. Connect the equipment into a different outlet or circuit different from the one where the receiver is connected. Consult a dealer or an experienced radio technician for help. Shielded cables and I/O cords must be used for this equipment to comply with relevant FCC regulations. Changes or modifications not expressly approved in writing by GRE America, Inc. may void the user’s authority to operate this equipment. What is GTALK? GINA models 6000N, 6000NV, 8000N, and 8000NV use GTALK. GTALK is terminal emulation program that transforms your computer into an integrated communications workstation. GTALK allows your computer to exchange data with other computers via radio communications, rather than by a hard-wired connection, such as a Local Area Network (LAN). GTALK was designed specifically for use with the GINA transceiver and provides a user-friendly menu system that allows complete control and configuration of GINA. The primary functions of GTALK are: • • • • Terminal emulation Point-to-point communication File transferal Print sharing NOTE: GTALK is only an aid for GINA models 6000N and 8000N. Since GINA is self contained, you may use any type of communications software (such as PC Anywhere©, Procomm©, or HyperTerminal©) and manually control GINA using the command set. 1-7 ©2000 GRE America, Inc. All rights reserved. This material is the property of GRE America, Inc. Copying or reproducing this material is strictly prohibited. All violators shall be prosecuted to the fullest extent of the law. 5/2000 General Information GINA User’s Manual Customer Support If you need answers to technical questions or require information about product updates, please contact GRE America’s Technical Support Team at: Tel: (650) 591-1400 Fax: (650) 591-2001 (800) 233-5973 (outside California) Between 8:00 A.M. and 5:00 PM, Pacific Time Email : [email protected] Product Returns If, after speaking to a technical support person, it is determined that your GINA unit requires servicing, call GRE and request a RMA number for repair and return units. Write the RMA number on the outside of the shipping box for reference. NOTE: Units returned without an RMA number will not be accepted. For further information, please write us at: GRE America, Inc. 425 Harbor Boulevard Belmont, CA USA 94002 Attn: Customer Support Safety Considerations For your safety, here are some things that you should do and not do: DO read this manual completely before using GINA. DO follow all instructions carefully. DO use the same caution with GINA as you would use with any electrical appliance. DO NOT try to use GINA for purposes for which it was not intended. DO NOT locate GINA in an area that does not have adequate ventilation for cooling. DO NOT use a ‘universal’ battery adapter with GINA. Only use the adapter supplied with the unit. 1-8 ©2000 GRE America, Inc. All rights reserved. This material is the property of GRE America, Inc. Copying or reproducing this material is strictly prohibited. All violators shall be prosecuted to the fullest extent of the law. 5/2000 Installation GINA User’s Manual Installation Introduction This section contains instructions for installing GINA for models the 6000N/NV and 8000N/NV. Hardware Installation Hardware installation consists of connecting the GINA transceiver to the RS-232 serial port of your peripheral device and connecting a power adapter and antenna to the transceiver. CAUTION: Make sure that the power switch on the back of the GINA transceiver is set to OFF before performing this procedure. 1. Set the power switch on the back of the GINA transceiver to OFF (see figure 2-1). Power ON/OFF DB RS - 232 Optional RSSI Ports Antenna Connector Power Supply Jack Figure 2-1. GINA Transceiver Rear Panel 2. Connect a shielded RS-232 interface cable to the RS-232 serial interface port on the back of your peripheral device. If your peripheral is a computer, connect the cable to the serial interface port (COM1) on the back of your computer. (Usually located on the same card as your printer connector.) NOTE: Most computers use a DB-9 connector for the serial interface. Some earlier machines use a DB-25 connector. If your computer has a 25-pin connector, you can get a 25-pin to 9-pin adapter at most computer supply stores. If your peripheral requires a special pin configuration, refer to Appendix A for further information. 2-1 ©2000 GRE America, Inc. All rights reserved. This material is the property of GRE America, Inc. Copying or reproducing this material is strictly prohibited. All violators shall be prosecuted to the fullest extent of the law. 5/2000 Installation GINA User’s Manual 3. Connect the other end of the cable to the RS-232 connector on the rear of the GINA transceiver. CAUTION: The power adapter for GINA is rated at 12 VDC @ 1 ampere. Do not use an adapter rated at less than this current or serious damage may result to the GINA transceiver or power adapter. Do not attempt to defeat the purpose of the polarizing plug of the power adapter. 4. Connect the power adapter (supplied) output cable to the 12 VDC power adapter jack on the rear of the GINA transceiver. 5. Connect the power adapter to an outlet with the rated voltage and cycle compliance for the adapter provided. 6. Connect the antenna to the ANT connector on the rear of the GINA transceiver. 7. Turn the ON/OFF switch to the ON position. 8. Verify that the PWR indicator on the front panel of the GINA transceiver (see figures 2-2 and 2-3) is lit. Figure 2-2. GINA Transceiver Front Panel 2-2 ©2000 GRE America, Inc. All rights reserved. This material is the property of GRE America, Inc. Copying or reproducing this material is strictly prohibited. All violators shall be prosecuted to the fullest extent of the law. 5/2000 Installation GINA User’s Manual 9. If you have purchased a GINA model 6000NV or 8000NV, connect the voice handset to the RJ-22 handset jack on the front panel of the transceiver (see figure 2-3.) Voice Option Jack (RJ-22) Figure 2-3. GINA Transceiver Front Panel Hardware installation is now complete. Software Installation The GINA Models 6000N, 6000NV, 8000N, and 8000NV transceivers are designed for operation with the GTALK software and an IBM compatible personal computer. However, GINA may be operated with any commercially available communications software such as BitCom©, Procomm©, Crosstalk©, or any special communications software provided by the customer. The GINA transceiver may also be operated with Data Terminal Equipment (DTE) rather than using a PC. The operating software consists of one executable file: GTALK.EXE. GRE America recommends that you make a working copy of the diskette, then place the original in a safe place. You can install the software to the hard disk or run it from the diskette. We recommend that you install the program to a hard disk, since operation is much faster. To install the software, proceed as follows: 1. Select the hard drive on which you wish to install the software. Disk storage requirements is approximately 254 Kbytes. For purposes of explanation, we will assume that you are using drive C. 2. Go to the C drive. Type: c: <ENTER> 3. Go to the root directory. Type: cd\<ENTER> 2-3 ©2000 GRE America, Inc. All rights reserved. This material is the property of GRE America, Inc. Copying or reproducing this material is strictly prohibited. All violators shall be prosecuted to the fullest extent of the law. 5/2000 Installation GINA User’s Manual 4. Make a GINA directory. Type: md gina<ENTER> 5. Go to the GINA directory. Type: cd gina<ENTER> 6. The screen displays: C:\GINA> 7. Place the GTALK diskette in the diskette drive and close the door. 8. At the DOS prompt, type: copy a:\*.*<ENTER> 9. The screen displays: (1)FILE(S) COPIED. 10. To verify that the software is properly installed, type: dir<ENTER> 11. The screen displays the following (dates, times, and file size will differ): <DIR> 06-04-94 12:00p .. <DIR> 06-04-94 12:00p GTALK.EXE 253,984 11-29-93 11:00a NOTE: Your computer must have an available COM1 communications port to use the GTALK software. If your COM1 port is in use, you must free it for GTALK. Refer to your computer operating manual for details. 12. Initialize your COM1 port for 9600 baud, no parity, 8 data bits and one stop bit by entering the following command from the DOS prompt: mode com1:96,N,8,1 <ENTER> NOTE: You can insert the mode command in your autoexec.bat file to avoid performing step 12. Otherwise, when you reboot your computer, the COM port will revert to the DOS default of 24,n,8,1. 13. The screen displays: COM1: 96,N,8,1 Software installation is now complete. 2-4 ©2000 GRE America, Inc. All rights reserved. This material is the property of GRE America, Inc. Copying or reproducing this material is strictly prohibited. All violators shall be prosecuted to the fullest extent of the law. 5/2000 GINA 6000N, 6000NV, 8000N, & 8000NV GINA User’s Manual GINA Models 6000N, 6000NV, 8000N, & 8000NV Overview GINA models 6000N and 8000N are stand-alone, high frequency data transceivers using spread spectrum technology. GINA 6000N/8000N has a standard RS-232 serial data interface that can be driven asynchronously at rates to 38.4 Kbps. GINA 6000N receives and transmits data in the frequency range of 902 to 928 MHz at air speeds to 128 Kbps. GINA 8000N receives and transmits data in the frequency range of 2.404 - 2.478 GHz at air speeds of up to 128 Kbps. Communicating at this speed allows GINA to be a duplex link. GINA 6000N/8000N can be configured to be used as a point-to-point or point-to-multipoint communication device. GINA 6000N/8000N contains a packet controller module with a custom communication protocol that provides communications handshaking, error detection, retry, packet sequencing, flow control, and repeaters to extend the communication range. GINA 6000N/8000N implements a subset of standard packet framing with a built in Cyclic Redundancy Check (CRC) and High Level Data Link Control (HDLC). The protocol used is a modified X.25 protocol. GINA 6000N/8000N automatically resends all information until it is completely received with no errors in the point-to-point mode. The point-to-point mode assures extremely accurate data transmission. GINA Command Structure Overview The GINA can be configured for point-to-point or point-to-multipoint by selecting the ID (refer to the Command section for more information). Use ID settings 1 through 99 for point-to-point communication. Use ID settings 100 through 119 for point-to multipoint communication. In a point-to-point configuration, GINA must establish a link before it can receive or transmit. Each GINA must have an individual ID from 1 through 99. In a point-to-multipoint configuration, all remote (receiver) GINA(s) must have the same ID but the ID must be different from the sender’s (host) ID. Figure 4-1 is a flow chart illustrating the command structure overview. GINA provides four modes of operation: 1. COMMAND MODE. The command mode is where the dedicated command set can be changed. This mode is automatically entered when GINA is turned on. 3-1 ©2000 GRE America, Inc. All rights reserved. This material is the property of GRE America, Inc. Copying or reproducing this material is strictly prohibited. All violators shall be prosecuted to the fullest extent of the law. 5/2000 GINA 6000N, 6000NV, 8000N, & 8000NV GINA User’s Manual 2. CONVERSE MODE. The converse mode is a conversational mode that only sends data after a SENDPAC command character is entered or when the packet size is exceeded. NOTE: To return to the command mode from the converse mode, enter the command mode character set by using the command COMCHR. The default command mode character is <CTRL> + <C>). 3. TRANSPARENT MODE. The transparent mode makes GINA completely transparent to the user. The data is immediately transmitted if the PACWAIT or PACSIZE command limits are exceeded. NOTE: To return to the command mode to disconnect or change parameters, press <CTRL> + <V> three times in succession. This forces GINA into the converse mode. Then press <CTRL> + <C> and a CMD prompt displays indicating you are in the command mode. 4. PERMANENT CONNECT MODE. The permanent mode is similar to the transparent mode, except that there is no escape character to return back to the command mode to disconnect. Once a communication link is established in the permanent mode, the only way to disconnect is by turning GINA off. Power On Command Mode Disconnect CONNECT CONMODE = 1 CONMODE = 0 <CTRL>C Converse Mode Transparent Mode CONMODE = 2 Permanent Mode <CTRL> VVV Turn Power Off to Disconnect Figure 4-1. Command Structure Flow Chart 3-2 ©2000 GRE America, Inc. All rights reserved. This material is the property of GRE America, Inc. Copying or reproducing this material is strictly prohibited. All violators shall be prosecuted to the fullest extent of the law. 5/2000 GINA 6000N, 6000NV, 8000N, & 8000NV GINA User’s Manual Operation This section contains operating instructions for the GINA transceiver and our dedicated GTALK communication software. Information in this section is presented in the following order: 1. Getting started with GINA. 2. GTALK Menu Commands. This part describes the software menu system. 3. Basic file transfer. This part explains how to set up the GINA sending transceiver software and select the ASCII or print files to be transferred. 4. Auxiliary operations. This part explains miscellaneous commands and functions available as part of the GINA operating software. You most likely will not use most of them in normal operations. However, certain specialized applications require some adjustment of operating parameters. If you are not sure of the effect of an operation or function, do not use it without contacting GRE America customer service personnel. 5. Print server operation. This part explains how to set up a GINA transceiver as a dedicated print server. 6. Voice operation. This part explains how to use the press-to-talk (PTT) handset (Models 6000NV/8000NV only). Getting Started with GINA We recommend that first time users use our factory settings. This will help to familiarize yourself with GINA. Below describes a quick and easy approach to get two GINA radio communicating in a point-to-point (broadcast) configuration: 1. Follow the installation procedure in the Installation section to connect each radio to a personal computer. You may use any communication software you desire or our own GTALK software in your PC. 2. Set the communication software to 9600 baud rate, 8 bit, none parity and one stop bit. 3-3 ©2000 GRE America, Inc. All rights reserved. This material is the property of GRE America, Inc. Copying or reproducing this material is strictly prohibited. All violators shall be prosecuted to the fullest extent of the law. 5/2000 GINA 6000N, 6000NV, 8000N, & 8000NV GINA User’s Manual 3. Turn on GINA. The prompt: CMD> displays on the screen. If the CMD> prompt does not appear, check your cable connection or communication software setup. 4. Set each radio to different ID values from 1 through 99. The ID can be set by entering ID=? at the CMD> prompt. 5. Now you are ready to establish a communication link. The link is established by instructing GINA what ID to connect to. Do this by entering C= ID of destination unit. GINA automatically connects and enters into the transparent mode. 6. Once connected, the two GINAs are completely transparent. There are two ways to return to the command mode: a. Disconnect the link by entering DC at the CMD> prompt. b. Enter <CTRL> + <V> three consecutive times followed by <CTRL> + <C>. If the sequence is entered correctly, a CMD> prompt displays. Below describes a quick and easy approach to get two GINA radio communicating in a point-to-multipoint configuration: 1. Follow the installation procedure in the Installation section to connect each radio to a personal computer. You may use any communication software you desire or our own GTALK software in your PC. 2. Set the communication software to 9600 baud rate, 8 bit, none parity and one stop bit. 3. Turn on GINA. The prompt: CMD> displays on the screen. If the CMD> prompt does not appear, check your cable connection or communication software setup. 4. Set the Transmitter (Host) and Receiver(s) (Remote) to different ID values (from 100 through 119). The ID can be set by entering ID=? at the CMD> prompt. NOTE: Make sure all Receiver(s) (Remote) are set to the same ID. 5. Now you are ready to establish a communication link. The link is established by instructing GINA what ID to broadcast to. This is done by entering C= ID of Remote(s) unit on the Host GINA and C=ID of the Host unit on the Remote(s) GINA. GINA automati- 3-4 ©2000 GRE America, Inc. All rights reserved. This material is the property of GRE America, Inc. Copying or reproducing this material is strictly prohibited. All violators shall be prosecuted to the fullest extent of the law. 5/2000 GINA 6000N, 6000NV, 8000N, & 8000NV GINA User’s Manual cally enters the transparent mode. NOTE: When the GINAs are in the point-to-multipoint (broadcast) configuration, GINA only performs a CRC check when data is received. If the data becomes corrupted, GINA discards the data block. GTALK Menu Commands Figure 4-2 is a flowchart of the GTALK menu system. The menu shows the 30 different menu commands and functions. Many of the commands are seldom used but are provided to give the user maximum control and flexibility. The commands used for basic file transfer are described in the next two paragraphs. These are the commands that you will use most often. NOTE: All menu commands may be entered from the command line when in the command mode. In the following instructions, the screens are shown as they appear on your monitor. You may select any item by using the cursor arrow keys to highlight it, then pressing <ENTER>. You may also select an item by pressing the key corresponding to the letter highlighted in the menu. 3-5 ©2000 GRE America, Inc. All rights reserved. This material is the property of GRE America, Inc. Copying or reproducing this material is strictly prohibited. All violators shall be prosecuted to the fullest extent of the law. 5/2000 GINA 6000N, 6000NV, 8000N, & 8000NV GINA User’s Manual Figure 4-2. GTALK Menu Flowchart Basic File Transfer To operate GINA and the GTALK software, proceed as follows: 1. Make sure that the hardware and software are installed correctly. 2. At the DOS prompt, make sure you are in the C drive by typing: c:<ENTER>. 3. The computer displays: C:\subdirectory or C:\ 4. At the DOS prompt, type: cd\GINA<ENTER>. 5. The computer displays: C:\GINA>. 3-6 ©2000 GRE America, Inc. All rights reserved. This material is the property of GRE America, Inc. Copying or reproducing this material is strictly prohibited. All violators shall be prosecuted to the fullest extent of the law. 5/2000 GINA 6000N, 6000NV, 8000N, & 8000NV GINA User’s Manual 6. Start GTALK by typing: GTALK<ENTER>. 7. The GTALK opening screen displays. Press <ALT> + <C> twice and the following displays: 8. Use the cursor arrows to highlight the first line to select Terminal ==>RF Modem Link and press <ENTER>. The following screen displays: 9. Select Set COM Port. The following screen displays: NOTE: Your computer must have an available COM1 communications port to use the GTALK software. If your COM1 port is in use, you must free it for GTALK. Refer to your computer operating manual for details. 3-7 ©2000 GRE America, Inc. All rights reserved. This material is the property of GRE America, Inc. Copying or reproducing this material is strictly prohibited. All violators shall be prosecuted to the fullest extent of the law. 5/2000 GINA 6000N, 6000NV, 8000N, & 8000NV GINA User’s Manual 10. Select COM1 and press <ENTER>. Select set Baud rate and the following screen displays: CAUTION: The same baud rate must be used at both the sending and receiving units. 11. Select the desired baud rate and press <ENTER>. GRE strongly recommends that you accept the default rate of 9600. NOTE: If none of the baud rates are highlighted, STOP. DO NOT PROCEED. Either you have not connected the GINA transceiver right or you have not turned the transceiver on. Check all connections and make sure the PWR lamp on the transceiver is ON. 12. When you select a highlighted baud rate, the baud rate box will close. Press <ESC> to return to the first screen, then select RF Modem==>RF Modem Link and the following screen displays: 3-8 ©2000 GRE America, Inc. All rights reserved. This material is the property of GRE America, Inc. Copying or reproducing this material is strictly prohibited. All violators shall be prosecuted to the fullest extent of the law. 5/2000 GINA 6000N, 6000NV, 8000N, & 8000NV GINA User’s Manual 13. Select set Baud rate and the following screen displays: CAUTION: The same baud rate must be used at both the sending and receiving units. 14. Select the desired baud rate and press <ENTER>. GRE strongly recommends that you accept the default rate of 128,000. NOTE: The baud rate of 256,000 is not available. 15. When you select a highlighted baud rate, the baud rate box will close. Press <ESC> to return to the first screen, then select Set Channel. The following screen displays: 3-9 ©2000 GRE America, Inc. All rights reserved. This material is the property of GRE America, Inc. Copying or reproducing this material is strictly prohibited. All violators shall be prosecuted to the fullest extent of the law. 5/2000 GINA 6000N, 6000NV, 8000N, & 8000NV GINA User’s Manual 16. This screen selects the RF channel (frequency) that the transceiver transmits and receives. When communicating with another transceiver both units must be set to the same channel. Depending on the time of day and local atmospheric conditions, the channel number selected can affect the range of the unit. If you are experiencing marginal reception conditions, try changing the channel until maximum performance is reached. Channel 11 usually produces satisfactory results. 17. Select the set ID line and the following screen displays: 18. The ID is the number loaded into GINA internal memory as the station ID. The ID is inserted automatically into the address field of all packets transmitted. Two or more stations cannot use the same ID number if they are transmitting and receiving on the same channel at the same time. Type a unique ID number, then press <ENTER>. The ID screen will close. 3-10 ©2000 GRE America, Inc. All rights reserved. This material is the property of GRE America, Inc. Copying or reproducing this material is strictly prohibited. All violators shall be prosecuted to the fullest extent of the law. 5/2000 GINA 6000N, 6000NV, 8000N, & 8000NV GINA User’s Manual 19. Press <ESC> then select Display configuration. The following screen (with an ID of 1 selected) displays: 20. Press <ESC> and the configuration display window will close. Select Link and the following screen displays: 21. Press <ENTER> and the following screen displays: 22. Type the ID number of the computer to which you wish to connect. If you will be routing transmission through repeaters, press the right arrow cursor position key to step through the repeater IDs and type the ID numbers of the computers that are functioning as repeaters. 3-11 ©2000 GRE America, Inc. All rights reserved. This material is the property of GRE America, Inc. Copying or reproducing this material is strictly prohibited. All violators shall be prosecuted to the fullest extent of the law. 5/2000 GINA 6000N, 6000NV, 8000N, & 8000NV GINA User’s Manual NOTE: Repeater numbers are optional, but when specified, the repeater ID’s must be entered in the exact order in which they will relay the transmitted signals. 23. After entering the ID number of the computer and pressing <ENTER>, the TX indicator on the GINA transceiver front panel will light. When a connection with the called computer is established, the Not Connected message at the top of the screen will be replaced by Connected to n, where n represents the ID number of the called computer. 24. Select Transfer and the following screen displays: NOTE: To transfer a file, the receiving computer should select Download file(s) and the transmitting computer should select Upload file(s). Files may be transferred only after you have established a connection with the receiving computer. 25. If you want to transfer a single file, type the directory and path of the file you want to transfer, as follows: C:\DIRECTORY\FILENAME.EXT<ENTER> If you want to transfer several files, or if you are not sure of the file name that you wish to transfer, type: C:\DIRECTORY\*.* 26. When the following screen appears, mark the files that you wish to transfer. Move the highlight bar with the cursor control keys to the desired file, then press the <SPACE> bar. If you change your mind about a file that you have already marked, press the <SPACE> bar again. When you have made all your selections, press <ENTER>. All marked files will then be transferred. 3-12 ©2000 GRE America, Inc. All rights reserved. This material is the property of GRE America, Inc. Copying or reproducing this material is strictly prohibited. All violators shall be prosecuted to the fullest extent of the law. 5/2000 GINA 6000N, 6000NV, 8000N, & 8000NV GINA User’s Manual Auxiliary Operations System Menu The system menu has three selections: DOS Shell, Screen Row, and Quit. DOS Shell If you select DOS Shell (see screen display below), you will temporarily exit the GTALK program. The following prompt displays: Type EXIT to return to Gtalk. C:\GINA> CAUTION: DO NOT enter the DOS Shell while you are transmitting or receiving; any file being transferred will be lost. NOTE: GTALK operation will be suspended while you are in the DOS shell. When you are finished using DOS, type: exit <ENTER> to return to GTALK. Set Number of Screen Rows As shown below, you may select either 25 lines per screen (default) or 40 lines per screen. Set it according to your preference. The screen appearance set at 40 rows is shown below. 3-13 ©2000 GRE America, Inc. All rights reserved. This material is the property of GRE America, Inc. Copying or reproducing this material is strictly prohibited. All violators shall be prosecuted to the fullest extent of the law. 5/2000 GINA 6000N, 6000NV, 8000N, & 8000NV GINA User’s Manual Quit If you select Quit, the GTALK program will terminate, and you will be returned to the DOS prompt. Config Terminal ⇔ RF Modem Menu This menu allows access to five different functions: Set COM Port As shown below, you must select COM1 for GTALK operation. NOTE: Your computer must have an available COM1 communications port for GTALK. If your COM1 port is in use, you must free it for GTALK. Refer to your computer operating manual for details. Set Baud Rate As shown below, this command sets the asynchronous link baud rate. You may choose from the standard rates: 2400, 4800, 9600 (default), 19220, or 38400. CAUTION: The same baud rate must be used at both the sending and receiving units. 3-14 ©2000 GRE America, Inc. All rights reserved. This material is the property of GRE America, Inc. Copying or reproducing this material is strictly prohibited. All violators shall be prosecuted to the fullest extent of the law. 5/2000 GINA 6000N, 6000NV, 8000N, & 8000NV GINA User’s Manual Set Echo As shown below, the echo may be enabled (default) or disabled. When echo is enabled, characters received from the sending unit are echoed on the computer display. When echo is disabled, characters are not displayed. Echoing is disabled when in the transparent mode. Set Transparent Flow When transparent flow is disabled, software flow control is disabled in the transparent mode. Hardware flow control is used so that data received by GINA are transmitted as data. When transparent flow is enabled (default), software flow control can be activated in the transparent mode. START and STOP characters control input from the DTE. The transparent flow parameter must also be enabled if XFLOW is enabled. A screen display is shown below: Set Transmit Flow As shown below, transmit flow may be enabled or disabled (default) When transmit flow is disabled, software flow control is disabled in the transparent mode. Hardware flow control is used so that data sent to the transceiver is transparent. When transmit flow is enabled, software flow control can be activated in the transparent mode. 3-15 ©2000 GRE America, Inc. All rights reserved. This material is the property of GRE America, Inc. Copying or reproducing this material is strictly prohibited. All violators shall be prosecuted to the fullest extent of the law. 5/2000 GINA 6000N, 6000NV, 8000N, & 8000NV GINA User’s Manual NOTE: Transmit flow must be set to enable if you enable transparent flow. (See description above). Set Xflow As shown below, XFLOW may be enabled (default) or disabled. When XFLOW is enabled, XON/XOFF flow control is activated. When XFLOW is disabled, the transceiver sends hardware flow control commands via the RS-232 RTS (Ready To Send) line. Config RF Modem ⇔ RF Modem Link Menu This menu allows access to ten different functions: Set Baud Rate As shown below, RF BAUD RATE sets the radio transmission baud rate. The following baud rates are available: 32000, 64000, 128000 (default), or 256000*. 3-16 ©2000 GRE America, Inc. All rights reserved. This material is the property of GRE America, Inc. Copying or reproducing this material is strictly prohibited. All violators shall be prosecuted to the fullest extent of the law. 5/2000 GINA 6000N, 6000NV, 8000N, & 8000NV GINA User’s Manual CAUTION: The same baud rate must be used at the sending and receiving units. * Not available on GINA Model 6000 Set Channel You may select a channel number in the range 1 to 21. Channel numbers and frequencies are shown in table 4-1. Channel refers to the RF channel (frequency) that the transceiver transmits and receives. When communicating with another transceiver, both units must be set to the same channel. Depending on time of day and local atmospheric conditions, the channel number selected can affect the range of the unit. If you are experiencing marginal reception conditions, try changing the channel until maximum performance is reached. Channel 11 usually produces satisfactory results. CAUTION: Changing the channel number while transmitting or receiving will cause a loss of communication. A screen display for the select channel command is shown below: 3-17 ©2000 GRE America, Inc. All rights reserved. This material is the property of GRE America, Inc. Copying or reproducing this material is strictly prohibited. All violators shall be prosecuted to the fullest extent of the law. 5/2000 GINA 6000N, 6000NV, 8000N, & 8000NV GINA User’s Manual CHANNEL CODE SWITCH SETTINGS FOR GINA MODELS 6000N AND 6000NV CHANNEL FREQUENCY (MHz) PN CODE 1 905.055 1 2 906.055 2 3 907.055 3 4 908.055 4 5 909.055 2 6 910.055 3 7 911.055 4 8 912.055 1 9 913.055 3 10 914.055 4 11 915.055 1 12 916.055 2 13 917.055 4 14 918.055 1 15 919.055 2 16 920.055 3 17 921.055 1 18 922.055 2 19 923.055 3 20 924.055 4 21 925.055 2 3-18 ©2000 GRE America, Inc. All rights reserved. This material is the property of GRE America, Inc. Copying or reproducing this material is strictly prohibited. All violators shall be prosecuted to the fullest extent of the law. 5/2000 GINA 6000N, 6000NV, 8000N, & 8000NV GINA User’s Manual CHANNEL CODE SWITCH SETTINGS FOR GINA MODELS 8000N AND 8000NV 1 2.405 1000110000 1 2 2.406 1000101000 2 3 2.408 1000100100 3 4 2.410 1000110100 3 5 2.412 1000100010 1 6 2.414 1000101010 2 7 2.416 1000100110 3 8 2.418 1000101110 4 9 2.420 1000111110 4 10 2.422 1000101001 2 11 2.424 1000100101 3 12 2.426 1000101101 4 13 2.428 1000100011 1 14 2.430 1000101011 2 15 2.433 1000100111 3 16 2.435 1000101111 4 17 2.437 1001100000 1 18 2.439 1001101000 2 19 2.441 1001100100 3 20 2.443 1001110100 3 21 2.445 1001100010 1 22 2.447 1001101010 2 23 2.449 1001100110 3 24 2.451 1001101110 4 25 2.453 1001111110 4 26 2.455 1001101001 2 3-19 ©2000 GRE America, Inc. All rights reserved. This material is the property of GRE America, Inc. Copying or reproducing this material is strictly prohibited. All violators shall be prosecuted to the fullest extent of the law. 5/2000 GINA 6000N, 6000NV, 8000N, & 8000NV GINA User’s Manual CHANNEL CODE SWITCH SETTINGS FOR GINA MODELS 8000N AND 8000NV 27 2.457 1001100101 3 28 2.59 1001101101 4 29 2.461 1001100011 1 30 2.463 1001101011 2 31 2.465 1001100111 3 32 2.467 1001101111 4 33 2.469 1010100000 1 34 2.471 1010101000 2 35 2.473 1010100100 3 36 2.475 1010110100 3 37 2.478 1010100010 1 3-20 ©2000 GRE America, Inc. All rights reserved. This material is the property of GRE America, Inc. Copying or reproducing this material is strictly prohibited. All violators shall be prosecuted to the fullest extent of the law. 5/2000 GINA 6000N, 6000NV, 8000N, & 8000NV GINA User’s Manual Set ID The ID number can be any number in the range 1 to 99. Each GINA must have a unique ID number. The ID is the number loaded into GINA internal memory as the station ID. The ID is inserted automatically into the address field of all packets transmitted. A screen display follows: CAUTION: Two or more stations cannot use the same ID number if they are transmitting and receiving on the same channel at the same time. Set Permanent Link The permanent link feature may be enabled (default) or disabled When the permanent link is disabled, the transceiver can connect to and disconnect from other units. If the permanent link is enabled after a connection is established, the GINA control module will not allow a disconnect until a permanent link disabled command is entered. You may set the permanent link to enabled only after a connection with another GINA has been made. A screen display follows: 3-21 ©2000 GRE America, Inc. All rights reserved. This material is the property of GRE America, Inc. Copying or reproducing this material is strictly prohibited. All violators shall be prosecuted to the fullest extent of the law. 5/2000 GINA 6000N, 6000NV, 8000N, & 8000NV GINA User’s Manual Set Collision Wait Time The collision wait time is entered as a number in the range 0 to 255, where 1=10 milliseconds (default = 1). A collision wait period forces the GINA control module to pause after the last transmission for the time specified in the argument. GRE America strongly recommends that you use the default value. If you experience garbled data, try increasing the collision wait time in multiples of ten until the problem is solved. CAUTION: All GINAs in the same network must use the same collision wait time. Do not change this parameter unless you are experienced in networking and packet timing. If N is set at 255, GINA picks a random time interval from 10 to 680 msec to pause after each retry. If N is set between 1 and 254, the selected interval is fixed after each retry. A screen display follows: 3-22 ©2000 GRE America, Inc. All rights reserved. This material is the property of GRE America, Inc. Copying or reproducing this material is strictly prohibited. All violators shall be prosecuted to the fullest extent of the law. 5/2000 GINA 6000N, 6000NV, 8000N, & 8000NV GINA User’s Manual Set Transmit Delay The transmit delay time is entered as a number in the range 0 to 512 and is the time the control module waits before sending packet frame data after asserting RTS on the RS-232 interface. In this instance, 1=5 milliseconds (default = 50). The minimum setting to be used should be 3 (= 15 milliseconds). GRE America recommends that you use the default value. A screen display is shown below: CAUTION: Do not change this parameter unless you are experienced in networking and packet timing. 3-23 ©2000 GRE America, Inc. All rights reserved. This material is the property of GRE America, Inc. Copying or reproducing this material is strictly prohibited. All violators shall be prosecuted to the fullest extent of the law. 5/2000 GINA 6000N, 6000NV, 8000N, & 8000NV GINA User’s Manual Set Error Checking As shown below, error checking can be enabled (default) or disabled. If error checking is disabled, the software displays packets received that contain cyclic redundancy check (CRC) errors. These packets are accepted for display if they total a number that is a multiple of eight bits up to 330 bytes. Error checking is normally enabled. This ensures that all packet data is error free. Error checking is normally used by maintenance personnel to troubleshoot a network, although this is of limited value, since ‘packets’ are displayed periodically, and there is no way to distinguish between actual data and random noise. 3-24 ©2000 GRE America, Inc. All rights reserved. This material is the property of GRE America, Inc. Copying or reproducing this material is strictly prohibited. All violators shall be prosecuted to the fullest extent of the law. 5/2000 GINA 6000N, 6000NV, 8000N, & 8000NV GINA User’s Manual Set Packet Size The packet size is entered as a number in the range 5 to 1024. The default is 256. The packet size specifies the maximum number of user data bytes contained in each packet information field. User data are characters typed at the keyboard or sent from an ASCII file. The GINA control module sends a packet when the number of characters sent from the keyboard or file reaches the number set by packet size of user data bytes contained in each packet information field. A screen display is shown below: 3-25 ©2000 GRE America, Inc. All rights reserved. This material is the property of GRE America, Inc. Copying or reproducing this material is strictly prohibited. All violators shall be prosecuted to the fullest extent of the law. 5/2000 GINA 6000N, 6000NV, 8000N, & 8000NV GINA User’s Manual Set Packet Retry Maximum The packet retry maximum amount is entered as a number in the range 3 to 255. The default is 18. This number specifies the maximum number of times to retransmit a data packet. Data packets are retransmitted the number of times selected before the link is disconnected. If you are located in an area of marginal reception or if you are experiencing an unusual number of disconnects, try increasing the value of packet retry amount. If a disconnect occurs, the following message displays (except in transparent mode): DISCON IS COMPLETED A screen display is shown below: 3-26 ©2000 GRE America, Inc. All rights reserved. This material is the property of GRE America, Inc. Copying or reproducing this material is strictly prohibited. All violators shall be prosecuted to the fullest extent of the law. 5/2000 GINA 6000N, 6000NV, 8000N, & 8000NV GINA User’s Manual Set Packet Wait Time The packet wait time is selected as EVERY or AFTER and a number in the range 5 to 250, where 1=10 milliseconds (default = AFTER, 5). When EVERY is selected, characters are packetized and sequenced for transmission N X 10 msec. When AFTER is selected, characters are packetized and sequenced for transmission when input from the terminal stops for N X 10 msec. CAUTION: Do not change this parameter unless you are experienced in networking and packet timing. A screen display is shown below: 3-27 ©2000 GRE America, Inc. All rights reserved. This material is the property of GRE America, Inc. Copying or reproducing this material is strictly prohibited. All violators shall be prosecuted to the fullest extent of the law. 5/2000 GINA 6000N, 6000NV, 8000N, & 8000NV GINA User’s Manual Config Control Characters Menu The GTALK software uses special control characters (sometimes referred to as ‘hot’ keys) to control four functions: • • • • The send packet character <CTRL> + <M> Enter command mode <CTRL> + <C> Enter converse mode <CTRL> + <V> Enter transparent mode <CTRL> + <T>. Since many computer applications use hot keys, GTALK allows you to change the character in the event of a conflict with other applications. If there isn’t a conflict with other software, do not change the control characters. NOTE: You must type the ASCII decimal code for the character you want to use. For example, the default character for the send packet character is decimal 13 or <Ctrl-M>. Refer to the table of ASCII equivalents in Appendix D for a list of characters. Set Send Packet Character This menu allows you to change the send packet character. A screen display is shown below: 3-28 ©2000 GRE America, Inc. All rights reserved. This material is the property of GRE America, Inc. Copying or reproducing this material is strictly prohibited. All violators shall be prosecuted to the fullest extent of the law. 5/2000 GINA 6000N, 6000NV, 8000N, & 8000NV GINA User’s Manual Set Command Mode Character This menu allows you to change the command mode character. A screen display is shown below: Set Converse Mode Character This menu allows you to change the converse mode character. A screen display is shown below: 3-29 ©2000 GRE America, Inc. All rights reserved. This material is the property of GRE America, Inc. Copying or reproducing this material is strictly prohibited. All violators shall be prosecuted to the fullest extent of the law. 5/2000 GINA 6000N, 6000NV, 8000N, & 8000NV GINA User’s Manual Set Transparent Mode Character This menu allows you to change the transparent mode character. A screen display is shown below: Config Miscellaneous Menu This menu allows access to four different functions: 1. Set Bell Stamp With Connect Message. If the bell stamp is enabled (default), three bells are sent with the “Connected to (ID)” message to remote users to notify them that your transceiver has made a connection to theirs. A screen display is shown below: 3-30 ©2000 GRE America, Inc. All rights reserved. This material is the property of GRE America, Inc. Copying or reproducing this material is strictly prohibited. All violators shall be prosecuted to the fullest extent of the law. 5/2000 GINA 6000N, 6000NV, 8000N, & 8000NV GINA User’s Manual 2. Set Time Stamp With Connect Message. If the time stamp is enabled (default), the current time is sent with the “Connected to (ID)” message to remote users to notify them that your transceiver has made a connection to theirs. A screen display is shown below: 3. Set Date Stamp With Connect Message. If the date stamp is enabled (default), the current date is sent with the “Connected to (ID)” message to remote users to notify them that your transceiver has made a connection to theirs. A screen display is shown below: 3-31 ©2000 GRE America, Inc. All rights reserved. This material is the property of GRE America, Inc. Copying or reproducing this material is strictly prohibited. All violators shall be prosecuted to the fullest extent of the law. 5/2000 GINA 6000N, 6000NV, 8000N, & 8000NV GINA User’s Manual 4. Set Current Time and Date. This command sets the GINA internal clock chip in the control module of the transceiver. If your computer has an internal clock and an AUTOEXEC.BAT file, GTALK automatically uses that system date and time. If your machine does not have an internal clock, you may set the time and date with this command. A screen display is shown below: Config Display Configuration Menu If you select this menu item, the current configuration displays. The display shown below shows the default configuration, with channel 11 and ID=1 selected: 3-32 ©2000 GRE America, Inc. All rights reserved. This material is the property of GRE America, Inc. Copying or reproducing this material is strictly prohibited. All violators shall be prosecuted to the fullest extent of the law. 5/2000 GINA 6000N, 6000NV, 8000N, & 8000NV GINA User’s Manual Config Reset All Configurations Menu If you select this menu item, the configuration of your system resets to the default configurations described herein. CAUTION: If you reset all configurations, you must reenter the GINA channel and ID numbers. Link Menu Transfer Menu Print Menu NOTE: Use this command only to send a file to a GINA dedicated print server. To print a file on your local printer, use the DOS PRINT command. If you select this menu item, the screen shown below displays: 3-33 ©2000 GRE America, Inc. All rights reserved. This material is the property of GRE America, Inc. Copying or reproducing this material is strictly prohibited. All violators shall be prosecuted to the fullest extent of the law. 5/2000 GINA 6000N, 6000NV, 8000N, & 8000NV GINA User’s Manual If you have set up a GINA transceiver as a dedicated print server in your network, enter the ID number of the print server and any repeater ID numbers, then press <ENTER>. Voice Operation (Models 6000NV & 8000NV Only) NOTE: GINA only operates with the handset supplied with the unit. Do not attempt to use a standard telephone handset. On Models 6000NV and 8000NV, GINA is provided with a PTT (press-to-talk), release-to-listen handset that connects to the RJ-22 jack on the front panel. It allows a remote user to communicate with the main station. Tonal quality is adequate for communication but not telephone ‘toll grade.’ Some distortion may be noted, depending on operating environment. Using the handset is quite uncomplicated, but since GINA operates in half-duplex mode (only one person may speak at a time, as opposed to a standard telephone, which is full duplex, allowing both stations to speak simultaneously), we recommend military protocol: To speak, press the PTT switch. When you are finished speaking and expect a reply, say “over,” and release the PTT button. When you are finished speaking and do not expect a reply, say “out.” 3-34 ©2000 GRE America, Inc. All rights reserved. This material is the property of GRE America, Inc. Copying or reproducing this material is strictly prohibited. All violators shall be prosecuted to the fullest extent of the law. 5/2000 GINA 6000N, 6000NV, 8000N, & 8000NV GINA User’s Manual Command Set This section contains the GINA controller command set, definitions, and instructions for use. GINA must be in the command mode for these commands to have any effect. (1) ALTERNATE ID. For future use. (2) BELL STAMP Mnemonic: BSTAMP=V Parameter: V=0(OFF) or 1(ON) Command abbreviation: B Default: 1 (ON) Example: BSTAMP=1<Enter> or B=1<Enter> Description: Sends three bells with the “Connected to (ID)” message to users to notify them that GINA has established a connection. Set BSTAMP=0 to suppress the three bells. (3) CHANNEL SELECT Mnemonic: CHSEL=N Parameter: N=1 ... 21 Command abbreviation: CH or CS Default 11 Example: CHSEL=11<Enter>or CS=11<Enter> Description: Selects the RF channel (frequency) that the GINA transmits and receives. When communicating with another GINA, both units must be set to the same channel. Depending on the time of day and local atmospheric conditions, the channel number selected can affect the range of the unit. If you are experiencing marginal reception conditions, try changing the channel until maximum performance is reached. Channel 11 usually produces satisfactory results. CAUTION: Changing the channel number while transmitting or receiving causes a loss of communication. Both GINAs must be set to the same channel to establish a connection. 3-35 ©2000 GRE America, Inc. All rights reserved. This material is the property of GRE America, Inc. Copying or reproducing this material is strictly prohibited. All violators shall be prosecuted to the fullest extent of the law. 5/2000 GINA 6000N, 6000NV, 8000N, & 8000NV GINA User’s Manual (4) COM PORT BAUD RATE Mnemonic: COMBAUD=R,P,S,W Parameter: R=12 (1200), 24 (2400), 48 (4800), 96(9600), 192 (192,000) and 384 (38,400) P= 0 (none), 1 (odd) and 2 (even) S= 1 (1 stop bit) and 2 (2 stop bit). W= 7 (7 bit) and 8 (8 bit) Command abbreviation: CB Default: 96 (9600 baud), 0 (none), 1 (1 stop bit), 8 (8 bit) Example: COMBAUD=96,0,1,8 <Enter> or CB=96,0,1,8 <Enter> Description: COMBAUD sets the asynchronous link baud rate. COMBAUD is not related to the RF baud rate set by RFBAUD. The COMBAUD rate is the speed that your peripheral communicates with GINA through the RS-232 serial interface (5) COMMAND MODE CHARACTER Mnemonic: COMCHR=N Parameter N=0 ... 127 Command abbreviation: CC Default: N=3 <Ctrl-C> Example: COMCHR=3<Enter> or CC=3<Enter> Description: COMCHR changes the command mode entry character that activates the GINA command mode. GRE America recommends that you use the default value. The command character instructs GINA to enter the command mode from the converse (menu) mode. The command mode is the mode where GINA can be configured to change any of the 31 commands. NOTE: You must type the ASCII decimal code for the character you want to use. For example, the default character is decimal 3 or <Ctrl-C>. Refer to the list of ASCII equivalents in Appendix D. (6) CONMODE Mnemonic: Parameter: CONMODE=V V=0 (converse mode) V=1 (transparent mode) V=2 (permanent mode) Command abbreviation: CONM Default: V=1 (transparent mode) Example: CONMODE=1 <Enter> or CONM=1 <Enter> Description: The CONMODE command selects the mode that GINA enters after a connection is established. The connection can result either from a connect request received from a distant station or a connection initiated by entering a CONNECT command. 3-36 ©2000 GRE America, Inc. All rights reserved. This material is the property of GRE America, Inc. Copying or reproducing this material is strictly prohibited. All violators shall be prosecuted to the fullest extent of the law. 5/2000 GINA 6000N, 6000NV, 8000N, & 8000NV GINA User’s Manual • Set CONMODE=0: GINA automatically enters the CONVERSE mode when a connection is established. • Set CONMODE=1: Automatically enters the TRANSPARENT mode. • Set CONMODE=2: Automatically enters into the PERMANENT mode. The only way to get out of the permanent mode is to power down GINA. This will disconnect the link and enter the COMMAND mode. NOTE: GRE America’s GTALK software overrides CONMODE settings 1 and 2. The GTALK software automatically places GINA into the CONVERSE mode. (7) CONNECT Mnemonic: CONNECT = Dest, [Rep1],[Rep2], [Rep3] Parameter: Dest = 1 ... 119 Rep1 = 1 ... 99 Rep2 = 1 ... 99 Rep3 = 1 ... 99 Command abbreviation: C Default: No default set Example: CONNECT=2 <Enter> or C=2 <Enter> NOTE: Repeater numbers are optional but, when specified, the repeater ID’s must be entered in the exact order that they will relay the transmitted signals. For example, the command: C=2,6,7,8 <Enter> connects the transmitting location to GINA ID No. 2 via repeaters 6, 7, and 8, in that order. Description: CONNECT sends a request to a destination station directly or via one or more repeaters. When a connection is made the following message displays on the screen: Link stat is:CONNECT TO ID n If the distant station does not acknowledge the connect request, the following message displays on the screen: CONNECT IS FAILED - UNABLE TO CONNECT REMOTE STATION * ID 1-99 is for Point-to-point communication. * ID 100-119 is for point-to-multipoint communication 3-37 ©2000 GRE America, Inc. All rights reserved. This material is the property of GRE America, Inc. Copying or reproducing this material is strictly prohibited. All violators shall be prosecuted to the fullest extent of the law. 5/2000 GINA 6000N, 6000NV, 8000N, & 8000NV GINA User’s Manual NOTE: The caller, repeaters, and destination GINAs must all be set to the same channel. Each GINA communicating on the same channel must have a unique ID number. All remotes must be able to communicate with the last repeater designated. (8) CONVERSE MODE CHARACTER Mnemonic: CONVCHR=N Parameter: N = 0 ... 127 Command abbreviation: CVC Default: N = 22 Example: CONVCHR =22 <Enter> or CVC= 22 <Enter> Description: CONVCHR is the only character that forces GINA out of the transparent mode into the converse mode. The CONVCHR character must be entered three consecutive times. The sequence should entered as follows: <Ctrl-V> delay <Ctrl-V> delay <Ctrl-V> GRE America recommends that you use the default value. Type the character to type the converse mode from the transparent mode. NOTE: You must type the ASCII decimal code for the character you want to use. For example, the default character is decimal 22 or <Ctrl-V>. Refer to the table of ASCII equivalents in Appendix D for a list of characters. (9) DATE STAMP Mnemonic: DSTAMP=N Parameter: N = 0 (OFF) or 1 (ON) Command abbreviation: DS Default: 1 (ON) Example: DSTAMP=1 <Enter> or DS=1 <Enter> Description: Sends current date with the “Connected to (ID)” message to users to notify them that GINA has made a connection. Set DSTAMP=0 if you want to suppress the date. 3-38 ©2000 GRE America, Inc. All rights reserved. This material is the property of GRE America, Inc. Copying or reproducing this material is strictly prohibited. All violators shall be prosecuted to the fullest extent of the law. 5/2000 GINA 6000N, 6000NV, 8000N, & 8000NV GINA User’s Manual (10) DEFAULT WAIT OR COLLISION WAIT TIME Mnemonic: DEFWAIT=N Parameter: N = 1 ... 255 X 10 msec (time scale) Command abbreviation: DW Default: N=1 (10 msec) Example: DEFWAIT=1 <Enter> or DW=1 <Enter> Description: DEFWAIT forces the GINA control module to pause for the time specified in the argument if a collision occurs or the GINA sees that the channel is occupied before transmitting. GRE America strongly recommends that you use a different value for each unit. If you experience an excess amount of retries, try increasing the DEFWAIT time in until the problem is solved. If N is set at 255, GINA picks a random time interval from 10 to 680 msec to pause after each collision retry. If N is set between 1 and 254, the selected interval is fixed after each collision retry. (11) DISCONNECT Mnemonic: DISCON Parameter: None Command abbreviation: DC Default: Not applicable Example: DISCON <Enter> or DC <Enter> Description: DISCON initiates a disconnect request to the station to which you are connected. New connections cannot be made until the disconnect is complete. If the disconnect is successful, the following message displays: ***DISCON is COMPLETED If the retry count is exceeded while waiting for the distant station to acknowledge the disconnect command, GINA disconnects and the following message displays: ***CONNECT IS FAILED - UNABLE TO CONNECT REMOTE STATION 3-39 ©2000 GRE America, Inc. All rights reserved. This material is the property of GRE America, Inc. Copying or reproducing this material is strictly prohibited. All violators shall be prosecuted to the fullest extent of the law. 5/2000 GINA 6000N, 6000NV, 8000N, & 8000NV GINA User’s Manual (12) DISPLAY Mnemonic: DISP=N Parameter: Where: (A)sync = Display asynchronous port parameters (C)har = Display special characters (D)aytime = Display date/time stored in GINA (I)d = Display ID parameters (L)ink = Display link parameters (M)isc = Display miscellaneous parameters (T)iming = Display timing parameters (Z) = Display command list Command abbreviation: D Default: Not applicable Example: DISP Z <Enter> or D Z <Enter> Description: DISPLAY lists the current parameter settings. (A)sync (C)har (D)ate (I)d (L)ink (M)isc (T)iming (Z) COMBAUD, ECHO, TRANSFLOW, TXFLOW, XFLOW COMCHR, SENDCHR, TRANSCHR SETTD ID, ALTID ERRCK, PERMLINK, PACSIZE, RFBAUD NUMCONS, CHSEL, DSTAMP, MSTAMP, TSTAMP, BSTAMP DEFWAIT, PACWAIT, PACRETRY, TXDELAY List Control Command Set (CCS) (13) ECHO Mnemonic: ECHO = N Parameter: N = 0 (OFF) or 1 (ON) Command abbreviation: E Default: 0 (OFF) Example: ECHO=0 <Enter> or E=0 <Enter> Description: When ECHO is ON, characters received from the sending unit are echoed on the peripheral display. When ECHO is OFF, characters are not displayed. Echoing is disabled when in the transparent mode. 3-40 ©2000 GRE America, Inc. All rights reserved. This material is the property of GRE America, Inc. Copying or reproducing this material is strictly prohibited. All violators shall be prosecuted to the fullest extent of the law. 5/2000 GINA 6000N, 6000NV, 8000N, & 8000NV GINA User’s Manual (14) ERROR CHECKING Mnemonic: ERRCHK = V Parameter: V = 0 (OFF) or 1 (ON) Command abbreviation: EC Default: 1 (ON) Example: ERRCHK=1 <Enter> or EC=1 <Enter> Description: When ERRCHK is OFF, the software displays packets received that contain cyclic redundancy check (CRC) errors. These packets are accepted for display if they total a number that is a multiple of eight bits up to 330 bytes. ERRCHK is normally ON. This assures that all packet data is error free. ERRCHK is normally used by maintenance personnel to troubleshoot a network, although this is of some limited value, since ‘packets’ are displayed periodically and there is no way to distinguish between actual data and random noise. (15) HARDWARE FLOW Mnemonic: HARDWARE FLOW = N Parameter: N = 0 (OFF) or 1 (ON) Command abbreviation: HF Default: 0 (OFF) Example: HARDWARE FLOW =1<Enter> or HF=1 <Enter> Description: When HARDWARE FLOW is ON, CTS and RTS are enabled. When HARDWARE FLOW is OFF, CTS and RTS are disabled. NOTE: If your peripheral requires a three-wire configuration (TXD, RXD, and GND) HARDWARE FLOW should be set to OFF. (16) ID Mnemonic: ID = N Parameter: N = 1 ... 119 Command abbreviation: I Default: None Example: ID=1 <Enter> or I=1 <Enter> Description: ID is the number loaded into GINA internal memory as the station ID. The ID is inserted automatically into the address field of all packets transmitted. ID’s 1 through 99 are used for point-to-point communication. ID’s 100 through 119 are used for point-to-multipoint communication. CAUTION: Two or more stations cannot use the same ID number if they are transmitting and receiving on the same channel at the same time. 3-41 ©2000 GRE America, Inc. All rights reserved. This material is the property of GRE America, Inc. Copying or reproducing this material is strictly prohibited. All violators shall be prosecuted to the fullest extent of the law. 5/2000 GINA 6000N, 6000NV, 8000N, & 8000NV GINA User’s Manual (17) MESSAGE STAMP Mnemonic: Parameter: MESSAGE STAMP = N N = 0 (OFF) or 1 (ON) or 2 (GTALK Mode) Command abbreviation: MS Default: 1 (Enable) Example: MESSAGE STAMP =1<Enter> or MS=1 <Enter> Description: When MESSAGE STAMP is OFF (0), all stamp functions (date stamp, time stamp, bell stamp, ‘connect to,’ and ‘disconnect’ messages) are disabled. When MESSAGE STAMP is ON (1), all stamp functions are displayed (if activated) except for special GTALK control characters. When MESSAGE STAMP is in GTALK mode (2), all stamp functions are displayed (if activated) including special GTALK control characters. NOTE: MESSAGE STAMP 2 should only be used with the GTALK communication software. Set MESSAGE STAMP to 1 if you are not using GTALK. (18) PACKET RETRY Mnemonic: PACRETRY Parameter: N = 3 ... 255 Command abbreviation: PR Default: 10 Example: PACRETRY =10 <Enter> or PR=10 <Enter> Description: PACRETRY specifies the maximum number of times to retransmit a data packet. Data packets are retransmitted N times before the link is disconnected. If you are located in an area of marginal reception or if you are experiencing an unusual number of disconnects, try increasing the value of PACRETRY. If a disconnect occurs, the following message displays (except in transparent mode): DISCON IS COMPLETED (time out) 3-42 ©2000 GRE America, Inc. All rights reserved. This material is the property of GRE America, Inc. Copying or reproducing this material is strictly prohibited. All violators shall be prosecuted to the fullest extent of the law. 5/2000 GINA 6000N, 6000NV, 8000N, & 8000NV GINA User’s Manual (19) PACKET SIZE Mnemonic: PACSIZE Parameter: N = 5 ... 1024 Command abbreviation: PS Default: 256 Example: PACSIZE =256<Enter> or PS=256 <Enter> Description: PACSIZE specifies the maximum number of user data bytes contained in each packet information field. User data are characters typed at the keyboard or sent from an ASCII file. The GINA control module sends a packet when the number of characters sent from the keyboard or file reaches the number set by PACSIZE of user data bytes contained in each packet information field. The packet size is used in both the converse and transparent modes. (20) PACKET WAIT CAUTION: Do not change this parameter unless you are experienced in networking and packet timing. Mnemonic: Parameter: PACWAIT = V, N V = 0 (EVERY) or 1 (AFTER) N = 2 ... 250 X 2 msec (time scale) Command abbreviation: PW Default: 1, 5 (AFTER, 10 msec) Example: PACWAIT =1,10 <Enter> or PW=1,10 <Enter> Description: When V is set = 0 (EVERY), characters are packetized and sequenced for transmission N X 10 msec. When V is set = 1 (AFTER), characters are packetized and sequenced for transmission when input from the terminal stops for N X 10 msec. (21) PERMANENT CONNECT Mnemonic: PERMCONN = N Parameter: N = 0 (OFF) or 1 (ON) Command abbreviation: PC Default: 0 (OFF) Example: PERMCONN = 0<Enter> or PC= 0 <Enter> Description: When PERMCONNECT is OFF, GINA disconnects if the DC power is turned OFF. If PERMCONNECT is ON, GINA reconnects after the DC power is turned on.. NOTE: If operating in a point-to-multipoint and permanent connect and permanent link are both ON, the only way to disconnect and return to the command mode is to turn the power off three times. 3-43 ©2000 GRE America, Inc. All rights reserved. This material is the property of GRE America, Inc. Copying or reproducing this material is strictly prohibited. All violators shall be prosecuted to the fullest extent of the law. 5/2000 GINA 6000N, 6000NV, 8000N, & 8000NV GINA User’s Manual (22) PERMANENT LINK Mnemonic: PERMLINK = N Parameter: N = 0 (OFF) or 1 (ON) Command abbreviation: PL Default: 0 (OFF) Example: PERMLINK = 0<Enter> or PL= 0 <Enter> Description: When PERMLINK is OFF, GINA can connect to and disconnect from other units after the PACKET RETRY is exceeded. If PERMLINK is set to ON after a connection is established, the GINA control module will not allow a disconnect. GINA remains connected and continues to retry until the destination responds or until GINA is turned off. PERMLINK ON is active only after a connection with another GINA has been made. NOTE: If operating in a point-to-multipoint and permanent connect and Permanent Link are both ON. The only way to disconnect and return to the command mode is by turning the power off three times. (23) RESET Mnemonic: RESET Command abbreviation: NONE Example: RESET Description: Resets all parameters to factory settings except for COMBAUD, RFBAUD, CHANNEL and ID. (24) RF BAUD RATE CAUTION: The same baud rate must be used by both the sending and receiving units. Mnemonic: Parameter: RFBAUD = N N = 32 (32K), 64 (64K), 128 (128K), or 256* (256K) Command abbreviation: RF Default: 128 (128K) Example: RFBAUD = 128 <Enter> or RF = 128 <Enter> Description: RF BAUD RATE sets the radio transmission baud rate. This is not related to the asynchronous link baud rate. * Not available on current GINA models 3-44 ©2000 GRE America, Inc. All rights reserved. This material is the property of GRE America, Inc. Copying or reproducing this material is strictly prohibited. All violators shall be prosecuted to the fullest extent of the law. 5/2000 GINA 6000N, 6000NV, 8000N, & 8000NV GINA User’s Manual (25) SEND PACKET CHARACTER Mnemonic: SENDPAC = N Parameter: N = 0 ... 127 Command abbreviation: SC Default: 13 (<Ctrl-M> Example: SENDPAC = 13 <Enter> or SC = 13 <Enter> Description: SENDPAC changes the command mode entry character that activates GINA to send the characters that are stored in the buffer. SENDPAC is only used in the converse mode. GRE America recommends that you use the default value. NOTE: You must type the ASCII decimal code for the character you want to use. For example, the default character is decimal 13 or <Ctrl-M>. Refer to the table of ASCII equivalents in Appendix D for a list of characters. (26) SET TIME AND DATE Mnemonic: SETTD = yymmddhhnnss Parameter: yy= last two digits of year mm=two digit month code, 01 - 12 dd=two digit day code, 01 - 31 hh=two digit hour code, 00 - 23 nn=two digit minute code, 00 - 59 ss=two digit second code, 00 - 59 Command abbreviation: STD Default: None set Example: STTD=950102123000<Enter> or STD=950102123000<Enter> Description: Sets the GINA time and date in the control module. (27) TIME STAMP Mnemonic: TSTAMP = N Parameter: N = 0 (OFF) or 1 (ON) Command abbreviation: TS Default: 1 (ON) Example: TSTAMP = 1<Enter> or TS = 1 <Enter> Description: Sends current time with the “Connected to (ID)” message to remote users to notify them that GINA has established a connection. Set TSTAMP=0 if you want to suppress the time. 3-45 ©2000 GRE America, Inc. All rights reserved. This material is the property of GRE America, Inc. Copying or reproducing this material is strictly prohibited. All violators shall be prosecuted to the fullest extent of the law. 5/2000 GINA 6000N, 6000NV, 8000N, & 8000NV GINA User’s Manual (28) TRANSMIT DELAY CAUTION: Do not change this parameter unless you are experienced in networking and packet timing. Mnemonic: TXDELAY = N Parameter: N = 3 ... 255 (X5 msec) Command abbreviation: TXD Default: 5 (25 msec) Example: TXDELAY = 5 <Enter> or TXD = 5 <Enter> Description: TXDELAY sets the GINA delay time (which is the time the control module waits before sending packet frame data). GRE America recommends that you use the default value (29) TRANSMIT FLOW Mnemonic: TXFLOW = N Parameter: N = 0 (OFF) or 1 (ON) Command abbreviation: TXF Default: 0 (OFF) Example: TXFLOW = 0 <Enter> or TXF = 0 <Enter> Description: When TXFLOW is OFF, software flow control is disabled in the transparent mode. Hardware flow control is used so that data sent to the transceiver is transparent. When TXFLOW is ON, software flow control can be activated in the transparent mode. START and STOP characters control input from the DTE. The TRANSFLOW parameter must also be ON for XFLOW=1 to work. NOTE: GRE recommends that you disable TXFLOW if your peripheral does not support this type of ‘handshaking.’ (30) TRANSPARENT CHARACTER Mnemonic: TRANSCHR=N Parameter: N = 0 ...127 Command abbreviation: TC Default: 20 (Ctrl-T) Example: TRANSCHR=20 <Enter> or TC = 20 <Enter> Description: The TRANSPARENT CHARACTER is used to place GINA into the transparent mode from the converse mode. GRE America recommends that you use the default value. NOTE: You must type the ASCII decimal code for the character you want to use. For example, the default character is decimal 20 or <Ctrl-T>. Refer to the table of ASCII equivalents in Appendix D for a list of characters. 3-46 ©2000 GRE America, Inc. All rights reserved. This material is the property of GRE America, Inc. Copying or reproducing this material is strictly prohibited. All violators shall be prosecuted to the fullest extent of the law. 5/2000 GINA 6000N, 6000NV, 8000N, & 8000NV GINA User’s Manual (31) TRANSPARENT FLOW Mnemonic: TRANSFLOW=V Parameter: V = 0 (OFF) or 1 (ON) Command abbreviation: TF Default: 0 (OFF) Example: TRANSFLOW=0 <Enter> or TF = 0 <Enter> Description: When TRANSFLOW is OFF, software flow control is disabled in the transparent mode only. Hardware flow control is available so that data received by GINA is transmitted as data. When TRANSFLOW is ON, software flow control can be activated in the transparent mode. START and STOP characters control input from the DTE. The TXFLOW parameter must also be ON for XFLOW=1 to work. (32) XFLOW Mnemonic: XFLOW=V Parameter: V = 0 (OFF) or 1 (ON) Command abbreviation: XF Default: 1 (ON) Example: XFLOW=0 <Enter> or XF=0 <Enter> Description: When XFLOW is ON, XON/XOFF flow control is activated. When XFLOW is OFF, the transceiver sends hardware flow control commands via the RS-232 RTS (Ready to Send) line. 3-47 ©2000 GRE America, Inc. All rights reserved. This material is the property of GRE America, Inc. Copying or reproducing this material is strictly prohibited. All violators shall be prosecuted to the fullest extent of the law. 5/2000 GINA 6000N, 6000NV, 8000N, & 8000NV GINA User’s Manual 6000N/6000NV SPECIFICATIONS Adjacent Channel Rejection -40dB = 4MHz Baud Rate Asynchronous 1.2 to 38.4 Kbps Duplex TDD - RS-232 (DB9F) Channels 21 Programmable Control CTS, RTS Data Format 7 and 8 bits, (none, even, and odd) parity, 1 or 2 stop Dimensions (1.52”H) x (4.17”W) x (5.0”D) (38.6mm) x (105.9mm) x (127mm) Dynamic Range -100 dBm ~ -30 dBm Frequency Range 905-928 MHz Indicators PWR, TxD, RxD Modulation Bi-Phase Shift Keying (BPSK) PN 7 Stage (127 Chip) PN Rate 2 Mhz Operating Mode Point-to-Point Operating Temperature -20 to +60 Degrees C Extended Temperature Option -34 to +74 Degrees C PN Codes 4 PN Codes Sequence varies within each channel Power Consumption 10 Watt Maximum Power Requirements 10.5 to 13.8 VDC Radio Technique Spread Spectrum Direct Sequence Range Nominal 800+ feet Range Indoor 500 to 1500+ feet Range Outdoor 12+ Miles - Direct Line-of-Site FCC Compliant Relative Humidity 0-90% Non-Condensing System Gain 120 dB Transmission Delay 30 mSec Voice Option Interface RJ22 3-48 ©2000 GRE America, Inc. All rights reserved. This material is the property of GRE America, Inc. Copying or reproducing this material is strictly prohibited. All violators shall be prosecuted to the fullest extent of the law. 5/2000 GINA 6000N, 6000NV, 8000N, & 8000NV GINA User’s Manual 6000N/6000NV SPECIFICATIONS Weight 16 oz. TRANSMITTER Carrier Frequency Stability 15KHz Power Consumption 800mA @ 12 VDC Spurious Output FCC Part 15, meets 15.245 & 15.247 Output Power 725 mW (28.6 dBm) RECEIVER Bit Error Rate 10 -6 @ -92 dBm Local Oscillator Stability 15 KHz Sensitivity Threshold -100 dBm Stand-by Power 400mA @ 12 VDC Signal Acquisition Time 8 mSec Spurious Rejection -50 dBm CONTROLLER Buffer 20K Bytes Collision CSMA / CDMA CPU 80C188 Error Control HDLC Flow Control X ON / X OFF and / or CTS / RTS Packet Size 5 to 1024 Bytes Packetizing Time 18mS/1 byte, 96 mS/1024 Bytes @ 9600 bps Repeater Selectable 3-49 ©2000 GRE America, Inc. All rights reserved. This material is the property of GRE America, Inc. Copying or reproducing this material is strictly prohibited. All violators shall be prosecuted to the fullest extent of the law. 5/2000 GINA 6000N, 6000NV, 8000N, & 8000NV GINA User’s Manual 8000N/8000NV SPECIFICATIONS Adjacent Channel Rejection -40dB = 4MHz Baud Rate Asynchronous 1.2 to 38.4 Kbps Duplex TDD - RS-232 (DB9F) Channels 37 Programmable Control CTS, RTS Data Format 7 and 8 bits, (none, even, and odd) parity, 1 or 2 stop Dimensions (1.52”H) x (4.17”W) x (5.0”D) (38.6mm) x (105.9mm) x (127mm) Dynamic Range -100 dBm ~ -30 dBm Frequency Range 2.404 to 2.478 GHz Indicators PWR, TxD, RxD Modulation Bi-Phase Shift Keying (BPSK) PN 7 Stage (127 Chip) PN Rate 2 Mhz Operating Mode Point-to-Point Operating Temperature -20 to +60 Degrees C Extended Temperature Option -34 to +74 Degrees C PN Codes 4 PN Codes Sequence varies within each channel Power Consumption 10 Watt Maximum Power Requirements 10.5 to 13.8 VDC Radio Technique Spread Spectrum Direct Sequence Range Nominal 800+ feet Range Indoor 500 to 1500+ feet Range Outdoor 12+ Miles - Direct Line-of-Site FCC Compliant Relative Humidity 0-90% Non-Condensing System Gain 119 dB Transmission Delay 30 mSec Voice Option Interface RJ22 3-50 ©2000 GRE America, Inc. All rights reserved. This material is the property of GRE America, Inc. Copying or reproducing this material is strictly prohibited. All violators shall be prosecuted to the fullest extent of the law. 5/2000 GINA 6000N, 6000NV, 8000N, & 8000NV GINA User’s Manual 8000N/8000NV SPECIFICATIONS Weight 16 oz. TRANSMITTER Carrier Frequency Stability 25 KHz Power Consumption 800 mA @ 12 VDC Spurious Output FCC Part 15, meets 15.245 & 15.247 Output Power 500 mW (27 dBm) Optional Output Power 100 mW RECEIVER Bit Error Rate 10-6 @ -90 dBm Local Oscillator Stability 25 KHz Sensitivity Threshold -100 dBm Stand-by Power 450mA @ 12 VDC Signal Acquisition Time 8 mSec Spurious Rejection -50 dBm CONTROLLER Buffer 20K Bytes Collision CSMA / CDMA CPU 80C188 Error Control HDLC Flow Control X ON / X OFF and /or CTS / RTS Packet Size 5 to 1024 Bytes Packetizing Time 18mS/1 byte, 96 mS/1024 Bytes @ 9600 bps Repeater Selectable 3-51 ©2000 GRE America, Inc. All rights reserved. This material is the property of GRE America, Inc. Copying or reproducing this material is strictly prohibited. All violators shall be prosecuted to the fullest extent of the law. 5/2000 GINA 6000N, 6000NV, 8000N, & 8000NV GINA User’s Manual This page intentionally blank. 3-52 ©2000 GRE America, Inc. All rights reserved. This material is the property of GRE America, Inc. Copying or reproducing this material is strictly prohibited. All violators shall be prosecuted to the fullest extent of the law. 5/2000 Troubleshooting GINA User’s Manual Troubleshooting Introduction This section contains user information about troubleshooting your GINA system. It also contains information about GRE’s limited warranty, software agreement, disclaimer, customer support policies, some common problems and how to solve them, and a description of the GINA self tests and diagnostics. Limited Warranty General GRE America, Inc. warrants all parts of each new product to be of sound design, good material and workmanship, and will repair or exchange any parts proven to be defective under normal use at no charge for a period of 12 months from the date of sale to the end user. Defects will be corrected by GRE America. There will be no charge for labor for a period of 12 months from the date of original sale, except as provided below. Overtime premiums and/or expedited handling and shipping costs must be paid by the owner. Warranty Limitations This warranty does not apply to equipment or parts that have been subject to accident, abuse, incorrect service, alterations, service by non-authorized service personnel, misuse, or on units upon which the warranty seal has been removed, altered, or mutilated. A copy of the warranty certificate or purchase receipt must be supplied to GRE America when requesting service. Equipment must be sent to GRE America at the owner’s expense and will be returned via surface carrier at no cost to the owner. This warranty is strictly limited to the terms indicated herein, and no other warranties or remedies thereunder, express or implied, shall be binding on GRE America. 4-1 ©2000 GRE America, Inc. All rights reserved. This material is the property of GRE America, Inc. Copying or reproducing this material is strictly prohibited. All violators shall be prosecuted to the fullest extent of the law. 5/2000 Troubleshooting GINA User’s Manual Software Agreement General The enclosed GTALK computer program is licensed to you for use only under the terms of this license, and GRE America reserves any rights not expressly granted to you. You own the disk upon which the GTALK software is recorded but GRE America retains ownership of the software itself. Restrictions You may not distribute copies of the GTALK software to others or electronically transfer the software from one computer from another via a network. The GTALK software contains trade secrets and, in order to protect them, you may not decompile, reverse engineer, disassemble, or otherwise reduce the GTALK software to any human-perceivable form. YOU MAY NOT MODIFY, TRANSLATE, ADAPT, LEASE, RENT, LOAN, RESELL FOR PROFIT, DISTRIBUTE, OR CREATE DERIVATIVE WORKS BASED UPON THE GTALK SOFTWARE OR ANY PART THEREOF. Disclaimer GRE America, Inc. is not liable to the user for any damages including loss of profits, savings, or other incidental or consequential damages arising out of the user’s inability to use this program, even if advised of the possibility of such damages. GRE America makes no representation or warranties with regard to the content of the GTALK software program or manual and specifically disclaims any implied warranties of merchantability or adaptability for any particular purpose. GRE America reserves the right to change or revise any portion of the GTALK software and manual without obligation to notify any persons or parties of such revisions or changes. 4-2 ©2000 GRE America, Inc. All rights reserved. This material is the property of GRE America, Inc. Copying or reproducing this material is strictly prohibited. All violators shall be prosecuted to the fullest extent of the law. 5/2000 Troubleshooting GINA User’s Manual Common Problems and Remedies General Questions Q. I have problems transferring files. How can I fix this? A. Check the following: 1. The packet size may be too small. Set packet size to the size of your protocol block. 2. Make sure that hardware flow (HF) is enabled. Q. When I transfer files with GINA, data is garbled. What causes this? A. This is usually caused by electrical or rf ‘noise’ interfering with data. Make sure you are using a shielded RS-232 cable. Try relocating GINA so that the antenna is located as far away from your computer video display as possible. If GINA is located in an especially noisy area (for instance, close to large electrical machinery), consider using an external antenna. Refer to Appendix B for details. Q. When I power up GINA 6000N, no CMD> prompt displays. What is wrong? A. The RS-232 interface between GINA and your peripheral is probably incorrect. Check Appendix A to verify the configuration. Q. My GINA will not transmit. What is the problem? A. If the TX LED on the front panel does not light, check the RS-232 cable. If your peripheral is not a DTE device, you must switch pins 2 and 3. (You may use a null cable.) Refer to Appendix A for RS-232 information. Q. My GINA is not receiving data. What is wrong? A. This problem is indicated by the RD LED not blinking. This condition may be caused by one of two conditions: 1. The GINA’s are set on different channels. They must be the same. 2. The GINA is out of range. Consider using an external antenna. Refer to Appendix B for antenna information. 4-3 ©2000 GRE America, Inc. All rights reserved. This material is the property of GRE America, Inc. Copying or reproducing this material is strictly prohibited. All violators shall be prosecuted to the fullest extent of the law. 5/2000 Troubleshooting GINA User’s Manual Q. My GINA is receiving strange characters. How can I fix this? A. This problem can be caused by the following: 1. An incompatible baud rate. GINA will synchronize on any baud rate between 1200 and 38.4 Kbps. If your peripheral is operating outside of this range, you must change it. 2. Spurts of invalid data indicates that someone else is using the same channel. Change channel (on both the transmitting and receiving GINA’s). 3. If data is being cut off, your peripheral is ignoring the CTS signal. Some GINA’s operate in half duplex mode, so you cannot transmit and receive at the same time. You may only transmit when CTS is active (high). Q. I occasionally receive an extra character on my GINA. What causes this? A. This occasionally occurs when there are fluctuations in power and current in the supply voltage, usually upon start-up. If this is a continuing problem in your area, consider using an isolation transformer. GINA 8000N & 8000NV Q. When I power up GINA, no CMD> prompt displays. What’s wrong? A. The RS-232 interface between GINA and your peripheral is probably incorrect. Refer to Appendix A to verify the configuration. Q. When I type GTALK to start the program, a blank screen displays (no HELP or CONNECT messages are displayed on the screen). What is wrong? A. There are three possible reasons for this condition: 1. GINA is not connected to your computer correctly. 2. GINA is not connected to the power adapter or the POWER switch is not ON. 3. The GTALK baud rate and the GINA baud rate are not the same. This happens if GINA is disconnected or powered down before quitting GTALK, or if you reboot your computer before quitting 4-4 ©2000 GRE America, Inc. All rights reserved. This material is the property of GRE America, Inc. Copying or reproducing this material is strictly prohibited. All violators shall be prosecuted to the fullest extent of the law. 5/2000 Troubleshooting GINA User’s Manual GTALK. Check all connections and try again. See the next question if you get a time-out message. Q. When I try to use GINA, I get a red message on the screen saying “Error: Communications timed out - Press any key to continue.” How do I fix this? A. If you get an error time-out message, proceed as follows: 1. Press <Alt>-C and wait for the error time-out message to appear again. 2. Press <Alt>-C again. The message “Not Connected and F1:Help” displays in the upper right corner of your screen. 3. Wait for the error time-out message to appear again. 4. Press <Alt>-C and the following screen appears: 5. Select set baud rate and the following screen displays: 6. Wait until the error time-out message appears again and press any key to continue. 4-5 ©2000 GRE America, Inc. All rights reserved. This material is the property of GRE America, Inc. Copying or reproducing this material is strictly prohibited. All violators shall be prosecuted to the fullest extent of the law. 5/2000 Troubleshooting GINA User’s Manual 7. Select the baud rate with the speed that you believe GINA was set at previously. 8. If one of the baud rates is highlighted and the error time-out message does not appear, the system will work properly. If the error message does appear, repeat steps 6 and 7 and try a different baud rate. To prevent this from happening again, always quit GTALK before turning off GINA. DO NOT REBOOT your computer while GTALK is running. Q. I get a “CONNECT IS FAILED - UNABLE TO CONNECT REMOTE STATION” message. What causes this? A. You have exceeded the packet retry count. This can be caused by: 1. The GINA’s are set on different channels. 2. The GINA’s are set with different RF baud rates. 3. The destination GINA is already connected to another GINA. The third party cannot break the link until the original link is disconnected. 4. The destination GINA hardware flow (HF) is enabled and there is no RS-232 peripheral connected to it or the device is only a three wire system without RTS and CTS. Disable the hardware flow in the command mode. Q. The “CONNECT TO” message keeps repeating. What do I do? ` The host GINA is not receiving an acknowledgment back from the remote GINA. This may be caused by being on the borderline of the effective range or by a faulty antenna. 4-6 ©2000 GRE America, Inc. All rights reserved. This material is the property of GRE America, Inc. Copying or reproducing this material is strictly prohibited. All violators shall be prosecuted to the fullest extent of the law. 5/2000 Troubleshooting GINA User’s Manual Self - Tests and Diagnostics Firmware within GINA performs diagnostic test routines upon initial application of power. The tests perform the following tasks: • • • • A self test of the CPU chip by execution of a special set of instructions. The program memory (EPROM) is tested by doing a byte checksum of the program code. The data memory (SRAM) is tested by writing, reading, and verifying the memory with varying data test patterns. The serial communications chip (UART) is tested by transmitting and verifying data test patterns. Troubleshooting In the event of a problem with a GINA transceiver, GRE strongly recommends that you contact the customer support department for assistance. If it is determined that the unit is malfunctioning, return it to GRE for repair or replacement. 4-7 ©2000 GRE America, Inc. All rights reserved. This material is the property of GRE America, Inc. Copying or reproducing this material is strictly prohibited. All violators shall be prosecuted to the fullest extent of the law. 5/2000 Appendix A: RS-232 Configuration Data GINA User’s Manual Appendix A: RS-232 Configuration Data DB-9 Connector PIN 1 - Not Used 2 - RX Data 3 - TX Data 4 - Not Used 5 - Ground 5 4 3 2 1 6 -12V DC PWR 7 - RTS 8 - CTS 9 8 7 6 9 - Not Used DB-9 Connector 1 2 3 4 5 6 7 8 9 DB-25 Connector —Not Used— —Not Used— —Not Used— —Not Used— 8 3 2 20 7 6 4 5 22 DCD (Carrier) RTX (Receive Data) TXD (Transmit Data) DTR (Data Terminal Ready) GND (Signal Ground) DSR (Data Set Ready) RTS (Request to Send) CTS (Clear to Send) RI (Ring Indicator) DB-9 to DB-25 SERIAL PORT RS-232 Interface SIGNAL DESIGNATION PIN NUMBER Secondary Transmitted Data 14 DCE Transmitter Signal Element Timing 15 Secondary Received Data 16 Receiver Signal Element Timing 17 18 Secondary Request to Send 19 Data Terminal Ready 20 Signal Quality Detector 21 Ring Indicator 22 Data Signal Rate Selector 23 DTE Transmitter Signal Element Timing 24 25 PIN NUMBER SIGNAL DESIGNATION 1 Protective Ground 2 Transmitted Data 3 Received Data 4 Request to Send 5 Clear to Send 6 Data Set Ready 7 Signal Ground/Common Return 8 Received Line Signal Detector 9 + Voltage 10 – Voltage 11 12 Secondary Received Line Signal Indicator 13 Secondary Clear to Send A-1 ©2000 GRE America, Inc. All rights reserved. This material is the property of GRE America, Inc. Copying or reproducing this material is strictly prohibited. All violators shall be prosecuted to the fullest extent of the law. 5/2000 Appendix B: Using an External Antenna with GINA GINA User’s Manual Appendix B: Using an External Antenna with GINA Introduction This appendix contains information for users who wish to install an outside antenna to improve the transmission/reception range of GINA. GRE America recommends that a professional electrical contractor with experience in antenna installation be used to install the antenna. Users who wish to install their own antenna should follow the instructions below. CAUTION: Section 810 of the National Electrical Code, ANSI/NFPA No. 70-1994 contains the minimum legal requirements for the installation and protection of outside antennas. Consult your local building or fire department; additional requirements may exist for your location. NOTE: For additional information regarding outside protection, GRE recommends that you contact Polyphaser and refer to their application notes. Antenna Select an antenna suitable for the frequency range of your GINA. If a high gain antenna is going to be used, you must obey the FCC Part 15.247 regulation. The regulation states any professional installer may change to a different antenna and must meet the 6dBi system gain requirements. GRE offers many optional high gain antennas that are certified with FCC. Each contains our non-standard SMA connector. Three antennas are: 1. 13 dBi Directional Yagi Antenna with a 10 ft. cable. 2. 3 dBd Omnidirectional Antenna with a 10 ft. cable. 3. 3 dBd Patch Antenna with 3 ft. cable. Contact a GRE sale representative for more details. Mast/Tower Generally, the higher the antenna is mounted the greater the improvement in range. Fifteen to twenty feet is adequate for most locations. For longer distances, height may need to be increased. B-1 ©2000 GRE America, Inc. All rights reserved. This material is the property of GRE America, Inc. Copying or reproducing this material is strictly prohibited. All violators shall be prosecuted to the fullest extent of the law. 5/2000 Appendix B: Using an External Antenna with GINA GINA User’s Manual Grounding Make sure that the antenna system is grounded to protect against voltage surges, built up static charges, and lightning strikes: Use No. 10 AWG (5.3 mm) copper or No. 8 AWG (8.4 mm) aluminum wire or larger as a ground wire. Secure antenna lead-in and ground wires with insulated standoff insulators spaced 4-6 ft.(1.2 - 1.7 m) apart. Mount the antenna discharge unit as close as possible to where the lead-in enters the building. B-2 ©2000 GRE America, Inc. All rights reserved. This material is the property of GRE America, Inc. Copying or reproducing this material is strictly prohibited. All violators shall be prosecuted to the fullest extent of the law. 5/2000 Appendix D: The ASCII Character Set GINA User’s Manual Appendix D: The ASCII Character Set D-1 ©2000 GRE America, Inc. All rights reserved. This material is the property of GRE America, Inc. Copying or reproducing this material is strictly prohibited. All violators shall be prosecuted to the fullest extent of the law. 5/2000 Appendix D: The ASCII Character Set GINA User’s Manual D-2 ©2000 GRE America, Inc. All rights reserved. This material is the property of GRE America, Inc. Copying or reproducing this material is strictly prohibited. All violators shall be prosecuted to the fullest extent of the law. 5/2000 Appendix E: Creating a Print File GINA User’s Manual Appendix E: Creating a Print File Introduction For GINA to correctly transfer files containing than plain ASCII text (for example, illustrations), the file must be converted to a print file with a word processing program. This appendix contains instructions for creating a print file using Word for Windows Version 6.0. These instructions assume that the user is familiar with the operation of this program and provides abbreviated instructions only. If you require more detailed instructions, please refer to the software user’s manual. Most word processing programs provide the capability of creating print files. If you do not use Word for Windows, refer to your word processor user’s manual for instructions about creating a print file. Making a Print File with Word for Windows Version 6.0 To create a print file with Word for Windows 6.0, proceed as follows: 1. Click on File. From the drop-down menu, select Open. 2. Select the file to be converted and open it. 3. Click on File. From the drop-down menu, select Print. 4. When the print menu opens, place the cursor on the Print to File box and click the left mouse button once. Then click OK. 5. When the Print to File menu appears, the Output File Name box will contain the file name *.prn. (.prn is the default filename extension for print files.) Change the name to the file name of your choice. Include a complete path (drive and subdirectory name) if necessary. If desired, you can change the extension name (for example, to .txt). 6. After assigning the output file name, click OK in the Print to File menu. 7. The print file will be generated and stored in the file and directory specified. You may now transfer the file with GINA. E-1 ©2000 GRE America, Inc. All rights reserved. This material is the property of GRE America, Inc. Copying or reproducing this material is strictly prohibited. All violators shall be prosecuted to the fullest extent of the law. 5/2000