1
USER'S MANUAL
PHOENIX TR.IO MANUAL TREADMILL
MODEL NUMBER:98510
DHO ENI>{
I
HEALTH
S
FITNESS IN(]TX
USER WEIGHT LIMITATION: 250lbs.
TOLL FREE CUSTOMER SERVICE NUMBER: 1.888.535.8637
SERIAL NUMBER (found on frame):
APPLICATION STANDARD
PHOENIX TR.iO MANUAL TRE
For future service or
rehbd questions:
Please staple )our receipt and/orwrite in
PHOENIX treadmill.
tre name and phone number
Phone Numben
Name:
wiere you purchased your
of the retail store
Receipt
Precautions:
WA,RNING: Read the following important precautions and information before operating the teadmill. lt is the responsibility of
the ovrnel to ensure that all users of this treadmill are adequately informed of all warnings and precautions.
r
o
.
Use the treadmill only as described in this manual.
Place on a level surface, with 6 feet (2 m) of clearance behind
a mat underthe teadmll.
Keep the teadmill indoors, away from moisture and
near water.
it
dust Do not
To protect the froor or carpet from damage, place
px.tt
the teadmill in a garage or covered patio, or
o
ps not operale the teadmill where aerosol producb are used
.
Keep children under the age o{ 12 and peb a*ay from
.
The treadmill should not be used by pesons waghing mote Sran 250lbs.
o
Neler alow more than one peson on the teadmill at a time. Wear appropriate exercise clothing when using the
beadmil. Dc nct wear locse clothing that could become caught in he beadmill. Athletic support clothes are
reccmrrended fci' botr rnen and women.
weanrg only stociirrgs, or in sandals.
A.h,,vays
or where oxygen is being administered.
be beadmill
at all times.
wear athletic shoes. Never use the treadmill wrth bare feet
.
Alwa),s examine your t eadmill before using to ensure all parts are in working order.
.
Ajlow
o
o
he be[ tc fulty stop before dismountng.
Never insert any object or body parG into any opening.
Service to your treadmill should only be performed by an auhorized service representative, unless authorized
and/or instucted by the manuhcturer. Failure to follow these instructions will void the treadmill warranty.
Visit us at www.phoen ixhealthandfi tness.com
PHOENIX TR.1O MANUAL TREADMILL
Open the boxes:
Youareno,rlreadytoopentheboxesofyournewequipment Makesuretoinventoryall ofthepartsthatareindudedintre
boxes. ChecktheHardrarareComparisonChartforafull countofthenumberofpartsincludedforthisproducttobe
assemued properly. lf you are missing any parts, please DO NOT TAKE THE UNIT BACK TO THE R'ETAIL STORE.
lnstead, call our Customer Service Departnent Monday through Friday, 8:00am until 4:00pm, Pacific time (excluding
holi'Cays)
at
1
888.535.8637
Gather your tools:
Before sarting the as.sembty of your unit, make sure that you have gatrered all the necessary tools you may require to
assemble the unit properly. Having all of the necessary equipment at hand will save time and make the assemHy quick and
hassle-free.
Clear your work arca:
Make sure that you have cleared away a large enough space to properly assemUe the unit Make sure the spaee b free
from anything that may cause injury during assembly. Afier the unil is fulty assemUed, make sure there is a comfortaue
amountof free area around the unitfor unobstn:cied operation.
lnvite a friend:
Some of the assembly steps may require heavy lifting. lt is recommended that you obtain the assistance of another person
when assembling this product
User Wepht Limitatirn:
Please note thai there is a weight limitation fcr this product lf you vueigh more than 250bs. it is not recommended that
you use this product Serious injury may occur if the use/s weight exceeds the limit shown here. This product b not
intended to support uses wtose weight exceeds this limit
Visit us at www.phoenixhealthandfitness.com
PHOENIX TR.1O MANUAL TREADMILL
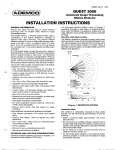
COMPAR
Hardware chart
Foryour convenience, we have idenffied tre hardranre used in tre assembly of this product This chart is provided tc help
you identiff those,items that may be unfamiliar to you.
NO.
DESCRIPTION
QTY.
15
16
17
18
23
25
30
31
U
M6 Sersar
2
M6 Nut
2
M8 Fixino Bott
2
Washer
t
Handle Screw
2
Computer Fixinq Screw
z
Wrench Tool
@
@
ffi
H
@
@
E
E
I
Phillips Head Tool
1
Lockino Knob
2
o
'Visil us at www.phoenixhealthandfitness.com
o
PHOENIX TR.1O MANUAL TREADMILL
Order No.
1
3
4
6
'8
Main
Frame
1
Board
Front Roller
1
1
Frame
RearRollel|
Bott
9 Rear End Plate
10 Sensor Wire
11 Fixinq Screw
BeftTension
9851041
98510-03
Order No.
30
31
32
Wrench
Tool
Front
Support
2
2
'1
98510{8
12
98510-1
35
36
Knob
Water Botfle
Stop
98510{9
98510-10
1
98510-13
98510-14
98510-15
98510-16
9851G.17
9851 0-1
19
Front
21
Handle
I
Handle
1
98510-19
Grio
Wire
23 Handle Screw
2
1
2
9851A-21
98510-23
1
98510-24
2
9851G25
1
2
98510-28
25
Comouter Fixino
Screw
28 CentralWire
29 Front End Cao
1
98510-32
2
98510-34
985'10-04
98510{6
2
2
2
2
2
9851G30
Phillips Head Tool
9851 0-1 2
13 WheelPin
14 Star Lock Waslrer
15 M6 Scrsry
16 MO Nut
17 M8 Fixinq Boft
1
9851G2.
98510-29
Msit us at www.phoenixhealthandfitness.com
1
1
98510-35
98510-36
PHOENIX TR-10 MANUAL TREADMILL
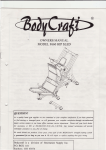
,
A MAJORITY OF THE PARTS
SHO\^/I.I HERE HAVE BEEN PREASSEMBLED AT THE FACTORY.
a
@
@
6
Visit us
at www.phoenixhealthandfitness.com
PHOENIX TR-10 MANUAL TREADMILL
STEP 1:
Attach Right Upright (20) and Left Upright (24) to the Front Handte (19). Secure with Scrq,vs (23) but do nottighten tully until
the entire unit has been assembled.
Connectthe UpperWire (22) with the Central\Mre (28).
L
Visit us at www.phoen ixhea lthandfi tness.com
PHOENIX TR.1O MAt{UAL TREADMILL
STEP 2:
tre Main Frame (1) inside the assembly. Fit the front sides of the Main Frame (1) to the plates on the Handlebar
Uprights (20 and 24). Sectre with Fixing Bolts (17) and Washers (18). Do not tully tighten the bofts until the unit is fully
Place
assembled.
Connectthe CentralWire (28) with the SensorWire (10).
Vrsit us
at www.phoenixhealhandfi tness.com
STEP 3:
Attach the Fiont Support (32) to the ends of the Right and Left Handlebar Uprighb (20 and
24). Secure with M6 Botts (15)
and M6 Nuts (16). Do not fully tighten until the entire unit has been assembled.
Visit us at www.phoenixhealthandfitnesscom
PHOENIX TR.lO
ASSEMBLY
STEP 4:
Rotate the frame assembly up as shown. Secure by inserting the Washers (18) and Locking Knobs (34) through the plates
on lhe Right and Left Handlebar Uprights (20 and 24) into the Main Frame (1).
Visit us at www.phoenixhealthandfitness.com
ASSEMBLY
STEP 5:
Attach the Console (26) to the Front Handle (19)- Secure with Fixing Scrsrys (25) as shown.
Connect the Upper Wre (22) to the Computer (27).
Should you ever need to replace the bateries in the Compuler (27) simply remove the batery doorfrom the rear of the unit.
Battery Door
Visit us at www.phoenixhealhandfitness.com