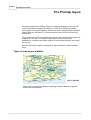
1
It's all in the detail
2
Promap User Guide
Table of Contents
Part I Welcome to Promap
8
Who supplies
...................................................................................................................................
our maps
8
How we invoice
...................................................................................................................................
you
9
How secure
...................................................................................................................................
is Promap?
10
What’s new
...................................................................................................................................
in Promap v4?
10
What you...................................................................................................................................
see on screen
12
Using Promap
...................................................................................................................................
Help
12
If you're new
...................................................................................................................................
to computers
14
How the mouse
...................................................................................................................................
buttons work in Promap
17
Part II Logging in to Promap
19
To log in ................................................................................................................................... 19
To log out
................................................................................................................................... 21
Part III The Promap layers
22
Types of ...................................................................................................................................
map layers available
22
To switch...................................................................................................................................
between map layers
27
Part IV Opening maps
29
Choosing...................................................................................................................................
how to locate your map
29
To locate...................................................................................................................................
a new site
30
To select...................................................................................................................................
a map layer and marker style
32
To locate...................................................................................................................................
a site without an address or OS Tile number
34
To search
...................................................................................................................................
for sites to develop
36
Opening ...................................................................................................................................
a saved map file
37
To open a.........................................................................................................................................................
recent file
To open a.........................................................................................................................................................
saved file by browsing
To search.........................................................................................................................................................
for saved files
38
38
39
To close ...................................................................................................................................
a map
40
Part V Moving around the map
41
To move ...................................................................................................................................
around the map
41
Distances...................................................................................................................................
you can roam for free
42
To zoom ...................................................................................................................................
in and out
42
Part VI Customising your map
43
To delete...................................................................................................................................
the site marker
43
Contents
3
Measuring
...................................................................................................................................
objects on the map
43
Selecting .........................................................................................................................................................
the shapes to be measured
To fill a shape
.........................................................................................................................................................
To draw around
.........................................................................................................................................................
a shape
Snap to point
.........................................................................................................................................................
To measure
.........................................................................................................................................................
between two points
To check .........................................................................................................................................................
clearance
To indicate
.........................................................................................................................................................
clearance
44
44
45
47
47
48
49
Annotating
...................................................................................................................................
the map with measurements
50
To see the.........................................................................................................................................................
measurements of shapes and lines
To annotate
.........................................................................................................................................................
a map with a text box showing measurements
50
51
Finding a...................................................................................................................................
grid reference
51
To obtain.........................................................................................................................................................
an Easting and Northing for a point on the map
To see grid
.........................................................................................................................................................
references in real-time
51
52
Drawing shapes
...................................................................................................................................
and symbols
52
To draw a.........................................................................................................................................................
symbol, regular shape, arrow or line
To label objects
.........................................................................................................................................................
with a text box
To draw a.........................................................................................................................................................
building freehand
53
54
54
Editing shapes
...................................................................................................................................
and lines
55
To select .........................................................................................................................................................
an overlapping object
To delete .........................................................................................................................................................
the last line while drawing
To open closed
.........................................................................................................................................................
shapes and lines
To add a point
.........................................................................................................................................................
to a shape or line
To drag an
.........................................................................................................................................................
existing point out
To delete .........................................................................................................................................................
a point from a shape or line
To delete .........................................................................................................................................................
an object
56
56
56
57
57
58
58
Moving, sizing
...................................................................................................................................
and rotating objects
58
To move your
.........................................................................................................................................................
object
To resize .........................................................................................................................................................
your object
To rotate .........................................................................................................................................................
your object
59
59
60
Changing...................................................................................................................................
an object's colours and styles
61
Shape Properties
.........................................................................................................................................................
Text Properties
.........................................................................................................................................................
Symbol Properties
.........................................................................................................................................................
Line Properties
.........................................................................................................................................................
61
62
63
63
Changing...................................................................................................................................
the appearance of map features
64
To switch.........................................................................................................................................................
map features on and off
To change
.........................................................................................................................................................
the style and colour of a map feature
64
64
Colour schemes
................................................................................................................................... 65
To save a.........................................................................................................................................................
colour scheme
To apply a.........................................................................................................................................................
saved colour scheme
To delete .........................................................................................................................................................
a colour scheme
Part VII Advanced customisation
66
67
68
69
To copy objects
................................................................................................................................... 69
To group...................................................................................................................................
objects
70
To re-order
...................................................................................................................................
objects
71
To align objects
................................................................................................................................... 72
4
Promap User Guide
To space...................................................................................................................................
objects
72
To size objects
................................................................................................................................... 73
To lock objects
...................................................................................................................................
in place
74
To lock objects
...................................................................................................................................
to the background
74
Drawing ...................................................................................................................................
Libraries
75
To create .........................................................................................................................................................
a drawing library
To save a.........................................................................................................................................................
drawing library
To open a.........................................................................................................................................................
drawing library
To use an.........................................................................................................................................................
item from the drawing library
To show or
.........................................................................................................................................................
hide a drawing library
To delete .........................................................................................................................................................
a drawing library
To convert
.........................................................................................................................................................
a Promapcd drawing library to Promap on the web
75
76
76
77
78
78
78
80
Part VIII Saving files
To save a...................................................................................................................................
file for the first time
81
To save an
...................................................................................................................................
existing file
82
To save changes
...................................................................................................................................
to a read only file
82
To create...................................................................................................................................
a new folder
82
To organise
...................................................................................................................................
files and folders
83
To convert
...................................................................................................................................
PromapCD maps
85
87
Part IX Printing
To set a print
...................................................................................................................................
frame and scale
87
To stretch
...................................................................................................................................
a variable scale print frame
89
To move ...................................................................................................................................
a print frame
89
To centre...................................................................................................................................
a print frame
90
To fix a print
...................................................................................................................................
frame
90
To print a...................................................................................................................................
map
91
Print layout:
...................................................................................................................................
logos, headers and footers
92
To add a header
.........................................................................................................................................................
or footer
To add your
.........................................................................................................................................................
company logo
To create .........................................................................................................................................................
a template
To use a template
.........................................................................................................................................................
To edit a template
.........................................................................................................................................................
To overwrite
.........................................................................................................................................................
a template
To delete .........................................................................................................................................................
a template
To organise
.........................................................................................................................................................
templates
93
93
95
95
96
98
98
99
Using a ...................................................................................................................................
map in other applications
100
To download
.........................................................................................................................................................
a map
To copy .........................................................................................................................................................
a map to the clipboard
Ordnance
.........................................................................................................................................................
Survey Paper Map Copying Licence
100
102
102
Part X Selecting your next action
103
Part XI Exporting maps
106
Contents
5
Format ...................................................................................................................................
options
106
Export Options
................................................................................................................................... 106
Choosing
...................................................................................................................................
between Detail and MasterMap® exports
108
Samples...................................................................................................................................
of Detail and MasterMap® data
108
To export
...................................................................................................................................
map data
109
Part XII Landmark Historical mapping
113
Who supplies
...................................................................................................................................
Landmark historical mapping?
113
Why would
...................................................................................................................................
you use historical mapping?
114
Samples...................................................................................................................................
of historical mapping
115
To order...................................................................................................................................
historical mapping
118
To save...................................................................................................................................
your historical maps
121
Part XIII Aerial photography
122
Why would
...................................................................................................................................
you use aerial photography?
122
Who supplies
...................................................................................................................................
our aerial photography?
122
Samples...................................................................................................................................
of aerial photography
123
Ordering
...................................................................................................................................
aerial photography
131
To buy an
.........................................................................................................................................................
aerial photograph
To switch
.........................................................................................................................................................
between aerial photographs
To customise
.........................................................................................................................................................
your photograph
To print .........................................................................................................................................................
your aerial photograph
132
135
137
137
Using aerial
...................................................................................................................................
photos in other applications
137
To download
.........................................................................................................................................................
your aerial photograph
To copy .........................................................................................................................................................
an aerial photograph to the clipboard
Part XIV Enviroscreen
137
138
139
What is ...................................................................................................................................
Enviroscreen?
139
What is ...................................................................................................................................
an Enviroscreen Overview?
141
What is ...................................................................................................................................
an Enviroscreen Environmental Certificate?
141
Contaminated
.........................................................................................................................................................
land legal case
143
What data
...................................................................................................................................
does Enviroscreen use?
144
Samples...................................................................................................................................
of Enviroscreen reports
147
To view...................................................................................................................................
a free Contamination Check
150
To order...................................................................................................................................
an Enviroscreen report
151
Part XV Setting preferences
156
To change
...................................................................................................................................
general settings
156
To change
...................................................................................................................................
display settings
158
Part XVI Charges and invoicing
160
Charges................................................................................................................................... 160
6
Promap User Guide
Invoicing
................................................................................................................................... 162
Part XVII Administrating Promap
163
About user
...................................................................................................................................
administration
163
The admin
...................................................................................................................................
user's folder view
164
The Admin
...................................................................................................................................
User's tasks
166
Creating,
...................................................................................................................................
modifying and deleting user accounts
166
To create
.........................................................................................................................................................
a new user account
To modify
.........................................................................................................................................................
a user account
To delete.........................................................................................................................................................
a user account
166
169
171
Creating,
...................................................................................................................................
modifying and retiring user groups
172
To create
.........................................................................................................................................................
a user group
To add or
.........................................................................................................................................................
remove users in a group
To retire.........................................................................................................................................................
a user group
172
173
174
Creating...................................................................................................................................
and modifying office details
175
To create
.........................................................................................................................................................
a new office
To edit an
.........................................................................................................................................................
existing office
175
176
Setting usage
...................................................................................................................................
restrictions
176
To change
.........................................................................................................................................................
usage restrictions
177
Setting user
...................................................................................................................................
defaults
180
To set user
.........................................................................................................................................................
defaults
To create.........................................................................................................................................................
a read-only print template
180
182
Using the
...................................................................................................................................
Ordnance Survey Paper Map Copying Licence
182
To enter.........................................................................................................................................................
existing licences into Promap
Part XVIII Viewing users' expenditure
183
184
To view...................................................................................................................................
standard users' expenditure reports
184
To view...................................................................................................................................
expenditure reports as an admin user
186
To see a...................................................................................................................................
more detailed admin report
188
To save...................................................................................................................................
or print your expenditure report
188
Part XIX Reference
190
Promap...................................................................................................................................
hot keys
190
Landmark
...................................................................................................................................
Historical Mapping Legends
192
Dialog boxes
................................................................................................................................... 192
Relocate.........................................................................................................................................................
Enter expenditure
.........................................................................................................................................................
details
192
193
Troubleshooting
................................................................................................................................... 194
Contacting
.........................................................................................................................................................
the Technical Support Team
Specifications
.........................................................................................................................................................
for Promap
Part XX Landmark Company Information
195
195
197
Contact...................................................................................................................................
details
197
Related ...................................................................................................................................
websites
198
Terms and
...................................................................................................................................
Conditions
198
Contents
Index
7
199
8
Promap User Guide
Welcome to Promap
Promap gives you instant access to seven different layers of mapping including
Landmark Historical mapping and large-scale digital Ordnance Survey maps.
Promap also supplies aerial photography and Enviroscreen, the world’s first
online, real time environmental due diligence report.
Promap uses the power of Windows and the convenience of the Internet to
provide you with a powerful, flexible tool for locating, measuring, customising,
printing and exporting maps. Printing high quality maps of anywhere in Britain
requires no more than a standard desktop pc with an Internet connection and a
printer. Multiple users can access Promap at the same time within an
organisation and access each other's mapping to work together efficiently and
quickly.
We have included step-by-step instructions on how to produce your mapping
for all your business needs from accessing Promap to producing your finished
map. It also includes instructions on how to access aerial photography from the
UK's three leading suppliers and Enviroscreen, the world’s first online, real time
environmental due diligence report.
Note to new Promap Users
If this is the first time you have used Promap, have a look at the Contents
pages to get an idea of what the program can do
Who supplies our maps
Promap provides seven layers of mapping ranging from the large scale
overview of the Great Britain map to the detailed information on the Detail
map. We also provide aerial photographs.
We use different suppliers to provide you with these maps. The suppliers and
what they provide are listed below.
Map supplier
Description
Ordnance Survey supplies the Detail
(Landline), Street Plus (1:10,000),
Street (1:20,000) and Town (1:50,000)
mapping layers.
Welcome to Promap
Map supplier
9
Description
Collins Bartholomew supplies the
Road Atlas (1:200,000) and Great
Britain (1:5,000,000) mapping layers.
You can print all of these layers from
A4 to A0.
Landmark Information Group supplies
Historical maps of various dates and
scales. These can only be printed on
an A3 printer.
Promap also provides current aerial
photography for any specified location
from the UK's three leading aerial
photography suppliers. The suppliers
are GetMapping, UK Perspectives and
Cities Revealed.
Cities Revealed also supplies
historical aerial photography from the
RAF and Luftwaffe.
Intermap supplies NEXTMap 5m DSM
height data.
See also
Types of map layers available
22
How we invoice you
At the end of every month we send you an invoice listing all the users within
your organisation and the amounts they have spent. Each user can spend as
much as they want on the system unless the Promap administrator in your
company chooses to restrict their spend. Please see To change usage
restrictions 179 for further information about restricting access.
Each individual user has access to four different accounting files to keep track
of their expenditure. These accounting files allow you to account accurately for
the work users have done on different projects or for different clients.
There are more detailed expenditure reports available to the administrator for
Promap. All the accounting records can be exported to the common
spreadsheet or accounting applications. Many of our clients use this facility to
10
Promap User Guide
pass their Promap charges on to their clients.
See also
Viewing users' expenditure 184
How secure is Promap?
We understand that you may have some concerns regarding security on the
Internet. Promap uses SSL together with our own encryption. This means your
username and password are protected by the same mechanism used by online
banks. As a result the site is secure.
Each organisation set up on Promap has an administrator. This person is the
main contact for the organisation and is the first person to be issued with a
username and password. The administrator username and password should
remain confidential. The administrator creates individual usernames and
passwords for their colleagues to use. It is very important that each user is
issued with their own username and password so that the administrator can
block the user if need be and control their usage.
What’s new in Promap v4?
· Better Address matcher
The address matcher has been improved to get you to your site quicker
and to provide you with the ability to search by place name.
To locate a new site
30
· More ways to navigate around a map
You can now move the map by dragging it or clicking on a panning arrow
at the edges. If you have a scroll wheel on your mouse, you can use it to
zoom in and out of the map.
To move around the map
To zoom in and out
41
42
· More user drawn features
You can draw on Town maps.
Modifying polygons and polylines has been made easier by allowing you to
add or remove points anywhere on the shape.
To add a point to a shape or line
57
To delete a point from a shape or line
58
If you like having real-time shape measurements and/or grid references on
the map, you can choose whether or not to show them in a popup. You can
also move the popup around the map by dragging it.
Welcome to Promap
To see the measurements of shapes and lines
To see grid references in real-time
11
50
52
There are now five site marker styles to choose from.
To select a map layer and marker style
32
· More formats for downloading maps
We have added .tiff, .jpeg, .gif and .png formats to the list for downloading
maps.
To download a map 100
· New options in Enviroscreen
You will now receive an aerial photograph with an Overview or Certificate
report.
In addition the Certificate will include a lender's risk assessment and the
option to obtain an insurance quote if your site is eligible following a risk
assessment analysis.
What is an Enviroscreen Environmental Certificate 141
· Compatibility with Internet Explorer v 7 and Vista
You can use Promap if you use the Vista operating system and/or if you
use Internet Explorer 7 as your internet browser.
· New next action page
To speed up the process of going from one task to another, a new page
will appear after certain actions, such as printing a map. It will give you a
comprehensive list of next actions to consider.
Selecting your next action 103
· Watermark on maps
You will now see a Promap watermark in the background on all maps. This
will not be visible on printed, exported, downloaded or copied-to-clipboard
maps. It is simply there as a security measure to comply with Ordnance
Survey licensing agreements.
· Better search facilities in online Help
If you need help on a subject such as printing, you can type it into the
Search box on the Menu bar, click the arrow and the Help window will
open with a list of suggested topics.
You will also now find clickable links to other relevant topics.
Using Promap Help
12
12
Promap User Guide
What you see on screen
This is how Promap appears in Internet Explorer 7. If you have an older version
of Internet Explorer, the top of the screen will be different.
Using Promap Help
Viewing online Help
Select Help>Reference>Contents. The Promap Help window will open.
If you're new to Promap
For a quick overview of what you can do using Promap look at the chapter
heading topics, the ones with a book to the left. Also useful is the topic on What
you see on screen 12 . This will help you orient yourself in the Promap
workspace.
Searching online Help
Contents
The first place to look for information is the Contents page. Here you'll find
a list of chapter headings and topics laid out in a logical form. Click on a
book to open and close a chapter. Click on a topic title to see the
information in it.
Welcome to Promap
13
Index
If you want to search for a particular task or feature in Promap go to the
Index page. This has an alphabetical list of keywords that describe all the
task and background information in Promap. Click on a letter in the top
Alphabet row to see a list of keywords beginning with that letter. Click on a
keyword and you will be shown a list of topics that are associated with that
keyword. Click the relevant topic title to see the information.
Search
If this doesn't find what you're looking for, you can try a more extensive
search on the Search page, by searching for every instance of a particular
word or phrase in the entire Help. You will then see a much longer list of
topic headings with the first few lines of the topic underneath. The Search
feature is also available direct from the Promap workspace on the Menu
bar.
Click the topic title that most fits what you're trying to do. The information
will appear in the right-hand pane. If the topic answers your question, you
might like to see where it fits in the Contents so that you can read other
topics around it. Click the Contents button. You will see the Contents tree
with your topic highlighted.
Using the help while you're working
· Many dialog boxes have a Help button or an Information button
can click to get Help on the task that you're about to do.
that you
· If you want to know what an icon on the screen does, hold the mouse cursor
over it. A popup will appear with a brief description.
Finding your way around the Help topics
Scrollbar
If a topic is longer or wider than fits in the window, there will be a scrollbar
on the right or bottom edge of the window. Click and drag the darker
coloured scroll bar to move up or down the page. Click the lighter grey on
either side of the bar to move quicker.
See Also links
When you're looking at a topic you will usually see a See Also heading at
the bottom. This lists other topics that are relevant to the one you're
reading.
Expanding text and images
Whenever you see a heading like this, click it to see further details
Then when you've read the information, click the heading again to
collapse the text.
You can also click most of the larger screenshot to make them bigger and
more easily understood. Click them again to make them smaller.
14
Promap User Guide
Back and Forward topic buttons
There is a Back and Forward button in the top right-hand corner of the
Help. These allow you to go back to the previous topic you were looking at
and forward again to your current topic.
Return to chapter overview button
This button will take you to the chapter heading topic that contains the topic
you are looking at.
Navigation:
The Navigation: section at the top of the topic shows you which chapter(s)
the current topic is in. Click a chapter name to go to it.
Understanding Typographical Conventions
Menu commands
The phrase "Select File>Open" means that you should click the File menu
and then click the Open command when the menu drops down.
Buttons and dialog box titles
These are highlighted in Bold.
Keyboard keys
These are highlighted in Bold. There is a useful list in Promap hot keys 190 .
Downloading a printable user guide
If you prefer to read printed instructions, you can download a pdf file that you
can print. Select Help>Reference>User Manual (pdf) and a web page will
open with a downloading link for the manual.
You can also print individual topics by clicking the Print button
the topic page.
at the top of
If you're new to computers
If you've not used computers much before, you might find it useful to read
through the information below. It will help you become familiar with what you
see on screen, how it is described and how to use the mouse and the
keyboard.
To learn how to use the Help system to its best advantage read Using Promap
Help 12 .
Welcome to Promap
15
To open Promap
1. Log in to Promap. See To log in
19
.
2. Click the Cancel button on the Address Search dialog box that opens.
The Promap window
Promap will open in the Internet Explorer browser window. See What you see
on screen 12 for a picture of the Promap window as it appears in Internet
Explorer 7.
Internet Explorer is a computer program that allows you to view websites. It
belongs to a type of program called a browser. Other well-known browsers are
Netscape, Firefox and Opera. Promap does not work in those browsers.
The title bar
At the top of the window is the title bar.
It briefly describes what is in the window. Other windows called dialog boxes
also have title bars. You can click on the title bar and hold down the mouse
button to drag the window to another part of the screen. This is useful when a
dialog box or the Promap online Help obscures your view of the Promap
workspace.
The menu bar
The next bar that applies to Promap is the menu bar.
You use the options, also known as commands, on the menu bar to tell Promap
what you'd like to do. To see the options on a menu, click the name of the
menu. A list of options will drop down. To select one of them, click it with the
left mouse button.
For example, click the File menu and then click on the New Map Locate
option. The Address Search dialog box appears. This is where you type in
information such as a postcode and house number in order to locate your site.
Click the Cancel button to close the dialog box.
The toolbars
A toolbar shows you shortcut buttons that do the same things as the menu
options. You click on the button to perform an action. The Help instructions
usually direct you to clicking a button rather than selecting an option from a
menu. This is because it's usually quicker to click a button.
There are several toolbars in Promap. Some are visible all the time, such as
the Map Navigation toolbar.
16
Promap User Guide
Others you can expand or contract by clicking on the heading, such as the
Drawing & Measuring toolbar.
Dialog boxes
With many of the tasks in Promap you will be asked to make selections or enter
text on a dialog box. This is basically a window where you can give Promap
more information. A dialog box may open when you click a menu option or a
tool button.
You may find any of the following items in a dialog box:
Drop-down lists
Click on the down arrow to open the list. Then click the option you want.
Text boxes
Click inside the box to put the cursor there. Type your text.
Radio buttons
Click to select the option next to it. When there are several radio buttons,
it means that you can only select one of the options. This is different from
tick boxes. See below.
Tick boxes
Click to select the option next to it. You can select as many tick boxes as
you like.
Welcome to Promap
17
Using the mouse
Clicking
When the Help instructions ask you to click something, it means you should
move the mouse pointer
once.
over it and press down the left button on the mouse
Right-clicking
When the instructions ask you to right-click something, you move the mouse
cursor over it and press down the right button once.
Double-clicking
In order to double-click something, you move the mouse cursor over it and
press down the left button twice in quick succession.
Drag and drop
To click and drag you move the mouse pointer
over the object or area you
want to move to another part of the screen. Then press and hold down the left
button on the mouse. Now move (or drag) the object or mouse pointer to the
desired location by physically moving your mouse. To release (or drop) the
object, you release the mouse button.
For further tips on how to use the mouse in Promap see How the mouse
buttons work in Promap 17
How the mouse buttons work in Promap
Clicking the mouse performs the majority of the functions in Promap.
The left mouse click
Clicking the LEFT mouse button will perform the following actions:
· Clicking any object you have drawn on the map will select that object
· Clicking the drop-down menus and buttons will select that function
· Clicking and dragging a map will move the map
18
Promap User Guide
The right mouse click
Clicking the RIGHT mouse button will perform the following actions:
· Right clicking the map allows you to position the area clicked on as the centre
of the map
· Right clicking a particular building or site will centre that building or site on
your screen.
· Right clicking a selected drawn object will allow you to use the advanced
customisation.
Double-clicking
Double-clicking any object you have drawn will bring up the Properties dialog
box, allowing you to change its appearance.
Drag and drop
You'll be asked to 'drag and drop' in order to:
· Draw shapes such as arrows, rectangles, symbols and circles
· Move drawn shapes
· Change the size of print or export frames by dragging their size handles
To click and drag you move the mouse pointer over the object or area. Then
press and hold down the left button on the mouse. You then move (or drag) the
object or mouse pointer to the desired location. To release (or drop) the object,
you release the mouse button.
Mouse scroll wheel
If you have a wheel in between the two buttons on your mouse, you can use it
to zoom in and out of a map. See To zoom in and out 42 .
Logging in to Promap
19
Logging in to Promap
To use Promap you will need to log in via our website www.promap.co.uk. You
will also need Internet Explorer 6 or 7.
To run Promap properly you will need to download a piece of software called an
'Active X' control. This allows Promap to run in Internet Explorer.
Some organisations block 'Active X' controls with their firewall, or Internet
Explorer's security settings may prohibit them. In either case you will need to
contact your systems administrator before being able to log in to Promap.
If your company is large, your IT department may wish to install the ActiveX
control onto PCs themselves, rather than rely on the automatic download from
the Promap website. This can now be done using an MSI file (Microsoft Self
Install package). They can download the MSI file and instructions on how to
install it from www.promap.co.uk/promap/downloads.jsp.
See the rest of the chapter for details.
To log in
1. Open Internet Explorer by clicking this button
on your desktop.
-orSelect Start>Programs>Internet Explorer.
2. When Internet Explorer has opened, type www.promap.co.uk in the
address bar.
3. Press Enter on your keyboard.
Internet Explorer will take you straight to our corporate site.
4. On the right of the screen you will see the words Username and Password
. Enter your username and password in to the respective text boxes.
Your username and password are case sensitive. If you cannot log in on
the first attempt check that Caps Lock on your keyboard is turned off and
try again.
5. Click Login.
6. You may receive warning messages regarding security issues. This
depends on the setup of your computer. Click OK on these messages.
7. If this is the first time you have used Promap you will see our terms and
conditions. You will need to click Accept to use Promap. You will also be
presented with a dialog box that is required under the Data Protection Act
20
Promap User Guide
called Contact Preferences. Choose one of the options provided and click
Submit Details.
8. Promap will now prompt you to select your starting point. To access
Promap click on the Promap graphic.
You are now ready to start using Promap!
Note
If you click on the Promap IQ graphic you will be logged in to Promap
IQ.
Promap IQ provides a unique, powerful and simple way to search,
view, interact and gather crucial property and planning information for
a specific site, all displayed in context on a map.
In a matter of seconds, you can get an understanding of all
planning-related activity, past and present, prior to conducting a full
enquiry, which can instantly download straight to your desktop, or
create a customised report.
Promap IQ can save you minutes, hours or even days and is the ideal
starting point to source planning applications, listed buildings and
points of interest information.
See also
To log out
21
Logging in to Promap
21
To log out
When you finish working on Promap you should log off to ensure that no one
can use Promap using your username and password.
To log out
1. Click Log Out on the menu bar.
2. Click Log Out on the Confirm Log Out message.
You will be logged out of Promap. Promap will return you to our corporate
site where you can log in again later if you need to.
The next time that you open Promap, it will expand the toolbar that you
used last.
See also
To log in
19
22
Promap User Guide
The Promap layers
Promap provides seven different layers of mapping ranging from the full GB
map to the detailed mapping at a scale of 1:1250. You can also purchase
seven types of aerial photography. Each of the seven mapping layers supplies
slightly different information. So some layers may be of more interest to you
than others.
These layers are useful for professionals that require several different layers of
mapping for one site. For example, they require a map for planning
applications, a location plan and a map for environmental analysis, all centred
on one site.
See the rest of this chapter for samples of maps and how to switch between
them.
Types of map layers available
GB 1:5,000,000
GB is clean, simple and uncluttered mapping making it ideal for magazine
and brochure illustrations.
The Promap layers
23
Road Atlas
1:250000
Road Atlas combines roads, railways and other key features. It shows all
cities, towns, many villages, all motorways, A and B roads enabling simple
route planning.
Town 1:50000
Town shows all roads and buildings as blocks of colour to allow easy
identification of land features. Its clarity is particularly suited to development
and land use planning, environmental analysis, vehicle routing and asset
management. Town offers clear detail on roads, footpaths, woods, water
features, important buildings and height contours.
24
Promap User Guide
Street 1:20000
The street-level detail of Street makes it particularly useful for displaying and
analysing data about specific localities. It shows clear street-level detail,
including building outlines, woodland and water.
Street Plus
1:10000
Street Plus provides a comprehensive map base ideal for detailed work
where street names are not required, such as environmental analysis.
Provides a static map backdrop on which you can overlay information. Street
Plus provides detail, including fences, field boundaries, road names and
buildings.
The Promap layers
25
Detail 1:1250,
1:2500 or
1:10000
Detail is comprehensive mapping showing man-made and natural features
ranging from houses, factories, roads, rivers, marshland and administrative
boundaries. There are almost 229,000 Land-Line tiles covering Great Britain,
surveyed and digitised at three different scales according to location:
· 1:1250 scale in urban areas
· 1:2500 scale in rural areas
· 1:10000 scale for remote areas such as mountains and moor land
When you look at a Detail layer map you will be charged a fee. For further
information on pricing please refer to our current online price list:
www.promap.co.uk/promap/pricing.jsp
26
Promap User Guide
Landmark
Historical
Mapping
Landmark’s Historical map data is offered as black and white raster data. The
data provides a good quality map background and is geographically accurate.
This allows a direct comparison to be made between the present and the
past.
The Promap layers
27
Aerial
Photography
Aerial photography is ideal to bring context to maps, providing a clear and
uninterrupted view of what is actually on the ground. The modern high
quality colour digital aerial photographs are a valuable addition to printed
and exported maps and provide detail down to street level, with objects
such as cars and trees clearly identifiable.
The historical orthorectified black and white images provide a rare look in to
the past of the major UK cities dating between 1939 and 1954.
For samples from the different suppliers see Samples of aerial photography
123
To switch between map layers
· Click on the Map button for the map that you'd like to see.
For example
.
The circle on the map button will now be red to indicate that you've looked
at that layer.
It will stay red until you locate another site using the Address Search
dialog box.
The background colour of the button for the current map layer is light blue.
There are two things to remember when switching between map layers:
· The layers work independently of each other.
For example: You have your site in the centre of the screen on the Town
28
Promap User Guide
layer. You then switch to the Street + layer and move away from your site.
When you switch back to the Town layer, your site will still be centred on
the screen on that map while the Street + map shows a different area.
The layer buttons operate in a similar way to switching between different
worksheets in a spreadsheet application such as Excel. Switching between
layers is the process of moving from one layer to another , although each
layer does not need to be centred on the same location.
· When switching to the Detail layer a new map access charge will be
incurred. For further information on charges please refer to our latest online
price list: www.promap.co.uk/promap/pricing.jsp.
See also
To switch between an aerial photograph and a mapping layer 136
Saving files
Relocate 192
80
Opening maps
29
Opening maps
This chapter explains how to locate a site and display a map of it in Promap.
When searching for a site, you have the option of using an address, a place
name or an Easting and Northing. When you've found the site, you can indicate
it on the map with a site marker and you can choose what level of layer you'd
like to look at first.
The chapter also give you some tips on how to search for a site if you have
only vague location details and how to search for sites for developments.
Finally, there is information on how to open saved map files.
See the rest of the chapter for details.
Choosing how to locate your map
Before you display your map you need to decide what method to use to locate
your map. How you locate your map will often depend on the information you
have to start with.
For example, if you are searching for a rural location, you may want to use an
Easting and a Northing. On the other hand, if you are searching for a specific
building or site in an urban area, using the address or postcode is more
appropriate.
If you know the location of the site you are looking for but don’t have an
address or grid reference, you can locate to a site in the general area on a
Town or Street map. Then search for your site by moving around the map. See
To locate a site without an address or OS Tile number 34 for further details.
· Address – You can use this method to locate your site using a full postcode,
partial postcode and street name, building name or number, company name
or simply a town name.
· Place name – This allows you to search for well-known landmarks such as
The British Museum,
· OS Tile number – If you are trying to locate a rural location you may have an
Ordinance Survey Tile number.
· Easting & Northing Coordinates: – An Easting and Northing value will
identify any single point on a map. They are given as values in meters, and
take the form 528951, 179637 where the first number is the Easting and the
second is the Northing.
30
Promap User Guide
See also
To locate a new site
30
To search for sites to develop
36
To locate a new site
1. Click the Address Search button
on the Menu bar.
If you already had a map loaded you will be prompted to save that map
before another is loaded. We recommend that you save any loaded map
before locating another.
The Address Search dialog box will appear.
2. Enter as little or as much information as you choose.
Text box
Description
Organisation
Enter a company or organisation name i.e.
Landmark Information Group.
You need to combine this with either:
· Town
· County
· Partial or full Postcode
Building
name/number
Enter a building number, e.g. 27, or building
name, e.g. Pine Cottage.
You need to combine this with
· Town
· County
· Partial or full Postcode
Street
Enter a street or road name, e.g. Harlech Close.
You need to combine this with either:
· Town
· County
· Partial or full Postcode
Opening maps
Text box
Description
Town
Enter a town or city name, e.g. Basingstoke.
31
If you only enter a Town, Promap will search for
places and show you a list together with the type
of place (eg City, Village, Hamlet)
You can combine it with either:
· Organisation
· Building name/number and Street
· Street
· Partial or full Postcode
County
Enter a county.
You need to combine it with either:
· Organisation
· Building name/number and Street
· Street
Postcode
A full postcode will show you a list of all properties
in that postcode.
You need to combine a partial postcode with
either:
· Organisation
· Building name/number and Street
· Street
Place name
search
Enter the name of a natural feature (eg lake or
forest), farm or other special feature such as a
museum.
Ordnance Survey has some useful tips on how to
search using just this field: See
www.ordnancesurvey.co.uk/oswebsite/freefun/did
youknow/searchtips.html
OS Tile number
Enter a Tile number, e.g. TL5904SW.
Promap will convert the OS tile number you
provide in to the closest Easting and Northing
coordinates.
OS Easting
Enter the Easting, e.g. 461289
32
Promap User Guide
Text box
Description
OS Northing
Enter the Northing, e.g. 152283.
3. Click Search.
If Promap finds more than one result, it will display the Address Search Results dialog box. If it only finds one result, it will go straight to the
Address Search - Confirmation dialog box and you can go to To select a
map layer and marker style 32 for the next step.
You can click the Back button if the results are not the ones you wanted.
Then redefine your search.
4. On the Address Search - Results dialog box click the property you want to
see.
The Address Search - Confirmation dialog box will appear. At the top you
will see the property you selected.
You are now ready to display your map using the map layer selector. Go to To
select a map layer and marker style 32 .
See also
Choosing how to locate your map
Opening a saved map file
29
37
To locate a site without an address or OS Tile number
To search for sites to develop
36
To save a file for the first time
81
34
To select a map layer and marker style
When Promap has found your site, you can choose which map layer you would
like it displayed on. The Address Search - Confirmation dialog box lists all
the layers available to you.
If you've searched just by Town or by Place name, Promap will have
pre-selected the Town layer. All other searches have the Detail layer
pre-selected.
You can also select whether or not you’d like a site marker to indicate your site
on the map.
To select a map layer and marker style
1. Click the radio button
next to your preferred map layer to select it.
If you intend to look at a Detail map, it is a good idea to go to the Street +
Opening maps
33
layer first. This allows you to make sure you've found the right site before
you pay to see a Detail layer.
2. If you want to go straight to a Detail map, you can ask Promap to check
whether you already have a saved Detail map of the area. To do this, make
sure the tick box next to Check your saved maps for any that cover this
area is selected.
If you do have a map, Promap will allow you to view it and not pay the new
map access charge.
If you do not have a saved map, the Enter Expenditure Details popup box
will appear to warn you that you are about to do a chargeable action. Enter
a Project and Reference for your map view and this will be entered into
your accounting files. For more information on expenditure details go to
Enter Expenditure details 193
3. Decide whether or not to have a site marker by clicking the tick box next to
Display site marker as.
4. If you do want a site marker, choose a style from the drop-down menu
Marker Style
How it indicates the site
The tip of the arrow point rests on the site.
Arrow
The tip of the pin rests on the site
Pin
The site is at the centre of the circle
Circle
The site is at the centre of the cross
Cross
The tip of the arrowhead rests on the site.
Arrowhead
You can nestle a text box label in the corner
created by the wings of the arrowhead.
5. Click Go to map.
Promap will display your map on your selected layer.
6. Promap will display a Promap IQ window in the top right of the workspace
on all layers of mapping. This displays the number of planning
34
Promap User Guide
applications, point of interest and listed buildings near the centre of your
map.
Click on the View Full Details button to go to Promap IQ to configure and
view more detailed information spatially on a map. This will open Promap
IQ with a map of your site on the screen displaying data spots for planning
applications, listed buildings and points of interest. This can be refined by
using the configuration panel down the right hand side of the screen.
Note
You will see a Promap watermark in the background of the map. This will
not be visible on printed, exported, downloaded or copied-to-clipboard
maps. It is simply there as a security measure to comply with Ordnance
Survey Licensing agreements.
See also
To locate a new site
30
To locate a site without an address or OS Tile number
You may sometimes only know the general area where your site is. For
example: You're looking for a farm North of Oxford. In that case you can locate
the town on the Road or Town layer and then move around the map to find the
general area of where the site is. Next you switch to a more detailed map layer
such as Street + to find the exact location of your site. Finally, you switch to the
Detail layer and centre your map on the site.
To locate a site using just the Town search
1. Click the Address Search button
on the Menu bar.
2. If you already had a map loaded you will be prompted to save that map
before another is loaded. We recommend that you save any loaded map
before locating another.
The Address Search dialog box will appear.
3. Enter the name of the town nearest to your site in the Town text box.
4. Click Search.
Opening maps
35
If there are several towns to choose from, the Address Search - Results
dialog box will appear.
5. Click the town you want.
The Address Search - Confirmation dialog box will show you the m
atched address at the top.
6. Select the map layer where you want to start your search for the site.
If you're not sure of your site's address, you might want to start on the
Road layer.
If you're searching for a site to develop, you might want to start on the
Street layer.
7. Select the other options you want and click Go to map.
See To select a map layer and marker style
the options here.
32
for further information on
(If you're searching for a site to develop go to step 2 of To search for sites
to develop) 36
8. Now move around your map until you find a closer match to your site.
See To move around the map
41
for tips on how to do this.
9. Right-click the site area to centre it on your map.
10.Move to the next more detailed map layer.
11.Repeat steps 8 to 10 until you get to the Street + map.
12.If you're sure that you've located the right site, click the Detail map button.
13.The Enter Expenditure Details popup box will appear to warn you that
you are about to do a chargeable action. Enter a Project and Reference
for your map view and this will be entered into your accounting files. For
more information on expenditure details go to Enter Expenditure Details 193 .
The Detail map will appear.
If you now find that you have made a mistake, you could use your free
roaming allowance to search for the site you do want. However, you do not
need to search for your site on the Detail layer map. Although you have a
certain amount of free roaming, you will soon be charged if you move too
far away from the site. See Distances you can roam for free. 42
So if you think your site is a good distance away and it will be cheaper to
open a new Detail map, continue on to step 14 below.
14.Save the Detail map first by clicking the Save button
See To save a file for the first time 81 for details.
on the Menu bar.
15.Go back to the Street + map and search for your site.
16.When you've found it, centre it on the map by right-clicking it and click the
Relocate button
on the Map Navigation toolbar.
36
Promap User Guide
The Relocate dialog box appears.
17.Select the Detail map layer and click Create.
18.Click OK on the Enter Expenditure Details popup box that will appear.
A new Detail map will open centred on the new location you found in step
16.
You will be charged for viewing this new detail map.
See also
To search for sites to develop
To locate a new site
36
30
Choosing how to locate your map
29
To search for sites to develop
You may want to use Promap to find a site to develop. You will therefore want
to start your search in a general area perhaps near a town.
To search for sites to develop
1. Follow steps 1 to 6 in To locate a site without a postcode or grid reference
34 .
2. Now move around your map until you find a potential site to develop.
See To move around the map
41
for tips on how to do this.
3. Right-click the site area to centre it on your map.
4. Click the Detail map button.
5. The Enter Expenditure Details popup box will appear to warn you that you
are about to do a chargeable action. Enter a Project and Reference for
your map view and this will be entered into your accounting files. For more
information on expenditure details go to Enter Expenditure details 193 .
The Detail map will appear.
If you now find that the site is not suitable, you could use your free roaming
allowance to search for the site you do want. However, you do not need to
search for a site on the Detail layer map. Although you have a certain
amount of free roaming, you will soon be charged if you move too far away
from the site. See Distances you can roam for free. 42
So if you think your site is a good distance away and it will be cheaper to
open a new Detail map, continue on to step 6 below.
6. Save the Detail map first by clicking the Save button
See To save a file for the first time 81 for details.
on the Menu bar.
7. Go back to the Street + map and search for another site.
Opening maps
37
8. When you've found it, centre it on the map by right-clicking it and click
Relocate button
on the Map Navigation toolbar.
The Relocate dialog box appears.
9. Select the Detail map layer and click Create.
10.Click OK on the Enter Expenditure Details popup box that will appear.
A new Detail map will open centred on the new location you found in step
8.
You will be charged for viewing this new detail map.
See also
To locate a site without an address or OS Tile number
To locate a new site
34
30
Choosing how to locate your map
29
Opening a saved map file
By clicking the Open button
Promap allows you to search for and open
previously saved files. There are three different ways of finding the file you are
looking for:
Recent – Provides a list of your 10 most recently saved files
Browse – Lists your folders for you to browse looking for your file
Search – Allows you to search all your saved files using a keyword or grid
reference
When you open a previously saved file, the file will be loaded at the point where
you saved the map or aerial photograph, along with all the map layers and
aerial photographs that have been accessed or activated.
See also
To open a recent file
38
To open a saved file by browsing
To search for saved files
To close a map
40
39
38
38
Promap User Guide
To open a recent file
1. Click the Open button
on the Menu bar.
If you have a map already open, Promap will prompt you to save it. See
Saving files 80 for help.
The Open Map dialog box will appear.
2. Click the Recent tab.
You will see a list of up to 10 of your most recently saved files. The most
recently saved map file will appear at the top of the list.
3. Click the file that you want to open.
The file will be highlighted in grey.
4. Click Open.
The map will be displayed on your screen.
See also
To open a saved file by browsing
To search for saved files
38
39
To open a saved file by browsing
1. Click the Open button
on the Menu bar.
If you have a map already open, Promap will prompt you to save it. See
Saving files 80 for help.
The Open Map dialog box will appear.
2. Click the Browse tab.
The tab will split into two panes. Your folders will appear in the left-hand
pane.
3. Click the folder you want.
4. Promap will show any subfolders that the folder has below the folder, and
display any files it contains in the right-hand pane. If your map was saved in
a subfolder, click the subfolder and the files it contains will be displayed in
the right-hand pane.
5. Click the file you want to open.
The file will be highlighted in grey and a tick will appear in the tick box.
6. Click Open.
Opening maps
39
The map will be displayed on your screen.
Note
You will see a row of five buttons available to you at the top the
Browse window.
They allow you to organise your files. To learn how to use these see
Organising files and folders 83 .
See also
To open a recent file
38
To search for saved files
39
To search for saved files
Promap allows you to search for maps you have saved using a keyword or an
Easting and Northing.
Keyword search
The keyword, or keywords, you enter are checked against the file names,
descriptions and references you have entered when saving your files.
To search using a keyword
1. Click the Open button
on the Menu bar.
If you have a map already open, Promap will prompt you to save it.
See Saving files 80 for help.
The Open Map dialog box will appear.
2. Click the Search tab.
3. Type the word you would like to search for in the Keyword Search text
box.
4. Click Search.
Promap will display any files that contain the keyword you searched for.
5. Click the file that you want to open.
The file will be highlighted in grey.
6. Click Open.
The map will be displayed on your screen.
40
Promap User Guide
Easting and Northing search
Promap provides you with the ability to search for maps within any distance
of an Easting and Northing you have. For example, you may have a
reference for a new site and believe you have saved a map that covers that
area.
To search using an Easting and Northing
1. Click the Open button
on the Menu bar.
If you have a map already open, Promap will prompt you to save it.
See Saving files 80 for help.
The Open Map dialog box will appear.
2. Click the Search tab.
3. Enter the Easting and Northing you have in to the boxes provided.
4. Enter the radius from that point within which you like to search your
saved map files.
5. Click Search.
Promap will display any files that have a map within the radius area.
6. Click the file that you want to open.
The file will be highlighted in grey.
7. Click Open.
The map will be displayed on your screen.
See also
To open a recent file
38
To open a saved file by browsing
38
To close a map
· Select File>Close Map
Promap will prompt you to save the map. See Saving files
about this.
80
for information
Moving around the map
41
Moving around the map
Promap gives you several methods for moving around your map, as well as
being able to zoom in and out on the map.
You can move (also known as roam) as far as you like on all maps except the
Detail map. Here you have a certain amount of free roaming before you are
charged a small fee.
See the rest of this chapter for details.
To move around the map
· Use any of the ways below to move around the map. They each change
your point of view in different ways.
Do the following:
In order to:
Right click an area
Display it as the centre of the map
Click a panning arrow at the
edge of the map
Move the map ½ a map in that direction.
The options are: North, North-East, East,
South-East, South, South-West, West
and North-West
Click and drag the map
Move it in any direction
Alt + click and drag the map
Move the map when clicking a shape
you have drawn
Click Home
in the top left
of the window, on the Map
Navigation bar
Return to the location that you originally
searched for. Useful if you've roamed
away from your location. Only available
in the Detail map.
If you try to move outside the free roaming area on a Detail map the Enter
Expenditure Details dialog box appears. Promap is warning you that you will
be charged for viewing a Detail map.
Enter a Project and Reference in the Enter Expenditure Details dialog box.
When you click OK you are accepting the charge.
42
Promap User Guide
Now, each time you move around the map, there will be a small charge.
See also
Distances you can roam for free
To zoom in and out
42
42
Enter Expenditure Details 193
Distances you can roam for free
· Promap is designed to allow you to navigate your way around all the
mapping layers free of charge except for the Detail Layer map. In the Detail
Layer you can navigate or roam for 1,350m free of charge.
You can also roam for free within a fixed print frame of a saved map. You
need to have paid the initial print cost first.
· You will incur a roaming charge for roaming once you have used your free
allocation. Each additional 150 metres is chargeable. For costs please refer
to our current online price list: www.promap.co.uk/promap/pricing.jsp.
To zoom in and out
You can zoom in and out on the map you are viewing.
· When you zoom in, you can see details more clearly with larger features but
less map.
· When you zoom out, you see more of the map but smaller details.
To zoom in and out
1. Move your mouse scroll wheel forwards to zoom in or backwards to zoom
out of the map.
-orClick one of the Zooming tools.
The zooming tools are on the Map Navigation menu bar and look like this:
The magnifying glass with the plus sign on it is the zoom-in button. The
magnifying glass with the minus sign on it is the zoom-out button. With
each click of these buttons Promap zooms you in/out once.
The four bars between are set viewing levels that move you in or out
quicker.
Customising your map
43
Customising your map
Once you have successfully located and displayed your map, you may want to
customise it with the drawing tools available. The drawing tools are situated on
the left-hand side of your screen. They appear when you click the Drawing &
Measuring button.
This chapter will explain how to obtain area and length measurements and
customise your map with text boxes, symbols and freehand drawings.
Tip
If you want to customise your map and then print it, it's a good idea to
set and fix the print frame before you attempt any annotations or
measurements. This will make sure you don't make drawings outside
the print frame. See To set a print frame and scale 87 for details.
To delete the site marker
You can choose whether or not to show a site marker on the map to help you
find the location of your site. See To select a map layer and marker style 33
You can subsequently delete it from the map.
To delete the site marker
· To remove the site marker just from the map you are currently viewing, click
it once and press Delete on your keyboard.
It will still appear on other map layers unless you deselect the site marker
option on the Display Settings tab of the General Settings dialog box.
See To change display settings 158 .
Measuring objects on the map
You can use Promap’s measuring and drawing tools to measure and customise
your map in all of the map layers as well as aerial photography. You can get
the following measurements of a shape or line on your map: perimeter, area,
width, height and rotation.
Promap displays the drawing and measuring tools on the-left hand side of your
screen.
44
Promap User Guide
· You can switch the drawing tools on and off by clicking the Drawing &
Measuring button.
To use a tool, click its button. For example, the Fill tool.
The tool button will turn blue when you are using it
When you've finished using the tool, you need to turn it off by clicking the
button again. It will be grey after you've turned it off.
· When you click the tool button, the Shape Information popup opens in the
top right of the workspace. This will show you the measurements of the
shape you are drawing as you draw it. You can hide the popup by clicking
Hide Measurements in the bottom left of the screen.
This chapter will show you how to select objects to measure, perform specific
functions such as area and length measurements and how to check and
indicate clearance.
See also
What you see on screen
12
Selecting the shapes to be measured
Use one of the following tools on the Drawing & Measuring toolbar:
• Fill tool 44 . If the shape(s) you want to measure are single properties or
fields, you use the Fill tool.
• Shape tool 45 . If there are several shapes or areas that you want turn into a
single shape, you draw around them using Snap to Point 47 and the Shape
tool.
• Get length tool 47 . This allows you measure between two or several points
on the map, draw a line and can be used as a clearance tool.
To fill a shape
1. Open the Drawing & Measuring toolbar.
2. Click the Fill tool.
The Shape Information popup opens in the top right of the workspace.
45
Customising your map
You can hide it by clicking Hide Measurements in the bottom left of the
screen.
3. Click inside the closed shape that you would like to fill.
Promap will fill the closed shape with the fill and outline styles currently
selected in the Shape properties dialog box. To learn how to change
these settings see Shape Properties 61 .
The Shape Information popup will show you the perimeter and area of the
filled shape.
4. Fill any other shapes that you want to measure by clicking them.
5. Turn the tool off again by clicking it on the Drawing & Measuring toolbar.
Tips
· You should only fill fully closed shapes, i.e. shapes where there are
no visible gaps in the boundary. If there is a gap, the colour will spill
into other areas of the map.
· The Fill tool is only available on a Detail map.
See also
To see the measurements of shapes and lines
50
To annotate a map with a text box showing measurements
To label objects with a text box
51
54
To draw around a shape
1. Open the Drawing & Measuring toolbar.
2. Activate the Snap to Point dots by clicking the Snap to Point tool.
White and orange dots will appear on your map. See Snap to point
more information.
47
for
3. Click the Shape tool.
The Shape Information popup opens in the top right of the workspace.
You can hide it by clicking Hide Measurements in the bottom left of the
screen.
4. Zoom into the map so that you can see the shape and snapping points
clearly. See To zoom in and out 42 .
46
Promap User Guide
5. Click the snapping point on the map where you want to start drawing
around the shape.
6. Move the mouse cursor to the next point and click once more. You will
notice that as you move the mouse cursor, a line is drawn between the
current mouse location and the previous point.
As you draw around the shape, the Shape Information popup will show
you the accumulated lengths of the lines you have drawn, the length of the
line you are drawing and the positive and negative angle of the current line
with regard to the previous line.
7. Repeat step 6 for each point of the shape until the whole of the shape has
been drawn except for the last line.
If you make a mistake and want to move back a step, press Backspace on
your keyboard. The last segment drawn will be deleted.
8. Finish the shape either by double-clicking on the first point of the shape or
by clicking the Shape tool on the Drawing & Measuring toolbar.
Your shape has been created and the Shape tool is turned off. The Shape
Information popup will now display the perimeter and area of the shape.
9. To change the appearance of your shape, double-click it. This will bring up
the Shape Properties box. Please refer to Shape Properties 61 for further
help.
Tip
If you are drawing around a large area with many white points, you can
click the first point, then hold down the space bar and click the last
point. This automatically selects all the points in between two white
points. The line 'snaps' to the nearest map feature or digital data point
automatically.
However, if there is an orange point in-between, you will not be able to
snap to the line, as there is a change in the map feature. In this case
you must click the nearest white point before the orange point, then
click the orange point and then the final white point.
See also
To see the measurements of shapes and lines
50
To annotate a map with a text box showing measurements
To draw a building freehand
54
To label objects with a text box
54
51
Customising your map
47
Snap to point
Snap to Point allows you to switch on digital data points that Ordnance Survey
supply on a Detail Layer map. Click the Snap to Point button to switch on the
digital data points.
You will see white and orange dots appear on your map. These are the digital
data points. The orange dots denote the beginning of lines, end of lines and a
change in the map feature while the white dots indicate other changes in the
lines.
You can connect these points using the Shape tool to measure the exact area
of a site. You need to click every white and orange dot on the outline of the
shape to get an accurate measurement.
To obtain the exact distance from one point to another and to check clearance
from a specific point, you use snap to point with the Get Length tool.
Without Snap to Point the accuracy of any measurement is only as good as
your drawing skills.
See also
To draw around a shape
45
To draw a line between two points
To check clearance
47
48
To measure between two points
1. Open the Drawing & Measuring toolbar.
2. Activate the Snap to Point dots by clicking the Snap to Point tool.
See Snap to point
47
for more information.
3. Click the Get Length tool.
The Shape Information popup opens in the top right of the workspace.
You can hide it by clicking Hide Measurements in the bottom left of the
screen.
4. Click the snapping point on the map where you want to start measuring
from.
48
Promap User Guide
5. Double-click the point where you want to measure to.
Clicking a snapping point will give you the most accurate measurement.
However, this is not always possible
A completed line will appear on the map. The Shape Information popup
will display the length of the line.
6. Click the Get Length tool again to turn it off.
7. To change the appearance of your line, double-click it. This will bring up
the Line Properties box. See Line Properties 63 for further details.
See also
To see the measurements of shapes and lines
50
To annotate a map with a text box showing measurements
To label objects with a text box
51
54
To check clearance
1. Open the Drawing & Measuring toolbar.
2. Activate the Snap to Point dots by clicking the Snap to Point tool.
See Snap to point
47
for more information.
3. Click the Get Length tool.
The Shape Information popup opens in the top right of the workspace.
You can hide it by clicking Hide Measurements in the bottom left of the
screen.
4. Click the position on the map from where you would like to check the
clearance.
5. Press L on your keyboard.
A Length box will appear on your screen.
6. Enter the length of the clearance you would like to check and press Enter
on your keyboard.
The length of the line is now fixed.
7. Move your mouse.
Promap will rotate the line from that point 360 degrees allowing you to
check what is within that distance on the map.
8. Click the Get Length tool again to turn it off.
Customising your map
49
No line will be drawn on the map.
See also
To indicate clearance
49
To indicate clearance
1. Open the Drawing & Measuring toolbar.
2. Click the Circle tool.
3. Move the mouse pointer to where you want to start indicating clearance
from.
4. Click and drag the mouse to where you want indicate clearance to.
As you drag the mouse you will see the outline of the circle grow on the
map.
5. Release the mouse button.
6. To set a specific radius to your circle, press R on your keyboard.
A Radius box will appear on your screen.
7. Type in the radius you would like to set in metres. The maximum radius
allowed is 2000m.
8. Press Enter on your keyboard.
The circle radius will now be 'x' metres.
To change the appearance of your circle, double-click it. This will bring up
the Circle Properties box. Please refer to Shape Properties 61 for further
help.
9. Click anywhere on the map to turn the Circle tool off.
10.To resize the circle either click it and press R or click and drag the sizing
handle on the perimeter of the circle.
See also
To see the measurements of shapes and lines
50
To annotate the map with a text box showing measurements
To label objects with a text box
54
51
50
Promap User Guide
Annotating the map with measurements
Once you have selected your shape or line to measure, you can see its
measurements and place a text box showing those measurements on your
map.
To see the measurements of shapes and lines
1. If the Shape Information popup isn't already visible on screen, click the
shape or line that you have created when you used the Fill, Shape, Get
Length or Circle tool.
-orTo measure several shapes click the first one and then hold down the Ctrl
key on your keyboard while you click the other shapes.
2. Click Show Measurements in the bottom left of the screen.
The Shape Information popup will appear in the top right of the
workspace. It gives you the measurements of the single shape or the
aggregate shapes.
For more information on putting measurements on maps see To annotate a
map with a text box showing measurements 51
Tip
If you have drawn more than one object you may want to move from
one to the other without clicking. This is particularly useful if you have
drawn objects layered on one another. You can move from one drawn
object to another by pressing N and P on your keyboard. Press N once
to move you to the next drawn object on the map. Press P once to
move to the previously drawn object.
Customising your map
51
To annotate a map with a text box showing measurements
· With your shape(s) selected and the Shape Information box visible on
screen, click the T button next to the measurement you would like.See the
screenshot above.
Promap will place a text box with that measurement on the map.
If you want to add another measurement, the best thing to do is to add it to
the existing text box, rather than create another one. This is because if you
click another T button for a different measurement, its text box will be
placed on top of the first text box.
The popup will show different measurements depending on the type of
shape you have selected.
The format of the text box will be based on the most recent formatting that
was set in the Text Properties dialog box. See Text Properties 62 to learn
how to change the way the text box looks.
See also
To label objects with a text box
Advanced customisation
54
69
Finding a grid reference
Promap will supply you with an Easting and a Northing for any site on your
screen.
You can also see OS tile numbers and National Grid References for any point
on your map in real-time. As you move your mouse cursor around the screen
the co-ordinates are updated for you.
To obtain an Easting and Northing for a point on the map
1. Click Show Grid Reference in the bottom left of the screen.
The Grid Reference popup will appear in the top right of the workspace.
2. Click Get Gridref on the popup.
The mouse cursor will change to be an arrow and a question mark.
3. Click the site or building you would like the grid reference for.
A popup will appear giving you the Easting and Northing for the building or
site you selected.
4. Click Yes if you want to create a text box showing the reference.
The top left-hand corner of the box is placed at the point the reference is
for. If you move the box the reference is no longer accurate.
52
Promap User Guide
5. To hide the Grid Reference popup, click Hide Grid Reference at the
bottom of the screen.
Tip
· You can use this feature to find a site when you have an Easting and
Northing. Just move the question mark around the map and click the
site when you find the co-ordinates you're looking for.
· If you’d like to include the OS Tile number and the National Grid
Reference in the text box, double-click it. Type the co-ordinates you
want to add in to the top left hand corner of the Text Properties
dialog box and click OK. The co-ordinates you've added will be
displayed on screen.
To see grid references in real-time
1. Click Show Grid Reference in the bottom left of the screen.
The Grid Reference popup will appear in the top right of the workspace.
2. As you move your mouse cursor around the screen you will see Promap
update the information for you.
Click Hide Grid Reference to hide the popup.
See also
To obtain and Easting and Northing for a point on the map
51
Drawing shapes and symbols
You can draw the following shapes and symbols:
· Symbols
53
· Rectangles
– such as trees, triangles or arrows
53
– such as site markers or cars
· Rounded Rectangles
· Ovals
· Lines
53
– such as site markers or car parks
– such as site markers or ponds
53
· Arrows
53
53
– to point from a text box to your site or vice versa
– to connect objects
· Text boxes
54
– to label items on your map
· Freehand shapes
54
– such as buildings on a new development
Customising your map
53
To draw a symbol, regular shape, arrow or line
1. Open the Drawing & Measuring toolbar.
2. Click one of the following tools:
The Symbol tool
The Rectangle tool
The Rounded Rectangle tool
The Oval tool
The Arrow tool (choose this if you want to draw a line)
The Shape Information popup opens in the top right of the workspace. It
will show you the measurements of the object as you draw it. You can hide
it by clicking Hide Measurements in the bottom left of the screen.
3. Move your cursor over the position on the map where you want to start
drawing the shape.
4. Click and drag to where you would like the shape to end.
5. Release the mouse button and your shape will be displayed on the map.
To change the appearance of your shape or the type of symbol used, or
add or remove arrow heads from lines, double-click it. This will bring up
the Symbol, Shape or Line Properties box. Please refer to Changing an
object's colours and styles 61 for details.
6. Click anywhere on the map to turn the tool off.
See also
Editing shapes and lines
55
Moving, sizing and rotating objects
Advanced customisation
69
58
54
Promap User Guide
To label objects with a text box
1. Open the Drawing & Measuring toolbar.
2. Click the Text tool.
The Shape Information popup opens in the top right of the workspace.
You can hide it by clicking Hide Measurements in the bottom left of the
screen.
3. Move the cursor to where you would like the text box to start.
4. Click and drag the mouse diagonally to where you want the text box to stop.
As you drag the mouse you will see the outline of the text box grow on the
screen.
5. Release the mouse button and click anywhere on the map to turn the Text
tool off.
Promap will draw the text box using the fill and outline styles currently
selected for text boxes. Notice that the text box contains the text Your Text
Here which can be changed, along with the current style settings, by
double-clicking the text box. The Text Properties box will appear. Please
refer to Text Properties 62 .
See also
Moving, sizing and rotating objects
Advanced customisation
58
69
Annotating the map with measurements
50
To draw a building freehand
1. Open the Drawing & Measuring toolbar.
2. Click the Shape tool.
Don’t turn on Snap to Point.
The Shape Information popup opens in the top right of the workspace. It
will show you the measurements of the shape as you draw it. You can hide
it by clicking Hide Measurements in the bottom left of the screen.
3. Move the cursor to where you would like to draw your building and click to
start the line.
4. Press L on your keyboard to set the length of the line you would like to
Customising your map
55
draw. For example 10m.
5. Press Enter after entering the length.
6. Press A to set the angle of the line in a clockwise direction from its starting
point. For example 90º.
7. Press Enter after entering the angle.
8. Click to attach the next line.
9. Press A to set the angle of the next line from the previous segment or L to
adjust the length. For example 270º and 5m. Press Enter.
10.Click again to attach the third line.
11.Repeat the steps until your building is drawn.
Tip
If you are drawing a building freehand and want to move back a step,
press Backspace on your keyboard. The last segment drawn will be
removed.
See also
Editing shapes and lines
55
Moving, sizing and rotating objects
Shape Properties
58
61
Advanced customisation
69
Editing shapes and lines
You can change irregular shapes (polygons) and lines (polylines) while you are
drawing them by:
Deleting the most recently drawn line
or after you've closed a shape by:
Dragging an existing point out
Adding a new point
57
57
Removing an existing point
58
Opening a closed shape or line
56
56
56
Promap User Guide
To select an overlapping object
· If possible, click the object.
However, if there are several hand-drawn objects on a map overlapping each
other, you may find it difficult to select one. In that case you can select one at
random and then press either P or N on your keyboard to change which object
is selected.
P
(Previous)
Allows you to tab backwards through any
customisations you have made.
When you've drawn several objects and you need to
edit one or more, press P on the keyboard to select
each previous object.
N
(Next)
The same as pressing P, except it selects the next
object.
To delete the last line while drawing
At any point while drawing your shape you can press the Backspace key on
your keyboard to delete the most recently drawn line. Continue pressing
Backspace to delete multiple lines.
See also
Promap hot keys 190
To open closed shapes and lines
You can reopen any closed shape by clicking it and then pressing Enter on
your keyboard. This will reopen your shape at the point where you closed it and
enable you to delete lines, using the Backspace key, without having to delete
the whole shape.
See also
Promap hot keys 190
Customising your map
57
To add a point to a shape or line
1. Open the Drawing & Measuring toolbar.
2. Click the Add Point tool.
3. Click on the shape or line where you want to add the point. This should be
on the perimeter of the actual shape, not the outside selection square with
the black dragging handles.
Promap adds an additional point.
4. You can add more points in the same way.
5. Click the Add Point tool again to turn it off.
You can now drag the point out by clicking and dragging it. See To drag an
existing point out 57 .
See also
To delete a point from a shape or line
To open closed shapes and lines
58
56
To drag an existing point out
1. Open the Drawing & Measuring toolbar.
2. Click your shape to select it.
3. Move the mouse cursor over the point that you want to drag. This should be
a point on the perimeter of the shape, not the outside dragging handles.
The cursor changes to a hand
4. Click and drag the point to its new position.
5. Release the mouse button.
See also
To add a point to a shape or line
57
To remove a point from a shape or line
To open closed shapes and lines
56
58
58
Promap User Guide
To delete a point from a shape or line
1. Open the Drawing & Measuring toolbar.
2. Click the object in order to select it and to see where the points are.
3. Click the Delete Point tool.
4. Click on the point that you want to remove.
Promap removes the point from the shape or line and joins the points
either side of the removed point to close the shape or recreate the line.
5. You can remove more points in the same way.
6. Click the Remove Point tool again to turn it off.
Note
You can’t remove points from a three-pointed shape (triangles) or from
a two-pointed line.
See also
To add a point to a shape or line
57
To delete an object
1. Select the object by clicking it.
2. Press the Delete key on your keyboard.
See also
To select an overlapping object
56
Moving, sizing and rotating objects
You can move
59
, resize
59
and rotate
60
objects you've put on to the map.
Customising your map
59
To move your object
· Select the object by clicking it.
Move it by dragging
i. Move your cursor to the centre of the object.
The cursor changes to look like this
.
ii. Click and drag the object.
iii. Release the mouse button when the object is where you want it.
If you hold down the Shift button and then click and drag, you can
restrict the movement of the object to only going up or down.
-orMove it by nudging
· Press one of the arrow keys on your keyboard.
As you press an arrow key the object will move one pixel at a time.
See also
To select an overlapping object
56
To resize your object
1. Select the object by clicking it.
When the object is selected, Promap places a box with dashed lines
around the object. Black squares known as sizing handles appear on the
lines of the box.
60
Promap User Guide
2. Place your cursor over one of these sizing handles and the cursor will
change to show you in which direction you can resize the object, for
example:
3. Click and drag the sizing handle to resize the object.
4. Release the mouse button when the object is the right size.
Note
The aspect ratio is not maintained. The ratio of the object's width to its
height will therefore change and the object may looked stretched.
To rotate your object
1. Select the object you wish to rotate by clicking it.
Look at the centre of the object and you will see a circle. Coming out of the
circle is a thin black line and a small black box at the end of the line.
2. Place your cursor over the circle in the centre of the object and move it to
the right until you see the cursor change to a circular arrow.
3. Click and drag the arrow to rotate your object.
Customising your map
61
4. As you rotate the object, you can see the angle of rotation in the Shape
Information popup. If it's not on screen, click Show Measurements in the
bottom left of the screen.
Tip
Once you have hold of the rotation handle, you can make the rotation
line longer by dragging it. A longer handle will give you more control
over the rotation speed.
See also
To select an overlapping object
56
Changing an object's colours and styles
If you want to change the colour and style of anything that you have drawn on
your map you double-click it to display the appropriate Properties dialog box.
Shape properties
Text properties
61
62
Symbol properties
Line properties
63
63
Note
Promap will remember all the changes you make in the Properties dialog
box for the length of the session. However, if you log out and log in again
the standard settings will return.
Shape Properties
This will change the Outline and Fill properties for shapes you've created with
the Shape, Fill, (Rounded) Rectangle and Oval tools. You can set the
properties for these shapes independently from each other: Settings for an oval
will not affect settings for a rectangle, for example.
An identical dialog box will change the properties for circles. It has the title
Circle Properties.
· To display the Shape Properties dialog box double-click the shape on the
map.
62
Promap User Guide
Click OK to save your changes and close the dialog box.
Text Properties
This is where you can type the text for text boxes and change its properties.
· To display the Text Properties dialog box double-click the text box on the
map.
Other sections are the same as in Shape Properties.
61
Customising your map
63
Symbol Properties
This will change the properties for symbols.
· To display the Symbol Properties dialog box double-click the symbol.
Other sections are the same as in Shape Properties
58
.
Line Properties
This will change the properties for Lines and Arrows.
· To display the Line Properties dialog box double-click the line or arrow you
wish to change.
Other sections are the same as in Shape Properties
61
.
64
Promap User Guide
Changing the appearance of map features
A Detail layer map consists of features that can be switched off or changed in
appearance e.g. you can change the outlines of all the buildings to red or
remove them totally. To change any of the features, you need to use the
Legend tool.
This facility is only available in the Detail layer of mapping.
See also
To switch features on and off
64
To change the style and colour of a map feature
Colour schemes
64
65
To switch map features on and off
1. Open the Drawing & Measuring toolbar.
2. Click the Legend tool to open the map legend.
3. The Legend dialog box will appear on your screen listing all the map
features relating to detail maps.
To the right of each feature you will see a tick box. A green tick means the
feature is turned on and a red cross means the feature is turned off.
4. To turn a feature on or off, click the tick box.
5. Click OK.
Promap will now remember your selection for this map and the dialog box
will close.
See also
To change the style and colour of a map feature
64
To change the style and colour of a map feature
1. Open the Drawing & Measuring toolbar.
2. Click the Legend tool to open the map legend.
3. To change the appearance of any feature, double-click the feature’s name
Customising your map
65
in the list e.g. building outlines.
The Edit dialog box will appear.
4. To alter the Line style of a feature, click the down arrow to the right of the
style displayed and select the style you prefer.
5. To alter the Colour of the feature, click the down arrow to the right of the
colour displayed and select the colour you prefer.
6. The Sample view on the right will show you a preview.
7. Click OK on the Edit dialog box to apply your changes.
8. Click OK again to close the legend and return to your map.
You can save settings you have made in the Legend so that they can be
applied to future maps. These are called Colour Schemes. To learn more
about colour schemes, read Colour schemes 65 .
Note
When you save a map, the changes you have made in the Legend are
saved with it. It will look exactly the same when you open the map
again.
See also
To switch features on and off
64
Colour schemes
Promap allows you to set the colours and styles of Detail map features, using
the Legend tool, and save them in a folder. These saved colours and styles are
called 'Colour Schemes'. To find out how to change map features, see
Changing the appearance of map features 64 .
You can load a colour scheme at any time to a new map to give the map the
appearance you specified in the colour scheme. Colour schemes also provide
you with the ability to define a company colour scheme to be applied to new
maps. This makes it easy to define a corporate or project specific colour
scheme and to ensure that your mapping has a consistent appearance.
See also
To save a colour scheme
66
66
Promap User Guide
To save a colour scheme
1. Make your changes to the map features using the Legend tool.
See Changing the appearance of map features
64
for details.
2. Select Options>Colour Schemes>Save Colour Scheme.
The Save Colour Scheme dialog box will appear.
3. Click the folder you would like to save the colour scheme in. You will see
your Org(anisation) folder (available to everyone in the company), your
Group folder (available to users in that group) and your Private folder
(available only to you).
If you want to set this colour scheme as a default, you need to save it in
the Org\Colour_Schemes folder.
Promap will automatically put its name in the Folder Name box.
4. In the File name text box, type the name of your colour scheme, e.g.
Scheme 1. Enter a Description, e.g. red building outlines, and a
Reference, e.g. Development Team, if you wish.
5. Click Save.
Your colour scheme will be saved in the folder you specified.
Tip
You can move, delete and rename colour schemes
using the quick fire buttons shown here. The button that looks like an
open folder allows you to create subfolders to save your colour
schemes in. The final button is Properties and allows you to get
information about any selected colour scheme.
Select Options>Colour Schemes>Open and click the Browse tab.
The quick fire buttons will appear in the top right hand corner of the
Browse box. For further help, go to To organise files and folders 83 .
See also
To apply a saved colour scheme
To change general settings 157
To set user defaults 181
67
Customising your map
67
To apply a saved colour scheme
To apply a saved colour scheme to a map, ensure that you have opened a new
or saved map file before following the steps below.
To apply a default colour scheme
· Select Options>Colour Schemes>Apply Default Colour Scheme.
This will apply the default template that has been selected in the Settings
dialog box. See To change general settings 156 .
The administrator can set a default template for the entire company that
cannot be changed. If that is the case, you will not be able to change the
default in General Settings.
To apply a recent colour scheme
1. Select Options>Colour Schemes>Open Colour Scheme.
The Open Colour Scheme dialog box appears.
You will see a list of up to ten of your most recently saved colour schemes
with the most recent at the top.
2. Click the colour scheme you would like to use. It will be highlighted in grey.
3. Click Open.
Your colour scheme will now be applied to the map.
To apply an older colour scheme
1. Select Options>Colour Schemes>Open Colour Scheme.
The Open Colour Scheme dialog box will appear.
2. Click the Browse tab to see older saved colour schemes.
3. Click the folder and/or subfolder which contains the colour scheme you
would like to use.
4. Click the colour scheme you want to open.
Promap will highlight it in grey and tick the selection box to the left of the
colour scheme's name.
5. Click Open.
The colour scheme will be applied to the map.
68
Promap User Guide
To delete a colour scheme
You may want to delete saved colour schemes from time to time. For example,
when a specific project they were created for ends.
To delete a colour scheme
1. Select Options>Colour Schemes>Delete Colour Scheme.
The Delete dialog box will appear.
2. Click the folder containing the colour scheme you want to delete.
In the right hand panel all the colour schemes within this folder will appear.
3. Click the colour scheme you want to delete.
4. Click Delete.
Promap will ask you to confirm that you want to delete this scheme.
5. Click OK.
Promap will confirm that the colour scheme you selected has been deleted
successfully.
6. Click Cancel to close the Delete dialog box.
Advanced customisation
69
Advanced customisation
This section contains advanced customising features that are likely to be of use
and require a little more work with Promap to achieve. The features are useful
when you're creating a key or legend for your map.
You can use these features to edit objects you've drawn by:
· Copying
(cloning) an object
69
· Grouping
objects so that they can all be moved together
69
· Re-ordering
71
objects
· Aligning
72
objects
· Spacing
72
objects so that they match horizontally or vertically
· Sizing
73
objects to match other objects
· Locking
74
objects into place
· Locking
74
objects to the background
When you've created a drawing, you can save it in a drawing library
on other maps.
75
for use
To copy objects
If you want to copy any object you have drawn on your map i.e. make another
exact copy, you can clone it.
To copy objects
1. Select the object you want to clone by clicking it.
You will see sizing handles around the object.
70
Promap User Guide
2. Right-click the object and select Clone from the menu that appears.
An exact replica of your object will appear on you map. You will need to
move it.
See also
Moving, sizing and rotating objects
58
Changing an object's colours and styles
To delete an object
61
58
To select an overlapping object
Advanced customisation
56
69
To group objects
You can group objects so that they can all be moved as one.
To group objects
1. Select the objects you wish to group. There are two ways to do this
Selecting one by one
i. Start to select the objects you wish to group together by clicking
one of them.
ii. Hold down the Ctrl key on your keyboard and proceed to click the
other objects that you wish to group.
You will see small black boxes, called sizing handles, appear
around the objects you have selected.
iii. When you have selected all the objects you want to group, release
the Ctrl key.
Selecting by lassoing the objects
Advanced customisation
71
i. When no objects are selected, hold down the Shift key and click
and drag a lasso around the objects you wish to select. The lasso
will be a rectangular shape.
Start the click and drag action away from the objects so that you
don't accidentally select one of them.
ii. Release the mouse and then the Shift key when the lasso is
around all the objects.
Each object will be selected and have sizing handles around it.
2. Right-click the centre of one of the objects and select Group from the
menu that appears.
Your objects should now be grouped and have only one set of sizing
handles around the whole group.
3. To select the group for further editing, click the centre of one of the objects.
4. To un-group the objects, click one. Then right-click and select Un-group
from the menu.
See also
Moving, sizing and rotating objects
Advanced customisation
58
69
To re-order objects
Once you have drawn multiple objects in Promap you can re-order them. This
enables you to draw objects without having to remember to draw them in the
order you wish them to appear on your map. Every object you draw in Promap
is a separate layer.
To re-order objects
1. Click the object you want to re-order.
It will now have sizing handles around it.
2. Right-click the centre of the object and select Re-order from the menu that
appears.
3. Choose one of the following options:
· Send backward - to move your object back one layer
· Bring forward- to move it forward one layer
· Send to back- to place it beneath everything else
· Bring to front - to place it above everything else
72
Promap User Guide
See also
To select an overlapping object
Advanced customisation
56
69
To align objects
If you have drawn multiple objects you may wish to align them, i.e. to create a
legend or a key for the map.
To align objects
1. Click the object you want to align everything else with.
2. Use Ctrl+Click to select all the objects you want to align with the first
object.
3. Right-click the first object and select Align.
4. Choose one of the following options:
· Left - to align the objects with the left edge of the first object
· Right- to align the objects with the right edge of the first object
· Top- to align the objects with the top edge of the first object
· Bottom - to align the objects with the bottom edge of the first object
· Centre -to align the objects one on top of the other with all the centres
in the same place as the centre of the first object.
See also
To select an overlapping object
Advanced customisation
56
69
To space objects
Spacing allows you to space objects equally either horizontally or vertically
across the map. You can create a row or column of objects that have the same
spacing between them.
To space objects
To space objects equally you need to give Promap an example of the spacing
you would like. The objects also need to be roughly in a column or row.
1. Find two objects that you have drawn that have the spacing you want all the
objects to have. Click the first of these two objects.
Advanced customisation
73
2. Hold down the Ctrl key on the keyboard and click the second of the two
objects.
3. Use Ctrl+Click to select all the objects you want to space equally.
4. Right-click one of the selected objects and select Sizing & Spacing from
the menu.
5. Choose one of the following options:
· Space vertically - to match the vertical spacing between the first two
objects. Use this if you want to create a column of objects.
· Space horizontally- to match the horizontal spacing between the first
two objects. Use this if you want to create a row of objects
All the objects will now be equally spaced vertically or horizontally across
the map.
See also
To select an overlapping object
Advanced customisation
56
69
To size objects
Sizing allows you to change the sizes of objects to match other objects you
have drawn. All the objects need to be the same shape. This means, for
example, that you can make squares in a map key all the same size.
To size objects
1. Click the object that is the size you want the other objects to match.
2. Hold down the Ctrl key on your keyboard and click the object or objects
you want to change in size.
3. When all the objects have been selected, release the Ctrl key.
4. Right-click one of the selected objects and select Sizing & Spacing from
the menu.
5. Choose one of the following options:
· Make same height - to make all the objects the same height as the first
one selected
· Make same width- to make all the objects the same width as the first
one selected
· Make same size - to make all the objects the same size as the first one
selected
74
Promap User Guide
See also
Advanced customisation
69
To lock objects in place
Locking objects to the map means that you can no longer move them. This has
a variety of uses. For example, you may have drawn a complex shape on your
map and you could accidentally move the shape with your mouse.
To lock objects in place
1. Click the shape that you want to lock.
2. Right-click the selected object and select Lock from the menu.
Your shape will now be locked in place.
To unlock an object
· If you want to unlock your shape, repeat steps 1 & 2 and select Unlock.
Note
· You can still change the properties of the shape by double-clicking it.
· Objects that are locked cannot be grouped or re-ordered. You must
unlock the shape first.
See also
To select an overlapping object
56
To lock objects to the background
Locking objects to the background means that you can lock a shape
underneath the map data layer. This is a good method of making a colour fill
transparent on an object.
This works for a solid, symbol or fade fill. You can set a patterned fill to be
transparent on the Shape Properties 61 dialog box.
This feature only works on the Detail layer map.
To lock objects to the background
1. Click the shape that you want to lock to the background.
2. Right-click the selected object and select Special>Lock to background.
Advanced customisation
75
Your shape will now be locked below the Detail Map layer.
To unlock an object
· If you want to unlock your shape, repeat steps 1 & 2 above but select
Special>Unlock from background.
Note
· You can still change the properties of the shape by double-clicking it.
· Objects that are locked to background cannot be grouped or
re-ordered. You must unlock the shape first.
See also
To select an overlapping object
56
Drawing Libraries
You can save all types of drawings you make in a drawing library. This allows
you to use them again on your current map or future maps.
Each drawing library can store up to twenty user-drawn objects and you can
create as many drawing libraries as you want.
Drawing libraries that you create on a Detail map can only be used on that and
other Detail maps. Drawing libraries created on other map layers can be used
on all maps.
To create a drawing library
1. Open the Drawing & Measuring toolbar when you've opened a map.
2. Under the Drawing Libraries heading, click New.
Promap will open a new drawing library and place in the top right hand
corner of the map for you. As this is a new drawing library it will not contain
any objects.
It is best to save it now so that you don't lose any drawings you might add
to it. See To save a drawing library 76
3. Draw and click (to select) the object that you want to store in the drawing
library.
4. Right-click the object and select Special> Add to Drawing Library.
5. A Custom Drawing Properties dialog box will appear.
6. Type a description for the item in the box provided. You can also add any
notes that you may find useful i.e. measurements of the item.
76
Promap User Guide
7. Once you have completed the details, click OK and your item will be stored
in the drawing library.
See also
To open a drawing library
76
To save a drawing library
1. With a new drawing library open, click Save under the Drawing Libraries
heading.
The Save Drawing Library dialog box will appear.
2. Click the folder you would like to save in.
If you want to save in a new subfolder, you can click the New Folder
button and enter a name and click Submit. You will now have to select the
subfolder in the folder tree.
Promap will automatically put its name in the Folder Name box.
3. In the Drawing Library Name text box type the name of your drawing
library. Enter a Description and a Reference if you wish.
4. Click Save.
Your drawing library will be saved in the folder you specified.
See also
To open a drawing library
76
To open a drawing library
To open a recent drawing library
1. Open the Drawing & Measuring toolbar.
2. Click Open under the Drawing Libraries heading.
The Open Drawing Library dialog box will appear with the Recent tab
selected.
You will see a list of up to ten of your most recently saved drawing libraries
with the most recent at the top.
3. Click the drawing library that you want to open.
The drawing library will be highlighted in grey.
4. Click Open.
The drawing library will be displayed on your screen.
Advanced customisation
77
To open an older drawing library
1. Open the Drawing & Measuring toolbar.
2. Click Open under the Drawing Libraries heading.
The Open Drawing Library dialog box will appear with the Recent tab
selected.
3. Click the Browse tab to see older saved drawing libraries.
4. Click the folder and/or subfolder which contains the drawing library you
would like to use.
5. Click the drawing library you want to open.
Promap will highlight it in grey and tick the selection box to the left of the
drawing library's name.
6. Click Open.
The drawing library will be displayed on your screen.
Note
You can use the quick fire buttons
on the Browse
tab to move, delete and rename drawing libraries. The button that
looks like an open folder allows you to create subfolders to save your
drawing libraries in. The final button is Properties and allows you to
get information about any selected drawing library.
For further help, go to To organise files and folders
83
.
See Also
To use an item from the drawing library
To show or hide a drawing library
77
78
To use an item from the drawing library
1. Open the drawing library.
See To open a drawing library
76
.
2. Click and drag the object you want to use from the drawing library onto the
map.
You can now position or rotate the item using the normal methods. For
further help with doing this go to Moving, sizing and rotating objects 58 .
78
Promap User Guide
See also
Advanced customisation
69
To show or hide a drawing library
If your screen is getting crowded with objects and the drawing library is taking
up too much space, you can hide it by clicking Hide under the Drawing
Libraries heading.
To see it again, click Show.
To delete a drawing library
1. Select Options>Drawing Libraries>Delete Library.
The Delete dialog box appears.
2. In the left pane, click the folder that holds the drawing library.
The drawing libraries in that folder appear on the right.
3. Click the drawing library you want to delete.
4. Click Delete and then OK to confirm.
5. Click OK on the Delete dialog box to delete more drawing libraries
-orClick Cancel to close the dialog box.
See also
To organise files and folders
83
To convert a Promapcd drawing library to Promap on the web
Promap allows you to convert old Promapcd drawing libraries into Promap
drawing libraries for use over the Internet. Once a saved Promapcd drawing
library is converted, it is saved on to the Promap server in your organisation’s
folder.
To convert a Promapcd library
1. Select Options>Drawing Library>Convert Drawing Library.
2. The Pick Promapcd Drawing Library to Convert to Promap dialog box
will appear.
3. Select the drive and folders that contain your Promapcd drawing library on
your computer.
Advanced customisation
79
4. Click the drawing library you want to convert. It will be highlighted in blue to
show it’s selected.
5. Click Open.
The Save Drawing Library dialog box will appear. The drawing library
name will be the same as Promapcd drawing library name.
6. You can select a different destination folder by clicking the folders in the left
hand pane.
7. Enter a description and reference into the text boxes provided if you wish.
8. Click the Convert button and Promap will convert your drawing library for
you.
To open the converted drawing library, see To open a recent drawing
library 76 .
80
Promap User Guide
Saving files
We recommend that you save every map or aerial photograph you pay for. As
you work, Promap will prompt you to save files frequently. At the risk of
sounding prescriptive, It is best practice to save your files at regular intervals, in
addition to the prompts from Promap. That way, if your computer should crash
for any reason, you won't have lost too much work.
Any map file you save is saved on our server, not on your computer. Promap
will not allow you to save a Promap file on your computer. This has the
following advantages:
· Provides a secure place to store your files
· Keeps your company's computers disk space free
· Allows you to search for saved Detail maps with the same location as a new
site
· Gives you a ready-made folder structure to store map files, templates, and
colour schemes. You can create your own subfolders if you wish.
When you save your map or aerial photograph, Promap saves all the map
layers that you have looked at together with any customisations you have
made. By clicking the Save button, you save a whole set of map layers and/or
aerial photographs and not just the map or aerial photograph displayed on your
screen at the time. This is why we talk in terms of 'Saving Files'.
The only exception to this is historical maps. These cannot be viewed or saved
within the Promap software. Once you have purchased historical maps you can
save them on your computer as either PDF or GIF files.
You can also save a copy of any printed map and aerial photograph as an
image file (.bmp, .png, .gif, jpeg or .tiff) on your computer.
See also
To save a file for the first time
To save an existing file
81
82
To save changes to a read only file
To create a new folder
82
To organise files and folders
83
82
Saving files
81
To save a file for the first time
1. Click the Save button
on the Menu bar.
2. The Save Map dialog box will appear with the last folder that was saved in
selected.
On the left-hand side you can see the list of folders. You can save your file
in the Org.(your company name) folder (available to everyone in the
organisation), or your Private.(your name) folder (available only to you). If
you are a member of a group, you can also save the file in your Group.(
group name) folder (available only to users in that group)
3. Click the folder you would like to save in.
4. The folder's name appears in the Folder Name text box.
5. Fill in the following text boxes:
Titles
Description
File name:
Enter a short descriptive name for your
map or aerial photo.
Description:
Enter a description of the file you are
saving. This becomes useful as your
saved file collection grows and you need to
use the search function in Promap.
Reference:
Allows you to enter a reference code of
your own choosing. You may wish to enter
a unique project code, client name or the
reference you entered into your
expenditure details.
6. If you want to make the file read-only, click the tick box next to Make this
map read only. Read only is useful in preventing people accidentally
overwriting your maps. This means that if you want to save any further
changes to the map, you need to unlock it first. See To save changes to a
read only map 82 .
7. Click Save.
See also
To save an existing file
To create a new folder
82
82
82
Promap User Guide
To save an existing file
1. Click the Save button
on the Menu bar.
The Save File dialog box will appear.
The file's current folder, name, description and reference will be visible.
2. If you want to give the file a different name or save it in a different folder,
select a different folder and/or type a new name in the File name text box.
3. If you want to make the file read-only, click the tick box next to Make this
map read only.
The map will now be locked. This means that if you want to save any
further changes to the map, you need to unlock it first. See To save
changes to a read only file 82 for details.
4. Click Save.
See also
To save a file for the first time
81
To save changes to a read only file
1. If you would like to save changes to a read-only file you will need to unlock
it first. Click the Save button
and the Save Map dialog box will appear.
There will be a closed lock
before the map file's name.
2. Select the file's name and click the unlock button
corner of the dialog box.
in the top right hand
This will unlock the file enabling you to save any changes to the maps.
See To save an existing file 82 .
To create a new folder
1. Click the Save button
on the Menu bar.
2. In the Save File dialog box click the folder in which you'd like to create a
subfolder.
This will be the parent folder.
3. Click the New Folder button
box.
in the top right-hand corner of the dialog
A New Folder text box will appear.
4. Type in the name of the subfolder you want to create.
Saving files
83
5. Click Submit and OK to confirm.
Promap will return you to the original Save Map dialog box without a folder
selected.
6. Click the parent folder and the new subfolder will appear.
You can now save files in that folder.
Promap will allow you to create as many subfolders and as many levels of
folders as you like.
Note
· A folder name and reference can contain any character except ¦ “ %
& + # \.
· A folder description can contain any character except ¦ ” % & + # |.
· If you don’t specify a parent folder for your subfolder, it is
automatically placed under your Private folder.
· Names of folders, maps and other objects are case insensitive. If
you save a map file with the name 'MIXEDcase', it will overwrite one
called ‘'mixedCASE' The name of the map will still appear as you
typed it originally.
See also
To organise files and folders
83
To organise files and folders
When you click the Open button in Promap and then select the Browse tab,
you will see a row of buttons. They give you fast and easy ways to:
Move files from one folder to another
Create subfolders to organise your saved files more efficiently
Delete files and folders
Rename files and folders
See information about any saved maps and aerial photographs
To organise files or folders
1. Click the Open button
tab.
and on the Open dialog box click the Browse
The quick fire buttons will appear in the top right hand corner of the dialog
84
Promap User Guide
box.
2. Do one of the following:
Move a file
i. Select it.
ii. Click the Move Files button
.
iii. Click the folder you want to move it to in the left-hand folder tree.
iv.Click Move.
Delete a file
i. Select it.
ii. Click the Delete button
.
iii. Click OK to confirm.
Delete a folder other than an Org, Group or Private folder
i. Move or delete any files that are in the folder.
ii. Select the folder you want to delete.
iii. Click the Delete button
.
iv.Click Submit and then OK to confirm
Create a subfolder to store files in
i. Select the folder in which you want to create a subfolder.
ii. Click the New Folder button
.
iii. Enter the name of the new folder.
iv.Click Submit and OK to confirm
Rename a file or folder
i. Select the file or folder you want to rename.
ii. Click the Rename button
.
iii. Enter the new name.
iv.Click Submit and OK to confirm.
See the properties of a file
Saving files
85
i. Select the file.
ii. Click the Properties button
.
iii. You will see the file's name, description, reference and which layers
have been accessed and saved.
iv.Click OK to close.
3. Click Cancel on the Open dialog box to close it.
To convert PromapCD maps
· Promap allows you to convert old Promapcd saved map files to maps for use
over the Internet. Once a saved Promapcd map is converted, it is saved on the
Promap server.
· Map colour schemes, customisation, the data export frame and the print
frame are preserved when converting maps.
· If you have several maps that you want converted, contact us at
[email protected], we will convert the maps and load them on
to Promap for you. If you have less than 50 maps to convert you can attach
them to the email you send us.
To convert a PromapCD map
86
Promap User Guide
1. Select File>Convert Map.
The Pick Promapcd map to convert to Promap dialog box will appear.
2. Browse to the folder that contains your PromapCD maps so that it
appears in the Look in box.
Click the map you want to convert. It will be highlighted in blue to show
it’s selected.
3. Click Open.
The Save File dialog box will appear.
Promap will automatically direct the map to be saved in your private
folder and the subfolder called Converted.
The map name will be the same as Promapcd map.
4. You can select a different destination folder by clicking the folders in the
left hand pane.
For help with saving the file see To save a file for the first time
81
.
5. Enter a map Description and Reference in the boxes provided.
6. Click the Convert button.
Promap will begin the conversion process. Most maps are converted
very quickly. If Promap is going to take some time to convert the map
you will be told.
Promap will display your converted map on the screen.
See also
To organise files and folders
83
Printing
87
Printing
This chapter covers in detail how to:
· Select an area and scale for printing
87
· Insert your company logo, a header and footer
· Print a map
92
91
Note
Printed maps supplied by Ordnance Survey remain Crown Copyright.
This means that before photocopying or duplicating an OS map printed
from Promap, you must purchase an Ordnance Survey Paper Map
Copying Licence.
You can purchase an Ordnance Survey Paper Map Copying Licence
from Ordnance Survey. This licence entitles you to unlimited free
copies of maps once the initial print cost has been paid. See Ordnance
Survey Paper Map Copying Licence 102 for further details.
To set a print frame and scale
When you are ready to print your map you need to define the area that you
want to print and select the scale the map will print to. Printing the map to scale
will ensure recipients of the map can scale off the map.
To set the print frame and scale
1. Open the printing tools by clicking the Printing button on the toolbars pane.
2. Click the Set Print Frame button
The Print Preferences dialog box will appear.
3. Select the paper size from the Paper Size drop-down list.
The two A4 size options are a little different from the usual:
.
88
Promap User Guide
Paper size
Description
A4
A layout with large margins. Useful for adding
headers and footers and a company logo.
Gives you space for a binder.
A4 large
A layout with small margins. You can add a
small header and logo. Difficult to bind.
4. Click a radio button
landscape.
to select the orientation you would like: portrait or
5. Choose whether to print to a variable scale or a set scale:
Scale
Description
Variable
Promap will allow you to adjust the size of the
print frame. See To stretch a variable scale
print frame 89 .
Set at a specific scale
Either click one of the suggested scales e.g.
1:1250 or type the scale you would like in to
the Custom Scale text box. Promap will
accept typed scales between 1:50 and
1:10,000.
6. Click the Apply button.
A blue rectangle will appear over your map. This is the print frame. This
frame is defining the area you wish to print; everything inside the frame
would print if you printed the map.
7. If the frame doesn't cover the right amount of land, click one of the other
set scale options and click Apply again.
8. When you are happy with your selections, click OK.
The Print Preferences dialog box will close and the print frame will be left
your map. At the top of the print frame you will see:
· The paper size you selected
· The current printable scale in parenthesis
· The initial print cost of the map if you choose to print
· The area of land contained within the print frame
9. Now go to To fix a print frame
90
for the next step.
Printing
89
Note
When the print frame changes in size or the scale is adjusted, Promap
recalculates the cost of printing the map and displays it at the top of
the print frame.
See also
To move a print frame
To centre a print frame
89
90
To stretch a variable scale print frame
Only stretch a print frame if you've selected the Variable Scale option on the
Print Preferences dialog box. See Setting the print frame and scale 87 . If you
stretch a scaled map, the scale will be lost.
To stretch a variable scale print frame
1. Move your cursor over the handles (black boxes) around the outside of the
print frame.
The mouse cursor will change to
.
2. Click and drag the frame to the size you would like it to be.
Promap will adjust the print frame to the size you have requested.
3. If the print frame is no longer centred on the screen, click the Centre Print
Frame button.
Note
When the print frame changes in size or the scale is adjusted, Promap
recalculates the cost of printing the map and displays it at the top of
the print frame.
To move a print frame
You may want to move your print frame to show main roads or other sites in
relation to the site you want to print.
To move the print frame
1. Ensure your print frame is blue before attempting to move it. If it is red, then
90
Promap User Guide
it's fixed. You can unfix it by clicking the Fix Print Frame button.
2. Click the print frame to select it.
3. There are two ways to move your print frame, dragging and nudging.
Action
Description
Dragging
Click in the centre of the frame and drag it to
where you want it to be.
Nudging
Click in the centre of the frame and press one
of the arrow keys on your keyboard. This
moves the frame one pixel at a time.
Holding the Shift key down on the keyboard
at the same time will increase the speed of
nudging.
To centre a print frame
This feature allows you to re-centre the print frame on your screen after you've
moved the frame or roamed away from it.
To centre the print frame
· Click the Centre Print Frame button.
Promap will place your print frame in the centre of your screen.
To fix a print frame
Once you have positioned the print frame you will need to fix it in place. This
allows you to print or customise your map without fear of changing any of the
settings.
To fix a print frame
1. Click the Fix Print Frame button to fix the print frame in place.
The print frame will turn from blue to red to denote that it is fixed in place.
Printing
91
2. To change the selected print area, click the Fix Print Frame button again
to unfix the print frame. You can then move the print frame by dragging or
nudging.
3. To change the paper size, orientation or scale, click the Set Print Frame
button twice (with a pause between clicks).
The frame will be removed and the Set Print Preferences box will
reappear.
4. Now either add a logo, header and footer
92
or print
91
the map.
Note
If you unfix the print frame after you have done the initial print and
move it or change the scale, the next print will be treated as an initial
print and you will be charged accordingly.
See also
To move a print frame
89
To set a print frame and scale
87
To print a map
1. You need to set 87 and fix
header and footer 92 .
90
a print frame first. You can also add a logo,
2. Click the Headers & Footers button if you'd like to preview the way the
printed map will look before actually printing it. Click the button again to go
back to the map.
3. Click the Print button.
The Print dialog box will appear.
You can check the cost and print scale under the Map Details heading.
4. Select the printer you would like to use to print.
If you have a pdf printer driver installed on your computer you can choose
that in order to create a pdf file. You can then easily email it to other
people.
5. You can choose to print more than one copy by increasing the number
shown in the Number of Copies box.
6. If you are unsure if you are connected to the printer correctly you can check
by clicking the Test Print tick box. When you click Print, a test print will be
92
Promap User Guide
printed free of charge. A test print will only print user drawn features, not
mapping information.
7. Click OK.
8. The Enter Expenditure Details box will appear to warn you that you are
about to do a chargeable action. Enter a Project and Reference for your
map print and this will be entered in to your accounting files. For more
information on expenditure details go to Enter Expenditure Details 193 .
9. Click OK.
10.The Save Map dialog box will appear on your screen.
All detailed maps printed through Promap include a 12 month licence.
Once that period has ended, if you wish to print the map again you will be
charged. Once you have paid for the initial print any further copies you
print within the twelve month licence period will either cost you a nominal
amount or will be free if you have an Ordnance Survey Paper Map Copying
Licence. We strongly recommend that you save your map now to avoid
paying a first print charge again within the twelve month licence period.
All detailed maps printed through Promap will automatically contain a North
Point in the top right hand corner, the scale of the map, and a scale bar.
See the Saving
80
chapter if you need help saving your map.
11.Once you've clicked Save or Cancel, the map will print.
See also
Ordnance Survey Paper Map Copying Licence 102
Print layout: logos, headers and footers
Before you print a map you can add a logo, a header and a footer in the
margins around the map. You may want to give your map a title in the header
and use the footer for a disclaimer. Promap maps are printed centred on the
page so that you can include them easily.
Promap allows you to save a copy of your header, footer and logo preferences
as a print template. These can be saved in your Promap folders just like saved
map files. You can reload a saved print template later to give a new map the
same logo, header and footer.
The print template used when you save a map is saved along with the map.
This means that changing a saved template after it has been applied to a map
will not change the map’s layout.
The administrator can set a default template for the entire company. If that is
the case, you will not be able to change the default in General Settings.
See the rest of the chapter for details.
Printing
93
To add a header or footer
1. You need to set
87
and fix
90
a print frame first.
2. Click the Headers and Footers button on the Printing toolbar.
The Print Layout Setup dialog box will appear. You will also see a preview
of your printed map.
3. Type the header or footer text you would like in the Header or Footer text
box.
4. You can now either click Apply to see how it looks.
-orClick the Show Fonts & Logos button to format the text.
The Show Fonts & Logos dialog box appears and your header or footer
text will appear in the Header and Footer text boxes.
5. To change the size or style of the text, click the Header Font button to
change the header or the Footer Font button to change the footer.
The Font dialog box will appear. Make the selections you want and click
OK.
If you'd like to add a logo, see To add your company logo
93
.
6. Click OK.
The changes will appear on the map.
7. When you're happy with the way the text looks, click the Apply and Print
button on the Print Layout Setup dialog box. The Print dialog box will
appear. Go to step 4. in To print a map 91 .
-orClick Apply and then Cancel if you just want to save the header and footer
in a template and go to step 5 in To create a template 95 .
To add your company logo
Promap can only accept logos that are in a Windows Metafile format. If your
logo is in a different format such as a bitmap (.bmp) or jpeg (.jpg) ,you can
convert to a .wmf using an image editor such as Paint Shop Pro.
If you would like help converting your company logo, contact Technical Support
on 0844 844 9961 or email your logo to [email protected] and we'll convert
it for you.
94
Promap User Guide
To add a logo
1. You need to set
87
and fix
90
a print frame first.
2. Click the Headers and Footers button on the Printing toolbar.
The Print Layout Setup dialog box will appear. You will also see a preview
of your printed map.
3. Click the Show Fonts & Logos button.
The Show Fonts & Logos dialog box appears.
4. Click one of the following buttons:
Button
Description
Logo right
The logo will appear in the top right-hand
corner of the page.
Logo left
The logo will appear in the top left-hand
corner of the page
Logo bottom
The logo will appear in the bottom right-hand
corner of the page
The Select Windows Metafile dialog box will appear.
4. Find the graphic file that contains the logo and click Open.
Promap will return you to the Show Fonts & Logos box. To the left of the
placement button you selected e.g. Logo Right; you will see the pathway to
your logo. It will look similar to this: I:\Training\Landmark Information Group
logo.wmf
5. If you would like to add a header and footer see To add a header or footer
93 .
-orIf you don't want to add a header or footer click OK.
6. Click Apply and Print if you're happy with the layout and you want to print
the map. The Print dialog box will appear. Go to step 4. in To print a map
91 .
-orClick Cancel if you want to save the logo in a template and go to step 5 in
Printing
To create a template
95
95
.
To create a template
1. Open a saved file or locate a new map.
See Opening a saved map file
or Opening a new map file
29
29
.
2. Set a print frame on your map.
See To set a print frame and scale
87
.
You will not have to print the map or accept a charge in order to create a
template.
3. Create a header or footer, but click Apply and then Cancel on the Print
Layout Setup dialog box.
See To add a header or footer
93
.
4. Add a logo, but click Apply and then Cancel on the Print Layout Setup
dialog box.
See To add your company logo
93
.
You now need to save your template.
5. Select Options>Print Layouts>Save Layout on the menu bar.
The Save Print Layout box will appear.
6. Click the folder you would like to save in to e.g. Org. Promap automatically
puts its name in the Folder Name box.
7. In the Print Layout Name text box type a name for your template. Enter a
Description and a Reference if you wish.
8. Click the Save button.
The print layout in your currently open map will be saved as a template.
See also
To use a template
95
To create a read-only print template 182
To use a template
To apply a template
1. With a map open and a print frame fixed, click the Headers and Footers
button.
96
Promap User Guide
The Print Layout Setup dialog box will appear.
2. In the Print Template drop-down list select the template you'd like to use.
3. Click Apply and Print if you're happy with the layout and you want to print
the map.
If you'd like to make changes to the template, see To overwrite a template
98 .
Note
You can also use a template by selecting Options>Print Layouts>
Open and then selecting the print layout you'd like to apply. However,
you won't be able to check what it looks like unless you click the
Headers and Footers button.
To apply a default template
· Select Options>Print Layouts>Apply default.
This will apply the default template that has been selected in the General
Settings dialog box. See To change general settings 156 for details.
The administrator can set a default template for the entire company that
cannot be changed. If that is the case, you will not be able to change the
default in General Settings.
See also
To set a print frame and scale
To fix a print frame
To print a map
87
90
91
To create a template
95
To edit a template
1. With a map open, click the Headers and Footers button.
The Print Layout Setup dialog box will appear.
2. In the Print Template drop-down list select the template you'd like to edit.
3. Its headers or footers will appear in the Header Text and Footer Text text
boxes.
4. Click the Show Fonts & Logos button to format the text or change the
logo.
Printing
97
The Show Fonts & Logos dialog box appears and your header or footer
text will appear in the Header and Footer text boxes.
5. To change the size or style of the text, click the Header Font button to
change the header or the Footer Font button to change the footer.
6. The Font dialog box will appear. Make the selections you want and click
OK.
7. To change the logo do one of the following:
To
Do this
Replace a logo in the
same position
Click the logo position button (eg Logo Left)
and open a different logo file.
Remove a logo
Click the Clear button next to the logo you
want to remove.
Put the logo in a
different position
Click the Clear button next to the logo you
want to move. Then click the logo position
button where you want the logo to be and
open the logo file.
See To add your company logo
93
for details.
8. Click OK.
The changes will appear on the map.
9. Click Cancel on the Print Layout Setup dialog box.
-orIf you just want to use these changes for this one map, go to To overwrite
a template 98 .
10.Select Options>Print Layouts>Save on the menu bar.
The Save Print Layout box will appear.
11.Click Save.
-orGive the template a different name in the Print Layout Name text box and
then click Save.
98
Promap User Guide
Note
You can edit a template so long as the administrator hasn't made it
read-only. If your administrator selected read-only, the read-only check
boxes on the Show Fonts & Logos dialog box will be ticked.
To overwrite a template
You can change one aspect of a template for a one-off map print.
To overwrite a template
1. Follow the steps 1 to 8 in To edit a template
96
.
2. Click Apply and Print if you're happy with the layout and you want to print
the map.
The changes you've made to the template will not be permanently saved,
but will apply to this map.
Note
You can overwrite a template so long as the administrator hasn't made
it read-only. If your administrator selected read-only, the read-only
check boxes on the Show Fonts & Logos dialog box will be ticked.
To delete a template
1. Select Options>Print Layouts>Delete on the menu bar.
The Delete dialog box will appear.
2. Select the template you want to delete in the Org\Print Layouts folder, by
clicking the tick box before it.
3. Click Delete.
4. Click OK to confirm.
5. Click Cancel to return to your map
-orClick OK to delete more templates.
See also
To organise templates
99
Printing
99
To organise templates
If you need to move, delete, or rename templates, you can use the quick fire
buttons in the Open dialog box.
To organise templates
1. Select Options>Print Layouts>Open on the menu bar and click the
Browse tab.
2. The quick fire buttons will appear in the top right hand corner of the dialog
box.
3. Do one or more of the following:
Move a template
i. Select it.
ii. Click the Move Files button
.
iii. Click the folder you want to move it to in the left-hand folder tree.
iv.Click Move.
Delete a template
i. Select it.
ii. Click the Delete button
.
iii. Click OK to confirm.
Delete a folder other than an Org, Group or Private folder
i. Move or delete any templates that are in the folder.
ii. Select the folder you want to delete.
iii. Click the Delete button
.
iv.Click Submit and then OK to confirm
Create a subfolder to store templates
i. Select the folder in which you want to create a subfolder.
ii. Click the New Folder button
.
iii. Enter the name of the new folder.
iv.Click Submit and OK to confirm
100
Promap User Guide
Rename a template
i. Select the template you want to rename.
ii. Click the Rename button
.
iii. Enter the new name.
iv.Click Submit and OK to confirm.
See the properties of a template
i. Select the template.
ii. Click the Properties button
.
iii. You will see the template's name, description, reference, header
and footer text.
iv.Click OK to close.
4. Click Cancel on the Open dialog box to close it.
Using a map in other applications
Once you have printed a map, you can download electronic copies of the map
as a bitmap (.bmp), .jpeg , .gif, .png or .tiff file on your computer. This allows
you to paste the map into other applications and documents, i.e. PowerPoint or
Word.
You can also copy it to the clipboard and then paste it into another application.
You may only download or copy images when permitted under the terms and
conditions of your licence. Use of general screen capture tools to obtain
mapping images is not permitted within Promap and a breach of Crown
Copyright.
See also
To download a map 100
To copy a map to the clipboard 102
To download a map
1. If you haven’t printed the map yet, set and fix the print frame around the
area you’d like to download. See To set the print frame and scale 87 and
To fix the print frame 90 .
2. Click the Download as JPG button on the Printing toolbar.
3. A Save As dialog box will appear on your screen.
Printing
101
This will save the file on your computer.
4. Choose a folder to save your file in.
5. Type a name for your image in the File name text box.
6. Select a file format in the Save as Type drop-down box and click Save.
You can save in jpeg, tiff, bmp, gif or png format.
If you haven’t printed the map, the Enter Expenditure Details dialog box
will appear to warn you that you are about to be charged. Enter a Project
and Reference for your map print and click OK. This will be entered in to
your accounting files.
For more information on expenditure details see Enter Expenditure Details
193 .
7. The Save Map dialog box will appear on your screen. This allows you to
save the map on the Promap server. We strongly recommend that you
save your map now to avoid paying a first print charge again. If you need
help saving your map go to To save a file for the first time 81 .
8. Click Save and Promap downloads the file in the requested format onto
your computer.
You can now open the file in other programs or email it to another person.
9. If you've downloaded your map and paid the initial print cost at the same
time (ie you hadn't printed it before downloading it), Promap will take you to
the Next Action page. See Selecting your next action 103 for details.
Note
Your downloaded map will have a North Point, the Promap logo and
copyright statement, any objects you've added and any colour scheme,
grid line and legend preferences.
See also
Ordnance Survey Paper Map Copying Licence 102
102
Promap User Guide
To copy a map to the clipboard
You can copy a map to the clipboard once you have printed it.
· Select Print>Copy to Clipboard.
The map will be copied to the clipboard. You can now paste the map into
other programs.
Note
Your copied map will have any objects you've added and any colour
scheme, grid line and legend preferences.
See also
Ordnance Survey Paper Map Copying Licence 102
Selecting your next action 103
Ordnance Survey Paper Map Copying Licence
Printed maps supplied by Ordnance Survey remain Crown Copyright. This
means that before photocopying or duplicating an OS map printed from
Promap, you must purchase an Ordnance Survey Paper Map Copying Licence.
Once you have purchased an OS licence subsequent OS map prints from
Promap made within the 12 month licence period will incur no further charge.
You can also photocopy maps.
All detailed maps printed through Promap include a 12 month licence. Once
that period has ended, if you wish to print the map again you will be
charged.
See also
Using the Ordnance Survey Paper Map Copying Licence 182
Selecting your next action
103
Selecting your next action
The Next Action page gives you an at-a-glance overview of the different actions
available in Promap. It will appear when you've completed a task such as:
· Printing or exporting a map
· Buying an aerial photograph or historical map
· Downloading a map having not printed it first. (You will have paid an initial
print cost for downloading the map)
· Looking at an Enviroscreen report
Below is an explanation of what you could do next
Download as JPG
Click this to download a map as a bmp, jpeg, gif, png or tiff file. If you have not
just printed your map, you will need to click Go Back to map first and set and
fix the print frame. See To download a map 100 .
Copy to Clipboard
Click this to copy a map to the clipboard. You need to have printed the map
before being able to copy it to the clipboard.
New Address Search
Click to search for a new site. See Opening a new map file
29
.
Go Back to Map
Click to return to your map at the position you were previously.
Select next action area
Mapping, prints and exports
This shows you a list of other maps you can buy to print or export. It shows the
map style and scale. Click a map name to see it. If you click a Print option, the
Printing toolbar will open and you will be asked to set the print frame on the
map. See To set a print frame and scale 87 . If you click an Export option, the
Exporting toolbar will open with an export frame on the map. See To export
detail data 109 .
104
Promap User Guide
Aerial Imagery
Modern Aerial Photographs
Click to buy the most recent photographs available. You will be taken back to
your map with an aerial frame already on the map. See To buy an aerial
photograph 132 .
Historical Aerial Photographs
Click to buy a photograph from between 1939 to 1954. You will be taken back
to your map with an aerial frame already on the map. See To buy an aerial
photograph 132 .
Environmental Reports
Enviroscreen
Click to order an Envirocheck Overview or Environmental Certificate. See To
order an Enviroscreen report 151 for details.
Landmark Reports
To order one of these reports, you will be redirected to www.envirocheck.co.uk
and Promap will close.
Enviroscreen quick summary area
This will show you a brief contamination check for your site. See To view a free
Contamination Check 150 for more details.
Promap IQ
Promap IQ provides a unique, powerful
and simple way to search, view, interact and gather crucial property and
planning information for a specific site, all displayed in context on a map.
The next action page shows you a summary of the data found near your site.
Selecting your next action
105
If you click on the View button to the right of the data set you would like to see,
Promap IQ will open with a map of your site on the screen displaying the data
you have chosen to View. The data can be refined using the configuration
panel down the right hand side of the screen.
If you click on the Promap IQ logo on the right of the Details about your site
window, this will open Promap IQ with a map of your site on the screen with all
data displayed. The data can be refined using the configuration panel down
the right hand side of the screen.
In a matter of seconds, you can get an understanding of all planning related
activity past and present, prior to conducting full enquiries. You can the
instantly download them straight to your desktop or create a customised report.
Promap IQ can save you minutes, hours or even days and is the ideal starting
point to source planning applications, listed buildings and points of interest
information.
To return back to Promap, click on the Back to Promap button in the top right
hand corner of the Promap IQ screen
Dynamic Links
Click to go to the Land Registry or Valuation Office Agency. These are external
websites and are outside of Promap's control.
Greyed out options
If any action is greyed out, it means that you've just done it. It will become
available again when you've carried out another action.
In addition the Download as JPG button may be greyed out. Unless you have
just printed your map, you will need to click Go Back to map first, in order to
download a map, and set and fix the print frame. See To download a map 100 .
106
Promap User Guide
Exporting maps
· This chapter will show you how to export your site as LandLine or MasterMap
data from Promap. Exporting data as DXF or GML files allows you to use the
mapping in GIS systems, CAD or other applications.
· The export facility is available in Detail, Street and Street Plus layers of
mapping only. The export process and result, i.e. LandLine or MasterMap, is
the same whether you select Detail, Street or Street plus.
· Any annotations you have drawn on to the map will not be exported. Only the
Ordnance Survey mapping data you request will be exported.
· You must agree to special data export terms and conditions whenever you
export DXF or GML data from Promap. There is a link when you select the
export options so that you can read them.
See the rest of the chapter for details.
Format options
DXF format
DXF format is a data exchange format supported by most Geographical
Information Systems (GIS) products, CAD and many other applications. You
can export a selected area of Ordnance Survey Land-Line or MasterMap data
from Promap as a file in DXF format. The most common use for exporting data
in this form is to supply architects with a map they can use in CAD systems.
GML format
The Open GIS Consortium, a global organisation of GIS users and developers,
has created Geography Mark-up Language (GML) with the intention that GIS
users use the same format. The software that can accept GML is relatively new
and users of Promap should check that their systems can accept GML before
using it.
Export Options
Detail export
You can export a selected area of Ordnance Survey Detail (Land-Line) data
from Promap as a DXF file. You can then load this DXF file into other
applications. DXF format is accepted by most GIS products, CAD systems
(used by architects) and many other applications. Ordnance Survey provides
technical information on LandLine, including a user guide that explains how
Exporting maps
107
LandLine is represented in DXF at
http://www.ordnancesurvey.co.uk/oswebsite/products/landline/pdf/lluserguide.p
df.
MasterMap export
MasterMap is Ordnance Survey’s newest detailed mapping data set and has
been designed as LandLine’s replacement. You can export a selected area of
Ordnance Survey MasterMap data from Promap in DXF or GML file format.
You can load this DXF or GML file into other applications.
GML format captures the full richness of the MasterMap data. This includes
information not visible in Promap, such as the history of changes that Ordnance
Survey has made to the data. The latest versions of most GIS products and
CAD systems now support GML.
DXF format is supported by most GIS products, CAD and many other
applications. We have adapted the MasterMap data to DXF format so that you
can load MasterMap data into applications that do not support GML. It also
allows you to load MasterMap data alongside any Land-Line DXF that you
already have, preserving the value of investment in existing LandLine data.
MasterMap is designed to look just like Detail Land-Line DXF and to blend
seamlessly with it.
When you have exported MasterMap data, you can re-export the same data in
either GML or DXF format without further charge within your export licence
period. This means that if you exported in one format, say GML, and now want
a DXF file, then you can have it without further charge. This also allows you to
view the MasterMap as both DXF and GML or as DXF alongside existing
Land-Line DXF data for comparison.
MasterMap feature classifications
MasterMap uses different feature classifications from LandLine so we map
MasterMap classifications onto LandLine ones. As MasterMap is a richer data
set than LandLine this mapping is mostly straightforward. The main differences
are set out for you below:
Shape attributes create seeds – MasterMap shapes can have attributes that
indicate the type of land area the shape covers, e.g. 'Orchard'. For these
shapes we generate DXF seeds indicating the land type, e.g. DXF 'Area of
Orchard' seed, positioned within the shape centre.
One type of pylon – MasterMap does not distinguish between LandLine's
square pylons (G8010049) and general pylons (G8010030), so all MasterMap
pylons are treated as general pylons.
Not present in MasterMap – MasterMap does not show the centre line of
public roads or land parcel numbers.
Only map data – MasterMap does not contain the annotations that appear
outside the map area, thus it has no 'Marginal Text' or 'Footnotes' when you
export it.
108
Promap User Guide
Choosing between Detail and MasterMap® exports
Cheapest
The prices for Detail and MasterMap exports are displayed beside each other
on the export frame, so you can decide to take whichever is cheapest each
time.
Most up-to-date
At present the LandLine and MasterMap data sets are approximately equally
current, but Ordnance Survey are committed to much more frequent updates of
MasterMap in the future. Therefore you may wish to choose MasterMap data
because it is becoming Ordnance Survey's most up-to-date detailed mapping.
Change history
Each item of MasterMap data has a list of all the dates when that item was
changed by Ordnance Survey and the reason for each change. This tells you
when the item was created and when it underwent significant revision.
Future proof
You may wish to standardise on MasterMap because it is a richer data set than
LandLine and the successor to LandLine.
Samples of Detail and MasterMap® data
Samples of Ordnance Survey Detail (Land-Line) data and Ordnance Survey
MasterMap data files and image of this data are supplied below.
Detail export DXF sample
Detail data in DXF formats is available and looks like the following image:
MasterMap export GML sample
Exporting maps
109
MasterMap data in GML format is available and looks like the following image:
MasterMap export DXF sample
MasterMap Data in DXF format is available and looks like the following image:
To export map data
1. Locate your site in Promap, selecting a Detail, Street or Street + layer. See
To locate a new site 30 for details.
2. Open the Export Steps tools by clicking the Exporting button.
3. Before you export the mapping data you need to define the area you would
like to export. There are three methods that can be used to define the
export area: by shape, circle or export area frame.
Choose one of the options below:
- either -
110
Promap User Guide
Export as a user drawn shape
i. Click the Set Shape Export Frame button.
ii. Define the area to be exported by drawing a shape around the required
area.
a) Click a point on the map where you want to start drawing around the
area. If you've chosen a particular map feature, such as a building,
click slightly away from the boundary line.
b) Move the mouse cursor to the next point and click once more.
c) Repeat step b) for each point of the shape until the whole of the
shape has been drawn except for the last line.
d) If you make a mistake and want to move back a step, press
Backspace on your keyboard. The last segment drawn will be
deleted.
e) Finish the shape by clicking on the first point of the shape.
iii. Once you have finished drawing your shape, Promap will automatically
put an export frame around the shape you have drawn. The cost of the
Detail and MasterMap export will appear at the top of the frame.
iv.Now go to step 4 below.
- or Export as a circle
i. Click the Set Circle Export Frame button.
ii. A Set Up Circle Export Frame dialog box will appear. Type in the
radius of the circle you would like to set and click OK.
The maximum radius allowed is 2000m.
Promap will automatically put an export frame and the circle on the
map. The cost of the Detail and MasterMap export will appear at the top
of the frame.
iii. You can move the Circle Export Frame if it is in the wrong position. To
do this, click and drag it.
iv.Now go to step 4 below.
- or -
Exporting maps
111
Export as a rectangle
i. Click the Set Export Frame button.
ii. A frame will appear on your screen. To resize it, click it to select it and
then click and drag the sizing handles. As you resize the frame the cost
of the data export will be adjusted and displayed at the top of the frame.
iii. To move it, click and drag its centre.
iv.Now go to step 4 below.
4. Click the Fix Export frame button.
5. Click the Get Export Data button.
The Data Export Options dialog box will appear.
6. Select either a Detail or MasterMap export and decide on the other options.
7. Click OK.
112
Promap User Guide
8. If you've chosen to purchase height data, the Save DSM Data As dialog
box appears first. Select a folder to save in and type in a name for the file.
Click Save.
9. The Save Detail DXF Data as or Save MasterMap DXF/GML dialog box
will appear, depending on which format you chose. Select a folder to save
in and type in a name for the file. Click Save.
10.The Enter Expenditure Details box will appear to warn you that you are
about to do a chargeable action. Enter a Project and Reference for your
map export and this will be entered in to your accounting files. For more
information on expenditure details see Enter Expenditure Details 193 .
11.Click OK.
12.Promap will now prompt you to save you map file to our server. See
Saving Files 80 .
All maps exported through Promap include a 12 month licence. Once that
period has ended, if you wish to export the map again you will be charged.
We strongly recommend that you save your map now to avoid paying a
first export charge again within the twelve month licence period. This is
useful in case the original export file is damaged in any way or lost.
Promap will now take you to the Next Action page. See Selecting your next
action 103 for details.
See also
Exporting maps 106
Landmark Historical mapping
113
Landmark Historical mapping
This chapter will explain how to select your site and order your historical
mapping.
Download formats
Once you have purchased your historical maps, you can save them on your
computer either individually as a PDF file or collectively as ZIP file. The
historical maps cannot be viewed or saved within the Promap software and
therefore the drawing tools cannot be used on them.
Printing historical maps
Landmark Historical Mapping PDFs are created at A3 size. They should
therefore be printed to A3 paper to be viewed as intended. It is also possible to
print the PDF files to A4 paper, using Acrobat Reader, which is generally set up
to resize large documents by default.
Landmark Historical maps are not plotted to their original scale when printed
from the A3 PDF or GIF files supplied. However, they will have the details of
the originally plotted scale and grid references on them for reference.
Licensing
County series data is licensed for perpetual usage. The National Grid data has
an annual licence and data is licensed for one year’s usage.
Customising historical maps
The historical maps cannot be viewed or saved within the Promap software and
therefore the drawing tools cannot be used on them.
See the rest of the chapter for details.
Who supplies Landmark historical mapping?
Ordnance Survey has one of the largest collections of historical mapping in
Great Britain and until recently this was only held as a paper archive. As a
result of a joint venture between Ordnance Survey and Landmark Information
Group Ltd, an extensive collection of mapping from 1841 to 1996 has been
created in digital form. This has been taken from Ordnance Survey’s historical
archive of Town Plans, County Series and post-war National Grid Mapping.
Ordnance Survey large-scale mapping began with the first maps, covering
individual counties, in September 1841. Each county was then revised between
three and five times prior to 1945. These sheets became known as the County
114
Promap User Guide
Series. Mapping was produced to the Cassini projection with each county
surveyed separately, and often to different origins and projections, which meant
that they did not match the neighbouring county. In 1944-45 the National Grid
was adopted and the entire country’s mapping was transferred to the National
Grid projection that we use today.
Scale and Sources:
The historical mapping was originally plotted at the following scales:
· County Series – 1:1,250 Scale
· County Series – 1:2,500 Scale
· County Series – 1:10,560 Scale
· National Grid – 1:2,500 Scale
· National Grid – 1:10,000 Scale
· National Grid – 1:10,560 Scale
Note
The legend information for the various Historical Mapping scales and
series provided in Promap is available online at
www.promap.co.uk/promap/historical_legends.jsp.
Why would you use historical mapping?
Landmark’s Historical map data is offered as black and white raster data.
Raster data provides a map image where the map information is composed of
a grid of pixels that can be displayed on a computer screen. The data provides
a good quality map background and is geographically accurate. This allows a
direct comparison to be made between the present and the past. Historical Map
data can also be printed on a suitable printer.
Features
· An extensive collection of nearly one million map tiles spanning from 1841 to
1992
· Each historical map will cover a 1km2 area
· Each map is scanned at a resolution of 300 or 200 dots per inch (dpi)
· These dpi’s optimise file size with quality resulting in clear images and
manageable file sizes
· All the historical maps are produced as A3 PDF files or GIF files
· All the maps have been de-skewed as much as possible to align the maps
north and south
· Each map is uniquely identified and four pairs of National Grid co-ordinates
Landmark Historical mapping
115
that define the corners of the map sheet are provided.
Issues to bear in mind when purchasing historical maps
Quality
We recommend that you check the previews supplied for quality and suitability
before purchasing your historical maps. The majority of historical mapping is in
excellent condition resulting in clean line work and backgrounds. However, a
number of factors affect the quality of the scanned image. For example
ingrained dust on the maps, in a small proportion of cases, resulted in dark
areas.
The paper of some maps has become slightly distorted, affecting the overall
geometry of the map; this is especially the case with the full sheet 1:10 560
scale County Series maps. As a result, these maps are not perfect rectangles
and once de-skewed there may be some loss of data and a less than perfect
join when the maps are lined up. However, this category of maps is a small
proportion of the total.
Plotted Scales
Landmark Historical maps are not plotted to their original scale when printed
from the PDF or GIF files supplied. However, they will have the details of the
originally plotted scale and grid references on them for reference.
Epochs
Historical map data is available for different time periods referred to as epochs.
These epochs roughly equate to the first County Series survey, and
subsequent revisions, and the first National Grid resurvey and subsequent
sheet revisions. Not all areas will have mapping available for each epoch as the
number of revisions for each county varies.
Samples of historical mapping
Published dates: 1875 – 1879
Originally plotted at 1:2,500
116
Promap User Guide
Landmark Historical mapping
Published dates: 1914 – 1919
Originally plotted at 1:10,560
117
118
Promap User Guide
Published dates: 1969 – 1970
Originally plotted at 1:10,560
To order historical mapping
1. Locate your site. See To locate a new site
30
for information.
2. Click the Historical Maps button.
3. The Landmark Historical Mapping page will open. This page will display
every historical map available for the site you have specified. We also
supply the following information about each historical map:
Landmark Historical mapping
119
Information
Description
Date(s)
The epoch or time period that the map was
created.
Historical map data is available for different
time periods referred to as epochs. These
epochs roughly equate to the first County
Series survey, and subsequent revisions, and
the first National Grid resurvey and
subsequent sheet revisions. Not all areas will
have mapping available for each epoch as
the number of revisions for each county
varies.
Price
The price of the historical map
Survey Scale
The original Ordnance Survey scale of the
historical map.
Landmark Historical maps are not plotted to
their original scale when printed from the A3
PDF or GIF files supplied.
Coverage
Tells you how much of the site is covered by
the map offered.
If the coverage is less than 100% then you
should view the preview available to ensure
that you are happy with the map available.
120
Promap User Guide
Information
Description
Preview
We recommend that you check the previews
supplied for suitability before purchasing your
historical maps. The majority of historical
mapping is in excellent condition resulting in
clean line work and backgrounds. However, a
number of factors affect the quality of the
scanned image. For example ingrained dust
on the maps, in a small proportion of cases,
resulted in dark areas.
The paper of some maps has become slightly
distorted, affecting the overall geometry of
the map; this is especially the case with the
1:10 560 scale County Series maps. As a
result, these maps are not perfect rectangles
and once de-skewed there may be some loss
of data and a less than perfect join when the
maps are lined up. However, this category of
maps is a small proportion of the total.
4. To order the historical maps you want, click the tick boxes provided next to
each historical map entry to select them. Once selected, the chosen maps
will turn a darker shade of blue.
You can see the total number and the total cost of the maps selected on
the right of the page in the Totals box.
5. Next to Create my map as: choose whether to download the map as a pdf
or a gif.
6. Before you buy your historical maps you must accept the Terms and
Conditions. The check box is already ticked for you. If you would like to
read the Terms and Conditions, click the words Terms and Conditions.
7. Once you are ready to purchase your maps click Buy Historical Maps.
8. The Expenditure Details pop-up box will appear to warn you that you are
about to do a chargeable action. Enter a Project and Reference for your
historical maps and these will be entered into your accounting files. Click
OK.
Promap displays the Map Generation page whilst it downloads your file. If
you have made multiple purchases, Promap compiles all your historical
maps in to a single zip file for ease when saving. An Order Summary is
also displayed on this page for you. Once the generation is complete you
will see 100% appear next to a blue line.
9. You are now ready to save your historical maps. Please go to To save your
historical maps 121 .
We strongly recommend that you save your historical maps to your
computer before exiting Historical Maps. Once you have exited the
Landmark Historical mapping
121
historical map section your maps are discarded and you will not be able to
retrieve them at a later date. Historical maps are not saved within Promap
in any format.
See also
Landmark Historical mapping 113
To save your historical maps
When you have ordered your historical map, you should download and save it
on your computer.
1. With the Map Generation page on screen, click the link Click here to
download your file that appears next to the blue line.
A File Download dialog box will appear on your screen.
2. Click Save.
3. A Save As dialog box will appear with the File name field already
automatically filled in. Change the name if you wish.
4. Select the folder where you would like to save the maps.
5. Click Save when you are ready to save your maps.
Promap will now download your maps, this will only take a second or two.
When the download of your maps has finished a Download Complete
message box will appear.
6. Click Open if you would like to view your maps.
-orClick Close.
You can now access and print your historical maps from the location you
specified on your computer as you would any other file.
7. Click Exit Historical Maps on the Map Generation page.
Note
If you have purchased several maps, they will have been downloaded
in a zip file. Zip files can be accessed using software such as WINZIP.
This can be purchased and downloaded from www.winzip.com.
122
Promap User Guide
Aerial photography
This chapter will tell you about our seven levels of aerial photography. It will
instruct you on how to buy your aerial photography, customise it, save it in
various formats and print it.
See the rest of the chapter for details.
Why would you use aerial photography?
Aerial photography is ideal to bring context to maps, providing a clear and
uninterrupted view of what is actually on the ground currently and what was
there historically. We are able to supply you with aerial photography for a
specified site using a simple order process. The aerial photography we supply,
once it has been purchased, can be customised, printed and saved along with
any other mapping layer, GB to Detail. You can also navigate around the
photograph and zoom in and out as usual.
Features
· Historical aerial photography from the RAF and Luftwaffe, 1939-54
· 50cm (Historical), 25cm and 12.5cm per pixel resolutions
· Prices from just £7.00 plus VAT
· Order multiple photographs for a single site
· Free drawing and customisation tools to identify the site or property
· Save the images straight to your desktop as a JPEG, BMP or TIFF file
· Print or copy and paste the image straight into Word or GIS applications
· Preview your area prior to purchase (where available)
Who supplies our aerial photography?
Promap has brought together the UK’s three leading aerial photography
suppliers, UK Perspectives, GetMapping and Cities Revealed, to provide
Promap users with the most comprehensive range of aerial photographs
available. Through Cities Revealed we are now able to supply historic aerial
photography using archives from the RAF and Luftwaffe.
The modern high quality colour digital aerial photographs are a valuable
addition to printed and exported maps and provide detail down to street level,
with objects such as cars and trees clearly identifiable. The historical
orthorectified black and white images provide a rare look in to the past of the
Aerial photography
123
major UK cities.
Unique to Promap you can compare availability, resolution, price and the date
of when the photographs were taken by the three aerial suppliers. This allows
you to choose the photography that best suits your requirements.
Please note you cannot export your aerial photograph for use in CAD packages
or order an Enviroscreen report using an aerial photograph.
Historical photography
The minimum area for historical aerial photographs is 300m2. They are
available for major UK cities and were taken between 1939 and 1954.
Samples of aerial photography
The samples below give you an idea of what the different resolutions look like
from the different companies.
A 12.5cm resolution photograph will give you more pixels per metre than a
25cm resolution photograph. This means that the picture has more detail and
you can zoom into it and still see a clear picture.
If you look at the samples from GetMapping, you can see the different quality of
the resolutions when zoomed in.
124
Promap User Guide
GetMapping
12.5cm resolution - 600x568 pixels - available for sites up to 375m2
Aerial photography
125
A detail of the same photo as above at 12.5cm resolution, but zoomed in 3 times
using Promap
126
Promap User Guide
25cm resolution - 600x568 pixels - available for sites up to 750m2
Aerial photography
127
A detail of the same photo as above at 25cm resolution, but zoomed in 3 times using
Promap
128
Promap User Guide
UK Perspectives
25cm resolution - 600x568 pixels - available for sites up to 750m2
Aerial photography
Cities Revealed
12.5cm resolution - 600x568 pixels - available for sites up to 375m2
129
130
Promap User Guide
25cm resolution - 600x568 pixels - available for sites up to 750m2
Aerial photography
131
50cm resolution (Historical), 600x568 pixels available for sites between 300m2
and 750m2
Ordering aerial photography
· A standard aerial photograph covers an area of 150m2 around the selected
site.
· The maximum area is 750m2.
· The minimum area for historical aerial photography is 300m2.
To order an aerial photograph see To buy an aerial photograph 132 .
132
Promap User Guide
To buy an aerial photograph
· Locate and display the map that you want an aerial photograph of. See To
locate a new site 30 for details.
Step 1 - Specify the area of the photograph
1. Click the Aerial Photos button to open the aerial photo tools.
If you have photos saved, Promap will ask you whether you'd like to see them or
order a new photograph.
2. Click the Set Aerial Frame button to specify the area for the aerial photograph.
A blue aerial frame will appear on the map.
3. If you have a site marker on the map, you can delete it by clicking it and pressing
Delete on your keyboard.
4. To increase or decrease the area size, select the frame by clicking it and then click
and drag one of the black sizing handles. Drag the frame until Promap tells you that
the Frame is OK for the resolution you want.
Aerial photography
133
Resolution
Means
12.5cm
One pixel of the photograph represents
12.5cm on the ground.
This is the most detailed photograph. It covers
less area and the file size will be large.
25cm
One pixel of the photograph represents 25cm
on the ground.
Slightly less detail but covers a larger area.
50cm
One pixel of the photograph represents 50cm
on the ground.
Low quality. Mainly used for historical
photography. If you want a historical
photograph of the site you need to drag the
frame to suit this resolution.
Step 2 - Ordering the photograph
1. Click the Get Aerial Photo button.
Promap will now contact the different suppliers of aerial photography and
list the photographs available to you.
After a short wait you will be able to see whether any photographs are
available under each resolution: i.e. 12.5cm, 25cm and 50cm (Historic).
Below is a list of column headings and what they mean:
134
Promap User Guide
Column
Means
Price
The price of each individual aerial
photograph
Provider
The name of the supplier
Product
The name the supplier uses for this
layer of aerial photography
Coverage
How much of the site you want is
covered by photograph offered
Dates Flown
The date range of when the site was
photographed
Area
The amount of land covered by the
aerial photograph
Preview
A link to a preview of the aerial
photograph offered. This is just a guide
to help you decide whether it is the
right quality. It does not show you the
actual amount of land the photograph
will cover.
View Samples
A link to view general samples from the
different suppliers
2. Select the aerial photographs you would like to order using the tick
boxes.
You can choose to order a single aerial photograph or several
photographs from different suppliers and time periods.
3. Before you buy your aerial photographs you must accept the Terms and
Conditions. The check box is already ticked for you. If you would like to
read the Terms and Conditions, click the words Terms and Conditions.
4. Click the Buy Aerial Photos button.
5. Enter a Project and Reference for your photographs in the Enter
Expenditure Details dialog box. This will be entered in to your
accounting files. For more information on expenditure details go to Enter
Expenditure Details 193 .
6. Click OK to accept the charge.
7. Go to Step 3 - Save your photographs below. We strongly recommend
that you do save the photographs.
Aerial photography
135
Step 3 - Saving your photograph
If you have just purchased your aerial photographs Promap will be
displaying the Save Map dialog box.
You will see your Organisations folder (available to everyone in the
company), your Group folder (available users in that group) or your
Private folder (available only to you).
1. Click the folder you would like to save in.
Promap will automatically puts its name in the Folder Name text box.
2. In the File name text box type the name of your aerial photograph. Enter
a Description and a Reference if you wish.
3. Click Save.
Your aerial photographs, along with any maps layers you have viewed,
will be saved in the folder you specified on the Promap server.
4. Promap will now take you to the Next Action page. See Selecting your
next action 103 for details. If you'd like to see the photographs, click Go
Back to map. Promap will display the photograph. If you have purchased
more than one photograph see To switch between aerial photographs 135 .
Note
When you save your aerial photographs to our server any
annotations you have made on the photograph will be saved along
with it.
To switch between aerial photographs
If you have purchased more than one aerial photograph for your site, you may
wish to switch between them to view them in Promap. You can only view one
photograph at a time.
You may also want to switch between one of the aerial photographs and the
other layers of mapping available.
To switch between aerial photographs
1. Click the Aerial Photos button if the aerial tools are not already open.
.
2. Click the Select Aerial Photo button.
136
Promap User Guide
The Choose Aerial Photo dialog box will appear. It will list the photos you
have purchased. The radio button next to the current photograph will be
greyed out and the next photo in the list selected.
3. Select the radio button next to the supplier whose photograph you want to
view.
4. Click Display.
Promap will display your chosen aerial photograph.
To switch between an aerial photograph and a mapping layer
1. To change from the current aerial photograph to a mapping layer, click that
map’s button at the top of the screen e.g. Street.
Promap will now display the mapping layer you requested on your screen.
2. To return to the photograph, click the Choose Aerial Photo button and
click the radio button next to the supplier’s name on the Choose Aerial
Photo dialog box.
-orClick the View Existing Aerial Photos button
and then the Choose Aerial Photo button if you have more than one
photo.
3. Click Display.
Promap will display your chosen aerial photograph.
Warning
If you move to a map layer e.g. Street and use the 'Set Aerial Frame'
button to purchase a new aerial photograph, Promap will allow you to
overwrite any existing aerial photograph you have of the same type i.e.
Promap will replace a purchased 25cm aerial photo from GetMapping
with a new 25cm aerial photo from GetMapping of the new site
specified by the aerial frame.
If the new aerial photograph has more than a 95% overlap with the
previously purchased aerial photograph Promap won’t let you overwrite
it. We have set this limit to stop users purchasing essentially the same
photograph twice in error.
Aerial photography
137
To customise your photograph
Once you've bought your photograph, the Drawing and Measuring tools
become available to you. You can use these tools to draw items on your
photograph. For example, you might want to indicate the site by adding a circle
around it.
For further help using the tools go to Customising your map
43
.
To print your aerial photograph
The steps for printing a photograph are the same as for printing a map. See
the Printing 87 chapter and the Print Layout: logos, headers and footers 92
chapter.
Using aerial photos in other applications
Once you've bought your aerial photographs you can download electronic
copies of the them as a jpg file on your computer. This allows you to paste the
photo into other applications and documents, i.e. PowerPoint or Word or email
them.
If you'd like to download the photo in a different image format, such as bmp,
tiff, gif or png, you can do so by using the Printing tools. You need to open the
Printing toolbar first and then follow the same steps as in To download a map
100 .
You can also copy it to the clipboard and then paste it into another application.
See also
To download your aerial photograph 137
To copy an aerial photograph to the clipboard 138
To download your aerial photograph
1. Click the Download as JPG button.
Promap will warn you that any drawings you have done will not be saved
with the aerial photograph.
2. Click OK.
3. Select the folder you'd like to save the photo in.
4. Enter a name for the photo in the File name text box.
5. Click Save.
138
Promap User Guide
Your aerial photograph will be saved in to the folder or drive you specified.
To copy an aerial photograph to the clipboard
This allows you to paste a copy of your aerial photograph in to other
applications, i.e. Word, PowerPoint.
To copy an aerial photograph
1. Click the Copy to clipboard button on the Aerial Photos toolbar.
Promap will tell you that you have copied your aerial photograph to the
clipboard. Any drawings you have made on the photograph will be copied
along with it.
You can now paste it into other applications i.e. Word, PowerPoint etc.
Enviroscreen
139
Enviroscreen
This chapter will inform you about Enviroscreen. Enviroscreen is the world’s
first online, real time environmental due diligence report.
What is Enviroscreen?
The impact that environmental issues can have on the value of a property is not
something you want to gamble on. Now you don’t have to.
Enviroscreen is designed specifically to meet the challenging needs of
surveyors, investors, developers and property professionals to deliver a unique,
cost effective and straightforward approach to tackling contamination and
environmental matters.
Enviroscreen is a unique service delivered online through Promap developed
by Landmark Information Group, the UK’s leading supplier of environmental
risk information.
Available for any site or property in mainland Great Britain, Enviroscreen
identifies potentially contaminative sites, within 100m of the site boundary,
using high quality, accurate data from reliable sources and reports this
information to you. You can choose the required level of detail in the report by
selecting either an Overview or Environmental Certificate.
The key benefits of Enviroscreen:
· Fast – Results delivered immediately online within 1 minute!
· Cost effective – From only £25 plus VAT
· Comprehensive – Available for sites anywhere in mainland Britain
· Accurate – Site-specific data indicates the location of potential risks in
relation to the site
· Reliable – Quality controlled environmental data from a range of reliable
sources
· Easy – Simply identify the site and we do the rest
· Flexible – Save as .PDF, print or email your report
· Dedicated technical support and customer service
140
Promap User Guide
Enviroscreen is ideal for:
· Environmental due diligence in commercial property transactions
· Valuation reports – assets, bank, loan security and pension funds
· Evaluating development opportunities
· Conducting a pre-site enquiry
· Assisting the decision making process on environmental liabilities
· Planning applications
· Auction valuation
Enviroscreen uses high quality, accurate data from reliable sources
such as:
· Environment Agency
· Scottish Environment Protection Agency
· Coal Authority
· British Geographical Society
· Local Authorities
· Radon Protection Board
· Ordnance Survey
The ordering process for Enviroscreen is quick, easy and takes
only five steps
1. Log In to Promap at www.promap.co.uk.
2. Locate the site or property.
3. Draw and select the boundary.
4. Input order details.
5. Receive the Enviroscreen Overview or Environmental Certificate within
seconds.
For more detailed instructions, go to To order an Enviroscreen report 151
Enviroscreen
141
What is an Enviroscreen Overview?
The Overview report provides Investors, Surveyors and Developers clear and
concise information to assist the due diligence process when completing a
property transaction. Form only £25 plus VAT the Overview will assist with the
making of informed decisions on environmental issues and impacts when
assessing, negotiating and bidding for a property. To view samples of an
Overview report, see Samples of Enviroscreen reports 147 .
The Overview is ideal for:
· Investment professionals
· Land Agents/Managers
· Developers
· Fund Management
· Chartered Environmental Surveyors
The Overview provides:
· A location map
· An aerial photograph
· A potential contamination indicator
· Comprehensive environmental data 100m out from the boundary of the site
covering Historical Land Use, Landfill sites, Statutory Authorisations,
Contraventions and Natural Features
What is an Enviroscreen Environmental Certificate?
The Environmental Certificate is an ideal tool for commercial valuations,
ensuring surveyors can comment with confidence on contamination issues and
meet RICS best practice. Form only £45 excluding VAT.
The Certificate provides the professional opinion of a Chartered Environmental
Surveyor, Wilbourn Associates, as to whether the site or property will be
affected by Part IIA of the Environmental Protection Act and what impact there
may be on value.
The Certificate has been developed with surveyors and financial institutions to
ensure it supports the property transaction regarding contamination due
diligence. The process is consistent with Local Authorities and Consultants
alike by using the "Source-Pathway-Target" methodology to determine the
potential linkage between contamination and human health.
142
Promap User Guide
The Environmental Certificate is ideal for:
· Valuation Surveyors
· Pension fund managers
· Investment professionals
· Developers
The Environmental Certificate provides:
· A detailed report and professional opinion of either ‘Passed’ or ‘Further
Action'
· A lender's risk assessment
· A location map
· An aerial photograph
· Comprehensive environmental data 100m out from the boundary of the
site covering Historical Land Use, Landfill sites, Statutory Authorisations,
Contraventions and Natural Features
· Full PI cover up to £5million
· The option to obtain an insurance quote if the site is eligible following a
risk assessment analysis.
The property or site will be ‘Passed’ in the professional opinion of Wilbourn
Associates where the level of risk disclosed in the Enviroscreen report:
· Is unlikely to have an adverse affect on the value of the property
· Is not such that the property would be designated “contaminated land” within
the meaning of Part IIA of the Environmental Protection Act 1990
However, if there is a potential linkage between the “Source-Pathway-Target”, it
is likely Wilbourn Associates, will refer the site for further analysis, at no extra
cost.
Following a referral, the report will normally be returned by email within 48
hours with either a ‘Passed’ or ‘Referred’ certificate giving further advice for
consideration and a panel of Environmental Consultants to contact if required.
If the issues outlined in the report are adequately addressed then it is likely the
report can be ‘Passed’. To view samples of ‘Passed’ and ‘Referred’ reports,
see Samples of Enviroscreen reports 147 .
The importance has previously been highlighted in Part IIa of the
Environmental Protection Act, the Law Society Contaminated Land Warning
Card and more recently the revised RICS guidance on Contamination and
Environmental Matters – Their Implications for Property Professionals, which
clearly states that "Surveyors must be aware of their professional obligations to
Enviroscreen
143
help clients understand the challenges raised by contaminated land".
More recently the case in dealing with the statutory contaminated land regime
has taken place in the Magistrates Court. The case of Circular Facilities
(London) Limited v Sevenoaks District Council involved an appeal under
section 78L of the Environmental Protection Act 1990. To learn more go to
Contaminated land legal case 143 .
Contaminated land legal case
Circular Facilities (London) Limited v Sevenoaks District
Council
Environment Business – Sept 2004
The first case in dealing with the statutory contaminated land regime has taken
place in the Magistrates Court. The case of Circular Facilities (London) Limited
v Sevenoaks District Council involved an appeal under section 78L of the
Environmental Protection Act 1990. Circular Facilities appealed against the
service of a remediation notice on them.
The history behind the service of the remediation notice was that residential
development took place in the 1980s on land which had historically been used
as clay pits and infilled with organic material. Some time after the residential
development had been completed, emissions of carbon dioxide and methane
were found on the properties. These emissions were posing a risk to the
residents of the houses and as a result of this risk; Sevenoaks Council
undertook certain remediation works. The council then served a remediation
notice on Circular Facilities, which was the landowner at the time of the
residential development.
The grounds for Circular Facilities appeal were:
· The council had wrongly decided that Circular Facilities was the “appropriate
person” (i.e. liable for undertaking the remediation works);
· The owner of the original site should have been designated the “appropriate
person”; and
· Because the remediation works had already been done, the court was not
able to make an order seeking compliance with the remediation notice (the
remediation notice had become redundant).
The evidence considered by the judge included the fact that a soil investigation
report for the property (which referred to the presence of black organic matter
and gases) was available on the planning register and must have been
available to Circular Facilities when it purchased the property.
The judge found that the company must have been aware of this information,
and further, ought to have been aware of the risk posed by the condition of the
site. He considered that Circular Facilities could have commissioned a report
on the risk arising from the gases onsite and could have taken measures to
remove the risk when the site was redeveloped. The judge accepted that the
failure of Circular facilities to deal with the escape of gas was equivalent to
permitting its presence, and therefore determined that Circular Facilities was an
144
Promap User Guide
appropriate person for the purposes of Section 78 of the Act.
He also confirmed that the council was right to exclude the previous landowner
in accordance with one of the exclusion tests set out in the statutory guidance.
This was because Circular Facilities had actually introduced the relevant
pathways (i.e. the housing development) and the receptors (i.e. the occupants
of the housing development), thus causing a pollutant linkage.
Exclusion Test 6 excludes from liability those who would otherwise be liable
solely because of the subsequent introduction by others of the relevant
pathways or receptors.
What data does Enviroscreen use?
Historical land use
Enviroscreen
145
The Historical Land Use Data are derived from the physical analysis of
more than 60,000 Ordnance Survey map sheets at 1:10,000 and 1:10,560
scale, covering mainland Great Britain, except for parts of rural Scotland,
and dating from the middle of the nineteenth century to the late twentieth
century. In addition 1:1,250 and 1:2,500 scale mapping between 1946 and
1996 have been analysed for text relating to historical tanks and energy
facilities recorded.
Contamination is usually the result of industrial activity, which has resulted
in spillage, leaks or deposits from air emissions or waste. Industries, which
may cause significant contamination, include gas works, chemical plants, oil
refineries, petrol stations, scrap yards, industrial processing or disposal
sites or historical tanks and energy facilities.
There are around 400,000 sites in Britain which were formerly used for
industrial purposes and a further 250,000 sites which have been in filled. It
is difficult to assess the risk from specific past land uses and some sites
may have had multiple uses. It is possible for an expert to make a good
general risk assessment however materials used to fill quarries, pits and
ponds may never have been catalogued and so in most cases the type of
infill used is not known. If the backfilling is more recent the local authority
may have records.
Most in filled sites should be regarded with suspicion and as potentially
contaminated, especially if a site lays on or close to a source of
contaminative material for example a mine or a factory. The stability of in
filled land is questionable and research has found many cases where
residential properties have been affected by subsidence because of
previous quarrying or similar mining activity. Therefore if your chosen
property is on or close to in filled land we recommend you check the
situation carefully.
Landfill sites
Landfill is well established as the main disposal method for Britain's waste.
Up to 90% of all domestic waste takes this route and it is estimated that
there are currently over 13,000 landfill sites in Britain. There are three main
categories of landfill sites; those accepting domestic, industrial and
commercial wastes, those accepting hazardous waste and those accepting
inert waste for example brick, rubble or soil.
The main risk presented by landfills is from the methane gas, which is
created by the microbiological decomposition of biodegradable materials.
Methane gas is highly flammable and can become explosive if it
accumulates in a confined space. Other landfill emissions may also include
traces of heavy metals and complex organic compounds such as dioxins.
Statutory authorisations
146
Promap User Guide
There are thousands of processes, large and small, permitted to release
pollutants to the air, ground and water - some 2,000 factory sites can be
categorised as major industrial processes, such as power stations,
incinerators, chemical manufacturers and cement producers. However, the
majority, some 12,000, can be classified as smaller industrial processes,
typically such as paint spraying, small waste incinerators, or discharge
overflows from domestic septic tanks.
This will detail all regulated activities such as Contaminated land entries and
notices, Control Of Major Accident Hazard (COMAH) sites, Discharge
consents, Registered radioactive substances, Hazardous substance
consents, Integrated pollution controls, Explosive sites, Notification of
Installations Handling Hazardous Substances (NIHHS). The most toxic
substances are controlled by 'Red List Discharge Consents' The 'red-list' is
given in the Environmental Protection (Prescribed Processes and
Substances) Regulations 1991 and consists of substances considered to be
so toxic that priority should be given to eliminating pollution by them. If
stored and used correctly then hazardous substances listed under the
regulations should not pose a risk to Freeholders. However, purchasers
may wish to know if such substances are stored close to a property and if
they are being managed effectively.
Contraventions
When a pollution event has occurred and either an enforcement notice or
prosecution has resulted, this would be registered by the regulator. Events
range from Air pollution, pollution to controlled waters, Hazardous
substances to the mismanagement of Authorised processes.
Natural features
Naturally occurring features are issues such as, Flooding, Radon, Coal
Mining, Groundwater Vulnerability and Brine areas.
Around 5 million people live in flood risk areas in England and Wales. An
increasing demand for residential property in Britain has resulted in
pressure to build on low-lying land, which may be at risk from coastal
flooding, particularly in the context of global warming and a possible sea
level rise. Research by the Association of Drainage Authorities has shown
that 7.1% of England and Wales is at risk from flooding.
Many areas are affected by past, present, or future surface or underground
coal mining activities. Coal mining is a potentially contaminative land use. In
a coal mining area there may be the risk of subsidence, and the danger of
collapse from old mine workings. There may also be the risk of emissions of
mine gas and discharges of contaminated mine water.
Enviroscreen
147
Radon is a naturally occurring radioactive gas, which comes from minute
amounts of uranium present in earth materials such as rocks, soils, bricks
and concrete. It is present in all areas of Britain but levels in most areas are
too low to present any risk. Some of the highest levels have been found in
South West England, but levels well above average have been found in
some other parts of England and Wales.
When the radon concentration is high, it does pose a serious risk to your
health. Radon is measured in Becquerel’s per cubic metre (Bq/m3). The
National Radiological Protection Board (NRPB) has advised the
Government that a 'safe level' of radon is 200 Bq/m3. If readings are found
to exceed this steps should be taken to reduce health risks.
Samples of Enviroscreen reports
Enviroscreen free Contamination Check
148
Promap User Guide
Enviroscreen Overview - cover page
Enviroscreen Environmental Certificate – Passed
Enviroscreen
cover page
Enviroscreen Environmental Certificate – Further Action
149
150
Promap User Guide
cover page
To view a free Contamination Check
1. When you are on the Next Action page, you have the option to see a free
Enviroscreen Contamination check for your or a different site.
2. Click the View button to obtain the contamination check.
You will be taken to the Free Contamination Check Results page.
The factors considered are: Historical Land Uses, Landfill and Mineral
Enviroscreen
151
Sites, Statutory Authorisations, Contraventions and Natural Features. If
you are unsure what any of these are, click the More Info button. A popup
box containing a full explanation will appear on your screen.
A red Yes next to a factor means that there are potential issues. A green
No means the site is free of potential issues for that factor.
3. If you would like to order an Enviroscreen Overview or Environmental
Certificate, click the Order Report button and see to To order an
Enviroscreen report 151 for more details.
4. Click the Back to Previous Screen button to see a check for a different
postcode.
-orClick the Exit Free Check button to go back to Promap.
To order an Enviroscreen report
If you already have a map on your screen start by clicking the Enviroscreen
button and go to Step 2 - Selecting the site.
Step 1 - Locating your map
i. Locate your site. See To locate a new site
30
for help.
ii. When selecting the map layer, choose the Detail map option. The charge
for this will be automatically refunded when you order your report.
Now click the Enviroscreen button to open the toolbar.
Step 2 - Selecting the site
By filling the building
i. Click the Fill button on the Enviroscreen toolbar.
ii. Click inside the closed shape that you would like to fill.
Promap will fill the closed shape.
iii. Turn the tool off again by clicking it on the Drawing & Measuring
toolbar.
152
Promap User Guide
By drawing around the building
i. Click the Shape button.
ii. Click the Snap To Point button.
This will display guidance points, which you can click to guide you
around the outside of the site.
iii. Zoom into the map to make your site bigger. You can use the Zooming
tool on the Map Navigation toolbar.
iv.Click the guidance point on the map where you want to start drawing
around the shape.
v. Move the mouse cursor to the next point and click once more. You will
notice that as you move the mouse cursor, a line is drawn between the
current mouse location and the previous point.
vi.Repeat step v. for each point of the shape until the whole of the shape
has been drawn except for the last line.
vii.Finish the shape by clicking on the first point of the shape. Turn the
Shape and Snap to point tools off by clicking their buttons.
Step 3 - Ordering the report
i. Click the Order Report button on the Enviroscreen toolbar.
The Enviroscreen Order Details page will appear on the screen.
ii. The site address you specified will automatically appear in the relevant
boxes under Site Address. These details appear in the printed report. If
you want to make them more understandable, you can edit them in the
text boxes. This will not affect the site selected for the report.
Under Site Boundary you will see the total site area reported in
hectares.
iii. Below Report Type, click the radio button for Overview or
Environmental Certificate.
Their respective costs are highlighted in red.
Enviroscreen
153
iv.You must enter the following information in the text boxes under the
Additional Questions heading:
· Your client reference
· Your client name
· Delivery email address
· A Purchase Order Number is optional
v. You must select an answer from the drop-down lists or click Yes or No
under The following questions will tailor your report.
We use this information to ensure that we consider the implications and
future use of the site when producing our report.
The Subtotal, the VAT and Order Total costs for the report are
displayed in the bottom right-hand corner.
vi.Before you buy your Enviroscreen report you must accept the Terms
and Conditions. The check box is already ticked for you. To read the
terms and conditions, click the words Terms & Conditions.
vii.You can print this page before submitting your order by clicking the
Print Page button.
viii.To complete your order click Submit Order.
The Enviroscreen report may take a few minutes to appear on your
screen.
Step 3a - The Environmental Certificate: passed or referred
· If you've ordered an Enviroscreen Environmental Certificate and it has
passed, the report will appear on your screen. You can now save, email
or print this report for future reference. Promap will insist you save this
report before producing another report or leaving the site.
· If your Enviroscreen Environmental Certificate is referred, a single page
will appear on your screen informing you it’s referred. Your report will be
forwarded to Wilbourn Associates for further analysis. You can now save,
email or print this report for future reference. Promap will insist you save
this report before producing another report or leaving the site.
· The report and their findings will usually be returned to you by email within
forty-eight hours. The returned report will either have a Passed or
Referred certificate giving further advice for consideration and a panel of
Environmental Consultants to contact if required.
· For help on what the report covers see
www.enviroscreen.co.uk/enviroscreen/support.jsp
154
Promap User Guide
Step 4 - Saving, printing or emailing the report
· You can save, print or email this report using the buttons displayed on
the screen. You should save the report before proceeding with any other
action.
· You will need a pdf reader to open the report after saving it. You can
download a free pdf reader from
www.adobe.com/products/acrobat/readstep2.html.
To save the report
Click the Save button. A File Download dialog box will appear.
Click Save and the Save As dialog box will appear. Type a file
name in the box provided and click Save. A File Download box will
appear as Enviroscreen saves the report on your computer. When
the file has been saved a Download complete box will appear.
Click Close.
To print the report
Click the Print button. The Print dialog box will appear. Select the
printer you want to print on. Enter the number of copies you require
in the Copies box supplied. Click OK.
To email the report
Click the Email button. The Email PDF Report page will appear.
Type the email address you would like the report sent to in To text
box. Enter your name in the From box if it’s different to your email
address. You can also change the Subject text and the Body text
by clicking in the boxes if you wish to. Click Send report via Email.
Step 5 - Finding a consultant
· You may wish to find a consultant to discuss your reports finding with.
Click Find Consultant and we'll provide you with a list of Environmental
Consultants which you can read about and contact if you wish.
Step 6 - Ordering another report or exiting Enviroscreen
· Click New Order if you wish to order another report for a different site.
You will be taken back to your map with the Enviroscreen tools open.
-orClick Exit Enviroscreen to exit Enviroscreen and continue working on
Promap. Click OK on the confirmation box.
Enviroscreen
155
156
Promap User Guide
Setting preferences
This chapter will show you how to customise the overall settings of Promap to
suit your needs. There are two kinds of settings: general and display.
General settings allow you to organise your accounting information, set
default options for opening and saving maps and set defaults for colour
schemes and print layouts. If you are a system administrator you can also turn
off parts of your administrator’s functionality leaving you to work on Promap like
a Standard User.
Display settings allow you to display grid lines on your maps and to change
between metric and imperial units for measurement. You can set up a grid
using lines or crosses, define subdivisions and set the distance between grid
lines. You can also change whether or not Promap automatically puts a site
marker on a map.
All the settings you select here, except Project codes and References, are
saved and remembered so that they are used by Promap the next time you log
in.
See also
To change general settings 156
To change display settings 158
To change general settings
1. Click the Settings button
on the Menu bar.
The General Settings dialog box will appear.
2. Click the General Settings tab.
3. Select options for the following settings:
Project Code and Reference
Setting preferences
157
Expenditure details allow you to assign project codes and references to
the usage costs you incur in Promap. By entering them in to the
Project and Reference text boxes here you can set them to appear
repeatedly until you need to change them.
This is particularly useful if you are going to spend some time using
Promap for one project or site in particular. The settings will not be
remembered once you log out of Promap, however.
IMPORTANT: Never put your Username and Password in to the project
or reference boxes.
Admin user on
Each organisation that uses Promap has a Promap administrator. The
Admin User On option is available to administrator users only. This
allows the administrator to change their view of Promap.
When an administrator logs in and saves a map, views the expenditure
reports or opens a saved file they will see folders and files for all the
users in their organisation. If they are regular users and belong to a
large organisation they may want to turn this off so they don’t see other
users folders and files while using Promap.
When the box is unticked, the Admin User will view Promap in the
same way as a Standard User.
Force Expenditure Details popup
This is a setting that can only be changed by your organisation’s
Promap administrator. See To force users to enter expenditure details
180 .
Open Locate by box on start-up
The Address Search dialog box appears automatically when you first
log in to Promap. It allows you to search for a new site. If you are
repeatedly using Promap to view saved maps, you may wish to turn this
option off. To turn of this setting click the tick box so that the tick
disappears.
Check for saved maps when locating an address
When this tick box is ticked, Promap will always check whether you
have any saved maps that cover the site you are searching for in the
Address Search dialog box.
Prompt to save map after valuable actions
Promap will remind you to save your map file after you've had to pay for
something. Printing, exporting a map or purchasing an aerial
photograph are considered a valuable action. If you no longer wish to
be reminded to save your map after a valuable action, untick the box.
Default Colour Scheme and Default Print layout
158
Promap User Guide
If you use one particular Colour Scheme frequently, you can select it
here and set it as the default. Click the down arrow to open the list of
Colour Schemes and select the one you would like to use. See Colours
Schemes 65 to learn more about them.
The same applies to Print Layouts. If you'd like to set a default, select it
here. See Print layout: logos, headers and footers 92 to learn more
about them.
The Promap administrator can force Promap to use a particular colour
scheme or print layout. This is particularly useful if you have to include
disclaimers on the bottom of every map you produce. See To change
usage restrictions 179 . If this is the case, you will not be able to change
the settings here.
4. Click OK.
To change display settings
1. Click the Settings button
on the Menu bar.
The General Settings dialog box will appear.
2. Click the Display tab.
3. Select options for the following settings:
Display Grid lines
When you are viewing a Detail layer map, you can choose to display a
custom grid over your map. You can also set the type and size of grid you
require.
Display grid lines: Tick to turn on custom grid lines. If you subsequently
turn it off, the other settings are not affected.
Grid line interval (metres): Enter the distance you would like between
each grid line i.e. 100m. It can have any value between 50 and 5000
metres inclusive, in increments of 1 metre.
Grid line style: Select line or cross. The style will either be continuous
lines or crosses at intersections. Subdivisions only appear on a grid set to
line style.
Grid line subdivisions count: If you would like to have subdivisions
displayed on your map, enter the amount in the box provided and tick the
Turn on grid line subdivisions box. The grid line subdivision count must
be between 1 and 10 inclusive. Setting it to 1 is equivalent to turning
subdivisions off.
Use Imperial Measures
Setting preferences
159
Promap is set to display metric measurements unless you choose to
change the setting here.
If you prefer to use imperial measures tick the box next to Use imperial
measures.
· Measurement options apply to all Street, Street Plus and Detail maps as
well as Aerial photography.
· Area measurements below one hectare or one acre appear as square
metres or square feet respectively (unless you set the Always use
hectares/acres option below).
· Length measurements below one kilometre or one mile appear as
metres or feet respectively.
· You can force Promap to always provide either acres or hectares for
area measurements if you prefer.
· You can also toggle between Imperial and Metric on the Shape
Information popup.
Always use hectares/acres
If you prefer to have hectares and acres used for area measurement
instead of square metres and feet respectively, tick the box by Always
hectares/acres. Promap will now provide area measurements for sites as
hectares or acres only depending on whether you have selected metric or
imperial measurements.
Site marker style
When you first view your map on screen you will see a site marker
marking your site. Promap does this automatically. You can select the
style of the site marker from the Site marker style drop-down list or
select None if you don't want Promap to display it at all.
Whichever option you choose will be reflected on any open maps
straightaway.
4. Click OK.
160
Promap User Guide
Charges and invoicing
This chapter has a brief description of all the chargeable actions that may occur
in Promap. It also tells you how we invoice you.
See also
Charges 160
Invoicing 162
Charges
Changes to maps and charges for printing
Adding or changing-user drawn features (customisation) to a map after the first
print of a map will not cause an increase to the price of reprints.
However, please note:
If the print area rectangle is unfixed and moved, or the scale changed, the next
print will be treated as an initial print.
Basic Charges
For details of the cost of each chargeable action and for further explanation
please refer to our current online price list:
www.promap.co.uk/promap/pricing.jsp.
Text box
Description
New Map Access
(Detail Layer only) Incurred when newly
locating or switching to a Detail map
Updated Data Access
(Detail Layer only) Incurred when a previously
saved map is loaded using newer data from
Ordnance Survey than when the map was
created.
Roaming
(Detail Layer only) Incurred when you move
outside the 'free roaming' area on the map.
Charges and invoicing
161
Text box
Description
Initial Print
Incurred when printing a map for the first time.
The cost of printing a map is based on the
amount of land and the scale of the data that
the map is derived from.
Subsequent Prints
(Detail and Street Plus Layers only) Incurred
when a previously printed map is re-printed. No
subsequent charges are incurred if your
organisation has an Ordnance Survey Paper
Map Copying Licence and its number has been
entered in Promap.
Please note that it is breach of Crown Copyright
to photocopy or produce publication copies of
Promap printed maps without possessing a valid
Ordnance Survey Paper Map Copying Licence.
Exporting
(From Detail, MasterMap data, Street Plus and
Street Layers only) Incurred when data is
exported in DXF or GML format.
Landmark Historical
Incurred when buying Landmark Historical
mapping.
Aerial Photography
Incurred when you buy your aerial photography.
Enviroscreen
Incurred when you buy an Enviroscreen
Overview or Environmental Certificate.
IQ View
Incurred when you view detailed information
within Promap IQ.
IQ Report
Incurred when you order a report (pdf or CSV)
from Promap IQ.
162
Promap User Guide
Invoicing
Promap works on a pay-as-you go basis. It logs all of the chargeable actions
made by each user on Promap along with their Usernames. We access these
records at the end of each month to compile invoices for each organisation
using Promap.
Invoicing by organisation
Each organisation nominates an invoice contact when they register with us. At
the end of each month we send the organisation’s invoices to this contact.
Each organisation has thirty days to pay their invoices from the issue date that
appears on the invoice.
Invoicing by user
We can arrange for each individual user of Promap to receive their invoices. A
statement of all usage is sent to the main contact for your organisation so that
they can track the usage of Promap. To arrange for this to happen, please
contact your company's administrator for Promap or email
[email protected].
Administrating Promap
163
Administrating Promap
Each organisation set up on Promap has an 'administrator user'. This person is
usually the main contact we have for the organisation and is the first person to
be issued with a Username and Password. They are also known as the 'Admin
User'.
The administration facility was established to make it easier for customers to
set up and control their own accounts on Promap. It enables them to share
objects which are stored on our servers across their organisation i.e. an office
based in London will have no problem accessing work saved by a team in
Glasgow.
There is strict organisation confidentiality. There can be no access to other
customer accounts or files and the Admin User can restrict access to certain
files to ensure client confidentiality within their own organisation i.e. stopping
some users being able to see certain files saved on the server.
Note
The Administrator Username and Password should remain
confidential.
See the rest of the chapter for details.
About user administration
The Admin User creates Standard User accounts. It is important that each
Standard User on the system has their own username and password. This
ensures the Admin User has full control of their usage. Standard Users have
restricted access to saved files and accounting information. The Admin User
can also restrict how much they can spend, when they can access the system
and whether or not they order reports.
About users and their accounts
Care must be taken when setting up a new Standard user account. A valid
username and password allows the user to spend your company's money, so
it's important that:
· Each person has their own Username and Password
· Usernames and Passwords are kept confidential
· Usernames and Passwords aren't easily guessed i.e. Nigel1, Liverpool
It's important that each Standard User has their own account so they are
164
Promap User Guide
creating an accurate breakdown of their expenditure. If you have more than
one user using the same account you will not be able to tell who among those
users has spent money and how much.
It is especially important that the Admin User's Username and Password is kept
secure. The administrator account is capable of creating new accounts and
changing passwords on existing accounts. It is sensible to change your Admin
User password regularly, or if you suspect that someone else has used the
Username and Password.
Having more than one administrator
It is not recommended that you have more than one Admin User for your
organisation. If you do decide to do this, make sure you set up a different
administrator account for each person doing the job. Do not share the original
Admin User Username and Password, as this account can't be locked out of
Promap.
Stopping an administrator account
It is not currently possible for an Admin User to stop the original Admin User
account. This is to prevent Admin Users from locking themselves out by
mistake. The original Admin User account cannot be prevented from being
used, it will always be allowed to Log In. However, you can change the
password if you feel it has been compromised.
If you are sure that you want to stop the Admin User account, contact
[email protected]
If you want to stop an additional administrator account that was set up by your
Admin User, you can use the Modify User facility in the Admin Pages to put
them on stop. See To modify a user account 169 .
See also
Administrating Promap 163
The Admin User's tasks 166
The admin user's folder view
The Admin User can see all the folders, saved files, colour schemes and print
layouts belonging to their organisation. This means that the Admin User can
read, copy or modify maps and other files belonging to Standard Users in the
same organisation.
This is what an Admin User sees when they open a map, save a map etc and
see the folder view for the first time.
Administrating Promap
165
The Admin User can see the following folder types:
Folder
Description
_Org:
This contains maps, aerial photographs,
schemes and layouts shared by all the users
in the organisation.
_Group:
These contain maps, aerial photographs,
schemes and layouts shared by the members
of the group. The group name is always the
same as the folder name.
_Private:
These contain maps, aerial photographs,
schemes and layouts that are private and
accessible only by the user named on the
folder and the Admin User.
The Admin User may want to use Promap and find seeing other group and user
folders irritating. For this reason you can turn off your administration access
while you are using Promap. By turning the administrator access off, normal
permissions will apply and the Admin User will only see the Org, Group (if they
belong to one) and Private folders for themselves. The Admin User will no
longer see other users' private and group folders. Go to To change general
settings 157 to find out how to do this.
166
Promap User Guide
The Admin User's tasks
The Admin User can carry out the following administration tasks:
· Create, edit and delete users 166
· Create, edit and retire groups of users 172
· Create and edit addresses of their organisation's branches 175
· Set usage restrictions for users 176
· Set up defaults and force users to use them 180
· Enter an Ordnance Survey Paper Map Copying Licence number 182
See also
About user administration 163
The admin user's folder view 164
Creating, modifying and deleting user accounts
The Promap administrator can:
· Create standard user accounts 166
· Create additional administrator accounts 168
· Modify those accounts 169 once they have been created i.e. for changing
passwords, details etc.
· Delete user accounts 171
To create a new user account
Note
If you are currently in Promap IQ, you will need to click on the back to
Promap button in the top right hand corner of the screen to access the
administration pages.
1. Select Account>Administration on the Menu bar.
2. Click User Administration and then Create User on the User
Administration dialog box.
The Create User dialog box will appear.
3. There are several places for you to enter information about the new user.
The red boxes are compulsory and must be filled for the account to be set
Administrating Promap
167
up.
Text box
Description
Login ID
This will become the user's Username. It
should be a minimum of six characters and a
maximum of eight. It is case sensitive.
You may like to use a short form of your
company name followed by a few numbers
for added security.
Password
This needs to be a minimum of 6 characters
and a maximum of 16. It also case sensitive.
We suggest you do not use obvious words
such as Password or the user's Christian
name or surname. Instead, use the first
letters of a meaningful phrase along with
some numbers for added security.
Title and Surname
These are compulsory, so that we do not
have anonymous users on Promap.
Telephone and Fax
These are optional details. However, we
suggest you supply these details so that as
the admin user you can contact them quickly
in relation to Promap if you need to.
Invoice Contact
You can decide whether the user's invoices
will be sent to the user or another person
within the organisation. However, when you
are creating a user for the first time the only
option that will appear is 'Self'. Once you
created the user you can modify who
receives the invoices for this user through
Modify User. For further information see To
modify a user account 169 .
Address
All users must be assigned to a branch.
Addresses that were registered along with
your organisation are supplied in the drop
down list next to Address. Select the address
you would like to assign the user to. If the
address doesn't appear, create a new office.
See To create a new office 175 .
168
Promap User Guide
Text box
Description
Email
This is compulsory because it is needed for
communication between users. In future
releases the e-mail address will be used for
confirmation of maps sent from one user to
another. This email will not be used for other
purposes without permission from the user.
Department
This is optional and designed for large
organisations. Select a department from the
drop down list if appropriate.
User Group
This allows you to give this user access to a
User Group already on the system. Use the
drop down menu to select the group you wish
them to be added to. For further information
on user groups, see Creating, modifying and
retiring user groups 172 .
Stop User
Locks the user out of Promap. If you are
creating a Log In for a new member of staff,
you may want to use this so that you can
issue them with the Username and Password
and take it off stop when they arrive for their
first day. Click the box to put the user on stop
and a tick will appear in the box.
Admin User
This is provided so that you can set up a
second administrator for the organisation if
need be. Click the box to turn this on and a
tick will appear in the box.
4. Click OK.
5. A Confirmation message will appear, confirming the new user has been
set up successfully and showing all the details you provided. Click OK and
you will be returned to the User Administration Menu
See also
About user administration 163
Administrating Promap
169
To modify a user account
Note
If you are currently in Promap IQ, you will need to click on the back to
Promap button in the top right hand corner of the screen to access the
administration pages.
1. Select Account>Administration on the menu bar.
2. Click User Administration and then Modify User on the User
Administration dialog box.
The Modify User dialog box will appear.
3. Select the user whose details you want to change from the drop-down list.
If the user account is on stop, you will need to tick the check box next to
List Stopped Users so that stopped users are added to the drop-down list.
4. See the table in To create a new user account 166 for details of the text
boxes you can change except for:
Text box
Description
Login ID
You cannot change this
Surname
You can change a user's surname e.g. when
a user gets married, but this facility shouldn't
be used to change the person who uses this
user account. If a new person is going to use
the system they should have their own
Username and Password.
170
Promap User Guide
Text box
Description
Invoice Contact
You can decide whether the user's invoices
will be sent to the user or another person
within the organisation. A list of all the current
invoice contacts in the organisation is
supplied in the drop down list provided. To
arrange to send user invoices to another
contact, click the contact and address you
would like the invoices to be sent to in the list
provided.
If the contact you wish to receive the invoices
doesn't appear in the list, please contact our
Customer Services team on 0844 844 9960
to arrange for them to be added.
User Group
This cannot be changed here. You need to
go to To add or remove users in a group 173 .
Stop User
This locks the user out of Promap. Click the
box to put the user on stop and a tick will
appear in the box.
5. Click OK.
6. A Confirmation message will appear, confirming the user has been
modified successfully and all the details you changed updated. Click OK
and you will be returned to the User Administration Menu.
See also
To delete a user account 171
Administrating Promap
171
To delete a user account
Each user account should be assigned to one person within your organisation.
If that person leaves you may want to delete their account completely instead
of putting it on 'Stop'.
To delete a user account
Note
If you are currently in Promap IQ, you will need to click on the back to
Promap button in the top right hand corner of the screen to access the
administration pages.
1. Select Account>Administration on the menu bar.
2. Click User Administration and then Delete User on the User
Administration dialog box.
The Delete User dialog box will appear.
3. Select the user who you want to delete from the drop-down list. If the user
account is on stop, you will need to tick the check box next to List Stopped
Users so that stopped users are added to the drop-down list.
Promap will show all the details of that account.
4. Click Delete and OK to confirm.
A User Deleted Successfully message will appear confirming the user
account has been deleted.
5. Click Done and you will be returned to the User Administration Menu.
Note
Once you have deleted a user account, any maps saved by that user
account are moved in to a folder called Legacy. This folder is only
visible to the Admin User of Promap. The Admin User can move the
maps from this folder to another folder of their choosing using the
quick fire buttons available in Promap. To learn how to use the quick
fire buttons see To organise files and folders 83 .
172
Promap User Guide
Creating, modifying and retiring user groups
What is a user group?
User Groups are designed for a number of users within any organisation with a
common connection e.g. part of the same office or working on the same
project.
Every user can belong to one and only one user group. Each user group is also
a member of the organisation group, so adding a user to a group does not
exclude them from having access to the organisation folder. A user does not
have to belong to a group.
Why use groups?
When a group is set up for the first time, a folder for the group is created. This
means that the users within any group can save all their maps, colour schemes
and print layouts in one folder. Only users within the group will be able to gain
access to this folder ensuring that if they are working on a confidential project
the other users within the organisation cannot access the information, except
for the Admin User.
See also
To create a user group 172
To add or remove users in a group 173
To retire a user group 174
To create a user group
Note
If you are currently in Promap IQ, you will need to click on the back to
Promap button in the top right hand corner of the screen to access the
administration pages.
1. Select Account>Administration on the Menu bar.
2. Click User Group Administration and then Create Group on the User
Group Administration dialog box.
3. Type a name for the group in the Group name text box e.g. Leeds office or
Development A. Remember that the name you give the group will become
the folder name too and visible to the users in the group.
4. Click Create.
The Group Successfully Created message will appear on your screen.
Administrating Promap
173
5. Click Back and you will be returned to the User Group Administration
Menu.
See also
Creating, modifying and retiring user groups 172
To add or remove users in a group
Note
If you are currently in Promap IQ, you will need to click on the back to
Promap button in the top right hand corner of the screen to access the
administration pages.
1. Select Account>Administration on the Menu bar.
2. Click User Group Administration and then Users on the User Group
Administration dialog box.
The Group Users dialog box will appear.
3. Select a group from the User Group Name drop-down list.
A second screen will appear with two panels. Unassigned Users will
appear in the left hand panel. Users already in Group appears on the
right hand side.
4. If the user that you want to add to the group is on stop, you will need to
click the box provided next to List Stopped Users to see their name.
5. Do one of the following:
To add users
In the Unassigned Users list click the name of the user you want to
add.
Click
to move them in to the Users already in group panel.
Repeat this step until all the users you want added are in the Users
already in group panel.
To remove users
Click the name of the user you want to remove in the Users already in
group list.
Click
to move them in to the Unassigned Users panel.
Repeat this step until all the users you want removed are in the
Unassigned Users panel.
6. If the user owns shared maps in the group folder you will be asked whether
you want to move those maps or assign them to a new owner who is still a
group member.
174
Promap User Guide
7. Click Apply.
The user(s) will be added or removed and you will be returned to the
Group Administration Menu.
See also
To retire a user group 174
To create a user group 172
To retire a user group
If a group has been set up for a specific project you may want to retire, i.e.
delete, the group at the end of the project.
Before you can retire a user group, the Admin User must first ensure that the
map files belonging to that group are dealt with. They can decide to delete or
move them to another group folder using the quick fire buttons. To learn how to
use the quick fire buttons go to To organise files and folders 83 .
They must then remove all the users from the group. See To add or remove
users in a group 173 .
To retire a user group
Note
If you are currently in Promap IQ, you will need to click on the back to
Promap button in the top right hand corner of the screen to access the
administration pages.
1. Select Account>Administration on the menu bar.
2. Click User Group Administration and then Retire Group on the User
Group Administration dialog box.
The Retire Group dialog box will appear.
3. Select a group from the User Group Name drop-down list.
4. Click Apply.
5. A security message may appear on your machine asking if you would like
to view non-secure items, click Yes.
6. You will then see a confirmation message showing the group you have
selected to retire. Click Apply.
7. The Group Retired Successfully message will appear on your screen.
8. Click Back and then Back again and you will be returned to the User
Group Administration Menu.
Administrating Promap
175
See also
Creating, modifying and retiring user groups 172
Creating and modifying office details
All user accounts in Promap must be assigned to a branch. Addresses that
were registered along with your organisation are also supplied in this section in
case they require any changes.
See also
To create a new office 175
To edit an existing office 176
To create a new office
If you would like to set up new users on Promap who are based at a different
branch or working from a new branch, you will need to set up the branch on
Promap first.
To create a new office
Note
If you are currently in Promap IQ, you will need to click on the back to
Promap button in the top right hand corner of the screen to access the
administration pages.
1. Select Account>Administration on the menu bar.
2. Click Office Administration and then Create Office on the Address
Administration dialog box.
The Create Office dialog box will appear.
3. Type in the address of the new office you are creating supplying at least the
first line of the address, town name and full postcode.
4. Click OK.
A Create New Office confirmation message will appear.
5. Click OK
The new office address will be added to Promap and you'll be returned to
the Office Administration menu.
176
Promap User Guide
See also
To edit an existing office 176
To edit an existing office
When you are changing an existing office on Promap you can change all the
details for the office. However, all the changes are sent to our customer
services team electronically, who will change the details for you and notify you
of their completion. This system is in place to ensure there are no problems
with altering the offices, which could affect users assigned to the office.
If you wish to delete an office, contact Customer Services on 0844 844 9960.
To edit an existing office
Note
If you are currently in Promap IQ, you will need to click on the back to
Promap button in the top right hand corner of the screen to access the
administration pages.
1. Select Account>Administration on the Menu bar.
2. Click Office Administration and then Edit Office on the Address
Administration dialog box.
The Edit Office dialog box will appear.
3. From the drop-down list select the office you would like to edit.
4. Type in the new address of the office you are editing, supplying at least the
first line of the address, town name and full postcode.
5. Click OK.
A Office Edit Request confirmation message will appear.
6. Click OK
The new office address will be added to Promap and you'll be returned to
the Office Administration menu.
Setting usage restrictions
When an organisation is initially set up on Promap there are no usage
restrictions in place against the organisation as a whole or any of its users. This
chapter shows you how to restrict usage of Promap using the Usage
Restrictions facility. The Admin User can set the following restrictions for user
accounts:
· Which days the user/s or organisation can log In
Administrating Promap
177
· The times the user/s or organisation can log In
· How much the user/s or organisation can spend weekly
· Whether the user/s or organisation can order environmental reports
· Force the user/s or organisation to use certain colour schemes and print
templates
The Admin User can set up usage restrictions that apply to an individual or the
whole organisation. The restrictions you have set for your organisation will
apply to all new user accounts you create and to any existing users in the
organisation if you tick Force for all users
Additionally the Admin User can override restrictions set for an organisation so
that trusted individuals are able to work on Promap outside of office hours or
have a higher spending limit.
Notes
· Admin Users cannot set time restrictions on themselves, as this is
effectively the same as them locking themselves out of the system.
The Admin User can never prevent him, or herself, from logging in to
Promap.
· Care must be taken when setting up usage restrictions. If restrictions
are set for an Organisation incorrectly or by mistake, it is possible to
STOP anybody logging in to Promap!
See also
To change usage restrictions 177
To change usage restrictions
Note
If you are currently in Promap IQ, you will need to click on the back to
Promap button in the top right hand corner of the screen to access the
administration pages.
1. Select Account>Administration on the menu bar.
2. Click Usage Restrictions.
The Usage Restrictions dialog box will appear.
178
Promap User Guide
Option
Description
Organisation
If you want to set restrictions for the whole
organisation, select this radio button.
User
If you want to set restrictions for an individual
user, select this radio button.
Then select the user from the drop-down list.
If the user account is on stop, tick the Show
stopped users box and stopped users will be
added to the drop-down list.
Any restrictions you set on this user will
overwrite any organisation restrictions you
may have set previously for them.
If you change any organisation restrictions in
the future, they won't apply to this user
unless you click the Force for all users tick
box.
Force for all users
Tick if you want to set the restrictions for the
whole organisation including user accounts
that have previously had different usage
restrictions.
Clear the tick box if you want to set
restrictions for your organisation but not apply
them to existing users with individual
restrictions.
Days allowed
Click the boxes to select the days you would
like the organisation or user to have use of
Promap.
Time
Type in the times you would like the
organisation or user to have access to
Promap. You may like to restrict it to 09.00 to
17.30, to ensure access is only allowed
during working hours.
Administrating Promap
179
Option
Description
Expenditure
You can set a limit to how much you would
like the organisation or user to be able to
spend weekly. If the setting is left as £0.00,
this means the user has unlimited spending,
not that they have nothing to spend weekly.
Landmark Report
Ordering
You can enable or disable the ability for users
to order planning and environmental reports.
To do this, click the box supplied. When the
box is ticked the users will be able to order
reports, when the box is clear they won’t.
This box does not affect whether users can
order Enviroscreen, they will always be able
to do this.
Colour Schemes &
Print Templates
You can force users to use a particular
default colour scheme or print template when
they print their maps. You must have
selected the ones you would like to enforce
first through the Setting options. See To set
user defaults 180 . Once you've selected them,
just tick the boxes here on Usage
Restrictions to enforce them.
This only applies if users choose to apply a
default colour scheme or template. They can
still choose to use their own colour scheme
and make additions to the default template.
3. Click Apply.
The information will briefly disappear while the usage restrictions are being
applied.
4. Set more usage restrictions or click Back when it reappears and you will be
returned to the Main menu.
Note
Changed restrictions will be applied when a user next logs in to
Promap. If the user is logged in while you make the changes it will not
affect them and they won't be forcibly logged out.
180
Promap User Guide
Setting user defaults
The settings section allows to you enforce or turn off several settings:
· Forcing users to enter expenditure details
· Allowing users to alter the map legend on a Detail map
· Selecting the default colour scheme and print template
See also
To set user defaults 180
To create a read-only print template 182
To set user defaults
Note
If you are currently in Promap IQ, you will need to click on the back to
Promap button in the top right hand corner of the screen to access the
administration pages.
1. Select Account>Administration on the Menu bar.
2. Click Settings.
The Settings dialog box will appear.
3. Select the options as detailed below:
Force expenditure details
Administrating Promap
181
Promap automatically creates expenditure reports listing each
chargeable action a user performs. The Enter expenditure details popup
box appears before a chargeable action forcing the user to allocate
different projects or clients to expenditure. There are two fields provided
for the user to enter a project code and a reference name of their
choosing.
Most users find expenditure details useful as they point out that a
chargeable action is about to take place. The project code and
reference are stored in the database along with the charges the user
incurs whilst using Promap. They appear in the expenditure report
allowing the Standard User and Admin User to quickly see how much
money has been spent on any given project or client.
This is a useful feature for the Admin User who can access these to
investigate expenditures they do not understand or are unsure of. It may
be worth considering an organisation wide standard for entering of
project codes and references to ensure they are easily understandable
to the Admin User.
The Admin User can turn this feature on or off.
Enable map legend
A detail layer map consists of features that can be switched on or off
and changed in appearance e.g. you can change the outline of all the
buildings to red or remove them totally. These settings are controlled in
the map legend. The Admin User can decide whether to allow users to
make changes to the map legend.
Colours schemes and print templates
Select defaults for colour schemes and print templates from the
drop-down lists.
If you don't want users to be able to make changes to the print template,
make sure you choose one that is read only. See To create a read-only
template 182 for details.
This does not affect the colour schemes and templates available to
standard users. It simply allows you to select which ones could be
defaults. If you want to force users to use them, you need to select the
Force users tick boxes under the Colour Schemes & Print Templates
heading on the Usage Restrictions dialog box. See To change usage
restrictions 179 .
4. Click Apply.
The Setting Change Request confirmation message will appear.
5. Click OK again and you will be returned to the Main menu.
182
Promap User Guide
See also
Enter expenditure details 193
Colour Schemes
65
To create a read-only print template
Only the administrator can make print templates read-only. The read-only
template can then be set as a default. This is useful when a company wants all
its maps to be printed with the same header, footer and logo.
To create a read-only print template
Note
If you are currently in Promap IQ, you will need to click on the back to
Promap button in the top right hand corner of the screen to access the
administration pages.
1. Follow the steps in To create a template
95
.
2. When you are adding the logo or changing the font of the header/footer in
the Show Fonts & Logos dialog box, tick the Read-only check boxes next
to the items that you don't want standard users to be able to change.
See also
To set user defaults 180
To change user restrictions 177
Using the Ordnance Survey Paper Map Copying Licence
All printed maps remain Crown Copyright. This means that before
photocopying or duplicating a map printed from Promap, you must purchase an
Ordnance Survey Paper Map Copying Licence.
The benefits of an Ordnance Survey Paper Map Copying Licence are:
· Copies after the initial map charge are free
· Unlimited copying of Ordnance Survey Mapping
If you want to purchase an Ordnance Survey Paper Map Copying Licence, you
can visit the Ordnance Survey website
http://www.ordnancesurvey.co.uk/oswebsite/business/copyright/purpose/interna
luse.html or phone them on 023 8030 5030. Ask to purchase an Ordnance
Survey paper map copying licence.
Only your organisation's Promap administrator can enter the licence into
Administrating Promap
183
Promap on behalf of the organisation. If you don’t know who the administrator
for your organisation is, contact Customer Services on 0844 844 9960 and we
will tell you. If you are the administrator for your company refer to To enter
existing licences into Promap 183
To enter existing licences into Promap
Note
If you are currently in Promap IQ, you will need to click on the back to
Promap button in the top right hand corner of the screen to access the
administration pages.
1. Select Account>Administration on the menu bar.
2. Click Ordnance Survey Paper Map Copying Licence.
The OS Licence dialog box will appear.
3. Your licence number will be a combination of letters and numbers. Type
only the numbers, not the letters, in to the box provided.
4. Click Apply. You will see the Licence Updated Successfully confirmation
message.
5. Click Back and you will be returned to the Main menu.
Note
You must not enter a licence number unless it covers all the offices
that have access to Promap. All maps remain Crown Copyright with
the licence covering the facilities mentioned Using the Ordnance
Survey Paper Map Copying Licence 182 .
184
Promap User Guide
Viewing users' expenditure
You can create expenditure reports to see:
· What a user has purchased
· When it was purchased
· How much it cost
· The project and reference the purchase was allocated to
The reports are based on the information entered by you in the Enter
expenditure details popup which appears before a chargeable action.
You can view this data in different ways. For example, by project or by type of
transaction. You can ask for a detailed report or a summary. You can also print
the reports and save them as a spreadsheet file, which can be opened by
spreadsheet packages such as Excel and imported into many databases.
Standard users can only run reports on their own expenditure. Admin Users
can view expenditure for everyone in the organisation.
This is a useful feature for the Admin User who can access these to investigate
expenditure they do not understand or are unsure of.
Tip
It may be worth considering an organisation-wide standard for entering of
project codes and references to ensure they are easily understandable by
the Admin User.
See the rest of the chapter for details.
To view standard users' expenditure reports
Note
If you are currently in Promap IQ, you will need to click on the back to
Promap button in the top right hand corner of the screen to access the
administration pages.
1. Click the Account Expenditure button
on the Menu bar .
The Expenditure Reporting dialog box will appear.
Viewing users' expenditure
185
2. From the Report Styles drop-down list, select the type of report you would
like to run i.e. Project Summary.
Report Style
Description
Project Summary
Shows the project codes and the costs for
each project.
Transaction Summary
Show the type of actions that took place to
incur charges, how many times they occurred
and the cost.
Transaction Detail
Shows the date and time of each action, the
project code and reference that were
entered, the action type and the cost.
Project/Ref Summary
Shows the project codes and the reference
for each project along with the cost.
3. Choose a time period:
You can choose to use either a standard time period or a specific time
range.
If you would like to use a standard time, under Standard Time Periods,
select whether you would like this report for today, this week or this
month.
-orUnder Custom Date Range, enter a start date and an end date.
4. Click the Run Report button under the respective option you used.
Promap will retrieve the information for you.
If you'd like to save or print the report see To save or print your expenditure
report 188 .
Tip
Standard Users can only view expenditure reports for their own usage.
Admin users can see reports for everyone in the organisation. If you
are the Admin User and would like to view just your usage in Promap,
you can do so by deselecting Admin user on in General settings.
See To change general settings 157 .
186
Promap User Guide
See also
Viewing users' expenditure 184
To view expenditure reports as an admin user
Note
If you are currently in Promap IQ, you will need to click on the back to
Promap button in the top right hand corner of the screen to access the
administration pages.
1. Click the Account Expenditure button
on the Menu bar.
The Expenditure Reporting dialog box will appear.
2. From the Report Styles drop-down list, select the type of report you would
like to run i.e. Project Summary.
If you select a User report e.g. User Summary, you'll need to enter the
user’s name into the Filter Results text box before going on to step 4.
Report Styles
Viewing users' expenditure
187
Report Style
Description
User Summary
Shows the users in the organisation and
their expenditure.
Project Summary
Shows the project codes and the costs for
each project.
User/Project
Summary
Shows the users, the project codes they've
entered and the costs for each project
Project/Ref Summary
Shows the project codes and the reference
for each project along with the cost.
User/Project/Ref
Summary
Shows the users, the project codes and
references they've entered and the costs
for each project.
Office Summary
Shows the offices within the organisation
separately so you can view their
expenditure.
Company Summary
Shows the date/time, type of transaction,
project/reference, user and cost for each
action for every office within your
organisation listed together.
If your organisation has a large number of
offices within it, this report may take longer
to run than the other reports available.
3. Choose a time period.
You can choose to use either a standard time period or a specific time
range.
If you would like to use a standard time, under Standard Time Periods,
select whether you would like this report for today, this week or this
month.
-orUnder Custom Date Range, enter a start date and an end date.
4. Click the Run Report button under the respective option you used.
188
Promap User Guide
Promap will retrieve the information for you. You will then be given the
option of seeing a more detailed report. Go to To see a more detailed
admin report 188 for more information.
If you'd like to save or print the reports see To save or print your
expenditure report 188 .
Note
To be able to see the reports available to the Admin User, you must
have logged in using the Admin User username and password.
See also
Viewing users' expenditure 184
To see a more detailed admin report
When an admin user has generated a report, they will be given the option of
generating a more detailed report for a row. This option is not available for the
Company Summary.
·
Click the button on the left to generate a Transaction Detail report giving
a complete breakdown of all transactions.
·
Click the button on the right to generate a Transaction Summary report
giving a summary of the transactions.
See also
To save or print your expenditure report 188
To save or print your expenditure report
To save your expenditure report
Note
If you are currently in Promap IQ, you will need to click on the back to
Promap button in the top right hand corner of the screen to access the
administration pages.
1. Generate your expenditure report. See To view standard expenditure
reports 184 or To view expenditure reports as an admin user 186 .
2. Click the Save As Spreadsheet button.
3. Click Save on the File Download dialog box.
Viewing users' expenditure
189
4. In the Save As dialog box, select the folder where you would like to save
the report.
5. When the download is complete click Open to view the file in an accounting
package such as Excel.
-orClick Close to carry on with your work.
Saved spreadsheet files can be opened by spreadsheet packages such as
Excel and imported into many databases.
To print your expenditure report
1. Generate your expenditure report.
2. Click Print.
The Print dialog box will appear.
3. Choose the printer you would like to print on.
4. Enter the number of copies you would like.
5. Click Print.
190
Promap User Guide
Reference
In this chapter you will find:
Promap hot keys 190 for use when drawing objects on your map.
A website link to the Historical mapping legends 192 .
Troubleshooting 194 .What to do in order to solve any problems you may be
having with Promap and how to contact the Technical Support team.
Landmark Company information 197 , including Terms & Conditions.
Promap hot keys
Below is a list of hot keys you press on your keyboard when drawing shapes.
Key
Action
A
(Angle)
Allows you to specify the angle of the current line from
the previous line
Press A when you're using the Get Length tool to
draw a line or freehand shape. Type in the angle and
press Enter.
L
(Length)
Allows you to specify the length of the current line.
This is always in metres regardless of the setting on
the Display Settings tab. You can see the length in
imperial measurements on the Shape Information box
which appears automatically when you draw the line.
Press L when you're using the Get Length tool to
draw a line or freehand shape. Type in the length and
press Enter. If you then want to cancel the length and
draw the line freehand, press Escape on your
keyboard.
Reference
Key
Action
Escape
· Cancels a length you've set using the L hot key.
191
· Draws the final line and closes a shape you're
drawing using the Shape tool.
· Finishes a shape you're drawing using the Get
Length tool.
Spacebar
Allows you to join multiple, white snap to point dots
with one click.
When drawing round a boundary using snap to point,
hold the Spacebar down and click on a white dot
further down the boundary line. This will continue your
shape/line and join up all the points in between.
It doesn't work when there's an orange dot in between
your first and last point.
Backspace
Undoes the previous click when you're drawing a
shape or line.
R
(Radius)
Allows you to specify the radius of a circle.
Draw a circle on the map. Press R on the keyboard,
type the radius required and press Enter.
Enter
Allows you make changes to a shape once it's been
completed.
Click on the finished shape, press Enter on the
keyboard. This will take you back to your last step.
You can then use Backspace to delete the lines.
P
(Previous)
Allows you to tab backwards through any
customisations you have made.
When you've drawn several features and you need to
edit one or more, press P on the keyboard to select
each previous feature.
192
Promap User Guide
Key
Action
N
(Next)
The same as pressing P, except it selects the next
feature.
Shift
· Allows you to click and drag around several objects
you've drawn in order to select them all.
Press and hold down Shift and then click and drag
around the objects. Release the mouse and the
Shift key when you've drawn around them all.
· Allows you to restrict the movement of a dragged
object to up or down.
Select the object. Press and hold down Shift and
then click and drag the object.
Ctrl
Allows you to select multiple objects one after the
other.
Press and hold down Ctrl and then click each object in
turn. Release the Ctrl key when you clicked them all.
Landmark Historical Mapping Legends
To view the legend information for the various Historical Mapping scales and
series provided in Promap, go to
www.promap.co.uk/promap/historical_legends.jsp.
Dialog boxes
Here you will find details on how to use two features in Promap:
Relocate 192
Enter expenditure details 193
Relocate
You can use this dialog box when you're:
· Searching for a site for which you have no location information apart from
that it's near a certain town or village.
See To locate a site without a postcode or grid reference
· Searching for a site to develop
34
Reference
See To search for sites to develop
193
36
It allows you to:
1. Search for a site on a map layer such as Street +.
2. View it on a Detail map layer (or any other map layer apart from aerial or
historical).
3. Go back to Street + to search for another site.
4. Create a new Detail map centred on the new site.
If you simply went back to the Detail layer after step 3. you'd find that it was still
centred on the site you found in step 2.
Enter expenditure details
Promap automatically creates expenditure reports listing each chargeable
action you perform. The Enter expenditure details dialog box appears before
a chargeable action allowing you to allocate usage costs to different projects or
clients.
You can enter a Project code and a Reference. These are stored in the
database along with the charges you incur whilst using Promap. They appear in
your expenditure reports allowing you to see how much money has been spent
on any given project or client.
You must enter a Project and Reference and click OK or Promap will not
proceed with the action.
Until you log out Promap remembers the last project code and reference you
entered. So you only need to enter new ones if you have started work on a new
project or for a new customer.
To enter expenditure details
· Click OK to accept the charge.
These details will be added to your expenditure reports.
194
Promap User Guide
Tips
· Never put your Username or Password in to the project or reference
boxes. They are private to you and would allow anyone to purchase
maps on your account.
· Project codes and references can be anything of your choosing. For
example, you could use the names of customers for whom you are
preparing maps or unique project codes used by your organisation.
· There is no benefit to entering the name of the current user in these
fields. All chargeable actions will automatically be associated with the
current user.
See also
To force users to enter expenditure details 180
Charges 160
Troubleshooting
If you are experiencing problems with Promap, please read the following
carefully before contacting our Technical Support helpline 195 .
Have a look at our the Frequently Asked Questions on our website at
www.promap.co.uk/promap/faq.jsp
If this doesn't help, check that your Internet setup includes or allows the
following:
Operating System
One of the following: Windows NT SP6, 2000 SP4, XP SP2, Vista
Microsoft Internet Explorer 6 or 7
This website requires Microsoft Internet Explorer 6 or 7. The display of maps in
this website is handled by Promap, using an ActiveX control that will run only in
Internet Explorer 6 and above.
Download of ActiveX controls
The ActiveX control downloads automatically once you have successfully
logged In. You may be presented with a dialog box asking whether or not you
would like to download and install a Promap component. We have a digitally
signed control with a certificate of authenticity. This is your assurance that
Prodat Systems created the software you are downloading and is not malicious
in any way. Promap will not function correctly if you do not install the control.
Use of secure communications (https)
Reference
195
This website uses a secure connection to protect any sensitive information (e.g.
your username and password) that is exchanged between you and our server.
The secure connection mechanism is the same as that used by on-line banking
and shopping sites to protect your account/credit card details.
Using this site through a firewall
If you are accessing this website from a machine on your corporate network,
your Internet connection may be protected by a firewall. A firewall is designed
to protect your corporate network from malicious attacks through the Internet. It
may be configured to prevent you downloading ActiveX controls and other
executable programs (which can be malicious).
It may also be configured to prevent you accessing websites that uses secure
communications (perhaps to prevent employees shopping on-line during work
hours).
If either of the above applies to you, Promap will not work correctly. You should
contact your systems/network administrator and enquire about the possibility of
relaxing these two constraints, or use a machine that is not governed by the
firewall.
Contacting the Technical Support Team
The Technical Support team work from 9am until 6pm, Monday to Friday. They
are happy to help you with any technical enquiries or problems you have.
Tel
0844 844 9961
Email
[email protected]
They may then ask you to go to our corporate website and run a diagnostic test
on your computer. This will not affect anything on your computer: It will just
check your computer's ability to run Promap.
Specifications for Promap
Minimum Specification:
Windows NT SP6, 2000 SP4, XP SP2, Vista
Internet Explorer 6 or 7
Internet connection speed 56k or ISDN
Colour Screen Resolution of 1024 x 768 pixels
Use of secure communications (https)
Adobe Acrobat Reader (required for Enviroscreen and Historical Mapping)
32 bit colour depth
196
Promap User Guide
We recommend a broadband connection for an optimal Promap experience.
Important: Please read
If you are going to access this website from a machine on your corporate
network, then your Internet connection may be protected by a firewall. A firewall
is designed to protect your corporate network from malicious attacks from the
Internet. It may be configured to prevent you downloading Active X controls and
other executable programs (which can be malicious).
It may also be configured to prevent you accessing websites that uses secure
communications (perhaps to prevent employees shopping on-line during work
hours).
If either of the above applies to you, Promap will not work correctly. You should
contact your systems / network administrator and enquire about the possibility
of relaxing these two constraints.
Landmark Company Information
197
Landmark Company Information
This chapter gives you more information about Landmark Information Ltd, the
company that runs Promap.
Contact details
Henley Office – Property and Environment Business Unit
Landmark Information Group
The Smith Centre
Henley-on-Thames
Oxfordshire
RG9 6AB
Tel:
0844 844 9950
Fax:
0844 844 9951
Sales:
[email protected]
Customer Services:
0844 844 9960
[email protected]
Technical Support:
0844 844 9961
[email protected]
Training:
0844 844 9965
[email protected]
Environment
Customer Services:
0844 844 9952
[email protected]
198
Promap User Guide
Exeter Office (Head Office) – Landmark Solutions
Landmark Information Group
6-7 Abbey Court
Eagle Way
Sowton Industrial Estate
Exeter
Devon
EX2 7HY
Tel:
(01392) 441700
Fax:
(01392) 441709
Related websites
Related websites
www.promap.co.uk
Promap is the industry standard digital mapping delivery system, used by
hundreds of companies across the country. It uses a unique pay-as-you-go
charging system to provide cost effective access to seven layers of Ordnance
Survey mapping including LandLine and MasterMap data for the whole of
mainland Great Britain.
www.landmarkinfo.co.uk
Landmark Information Group is a specialist in the collation and distribution of
environmental data. Their corporate site provides a comprehensive list of
products and services offered by Landmark.
www.ordnancesurvey.co.uk
Britain’s national mapping agency, responsible for creating and maintaining a
huge range of map products and data.
www.enviroscreen.co.uk
Enviroscreen is an online environmental risk screening tool for commercial
property, delivering a cost effective and straightforward approach for tackling
contamination and environmental issues.
Terms and Conditions
For all our Terms and Conditions, please see our website
www.promap.co.uk/promap/terms.jsp.
Index
Index
-C-
-AA key 54, 190
Accuracy, increasing using 'snap to point'
Acres, using 158
ActiveX control 19, 194
Add point tool 57
Address Search dialog 30
Admin user on 156
Administration
admin users 163
folder view 164
overview 163
tasks 166
Aerial photography
buying 132
charges 160
copying to clipboard 138
customising 137
downloading 137
printing 137
samples 123
suppliers 8, 122
switching between photographs 135
uses of 122
using in other applications 137
Aligning objects 72
Angles, setting 54, 190
Arrows
changing 63
drawing 53
-BBackspace key 56
Basics of using Promap 14
Billing 9, 42, 160, 162
Bmp, downloading maps 100
Buildings, drawing on maps 54
199
47
CAD systems, using Promap data
Certificate, Enviroscreen 141
Charges
free roaming 42
list of 160
viewing expenditure 184
Check for saved maps 32
Circle Properties dialog box
Circle tool 49
Clearances
checking 48
indicating 49
106
61
Click and drag 17, 41
Close map 40
Colour schemes
applying 67
deleting 68
organising files 66
saving 66
setting a default scheme 156
setting user defaults 180
Colouring objects 44
Contacting us
Landmark Information Group
technical support 195
Contaminative sites 139
Coordinates, Easting and Northing
Copy to clipboard
maps 102
photographs 138
197, 198
29, 51
Copying objects 69
Copyright
Ordnance Survey Paper Map Copying Licence
182
Ctrl key
190
-DData Export dialog box
Delete point tool 58
Deleting
files & folders 83
lines 56, 190
objects 58
109
200
Promap User Guide
Detail 22
(Landline) format
Enviroscreen
certificate 141
charges 160
data 144
free contamination check
ordering a report 151
overview 141
samples 147
what is it? 139
106
Developers
Enviroscreen 141
finding potential sites
36
Distances, measuring 43, 47
Documentation, downloading 14
Downloading
maps 100
photographs 137
Drag and drop 17
Drawing
aligning objects 72
around a shape 45
copying objects 69
deleting objects 58
grouping objects 70
locking in place 74
locking to background 74
making changes 55, 61
matching sizes 73
moving objects 59
resizing objects 59
rotating objects 60
selecting objects quickly 56
shapes 53
shapes and symbols available
'snap to point' 47
spacing objects out 72
Drawing libraries
converting from PromapCD
creating 75
deleting 78
opening 76
saving 76
showing 78
using items from 77
52
-FFees 160
viewing expenditure
78
184
Files, opening 29
Fill tool 44
Firewalls, using Promap with
Folders
creating new 82
organising 83
139
Fonts
in print templates 93
in text boxes 62
-G-
Easting & Northing 29, 39, 51
Encryption 10
Enter expenditure details
dialog box 193
forcing users to 180
Enter key
188
Exporting maps
charges 160
Detail (Landline) 106, 108
DXF format 106
GML format 106
how can you use this? 106
Mastermap 106, 108
samples 108
steps for 109
Due diligence, using Enviroscreen
DXF files 106
-E-
Escape key 190
Expenditure reports
admin users 186
detailed admin report
printing reports 188
saving reports 188
standard users 184
what's in them 184
190
150
GB map 22
Get Length tool 47, 48
Gif
downloading maps 100
historical maps 118
19, 194
Index
GIS systems, using Promap data 106
GML files 106
Grid lines 158
Grid references
obtaining easting & northing 51
real time 52
Landline format 106
Layers
of objects on a map
selecting 32
switching map 27
types of map 22
Grouping objects
Legend tool 64
Legend, enabling changes to
Length, setting 190
Lines
adding points to 57
changing 63
drawing 53
70
-HHeaders & footers 93
Hectares, using 158
Help, online 12
Historical maps
charges 160
downloading 121
legends 192
ordering 118
overview 113
samples 115
saving 121
supplier 113
uses of 114
zip file 121
Home button 41
Hot keys for shapes
Locked files 82
Locking objects in place 74
Locking objects to background
Loggin out 21
Logging in 19
Logos 93
-IImperial 158
Installing Promap 19
Internet Explorer 7 11
Invoicing 9, 160, 162
-J100
-KKeyboard shortcuts for shapes 190
Keyword, searching for maps 39
-LL key 48, 54, 190
Labels 54
180
74
-M-
190
Jpeg, downloading maps
71
Map navigation toolbar 15
Maps
adding text to 54
adding your logo to 93
advanced customisations 69
browse saved 38
changing appearance to 64
charges 160
closing 40
colour schemes 65
converting from PromapCD 85
copy to clipboard 102
downloading 100
drawing buildings on 54
drawing on 43, 53, 61
historical 113
layers 22, 32
locating 29
moving around 17, 41
opening 29, 30, 34, 36, 37, 39
ordering an Enviroscreen report 151
printing 87
read only 81, 82
recent 38
saved 37, 38
saving 80, 81, 82
201
202
Promap User Guide
Maps
search for saved 39
suppliers 8
switching layers 27
types 22
using in other applications
zooming 17, 42
selecting multiple
spacing out 72
Offices
creating 175
editing 176
100, 106, 109
Mastermap format 106
Measurements
imperial or metric 158
system settings 158
viewing 50
Measuring
annotating maps 51
between two points 47
by drawing around a shape
by filling 44
clearances 48
objects 43
selecting shapes for 44
Metric 158
Mouse 17
Moving around maps
45
41
-NN key
selecting next object 190
using to select objects 50
North point
17, 56, 190
91
-OObjects, see also Shapes
aligning 72
available 52
copying 69
deleting 17
grouping 70
hot keys 190
locking in place 74
locking to background 74
matching sizes 73
moving 59
re-ordering 71
resizing 59
restricting movement of 190
rotating 60
Online Help, using 12
Open map dialog 37
Ordnance Survey Paper Map Copying Licence
182, 183
OS Tile number 30
Ovals
drawing 53
making changes to 61
Overlapping objects
re-ordering 71
selecting 56
-PP key 50, 190
Passwords 10, 19
PDF
historical maps 118
user guide 14
Photographs, see Aerial photography
Place name 30
Png, downloading maps 100
Previous object, selecting 190
Print layouts
creating templates 95
default templates 95
deleting templates 98
editing 96
headers & footers 93
logos 93
organising files 99
overview 92
overwriting templates 98
setting a default 156, 180
using templates 95
Printing
charges 160
expenditure reports
photographs 137
188
Printing maps
centring the print frame 90
fixing the print frame 90
moving the print frame 89
122
Index
colour schemes 66
drawing libraries 76
expenditure reports 188
files 80
historical maps 121
Printing maps
paper size 87
setting the frame and scale 87
steps for 91
stretching the print frame 89
Scale bar 91
Security 10
Shading objects 44
Shape information popup 43, 50, 51
Shape tool 45, 54
Shapes
adding points to 57
deleting a point from 58
deleting lines 56, 190
dragging out a point 57
drawing around 45
filling 44
making changes to 55, 61
measuring 44
showing measurements of 43
Project codes, default 156
Promap
basics 14
contacting us 195, 197
specifications 195
terms & conditions 198
window 12
Promap IQ 32, 103
PromapCD
converting libraries 78
converting maps 85
-RR key 49, 190
Radius
indicating clearance with
setting 190
Read only files
making 81, 82
saving changes to
Rectangles
drawing 53
making changes to
Shift key
restricting object movement with
using to lasso objects 190
49
Show fonts & logos dialog box
Show measurements 50
Site markers
default style 158
deleting 43
selecting style 32
82
61
Rounded rectangles
drawing 53
making changes to
-SSaving
61
93
Sites
for potential development 36
searching for 29, 30, 34, 36
Reference codes, default 156
Relocate
dialog box 192
using to locate a site 34, 36
Re-ordering objects 71
Reports, expenditure 184
Risk information using Enviroscreen
Road atlas 22
Roaming
for a site 35, 36
free 42
59
139
Snap to point
using to draw around a shape
using with the spacebar 190
what is it? 47
Spacebar 190
Spacing objects 72
Specifications 195
Street 22
Street + 22
Symbols
changing 63
drawing 53
System settings
156, 158
45
203
204
Promap User Guide
What's new in Promap V4
Writing on maps 54
-TTechnical support contacts 195
Templates, see Print layouts 92
Terms and conditions 198
Text boxes
adding 54
changing 62
with measurements 51
Text tool 54
Tiff, downloading maps 100
Toolbars
expanding 15
map navigation 15
Town maps 22
Trees, drawing as symbols 53
Troubleshooting 194
Tutorial, computer basics 14
-UUsage restrictions 176, 177
User accounts
creating 166
deleting 171
modifying 169
setting defaults 180
usage restrictions 176
User groups
adding & removing users
creating 172
deleting 174
what are they? 172
User IDs
administering 163
security of 10
Username
19
-VVista
11
-WWatermark 11
What to do next?
103
173
-ZZooming maps
42
10
www.promap.co.uk