Download WIND - User Manual - Network Operations

Transcript
Edi
t
i
onNumber
:
Val
i
di
t
yDat
e:
2.
0.
27
26J
une2015
WIND User Guide
1
Table of Contents
1.
Table of Contents
2.
Changes and Updates
8
2.1. Download the Manual
8
3.
4.
1-7
EVITA
9
3.1. VAAC Forecasts Publication
9
3.2. Danger Areas Publication
9
WIND
10
4.1. The Wind Editor
10
4.1.1. Document <> Entity
10-11
4.1.2. Presentation
11-13
4.1.2.1. 1 User & View
11-13
4.1.2.2. 2 Menu Bar
11-13
4.1.2.3. 3 Navigation Tree
11-13
4.1.2.4. 5 Main Display
11-13
4.1.3. The View Concept
13-16
4.1.3.1. Managing Views
13-16
4.1.3.2. Displaying Views
13-16
4.1.4. Quick Start
16-18
4.1.4.1. 1. Open a PUBLISH instance of the Portal
16-18
4.1.4.2. 2. Launch WIND
16-18
4.1.4.3. 3. Open an existing View ...
16-18
4.1.4.4. 4. ... Or create a new View ...
16-18
4.1.4.5. 5. ... Or just go and start editing
16-18
4.1.4.6. 6. Prepare and upload the file imports (if relevant)
16-18
4.1.4.7. 7. Open an existing document ...
16-18
4.1.4.8. 7. ... Or create a new document
16-18
4.1.4.9. 8. Save your work
16-18
4.1.4.10. 9. Complete your session
16-18
4.1.4.11. 10. Check your data against the system
16-18
4.1.4.12. 12. Publish
16-18
4.1.5. Editing a WIND Document
4.1.5.1. Create a new WIND Document
4.1.5.1.1. 1. Create the Document
4.1.5.2. Modify an existing WIND Document
18-20
20-22
20-22
22-23
4.1.5.2.1. 1. Edit the Document
22-23
4.1.5.2.2. 2. Open the Document
22-23
4.1.5.2.3. 3. Edit the Document
22-23
4.1.5.2.4. 4. Save the Document
22-23
4.1.5.3. Best Practices
23
4.1.5.3.1. Portlet Titles Capitalization
23
4.1.5.3.2. Simple rules to enter keywords
23
4.1.5.3.3. Bold usage
23
page 1 | WIND User Guide | Version 2.27 of 26 June 2015
WIND User Guide
4.1.5.3.4. Personal data
23
4.1.5.3.5. Compact texts
23
4.1.5.3.6. ... More to come
23
4.1.5.4. Editing Tools and Components
24
4.1.5.4.1. Formatting Text in WIND
24-25
4.1.5.4.1.1. Create a List
25-26
4.1.5.4.1.2. Insert a Link
26-28
4.1.5.4.1.3. Date Format
29-30
4.1.5.4.1.4. Insert Image
30-31
4.1.5.4.2. Edit in Popup
31
4.1.5.4.3. Keywords / Search
31-32
4.1.5.4.3.1. Simple rules to enter keywords
31-32
4.1.5.4.4. Display Period
32
4.1.5.4.4.1. Set the Date and Time
32-33
4.1.5.4.4.1.1. Set the Date and Time
32-33
4.1.5.4.4.2. Occurrences
33-34
4.1.5.4.4.2.1. Managing Occurences
33-34
4.1.5.4.5. Content Link
34
4.1.5.4.5.1. Changing the Link mode
34
4.1.5.4.6. Entity Usage
34-35
4.1.5.4.7. Sorting Data
35
4.1.5.4.8. Drag and Drop
35-37
4.1.5.5. File Resources
37-38
4.1.5.5.1. Add Directory
38
4.1.5.5.2. Add File
38-40
4.1.5.5.2.1. Allowed File Types
38-40
4.1.5.5.3. Manage Resources
40
4.1.5.5.3.1. Directories
40-42
4.1.5.5.3.1.1. Move a Directory
40-42
4.1.5.5.3.1.2. Delete a Directory
40-42
4.1.5.5.3.2. Files
42-43
4.1.5.5.3.2.1. Move a File
42-43
4.1.5.5.3.2.2. Delete a File
42-43
4.1.5.5.3.3. Purge unused files
43-45
4.1.5.5.3.3.1. Example
43-45
4.1.5.5.1.
37-38
4.1.5.1. The WIND File System
18-20
4.1.5.2. Viewing/Editing Content
18-20
4.1.5.3. Saving changes
18-20
4.1.6. Validate and align
45
4.1.7. Publish
45-46
4.1.1. Data editable in WIND (with the appropriate administrative rights)
4.2. The WIND Documents
10
46
4.2.1. ACC
46-47
page 2 | WIND User Guide | Version 2.27 of 26 June 2015
WIND User Guide
4.2.2. ACCPlan
47-51
4.2.2.1. General
47-51
4.2.3. AdhocReport
51
4.2.4. Airport
51-52
4.2.4.1. General
51-52
4.2.5. AirportPlan
52
4.2.6. ATFCMEvent
52-54
4.2.6.1. General
54
4.2.6.1.1. Title
54
4.2.6.1.2. Occurence
54
4.2.6.1.3. Summary
54
4.2.6.2. Details
54-56
4.2.6.2.1. Category
54-56
4.2.6.2.2. ACCs
54-56
4.2.6.2.3. Airports
54-56
4.2.6.2.4. Scenarios
54-56
4.2.6.2.5. Display Options
54-56
4.2.7. CalendarEvent
56-57
4.2.7.1. General
57
4.2.7.2. Details
57
4.2.8. CalendarEventCategory
57-58
4.2.9. CFMUNews
58
4.2.10. Country
58
4.2.11. DailyPlan
58-61
4.2.11.1. General
61-63
4.2.11.1.1. Item Type
61-63
4.2.11.1.2. Description and Conclusion
61-63
4.2.11.2. Scenarios
63-64
4.2.11.2.1. Adding / Deleting a scenario
63-64
4.2.11.3. Links
64-65
4.2.11.4. Map
65-69
4.2.11.4.1. Adding Locations
65-69
4.2.11.4.2. Removing Locations
65-69
4.2.11.4.3. Add Portion
65-69
4.2.11.5. Updates
69-70
4.2.11.5.1. Adding an update
69-70
4.2.11.1. General
58-61
4.2.11.2. Items
58-61
4.2.12. DailyReport
70
4.2.13. CALENDAR_DC
70-72
4.2.13.1. Events
72-74
4.2.13.1.1. General
74-76
4.2.13.1.1.1. First Panel
74-76
page 3 | WIND User Guide | Version 2.27 of 26 June 2015
WIND User Guide
4.2.13.1.1.2. Second Panel
74-76
4.2.13.1.1.3. Third Panel
74-76
4.2.13.1.2. Calendar
76-77
4.2.13.1.2.1. First Panel
76-77
4.2.13.1.2.2. Second Panel
76-77
4.2.13.1.1. Preliminary - Opening the FCU
72-74
4.2.13.1.2. Editing Events
72-74
4.2.13.1. Preliminary - Opening the FCU
70-72
4.2.13.2. CALENDAR_DC
70-72
4.2.14. FAQ
77-78
4.2.15. FAQTopic
78-80
4.2.15.1. Creating / Editing Topics
78-80
4.2.15.2. General
78-80
4.2.15.3. FAQs
78-80
4.2.15.4. Adding a question to a Topic
78-80
4.2.15.5. Deleting a question from a Topic
78-80
4.2.16. GeneralEvent
80-81
4.2.16.1. General
81-83
4.2.16.1.1. First Panel
81-83
4.2.16.1.2. Second Panel
81-83
4.2.16.1.3. Third Panel
81-83
4.2.16.2. Details
83-84
4.2.16.2.1. Location
83-84
4.2.16.2.2. Image
83-84
4.2.16.2.3. Content link
83-84
4.2.16.2.4. Display in main view
83-84
4.2.16.2.5. Show in calendar
83-84
4.2.16.1. Preliminary - Opening the FCU
80-81
4.2.16.2. Editing Events
80-81
4.2.17. MonthlyReport
84
4.2.18. PC
84-85
4.2.19. PrevalidationExercise
85
4.2.20. Pri
85
4.2.21. Scenario
85-89
4.2.21.1. Structure
85-89
4.2.22. SeasonReport
89
4.2.23. WeeklyReport
90
4.2.24. YearlyReport
90
4.2.25. NOP_DC
90
4.2.25.1. ACCs
90-92
4.2.25.1.1. General
90-92
4.2.25.2. Acc Plans
92
4.2.25.2.1. Under Construction
92
4.2.25.3. Countries
92-94
page 4 | WIND User Guide | Version 2.27 of 26 June 2015
WIND User Guide
4.2.25.4. ATFCM Events
94-95
4.2.25.4.1. Editing Events
94-95
4.2.25.5. Daily Plans
95-96
4.2.25.5.1. General
96-97
4.2.25.5.1.1. First Panel
96-97
4.2.25.5.1.2. Second Panel
96-97
4.2.25.5.2. Items
97-98
4.2.25.5.2.1. General
98-99
4.2.25.5.2.1.1. First Panel
98-99
4.2.25.5.2.1.2. Second Panel
98-99
4.2.25.5.2.2. Scenarios
99
4.2.25.5.2.2.1. Scenarios label
99
4.2.25.5.2.2.2. Scenarios
99
4.2.25.5.2.3. Links
99-100
4.2.25.5.2.3.1. First Panel
99-100
4.2.25.5.2.3.2. Second Panel
99-100
4.2.25.5.2.3.3. Third Panel
99-100
4.2.25.5.2.3.4. Fourth Panel
99-100
4.2.25.5.2.4. Updates
100
4.2.25.5.2.1. Adding, Deleting or Editing Items
97-98
4.2.25.5.1. Preliminary - Opening the FCU
95-96
4.2.25.5.2. Editing Daily Plans
95-96
4.2.25.5.3. The Copy function
95-96
4.2.25.6. Scenarios
101
4.2.25.6.1. Under Construction
4.2.25.1. Preliminary - Opening the FCU
4.2.26. REPORTS_LIB_DC
101
90
101-102
4.2.26.1. Adding - Editing Reports
102-104
4.2.26.1.1. Common Features
102-104
4.2.26.1.2. Setting the period
102-104
4.2.26.1. Preliminary - Opening the FCU
101-102
4.2.26.2. REPORTS_LIB_DC - the Folder
101-102
4.2.26.3. Editing Events
101-102
4.3. The WIND Portlet Configuration (PC)
4.3.1. Types of PC
104-107
107
4.3.1.1. Common Features
107-108
4.3.1.1.1. The Common Tab
108-110
4.3.1.1.1.1. Text area
108-110
4.3.1.1.1.2. Help link
108-110
4.3.1.1.1.3. Help External Link
108-110
4.3.1.1.2. The Main View Tab
110-112
4.3.1.1.2.1. Name and Title
110-112
4.3.1.1.2.2. Not authorized text
110-112
page 5 | WIND User Guide | Version 2.27 of 26 June 2015
WIND User Guide
4.3.1.1.2.3. Service unavailable text
110-112
4.3.1.1.2.4. Hidden when not ...
110-112
4.3.1.1.2.5. Scopes
110-112
4.3.1.1.2.6. Not in scope
110-112
4.3.1.1.3. The Detached Views Tab
112-113
4.3.1.1.3.1. Editing aTitle
112-113
4.3.1.1.3.2. Editing a Footer
112-113
4.3.1.1.1.
107-108
4.3.1.2. Application
113-115
4.3.1.2.1. AIM_PC
115-118
4.3.1.2.1.1. Configuration
115-118
4.3.1.2.1. Common features
113-115
4.3.1.2.2. Application Config
113-115
4.3.1.2.3. Practical example: AIM_PC
113-115
4.3.1.3. Linklist
118-124
4.3.1.3.1. Top Links
118-124
4.3.1.3.2. Body Links
118-124
4.3.1.3.3. Intro / Concl
118-124
4.3.1.3.4. Bottom Link
118-124
4.3.1.4. GLOBAL_DC
125
4.3.1.4.1. General
125-127
4.3.1.4.1.1. Not authorized text, Service unavailable text and Not in scope text
125-127
4.3.1.4.1.2. Session expired
125-127
4.3.1.4.1.3. More label to item
125-127
4.3.1.4.1.4. Portal developments label and Portal Developments
125-127
4.3.1.4.1.5. Query launch label
125-127
4.3.1.4.1.6. Help link and External Help link
125-127
4.3.1.4.1.7. Flight level ground
125-127
4.3.1.4.1.8. Flight level max
125-127
4.3.1.4.1.9. Flight level range separator
125-127
4.3.1.4.2. Footers
127-128
4.3.1.4.3. Colors
128
4.3.1.4.3.1. Deprecated
128
4.3.1.4.4. Map Geometry
128-131
4.3.1.4.4.1. Map Lower-Left and Upper-Right Corner
128-131
4.3.1.4.4.2. Map Dimensions - Main View
128-131
4.3.1.4.4.3. Map Dimensions - Detached ...
128-131
page 6 | WIND User Guide | Version 2.27 of 26 June 2015
WIND User Guide
4.3.1.4.4.4. Interactive Map - Gather Info
128-131
4.3.1.4.4.5. Interactive Map Disclaimer
128-131
4.3.1.4.5. Map Configuration
131-134
4.3.1.4.5.1. Dimensions/Scale
131-134
4.3.1.4.5.2. Query Limit
131-134
4.3.1.4.5.3. Colors
131-134
4.3.1.4.6. File resource Configuration
4.3.2. Special PC Entities
134
4.3.2.1. AIRPORT_INFO_PC
134-135
4.3.2.1.1. Configuration
134-135
4.3.2.2. AIRSPACE_INFO_PC
135
4.3.2.3. AIRSPACE_PC
135-138
4.3.2.3.1. Configuration
135-138
4.3.2.4. E_HELPDESK PC
138-140
4.3.2.4.1. Request Types Categories
138-140
4.3.2.4.2. Managing Types
138-140
4.3.2.5. NOP_PC
140-141
4.3.2.6. SAFA_PC
141-143
4.3.2.6.1. Users / Countries
141-143
4.3.2.6.2. Add entry
141-143
4.3.2.6.3. Delete entry
141-143
4.3.2.6.4. Edit entry
141-143
4.3.2.7. TIME_MANAGER_PC
143-144
4.3.2.7.1. Details Tab
143-144
4.3.1. Matching Portlet and Configuration
4.4. How To...
6.
104-107
144
4.4.1. Crisis Management - Step by Step
5.
134
144-154
4.4.1.1. 1. Open a PUBLISH instance of the Portal
144-154
4.4.1.2. 2. Launch WIND
144-154
4.4.1.3. 3. Prepare and upload the file imports (if relevant)
144-154
4.4.1.4. Allowed File Types
144-154
4.4.1.5. 4. Edit the CRISIS_SUPPORT_PC entity
144-154
4.4.1.6. 5. Save your work
144-154
4.4.1.7. 6. Check your data against the system
144-154
4.4.1.8. 7. Verify your changes
144-154
4.4.1.9. 8. Publish
144-154
Help
155
5.1. Using the online NOP Help
155-157
5.1.1. Main Help screen areas
155-157
5.1.2. The Toolbar
155-157
5.1.3. Glossary
155-157
Index
158-162
page 7 | WIND User Guide | Version 2.27 of 26 June 2015
WIND User Guide
2
Changes and Updates
Document
Version: 2.0
Online
Revision
Version: 27
Last
Update: 26/06/2015
Date
Section
Detail
Link
21/04/2015 Headline News
Section removed
04/12/2014 How to...
Headline News section updated
go
('Headlines
News
-
Step
by
Step'
in
the
online
documentation)
01/12/2014 -
Crisis Management added
-
11/08/2014 MEASURES
Section moved to regular Help Package
-
26/06/2014 NET
Section moved to regular Help Package
-
06/05/2014 -
Addition of EVITA
-
22/03/2014 -
Addition of NET and MEASURE Editors
-
10/02/2014 -
Headline News - Step by Step
go
('Headlines
News
-
Step
by
Step'
in
the
online
documentation)
18/07/2013 -
Global review & update
-
03/03/2011 Best Practices
Section added
go
(Section
4.1.5.3)
15/02/2011 -
CFMU 15 adaptation
-
18/05/2010 How To...
Headline News Movie added
go
('Create
a
Headline
News'
in
the
on-line
documentation)
14/05/2010 Headline News
Section reworked
go
('HeadlineNews'
in
the
on-line
documentation)
05/05/2010 -
Major update starting, to reflect WIND
2.0
-
2.1
Download
the
Manual
Download here
('WIND-User-Manual.pdf'
in
the
on-line
documentation) the most recent pdf version of the
WIND
USER
MANUAL.
The online HTML version of the WIND Help will be maintained and kept up to date on a regular basis. The pdf
manual, on the contrary, will only be generated on more important revisions.
As a result, the pdf version (and the material printed from it) can be potentially outdated by the time you wish
to use it.
Whenever in doubt, please always refer to the online version for the most recent information.
page 8 | WIND User Guide | Version 2.27 of 26 June 2015
WIND User Guide
3
EVITA
3.1
VAAC Forecasts Publication
VAAC_Forecasts_Publication
3.2
Danger Areas Publication
//
page 9 | WIND User Guide | Version 2.27 of 26 June 2015
WIND User Guide
4
WIND
4.1
The Wind Editor
The Portal is updated through the WIND (Web Interface for NOP Data) application.
Access to the WIND is profile dependent.
As a result, not all users will have the WIND button (and its companion VIEW button) visible and/or working.
The editing functionalities of the Portal are accessible in the Main View of the Portal, by clicking the WIND button located in
the Header:
WIND gives editing facilities to the content of the Portal not
coming
from
the
CFMU
Back-End
Systems.
4.1.1
Data
editable
in
WIND
(with
the
appropriate
administrative
rights)
Data generated and editable in WIND can be either of Content Type or Configuration Type, and we give you some examples
below:
Configuration
Type
1. Global Portal features and content such as
color scheme for the alert levels, the events, ...
footer text, including the Disclaimer
2. Title and visibility (depending on the phase) of the Portlets;
The Configuration
Type entities are grouped in the PC folder, which only administrator can access.
Content
Type
1. Text content (including image thumbnail and hyperlinks) of the Portlets;
2. Content and visibility (depending on the phase and/or on the WEF/TIL values) of some of the displayed entities, such
as
NM News,
Scenarios,
Events,
Reports,
...;
Access to the content is based on your user profile - this means that with your specific profile you may not be able to
modify some of the documents.
4.1.1 Document <> Entity
WIND manipulates collections of data arranged in individual containers called Entities, which are in turn stored in
folders.
An Entity can be very simple, and only contain some text (like ACC); or very complex, and contain text, images,
links to other entities and other documents, ... (like the Daily Plan).
A Document, in the context of the WIND Online Help and its derived WIND User Manual, is a set of data and
information arranged in a structured way. The term is therefore not restricted to the usual perception of a physical
item such as a sheet of paper, or its moder counteraprt of electronic file.
Depending on the conceptual angle, we will be using the terms (WIND) Entity or (WIND) Document to express the
page 10 | WIND User Guide | Version 2.27 of 26 June 2015
WIND User Guide
same notion of 'structured data container'.
4.1.2 Presentation
The WIND editor opens in a new browser window (or browser tab, depending on your browser make and configuration)
containing the WIND Application. By default, the WIND Editor opens as shown below:
4.1.2.1 1 User
&
View
The User field displays the username with which you have logged in to the Portal.
The View field tells you which view is currently selected. By default, if you will not already have created a new View or
opened an existing one, it will be set to 'published'. This means that the WIND content is displayed to you as it is currently
published on the Portal.
The View concept is developed here
(Section
4.1.3).
4.1.2.2 2 Menu
Bar
The Menu Bar proposes different means and options to interact with WIND: Trees, View, Workspace and Preferences.
Trees
The Trees menu reveals two commands, Refresh
Data and Purge
File
Resources
page 11 | WIND User Guide | Version 2.27 of 26 June 2015
WIND User Guide
The Refresh
Data command will cause the window to reload and display any changes occurred to the status of the
elements displayed in the current tree.
The Purge
File
resources command will remove all unused external elements (pictures, documents, ...) present in
the File
resources folders that are not referred to or linked to from any WIND entity
View
The View menu reveals five commands, Validate
and
align, Publish, Goto, Manage... and Transfer...
Get more details on these commands here
(Section
4.1.3).
Workspace
The Workspace menu reveals two commands, Close
every
window and Show
window.
The Close
every
window command causes all windows opened in the Main Display panel to close simultaneously.
The Show
window command will display the list of all (if any) windows opened in the Main Display, allowing you
to select which one you wish to have on top of the others - typically to view or edit its content. This is of course of
special interest when you have opened several windows in the same view.
Preferences
Lastly, the Preferences menu reveals a single command, Options...
The Options command opens the dialog window shown below, where you can define the preferred order in the Tree menu, as
well as the default sorting order within the trees:
To modify the order of appearance in the Tree
Menu, drag a selected item and drop it to its desired position.
You can change the Default sort beteween the lastUpdate and label - or more simply expressed, by date or by name.
Note: the Preferences settings will be stored on your computer - they are not part of your profile and will therefore
not be taken into account if you log in from a different computer.
4.1.2.3 3 Navigation
Tree
The Navigation
Tree is divided in three 'Accordion' type sections, each one with its own purpose:
1. The Typed
tree groups all the WIND entities by type - this is the 'logical' way the Portal content is grouped. However,
you might not wish to see all of these elements, or see them in another way better fitting your own needs...
2. ... and this is the purpose of the Business
tree, allowing you to organize your own WIND entities in your own way,
page 12 | WIND User Guide | Version 2.27 of 26 June 2015
WIND User Guide
inside you own folders and subfolders.
3. Lastly, the Files
resources
tree holds all the resources (images, imports of all sorts, ...) in a structured file system.
Here also, you can create you own folders and subfolders, import and manage external files to be used within or linked
to from the Portal.
4 Resize Handle
Drag the Resize
Handle left or right to expand or narrow the Navigation Tree.
4.1.2.4 5 Main
Display
This is where the WIND entities will open.
4.1.3 The View Concept
The view concept is at the very heart of the WIND. It allows you to create and manage any number of 'recordings' of
actions, which are stored in identified working spaces called Views. A view can therefore keep changes made to the Business
tree or to the File
resources
tree, changes made to
existing documents and of course newly created documents.
This allows you to use a given view to organize your work, create content and make all the necessary changes until
the material is ready to be published. More importantly, it allows you to privately monitor how your changes would
appear on the Portal, by generating a page mixing the actual NOP content and your own contribution.
4.1.3.1 Managing
Views
As you initiate a WIND session and open the WIND
Detail window to start working, this is how the header looks
like:
The User field tells with which account you are logged in to the Portal, and the View field indicates the currently set
view - by default, it will be the published view, containing all the elements and structure of the published NOP (in
other words, the Portal as it is seen by the public).
The
View
Menu
By default, the View menu proposes the commands as shown above, with the Validate
and
align and the Publish
command greyed out (not available) since, by default, there is nothing new to validate or publish at this stage.
You can now either go to a previously created View, create or delete a view, or even transfer a view to someone
else's account to allow that person to work on the changes you made.
The
Goto
command
In the below example, three views are proposed to you (you can have many more):
page 13 | WIND User Guide | Version 2.27 of 26 June 2015
WIND User Guide
1. Published - not available at this time since the selected view is already set to published
2. MyFirstSavedView - a previously created view
3. MySecondSavedView - another example
If you select, for example, the MyFirstSavedView to activate it, this is how the Goto options do look like:
As you can see, the active view is now MyFirstSavedView: it is displayed in the blue header and greyed out in the
proposed Goto options.
The
Manage
Command
Clicking on the Manage command opens the View
Manager:
The View
Manager allows you to set (select) an existing view, create a new one, or delete any of the views created
using the account with which you are logged in:
Set
the
Current
View: select the desired view to activate from the drop down list and click on the Set
button; Create
a
new
view: type in the name of your choice for a new view and click on the Create button;
Because the name of a View can only contain alphanumeric character, any other keystroke (space
bar, special character, ...) will be skipped by the system as you type in.
Caution: When you publish a view (this step is decribed in the Publish
(Section
4.1.7) section),
ALL ITS CONTENT is going live, regardless of its completion state. It is therefore recommended to
name your views after the type of content or intended action (i.e. 'draft' 'forMonday', ...) and
page 14 | WIND User Guide | Version 2.27 of 26 June 2015
WIND User Guide
manage them carefully to avoid the unwanted publication of unfinished work.
Delete
a
View: select the desired view to remove from the drop down list and click on the Delete
button. NOTE: Failing to Create and Set a view before opening documents for edition will not prevent the operation.
A new session will be automatically created and set for you, and named after your username appended with a
time stamp (example: testUser_2011_02_15_18_07_07). It is however recommended to create your own,
with a meaningful naming convention reflecting its purpose.
The
Transfer
Command
This enables you to select and Transfer
a
View from a given owner (the user with which the view was created) to
another user.
The field labels are self-explanatory - simply fill in the form and click on the Ok button to execute the command.
Transferring a view can be very useful, as it allows you to:
pass unfinished work to a colleague to resume,
send your work for validation to a supervisor,
unblock a situation where an absent user has left locked items which another user urgently needs to
access.
Note: You will need special privileges to transfer a view owned by another user than yourself.
4.1.3.2 Displaying
Views
You may wish to monitor the progress on your work and check how your changes will look like in the Portal.
As a good practice, you will also want to give your changes a last look before publishing your work.
To do so, return to the header of the NOP and click on the View button:
This opens the View
selector, from which you will set the view to display in the Portal:
For this example, we have selected for you the view MyFirstSavedView and clicked on the Set button. It is easy to
check which is the view currently in use by clicking again on the View button in the header.
Continuing our example, this is how the View
selector would now look like:
page 15 | WIND User Guide | Version 2.27 of 26 June 2015
WIND User Guide
This tells you that the current view is indeed MyFirstSavedView (in a red border above) - and enables you to either
opt for another view, or revert to the published view and restore the Portal in its initial state.
This step is very important to perform a visual check of your data.
Another important step to take before publishing is now to Validate
and
align you changes against the system this is detailed in the Validate
and
align
(Section
4.1.6) section.
4.1.4 Quick Start
This Quick
Start section can be used to rapidly get the basics about the WIND and start publishing - or as a
refresher course for already trained WIND users.
4.1.4.1 1.
Open
a
PUBLISH
instance
of
the
Portal
Neither the Public
Portal or the Protected
Portal will allow you to get access to WIND. You will need to go the a
specifically dedicated URL:
https://www.nm.eurocontrol.int/PUBLISH/gateway/spec/index.html
4.1.4.2 2.
Launch
WIND
Click on the WIND Button in the Header.
4.1.4.3 3.
Open
an
existing
View
...
In the Menu Bar, go to View > Manage and open the View
Manager.
Select the desired view from the top pull down menu and click on the Set button from the Set
the
current
view
section.
4.1.4.4 4.
...
Or
create
a
new
View
...
In the Menu Bar, go to View > Manage and open the View
Manager. Type the desired name in the View
Name text field and click on the Create button in the Create
a
new
view
section, then click on the Set button in the Set
the
current
view section.
4.1.4.5 5.
...
Or
just
go
and
start
editing
In cases where you choose to directly select an entity and edit it, without using an existing view or explicitely
creating one, a new view is automatically created to store the changes you are about to make, named after your
username and appended with a time stamp.
4.1.4.6 6.
Prepare
and
upload
the
file
imports
(if
relevant)
Click and open the File resources tree, locate the desired folder and right-click on it to create a new folder (if
needed) and/or add a new resource in an existing folder.
4.1.4.7 7.
Open
an
existing
document
...
Method
A
-
List
Mode
Go now to either the Typed tree or the Business tree (depending on your working preference) and locate the
document you want to edit.
Right-click on the desired document and choose one of the following actions:
1. Copy
Entity: to clone an existing document and change some of its content
2. Edit
Entity: to make changes in an entity while locking it from other users' alteration
3. View
Entity: to view the selected document
page 16 | WIND User Guide | Version 2.27 of 26 June 2015
WIND User Guide
The Delete
Entity command will, obviously, permanently remove the selected entity from the tree.
Method
B
-
Table
Mode
Locate the folder in which your document reside, right-click on its icon and select the "Open list
of xxx" command
(xxx being the type of item).
This will open the list of existing documents in a table. Locate and select (highlight) the desired document and select
the desired command from the buttons (View...,
Add..., Delete..., Copy..., Edit..., Undo
Changes...) lined at the
bottom of the table.
The Delete... button will, obviously, permanently remove the selected entity from the table.
4.1.4.8 7.
...
Or
create
a
new
document
Method
A
-
List
Mode
Go now to either the Typed tree or the Business tree (depending on your working preference) and locate the folder
in which you want to create a new document.
Right-click on the folder icon and select the "Create
new xxx" command (xxx being the type of item).
Method
B
-
Table
Mode
Locate the folder in which your document shall be created, right-click on its icon and select the "Open
list
of xxx"
command (xxx being the type of item).
This will open the list of existing documents in a table. Go to the bottom of the table and click on the Add... button to
create a new document.
4.1.4.9 8.
Save
your
work
The Apply button at the bottom of the Edit window will save the changes made to the document being edited - the
OK button does the same, and in addition closes the Edit window.
These changes are stored in a temporary location, and linked to the profile and view used to generate them.
They can be retrieved at any time during the same or another session, changed again, deleted .. or of course
published on the live server.
Should you forget to save your changes, you will be prompted to do so when you close the Edit window.
The warning about unsaved work does NOT appear when you close the main WIND window. Remember
to
save
your
work, a there is no way to recover lost data.
4.1.4.10 9.
Complete
your
session
Repeat steps 6, 7 and/or 8 at will until you have achieved your edition objective.
4.1.4.11 10.
Check
your
data
against
the
system
Go to the View menu and select the Validate
and
align command. This will run a technical check to validate the
changes you made and result in a "0 errors found" messages if everything is OK - or some other message indicating
the type of error encountered.
11.
Verify
your
changes
Before publishing, you may also wish to make sure that the changes you are about to have copied to the live server
are indeed what you intended to display, by means of a visual check.
Simply return to the header of the Portal and click on the View button - and select in a drop-down list from which of
your views (there may be just one item listed there if you have created only one view) you wish to have the content
displayed.
This step is very
important and allows to you verify exactly how your changes or additions will look like
without the need to publish on the live site - and therefore allowing you to modify or finetune your changes as
long as necessary until ready to publish.
4.1.4.12 12.
Publish
As no errors were encountered during the Validate
and
Align check, you can now safely click on the Publish
command located in the View menu to publish your data in the NOP. As a result, the view used for making the
changes is terminated, and removed from the list of available views. Should you wish to make another set of
changes, you will have to either open an existing view, or create a new one.
page 17 | WIND User Guide | Version 2.27 of 26 June 2015
WIND User Guide
A view may be kept open for any given time - you may in fact create several views and use them at will, from
one day or working session to another, until you estimate your document is ready to be published.
Read more on the View
Concept here
(Section
4.1.3).
4.1.5 Editing a WIND Document
Before any creation or modification of WIND Entity, you may wish to get a few basic facts on how documents are
handled in the WIND interface.
4.1.5.1 The
WIND
File
System
The WIND documents are represented by a document symbol followed by a name (and followed, between
braquets, by a usage status indication and by the last update date). A WIND document is also referred to as an
entity - this is how it will be named in the different menus.
The WIND entities are grouped in logical collections, and for that purpose stored inside folders represented by the
typical folder icon.
As in most file systems, the folder can be either collapsed or expanded, to reveal its content (see illustrations below,
with the CalendarEvent folder taken as example):
Collapsed
Folder
Expanded
Folder
You can also move your mouse over the listed items to get a tooltip with a summary of the overflown entity, showing
its name, type, last update and usage status:
Entity
status
Visual clues let you know the current status of an entity:
A padlock icon next to the entity label indicates that it is currently being edited and therefore not available for
edition, until it is released.
In addition to this, a color code further clarifies its status:
Labels are set to Green when they are being edited by yourself, within the active view in which you are
currently making changes.
page 18 | WIND User Guide | Version 2.27 of 26 June 2015
WIND User Guide
They are set to Orange when edited by yourself - within any view other than the currently active one (and
indentified between parenthesis). You will need to return to this view in which the changes took place to
resume your work.
Labels are finally set to Red to indicate that the entity is being edited by someone else (indentified
between parenthesis).
Note: The last update date and time indicated next to an entity status may be misleading - they firstly reflect
the date and time of the last migration (internal procedure reserved to system administrators) and then, when
relevant, the date and time of a content update (if posterior to the last migration).
Entity
Title
Bar
Once you have opened an entity, the Title
Bar
displays its Title (name), preceded for easier reference by the
identifier of the collection to which it belongs:
Resize
-
Close
-
Move
the
Edit
Window
The Title
Bar also provides 4 buttons to automatically resize the Edit window:
Minimize: reduces the Edit window to its title bar - the opposite action to Maximize
Maximize: restores the Edit window to its original size - the opposite action to Minimize
Full
Screen: stretches the Edit window to fill the available space
Close: closes the Edit window
Another way to manually resize the window is by means of the Resize Handle, located at the bottom right of the
window, as highlighted below:
You can finally move the window with a standard drag-and-drop action on the title bar.
4.1.5.2 Viewing/Editing
Content
There are to main methods to view or edit a WIND document - the List
Mode and the Table
Mode.
The
List
Mode
In the List Mode you will work in a way very similar to what you are used to do in your regular computing
environment: open a folder, locate a document, and double-click on its name or icon, or right-click on its name or
icon and select a command from the proposed contextual menu.
The
Table
Mode
The Table mode is quite different, as it displays the content of a WIND folder in a table format.
To work in the Table mode first locate and select the target folder, right-click on its name or icon, and select the
'Open list
...' command. The tables prove very useful for displaying and sorting long lists of documents, as you can
drag the columns in your preferred sequence, and sort
(Section
4.1.5.4.7) their content at will. The Table mode is also very useful to check if an entity is being USED - and where.
4.1.5.3 Saving
changes
The WIND Editor provides two methods to persist the changes made to a document: the Apply and Ok buttons
mocated at the bottme left of the window.
The Apply button will save the changes made to the document being edited - the OK button does the same, and in
addition closes the Edit window.
These changes are stored in a temporary location, and linked to the profile and view used to generate them.
They can be retrieved at any time during the same or another session, changed again, deleted .. or of course
page 19 | WIND User Guide | Version 2.27 of 26 June 2015
WIND User Guide
published on the live server.
Should you forget to save your changes, you will be prompted to do so when you close the Edit window.
The warning about unsaved work does NOT appear when you close the main WIND window. Remember
to
save
your
work, a there is no way to recover lost data.
4.1.5.1 Create a new WIND Document
These are the typical steps to follow when you want to create a WIND document.
4.1.5.1.1 1.
Create
the
Document
There are several ways to create a document - pick the one you like best:
From
the
Typed
tree
1. Locate the folder corresponding to the type of document you are about to create (in this example, ATFCMEvent)
2. Right-click on its name or icon
3. Select the Create
new xxx" command (xxx being the type of item) from the contextual menu
4. goto step 2
From
the
Business
tree
1. First create the folder(s) you will need to best organize your work with the Create
a
new
directory command. You
are totally free here so arrange your directories and files at your convenience - as you are free not to create any and
place all your files in the root folder...
For this example we have created for you a MyFolder_1 and MyFolder_2 directories, as well as a MySubfolder_1.
2. Locate the folder in which you want a new document to be created and right-click on its name or icon and select the
Create
a
new
entity from the contextual menu:
page 20 | WIND User Guide | Version 2.27 of 26 June 2015
WIND User Guide
3. Select the type of document from the Select
the
type
of
entity
to
create list:
... and click on the Ok button to open a blank document Edit window of the corresponding type.
This is for example such a blank document of type CFMUNews:
You can see that most fields are empty - however some elements are configured by default by the system. Such is the
case of the WEF argument in the Display
Period panel, which is set to the date and time of the creation. You can of
course manually change these values.
page 21 | WIND User Guide | Version 2.27 of 26 June 2015
WIND User Guide
4. Configure and fill in the details - See in the Editing
Tools
and
Components
(Section
4.1.5.4) section how to make
the best use of the WIND interface.
5. Save your document.
4.1.5.2 Modify an existing WIND Document
These are the typical steps to follow when you want to edit (modify) a WIND document.
4.1.5.2.1 1.
Edit
the
Document
Select the document to edit (its name will be displayed against a grey background) and right-click anywhere on the
highlighted line, then select the Edit
Entity command from the contextual menu:
The selected document is now marked with a padlock icon and its named printed in bold green, indicating to you
(and to other WIND users) that this document is being protected from someone else's alteration:
Note: you can release a locked document by one of the following ways:
1. Select the Undo
my
changes command from the contextual menu obtained by a right-click on the
document name
2. Publish the changes made
4.1.5.2.2 2.
Open
the
Document
Opening a document is very simple: just double-click on its name or icon. You may alternatively right-click on its
name or icon and select the View
entity command from the contextual menu.
Note: You can edit an already opened document from its contextual menu, as above explained, without having
to close it first.
This opens a document window featuring all the information and data related to the selected document.
4.1.5.2.3 3.
Edit
the
Document
Depending on its type, a document window may be simple or very complex, offering various fields to fill in and
options to select, grouped in a varying number of tabs.
The Title, Display
Period, Summary, Description, Keywords etc. are common to most documents - and
obviously less generic fields such as Location, ACC, Criticality, Conditions, OffLoad
Areas, Applicability, ... are
attached to very specific WIND documents.
Please refer to the sections below to get more details on how precisely use the WIND editing facilities:
page 22 | WIND User Guide | Version 2.27 of 26 June 2015
WIND User Guide
Tagged
Text
Editor
(Section
4.1.5.4.1)
Keywords
/
Search
(Section
4.1.5.4.3)
Display
Period
(Section
4.1.5.4.4)
Set
the
Date
and
Time
(Section
4.1.5.4.4.1)
Content
Link
(Section
4.1.5.4.5)
Content
Item
Usage
(Section
4.1.5.4.6)
Sorting
Data
(Section
4.1.5.4.7)
Drag
and
Drop
(Section
4.1.5.4.8)
The File
Resources
(Section
4.1.5.5) section is also of interest to you, as it explains how to upload, download and
manage files (images and other formats) into the WIND system to allow the documents to link to them.
4.1.5.2.4 4.
Save
the
Document
4.1.5.3 Best Practices
This section compiles a number of proposed editing guidelines, aiming at a consistent and well-balanced Portal.
It will be updated every now and then to incorporate new additions. In this perspective, feel
free
to
submit
your
own
suggestions.
4.1.5.3.1 Portlet
Titles
Capitalization
Ensure that the Portlets' titles are typed in in a consistent way (in the wording of course) but also in the way letters and
words are capitalized.
4.1.5.3.2 Simple
rules
to
enter
keywords
In order to simplify and alleviate the task of having to select and enter keywords for every single item presented via the
Portal, WIND automatically parses (scans) the text (title, summary, description, etc.) you enter when creating / editing an
item, removes unsignificant words such as "a", "the", "in", "for" and tags the remaining words as keywords.
Should you wish to further enrich the list of keywords associated to your item, please consider applying the following rules:
Comma-separated: use a simple comma to separate keywords - with or without blank space(s)
Targeted: use only simple targeted keywords - which are, if not truly unique, very relevant for the topic.
As a good practice, try also to use keywords as someone not as literate as you on the topic at hand would imagine
them...
4.1.5.3.3 Bold
usage
Please refrain from using too much bold in your texts
4.1.5.3.4 Personal
data
Do not disclose too much personal contact information such as names, phone
numbers, or email
addresses.
For these, you can use the Link
(Section
4.1.5.4.1.2) feature and enter the following code as hyperlink :
'mailto:' followed by the email address - see example below:
And this is how the code is rendered in the NOP:
4.1.5.3.5 Compact
texts
Keep your texts short, simple and clear. The Portal is meant to present a maximum of tools to its users, not to serve as a
marketing media. If your text exceeds a couple of lines, you may use the 'more' feature and link to additional webpages.
4.1.5.3.6 ...
More
to
come
page 23 | WIND User Guide | Version 2.27 of 26 June 2015
WIND User Guide
4.1.5.4 Editing Tools and Components
4.1.5.4.1 Formatting Text in WIND
A basic set of formatting tools are present under some input area, allowing you to apply some simple text styles and
enhance the presentation of the text fields.
A text field which can be enriched with tagged text is easy to identify: it has the Tagged
Text
Editor toolbar (illustrated
below) located right under it.
The term 'Tagged Text' refers to the editor inserting specific formatting code instructions within the text - these small
pieces of code are named Tags.
Note that this component is not a WYSIWYG editor - it will only show some code, and does not render it as it would be
when seen from the NOP.
Caution: the Tagged Text Editor must be used very carefully
Since the HTML code is visible - and therefore editable as well - your text might not render as expected if some tag
has been damaged or removed by mistake.
As for most simple text editors, many of the commands are quite straightforward to understand. This is certainly the case
for these:
Undo / Redo: undo (or redo) the last entered changes.
Carriage
Return: Inserts a line break each time you click on it, forcing a carriage return.
Hitting the return key on your keybord will not be enough to force a new line - even though it might seem so in the
editor window. Again, this is not a WYSIWYG editor.
Bold / Italic / Underline
Simply highlight with the mouse the text you want to edit, then click on the desired button. Should you wish to apply a
second style on the same text string, please make sure to only reselect the original text - excluding all tags (tags are
HTML commands placed between <
> brackets).
Example
1. Select the text
2. Click on the Bold button - you text is now surrounded by the <b> and </b> tags (marking where to start and
where to end the effect)
page 24 | WIND User Guide | Version 2.27 of 26 June 2015
WIND User Guide
3. Select again the same text ...
4. .. and this time click on the Italic button
Notice how the <i> tags are correctly nested within the <b> tags. This gives the following sequence:
<b><i>some words</i></b> which will correctly display in the viewers' browser.
An incorrect sequence, such as <b><i>some words</b></i> is likely to be wrongly rendered. The whole text
will probably be set in bold, since the bold closing tag is not located where it is expected, namely after the </i>
tag.
Example: the source code
Example: how is shows in the NOP
Note: in case you are familiar with HTML, it is tempting to add your own HTML code to further enrich your text.
Unfortunately, WIND will not retain any additional HTML code...
The other tools are described each in the next sections.
4.1.5.4.1.1 Create a List
In addition to the basic commands detailed in the Tagged
Text
Editor
(Section
4.1.5.4.1) section, here is a more
page 25 | WIND User Guide | Version 2.27 of 26 June 2015
WIND User Guide
complex one allowing you to create lists within WIND documents.
Create
a
List
Clicking on the Create
a
list button opens the palette below
First choose between a Numbered
list or a Bulleted
list by means of the drop-down list.
The next step is to select the desired number of items, with the Length up and down arrows.
You will then need to individually edit each of the rows of the table to enter the text - simply click and type, as in the
following example:
This is the code corresponding to the list we have just created in the example:
4.1.5.4.1.2 Insert a Link
page 26 | WIND User Guide | Version 2.27 of 26 June 2015
WIND User Guide
Insert
Link
Clicking on the Insert
Link button opens the palette below:
Note that is is set by default to Link
to
a
file
resource. The Type field allows you to opt for an External
link:
First choose between the External
link or the Link
to
a
file
resource type of link.
Both types work int he same way:
First select the desired Type.
Check the Open
in
a
new
window box if you want the target page to be opened in a new browser
window instead of in the current one.
In case you did not yet select the text to which apply the change, the next step is to type in the text which
will be the label for the hyperlink . If you did so (by first selecting a text string then clicking on the Link
button), then the selected text will already appear in the Text field.
Indicate the path to the target file, in the form of an URL in the case of an external link, or drag and drop
an element already available in the File
Resources folders. If necessary, follow the instructions provided
in Step
4 (upload files).
Example
for
an
external
link
This is, highlighted in a red border, the corresponding code:
page 27 | WIND User Guide | Version 2.27 of 26 June 2015
WIND User Guide
And this is how the code is rendered in the NOP:
Example
for
an
internal
link
Drag and drop the file to the File Resource field:
Check that it has been correctly linked:
This is, highlighted in a red border, the corresponding code:
And this is how the code is rendered in the NOP:
page 28 | WIND User Guide | Version 2.27 of 26 June 2015
WIND User Guide
4.1.5.4.1.3 Date Format
Date
Format
Clicking on the Date
Format button opens the palette below:
The notions of time and date are at the heart of the NOP. To ensure their accuracy, they are handled in a format
different from the ones mostly used. This component has been designed to help you enter / edit times and dates in
the Portal format.
To enter a time based data, simply select from the drop-down list the desired format:
Date
Time
Date
and
Time
Depending on your choice, a calendar and/or a time picker will then invite you to select the date and/or time to
appear in your text once you have clicked on the Insert button.
Example
This is the corresponding code as it will appear in the text editor:
And this is how the code is rendered in the NOP:
Note: when you click on the Date
and
Time button with the mouse insertion point set inside the date tags
(highlighted in red), this component turns into an editor, allowing to change any of the parameters (format,
date and time).
page 29 | WIND User Guide | Version 2.27 of 26 June 2015
WIND User Guide
4.1.5.4.1.4 Insert Images
Insert
Image
Clicking on the Insert
Image button opens the Select
the
image
properties palette. To add an image to your text, simply dag it from the File
resources
tree.
Next choose the type of alignment among the following:
Left
Right
Top
Bottom
Middle
You may optionally specify the display pixel dimensions of the image (Height and Width) - use this feature when
your image is too big to fit (WIND will not automatically resize oversized images).
Example
This is the corresponding code as it will appear in the text editor:
The
Align
Parameter
-
some
examples
= "left"
page 30 | WIND User Guide | Version 2.27 of 26 June 2015
WIND User Guide
= "right"
= "top"
Note: when you clink on the Images button with the mouse insertion point set inside an image code
(highlighted in red), this component turns into an editor, allowing to change the parameters (source and
alignment) for the selected image.
4.1.5.4.2 Edit in Popup
The Tagged
Text
Editor present at the bottom of any text entry fields is completed by an Edit
in
popup button, located
on the right (as highlighted below). Click on the featured button to pop up a large edition window, best adapted to working with larger texts without
the need to start scrolling up or down after a few lines.
4.1.5.4.3 Keywords / Search
It is very important to indicate relevant keywords the Keywords field: not too many and with a strong relation with
the matter at hand.
page 31 | WIND User Guide | Version 2.27 of 26 June 2015
WIND User Guide
4.1.5.4.3.1 Simple
rules
to
enter
keywords
In order to simplify and alleviate the task of having to select and enter keywords for every single item presented via
the Portal, WIND automatically parses (scans) the text (title, summary, description, etc.) you enter when creating /
editing an item, removes unsignificant words such as "a", "the", "in", "for" and tags the remaining words as
keywords.
Should you wish to further enrich the list of keywords associated to your item, please consider applying the following
rules:
Comma-separated: use a simple comma to separate keywords - with or without blank space(s)
Targeted: use only simple targeted keywords - which are, if not truly unique, very relevant for the topic.
As a good practice, try also to use keywords as someone not as literate as you on the topic at hand would
imagine them...
4.1.5.4.4 Display Period
The Portal data being mostly driven by time, you will typically have to specify the Start and End period during which
the item you are entering will be visible to the Portal visitors.
The Display
period proposes the following value by default:
Start: the date and time of the creation of the item
End: "plus infinity" - that is , with no limit in the future
These values can of course be modified, as explained in the next Set
the
Date
And
Time
(Section
4.1.5.4.4.1)
section.
4.1.5.4.4.1 Set the Date and Time
4.1.5.4.4.1.1 Set
the
Date
and
Time
This component provides a simple and intuitive way to enter dates and times in the relevant fields within the WIND
document.
The dates in a WIND document get default values when creating an item. However, you can modify them either by
entering new values in the fields, or with the help of the Calendar and Clock tools provided here.
The Calendar icon brings forward a Date Picker with which you can select the desired day with a few mouse clicks:
page 32 | WIND User Guide | Version 2.27 of 26 June 2015
WIND User Guide
The Clock icon simply sets the time to "Midnight" - 00:00
Finally, the Plus Infinity buttons is a convenient way to make an item visible forever in the future.
Caution: there is no validity check on dates and times - please check your entries and make sure a start date
is not set later than a stop date...
4.1.5.4.4.2 Occurences
While most of the WIND entities have their period of appearance on the NOP regulated by the Display
Period component,
providing a simple pair of Start day and time and End day and time, some do rely on a different mechanism, allowing any
number of programmed appearances.
This is achieved with the Occurence component, which can be found associated to specific entities such as ATFCM
Events,
Calendard
Events, ... and other recurrent events which are likely to have multiple validity periods.
This is a typical example fot he Occurence field, indicated that the concerned item whill be visible on the Portal from
01/03/2013
at
00:01 to 12/09/2012
at
23:59 and from 15/5/2013
at
13:22 to 31/5/2013
at
12:45.
4.1.5.4.4.2.1 Managing
Occurences
The component allows to to Add, Edit and Delete occurences.
Adding
Occurences
Click on the Add button ...
to open the Display
Period editor:
The default values are 'now' for start and 'never' for end.
Please refer to the Set
the
Date
and
Time
(Section
4.1.5.4.4.1) section for additional information on how to use the
component.
Editing
Occurences
page 33 | WIND User Guide | Version 2.27 of 26 June 2015
WIND User Guide
There is actually no 'Edit' procedure - but here is a workaround:
1. select a display period pair - it will be highlighted with a light blue background, and the Display Period component will
appear, if not already opened.
2. make the necessary changes in the Start and/or End fields
3. select another existing display period pair to persist your changes
In cases where only one display period pair is present, you can create a temporary new one and delete it as soon as you
managed to make the desired changes.
Deleting
Occurences
Simply select the display period pair to remove and click on the Delete button.
4.1.5.4.5 Content Link
The Content
Link component is set, by default, in the Internal Link mode. This is made visible by the INTERNAL
button being ON, in bright orange: .
Simply drag and drop in to the File
Name field the desired element from the File
Resources
tree.
4.1.5.4.5.1 Changing
the
Link
mode
When you click on the INTERNAL button, it changes from ON to OFF, changing its color to gray: .
The associated parameters to a now EXTERNAL link are:
URI: a path to an external resource (typically, a web page)
Keywords: the list of words by which this link should be picked up by the search engine.
4.1.5.4.6 Entity Usage
When viewed in Table
Mode (see Editing
a
Wind
Document
(Section
4.1.5) for details), all entities do all have a
column with the label "Used" as title.
The location of the Used column can vary from one entity table to another - but its purpose is always the same: tell
you if and where a given entity is used by another entity.
The USED button presents two states: grayed out (inactive) and green (active).
When you move your mouse over an active USED button, a yellow tooltip opens and lists all occurences of the
selected item:
page 34 | WIND User Guide | Version 2.27 of 26 June 2015
WIND User Guide
Items which are used by other WIND entities (referenced in other documents) can not be removed. You will
need to spot all the places where there are used (this is where the usage list is very useful) and remove all
references to the item first. Only when this is done, and the Used status returned to inactive, can you finally
delete the entry.
4.1.5.4.7 Sorting Data
You can easily sort any list or table by clicking in the header of the column by which you want to sort.
For your convenience, you can drag and drop the column headers to arrange the table as best suits your needs
When you open a list, its content is not specifically sorted. The headers of the columns are in their normal state, as
shown below:
A click on an unsorted column header will sort its content in descending order, the newest entry being on top of the
list. And an upward pointing arrow appears in the right corner of the header, to reflect the sort status:
A click on a sorted column will toggle its state to the other sorted status. For example, clicking on a column sorted in
descending order will reverse its sorting order to ascending, and reflect the new status in the header:
Clicking on an unsorted column will reset all other headers to their normal status - in short, you can only one
primary sort by one of the columns.
4.1.5.4.8 Drag and Drop
page 35 | WIND User Guide | Version 2.27 of 26 June 2015
WIND User Guide
Some WIND data can be dragged from one location to another. "Linked" would actually be a better description,
because this action does not relocate or create a duplicate of the content, but rather generates a reference to a given
content item.
The major benefit is that when the referenced item is being updated, all its occurences automatically reflect the
change, wherever the data is being used.
See below how to very simply create this kind of relationship between an item in a pre existing ACCs listing and, in
this example, the ACC field of the Daily
Plan.
1. Select the source element and start dragging it in direction of the target area.
Note that a mouse tip.
icon next to the mouse indicates that the selected item can not be dropped in the area under the
2. When you reach the target area, the warning icon changes to , indicating that the mouse button may now be
released to drop the item.
3. As a result, the ESOS ACC now appears in the correct field in the NOP_DC
-
Daily
Plan table. What is more, the usage indicator is now turned on in the NOP_DC
-
ACCs table, telling you that the resource is being used
somewhere in another entity.
page 36 | WIND User Guide | Version 2.27 of 26 June 2015
WIND User Guide
Placing the mouse over the now highlighted usage indicator reveals a pop up information box, indicating where
exactly the resource is being used. This is very helpful when you need to Delete an item.
The example below states that, in addition to the Countries list itself, the ESOS ACC are being used in both Lapland
Axis
2008/2009 and North
East
Axis. These will need to be edited and the link to ESOS deleted before the ESOS
ACC can in turn be removed from the list.
4.1.5.5 File Resources
The File
resources tree panel is in effect a file system, complete with directories, sub-directories and files,
presented in an organized way for easier retrieval and usage.
This is where you will look for the files you want to create a link to from your document(s), or where you will
yourself upload files for such purposes.
Not all file types are permitted - Please check the Add
File
(Section
4.1.5.5.2) section for details.
page 37 | WIND User Guide | Version 2.27 of 26 June 2015
WIND User Guide
4.1.5.5.1 4.1.5.5.1 Add Directory
To add a directory in the File
Resources, first locate the folder in which you intend to create it, right-click with the
mouse and select Create
a
new
directory command from the contextual menu:
You will next be prompted to enter the name for your new directory:
The name of your new directory must not contain whitespaces, backslashes or special characters - failure to
observe this rule will return an error message.
Enter a valid name and click on the Ok button:
When this is done, the new folder appears in the File
Resources
tree, at the end of the current list.
Important: immediatly add one or more files to this directory. Leaving it empty will result in it not being
saved in your View.
4.1.5.5.2 Add File
page 38 | WIND User Guide | Version 2.27 of 26 June 2015
WIND User Guide
Due to a problem caused by a known bug for firefox and other netscape-based browsers, please use Internet
Explorer for your uploads.
To add a file resource, first locate the desired folder, right-click with the mouse and select Add
a
file
resource
command from the contextual menu:
You will then be prompted to Select
the
file
resource
properties by means of a dialog:
The Directory field is set by default to the folder from which you invoked the command
The Type field allows you to select from one of the following file types:
1. PORTLET_IMAGE
Usage: Illustration in all portlets - main view
Size: image size must be 75x75 pixels
2. NEWS_THUMB_IMAGE
Usage: Illustration in CFMU News (main view) and HEADLINE NEWS (detached view)
Size: Image will automatically be resized to 52x52 pixels
3. SCENARIO_IMAGE
Usage: Illustration in SCENARIOS (detached view)
Size: Image will, if too big, be resized to 720x540 pixels
4. FREESIZE_IMAGE
Usage: Illustration in all documents where images can be embedded
Size: Image size must be at least 90x90 pixels
5. OTHER
Usage: for all documents other than images
The File field prompts you to browse the files present on your local file system (from your computer hard
disk or any network drive to which you have access) - confirm your choice by clicking on the Select button
4.1.5.5.2.1 Allowed
File
Types
WIND only accepts the upload of the files in the following formats:
Text (txt, doc, rtf)
Html (htm, html)
Image (gif, jpeg, png)
Powerpoint (ppt)
Excel (xlc, xll, xlm, xls, xlw)
Any other format will cause WIND to generate an error message
Once you have confirmed the target folder, set the file type and selected the file to add to the WIND resources,
simply click on the Ok button to initiate the upload process. See the example below with a sample
volcanic_delay.gif file...
page 39 | WIND User Guide | Version 2.27 of 26 June 2015
WIND User Guide
... wait for the file to be transferred to the temporary files associated to your current View...
... and see below how your new file now appears in the file resources: the filename has turned green (meaning that
the requested modification, in this case the addition, has not yet been saved) and is preceded with a green
"plus" sign, indicating the nature of the change.
In short, the file has not yet been copied to the production server, and is not yet available to the Portal or to other
WIND users.
In other words, no one but yourself (until you publish your View) can make use of that resource.
In case you delete your View, all the changes having occurred while it was there will be lost, including your
additions to the file resources.
4.1.5.5.3 Manage Resources
4.1.5.5.3.1 Directories
There are a few operations that you can apply on Directories to offer some flexibility in the file management.
4.1.5.5.3.1.1 Move
a
Directory
In order to change the location of a given directory, right-click on its name or icon and select the Cut
directory
(move
from...) command...
page 40 | WIND User Guide | Version 2.27 of 26 June 2015
WIND User Guide
... select the new destination directory and apply now the Paste
directory
(move
to...) command from the
contextual menu...
... and check that your directory has in effect changed place - the MyNewFolder directory has moved from the
MyImages folder to the NAT folder:
4.1.5.5.3.1.2 Delete
a
Directory
Deleting a Directory is even simpler - locate the folder to suppress in the File resources tree, right-click on its name
or icon and select the Delete
Folder command from the contextual menu:
page 41 | WIND User Guide | Version 2.27 of 26 June 2015
WIND User Guide
4.1.5.5.3.2 Files
There are a few operations that you can apply on documents from the File
resources
tree to offer some flexibility
in the file management.
4.1.5.5.3.2.1 Move
a
File
In order to change the location of a given file, right-click on its name or icon and select the Cut
file
resource
(move
from...) command...
... select the new destination directory and apply now the Paste
file
resource
(move
to...) command from the
contextual menu...
... and check that your file has in effect changed place - the volcanic_delay.gif file has moved from the MyImages
folder to MyNewTargetFolder:
page 42 | WIND User Guide | Version 2.27 of 26 June 2015
WIND User Guide
4.1.5.5.3.2.2 Delete
a
File
Deleting a File is even simpler - locate the item to suppress in the File
resources
tree, right-click on its name or
icon and select the Delete
file
resource command from the contextual menu:
The file is now marked for deletion:
The filename has turned green (meaning that the requested modification, in this case the deletion, has not yet been
saved) and is preceded with a red coss sign, indicating the nature of the change.
Very
important: The file will be actually removed from the File
resources
tree only after you have published your
View.
As a consequence, the only way to cancel a deletion command is to delete the View from which it was invoked.
4.1.5.5.3.3 Purge unused files
As in any collection of files, after a while one ends up with a certain amount of files outdated or no longer in use, and
wishes to tidy up.
This is facilitated by the Purge
file
resources from the Trees menu:
page 43 | WIND User Guide | Version 2.27 of 26 June 2015
WIND User Guide
This command is available to you from within a View, so you will need to first create one - see here
(Section
4.1.3)
for details on how to do so.
4.1.5.5.3.3.1 Example
This example shows how to remove the unused volcanic_delay.gif image file.
Clicking on the Purge file resources command makes a dialog to pop up prompting you to select the file to delete:
The Ctrl
+
Click method (hold the control key down as you click on an item) allows you to select multiple
elements to suppress in one go.
Clicking on the Delete
selected button marks the file for deletion:
The filename has turned green (meaning that the requested modification, in this case the deletion, has not yet been
saved) and is preceded with a red coss sign, indicating the nature of the change.
Very
important: The file will be actually removed from the File
resources
tree only after you have published your
View.
As a consequence, the only way to cancel a deletion command is to delete the View from which it was invoked.
page 44 | WIND User Guide | Version 2.27 of 26 June 2015
WIND User Guide
Note: removing all files from a directory will make this directory disappear from the File
resources
tree.
Remember that a directory needs to contain at least one file to exist.
4.1.6 Validate and align
The Validate
and
align command automatically performs a check on the technical validity of your changes. Any
blank mandatory field, any broken link or missing import will be spotted and an error message will pop up and
summarize the situation, for you to take the corrective measures required.
See below a typical error message, telling you that in the view 'MyFirstSavedView' owned by the user 'sph', there
is a document on the 'CFMUNews' folder missing a mandatory'summary' field.
These error messages are not always straightforward to read - feel free to copy & past the text (or take a
screenshot) when you need to ask for technical assistance.
On the other hand, here is the message telling you that you can now safely publish:
4.1.7 Publish
page 45 | WIND User Guide | Version 2.27 of 26 June 2015
WIND User Guide
The Publish command comes last, after you have first visually checked your data and run the Validate
and
align
command.
Its purpose is to move the changed or added files from the prepublication server to the publication server, and
therefore make them visible to the users of the NOP.
Here again some processing checks the technical validity of your request, and you finally get a message indicating
that the publication was successful.
In some occasions, an error message may pop up - please take note of its content (copy & paste or screenshot) and
send it to the relevant technical department.
4.2
The WIND Documents
This section covers the specific features relative to all listed WIND
Documents
/
Entities (see the Document
<>
Entity
(Section
4.1.1) section for more details on the terms) and provides some instruction on their optimal usage,
when relevant.
General features such as how to manage
(Section
4.1.5) a WIND document, edit
(Section
4.1.5.4) its content or
handle
(Section
4.1.5.5) files and imports are described in other sections.
You may finally use the Quick
Start
(Section
4.1.4) section for a very brief overview of these notions.
4.2.1 ACC
The ACC folder contains a number of ACC entities:
Here is the content of one of them (EHAA) - the content of this single General tab is very straightforward and does
not require scpecific instructions to be used correctly:
page 46 | WIND User Guide | Version 2.27 of 26 June 2015
WIND User Guide
Note: This information has no direct visibility on the portal as such.
You only create a new entry when required for feeding the ACC field of other documents (e.g. new ACCPlans
being made available, ATFCM events, scenarios...).
The
creation
of
a
new
ACC
must
be
correlated
to
existing
corresponding
entities
in
CACD
(ENV
db).
Caution: WIND will not validate or cross-check against the CACD. It is your responsibility to ensure
correctness of any info created.
4.2.2 ACCPlan
The ACCPlan folder holds all the issued ACC Plan documents:
page 47 | WIND User Guide | Version 2.27 of 26 June 2015
WIND User Guide
ACC Plans are delivered on the NOP via the ACC
Info Portlet:
4.2.2.1 General
A single General tab contains all the ACCPlan edition parameters:
ACC
This is where you will either type in the name of the relevant ACC (note the autotype feature - see below what
shows up as you type in E - D - G ...) ...
... or drag and drop an item from the ACC list:
Year
ACCPlans are yearly - unlike AirportPlans which are seasonal. Simply type in (or use the up and down arrows) to
indicate the year for which the plan is valid:
ACC
Image
This is where you will drag and drop the image (or more exactly, the image name as is appears in the File
Resources
tree), to be published on the NOP portal.
ATCFM
Events
Comments
This first text area is reserved for ATFCM Events Comments.
page 48 | WIND User Guide | Version 2.27 of 26 June 2015
WIND User Guide
Overview
This is where you place the text to appear in the Overview section of the ACC Plan.
Planned
Capacity
-
Enhancement
Measures
Place in this other text area the relevant content to be published.
Prospects
This panel contains two elements, Table and Comments.
page 49 | WIND User Guide | Version 2.27 of 26 June 2015
WIND User Guide
The Table is a 5 columns x 4 rows one, which you can use freely.
Data are fed manually monthly, rows and columns labels are editable and should be adapted at the start of the year
when creating a new ACCPlan:
Target
Delay
per
Flight
(min)
Forecast
Delay
per
Flight
(min)
Actual
Average
En-route
Delay
per
Flight
(min)
Year
Data
Data
Data
Year
Data
Data
Data
Year
Data
Data
Data
The Comments text area is there for you to enter additional comments to the Prospects panel.
Actual
Traffic
-
Delay
Follow-up
This is another Table - Comments group.
This table is automatically updated by a monthly PFR file upload. It is can however be edited, following a decision to
adapt the content. The table structure is however not editable.
When completed, this is how this table is rendered in the NOP:
page 50 | WIND User Guide | Version 2.27 of 26 June 2015
WIND User Guide
Lastly, the Keywords and Display
Period are to be completed in the same way you would do for any WIND entity please see here
(Section
4.1.5.4.3) for details about the Keywords and here
(Section
4.1.5.4.4) for details
about the Display Period.
4.2.3 AdhocReport
Note: Entity currently not in use. It is operationally hidden by default on the Portal, although still visible in the
WIND tool.
4.2.4 Airport
The Airport folder contains a list of Airports.
4.2.4.1 General
A single General tab contains all the Airport edition parameters:
page 51 | WIND User Guide | Version 2.27 of 26 June 2015
WIND User Guide
The above template is rather self-explanatory, and you will easily find where and how to input these parameters: ICAO
code, IATA code, Name, Keywords and Display
Period.
Note: This information has no direct visibility on the portal as such.
You only create a new entry when required for feeding the Airport field of other documents (e.g. new ACCPlans
being made available, ATFCM events, scenarios...).
The
creation
of
a
new
Airport
must
be
correlated
to
existing
corresponding
entities
in
CACD
(ENV
db).
Caution: WIND will not validate or cross-check against the CACD. It is your responsibility to ensure correctness
of any info created.
4.2.5 AirportPlan
Note: The Airport
Info Portlet, which is the front end for the AirportPlan entity, is meant to provide
airport information per airport.
The data is fed from the Airport corner tool. This upload is an automatic process, run by each airport unit.
The AirportPlan entity is still currently under work.
4.2.6 ATFCMEvent
page 52 | WIND User Guide | Version 2.27 of 26 June 2015
WIND User Guide
The ATFCMEvents folder contains a number of documents describing events likely to affect the operations:
ATFCM Events are delivered on the NOP via the ATFCM
EVents Portlet:
We will be using an existing event (London
2012
Olympics
&
Paralympics) - see a small sample below:
page 53 | WIND User Guide | Version 2.27 of 26 June 2015
WIND User Guide
As you can see, this entity presents two edition tabs - General and Details - which are described in the next
section.
4.2.6.1 General
The General tab comprises several panels described below.
4.2.6.1.1 Title
This is where you enter the title of the event - as it will appear in the titlebar and in the events list:
4.2.6.1.2 Occurence
This field is used to indicate to the back-end system when to display the event on the portal.
An Occurence consists of a pair of time stamps (date and hour), the first one expressing the start of the period, the
second one the end of the period.
In the example below, this London
2012
Olympics event has been visible on the NOP from 01/03/2012
at
00:01 to 12/09/2012
at
23:59.
Please check the Occurences
(Section
4.1.5.4.4.2) section for more information.
4.2.6.1.3 Summary
This standard text area is where you type the Summary for your document. This text appears on the Portal when
you mouse over the title of an event.
Description,
Keywords
and
Display
Period
These fields are general and behave no differently than in the other entities.
Please refer to the Editing
Tools
and
Components
(Section
4.1.5.4) section for more information.
page 54 | WIND User Guide | Version 2.27 of 26 June 2015
WIND User Guide
4.2.6.2 Details
The Details tab comprises several panels described below.
4.2.6.2.1 Category
Select the appropriate category from the drop-down list:
AXIS
SPECIAL
MILITARY
CRITICAL
4.2.6.2.2 ACCs
Type in (or drag and drop from the ACC folder) the name of the ACC(s) involved in the event.
4.2.6.2.3 Airports
Type in (or drag and drop from the Airport folder) the name of the Airport(s) involved in the event.
4.2.6.2.4 Scenarios
page 55 | WIND User Guide | Version 2.27 of 26 June 2015
WIND User Guide
Type in the Scenarios
label field the title for your scenarios section.
Next drag and drop from the Scenario folder and into the Scenarios field, all the scenarios involved.
4.2.6.2.5 Display
Options
Lastly, check the Display
Options as you wish:
Show
in
calendar: will show the event in the NOP Calendar
Show
in
ATFCM
Events: will show the event in the ATFCM Events section - to be reserved to major
events of significative impact (please coordinate with NOS when you are not sure)
First
day
only: for events spanning over multiple days, this shows only the first day of the series in order
not to clutter the Calendar.
4.2.7 CalendarEvent
The CalendarEvents folder contains a number of documents describing events to appear in the NOP Calendar:
We will be using an existing event (London
2012
Olympics
&
Paralympics) - see a small sample below:
page 56 | WIND User Guide | Version 2.27 of 26 June 2015
WIND User Guide
As you can see, this entity presents two edition tabs - General and Details - which are described in the next
section.
4.2.7.1 General
4.2.7.2 Details
4.2.8 CalendarEventCategory
This folder contains the different Event
Categories available for the creation or edition of Calendar events
(CalendarEvent):
There are currently 4 categories readily available to you:
NM News
AIRAC
FRIDAY
page 57 | WIND User Guide | Version 2.27 of 26 June 2015
WIND User Guide
HOLIDAY
This would normally be sufficient for most publication needs. You may however wish to create you own...
Adding
Categories
name: type in the name of the new Category.
color: use the color picker to select of type in the color which will be distinctive to all events associated to
this new category - like, for instance, when displayed in the Calendar.
Aplha: you can additionally modify the value of the Alpha parameter - controlling the transparency of the
color.
The Alpha value ranges from 255 (100% opaque) to 0 (totally transparent).
Do not forget to click on the Apply or the Ok button to respectively save the newly created item, or save it and
close the component.
4.2.9 CFMUNews
The CFMUNews folder and entities are used to manage the content of the NM
News Portlet.
CFMUNews entities are very similar to HeadlineNews ones - with two exceptions:
there is no Criticality field
there is no Display
in
main view check box - the visibility on the Portal is automatically managed by a
parameter coming from the CFMU_NEWS_PC and usually set to 2, meaning that the two latest news will
always be showing.
This can be set to another figure for a limited span and on certain occasions where it is necessary to show more
concurrent news at the same time. It is however recommended not to exceed a number of 3 items in order not to
clutter the Main
View.
Pay attention to the Display
Period you indicate, to ensure that there is always a minimum of two entries
visible in the Portlet.
4.2.10 Country
Note: This information has no direct visibility on the portal as such.
You only create a new entity when required for feeding the Country field of other documents.
The
creation
of
a
new
Country
must
be
correlated
to
existing
corresponding
entities
in
CACD
(ENV
db).
Caution: WIND will not validate or cross-check against the CACD. It is your responsibility to ensure
correctness of any info created.
page 58 | WIND User Guide | Version 2.27 of 26 June 2015
WIND User Guide
4.2.11 DailyPlan
The DailyPlan folder contains all the Daily
Plans created for the Network and delivered via the NOP.
A DailyPlan document is a rather complex entity, designed to assemble a great number of heterogeneous elements of
information in a manageable form.
This information is spread across two main tabs, General and Items.
4.2.11.1 General
The General tab is depicted below - as you can see, it contains data of very general level, which do not require specific
instructions as their editing features have already been covered in the WIND
Editor section.
This is where you will specify:
The Applicability
Date,
The Keywords,
The Display
Period.
4.2.11.2 Items
This tab lists the different Items being part of the Daily Plan, in the form of a simple table with three headers:
Type
Title
Last
Update
page 59 | WIND User Guide | Version 2.27 of 26 June 2015
WIND User Guide
At the bottom of the screen, you will find the familiar Add, Delete and Edit buttons.
The Add or the Edit command will each open the same interface, where the Item details are to be entered.
page 60 | WIND User Guide | Version 2.27 of 26 June 2015
WIND User Guide
As you can see, 5 new tabs are revealed, further described in the next sections:
General
Scenarios
Links
Map
Updates
4.2.11.1 General
This General tab is a sub-element of the Items tab. This Item tab is in turn located next to another General
tab - both at the root level on the DailyPlan
(Section
4.2.11) entity.
The General tab contains a number of elements grouped in two main panes.
page 61 | WIND User Guide | Version 2.27 of 26 June 2015
WIND User Guide
4.2.11.1.1 Item
Type
This parameter allows you select one of the six proposed options:
HEADLINE
EVENT
ACC
NAT
WEATHER
OTHER
Doing so brings up a secondary input area, relevant to the selected Type.
Selecting HEADLINE will prompt you to enter the following elements:
Title: the title for the item
Event Label: the label for the Event
Event: the field into which you drag and drog the desired event from the ATFCMEvent Folder in the
Typed
tree (or the Business
tree, depending on your working preference) - or type in some text and
pick up the desired event from the autotype proposed suggestions.
ACCS: the field into which you drag and drop the desired ACC(s) from the ACC Folder.
Selecting EVENT will prompt you to enter the following elements:
Title: the title for the item
Event Label: the label for the Event
Event: the field into which you drag and drop the desired event from the ATFCMEvent Folder in the
Typed
tree (or the Business
tree, depending on your working preference) - or type in some text and
pick up the desired event from the autotype proposed suggestions.
ACCS: the field into which you drag and drop the desired ACC(s) from the ACC Folder.
Selecting ACC will prompt you to enter the following elements:
ACC: the field into which you type in the name of the ACC.
Selecting NAT will prompt you to enter the following elements:
Title: the title for the item
ACCS: the field into which you drag and drop the desired ACC(s) from the ACC Folder.
Selecting WEATHER will prompt you to enter the following elements:
Title: the title for the item
page 62 | WIND User Guide | Version 2.27 of 26 June 2015
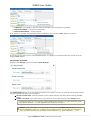
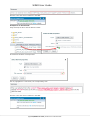
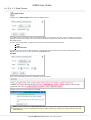
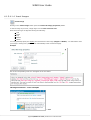
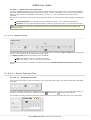
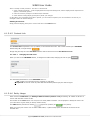
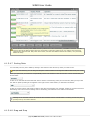
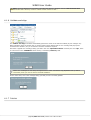
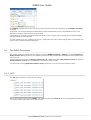
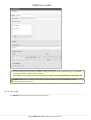
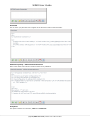
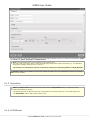
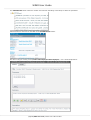
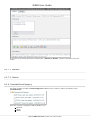
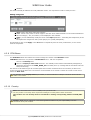
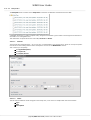
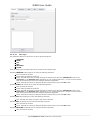
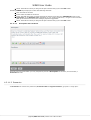
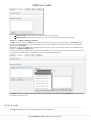
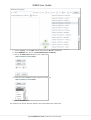
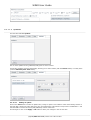
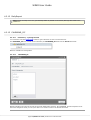
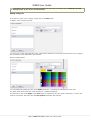
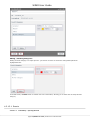
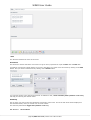
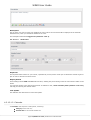
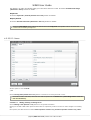
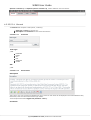
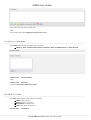
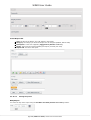
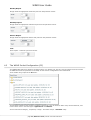
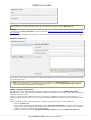
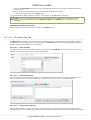
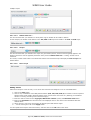
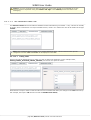
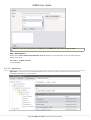
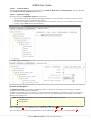
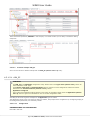
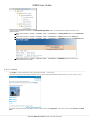
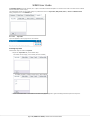
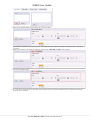
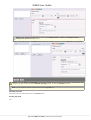
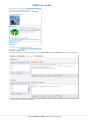
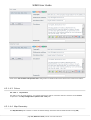
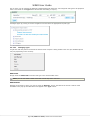
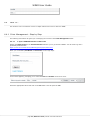
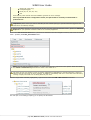
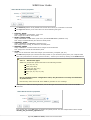
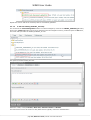
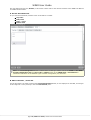
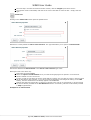
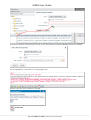
WIND User Guide
ACCS: the field into which you drag and drop the desired ACC(s) from the ACC Folder.
Selecting OTHER will prompt you to enter the following elements:
Title: the title for the item
Event Label: the label for the Event
Event: the field into which you drag and drop the desired event from the ATFCMEvent Folder in the
Typed
tree (or the Business
tree, depending on your working preference) - or type in some text and
pick up the desired event from the autotype proposed suggestions.
ACCS: the field into which you drag and drop the desired ACC(s) from the ACC Folder.
4.2.11.1.2 Description
and
Conclusion
These are two text areas which you may complete to provide a Description for the item, and if relevant, a
Conclusion as well.
4.2.11.2 Scenarios
The Scenarios tab contains two parameters, Scenarios
label and Agreed
scenarios, grouped in a single pane:
page 63 | WIND User Guide | Version 2.27 of 26 June 2015
WIND User Guide
Scenarios
label is where you will type in the name for your Scenario
Agreed
scenarios is the field into which you enter the name of the scenario(s) part of the Plan.
4.2.11.2.1 Adding
/
Deleting
a
scenario
To add a scenario, click on the Add button to open a component allowing you to enter the name of the Scenario (mark
the autotype feature which filters the possible matches as you type and allows you to select one from the proposed list)
and an optional Comment. Remember to click on the Apply button (bottom left of the window) to save your selection and have the selected scenario
appear in the Agreed
scenarios field.
Type RR into the box and an auto-filter drop-down list should appear. The user should select the scenario they want from
the drop-down and click APPLY. To add another scenario click the ADD button again
To delete a scenario, first select the one you want to remove from the list. This will bring the Delete button you will use
to acgtually remove the entry.
4.2.11.3 Links
The Links tab allows you to link additional material to the Daily Plan:
page 64 | WIND User Guide | Version 2.27 of 26 June 2015
WIND User Guide
A Link, either INTERNAL or EXTERNAL (check the Content
Link
(Section
4.1.5.4.5) section for more
information on links) and its associated Label,
An Image (check the Files
Resources
(Section
4.1.5.5) section to see how to manage images in
WIND),
And an optional Description.
4.2.11.4 Map
This is what the Map tab looks like when first opened:
page 65 | WIND User Guide | Version 2.27 of 26 June 2015
WIND User Guide
This is where you indicate the reference locations to be drawn on the Daily Plan map.
4.2.11.4.1 Adding
Locations
First search for all locations matching your query settings and then click on the Query... button to populate the
right-hand Queried
Reference
Locations column:
page 66 | WIND User Guide | Version 2.27 of 26 June 2015
WIND User Guide
The query settings will make use of the following parameters:
ID: the ID of the reference location - note that you can use the * wildcard (at the beginning, somewhere
in the middle, or at the end of the search string;
REG, AD, AZ, AS, PT, RT, RS: checkboxes to enlarge the search scope to the selected arguments (REG
being selected by default).
The next step will be to select (muliple selection is possible whlile holding the ctrl key down) the desired location(s)
and click on the left arrow to move them to the left-hand Linked
Reference
Locations column - as
depicted below:
1. selection
2. click on the Move
Left arrow 3. ... and see the result
4.2.11.4.2 Removing
Locations
Simply select the location(s) to remove from the Linked Reference Locations column and click on the right arrow
button.
4.2.11.4.3 Add
Portion
The Add
Portion button serves to add portion(s) of route(s) to the map elements
The example below shows the steps involved in adding to the Linked
Reference
Locations list the PIMUR
<>
ZORBA portion from route UM30:
page 67 | WIND User Guide | Version 2.27 of 26 June 2015
WIND User Guide
1. Launch a Query... for the UM* search string with the RT filter checked on,
2. Select UM30-RT from the list of Queried
Reference
Locations,
3. Click on the Add
Portion button to open a dialog box:
4. Locate and select ZORBA from the second drop-down list:
5. Click on the OK button
The selected route protion has been added to the Linked Referende Locations list:
page 68 | WIND User Guide | Version 2.27 of 26 June 2015
WIND User Guide
4.2.11.5 Updates
The last tab is labelled Updates.
This is where updates to the (published) Daily plan are to be created.
Consecutive updates are listed sequentially, allowing you to either delete (with the Delete button) or modify them
(with the Edit
Daily
Plan
Item button):
4.2.11.5.1 Adding
an
update
Click on the Add button to create an update entry. Doing so opens a new instance of the whole editing content of
the Daily Plan, allowing to make changes to any of its parameters. This allows to keep track of modifications - and
tells the NOP to use the last saved (and published) version of the Plan.
Do not forget to click on the Apply or OK button to store your changes in the current View.
page 69 | WIND User Guide | Version 2.27 of 26 June 2015
WIND User Guide
4.2.12 DailyReport
Note: Entity currently not in use, operationally hidden by default on the Portal, although still visible in the
WIND tool.
4.2.13 CALENDAR_DC
4.2.13.1 Preliminary
-
Opening
the
FCU
You must have read the Folder
FCU section to get instruction on how to access this FCU.
The CALENDAR_DC FCU consists of two elements, the CALENDAR_DC folder and an Events document.
Both are editable and configurable.
4.2.13.2 CALENDAR_DC
Besides indicating the name of the FCU and its last update date and time, the CALENDAR_DC also keeps the list of
the Event Categories which you will youse later on to create events in the Events document.
page 70 | WIND User Guide | Version 2.27 of 26 June 2015
WIND User Guide
To be able to add or edit items in the Event Categories, first make sure that the FCU is checked
out
('FCU
Editing
Status'
in
the
on-line
documentation).
Adding
Categories
If you want to create a new category, simply click on the Add button.
A <NEW> entry is added to the list:
You can give it a name and designate a color, which will be distinctive to all events associated to this new category like, for instance, when displayed in the Calendar.
See the example below:
You can additionally modify the value of the Alpha parameter - controlling the transparency of the color.
The Alpha value ranges from 255 (100% opaque) to 0 (totally transparent).
Do not forget to click on the Apply or the Save button to respectively save the newly created item, or save it and
close the component. And notice how the Last
Update information has changed:
page 71 | WIND User Guide | Version 2.27 of 26 June 2015
WIND User Guide
Editing
/
Deleting
Categories
Editing an Event Category is a simple process - just click on its name to access the configuration palette as
highlighted below:
In the Edit mode, a Delete button is located next to the Add button, allowing you to delete the currently selected
category.
4.2.13.1 Events
4.2.13.1.1 Preliminary
-
Opening
the
FCU
page 72 | WIND User Guide | Version 2.27 of 26 June 2015
WIND User Guide
You must have read the Folder
FCU section to get instruction on how to access this FCU.
The FCU opens on a list of Events.
See the Sorting
Data
(Section
4.1.5.4.7) section to read more on sorting elements in a list.
To be able to add or edit items in the Events list, first make sure that the parent FCU is checked
out
('FCU
Editing
Status'
in
the
on-line
documentation).
4.2.13.1.2 Editing
Events
There are two methods to open an Event for editing:
double-click anywhere on its row in the table
select it and click on the Edit button.
Each of these actions opens the relevant event in the edition mode, as shown below:
page 73 | WIND User Guide | Version 2.27 of 26 June 2015
WIND User Guide
The Event window is split in two distinctive tabs, General
(Section
4.2.13.1.1) and Calendar
(Section
4.2.13.1.2). By
default, the component will open with the General Tab selected.
4.2.13.1.1 General
The General Tab comprises 3 main panels, containing:
Title, Occurence and Summary for the first one;
Description for the second one;
Keywords, Display
Period and Last
update for the third and last one.
4.2.13.1.1.1 First
Panel
page 74 | WIND User Guide | Version 2.27 of 26 June 2015
WIND User Guide
Title
The Title field contains the name of the event
Occurence
The Occurence section lists all the occurences of a given event, expressed as a pair of Start date and End date.
You Edit an occurence by simply clicking on its row in the table. You create a new Occurence by clicking on the Add
button. And you delete a selected one by clicking on the Delete button.
You can type directly in the date and time fields. In addition to this, a date
and
time
picker
(Section
4.1.5.4.4.1)
will help you entering the desired values.
Summary
This is where you enter a short text presenting a summary of the event. This is the text which will be displayed in
the Calendar Portlet, when you mouse over an event marker.
The Summary field allows tagged
text
(Section
4.1.5.4.1).
4.2.13.1.1.2 Second
Panel
page 75 | WIND User Guide | Version 2.27 of 26 June 2015
WIND User Guide
Description
This is where you enter a longer text detailing the event. This is the text which will be displayed in the Calendar
Detached View, when you consult the details on an event.
The Description field allows tagged
text
(Section
4.1.5.4.1).
4.2.13.1.1.3 Third
Panel
Keywords
The Keywords field is there for you to enter, separated by a coma, all the words you would like the Search engine to
pick in order to find the concerned event.
Display
Period
These settings tell the WEF and TIL dates and time, defining the period during which the event will be visible on the
Portal.
You can type directly in the date and time fields. In addition to this, a date
and
time
picker
(Section
4.1.5.4.4.1)
will help you entering the desired values.
Last
Update
This indicates the date and time of the last update.
4.2.13.1.2 Calendar
The Calendar Tab comprises 2 main panels, containing:
Category for the first one;
Content
link for the second and last one.
page 76 | WIND User Guide | Version 2.27 of 26 June 2015
WIND User Guide
4.2.13.1.2.1 First
Panel
Category
Contains the Category to which the event is associated.
To create such an association, simply drag
and
drop
(Section
4.1.5.4.8) the desired category name from the
CALENDAR_DC
(Section
4.2.13) main FCU into the Category text field:
The Clear button initialises the Category field in case you want to create a new association.
4.2.13.1.2.2 Second
Panel
Content
link
This is where you enter to which file or URL the event would provide a link. See the Content
Link
(Section
4.1.5.4.5)
section for more information on how to use this feature.
4.2.14 FAQ
The FAQ folder contains a list of FAQ (frequently asked questions) to be presented in the NOP.
Each FAQ is basically formed by a typical question of general interest to the NOP user - and the answer provided.
page 77 | WIND User Guide | Version 2.27 of 26 June 2015
WIND User Guide
This is reflected in the editing structure of the FAC entity, which comprises the following parameters:
The Question
/
Answer pair ...
... and the regular Keywords, Display
Period and Last
Update fields - not described here.
The FAQ entities need to be imported in one or more FAQ Topics in order to be visible on the NOP - see how to
achieve this in the next
section
(Section
4.2.15).
4.2.15 FAQTopic
This folder contains the different FAQTopic available for the creation or edition of a FAQ entity:
4.2.15.1 Creating
/
Editing
Topics
Please refer to the Editing
a
WIND
Document
(Section
4.1.5) section for more information on general WIND
features.
Once opened, the Topics edit window shows two tabs: General and FAQs, further detailed in the next sections.
4.2.15.2 General
The General Tab comprises 2 main panels, containing:
Title and Scopes for the first one;
Keywords, Display
Period and Last
Update for the second and last one.
page 78 | WIND User Guide | Version 2.27 of 26 June 2015
WIND User Guide
First
Panel
Title
The Title field contains the name of the Topic.
All
view
/
Main
scopes
All
view
scopes: Five buttons allow you to set in which of the phases any of the views (Main or Detached) will
show.
Main
view
scopes: These allow you to set in which of the phases a Portlet is shown in the Main view.
Click on a phase button to toggle it on (brightly colored - as in the example above) or off (dimmed / greyed out as in
the example below)
Second
Panel
Keywords
Check the Keywords
/
Search
(Section
4.1.5.4.3) section for details.
Display
Period
Check the Set
Date
and
Time
(Section
4.1.5.4.4.1) section for details.
Note the Last
Update panel, telling the date and time the FAQ
item was updated. This is of course not
relevant when creating a FAQ item.
4.2.15.3 FAQs
The FAQs Tab comprises only one panel:
page 79 | WIND User Guide | Version 2.27 of 26 June 2015
WIND User Guide
It shows a list of all FAQ questions to be associated to the opened topic.
4.2.15.4 Adding
a
question
to
a
Topic
Simply drag a question from the FAQ folder and drop it into the FAQs window. Check the Drag
and
Drop
(Section
4.1.5.4.8) section for details.
4.2.15.5 Deleting
a
question
from
a
Topic
All you need to do is to select / highlight the question to be removed. This will reveal the Delete button, on which
you click to engage the deletion process.
Remember that you still need to Save
('Workflow'
in
the
on-line
documentation) these changes to the
entity.
4.2.16 GeneralEvent
4.2.16.1 Preliminary
-
Opening
the
FCU
You must have read the Folder
FCU section to get instruction on how to access this FCU. The GENERAL_EVENTS_DC FCU consists of two elements, the GENERAL_EVENTS_DC folder and an Events document.
While Events is editable, there is little you can do with GENERAL_EVENTS besides getting the ID of the FCU and its last
update date and time:
page 80 | WIND User Guide | Version 2.27 of 26 June 2015
WIND User Guide
The FCU opens on a list of Events:
This is where you will enter all ATFCM events likely to have an impact on the operations.
These events are displayed either through the Events
and
Meetings Portlet, or via the Calendar Portlet, when the check
box in he Calendar column is checked.
See the Sorting
Data
(Section
4.1.5.4.7) section to read more on sorting elements in a list.
To be able to add or edit items in the Events list, first make sure that the parent FCU is checked
out
('FCU
Editing
Status'
in
the
on-line
documentation).
4.2.16.2 Editing
Events
See the Editing
a
FCU
(Section
4.1.5) section for the general information.
Once opened, the Event edit window shows two tabs: General
(Section
4.2.16.1) and Details
(Section
4.2.16.2), further
detailed in the next sections.
4.2.16.1 General
The General Tab comprises 3 main panels, containing:
Title, Occurence and Summary for the first one;
Description for the second one;
USED,
Keywords, Display
Period and Last
update for the third and last one.
4.2.16.1.1 First
Panel
page 81 | WIND User Guide | Version 2.27 of 26 June 2015
WIND User Guide
Title
The Title field contains the name of the event
Occurence
The Occurence section lists all the occurences of a given event, expressed as a pair of Start date and End date.
You Edit an occurence by simply clicking on its row in the table. You create a new Occurence by clicking on the Add
button. And you delete a selected one by clicking on the Delete button.
You can type directly in the date and time fields. In addition to this, a date
and
time
picker
(Section
4.1.5.4.4.1)
will help you entering the desired values.
Summary
This is where you enter a short text presenting a summary of the event. This is the text which will be displayed in the
Events
and
Meetings Portlet.
The Summary field allows tagged
text
(Section
4.1.5.4.1).
4.2.16.1.2 Second
Panel
page 82 | WIND User Guide | Version 2.27 of 26 June 2015
WIND User Guide
Description
This is where you enter a longer text detailing the event. This is the text which will be displayed in the Events and
Meetings Detached View, when you consult the details on an event.
The Description field allows tagged
text
(Section
4.1.5.4.1).
4.2.16.1.3 Third
Panel
USED
This button is in reality an indicator telling you if and where the item is used. Check the Content
Item
Usage
(Section
4.1.5.4.6) section for details.
Keywords
Check the Keywords
/
Search
(Section
4.1.5.4.3) section for details. Display
Period
Check the Set
Date
and
Time
(Section
4.1.5.4.4.1) section for details.
Note the Last
Update panel, telling the date and time the FAQ
item was updated. This is of course not relevant
when creating a FAQ item.
4.2.16.2 Details
The Details Tab comprises one single panel, containing:
Location, Image, Content
Link, Display
in
main
view and Show
in
calendar.
page 83 | WIND User Guide | Version 2.27 of 26 June 2015
WIND User Guide
4.2.16.2.1 Location
The place where the Event is organised.
4.2.16.2.2 Image
This field is used to link to the thumbnail image displayed next to the News tile. See the File
Resources
(Section
4.1.5.5) section to learn more on managing images.
4.2.16.2.3 Content
link
This is where you enter to which file or URL the event would provide a link. See the Content
Link
(Section
4.1.5.4.5)
section for more information on how to use this feature.
4.2.16.2.4 Display
in
main
view
Check this bow to have the Event displayed in the Events
and
Meetings Portlet.
4.2.16.2.5 Show
in
calendar
Check this box to have the Event displayed in the Calendar.
4.2.17 MonthlyReport
Note: Entity currently not in use, operationally hidden by default on the Portal, although still visible in the
WIND tool.
4.2.18 PC
The WIND Editor features a collection of entities with a very specific role: they are used to configure how the content
of WIND documents are presented on the NOP, as well as some configuration to the Portal itself.
These entities are grouped in the PC folder:
page 84 | WIND User Guide | Version 2.27 of 26 June 2015
WIND User Guide
Please refer to The
WIND
Portlet
Configuration
(PC)
(Section
4.3) section to access the description of the PC
entities.
4.2.19 PrevalidationExercise
Note: The PrevalidationExercise entity is currently under development.
4.2.20 Pri
Pri stands for 'Portal Release Info'
It is used to manage the content of the NM
Release
Information Portlet.
Pri entities are very similar to HeadlineNews ones - with two exceptions:
there is no Criticality field
The Display
in
main view check box behaves differently and effectively determines the visibility on the
Portal (overriding the settings from the Display
Period method).
You may wish to manually check or uncheck the Display
in
main
view box and/or make good use of the
Display
Period to ensure that there is always a minimum of two entries visible in the Portlet.
4.2.21 Scenario
The Scenario folder holds all the issued Scenario documents:
page 85 | WIND User Guide | Version 2.27 of 26 June 2015
WIND User Guide
Scenarios are delivered on the NOP via the ATFCM
Measures
(Scenarios) Portlet:
4.2.21.1 Structure
The Scenario Portlet is a somewhat complex one, and features 5 tabs:
General
Details
Places
Applicability
Periods
General
The General tab contains high level parameters such as:
Title: the name of the Scenario as it will appear on the NOP
Unique
ID: this field is not editable - the system generates a unique Id when you first Apply or Save
your document.
Keywords: the list of keywords associated with the document
Display
Period: The Start and End date of the period during which the document will be visible on the
NOP.
Note: Please see here
(Section
4.1.5.4.3) for details about the Keywords and here
(Section
4.1.5.4.4)
for details about the Display
Period.
Details
The Details tab presents 7 more parameters:
Conditions: //def
Refile: //def
Suggested
Alternative
Routes: a list of suggested alternative routes, separated by a carriage return
Comments: Text field to enter optional comments
Draft: Check box to indicate the document is still being drafted. Allows the NOP user to pick-up the
desired document Status from the Portal:
Show
Scenario
Image
Inline: Check box to instruct the system to display the image defined in the
Scenario
File parameter within the Scenario
Details Detached View
Scenario File > File
Name: Drag and drop here the relevant image from the File
resources
tree
page 86 | WIND User Guide | Version 2.27 of 26 June 2015
WIND User Guide
Places
The Places tab contains three panels used to indicate the different locations associated with the Scenario:
Origins
/
Destinations
OnLoad
/
OffLoad
Areas
Locations
Managing
'Places'
Click on the Add button to create a new Place and enter its name or description - and on Apply (or OK) to save it.
Click on the Delete button to erase a selected Place.
Applicability
This is where you enter one or more period or applicability.
Scenarios may have various applicability schemes - this is why WIND proposes six ways to set the applicability
ranges:
1. Date/Time
This is the standard way to provide a Start / End pair of Date/Time values:
2. Year
Use the Year argument when the scenario is valid for a whole year - and type in/select the appropriate
value:
page 87 | WIND User Guide | Version 2.27 of 26 June 2015
WIND User Guide
3. Season
Seasonal plans are designated with the Season argument, in which you select both the Season (SPRING,
SUMMER, FALL, WINTER) and Year parameters:
4. Month
Use the Month argument when a given Scenario has a monthly applicability span, in which you select both
the Month and Year:
page 88 | WIND User Guide | Version 2.27 of 26 June 2015
WIND User Guide
5. Week
Use the Week argument when a given Scenario has a weekly applicability span, in which you select both the
Week and Year:
6. As
Weekly
Day
Period
This last way allows you to set a Start and End time for a selection (by means of check boxes) of days in the
week.
Periods
The Periods tab features two panels, Agreed
Periods and Active
Periods, which you can manage in the way
described in the Display
Period
(Section
4.1.5.4.4) section.
4.2.22 SeasonReport
Note: Entity currently not in use, operationally hidden by default on the Portal, although still visible in the
WIND tool.
page 89 | WIND User Guide | Version 2.27 of 26 June 2015
WIND User Guide
4.2.23 WeeklyReport
Note: Entity currently not in use, operationally hidden by default on the Portal, although still visible in the
WIND tool.
4.2.24 YearlyReport
Note: Entity currently not in use, operationally hidden by default on the Portal, although still visible in the
WIND tool.
4.2.25 NOP_DC
4.2.25.1 Preliminary
-
Opening
the
FCU
You must have read the Folder
FCU section to get instruction on how to access this FCU. The NOP_DC FCU consists of eighth elements, the NOP_DC folder and seven document: ACCs, AccPlans, Countries,
ATFCM Rvents, Daily Plans, Prevalidation Exercises and Scenarios.
While Events is editable, there is little you can do with GENERAL_EVENTS besides getting the ID of the FCU and its
last update date and time:
The remaining seven FCUs serve various purposes and have all a different layout - but they are grouped in the same
folder because they share common data.
Due to their nature and scope, the FCUs belonging to the NOP_DC folder have a specific workflow.
page 90 | WIND User Guide | Version 2.27 of 26 June 2015
WIND User Guide
4.2.25.1 ACCs
4.2.25.1.1 General
First
Panel
Name
//TBC
ENV
ACC
Ids
//TBC
Second
Panel
page 91 | WIND User Guide | Version 2.27 of 26 June 2015
WIND User Guide
USED
This button is in reality an indicator telling you if and where the item is used. Check the Content
Item
Usage
(Section
4.1.5.4.6) section for details.
Keywords
Check the Keywords
/
Search
(Section
4.1.5.4.3) section for details. Display
Period
Check the Set
Date
and
Time
(Section
4.1.5.4.4.1) section for details.
Note the Last
Update panel, telling the date and time the ACC was updated. This is of course not relevant
when creating an ACC.
4.2.25.2 Acc Plans
4.2.25.2.1 Under
Construction
4.2.25.3 Countries
page 92 | WIND User Guide | Version 2.27 of 26 June 2015
WIND User Guide
page 93 | WIND User Guide | Version 2.27 of 26 June 2015
WIND User Guide
4.2.25.4 ATFCM Events
Of all he FCUs, the ATFCM Events one is the most extensive.
It is actually too big to be fully displayed on , so we will split it in tho pieces for the sake of readability:
Left
part
Right
part
page 94 | WIND User Guide | Version 2.27 of 26 June 2015
WIND User Guide
4.2.25.4.1 Editing
Events
See the Editing
a
FCU
(Section
4.1.5) section for the general information.
Once opened, the Event edit window shows two tabs: General and Details, further detailed in the next sections.
4.2.25.5 Daily Plans
4.2.25.5.1 Preliminary
-
Opening
the
FCU
You must have read the Folder
FCU section to get instruction on how to access this FCU. The FCU opens on a list of Daily
Plans:
//TBC
//Daily plan portlet
See the Sorting
Data
(Section
4.1.5.4.7) section to read more on sorting elements in a list.
page 95 | WIND User Guide | Version 2.27 of 26 June 2015
WIND User Guide
To be able to add or edit items in the Events list, first make sure that the parent FCU is checked
out
('FCU
Editing
Status'
in
the
on-line
documentation).
4.2.25.5.2 Editing
Daily
Plans
See the Editing
a
FCU
(Section
4.1.5) section for the general information.
Once opened, the Daily Plan edit window shows two tabs: General
(Section
4.2.25.5.1) and Items
(Section
4.2.25.5.2), further detailed in the next sections.
4.2.25.5.3 The
Copy
function
//TBC
4.2.25.5.1 General
The General Tab comprises 2 main panels, containing:
Applicability
Date for the first one;
USED,
Keywords, Display
Period and Last
update for the second and last one.
4.2.25.5.1.1 First
Panel
Applicability
Date
//TBC
4.2.25.5.1.2 Second
Panel
USED
page 96 | WIND User Guide | Version 2.27 of 26 June 2015
WIND User Guide
This button is in reality an indicator telling you if and where the item is used. Check the Content
Item
Usage
(Section
4.1.5.4.6) section for details.
Keywords
Check the Keywords
/
Search
(Section
4.1.5.4.3) section for details. Display
Period
Check the Set
Date
and
Time
(Section
4.1.5.4.4.1) section for details.
Note the Last
Update panel, telling the date and time the FAQ
item was updated. This is of course not
relevant when creating a FAQ item.
4.2.25.5.2 Items
The FCU opens on a list of Items:
//TBC
See the Sorting
Data
(Section
4.1.5.4.7) section to read more on sorting elements in a list.
To be able to add or edit items, first make sure that the parent FCU is checked
out
('FCU
Editing
Status'
in
the
online
documentation).
4.2.25.5.2.1 Adding,
Deleting
or
Editing
Items
See the Editing
a
FCU
(Section
4.1.5) section for the general information.
Clicking on the Add or Edit button opens the Item editor to respectively create a new item or make changes to an existing
one.
Once opened, the editor shows four tabs: General
(Section
4.2.25.5.2.1), Scenarios
(Section
4.2.25.5.2.2), Links
page 97 | WIND User Guide | Version 2.27 of 26 June 2015
WIND User Guide
(Section
4.2.25.5.2.3) and Updates
(Section
4.2.25.5.2.4), further detailed in the next sections.
4.2.25.5.2.1 General
The General Tab comprises 2 main panels, containing:
Item
type and ACC for the first one;
Description and Conclusion for the second and last one.
4.2.25.5.2.1.1 First
Panel
Item
type
//TBD
HEADLINE
EVENT
ACC
NAT
WEATHER
OTHER
ACC
//TBD
4.2.25.5.2.1.2 Second
Panel
Description
This is where you enter a longer text detailing the item. This is the text which will be displayed in the ATFCM Network Daily
Plan Portlet, under the above selected item type header.
The Description field allows tagged
text
(Section
4.1.5.4.1).
Conclusion
page 98 | WIND User Guide | Version 2.27 of 26 June 2015
WIND User Guide
This is where you enter the conclusion text.
//TDB
The Conclusion field allows tagged
text
(Section
4.1.5.4.1).
4.2.25.5.2.2 Scenarios
The Details Tab comprises one single panel, containing:
Category,
ACCs, Scenarios
label, Show
in
calendar, Show
in
ATFCM
Events and First
day
only.
4.2.25.5.2.2.1 Scenarios
label
//TBC
4.2.25.5.2.2.2 Scenarios
//drag from Scenarios
(Section
4.2.25.6)
4.2.25.5.2.3 Links
The Links Tab comprises 4 main panels, containing:
Label
for the first one;
Image for the second one;
Description for the third one;
Link for the fourth and last one.
4.2.25.5.2.3.1 First
Panel
page 99 | WIND User Guide | Version 2.27 of 26 June 2015
WIND User Guide
Label
//TBD
4.2.25.5.2.3.2 Second
Panel
Image
This field is used to link to the //image. See the File
Resources
(Section
4.1.5.5) section to learn more on managing
images.
4.2.25.5.2.3.3 Third
Panel
Description
This is where you enter a text describing the link.
The Description field allows tagged
text
(Section
4.1.5.4.1).
4.2.25.5.2.3.4 Fourth
Panel
Link
See the Content
Link
(Section
4.1.5.4.5) section for details.
4.2.25.5.2.4 Updates
//TBD - screen currently void
page 100 | WIND User Guide | Version 2.27 of 26 June 2015
WIND User Guide
4.2.25.6 Scenarios
4.2.25.6.1 Under
Construction
4.2.26 REPORTS_LIB_DC
4.2.26.1 Preliminary
-
Opening
the
FCU
You must have read the Folder
FCU section to get instruction on how to access this FCU.
The REPORTS_LIB_DC FCU consists of seven elements, the REPORTS_LIB_DC folder and an six documents: Adhoc
Reports, Yearly Reports, Season Reports, Monthly Reports, Weekly Reports and Daily Reports.
Their respective names indicate clearly enough the period they cover - with the exception of the Adhoc reports, involving a
certain amount of customisation, and not linked with a specific period.
4.2.26.2 REPORTS_LIB_DC
-
the
Folder
The FCU opens on a list of Events:
page 101 | WIND User Guide | Version 2.27 of 26 June 2015
WIND User Guide
This is where you will enter all ATFCM events likely to have an impact on the operations.
These events are displayed either through the Events
and
Meetings Portlet, or via the Calendar Portlet.
See the Sorting
Data
(Section
4.1.5.4.7) section to read more on sorting elements in a list.
To be able to add or edit items in the Events list, first make sure that the parent FCU is checked
out
('FCU
Editing
Status'
in
the
on-line
documentation).
4.2.26.3 Editing
Events
See the Editing
a
FCU
(Section
4.1.5) section for the general information.
Once opened, the Event edit window shows two tabs: General
(Section
4.2.16.1) and Details
(Section
4.2.16.2), further
detailed in the next sections.
4.2.26.1 Adding - Editing Reports
The Adhoc Reports, Yearly Reports, Season Reports, Monthly Reports, Weekly Reports and Daily Reports have most
of their features in common. They actually are link references to documents stored in the File
Resources
(Section
4.1.5.5) folder.
The difference lays obviously in how they relate with time. 4.2.26.1.1 Common
Features
All Reports components have the following features in common:
In
the
General
tab
The classical USED
(Section
4.1.5.4.6), Keywords
(Section
4.1.5.4.3), Display
Period
(Section
4.1.5.4.4)
and Last
Update fields.
page 102 | WIND User Guide | Version 2.27 of 26 June 2015
WIND User Guide
In
the
Report
tab
Title: the title of the Report, as it will appear in the Portlet
Category: the category to which the Report is to be assigned (PUBLIC, OPS or DOP)
Description: a text area supporting taggged
text
(Section
4.1.5.4.1)
Image: the link to the image illustrating the report (currently not used)
Report
link: the link to the report
4.2.26.1.2 Setting
the
period
Daily
Report
You enter the day of the report using the Set
Date
and
Time
(Section
4.1.5.4.4.1) feature.
page 103 | WIND User Guide | Version 2.27 of 26 June 2015
WIND User Guide
Weekly
Report
Simply select the appropriate week and year from the pull-down menus.
Monthly
Report
Simply select the appropriate month and year from the pull-down menus.
Season
Report
Simply select the appropriate season and year from the pull-down menus.
Year
Even simpler - select the year from the list.
4.3
The WIND Portlet Configuration (PC)
The WIND Editor features a collection of entities with a very specific role: they are used to configure how the content
of WIND documents are presented on the NOP, as well as some configuration to the Portal itself.
These entities are grouped in the PC folder:
The PC folder contains a large number of entities (close to 80). They do however share many common features, and
most of them come in two main types: Applications and Linklists.
There is also a third category, occupied by a single - and rather unique - Global
DC entity.
page 104 | WIND User Guide | Version 2.27 of 26 June 2015
WIND User Guide
You can usually tell by the type of a PC by its tabs:
Applications come with 4 tabs - Common, Main
View, Detached
Views and Application
Config
Linklists come with 4 tabs - Common, Main
View, Detached
Views and Details
Global DC comes with the following tabs: General, Footers, Colors, Map
Geometry, Map
Configuration and File
resource
Configuration. covering all high level configuration parameters.
Lastly, a small number of entities do however not belong to any of the above and feature settings of their own. There
are described further in this document.
4.3.1
Matching
Portlet
and
Configuration
Most of the time, the name of an entity will self-explanatory and will be sufficient to associate them with the
corresponding document/entity type and Portlet.
When in doubt, please consult the list below:
Summary
Table
ENTITY
NAME
Type
APPLICATION
Type
LINKLIST
Type
GLOBAL
DC
CORRESPONDING
PORTLET
(*)
ACC3_PC
Airspace Data
ACC_INFO_PC
ACC Info
ACCESS_REQ_PC
Access Requests
AIM_PC
AIM
AIRPORT_INFO_PC
Airport Info
AIRSPACE_INFO_PC
Airspace Information
AIRSPACE_PC
Airspace Data
AIRSPACE_STRUCT_PC
Airspace Structure
AIS_AGORA_PC
AIS Agora
ANM_PC
ANM
ASD_PC
ATFCM Network Situation Data
ATFCM_EVENTS_PC
ATFCM Events
ATM_N_CHANGES_PLANNING_PC
Planning of Network Changes
AXISMGT_PC
Axis Management
CASTAR_PC
CASTAR
CFMU_DEV_PC
NM Developments
CFMU_HANDBOOK_PC
Network Operations HANDBOOK
CFMU_NEWS_PC
NM News
CFMU_OPS_PC
NM Operations Overview
CHARTS_PC
Charts
CIR_PC
NM Interactive Reporting
CLAIMS_PC
Claims
CODA_PC
CODA
page 105 | WIND User Guide | Version 2.27 of 26 June 2015
WIND User Guide
ENTITY
NAME
Type
APPLICATION
Type
LINKLIST
Type
GLOBAL
DC
CORRESPONDING
PORTLET
(*)
CONTACTS_PC
Contacts
CONTINGENCY_PC
Contingency
CRISIS_SUPPORT_PC
Crisis Management
CSS_PC
CSST
CUSTOMISATION_PC
N.A. (Parameters for the
Customisation Editor)
DAILY_PLAN_PC
Daily Plan
DAILY_UPDATES_PC
Daily Updates
DATASET
N.A. (Parameters for CSST)
DDR_PC
DDR
E_CONFERENCES_PC
Tele/WebEx conferences
E_HELPDESK
E-Helpdesk
EAD_PC
EAD
EAUP_PC
European AUP/UUP
EVITA_PC
EVITA
EXTERNAL_REPORTS_PC
Sub-regional and Local Reports
FAQS_PC
FAQs
FAVOURITES_PC
N.A. (not in use for the moment)
FLIGHTS_PC
Flights
GENERAL_EVENTS_PC
Events and Meetings
GLOBAL_DC
N.A. (covers parameters global to
the NOP)
HEADLINE_NEWS_PC
N.A. (not to be used - deprecated)
IFPUV_PC
Flight Planning
MAIN_REPORTS_PC
Main Reports
MEASURES_PC
Measures
MCDM_TOOL_PC
MCDM Tool
N_AXIS_MANAGEMENT_PC
Network Axis Management
NATSLINK_PC
Enhanced Airport Event Information
NEVAC_PC
NEST
NETWORKEVENT_PC
Network Events
NOP_ARCHIVES_PC
NOP Archive
NOP_DOC_PC
N.A. (not in use for the moment)
NOP_MONITOR_PC
N.A. (Parameters for the NOP
Monitor)
NOP_PC
N.A. (Parameters for the NOP
Header labels and buttons)
NOP_PROCESS_PC
N.A. (not in use for the moment)
NOP_SHOWCASE_PC
NOP-Showcase (not in use for the
moment)
NOP_UPDATES_PC
NOP Updates
ONE_SKY_PC
OneSky Online
OPS_PROCESSES_PC
Operational Processes (not in use
for the moment)
PREVAL_EXERCISES_PC
Pre-validation Exercises (not in use
for the moment)
PRI_PC
NM Release Information
page 106 | WIND User Guide | Version 2.27 of 26 June 2015
WIND User Guide
ENTITY
NAME
Type
APPLICATION
Type
LINKLIST
Type
GLOBAL
DC
CORRESPONDING
PORTLET
(*)
PRTL_ASSIST_PC
Portal Assistance
RAD_PC
RAD
REPORTS_LIB_PC
NM ATFCM Reports (not in use for
the moment)
RESERVE1_PC
Axis Weekly Management
RESERVE2_PC
Skybrary
RESERVE3_TOKEN_PC
N.A. (not in use for the moment)
RESERVE4_PC
Network Operations Monitoring and
Reporting
RESERVE5_PC
Network Operations Weather
Assessment
RVSM_PC
RVSM
SAAM_PC
SAAM
SAFA_PC
EC/SAFA ALARMING
SCENARIOS_PC
ATFCM Measures (Scenarios)
SKY_VIEW_PC
Skyview
STATFOR_PC
STATFOR
STATUS_MAP_PC
ATFCM Network Situation
TIME_MANAGER_PC
N.A. (Parameters for the NOP
Header ATFCM Phases tabs)
TRAFFIC_PC
Traffic Counts
TRAINING_PV
Training
(*) Since the Portlet titles are configurable, they may appear under a different name on the NOP.
4.3.1 Types of PC
The three main types of PC entities are Application, Linklist and Global
DC.
A small number of entities do however not belong to any of the above and feature settings of their own, as for
instance:
E-HELPDESK
SAFA
TIME_MANAGER
...
They are listed and detailed in the Special
PC
Entities
(Section
4.3.2) section.
4.3.1.1 Common Features
A significant number of configuration parameters are common to all PC entities and will be described in this section.
They are grouped in the following tabs:
Common
Main
View
Detached
Views
page 107 | WIND User Guide | Version 2.27 of 26 June 2015
WIND User Guide
4.3.1.1.1 4.3.1.1.1 The Common Tab
The Common Tab gives access to the following parameters:
Not
authorized
text
Service
unavailable
text
Not
in
scope
text
Help
link
Help
External
Link
Detached
view
footer
4.3.1.1.1.1 Text
area
The first three parameters consist in text areas, where you can enter the default text to be displayed in each of the
three situation:
when the user is not authorized to view the content of a Portlet,
when the related application is not available
when a Portlet appears in an ATFCM phase it does not belong to. This last parameter is seldom used, since
you can configure (in the Main
View tab) in which phase a given portlet would be visible or not...
Please check this section
(Section
4.1.5.4.1) for more information on the text editor.
Note: these settings will be overridden by the ones declared in the Main
View tab, in case you would rather
use this alternate way - allowing you to specify texts individually targeted to given scope(s), and override the
corresponding settings from the GLOBAL_DC entity.
4.3.1.1.1.2 Help
link
Drang and drop from the File resources tree the file to be opened when a user click on the ? button located in the
title bar of the Portlet.
4.3.1.1.1.3 Help
External
Link
If you want a web page being opened instead of a document, enter in the URI field the URL of the page of the NOP
Online
Help you want to launch.
You can target the Help default page (https://www.nm.eurocontrol.int/HELP/webframe.html), or more likely a
specific page in relation with the context of the Portlet. In this case, simply append the root URL with a question
mark and the full name of the Help page you want to target.
page 108 | WIND User Guide | Version 2.27 of 26 June 2015
WIND User Guide
Caution: use only one of these two method to avoid getting an error message when publishing - and the
second one is currently the preferred one. It is therefore discouraged to use the Help
link field.
Example
To access the page ACC_Info.html you will enter this URL: https://www.nm.eurocontrol.int/HELP/webframe.html?
ACC_Info.html.
A Keywords field is linked to the component - it is not really useful in this context and may therefore be left blank.
Detached
view
footer
This is where you can enter the elements to be displayed by default at the bottom of each Detached View belonging
to the same entity type.
Note: these settings will be overridden by the ones declared in the Detached
Views tab, in case you would
rather use this alternate way to handle detached view footers - check this section
(Section
4.3.1.1.3) for
more information on Detached Views configuration.
Adding
a
Detached
view
footer
The text for the footer of the NOP Detached Views is managed at global level, in the GLOBAL_DC
(Section
4.3.1.4) entity, and is designed to be automatically applied to all Detached views so you will not have to individually
enter each and any of them.
However, in cases were the detached Views of a given Portlet or application need to have specific footers (i.e.
containing a disclaimer of some sort), you may use this component and enter content which will override the global
values.
Follow these steps to create a specific Detached view footer, and assign it to one or more NOP Phase:
1. Click on the Add button
2. Click on any combination of the NOP phases buttons (POS, TAC, PRE, STR, R) to indicate in which scope this
specific footer will be visible (dimmed buttons mean 'off' and vivid ones mean 'on') allowing you a different
content or wording according to the selected scope(s)
3. Enter the desired values for the Copyright, Webmaster
address (email) and Disclaimer
label fields
page 109 | WIND User Guide | Version 2.27 of 26 June 2015
WIND User Guide
4. Enter in the Disclaimer text area the text to be displayed when a user clicks on the Disclaimer label link
defined above
5. When relevant, enter some keywords to be picked by the NOP search engine
6. ... and do not forget to clik on the Apply button.
You can repeat these steps to add more footers, and then click on the OK button when done.
Caution: you may not assign more than one value to a given scope. Should you accidentally do so, the
systems cheks for duplicates during the Validate
and
align or the Publish process and returns error
message(s).
Deleting
a
Detached
view
footer
Simply select the entry to be removed and click on the Delete button.
4.3.1.1.2 The Main View Tab
The Main
View tab provides a more complete and sophisticated way to determine how a given portlet behaves on
the NOP Main view (Homepage) than what is provided in the Common tab, and extends the possibility to specify
parameters individually targeted to given scope(s).
4.3.1.1.2.1 Name
and
Title
The first panel is dedicated to the title of a Porlet, as it appears in the Title
Bar. In the example below, see how a
separate entry has been created for each of the NOP phases:
4.3.1.1.2.2 Not
authorized
text
The second panel is where you enter the text to be displayed in the Portlet when a user is not authorized to view
some content. The picture below illustrates how you can have a single entry covering multiple scopes.
4.3.1.1.2.3 Service
unavailable
text
The third panel is where you enter, in cases where it is relevant, the text to be displayed in the Portlet when the
associated service is not available. Here again, the picture below illustrates how you can have a single entry covering
page 110 | WIND User Guide | Version 2.27 of 26 June 2015
WIND User Guide
multiple scopes.
4.3.1.1.2.4 Hidden
when
not
...
This set of buttons lets you determine in which phase a given Portlet will be visible or hidden.
In this example, the Portlet will be hidden in the TAC, PRE and R scopes and visible in the POS and STR scope:
4.3.1.1.2.5 Scopes
This set of buttons lets you determine the scope of a given Portlet, that is, where it should typically appear in the
Portal. It is however not the opposite parameter of the previous Hidden
when
not
... setting, as both can be
combined.
As a result, a Porlet made visibe on the Portal but outside of its declared scope will display the Not
in
scope text
defined below.
4.3.1.1.2.6 Not
in
scope
Adding
entries
Follow these steps to create an entry in one of the the text areas and assign it to one or more NOP Phase:
1. Click on the Add button
2. Click on any combination of the NOP phases buttons (POS, TAC, PRE, STR, R) to indicate in which scope this
specific footer will be visible (dimmed buttons mean 'off' and vivid ones mean 'on') allowing you a different
content or wording according to the selected scope(s)
3. Enter the desired values for the Copyright, Webmaster
address (email) and Disclaimer
label fields
4. Enter in the Disclaimer text area the text to be displayed when a user clicks on the Disclaimer label link
defined above
5. When relevant, enter some keywords to be picked by the NOP search engine
6. ... and do not forget to clik on the Apply button.
You can repeat these steps to add more footers, and then click on the OK button when done.
page 111 | WIND User Guide | Version 2.27 of 26 June 2015
WIND User Guide
Caution: you may not assign more than one value to a given scope. Should you accidentally do so, the
systems cheks for duplicates during the Validate
and
align or the Publish process and returns error
message(s).
4.3.1.1.3 The Detached Views Tab
The Detached
Views tab lists the different detailed windows associated a given Portlet - if any. This list can actually
be empty, when a Portlet does not require a Deatched View, which is for instance the case for all entities of the type
Linklist.
Note: This component does not allow you to created Detached Views - this is however where you will
configurate how their Title and Footer will be displayed on the NOP.
4.3.1.1.3.1 Editing
aTitle
Select in the list the Detached View for which you wish to change the parameter (in the example below,
ATFCM_EVENTS_PC.ATFCM_EVENTS_DETAILS) and click on it to open the editor:
Next select the scope in which to want the Title text to be modified and make your changes in the Title text field (in
this example, the scope is TAC and the new title is ATFCM
Events
Detail):
page 112 | WIND User Guide | Version 2.27 of 26 June 2015
WIND User Guide
Note: the name of a Detached View, as displayed in the Name field, can not be changed in WIND.
Add
/
Delete
Entries
Please refer to The
Common
Tab
(Section
4.3.1.1.1) section for more information on how to add and delete
entries of this kind.
4.3.1.1.3.2 Editing
a
Footer
To be completed
4.3.1.2 Application
Application is a type of entity linked to NOP Applications. They do share a couple of common features, but most of the
configurable parameters are in effect specific.
page 113 | WIND User Guide | Version 2.27 of 26 June 2015
WIND User Guide
4.3.1.2.1 Common
features
The most obvious common features are the first three tabs: Common, Main
View and Detached
Views. They are described
in the Common
Features
(Section
4.3.1.1) section.
4.3.1.2.2 Application
Config
Next comes the way the Application
Config tab is presented:
1. A first column on the left side lists the configurable parameters in a tree-like fashion, containing a number of nested
collapsible folders where the parameters are grouped.
2. The right panel displays the content corresponding to the node selected in the tree. It can be tables (as in the above
example), simple Value fields (as depicted below) ...
... or more complex combinations:
Structure
and
Navigation
The Application
Config screen presents a significant amount of information, and features several coexistent navigation
methods to access the configuration parameters.
In addition the navigation tree on the left side, you get a breadcrumb trail appearing horizontally across the top right part of
the editor, providing links back to the level parent to the current one, and getting longer as you dig deeper in the nested
folders of the navigation tree.
Note: the parameters present at root level are not editable by WIND. This is the case for:
ENUMMAPPINGS
SHAREDAREAS
...
In the example below, having navigated down to the EVENTS_TABLE folder ( 1 ) has caused the corresponding breadcrumb
trail to be displayed ( 2 ) - and incidentally lets you edit the title of the level (Events - 3 ).
The content below the current level is displayed both in the navigation tree ( 4 ) and in the corresponding table ( 5 ).
page 114 | WIND User Guide | Version 2.27 of 26 June 2015
WIND User Guide
Select the desired parameter (AIRPORT in this example) from either location (tree or table) to enable the editing
component:
4.3.1.2.3 Practical
example:
AIM_PC
See in the next section a detailed example with the AIM_PC
(Section
4.3.1.2.1) entity.
4.3.1.2.1 AIM_PC
FOREWORD
The AIM_PC is an Application configuration entity. Please refer to the Types
of
PC
(Section
4.3.1) section for
more information on PC Types.
The Common, Main
View and Detached
Views tabs are common to most configuration entities and further
described in the Common
Features
(Section
4.3.1.1) section.
Application Config
tab
This is where the Application settings specific to this entity are managed. Please check the Application
(Section
4.3.1.2) section to get more information on how to use the configuration editor.
The AIM_PC will serve as generic example for all Application type PC entities.
The parameters will of course vary from one entity to another, but principle of the navigation tree, the logical grouping of
the Configuration parameters, are commonly shared.
4.3.1.2.1.1 Configuration
ENUMMAPPINGS
and
SHAREDAREAS
Not used in this case
page 115 | WIND User Guide | Version 2.27 of 26 June 2015
WIND User Guide
MAIN
These are the parameters available in the MAIN folder, corresponding to elements present in the Main View:
MAIN > AREAS > AIRPORT_INFO_LAUNCH_AREA > ACTIONS > SUBMIT_ACTION_FIELD (Label for the more
link)
MAIN > AREAS > AIM_TABLE_AREA > COMPONENTS > DESCRIPTION (Label for the Description column
header)
MAIN > AREAS > AIM_TABLE_AREA > COMPONENTS > RELEASE (Label for the Released
on column header)
MAIN > MISCELLANEOUS > MAX_IN_MAIN_VIEW (Maximum number of items listed in the Main View )
MAIN > MISCELLANEOUS > REFRESH_PERIOD (Number of milliseconds before the Portlet content is
refreshed)
DETACHED_LIST
page 116 | WIND User Guide | Version 2.27 of 26 June 2015
WIND User Guide
These are the parameters available in the DETACHED_LIST folder, corresponding to elements present in the Detached
List:
DETACHED_LIST > AREAS > SUMMARY_AREA > ACTIONS > LAUNCH_ACTION (Label for the Go button)
DETACHED_LIST > AREAS > SUMMARY_AREA > COMPONENTS > CURRENT_FUTURE_AIM (Does not seem to
be used/rendered on the NOP)
DETACHED_LIST > AREAS > SUMMARY_AREA > COMPONENTS > SUMMARY (Does not seem to be
used/rendered on the NOP)
DETACHED_LIST > AREAS > MESSAGE_AREA > COMPONENTS> MESSAGE (Label next to the items count in
the green Message area - Does not seem to be used/rendered on the NOP)
DETACHED_LIST > AREAS > AIM_TABLE_AREA > COLUMNS > VALID
(Label for the 1 Valid
From column
header)
DETACHED_LIST > AREAS > AIM_TABLE_AREA > COLUMNS > UNTIL (Label for the 2 Until column header)
DETACHED_LIST > AREAS > AIM_TABLE_AREA > COLUMNS > DESCRIPTION (Label for the 3 Description
column header)
DETACHED_LIST > AREAS > AIM_TABLE_AREA > COLUMNS > RELEASE (Label for the 4 Released
on column
header)
DETACHED_DETAILS
page 117 | WIND User Guide | Version 2.27 of 26 June 2015
WIND User Guide
These are the parameters available in the DETACHED_DETAILS folder, corresponding to elements present in the
Detached View:
DETACHED_DETAILS > AREAS > SUMMARY_AREA > COMPONENTS > VALID_FROM (Label for the Valid
from
date)
DETACHED_DETAILS > AREAS > SUMMARY_AREA > COMPONENTS > UNTIL (Label for the Until date)
DETACHED_DETAILS > AREAS > SUMMARY_AREA > COMPONENTS > RELEASED (Label for the Released date)
DETACHED_DETAILS > AREAS > MESSAGE_AREA > COMPONENTS > MESSAGE (Does not seem to be
used/rendered on the NOP)
4.3.1.3 Linklist
The Linklist is a type of NOP entity used in the Portal to display ... lists of links !
These links are grouped inside logical containers and may come along with additional elements such as a picture, intro text, etc.).
PC entities of the type Linklist share features with PC entities of the type Application, within their common tabs Common and Main
View. page 118 | WIND User Guide | Version 2.27 of 26 June 2015
WIND User Guide
A Detached
Views tab is also present, as it is part of the basic technical template. It is however not used in the case of the Linklists
and will therefore remain empty.
The parameters specific to the Linklist entity are presented in the four Top
Links, Body
Links, Intro
/
Concl and Bottom
Link
tabs, grouped in turn in the Details tab.
4.3.1.3.1 Top
Links
Top Links appear in the top right corner of a Portlet:
Creating
Top
Links
Follow these steps to create a Top
Link:
1. Open the Top
Links tab (in the Details Tab):
The editor can be empty (if no link has yet been created)
... or already contain a number of links (two in this example)
2. Click on the Add button - this makes a new Link entry appear against a light blue background and opens the Scope list:
page 119 | WIND User Guide | Version 2.27 of 26 June 2015
WIND User Guide
3. Next click on the Add button from the Scope list to open the editor:
This creates a new blank entry in the Scope list - still empty but with the light blue background already present - and opens
the editor.
4. Select now the scope(s) for which you intend to create the link (TAC, PRE and STR in this example):
5. Then set the Display period:
6. It is now time to enter the text for the Label (the text which will serve as link) and the document or webpage to be opened
when the link is activated:
page 120 | WIND User Guide | Version 2.27 of 26 June 2015
WIND User Guide
Note: you can find detailed information on how to set the Dispaly
Period and Link in the Editing
Tools
and
Components
(Section
4.1.5.4) section.
7. Lastly, do not forget to click on the Apply button to allow you to create a new entry, on on the Ok button to close and exit.
Caution: The fields Image and Description, which are also available at the bottom of the Top Links tab, should NOT be used
- doing so will result in errors during the Validate
and
align process, or when you Publish your view.
Note: you can repeat the process to create more than one Top
Link entry.
Deleting
Top
Links
Select the entry to be removed and click on the Delete button.
Sorting
Top
Links
dsd
page 121 | WIND User Guide | Version 2.27 of 26 June 2015
WIND User Guide
4.3.1.3.2 Body
Links
To create a Body
Link, you can start by simply follow the steps 1 to 7 as described above - the only difference being that you will
have opened the Body Links tab first ...
This will create a simple link, as depicted here:
You may in addition use the following optional fields from the Body
Link tab, to add more content under a Body Link:
Fom the Main panel:
Image
Description
From the Bottom panel:
Display period
Label
Link
Image
Description
The example below shows how you can enrich a Body Link (in this case, the Body
Link
3 in the red frame):
page 122 | WIND User Guide | Version 2.27 of 26 June 2015
WIND User Guide
4.3.1.3.3 Intro
/
Concl
The third tab allows you to create and manage an optional Introduction and/or Conclusion text. See the settings below... :
... and see how it is rendered in the Portlet:
page 123 | WIND User Guide | Version 2.27 of 26 June 2015
WIND User Guide
4.3.1.3.4 Bottom
Link
The last tab is labelled Bottom
Link.
You may recognise this component, as it is also in use in the Body
Links tab.
It will therefore behave in the sery same way. The difference is that the resulting link appears at the bottom of the Portlet.
The entry depicted here:
... generates this:
page 124 | WIND User Guide | Version 2.27 of 26 June 2015
WIND User Guide
4.3.1.4 GLOBAL_DC
The GLOBAL_DC entity gathers all general parameters, not directly related to an individual Portlet.
As these parameters affect the whole of the Portal, they should be edited with utmost care, and by authorized user
only.
It contains six tabs:
General
Footers
Colors
Map
Geometry
Map
Configuration
File
resource
Configuration
4.3.1.4.1 General
The first General tab from the GLOBAL_DC entity is about the most general parameters of the NOP.
4.3.1.4.1.1 Not
authorized
text,
Service
unavailable
text
and
Not
in
scope
text
These three parameters are indentical to those described in The
Common
Tab
(Section
4.3.1.1.1) section, and
are used in the same way.
They serve to provide default values, in case they are not specified in lower levels of the configuration flow.
4.3.1.4.1.2 Session
expired
A texta area field to enter the text to be displayed in the pop-up when a user session has expired:
page 125 | WIND User Guide | Version 2.27 of 26 June 2015
WIND User Guide
4.3.1.4.1.3 More
label
to
item
A text field to enter the text for the label associated to the More function.
4.3.1.4.1.4 Portal
developments
label
and
Portal
Developments
These two fields are currently not displayed in the NOP.
4.3.1.4.1.5 Query
launch
label
Field currently not displayed in the NOP.
4.3.1.4.1.6 Help
link
and
External
Help
link
The (External)
Help
link serves to indicate what to display when a user clicks on the HELP button located in the
NOP header.
page 126 | WIND User Guide | Version 2.27 of 26 June 2015
WIND User Guide
Use the Help
link field to open a file from the File
resources
(Section
4.1.5.5) - or preferably the External
Help
link field to open the default page from the NOP Help: https://www.nm.eurocontrol.int/HELP/webframe.html.
Use only of the the methods in order not to get the following error message:
4.3.1.4.1.7 Flight
level
ground
4.3.1.4.1.8 Flight
level
max
4.3.1.4.1.9 Flight
level
range
separator
4.3.1.4.2 Footers
This is where the parameters for the Main
page and the Detached
Views footers are entered.
They serve to provide default values, in case they are not specified in lower levels of the configuration flow.
page 127 | WIND User Guide | Version 2.27 of 26 June 2015
WIND User Guide
Please check The
Common
Tab
(Section
4.3.1.1.1) section for detailed instructions about footers creation and edition.
4.3.1.4.3 Colors
4.3.1.4.3.1 Deprecated
This tab is not to be used anymore - any values entered here will be overridden with the content from the Colors
component in the Map
Configuration
(Section
4.3.1.4.5) tab.
4.3.1.4.4 Map Geometry
The Map
Geometry tab contains a number of default settings associated with the NOP Interactive Map (IM).
page 128 | WIND User Guide | Version 2.27 of 26 June 2015
WIND User Guide
4.3.1.4.4.1 Map
Lower-Left
and
Upper-Right
Corner
Type in (or use the up / down arrows) the desired values in the Longitude and Latitude fields to specify the portion
of the MAP tp be displayed by default:
4.3.1.4.4.2 Map
Dimensions
-
Main
View
4.3.1.4.4.3 Map
Dimensions
-
Detached
...
4.3.1.4.4.4 Interactive
Map
-
Gather
Info
page 129 | WIND User Guide | Version 2.27 of 26 June 2015
WIND User Guide
The Max
Nr
Results parameter limits the number of results returned with the Gather
Info function of the Map:
4.3.1.4.4.5 Interactive
Map
Disclaimer
A text area used to manage the text appearing in a popup when the user first accesses the Interactive Map:
The picture belows shows how the text is rendered in the NOP:
page 130 | WIND User Guide | Version 2.27 of 26 June 2015
WIND User Guide
4.3.1.4.5 Map Configuration
The Map
Geometry tab contains additional settings associated with the NOP Interactive Map (IM).
It consists of two distinct tabs, Dimensions/Scale and Colors.
4.3.1.4.5.1 Dimensions/Scale
Maximum
Map
Dimensions
This set of parameters determines the maximum size (in pixels) for the Map and the file format of the Map image.
//NOTE - DOES NOT SEEM TO BE EFFECTIVE
Layer
Visibility
Threshold
This component lets you determine when a given layer is visible on the Interactive Map.
Each of the parameters can be either set to be visible in any circumstance, by ticking the Always
Show check box:
... or set to be visible starting from a given scale, indicating a Visible
from value expressed in million pixels /
meter:
page 131 | WIND User Guide | Version 2.27 of 26 June 2015
WIND User Guide
Using 0 (zero) will be equivalent to 'Always Show'
A low value will result in the associated layer being visible even under a small amount of magnification of
the Map
A high value means that the associated layer is visible only when the Map is strongly zoomed in
4.3.1.4.5.2 Query
Limit
The Query
Limit component limits the number of results returned for each of the query parameter:
AB
AS
AD
AZ
PT
TV
RT
...
ProposedRoute
The possible settings are No
limit (checkbox) or Max
Nb
of
Entities (numeral):
4.3.1.4.5.3 Colors
The Color tab is where the color and label settings for the Map elements are managed.
A vast number of parameters are available, grouped in 7 tabs:
General
As the title says, the General tab contains the general Map features, namely:
Background
Countries
Grid
The Background of the Map is defined with a Color / Alpha value pair:
page 132 | WIND User Guide | Version 2.27 of 26 June 2015
WIND User Guide
Select the desired color from the Color
picker - or enter a coded hexadecimal value in the text field (7888A0 in the
case depicted above).
The Alpha value indicates the level of opacity of the color (255 being the maximum) - simply lower this value to get
the desired amount of transparency.
The Countries and Grid parameters each contain the following elements:
Legend (text)
Fill (color and alpha)
Line (color and alpha)
Label (color and alpha)
Changing these values will affect how the world map is displayed in the background of the Map.
Reference
Locations
The Reference
Location tab groups all the Map parameters related to reference locations (Aerodrome, Airblocks,
Airspace, ..).
They each present the following elements:
Legend (text)
Fill (color and alpha)
Line (color and alpha)
Label (color and alpha)
You can edit them in the fashion described in the General tab section above.
Flow
Restrictions,
Delays,
Daily
Plans,
Flights
and
AUPs
The 5 remaining tabs do present the same structure as in the Reference
Locations tab.
They contain items relevant to each topic:
Flow
Restrictions: Routing, DCT, Reference Location, Included, ...
Delays: Normal, Low, Medium, High
Daily
Plans: Headline, Event, ACC, NAT, Weather, Other
Flights: Actual, Estimated, Calculated, Confirmed, Proposed page 133 | WIND User Guide | Version 2.27 of 26 June 2015
WIND User Guide
AUPs: AMA/NAM Allocations, RCA Allocations, AMA/NAM Availability
4.3.1.4.6 File resource Configuration
The File
resource
Configuration tab lets you set the maximum dimensions for uploaded images of the type
Freesize (check the File
Resources
(Section
4.1.5.5) section for more information about image uploads).
It features two parameters: Maw
width and Max
height (both expressed in pixel).
4.3.2 Special PC Entities
4.3.2.1 AIRPORT_INFO_PC
FOREWORD
The AIRPORT_INFO_PC is an Application configuration entity. Please refer to the Types
of
PC
(Section
4.3.1) section for more information on PC Types.
The Common, Main
View and Detached
Views tabs are common to most configuration entities and further
described in the Common
Features
(Section
4.3.1.1) section.
Application Config
tab
This is where the Application settings specific to this entity are managed. Please check the Application
(Section
4.3.1.2) section to get more information on how to use the configuration editor.
4.3.2.1.1 Configuration
MAIN
page 134 | WIND User Guide | Version 2.27 of 26 June 2015
WIND User Guide
These are the parameters available in the MAIN folder, corresponding to elements present in the Main View:
MAIN > AREAS > AIRPORT_INFO_LAUNCH_AREA > ACTIONS > SUBMIT_ACTION_FIELD (Label for the Go
button)
// CORRESPONDING PORTLET CURRENTLY OFF ... TO BE CONTINUED
4.3.2.2 AIRSPACE_INFO_PC
FOREWORD
The AIM_PC is a Linklist configuration entity. Please refer to the Types
of
PC
(Section
4.3.1) section for
more information on PC Types.
The Common, Main
View and Detached
Views tabs are common to most configuration entities and further
described in the Common
Features
(Section
4.3.1.1) section.
Details tab
This is where the settings specific to this entity are managed. Please check the Linklist
(Section
4.3.1.3)
section to get more information on how to use the configuration editor.
// CORRESPONDING PORTLET CURRENTLY OFF ... TO BE CONTINUED
4.3.2.3 AIRSPACE_PC
FOREWORD
The AIRSPACE_PC is an Application configuration entity. Please refer to the Types
of
PC
(Section
4.3.1)
section for more information on PC Types.
The Common, Main
View and Detached
Views tabs are common to most configuration entities and further
described in the Common
Features
(Section
4.3.1.1) section.
Application Config
tab
This is where the Application settings specific to this entity are managed. Please check the Application
(Section
4.3.1.2) section to get more information on how to use the configuration editor.
4.3.2.3.1 Configuration
page 135 | WIND User Guide | Version 2.27 of 26 June 2015
WIND User Guide
SHAREDAREAS
These are the parameters available in the SHAREDAREAS folder:
SHAREDAREAS > AIR_ROUTE_SHARED_AREA > COMPONENTS > AIR_ROUTE_DATA_TABLE >
COLUMNS > POINT_ID_COLUMN - multiple parameters:
SHAREDAREAS > AIR_ROUTE_SHARED_AREA > COMPONENTS > AIR_ROUTE_DATA_TABLE > COLUMNS
> FL_LOW_HIGH_COLUMN - multiple parameters:
page 136 | WIND User Guide | Version 2.27 of 26 June 2015
WIND User Guide
SHAREDAREAS > AIR_ROUTE_SHARED_AREA > COMPONENTS > AIR_ROUTE_DATA_TABLE > COLUMNS
> FL_SER_COLUMN - multiple parameters:
SHAREDAREAS > AIR_ROUTE_SHARED_AREA > COMPONENTS > AIR_ROUTE_DATA_TABLE > COLUMNS
> CDR_CAT_COLUMN - multiple parameters:
SHAREDAREAS > AIR_ROUTE_SHARED_AREA > COMPONENTS > AIR_ROUTE_DATA_TABLE > COLUMNS
> WEEKLY_APP_COLUMN - multiple parameters:
SHAREDAREAS
-
cont.
These are the parameters available in the SHAREDAREAS folder:
SHAREDAREAS > TV_RESULT_SET_SHARED_AREA > COMPONENTS >TV_DATA_TABLE > COLUMNS >
ID_COLUMN - multiple parameters:
SHAREDAREAS > TV_RESULT_SET_SHARED_AREA > COMPONENTS >TV_DATA_TABLE > COLUMNS >
NAME_COLUMN - multiple parameters:
page 137 | WIND User Guide | Version 2.27 of 26 June 2015
WIND User Guide
SHAREDAREAS > TV_RESULT_SET_SHARED_AREA > COMPONENTS >TV_DATA_TABLE > COLUMNS >
REF_LOC_COLUMN - multiple parameters:
SHAREDAREAS > TV_RESULT_SET_SHARED_AREA > COMPONENTS >TV_DATA_TABLE > COLUMNS >
FLOWS_COLUMN - multiple parameters:
// ... TO BE CONTINUED
4.3.2.4 E_HELPDESK PC
FOREWORD
The E_HELPDESK_PC is an entity based on the Application type. Please refer to the Types
of
PC
(Section
4.3.1) section for more information on PC Types.
The Common, Main
View and Detached
Views tabs are common to most configuration entities and further
described in the Common
Features
(Section
4.3.1.1) section.
4.3.2.4.1 Request
Types
Categories
This is the content of the Request
Types
Categories tab:
page 138 | WIND User Guide | Version 2.27 of 26 June 2015
WIND User Guide
This is where you can manage the different E-Helpdesk Request categories, sub-categories and types to be proposed
when a user clicks on the Type button show below when filling in a query:
A dialogue pops up, inviting to use the navigation tree and select the appropriate request type:
4.3.2.4.2 Managing
Types
A right-click with the pointer inserted at the desired node will open a dialog similar to this one (the disabled options
may vary depending on the context):
Add
Folder
Simply select the Add
Folder command and type in the desired folder name.
Note: you can not create a folder more than 3 level deep from root level.
Add
Element
Navigate to the folder in which you want to create an Element - that is, the label of the text as it will be made
selectable in the pop-up described above and appear in the Type column:
page 139 | WIND User Guide | Version 2.27 of 26 June 2015
WIND User Guide
Edit
Allows you to edit the selected node
Hide
/
Unhide
Use this command to respectively hide or show a given Folder or Element. A hidden item is indicated with a red
cross:
Fake
/
Unfake
On some of the options in the E-Helpdesk the answer to the questions can be 'No'. Use the Fake function to ensure
that when an AO selects that option, an error message is returned. This can serve to let the requester know that a particular query should not be used for E-Helpdesk purposes.
4.3.2.5 NOP_PC
page 140 | WIND User Guide | Version 2.27 of 26 June 2015
WIND User Guide
4.3.2.6 SAFA_PC
FOREWORD
The SAFA_PC is an entity based on the Application type. Please refer to the Types
of
PC
(Section
4.3.1)
section for more information on PC Types.
The Common, Main
View and Detached
Views tabs are common to most configuration entities and further
described in the Common
Features
(Section
4.3.1.1) section.
4.3.2.6.1 Users
/
Countries
The User/
Countries tab features a table listing user and country pairs:
page 141 | WIND User Guide | Version 2.27 of 26 June 2015
WIND User Guide
4.3.2.6.2 Add
entry
Click on the Add button to create a blank line at the end of the table:
Next type in the user's token id, and select the relevant country from the Country pull-down menu:
4.3.2.6.3 Delete
entry
Select (highlight) the line in the table you want to remove from the list and click on the Delete button.
4.3.2.6.4 Edit
entry
Select (highlight) the line in the table you want to modify and either change the User token, the corresponding
country, or both.
page 142 | WIND User Guide | Version 2.27 of 26 June 2015
WIND User Guide
4.3.2.7 TIME_MANAGER_PC
FOREWORD
The Common, Main
View and Detached
Views tabs are common to most configuration entities and further
described in the Common
Features
(Section
4.3.1.1) section.
The Time Manager PC is one of the 'special' entities - whose specific settings are grouped in the Details Tab.
4.3.2.7.1 Details
Tab
This is where you can manage the various parameters for each of the NOP Header ATFCM Phases tabs:
Tab
text: the text as it appears in the tab
Tab
colour: the background (or fill) color of the tab itself - by means of a color picker - and its
transparency - by means of the Alpha setting
Tab
text
colour: the color of the tab text - by means of a color picker - and its transparency - by means
of the Alpha setting
The last Profile panel is currently not in use:
page 143 | WIND User Guide | Version 2.27 of 26 June 2015
WIND User Guide
4.4
How To...
This sections covers a collection of more in-depth instructions on how to best use WIND.
4.4.1 Crisis Management - Step by Step
The following instructions will guide you in managing the content of the Crisis
Management Portlet.
4.4.1.1 1.
Open
a
PUBLISH
instance
of
the
Portal
Neither the Public
Portal or the Protected
Portal will allow you to get access to WIND. You will need to go the a
specifically dedicated URL:
https://www.nm.eurocontrol.int/PUBLISH/gateway/spec/index.html
Enter your credentials (UserName and Passcode) on the Login Page:
A new screen appears, prompting you to select the Role and Domain values to be used:
Select the appropriate values and click on the Go button. This will open the NOP:
page 144 | WIND User Guide | Version 2.27 of 26 June 2015
WIND User Guide
4.4.1.2 2.
Launch
WIND
Click on the WIND Button in the Header:
This action opens the WIND Editor:
4.4.1.3 3.
Prepare
and
upload
the
file
imports
(if
relevant)
The obvious initial step will be to have the desired file(s) ready for import prior to engage in the upload process.
Allowed
File
Types
WIND only accepts the upload of the files in the following formats:
Text (txt, doc, rtf)
Html (htm, html)
page 145 | WIND User Guide | Version 2.27 of 26 June 2015
WIND User Guide
Image (gif, jpeg, png)
Powerpoint (ppt)
Excel (xlc, xll, xlm, xls, xlw)
Pdf
Note that any other format will cause WIND to generate an error message.
Due
to
potential
browser
configuration
issues,
the
pdf
format
is
currently
recommended
as
preferred
one...
Important: please name your files so that they do not contain space(s) or special characters (hyphen and
underscore are allowed, though).
Due to a problem caused by a known bug for firefox and other netscape-based browsers, please use Internet
Explorer for your uploads. Versions 9 and 10 are currently supported.
Click on the File
resources
tree button (the third one featured in the left navigation column) and locate the desired
folder - probably the Crisis_documents folder:
Note: you can use any existing location - or create your own one: right-click on the 'parent' folder and select
the Create
a
new
directory command to create a new folder in it.
The name of your new directory must not contain whitespaces, backslashes or special characters - failure to
observe this rule will return an error message. In addition, immediately add one or more files to this directory.
Leaving it empty will result in it not being saved in your View.
With the target folder selected (highlighted), right-click and select the Add
a
file
resource command:
This will open a new dialog prompting you to specify the file details:
page 146 | WIND User Guide | Version 2.27 of 26 June 2015
WIND User Guide
The Directory field is set by default to the folder from which you invoked the command
The Type field allows you to select from one of the following file types:
1. PORTLET_IMAGE
Usage: Illustration in all portlets - main view
Size: image size must be 75x75 pixels
2. NEWS_THUMB_IMAGE
Usage: Illustration in CFMU News (main view) and HEADLINE NEWS (detached view)
Size: Image will automatically be resized to 52x52 pixels
3. SCENARIO_IMAGE
Usage: Illustration in SCENARIOS (detached view)
Size: Image will, if too big, be resized to 720x540 pixels
4. FREESIZE_IMAGE
Usage: Illustration in all documents where images can be embedded
Size: Image size must be at least 90x90 pixels
5. OTHER
Usage: for all documents other than images (text documents, powepoint, pdf, etc.)
The File field prompts you to browse the files present on your local file system (from your computer hard
disk or any network drive to which you have access) - confirm your choice by clicking on the Select button
4.4.1.4 Allowed
File
Types
WIND only accepts the upload of the files in the following formats:
Text (txt, doc, rtf)
Html (htm, html)
Image (gif, jpeg, png)
Powerpoint (ppt)
Excel (xlc, xll, xlm, xls, xlw)
Pdf
Due
to
potential
browser
configuration
issues,
the
pdf
format
is
currently
recommended
as
preferred
one...
Note that any other format will cause WIND to generate an error message.
Once you have confirmed the target folder, set the file type and selected the file to add to the WIND
resources:
Then simply click on the Ok button to initiate the upload process. See the example below with a sample
141201_test_document_upload.txt file:
page 147 | WIND User Guide | Version 2.27 of 26 June 2015
WIND User Guide
Repeat this routine until all the necessary files are successfully uploaded.
4.4.1.5 4.
Edit
the
CRISIS_SUPPORT_PC
entity
The content of the Crisis
Management Portlet is in effect managed by means of the CRISIS_SUPPORT_PC entity.
Click on the Typed
tree button (the first one featured in the left navigation column), locate and open the PC folder,
and scroll until you locate the CRISIS_SUPPORT_PC icon:
This opens a windows looking like this:
Notice the 4 tabs, namely Common, Main
View, Detached
Views and Details.
The first three are not to be used on a daily basis and are typically reserved to administrators.
page 148 | WIND User Guide | Version 2.27 of 26 June 2015
WIND User Guide
We only address the last one, Details, in this section. Please refer to the relevant sections of the WIND User Manual
for additional information.
A.
Access
the
Details
Tab
As you open the Details tab, another series of sub-tabs is revealed:
Top
Links
Body
Links
Intro
/
Concl
Bottom
Link
Note: The Crisis
Management Portlet is indeed of the Linklist type. Please refer to the WIND
>
The
WIND
Portlet
Configuration
(PC)
>
Types
of
PC
>
Linklist section of the WIND
Help
/
User
Manual for
additional information on the different types of Portlet Configuration (PC) elements.
B.
Edit
in
the
Intro
/
Concl
tab
For the time being, the whole content of the Crisis
Management Portlet, as it is displayed on the NOP, is managed
in this single tab - more precisely in the first Introduction pane:
page 149 | WIND User Guide | Version 2.27 of 26 June 2015
WIND User Guide
As a result, you will only have to edit one text area to add, modify or suppress text or links - using a simplified text
editor: the WIND
Text
Editor.
WIND
Text
Editor
This is the Tagged
Text
Editor toolbar:
The term 'Tagged Text' refers to the editor inserting specific formatting code instructions within the text - these
small pieces of code are named Tags.
Note that this component is not a WYSIWYG editor - it will only show some code, and does not render it as it would
be when seen from the NOP.
Caution: the Tagged Text Editor must be used very carefully
Since the HTML code is visible - and therefore editable as well - your text might not render as expected if
some tag has been damaged or removed by mistake.
As for most simple text editors, many of the commands are quite straightforward to understand. This is certainly the
case for these:
Undo / Redo: undo (or redo) the last entered changes.
Carriage
Return: Inserts a line break each time you click on it, forcing a carriage return.
Hitting the return key on your keyboard will not be enough to force a new line - even though it might seem so
in the editor window. Again, this is not a WYSIWYG editor.
Bold / Italic / Underline
Simply highlight with the mouse the text you want to edit, then click on the desired button. Should you wish to apply
a second style on the same text string, please make sure to only reselect the original text - excluding all tags (tags
are HTML commands placed between <
> brackets).
Create
a
List
Clicking on the Create
a
list button opens a palette where you can enter the following parameters: First choose between a Numbered
list or a Bulleted
list by means of the drop-down list.
page 150 | WIND User Guide | Version 2.27 of 26 June 2015
WIND User Guide
The next step is to select the desired number of items, with the Length up and down arrows.
You will then need to individually edit each of the rows of the table to enter the text - simply click and
type...
Insert
Link
Clicking on the Insert
Link button opens the palette below:
Note that it is set by default to Link
to
a
file
resource. The Type field allows you to opt for an External
link:
First choose between the External
link or the Link
to
a
file
resource type of link.
Both types work in the same way:
First select the desired Type.
Check the Open
in
a
new
window box if you want the target page to be opened in a new browser
window instead of in the current one.
In case you did not yet select the text to which apply the change, the next step is to type in the text which
will be the label for the hyperlink . If you did so (by first selecting a text string then clicking on the Link
button), then the selected text will already appear in the Text field.
Indicate the path to the target file, in the form of an URL in the case of an external link, or drag and drop
an element already available in the File
Resources folders. If necessary, follow the instructions provided
in Step
4 (upload files).
Example
for
an
external
link
page 151 | WIND User Guide | Version 2.27 of 26 June 2015
WIND User Guide
This is, highlighted in a red border, the corresponding code:
And this is how the code is rendered in the NOP:
Example
for
an
internal
link
Drag and drop the file to the File
Resource field:
page 152 | WIND User Guide | Version 2.27 of 26 June 2015
WIND User Guide
Check that it has been correctly linked (see that we also have filled the mandatory Text field with the word 'MAP'):
This is, highlighted in a red border, the corresponding code:
And this is how the code is rendered in the NOP:
Insert
Date
page 153 | WIND User Guide | Version 2.27 of 26 June 2015
WIND User Guide
This feature is not used in the context of the Crisis
Management Portlet.
Insert
Image
Clicking on the Insert
Image button opens the Select
the
image
properties palette. To add an image to your text, simply drag it from the File
resources
tree.
Next choose the type of alignment among the following:
Left
Right
Top
Bottom
Middle
You may optionally specify the display pixel dimensions of the image (Height and Width) - use this
feature when your image is too big to fit (WIND will not automatically resize oversized images).
Note: Please refer to the section of the WIND
>
The
Wind
Editor
>
Editing
a
WIND
Document
>
Editing
Tools
and
Components
>
Formatting
Text
in
WIND
>
Insert
Images section of the WIND
Help
/
User
Manual for additional information on inserting images.
4.4.1.6 5.
Save
your
work
The Apply button at the bottom of the Edit window will save the changes made to the document being edited - the
OK button does the same, and in addition closes the Edit window.
These changes are stored in a temporary location, and linked to the profile and view used to generate them.
They can be retrieved at any time during the same or another session, changed again, deleted .. or of course
published on the live server.
Should you forget to save your changes, you will be prompted to do so when you close the Edit window.
The warning about unsaved work does NOT appear when you close the main WIND window. Remember
to
save
your
work, a there is no way to recover lost data.
4.4.1.7 6.
Check
your
data
against
the
system
Go to the View menu and select the Validate
and
align command. This will run a technical check to validate the
changes you made and result in a "0 errors found" messages if everything is OK - or some other message indicating
the type of error encountered.
4.4.1.8 7.
Verify
your
changes
Before publishing, you may also wish to make sure that the changes you are about to have copied to the live server
are indeed what you intended to display, by means of a visual check.
Simply return to the header of the Portal and click on the View button - and select in a drop-down list from which of
your views (there may be just one item listed there if you have created only one view) you wish to have the content
displayed.
Please refer to the WIND
>
The
Wind
Editor
>
The
View
Concept section of the WIND
Help
/
User
Manual for
additional information on managing Views.
This step is very
important and allows to you verify exactly how your changes or additions will look like
without the need to publish on the live site - and therefore allowing you to modify or finetune your changes as
long as necessary until ready to publish.
4.4.1.9 8.
Publish
As no errors were encountered during the Validate
and
Align check, you can now safely click on the Publish
command located in the View menu to publish your data in the NOP. As a result, the view used for making the
changes is terminated, and removed from the list of available views. Should you wish to make another set of
changes, you will have to either open an existing view, or create a new one.
A view may be kept open for any given time - you may in fact create several views and use them at will, from
one day or working session to another, until you estimate your document is ready to be published.
page 154 | WIND User Guide | Version 2.27 of 26 June 2015
WIND User Guide
5
Help
5.1
Using the online NOP Help
The NOP Help is available either from the Header, or from each Portlet.
This sections show you how to make the best use of the numerous features available here.
The screenshot below shows how the NOP Help open by default.
5.1.1
Main
Help
screen
areas
1. Toolbar
This is where all the tools are located - they are detailed below
2. Navigation
Panel
This is where the selected Navigation method is displayed - in this example, the Table of Content
3. Navigation
Selection
Here are 4 different ways to access the NOP Help content:
1. Table
of
Content
In a classical tree-structure presentation, a table lists all the topics available.
Whenever relevant, the usual "expand" and "collapse" icons open or close the selected section.
2. Index
List the indexed entries (including the secondary level) in ascending alphabetical order.
3. Search
Proposes a text field where to enter the words to search for.
You can combine the words to search using OR and AND to execute a complex query.
A Highlight
search
terms check box highlights the matching words in different colors (one per term entered in the
Search field).
4. Favorites
Lists the pages you will have bookmarked with the Add
to
Favorites buttons in the Toolbar. Click on the icon next
to a listed topic to remove if from the Favorites.
4. Main
panel
This is where the pages are displayed. Note the See
Also group of links proposing shortcuts to related material.
5.1.2
The
Toolbar
page 155 | WIND User Guide | Version 2.27 of 26 June 2015
WIND User Guide
Hide
/
Show
Navigation
Clicking on the Hide
Navigation button closes the Navigation Column (Navigation Panel + Navigation Selection) to provide
more room for the Mail Panel. Clicking on in it again shows the Navigation Column and restores the initial display.
Add
to
Favorites
Clicking on this button adds the currently viewed page to the list of favorites.
Print
Topic
Prints the currently viewed topic. Quick
Search
Scans the currently opened page, locates the (single) word typed in the Quick Search field and highlights it.
Clear
Search
Hides the highlighted words revealed by the Quick Search command.
Previous
/
Next
Go respectively to the previous or next page(s) of a series of visited pages - exactly like with your regular web browser.
Refresh
Refreshes the visited page.
Home
Shortcut to the Home page.
Shortcuts
These 4 buttons provide shortcuts respectively to the Table of Content, Index, Search and Favorites Navigation.
5.1.3
Glossary
Some important terms are highlighted in green, as shown below.
Clicking on such a link, 'Target
Date' in this example, opens a pop-up with the definition as entered in the Glossary.
page 156 | WIND User Guide | Version 2.27 of 26 June 2015
WIND User Guide
Simply click on the pop-up to close it.
page 157 | WIND User Guide | Version 2.27 of 26 June 2015
WIND User Guide
6
Index
ACC,
46-47
Acc
Plans,
92
ACCPlan,
47-51
ACCs,
90-92
Add
Directory,
38
Add
File,
38-40
Adding
-
Editing
Reports,
102-104
AdhocReport,
51
AIM_PC,
115-118
Airport,
51-52
AIRPORT_INFO_PC,
134-135
AirportPlan,
52
AIRSPACE_INFO_PC,
135
AIRSPACE_PC,
135-138
Application,
113-115
ATFCM
Events,
94-95
ATFCMEvent,
52-54
Best
Practices,
23
Calendar,
32-33
,
76-77
CALENDAR_DC,
70-72
CalendarEvent,
56-57
CalendarEventCategory,
57-58
CFMUNews,
58
Changes
and
Updates,
8
Colors,
128
Common
Features,
107-108
Content
Link,
34
Countries,
92-94
Country,
58
Create
a
List,
25-26
Create
a
new
WIND
Document,
20-22
Crisis
Management
-
Step
by
Step,
144-154
Daily
Plans,
95-96
DailyPlan,
58-61
DailyReport,
70
Danger
Areas
Publication,
9
Date,
32-33
Date
Format,
29-30
Details,
54-56
,
57
,
83-84
Directories,
40-42
Display
Period,
32
Document
<>
Entity,
10-11
Drag
and
Drop,
35-37
E_HELPDESK
PC,
138-140
Edit
in
Popup,
31
Editing
a
WIND
Document,
18-20
Editing
Tools
and
Components,
24
Entity
Usage,
34-35
Events,
72-74
FAQ,
77-78
FAQTopic,
78-80
file,
37-38
page 158 | WIND User Guide | Version 2.27 of 26 June 2015
WIND User Guide
File
resource
Configuration,
134
File
Resources,
37-38
Files,
42-43
Footers,
127-128
Formatting
Text
in
WIND,
24-25
General,
125-127
,
74-76
,
54
,
57
,
61-63
,
96-97
,
98-99
,
81-83
GeneralEvent,
80-81
GLOBAL_DC,
125
How
To...,
144
Insert
a
Link,
26-28
Insert
Images,
30-31
Items,
97-98
Keywords
/
Search,
31-32
Linklist,
118-124
Links,
64-65
,
99-100
Manage
Resources,
40
Map,
65-69
Map
Configuration,
131-134
Map
Geometry,
128-131
mime,
37-38
Modify
an
existing
WIND
Document,
22-23
MonthlyReport,
84
Navigation
Tree,
11-13
NOP
Acc Plans, 92
ACCs, 90-92
ATFCM Events, 94-95
Countries, 92-94
Daily Plans, 95-96
Scenarios, 101
NOP_DC,
90
NOP_PC,
140-141
Occurences,
33-34
PC,
84-85
Presentation,
11-13
PrevalidationExercise,
85
Pri,
85
Publish,
45-46
Purge
unused
files,
43-45
Quick
Start,
16-18
REPORTS_LIB_DC,
101-102
SAFA_PC,
141-143
Scenario,
85-89
Scenarios,
99
,
63-64
,
101
SeasonReport,
89
Set
the
Date
and
Time,
32-33
Sorting
Data,
35
Special
PC
Entities,
134
tagged,
24-25
Tagged
Text
Editor
Create a List, 25-26
Date Format, 29-30
Insert a Link, 26-28
Insert Images, 30-31
page 159 | WIND User Guide | Version 2.27 of 26 June 2015
WIND User Guide
text,
24-25
The
Common
Tab,
108-110
The
Detached
Views
Tab,
112-113
The
Main
View
Tab,
110-112
The
View
Concept,
13-16
The
WIND
Documents,
46
The
Wind
Editor,
10
The
WIND
Portlet
Configuration
(PC),
104-107
TIL,
32-33
Time,
32-33
TIME_MANAGER_PC,
143-144
Types
of
PC,
107
Updates,
69-70
,
100
upload,
37-38
Using
the
online
NOP
Help,
155-157
VAAC
Forecasts
Publication,
9
Validate
and
align,
45
WeeklyReport,
90
WEF,
32-33
WIND
ACC, 46-47
ACCPlan, 47-51
Add Directory, 38
Add File, 38-40
Adding - Editing Reports, 102-104
AdhocReport, 51
AIM_PC, 115-118
Airport, 51-52
AIRPORT_INFO_PC, 134-135
AirportPlan, 52
AIRSPACE_INFO_PC, 135
AIRSPACE_PC, 135-138
Application, 113-115
ATFCMEvent, 52-54
Best Practices, 23
Calendar, 76-77
CALENDAR_DC, 70-72
CalendarEvent, 56-57
CalendarEventCategory, 57-58
CFMUNews, 58
Colors, 128
Common Features, 107-108
Content Link, 34
Country, 58
Create a new WIND Document, 20-22
DailyPlan, 58-61
DailyReport, 70
Details, 54-56 , 57 , 83-84
Directories, 40-42
Display Period, 32
Document <> Entity, 10-11
Drag and Drop, 35-37
E_HELPDESK PC, 138-140
Edit in Popup, 31
page 160 | WIND User Guide | Version 2.27 of 26 June 2015
WIND User Guide
Editing a WIND Document, 18-20
Editing Tools and Components, 24
Entity Usage, 34-35
Events, 72-74
FAQ, 77-78
FAQTopic, 78-80
File resource Configuration, 134
File Resources, 37-38
Files, 42-43
Footers, 127-128
Formatting Text in WIND, 24-25
General, 125-127 , 74-76 , 54 , 57 , 61-63 , 96-97 , 98-99 , 81-83
GeneralEvent, 80-81
GLOBAL_DC, 125
How To..., 144
Items, 97-98
Keywords / Search, 31-32
Linklist, 118-124
Links, 99-100
Manage Resources, 40
Map Configuration, 131-134
Map Geometry, 128-131
Modify an existing WIND Document, 22-23
MonthlyReport, 84
NOP_DC, 90
NOP_PC, 140-141
Occurences, 33-34
PC, 84-85
Presentation, 11-13
PrevalidationExercise, 85
Pri, 85
Publish, 45-46
Purge unused files, 43-45
Quick Start, 16-18
REPORTS_LIB_DC, 101-102
SAFA_PC, 141-143
Scenario, 85-89
Scenarios, 99 , 63-64
SeasonReport, 89
Set the Date and Time, 32-33
Sorting Data, 35
Special PC Entities, 134
The Common Tab, 108-110
The Detached Views Tab, 112-113
The Main View Tab, 110-112
The View Concept, 13-16
The WIND Documents, 46
The Wind Editor, 10
The WIND Portlet Configuration (PC), 104-107
TIME_MANAGER_PC, 143-144
Types of PC, 107
Updates, 100
Validate and align, 45
WeeklyReport, 90
page 161 | WIND User Guide | Version 2.27 of 26 June 2015
WIND User Guide
YearlyReport, 90
YearlyReport,
90
page 162 | WIND User Guide | Version 2.27 of 26 June 2015