1
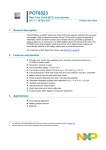
GENICOM Matrix Printers 3850/3870Plus
Quick Reference Guide
GEK-01009
Safety Information
Safety Information
A. Never remove any printer cover unless it is necessary for the installation of a
printer accessory and expressly described in the User’s Manual on the CD-Rom.
B. Please retain the printer covers in a safe place because they should be
reinstalled if you decide to remove any printer accessory.
The following areas of the printer should be covered for safety
reasons:
R ear P ull Tractor Assem bly C ove rs
A S F A re a C ov e rs
The above openings must always be protected with
their cover when the corresponding option is not
installed. Do not touch inside and do not insert any
object into these openings or into the gears.
GB-ii
Table of Contents
Table of Contents
Safety Information................................................................................. ii
Table of Contents................................................................................. iii
Step 1 – Unpacking Your Printer ......................................................... 1
Carton Contents............................................................................................... 1
Printer Parts ..................................................................................................... 1
Front View.................................................................................................... 1
Rear View .................................................................................................... 2
Choosing a Suitable Location .......................................................................... 2
Removing the Shipment Locks ........................................................................ 3
Step 2 – Installing the Ribbon Cartridge............................................. 4
Replacing the Ribbon Cartridge....................................................................... 6
Step 3 – Starting-up the Printer ........................................................... 7
Host Computer Connection.............................................................................. 7
Software Driver Selection ................................................................................ 7
Power Connection............................................................................................ 8
Step 4 - Selecting the Display Language............................................ 9
Step 5 – Loading Fanfold Paper ........................................................ 10
Maintenance & Troubleshooting ....................................................... 14
Cleaning the Printer ....................................................................................... 14
Printing the Self Test...................................................................................... 15
LCD Display Messages....................................................................... 16
Error Messages.......................................................................................... 16
Supplies and Options ......................................................................... 18
Consumables............................................................................................. 18
Accessories and Options ........................................................................... 18
Compliance Statements ..................................................................... 19
FCC Compliance Statement (USA) ............................................................... 19
Compliance Statement (Canada)................................................................... 19
Übereinstimmungserklärung (Deutschland) .................................................. 19
Compliance Statement (Europe).................................................................... 20
Energy Star .................................................................................................... 20
International Compliance ............................................................................... 20
Trademark Acknowledgements ..................................................................... 20
GB-iii
Step 1 – Unpacking Your Printer
Carton Contents
Together with the Quick Reference Guide, the following items are
included in the carton:
Notify any damage to your supplier.
Ribbon C artridge
(1A300 0B01)
CD-RO M
Ribbon C artridge
(1A300 0B04)
Power Cable
Printer Parts
Front View
O p era to r P a ne l
P ape r K no b
Fro n t Tra ctor Asse m blie s C over
P ow er Sw itch
GEK-01009
GB-1
Step 1 – Unpacking Your Printer
Rear View
R e ar P ap er S lo t
Top C o ve r
R e ar P ull Trac to r A s s em b ly
C o ve r
In te rfa ce C o nn ec to rs
A S F A rea C ov e r
P o w er C ab le C o nn ec to r
R e ar P ull Trac to r A ttac h m e n t
A re a C ove rs
Choosing a Suitable Location
Consider the following points when you choose the location for your
printer:
• The distance between the printer and the host computer must not
exceed the length of the interface cable. The location must be
sturdy, horizontal and stable;
• Your printer must not be exposed to direct sunlight, extreme heat,
cold, dust or humidity (see "Printer Specifications" in the User’s
Manual you find on the CD-Rom);
• You need a power outlet compatible with the plug of the printer's
power cord.
GB-2
Step 1 – Unpacking Your Printer
Additionally, you must make sure that when you install the printer in
the selected location, there are sufficient clearances on all sides for
easy operation. The required space is shown below:
80 cm
3 1.5 in.
1
39 00
.4 cm
in
m
2 0 c in
7 .9
m
0c n
1 0 .4 i
39
m
20 c
7 . 9 in
Removing the Shipment Locks
Open all the printer covers and make sure that you remove all the
shipment locks from the printer.
GB-3
Step 2 – Installing the Ribbon Cartridge
Step 2 – Installing the Ribbon Cartridge
1. Find the ribbon cartridge among the accessories.
Make sure that you are using only GENICOM original consumables.
R ib b on G uide
1A3000B01
(3850 model)
to be used when the color
kit is not installed
R ib b on W ind in g K no b
C a rtrid g e S up po rts
R ib b on G uide
1A3000B04
(3870Plus model)
to be used when the color
kit is installed
W h ite P lastic S nap A rm
R ib b on W ind in g K nob
C a rtrid g e S upport
2. Open the top cover using the small handles on either side of the
top cover.
3. Turn the printer on. The print carriage prepares for ribbon
cartridge installation. Before installing the ribbon cartridge turn
the ribbon winding knob in the arrow direction (located on the
cartridge) to take up slack in the ribbon.
To avoid damage to the ribbon, do not turn the winding knob in the wrong
direction.
GB-4
Step 2 – Installing the Ribbon Cartridge
4. Align the left and right
cartridge supports with
the locking points.
The ‘Extended Life’ Black cartridge (1A3000B04) or the Color cartridge
(1A3000B02) to be used when the color kit is installed has only one cartridge
support.
5. Slide and insert the ribbon guide between the print head and the
ribbon guide mask holding it perpendicular to the print head.
Make sure that the ribbon is inserted correctly between the print head and the
print head mask.
12
2.
If the color kit option is
installed on your printer, insert
the white plastic snap arm
onto the color kit ribbon shifter
as shown in the following
figure.
R ib b on G uide
W h ite P la stic S n ap A rm
GB-5
Step 2 – Installing the Ribbon Cartridge
6. Turn the ribbon winding knob in the arrow direction (located on
the cartridge) to take up slack in the ribbon.
7. Push the cartridge down gently until it clips into place at all four
locking points.
8. Turn the ribbon winding knob again in the direction of the arrow
to take up slack in the ribbon.
9. To ensure that the ribbon guide runs freely along the ribbon,
manually move the print carriage horizontally.
Replacing the Ribbon Cartridge
1. Make sure that the printer is turned off for at least 15 minutes.
Pay attention to the print head because it becomes hot
during operation.
2. Open the top printer cover.
3. Slide the ribbon guide out of the print head.
4. Remove the used ribbon cartridge by lifting it up.
Now, you are ready to insert the new ribbon cartridge.
GB-6
Step 3 – Starting-up the Printer
Step 3 – Starting-up the Printer
Host Computer Connection
This printer can be connected to your host computer via two available
interfaces. The interface connectors are located in the rear of the printer.
• A bidirectional IEEE1284 parallel interface
• A RS232C/RS422A serial interface
Before connecting the interface cable, make sure that the printer and the host
computer are turned OFF.
Insert the parallel interface cable into the parallel connector and
fasten it by means of the clips.
Insert the serial interface cable into the serial connector, and fix it
fastening the two screws on both sides of the connector.
Parallel interface
Serial interface
Software Driver Selection
At this point it is necessary to configure your printer for your
application package. The installation procedures depend upon the
host environment. Follow the instructions in the readme file you find
on the CD-Rom.
In a WINDOWS 95/98/2000® environment the printer supports the Plug &
Play feature.
The printer drivers of GENICOM printers can be found at the Internet Address
http://www.genicom.com/drivers/genicom.htm
GB-7
Step 3 – Starting-up the Printer
Power Connection
You need a power outlet compatible with the plug of the
printer's power cord.
Always use a grounded outlet.
1. Make sure the power outlet is near the printer location and easily
accessible.
2. Make sure that the power switch is in 0 position (OFF).
3. Insert the power cable plug into the printer connector and the
other power cable end into a convenient outlet (the figures shows
the European version).
1
4. If you need to turn the
printer on, press the
power switch in the I
position (ON).
GB-8
2
Step 4 - Selecting the Display Language
Step 4 - Selecting the Display Language
The display messages for this printer can be displayed in five
different languages: English (Default), French, German, Italian and
Spanish. To select the language, that you prefer, proceed as follows:
1. Hold the MENU key down on power up. The display shows:
STARTING UP
2. Shortly after the power comes up, the LCD displays the following
message:
SYSTEM MENU
3. Release the MENU key. The LCD displays the first menu item:
CHARACTER SET
4. Now, press the ↓ key until the LCD language function displays:
LCD LANGUAGE
5. Press the ENTER key to enter this function.
6. Press the ↓ key to scroll the LCD languages:
LCD:ENGLISH
LCD:ITALIANO
LCD:FRANCAIS
LCD:ESPAÑOL
LCD:DEUTSCH
7. When the desired language is displayed, press the ENTER key
again to select it.
8. Press the ON LINE key to exit menu.
GB-9
Step 5 – Loading Fanfold Paper
Step 5 – Loading Fanfold Paper
This sequence describes how to load the fanfold paper with the
Front1 Push tractor assembly (default). For the other paper paths
please see the User’s Manual you find on the CD-Rom.
1. Turn the printer on.
2. Open the tractor area cover
turning it upwards and lay it
on the top of the printer.
3. Unlock the sprockets of the
tractor moving the sprocket
levers: up for the 3870Plus
model or down for the 3850
model. Slide the left sprocket
to the first printing column.
GB-10
Step 5 – Loading Fanfold Paper
4. Space the paper guides along
the tractor bar. Open the
sprocket covers of the left and
right sprocket
5. Hold the fanfold paper in
front of the sprockets and
insert the paper perforation
on the left sprocket pins and
close the sprocket cover.
6. Insert the paper on the right
sprocket pins. If you have the
3870Plus model, make sure
that the paper is correctly
inserted under the paper jam
sensor. Close the sprocket
cover.
GB-11
Step 5 – Loading Fanfold Paper
7. Match the left sprocket with the ninth position. Adjust the right
sprocket gently to remove slack from the paper.
9
8. Lock both sprockets moving the sprocket levers: down for the
3870Plus or up for the 3850 models.
9. Close the tractor area cover.
GB-12
Step 5 – Loading Fanfold Paper
10. The paper must be loaded as shown in figure.
11. Press the PATH key to select the Front 1 push path until the
FRONT 1 led is turned on.
12. Press the LOAD/FF key to load the paper into the printer (LOAD
PAPR: FRONT1 message will be displayed).
13. Press the ON LINE key, the printer now is ready to print.
GB-13
Maintenance & Troubleshooting
Maintenance & Troubleshooting
Cleaning the Printer
Make sure the printer has been turned off for at least 15 minutes before starting
any cleaning operations.
Periodic cleaning will help keep your printer in top condition so that
it will always provide optimal performance.
• Use a neutral detergent or water solution on a soft cloth to clean
dirt and grease from the cabinet of the printer.
• Do not use an abrasive cloth, alcohol, paint thinner or similar
agents because they may cause discoloration and scratching.
• Vacuum the inside of the printer in order to remove paper dust
and other particles.
• Wipe the carriage rail with a soft dry cloth.
GB-14
Maintenance & Troubleshooting
Printing the Self Test
If you need to know any printer setting, and to check if the printer is
working well, print the self-test. Make sure that the printer is turned
on and the paper is present. If not, load the paper into the printer
(see Step 5: “Loading Fanfold Paper”).
Proceed as follows:
1. Press the ON LINE key to disable the printer. The ON LINE led
should go out and the display shows:
OFF LINE
2. Press the MENU key to enter the Operational Menu. The display
shows:
OPERATIONAL MENU
3. After a time out of a few seconds, the first menu item is
displayed:
FONT STYLE
4. Now, press the ↑ key until the display shows:
TEST MODE
5. Press the ENTER key. The display shows:
TEST:PAPER WIDTH
6. Press the ENTER key and then use the ↓ key to select the desired
print width based upon the type of paper which you loaded. Push
the ENTER key to save your selection. The display reads:
TEST:START TEST
7. Press the ENTER key, then the ↓ key. The display shows:
TEST:START:N
8. Press ↓ to change LCD display to read:
TEST:START:Y
9. Press the ENTER key and the test pattern will begin printing.
10. To stop the test printing and to exit test mode, press the ON LINE
key.
GB-15
LCD Display Messages
LCD Display Messages
The display messages can be divided into different groups:
- Initial Set Up (ISU) Menu
- System Menu
- Operational Menu
- Paper path intermediate status
- Printer fault status (error messages)
- Printer On Line status
- Messages from the Host
Error Messages
When an error condition occurs:
• the printer enters in WAIT state.
• the display will show the first message indicating the error. Then,
another second message will be displayed giving more specific
information about the error condition.
After you have alleviated the error condition, press the ON LINE key to clear the
error condition.
A.G.A. NOT OPER. Indication: The automatic gap adjustment (A.G.A)
ADJUST THE GAP
BUFFER OVERFLOW
CHARACTER LOST
DATA SET OFF
FRAMING ERROR
WRONG CHARACTER
INTERLOCK ERROR
CHECK INSERTION
GB-16
is not enabled.
Solution: Adjust the gap manually. Press the ON LINE
key to clear the error condition.
Indication: An overflow condition occurs in the buffer
(if the serial interface is selected).
Solution: Turn the printer off and the buffer will be
cleared. Press the ON LINE key to clear the error
condition.
Indication: The printer detects a remote connection serial
interface error. The DST or DCD signal was not sensed.
Solution: Press the ON LINE key to clear the error
condition.
Indication: The stop bit is not detected on complexion
of the next reception.
Solution: Press the ON LINE key to clear the error
condition.
Indication: At power on, the rear tractor assembly
or the rear cover has not been correctly inserted.
Solution: Press the ON LINE key to clear the error
condition.
LCD Display Messages
JAM ON FRONT1
CHECK PAPER
(3870Plus model only)
JAM ON FRONT2
CHECK PAPER
(3870Plus model only)
OVERRUN ERROR
CHARACTER LOST
PAPER JAM
CHECK ALL PATHS
PARITY ERROR
WRONG CHARACTER
PRINT INTEGRITY
RIBBON BLOCKED
CHECK RIBBON
Indication: A paper jam error condition occurs in Front
1 paper path.
Solution: Check the front 1 push tractor and remove
the jammed paper. Press the ON LINE key to clear the
error condition.
Indication: A paper jam error condition occurs in Front
2 paper path.
Solution: Check the front 2 push tractor and remove
the jammed paper. Press the ON LINE key to clear the
error condition. If paper jams are not present and the
error message still appears, refer to "Tuning the Paper
Sensors" in the User’s Manual you find on the CD-Rom.
Indication: An overflow condition has occurred in the
buffer and the data has been lost.
Solution: Press the ON LINE key to clear the error
condition
Indication: A paper jam error condition occurs in Front
1 and/or Front 2 or ASF paper paths.
Solution: Check all the paper paths and remove the
jammed paper. Press the ON LINE key to clear the error
condition. If this error is displayed during the parking
procedure of fanfold paper, first press the ON LINE key
to cancel the jam message and then the PARK key
again, to complete the park procedure.
Indication: The parity condition and receive data parity
do not match.
Solution: Press the ON LINE key to clear the error
condition.
Do not move the platen knob.
Indication: Abnormal printout because of a possible
print carriage blockage.
Solution: Press the ON LINE key to clear the error
condition
Indication: The ribbon is blocked.
Solution: Check that the ribbon is correctly inserted.
Turn the tension knob to make sure that the ribbon is
not jammed. Check for proper installation of the ribbon
guide on the print head. Press the ON LINE key to clear
the error condition.
GB-17
Supplies and Options
Supplies and Options
This appendix lists the supplies, accessories and options available for
your printer. Contact your dealer for information on ordering any of
these items.
Consumables
Supplies
Black Ribbon
Extended Life Black
Ribbon
4 Color Process Ribbon
Order
Number
1A3000B01
1A3000B04
1A3000B02
Comments
Use on 3850 w/o ribbon shifter
Use on 3870Plus
(3850 needs ribbon shifter
installed)
Use on 3870Plus
(3850 needs ribbon shifter
installed)
Accessories and Options
Supplies
Order
Number
Auto Sheet Feeder
1A3003B01
ASF Extension Modules 1A3003B02
Color Kit Ribbon
1A3003B04
Shifter
Stationary Pedestal
1A3003B06
Tilt Pedestal
Additional 4 Pin Front
Push Tractor Assembly
Additional 6 Pin Front
Push Tractor Assembly
Additional 4 Pin Rear
Pull Tractor Assembly
GB-18
Comments
Use on either 3850 or 3870Plus
Use on either 3850 or 3870Plus
Standard on 3870Plus
Option for 3850
Use on either 3850 or 3870Plus
1A3003B05
1A3003B10
Use on either 3850 or 3870Plus
Use on 3850
1A3003B11
Use on 3870Plus
1A3003B12
For Push-Pull Mode Operation.
Use on either 3850 or 3870Plus
Compliance Statements
Compliance Statements
FCC Compliance Statement (USA)
This equipment complies with Part 15 of the FCC Rules. Operation is subject
to the following two conditions: (1) This device may not cause harmful
interference, and (2) this device must accept any interference received,
including interference that may cause undesired operation. If this equipment
does cause harmful interference to radio or television reception, which can be
determined by turning the equipment off and on, the user is encouraged to
try to correct the interference by one or more of the following measures:
•
Reorient or relocate the receiving antenna.
•
Increase the separation between the equipment and receiver.
•
Connect the equipment to an outlet on a circuit different from that to
which the receiver in connected.
•
Consult the dealer or an experienced radio/TV technician for help.
FCC Warning
Changes or modifications not expressly approved by the party responsible
for compliance could void the user’s authority to operate the equipment.
Note the following:
•
The use of a non-shielded interface cable with the referenced device is
prohibited.
•
The length of the parallel interface cable must be 3 meters
(10 feet) or less.
•
The length of the serial interface cable must be 15 meters
(50 feet) or less.
•
The length of the power cord must be 3 meters (10 feet) or less.
Compliance Statement (Canada)
This digital apparatus is in conformity with standard NMB-003 of Canada.
Cet appareil numérique est conforme à la norme NMB-003 du Canada.
Übereinstimmungserklärung (Deutschland)
Bescheinigung des Herstellers/Importeurs:
Hiermit wird bescheinigt, dass der Drucker der Maschinenlärminformationsverordnung 3. GSGV, 18.01.1991 entspricht: Der höchste
Schalldruckpegel beträgt 70 dB (A) oder weniger gemäß EN27779-1991.
GB-19
Compliance Statements
Compliance Statement (Europe)
Warning
This product meets the interference requirements of EN55022. In a
domestic environment, this product may cause radio interference in which
case, the user may be required to take adequate measures.
Energy Star
As an ENERGY STAR® Partner, GENICOM has determined that this
product meets the ENERGY STAR® guidelines for energy efficiency. The
International ENERGY STAR® Office Equipment Program is an
international program that promotes energy saving through the use of
computers and other office equipment. The program backs the development
and dissemination of the products with functions that effectively reduce
energy consumption. It is an open system in which business proprietors can
participate voluntarily. The targeted products are office equipment such as
computers, displays, printers, facsimiles and copiers. Their standards and
logos are uniform among participating nations.
International Compliance
EN55022:1998
Emissions Series
EN 61000-3-2:1995
Power line harmonics
EN 61000-3-3:1995
Power line flicker
EN55024:1998
Immunity Characteristics
EN61000-4-2:1995
E.S.D.
EN61000-4-3:1995
Radiated Susceptibility
EN61000-4-4:1995
E.F.T
EN61000-4-5:1995
Surge
EN61000-4-6:1996
R.F. Common mode
EN61000-4-11:1994
Voltage dips and interruptions
Trademark Acknowledgements
GENICOM is a registered trademark of GENICOM L.L.C. The following
companies own the other trademarks used in this manual:
GENICOM L.L.C.: Centronics
International Business Machines Corporation: IBM
GB-20