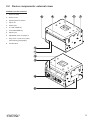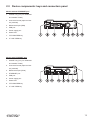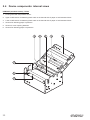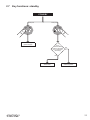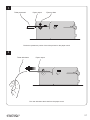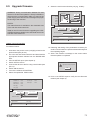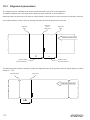
1
USER MANUAL
KPM180H
TK180
CUSTOM S.p.A.
Via Berettine 2/B
43010 Fontevivo (PARMA) - Italy
Tel. : +39 0521-680111
Fax : +39 0521-610701
http: www.custom.biz
Customer Service Department:
Email : [email protected]
© 2014 CUSTOM S.p.A. – Italy.
All rights reserved. Total or partial reproduction of this manual in whatever form,
whether by printed or electronic means,
is forbidden. While guaranteeing that the
information contained in it has been carefully checked, CUSTOM S.p.A. and other
entities utilized in the realization of this
manual bear no responsibility for how the
manual is used.
Information regarding any errors found in it
or suggestions on how it could be improved
are appreciated. Since products are subject to continuous check and improvement,
CUSTOM S.p.A. reserves the right to make
changes in information contained in this
manualwithoutpriornotiication.
The pre-installed multimedia contents
are protected from Copyright CUSTOM
S.p.A. Other company and product names
mentioned herein may be trademarks of
their respective companies. Mention of
third-party products is for informational
purposes only and constitutes neither
an endorsement nor a recommendation.
CUSTOM S.p.A. assumes no responsibility
with regard to the performance or use of
these products.
THE IMAGES USED IN THIS MANUAL ARE USED AS AN ILLUSTRATIVE EXAMPLES. THEY COULDN’T
GENERAL SAFETY INFORMATION
Your attention is drawn to the following
actions that could compromise the characteristics of the product:
• Read and retain the instructions which
follow.
• Follow all indications and instructions
given on the device.
• Make sure that the surface on which
the device rests is stable. If it is not, the
device could fall, seriously damaging it.
• Make sure that the device rests on a hard
(non-padded) surface and that there is
suficientventilation.
• When positioning the device, make sure
cables do not get damaged.
• Use the type of electrical power supply
indicated on the device label. If uncertain, contact your dealer.
• Make sure the electrical system that
supplies power to the device is equipped
with a ground wire and is protected by a
differential switch.
• Do not block the ventilation openings.
• Do not insert objects inside the device as
this could cause short-circuiting or damage components that could jeopardize
printer functioning.
• Do not carry out repairs on the device
yourself, except for the normal maintenance operations given in the user
manual.
• Make sure that there is an easily-accessible outlet with a capacity of no less
than 10A closely to where the device is
to be installed.
• Periodically perform scheduled maintenance on the device to avoid dirt build-up
that could compromise the correct, safe
operation of the unit.
• Before any type of work is done on the
machine, disconnect the power supply.
• Do not touch the head heating line with
bare hands or metal objects. Do not
perform any operation inside the printer
immediately after printing because the
head and motor tend to become very
hot.
REPRODUCE THE DESCRIBED
MODEL FAITHFULLY.
UNLESS OTHERWISE SPECIFIED,
THE INFORMATION GIVEN IN THIS
MANUAL
ARE REFERRED TO ALL MODELS
IN PRODUCTION AT THE ISSUE
DATE OF THIS DOCUMENT.
GENERAL INSTRUCTIONS
CUSTOM S.p.A. declines all responsibility for accidents or damage to persons or
property occurring as a result of tampering,
structuralorfunctionalmodiications,unsuitable or incorrect installations, environments not in keeping with the equipment’s
protection degree or with the required temperature and humidity conditions, failure
to carry out maintenance and periodical
inspections and poor repair work.
THE CE MARK AFFIXED TO
THE PRODUCT CERTIFY
THAT THE PRODUCT SATISFIES THE BASIC SAFETY
REQUIREMENTS.
The device is in conformity with the essential Electromagnetic Compatibility and
Electric Safety requirements laid down in
Directives 2006/95/CE and 2004/108/CE
inasmuch as it was designed in conformity
with the provisions laid down in the following Standards:
• EN 55022 Class B (Limits and methods
of measurements of radio disturbance
characteristics of Information Technology Equipment)
• EN 55024 (Information Technology
Equipment – Immunity characteristics –
Limits and methods of measurement)
• EN 60950-1 (Safety of information
equipment including electrical business
equipment)
GUIDELINES FOR
THE DISPOSAL OF
THE PRODUCT
The crossed-out rubbish bin logo means
that used electrical and electronic products
shall NOT be mixed with unsorted municipal waste. For more detailed information
about recycling of this product, refer to the
instructions of your country for the disposal
of these products.
• Do not dispose of this equipment as
miscellaneous solid municipal waste, but
arrange to have it collected separately.
• The re-use or correct recycling of the
electronic and electrical equipment
(EEE) is important in order to protect
the environment and the wellbeing of
humans.
• In accordance with European Directive
WEEE 2002/96/EC, special collection
points are available to which to deliver
waste electrical and electronic equipment and the equipment can also be
handed over to a distributor at the moment of purchasing a new equivalent
type.
• The public administration and producers
of electrical and electronic equipment
are involved in facilitating the processes
of the re-use and recovery of waste electrical and electronic equipment through
the organisation of collection activities
and the use of appropriate planning arrangements.
• Unauthorised disposal of waste electrical
and electronic equipment is punishable
by law with the appropriate penalties.
The format used for this manual improves use of natural resources reducing the quantity of necessary paper to print this
copy.
POWER SUPPLY INFORMATION
The device is fed by a SELV power supply (Safety Extra Low
Voltage).
When power supply unit is installed as accessory in the endproduct, the following items must be considered:
• The power supply must be properly bonded to the main protective earthing termination.
• A suitable mechanical, electrical and ire enclosure must be
provided.
• The power supply has been evaluated for use in a pollution
degree 2 environment, overvoltage category II.
• An appropriate disconnect device must be provided.
• The power supply must be installed in compliance with the
mounting, creepage, clearance, markings and segregation requirements of the end-use application.
WARNING: PRESENCE OF DANGEROUS VOLTAGES (POWER
SUPPLY)
Risk of electric shock (accessory power supply).
WARNING: PRESENCE OF HAZARDOUS MOVING PARTS
MANUAL
For details on the commands,
refer to the manual with code 77200000001800
TABLE OF CONTENTS
1
INTRODUCTION . . . . . . . . . . . . . . . . . . . . . . . . . . . . . . . . . . . . . . . . . . . . . . . . . . . . . . . . . . . . . . 9
1.1
1.2
Document structure . . . . . . . . . . . . . . . . . . . . . . . . . . . . . . . . . . . . . . . . . . . . . . . . . . . . . . . . . . . . . . . . . 9
Explanatory notes used in this manual . . . . . . . . . . . . . . . . . . . . . . . . . . . . . . . . . . . . . . . . . . . . . . . . . . . 9
2
DESCRIPTION
2.1
2.2
2.3
2.4
2.5
2.6
2.7
2.8
2.9
Box contents . . . . . . . . . . . . . . . . . . . . . . . . . . . . . . . . . . . . . . . . . . . . . . . . . . . . . . . . . . . . . . . . . . . . . . 11
Device components: external views . . . . . . . . . . . . . . . . . . . . . . . . . . . . . . . . . . . . . . . . . . . . . . . . . . . . 15
Device components: keys and connectors panel . . . . . . . . . . . . . . . . . . . . . . . . . . . . . . . . . . . . . . . . . . 19
Device components: internal views . . . . . . . . . . . . . . . . . . . . . . . . . . . . . . . . . . . . . . . . . . . . . . . . . . . . 20
Product label . . . . . . . . . . . . . . . . . . . . . . . . . . . . . . . . . . . . . . . . . . . . . . . . . . . . . . . . . . . . . . . . . . . . . . 22
Key functions: power up . . . . . . . . . . . . . . . . . . . . . . . . . . . . . . . . . . . . . . . . . . . . . . . . . . . . . . . . . . . . . 23
Key functions: standby . . . . . . . . . . . . . . . . . . . . . . . . . . . . . . . . . . . . . . . . . . . . . . . . . . . . . . . . . . . . . . 25
StatusLEDlashes . . . . . . . . . . . . . . . . . . . . . . . . . . . . . . . . . . . . . . . . . . . . . . . . . . . . . . . . . . . . . . . . . 26
Display messages . . . . . . . . . . . . . . . . . . . . . . . . . . . . . . . . . . . . . . . . . . . . . . . . . . . . . . . . . . . . . . . . . . 27
3
INSTALLATION . . . . . . . . . . . . . . . . . . . . . . . . . . . . . . . . . . . . . . . . . . . . . . . . . . . . . . . . . . . . . . . 29
. . . . . . . . . . . . . . . . . . . . . . . . . . . . . . . . . . . . . . . . . . . . . . . . . . . . . . . . . . . . . . . 11
3.1 Fastening . . . . . . . . . . . . . . . . . . . . . . . . . . . . . . . . . . . . . . . . . . . . . . . . . . . . . . . . . . . . . . . . . . . . . . . . 29
3.2 Near paper end sensor . . . . . . . . . . . . . . . . . . . . . . . . . . . . . . . . . . . . . . . . . . . . . . . . . . . . . . . . . . . . . . 34
3.3 Connections . . . . . . . . . . . . . . . . . . . . . . . . . . . . . . . . . . . . . . . . . . . . . . . . . . . . . . . . . . . . . . . . . . . . . . 36
3.4 Pinout . . . . . . . . . . . . . . . . . . . . . . . . . . . . . . . . . . . . . . . . . . . . . . . . . . . . . . . . . . . . . . . . . . . . . . . . . . . 38
3.5 Driver and SDK . . . . . . . . . . . . . . . . . . . . . . . . . . . . . . . . . . . . . . . . . . . . . . . . . . . . . . . . . . . . . . . . . . . . 42
4
OPERATION . . . . . . . . . . . . . . . . . . . . . . . . . . . . . . . . . . . . . . . . . . . . . . . . . . . . . . . . . . . . . . . . . . 43
4.1
4.2
4.3
4.4
4.5
4.6
Opening cover . . . . . . . . . . . . . . . . . . . . . . . . . . . . . . . . . . . . . . . . . . . . . . . . . . . . . . . . . . . . . . . . . . . . 43
Adjusting paper width . . . . . . . . . . . . . . . . . . . . . . . . . . . . . . . . . . . . . . . . . . . . . . . . . . . . . . . . . . . . . . . 45
Adjusting the alignment sensors . . . . . . . . . . . . . . . . . . . . . . . . . . . . . . . . . . . . . . . . . . . . . . . . . . . . . . . 46
Switch the device ON . . . . . . . . . . . . . . . . . . . . . . . . . . . . . . . . . . . . . . . . . . . . . . . . . . . . . . . . . . . . . . . 48
Loading the paper roll . . . . . . . . . . . . . . . . . . . . . . . . . . . . . . . . . . . . . . . . . . . . . . . . . . . . . . . . . . . . . . . 51
Issuing ticket (models with presenter) . . . . . . . . . . . . . . . . . . . . . . . . . . . . . . . . . . . . . . . . . . . . . . . . . . 54
5
CONFIGURATION. . . . . . . . . . . . . . . . . . . . . . . . . . . . . . . . . . . . . . . . . . . . . . . . . . . . . . . . . . . . 59
5.1
5.2
5.3
5.4
5.5
5.6
Conigurationmode . . . . . . . . . . . . . . . . . . . . . . . . . . . . . . . . . . . . . . . . . . . . . . . . . . . . . . . . . . . . . . . . 59
Setup report . . . . . . . . . . . . . . . . . . . . . . . . . . . . . . . . . . . . . . . . . . . . . . . . . . . . . . . . . . . . . . . . . . . . . . 60
Device status . . . . . . . . . . . . . . . . . . . . . . . . . . . . . . . . . . . . . . . . . . . . . . . . . . . . . . . . . . . . . . . . . . . . . 62
Printer parameters . . . . . . . . . . . . . . . . . . . . . . . . . . . . . . . . . . . . . . . . . . . . . . . . . . . . . . . . . . . . . . . . . 63
Ethernet parameters . . . . . . . . . . . . . . . . . . . . . . . . . . . . . . . . . . . . . . . . . . . . . . . . . . . . . . . . . . . . . . . . 68
Hexadecimal dump . . . . . . . . . . . . . . . . . . . . . . . . . . . . . . . . . . . . . . . . . . . . . . . . . . . . . . . . . . . . . . . . . 69
7
6
MAINTENANCE . . . . . . . . . . . . . . . . . . . . . . . . . . . . . . . . . . . . . . . . . . . . . . . . . . . . . . . . . . . . . . 71
6.1
6.2
6.3
6.4
6.5
Printer paper jam . . . . . . . . . . . . . . . . . . . . . . . . . . . . . . . . . . . . . . . . . . . . . . . . . . . . . . . . . . . . . . . . . . 71
Cutter paper jam . . . . . . . . . . . . . . . . . . . . . . . . . . . . . . . . . . . . . . . . . . . . . . . . . . . . . . . . . . . . . . . . . . . 72
Planning of cleaning operations . . . . . . . . . . . . . . . . . . . . . . . . . . . . . . . . . . . . . . . . . . . . . . . . . . . . . . . 74
Cleaning . . . . . . . . . . . . . . . . . . . . . . . . . . . . . . . . . . . . . . . . . . . . . . . . . . . . . . . . . . . . . . . . . . . . . . . . . 75
Upgradeirmware . . . . . . . . . . . . . . . . . . . . . . . . . . . . . . . . . . . . . . . . . . . . . . . . . . . . . . . . . . . . . . . . . . 79
7
SPECIFICATION
7.1
7.2
7.3
7.4
7.5
7.6
7.7
7.8
7.9
Hardwarespeciications . . . . . . . . . . . . . . . . . . . . . . . . . . . . . . . . . . . . . . . . . . . . . . . . . . . . . . . . . . . . . 81
CharacterspeciicationsinCUSTOM/POSemulation . . . . . . . . . . . . . . . . . . . . . . . . . . . . . . . . . . . . . . 84
Device dimensions . . . . . . . . . . . . . . . . . . . . . . . . . . . . . . . . . . . . . . . . . . . . . . . . . . . . . . . . . . . . . . . . . 85
Device dimensions with paper roll holder . . . . . . . . . . . . . . . . . . . . . . . . . . . . . . . . . . . . . . . . . . . . . . . . 89
Dimensions of paper roll holder cod. 963GE020000003 . . . . . . . . . . . . . . . . . . . . . . . . . . . . . . . . . . . . 91
Dimensions of power supply cod. 963GE020000003 . . . . . . . . . . . . . . . . . . . . . . . . . . . . . . . . . . . . . . . 92
Paperspeciication . . . . . . . . . . . . . . . . . . . . . . . . . . . . . . . . . . . . . . . . . . . . . . . . . . . . . . . . . . . . . . . . . 93
Character sets in CUSTOM/POS emulation . . . . . . . . . . . . . . . . . . . . . . . . . . . . . . . . . . . . . . . . . . . . . . 95
Character sets in SVELTA emulation . . . . . . . . . . . . . . . . . . . . . . . . . . . . . . . . . . . . . . . . . . . . . . . . . . . 97
8
CONSUMABLES . . . . . . . . . . . . . . . . . . . . . . . . . . . . . . . . . . . . . . . . . . . . . . . . . . . . . . . . . . . . . 99
9 ACCESSORIES
. . . . . . . . . . . . . . . . . . . . . . . . . . . . . . . . . . . . . . . . . . . . . . . . . . . . . . . . . . . . . 81
. . . . . . . . . . . . . . . . . . . . . . . . . . . . . . . . . . . . . . . . . . . . . . . . . . . . . . . . . . . . . 101
10 ALIGNMENT. . . . . . . . . . . . . . . . . . . . . . . . . . . . . . . . . . . . . . . . . . . . . . . . . . . . . . . . . . . . . . . . 103
10.1
10.2
10.3
10.4
Enable alignment . . . . . . . . . . . . . . . . . . . . . . . . . . . . . . . . . . . . . . . . . . . . . . . . . . . . . . . . . . . . . . . . 104
Calibration . . . . . . . . . . . . . . . . . . . . . . . . . . . . . . . . . . . . . . . . . . . . . . . . . . . . . . . . . . . . . . . . . . . . . . 107
Alignment parameters . . . . . . . . . . . . . . . . . . . . . . . . . . . . . . . . . . . . . . . . . . . . . . . . . . . . . . . . . . . . . 110
Printing area . . . . . . . . . . . . . . . . . . . . . . . . . . . . . . . . . . . . . . . . . . . . . . . . . . . . . . . . . . . . . . . . . . . . 114
11 TECHNICAL SERVICE
. . . . . . . . . . . . . . . . . . . . . . . . . . . . . . . . . . . . . . . . . . . . . . . . . . . . 117
12 ADVANCED FUNCTIONS . . . . . . . . . . . . . . . . . . . . . . . . . . . . . . . . . . . . . . . . . . . . . . . . . 119
12.1 File sharing . . . . . . . . . . . . . . . . . . . . . . . . . . . . . . . . . . . . . . . . . . . . . . . . . . . . . . . . . . . . . . . . . . . . . 119
12.2 Drivers installation . . . . . . . . . . . . . . . . . . . . . . . . . . . . . . . . . . . . . . . . . . . . . . . . . . . . . . . . . . . . . . . 119
12.3 Logos management . . . . . . . . . . . . . . . . . . . . . . . . . . . . . . . . . . . . . . . . . . . . . . . . . . . . . . . . . . . . . . 120
12.4 Fonts management . . . . . . . . . . . . . . . . . . . . . . . . . . . . . . . . . . . . . . . . . . . . . . . . . . . . . . . . . . . . . . . 120
12.5 Setup . . . . . . . . . . . . . . . . . . . . . . . . . . . . . . . . . . . . . . . . . . . . . . . . . . . . . . . . . . . . . . . . . . . . . . . . . 121
8
1
INTRODUCTION
1.1
Document structure
This document includes the following chapters:
1
INTRODUCTION
information about this document
2
DESCRIPTION
general description of device
3
INSTALLATION
information required for a correct installation of the device
4
OPERATION
information required to make the device operative
5 CONFIGURATION
descriptionoftheconigurationparametersofthedevice
6
information for a correct periodic maintenance
MAINTENANCE
7 SPECIFICATION
technicalspeciicationforthedeviceanditsaccessories
8
CONSUMABLES
description and installation of the available consumables for the device
9
ACCESSORIES
description and installation of the available accessories for the device
10 ALIGNMENT
information required for managing the paper alignment
11 TECHNICAL SERVICE
information required for contacting the technical service
12 ADVANCED FUNCTIONS
information about special functions available with the device
1.2
Explanatory notes used in this manual
NOTE:
Gives important information or suggestions relative to the use of the device
ATTENTION:
Gives information that must be carefully followed to guard against damaging the
device
DANGER:
Gives information that must be carefully followed to guard against operator injury or
damage
9
10
2
DESCRIPTION
2.1
Box contents
Remove the device from its carton being careful not to damage the packing material so that it may be re-used if the device
is to be transported in the future.
Make sure that all the components illustrated below are present and that there are no signs of damage. If there are, contact
Customer Service.
KPM180H (standard models)
1. Installation instruction sheet
2. Device
3. Reducer for paper width
4. External near paper end sensor
with cable
1
2
3
4
11
KPM180H (models with presenter)
1. Device
2. Installation instruction sheet
3. Reducer for paper width
4. External near paper end sensor
with cable
1
2
3
12
4
TK180 (metallic models)
1. Short guide
2. Device
3. AC adapter
4. Reducer for paper width
5. Serial cable
6. USB cable
7. External near paper end sensor
with cable
1
2
3
7
6
4
5
13
TK180 (plastic models)
1. Short guide
2. Device
3. AC adapter
4. Reducer for paper width
5. AC power cable
1
2
3
5
4
•
Open the device packaging.
•
Take out the device.
•
Take out the rest of the content.
•
Keep the box, trays and packing materials in the event the device must be transported/shipped in the future.
14
2.2
Device components: external views
KPM180H (standard models)
1. Device chassis
5
2. Device cover
4
3
2
1
3. Opening lever for device
1. Paper out
2. Status LED
3. LF LINE FEED key
4. FF FORM FEED key
5. Paper input
6. Adjustable cursor for paper in
7. Keys and connectors panel
(see following paragraphs)
8. Product label
6
7
8
9
10
11
15
KPM180H (models with presenter)
1. Device chassis
5
2. Device cover
3. Opening lever for device
4. Opening lever for presenter
5. Paper out
6. Status LED
7. LF LINE FEED key
8. FF FORM FEED key
9. Presenter chassis
10. Paper input
11. Adjustable cursor for paper in
12. Keys and connectors panel
(see following paragraphs)
13. Product label
6
7
8
9
10
11
12
13
16
4
3
2
1
TK180 (metallic models)
1. Device chassis
4
2. Device cover
3
2
1
3. Paper out
4. Display
5. Paper input
6. Adjustable cursor for paper in
7. Keys and connectors panel
(see following paragraphs)
5
6
7
17
TK180 (plastic models)
1. Connectors cover
4
2. Display
3. Paper out
4. LF LINE FEED key
5. FF FORM FEED key
6. ON/OFF key
7. Device cover
8. Opening lever for device
9. Paper input
10. Adjustable cursor for paper in
11. Keys and connectors panel
(see following paragraphs)
12. Device chassis
5
6
7
8
9
10
11
12
18
3
2
1
2.3
Device components: keys and connectors panel
Models without ETHERNET port
1. ON/OFF key (only for KPM180H
and metallic TK180)
2. Connector for near paper end sensor (external)
3. RS232 serial port (DB9)
4. USB port
5. Power supply port
6. Status LED
7. FF FORM FEED key
1
2
1
2
3
4
5
6
7
8
5
6
7
8
9
8. LF LINE FEED key
Models with ETHERNET port
1. ON/OFF key (only for KPM180H
and metallic TK180)
2. Connector for near paper end sensor (external)
3. RS232 serial port (RJ45)
4. ETHERNET port
5. USB port
6. Power supply port
7. Status LED
3
4
8. FF FORM FEED key
9. LF LINE FEED key
19
2.4
Device components: internal views
KPM180H (standard models), TK180
1. Printing head with temperature sensor
2. Upper mobile sensor for detecting black mark on the thermal side of paper or hole between tickets
3. Lower mobile sensor for detecting black mark on the thermal side of paper or hole between tickets
4. Sensors for detecting paper in presence
5. Sensor for cover opening detection
6. Sensors for detecting paper out presence
4
5
6
6
20
4
3
2
1
KPM180H (models with presenter)
1. Printing head with temperature sensor
2. Upper mobile sensor for detecting black mark on the thermal side of paper or hole between tickets
3. Lower mobile sensor for detecting black mark on the thermal side of paper or hole between tickets
4. Sensors for detecting paper in presence
5. Sensor for detecting the opening of device cover
6. Sensor for detecting the opening of presenter cover
7. Sensors for detecting paper out presence
4
4
3
2
1
5
6
7
7
21
2.5
Product label
PC = Product code (14 digits)
SN = Serial number
HW = Hardware release
XXXXXXXXXXXXXX
Rx
0000000000000000000
PC
22
SN
HW
2.6
Key functions: power up
Models without ETHERNET port
POWER UP
Hold down
LF
Hold down
FF
LF
printing
SETUP report
Fast push
LF
FF
enter the SETUP MODE
Fast push
LF
FF
modify
selected parameter
FF
printing
FONT TEST
Fast push
LF
FF
skip the
SETUP MODE
Fast push
LF
FF
next
parameter
23
Models with ETHERNET port
POWER UP
Hold down
LF
Hold down
FF
LF
printing
SETUP report
printing
FONT TEST
Fast push
LF
Fast push
FF
LF
Fast push
Fast push
FF
LF
print the report and enter the
SETUP PROCEDURE
for ETHERNET parameters
Fast push
LF
FF
modify
selected parameter
24
Fast push
FF
next
parameter
FF
enter the
SETUP PROCEDURE
for printer parameters
Fast push
LF
FF
skip the
SETUP MODE
enter the SETUP MODE
LF
FF
LF
FF
modify
selected parameter
Fast push
LF
FF
next
parameter
2.7
Key functions: standby
STANDBY
Fast push
LF
Fast push
FF
LF
FF
Advance the paper
(preset length)
Is the
“Notch/B.Mark
Position” parameter
set on “Disabled”?
(see Setup)
NO
YES
printing
demo ticket
perform the
ticket alignment
25
2.8 Status LED lashes
The Status LED indicates hardware status of device. Given in the table below are the various LED signals and the corresponding device status.
STATUS LED
DESCRIPTION
-
OFF
DEVICE OFF
GREEN
ON
DEVICE ON: NO ERROR
x1
RECEIVE DATA
x2
RECEPTION ERRORS
(PARITY, FRAME ERROR, OVERRUN ERROR)
x3
COMMAND NOT RECOGNIZED
x4
COMMAND RECEPTION TIME OUT
x2
HEADING OVER TEMPERATURE
x3
PAPER END
x4
PAPER JAM
x5
POWER SUPPLY VOLTAGE INCORRECT
x6
COVER OPEN
3x
RAM ERROR
GREEN
COMMUNICATION
STATUS
YELLOW
RECOVERABLE
ERROR
RED
UNRECOVERABLE
ERROR
26
2.9
Display messages
TK180
The display indicates the hardware status of device. Given in the table below are the various display messages and the
corresponding device status.
PRINTER READY
RECEIVING DATA
Device ON: no error
Receive data
RS232 RX ERROR
Reception errors
(parity, frame error, overrun error)
PRINTHEAD
OVERTEMP
Heading over temperature
COMMAND ERROR
Command not recognized
END PAPER
Paper end
PAPER JAM
POWER VOLTAGE ERROR
Paper jam
Power supply voltage incorrect
COVER OPEN
RAM ERROR
Cover open
RAM error
EEPROM ERROR
PRINT TICKET ERROR
EEPROM error
Notch alignment error
PRINTING DOCUMENT
Printing in progress
27
28
3
INSTALLATION
3.1
Fastening
NOTE:Allthedimensionsshowninfollowingiguresareinmillimetres.
KPM180H (standard models)
Thedeviceisprovidedwithfourixingholesonthebottomofdevice(seefollowingigure).Tofastenthedeviceonapanel,
use four M3 screws.
66
90
10
A
A
4 x M3
Device chassis
SP
max 10
It'sveryimportanttoconsiderthescrewslengthnottodamagetheinternalcomponentsplacedneartheixingholes(see
followingigure).
Fixing panel
Section A-A
Fixing screw
Thescrewlength(L)willbecalculatedaccordingtothethicknessofthepanel(Sp)onwhichthedeviceisixed,asfollows:
L≤10mm+Sp
For example, if panel thickness is 10mm (Sp = 10mm), the maximum length for screws will be 20mm.
29
KPM180H (models with presenter)
Thedeviceisprovidedwithsixixingholesonthebottomofdevice(seefollowingigure).Tofastenthedeviceonapanel,
use six M3 screws.
32.5
30
66
B
B
A
B
B
90
A
6 x M3
Additionally, the panel must provide an opening for dust of paper that meets the following measures (in millimetres):
45
min. 34
45
7.5
min. 9
30
max 10
Fixing panel
Detail A
Device chassis
SP
Device chassis
SP
max 5
Itisveryimportanttoconsiderthescrewslengthnottodamagetheinternalcomponentsplacedneartheixingholes(see
followingigure).
Fixing screw
Fixing panel
Detail B
Fixing screw
Thescrewlength(L)willbecalculatedaccordingtothethicknessofthepanel(Sp)onwhichthedeviceisixed,asfollows:
L≤5mm+Sp(DetailA)
L≤10mm+Sp(DetailB)
For example, if panel thickness is 10mm (Sp = 10mm), The maximum screw length will be 15mm (detail A) or 20mm (detail B).
31
TK180 (plastic models)
The device is provided with two slots for the mounting of the machine on a panel.
Theslotsareplacedatthebottomofthemachine(seefollowingigure)
58.5
71.43
24
32
2.5
2.9
52.9
90.9
90
42
8
Ø
Ø
4
7.5
Additionally, the panel can provide an opening for the passage of the connection cables that meets the hole at the bottom
ofthedevice.Themeasures(inmillimeters)oftheopeningareshowninthefollowingigure:
24
45
42
45
58.5
33
3.2
Near paper end sensor
KPM180H
Thedeviceincludesanearpaperendsensorwiththecable(seefollowingigure).Toixthesensor,useanM3screwnot
supplied.
MATERIAL NOT
INCLUDED
MATERIAL INCLUDED
NPE sensor
NPE sensor board
Fixing screw M3
Connector
NPE wiring
For the assembly procedure, proceed as follows:
1
B
A
NPE wiring
Spacers
A+B
NPE sensor
Paper roll
NPE sensor board
Support
1÷6 mm
Fix the near paper end sensor board to the support by using an M3 screw not included.
For the correct functioning of the near paper end sensor, comply with the measures specified.
34
2
NPE wiring
Connect the wiring coming from the near paper end sensor board
at the connector shown in figure.
35
3.3
Connections
Thefollowingigureshowsthepossibleconnectionsforthedevice.
Models without ETHERNET port
RS232
Serial
standard cable
(supplied with
metallic TK180)
PC
serial device
USB
standard cable
(supplied with
metallic TK180)
PC
USB device
POWER
Power supply cable
(included)
Power supply
ATTENTION: In some conditions, we recommend the installation of a ferrite core on the power supply cable.
NOTES: If serial and USB connectors are inserted, communication port is USB.
For some models, only the internal printer group is represented.
36
Models with ETHERNET port
RS232
ETH
POWER
Serial
standard cable
USB
standard cable
ETHERNET
CrossOver
standard cable
PC
serial device
ETHERNET UTP
standard cable
(pin-to-pin)
PC
HUB
PC
USB device
Power supply
cable
(included)
Power supply
ATTENTION: In some conditions, we recommend the installation of a ferrite core on the power supply cable.
NOTES: If serial and USB connectors are inserted, communication port is USB.
For some models, only the internal printer group is represented.
37
3.4
Pinout
2
1
3
POWER SUPPLY
Tripolar female connector
4
1 GND
2 +24 Vdc
J20
3 GND
4 Frame GND
ATTENTION:
Respect power supply polarity.
NOTE:
Power supply cable
Thefollowingigureshowstheconnectorpinoutofthepowersupplycableforthedevice:
Tripolar male connector
n.c.
GND
Power supply cable
2
1
USB INTERFACE
Female USB type B connector
3
4
1 USB0-VBUS
J2
2 USB0_D-
(in/out)
3 USB0_D+
(in/out)
4 GND
SH1 SHIELD
SH2 SHIELD
38
(in)
+24 V
Models without ETHERNET port
5
9
1
6
RS232 SERIAL INTERFACE
Female DB9 connector
1 DTR
2 TX
During transmission, takes the values “0” and “1” depending on data.
3 RX
During reception, takes the values “0” and “1” depending on data.
4 DSR
J1
5 GND
6 DTR
When “1”, device is power on.
7 CTS
8 RTS
When “1”, device is ready to receive data
9 n.c.
NOTES:
Given the presence of the RS232 standard, logic value “0” corresponds to a voltage level of between +3Vdc and +15Vdc
and logic value “1” corresponds to a voltage level of between -3Vdc and -15Vdc.
1
2
3
4
5
6
7
8
9
DEVICE
DTR
DCD
TXD
RXD
RXD
TXD
DSR
DTR
GND
GND
DTR
CTS
DSR
RTS
RTS
CTS
1
2
3
4
5
6
7
8
9
DB9
DB9
DEVICE > PC connection
The following picture shows an example of connection between the device and a personal computer using a 9 pin
RS232 serial connector:
PC
When use a serial cable, we recommend the installation of a ferrite core on the power supply cable.
39
Models with ETHERNET port
1
8
RS232 SERIAL INTERFACE
Female RJ45 connector
1 DTR
2 TX
(out)
During transmission, takes the values “0” and “1” depending on data
3 RX
(in)
During reception, takes the values “0” and “1” depending on data
4 DR
J1
5 GND
6 DT
When “1”, device is power on
7 CT
8 RTS
(out)
When “1”, device is ready to receive data
NOTES:
Given the presence of the RS232 standard, logic value “0” corresponds to a voltage level of between +3Vdc and +15Vdc
and logic value “1” corresponds to a voltage level of between -3Vdc and -15Vdc.
1
2
3
4
5
6
7
8
DEVICE
DTR
DCD
TXD
RXD
RXD
TXD
DSR
DTR
GND
GND
DTR
CTS
DSR
RTS
RTS
CTS
1
2
3
4
5
6
7
8
9
DB9
RJ45
DEVICE > PC connection
The following picture shows an example of connection between the device and a personal computer using an 8 pin
RJ45 male and a 9 pin RS232 serial connector:
PC
When use a serial cable, we recommend the installation of a ferrite core on the power supply cable.
40
1
8
ETHERNET INTERFACE
Female RJ45 connector
1 RX +1
2 +3.3V ETH
3 RX -1
4 TX +1
5 +3.3V ETH
6 TX -1
7 n.c
J23
8 GND
9 +3.3 V
10 LED-LNK
11 +3.3 V
12 LED-LAN
13 Shield
14 Shield
NOTES:
ThefunctionalityoftwoLEDarespeciiedinthefollowingtables:
- For 10Base-T connection:
LED
FUNCTION
LED-LNK
Link (yellow color): the LED lights up when a connection is active
LED-LAN
Rx/Tx: (green color): the LED lights up when occurs a data reception or transmission
- For 10/100Base-TX connection:
LED
FUNCTION
LED-LNK
TheLEDlight(yellowcolor)onwhenaconnectionisactiveandlasheswnenoccursadata
reception or transmission
LED-LAN
The LED light (green color) on when occurs a 100Mbit connection and off when occurs a
10Mbit connection
The device automatically recognizes the type of connection (cross or pin-to-pin).
The pinout shown in table represents the input signals to component J23 before the isolation voltage transformer
(through-hole pin).
41
3.5
Driver and SDK
The drivers are available for the following operating system:
OPERATING
SYSTEM
DESCRIPTION
INSTALLATION PROCEDURE
Driver for Windows XP
Driver for Windows VISTA (32/64bit)
Windows
Driver for Windows 7 (32/64bit)
From the START menu, press Run
and type-in the path where the SW
was saved on your PC, then click OK.
Follow the instructions that appear
on the screen to install the driver.
Driver for Windows 8 (32/64bit)
Linux
Android
iOS
(32/64bit)
Follow the instruction get back on the
README.TXTile.Youcaninditinthe
software package downloaded in advance.
SDK for CustomAndroidAPI
Extract the zipped folder to
the destination path desired.
Follow the instructions present
in the software package that you
downloaded on how to install
and use the SDK
SDK for CustomiOSApi
Extract the zipped folder to
the destination path desired.
Follow the instructions present
in the software package that you
downloaded on how to install
and use the SDK
NOTE:
All drivers can be found in the DOWNLOAD section of the web site www.custom.biz.
42
4
OPERATION
4.1
Opening cover
KPM180H
TK180 (plastic models)
1
1
Push the release lever
in the direction shown in the figure.
2
Push the release lever
in the direction shown in the figure.
2
Open the
device cover.
Open the
device cover.
43
TK180 (metallic models)
1
3
Open the
metallic cover.
Open the
device cover.
2
Push the opening lever
shown in figure.
44
4.2
Adjusting paper width
Paperwidthmaybeadjustedfrom25mmto82.5mmbymovingtheadjustablecursorasshowninthefollowingigure.
90°
To manage paper width from 20 mm to
25 mm, apply the spacer on the mobile
paperguide(seefollowingigure),then
adjust the paper width.
NOTE: For some models, only the internal printer group is represented.
45
4.3
Adjusting the alignment sensors
The device is equipped with two mobile sensors for the detection of the alignment black mark placed both on the thermal
sideandonthenon-thermalsideofpaperasshowninthefollowingigure.
The user will need to manually move these mobile sensors according to the position and the type of the black mark on
the paper (see next paragraphs).
To use these sensors, you must set the “Notch/B.Mark Position” setup parameter on the correct value (see Chapter 5).
NOTE: For some models, only the internal printer group is represented.
UPPER
MOBILE SENSOR
dir
ec
pa
pe of tion
rf
ee
d
LOWER
MOBILE SENSOR
THERMAL SIDE
NON-THERMAL SIDE
46
To adjust the mobile sensors position according to the black mark position and type on paper, open the device cover (see
par.4.1) and move the sensors to the desired position using a small screwdriver or a pointed object.
ATTENTION:
To avoid damaging the sensor, use the plastic tabs
as foothold for the screwdriver to push the sensor
in the desired position.
47
4.4
Switch the device ON
KPM180H
3
1
Power supply cable
(supplied)
EXTERNAL POWER
SUPPLY UNIT
(OPTIONAL)
ON/OFF
Switch device On
pressing the ON/OFF key.
Connect the power supply cable
to an external power supply unit.
2
4
IN DC 24V
1.5A
The green leds (front and rear) turn on
and the device is ready.
Power supply cable
(supplied)
Connect the power supply cable to the device.
Use the type of electrical power supply
indicated on the label.
48
TK180 (metallic models)
1
IN DC 24V
1.5A
Power supply cable
(supplied)
VIn 24Vdc
Connect the power adapter (supplied) to the device and the mains outlet.
Use the type of electrical power supply indicated on the label.
2
ON/OFF
Switch device on pressing the ON/OFF key.
The display turns on and shows the message in figure.
49
TK180 (plastic models)
3
1
ON/OFF
Remove the connector cover
by sliding it in the direction shown.
2
Switch device on pressing the ON/OFF key.
The display turns on and
shows the message in figure.
VIn 24Vdc
IN DC 24V
1.5A
Connect the power adapter (supplied) to the device and
the mains outlet. Use the type of electrical power supply
indicated on the label.
50
4.5
Loading the paper roll
To change the paper proceed as follows. At every change of paper, check inside the device to locate and remove any
scraps of paper.
NOTE: For some models, only the internal printer group is represented.
1
3
Close the
device cover.
Open the device cover
(see previous paragraphs).
4
2
thermal side
thermal side
Adjust the paper width and the notch sensors
position (see previous paragraphs).
Insert the paper into the input mouth so that it unrolls
correctly. Be sure that the paper is
correctly positioned into paper guides.
51
6
thermal side
VROOM
thermal side
VROOM
Wait until the paper is
automatically loaded.
52
Thefollowingiguregivesthelimitpositionsofthepaperrollrelatedtothedeviceforacorrectpaperloadingwithouta
paper roll holder support.
The direction of the paper will always form a maximum angle of 90 ° or -90 ° with the insertion plane of paper inside the
device.
90°
Paper with thermal side
on outside of roll
-90°
90°
-90°
Paper with NON-thermal side
on outside of roll
NOTE: For some models, only the internal printer group is represented.
53
4.6
Issuing ticket (models with presenter)
The device allows you to choose between different operating modes for the issuance of printed tickets.
Theoperatingmodesshowninthefollowingimages,dependonthesettingsoftheconigurationparametersandcommands sent to the device.
“EJECT” mode
1
Paper input
Printing head
min 45°
The device starts the ticket printing
2
Cutter
Ejector rollers
min 45°
When printing ends, the device cuts the ticket printed
54
3
Ejector rollers
Paper output
Ticket ejected
min 45°
The device directly ejects the ticket
55
“PRESENT” mode
1
Printing head
Paper input
The device starts the ticket printing
2
Ejector rollers
Cutter
When printing ends, the device cuts the ticket printed
56
3
Ticket presented
Paper output
Ejector rollers
The device presents a portion of the ticket printed on the paper mouth
4
Ticket withdrawn
Paper output
The user withdraws the ticket from the paper mouth
57
58
5
CONFIGURATION
5.1 Coniguration mode
ToentertheconigurationmodeandprintaSETUPreportwiththeoperatingparametersofthedevice,proceedasfollows.
1
ON/OFF
KEY
+
LF LINE FEED
KEY
ON/OFF
KEY
+
LF LINE FEED
KEY
LF
FF
LF
rear keys
FF
front keys
While pressing the LF LINE FEED key,
switch on the device by pressing the ON/OFF key.
2
PRINTER SETUP
The device prints the report with the settings parameters. Follow the instruction printed on the paper
or shown on display to proceed with configuration procedure.
59
5.2
Setup report
Thefollowingigureshowsthesetupreportofthedevice.Theshownvaluesforparametersaresamplevalues;forthelist
and the description of device parameters see the following paragraphs.
DEVICE NAME and
FIRMWARE MODULES
RELEASE
<device name>
SCODE. <code>
- rel 1.00
DCODE. <code>
- rel 1.00
FCODE. <code>
- rel 1.00
PRINTER SETTINGS
PRINTING HEAD
STATUS
DEVICE
STATUS
PRINTER
PARAMETERS
KEYS FUNCTIONS
60
1 «••••••••»640
---------------------------------------------------------------------------PRINTHEAD WORKING GOOD!
PRINTER TYPE ....................................<device model>
PRINTING HEAD TYPE ........................<head model>
INTERFACE ..........................................RS232
PROGRAM MEMORY TEST.................OK
DYNAMIC RAM TEST...........................OK
EXTERNAL MEMORY TEST ................OK
CUTTER TEST......................................OK
HEAD VOLTAGE
[V] = 23,37
HEAD TEMPERATURE
[°C] = 25
POWERONCOUNTER
= 4
PAPERPRINTED
[cm] = 40
CUT COUNTER
= 1
Printer Emulation ............................. :
RS232 Baud Rate ........................... :
RS232 Data Length ......................... :
RS232 Parity ................................... :
RS232 Handshaking ....................... :
Busy Condition ................................ :
USB Mass Storage .......................... :
USB Address Number ..................... :
USB Virtual COM............................. :
Print Mode ....................................... :
Autofeed .......................................... :
Code Table [num] ............................ :
Chinese Font .................................. :
Chars / inch ..................................... :
Speed / Quality................................ :
Print Width ....................................... :
Paper Threshold .............................. :
Notch/B.Mark Position ..................... :
Notch/B.Mark Threshold.................. :
Notch Distance [mm] ....................... :
Notch/B.Mark Min.Width.................. :
Ticket Locking.................................. :
Ticket Management ......................... :
PrintHead Test PowerOn ................. :
Casing Type..................................... :
Print Density.................................... :
[ LF ]
[ FF ]
enter Setup
skip Setup
CUSTOM/POS
115200 bps
8 bits/chr
None
Hardware
RxFull
Disabled
0
Disabled
Normal
CR Disabled
0
Disabled
A=15 B=20 cpi
Normal
80 mm
40%
Bottom
40%
+00.0
0 mm
Disabled
Disabled
Disabled
Plastic
0%
Models with ETHERNET port
ThefollowingigureshowsthesetupreportoftheETHERNETparameters.Theshownvaluesforparametersaresample
values;forthelistandthedescriptionofdeviceparametersseethefollowingparagraphs.
ETH. SPEED = 10Mb/s
DHCP Client ............................... : Disabled
ETHERNET
PARAMETERS
IP Address .................................. : 192.168. 0. 1
Subnet Mask .............................. : 255.255.240. 0
Default Gateway ........................ : 192.168. 0. 5
MAC Address ............................. : 00-0E-E2-0A-D2-D0
KEYS FUNCTIONS
[ LF ]
[ FF ]
to modify parameter
for next parameter
61
5.3
Device status
Thedeviceoperatingstatusisindicatedintheconigurationprint-outinwhich,nexttothenameofthecomponentsdisplayed, the following information is given:
PRINTER TYPE
device model
PRINTING HEAD TYPE
print head model
INTERFACE
interface present
PROGRAM MEMORY TEST
OK appears if functioning and NOT OK if faulty
DYNAMIC RAM TEST
OK appears if functioning and NOT OK if faulty
EXTERNAL MEMORY TEST
OK appears if functioning and NOT OK if faulty
CUTTER TEST *
OK appears if functioning and NOT OK if faulty
HEAD VOLTAGE
voltage of the head
HEAD TEMPERATURE
temperature of the head
POWER ON COUNTER
number of power-ups made
PAPER PRINTED
centimetres of paper printed
CUT COUNTER *
number of cuts made
NOTE:
* : Only for KPM180H with presenter.
62
5.4
Printer parameters
Thedeviceallowstheconigurationoftheparameterslistedinthefollowingtable.
The parameters marked with the symbol D are the default values.
Settings remain active even after the device has been turned off and they are stored in non-volatile memory.
PRINTER EMULATION
Available emulations for the device:
SVELTA
CUSTOM/POS D
RS232 BAUD RATE
Communication speed of the serial interface:
115200 D
57600
38400
19200
9600
4800
2400
1200
NOTE: Parameter valid only with serial interface.
RS232 DATA LENGTH
Number of bit used for characters encoding:
7 bits/car
8 bits/car D
NOTE: Parameter valid only with serial interface.
RS232 PARITY
Bit for the parity control of the serial interface:
None D = parity bit omitted
Even = even value for parity bit
Odd =
odd value for parity bit
NOTE: Parameter valid only with serial interface.
RS232 HANDSHAKING
Handshaking:
XON/XOFF =
Hardware D =
software handshaking
hardware handshaking (CTS/RTS)
NOTES:
Parameter valid only with serial interface.
When the receive buffer is full, if handshaking is set to XON/XOFF, the device sends the XOFF (0x13) on the
serial port. When the receive buffer has cleared once again, if handshaking is set to XON/XOFF, the device
sends the XON (0x11) on the serial port.
BUSY CONDITION
Activation mode for Busy signal:
OffLine/ RXFull = Busy signal is activated when the device is both in OffLine status and
the buffer is full
RXFull D =
Busy signal is activated when the buffer is full
NOTE: Parameter valid only with serial interface.
63
USB MASS STORAGE
Sharing mode from Mass Storage:
Disabled D = sharing mode disabled
Enabled =
sharing mode enabled
USB ADDRESS NUMBER
Numerical address code for the univocal identiication of the USB device (in case of more
than a USB device connected with the same PC):
0D
1
USB VIRTUAL COM
2
3
4
5
6
7
8
9
Setting the USB port as a virtual serial port:
Disabled D
Enabled
= Virtual COM disabled
= Virtual COM enabled
NOTE:Tousethisconigurationitisnecessarytoinstallanaddictionaldriver.
PRINT MODE
Printing mode:
Normal D = enables printing in normal writing way
Reverse = enables printing rotated 180 degrees
AUTOFEED
Setting of the Carriage Return character:
CR disabled D = Carriage Return disabled
CR enabled = Carriage Return enabled
NOTE: The parameter is printed only with CUSTOM/POS emulation enabled.
CODE TABLE [num]
Identiier number of the character code table to use.
The numeric value of the identiier is made up with the following two parameters for the
setting of two digits for the tens and the units:
Setting the digit for tens:
CODE TABLE [num x 10]
0D
1
2
3
4
5
Setting the digit for units:
CODE TABLE [num x 1]
0D
1
2
3
4
5
6
7
8
9
NOTE:
Seethepar.7.8tolearnaboutthecharactertablescorrespondingtotheidentiicationnumberssetwiththis
parameter.
The character tables set with this parameter are the same set with the command 0x1B 0x74 (refer to the
Commands Manual of the device).
64
CHINESE FONT
Setting of the Chinese font:
Disabled D
Enabled
= Disables the use of the Chinese extended font GB18030-2000
= Enables the use of the Chinese extended font GB18030-2000
NOTE: When the Chinese font is enabled, the selection of the character code table is suspended (parameter
“CODE TABLE”). When the Chinese fonts is disabled, it returns the character code table previously in use
(parameter “CODE TABLE”).
CHARS / INCH
Font selection:
A = 11 cpi, B = 15 cpi
A = 15 cpi, B = 20 cpi D
A = 20 cpi, B = 15 cpi
NOTES:
CPI = Characters Per Inch
The parameter is printed only with CUSTOM/POS emulation enabled.
SPEED / QUALITY
Setting of printing speed and printing quality:
Normal D
High Quality
High Speed
PRINT WIDTH
Width of printing area:
18 mm
20 mm
22 mm
24 mm
26 mm
28 mm
30 mm
32 mm
PAPER THRESHOLD
50 mm
52 mm
54 mm
56 mm
58 mm
60 mm
62 mm
64 mm
66 mm
68 mm
70 mm
72 mm
74 mm
76 mm
78 mm
80 mm D
Threshold value (in percent) for the recognition of the presence of paper by the paper
presence sensor:
30%
40% D
50%
60%
NOTCH/B.MARK
POSITION
34 mm
36 mm
38 mm
40 mm
42 mm
44 mm
46 mm
48 mm
70%
80%
90%
Position of the alignment notch and choice of appropriate notch sensor:
Disabled D =
Top =
Bottom =
Transparent =
the notch alignment is not performed
the notch position is detected by the upper sensor (relection)
the notch position is detected by the lower sensor (relection)
the notch is detected by the lower sensor and the upper sensor placed
in front of (transparence)
65
NOTCH THRESHOLD
Threshold value (in percent) for the recognition of the presence of notch by the notch
sensor:
30%
40% D
50%
60%
70%
80%
90%
NOTE: If the “Notch/B.Mark position” parameter is disabled, this parameter is not printed.
NOTCH DISTANCE
“Notch Distance” is the minimum distance (in mm) between the upper edge of ticket and
the notch (see chapter 10).
The numeric value of the distance is made up with the following four parameters for the
setting of three digits (two for the integer part of the number, one for the decimal part
and of the sign):
Sign setting:
NOTCH DISTANCE SIGN
+ D = positive distance
-=
negative distance
Setting the digit for tens:
NOTCH DISTANCE [mm x 10]
0D
1
2
3
4
5
6
7
8
9
Setting the digit for units:
NOTCH DISTANCE [mm x 1]
0D
1
2
3
4
5
6
7
8
9
Setting the digit for decimals:
NOTCH DISTANCE [mm x .1]
0D
1
2
3
4
5
6
7
8
9
NOTES:
For example, to set the notch distance to 15 mm, modify the parameters as follows:
Notch Distance Sign
=+
Notch Distance [mm x 10] = 1
Notch Distance [mm x 1] = 5
Notch Distance [mm x .1] = 0
If the “Notch/B.Mark Position” parameter is disabled, the parameters for the “Notch Distance” are not printed.
66
NOTCH/B.MARK
MIN. WIDTH
Minimum length of the alignment notch:
0 mm D
1 mm
2 mm
3 mm
4 mm
5 mm
6 mm
7 mm
8 mm
9 mm
10 mm
11 mm
12 mm
13 mm
14 mm
15 mm
16 mm
17 mm
18 mm
19 mm
20 mm
NOTES:
If the “Notch/B.Mark Position” parameter is disabled, the parameter is not printed.
The parameter “Notch/B.Mark Min. Width” is used to set the notch dimensions in order to avoid that other
graphics present on the ticket can be detected as a Notch/B.Mark.
TICKET LOCKING
This parameter enables/disables the block of the paper inside the device where the ticket
is not cut with the cutter, but is presented for the manual tear off by the user:
Disabled D =
Enabled =
paper block disabled
paper block enabled
NOTE: If the “Notch/B.Mark Position” parameter is disabled, the parameter is not printed.
TICKET MANAGEMENT
This parameter allows the ticket management:
Disabled D = no check
Check First = before printing, the device checks the integrity of the irst ticket
CASING TYPE
Type of device casing:
Plastic D =
Metal =
plastic casing
metallic casing
NOTE:
The parameter is printed only for TK180 models.
PRINTHEAD TEST
POWERON
Setting of the performing of the print head test:
Disabled D = the test is performed only during the printing of the setup report
Enabled =
the test is performed at each power on
PRINT DENSITY
Adjusting the printing density:
-50%
-37%
-25%
-12%
0D
+12%
+25%
+37%
+50%
67
5.5
Ethernet parameters
Models with ETHERNET port
Thesedevicesallowtheconigurationoftheparameterslistedinthefollowingtable.
The parameters marked with the symbol D are the default values.
Settings remain active even after the device has been turned off and they are stored in non-volatile memory.
DHCP CLIENT
Setting of the DHCP protocol:
Disabled D = protocol disabled
Enabled =
protocol enabled
IP ADDRESS
IP address of device; this parameter is assigned by the network administrator.
NOTE: Press the FEED key to modify the value of the highlighted digit.
Pressing OPEN key to move the cursor on the next digit (if the cursor is on the latest digit, proceed to next
parameter by pressing the OPEN key).
SUBNET MASK
This parameter identiies the local network address.
NOTE: Press the FEED key to modify the value of the highlighted digit.
Pressing OPEN key to move the cursor on the next digit (if the cursor is on the latest digit, proceed to next
parameter by pressing the OPEN key).
DEFAULT GATEWAY
This parameter identiies the Gateway IP address used to send applications to the external
network.
NOTE: Press the FEED key to modify the value of the highlighted digit.
Pressing OPEN key to move the cursor on the next digit (if the cursor is on the latest digit, proceed to next
parameter by pressing the OPEN key).
DOMAIN NAME SYSTEM
This parameter identiies the Domain Name System (DNS).
NOTE:ThisparameterisnotprintedonSetupReport,becauseitisnotmodiiableduringtheSetupprocedure.Tosetthisparameter,entertheSetup.iniile(seepar.12.5).
TCP PRINTER PORT
This parameter sets the TCP port number.
NOTE:ThisparameterisnotprintedonSetupReport,becauseitisnotmodiiableduringtheSetupprocedure.Tosetthisparameter,entertheSetup.iniile(seepar.12.5).
MAC ADDRESS
This is the number, provided by the constructor, that identiies the device; this number is
univocal.
NOTE:Thisparametercan’tbemodiiedbysetup.
ATTENTION: Any changes to network parameters will interrupt browser connection. If the server not responding you
must reconnect to the new IP address set.
68
5.6
Hexadecimal dump
This function is used for the diagnosis of the characters received from the communications port. Characters are printed as
hexadecimal code and the corresponding ASCII code (see below). Each line is preceded by a counter in hexadecimal that
indicates the number of bytes received.
During the startup, if you hold down the FEED key, the device enters the self-test routine and print the setup report.
The device remains in standby until a key is pressed or characters are received through the communication port (Hexadecimal Dump mode). For each character sent, the ticket shows the hexadecimal value and the ASCII codes (if the characters
are underlined, the receive buffer is full). Shown below is an example of a Hexadecimal Dump:
HEXADECIMAL DUMP
31
39
37
68
73
66
65
6F
6F
77
72
6B
64
73
66
6A
32
30
38
6B
64
73
69
72
75
65
69
6C
66
64
6B
6B
33
31
39
6A
66
64
6F
69
77
72
6F
73
6B
66
F2
6C
34
32
75
73
6B
66
79
75
65
69
75
64
73
6B
6A
68
35
33
69
64
6A
6B
75
77
72
6F
77
66
64
6A
73
...
...
...
...
...
...
...
...
...
...
...
...
...
...
...
12345 ...
90123 ...
789ui ...
hkjsd ...
sdfkj ...
fsdfk ...
eioyu ...
oriuw ...
ouwer ...
werio ...
riouw ...
klsdf ...
dfksd ...
sdfkj ...
fk≥j ...
jklh
69
70
6
MAINTENANCE
6.1
Printer paper jam
1
3
Open the device cover
(see previous paragraphs).
Close the
device cover.
2
4
VROOM
Remove the damaged paper and check the presence
for paper scraps inside the device. Carefully remove all
paper scraps. If necessary use tweezers.
Insert the paper
(see previous paragraphs).
NOTE: For some models, only the internal printer group is represented.
71
6.2
Cutter paper jam
KPM180H (models with presenter)
1
4
Open the printer cover
(see previous paragraphs).
Lift the cover
of the presenter.
2
LF
FF
5
Start the automatic unlocking procedure
by pressing the LF LINE FEED key.
3
Push the opening lever
of the presenter.
72
Try to remove the paper.
If the operation fails, see the next point.
6
8
Inspection
window
Locate the inspection window for the cutter
placed in the bottom of the presenter
7
Blade
Remove the damaged paper and check the presence
for paper scraps inside the printer; carefully remove
all scraps of paper. If necessary, use tweezers.
Insert a Phillips screwdriver in the
inspector window and turn the worm screw
to lower the cutter blade.
73
6.3
Planning of cleaning operations
The regular cleaning of the device keeps the print quality and extends its life. The following table shows the recommended
planning for the cleaning operations.
EVERY PAPER CHANGE
Printing head
Use isopropyl alcohol
Rollers
Use isopropyl alcohol
EVERY 5 PAPER CHANGES
Cutter (1)
Paper path
Sensors
Use compressed air
Use compressed air or tweezers
Use compressed air
EVERY 6 MONTHS OR AS NEEDED
Display (2)
Use compressed air or a soft cloth
Case
Use compressed air or a soft cloth
Forspeciicprocedures,seethefollowingpages.
NOTES:
If you use the device in dusty environments, you must reduce the intervals between the cleaning operations.
For some models, only the internal printer group is represented.
(1) Only for KPM180H with presenter.
(2) Only for TK180. Don't use any ammonia-based product.
74
6.4
Cleaning
For periodic cleaning of the device, see the instructions below
Sensors
Paper path
1
1
Disconnect the power supply cable and
open the device cover (see par.4.1).
2
Disconnect the power supply cable and
open the device cover (see par.4.1).
2
ATTENTION:
Do not use alcohol, solvents, or hard brushes.
Do not let water or other liquids get inside the device.
ON
Alcohol, solvent
Clean the device sensors
by using compressed air.
ATTENTION:
Do not use alcohol, solvents, or hard brushes.
Do not let water or other liquids get inside the device.
ON
Alcohol, solvent
Clean the area involved in the passage of paper
by using compressed air.
75
Printing head
Printing roller
1
1
Disconnect the power supply cable and
open the device cover (see par.4.1).
2
Disconnect the power supply cable and
open the device cover (see par.4.1).
2
ISOPROPYL ALCOHOL
ISOPROPYL ALCOHOL
ATTENTION:
Do not use solvents, or hard brushes.
Do not let water or other liquids get inside the machine.
ATTENTION:
Do not use solvents, or hard brushes.
Do not let water or other liquids get inside the machine.
ON
ON
Clean the printing head by using
a non-abrasive cloth moistened with isopropyl.
76
Clean the printing roller by using
a non-abrasive cloth moistened with isopropyl.
Cutter
1
3
Disconnect the power supply cable and
open the device cover (see par.4.1).
2
ATTENTION:
Do not use alcohol, solvents, or hard brushes.
Do not let water or other liquids get inside the device.
ON
Alcohol, solvent
Clean the cutter
by using compressed air.
Push the opening lever and
lift the presenter cover.
77
Case
Display
1
1
Disconnect the power supply cable.
2
Disconnect the power supply cable.
2
ATTENTION:
Do not use alcohol, solvents, or hard brushes.
Do not let water or other liquids get inside the device.
ATTENTION:
Do not use alcohol, solvents, or hard brushes.
Do not let water or other liquids get inside the machine.
Do not use ammonia-based products .
Alcohol, solvent
ON
Alcohol, solvent
To clean the device,
use compressed air or a soft cloth.
78
Ammonia
ON
To clean the display,
use compressed air or a soft cloth.
6.5 Upgrade irmware
9. Select the serial communication port (e.g. COM1):
Select the system communication port
WARNING: During communication between PC and
devicefortheirmwareupdateitisstrictlyforbiddento
disconnect the communication cable or to remove the
power supply of the devices not to endanger the proper
functioning of the machine.
NOTES:
Thelatestirmwareisavailableinthedownloadarea
of the web site www.custom.biz
Available port
OK
COM1
Firmware rel.:COM2None
COM3
Hardware rel.:COM4None
COM5
PSW Version :
None
COM6
File [*.cfg] :
None
Printer type:
None
Cancel
Select port:
None
Selected port
COM1
File (*.psw):
C:\<device>.PSW
Select (*.psw):
Install on the PC used for device upgrading the UPGCEPRN software available in the download area of the
web site www.custom.biz.
Begin upgrade
Data flush status...
Upgrade status:
Port config:
No upgrade thread active...
Communication port not init
Update via serial interface
Proceed as follows:
1. Write down the product code (14 digits) printed on the
product label (see par.2.5).
2. Go to the web site www.custom.biz and download the
appropriate irmware release from the DOWNLOAD
area.
3. Print the SETUP report (see chapter 5).
4. Switch OFF the device.
5. Connect the device to the PC using a serial cable (see
par.3.3).
6. Switch ON the device.
7. Launch the software UPGCEPRN.
8. Select the updateile.PSWlocation:
10. Detecting and setting of the parameters necessary for
serial communication are performed automatically and
then updating begins.
11. After a few minutes a message on the screen warns
that the update is completed.
Upgrade OK
Upgrade succesfully completed.
OK
12. PrintanewSETUPreporttoverifythenewirmware
release (see chapter 5).
Firmware rel.:
None
Printer type:
None
Hardware rel.:
None
Select port:
None
PSW Version :
None
File [*.cfg] :
None
File (*.psw):
Select (*.psw):
Begin upgrade
Data flush status...
Upgrade status:
No upgrade thread active...
Port config:
Communication port not init
79
Update via USB interface
Select Printer
ATTENTION:
Only during the irmware update, the connection between PC and device must be direct, without the use
of HUB device.
<device1>
<device2>
<device3>
<device4>
<device5>
Only during the irmware update, do not connect or
disconnect other USB devices.
Selected Printer
NOTE: For communication via USB you must install on
PC the deice driver available in the download area of
the web site www.custom.biz.
<device1>
OK
Port filtering...
Cancel
USB
Select the system communication port
Available port
OK
COM4
Firmware rel.:COM5None
COM6
Hardware rel.:COM7None
COM9
PSW Version :
None
USB
File [*.cfg] :
None
Proceed as follows:
1. Write down the product code (14 digits) printed on the
Printer type:
None
Cancel
Select port:
None
Selected port
USB
File (*.psw):
C:\<device1>.PSW
product label (see par.2.4).
2. Go to the web site www.custom.biz and download the
Select (*.psw):
Begin upgrade
appropriate irmware release from the DOWNLOAD
Data flush status...
area.
3. Print the SETUP report (see chapter 5).
4. Switch OFF the device.
Upgrade status:
5. Connect the device to the PC using a USB cable (see
Port config:
No upgrade thread active...
Communication port not init
paragraph 3.3).
6. Switch ON the device.
7. Launch the software UPGCEPRN.
10. After a few minutes a message on the screen warns
that the update is completed.
8. Selecttheupdateile.PSW location:
Firmware rel.:
None
Printer type:
None
Hardware rel.:
None
Select port:
None
PSW Version :
None
File [*.cfg] :
None
Upgrade OK
Upgrade succesfully completed.
OK
File (*.psw):
Select (*.psw):
Begin upgrade
11. PrintanewSETUPreporttoverifythenewirmware
release (see chapter 5).
Data flush status...
Upgrade status:
No upgrade thread active...
Port config:
Communication port not init
9. Select item USB and then select the USB device among
those proposed (e.g. device1):
80
7
SPECIFICATION
7.1 Hardware speciications
Operating temperature
Sensors
Head temperature, paper presence, mobile detectors of black mark or
translucent gap/hole (setting by software),
cover open, external near paper end,
MTBF (1)
113 000 hours
Emulations
Printing driver
CUSTOM/POS, SVELTA
Windows XP
VISTA (32/64bit)
Windows 7 (32/64bit)
Windows 8 (32/64bit)
Linux
Android
iOS
INTERFACES
USB port
12 Mbit/sec (USB 2.0 full speed)
RS232 serial port
from 1200 to 115200 bps
ETHERNET port
(models with ETHERNET port)
10 Mbit/sec, 100 Mbit/sec
MEMORIES
Receive buffer
16 Kbytes
Flash memory
1 Mbytes internal + 8 Mbytes external (of which 4Mbytes available for user)
RAM memory
128 Kbytes internal + 8Mbytes external
PRINTER
Resolution
200dpi models
203 dpi (8 dot/mm)
300dpi models
304 dpi (12 dot/mm)
Printing method
Thermal,ixedhead
81
Head life (2)
100 Km / 100M pulse
Printing width
80 mm
Printing mode
Normal, 90°, 180°, 270°
Printing format
Height/Width from 1 to 8, bold, reverse, underlined, italic
Character fonts
CUSTOM/POS emulation
SVELTA emulation
Printable barcode
54 character code tables (see par. 7.8)
2 TrueType font (3), extended chinese GB18030-2000
20 embedded fonts, 2 TrueType font (3)
UPCA, UPCE, EAN13, EAN8, CODE39, ITF, CODABAR, CODE93,
CODE128, CODE32, PDF417, DATAMATRIX, AZTEC, QRCODE
Printing speed (2) (4)
200dpi models
High Speed = 200 mm/sec
Normal = 150 mm/sec
High Quality = 100 mm/sec
300dpi models
High Speed = 150 mm/sec
Normal = 120 mm/sec
High Quality = 90 mm/sec
PAPER
Type of paper
Paper width
Paper weight
Paper thickness
Recommended types of paper
External roll diameter (5)
External roll core diameter
Paper end
82
Thermal rolls, heat-sensitive side on outside of roll
Thermal rolls, heat-sensitive side on inside of roll
Thermal fanfold module with alignment notch
from 20 mm to 82.5 mm (2 mm step)
from 70 g/m2 to 255 g/m2
max270μm
KANZAN KF50 and KP460
MITSUBISHI PG5075 and TL4000
max. 200 mm
25 mm (+ 1mm)
Not attached to roll core
Core type
Cardboard or plastic
CUTTER (models with presenter)
Paper cut
Total
Estimated life (2)
1 000 000 cutter number
DEVICE ELECTRICAL SPECIFICATIONS
Power supply
24 Vdc ±10% (optional external power supply)
Medium consumption (4)
1.5 A
Stand-by consumption
200dpi models
0.04 A
300dpi models
0.06 A
ELECTRICAL SPECIFICATIONS POWER SUPPLY cod.963GE020000003
Power supply voltage
Frequency
from 100 Vac to 240 Vac
from 50 Hz to 60 Hz
Current (output)
2.5 A
Power
60 W
ENVIRONMENTAL CONDITIONS
Operating temperature
Relative humidity
Storage temperature
Storage relative humidity
from 0°C to +50°C
from 10% Rh to 85% Rh
from -20 °C to +70 °C
from 10% Rh to 90% Rh
NOTES:
(1) : Control board.
(2) : Respecting the regular schedule of cleaning for the device components.
(3) : “Veramono.ttf” and “Vera.ttf” are installed on the device. It is possible to install additional TrueType fonts (see par.12.4).
(4) : Referred to a standard CUSTOM receipt (L=10cm, Density = 12,5% dots on).
(5) : For external rolls diameter larger than Ø100mm it’s recommended to use a paper pretensioning device.
83
7.2 Character speciications in CUSTOM/POS emulation
200dpi models
Character set
Character density
3
11 cpi
15 cpi
20 cpi
35
45
64
Chars / sec
2370
3047
4266
Lines / sec
66
66
66
2.25 x 3
1.75 x 3
1.25 x 3
Number of columns
Characters (L x H mm)-Normal
300dpi models
Character set
Character density
3
11 cpi
15 cpi
20 cpi
53
68
96
Chars / sec
4000
5142
7200
Lines / sec
75
75
75
1.5 x 3
1.2 x 3
0.8 x 3
Number of columns
Characters (L x H mm)-Normal
84
7.3
Device dimensions
KPM180H (standard models)
Length
97.5 mm
Height
67 mm
Width
108 mm
Weight
800 g
5
10
4 x M3
66
88
4.5
NOTE:Allthedimensionsshowninfollowingiguresareinmillimetres.
51
53
90
45
67
108
85
KPM180H (models with presenter)
Length
149 mm
Height
67 mm
Width
108 mm
Weight
1 500 g
5
32.5
30
140
139.5
6 x M3
66
4.5
NOTE:Allthedimensionsshowninfollowingiguresareinmillimetres.
90
49
45
67
108
86
TK180 (metallic models)
Length
122.6 mm
Height
85 mm
Width
145.6 mm
Weight
2 240 g
NOTE:Allthedimensionsshowninfollowingiguresareinmillimetres.
3.6
27.7
42.9
119
61.5
64
85
133
12.6
87
TK180 (plastic models)
Length
185.9 mm
Height
118.9 mm
Width
130 mm
Weight
1 940 g
52.9
90.9
118.9
NOTE:Allthedimensionsshowninfollowingiguresareinmillimetres.
130
185.9
88
7.4
Device dimensions with paper roll holder
TK180 (metallic models)
Length
324 mm
Height
158 mm
Width
145.6 mm
Weight
3 240 g
NOTE:Allthedimensionsshowninfollowingiguresareinmillimetres.
205
61.5
64
67
88
158
93
119
95.75
133
55
22.25
12.6
251
89
TK180 (plastic models)
Length
371.4 mm
Height
210.8 mm
Width
136.5 mm
Weight
2 840 g
118.9
210.8
NOTE:Allthedimensionsshowninfollowingiguresareinmillimetres.
371.4
130
136.5
90
162.8
124
109.5
6.5
185.9
7.5
Dimensions of paper roll holder cod. 963GE020000003
KPM180H
Thefollowingigureshowsthespeciicationsforthepaperrollholderprovidedasanaccessoryforthedeviceandthe
dimension of the related paper roll to use.
120
Ø max. 82,5
98
Ø 25
Ø max. 150
35
50
- 0,2
38 +0,2
- 0,2
56 +0,2
Ø 3,2
6
NOTES:
Allthedimensionsinigureareinmillimetres.
For external rolls diameter larger than 100 mm it’s recommended to use a paper pre-tensioning device.
91
7.6
Dimensions of power supply cod. 963GE020000003
Length
127 mm
Height
35.5 mm
Width
56 mm
35,5
NOTE:
Allthedimensionsshowninfollowingiguresareinmillimetres.
AC INLET
56
N.C
2 1
3
GND
127
DC OUTPUT WIRE
92
+24V
7.7 Paper speciication
Paper with black mark
The following image shows the placement of the black mark on paper. The notch can be printed both on the thermal side
and on the non-thermal side of paper and it can be placed anywhere on the whole width of the paper.
For more information about the use of paper with black mark see Chapter 10.
+1
min 40 mm
90
DIRECTION OF PAPER FEED
50
+1
NOTE:
Allthedimensionsshowninfollowingiguresareinmillimetres.
PAPER WIDTH from 20 to 82 mm
93
Fanfold paper with hole
The following image shows the placement of the hole on the paper. The hole can be positioned across the width of the ticket.
To manage tickets with hole, set the parameter “Notch / B.Mark position” to “Transparent” (see par. 5.4).
For more information about the use of paper with hole see Chapter 10.
min 40
min 10
PAPER WIDTH from 20 to 82 mm
94
DIRECTION OF PAPER FEED
min 2
NOTE:
Allthedimensionsshowninfollowingiguresareinmillimetres.
7.8
Character sets in CUSTOM/POS emulation
The device has 3 fonts of varying width (11, 15 and 20 cpi) which may be related one of the coding tables provided on the
device.
To know the coding tables actually present on the device, you need to print the font test (see par.2.6).
You can set font and coding table by using the commands (see the Commands Manual of the device) or using the “Code
Table” and the "Chars / Inch" parameters during the Setup procedure (see par.5.4).
The following is the full list of coding tables that can be installed on the device.
<CodeTable>
Coding table
0
PC437 - U.S.A., Standard Europe
1
Katakana
2
PC850 - Multilingual
3
PC860 - Portuguese
4
PC863 - Canadian/French
5
PC865 - Nordic
11
PC851 - Greek
on request
12
PC853 - Turkish
on request
13
PC857 - Turkish
on request
14
PC737 - Greek
on request
15
ISO8859-7 - Greek
on request
16
WPC1252
17
PC866 - Cyrillic 2
18
PC852 - Latin 2
19
PC858 for Euro symbol in position 213
20
KU42 - Thai
on request
21
TIS11 - Thai
on request
26
TIS18 - Thai
on request
30
TCVN_3 - Vientamese
on request
31
TCVN_3 - Vientamese
on request
32
PC720 - Arabic
on request
33
WPC775 - Baltic Rim
on request
on request
95
<CodeTable>
Coding table
34
PC855 - Cyrillic
on request
35
PC861 - Icelandic
on request
36
PC862 - Hebrew
37
PC864 - Arabic
38
PC869 - Greek
on request
39
ISO8859-2 - Latin 2
on request
40
ISO8859-15 - Latin 9
on request
41
PC1098 - Farci
on request
42
PC1118 - Lithuanian
on request
43
PC1119 - Lithuanian
on request
44
PC1125 - Ukranian
on request
45
WPC1250 - Latin 2
46
WPC1251 - Cyrillic
47
WPC1253 - Greek
48
WPC1254 - Turkish
49
WPC1255 - Hebrew
50
WPC1256 - Arabic
51
WPC1257 - Baltic Rim
52
WPC1258 - Vientamese
53
KZ1048 - Kazakhstan
255
Space page
on request
In CUSTOM/POS emulation, it is possible to use TrueType fonts. To be used, a TrueType font must be monospace type
(every character of the font must have the same dimension). The check is made by the device when the font is selected.
TrueType fonts will be automatically scaled by the device in order to obtain the same available width for the embedded
fonts (11, 15 and 20 cpi).
The quality of TrueType fonts, the correct positioning into the printable area and the available code tables, will result from
the font producers and the font implementation.
For the correct printing of the code tables, it is necessary that the selected TrueType font contains all the characters in
thetables.Otherwise,the‘�’symbolwillbeprintedinsteadthemissingcharacter.Allcommandsforprintingconiguration
are usable both with TrueType fonts and with embedded fonts. It is possible to address the TrueType font respects the
UNICODE™ standard (see www.unicode.org), by using UTF-8 or UTF-16 encoding.
96
7.9
Character sets in SVELTA emulation
In SVELTA emulation, the device has 20 embedded fonts of varying width which may be accessed through control characters (see the Commands Manual of the device). The following list shows the font available and relative dimensions in dot:
•
•
•
•
•
•
•
•
•
•
•
•
•
•
•
•
•
•
•
Font HEL8PT8 (A) Font HEL10PT8 (A) Font HEL14PT8 (A) Font HEL16PT8 (A) Font 18x24
Font 14x24
Font 10x24
Font 8x12 (B)
Font 8x12-2 (B)
Font 12x12 (B)
Font 14x11 (B)
Font 16x24 (B)
Font 16x24_1 (B) (C)
Font 16x24_2 (B) (C)
Font 20x15 (B)
Font 28x20 (B)
Font 14x24_1 (B) (C)
Font 16x24CN (B) (C)
Font OCRB (20x32) (B)
ProportionalFontwithixedheight(H=28dot)
ProportionalFontwithixedheight(H=34dot)
ProportionalFontwithixedheight(H=50dot)
ProportionalFontwithixedheight(H=55dot)
(Font 18x24 in CUSTOM/POS emulation)
(Font 14x24 in CUSTOM/POS emulation)
(Font 10x24 in CUSTOM/POS emulation)
Fixed Font
Fixed Font
Fixed Font
Fixed Font
Fixed Font
Fixed Font
Fixed Font
Fixed Font
Fixed Font
Fixed Font
Fixed Font
Fixed Font
For further information to characters representations print the Font Test (D).
NOTES:
(A)
A proportional font is a font in which different characters have different pitches (widths).
(B)
Aixedfontistheoppositeofaproportionalfontandisaixed-pitchfont.
(C)
The fonts with the same name and dimension contain different characters in different positions from theirs.
(D)
During power-up, if the FF FORM FEED key is held down, the device executes the FONT TEST.
In SVELTA emulation, it is possible to use TrueType fonts. True Type fonts are printable with every angle of rotation and in
bold, reverse, italic and underlined mode.
It is possible to address the TrueType font respects the UNICODE™ standard (see www.unicode.org), by using UTF-8 or
UTF-16 encoding.
For the correct printing of the code tables, it is necessary that the selected TrueType font contains all the characters in the
tables.Otherwise,the‘�’symbolwillbeprintedinsteadthemissingcharacter.
97
98
8
CONSUMABLES
The following table shows the list of available consumables for device:
DESCRIPTION
CODE
67A00000000304
FANFOLD (100 tickets)
weight = 140 g/m2
dimensions = 152mm x 80mm
99
100
9
ACCESSORIES
The following table shows the list of available accessories for device:
KPM180H (all models)
DESCRIPTION
CODE
963GE020000003
POWER SUPPLY
(fortechnicalspeciications,seethepar.7.1)
974AU010000305
PAPER ROLL HOLDER
KPM180H (standard models)
DESCRIPTION
CODE
976AH010000001
PRESENTER MODULE + AUTOCUTTER
(fortechnicalspeciications,seethepar.7.1)
101
TK180 (metallic models)
DESCRIPTION
CODE
963GE020000003
POWER SUPPLY
(fortechnicalspeciications,seethepar.7.1)
974HL010000001
PAPER ROLL HOLDER
TK180 (plastic models)
DESCRIPTION
CODE
963GE020000003
POWER SUPPLY
(fortechnicalspeciications,seethepar.7.1)
974HL020000001
PAPER ROLL HOLDER
102
10
ALIGNMENT
Device is provided with sensors for the use of alignment notch in order to handle:
• rollofticketswithpre-printedieldsandaixedlength;
• Fan-foldofticketswithpre-printedieldsandaixedlength.
The alignment notch may be formed by
• blackmarkprintedonpaper(seepar.7.7);
• holebetweentwotickets(seepar.7.7);
Allalignmentsensorsare“relection”sensors:thiskindofsensoremitsabandoflightanddetectsthequantityoflight
relectedtoit.Thepresenceofthenotchisthereforedetectedbytheamountoflightthatreturnstothesensor,considering
thatthelightisrelectedbythewhitepaperandabsorbedbytheblackmark.
To use tickets with holes, it is possible to use the same sensors as “transparence” sensors, coupled two by two: a beam of
light is emitted by the transmitter sensor and the quantity of light which reaches the opposite receiver sensor is detected.
The presence of the hole is detected evaluating the amount of light that arrives to the opposite sensor, considering that the
paper doesn’t allow the beam of light to reach the receiver, whereas a hole lets the light to reach the receiver.
Thefollowingparagraphsshowhowtocorrectlysettheconigurationparametersofdeviceinordertoassurethealignment.
103
10.1
Enable alignment
Device is provided with two sensors for alignment, placed as follows:
•
•
onemobilesensoronthelowerlat,
onemobilesensorontheupperlat.
To guarantee the alignment, it is necessary to correctly choose the sensor to use for the notch detection depending on the
type of notch and its location on the ticket.
To do this, you must enable the parameter “Notch/B.Mark Position” during the Setup procedure (see chapter 5) and set
the correct value of this parameter as described in the following table.
SENSOR
USED
VALUE OF THE
“NOTCH/B.MARK POSITION”
PARAMETER
USING MODE
OF SENSORS
NOTCH TYPE
-
Disabled
-
Alignment disabled
1
Bottom
Relection
Black mark printed on the non-thermal side of paper
2
Top
Relection
Black mark printed on the thermal side of paper
1+2
Transparent
Transparence
Hole between tickets
upper flat
SENSOR 2
SENSOR 1
lower flat
Thefollowingiguresshowtheusableformatofpaperandthecorrespondingsensorsusedforalignment:
NOTE:Foreaseofunderstanding,theimageshowsthetwolatsrepresentedinthesameplane.
For some models, only the internal printer group is represented.
104
Paper with black mark on the non-thermal side
Paper with black mark on the thermal side
direction
of paper
feed
SENSOR 1
NON-THERMAL
SIDE
direction
of paper
feed
SENSOR 2
THERMAL
SIDE
105
Tickets with hole
direction
of paper
feed
SENSOR 2
SENSOR 1
106
10.2
Calibration
The sensor calibration occurs automatically and consists in adjusting the quantity of light emitted to match the degree of
whiteness of the paper used and the degree of black of the mark printed on paper.
The device automatically performs the self-calibration during the Setup procedure only if the “Notch/B.Mark Position” parameter is set to a value other than “Disabled” (see chapter 5).
When self-calibration starts, the device performs some paper feeds and then it prints the calibration result and the value
of the PWM duty-cicle of the alignment sensor driver so that it can be perform an optimal notch detection:
Autosetting Notch : OK
PWM Duty Cycle : 85.3%
The“AutosettingNotch”parameterindicatestheresultoftheself-calibrationprocedure;OKwillappearifithasbeensuccessful, NOT OK will appear if the procedure has failed.
After the printing of the procedure result, the device offers the execution of the function of paper characterization “Characterize
Paper” and the change of the “Notch/B.Mark Threshold” parameter which represents the detection threshold of the notch.
Choosing the “Yes” value for the “Characterize Paper” parameter, the device prints a graphic representation (see following
igures)oftheoutgoingvoltageofthealignmentsensor(expressedasapercentage)andthe“Notch/B.MarkThreshold”value.
This graphic representation is useful to set the most suitable value to assign to the “Notch/B.Mark Threshold” parameter
and then to better identify the optimal threshold value which takes into account the variations of the signal and the small
oscillations around zero.
Thefollowingigureshowsanexampleofpaperwiththenon-thermalpaperprintedwithblackmarks:theoutgoingvoltage
is constant while passing the white paper between two notches and presents a peak at each black mark.
In this case, the optimal value for the “Notch/B.Mark Threshold” parameter is placed about half of the peak.
NON-THERMAL SIDE
Peak
THERMAL SIDE
“Notch/B.Mark
Threshold”
107
Thefollowingigureshowsanexampleofpaperwithholes:theoutgoingvoltageisconstantwhilepassingthepaperbetween two holes and presents a variation at each hole. In this case, the optimal value for the “Notch/B.Mark Threshold”
parameter is placed about half of the variation.
NON-THERMAL SIDE
“Notch/B.Mark
Threshold”
Peak
108
THERMAL SIDE
Thefollowingigureshowsanexampleofpaperwiththenon-thermalpaperprintedwithblackmarksandothergraphics
(for example, a barcode): the outgoing voltage is constant while passing the white paper between two notches, presents a
peak at each black mark and presents some “noise” at each barcode. In this case, the optimal value for the “Notch/B.Mark
Threshold” parameter is located about halfway between the peak value and the maximum value of the “noise”.
NON-THERMAL SIDE
Peak
THERMAL SIDE
“Notch/B.Mark
Threshold”
Noise
Ifthemaximumvalueof“noise”readbythesensorisveryclosetothepeakvalue,itmightbedificulttoplacethevalue
of the “Notch/B.Mark Threshold” at an intermediate point. In these cases, it is mandatory that the portion of paper between
the point of printing end and the front notch is completely white (no graphics). In this way, the only next graphic detected
by the sensor for alignment after the printing end will be the notch.
109
10.3
Alignment parameters
The“alignmentpoint”isdeinedasthepositioninsidethetickettouseforthenotchalignment.
Thedistancebetweenthenotchedgeandthealignmentpointisdeinedas“NotchDistance”.
Referring to the front of the notch, the value of “Notch Distance” value varies from -5mm minimum and 99.9mm maximum.
If the “Notch Distance” value is set to 0, the alignment point is set at the beginning of the notch.
Alignment
point:
notch front
Alignment
point
Alignment
point
PRINTING DIRECTION
+
0
positive values
of “Notch Distance”
negative values
of “Notch Distance”
Thefollowingigureshowsanexampleofpaperwithalignmentpointsetbyapositivevalueof“NotchDistance”(“Notch
Distance” = + A):
Alignment point
Notch front
PRINTING DIRECTION
+A
0
110
To set a negative value of the “Notch Distance” parameter is useful in cases where the alignment point refers to the notch
printed on the previous ticket or where the desired cutting line is placed in the middle of the alignment notch (for example,
for paper with holes or gap). In the following images, the value of “Notch Distance” parameter is set to -A.
Notch front
Alignment point
PRINTING DIRECTION
-A
0
Notch front
Alignment point
PRINTING DIRECTION
-A
0
111
Thefollowingiguresshowthesimpliiedsectionsofthedevicemodelswiththepaperpathandthedistances(inmm)
between the alignment sensor, the print head, cutter (for models with presenter) and paper out mouth.
KPM180H (standard models), TK180
38
20
distance between
distance between
printing line and
printing line and
notch sensor
paper out
KPM180H (standard models)
TK180 (plastic models)
TK180 (metallic models)
KPM180H (models with presenter)
112
38
20
32
16
distance between
distance between
distance between
distance between
printing line and
printing line and
cutting line and
nip rollers
notch sensor
cutting line
nip rollers
and paper out
CUSTOM/POS emulation
Todeinethealignmentpointyouneedtosettheprinterparametersthatcomposethenumericalvalueofthe“NotchDistance” parameter. (see par.5.4).
For example, to set a notch distance of 15mm between the notch and the alignment point, the parameters must be set on
the following values:
Notch Distance Sign
Notch Distance [mm x 10]
Notch Distance [mm x 1]
Notch Distance [mm x .1]
:+
:1
:5
:0
The“NotchDistance”parameter,maybemodiiedasfollows:
• during the Setup procedure of the device (see chapter 5)
• bymodifyingtheSetup.iniile(seepar.12.5)
• by using the 0x1D 0xE7 command (for more details, refer to the Commands Manual)
• by driver
SVELTA emulation
Theticketfeaturesandthealignmentparameters,maybemodiiedasfollows:
• by using the parameters of the <LHT> command (for more details, refer to the Commands Manual)
• bymodifyingtheSetup.iniile(seepar.12.5)
• by driver
ThefollowingigureshowsthesomeofparametersforalignmentoftheSetup.iniile:
• “Ticket X Dimension”
• “Ticket Y Dimension”
• “Notch Width”
• “Notch Distance”
Alignment
point
“Ticket Y Dimension”
“Ticket X Dimension”
PRINTING DIRECTION
“Notch Width”
“Notch Distance”
113
10.4
Printing area
In order to print ticket containing only one notch and to not overlay printing to a notch (that will make it useless for the next
alignment), it is important to well calibrate:
•
•
thelengthoftheprintingareaofticketaccordingtotheinter-notchdistance;
the value for the paper recovery after a cut (only for models with presenter).
KPM180H (standard models), TK180
Thefollowingigureshowsanexampleofticketswith“NotchDistance”setto0:
Line of manual
tear off
Line of manual
tear off
Printing line
Printing line
PRINTING DIRECTION
PRINTED
AREA
1 mm
H
D
1 mm
L
H
Distancebetweentheirstandthelastprintline,called“Heightoftheprintingarea”.
L
Distance between an edge of the notch and the next one, called “Inter-notch distance”.
D
Automatic feed for alignment at the next notch.
To use all the notches on paper, you must comply with the following equation:
1mm+H≤L
The height of the printing area (H) can be increased to make no progress on alignment (D) but no further.
114
KPM180H (models with presenter)
Thefollowingigureshowsanexampleofticketswith“NotchDistance”setto0:
Cutting line
Printing line
Cutting line
Printing line
PRINTING DIRECTION
PRINTED
AREA
A
H
D
A
L
A
“Non-printable area” of 1 mm generated from:
“Distance between cutter/printing head”- “Value for the paper recovery after a cut”
where:
”Distancebetweencutter/printinghead”=
“Value for the paper recovery after a cut”=
20mm (ixeddistance)
19 mm
In CUSTOM/POS emulation use the command 0x1C 0xC1 to set the “Value for the paper recovery after a cut”
(see Commands Manual).
H
Distancebetweentheirstandthelastprintline,called“Hieghtoftheprintingarea”.
L
Distance between an edge of the notch and the next one, called “Inter-notch distance”.
D
Automatic feed for alignment at the next notch.
To use all the notches on paper, you must comply with the following equation:
H+A≤L
The height of the printing area (H) can be increased to make no progress on alignment (D) but no further.
115
116
11
TECHNICAL SERVICE
In case of failure, send the 4 pieces of information listed below to our support team:
1. Product code
2. Serial number
3. Hardware release
4. Firmware release
To get the necessary data, proceed as follows:
1
3
XXXXXXXXXXXXXX
Rx
0000000000000000000
Customer Service Department:
[email protected]
Write down the data printed
on the product label (see par.2.5).
(worldwide)
or
[email protected]
2
(specific for North/South American customers)
FW
<device name>
SCODE. <code>
- rel 1.00
DCODE. <code>
- rel 1.00
FCODE. <code>
- rel 1.00
Send an e-mail to the Technical Service,
with the data collected.
PRINTER SETTINGS
1 «••••••••»640
---------------------------------------------------------------------------PRINTHEAD WORKING GOOD!
PRINTER TYPE ....................................<device model>
PRINTING HEAD TYPE ........................<head model>
INTERFACE ..........................................RS232
PROGRAM MEMORY TEST.................OK
Print a Setup report (see paragraph 5.1)
The Setup report shows
the firmware release.
117
118
12
ADVANCED FUNCTIONS
12.1
File sharing
The device can be connected to a PC with a USB cable.
Throughthiskindofconnection,itispossibletomanagedrivers,fontsandlogosofthedeviceandconiguretheoperating
parametersbyilessharingfromMassStorage.
USB
FILE SHARING
FROM
MASS STORAGE
12.2
Drivers installation
TK180 (all models)
It is possible to install the new driver update directly into the folder “DRIVER” on the Flash Drive of the device.
ToentertheFlashDrivebyilessharingfromMassStorageyouneedtoenabletherelativeparameterduringtheconiguration process (see chapter 5).
119
12.3
Logos management
It is possible to store new logos in addition to default logos stored on Flash Disk. The device automatically provides to
convert BMP image to the error-diffusion format in black and white.
It is possible to directly add the new logo directly into the folder “PICTURES” on the Flash Drive of the device.
ToentertheFlashDrivebyilessharingfromMassStorage,youneedtoenabletherelativeparameterduringtheconigurationprocess(seechapter5).
Afteraddingthelogo,opentheconigurationile“PictList.ini”andaddanewlinewithanumberassociatedtothelogo
(tobeusedwithdevice’scommands),aletterforthememoryunitandthelogoilename,asindicatedintheinstructions
writteninsidethe“PictList.ini”ile.
To delete a logos stored in the device, proceed as follows:
1. deletetheselectedlogofromthe“Pictures”folderonFlashDisk;
2. intheconigurationile“PictList.ini”,deletethelinerelatedtotheerasedlogo.
The logos stored on Flash Disk and converted by the device, can be printed by using the number associated to the logo
during the conversion step.
Thecorrespondencebetweenile-nameandlogo-numberiswarrantbytheconigurationile“PIctList.ini”anditisveriiable
with the logo test.
12.4
Fonts management
It is possible to store new font in addition to default fonts stored on Flash Disk.
You can directly add the new font directly into the folder “FONTS” on the Flash Drive of the device.
ToentertheFlashDrivebyilessharingfromMassStorage,youneedtoenabletherelativeparameterduringtheconigurationprocess(seechapter5).
NOTE:
Uploading the new font directly from the “Font” folder of Microsoft® Windows® directory, remember that the displayed
fontnameintothe“Font”foldermaynotmatchtherealnameofthefontile.
120
12.5
Setup
Itispossibletoconigurethedefaultparametersfordevicesetupbyeditingthe“Setup.ini”ileontheFlashDrive.
ToentertheFlashDrivebyilessharingfromMassStorage,youneedtoenabletherelativeparameterduringtheconigurationprocess(seechapter5).
Aftereditingdevice’sparameter,simplysavethe“Setup.ini”iletomakethemodiiesactivated.
The“Setup.ini”ileisaconigurationilethatcontainsalltheconigurableparameterslistedintextformatanddividedinto
some sections (indicated in square brackets).
The available values for every parameter, are listed after the parameter name. The value marked with the symbol ‘ * ’ is the
default one. To modify printer’s parameters, change the numeric value after the name of parameters. To set the parameter
to the default value, change the numeric value with the symbol D.
The“Setup.ini”ilepermitstheconigurationofthefollowingparameters:
[PRINT]
Printer Emulation
0*, 1
0 = CUSTOM/POS
1 = SVELTA
Print Mode
0*, 1
0 = Normal
1 = Reverse
Autofeed
0*, 1
0 = CR disabled
1 = CR enable
Chars / inch
0, 1*, 2
0 = A=11 B=15 cpi
1 = A=15 B=20 cpi
Code Table [num]
0
Chinese font
0*, 1
0 = Disabled
1 = Enabled
Speed / Quality
0, 1*, 2
0 = High Quality
1 = Normal
2 = High Speed
Paper Width
0, 1, 2, 3, 4, 5, 6, 7, 8, 9, 10,
11, 12, 13, 14, 15, 16, 17, 18,
19, 20, 21, 22, 23, 24, 25, 26,
27, 28, 29, 30, 31*
0 = 18 mm
1 = 20 mm
2 = 22 mm
3 = 24 mm
4 = 26 mm
5 = 28 mm
6 = 30 mm
7 = 32 mm
8 = 34 mm
9 = 36 mm
10 = 38 mm
11 = 40 mm
12 = 42 mm
13 = 44 mm
14 = 46 mm
15 = 48 mm
16 = 50 mm
17 = 52 mm
18 = 54 mm
19 = 56 mm
20 = 58 mm
21 = 60 mm
22 = 62 mm
23 = 64 mm
24 = 66 mm
25 = 68 mm
26 = 70 mm
27 = 72 mm
28 = 74 mm
29 = 76 mm
30 = 78 mm
31 = 80 mm
Paper Threshold
0, 1*, 2, 3, 4, 5, 6
0 = 30 %
1 = 40 %
2 = 50 %
3 = 60 %
4 = 70 %
5 = 80 %
6 = 90 %
2 = A=20 B=15 cpi
121
Notch/B.Mark Position
0*, 1, 2, 3
0 = Disabled
1 = Bottom
2 = Trasparence
3 = Top
Notch/B.Mark Threshold
0, 1*, 2, 3, 4, 5, 6
0 = 30 %
1 = 40 %
2 = 50 %
3 = 60 %
4 = 70 %
5 = 80 %
6 = 90 %
Notch/B.Mark Min.Width
0*, 1, 2, 3, 4, 5, 6, 7, 8, 9, 10,
11, 12, 13, 14, 15, 16, 17, 18,
19, 20
0 = 0 mm
1 = 1 mm
2 = 2 mm
3 = 3 mm
4 = 4 mm
5 = 5 mm
6 = 6 mm
7 = 7 mm
8 = 8 mm
9 = 9 mm
10 = 10 mm
11 = 11 mm
12 = 12 mm
13 = 13 mm
14 = 14 mm
15 = 15 mm
16 = 16 mm
17 = 17 mm
18 = 18 mm
19 = 19 mm
20 = 20 mm
Ticket Locking
0*, 1
0 = Disabled
1 = Enabled
Ticket Management
0*, 1
0 = Disabled
1 = Check First
Casing Type
0, 1*
0 = Metal
1 = Plastic
PrintHead Test PowerOn
0*, 1
0 = Disabled
1 = Enabled
Print Density
0, 1, 2, 3, 4*, 5, 6, 7, 8
0 = - 50 %
1 = - 37 %
2 = - 25 %
3 = - 12 %
4=0%
5 = + 12 %
6 = + 25 %
7 = + 37 %
8 = + 50 %
RS232 Baud Rate
1, 2, 3, 4, 5, 6, 7, 8*
1 = 1200 bps
2 = 2400 bps
3 = 4800 bps
4 = 9600 bps
5 = 19200 bps
6 = 38400 bps
7 = 57600 bps
8 = 115200 bps
RS232 Data Length
0*, 1
0 = 8 bits/chr
1 = 7 bits/chr
RS232 Parity
0*, 1, 2
0 = None
1 = Even
RS232 Handshaking
0, 1*
0 = Xon/Xoff
1 = Hardware
Notch Distance [mm]
[INTERFACE]
122
2 = Odd
Busy Condition
0*, 1
0 = RxFull
1 = OffLine/RxFull
USB Virtual COM
0*, 1
0 = Disabled
1 = Enabled
USB Mass Storage
0*, 1
0 = Disabled
1 = Enabled
USB Address Number
0*, 1, 2, 3, 4, 5, 6, 7, 8, 9
0=0
1=1
2=2
3=3
4=4
5=5
6=6
7=7
8=8
9=9
[SVELTA]
Ticket X Dimension
Ticket Y Dimension
Notch Distance
Notch Width
Barcode timeout
[NETWORK] (only for models with ETHERNET port)
DHCP Client
0*, 1
0 = Disabled
1 = Enabled
IP Address
Subnet Mask
Default Gateway
Domain Name System
TCP Printer Port
MAC Address
123
Rev.1.50
Part Number : 76200000002100
CUSTOM S.p.A.
World Headquarters
Via Berettine, 2/B - 43010 Fontevivo, Parma ITALY
Tel. +39 0521 680111 - Fax +39 0521 610701
[email protected] - www.custom.biz
All rights reserved
www.custom.biz