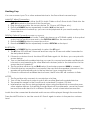
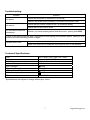
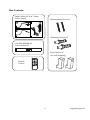
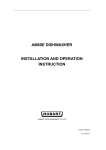
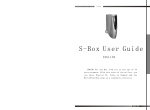
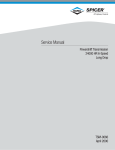
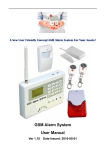
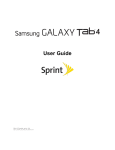
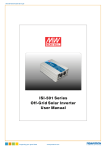
1
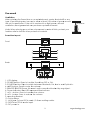
NX-SO
OUND
DBAR
R-40
40
0-Wa
att Stereo
o Sou
und Bar
Own
ners Ma
anual
nxgtechnolo
ogy.com
Congratulations on your purchase of the NXG Technology NX-SOUNDBAR-40 Stereo
Sound bar! Like all NXG products, great care has been taken in its design. A
combination of advanced engineering and state-of- the-art materials will provide
you with years of listening pleasure.
The NX-SOUNDBAR-40 allows you to play stereo audio from any Bluetooth enabled
device including TVs, Smart Phones, Tablets, or any device with an analog or optical
output.
IMPORTANT SAFETY INSTRUCTIONS - READ CAREFULLY BEFORE USE.
Read & Keep these Instructions.
1. Do not use the Sound bar near water or where it could be exposed to water.
2. Clean only with a dry cloth (microfiber works best).
3. Do not block any ventilation openings.
4. Do not install near heat sources like radiators, heat registers, stoves, or other devices
(including amplifiers) that produce heat.
5. Do not defeat or bypass the polarization or grounding of the Plug. A polarized plug has
two blades with one wider than the other. The wide blade is provided for your safety.
When the provided plug does not fit into your outlet, consult an electrician for
replacement of the outlet.
6. Protect the power cord from being walked on or pinched particularly at plugs,
receptacles, and the point where they exit from the sound bar
7. Unplug this apparatus during lightning storms or when unused for long periods of time.
8. Refer all servicing to qualified service personnel.
FCC Information
NOTE: This equipment has been tested and found to comply with the limits for a Class B
digital device, pursuant to Part 15 of the FCC Rules. These limits are designed to provide
reasonable protection against harmful interference in a residential installation. This
equipment generates, uses and can radiate radio frequency energy and, if not installed and
used in accordance with the instructions, may cause harmful interference to radio
communications. However, there is no guarantee that interference will not occur in a
particular installation. If this equipment does cause harmful interference to radio or television
reception, which can be determined by turning the equipment off and on, the user is
encouraged to try to correct the interference by one or more of the following measures:
• Reorient or relocate the receiving antenna - Increase the separation between the
equipment and receiver.
• Connect the equipment into an outlet on a circuit different from that to which the
receiver is connected.
• Consult the dealer or an experienced radio/TV technician for help.
Modifying or tampering with your system’s internal components can cause a malfunction
and will invalidate the system’s warranty and void your FCC authorization to operate it.
1
nxgtechnology.com
Pla
acementt
Ven
ntilation
Wh
hen placin
ng the Sou
und bar on an ente
ertainment center, bookshelf
b
f, or any
typ
pe of enclo
osed spac
ce, be surre to allow
w at least 2-3 inchess of space
e around
the
e unit for ventilation
v
. If the unit is enclosed in a tiight space
e, withoutt
ven
ntilation, heat
h
gene
erated ca
an produc
ce a poten
ntial hazard.
2-3 inches
y
unit on
o a lacqu
uered or n
natural finish, protec
ct your
Notte: When placing your
furn
niture with
h a cloth or
o other protective material.
Sou
und bar La
ayout
Front
ck
Bac
1. LCD
L
displa
ay.
2. POWER
P
bu
utton: Presss to turn the
t
Sound
d bar OFF or ON.
3. SOURCE
S
b
button:
Pre
ess to switc
ch betwe
een Blueto
ooth, FM, Aux
A in and
d Optical in.
4. MUTE
M
butto
on: Press to
t mute th
he volume
e.
5. REMOTE
R
SE
ENSOR Ensure this area
a
is nott covered
d or blocke
ed by any
y object.
6. Power
P
indiicator: Blu
ue LED rep
presents Bluetooth on.
o
7. VOL
V
+ button: Press to increa
ase the volume.
8. VOL
V
- buttton: Press to reduce
e the volume.
9. Mounting
M
Bracket.
10. FM Anten
nna.
11. AUX jack
k: To insert RCA cab
ble / 3.5mm
m auxiliary
y cable.
12. DIGITAL OPTICAL
O
a
audio inpu
ut.
13. DC powe
er in.
2
nxgtechnolo
ogy.com
REMOTE CONTROL BUTTON LAYOUT
1. POWER: Press to turn the Sound bar off or on.
2. CLOCK: Press to set the time.
3. SOURCE: Press to switch between Bluetooth, FM, AUX in and optical in.
4. TUNE BACK: Press to tune the FM radio. This button is for radio only.
5. VOL-: Press to reduce the volume.
6. SEARCH DOWN: Press to navigate down radio stations. This button is for radio only.
7. EQ: Press to select FLAT, ROCK, JAZZ, POP and CLASSICAL.
8. MUTE: Press to mute the volume.
9. ALARM: Press to set the alarm.
10. SLEEP: Press repeatedly to set the sleep timer.
11. SEARCH UP: Press to navigate up radio stations. This button is for radio only.
12. 3D: Press to turn 3D sound effects on and off.
13. MEM: Press to cycle through saved radio stations.
14. TUNE FORWARD: Press to tune the FM radio. This button is for radio only.
15. VOL+: Press to increase the volume.
7
POWER
1
8
2
10
3
12
9
11
13
14
4
15
5
6
The Remote Battery
1. The remote uses oneCR2025 battery (included).
2. Remove the protective transparent sheet before use
FM RADIO
Tuning the FM Radio
1. Press the POWER button to turn the Sound bar on.
2. Press the SOURCE button to switch to FM radio mode.
3. Press the
or buttons on the remote to tune the FM radio (#4 & #14 above)
Adjust the FM Wire Antenna (attached) to get the best reception signal.
3
nxgtechnology.com
Listening to a Saved Radio Station
1. Press the SOURCE button to switch to FM radio mode.
2. Press the UP and DOWN buttons on the remote to cycle through saved radio stations.
Saving a Radio Station
1. After tuning to the desired station, press the MEM button.
2. Press the UP or DOWN buttons on the remote to select a preset number.
3. Press the MEM button to save the current radio station to the selected preset.
Up to 20 stations can be saved to the Sound bar’s memory.
CLOCK, ALARM AND SLEEP TIMER
Setting the Clock
1. Press the POWER button to turn the power off.
2. Press the CLOCK button on the remote control.
3. The hour on the display will begin blinking.
4. Press the
or buttons on the remote to adjust the hour.
5. Press the CLOCK button again on the remote control. The minutes on the display will begin
blinking.
6. Press the
or buttons on the remote to adjust the minutes.
7. Press the CLOCK button again to finish setting the time
Setting the Sleep Timer
1. Press the SOURCE button on the Sound bar to switch to the desired sleep timer source.
2. Press the SLEEP button repeatedly to select preset the sleep timers: 5, 10, 15, 30, 60
and 90 minutes.
3. After the set sleep time has expired, the Sound bar will automatically power off
Setting the Alarm
1. Adjust the volume to the desired level.
2. Press the POWER button to turn the power off.
3. Press the ALARM button on the remote control.
4. The alarm time on the display will begin blinking.
5. Press the
or buttons on the remote to adjust the hour.
6. Press the ALARM button again on the remote control. The minutes on the display will
begin blinking.
7. Press the
or buttons on the remote to adjust the minutes.
8. Wait 5 seconds to finish setting the alarm
9. ALARM will appear on the display when the alarm is set.
10. Press and hold the ALARM button for 2-3 seconds to cancel the alarm.
4
nxgtechnology.com
Hooking it up
You can connect your TV or other external device to the Sound bar in several ways:
ANALOG Wired Connection
1. Plug the 3.5mm end of either the RCA Audio Cable or the 3.5mm Audio Cable into the
AUX IN located on the back of the Sound bar.
2. Plug the other end into the source device (TV, Phone, MP3 Player, etc.).
3. Press the SOURCE button repeatedly to select AUX as the input.
4. Once the device is hooked up, you can control playback as you would usually on the
source device.
DIGITAL Optical Connection(cable not supplied)
1. Connect a Digital Optical Audio Cable (also known as a TOSLINK cable) to the optical
output on the audio source and to the OPTICAL INPUT on the sound bar.
2. Press the POWER button to power the unit on.
3. Press the SOURCE button repeatedly to select OPTICAL as the input.
BLUETOOTH
1. Press the SOURCE button repeatedly to select the BT input.
2. The BT blue LED will flash 3 seconds and then stop for 30 seconds while it searches for
the last paired device.
3. If there is no device found, the blue LED will flash again. At this time, you can pair with
a new device.
4. Turn on the Bluetooth enabled device you want to connect and make sure Bluetooth
is turned on and searching for other Bluetooth devices (refer to the instructions for the
source device if needed).
5. The Sound bar will show up as SB40, select it and enter password 0000 to connect.
6. If the initial set up connection is successful, the next time the speaker is turned on, the
speaker will automatically pair to the last device it was connected with.
7. If there is no Bluetooth enabled device found, the BT blue LED will continue to flash.
NOTES:
1. The Sound bar only connects to one device at a time.
2. Turn off the Sound bar in order to pair it with another Bluetooth enabled device.
3. The reception range for the Sound bar is a standard 10 meters / 32 feet.
4. Interference may occur during playback when using the Bluetooth connection near
other wireless devices. If playback through Bluetooth is problematic, move the Sound
bar and the audio device to a different location, or use a hard-wired connection.
Audio from the connected & selected audio source will be played through the sound bar.
Press the MUTE button to turn the sound off. Press it again to return to the previous volume
level.
5
nxgtechnology.com
Wall Mounting
Using the included wall mounting accessories, the sound bar can be easily mounted onto a
wooden or sheet-rock wall. Distance Between Brackets 24”
24 inches
Tools Needed:
A Bubble Level, Pencil, Drill, Tape Measure, and a Philips Screw Driver
1. Determine how high you’d like to hang the Sound Bar on the wall. Seated Ear-Level is
usually a good guide – Note: The Sound Bar must be hung within 5 feet of an AC
power outlet (or power strip) for the attached AC power cord to reach.
2. Lightly mark the desired height as a horizontal line on the wall using a pencil.
3. Ensure that the line you drew is LEVEL. If it isn’t, adjust as needed to make it level.
4. Draw marks 12 inches to the right and left the midpoint of the desired location.
5. After you've double-checked your marks, screw through the Foam Spacers with
provided screws and into the marks that you made on the wall.
6. Use the LEVEL to ensure that the mounting screws are level.
7. Hang the Sound Bar onto the mounting brackets, and make sure there is a firm and
stable connection before letting go of the Sound Bar
8. Use the LEVEL to confirm that the Sound Bar is level.
When mounting to a wood wall or stud, only the screws and foam spacers are used.
When mounting into dry-wall/sheet-rock drill small holes in the sheet-rock and insert the
provided wall anchors prior to screwing in the screws.
Screws
6
Wall Anchors
nxgtechnology.com
Troubleshooting:
Problem
No power
No sound
No soundfrom Bluetooth
connection
Solution
Check that the power is switched on at the wall.
Check if the power cord is properly connected to the power outlet.
Check that the volume control is NOT at minimum setting.
Check that it is NOT set to mute.
Check if you have properly paired with the source - pairing code 0000
If none of the above solutions work, then switch off and unplug your Speaker system, leaving it for 2
minutes and then switching it back on again.
Remote won't work
Inspect or replace the batteries.
Make sure there are no obstacles obscuring the front of the Speaker.
Technical Specifications:
S ize
Output power
Standby power consumption
Input sensitivity
S/N (A weight)
Frequency Response
L/R separation (1khz)
L/R balance (stereo)
FM
31.9” Wide x 4.8” High x 2.4” Deep
40 watts (20W+20W)
<1W
800mV
60dB
60Hz~20KHz
40dB
1.5dB
87.5-108MHz
*Specifications are subject to change without prior notice.
7
nxgtechnology.com
Box Contents:
Input Cables (RCA & 3.5mm)
Power Supply
Wall mounting Screws x2
Wallmount Anchors x2
NX-SOUNDBAR-40
Stereo Sound bar
Foam Spacers x2
(for wall mounting)
POWER
Remote
Control
8
nxgtechnology.com