1
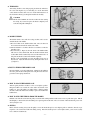
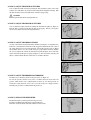
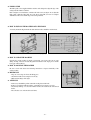
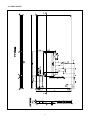
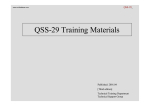
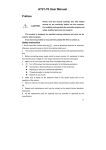
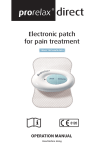
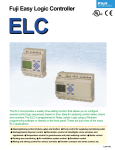
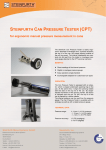
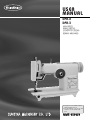
R
USER
MANUAL
DPK-2
DPK-3
HIGH-SPEED,
SINGLE-NEEDLE
LOCKSTITCH ZIGZAG
SEWING MACHINES
1) For proper use of the machine, read this
manual thoroughly before use.
2) Keep this manual in a safe place for future
reference in case the machine breaks
down.
SUNSTAR MACHINERY CO., LTD.
MME-050629
CAUTION: Operate the machine at a recommended speed
Rigorous testing and inspections have been performed on the machines at the factory. However, to ensure safe and proper use of
the machine, the user should carefully observe the following instructions.
During the first two weeks of machine operation, run the machine at 2,200 r.p.m for DPK-2, and at 2,000 r.p.m for DPK-3
machines. Afterwards, operate at a continuous rated 2,500 r.p.m for DPK-2, and at 2,300 r.p.m for DPK-3. Keep in mind that in
actual operation of the machine, the speed must be adjusted in line with the operation method and the user's control over the
machine.
■ DRIVING MOTOR, PULLEY AND BELT
We recommend that the motors and belts with the following specifications be used for proper operation of the machines.
Motor: Motor with separate transmission
– 3-phase, 2-pole, 200W output (or 1/4 horsepower)
– Motor speed: Approximately 450 r.p.m at 50Hz, and 1,750 r.p.m at 60Hz
Belt used: M-or V-shaped belt
Select the motor and pulley in reference to the below table
Outer diameter of the motor pulley
Speed of the machines
(r.p.m.)
60Hz
50Hz
2,800
70mm
85mm
2,500
60mm
75mm
2,200
55mm
65mm
2,000
50mm
60mm
■ LUBRICATION
Lubrication is one of the most critical factors in ensuring proper operation of delicate sewing machines as DPK series. Note that
supplying high-quality lubricants to all driving parts can enhance durability of the machine. Use P-50C, lubricant that comes with the
sewing machine, or S.F. (70W-150) of the pulley brand.
■ NEEDLE
All needles have type and size number, and the size number is carved on the needle body. The needle used for DPK series is straightblade DP×5 (135) (6) coated with chrome. The needle size is determined by the thread size and the thickness or weight of the sewing
materials.
The needle size is set as follows at the factory, unless is specified otherwise.
– Size number 11~16: for DPK-2 models
– Size number 14~16: for DPK-3 models
■ THE DPK SEWING MACHINE SERIES
SunStar’
s DPK series are single-needle, zigzag lockstitch sewing machines. This series promises to offer more user convenience,
speedy thread take-up at the start of sewing, and smooth and quite machine operations. Enjoy excellent and consistent stitches at all
speed, even at the maximum speed of 2,800 r.p.m.
■ FEATURES
– Improved adjustment of needle zigzags and stitch lengths
– Innovative thread take-up lever
– Protection of internal machine parts from dust with the enclosed mechanism
-2-
■ SPECIFICTION OF DPK SERIES
Model
DPK-2
DPK-3
Maximum speed
2,800 r.p.m.
2,500 r.p.m.
Continuous rated
2,500 r.p.m.
2,300 r.p.m.
Needle zigzag
0mm~5mm
0mm~10mm
Stitch length
6SPI~14SPI (4.2mm~1.8mm)
6SPI~14SPI (4.2mm~1.8mm)
Input
Descent
Descent
Presser foot
Hinge type
Hinge type
Lifting of presser foot
Max. 6.0mm
Max. 8.0mm
Lubrication
Manual
Manual
Needle type and size
DP× 5 #11
DP× 5 #14
Standard thread
Cotton 80/3
Cotton 80/3
Application
General flat seaming
Tacking and basting of upper garments support
[ Fig. 1 ]
■ APPLICATION
SunStar’
s DPK-2 models are high-speed, single-needle, two-thread zigzag lockstitch sewing machines for industrial use. Specially
designed for hemming, seaming, padding and attaching on knitted underwear, lingerie, dresses, trousers and other articles of light to
medium heavy materials made of cotton, wool, silks, rayon, nylon and similar synthetics. In addition, this sewing machine creates a
hand-made effect by: enabling the user to attach pre-made waistband linings to upper garments or men’
s trousers; joining two pieces
of cloth or lightweight leather, and preparing coat linings or finishing up coat collars. DPK-3 features up to 10mm (13/32˝)-sized
large needles for zigzagging. Specially made for all types of sewing works on medium to heavy materials. Good for basting and
tacking coat lining, hemming and stitching the edges of heavyweight leather, tents, sails and other fabrics, and sewing the shoe uppers
and seaming the edges of inlay soles.
■ HOW TO CHANGE NEEDLES
Turn the handle to bring the needle bar to its highest position. Loosen the needle
clamp screw (A in Figure 2) to take out the used needle. Insert the new needle,
with its groove facing front, into the needle hole as far as it would go. Then firmly
tighten the screw while holding the needle in the right position.
A
[ Fig. 2 ]
■ THREAD
The threads used for sewing should be able to move freely in the needle hole. Roughly or inconsistently woven threads normally
break during sewing, and/or cannot give you the number of stitches you desire to get. The recommended thread for DPK-2 and DPK3 is cotton 80/3. For all DPK sewing machines, you must use threads that are wound from right to left.
■ HOW TO REMOVE THE BOBBIN CASE
Turn the pulley in a counterclockwise direction to move the thread take-up lever to
its highest position. With your left index and the second finger, push up the latch
lever of the bobbin case frame to remove the frame with the bobbin case. Then
push down the latch lever to remove the bobbin case.
Bobbin case
Hook
[ Fig. 3 ]
-3-
■ THREADING
Your sewing machine comes with properly placed threads. Therefore,
the easiest and simplest way to re-threading is to tie the thread that
comes with the machine, with a new one. Check if the knotted area of
the old and new threads goes through the needle hole smoothly.
CAUTION
Pull the thread 100mm out from the needle hole when starting
the sewing. If you need to replace the threads completely, refer
to the threading table and Figure 4.
[ Fig. 4 ]
■ BOBBIN WINDER
The bobbin winder comes with the sewing machine and is used to
wind the thread on the bobbin.
a) Place the bobbin on the bobbin winder shaft. Place the thread to
move between the thread hole and the tension disk.
b) Turn the bobbin in a clockwise direction several times to make the
threading easier.
c) Press the latch (③, Figure 5), then the wheel of the bobbin winder
will come in contact with the belt. Run the machine until the wheel
of the bobbin winder automatically removes itself from the belt. At
this point, the thread is wound on the bobbin completely.
Threads can be wound tightly or loosely depending on the type of
threads used. Adjust the thread tension by turning the index screw
(②, Figure 5).
②
①
Pulley
Tension
disk
③
Latch
Adjusting screw
[ Fig. 5 ]
■ HOW TO THREAD THE BOBBIN CASE
Insert the bobbin case in the bobbin frame. Firmly fix the bobbin in
the frame, push the thread through the hole and pull it into the lower
part of the tension spring and the hole.
[ Fig. 6 ]
■ HOW TO PLACE THE BOBBIN CASE
Turn the pulley until the needle bar comes to its highest position.
Bring the bobbin case towards the center stud in the bottom of the
bobbin case. Press the bobbin case until it makes a clicking sound in
the frame. Follow the instructions carefully to protect the needle in the
bobbin frame.
[ Fig. 7 ]
■ HOW TO PULL THE THREAD FROM THE BOBBIN
Hold the end of the thread and turn the pulley towards machine turning until the needle starts to move up and down again. Pull the
thread lightly so that the thread in the bobbin passes up through the needle hole. Place two strands of threads under the presser foot
when you begin to sew.
■ SEWING
Before and after seaming, always turn the pulley to move the thread take-up lever to its highest position. Otherwise, threads can get
tangled or come out from the needle hole during sewing. If the thread take-up lever is at the highest stroke, you do not necessarily
have to hold on to both threads.
-4-
■ HOW TO ADJUST THE WIDTH OF STITCHES
You can adjust the width of stitches by turning the dial (A, Figure 8) in the center of the
machine arm. If the dial is set at 0, the machine will perform straight line stitching. Turn
the dial to the left to increase the width and to commence zigzag sewing.
CAUTION
Stop the machine before rotating the dial (A).
Narrow
Wide
[ Fig. 8 ]
■ HOW TO ADJUST THE LENGTH OF STITCHES
You can adjust the length of stitches by turning the dial inside the pulley (A, Figure 9).
Turn the dial to perform straight line stitching or zigzagging. Turn it to the right to
increase and to the left to decrease the length of stitches.
Long
Short
[ Fig. 9 ]
■ HOW TO ADJUST THE THREAD TENSION
Accurate control of thread tension determines sturdiness and elegance of completed seams.
Tension is accurately balanced when the needle engages the bobbin thread at the center of
the sewing material. To increase thread tension of the needle, turn the screw (A, Figure
10) clockwise and vice versa. If you still cannot get a proper number of stitches, unfasten
the screw (C, Figure 10) and turn the thread tension point (D, Figure 10) to control the
tension of the thread take-up lever spring (A, Figure 11). For more tension, turn the point
(D) in a counterclockwise direction and for less, in a clockwise direction.
C
A
B
D
[ Fig. 10 ]
A
[ Fig. 11 ]
■ HOW TO ADJUST THE PRESSER FOOT PRESSURE
The index screw controls the pressure of the presser foot. (A, Figure 12)
To raise the pressure, turn the screw (A) in a clockwise direction and to reduce the
pressure, either turn the screw counterclockwise or turn it up. Too much pressure can
deform the sewing materials, and too less can result in uneven or skipped stitches.
Normally, low pressure is recommended for the presser foot.
Low
High
A
[ Fig. 12 ]
■ HOW TO INSTALL THE KNEE LIFTER
The knee lifter replaces manual operation of the presser foot.
To install, assemble the knee lifter units as shown in Figure 13.
Then fix it onto the backside of the table with three wooden screws.
[ Fig. 13 ]
-5-
■ FABRIC GUIDE
The fabric guide comes supplied with the machine and is designed to align the edge of the
sewing material with the seam lines.
Refer to Figure 14 for installation. Unfasten the index screw (A, Figure 14) to adjust the
fabric guide. Slide the fabric guide (A) to the left or right until you secure an adequate
width between the seams and the edge of the sewing materials.
B
A
[ Fig. 14 ]
■ HOW TO INSTALL THE MACHINE ONTO THE TABLE
Accurately mount the drip fan under the table with four nails to install the machine head.
A
C
B
180
395
C
60
20
235
Centerline of
machine pulley
80
90 90
170
B
Centerline of
motor pulley
195
225
180
Centerline of belt
[ Fig. 15 ]
[ Fig. 16 ]
■ HOW TO CLEAN THE MACHINE
Cleaning the sewing machine is simple yet important. No need to take out any parts
during cleaning. Remove lint and dirt gathered around the hook, input groove and the
lower part of the needle bar.
■ HOW TO MAINTAIN THE MACHINE
Be sure to check and observe the following instructions to improve durability of the
sewing machine.
■ BEFORE USE
– Drop one or two drops of oil onto all driving parts.
– Check if the needle is intact and placed correctly.
– Make sure threading is done right.
■ AFTER USE
– Remove any dust build-up or lint around the needle plate and the hook.
– If there is any problem with the machine, ask technicians for assistance or repair.
– Check daily and keep a record of the number of times the needle breaks or the thread
breaks.
– Place the dust cover on the machine at all times.
-6-
[ Fig. 17 ]
■ TABLE DRAWING
-7-