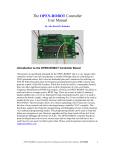
1
OPEN-ROBOT V2 Owner’s Manual
OPEN-ROBOT shown with Matchport b/g
This owner’s manual will guide you through the required assembly steps for your OPENROBOT V2 kit. The V2 stands for Version-2 Controller Board. First you will solder and
assemble the V2 Controller Board. The controller board is the “Brains” of your robot and
is powered by a PIC18F4520. Then you will assemble the MatchPort/XBee wireless
board and finally configure either you MatchPort b/g or XBee modules. Approximate
assembly time is 4 hours, but heavily depends upon your soldering experience. The
remainder of this Manual contains information related to programming, add-on sensors,
etc…
It is assumed that you have soldering experience and can identify common electronic
components, i.e. resistor, capacitor, LED, IC-Socket, header, voltage regulator and
common mechanical parts i.e. machine screw, nut, washer. If you are uncomfortable with
the above statement then please feel free to return your unopened OPEN-ROBOT Kit.
However, if you are up for the challenge then we hope you enjoy the assembly process.
All images are high resolution, so zoom in when you need a closer view.
Contents
Chapter 1: Main PIC18F4520 V2 PCB Assembly ............................................................. 5
Review OPEN-ROBOT Controller Board Component List:.......................................... 5
Required & Optional Tools:............................................................................................ 5
Step#1, Solder 1k Ohm Resistors: .................................................................................. 6
Step#2, Solder 47k Ohm Resistor:.................................................................................. 7
Step#3, Solder 4.7k Ohm Resistors: ............................................................................... 8
Step#4, Solder 2.7k Ohm Resistor & 0.1 uF Tantalum Capacitor:................................. 9
Step#5, Solder IC-Sockets: ........................................................................................... 10
Step#6, Solder Terminal Blocks: .................................................................................. 11
Step#7, Solder Non-Polarized Headers & Capacitors: ................................................. 12
Step#8, Solder High Efficiency RECOM +5 Volt Regulator:...................................... 13
Step#9, Solder Green LEDs:......................................................................................... 14
Step#10, Solder 10 MHz Crystal, 22pF Capacitors & RJ12 Connector:...................... 15
Step#11, Solder Cadmium Sulfide Photocells:............................................................. 16
Step#12, Solder RFID Antenna Header:....................................................................... 17
Step#13, Install Power and PIC18F4520 UART Wires ............................................... 18
Step#14, Install Chips: .................................................................................................. 19
Step#15, Install Heat Shrink Tubing on Cadmium Sulfide Cells: ................................ 20
Chapter 2: Assemble MatchPort/XBee wireless board..................................................... 21
Step#16, Review OPEN-ROBOT MatchPort/XBee Contents: .................................... 21
Step#17, Prepare the 2mm pitch MatchPort/XBee sockets: ......................................... 22
Step#18, Solder 74LVC245 and 74HC245 Octal Buffer: ............................................ 23
Step#19, Solder Remaining Components: .................................................................... 24
Step#20a, Install MatchPort b/g Module (purchase separately):..................................... 25
Step#20b, Install XBee ZigBee Module (purchase separately):...................................... 25
Chapter 3: How to Test OPEN-ROBOT Circuit Boards .................................................. 26
Chapter 4: OPEN-ROBOT body Assembly ..................................................................... 29
Step#21, Assemble OPEN-ROBOT Body:................................................................... 29
Step#22, Assemble and Attach Rear Caster Wheel:..................................................... 30
Step#23, Attach GM8 Motor Mounts: .......................................................................... 31
Step#24, Prepare to Attach RFID Antenna (purchase separately): ................................. 32
Step#25, Attach RFID Antenna to Base Plate: ............................................................. 33
Step#26, Prepare to Solder Noise Filtering Capacitors (Optional):.............................. 34
Step#27, Solder Noise Filtering Capacitors:................................................................. 35
Step#28, Attach GM8 Motors:...................................................................................... 36
Step#29, Prepare RFID Antenna Cable (purchase separately):....................................... 37
Step#30, Attach RFID Antenna Cable & Prepare to Mount Controller Deck:............. 38
Step#31, Prepare Controller Deck: ............................................................................... 39
Step#32, Attach Controller Board Standoffs: ............................................................... 40
Step#33, Mount Controller Deck:................................................................................. 41
Step#34, Mount Controller Board & Connect RFID Cable:......................................... 42
OPEN-ROBOT V2 Manual, Abe Howell’s Robotics November 14, 2009
2
Step#35, Attach MatchPort/XBee Deck Standoffs:...................................................... 43
Step#36, Attach GM8 Wheels & GM8 Wires: ............................................................. 44
Step#37, Mount GP2D120 Sensors to Brackets: .......................................................... 45
Step#38, Mount GP2D120 Sensors to Robot: .............................................................. 46
Step#39, Connect GP2D120 Sensors to the Controller Board: .................................... 47
Step#40, Attach Dual Lock Tape to Base and Battery Holder: .................................... 48
Step#41, Prepare MatchPort/XBee PCB Deck: ............................................................ 49
Step#42, Mount the MatchPort/XBee PCB to the Deck:.............................................. 50
Step#43, Mount MatchPort/XBee Deck to Robot: ....................................................... 51
Step#44, Connect Power Wires: ................................................................................... 52
Step#45, Connect PIC18F4520 Serial Port Wires: ....................................................... 53
Step#46, Attach MatchPort b/g Antenna (purchase separately):..................................... 54
Chapter 5: Get Started with a MatchPort Equipped Robot............................................... 55
Getting to Know Your OPEN-ROBOT & MatchPort b/g:........................................... 55
Connecting to OPEN-ROBOT for the First Time: ....................................................... 57
Connect Using the OPEN-ROBOT TCP-Socket Manual Control Program:................ 58
(OPTIONAL) - Reconfigure MatchPort Network Settings:......................................... 60
Chapter 6: Get Started with XBee® Equipped Robot ...................................................... 67
Getting to Know Your OPEN-ROBOT & XBee modules: .......................................... 67
Configure XBee Modules: ............................................................................................ 68
Connect Using the OPEN-ROBOT XBee/ZigBee Manual Control Program: ............. 72
Chapter 7: How to Wirelessly Upload PIC18F4520 code ................................................ 75
Connect a 1k Ohm Resistor Across Pin#3 & Pin#6 on J2 Program/Debug Connector:76
Connect to Robot Using OPEN-ROBOT TCP-Socket Manual Control Program: ...... 76
Chapter 8: How to modify PIC18F4520 firmware ........................................................... 79
Requirements: ............................................................................................................... 79
Getting Started with the PCWH Compiler: .................................................................. 79
Architecture of PIC18F4520 Firmware: ....................................................................... 82
Chapter 9: Details of PIC18F4520 controller board ......................................................... 83
Introduction to the OPEN-ROBOT Controller Board .................................................. 83
PIC18F4520 Main Controller Board Connectors ......................................................... 84
Board Power & Programming Connector, J1 & J2....................................................... 85
Analog to Digital (A/D) Headers, J12 & J13................................................................ 85
I2C Header, J7 ............................................................................................................... 86
GM-8 Motor Headers, J9 & J10 ................................................................................... 86
Extra I/O & WW-02 Wheel Encoders Header, J3 & J4 ............................................... 87
PIC18F4520 Serial Connector, J11............................................................................... 88
RFID Antenna Header, J8............................................................................................. 88
How to Connect the CCS ICD to the Programming Connector, J2.............................. 89
OPEN-ROBOT Serial-Based Firmware Command Set ............................................... 90
Serial-Based command set for OPEN-ROBOT. ........................................................... 91
Chapter 10: Details of analog to digital (A/D) sensors..................................................... 97
OPEN-ROBOT’s Battery Voltage Measuring Circuit:................................................. 97
OPEN-ROBOT’s GP2D120 IR Sensors:...................................................................... 98
OPEN-ROBOT’s Light Sensors: ................................................................................ 100
Chapter 11: Design of PIC18F4520 V2 Controller Board.............................................. 102
OPEN-ROBOT V2 Manual, Abe Howell’s Robotics November 14, 2009
3
List of board requirements .......................................................................................... 102
ExpressPCB board services ........................................................................................ 103
Chapter 12: Design of MatchPort/XBee Wireless Board ............................................... 104
List of board requirements .......................................................................................... 104
ExpressPCB board services ........................................................................................ 105
Chapter 13: Mechanical Design of OPEN-ROBOT ....................................................... 106
3D Modeling software ................................................................................................ 106
Chapter 14: Adding the SRV-1 Blackfin Camera........................................................... 107
Preparation for the SRV-1 Camera Board .................................................................. 107
Chapter 15: Upload Modified SRV-1 Firmware ............................................................ 108
Prerequisites................................................................................................................ 108
Uploading Firmware Using ShamCom Terminal and XModem................................ 108
Chapter 16: Upload srv1.ldr Using Flashload & ICEbear .............................................. 113
Prerequisites................................................................................................................ 113
Flashload srv1.ldr File Using ICEbear JTAG............................................................. 113
Upload srv1.ldr File Using XModem ......................................................................... 115
Appendix......................................................................................................................... 117
Main PIC18F4520 V2 Board Schematic .................................................................... 117
MatchPort/XBee Wireless Board Schematic .............................................................. 118
PIC18F4520 I/O Map ................................................................................................. 119
OPEN-ROBOT Parts List ........................................................................................... 120
OPEN-ROBOT Controller Board Parts List............................................................... 121
MatchPort/XBee/SRV-1 Board Parts List .................................................................. 122
OPEN-ROBOT V2 Manual, Abe Howell’s Robotics November 14, 2009
4
Chapter 1: Main PIC18F4520 V2 PCB Assembly
Review OPEN-ROBOT Controller Board Component List:
QTY Description
(2)
(1)
(5)
(1)
(2)
(2)
(2)
(1)
(1)
(1)
(1)
(5)
(1)
(3)
(1)
(1)
(1)
(2)
(2)
(1)
(1)
(1)
1k Ohm Resistor - R1 and R11
47k Ohm Resistor – R2
4.7k Ohm Resistor – R3, R5, R6, R7 and R8
2.7k Ohm Resistor – R4
Cadmium Sulfide Photocell – R9 and R10
0.1µF Tantalum Capacitor – C2 and C5
33µF Capacitor – C3 and C4
100µF Capacitor – C1
40-Pin IC Socket – U2
16-Pin IC Socket – U3
3-Position 0.1” Pitch Terminal Block – J11
4-Position Non Polarized Header – J14 and J15
2-Position Non Polarized Header – J8
2-Position 0.1” Pitch Terminal Block – J1, J9 and J10
6-Position RJ12 ICD Connector – J2
10Mhz Crystal – Y1
22pF Ceramic Capacitor – C6 and C7
Green LED – D1, D2
+5 Volt High-Efficiency 1.0 Amp Voltage Regulator – U1
PIC18F4520 Microcontroller – U2
SN754410 H-Bridge – U3
1” Length 3/16” Diameter Heat Shrink Tube
Required & Optional Tools:
•
•
•
•
•
•
Soldering Iron & Solder (Required)
Wire Snips or Side Cutters and Needle Nose Pliers (Required)
Wire Stripper (Required)
Phillips and flat head screwdriver (Required)
Metal hand file, nail file, or sand paper (Required when using MatchPort b/g)
Multi-Meter (Test assembled board & measure resistors) (Optional)
OPEN-ROBOT V2 Manual, Abe Howell’s Robotics November 14, 2009
5
Step#1, Solder 1k Ohm Resistors:
Figure#1a, Solder 1k Ohm Resistors.
In step#1 solder (2) 1k Ohm resistors as shown in figure#1a. The brown-black-red color
band identifies a 1k Ohm resistor. Solder the (2) resistors in the following locations on
the board: R1 and R11. Before soldering the resistors make sure to bend the wire leads
over and then cut off the excess wire as close to the board as possible without damaging
the board (refer to figure#1b). R1 & R11 are used as current limiting resistors for the
board’s green LEDs: D1 & D2.
Figure#1b, Bend 1k Ohm Resistor leads and cut off excess.
OPEN-ROBOT V2 Manual, Abe Howell’s Robotics November 14, 2009
6
Step#2, Solder 47k Ohm Resistor:
Figure#2, Solder 47k Ohm Resistor.
In step#2 solder (1) 47k Ohm resistor in location R2 on the board. The yellow-violetorange color band identifies a 47k Ohm resistor. R2 is used to pull the PIC18F4520’s
MCLR pin high, but also allows for in-circuit programming.
OPEN-ROBOT V2 Manual, Abe Howell’s Robotics November 14, 2009
7
Step#3, Solder 4.7k Ohm Resistors:
Figure#3, Solder 4.7k Ohm Resistors.
In step#3 solder (5) 4.7k Ohm resistors in the following locations: R3, R5, R6, R7, and
R8. The yellow-violet-red color band identifies a 4.7k Ohm resistor. R3 is used as part of
a battery voltage monitoring circuit. R5 and R6 are used as pull-up resistors for the
PIC18F4520’s I2C pins. R7 and R8 are used in a voltage divider so that the output from
the light sensing cadmium sulfide photocells can be measured.
OPEN-ROBOT V2 Manual, Abe Howell’s Robotics November 14, 2009
8
Step#4, Solder 2.7k Ohm Resistor & 0.1 uF Tantalum Capacitor:
Figure#4a, Solder 2.7k Ohm Resistor.
In step#4 solder (1) 2.7k Ohm resistor in the location R4. The red-violet-red color band
identifies a 2.7k Ohm resistor (Fig#4a). R4 is used in conjunction with R3 as part of a
battery voltage monitoring circuit. Solder (1) 0.1 uF Tantalum Capacitor in location C5,
but insert it from the bottom side of the circuit board so that it will not interfere with the
PIC18F4520’s (40)-pin IC-Socket. C5 is a noise filtering capacitor for the PIC18F4520.
Negative Pin
Positive Pin
Figure#4b, Insert 0.1 uF Tantalum Capacitor from bottom of PCB and then solder.
OPEN-ROBOT V2 Manual, Abe Howell’s Robotics November 14, 2009
9
Step#5, Solder IC-Sockets:
Figure#5, Solder IC-Sockets.
In step#5 solder (3) IC-Sockets in the following locations: U2, U3, and U4. U2 receives
the 40-pin socket, U3 receives the 16-pin and U4 receives a 28-pin (purchase separately).
The 40-pin socket will house the PIC18F4520, the 28-Pin socket will be used to house
the CY8C0105 RFID Chip Module (purchase separately) and the 16-pin socket will hold
the SN754410 H-bridge.
OPEN-ROBOT V2 Manual, Abe Howell’s Robotics November 14, 2009
10
Step#6, Solder Terminal Blocks:
Figure#6, Solder Terminal Blocks.
In step#6 solder (3) 2-position terminal blocks at locations J9, J10, and J1. These terminal
blocks provide a connection point for the GM8 gear motors and power to the board.
Solder (1) 3-position terminal block in location J11. J11 is used to connect the PIC’s
serial pins to the MatchPort wireless board.
OPEN-ROBOT V2 Manual, Abe Howell’s Robotics November 14, 2009
11
Step#7, Solder Non-Polarized Headers & Capacitors:
Figure#7, Solder Non-Polarized Headers & Capacitors.
In step#7 solder (5) 4-position non-polarized headers in the following locations of J14: 1,
2, 3 and J15: 4 & 5. These headers allow for the connection of devices that require an
analog to digital (A/D) conversion, for example, the Sharp GP2D12 or GP2D120 Infrared
Range Sensor. Solder (1) 0.1µF tantalum capacitor in the location C2. Then solder (1)
100µF capacitor in the location C1 and finally solder (2) 33µF capacitors in the following
locations: C3 and C4. C3 and C4 help to filter out any noise generated from the
connection of Sharp GP2D12 or GP2D120 IR Sensors to the J14 & J15 headers.
OPEN-ROBOT V2 Manual, Abe Howell’s Robotics November 14, 2009
12
Step#8, Solder High Efficiency RECOM +5 Volt Regulator:
Figure#8, Solder High Efficiency RECOM Voltage Regulator.
In step#8, solder (1) +5volt high-efficiency RECOM voltage regulator in the location U1.
Be sure to orient the regulator properly. The U1 regulator supplies +5 volts to all the
logic level devices on this board.
NOTE: The Open-Robot kit contains (2)-RECOM regulators. One is +5 volts and the
other is +3.3 volts. You can identify the +5 volt RECOM regulator by its part#, which is
R785.0-1.0.
OPEN-ROBOT V2 Manual, Abe Howell’s Robotics November 14, 2009
13
Step#9, Solder Green LEDs:
Figure#9a, Solder Green LEDs.
In step#9 solder the green LED in location D1 & D2. You should notice that the D1 &
D2 outlines on the board have one side with a flat spot; this flat spot corresponds to the
negative or cathode terminal of the LED. The round side corresponds to the LED’s anode
or positive terminal. Typically the LED would have a flat spot on the bulb, but since we
are using a small LED only the positive terminal can be identified as the longer one and
must correspond to the round side of the D1 & D2 outline. Please refer to the LED
illustration provided below in figure#9b.
Figure#9b, LED Illustration.
OPEN-ROBOT V2 Manual, Abe Howell’s Robotics November 14, 2009
14
Step#10, Solder 10 MHz Crystal, 22pF Capacitors & RJ12
Connector:
Figure#10, Solder 10MHz Crystal, 22pF Ceramic Capacitors & RJ12 Connector.
In this step solder the 10 MHz crystal in location Y1 and then solder (2)-22pF ceramic
capacitors in locations: C6 & C7. You also need to solder the 6-position RJ12 connector
in position J2. The RJ12 connector allows for the direct connection of an in-circuit
programmer/debugger (ICD) from CCS Inc.
OPEN-ROBOT V2 Manual, Abe Howell’s Robotics November 14, 2009
15
Step#11, Solder Cadmium Sulfide Photocells:
Figure#11, Solder Cadmium Sulfide Photocells.
In step#11 solder the cadmium sulfide photocells in locations: R9 and R10. You can bend
these as you see fit, but I have bent mine to look left and right so that the direction of
incident light can be determined.
OPEN-ROBOT V2 Manual, Abe Howell’s Robotics November 14, 2009
16
Step#12, Solder RFID Antenna Header:
Figure#12, Solder RFID Antenna Header.
In this step solder the 2-position non-polarized RFID antenna header in location J8.
Figure#12 shows the bottom side of the board because the J8 RFID antenna header must
be installed on the bottom side & soldered from the top side, since the RFID chip module
is to be installed on the top side of the board and would prevent you from connecting the
antenna.
OPEN-ROBOT V2 Manual, Abe Howell’s Robotics November 14, 2009
17
Step#13, Install Power and PIC18F4520 UART Wires
Figure#13. Install Power and PIC18F4520 UART Wires.
In this step you will be installing the board power and PIC18F4520 UART wires, which
will eventually connect to the MatchPort/XBee PCB. Strip back 1/8” and insert the red
wire to Vin on the J1 terminal block and the black wire to Gnd on J1 and tighten the
corresponding screws. Strip and install the white wire to Rx on J11 terminal block, the
yellow wire to Tx on J11 and the blue wire to +5v on J11 and then tighten the
corresponding screws.
OPEN-ROBOT V2 Manual, Abe Howell’s Robotics November 14, 2009
18
Step#14, Install Chips:
Figure#14. Install Chips.
*Please note the chip orientations. The front end of a
chip is typically denoted by a small U-shaped
depression and pin#1 is usually located to the left of
this mark.
In step#14 install the PIC18F4520, SN754410 and RFID Chip Module and (3) jumpers.
Install the PIC18F4520 chip in the 40-pin socket (U2), the SN754410 chip in the 16-pin
socket (U3) and the RFID chip (purchase separately) in the 28-pin socket (U4). You
might have to bend the pins on some of the chips to get them to insert into the respective
socket, but be very careful not to over bend pins as they can fracture and break off
yielding the chip useless. You may want to take a look at the How to Test OPENROBOT Circuit Boards chapter before installing the chips.
*NOTE: You should clean the solder flux from your board prior to installing the chips.
If you used a water-soluble flux then you can simply clean with water and scrub with
an old toothbrush. Otherwise, if you used alcohol-soluble flux you may need to clean
the flux with isopropyl alcohol. If you used a non-clean flux then you are already done.
OPEN-ROBOT V2 Manual, Abe Howell’s Robotics November 14, 2009
19
Step#15, Install Heat Shrink Tubing on Cadmium Sulfide Cells:
Figure#15, Install Heat Shrink Tubing on Cadmium Sulfide Cells.
In this step you need to cut the heat shrink tubing in half and then trim each piece to
length so that the cadmium sulfide cell’s face is just behind the end of heat shrink tubing.
The tubing will help to isolate each light sensor so that your robot can determine the
direction of incident light. You can shrink the tubing with a heat gun or simply bring the
end of your soldering iron close to the tubing, but don’t touch it.
OPEN-ROBOT V2 Manual, Abe Howell’s Robotics November 14, 2009
20
Chapter 2: Assemble MatchPort/XBee wireless board
Step#16, Review OPEN-ROBOT MatchPort/XBee Contents:
1. (1) – OPEN-ROBOT MatchPort/XBee PCB
2. (4) – 2mm pitch MatchPort/XBee sockets, U1 headers
3. (1) – SPST switch, SW1
4. (4) – 0.1” pitch 2-position non-polarized headers, J4 & J5
5. (2) – 0.1” pitch jumper
6. (1) – 0.1” pitch 3-position terminal, J3
7. (2) – 0.1” pitch 2-position terminal block, J1 & J6
8. (1) – RECOM 3.3volt high-efficiency switching regulator, U3
9. (1) – 74LVC245 octal buffer
10. (1) – 74HC245 octal buffer
11. (1) – 32-position socket for connecting SRV1 Camera Board, J2 (purchase separately)
12. (1) – 100uF Electrolytic capacitor
13. (1) – 0.1uF Tantalum capacitor
3
2
8
1
9
12
10
13
7
5
4
6
11
Figure#16. Review Kit Contents.
OPEN-ROBOT V2 Manual, Abe Howell’s Robotics November 14, 2009
21
Step#17, Prepare the 2mm pitch MatchPort/XBee sockets:
NOTE: Skip this step if you are using the XBee ZigBee module.
File
Figure#17. File or Sand the ends of 2mm MatchPort/XBee sockets.
You will need to slightly file or sand one end on each of the 2mm pitch MatchPort/XBee
sockets so that they fit on the PCB. Be careful not to file too much of the plastic
otherwise the metal pin will be exposed. You only need to perform this step if you are
using the MatchPort b/g module.
OPEN-ROBOT V2 Manual, Abe Howell’s Robotics November 14, 2009
22
Step#18, Solder 74LVC245 and 74HC245 Octal Buffer:
Figure#18. Solder 74LVC245 and 74HC245 Octal Buffers.
The 74LVC245 and 74HC245 chips are fine pitch SOIC chips and are not as easy to
solder as say a 0.1” PDIP component. However, there is something that will make this a
lot easier. Simply cut two small pieces of tape and then use these to secure each chip to
the PCB and also to your work surface. Be sure to orient the chips as shown and in their
proper location on the board. Now you can easily solder using 0.015” diameter solder
(RadioShack#64-035) and a fine tip soldering iron. Don’t worry if you accidentally
solder-bridge two pins together during the solder process because in the end you can use
a piece of de-soldering braid (RadioShack#64-2090) to remove the excess solder.
OPEN-ROBOT V2 Manual, Abe Howell’s Robotics November 14, 2009
23
Step#19, Solder Remaining Components:
Install Jumpers on J4 & J5
Install headers here if using MatchPort b/g module
Solder 32-pin
connector
Install headers here if using XBee ZigBee module
Figure#19a. Solder remaining components.
Solder the remaining components according figure#19a. If you are going to add the
SRV1 Camera Board then you will need to purchase & solder a 32-pin connector in the
J2 location. Also be sure to add the 0.1” jumpers to J4 and J5. If you are adding the SRV1
Camera Board, then attach the jumpers to pins 1&3 on both J4 and J5. Otherwise attach
the jumpers to pins 2&4 on both J4 and J5. Figure#19a shows the jumpers attached to
pins 2&4 and is therefore configured for normal non-SRV1 operation.
RECOM Regulator
0.1uF
100uF
NOTE: Your kit has a high-efficiency RECOM
3.3 volt regulator. Be sure to solder the RECOM
regulator such that the RECOM text is facing the
HC245 octal buffer. The +3.3 volt RECOM part#
is R783.3-1.0. You will also need to solder a
100uF electrolytic capacitor in location C1 and a
0.1uF tantalum capacitor in location C2. Refer to
figure#19b to the left.
Figure#19b. RECOM 3.3 volt regulator installation.
OPEN-ROBOT V2 Manual, Abe Howell’s Robotics November 14, 2009
24
*NOTE: You should clean the solder flux from your board prior to installing the
MatchPort b/g module.
Step#20a, Install MatchPort b/g Module (purchase separately):
Antenna
Cable
Antenna
Clip
Figure#20a. Fully assembled MatchPort/XBee PCB with MatchPort b/g installed.
Install the MatchPort b/g module by orientating the antenna clip towards the 3-position
terminal block, J3. Be sure to properly align the pins before firmly pressing into place.
Please refer to figure#20a. If you are using the XBee ZigBee module, then refer to
figure#20b. The remaining documentation will display the MatchPort b/g. If you are
using the XBEE module simply ignore the MatchPort b/g.
Step#20b, Install XBee ZigBee Module (purchase separately):
Figure#20b. Fully assembled MatchPort/XBee PCB XBee module installed.
OPEN-ROBOT V2 Manual, Abe Howell’s Robotics November 14, 2009
25
Chapter 3: How to Test OPEN-ROBOT Circuit Boards
Prerequisites & Setup:
1. Soldered Main PIC18F4520 circuit board & MatchPort/XBEE circuit board
preferably without chips installed, i.e. PIC18F4520, h-bridge, RFID module,
MatchPort b/g or XBee module.
2. Voltmeter capable of measuring up to10 volts
3. Connect the J1 red (Vin) and black (Gnd) wires from the PIC18F4520 board to the J6
connector on the MatchPort/XBEE board’s J6 connector. The red wire connects to J6
Vo and the black wire to J6 Gnd. This will provide power to the PIC18F4520 board.
4. Connect the (6)-AA battery holder’s red and black wires to the J1 connector on the
MatchPort/XBee board. The red wire from the battery holder goes to J1 Vin and the
black wire goes to J1 Gnd. This setup will provide power to both boards. At this
point, do not install the AA batteries and leave the power switch off!
5. Be sure to tape off the blue wire coming from the Main PIC18F4520 board because
this wire will have +5volts when the power is turned on and we do not want a short
circuit to develop.
Test Procedure:
1. Make sure the MatchPort/XBEE board’s power switch is off and then install the (6)AA batteries. Leave the power switch off!
2. Leave the power switch off! Check for +7 to +9volts at the MatchPort/XBEE board’s
J1 connector. Place the ground probe (usually black) from your meter on the J1 Gnd
pin and the signal probe (usually red) on the J1 Vin pin.
a. If you don’t read +7 to +9volts, then the batteries are dead or inserted
improperly in the holder (Check battery polarity in the holder. Flat end of
battery must be against spring).
3. Now turn the power switch on and verify that the green LED, D1, on the PIC18F4520
board is lit at this point. Turn the power switch off.
a. If the LED does not light up, then a short circuit or improperly installed
component might be to blame. You will need to take a look at both boards to
determine if it is related to a bad solder joint or a regulator that is soldered in
backwards or a mis-wiring of the battery pack or the J1 power wires from the
PIC18F4520 board.
OPEN-ROBOT V2 Manual, Abe Howell’s Robotics November 14, 2009
26
4. Turn the power switch on and check for +7 to +9volts at the MatchPort/XBEE
board’s J6 connector. Place the ground probe from your meter on the J6 Gnd pin and
the signal probe on the J6 Vo pin.
a. If you do not measure the correct voltage, then the switch might be defective.
5. Check for +5volts on the Main PIC18F4520 board’s +5volt header, J6. Place the
ground probe from your meter on the J5 Gnd Header and the signal probe on the +5
volt header, J6.
a. If you do not read +5volts, then something might be wrong with the RECOM
+5volt regulator. Check to be sure the regulator is soldered in properly. If
soldered properly, then it may be defective.
6. Check for +3.3volts at the +3.3volt regulator, U3. Place the ground probe from your
meter on the J6 Gnd pin and the signal probe on the +3.3volt pin on the U3 +3.3volt
regulator.
a. If you do not measure +3.3volts then the regulator might be soldered in
wrong.
Ground probe
+5 volt probe
Main PIC18F4520 Board Test Points.
OPEN-ROBOT V2 Manual, Abe Howell’s Robotics November 14, 2009
27
+3.3volt Regulator, U3
Signal probe, +3.3volts
Signal probe, Vin
Gnd probe, Gnd
MatchPort/XBEE Board Test Points.
Signal probe, Vo
Gnd probe, Gnd
OPEN-ROBOT V2 Manual, Abe Howell’s Robotics November 14, 2009
28
Chapter 4: OPEN-ROBOT body Assembly
Step#21, Assemble OPEN-ROBOT Body:
Controller
Deck
Top Plate
Bottom
Plate
Figure#21, Prepare OPEN-ROBOT body pieces.
The first step in assembling the OPEN-ROBOT’s body is to prepare the acrylic body
pieces. You need to peel off the brown protective paper coating from each piece so that
we can begin the assembly process.
*NOTE: Please note that the color of your body pieces may vary.
OPEN-ROBOT V2 Manual, Abe Howell’s Robotics November 14, 2009
29
Step#22, Assemble and Attach Rear Caster Wheel:
Figure#22, Assemble and mount rear caster wheel.
To assemble the caster wheel you need to first insert the metal roller ball then add the (3)needle rollers and finally attach the (3)-hole cover plate. Use the (3) #4-40x3/8” long
machine screws to attach the plastic caster wheel to the base plate.
OPEN-ROBOT V2 Manual, Abe Howell’s Robotics November 14, 2009
30
Step#23, Attach GM8 Motor Mounts:
Mate this side to base plate
Figure#23a, Attach GM8 motor mounts to base plate.
In step#23 attach each GM8 motor mount using (4) #6-32x1/2” long machine screws and
(4) #6 flat washers. The GM8 mounts must mate on the side of the base plate that is
opposite to the caster wheel. If you look closely on each GM8 mount you will notice that
one of the #2-56 threaded holes is drilled further away from the edge. This side must be
mated to the base plate. Refer to figure#23a if you are unsure.
Figure#23b, Attach GM8 motor mounts to base plate.
OPEN-ROBOT V2 Manual, Abe Howell’s Robotics November 14, 2009
31
Step#24, Prepare to Attach RFID Antenna (purchase separately):
Figure#24a, Prepare to attach RFID antenna.
In step#24 attach a small piece of the 3M Dual Lock® tape to the plastic connector on the
RFID antenna. After attaching the first piece, cut a second piece and snap it onto the first
piece. Be very careful when handling the RFID antenna because it is very fragile.
Figure#24b, Attach small piece of tape to connector.
Figure#24c, Cut second piece of tape and snap onto first piece.
OPEN-ROBOT V2 Manual, Abe Howell’s Robotics November 14, 2009
32
Step#25, Attach RFID Antenna to Base Plate:
Figure#25, Attach RFID antenna to base plate.
In step#25 peel the paper backing off of the piece of Dual Lock tape on the antenna
connector and carefully locate the antenna on the base plate and once you have it in
position firmly press the plastic connector onto the base. The antenna should be centered
in between the two GM8 mounts and the front edge of the antenna should be
approximately 1/8” –1/4” from the front edge of the base plate. Finally secure the antenna
to the base plate using three pieces of clear plastic tape.
OPEN-ROBOT V2 Manual, Abe Howell’s Robotics November 14, 2009
33
Step#26, Prepare to Solder Noise Filtering Capacitors (Optional):
Figure#26a, Prepare to solder noise filtering capacitors to GM8 motors.
First separate and strip back the ends of your 8” long clear motor wires. You will need to
separate each conductor by cutting the insulator in between and then peeling the two
conductors apart. Strip back approximately 1/8”-3/16” Note: The noise filtering
capacitors are only needed if you plan to install the WW02 Wheel Encoders.
Figure#26b, Strip 8” long GM8 motor leads and peel apart.
OPEN-ROBOT V2 Manual, Abe Howell’s Robotics November 14, 2009
34
Step#27, Solder Noise Filtering Capacitors:
Figure#27a, Solder 100pf ceramic capacitors.
Insert one leg of a 100pf ceramic capacitor into one of the metal GM8 motor tabs and
then solder the other capacitor leg to the case of the GM8 motor. You will need to do this
twice on each motor. Don’t solder the leg that was inserted into the motor tab yet. Take a
third capacitor and insert one leg into one of the motor tabs and the other leg into the
second motor tab. Finally insert the striped ends of the 8” motor lead into the motor tabs
as shown in figure#27b and solder. Be sure to insert the leads with the white marker on
the clear insulator into the appropriate motor tab.
Lead with
white mark
Figure#27b, Solder 100pf ceramic capacitors and 8” motor leads.
OPEN-ROBOT V2 Manual, Abe Howell’s Robotics November 14, 2009
35
Step#28, Attach GM8 Motors:
Figure#28, Attach GM8 motors.
Insert and press the GM8 motors into the GM8 mounts. Be sure to mount the motors with
the white marked motor lead on the topside away from the base plate. Use the four
supplied #2-56x1” machine screws and #2 washers to secure the GM8 motors to the
mounts.
OPEN-ROBOT V2 Manual, Abe Howell’s Robotics November 14, 2009
36
Step#29, Prepare RFID Antenna Cable (purchase separately):
In step#29 prepare to attach the RFID Antenna cable. This cable will connect the RFID
antenna to the bottom of the controller board, J8. The female end will later attach to the
bottom of the controller board, J8. The male end will connect to the RFID antenna.
Figure#29, RFID antenna cable.
OPEN-ROBOT V2 Manual, Abe Howell’s Robotics November 14, 2009
37
Step#30, Attach RFID Antenna Cable & Prepare to Mount
Controller Deck:
Figure#30, Attach RFID antenna cable.
Insert the male end of the RFID antenna cable into the antenna connector and bend the
cable slightly upwards as shown in figure#32. Be careful when plugging the RFID cable
into the RFID antenna connector because the RFID antenna wires are delicate.
OPEN-ROBOT V2 Manual, Abe Howell’s Robotics November 14, 2009
38
Step#31, Prepare Controller Deck:
Figure#31, Prepare Controller Deck.
Prepare the controller deck by attaching the (4) #4-40 machine screws. Use (2) #4-40
nuts on each screw so that there is enough clearance for the PIC18F4520 Controller
Board.
OPEN-ROBOT V2 Manual, Abe Howell’s Robotics November 14, 2009
39
Step#32, Attach Controller Board Standoffs:
Figure#32, Attach controller board standoffs.
In step#32 place the #6 nylon standoff spacers on top of each GM8 motor mount.
OPEN-ROBOT V2 Manual, Abe Howell’s Robotics November 14, 2009
40
Step#33, Mount Controller Deck:
Figure#33, Mount Controller deck.
Mount the controller deck and secure using (4) #6-32x5/8” machine screws.
OPEN-ROBOT V2 Manual, Abe Howell’s Robotics November 14, 2009
41
Step#34, Mount Controller Board & Connect RFID Cable:
Figure#34, Connect RFID cable to J8 on Controller Board.
In step#34 connect the RFID cable to J8 on the Controller Board and then align the
controller board with the (4) #4-40 machine screws.
OPEN-ROBOT V2 Manual, Abe Howell’s Robotics November 14, 2009
42
Step#35, Attach MatchPort/XBee Deck Standoffs:
Figure#35, Attach MatchPort/XBee Deck Standoffs.
In step#35 thread a 0.75” long standoff onto each of the #4-40 machine screws. This will
secure the controller board and allow us to mount the MatchPort/XBee deck later.
OPEN-ROBOT V2 Manual, Abe Howell’s Robotics November 14, 2009
43
Step#36, Attach GM8 Wheels & GM8 Wires:
Figure#36, Attach GM8 Wheels.
Attach both the left and right GM8 wheels. Gently press them onto the GM8 motor
output shaft. Then attach the GM8 Motor wires to the J9 & J10 terminal block
connectors. The right motor goes to J10 and the left to J9.
OPEN-ROBOT V2 Manual, Abe Howell’s Robotics November 14, 2009
44
Step#37, Mount GP2D120 Sensors to Brackets:
Figure#37, Mount GP2D120 sensors to brackets.
Mount the GP2D120 sensors to the angle brackets using (2) #4-40x3/8” long machine
screws. Try to mount the sensors at a 45-degree angle. Attach the GP2D120 sensor cable
by aligning the small white JST 3-pin connector and then firmly press into place.
OPEN-ROBOT V2 Manual, Abe Howell’s Robotics November 14, 2009
45
Step#38, Mount GP2D120 Sensors to Robot:
Figure#38, Mount GP2D120 sensor brackets to robot base plate.
Mount the GP2D120 sensor brackets to the robot base using (2) #8-32x1/4” long truss
head screws. You can adjust the sensors to look in whatever direction you want. You will
need to bend the sensor wires close to the white JST 3-pin sensor connector so that the
brackets can be bolted to the base plate. Please note that you may have to slightly bend
the RFID antenna out on each side so that there is enough clearance for the GP2D120
mounts.
OPEN-ROBOT V2 Manual, Abe Howell’s Robotics November 14, 2009
46
Step#39, Connect GP2D120 Sensors to the Controller Board:
GP2D120 Headers
Figure#39a, Connect GP2D120 sensors to the controller board.
A/D#5
A/D#4
A/D#3
A/D#2
A/D#1
In step#39 connect the GP2D120 sensor cables to the controller board. The left cable
must connect to J14, header#2, input signal row pin A/D#2 and the right cable connects
to J14, header#3, input signal row pin A/D#3. Be sure that the red wire connects to the +5
Volts row and the black wire connects to the ground row. The white wire is the signal
from the GP2D120 and connects to the input signal pin, which is closest to the
PIC18F4520 microcontroller.
Input Signal (Row#1)
+5 Volts (Row#2)
Ground (Row#3)
Vin (Row#4)
Header#’s
Figure#39b, Close-up of J14 headers on Controller board.
OPEN-ROBOT V2 Manual, Abe Howell’s Robotics November 14, 2009
47
Step#40, Attach Dual Lock Tape to Base and Battery Holder:
Attach Dual Lock Tape
Figure#40a, Attach Dual Lock tape to the base plate.
Attach (2) 1” long pieces of Dual Lock tape to the robot’s base plate. Leave the pieces of
tape approximately 1/8”-1/4” in from the back edge of the base plate. Then apply (2) 1”
long pieces to the bottom of the battery holder.
Figure#40b, Attach Dual Lock tape to the base of battery pack.
OPEN-ROBOT V2 Manual, Abe Howell’s Robotics November 14, 2009
48
Step#41, Prepare MatchPort/XBee PCB Deck:
Figure#41, Prepare MatchPort/XBee PCB Deck.
In figure#43 prepare the MatchPort/XBee PCB deck by attaching (4) #4-40 machine
screws and use (2) #4-40 nuts on each screw so that the MatchPort/XBee PCB has
enough clearance. Also, if you are using the MatchPort b/g module then attach the
MatchPort b/g module antenna cable.
OPEN-ROBOT V2 Manual, Abe Howell’s Robotics November 14, 2009
49
Step#42, Mount the MatchPort/XBee PCB to the Deck:
Figure#42, Mount MatchPort/XBee PCB to Deck.
Mount the MatchPort/XBee PCB to the deck and secure using (4) #4-40 nuts. Connect
the antenna cable to the MacthPort b/g module if you are using the MatchPort b/g. We
have decided to show you a MatchPort/XBee PCB with a MatchPort b/g module installed
to reduce the number images. It should be noted that you might be using the XBee
ZigBee module. From this point on we will only show images with the MatchPort b/g
module installed. XBEE users can simply disregard the MatchPort b/g specific steps.
Feed the antenna wire under the MatchPort/XBee PCB prior to mounting it on the (4)screws.
OPEN-ROBOT V2 Manual, Abe Howell’s Robotics November 14, 2009
50
Step#43, Mount MatchPort/XBee Deck to Robot:
Figure#43, Mount MatchPort/XBee Deck to Robot.
Mount the assembled MatchPort/XBee deck to the (4) standoffs and secure with (4) #440 machine screws.
OPEN-ROBOT V2 Manual, Abe Howell’s Robotics November 14, 2009
51
Step#44, Connect Power Wires:
Figure#44, Connect Power Wires.
Connect the (6)-AA battery pack wires to J1 on the MatchPort/XBee PCB. Connect the
J1 Controller board power wires to J6 on the MatchPort/XBee PCB. Connect each of the
black wires to ground, Gnd. Please look at the connection tables below. Improper
connection can result in damage to the Controller Board and/or MatchPort/XBee PCB
and/or MatchPort b/g module.
MatchPort/XBee PCB
J1, Vin pin
J1, Gnd pin
Purpose
Positive Battery Pack Red Wire
Ground Batter Pack Black Wire
MatchPort/XBee PCB
J6, Vo pin
J6, Gnd pin
OPEN-ROBOT PIC18F4520 Board
J1, pin#1 Red Wire
J1, pin#2 Black Wire
OPEN-ROBOT V2 Manual, Abe Howell’s Robotics November 14, 2009
52
Step#45, Connect PIC18F4520 Serial Port Wires:
Figure#45,Connect PIC18F4520 Serial Port Wires to MatchPort/XBee PCB.
Connect the controller board PIC18F4520 serial port wires to J3 on the MatchPort/XBee
PCB. The blue wire connects to J3 (+5v), the white wire to J3 (Rx), and the yellow wire
to J3 (Tx). Please look at the connection table below. Improper connection can result in
damage to the Controller Board and/or MatchPort/XBee PCB and/or MatchPort b/g
module.
OPEN-ROBOT PIC18F4520 Board
J6, +5 volts header, blue wire
J12, pin#3, white wire
J12, pin#4, yellow wire
MatchPort/XBee PCB
J3, +5v
J3, Rx
J3, Tx
OPEN-ROBOT V2 Manual, Abe Howell’s Robotics November 14, 2009
53
Step#46, Attach MatchPort b/g Antenna (purchase separately):
Figure#46,Attach MatchPort b/g module’s rubber antenna.
Finally attach the MatchPort b/g module’s rubber antenna. If you are using the XBee
module simply disregard this step. Congratulations because you know have a complete
OPEN-ROBOT!
If you are using the MatchPort b/g module then move onto Chapter 4 to learn to
configure your MatchPort b/g and get started using your robot. However, if you are using
XBee modules, then move onto Chapter 5 to get learn how to configure the XBee
modules and get started using your robot.
OPEN-ROBOT V2 Manual, Abe Howell’s Robotics November 14, 2009
54
Chapter 5: Get Started with a MatchPort Equipped Robot
This section will help get you started with your MatchPort b/g equipped OPEN-ROBOT.
You will be introduced to your robot along with the different sensors and where they are
located. This document assumes that you have already assembled your robot and
purchased a MatchPort b/g module, antenna, and UFL to SMA antenna cable.
Getting to Know Your OPEN-ROBOT & MatchPort b/g:
MatchPort b/g
Antenna
On/Off
Switch
Battery
Holder
In-Circuit Programmer/Debugger
Connector
Green Heartbeat LED
Figure 47. OPEN-ROBOT.
In figure 47 you can see the robot’s on/off switch and the (6)-AA battery holder. Before
we get started, remove the battery holder by unsnapping it from the robot’s base plate.
Firmly hold the robot with one hand while pulling the battery holder. Now load (6)-AA
batteries into the holder while observing the proper insertion orientation. The negative (-)
end of the each battery must be inserted such that it makes contact with the corresponding
spring on the holder. Failure to do this will damage the robot’s electronics. We
recommend using 15-minute rechargeable AA-batteries, however, you can use regular
alkaline batteries. After inserting the batteries snap the battery holder back onto the robot.
You will feel the holder lock into place when you press it onto the robot’s base plate.
OPEN-ROBOT V2 Manual, Abe Howell’s Robotics November 14, 2009
55
Turn your robot on using the on/off switch. Once on you should observe a green LED on
the controller board light up. If not be sure to check the orientation of each of the
batteries and also make sure that they are fully charged if using rechargeable batteries.
MatchPort b/g
Front Right
Light Sensor
Front Left
Light Sensor
Front Right
IR Sensor
Front Left
IR Sensor
Figure 48. Front view of OPEN-ROBOT.
RFID Antenna
In figure 48 the front left infrared (IR,) front left light, front right IR, and front right light
sensors can be seen. Additionally the RFID antenna is located on the robot’s base plate.
The IR sensors help the robot to see obstacles, other robots or even to follow walls.
Ambient light levels can be sensed using the light sensors, which means the robot can
sense whether it is light or dark in a given environment. Passive RFID tags can be read or
written to with the RFID antenna. Tags can be used to store x-y coordinate information so
that your robot can find its way in a room or small environment. The tags can also store
virtual food so that your robot has to search out tags in a game of survival of the fittest.
There are numerous other possible uses for the RFID tags and we have only touched on
two. The MatchPort b/g allows you to connect and control your robot using wireless
802.11 b/g, WiFi.
OPEN-ROBOT V2 Manual, Abe Howell’s Robotics November 14, 2009
56
Connecting to OPEN-ROBOT for the First Time:
By default the MatchPort b/g module is configured in Ad Hoc mode. This means that you
will need to open your Wireless Network Manager and browse for either the
LTRX_IBSS or OPEN_ROBOT Ad Hoc network. If you purchased your MatchPort from
us then it will be configured with the OPEN_ROBOT Network Name (SSID). Once the
LTRX_IBSS or OPEN_ROBOT Ad Hoc network is visible, simply connect. Be sure to
wait for your computer to acquire an IP address before moving on to the next section.
Figure 49. View Available Wireless Networks.
IMPORTANT NOTE - if your host computer is configured to use a static IP address,
you need to configure your computer to use DHCP, at least for communication with the
Matchport, or you need to assign a static IP address in the 169.254.xxx.xxx subnet. This
is because the Matchport acts as a DHCP server for the "LTRX_IBSS" or
“OPEN_ROBOT” Ad Hoc network, assigning addresses in the 169.254.xxx.xxx subnet,
and if your host computer has a static IP address of 192.168.1.27, it will never be able to
communicate with 169.254.xxx.xxx because the network driver won't know how to route
packets to a different subnet without explicit routing instructions.
OPEN-ROBOT V2 Manual, Abe Howell’s Robotics November 14, 2009
57
Figure 50. Browse for and connect to LTRX_IBSS Ad Hoc Network.
Click Refresh network list under Network Tasks. Once the LTRX_IBSS network is
available simply click it and then click the Connect button. It may take a minute or so for
your computer to acquire an IP address. Now that we are connected to the LTRX_IBSS
network we can connect to the MatchPort b/g and command OPEN-ROBOT.
Connect Using the OPEN-ROBOT TCP-Socket Manual Control
Program:
Download and install the OPEN-ROBOT TCP-Socket Manual Control Program from
Google Code. Run the program and enter your MatchPort’s IP address and select Open
from the Socket menu. If you purchased your MatchPort b/g module from us it will be
configured for Ad Hoc mode with an IP Address of 169.254.0.10 and the baud rate will
be set to 115,200 BPS so that it matches OPEN-ROBOT’s baud rate. If you purchased
your MatchPort from some place else, then you will need to scroll down to the next
section, Reconfigure MatchPort Network Settings, to set the baud rate to 115200 BPS.
After selecting Open, the program will attempt to create and open a TCP-Socket
connection with the MatchPort. Be sure that the robot is turned on first.
OPEN-ROBOT V2 Manual, Abe Howell’s Robotics November 14, 2009
58
Figure 51. Use Manual Control program to test out OPEN-ROBOT.
Once the socket is open you can command OPEN-ROBOT. Try getting the analog-todigital sensor readings by clicking on the Get AD Readings button.
Figure 52. Get AD Sensor Readings.
OPEN-ROBOT V2 Manual, Abe Howell’s Robotics November 14, 2009
59
(OPTIONAL) - Reconfigure MatchPort Network Settings:
If you didn’t purchase your MatchPort b/g from Abe Howell’s Robotics or simply want
to change the Network Settings, then proceed on with this section. By default the
MatchPort b/g’s ship with a baud rate of 9,600 BPS from the factory, but OPENROBOT’s PIC18F4520 is set to 115,200 BPS, so this needs to be changed. You need to
download the Device Installer utility from Lantronix. Go to the Lantronix downloads web
page: http://www.lantronix.com/support/downloads.html and click on Device Installer
under the Configuration Utility column. Download and install the Device Installer.
Connect to the LTRX_IBSS Ad Hoc network using the method described above in
“Connecting to OPEN-ROBOT for the First Time”. Then run the Lantronix Device
Installer utility. A pop-up window will display and ask if you would like a TCP/IP
tutorial. Simply disregard this and click NO.
Figure 53. Device Installer Utility.
Device Installer should recognize OPEN-ROBOT’s MatchPort b/g module and then
populate the list box as shown above in figure#53. Double-click the MatchPort b/g listing
in the list box to bring up the device details.
OPEN-ROBOT V2 Manual, Abe Howell’s Robotics November 14, 2009
60
Figure 54. Device Details.
Now click on the Web Configuration tab.
Figure 55. Connect via Web Configuration.
A password message box will appear. Simply click on the OK button and don’t enter
anything in the User name and Password fields because by default the MatchPort does
not utilize a username/password.
OPEN-ROBOT V2 Manual, Abe Howell’s Robotics November 14, 2009
61
Figure 56. Web Configuration Home.
Click on the WLAN link so that we can change these settings. By default the MatchPort
is configured for Ad Hoc mode and the Network Name (SSID) is set to LTRX_IBSS.
You can change from Ad Hoc to Infrastructure under Network Type and also change the
Network Name (SSID) to match your own wireless network name. For this example I
will be using abes_wireless for my Network name as shown below in figure#57. Also be
sure to disable Radio Power Management under the Advanced Settings section. Disabling
Radio Power Management will make the MatchPort more responsive during the initial
connection upon power-up and will prevent it from going into Radio Power Management
during robot operation. Once you have made these changes be sure to click on the OK
button. NOTE: Be sure to write down all WLAN Settings or take a screenshot.
OPEN-ROBOT V2 Manual, Abe Howell’s Robotics November 14, 2009
62
Figure 57. New WLAN Settings.
Now we need to change the Network settings, so click on the Network link, which is right
below the Home icon. Under the IP Configuration we need to select Use the Following IP
Configuration and then enter a suitable IP Address for the MatchPort, a Subnet Mask, and
a Default Gateway. The settings shown in figure#58 should work for most wireless
setups, but you must be sure to check your own setup and verify that the IP Address you
enter is an available address on your network otherwise you will be unable to connect to
the MatchPort. The Subnet Mask and Default Gateway must match your network setup as
well. Once the new information is entered be sure to click on the OK button. If you do
enter and apply the wrong settings, you will need to perform a recovery process.
Surveyor Corp does have a suitable recovery process documented in the link below. You
can also contact Abe Howell’s Robotics for assistance if you purchased the MatchPort
from us. NOTE: Be sure to write down all Network Settings or take a screenshot.
http://www.surveyor.com/cgi-bin/yabb2/YaBB.pl?num=1200515001
OPEN-ROBOT V2 Manual, Abe Howell’s Robotics November 14, 2009
63
Figure 58. New Network Settings.
You should also change the CPU Performance Mode to High. Click OK when done.
Figure 59. Set CPU Performance Mode to High.
OPEN-ROBOT V2 Manual, Abe Howell’s Robotics November 14, 2009
64
If you purchased your OPEN-ROBOT fully assembled then the serial port settings should
already be set. However, if you need to set them please enter as shown in figure#60
below. You should only have to change the Baud Rate to 115200, Flow Control to None,
Data bits = 8, Parity = None, and Stop Bits = 1. Click OK when done.
Figure 60. Channel 1 Serial Settings.
Figure 61. Apply Settings
OPEN-ROBOT V2 Manual, Abe Howell’s Robotics November 14, 2009
65
None of the settings you just changed are permanent until you click on the Apply Settings
link as shown above in figure#61. Once you click on Apply Settings, the MatchPort will
save the new values and then reboot so that they take effect. The MatchPort reboot may
take a minute or two. NOTE: Before applying the new settings, be sure to write them
down or take screenshots. This information will be important in case for example you
forget the assigned IP Address or Network Name (SSID).
OPEN-ROBOT V2 Manual, Abe Howell’s Robotics November 14, 2009
66
Chapter 6: Get Started with XBee® Equipped Robot
This chapter will help get you started with your XBee equipped OPEN-ROBOT. You
will be introduced to your robot along with the different sensors and where they are
located. This document assumes that you have already assembled your robot and
purchased the necessary XBee modules and USB Explorer dongle.
Getting to Know Your OPEN-ROBOT & XBee modules:
XBee
Module
On/Off
Switch
Battery
Holder
Figure 62. OPEN-ROBOT shown with XBee wireless module.
In figure 62 you can see the robot’s on/off switch and the (6)-AA battery holder. Before
we get started, remove the battery holder by unsnapping it from the robot’s base plate.
Firmly hold the robot with one hand while pulling the battery holder. Now load (6)-AA
batteries into the holder while observing the proper insertion orientation. The negative (-)
end of the each battery must be inserted such that it makes contact with the corresponding
spring on the holder. Failure to do this will damage the robot’s controller board. We
recommend using 15-minute rechargeable AA-batteries, however, you can use regular
OPEN-ROBOT V2 Manual, Abe Howell’s Robotics November 14, 2009
67
alkaline batteries. After inserting the batteries snap the battery holder back onto the robot.
You will feel the holder lock into place when you press it onto the robot’s base plate.
Turn your robot on using the on/off switch. Once on you should observe a green LED on
the controller board light up. If not be sure to check the orientation of each of the
batteries and also make sure that they are fully charged if using rechargeable batteries.
Front Right
Light Sensor
Front Left
Light Sensor
Front Left
IR Sensor
Front Right
IR Sensor
Figure 63. Front view of OPEN-ROBOT.
RFID Antenna
In figure 63 the front left infrared (IR,) front left light, front right IR, and front right light
sensors can be seen. Additionally the RFID antenna is located on the robot’s base plate.
The IR sensors help the robot to see obstacles, other robots or even to follow walls.
Ambient light levels can be sensed using the light sensors, which means the robot can
sense whether it is light or dark in a given environment. Passive RFID tags can be read or
written to with the RFID antenna. Tags can be used to store x-y coordinate information so
that your robot can find its way in a room or small environment. The tags can also store
virtual food so that your robot has to search out tags in a game of survival of the fittest.
There are numerous other possible uses for the RFID tags and we have only touched on
two.
Configure XBee Modules:
OPEN-ROBOT’s PIC18F4520 communicates with a baud rate of 115,200 bits per second
(BPS). However, the XBee modules are by default configured for 9,600 BPS, so we need
to change these to 115,200 BPS so that they will work with OPEN-ROBOT. To do this
you will need an XBee Explorer USB from SparkFun Electronics. You also need to
download and install the necessary FTDI drivers:
http://www.sparkfun.com/commerce/product_info.php?products_id=8687
OPEN-ROBOT V2 Manual, Abe Howell’s Robotics November 14, 2009
68
http://www.ftdichip.com/FTDrivers.htm
Once you have installed the FTDI drivers you then need to download and install the
XBee X-CTU program:
http://www.digi.com/support/kbase/kbaseresultdetl.jsp?kb=125
The X-CTU program allows us to change the XBee’s configuration parameters. Once you
have the X-CTU installed, plug an XBee Explorer USB into your computer. Be sure you
install one of your XBee modules into the Explorer USB prior to connecting to your
computer. Go ahead and run the X-CTU program. You should have a screen similar to
the once shown below.
Remember this
COM Port#
Figure 64. Open X-CTU program.
Be sure to select a Baud Rate if 9600 and then click on the Modem Configuration tab.
OPEN-ROBOT V2 Manual, Abe Howell’s Robotics November 14, 2009
69
Figure 65. Configuration Tab.
Click on the Read button to read the current configuration of the attached XBee module.
Then scroll down to the Serial Interfacing folder and click on the Interface Data Rate.
Figure 66. Scroll to Serial Interfacing.
Now select 115200 under the Interface Data Rate parameter.
OPEN-ROBOT V2 Manual, Abe Howell’s Robotics November 14, 2009
70
Figure 67. Select 115200 under Interface Data Rate.
Finally click on the Write button to save this parameter change to the XBee module.
Figure 68. Click on Write button.
After clicking the Write button you should see the following printouts at the bottom of
the screen as shown in figure#69 below.
“Setting AT Parameters..OK”
“Write Parameters…Complete”
OPEN-ROBOT V2 Manual, Abe Howell’s Robotics November 14, 2009
71
Figure 69. Interface Data Rate parameter change written to XBee module.
Connect Using the OPEN-ROBOT XBee/ZigBee Manual Control
Program:
Download and install the OPEN-ROBOT XBee/ZigBee Manual Control Program.
http://www.abotics.com/OPEN_ROBOT_Software/OPEN_ROBOT_ZigBee_Installer.zip
Run the installer and once the installation is complete go ahead and run the program. You
should see a screen similar to the one shown below.
OPEN-ROBOT V2 Manual, Abe Howell’s Robotics November 14, 2009
72
Figure 70. Use Manual Control program to test out OPEN-ROBOT.
Select the appropriate COM Port, set the baud rate to 115200 and set the number of
retries to 1. Use the COM Port that was displayed when you ran the X-CTU program. For
this example it happens to be COM7, but it may be different for you.
Figure 71. Configure COM Port.
From the COM Port menu select Open.
OPEN-ROBOT V2 Manual, Abe Howell’s Robotics November 14, 2009
73
Figure 72. Open Serial Port.
Once the serial port is open you can command OPEN-ROBOT. Try getting the analog-todigital sensor readings by clicking on the Get AD Readings button.
Figure 73. Get AD Sensor Readings.
Go ahead and try the other functions. If you are using your XBee equipped robot in a
WiFi environment you may notice that OPEN-ROBOT fails to respond and you see a
READ_ERROR. This is normal and happens because the XBee wireless packets
sometimes get dropped. To counteract this we recommend setting the Number of Retries
to at least 1.
OPEN-ROBOT V2 Manual, Abe Howell’s Robotics November 14, 2009
74
Chapter 7: How to Wirelessly Upload PIC18F4520 code
If you are using a MatchPort b/g then run the OPEN-ROBOT TCP Manual Program.
Otherwise if you are using the XBee modules then run the OPEN-ROBOT Serial Manual
Control Program. For illustration purposes I will be showing the OPEN-ROBOT TCP
Manual Program.
Figure 74. TCP Manual Program.
OPEN-ROBOT V2 Manual, Abe Howell’s Robotics November 14, 2009
75
Connect a 1k Ohm Resistor Across Pin#3 & Pin#6 on J2
Program/Debug Connector:
Pin#1 Pin#6
Figure 75. Connect 1k Ohm resistor across pin#3 & pin#6.
Hold a 1k Ohm resistor across pin#3 and pin#6 on the J2 program/debug connector of
OPEN-ROBOT’s Controller Board. Pin#1 is the first one on the left and Pin#6 is the last
one on the right. Now turn on the robot and be sure to hold the resistor firmly in place.
After about a second or so of being on you can carefully remove the resistor because as
soon as the PIC18F4520 boots it will check and see the resistor. At this point the
PIC18F4520 will enter “boot mode” and wait for a new hex program to be uploaded. The
Heartbeat LED will be off if the PIC18F4520 has entered “boot mode”.
Connect to Robot Using OPEN-ROBOT TCP-Socket Manual
Control Program:
Now connect to your robot using the OPEN-ROBOT TCP Socket Manual Control
Program. After making the socket connection you can browse for the PIC18F4520 hex
code file by selecting “Upload PIC18F4520 Hex File” from the “File” menu.
OPEN-ROBOT V2 Manual, Abe Howell’s Robotics November 14, 2009
76
Figure 76. Upload PIC18F4520 Hex File.
Then browse for the new PIC18F4520 hex file to upload.
Figure 77. Select hex file.
Select the new hex file and click the “Open” button. If you are creating your own
PIC18F4520 programs using the CCS C Compiler then you must follow our instructions
for including the “boot loader” files otherwise you will have to reprogram the
PIC18F4520 using a In-Circuit Programmer/Debugger pod. If you are uploading a new
firmware hex code file that was supplied by Abe Howell’s Robotics, then you don’t
have to worry about this.
OPEN-ROBOT V2 Manual, Abe Howell’s Robotics November 14, 2009
77
Figure 78. Hex upload complete.
Once the file upload is complete it will print, “Hex file upload is complete” in the
message window.
Figure 79. Get A/D sensor readings.
At this point the PIC18F4520 has rebooted and the new hex code should be running, so
go ahead and try it out by requesting the A/D Sensor Readings.
OPEN-ROBOT V2 Manual, Abe Howell’s Robotics November 14, 2009
78
Chapter 8: How to modify PIC18F4520 firmware
This chapter will explain the process of modifying OPEN-ROBOT’s PIC18F4520
firmware. The PIC18F4520 firmware was created using the CCS C Compiler and also
integrates a CCS bootloader. This bootloader allows for firmware upgrades without
requiring the use of a PIC programmer unit. This document will focus on using the
PCWH IDE version of the CCS C compiler.
Requirements:
You will need to purchase or have access to a suitable CCS C compiler for the
PIC18F4520. I recommend purchasing the PCHW IDE version of the compiler.
However, you can use the PCH command line compiler and achieve the same results, but
just without the ease of an IDE. You can check out the compilers by following the link
below.
http://www.ccsinfo.com/content.php?page=ideoverview
Download the latest version of the PIC18F4520 firmware from the OPEN-ROBOT
website. After the download is complete, be sure to extract the zip files to a suitable
location.
Getting Started with the PCWH Compiler:
Figure#80. Run PCWH IDE.
Go ahead and run the PCWH IDE. Click Open from the File menu and browse to the
location where you unzipped the PIC18F4520 firmware files. For this example the latest
version of the firmware happens to be “OPEN_ROBOT_PIC18F4520_V2.c”.
OPEN-ROBOT V2 Manual, Abe Howell’s Robotics November 14, 2009
79
Figure#81. Open Firmware C-File.
Select to view the details of the listed files and select the c_auto_file.
Figure#82. Source code displayed in IDE window.
OPEN-ROBOT V2 Manual, Abe Howell’s Robotics November 14, 2009
80
After opening the source c-file you will see the source-code populated in the IDE window
as shown above in figure#84.
Figure#83. Open header file.
Now open the corresponding h_auto_file or header file. The source code will be
displayed on a second tab. You should notice that the only include file is as follows
“bootloader_open_robot.h”. This include is very important because it lets the compiler
know that we are using the bootloader in the firmware.
Figure#84. Compile.
Now we can go ahead and test to be sure that our program compiles successfully. Simply
select “Compile” from the Compile menu or press the F9 key. Once the compile is
complete you will be notified and the amount of ROM and RAM that has been allocated
will be displayed in a pop-up window.
You can now begin modifying the firmware to suit your own needs or simply use this as
a starting point for your own custom firmware creation.
OPEN-ROBOT V2 Manual, Abe Howell’s Robotics November 14, 2009
81
Architecture of PIC18F4520 Firmware:
The basic architecture of the firmware is to wait for a serial interrupt to occur, read in the
received characters, and once a “\r” char is received decipher the command and execute
it.
Serial
Interrupt?
Yes
Read incoming
characters
Valid
Command?
Yes
Execute
Command
Figure#85. Architecture of firmware.
The Timer2 interrupt service routine (ISR) is used to update the velocity and position
control loops at a fixed frequency. Timer2 is also used to cycle through each of the
analog-to-digital pins and retrieve the most current reading for the attached sensor and
then store it in the appropriate variable. This ensures that the most up-to-date readings are
transmitted when a user requests them.
The Timer0 ISR is used to capture the WW02 Wheel encoder clock signal transitions
from the right encoder.
The external ISR for PIN_B0 is utilized to acquire the WW02 Wheel encoder clock
signal transitions from the left encoder.
The above-listed hardware interrupts are the only four used in the firmware.
Communication with the onboard RFID module is achieved by using a software UART.
The remainder of the program is basically a collection of functions that support the
Serial-Based firmware interaction with the outside world and provide an easy to use
interface for controlling OPEN-ROBOT. For additional information, I recommend taking
a look at the OPEN-ROBOT Control Board schematic and the PIC18F4520 I/O
Allocation, which can be found in the Appendix of this document.
OPEN-ROBOT V2 Manual, Abe Howell’s Robotics November 14, 2009
82
Chapter 9: Details of PIC18F4520 controller board
Introduction to the OPEN-ROBOT Controller Board
This board was specially designed for the OPEN-ROBOT and is a very unique robot
controller in that it not only incorporates a suitable H-Bridge chip for controlling two
GM-8 gear-head motors, but it also has dedicated pins and a connector for utilizing two
WW-02 Wheel Encoders from for Proportional Integral Derivative (PID) velocity and
position control of the GM-8 motors. While this in and of itself is a tremendous benefit,
there are other significant features such as direct integration of a low-cost Radio
Frequency Identification (RFID) chip module, which gives OPEN-ROBOT the ability to
read and write to in-range passive RFID Tags. There are a total of eight (8) analog to
digital capable pins, two (2) are dedicated to light sensing photocells, one (1) is used to
monitor the board’s supply voltage and the remaining five (5) are available to be used as
needed by the user. A user-friendly firmware and boot-loader is programmed into the
PIC18F4520. The boot-loader allows for wireless uploading of new firmware versions,
but also of user created code that is developed using a suitable CCS C compiler. This
board also supports development, programming, and debugging of user created programs
via a dedicated In-circuit program/debug (ICD) connector. This ICD connector can be
used to load and debug new programs or new firmware upgrades and has been tested with
an In-Circuit Programmer/Debugger (ICD) from CCS Inc. The OPEN-ROBOT controller
board has been developed and evolved over several years and we hope that you find this
to be a useful tool in your quest to build a great robot. Please send all questions and
comments to [email protected]
OPEN-ROBOT V2 Manual, Abe Howell’s Robotics November 14, 2009
83
PIC18F4520 Main Controller Board Connectors
Heartbeat LED
Program /Debug
Header, J2
Extra I/O, J3
Board Power, J1
Ground
Header, J5
WW-02 Encoders
Header, J4
+5 Volt Header, J6
Left GM-8
Header, J9
Right GM-8
Header, J10
Figure#86, PIC18F4520 Main Controller Board Connectors
MatchPort Wireless
Connector, J11
(5) Analog to Digital (A/D) Pins, J12 & J13
I2C Header, J7
Figure#86 points out all the board connectors. The upcoming sections will explain each
of these connections in more detail.
OPEN-ROBOT V2 Manual, Abe Howell’s Robotics November 14, 2009
84
Board Power & Programming Connector, J1 & J2
Header Pin#
J1 Pin#1
J1 Pin#2
J2 Pin#1
J2 Pin#2
J2 Pin#3
J2 Pin#4
J2 Pin#5
J2 Pin#6
Description
Vin (6 to10 volts)
Ground
PIC18F4520 MCLR
Ground
+5 volts
PIC18F4520 Pin B7
PIC18F4520 Pin B6
PIC18F4520 Pin B3
Figure#87, Power & Programming Headers (J14& J2)
The board can be powered in the range of 6-10 volts. We recommend using (6)-AA
batteries. Power is applied at the J1 header and pin#1 is +Vin and pin#2 is ground. A
polarized header is used to help prevent plugging the board power connector in
backwards. Reversing the polarity of the J1 connector may result in damage to the +5volt
regulator, U1, and possibly other components as well, so please be careful when applying
power to the board. The RJ12 programming connector allows the PIC18F4520 to be
programmed and debugged with an In-Circuit Programmer/Debugger (ICD) from CCS
Inc.
A/D#5
A/D#4
A/D#3
A/D#2
A/D#1
Analog to Digital (A/D) Headers, J12 & J13
Input Signal (Row#1)
+5 Volts (Row#2)
Ground (Row#3)
Vin (Row#4)
Header#’s
Figure#88, A/D Headers (J12 & J13)
The J124 & J13 headers provide connection points to the PIC18F4520’s analog to digital
(A/D) capable pins. Header#1 is for A/D Sensor#1, header#2 is for A/D Sensor#2,
header#3 is for A/D Sensor#3, header#4 is for A/D Sensor#4, and header#5 is for A/D
Sensor#5. The headers run vertically so that a GP2D120 or GP2D12 IR Sensor can be
plugged in. Each header provides an input signal, +5 volts, and ground pin for the
connected IR Sensor. Be sure to plug your sensors into the correct pins, since an incorrect
OPEN-ROBOT V2 Manual, Abe Howell’s Robotics November 14, 2009
85
connection can damage either the sensor and/or the board. Each input signal pin connects
to a corresponding A/D channel on the PIC18F4520.
I2C Header, J7
Header Pin#
J7 Pin#1
J7 Pin#2
J7 Pin#3
Description
I2C SDA
I2C SDL
Ground
Figure#89, I2C Header, J7
J7 provides access to the board’s I2C pins and ground, so that I2C devices can be
connected here. Pin#1 on J7 connects to SDA on the PIC18F4520, pin#2 connects to SCL
on the PIC18F4520, and pin#3 connects to ground on the PIC18F4520. You will need to
solder a suitable 3-position header to use the I2C and make the appropriate PIC18F4520
firmware changes since I2C is not supported in the supplied serial firmware.
GM-8 Motor Headers, J9 & J10
Header Pin#
J9 Pin#1
J9 Pin#2
J10 Pin#1
J10 Pin#2
Description
Left Motor Top Lead
Left Motor Bottom Lead
Right Motor Bottom Lead
Right Motor Top Lead
Figure#90a, GM-8 Headers, J9 & J10
The left GM-8 gear motor connects to the J9 header and the right GM-8 to the J10
header. Connecting the GM-8’s incorrectly will only result in improper wheel rotation
and encoder readings and can be corrected by simply switching the motor leads.
OPEN-ROBOT V2 Manual, Abe Howell’s Robotics November 14, 2009
86
Figure#90b, GM-8 Noise Suppression Capacitors
Three 100pf ceramic capacitors must be soldered to each GM8 motor when WW02
Wheel Encoders are added otherwise motor noise will negatively affect the WW02
Wheel Encoder readings.
Extra I/O & WW-02 Wheel Encoders Header, J3 & J4
Figure#91, Extra I/O & Wheel Encoders Header, J3 & J4
Header Pin#
J3 Pin#1
J3 Pin#2
J3 Pin#3
J3 Pin#4
J3 Pin#5
J3 Pin#6
J3 Pin#7
J3 Pin#8
J4 Pin#1
J4 Pin#2
J4 Pin#3
J4 Pin#4
J4 Pin#5
J4 Pin#6
J4 Pin#7
J4 Pin#8
Description
PIC18F4520 Pin C5
PIC18F4520 Pin B7
PIC18F4520 Pin B6
PIC18F4520 Pin B5
PIC18F4520 Pin B4
PIC18F4520 Pin B3
PIC18F4520 Pin B2
PIC18F4520 Pin B1
Left WW-02 Clock Line (Violet wire)
Right WW-02 Clock Line (Violet wire)
Left WW-02 Direction Line (Orange wire)
Right WW-02 Direction Line (Orange wire)
Left WW-02 Ground (Black wire)
Right WW-02 Ground (Black wire)
Left WW-02 Vcc (Red wire)
Right WW-02 Vcc (Red wire)
Figure#92, Extra I/O & Wheel Encoders Header, J3 & J4
OPEN-ROBOT V2 Manual, Abe Howell’s Robotics November 14, 2009
87
Please refer to the WW-02 Wheel Encoder User Manual for additional connection
information. You will need to either solder the WW02 cables directly to the appropriate
locations on J4 or purchase a suitable header, crimp pins, and connector to house the
crimp pins. WW02 Wheel Encoders must be purchased separately.
PIC18F4520 Serial Connector, J11
Header Pin#
J11 Pin#1
J11 Pin#2
J11 Pin#3
Description
PIC18F4520 RX
PIC18F4520 TX
+5 volts
Note: This Board is a TTL device and
can only accept serial connections that
are in the 0 to +5 volt range. You must
use a level shifter cable to connect to
non-TTL RS232 serial devices, which
have levels in the –15 to 15 volt range.
Figure#93, Serial Header, J11
RFID Antenna Header, J8
Top Side of Board
Bottom Side of Board
Figure#94, RFID Antenna Header, J8
The RFID antenna header, J8, is located on the bottom side of the board. This is where
the RFID antenna must be plugged in. The RFID antenna that SonMicro sells for use with
the RFID Chip Module has short leads. These need to be extended by a short cable so that
the antenna can be mounted properly on the base of OPEN-ROBOT.
OPEN-ROBOT V2 Manual, Abe Howell’s Robotics November 14, 2009
88
How to Connect the CCS ICD to the Programming Connector, J2
Figure#95, CCS ICD Cable & Connectors
In the above figure we have connected the CCS ICD cable to the CCS ICD and OpenRobot’s RJ12 program/debug connector, J2. Updating firmware or loading your own
custom program can be performed using the MatchPort b/g module and this does not
require the use of an In-Circuit Programmer since the PIC18F4520 has been preprogrammed with a boot-loader. Using the In-Circuit Programmer/Debugger allows for
true hardware debugging and can be an invaluable tool when developing new simple or
complex code.
OPEN-ROBOT V2 Manual, Abe Howell’s Robotics November 14, 2009
89
OPEN-ROBOT Serial-Based Firmware Command Set
The 802.11b/g or ZigBee protocol is used to maintain a wireless communication link
between OPEN-ROBOT and a corresponding 802.11b/g/ZigBee wireless equipped
laptop, desktop pc, Pocket PC (PPC) or micro-controller. However, as an option you can
wire OPEN-ROBOT’s serial port directly to a suitable device, but this will require that
you fabricate any necessary cables. The default serial port settings for OPEN-ROBOT are
as follows: 115,200BPS, 8-data bits, 1-stop bit and no parity. Once properly installed &
setup the user can communicate with OPEN-ROBOT and create their own high-level
programs using Visual Studio.Net® or any software development tool of choice.
Simple serial command packets are used to communicate with OPEN-ROBOT and these
packets will inevitably vary in size, since different commands require either more or less
information. An entire command packet must be constructed and sent by the high-level
controlling program. OPEN-ROBOT will receive this packet and determine the packet’s
nature. Once OPEN-ROBOT deciphers the enclosed packet command, it will begin
execution or return the requested data. All incoming move commands take priority over a
previously issued command. Finally, all packets must be terminated with a line return
(“\r”) character or else they will become part of the next incoming command upon receipt
of the next line return along with any other packets that were sent prior to the line return.
The line return character allows OPEN-ROBOT to determine the end of a command
packet and then parse out the appropriate data. A built-in watchdog timer will restart the
PIC18F4520 if it is not reset in time, which in turn eliminates OPEN-ROBOT from
locking up. A diagram below illustrates the overall communication structure for OPENROBOT.
Master Device: PC,
PDA or other serial
capable device
Bi-directional
connection
802.11b/g/ZigBee
OPEN-ROBOT’s PIC18F4520 Micro-controller
Onboard HBridge Motor
Controller
Attached A/D
Sensors &
Additional
Digital I/O
Onboard
RFID Chip
Module
Two WW02
Wheel
Encoders
Two GM-8
Gear Motors
Figure#97, OPEN-ROBOT’s Communication Structure
OPEN-ROBOT V2 Manual, Abe Howell’s Robotics November 14, 2009
90
Serial-Based command set for OPEN-ROBOT.
Get All A/D Sensor Readings: “A\r”
• Will retrieve all the 8-bit A/D sensor readings.
• Returns “aX0,X1,X2,X3,X4,X5,X6,X7\r”
• X0 = Channel 0 (battery level).
• X1 = Channel 1 (Front Center IR A/D Sensor J14 Pin#1). Purchase Separately
• X2 = Channel 2 (Front Left IR A/D Sensor J14 Pin#2).
• X3 = Channel 3 (Front Right IR A/D Sensor J14 Pin#3).
• X4 = Channel 4 (Rear Left IR A/D Sensor J15 Pin#4). Purchase Separately
• X5 = Channel 5 (Rear Right IR A/D Sensor J15 Pin#5). Purchase Separately
• X6 = Channel 6 (Right Front Light Sensor).
• X7 = Channel 7 (Left Front Light Sensor).
• Example return: “a140,120,110,108,0,1,145,151\r”
Get Digital I/O Pin Reading: “LX0\r”
• Gets the appropriate I/O pin reading.
• X0 = Pin number (0 to 7).
• Returns “l” + “pin reading” + “\r” upon receiving the command.
• The pin reading value will be either a 1 or 0. A 1 corresponds to +5 volts and 0 is
0 volts.
• Example Return: “l0\r”
Get Wheel Encoder Readings: “E\r”
• Retrieves the left and right encoder readings.
• Returns “e X0, X1\r”
• X0 = Left encoder reading.
• X1 = Right encoder reading.
• Example Return: “E100,99\r”
Get A/D Sensor and Light Reflex Levels: “F\r”
• Retrieves 8-bit A/D Sensor and Light Reflex Level.
• Returns “f X0, X1\r”
• X0 = A/D Reflex Level.
• X1 = Light Reflex Level.
• Example Return: “f60,200\r”
Get Open-Robot’s PIC18F4520 Firmware Version: “!\r”
• Retrieves Open-Robot’s current firmware version.
• Returns “!Firmware Version =X0, Build Date =X1, Hardware Version =X2 \r”
• X0 = Firmware Version, which takes the form of 2.1.
• X1 = Build Date, which takes the form of 10/29/09.
• X2 = Hardware Version, which takes the form of 2.1.
OPEN-ROBOT V2 Manual, Abe Howell’s Robotics November 14, 2009
91
Get PID Gains: “GX0\r”
• Gets the current set of 8-bit PID gains for the velocity or position controller.
• X0 = For position send “P” and for velocity send “V”
• Returns “gpKp,Ki,Kd\r”
• Returns “gvKp,Ki,Kd\r”
• Example Return: “gp5,2,1\r”
• Default Position PID gains are Kp = 5, Ki = 2, and Kd = 1.
• Default Velocity PID gains are Kp = 5, Ki = 1, and Kd = 1.
Get PWM Motor Offsets: “@G\r”
• Gets the current left and right 8-bit PWM Motor Offsets. These values are used to
offset the motor PWMs. The PIC18F4520’s hardware PWM can be set from 0 to
255, but the GM-8 motors may not begin to spin until say 160. By setting the
PWM Offsets to 160 we ensure that the motors start moving when we send an
open-loop speed greater than zero. This also helps the robot to drive straighter
during open loop velocity control, but is equally important for proper PID
velocity and position control.
• Returns “@X0, X1\r”, where X0 is the left PWM Motor Offset and X1 is the right
PWM Motor Offset.
• Example Return: “@160,162\r”
Is Robot Sensor Reflex Triggered: “B\r”
• Checks to see if robot is blocked by a sensor reflex. Used in conjunction with “Set
sensory reflex”, and “Reset Agent Blockage” commands.
• Returns “bc\r” if clear and “bb\r” if blocked.
Is Move Complete: “D\r”
• Checks to see if the current move is complete.
• Returns “da\r” if move complete and “dn\r” if not.
• When using Position control you do not know how long a move will take so
simply check this periodically until the move is complete and then issue the next
command. This way the high-level controlling program can perform other
calculations while the robot moves to the requested position
Reset Robot Sensor Reflex: “R\r”
• Resets the robot’s sensor reflex. Used in conjunction with “Set sensory reflex”
and “Is Robot Sensor Reflex Triggered” commands.
• Returns “r\r” upon receipt of the command.
Reset RFID Module: “X\r”
• Resets the RFID Module.
• Returns “x\r” upon receipt of the command.
OPEN-ROBOT V2 Manual, Abe Howell’s Robotics November 14, 2009
92
RFID Tag Found: “z\r”
• Checks to see if a valid RFID tag has been found by “RFID Search for Tag”.
Used in conjunction with “RFID Search for Tag “ command, “Z\r”.
RFID Search for Tag: “Z\r”
• Continuously searches for an in-range tag.
• Halts robot when tag is located or Stop Robot, “H\r”, is issued.
• Used in conjunction with RFID Tag Found command, “z\r”.
RFID Tag Read: “T\r”
• Attempts to read an in range RFID tag. If no tag in range or error, returns “tn\r”.
• Returns “t” + “four hex data bytes in ASCII” + “\r” upon receiving the
command.
• Example Return: “tabcd\r”, when the four bytes of tag data is converted from
ASCII characters to hexadecimal we get the following: “t61626364\r”.
RFID Write Tag: “WX0,X1,X2,X3\r”
• Writes four ASCII bytes to an in range tag. Only way to guarantee a successful
write is to read the tag afterwards and check the data.
• X0 = Byte#0.
• X1 = Byte#1
• X2 = Byte#2
• X3 = Byte#3
• Returns “wa\r” upon receiving and acknowledging the command.
• Suppose we want to write “abcd” to the tag. We would send the following:
“Wabcd\r”. If we then read the tag we should get: “tabcd\r”.
Save All Parameters To PIC18F4520 Data EEPROM: “Y\r”
• Saves all parameters to the PIC18F4520 data EEPROM.
• Saves velocity gains (KP, KI, KD), position gains (KP, KI, KD), A/D Reflex
Level, Light Reflex Level.
• Returns “y\r” upon receipt of the command.
Set A/D Sensor Reflex Level: “CX0\r”
• Sets A/D Sensor Reflex level for Sensory Reflexes.
• X0 = 8-bit A/D sensor level to use with Sensory Reflexes.
• Use “Save All Parameters To PIC18F4520 Data EEPROM” so that setting
persists.
• Returns “c\r” upon receipt of the command.
Set Light Sensor Reflex Level: “NX0\r”
• Sets Light Sensor Reflex level for Sensory Reflexes.
• X0 = 8-bit Light sensor level to use with Sensory Reflexes.
• Use “Save All Parameters To PIC18F4520 Data EEPROM” so that setting
persists.
OPEN-ROBOT V2 Manual, Abe Howell’s Robotics November 14, 2009
93
•
Returns “n\r” upon receipt of the command.
Set Sensory Reflexes: “IX0\r”
• Sets sensory reflexes to be active or inactive for each of the (8) A/D Channels. In
active mode the agent will immediately stop when any of the active A/D Channels
exceeds the value set by Set A/D Reflex Level or Set Light Reflex Level.
• X0 = An 8-bit value that sets the specified A/D channels to be active or inactive.
• Each of the (8)-A/D channels is represented by one of the 8-bits. The least
significant bit, bit 0, represents A/D channel#0 (battery level), bit 1 corresponds
to A/D channel#1 (Front Center IR, J14 Pin#1), … , bit 7 corresponds to the front
left light sensor. To turn off all the A/D channel reflexes we would need to send a
zero (0), which would correspond to the following 8-bit string: “00000000”. If we
only wanted to turn on the reflex for the Rear Right IR (A/D channel#5) we
would send a hexadecimal 20 for X0, which corresponds to the following binary
string: “00100000”. If we only wanted to turn on the reflex for the front right light
sensor we would send a hexadecimal 40 for X0, which corresponds to the
following binary string: “01000000”. Next you would have to convert the
hexadecimal value to a corresponding character to send out as serial data. All
Sensory Reflexes are turned off upon startup.
• Returns “i\r” upon receipt of the command.
Set Digital I/O Pin Low: “JX0\r”
• Sets the appropriate I/O pin low.
• X0 = Pin number (0 to 7).
• Returns “j\r” upon receiving the command.
Set Digital I/O Pin High: “KX0\r”
• Sets the appropriate I/O pin high.
• X0 = Pin number (0 to 7).
• Returns “k\r” upon receiving the command.
Set Position PID Controller Gains: “PX0X1\r”
• Sets the specified 8-bit Position PID gain.
• X0 = For KP send “P”, KI send “I” and KD send “D”.
• X1 = 8-bit Gain Value.
• Use “Save All Parameters To PIC18F4520 Data EEPROM” so that setting
persists.
• Returns “p\r” upon receiving command.
• Default Position PID gains are Kp = 1, Ki = 2, Kd = 1.
• Changing the default values can degrade OPEN-ROBOT’s performance.
Set Position Stop Constant: “@SX0\r”
• Sets the specified 8-bit Position Stop Constant. The default value is 80. However,
you can tune this parameter so that your Open-Robot decelerates accordingly
during a PID position move.
OPEN-ROBOT V2 Manual, Abe Howell’s Robotics November 14, 2009
94
•
•
X0 = 8-bit Position Stop Constant Value to be set.
Valid range of stop constant values is from 50 to 150. If you try and use a value
outside of this range, then Open-Robot may perform erratically during position
PID control.
Set PWM Motor Offsets: “@X0X1\r”
• Sets the specified 8-bit PWM Motor Offset.
• X0 = “L” to set the left PWM Motor Offset or “R” to set the right PWM Motor
Offset.
• X1 = 8-bit PWM Motor Offset value to set.
• Use “Save All Parameters To PIC18F4520 Data EEPROM” so that this setting
change persists.
• Returns “@\r” upon receiving command.
• Default PWM Motor Offset value is 160.
• Example to set left PWM Offset to 162. “@L162\r”.
• Changing the default value can degrade OPEN-ROBOT’s performance.
• Read PWM Motor Offsets using the Get PWM Motor Offsets command, “@G\r”.
Set Velocity Controller PID Gains: “Q X0X1\r”
• Sets the specified 8-bit Velocity PID gain.
• X0 = For KP send “P”, KI send “I” and KD send “D”.
• X1 = 8-bit Gain Value.
• Use “Save All Parameters To PIC18F4520 Data EEPROM” so that setting
persists.
• Returns “q\r” upon receiving command.
• Default Velocity PID gains are Kp = 2, Ki = 1, Kd = 1.
• Changing the default values can degrade OPEN-ROBOT’s performance.
Set Position Closed Loop: “MP X0, X1\r”
• Sets the desired position in terms of wheel encoder ticks and uses PID position &
velocity control to complete the move. Use Is Move Complete to check for when
the move is done.
• X0 = Number of Left encoder ticks.
• X1 = Number of Right encoder ticks.
• Left & Right encoder ticks must be an integer in the range of –250 to 250.
• All incoming move commands will cancel a previously issued command.
• Returns “ma\r” upon receiving and acknowledging the command.
Set Velocity Closed Loop: “MV X0, X1\r”
• Sets the wheel velocities and performs PID velocity control.
• X0 = Left motor velocity.
• X1 = Right motor velocity.
• Left/Right motor velocity will be an integer in the range of –60 to 60 and have
units of tenths of an inch per second.
• All incoming move commands will cancel a previously issued command.
OPEN-ROBOT V2 Manual, Abe Howell’s Robotics November 14, 2009
95
•
Returns “ma\r” upon receiving and acknowledging the command.
Set Velocity Open Loop: “MO X0, X1\r”
• Sets the open loop velocity of each wheel.
• X0 = Left PWM motor speed.
• X1 = Right PWM motor speed.
• Left/Right PWM motor speed will be an integer in the range of –60 to 60.
• All incoming move commands will cancel a previously issued command.
• Returns “ma\r” upon receiving and acknowledging the command.
Stop Robot: “H\r”
• Immediately stops the GM-8 Motors, however, robot may coast before stopping.
• Returns “h\r” upon receiving the command.
Wander Mode: “U\r”
•
•
Robot will wander with an open loop velocity of 25 and avoid obstacles based
upon currently set A/D Sensor Reflex Level and using the front left and front
right IR sensors.
Behavior halts when Stop Robot command, “H\r”, is issued.
OPEN-ROBOT V2 Manual, Abe Howell’s Robotics November 14, 2009
96
Chapter 10: Details of analog to digital (A/D) sensors
This chapter will explain how to interpret OPEN-ROBOT’s analog-to-digital sensor
readings. The battery level, GP2D120 infrared sensors and cadmium sulfide light sensors
comprise this sensor array.
OPEN-ROBOT’s Battery Voltage Measuring Circuit:
Battery voltage cannot be measured directly by one of the PIC18F4520’s analog-todigital capable pins since we are using 6-AA batteries and the output voltage will vary
from about 7 to 9 volts. The PIC18F4520 is setup to measure input voltage by using a
+5volt reference, so we need to map the 7 to 9volts over to 5 volts. To accomplish this we
have created a simple voltage divider circuit by placing (2) appropriately sized resistors
in series as shown below. The output voltage from the 6-AA batteries is Vin and the Vout
and is measured by the PIC18F4520 and then compared against the +5 volt reference to
generate an 8-bit digital value.
Figure#98. Voltage Divider for Battery Voltage Measurement.
To solve for the battery voltage, Vin, we can use the following formula.
Vin = [(8-bit digital value)*(R1 + R2)*5volts] / (R2 *255)
If the OPEN-ROBOT returns a 128 for the battery voltage, we can convert this 8-bit
number to volts.
Vin = [(128)*(7.4kohms)*5volts] / (2.7kohms*255)= 6.87 volts
When using rechargeable batteries you should recharge at around 6.87 volts or 128.
OPEN-ROBOT V2 Manual, Abe Howell’s Robotics November 14, 2009
97
OPEN-ROBOT’s GP2D120 IR Sensors:
Figure#99. GP2D120 IR Sensor.
The GP2D120 IR sensor is a small and powerful sensor. Triangulation is used to measure
the distance to an incident object. The infrared output is modulated at 40KHz to prevent
erroneous measurements due to ambient infrared. Measurements are taken approximately
every 30 to 40ms.
Figure#100. GP2D120 Triangulation and output.
The output from a GP2D120 is a varying voltage level. The PIC18F4520 can directly
measure the output of a GP2D120 since it is within the acceptable 0 to 5 volt range. The
PIC18F4520 converts the voltage output to an 8-bit value. This 8-bit value can be
converted to a distance reading in units of inches, centimeters, or any other unit of length.
The output from a GP2D120 is non-linear and can be seen above in figure#100. To
convert the 8-bit value to a distance we must first convert the 8-bit digital value back to a
voltage reading. We can do this using the formula below.
Vout = (8-bit digital value)*5volts/255
OPEN-ROBOT V2 Manual, Abe Howell’s Robotics November 14, 2009
98
If the returned 8-bit value is 120 we can calculate the voltage as follows.
Vout = (120)*5volts/255 = 2.35 volts
To convert this to a distance reading we need to look at the GP2D120 data sheet.
2.35v
5.25 cm ~ 2”
Figure#101. GP2D120 Voltage Output versus Object Distance Data Sheet.
OPEN-ROBOT V2 Manual, Abe Howell’s Robotics November 14, 2009
99
Looking at the data sheet in figure#103 it can be seen that 2.35 volts corresponds to an
object distance of approximately 5.25cm or 2.07 inches. This method works fine if you
are only interested in converting a few distance readings, but what if you want to be able
to convert these on the fly? There are several different ways to accomplish this. You
could take all the data points from figure#103 and build a spreadsheet of output voltage
versus object distance. Then use the spreadsheet to create a 2-D plot. Now we simply
have a plot similar to the one in figure#103, but what good is this? Now we can perform a
regression fit of the plot and attain an equation for the line. You can then use this
equation to calculate object distance in inches or centimeters on the fly. You must of
course be careful with regard to how you fit the regression line i.e. would it be best to use
a n-degree polynomial, logarithmic, power, or linear fit? Using the wrong fit will simply
calculate erroneous distance measurements.
You could also use the same spreadsheet information as a look-up table in your program.
After converting the 8-bit reading to a voltage measurement simply look up that value in
your table. What if the value falls in-between the values in your spreadsheet? For a coarse
calculation you could approximate by using the closest value. For example, suppose you
had an 8-bit value of 120, which is equal to 2.35 volts. You also have the following
spreadsheet data.
2.38 volts = 5.0cm
2.00 volts = 6.0cm
We would pick the closer spreadsheet value and use 2.35 volts, which corresponds to
5.0cm. To attain a more precise value we can perform a linear interpolation using the
spreadsheet data and the formula for linear interpolation, which can be found below.
Y2 = [(X2 – X1)(Y3 – Y1) / (X3 – X1)] + Y1
Where X1 = 2.38volts, Y1 = 5.0cm, X2 = 2.35volts, X3 = 2.00volts, and Y3 = 6.0cm
Solving for Y2 yields.
Y2 = [(2.35volts – 2.38volts)(6.0cm – 5.0cm) / (2.00volts – 2.38volts)] + 5.0cm =
5.08cm
The GP2D120 data sheet can be downloaded from the following location.
http://www.abotics.com/OPEN_ROBOT_DOCS/GP2D120_SS.pdf
OPEN-ROBOT’s Light Sensors:
OPEN-ROBOT has (2)-frontward facing cadmium-sulfide cells that are capable of
measuring the amount of ambient light. A cadmium-sulfide (cds) cell is simply a photoresistor and changes resistance based upon the amount of incident light. As the amount of
OPEN-ROBOT V2 Manual, Abe Howell’s Robotics November 14, 2009
100
light increases the cds cell’s resistance drops and as the amount of light decreases the
resistance increases. To measure this change in resistance with the PIC18F4520 we need
to place the cds cell into a voltage divider with a 4.7kohm resistor. We can calculate the
cds cell’s resistance value for the current voltage reading by using the voltage divider
formula from before.
Vin = [(8-bit digital value)*(R1 + R2)*5volts] / (R2 *255)
Where Vin = 5 volts, R1 = cds cell resistance, R2 = 4.7kohms
Vin = [(8-bit digital value)*(R1 + R2)*5volts] / (R2 *255)
R1 + R2 = (R2 *255*Vin) / (8-bit digital value)*5volts
R1 = [(R2 *255*Vin) / (8-bit digital value)*5volts] – R2
cds cell resistance = [(4.7kohms *255) / (8-bit digital value)] – 4.7kohms
It is possible to convert this resistance value back to a reading in units of illuminance
(lux), but I will leave that up to you. The cds cell data sheet can be downloaded from the
following location.
http://www.abotics.com/OPEN_ROBOT_DOCS/202403-PhotoCell.pdf
OPEN-ROBOT V2 Manual, Abe Howell’s Robotics November 14, 2009
101
Chapter 11: Design of PIC18F4520 V2 Controller Board
Figure#102. Main PIC18F4520 controller board.
Originally the board was designed around a PIC16F877A. However, later on it was
discovered that the PIC18F4520 is a direct drop-in replacement and is more powerful.
From my years of experience designing and building robots I had compiled a list of
requirements that a flexible autonomous mobile robot’s controller board should satisfy.
List of board requirements
1. Contain a powerful, low-cost, microprocessor that is capable of handling A/D, I2C,
serial, and digital sensors.
2. Contain enough object detection sensors so that the robot is able to sense objects
around its body perimeter.
3. Contain sensors that can detect and measure the amount of ambient light.
4. Contain a low-cost RFID module and antenna so that the robot can interact with and
collect specific information that is embedded within the environment.
5. Contain the necessary motor driver circuitry such as an h-bridge.
OPEN-ROBOT V2 Manual, Abe Howell’s Robotics November 14, 2009
102
6. Provide a programming and debugging connection point to the target microprocessor.
7. Power the board with a high-efficiency voltage regulator.
8. Provide connector access to all pins on the chosen microcontroller.
9. Contain the required circuitry to measure its own battery voltage level.
10. Board should be designed using freely available software so that end-users can
modify the PCB design to suit their specific needs in the future.
The above-list of (10)-requirements is what drove the design of OPEN-ROBOT’s main
controller board.
ExpressPCB board services
The main PIC18F4520 controller board was designed using freely available software
from ExpressPCB. You can download this software from http://www.expresspcb.com/
and make design changes to the board as you see fit. To have the boards manufactured I
recommend using ExpressPCB’s MiniBoard service. This service will cost you around
$60 (as of 1/02/09) and includes (3)-boards along with shipping. However, you must
leave the board size at 3.8”x2.5”. You can quickly and economically test out your
changes using this service and when you’re ready to get a production quality board you
can use their ProtoPro service, which includes (4)-boards with silkscreen and solder
mask. The schematic file for this board is located on our website, but can also be viewed
at the end of this document in the Appendix section.
OPEN-ROBOT V2 Manual, Abe Howell’s Robotics November 14, 2009
103
Chapter 12: Design of MatchPort/XBee Wireless Board
Figure#103. MatchPort/XBee wireless board.
In the beginning, OPEN-ROBOT made use of a low-cost wireless Bluetooth® module
from SparkFun Electronics. This module provided an easy to use wireless connection that
leveraged the Bluetooth Serial Port protocol. This worked well for some time; however,
later on it was decided that OPEN-ROBOT needed to be more forward compatible with
the latest developing wireless technologies. From this evolved the current
MatchPort/XBee wireless board. After reviewing the current state of the art in wireless
technologies and low-cost vision systems the following requirements list for the new
wireless bard was formulated.
List of board requirements
1. Must accommodate the WiFi MatchPort b/g and XBee module. Users can choose
whether to use MatchPort b/g or XBee module.
2. Must provide an on/off switch to control battery power for the entire robot.
3. Must provide any necessary level shifting circuitry to interface the wireless modules
with the PIC18F4520’s UART.
4. Must provide an efficient +3.3volt voltage regulator that will supply power to the
MatchPort and XBee module.
OPEN-ROBOT V2 Manual, Abe Howell’s Robotics November 14, 2009
104
5. Must provide the necessary hardware to properly interface the SRV-1 Blackfin
Camera board from Surveyor Corporation.
a. The board must function for an SRV-1 and non-SRV-1 equipped robot.
ExpressPCB board services
From the above (5)-requirements the MatchPort/XBee wireless board was designed using
ExpressPCB’s free software. You can download this software from
http://www.expresspcb.com/ and make design changes to the board as you see fit. To
have the boards manufactured I recommend using ExpressPCB’s MiniBoard service.
This service will cost you around $60 (as of 1/02/09) and includes (3)-boards along with
shipping. However, you must leave the board size at 3.8”x2.5”. You can quickly and
economically test out your changes using this service and when you’re ready to get a
production quality board you can use their ProtoPro service, which includes (4)-boards
with silkscreen and solder mask. The schematic file for this board is located on our
website, but can also be viewed at the end of this document in the Appendix section.
OPEN-ROBOT V2 Manual, Abe Howell’s Robotics November 14, 2009
105
Chapter 13: Mechanical Design of OPEN-ROBOT
Figure#104. OPEN-ROBOT Alibre modle shown with MatchPort b/g.
3D Modeling software
OPEN-ROBOT’s mechanical design was created using a low-cost 3D modeling program
named Alibre. If you are only interested in modifying a few of OPEN-ROBOT’s parts,
then you might be able to use Alibre Design Xpress, which is a completely free version
of their Alibre Standard design software. However, you can only build assemblies that
contain up to (6)-different parts. You will not be able to open the entire OPEN-ROBOT
model using Xpress, but you can open any of the part files.
https://www.alibre.com/products/xpress/xpress_for_all.asp
There are two OPEN-ROBOT models: one with the MatchPort b/g and one with the
XBee module. Every component has been modeled as a part and then constrained to the
final assembly. Feel free to redesign and/or add components to OPEN-ROBOT because
this is why we are providing the entire 3D model. A zip file containing the 3D model files
can be downloaded from http://www.abotics.com/open_robot.htm
OPEN-ROBOT V2 Manual, Abe Howell’s Robotics November 14, 2009
106
Chapter 14: Adding the SRV-1 Blackfin Camera
Figure#105. OPEN-ROBOT shown with SRV-1 Camera.
Preparation for the SRV-1 Camera Board
The SRV-1 camera from Surveyor Corporation can be added to OPEN-ROBOT when a
32-pin connector is purchased and then soldered to the MatchPort/XBee wireless board as
shown in Chapter#2. You will also need to install the jumpers on pins 1&3 on both J4
and J5 on the MatchPort/XBee wireless board (refer to Chapter#2). After completing the
above steps, you can simply plug the SRV-1 camera board into the 32-pin connector. To
prevent the SRV-1 camera board from moving around you may want to purchase a pair
of #4-40 x 0.625” long threaded standoffs from Jameco Electronics (Jameco Part# 77519),
www.jameco.com. To install the standoffs simply remove the two #4-40 nuts on the front
of the MatchPort/XBee wireless board and then thread on the standoffs.
OPEN-ROBOT V2 Manual, Abe Howell’s Robotics November 14, 2009
107
Chapter 15: Upload Modified SRV-1 Firmware
To be able to use the SRV-1 camera with OPEN-ROBOT you either need to know how to
modify the SRV-1 firmware yourself or download suitable firmware that has already
been modified to work with the SRV-1 and OPEN-ROBOT. To start out we suggest
downloading already modified firmware.
Prerequisites
Download the appropriate OPEN-ROBOT modified SRV1 Firmware from Abe Howell’s
Robotics. You must match the modified firmware baud rate with the current firmware
that is installed on your SRV1. For example, if your SRV1 was purchased with a
firmware running 115,200 bps then you need to use the srv1.ldr.115k firmware. These
files were built from a 10-19-08 SRV1 firmware and will not work with earlier versions.
http://www.abotics.com/OPEN_ROBOT_Software/srv1_openrobot_firmware.zip
After downloading the firmware zip file, go ahead and unzip the contents to a known
location. If you are running Windows® XP I would suggest that you download a suitable
Terminal program like Tera Term Pro or ShamCom. I will be using ShamCom in this
tutorial.
http://www.shamrock.de/tools.htm
http://hp.vector.co.jp/authors/VA002416/teraterm.html
Uploading Firmware Using ShamCom Terminal and XModem
The SRV1 firmware has to be uploaded using XModem and the ‘X’ SRV1 command.
Once the firmware has been uploaded to the flash buffer then it needs to be written to the
boot sectors of flash memory using the ‘zZ’ SRV1 command. First you need to go ahead
and connect to your SRV1. Run the ShamCom program and select Dial from the
Connection menu.
OPEN-ROBOT V2 Manual, Abe Howell’s Robotics November 14, 2009
108
Figure#106. ShamCom New entry.
Then press the New button to create a new entry.
Figure#107. Add new entry for OPEN-ROBOT.
I will be naming my entry with OPEN-ROBOT, but you can name yours anything. You
need to enter the IP Address of your robot’s MatchPort b/g in the Number: field. Don’t
forget to add :10001, which is the MatchPort b/g port number. There is no need to change
the other settings, so simply click the OK button.
OPEN-ROBOT V2 Manual, Abe Howell’s Robotics November 14, 2009
109
Figure#108. Save configuration
Be sure to press Yes when you are asked to save the entry.
Figure#109. Connect to OPEN-ROBOT.
Now you can go ahead and power up your robot and click on the Dial button. The
ShamCom program will now attempt to connect to your robot. At this point I would
suggest copying the appropriate srv1.ldr file to the ShamCom folder, which should be
located at C:\Shamrock\ShamCom. This way the file will be readily accessible for
when you upload using XModem. Go ahead and type the SRV1 XModem receive
command, X. You should start to see CCCC printed in the ShamCom window. This
means that the SRV1 is waiting to receive a file upload via XModem. Click on the Action
menu and select Upload then XModem… Quickly browse for the correct SRV1
firmware file, which should be any of the following: srv1.ldr.115k, srv1.ldr.921k, or
srv1.ldr.2500k. The file upload should only take a minute or so.
OPEN-ROBOT V2 Manual, Abe Howell’s Robotics November 14, 2009
110
Figure#110. New firmware upload in process.
Once the upload is complete, you need to write the flash buffer to boot sectors of flash
memory using the zZ SRV1 command. Type the zZ command in the ShamCom window
and you should receive a message similar to the one shown below. Your new firmware
has been loaded.
Figure#111. New firmware upload complete.
You will now be able to command the SRV1 camera board, but also send and receive
commands from your OPEN-ROBOT. Now all your OPEN-ROBOT commands have to
be preceded by the tilde (~) character. This lets the SRV1 firmware know that the
following command is for the OPEN-ROBOT. For example, to retrieve the analog-todigital sensor readings we would type the following: ~A and then press the Return or
OPEN-ROBOT V2 Manual, Abe Howell’s Robotics November 14, 2009
111
Enter button. To command OPEN-ROBOT to drive forward using open-loop velocity we
would type the following: ~MO25,25 and then press the Return or Enter key.
OPEN-ROBOT V2 Manual, Abe Howell’s Robotics November 14, 2009
112
Chapter 16: Upload srv1.ldr Using Flashload & ICEbear
If you decided to purchase the ICEbear USB JTAG, then this section will help to provide
a brief explanation with regard to uploading new loader files to the SRV-1 camera board.
Prerequisites
To be able to complete this process you must have ICEbear and Cygwin installed on your
Microsoft® Windows machine. I have only verified this running Windows XP. You can
obtain ICEbear from the Section5 website. Be sure to download the Win32/Cygwin
package. At the time of writing this I was using Version 1.2. This installer will provide
you with the flashload.exe and other necessary files. You must have the ICEbear JTAG.
http://www.section5.ch/software
The Cygwin environment can be downloaded from the following website.
http://www.cygwin.com/
Flashload srv1.ldr File Using ICEbear JTAG
I like to copy my srv1.ldr file into the bfloader directory, which can be found under the
ICEbear install directory. This folder also has the necessary backend file, m25p80.dxe,
for uploading the srv1.ldr file using flashload.exe. For this example, the name of my
srv1.ldr file is srv1.ldr.2500k.openrobot.
C:\Program Files\section5\ICEbear\lib\bfloader\
Figure#112. ICEbear bfloader directory.
Now plug in your ICEbear to the SRV-1 board on the 14-pin connector, J2, and then
attach the USB cable. You should notice that one of the pins on J2 has been cut off. You
should also notice that one of the pins on your ICEbear has been plugged. This is a way
OPEN-ROBOT V2 Manual, Abe Howell’s Robotics November 14, 2009
113
to polarize the ICEbear and J2 so that you don’t improperly connect them. Make sure the
robot is powered off when plugging in the ICEbear. Open a command console and
navigate to the above-listed Cygwin directory. Power up your robot and type the
following command into the command console.
Flashload - -eraseall - -backend=m25p80.dxe - -program=srv1.ldr
Figure#113. ICEbear flashload.exe erasing flash and then programming chip.
The ICEbear will begin to erase the flash chip and then start the process of programming.
I have had this process freeze on me several times and the only way I know how to
resolve it is to simply power down the robot and try again.
OPEN-ROBOT V2 Manual, Abe Howell’s Robotics November 14, 2009
114
Figure#114. ShamCom uploading srv1.ldr file using XModem.
Upload srv1.ldr File Using XModem
Once the flashload process is complete, you must then connect to the SRV1 and upload
the same srv1.ldr file using XModem as shown above in figure#116. I use ShamCom to
accomplish this task because it is a free program and it works well. You can download
ShamCom from the following website.
http://www.shamrock.de/tools.htm
If you are going from a srv1.ldr with a different baud rate (i.e 921,600 bps to 2500k bps)
then you will need to adjust the baud rate of your MatchPort b/g before proceeding. DO
NOT turn off your robot, otherwise you will have to start over.
Once connected to the SRV1 using ShamCom you need to enter the X command to set
the SRV1 to accept an XModem file transfer. From the ShamCom menu select Actions>Upload->XModem and then browse to find the same srv1.ldr file that you loaded using
flashload. I prefer to copy the srv1.ldr file to the ShamCom folder.
C:\Shamrock\ShamCom
After the file has been transferred to the SRV-1 go ahead and save using the zZ
command. If this is successful you should see the same as is shown in figure#117 below.
You are now safe to reboot your robot and your new srv1.ldr should be in use.
OPEN-ROBOT V2 Manual, Abe Howell’s Robotics November 14, 2009
115
Figure#115. Successful zZ command.
OPEN-ROBOT V2 Manual, Abe Howell’s Robotics November 14, 2009
116
Appendix
Main PIC18F4520 V2 Board Schematic
OPEN-ROBOT V2 Manual, Abe Howell’s Robotics November 14, 2009
117
MatchPort/XBee Wireless Board Schematic
OPEN-ROBOT V2 Manual, Abe Howell’s Robotics November 14, 2009
118
PIC18F4520 I/O Map
OPEN-ROBOT PIC18F4520 V2 Board
Master Clear/Reset
Battery Level
Front Center IR
Front Left IR
Front Right IR
ENC_R_CLK
Rear Left IR
Rear Right IR
Front Right Light
Front Left Light
5 volts
GND
10 MHz Crystal
10 MHz Crystal
HEART_BEAT_LED
L_GM8_PWM (1,2 EN)
R_GM8_PWM (3,4 EN)
SCK_I2C
L_GM8 (1A)
L_GM8 (2A)
MCLR
RA0
RA1
RA2
RA3
RA4
RA5
RE0
RE1
RE2
Vdd
Vss
OSC1
OSC2
RC0
RC1
RC2
RC3
RD0
RD1
RB7
RB6
RB5
RB4
RB3
RB2
RB1
RB0
Vdd
Vss
RD7
RD6
RD5
RD4
RC7
RC6
RC5
RC4
RD3
RD2
SPARE_IO/PGD
SPARE_IO/PGC
SPARE_IO
SPARE_IO
SPARE_IO/PGM
SPARE_IO
SPARE_IO
ENC_L_CLK
5 volts
GND
ENC_R_DIR
ENC_L_DIR
RFID_RX
RFID_TX
UART_RX
UART_TX
RESET_RFID
SDI_I2C
R_GM8 (4A)
R_GM8 (3A)
SN754410 H-Bridge Chip
1,2 EN
1A
1Y (L_GM8)
GND
GND
2Y (L_GM8)
2A
Vcc2 (Vin)
P1
P2
P3
P4
P5
P6
P7
P8
P16
P15
P14
P13
P12
P11
P10
P9
Vcc1 (+5v)
4A
4Y (R_GM8)
GND
GND
3Y (R_GM8)
3A
3,4 EN
OPEN-ROBOT V2 Manual, Abe Howell’s Robotics November 14, 2009
119
533-24-7068-7601
QTY
Part#
1
GC-MATCHPORT-G-01
1
GC-WIPORT-ANT
1
GC-MATCHPORT-CAB-UFL-SMA
1
MatchPort/SRV1-PCB
1
KidBot-Caster
2
R246-GM8
2
R249-BLACK-GM-WHEEL
2
534-611
2
IR_Cable
2
852-GP2D120XJ00F
4
133605
2
1
4
561-K6.25
2
534-9316
8
534-9302
9
534-9301
22
40943
1
1
809-06722
5
13864
2
809-49102
4
OPEN-ROBOT Parts List
Price
$75.00
$7.00
$3.90
$20.13
$2.82
$6.00
$3.50
$0.32
$2.99
$9.74
$0.21
$5.00
$25.00
$0.06
$0.05
$0.04
$0.05
$0.03
$28.13
$0.03
$0.03
$0.04
$0.25
Total
$75.00
$7.00
$3.90
$20.13
$2.82
$12.00
$7.00
$0.64
$5.98
$19.48
$0.84
$10.00
$25.00
$0.24
$0.10
$0.34
$0.45
$0.66
$28.13
$0.03
$0.17
$0.07
$1.00
Kester No Clean, ROHS Solder (0.31" dia.)
$41.87
Complete OPEN-ROBOT + MatchPort + RFID $242.93
Shipping from Each Vendor:Jameco, Mouser, etc… $5.00
TOTAL $247.93
Total w/MatchPort b/g & RFID $242.93
OPEN-ROBOT w/ GM8s WiFi
Description
MatchPort b/g Module (10+)
MatchPort Rubber Antenna
Matchport cable U.FL to Reverse SMA
MatchPort/XBee/SRV-1 Board
Tamiya Ball Caster Pair ($5.63)
GM8 Gearmotor
GM8 Wheel
GP2D120 Mount
Sharp GP2D120 JST Cable
Sharp GP2D120
3/4"x3/16" Female-Female 4-40 Hex Standoff (100+)
GM8 Motor mount
Base, Controller & MatchPort Deck 1/8" Acrylic
#4 x 0.25" Nylon spacer
8-32 x 0.25" Machine Screw
4-40 x 1/2" Pan Head Machine Screw
4-40 x 3/8" Pan Head Machine Screw
4-40 Nut (500 for $15.00)
OPEN-ROBOT Controller Board
2"x2" ESD Label (500)
1/4"x12"x24" Anti-Static Foam (288 sq inches)
3"x5" ESD Pink Poly Bag
3M Dual-Lock Recloseable Tape
www.mouser.com
Where?
www.gridconnect.com
www.gridconnect.com
www.gridconnect.com
www.abotics.com
www.pololu.com
www.acroname.com
www.acroname.com
www.mouser.com
www.roboticsconnection.com
www.mouser.com
www.jameco.com
www.emachineshop.com
www.pololu.com
www.mouser.com
www.mouser.com
www.mouser.com
www.mouser.com
www.jameco.com
www.abotics.com
www.mouser.com
www.jameco.com
www.mouser.com
www.abotics.com
1
1
0
0
0
0
1
3
1
1
1
1
5
2
2
1
1
5
1
2
2
1
2
1
1
1
1
1
yes
yes
yes
yes
yes
yes
yes
yes
yes
yes
yes
yes
yes
yes
yes
yes
N/A
yes
yes
yes
yes
yes
yes
yes
QTY
ROHS
579-PIC18F4520-I/P
1054684
SM125-M1-232
Q5(T5555)
PRT-08614
IND-125
PCB
651-1725656
651-1725669
520-HCU1000-18X
538-22-03-2021
571-5520250-3
117560
253681
33488
R-785.0-1.0
108206
108089
108062
108011
202403
94432
93747
12BH361-GR
123-4006-GR
112311
40301
112222
Part#
Total without PCB
Total with PCB
PIC18F4520 40-Pin Chip
SN754410NE 16-Dip H-Bridge
RFID Module
Q5 ISO T5555 Tag
RFID Antenna Cable
Antenna
Open-Robot V2 PCB From Express PCB (100)
2-Pos Terminal Block (100+)
3-Pos Terminal Block (100+)
10 MHz Crystal (100+)
2 Pos Non-Polarized Header (100+)
Tyco 6-Pos RJ11 Connector (100+)
4-Pos Non-Polarized Header (100+)
T-100 Green LED (100)
0.1 uF Tantalum Capacitor, 35volt (100)
SWITCHING REG., 1.0 AMP, SIP 3, 5.0V
1/8W 47k Ohm resistor (100)
1/8W 4.7k Ohm resistor (100)
1/8W 2.7k Ohm resistor (100)
1/8W 1k Ohm resistor (100)
3k - 200k Ohm Photocell (100)
100 uf radial capacitor (100)
33uf radial capacitor (100)
(6)- AA Holder w/9-volt snaps (50)
9-volt molded battery snap (50)
40 Pin IC Socket (10)
28 Pin IC Socket (0.6") (10)
16 Pin IC Socket (10)
Description
OPEN-ROBOT V2 Board
OPEN-ROBOT Controller Board Parts List
4.980
1.550
13.900
3.500
1.350
3.200
4.786
0.820
1.240
0.413
0.100
0.46
0.190
0.090
0.250
7.550
0.007
0.007
0.007
0.007
0.490
0.060
0.090
0.890
0.260
0.250
0.171
0.110
$23.35
$28.13
4.980
1.550
0.000
0.000
0.000
0.000
4.786
2.460
1.240
0.413
0.100
0.46
0.950
0.180
0.500
7.550
0.007
0.035
0.007
0.014
0.980
0.060
0.180
0.890
0.260
0.250
0.171
0.110
www.mouser.com
www.jameco.com
www.sonmicro.com
www.sonmicro.com
www.sparkfun.com
www.sonmicro.com
www.expresspcb.com
www.mouser.com
www.mouser.com
www.mouser.com
www.mouser.com
www.mouser.com
www.jameco.com
www.jameco.com
www.jameco.com
www.cypower.com
www.jameco.com
www.jameco.com
www.jameco.com
www.jameco.com
www.jameco.com
www.jameco.com
www.jameco.com
www.mouser.com
www.mouser.com
www.jameco.com
www.jameco.com
www.jameco.com
Where?
MatchPort/XBee/SRV-1 Board
Description
2mm 10-Pin Sockets
PCB from Express PCB
SWITCH,MINI SLIDE,SPDT
0.1" 2-position non-polarized header
0.1" jumper
2-Pos Terminal Block (100+)
3-Pos Terminal Block (100+)
SN74HC245
SN74LVC245
SWITCHING REG., 1.0 AMP, SIP 3, 3.3V (25+)
100uF Radial Cap
0.1uF Tantalum Cap
Samtec 32-Pin Connector
6" of 24 Gauge Wire
Total
$4.00
$3.78
$0.16
$0.40
$0.24
$1.64
$1.24
$0.33
$0.33
$7.55
$0.06
$0.25
$0.00
$0.15
Total $20.13
Price
$1.00
$3.78
$0.16
$0.10
$0.12
$0.82
$1.24
$0.33
$0.33
$7.55
$0.06
$0.25
$3.92
$0.03
OPEN-ROBOT V2 Manual, Abe Howell’s Robotics November 14, 2009
ROHS QTY Part#
yes
4
yes
1
N/A
1
204142
yes
4
538-22-03-2021
yes
2
151-8010-E
yes
2
651-1725656
yes
1
651-1725669
yes
1
595-SN74HC245DWR
yes
1 595-SN74LVC245ADWR
yes
1
R-783.3-1.0
yes
1
94432
yes
1
33488
yes
0
ESQ-116-23-T-D
N/A
5
MatchPort/XBee/SRV-1 Board Parts List
Where?
SparkFun
PCB Express
Jameco
Mouser
Mouser
Mouser
Mouser
Mouser
Mouser
www.cypower.com
Jameco
Jameco
Samtec
Jameco
122