1
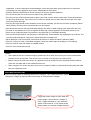
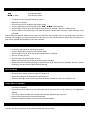
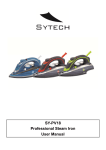
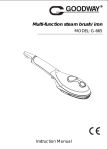
WELCOME
Welcome to Sytech! Thank you for purchasing the new Travel Iron SY-PV5T. Please read this manual carefully before
operating your product and pay close attention to the precautions which are mentioned below. Store this user manual
in a safe place for future reference.
DESCRIPTION OF PARTS
8
7
6
5
11
4
10 9
3
2
12
13
1
14
1.
2.
3.
4.
5.
6.
7.
Skirt
Water tank
House
Water inlet
Steam control knob
Top Cover
Burst of steam button
8. Handle
9. Cord
10. Lamp Cover
11. Temperature Control dial
12. Release button
13. Rear cover
14. Soleplate
IMPORTANT SAFEGUARDS
• Please read all instructions carefully before using the appliance for the first time.
• Before connecting the appliance, check if the voltage indicated on the rating plate corresponds with the mains
voltage in your home.
• Do not use the appliance for anything other than intended use.
• The iron should always be switched off before connecting or disconnecting from the power supply. Do not pull
on the cord to disconnect the plug from the wall socket.
• If the power cord is damaged or defective, it must be replaced by an authorized service center to avoid any
injuries.
• When you have finished ironing or when you are leaving the iron unattended:
o -turn the steam control knob (3) to position”0”, and the temperature control dial (6) to “OFF”
o -place the iron upright,
o -disconnect the iron from the wall outlet.
• The appliance is not intended for use by persons (including children) with reduced physical, sensory or mental
capabilities, or lack of experience and knowledge, unless they have been given supervision or instruction
concerning use of the appliance by a person responsible for their safety.
• Children should be supervised to ensure that they do not play with the appliance.
• Do not immerse the iron or the cord into water or any other liquid.
• Do not touch any of the hot metal parts or place your hand near the steam output area. These parts become
hot and may cause burns. Take care if you turn the iron upside down as there may be hot water in the tank
which may cause burnings.
• The plug and cord should not be allowed to touch the hot soleplate. Let the iron cool down completely before
taking it away. Roll the power cord around the iron for storage.
• Disconnect the iron from the wall outlet while filling it with water or when emptying the water tank after use.
• To avoid an overloaded circuit, do not operate another high voltage appliance in the same electric circuit.
• Never use an extension power cord set that is not approved by a competent authority.
• The cord should be rated for 10A (Europe) or 15A (America), cords rated for less amperage may overheat. The
cord should be arranged in a way that is cannot be pulled or tripped over.
• When placing the iron on its stand, ensure that the surface on which the stand is placed is stable.
• The iron is not to be used if it has been dropped, if there are visible signs of damage or if it is leaking.
• The iron must be used and rested on a stable surface.
• The iron is for household use only.
IMPORTANT
Notes:
•
Some parts of the iron have been slightly greased and as a result, the iron may emit some smoke when
switched on for the first time. This will not occur once the iron has been use various times.
•
Before using for the first time remove any protective films or stickers from the sole plate and the cabinet.
Clean the sole plate with a soft cloth before first use.
•
When using the iron for the first time, test it on an old piece of fabric to ensure that the sole plate and water
tank are completely clean.
VOLTAGE SELECTION
The iron has the option of selecting between two voltages: 115V / 800W and 230V / 800W
Change the voltage as required. See below image to select between voltages.
115V
230V
Toggle the switch voltage to 230V when the
power supply is connected to a voltage of
230V. Toggle the switch to 115V when the
switch is connected to a 115V power outlet.
Please follow your national voltage selection.
CHOICE OF WATER
•
•
•
This iron can be used with normal tap water.
If the water in your area is particularly hard, it is advisable to use distilled or demineralized water.
Do not use chemically descaled water or any other liquids for refilling.
FILLING THE TANK WITH WATER
•
•
•
•
Set the steam control knob (3) to “0” and the temperature control dial (1) to “OFF”.
Unplug the iron from the wall outlet, and wait for the iron to cool down.
Pour water into the water inlet (5):
-Fill up to the maximum level “MAX” of the water tank.
TEMPERATURE CONTROL SETTING
• Always check the garment label for ironing instructions before ironing the garment.
• If the ironing instructions are missing, then the table below may help you.
• First you should sort the laundry: Wool with wool, Cotton with cotton etc. Start ironing the fabrics
requiring the lowest temperature and progress to the higher ones because the iron heats up quicker
than it cools down.
• If the fabric consists of various kinds of fibers (e.g. cotton with polyester) you must always select the
ironing temperature for the material with the lowest advised temperature.
IRONING LABEL
TEXTILE MATERIAL
FABRICS
Synthetic
Acrylic
Polypropylene
Polyurethane
Synthetic
Acetate
Triacetate
Synthetic
Polyamide (Nylon)
Polyester
Viscose(Rayon)
Silk
Silk
Wool
Wool
Cotton
Cotton
Linen
Linen
SETTING THE TEMPERATURE
• Insert the plug in the wall socket and stand the iron upright.
• Turn the temperature control dial (6) to the desired temperature setting.
• The desired temperature has been reached when the pilot light has turned off. The pilot light will turn
on and off from time to time, indicating that the selected temperature is being maintained.
STEAM IRONING
This function can be used only at higher ironing temperature.
●●
for moderate steam
●●● or MAX
for maximum steam
•
•
•
•
•
•
Fill water into the iron as described on page 3.
Stand the iron upright.
Connect he iron to a suitable mains supply outlet
Turn the temperature control dial(6) to the “●●”, “●●●”or MAX setting
The pilot light turns off when the required temperature is reached. The iron is ready for use.
Turn the steam control knob (6) to the required position, steam starts coming out from the holes in the
sole plate.
Notice: With conventional steam ironing, water may leak from the sole plate if a very low temperature has been
selected. If this happens, turn the temperature control dial (6) to the advised position. Steam will recommence as
soon as the appropriate temperature has been reached.
BURST OF STEAM
This function provides an extra amount of steam to remove stubborn wrinkles.
•
•
•
•
•
•
•
Fill the iron with water as described on page 3.
Turn the temperature control to the position “MAX”
The pilot light turns off when the required temperature is reached
The iron is ready for use
Press the Burst of Steam button (5) once
Steam will penetrate into the garment removing the wrinkles
Wait a few seconds before pressing the steam button again when there are stubborn wrinkles. Usually
all wrinkles can be removed within three pressings
DRY IRONING
•
•
•
•
Connect the iron to a suitable mains supply outlet.
Ensure that the steam control knob(3) is in position”0”
Select the setting on the temperature control dial (6).
When the pilot light turns off, the required temperature is reached. The iron is ready for use.
CARE AND CLEANING
• Turn the temperature control dial (6) to “OFF”, then disconnect the iron from the wall outlet and let it
cool down completely.
• Deposits and other residues on the sole plate can be removed with a cloth soaked in a vinegar/water
solution.
• The casing may the wiped with a damp cloth and then polished with a dry one.
• Never use any abrasives to clean the sole plate.
• Keep the sole plate smooth; avoid contact with metal objects.
SAFETY PROTECTIVE CUT-OUT
In the unlikely event of the thermostat failing, the protection cut-out will operate to prevent the iron overheating.
Then the iron should be taken to the nearest authorized service facility.
STORAGE
• Turn the temperature control dial (6) to “OFF” and set the steam control knob (3) to position”0” (no
steam).
•
•
•
•
•
Disconnect the iron from the wall outlet.
Pour any remaining water out of the water tank.
Placed the iron upright and let it cool down completely.
The power cord can then be wrapped around the iron.
Always store the iron in an upright position.
SPECIFICATIONS
Travel Steam Iron
Stainless steel soleplate
Foldable Handle
Overheat security system
Temperature Regulator
Temperature ready indicator light
Water tank capacity: 40ml
Steam Capacity: 5±3g/min
Max Temperature: 220º
Power: 800W
Voltage: 220-240V
Rated Frequency: 50/60 Hz
Product size: 179x77x95mm
Weight: 0.58kg
DECLARATION OF CONFORMITY
Manufacturer Name: Satyatrade S. L.
Address: Pol.Ind.La Raya. C/ Guadalquivir, 2.
Camarma de Esteruelas, 28816 Madrid
Tel: 902 430 967
Fax: 91 8864285
NIF: B83254763
Manufacturing country: China
Description: Travel Iron
Sytech® SY-PV5T complies with the following directives:
CE Standard: Directive 2004/108/CE
ROHS Standard: 2011/65/EU Restriction of Hazardous Substances
Signed: Ajeet Nebhwani Utamchandani
Sole Administrator