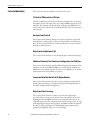
1
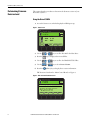
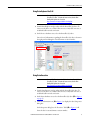
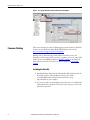
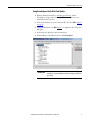
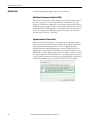
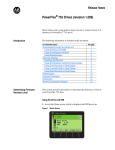
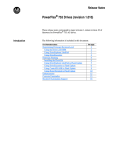
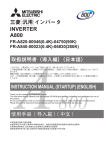
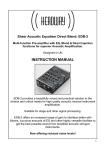
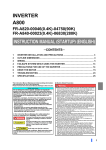
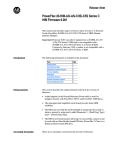
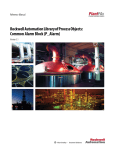
Release Notes
PowerFlex 753 Drives (revision 8.002)
These release notes correspond to major revision 8, minor revision 2 of firmware
for PowerFlex® 753 drives.
Introduction
The following information is included in this document:
For information about:
Determining Firmware Revision Level
Using the Drive LCD HIM
Using DriveExplorer Lite/Full
Using DriveExecutive
Firmware Flashing
Installing the Flash Kit
Using DriveExplorer Lite/Full to Flash Update
Using DriveExecutive to Flash Update
Using ControlFLASH to Flash Update
Using HyperTerminal to Flash Update
Enhancements
Corrected Anomalies
Known Anomalies
Restrictions
Rockwell Automation Support
See page:
2
2
3
3
4
4
5
6
8
10
15
16
19
20
21
PowerFlex 753 Drives (revision 8.002)
Determining Firmware
Revision Level
This section describes procedures to determine the firmware revision of your
PowerFlex 753 drive.
Using the Drive LCD HIM
1. Access the Status screen, which is displayed on HIM power up.
Figure 1 - Status Screen
Stopped
0.00 Hz
AUTO
F
Host Drive
480V 2.1A
20F...D2P1
00
ESC
REF
PAR#
TEXT
2. Use the
or
key to scroll to Port 00 for the Host Drive.
3. Press the
key to display its last-viewed folder.
4. Use the
or
key to scroll to the DIAGNOSTIC folder.
5. Use the
or
key to select Device Version.
6. Press the
(Enter) key to display device version information.
FW Revision is listed under –Main Control Board; see Figure 2.
Figure 2 - Device Version Information Screen
Stopped
0.00 Hz
PowerFlex 753
AUTO
F
Product Series A
Product Revision 1.007
Product Ser Num 00000000
–Main Control Board
FW Revision 5.001
ESC
2
TOP
END
PGUP
PGDN
Rockwell Automation Publication 750-RN030B-EN-P - November 2014
PowerFlex 753 Drives (revision 8.002)
Using DriveExplorer Lite/Full
IMPORTANT
You need DriveExplorer version 6.02 or later to interface with the
PowerFlex 753 drive. To obtain the latest version, visit the AllenBradley Web Updates site located at
http://www.ab.com/support/abdrives/webupdate.
1. Launch DriveExplorer and go online with the PowerFlex 753 drive. To
connect to the drive, use a 1203-USB converter, a 1203-SSS converter, or
an EtherNet/IP network connection.
2. In the Devices hardware view, select the PowerFlex 753 drive.
Once selected, information regarding the PowerFlex 753 drive is shown in
the right panel including the current firmware revision number.
Using DriveExecutive
IMPORTANT
You need DriveExecutive version 5.02 or later to interface with the
PowerFlex 753 drive. To obtain the latest version, visit the AllenBradley Web Updates site located at
http://www.ab.com/support/abdrives/webupdate.
1. Launch DriveExecutive and go online with the PowerFlex 753 drive. To
connect to the drive, use a 1203-USB converter, a 1203-SSS converter, or
an EtherNet/IP network connection.
2. In the Drives hardware view, select the PowerFlex 753 drive ( in Figure 3
on page 4).
3. Click the information icon ( in Figure 3) to display the drive’s Properties
dialog box.
In the Properties dialog box, the “Revision:” field ( in Figure 3) will
show the drive’s current firmware revision number.
Rockwell Automation Publication 750-RN030B-EN-P - November 2014
3
PowerFlex 753 Drives (revision 8.002)
Figure 3 - Accessing the PowerFlex 753 Drive Firmware Revision Number
Firmware Flashing
This section describes procedures to flash upgrade your drive firmware. Flash kits
for drives are provided on the Allen-Bradley Web Updates site located at
http://www.ab.com/support/abdrives/webupdate.
Flashing can be performed using a 1203-USB or 1203-SSS converter. For
information on connecting either converter to your drive, refer to the 1203-USB
USB Converter User Manual, publication DRIVES-UM001 or the 1203-SSS
Smart Self-powered Serial Converter User Manual, publication 20COMMUM001.
Installing the Flash Kit
1. Install the flash kit utility from the Allen-Bradley Web Updates site for the
PowerFlex 753 drive, which includes the latest version of the
ControlFLASH utility and deploys firmware files for using
HyperTerminal on your computer.
2. You are now ready to use DriveExplorer, DriveExecutive, ControlFLASH
or HyperTerminal to update the drive. Refer to the respective section and
follow the instructions.
4
Rockwell Automation Publication 750-RN030B-EN-P - November 2014
PowerFlex 753 Drives (revision 8.002)
Using DriveExplorer Lite/Full to Flash Update
1. With the Flash Kit installed (see Installing the Flash Kit), launch
DriveExplorer and go online (via a 1203-USB or 1203-SSS converter)
with the PowerFlex 753 drive.
2. In the Drives hardware view, select the PowerFlex 753 drive ( in Figure 3
on page 4).
3. Click the information icon ( in Figure 3) to display the drive’s Properties
dialog box.
4. In the Properties dialog box, click the Details tab.
5. With the Main Control Board selected, click Flash Update.
IMPORTANT
Flash updating the device firmware may cause the device to load
defaults. It is recommended that you save the setting to your PC before
proceeding.
Rockwell Automation Publication 750-RN030B-EN-P - November 2014
5
PowerFlex 753 Drives (revision 8.002)
6. From the list of available updates, select “v8.002.xxx” and click Next >.
7. Follow the remaining prompts until the flash update procedure completes
and displays the new firmware revision.
Using DriveExecutive to Flash Update
1. With the Flash Kit installed (see Installing the Flash Kit), launch
DriveExecutive and go online (via a 1203-USB or 1203-SSS converter)
with the PowerFlex 753 drive.
2. In the Drives hardware view, select the PowerFlex 753 drive ( in Figure 3
on page 4).
3. Click the information icon ( in Figure 3) to display the drive’s Properties
dialog box.
4. In the Properties dialog box, click the Component Details tab.
5. With the PowerFlex 753 drive selected, click Flash Update.
6
Rockwell Automation Publication 750-RN030B-EN-P - November 2014
PowerFlex 753 Drives (revision 8.002)
6. From the list of available devices, select the PowerFlex 753 drive and click
Next >.
IMPORTANT
Flash updating the device firmware may cause the device to load
defaults. It is recommended that you save the setting to your PC before
proceeding.
7. From the list of available updates, select “v8.002.xxx” and click Next >.
8. Follow the remaining prompts until the flash update procedure completes
and displays the new firmware revision.
Rockwell Automation Publication 750-RN030B-EN-P - November 2014
7
PowerFlex 753 Drives (revision 8.002)
Using ControlFLASH to Flash Update
1. With the Flash Kit installed (see Installing the Flash Kit on page 4), launch
ControlFLASH by selecting Start > (All) Programs > Flash
Programming Tools > ControlFLASH.
2. On the ControlFLASH Welcome dialog box, click Next >.
3. The Catalog Number dialog box appears. From the list, choose the
communication device you will use to update the PowerFlex 753 drive. In
the figure below, the embedded EtherNet device is selected.
Once the appropriate communication device is selected, click Next >.
8
Rockwell Automation Publication 750-RN030B-EN-P - November 2014
PowerFlex 753 Drives (revision 8.002)
4. Now that the correct communication device has been selected, you must
select which device is being updated. With the Select the PowerFlex…
dialog box displayed, follow these steps.
a. Expand the hardware view for the communication path you are using
( in Figure 4).
b. Select the drive icon that represents the PowerFlex 753 drive you are
updating ( in Figure 4).
c. Click OK ( in Figure 4).
Figure 4 - Selecting the Correct Drive to Flash
5. In the Multiple Assemblies Found display box, select
“Port x-PowerFlex 753” from the list and click OK.
Rockwell Automation Publication 750-RN030B-EN-P - November 2014
9
PowerFlex 753 Drives (revision 8.002)
6. In the Firmware Revision dialog box, select “v8.002…” from the list of
available updates and click Next >.
7. Follow the remaining prompts until the flash procedure completes and
displays the new firmware revision number.
Using HyperTerminal to Flash Update
IMPORTANT
The HyperTerminal process takes at least one hour to complete.
1. With the Flash Kit installed (see Installing the Flash Kit on page 4), access
and launch HyperTerminal as shown below.
10
Rockwell Automation Publication 750-RN030B-EN-P - November 2014
PowerFlex 753 Drives (revision 8.002)
2. A New Connection dialog box appears.
a. Enter the connection device name in the Name field or select an icon
from the library.
b. Click OK once you have finished.
3. A Connect To dialog box appears,
a. Use the “Connect using:” drop-down menu to select the appropriate
connection device.
b. Click OK once you have finished.
Rockwell Automation Publication 750-RN030B-EN-P - November 2014
11
PowerFlex 753 Drives (revision 8.002)
4. A Properties dialog box will appear for the selected connection device.
a. Use any of the drop-down menus to change the various port settings.
b. Click OK once you have finished.
5. After you click OK, you will get a blank screen.
Press Enter on your computer keyboard so the following test screen
appears.
6. From the Main Menu, select the flash upgrade ( in Figure 5 on page 13)
by pressing the number 3 key on your computer keyboard.
7. Additional text appears. From the Flash Upgrade menu, select the
PowerFlex 753 drive ( in Figure 5) by pressing the number 0 key on your
computer keyboard.
8. Additional text appears. After reading the conditions, select Yes ( in
Figure 5) to proceed by pressing the letter Y key on your computer
keyboard.
12
Rockwell Automation Publication 750-RN030B-EN-P - November 2014
PowerFlex 753 Drives (revision 8.002)
Figure 5 - HyperTerminal Test Screen Dialogue
The terminal program will start displaying the letter “C”. This signals the
XMODEM protocol that the download may proceed. You then have one
minute to start the transfer.
IMPORTANT
TIP
You have one minute to complete steps 9…14 or HyperTerminal will
return to step 5, where you must repeat steps 5…8.
To cancel the flash update at any time, press CTRL-X.
9. Select Transfer > Send File to display the Send File screen.
10. Click Browse and navigate to
C: > Program Files > ControlFLASH > 0001 > 0086 > 0490
11. Search through the subfolder until the “PF753_LP_App_v8_002_xxx.dpi”
file appears in the Select File to Send list.
Rockwell Automation Publication 750-RN030B-EN-P - November 2014
13
PowerFlex 753 Drives (revision 8.002)
12. With the file name highlighted, click Open so it appears in the Filename
data field in the Send File dialog box.
13. In the Protocol box, select “Xmodem.”
14. Click Send.
A dialog box appears and reports the progress of the update. This process
takes at least one hour for HyperTerminal to complete. When it is
complete, the message “Flash Complete” appears.
15. Press any key to continue.
16. Press the Enter key to return to the main menu.
14
Rockwell Automation Publication 750-RN030B-EN-P - November 2014
PowerFlex 753 Drives (revision 8.002)
Enhancements
This section describes the enhancements included in this revision.
There are no enhancements associated with this drive firmware release.
Rockwell Automation Publication 750-RN030B-EN-P - November 2014
15
PowerFlex 753 Drives (revision 8.002)
Corrected Anomalies
This section describes the anomalies corrected in this revision.
918 fault in IPM Encoderless FV Mode
The drive would throw an F918 Control Task Overload fault when accelerating
through the 7 Hz speed because of the way it changed PWM carrier frequency at
this speed. This anomaly only affected drives operating in the IPM Flux Vector
motor control mode without encoder feedback. It did not affect any other motor
control modes.
Aux Input Fault Status B
This revision of drive firmware changes the operation of parameter 953 [Fault
Status B]/bit 0 – Aux Input Flt, to remain set until the fault is cleared from the
drive. Previous revisions of firmware would clear this bit as soon as the auxiliary
fault input condition cleared.
Digital Input Config Alarms B & C
This revision of drive firmware corrects the digital input conflict alarm settings.
Additional Automatic Tach Switchover Configurations for PM Motors
This revision of drive firmware provides additional support for Automatic Tach
Switchover selections for IPM and SPM motor control. Specific additions for
IPM motor control include auto switchover from one feedback source to another
and auto switchover from feedback to open loop.
Inconsistent Min/Max/Default for IO Option Modules
This revision of drive firmware provides consistent minimum, maximum, and
default values for parameters 76 [Anlg Out0 Stpt] and 86 [Anlg Out1 Stpt] of
IO option modules in offline configuration.
Digital Input Run Processing
This revision of drive firmware contains corrections to the digital input
processing. The processing prevents the drive from responding to the level of a
digital input, when the digital input function is changed from an inactive (deenergized) input to an active (energized) input. The processing waits for an edge
of the digital input. This processing applies to the DI Run, DI Run Forward, DI
Run Reverse, DI Jog, DI Jog Reverse, and DI HOA Start commands, when
parameter 150 [Digital In Cfg] is set to 0 = “Run Edge.”
16
Rockwell Automation Publication 750-RN030B-EN-P - November 2014
PowerFlex 753 Drives (revision 8.002)
Adjustable Voltage not Returning to Command Frequency
This revision of drive firmware corrects the operation of the adjustable voltage
motor control mode, so that the frequency returns to the commanded frequency
when commanded for all possible values of Accel/Decel time parameters.
Parameter 383 Minimum Value is Too Large for Minimum Resistance
This revision of drive firmware corrects the logic and frame rating data used for
dynamic brake resistance. The minimum value of parameter 383 [DB Ext Ohms]
may now differ from the internal braking resistance value. Also, the internal
resistance values were corrected for the frame 1 and 2 drives.
DeviceLogix Not Able to Migrate Between Versions
This revision of drive firmware corrects the DeviceLogix macro block size,
eliminating errors from occurring in DeviceLogix programs that use type 3 macro
blocks when downloaded.
Calculation of the position integral term System Bandwidth
Calculation
This revision of drive firmware increases the max allowable value position
integral. This change has been made for compatibility with Logix V20 and
higher.
PM Motor Encoder Offset Test on Power Up
This revision of drive firmware adds logic to ensure that the PM/IPM Offset test
is successfully completed before running in a PM or IPM motor control mode. If
the scheduled test does not successfully complete, fault 197 – PM Offset Failed
will occur and the offset test will be automatically rescheduled.
9xx Non-Recoverable Faults are not recorded
This revision of drive firmware provides fault information, fault code and time
stamp, in the fault queue for all 9xx level faults. Associated documentation has
also been updated to provide appropriate information.
Rockwell Automation Publication 750-RN030B-EN-P - November 2014
17
PowerFlex 753 Drives (revision 8.002)
Ethernet Fault Actions, Last Stop Source Not Updated
This revision of drive firmware provides support to record the appropriate port as
the last stop source when the drive stops due to communication loss. The
pertinent port must be configured to stop on a communication loss for the last
stop source to be updated appropriately.
Alarm Dynamic Brake OT is Not in Parameters 960 or 963
This revision of drive firmware sets a drive alarm status bit for the Dynamic Brake
Overtemp alarm in relation to drive parameters 960 [Alarm Status B], and 963
[Alarm B at Fault].
Double Faults after Option Accept
This revision of drive firmware accounts for active faults to be appropriately
represented when the fault queue is cleared and persistent fault remains active.
18
Rockwell Automation Publication 750-RN030B-EN-P - November 2014
PowerFlex 753 Drives (revision 8.002)
Known Anomalies
This section describes the known anomalies that are present in this revision.
Feedback Selection
The HIM startup on the PowerFlex 753 drive includes a feedback device
selection step. Depending on the option modules installed, that step may first ask
the user to choose a port, then a parameter. In some situations, the list of ports
incorrectly shows multiple copies of “Port 0 - PowerFlex 753” followed by the
feedback port/module.
The incorrect behavior happens only under the following conditions:
• It is the first time that startup feedback selection has been run since
flashing the drive.
• The feedback module is a dual encoder or UFB and no other option
modules are installed.
• A reset to defaults of the drive NVS parameters has not been performed
since the drive was last flashed.
When the incorrect port list appears, it is still possible to successfully select the
feedback module port by following one of these methods.
• Scroll past the multiple copies of Port 0 to reach the desired feedback
module.
• Press the Esc soft key to back up one screen, then select “Feedback” and
press the Enter soft key to display the port selection screen a second time.
This time the correct list will be shown.
Persistent Stop Command with Profile Message Fault Action
In an application with the use of a PowerFlex 753 along with the 20-750-ENETR
dual port Ethernet/IP module, a persistent stop command may appear in some
cases. The action of disconnecting the Ethernet cable from the 20-750-ENETR
module, which will result in the drive stopping, may follow with a nuisance fault
action. This fault action previously noted is persistent communication of stop
commands.
Saving Parameters using Drive Explorer
When a user attempts to save all parameters, with a PowerFlex 753 and a 20-750ENETR dual port EtherNet/IP communication adapter, DriveExplorer, in some
cases, fails to complete the save function. To exit the loop, click the cancel button
and check if the text file had been saved.
Rockwell Automation Publication 750-RN030B-EN-P - November 2014
19
PowerFlex 753 Drives (revision 8.002)
Restrictions
The following restrictions apply to this revision of firmware.
Max Output Frequency Limited to 590Hz
This revision of drive firmware places a limit on the maximum output frequency
of the drive. In previous versions of drive firmware the maximum operating
frequency of the drive was 650Hz. The new maximum output frequency limit is
590Hz. If a previous application allows for a maximum output frequency greater
than 590Hz, the drive will ramp to the command frequency set point and once it
reaches a value greater than 590Hz for a period of time greater than 16ms the
drive will trip on a Fault 31, “Over-Freq”.
Implementation of Secure Flash
With this revision of drive firmware, an encryption layer with digital signature
has been attached to the drive firmware flash file. This encryption layer will not
allow the flashing of firmware files that have not been digitally signed by
Rockwell Automation. When flashing from a revision of firmware that is not
digitally signed, users will first need to flash up to V11.001 to enable the secure
flash feature to read the digital signature. Once at V11.001, a customer can flash
to any desired firmware revision level that has a secure digital signature. Previous
versions of drive firmware that don’t have a secure digital signature embedded in
the flash file will display the error shown below when a flash is attempted.
20
Rockwell Automation Publication 750-RN030B-EN-P - November 2014
PowerFlex 753 Drives (revision 8.002)
Rockwell Automation
Support
To assist you, Rockwell Automation provides technical information on the web.
At http://www.rockwellautomation.com/support, you can find technical
manuals, a knowledge base of Frequently Asked Questions (FAQs), technical and
application notes, sample code and links to software service packs, and a
MySupport feature you can customize to make the best use of these tools.
Rockwell Automation also provides complimentary phone support for drives,
option modules, and peripherals. If you experience a problem with an option
module, please review its documentation. For further help, contact a Customer
Support representative:
United States
Outside United States
(1) 262.512.8176
Monday – Friday, 7am – 6pm CST
Please contact your local Rockwell Automation representative for any technical support
issues.
For an additional level of technical phone support for installation, configuration,
and troubleshooting, we offer TechConnect Support programs. For more
information, contact your local distributor or Rockwell Automation
representative, or visit http://www.rockwellautomation.com/support.
Rockwell Automation Publication 750-RN030B-EN-P - November 2014
21
U.S. Allen-Bradley Drives Technical Support - Tel: (1) 262.512.8176, Fax: (1) 262.512.2222, E-mail: [email protected],
Online: www.ab.com/support/abdrives
www.rockwellautomation.com
Power, Control and Information Solutions Headquarters
Americas: Rockwell Automation, 1201 South Second Street, Milwaukee, WI 53204-2496 USA, Tel: (1) 414.382.2000, Fax: (1) 414.382.4444
Europe/Middle East/Africa: Rockwell Automation, Pegasus Park, De Kleetlaan 12a, 1831 Diegem, Belgium, Tel: (32) 2 663 0600, Fax: (32) 2 663 0640
Asia Pacific: Rockwell Automation, Level 14, Core F, Cyberport 3, 100 Cyberport Road, Hong Kong, Tel: (852) 2887 4788, Fax: (852) 2508 1846
Publication 750-RN030B-EN-P – November 2014
Supersedes 750-RN030A-EN-P – May 2013
Copyright © 2014 Rockwell Automation, Inc. All rights reserved. Printed in USA.