1
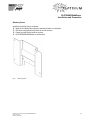
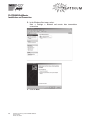
Installation and Operating manual
W e b M a s t e r
Mat. No. 736 926-AC, Version: 07/2010
PLATINUM WebMaster
Thank you for buying a PLATINUM WebMaster.
In this instruction, we have compiled all information that is important for
installation and operation.
If you still have any trouble, please call our service hotline.
Service hotline
You can reach the PLATINUM service hotline as follows:
Phone
+49 7522 73 777
Fax
+49 7522 73 737
E-mail
[email protected]
You can find more service documents at www.diehl.com/photovoltaics.
2
Installation and operating manual: PLATINUM WebMaster
Version: 07/2010
Mat. No. 736 926-AC
PLATINUM WebMaster
1 Symbols . . . . . . . . . . . . . . . . . . . . . . . . . . . . . . . . . . . . . . . . . . . . . . . . . . . . . . . . . . . . . . . . . . . .5
1.1 Warning notices . . . . . . . . . . . . . . . . . . . . . . . . . . . . . . . . . . . . . . . . . . . . . . . . . . . . . . . . .5
1.2 Other symbols . . . . . . . . . . . . . . . . . . . . . . . . . . . . . . . . . . . . . . . . . . . . . . . . . . . . . . . . . . .5
2 Safety and Dangers . . . . . . . . . . . . . . . . . . . . . . . . . . . . . . . . . . . . . . . . . . . . . . . . . . . . . . . . . . .6
3 Intended Use . . . . . . . . . . . . . . . . . . . . . . . . . . . . . . . . . . . . . . . . . . . . . . . . . . . . . . . . . . . . . . . .6
4 Function . . . . . . . . . . . . . . . . . . . . . . . . . . . . . . . . . . . . . . . . . . . . . . . . . . . . . . . . . . . . . . . . . . . .6
4.1 Applications. . . . . . . . . . . . . . . . . . . . . . . . . . . . . . . . . . . . . . . . . . . . . . . . . . . . . . . . . . . . .6
5 Start Up . . . . . . . . . . . . . . . . . . . . . . . . . . . . . . . . . . . . . . . . . . . . . . . . . . . . . . . . . . . . . . . . . . . .7
5.1 Scope of delivery . . . . . . . . . . . . . . . . . . . . . . . . . . . . . . . . . . . . . . . . . . . . . . . . . . . . . . . . .7
5.2 System Requirements . . . . . . . . . . . . . . . . . . . . . . . . . . . . . . . . . . . . . . . . . . . . . . . . . . . . .7
5.3 Switching On . . . . . . . . . . . . . . . . . . . . . . . . . . . . . . . . . . . . . . . . . . . . . . . . . . . . . . . . . . . .8
5.4 Initial Operation . . . . . . . . . . . . . . . . . . . . . . . . . . . . . . . . . . . . . . . . . . . . . . . . . . . . . . . . . .8
6 Installation and Connection . . . . . . . . . . . . . . . . . . . . . . . . . . . . . . . . . . . . . . . . . . . . . . . . . . . .10
6.1 Installing PLATINUM WebMaster . . . . . . . . . . . . . . . . . . . . . . . . . . . . . . . . . . . . . . . . . . .10
6.2 Connection Ports . . . . . . . . . . . . . . . . . . . . . . . . . . . . . . . . . . . . . . . . . . . . . . . . . . . . . . . .12
6.3 Power Supply . . . . . . . . . . . . . . . . . . . . . . . . . . . . . . . . . . . . . . . . . . . . . . . . . . . . . . . . . .13
6.4 Direct PC Connection. . . . . . . . . . . . . . . . . . . . . . . . . . . . . . . . . . . . . . . . . . . . . . . . . . . . .14
6.5 Local Network (LAN) Connection . . . . . . . . . . . . . . . . . . . . . . . . . . . . . . . . . . . . . . . . . . .17
6.6 Remote Access . . . . . . . . . . . . . . . . . . . . . . . . . . . . . . . . . . . . . . . . . . . . . . . . . . . . . . . . .18
6.7 Connection to PLATINUM network (EIA 485) . . . . . . . . . . . . . . . . . . . . . . . . . . . . . . . . . .27
6.8 Alarm Contact . . . . . . . . . . . . . . . . . . . . . . . . . . . . . . . . . . . . . . . . . . . . . . . . . . . . . . . . . .28
6.9 Connecting large-scale PV systems. . . . . . . . . . . . . . . . . . . . . . . . . . . . . . . . . . . . . . . . . .29
6.10 Connection to large-format display . . . . . . . . . . . . . . . . . . . . . . . . . . . . . . . . . . . . . . . . . .30
7 Operation . . . . . . . . . . . . . . . . . . . . . . . . . . . . . . . . . . . . . . . . . . . . . . . . . . . . . . . . . . . . . . . . . .33
7.1 Display. . . . . . . . . . . . . . . . . . . . . . . . . . . . . . . . . . . . . . . . . . . . . . . . . . . . . . . . . . . . . . . .33
8 Web Interface. . . . . . . . . . . . . . . . . . . . . . . . . . . . . . . . . . . . . . . . . . . . . . . . . . . . . . . . . . . . . . .35
8.1 User Rights . . . . . . . . . . . . . . . . . . . . . . . . . . . . . . . . . . . . . . . . . . . . . . . . . . . . . . . . . . . .35
8.2 Calling up Web Interface . . . . . . . . . . . . . . . . . . . . . . . . . . . . . . . . . . . . . . . . . . . . . . . . . .36
9 Plant state . . . . . . . . . . . . . . . . . . . . . . . . . . . . . . . . . . . . . . . . . . . . . . . . . . . . . . . . . . . . . . . . .39
9.1 Inverter . . . . . . . . . . . . . . . . . . . . . . . . . . . . . . . . . . . . . . . . . . . . . . . . . . . . . . . . . . . . . . .39
9.2 Sensors . . . . . . . . . . . . . . . . . . . . . . . . . . . . . . . . . . . . . . . . . . . . . . . . . . . . . . . . . . . . . . .40
10 Monitoring . . . . . . . . . . . . . . . . . . . . . . . . . . . . . . . . . . . . . . . . . . . . . . . . . . . . . . . . . . . . . . . . .41
10.1 Change monitoring options . . . . . . . . . . . . . . . . . . . . . . . . . . . . . . . . . . . . . . . . . . . . . . . .44
11 Reporting . . . . . . . . . . . . . . . . . . . . . . . . . . . . . . . . . . . . . . . . . . . . . . . . . . . . . . . . . . . . . . . . . .45
11.1 Daily power of entire plant. . . . . . . . . . . . . . . . . . . . . . . . . . . . . . . . . . . . . . . . . . . . . . . . .46
11.2 Daily yield of inverters . . . . . . . . . . . . . . . . . . . . . . . . . . . . . . . . . . . . . . . . . . . . . . . . . . . .48
11.3 Monthly yield for entire plant. . . . . . . . . . . . . . . . . . . . . . . . . . . . . . . . . . . . . . . . . . . . . . .50
11.4 Annual yield for entire plant . . . . . . . . . . . . . . . . . . . . . . . . . . . . . . . . . . . . . . . . . . . . . . . .52
11.5 Normalized Monthly Yield of the Entire plant . . . . . . . . . . . . . . . . . . . . . . . . . . . . . . . . . . .54
11.6 Performance ratio . . . . . . . . . . . . . . . . . . . . . . . . . . . . . . . . . . . . . . . . . . . . . . . . . . . . . . .56
12 Configuration . . . . . . . . . . . . . . . . . . . . . . . . . . . . . . . . . . . . . . . . . . . . . . . . . . . . . . . . . . . . . . .58
12.1 Main System . . . . . . . . . . . . . . . . . . . . . . . . . . . . . . . . . . . . . . . . . . . . . . . . . . . . . . . . . . .59
12.2 Communication . . . . . . . . . . . . . . . . . . . . . . . . . . . . . . . . . . . . . . . . . . . . . . . . . . . . . . . . .70
12.3 FTP upload. . . . . . . . . . . . . . . . . . . . . . . . . . . . . . . . . . . . . . . . . . . . . . . . . . . . . . . . . . . . .77
Installation and operating manual: PLATINUM WebMaster
Version: 07/2010
Mat. No. 736 926-AC
3
PLATINUM WebMaster
13
14
15
16
17
18
19
20
4
12.4 Display . . . . . . . . . . . . . . . . . . . . . . . . . . . . . . . . . . . . . . . . . . . . . . . . . . . . . . . . . . . . . . .78
12.5 Solar Plant . . . . . . . . . . . . . . . . . . . . . . . . . . . . . . . . . . . . . . . . . . . . . . . . . . . . . . . . . . . . .79
12.6 Safety . . . . . . . . . . . . . . . . . . . . . . . . . . . . . . . . . . . . . . . . . . . . . . . . . . . . . . . . . . . . . . . .89
Download . . . . . . . . . . . . . . . . . . . . . . . . . . . . . . . . . . . . . . . . . . . . . . . . . . . . . . . . . . . . . . . . . .91
13.1 System sum . . . . . . . . . . . . . . . . . . . . . . . . . . . . . . . . . . . . . . . . . . . . . . . . . . . . . . . . . . .92
13.2 Inverter details. . . . . . . . . . . . . . . . . . . . . . . . . . . . . . . . . . . . . . . . . . . . . . . . . . . . . . . . . .93
13.3 Sensor Data. . . . . . . . . . . . . . . . . . . . . . . . . . . . . . . . . . . . . . . . . . . . . . . . . . . . . . . . . . . .95
13.4 System events. . . . . . . . . . . . . . . . . . . . . . . . . . . . . . . . . . . . . . . . . . . . . . . . . . . . . . . . . .96
Documentation . . . . . . . . . . . . . . . . . . . . . . . . . . . . . . . . . . . . . . . . . . . . . . . . . . . . . . . . . . . . . .97
Software Update . . . . . . . . . . . . . . . . . . . . . . . . . . . . . . . . . . . . . . . . . . . . . . . . . . . . . . . . . . . .97
Disposal . . . . . . . . . . . . . . . . . . . . . . . . . . . . . . . . . . . . . . . . . . . . . . . . . . . . . . . . . . . . . . . . . . .97
Standards and Approvals . . . . . . . . . . . . . . . . . . . . . . . . . . . . . . . . . . . . . . . . . . . . . . . . . . . . . .97
Technical Data . . . . . . . . . . . . . . . . . . . . . . . . . . . . . . . . . . . . . . . . . . . . . . . . . . . . . . . . . . . . . .98
EU Declaration of Conformity . . . . . . . . . . . . . . . . . . . . . . . . . . . . . . . . . . . . . . . . . . . . . . . . . . .99
Manufacturers' Warranty of Diehl AKO Stiftung & Co. KG . . . . . . . . . . . . . . . . . . . . . . . . . . . .100
Installation and operating manual: PLATINUM WebMaster
Version: 07/2010
Mat. No. 736 926-AC
PLATINUM WebMaster
Symbols
1
Symbols
1.1
Warning notices
Classification of warning notices
The warning notices differentiate between three types of dangers
indicated by the following signal words:
Caution warns of material damages.
Warning warns of bodily injuries.
Danger warns of a danger to life.
Layout of the warning notices
Type and source of the danger!
! Measure to avoid the danger.
Signal words
1.2
Other symbols
Instructions
Layout of instructions:
! Instruction to do something.
Result of the action, if necessary.
Lists
Layout of bulleted lists:
List level 1
List level 2
Layout of numbered lists:
1. List level 1
2. List level 1
2.1 List level 2
2.2 List level 2
Installation and operating manual: PLATINUM WebMaster
Version: 07/2010
Mat. No. 736 926-AC
5
PLATINUM WebMaster
Safety and Dangers
2
Safety and Dangers
! Use WebMaster according to its intended use.
! Use PLATINUM WebMaster and accessories in original and
technically fully intact condition without unauthorized modifications.
! Ensure that PLATINUM WebMaster is installed and serviced
exclusively by qualified specialists.
! Exclusively operate the PLATINUM WebMaster with the designated
supply voltage respectively (see 18 Technical Data).
! Exclusively operate PLATINUM WebMaster with the provided power
supply.
! Ensure that all protection devices are fully operational.
! Prior to installation and maintenance work, ensure that PLATINUM
WebMaster is de-energized.
! Ensure that regulations stipulated by trade associations and
inspection authorities and agencies are observed and that the
connection conditions of the relevant energy supplier or equivalent
national and international rules and regulations are adhered to.
! Start up, install and mount according to the order indicated in the
installation and operating manual.
3
Intended Use
PLATINUM WebMaster is designed exclusively for process monitoring of
regenerative energy plants in combination with PLATINUM inverters.
4
Function
4.1
Applications
It is possible to operate PLATINUM WebMaster as follows:
in combination with a local PC
Direct PC Connection
in combination with a local PC that is integrated in a network (LAN)
Network connection
on local large-format screen via HVG protocol or remote display
via remote access
Connection to a remote PC via modem or internet connection
in PV systems with up to 50 inverters
in PV systems with up to 50 inverters via an additional PLATINUM
WebMaster control center
6
Installation and operating manual: PLATINUM WebMaster
Version: 07/2010
Mat. No. 736 926-AC
PLATINUM WebMaster
Start Up
In large-scale PV systems with more than 50 PLATINUM inverters:
! Form PLATINUM network bus groups of 50 devices at most and
connect them to a PLATINUM WebMaster client.
! Connect PLATINUM WebMaster clients to PLATINUM WebMaster
control center via a LAN switch.
Control center and client are configured at the factory. Indicate desired
option when ordering.
5
Start Up
5.1
Scope of delivery
Note
1 PLATINUM WebMaster
1 cross-link cable
1 power supply with connector strip
1 wall bracket
1 termination plug
1 installation and operating manual
Designs
PLATINUM WebMaster for DSL/LAN, order no. 713 757
PLATINUM WebMaster + analog modem, order no. 720 041
PLATINUM WebMaster + ISDN modem, order no. 720 042
PLATINUM WebMaster + GSM modem, order no. 720 043
Accessories
PLATINUM PowerCommander
for performance management according to EEG
PLATINUM SensorKit
for performance control of the PV system
PLATINUM SolarPortal
for internet-based remote monitoring of the PV system
comparison with current weather data
professional monitoring and analysis tools
5.2
System Requirements
PC with installed web browser
Internet Explorer (Version 6 or higher)
Firefox (version 2.0 or higher)
! Ensure that JavaScript is enabled in the browser.
Installation and operating manual: PLATINUM WebMaster
Version: 07/2010
Mat. No. 736 926-AC
7
PLATINUM WebMaster
Start Up
5.3
Switching On
! Connect PLATINUM WebMaster to the power supply
(see 6.3 Power Supply).
! Connect power supply to mains.
PLATINUM WebMaster generates an acoustic signal.
PLATINUM WebMaster performs a self-test (approx. 60 s).
All LEDs light up.
When the green LED on the top of the unit blinks:
PLATINUM WebMaster is ready for use.
Note
Information on LEDs on top and back of device, see 7.1 Display.
5.4
Initial Operation
The initial setup of PLATINUM WebMasters is done at a local PC via a
direct PC connection.
During the initial setup, PLATINUM WebMaster’s network configuration
will be adapted to your existing network.
For the first configuration of PLATINUM WebMaster:
! Connect PLATINUM WebMaster to a local PC via a direct PC
connection (see 6.4 Direct PC Connection).
Note
The configuration of PLATINUM WebMaster is password-protected. Diehl
Controls recommends that you change the password after the initial
setup operation (see 12 Configuration).
To log in:
! Enter the following address in your web browser:
192.168.1.190
! Click on Login.
! During the initial setup operation, enter:
User = admin
Password = admin
The web interface of PLATINUM WebMaster appears.
8
Installation and operating manual: PLATINUM WebMaster
Version: 07/2010
Mat. No. 736 926-AC
PLATINUM WebMaster
Start Up
Fig. 1
Web Interface of PLATINUM WebMaster (Welcome Screen)
! In the menu, select:
Configuration Main system network
! Adapt PLATINUM WebMaster’s network settings to your existing
network (see 12.1 Main System).
Installation and operating manual: PLATINUM WebMaster
Version: 07/2010
Mat. No. 736 926-AC
9
PLATINUM WebMaster
Installation and Connection
6
Installation and Connection
6.1
Installing PLATINUM WebMaster
! Install PLATINUM WebMaster in:
interiors
electrical cabinets
For indoor installations:
! Use the supplied wall bracket.
Possible installation positions in mounting rail systems:
hanging, connection ports facing down
For outdoor installations:
! Install PLATINUM WebMaster in a suitable electrical installation
cabinet (IP65).
10
Installation and operating manual: PLATINUM WebMaster
Version: 07/2010
Mat. No. 736 926-AC
PLATINUM WebMaster
Installation and Connection
Mounting fixture
Install the mounting fixture as follows:
!
!
!
!
Fig. 2
Mark the mounting holes using the mounting fixture as a template.
Drill the mounting holes and insert the screw anchors.
Fasten the wall bracket with the screws.
Put PLATINUM WebMaster in wall bracket.
Mounting fixture
Installation and operating manual: PLATINUM WebMaster
Version: 07/2010
Mat. No. 736 926-AC
11
PLATINUM WebMaster
Installation and Connection
6.2
Connection Ports
Fig. 3
Connection Ports
(1)
(2)
(3)
(4)
(5)
(6)
(7)
(8)
Note
Connector strip
Serial Modem Interface
Operation Display
Internet Switch
Function switch (no function)
Connection PLATINUM network (EIA 485)
Connection PLATINUM network (EIA 485)
Connection network or local PC (ethernet)
Information on LEDs on top and back of device, see 7.1 Display.
Connector strip
PIN
GND
Function
Description
Power Supply
12-24V
EasyLan EasyLan Bus
GND
-
(COM3) EIA 485 intrface
Optional interfaces for connecting
additional devices (e.g. large
display).
No PLATINUM bus (EIA485)
interface.
potential-free inlet
For a fault indicator (switching
voltage 12 – 24 VDC).
Connection to relay outlet is
possible.
Alarm contact
For outputting an error message
(switching voltage max. 48 VDC)
B
A
GND
IN1+
IN1-
OK1+
OK1-
12
For connecting a PLATINUM
PowerCommander (power
management) and PLATINUM
SensorKit.
Installation and operating manual: PLATINUM WebMaster
Version: 07/2010
Mat. No. 736 926-AC
PLATINUM WebMaster
Installation and Connection
6.3
Power Supply
Caution
Damage due to incorrect installation sequence!
Before connecting to the mains:
! Ensure that the PLATINUM WebMaster is completely
assembled.
! Ensure that all necessary cables are connected.
! Connect connector strip of supplied power supply to PLATINUM
WebMaster.
Fig. 4
Mains Connection
(1) Power Supply
The mains power connector is pre-wired to the power supply adaptor at
the factory.
Installation and operating manual: PLATINUM WebMaster
Version: 07/2010
Mat. No. 736 926-AC
Note
13
PLATINUM WebMaster
Installation and Connection
6.4
Direct PC Connection
Damage due to using incorrect cable!
! To connect PLATINUM WebMaster, use exclusively the
provided cross-link cable with the red plug.
Caution
! Connect PLATINUM WebMaster to network port of a local PC using
the cross-link cable.
Fig. 5
Direct PC Connection
(1) Electrical Power via Power Supply
(2) Direct connection to PC
! Connect power supply to PLATINUM WebMaster
(see 6.2 Connection Ports).
! Switch on PLATINUM WebMaster (see 5.3 Switching On).
The configuration of the IP addresses is the prerequisite for
communication between PLATINUM WebMaster and PC. The PLATINUM
WebMaster’s IP address is preset at the factory. Configuring the PC´s IP
address is required.
The configuration of the IP address of the PC depends on the operating
system used. The following describes the configuration of the IP address
on a PC running Windows XP.
14
Installation and operating manual: PLATINUM WebMaster
Version: 07/2010
Mat. No. 736 926-AC
PLATINUM WebMaster
Installation and Connection
Configure the IP address on the PC as follows:
! In the Windows Start menu, select:
Start Settings Network and Internet Connections
Local Area Connection
Installation and operating manual: PLATINUM WebMaster
Version: 07/2010
Mat. No. 736 926-AC
15
PLATINUM WebMaster
Installation and Connection
Properties
Internet Protocol (TCP/IP)
Properties
! Enter the following in the Properties dialog:
IP address: 192.168.1.191
Subnet mask: 255.255.255.0
! Click OK to confirm entries.
! Close the Properties dialog.
16
Installation and operating manual: PLATINUM WebMaster
Version: 07/2010
Mat. No. 736 926-AC
PLATINUM WebMaster
Installation and Connection
6.5
Local Network (LAN) Connection
Before connecting PLATINUM WebMaster to a local network (LAN),
configure a suitable IP address via direct PC connection (see 12.1 Main
System).
Note
! Connect PLATINUM WebMaster to network with patch cable.
Fig. 6
Network Connection
(1) Power Supply
(2) Connection to Local Network or Local PC (LAN)
To configure PLATINUM WebMaster for a local network (LAN) see
12 Configuration.
Installation and operating manual: PLATINUM WebMaster
Version: 07/2010
Mat. No. 736 926-AC
17
PLATINUM WebMaster
Installation and Connection
6.6
Remote Access
Remote access allows connecting a PC that is not part of the PV system
to PLATINUM WebMaster. Remote PC and PLATINUM WebMaster are
connected to the telephone network via modem or broadband router.
Possible modem connections
The following combinations are possible for connecting a modem to
PLATINUM WebMaster or PC:
PLATINUM
WebMaster
Note
PC
Condition
ISDN Modem
ISDN Modem
Protocol X.75
Analog Modem
ISDN Modem
ISDN Modem is capable of
Analog emulation
Only possible if ISDN-Modem über
Analog-Emulation verfügt.
Analog Modem
Analog Modem
GSM modem
Analog Modem
For other combinations it is necessary to consult the PLATINUM service
department.
Diehl Controls recommends that PLATINUM WebMaster be connected to
a telephone line with a separate telephone number.
Access to a PLATINUM WebMaster with analog modem via a PC with
DSL connection is not possible.
Fig. 7
Modem Connection
(1) Power Supply
(2) Connection to Modem
18
Installation and operating manual: PLATINUM WebMaster
Version: 07/2010
Mat. No. 736 926-AC
PLATINUM WebMaster
Installation and Connection
Possible connections Broadband Internet
The connection is usually established via routers with LAN connections.
Setting see 12.1 Main System.
Enregistring the router as a gateway in the PLATINUM WebMaster is
necessary (see 12.1 Main System).
In order to reach PLATINUM WebMaster from a remote PC via internet, a
URL address is required. For private individuals, a certain number of
dynamic addresses is available for free. There are several providers, e. g.
www.dyndns.com.
A DynDNS service will assign the router a definite name (URL). The router
set accordingly will transmit its IP address to the DynDNS service at
regular intervals and will thus be available. Diehl Controls recommends
registering at a DynDNS service.
Establishing a modem connection
The remote connection on the remote PC is configured with the installed
operating system. The method described below applies to the
Windows ® XP operating system.
Note
Establish modem connection on remote PC as follows:
!
!
!
!
Set switch Internet on PLATINUM WebMaster to On.
Connect modem to PLATINUM WebMaster.
Connect the power supply to the mains.
Connect the modem to the telephone line.
Installation and operating manual: PLATINUM WebMaster
Version: 07/2010
Mat. No. 736 926-AC
19
PLATINUM WebMaster
Installation and Connection
! In the Windows Start menu, select:
Start
Settings
Network and remote data transmission
connections
! Click on New Network Connections.
! Click on Next.
20
Installation and operating manual: PLATINUM WebMaster
Version: 07/2010
Mat. No. 736 926-AC
PLATINUM WebMaster
Installation and Connection
! Select Connect to the internet.
! Click on Next.
! Select Set up my connection manually.
! Click on Next.
Installation and operating manual: PLATINUM WebMaster
Version: 07/2010
Mat. No. 736 926-AC
21
PLATINUM WebMaster
Installation and Connection
! Select Connect using a dial-up modem.
! Click on Next.
! Enter the internet provider.
! Click on Next.
22
Installation and operating manual: PLATINUM WebMaster
Version: 07/2010
Mat. No. 736 926-AC
PLATINUM WebMaster
Installation and Connection
! Enter dial number of modem connection on PLATINUM WebMaster.
! Click on Next.
! Select My use only.
! Click on Next.
Installation and operating manual: PLATINUM WebMaster
Version: 07/2010
Mat. No. 736 926-AC
23
PLATINUM WebMaster
Installation and Connection
!
!
!
!
Enter usename.
Enter password.
Click on Next.
Click on Finish.
A new modem connection for the PLATINUM WebMaster is established.
Set up modem in web surface of PLATINUM WebMaster (see 12.1 Main
System).
Set up DSL router
Loss of data due to incorrect configuration!
! Ensure that the DSL router’s configuration is
performed by qualified persons exclusively.
Caution
Set up DSL router on PLATINUM WebMaster as follows:
! Set switch Internet on PLATINUM WebMaster to On.
! Set the same subnet for DSL router and PLATINUM WebMaster.
! Adapt PLATINUM WebMaster’s IP address to DSL router’s
assignment range.
If necessary, request data from network administrator.
! Ensure that IP addresses are assigned only once within a network.
24
Installation and operating manual: PLATINUM WebMaster
Version: 07/2010
Mat. No. 736 926-AC
PLATINUM WebMaster
Installation and Connection
The following example shows the assignment range of a DSL router
(Fritz!Box).
Example
IP address positions 1 – 3:
Indication of subnet
IP address position 4:
Assignment range of 254 addresses
51 – 149 assigned dynamically by DSL router
in the example, 254 is reserved for the DSL router
Thus, in the example it is possible to definitely assign the IP addresses
1 – 50, 150 – 254.
Before PLATINUM WebMaster is accessible from the external PC it is
necessary to configure Port Forwarding and DynDNS service.
Note
Seting up GSM modem
Set up GSM modem as follows:
! Set switch Internet on PLATINUM WebMaster to On.
! Ensure that data services are activated at the mobile phone service
provider’s.
! Insert SIM card into GSM modem.
! Connect antenna and power supply to modem.
Observe modem’s operating manual.
! Use serial cable to connect GSM modem to PLATINUM WebMaster.
! Set up GSM modem in web surface of PLATINUM WebMaster
(see 12.1 Main System).
Installation and operating manual: PLATINUM WebMaster
Version: 07/2010
Mat. No. 736 926-AC
25
PLATINUM WebMaster
Installation and Connection
Starting remote access
Modem connection
or GSM modem
connection
For modem connection or GSM modem connection on remote PC:
! Start modem connection or GSM modem connection to PLATINUM
WebMaster.
After successful connection on remote PC:
! Enter the following address in your web browser:
192.168.2.1
The web interface of PLATINUM WebMaster appears.
Broadband internet
For broadband internet:
! Enter URL address, DynDNS and the PLATINUM WebMaster’s port in
the web browser.
The web interface of PLATINUM WebMaster appears.
26
Installation and operating manual: PLATINUM WebMaster
Version: 07/2010
Mat. No. 736 926-AC
PLATINUM WebMaster
Installation and Connection
6.7
Connection to PLATINUM network (EIA 485)
! Use patch cable to connect PLATINUM WebMaster to PLATINUM
network (EIA 485).
! Use exclusively patch cables meeting the following specifications:
at least CAT 4 network cable
Capp.D. Unitronic Li2YCY (TP=twisted pair) 1x2x0.50 inside
Li2YCYv (TP) 1x2x0.50 outside (in the ground)
! Connect termination plug to free connector of PLATINUM network
(EIA 485) 2 or 3.
Fig. 8
Inverter Network Connection
(1)
(2)
(3)
(4)
Power Supply
Connection to PLATINUM network (EIA 485)
Termination plug
Connection to Network (LAN) or Local PC
For PLATINUM C central inverters:
! Connect isolation to central inverter display on one side.
Installation and operating manual: PLATINUM WebMaster
Version: 07/2010
Mat. No. 736 926-AC
27
PLATINUM WebMaster
Installation and Connection
6.8
Alarm Contact
The potential-free alarm contact allows outputting alarms to external
devices, e. g. a signal lamp or horn.
When an alarm has been triggered:
Alarm is displayed on the start screen of the web interface
Alarm contact is closed
Alarm contact opens after:
clicking Alarm off on the start screen of the web interface
the alarming period is over
! Information about the reason for the alarm see 10 Monitoring.
! Alarm contact configuration see 12 Configuration.
28
Installation and operating manual: PLATINUM WebMaster
Version: 07/2010
Mat. No. 736 926-AC
PLATINUM WebMaster
Installation and Connection
6.9
Connecting large-scale PV systems
A LAN switch is required for connecting the PLATINUM WebMaster in
large-scale PV systems.
2
1
3
4
~
~
~
~
~
~
5
Fig. 9
2
3
4
Connecting large-scale PV systems
(1)
(2)
(3)
(4)
(5)
Control Center PLATINUM WebMaster
PLATINUM WebMaster Client
PLATINUM network
Up to 50 inverters
Local network (via LAN switch)
The number of the LAN switch's inlets depends on the number of
WebMaster clients. It is possible to connect ten PLATINUM WebMaster
clients to a PLATINUM WebMaster control center.
Control center and client are configured at the factory. Indicate desired
option when ordering.
Installation and operating manual: PLATINUM WebMaster
Version: 07/2010
Mat. No. 736 926-AC
Note
29
PLATINUM WebMaster
Installation and Connection
6.10 Connection to large-format display
It is possible to connect PLATINUM WebMaster to a large-format display.
! Ensure that large-format display supports HVG or RICO protocol.
! Ensure that large-format display supports EIA 485 communication as
serial interface.
! Connect large-scale display to PLATINUM WebMaster’s terminal
strip (connector COM3 RS485) with double-wire cable.
Observe wiring diagram.
1
Fig. 10
Terminal strip PLATINUM WebMaster
(1) Connectors for large-format display
COM3
RS485
A
A
B
B
1
Fig. 11
2
(1)
(2)
(3)
(4)
30
3
4
Wiring diagram large-format display
Connector PLATINUM WebMaster (COM3 RS485)
Data+ (A)
Data- (B)
Connector large-format display
Installation and operating manual: PLATINUM WebMaster
Version: 07/2010
Mat. No. 736 926-AC
PLATINUM WebMaster
Installation and Connection
Connection as remote display
For remote displays, a serial-ethernet converter (RS485), e. g. Korenix
JetPort 5601, is used.
Connection example (IP address exemplary):
1
IP 192.168.1.53
2
5
IP 192.168.1.191
4
3
Fig. 12
IP 192.168.1.104:4000
Showcase connection on remote display
(1)
(2)
(3)
(4)
(5)
PLATINUM WebMaster
Internet
Large display
Serial ethernet converter (RS485)
Router
PLATINUM WebMaster supports the display of the following data:
Current power in kW
for display type HVG up to 99.99 kW
for display type HVG with nominal power >100 kW through
9,999.99 kW
Daily power in kWh
Daily power in Wh
Total yield up to 999,999 kWh
Installation and operating manual: PLATINUM WebMaster
Version: 07/2010
Mat. No. 736 926-AC
31
PLATINUM WebMaster
Installation and Connection
To connect PLATINUM WebMaster to remote display:
! Set required network settings in PLATINUM WebMaster.
! Observe operating manual for serial ethernet converter (RS485).
Note
32
Information about the network settings is provided by the administrator
of your local network.
Installation and operating manual: PLATINUM WebMaster
Version: 07/2010
Mat. No. 736 926-AC
PLATINUM WebMaster
Operation
7
Operation
7.1
Display
Top of Unit
Fig. 13
Top of Unit
(1)
(2)
(3)
(4)
Power LED
Current Power LED
Inverter Communication Error LED
LED Malfunction PLATINUM WebMaster
When Power LED 1 is blinking:
PLATINUM WebMaster is operating.
100%
Power < --------------6
When Power LED 2 is on:
100%
Power > --------------6
When Current Power LED 2 is blinking:
The power output of the inverter is low.
When Inverter Communication Error LED 3 is on:
There is a problem when communicating with the inverter.
If PLATINUM WebMaster Malfunction LED 4 is on:
Operating problem with PLATINUM WebMaster.
Installation and operating manual: PLATINUM WebMaster
Version: 07/2010
Mat. No. 736 926-AC
33
PLATINUM WebMaster
Operation
Back of Unit
Fig. 14
Back of Unit
(1)
(2)
(3)
(4)
(5)
Data LED
Dial Out LED
Switch Func (no function)
Internet Switch
Power LED
LED
Data
Dial out
Power
Switch
Internet
34
Installation and operating manual: PLATINUM WebMaster
Version: 07/2010
Mat. No. 736 926-AC
Color
Yellow
red
green
Position
On
Off
Function
Serial/modem communication active.
Modem connects to Internet automatically.
PLATINUM WebMaster is switched on.
Function
Modem connects to Internet automatically.
Modem does not connect to Internet automatically.
PLATINUM WebMaster
Web Interface
8
Web Interface
The web interface allows you to do the following:
Check system events and configure monitoring options
(see 10 Monitoring)
View readings and states for the PV system (see 11 Reporting)
Verify and change the configuration (see 12 Configuration)
Download system information details from a PC via a direct
connection (see 13 Download)
Display alarms
8.1
User Rights
Access to web interface and PLATINUM WebMaster’s settings is
secured by several access levels.
Access levels:
User
Enables access to system state, evaluations, monitoring and
download.
Admin
Enables access to all areas of PLATINUM WebMasters.
Allows to change settings.
Upon delivery, the default administrator password is admin, the user
password is user.
Installation and operating manual: PLATINUM WebMaster
Version: 07/2010
Mat. No. 736 926-AC
Note
35
PLATINUM WebMaster
Web Interface
8.2
Calling up Web Interface
To call up PLATINUM WebMaster’s web interface:
! Enter IP address of PLATINUM WebMaster in your web browser.
Note
Upon delivery, PLATINUM WebMaster’s default IP address is
192.168.1.190.
Bei Modemverbindung:
! Ensure that modem on remote PC is configured and accessible.
! Enter 192.168.2.1 in the web browser.
The web interface of PLATINUM WebMaster appears.
Fig. 15
Note
Installing PLATINUM WebMaster’s web interface
Diehl Controls recommends bookmarking the address of the web
interface.
A login is required to be able to use all functions.
10 min after the last entry with mouse or keyboard, PLATINUM
WebMaster will log out automatically.
36
Installation and operating manual: PLATINUM WebMaster
Version: 07/2010
Mat. No. 736 926-AC
PLATINUM WebMaster
Web Interface
Language
To select the language of the web interface:
! Click on the flag symbol.
The language is selected for one current session. After the session,
PLATINUM WebMaster will replace the language with the system language.
Note
System Details
Shows description of and information on the system.
It is possible to change the description and the information on the system
user and to add a picture (see 12 Configuration).
Note
Plant state
Displays the current state of the system.
Current overall state
Displays the overall state of the system.
red: More than 30% of the inverters are not feeding in or are
malfunctioning.
yellow: At least 1 inverter is malfunctioning.
green: All inverters are available and feeding in.
Mode of power specification and power specification level
(exclusively with PLATINUM PowerCommander connected)
shows which active power specified by the energy provider is
being fed in.
active power split to all three phases
Total power
Total power of the system
Total daily yield
Total daily yield in kWh
Rebate according to setting
Performance ratio
Efficiency of the solar system
Appears exclusively if the irradiation sensor is connected.
Installation and operating manual: PLATINUM WebMaster
Version: 07/2010
Mat. No. 736 926-AC
37
PLATINUM WebMaster
Web Interface
Last event
Displays the date and time of the last event.
Alarm is switched on. Please acknowledge:
Click Alarm off to acknowledge alarm and open alarm contact.
! Information about the reason for the alarm see 10 Monitoring.
! Alarm contact configuration see 12 Configuration.
38
Installation and operating manual: PLATINUM WebMaster
Version: 07/2010
Mat. No. 736 926-AC
PLATINUM WebMaster
Web Interface
9
Plant state
9.1
Inverter
Displays current state of solar system as well as power or error status of
inverters.
1
2
3
4
5
Fig. 16
System status of inverter
(1)
(2)
(3)
(4)
(5)
Inverter Group
Inverter Name
Current inverter power
Current power and daily yield of the inverter group
Current total power and total yield of the system
To refresh the status:
! Click Refresh.
To view detailed information for an inverter:
! Click on the name of the desired inverter.
Installation and operating manual: PLATINUM WebMaster
Version: 07/2010
Mat. No. 736 926-AC
39
PLATINUM WebMaster
Web Interface
9.2
Sensors
Shows current data of sensors connected to PLATINUM WebMaster.
Note
For information on connection and configurations, observe installation
and operating manual for PLATINUM SensorKit.
To refresh the status:
! Click Refresh.
40
Installation and operating manual: PLATINUM WebMaster
Version: 07/2010
Mat. No. 736 926-AC
PLATINUM WebMaster
Monitoring
10
Monitoring
The following monitoring options are available:
Configuration events
Displays changes in the configuration of PLATINUM
WebMasters.
System event
Displays events reported by PLATINUM WebMaster.
System Information
Displays information reported by PLATINUM WebMaster.
Inverter event
Displays events reported by the inverter.
No daily yield
Indicates that an inverter has not fed any energy during the
course of a day.
Communication Error
Indicates that the connection to an inverter is faulty.
Low daily yield
Indicates that an inverter is feeding too little energy during the
course of a day compared to other inverters.
Inverter failure
Indicates that an active inverter is not responding to the
PLATINUM WebMaster’s queries during the course of a day.
Perfomance management
Shows the performance signals sent to the system by the
energy provider via PLATINUM PowerCommander and
PLATINUM WebMaster.
Shows the last three data sets.
For information on connection and configurations, observe installation
and operating manual for PLATINUM PowerCommander.
Installation and operating manual: PLATINUM WebMaster
Version: 07/2010
Mat. No. 736 926-AC
Note
41
PLATINUM WebMaster
Monitoring
Fig. 17
Note
42
Monitoring
Overview shows the last 3 events of a category.
Installation and operating manual: PLATINUM WebMaster
Version: 07/2010
Mat. No. 736 926-AC
PLATINUM WebMaster
Monitoring
Buttons (Only visible after login.):
bold
Display all listed events.
Modify monitoring option settings.
Disable monitoring. (Only visible if monitoring is enabled.)
Enable monitoring. (Only visible if monitoring is disabled.)
When alarm is activated, PLATINUM WebMaster will send a message
(e.g. e-mail or alarm contact) to activated recipients when an event
occurs.
Installation and operating manual: PLATINUM WebMaster
Version: 07/2010
Mat. No. 736 926-AC
Note
43
PLATINUM WebMaster
Monitoring
10.1 Change monitoring options
To change the monitoring option settings:
! Click
Note
.
Settings are the same for all monitoring options.
Settings:
Notification
Enable ( ) or disable (!) notification when an event occurs.
Description
Description of the monitoring option.
Frequency
Select the frequency of repeated notifications for repeating
events.
Recipient
Enable ( ) or disable (!) the recipient to be notified.
Buttons:
Save
Apply settings.
Cancel
Do not apply settings.
Leave configuration.
44
Installation and operating manual: PLATINUM WebMaster
Version: 07/2010
Mat. No. 736 926-AC
PLATINUM WebMaster
Reporting
11
Reporting
The following reports are available:
Daily power of entire plant
Daily yield of inverters
Monthly yield for entire plant
Annual yield for entire plant
Normalized monthly yield
Performance ratio
Fig. 18
Evaluations
Buttons (Only visible after login.):
bold
Display all listed events.
Modify monitoring option settings.
Disable reporting. (Only visible if reporting is enabled.)
Enable reporting. (Only visible if reporting is disabled.)
Installation and operating manual: PLATINUM WebMaster
Version: 07/2010
Mat. No. 736 926-AC
45
PLATINUM WebMaster
Reporting
11.1 Daily power of entire plant
Buttons:
Day, Month, or Year
Select the report date.
Back 1 day
Day, Month, or Year
Forward 1 day
Update
Demand and display current data of PLATINUM WebMaster.
Print
Print report.
Back
Return to report.
46
Installation and operating manual: PLATINUM WebMaster
Version: 07/2010
Mat. No. 736 926-AC
PLATINUM WebMaster
Reporting
To change the report settings:
! Click on Daily power of entire plant.
! Click
.
Settings:
Notification
Enable ( ) or disable (!) notification.
Description
Description of the report.
Frequency
Select frequency of repeated notifications.
Recipient
Enable ( ) or disable (!) the recipient to be notified.
Buttons:
Save
Apply settings.
Cancel
Do not apply settings.
Leave configuration.
Installation and operating manual: PLATINUM WebMaster
Version: 07/2010
Mat. No. 736 926-AC
47
PLATINUM WebMaster
Reporting
11.2 Daily yield of inverters
Buttons:
Inverter Group
Select desired group.
Day, Month, or Year
Select the report date.
Back 1 day
Day, Month, or Year
Forward 1 day
Update
Demand and display current data from PLATINUM WebMaster.
Print
Print report.
Back
Return to report.
48
Installation and operating manual: PLATINUM WebMaster
Version: 07/2010
Mat. No. 736 926-AC
PLATINUM WebMaster
Reporting
To change the report settings:
! Click on daily yields of inverters.
! Click
.
Settings:
Notification
Enable ( ) or disable (!) notification.
Description
Description of the report
Frequency
Select frequency of repeated notifications.
Recipient
Enable ( ) or disable (!) the recipient to be notified.
Buttons:
Save
Apply settings.
Cancel
Do not apply settings.
Leave configuration.
Installation and operating manual: PLATINUM WebMaster
Version: 07/2010
Mat. No. 736 926-AC
49
PLATINUM WebMaster
Reporting
11.3 Monthly yield for entire plant
Buttons:
Inverter Group
Select desired group.
Month or Year
Select the period for the report.
Previous month
Month or Year
Next month
Update
Demand and display current data from PLATINUM WebMaster.
Print
Print report.
Back
Return to report.
50
Installation and operating manual: PLATINUM WebMaster
Version: 07/2010
Mat. No. 736 926-AC
PLATINUM WebMaster
Reporting
To change the report settings:
! Click on Monthly yield of the entire system.
! Click
.
Settings:
Notification
Enable ( ) or disable (!) notification.
Description
Description of the report.
Frequency
Select frequency of repeated notifications.
Recipient
Enable ( ) or disable (!) the recipient to be notified.
Buttons:
Save
Apply settings.
Cancel
Do not apply settings.
Leave configuration.
Installation and operating manual: PLATINUM WebMaster
Version: 07/2010
Mat. No. 736 926-AC
51
PLATINUM WebMaster
Reporting
11.4 Annual yield for entire plant
Buttons:
Inverter Group
Selectdesired group.
Year
Select the period for the report.
Previous year
Year
Next year
Update
Demand and display current data of PLATINUM WebMaster.
Print
Print report.
Back
Return to report.
52
Installation and operating manual: PLATINUM WebMaster
Version: 07/2010
Mat. No. 736 926-AC
PLATINUM WebMaster
Reporting
To change the report settings:
! Click on Annual yield of entire plant.
! Click
.
Settings:
Notification
Enable ( ) or disable (!) notification.
Description
Description of the report.
Frequency
Select frequency of repeated notifications.
Recipient
Enable ( ) or disable (!) the recipient to be notified.
Buttons:
Save
Apply settings.
Cancel
Do not apply settings.
Leave configuration.
Installation and operating manual: PLATINUM WebMaster
Version: 07/2010
Mat. No. 736 926-AC
53
PLATINUM WebMaster
Reporting
11.5 Normalized Monthly Yield of the Entire plant
The standardized monthly yield
is suitable for a comparison with other solar plants.
refers to the installed power.
Note
For a numerical comparison of solar systems, take into account
differences (e. g. module type, direction, module angle etc.).
Buttons:
Month or Year
Select the period for the report.
Previous month
Month or Year
Next month
Update
Demand and display current data from PLATINUM WebMaster.
Print
Print report.
Back
Return to report.
54
Installation and operating manual: PLATINUM WebMaster
Version: 07/2010
Mat. No. 736 926-AC
PLATINUM WebMaster
Reporting
To change the report settings:
! Click on Normalized monthly yield.
! Click
.
Settings:
Notification
Enable ( ) or disable (!) notification.
Description
Description of the report
Frequency
Select frequency of repeated notifications.
Recipient
Enable ( ) or disable (!) the recipient to be notified.
Buttons:
Save
Apply settings.
Cancel
Do not apply settings.
Leave configuration.
Installation and operating manual: PLATINUM WebMaster
Version: 07/2010
Mat. No. 736 926-AC
55
PLATINUM WebMaster
Reporting
11.6 Performance ratio
Note
Menu item appears only if irradiation sensor is connected.
Performance ratio
characterizes the efficiency of a solar plant.
is a comparison of the energy fed in relating to the installed power
with the energy irradiated within the same period of time per m2.
takes into account all losses between the PV module and the
connection to the mains supply (typical values: > 60%).
Note
An irradiation sensor is the precondition for determining the performance
ratio.
Buttons:
Month or Year
Select the period for the report.
Previous month
Month or Year
Next month
Update
Demand and display current data from PLATINUM WebMaster.
Print
Print report.
Back
Return to report.
56
Installation and operating manual: PLATINUM WebMaster
Version: 07/2010
Mat. No. 736 926-AC
PLATINUM WebMaster
Reporting
To change the report settings:
! Click Performance ratio.
! Click
.
Settings:
Notification
Enable ( ) or disable (!) notification.
Description
Description of the report
Frequency
Select frequency of repeated notifications.
Recipient
Enable ( ) or disable (!) the recipient to be notified.
Buttons:
Save
Apply settings.
Cancel
Do not apply settings.
Leave configuration.
Installation and operating manual: PLATINUM WebMaster
Version: 07/2010
Mat. No. 736 926-AC
57
PLATINUM WebMaster
Configuration
12
Configuration
Incorrect configuration may result in loss of data!
! Ensure that the configuration of PLATINUM
WebMasters is performed by qualified persons
exclusively.
Caution
Displays an overview of the system information.
Note
The configuration of PLATINUM WebMaster is password-protected. The
configuration can be changed by the user admin exclusively. Diehl
Controls recommends changing the password after the initial setup
operation (see 12.6 Safety).
Factory defaults:
Username = admin
Password = admin
Note
58
30 min after the last entry with mouse or keyboard, PLATINUM
WebMaster will log out automatically.
Installation and operating manual: PLATINUM WebMaster
Version: 07/2010
Mat. No. 736 926-AC
PLATINUM WebMaster
Configuration
12.1 Main System
Network
Displays the current network settings.
To change the settings:
! Click Edit.
If My Settings is selected, PLATINUM WebMaster can only be accessed
via the IP address entered. Diehl Controls recommends that you make a
note of the IP address.
Access to PLATINUM WebMaster is not possible with a wrong IP
address. Notify PLATINUM service.
Installation and operating manual: PLATINUM WebMaster
Version: 07/2010
Mat. No. 736 926-AC
59
PLATINUM WebMaster
Configuration
Settings:
Host name
Enter the host name of the network.
Domain name
Enter the domain name of the network.
IP address
Enter IP address of PLATINUM WebMaster.
Broadcast address
Enter the broadcast address of the network.
Subnet mask
Enter the subnet mask of the network.
Standard gateway
Enter standard gateway of network (e. g. IP address of DSL
router).
DNS server
Enter the DNS server for the network.
Note
Information about the network settings is provided by the administrator
of your local network.
Note
rthe only possibility is to set a definite IP address. DHCP client is not
possible.
Buttons:
Save
Apply settings.
Cancel
Do not apply settings.
Leave configuration.
60
Installation and operating manual: PLATINUM WebMaster
Version: 07/2010
Mat. No. 736 926-AC
PLATINUM WebMaster
Configuration
Modem
Displays the current modem settings.
To change the settings:
! Click Edit.
Installation and operating manual: PLATINUM WebMaster
Version: 07/2010
Mat. No. 736 926-AC
61
PLATINUM WebMaster
Configuration
Settings:
Modem type
Select the type of modem that is connected.
Standard modem (analog modem), ISDN modem, GSM modem
Note
If using a GSM modem, Diehl Controls recommends a M2M contract with
GPRS.
Baud rate
Select the baud rate of the modem connection (max. 56700 for
analog modems).
Additional modem configuration
Enter any additional modem configurations, for example: ATX3 –
do not wait for dial tone, but dial immediately.
Note
For more AT commands, see modem manual.
PIN* (if using GSM)
Enter PIN for dial-in with a GSM modem.
Note
The access number, login name, and password are provided by your
Internet service provider.
Multiple number
Enter ISDN number (MSN) of PLATINUM WebMaster.
Number of rings
Enter the number of rings that should be waited for before
accepting an incoming call.
Access number
Enter the access number of your Internet provider for accessing
the Internet.
For extensions: Enter the access number, along with the number
for accessing an outside line and the wait character w (e. g.
0wAccess number) if need be.
add. Dial-in command (exclusively for GSM modem)
additional dial-in commands
depending on mobile phone service provider, e.g. the German
provider T-Mobile:
AT+CGDCONT=1,”IP”,”internet.t-mobile.de”
Note
62
For GSM modems, Internet access generally takes place through your
mobile phone provider.
Installation and operating manual: PLATINUM WebMaster
Version: 07/2010
Mat. No. 736 926-AC
PLATINUM WebMaster
Configuration
Login name
Enter login for access at your internet or mobile network
provider’s.
Password
Enter password for access at your internet or mobile network
provider’s.
Number of rings
Enter the number of rings that should be waited for before
accepting an incoming call.
In order to enable access to the internet or an e-mail provider, ensure that
the switch Internet on the PLATINUM WebMaster is set to On.
Note
Buttons:
Save
Apply settings.
Cancel
Do not apply settings.
Leave configuration.
Installation and operating manual: PLATINUM WebMaster
Version: 07/2010
Mat. No. 736 926-AC
63
PLATINUM WebMaster
Configuration
Adapt Welcome Page
Customise the contents of the welcome page by inserting a picture of the
system and system information.
To insert a picture:
! Click Browse.
! Select picture in folder list.
Buttons:
+
Insert new text before the selected line of text.
Delete the selected line of text.
Add text
Add a new line of text after the last line.
Note
Text can be formatted with HTML tags.
Save
Saves any changes to the system information details and returns
you to the main menu.
Cancel
Return to the main menu without making any changes to the
system information.
64
Installation and operating manual: PLATINUM WebMaster
Version: 07/2010
Mat. No. 736 926-AC
PLATINUM WebMaster
Configuration
System time
Shows system time setting for installation site.
To change set time zone:
Time zone
! Click on Edit in Time zone.
Settings:
Region/country
Select region or country matching the installation site.
Time zone
Select time zone matching the installation site.
Buttons:
Save
Apply settings.
Cancel
Do not apply settings.
Leave configuration.
Installation and operating manual: PLATINUM WebMaster
Version: 07/2010
Mat. No. 736 926-AC
65
PLATINUM WebMaster
Configuration
System time
Data loss due to system time change!
! In case of a time deviation of more than 10 minutes,
recorded data may be lost.
Caution
To change set system time:
! Click on Edit in System time.
Note
The system time is the time at the installation site.
If PLATINUM WebMaster is connected to the internet, it is possible to
automatically obtain date and time from a time server as Central
European Time (GMT = Greenwich Mean Time). The adaptation to the
local time is effected via setting the time zone.
PLATINUM WebMaster automatically adjusts the system time for
daylight savings time.
Time setting via time server is done every day at 5.00 o’clock if the
network is connected.
In case of modem connection, PLATINUM WebMaster will establish the
connection on its own. As soon as the connection is established, the time
information will be transmitted.
66
Installation and operating manual: PLATINUM WebMaster
Version: 07/2010
Mat. No. 736 926-AC
PLATINUM WebMaster
Configuration
Settings:
Date
Set the date manually.
Time
Set the time manually.
Time synchronisation
Enable ( ) or disable (!) automatic synchronisation of the
system time with a time server.
Time server
Enter the address of the time server.
Buttons:
Save
Apply settings.
Cancel
Do not apply settings.
Leave configuration.
System Language
Shows the current system language settings.
To change the settings:
! Click Edit.
Settings:
System language setting
Set system language.
Buttons:
Save
Apply settings.
Cancel
Do not apply settings.
Leave configuration.
The session language selected by clicking on the flag symbols will be
replaced by the set system language once the session is finished.
Installation and operating manual: PLATINUM WebMaster
Version: 07/2010
Mat. No. 736 926-AC
Note
67
PLATINUM WebMaster
Configuration
Inlets/outlets
Shows settings of inlets/outlets on PLATINUM WebMaster’s terminal
strip.
To change the settings:
! Click on Edit behind desired inlet/outlet.
Settings:
Name
Shows name of inlet/outlet.
Description
Enter description of inlet/outlet.
Status
Activate ( ) or deactivate (!) inlet/outlet.
Output
Select outlet.
Note
68
It is possible to link the potential-free inlet to the alarm contact. In order
to do this, connect a fault indicator to the outlet and configure it.
Installation and operating manual: PLATINUM WebMaster
Version: 07/2010
Mat. No. 736 926-AC
PLATINUM WebMaster
Configuration
1
Fig. 19
2
Terminal strip PLATINUM WebMaster
(1) Potential-free inlet 12–24 VDC
(2) Alarm contact (outlet)
Buttons:
Save
Apply settings.
Cancel
Do not apply settings.
Leave configuration.
Installation and operating manual: PLATINUM WebMaster
Version: 07/2010
Mat. No. 736 926-AC
69
PLATINUM WebMaster
Configuration
12.2 Communication
E-mail service
Displays the current mail server settings for sending e-mails.
To use the e-mail service:
! Ensure that a valid e-mail account has been configured and is
available. PLATINUM WebMaster e-mails are sent via this e-mail
account.
Note
The access data for the e-mail account is provided by your e-mail
provider.
! Use exclusively e-mail providers that support SMTP authentication.
To change the settings:
! Click Edit.
70
Installation and operating manual: PLATINUM WebMaster
Version: 07/2010
Mat. No. 736 926-AC
PLATINUM WebMaster
Configuration
Settings:
Information about the SMTP server, login, password, and authentication
type are provided by your e-mail provider.
Note
SMTP server
Enter the address of the outgoing mail server.
Login
Enter the login for logging in with your e-mail provider.
Password
Enter the password for logging in with your e-mail provider.
For security reasons, each character is replaced by an * when you enter
your password.
Note
Authentication type
Select SMTP in order to send e-mails only after successful
authentication.
SMTP is selected by default.
Note
Sending time for e-mails (daily)
Select time for sending e-mails.
Sending time for e-mails (weekly)
Select day and time for sending e-mails.
Buttons:
Save
Apply settings.
Cancel
Do not apply settings.
Leave configuration.
In order to enable access to the internet or to an e-mail provider, ensure
that the internet switch is set to ON.
Installation and operating manual: PLATINUM WebMaster
Version: 07/2010
Mat. No. 736 926-AC
Note
71
PLATINUM WebMaster
Configuration
PLATINUM SolarPortal
Shows current settings for access to PLATINUM SolarPortal.
PLATINUM SolarPortal provides remote monitoring via internet.
If PLATINUM SolarPortal is activated, PLATINUM WebMaster will send
data of PLATINUM inverters to the PLATINUM SolarPortal.
To change the settings:
! Click Edit.
Settings:
Serial number
Enter serial number.
Portal code
Enter portal code.
Note
PLATINUM Sales will provide a portal code after the registration at
PLATINUM SolarPortal.
Have PLATINUM WebMaster set up by the PLATINUM service before
installing it in the solar system.
Data transfer
Select interval for data transfer.
Status
Activate ( ) or deactivate (!) PLATINUM SolarPortal.
72
Installation and operating manual: PLATINUM WebMaster
Version: 07/2010
Mat. No. 736 926-AC
PLATINUM WebMaster
Configuration
Buttons:
Save
Apply settings.
Cancel
Do not apply settings.
Leave configuration.
In order to enable access to the internet or to an e-mail provider, ensure
that the internet switch is set to ON.
Note
Message recipient
Administration of recipients who will be sent reports and notifications
when an event occurs.
Messages can be sent to:
E-mail address
Short e-mail
Alarm contact
FTP
Short e-mails are suitable for sending to mobile phones. When sending a
short e-mail, the information will be sent in the message’s subject
heading. Your mobile phone or e-mail provider must activate this option
for you. Check the features offered by the e-mail provider.
Note
The alarm contact is a message recipient that is activated if an event
occurs. If alarm contact is selected, PLATINUM WebMaster will, when
the corresponding event occurs, show a message on the welcome page
which must be acknowledged.
Receiving e-mails on a mobile phone is subject to charges.
Installation and operating manual: PLATINUM WebMaster
Version: 07/2010
Mat. No. 736 926-AC
73
PLATINUM WebMaster
Configuration
Create message
recipient
To create a new message recipient:
! Click New.
Message type Alarm contact:
Message type FTP:
74
Installation and operating manual: PLATINUM WebMaster
Version: 07/2010
Mat. No. 736 926-AC
PLATINUM WebMaster
Configuration
Settings:
Type
Select the message type.
Name
Enter the recipient’s name.
E-mail address (exclusively for message type E-mail or Short e-mail)
For type e-mail: Enter the recipient’s e-mail address.
For type Short e-mail: Enter the recipient’s e-mail address.
The mobile phone provider provides the e-mail address of the mobile
phone.
Note
Alarming period (for alarm contact message type exclusively)
Enter the duration of the alarm.
Destination server (for FTP message type exclusively)
Enter FTP server address.
Enter login and password.
Status
Enable ( ) or disable (!) the recipient.
Language (for e-mail or short e-mail message types exclusively)
Select the language to be used for the recipient.
Buttons:
Save
Apply settings.
Cancel
Do not apply settings.
Leave configuration.
To edit a message recipient:
! Select the recipient.
! Click Edit.
Edit message
recipient
Settings:
Type
Select the message type.
Name
Enter the recipient’s name.
E-mail address (exclusively for message type E-mail or Short e-mail)
For type e-mail: Enter the recipient’s e-mail address.
For type Short e-mail: Enter the recipient’s e-mail address.
The mobile phone provider provides the e-mail address of the mobile
phone.
Installation and operating manual: PLATINUM WebMaster
Version: 07/2010
Mat. No. 736 926-AC
Note
75
PLATINUM WebMaster
Configuration
Alarming period (for alarm contact type only)
Enter the duration of the alarm.
Status
Enable ( ) or disable (!) the recipient.
Language (for e-mail or short e-mail types exclusively)
Select the language to be used for the recipient.
Buttons:
Save
Apply settings.
Cancel
Do not apply settings.
Leave configuration.
To delete a message recipient:
! Select the recipient.
! Click Delete.
Check
e-mail sending
To check the e-mail sending:
! Click Test.
! Enable ( ) or disable (!) desired message recipients.
! Click Test.
Note
76
It can take up to 10 minutes until the message reaches the recipient.
Installation and operating manual: PLATINUM WebMaster
Version: 07/2010
Mat. No. 736 926-AC
PLATINUM WebMaster
Configuration
12.3 FTP upload
Allows settings for FTP upload.
To allow an FTP upload, it is necessary to configure an FTP server as the
message recipient.
Note
To change the settings:
! Click on
behind desired item.
Settings:
Replication
Activate ( ) or deactivate (!) FTP upload.
Description
Description of FTP upload.
Frequency
Frequency of FTP upload.
FTP
Select FTP server.
Buttons:
Save
Apply settings.
Cancel
Do not apply settings.
Leave configuration.
Installation and operating manual: PLATINUM WebMaster
Version: 07/2010
Mat. No. 736 926-AC
77
PLATINUM WebMaster
Configuration
12.4 Display
Allows settings for a connected large-format display.
To change the settings:
! Click Edit.
Display type
Select display type.
Connection
Select connection.
Address (exclusively for remote display connection)
Enter IP address of serial ethernet converter (without prefix
http://) or URL.
Port (exclusively for remote display connection)
Enter port setting of serial ethernet converter (e. g. port: 4000)
Refresh every
Select interval for update.
78
Installation and operating manual: PLATINUM WebMaster
Version: 07/2010
Mat. No. 736 926-AC
PLATINUM WebMaster
Configuration
Buttons:
Save
Apply settings.
Cancel
Do not apply settings.
Leave configuration.
12.5 Solar Plant
General settings
Displays information and monitoring functions for the inverter station.
PLATINUM WebMaster calculates:
the previous day’s yield for each connected inverter.
a weighted mean taking into consideration the maximum DC power
output (peak output) of each inverter.
whether there is a reduced yield for each connected inverter.
the percentage deviation for each connected inverter.
The procedures described assume identical irradiation behaviour for all
inverters.
Installation and operating manual: PLATINUM WebMaster
Version: 07/2010
Mat. No. 736 926-AC
Note
79
PLATINUM WebMaster
Configuration
To change the settings:
! Click Edit.
Settings:
Nominal power of plant
Enter the sum of the powers of the connected PV modules.
Minimum performance ratio
Enter minimum performance ratio.
Note
Minimum performance ration can only be entered if sensor is connected.
Inverter failure
Enable ( ) or disable (!) alarm for inverter failure.
Comparison deviation
Percentage deviation in the daily yield of an inverter from the
weighted mean daily yield of all inverters.
Note
To prevent unnecessary alarms, Diehl Controls recommends setting the
comparison deviation between 10 % and 15 %.
Minimum income for income comparison
Enter the minimum yield to prevent incorrect alarms on days
with very limited solar radiation.
Reaction holding time
Enter the holding time before an alarm is issued.
Note
80
Some events occur only temporarily. If the reaction holding time is
shorter than the event itself, PLATINUM WebMaster will not alarm.
Installation and operating manual: PLATINUM WebMaster
Version: 07/2010
Mat. No. 736 926-AC
PLATINUM WebMaster
Configuration
Buttons:
Save
Apply settings.
Cancel
Do not apply settings.
Leave configuration.
Inverter
Displays the inverters in the inverter network.
Enables
Search for new inverters in the inverter network.
Assigning inverters to groups.
Diehl Controls recommends assigning the inverters to groups e. g. if parts
of the system are oriented towards different directions (east, west,
south) or divided onto several roofs, or if different PV modules or inverter
types are used.
Note
To search the network for new inverters:
Search inverter
! Click Search.
Installation and operating manual: PLATINUM WebMaster
Version: 07/2010
Mat. No. 736 926-AC
81
PLATINUM WebMaster
Configuration
PLATINUM WebMaster shows serial numbers of detected inverters.
Number of inverters
Shows number of detected inverters in PLATINUM network.
Status
Shows status of inverter search.
Found inverter
Shows serial numbers of detected inverters in PLATINUM
network.
Settings
Change inverter
To change settings for assigning and naming an inverter:
!
!
!
!
Search for inverters.
Click on desired inverter in inverter list.
Change settings as desired.
Search for inverters again.
PLATINUM WebMaster transmits changed device list
82
Installation and operating manual: PLATINUM WebMaster
Version: 07/2010
Mat. No. 736 926-AC
PLATINUM WebMaster
Configuration
The serial number cannot be modified.
Note
Letters and numbers can be used for the name (e. g. “1” or “outside left”).
Short names make the information easier to read.
Configure each inverter separately.
Settings:
Inverter description
Enter the description for the inverter.
Inverter group
Assign inverters to a group.
Enter a group name to create a new group.
Inverter status
Enable ( ) or disable (!) the inverter.
Active inverters are displayed and monitored in the system state.
Monitoring
Enable ( ) or disable (!) the low daily yield alarm.
max. feed power (AC power)
Enter the maximum power output of the inverter.
Entering 0 disables yield monitoring for the inverter.
Buttons:
Save
Saves the inverter settings. Returns you to the overview.
Cancel
Returns you to the overview without saving any changed
settings.
Delete
Restores the inverter’s settings to the default settings.
Installation and operating manual: PLATINUM WebMaster
Version: 07/2010
Mat. No. 736 926-AC
83
PLATINUM WebMaster
Configuration
Sensors
In order to record the solar irradiation power in the spot where the solar
plant is located, it is possible to connect an irradiation sensor and to
visualize the data via PLATINUM WebMaster.
Note
Menu item Sensors is exclusively available if a sensor is connected.
For further information on sensors and their installation and configuration,
observe installation and operating manual for PLATINUM SensorKit.
Control center
It is possible to interconnect PLATINUM WebMasters in order to monitor
up to 500 PLATINUM inverters. For this, one PLATINUM WebMaster has
to be configured as the control center.
Note
Menu item Control Center will be available exclusively on the PLATINUM
WebMaster acting as control center.
Control center and client are confugured at the factory. Indicate desired
option when ordering.
84
Installation and operating manual: PLATINUM WebMaster
Version: 07/2010
Mat. No. 736 926-AC
PLATINUM WebMaster
Configuration
Reimbursement
Shows current reimbursement settings.
In Germany, energy fed in from solar plants is reimbursed according to
the EEG. PLATINUM WebMaster calculates the reimbursement and
indicates the amount of money.
The reimbursement in Germany depends on the year of installation, the
plant type and the plant power. From this information, PLATINUM
WebMaster calculates the current reimbursement per kWh.
Note
The meter in the inverter is not calibrated. Measuring errors are possible
and will be shown by PLATINUM WebMaster.
To change the settings:
! Click Settings.
Settings:
Reimbursement
Select reimbursement type.
Plant type
Select system type.
Size of the plant
Enter system power.
Year of installation
Select year of start-up.
Installation and operating manual: PLATINUM WebMaster
Version: 07/2010
Mat. No. 736 926-AC
85
PLATINUM WebMaster
Configuration
Buttons:
Save
Apply settings.
Cancel
Do not apply settings.
Leave configuration.
Inverter Group Administration
Note
Inverters can be combined into groups. As a factory default, all inverters
are assigned to the group ungrouped.
Buttons:
Save
Apply settings.
Delete
Delete group from system.
Assigned inverters are displayed as ungrouped.
Cancel
Do not apply settings.
Leave configuration.
86
Installation and operating manual: PLATINUM WebMaster
Version: 07/2010
Mat. No. 736 926-AC
PLATINUM WebMaster
Configuration
To change the settings:
! Click on the inverter number of the desired inverter .
Buttons:
Select all
Enable all inverters ( ).
Deselect all
Disable all inverters (!).
Save
Apply settings.
Cancel
Do not apply settings.
Leave configuration.
To assign an inverter to a group or to remove it from a group:
Group inverters
! Select group or create a new group.
! Enable ( ) or disable (!) inverter in group.
To create a new group:
! Click New.
! Enter group name.
Create
new group
New group is created.
If there is no inverter in a group, the group will be deleted.
Installation and operating manual: PLATINUM WebMaster
Version: 07/2010
Mat. No. 736 926-AC
Note
87
PLATINUM WebMaster
Configuration
Perfomance management
Allows setting the performance management according to EEG.
To change the settings:
! Click Edit.
! Observe installation
PowerCommander.
88
Installation and operating manual: PLATINUM WebMaster
Version: 07/2010
Mat. No. 736 926-AC
and
operating
manual
of
PLATINUM
PLATINUM WebMaster
Configuration
12.6 Safety
Public Access
Enables settings for public access to PLATINUM WebMaster web
interface.
If public access is activated, it is possible to show the following without
login:
Welcome page
System state
Reports
Buttons:
Activate
Allow public access to PLATINUM WebMaster web interface.
Deactivate
Prohibit public access to PLATINUM WebMaster web interface.
Cancel
Returns you to the overview without saving any changed
settings.
Installation and operating manual: PLATINUM WebMaster
Version: 07/2010
Mat. No. 736 926-AC
89
PLATINUM WebMaster
Configuration
Passwords
Password Management for System Administration.
To change the password:
! Click Edit.
Settings:
User name
Enter usename.
Password
Enter new password.
Password confirmation
Enter new password again.
Note
Diehl Controls recommends that you make a note of the password and
store it in a safe place.
The user admin can change the password for the users admin and user.
90
Installation and operating manual: PLATINUM WebMaster
Version: 07/2010
Mat. No. 736 926-AC
PLATINUM WebMaster
Download
13
Download
Download enables retrieving and local saving of data saved in PLATINUM
WebMaster.
! Ensure that popup blockers are deactivated in the browser.
PLATINUM WebMaster’s storage capacity is limited. To prevent data
loss, Diehl Controls recommends that you retrieve the stored data and
save them locally on a regular basis.
Note
Memory requirements per inverter and day about 10 kByte.
The following reports are available for download:
Sensor data (if irradiation sensor is connected)
Plant sum
Inverter details
Plant events
Installation and operating manual: PLATINUM WebMaster
Version: 07/2010
Mat. No. 736 926-AC
91
PLATINUM WebMaster
Download
To retrieve data:
! Click on the desired report.
The dialog for selecting the download criteria is displayed.
Use the download criteria to limit the download to the information that you
require.
13.1 System sum
Settings:
Data
Displays the selected data columns.
Period
Shows period of data available for download.
Record size
Displays the size of the download.
from
Select the starting date for the report period.
to
Select the end of the report period.
File type
Select the file type for the download.
To start the download:
! Click Download.
92
Installation and operating manual: PLATINUM WebMaster
Version: 07/2010
Mat. No. 736 926-AC
PLATINUM WebMaster
Download
13.2 Inverter details
Settings:
Data
Displays the selected data columns.
Period
Shows period of data available for download.
Record size
Shows size of record file.
The size of the record file depends on the selected report period. If record
period and report period are identical, the size of the record file
corresponds to the displayed value.
Installation and operating manual: PLATINUM WebMaster
Version: 07/2010
Mat. No. 736 926-AC
Note
93
PLATINUM WebMaster
Download
Data columns
Add ( ) or remove (!) data columns from the download.
Device number: internal inverter number
Serial number: inverter serial number
Number: Bus number of inverter in PLATINUM network
Error: Event code of inverters
Temperature 1: transformer or inductor temperature
(depending on PLATINUM S or TL)
Temperature 2: IGBT temperature
Temperature 3: inside temperature
Temperature 4: temperature in user interface
Phasing: Indicates on which phase the inverter is feeding (1-3:
L1-L3; 4: three-phase).
Delta phi: phase shift angle
Connections to power supply system: Indicates how often
inverter has been connected to power supply system and
feeding (exclusively for central inverters).
Note
For PLATINUM inverter TL, Data columns Temperature 1 – Temperature 4
will differ from diagram above.
from
Select the starting date for the report period.
to
Select the end of the report period.
File type
Change of file type is not possible.
Note
Data are downloaded as a text file. Data are separated by tabulators. This
enables export e. g. into Ecxel table.
Compressed transmission
Enable (!) or disable ( ) compressed data transmission.
To start the download:
! Click Download.
94
Installation and operating manual: PLATINUM WebMaster
Version: 07/2010
Mat. No. 736 926-AC
PLATINUM WebMaster
Download
13.3 Sensor Data
Settings:
Period
Shows period of data available for download.
Record size
Displays the size of the download.
Data columns
Add ( ) or remove (!) data columns from the download.
from
Select the starting date for the report period.
to
Select the end of the report period.
File type
Change of file type is not possible.
Data are downloaded as a text file. Data are separated by tabulators. This
enables export e. g. into Excel table.
Note
Compressed transmission
Enable (!) or disable ( ) compressed data transmission.
To start the download:
! Click Download.
Installation and operating manual: PLATINUM WebMaster
Version: 07/2010
Mat. No. 736 926-AC
95
PLATINUM WebMaster
Download
13.4 System events
Settings:
Data
Displays the selected data columns.
Period
Shows period of data available for download.
Record size
Displays the size of the download.
Events
Add ( ) or remove (!) events from the download.
from
Select the starting date for the report period.
to
Select the end of the report period.
File type
Change of file type is not possible.
Note
Data are downloaded as a text file. Data are separated by tabulators. This
enables export e. g. into Excel table.
Compressed transmission
Enable (!) or disable ( ) compressed data transmission.
To start the download:
! Click Download.
96
Installation and operating manual: PLATINUM WebMaster
Version: 07/2010
Mat. No. 736 926-AC
PLATINUM WebMaster
Documentation
14
Documentation
To open the installation and operating manual:
! Click Manual.
15
Software Update
The technical concept of PLATINUM WebMaster allows automatical
software updates via internet.
Software updates appear at irregular intervals.
PLATINUM WebMaster checks independently for available updates.
Prerequisites:
PLATINUM WebMaster is connected to internet.
A weekly update is configured by default. It can be activated exclusively
by the PLATINUM service.
16
Note
Disposal
! Dispose of packaging and consumed parts
according to the rules and regulations applicable in
the country where the unit was installed.
! Dispose of PLATINUM WebMaster at a recycling
point for electrical or electronic products.
! Do not put PLATINUM WebMaster into the
household waste.
17
Standards and Approvals
PLATINUM WebMaster meets the requirements of the relevant CE
guidelines.
Installation and operating manual: PLATINUM WebMaster
Version: 07/2010
Mat. No. 736 926-AC
97
PLATINUM WebMaster
Technical Data
18
Technical Data
Processor
Main memory
Operating system
COM ports
Interfaces
Signals
Data memory
Housing
Weight
Ambient humidity
Operating temperature
Dimensions (W x H x D)
Alarm contact
Power supply
98
Installation and operating manual: PLATINUM WebMaster
Version: 07/2010
Mat. No. 736 926-AC
Pentium Architecture
64 MB RAM
Linux
1x RS485 or RS232 via connector strip
1x RS485 via RJ45 duplicate sockets
LAN (ethernet 10/100 MBit full duplex)
Modem or GSM connection Sub-D9
EasyLan
Internal speaker
LED for event indication on top
(6x green, 2x red)
Compact Flash® Adapter Type I inside the housing
for operating system and data storage
2-part, metal housing without fan for mounting on
mounting rails (IP 20)
800 g net weight (without accessories and
external power supply unit)
In dry interiors or electrical cabinets
0 to 50 °C
6.89 in x 6.10 in x 1.77 in
incl. mounting rail adapter on the backside,
plus connector strips
Potential-free outlet, max. 40 V DC
External power supply unit: 100 - 240 V AC;
50 - 60 Hz;
12 to 24 V DC;
0.5 A (power 6 W)
(included in scope of delivery)