1
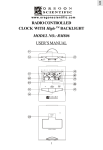
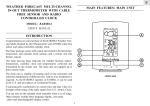
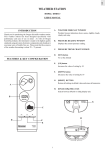
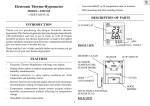
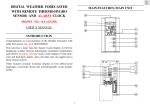
GB
MAIN UNIT CONTROLS
RF Projection Barometer
With Remote Thermo Sensor
Model No.: BAR338PA
User’s Manual
INTRODUCTION
Congratulations on your purchasing the BAR338PA RF Projection
Barometer.
The BAR338PA is a multifunctional radio frequency (RF) controlled
projection calendar clock that automatically synchronizes current
time and date with the RF signal broadcast by the US Atomic Clock,
one of the world's most accurate timekeepers.
The BAR338PA is very easy to use. No wire installation is required
between the main unit and the remote unit.
Other features of BAR338PA include: weather forecast display,
indoor and remote temperature display and daily alarm function.
1
GB
A3 IN/OUT BUTTON
Changes between indoor and outdoor temperature
A4 CLOCK BUTTON
Alternates between the time seconds display and the dayof-the-week display; also enables the clock setting mode
A5 ALARM BUTTON
Displays the alarm set time or activates the alarm function
A6 UP [
] AND DOWN [
] BUTTONS
Increases or decreases the value of a setting
A7 °C/°F BUTTON
Selects between degrees Centigrade (°C) and Fahrenheit
(°F)
A8 RESET BUTTON
Clears the user selected settings and causes the settings of
the main display unit to return to the factory default
settings
A9 ZONE BUTTON
Sequence through the 4 US time-zones of Pacific, Mountain,
Central and Eastern
A1 SNOOZE / LIGHT BUTTON
PROJECTOR CONTROLS
Enables the snooze alarm feature when the alarm is
sounding; also activates the backlight feature for five
seconds
A10 IMAGE ROTATION KNOB
Rotates the projected time image 90 degree in clockwise or
counter-clockwise direction
A2 MEMORY BUTTON
Sequence through temperature display selections of current,
maximum and minimum temperatures
A11 FOCUS KNOB
Adjusts the focus of the projected time image
2
GB
A12 180 ° ROTATION BUTTON
REMOTE UNIT CONTROLS
Flips the projected time image upside-down
B1 LED INDICATOR
A13 PROJECTION ON SLIDE SWITCH
Flashes when the remote unit transmits a reading
Activates continuous projected time image function when
used with the included AC power adapter
B2 RESET BUTTON
Clears the user selected settings and causes the settings of
the remote sensor to return to the factory default settings
MAIN UNIT INDICATORS
A14 WEATHER FORCAST ICONS
Graphically displays general weather forecast 12-24 hours
in the future
A15 ALARM ON INDICATOR
Appears when the alarm is active
A16 IN / OUT INDICATOR
Indicates outdoor or indoor temperature
A17 ALARM TIME INDICATOR
Appears when the alarm time is displayed
A18 RADIO RECEPTION SIGNAL
Identifies the strength of signal received from the US
Atomic Clock
A19 BATTERY - LOW INDICATOR
When displayed indicates that batteries are low and need to
be replaced
A20 M / D INDICATOR
Indicates month-day (MD) calendar display
3
GB
HINTS FOR BEST OPERATION
• Insert batteries in the remote unit before doing so for the main
unit.
• Position the main and remote unit within the transmission
range (20 to 30 meters; 65.5 - 100 feet).
MAIN UNIT
• Position the remote unit away from direct sunlight, rain or
snow.
• After battery installation, the main unit will search for signal
from the remote unit. Upon successful receipt of signal, the
remote temperature reading received will be displayed on the
main unit. Should the signal reception between the main unit
and the remote sensor be unsuccessful, shorten the distance
between them and/or reposition the main unit and/or the sensor
so they are in a more direct line of sight to one another.
HOW TO USE THE PROJECTOR
The BAR338PA includes a projection function that projects the
current time and remote sensor temperature onto a wall, ceiling or
other flat surface.
BATTERY INSTALLATION
1. Remove the battery compartment door.
2. Insert two AA-sized batteries (included) for the remote unit or
four AA-sized batteries (included) for the main unit. Batteries
are to be inserted with polarities in the direction shown in the
diagram on page 3 for the remote sensor unit and page 4 for the
main display unit.
To project the time-temperature onto a flat surface:
3. Press [RESET].
In a darkened room, press [ SNOOZE / LIGHT ], the projection will
activate for approximately 5 seconds.
4. Replace the battery compartment door.
This unit has several features to enhance the clarity of the projected
image.
4
Effect
2. Plug the adapter into the adapter socket.
Instructions
Adjustable
Rotates 180° to cast
Adjust by pivoting forwards
3. Connect the power adapter to a wall socket.
Projector
image onto any wall
or backwards the projector,
4. Slide [PROJECTION ON] to ON.
so that the projection lens
is pointed in the appropriate
direction
FOCUS
Focuses image
Knob (A11)
Rotate knob forwards or
backwards until the image
clarity is optimized
[
]
Rotates image on a
Turns an image to maintain
IMAGE
given surface to
an upright position
ROTATION
maintain an upright
knob (A10)
position
180°
Horizontally flips
Flips an image to maintain
ROTATION
an image on a given
an upright position
button (A12)
surface to maintain
To turn off the projector, slide the [PROJECTION ON] back. Note
that this switch can only be used with the power adapter connected.
For momentarily projection, use [SNOOZE/LIGHT].
HOW TO USE THE BACKLIGHT
Press the [SNOOZE/LIGHT] button once. The backlight will light
up on the LCD Display and around the key panel for five seconds.
Projection will also be on for five seconds.
an upright position
DISPLAY MODES
HOW TO USE THE PROJECTOR
POWER ADAPTER
In normal display mode, the current time, including seconds, will
be displayed. To display weekday, press [CLOCK] once. To switch
back to normal time display, press [CLOCK] once.
Your BAR338PA comes with an AC power adapter. For continuous
projection the AC power adapter must be used. To install the
adapter:
5
GB
1. Unscrew the cover at the bottom of the stand.
Projector Features
Feature
GB
Receiving
radio
signal
No signal
To display the daily alarm time, press [ALARM] once when the
date is displayed. To display the date, press [CLOCK] once when
alarm time is displayed.
Weak signal
Strong signal
When the reception is completed the reception icon will stop
blinking. The reception icon will show " " for no reception or
" " for successful reception.
The temperature and weather forecast will be shown in all display
modes.
Reception
complete
ABOUT RADIO RECEPTION
The BAR338PA is designed to synchronize current time and date
information via radio frequency signals from the US Atomic
Clock, one of the world's most accurate timekeepers.
No reception, or
manually adjusted
Successful reception
For best signal reception, position the BAR338PA away from PC's,
radios, TV's, microwave ovens and other appliances that emit or
receive radio frequency signals. Should the BAR338PA be new and
just out of the box, allow up to 72 hours for the unit to receive the
initial signal reception. To facilitate signal reception, poisitioning
on a windowsill is recommended.
After batteries are installed in the main unit, press ZONE to select
the appropriate US time zone of Pacific, Mountain, Central or
Eastern. Note that the appropriate time zone needs to be selected
each time if the BAR338PA is moved from one time zone to
another.
When the unit is receiving radio signal, the reception icon will start
to blink. The reception icon will show either strong, weak or no
signal depending on the strength of the radio signal. A complete
reception generally takes about two to 10 minutes.
HOW TO SELECT THE TIME-ZONE
After batteries are installed in the main display unit, press [ZONE]
to select the appropriate US time zone of Pacific, Mountain, Central
or Eastern. Note that the appropriate time zone needs to be selected
each time if the BAR338PA is moved from one time zone to another.
6
4. Enter the minutes using the [
ALARM AND SNOOZE FUNCTION
When travelling outside of the US Atomic Clock signal reception
range, the BAR338PA can be manually set to operate as a quartz
clock. Note that setting the clock manually will disable the signal
reception and synchronization function. To set the clock manually:
When the alarm is activated, it will go off at the set time. The display
] icon will flash.
will light up for five seconds and the [
The crescendo function allows the alarm to start off gently and with
its intensity in four steps. Without interruption, the alarm will
sound for a minute.
1. Press and hold [CLOCK] for two seconds.
2. Enter the hour using the [ ] or [ ] buttons. Hold down either
button to rapidly increase or decrease the value.
To stop the alarm, press [ALARM]. If the [SNOOZE/LIGHT]
button is pressed, the SNOOZE function will be triggered. The
alarm will stop for eight minutes before going off again.
3. Press [CLOCK].
] or [
] buttons.
The alarm is automatically activated after the setting procedure. To
] indicator when
deactivate it, press [ALARM] to turn off the [
the alarm time is displayed.
HOW TO MANUALLY SET THE
CALENDAR CLOCK
4. Enter the minute using the [
] or [
5. Press [ALARM].
] buttons.
5. Press [CLOCK].
6. Follow the same procedure to set the year, month, day and
display language. For the display language, you can choose
English, French or Spanish.
INDOOR AND OUTDOOR
TEMPERATURES
Press [IN/OUT] to toggle between indoor temperature and outdoor
temperature.
HOW TO SET THE ALARM
Press [°C/°F] to display the temperature in Centigrade °C or
Fahrenheit °F.
1. Press and hold [ALARM] for two seconds.
2. Enter the hour using the [
] or [
] buttons.
3. Press [ALARM].
7
GB
The [ZONE] button is located inside the battery compartment.
Press [ZONE] button to select among the 4 US time-zones: Pacific,
Mountains, Central or Eastern.
GB
MAXIMUM AND MINIMUM
TEMPERATURES
WEATHER FORECAST
The unit is capable of detecting barometric pressure changes, and
basing on the data collected, can provide a general weather forecast
for the next 12 to 24 hours. The effective range is 30 to 50 km (18.6
- 31 miles).
Press [IN/OUT] to select indoor or outdoor temperature display.
Then press [MEMORY] repeatedly to scroll through current
maximum and minimum temperatures recorded.
To clear the memory, select indoor or outdoor temperature display.
Then press and hold [MEMORY] for two seconds to clear the
memory for the selected display.
INTERRUPTED SIGNALS
sunny
If without obvious reasons the display for the outdoor temperature
becomes blank, press and hold [IN/OUT] for two seconds to
enforce an immediate signal search. If that fails, check if the
remote unit is still in place. Make sure the transmission is within
range and path is clear of obstacles and interference. The maximum
transmission range between the remote sensor and the main
display unit is 90 feet (28 meters).
partly cloudy
cloudy
rainy
snow
NOTE:
1. The accuracy of a general pressure-based weather forecast is
about 70 to 75%, and therefore, cannot be held responsible for
any inconveniences so caused by an inaccurate forecast.
2. The weather forecast is meant for the next 12 to 24 hours. It may
not necessarily reflect the current situation.
TRANSMISSION COLLISION
3. The "Sunny" icon, when appears at nighttime, implies clear
weather.
Signals from household devices, such as doorbells, home security
systems and entry controls, may interfere with those of this product
and cause temporarily reception failure. This is normal and does
not affect the general performance of the product. The transmission
and reception of temperature readings will resume once the
interference recedes.
4. When temperature goes equal or below 3OC (+37.4 OF), the
snow icon will display instead of the rainy icon.
8
When it is time to replace batteries, the low-battery indicator will
appear. Replace the batteries for the main unit when the indicator
appears on the clock window. Do the same for the remote unit when
the indicator appears below the OUT icon.
4. Do not tamper with the unit’s internal components. Doing so
will terminate the unit’s warranty and may cause damage. The
unit contains no user-serviceable parts.
CAUTION: Batteries contain dangerous chemicals and may leak,
explode or otherwise cause injury and damage if not hadled
properly. Do not mix old batteries with new as this may result in
leakage. Only insert batteries with the polarities in the directions
as shown in this manual. Always dispose of batteries properly.
5. Only use new batteries as specified in this instruction manual.
Do not mix new and old batteries as the old batteries may leak.
6. Read this instruction manual thoroughly before operating the
unit.
THE RESET BUTTON
SPECIFICATIONS
The [RESET] button is used to enhance synchronization of signals
after battery replacement. Note that when RESET is pressed all userselected settings will be cleared and the unit will return to its
factory set default settings. Use a blunt stylus to hold down the
button.
Temperature Measurement
Main unit
Operating range
Temperature resolution
MAINTENANCE
: 23.0°F to 122.0°F
(-5.0°C to +50.0°C)
: 0.1°F (0.1°C)
Remote unit
When handled properly, this unit is engineered to give you years
of satisfactory service. Here are a few product care instructions:
Operating range
: -20.0°C to +60.0°C
(-4.0°F to 140.0°F)
1. Do not immerse the unit in water. If the unit comes in contact
with water, dry it immediately with a soft lint-free cloth.
Temperature resolution
: 0.1°F (0.1°C)
RF Transmission Frequency : 433 MHz
2. Do not clean the unit with abrasive or corrosive materials.
Abrasive cleaning agents may scratch the plastic parts and
corrode the electronic circuit.
9
GB
3. Do not subject the unit to excessive: force, shock, dust,
temperature, or humidity. Such treatment may result in
malfunction, a shorter electronic life span, damaged batteries, or
distorted parts.
LOW BATTERY WARNING
GB
Maximum Transmission
Range between Main
Display Unit and
Remote Sensor
: 90 feets (28 meters)
Temperature sensing cycle
: approximately 30 seconds
Dimension
Main unit
: 109 x 158 x 39 mm
4.36" x 6.32" x 1.56"
(H x W x D)
Remote sensing unit
: 105 x 70 x 22 mm
4.2" x 2.8" x 0.88"
Radio Controlled Clock
Clock
Calendar
(H x W x D)
: 12hr format with hh:mm:ss
: Month / Day
weekday selectable in
3 language (E, F, Sp )
Alarm
: 2 minutes crescendo
Snooze
: 8 minutes
CUSTOMER ASSISTANCE
Should you have questions about this project or require additional
assistance, please contact our 24-7-365 customer service department
at 800-853-8883 or via email at [email protected].
Power
Main unit
WARRANTY
: 4 pcs UM-3 or “AA” 1.5V
alkaline battery (included)
Oregon Scientific, Inc. warrants this product from manufacturing
defects for a period of 90-days from date of retail purchase. Direct
return of defective product to the place of retail purchase. Should
this not be possible, contact our customer service department to
secure a Return Material Authorization. A RMA is required prior to
returning product to Oregon Scientific, Inc. Please keep your
receipt as proof of purchase as the receipt maybe required to
substantiate when purchased. Oregon Scientific, Inc. reserves the
right to replace or repair product at its discretion. This product
contains no user-serviceable parts or components. This warranty
does not cover product subjected to tampering, abuse, misuse or
accidental damage.
AC/DC 3V power adapter
(For continuous projection)
(included)
Remote sensing unit
: 2 pcs UM-4 or “AA” 1.5V
alkaline battery (included)
Weight
Main unit
Remote sensing unit
: 47 gm (11.27 ounces)
: 48 gm (3.5 ounces)
10
GB
NOTE ON COMPLIANCE
CAUTION
Warning: Changes or modifications to this unit not expressly
approved by the party responsible for compliance could void the
user's authority to operate the equipment.
— The content of this manual is subject to change without
further notice.
FCC :
— Due to printing limitation, the displays shown in this
manual may differ from the actual display.
NOTE: This equipment has been tested and found to comply with
the limits for a Class B digital device, pursuant to Part 15 of the
FCC Rules. These limits are designed to provide reasonable
protection against harmful interference in a residential installation.
This equipment generates, uses and can radiate radio frequency
energy and, if not installed and used in accordance with the
instructions, may cause harmful interference to radio
communications.
— The contents of this manual may not be reproduced
without the permission of the manufacturer.
However, there is no guarantee that interference will not occur in a
particular installation. If this equipment does cause harmful
interference to radio or television reception, which can be determined
by turning the equipment off and on, the user is encouraged to try
to correct the interference by one or more of the following measures:
! Reorient or relocate the receiving unit.
! Increase the separation between the equipment.
! Connect the equipment into an outlet on a circuit different from
that to which the receiver is needed.
! Consult the dealer of an experienced radio/TV technician for
help.
086-002283-01
11