1
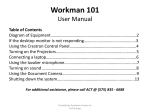
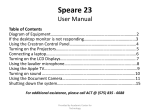
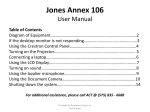
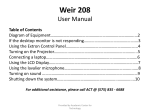
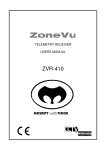
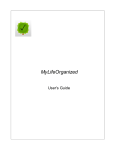
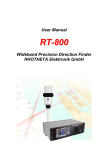
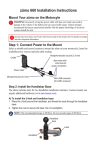
Weir 202
User Manual
Table of Contents
Diagram of Equipment……………………………………………………………..…….…2
If the desktop monitor is not responding………………………………….……...3
Using the Crestron Control Panel………………………………………………….…..4
Turning on the Projector..…………………………………………………………….…...5
Connecting a laptop………………………………………………………………….……...6
Using the LCD Display……………………………………………………………….…….…7
Using the lavalier microphone………………………………………………….......….8
Using the Apple TV…………………………………………………………………………….9
Turning on sound …………………………………………………………….………………10
Using the Document Camera……………………………………………..……………11
Shutting down the system………………………………………………….…………...15
For additional assistance, please call ACT @ (575) 835 - 6688
Provided by Academic Center for
Technology
Crestron
Control
Panel
Laptop
Connections
Lavalier
Microphone
Provided by Academic Center for
Technology
Desktop
Monitor
If the desktop monitor is not responding…
Determine if the monitor is receiving power by checking the power button indicator
If the power button is:
The monitor is:
Solution:
Solid Green
Working Properly
N/A
Flashing Green
Warming up
Wait a few minutes fir the monitor to warm up
Solid Amber
Computer is asleep
Move the computer mouse or press the space
bar to wake the computer up
OFF
Not receiving power
Turn on the monitor by pressing the power
button
Provided by Academic Center for
Technology
Getting to know the Crestron Control Panel…
This devise allows you to control the projectors, sound, and document camera
Shuts down the
system
Sound Input menu
Controls Projector 1
located on the left
Admin use only
Controls Projector 2
located on the right
Increases the
volume
Decreases the
volume
Controls the LCD
Display located on the
wall
Mutes the sound
Admin use only
Provided by Academic Center for
Technology
How to turn on the projector…
The following steps will turn on the projector and bring the projector screen down
1. To turn on the
projectors, press the
button labeled “PRJ1” or
“PRJ2” on the Crestron
Control Panel this will
turn on the projector
and lower the screen.
2. Next on the input menu
choose the desired input
(Desktop, Doc Cam,
Laptop, etc..) you would
like to project.
Provided by Academic Center for
Technology
How to connect a laptop to the projectors…
When using a Macbook, an adapter will be needed; contact ACT for assistance
1. Follow the instructions
on how to turn on the
projectors and choose
the input Laptop.
This classroom is only
equipped with a VGA
input.
Provided by Academic Center for
Technology
How to turn on the LCD Display…
The LCD Display will automatically turn on and is located on the East wall
1. To turn on the projectors
press the button labeled
“DISPLAY” on the
Crestron Control Panel,
this will also turn on the
LCD Display
2. Next on the input menu
choose the desired input
(Desktop, Doc Cam,
Laptop, etc..) you would
like to project
Provided by Academic Center for
Technology
Using the Lavalier Microphone…
If your presentation is being recorded, the lavalier microphone needs to be
used to amplify your voice. Attach the microphone to the collar of your shirt
and place the receiver in your pocket.
Turning on the microphone:
1. Push the two clutches to open the
battery compartment cover
2. Press the ON/OFF button
3. The display will light up with the LCD
lights displaying the
“Frequency/Name” and battery level
4. Make sure the microphone is not on
mute. The mute switch is located on
the top of the receiever.
When finished, push and hold the power
button until the LCD display powers off.
Provided by Academic Center for
Technology
Using the Apple TV…
Make sure that your device is signed into NMT-Encrypted-WPA-WPA2
1. Bring up the Airplay menu
on your Apple device
2. Next select the Apple TV
on your device, it will be
called weir_202
3. Make sure to turn on
mirror so that the display
on your device is mirrored
(projected) on the screen
4. Now you can select the
Apple TV on the Crestron
Control Panel so it is
projected on the projector
screen
Weir_202
Provided by Academic Center for
Technology
How to set-up the sound…
Make sure the sound on the desktop computer is on and set at a reasonable level
The sound will automatically
turn on when the projector
or LCD Display is turned on
Adjusting the volume:
• VOL+: increases the volume
• VOL - : decreases the volume
The blue color indicates the volume level
Provided by Academic Center for
Technology
Getting to know the Document Camera…
Provided by Academic Center for
Technology
Turning on the Document Camera…
These steps are followed after selecting “Doc Cam” on the Crestron Control Panel
1. Start by unlocking
the support arm and
pulling it up
2. Rotate the lens so it is
facing toward the
document plate
3. Remove the lens
cap
Turn on the document camera on by pressing the power button. Allow the
document camera to warm up for minute. It should now be projecting on the
screens.
Provided by Academic Center for
Technology
Document Camera Control Panel
1.
2.
3.
Power Button
LAMP: Turns the lamp on and off
ZOOM: Controls the size of the image
•
•
4.
5.
6.
7.
8.
(+) Zooms in
(-) Zooms out
FREEZE: Freezes the image being projected
AWC: Controls the color manually
AF: Automatically focuses the image
ROTATE: Rotates the image 90 °, 180 °, or 270 °
BRIGHT: Controls the brightness of the image
Provided by Academic Center for
Technology
Powering down the document
camera..
1.
Turn off the document camera
by holding down the powering
button
2.
Replace the lens cap
3.
While pushing the lock button,
lower the support arm to the
document plate
4.
Rotate the lens so it is laying flat
on the document plate
5.
Continue to Shutting down the
System to power down the
whole system
Provided by Academic Center for
Technology
Shutting Down the System
1. To shut down the
system, press the EXIT
button on the Creston
Control Panel
2. You will then be asked
“Shutdown the
System?” answering Yes
– Shut Down will turn
off the projectors and
raise the projector
screens
Provided by Academic Center for
Technology