1
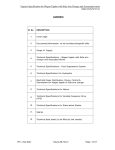
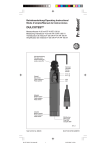
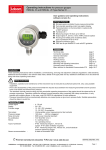
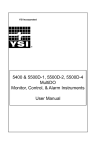
Pressure transmitter PASCAL Ci4
Type series CI4xxx
Operating Instructions
1 General Information....................................................................................................... 2
1.1 General Safety Notes .............................................................................................. 2
1.2 Intended Use ........................................................................................................... 2
1.3 Conformity with EU Regulations.............................................................................. 2
1.4 ATEX Approval........................................................................................................ 2
2 Transportation and Storage.......................................................................................... 2
3 Installation and Commissioning .................................................................................. 2
3.1 Mechanical Installation ............................................................................................ 3
3.2 Electrical Connection .............................................................................................. 3
3.3 Devices with Diaphragm Seal ................................................................................. 4
3.4 Mounting the Remote Display ................................................................................. 4
4 Operation........................................................................................................................ 5
4.1 Test Terminals ........................................................................................................ 5
4.2 Remove Display / Activate Write Protection ............................................................ 5
4.3 Maintenance / Service ............................................................................................. 6
5 Disassembly................................................................................................................... 7
6 User Manual ................................................................................................................... 8
6.1 Basics of the Operating Concept............................................................................. 8
6.2 Display Mode / Measured Value Display ................................................................. 9
6.3 Menue Mode / Operating Menue........................................................................... 13
6.4 The Menue Tree.................................................................................................... 16
Questions about this device? Hotline +49 (0) 4408 804 - 444
LABOM Mess- und Regeltechnik GmbH Im Gewerbepark 13 27798 Hude Deutschland
Tel.: +49 (0) 4408 804-0 Fax: +49 (0) 4408 804-100 e-mail: [email protected] www.labom.com
BA_072
Rev 1A5
Page 1/28
1
General Information
This document contains necessary information for the proper installation and use of this
device. In addition to this instruction, be sure to observe all statutory requirements,
applicable standards, the additional technical specifications on the accompanying data
sheet (see www.labom.com) as well as the specifications indicated on the type plate.
1.1
General Safety Notes
The installation, set up, service or disassembly of this device must only be done by
trained, qualified personnel using suitable equipment and authorized to do so.
Warning
Media can escape if unsuitable devices are used or if the installation is not
correct.
Danger of severe injury or damage
Ensure that the device is suitable for the process and undamaged.
1.2
Intended Use
The device is intended to measure pressure of gases, vapors and liquids as specified in
the data sheet.
1.3
Conformity with EU Regulations
The CE-marking on the device certifies its compliance with the applicable EU Directives for
placing products on the market within the European Union.
The following guidelines apply to these devices:
ATEX Directive
94/9/EC
EMC Directive
2004/108/EC
PED Directive
97/23/EC
You find the complete EC Declaration of Conformity (document no. KE_042) at
www.labom.com.
1.4
ATEX Approval
If you purchased a device with ATEX approval, please refer to the accompanying
document XA_010 or XA_011 for ATEX-relevant information.
2
Transportation and Storage
Store and transport the device only under clean and dry conditions preferably in the
original packaging. Avoid exposure to shocks and excessive vibrations.
Permissible storage temperature:
3
-40…80 °C
Installation and Commissioning
Ensure that the device is suitable for the intended application with respect to pressure
range, overpressure limit, media compatibility, temperature range and process connection.
After the mechanical installation and electrical connection is completed, the device is
ready for operation as soon as the power supply is switched on.
BA_072 Rev 1A5 Pressure transmitter PASCAL Ci4
Page 2/28
3.1
Mechanical Installation
Use gaskets, if required, that are suitable for the process connection and resistant to the
media.
Before starting operation, check the process connection carefully for leaks under pressure.
You can use the device in any mounting position. Normally the transmitter is adjusted for a
vertical mounting position. A different mounting position in combination with a small
nominal range might cause a zero point offset. In this case a zero point adjustment might
be necessary.
3.2
Electrical Connection
Complete the mechanical installation before you connect the device electrically.
Set up all electrical connections while the voltage supply is switched off.
Output (2-wire)
Permissible supply voltage
Permissible load
4...20 mA (20...4 mA)
UV = 12…30 VDC
RB ≤ (UV - 12 V) / 22 mA
Circular connector M12
( )
(-)
(+)
n.c.
Cable gland
12...30 V
0V
Bild 1: Options for the electrical connection
Observe the following points regarding for electrical connections via cable gland and
terminal block:
− Do not forget to tighten the cable gland after the electrical connection is finalised.
− Press down the spring of spring-operated terminals as far as possible, e.g. with a
screwdriver, before you insert the cable. Otherwise a safe electrical connection
cannot be ensured.
BA_072 Rev 1A5 Pressure transmitter PASCAL Ci4
Page 3/28
3.3
Devices with Diaphragm Seal
Remove the protective cap or protective wrapping from the diaphragm only just before
installation to prevent contamination or damage.
The diaphragm must not be touched. Do not place the device on its diaphragm. Even
small scratches or deformations may negatively influence the zero point or other
characteristics of the device.
Pressure transmitter and diaphragm seal are a closed system that must not be separated.
You can find further information about diaphragm seals in the document TA_031 on
www.labom.com.
3.4
Mounting the Remote Display
Optionally you can mount the display and control unit up to 10 m away from the measuring
point in an additional housing. The back plate of the housing is universally suitable for wall
mounting or pipe mounting for pipe diameters from 30 – 64 mm. For pipe mounting, you
can order the corresponding U-bolts from LABOM.
For best EMC protection, only use the included cable.
If you ordered the remote display together with the device, the assembly has been
completed in the factory. You only need to route the cable and mount the housing with the
remote display.
If you have received the remote display as a retrofit kit, proceed as follows:
1. Unmount the front cover and the display unit from the PASCAL Ci4 (see 4.2).
2. Replace them with the adapter piece (round part with M12 socket) and front cover,
which were screwed onto the remote display housing for shipment. Do not forget to
connect the cable on the back with the display connector on the CPU module.
3. The cable may be shortened to on-site requirements. Colour codes on the terminals
indicate which wire should be connected to which terminal (see Figure 2).
4. Mount the remote display housing using the mounting holes to a wall, a pipe or another
suitable location.
5. Plug the M12 connector of the cable into the socket of the adapter piece.
6. Now connect the cable on the display module with the corresponding connector on the
terminal board in the remote housing and insert the display module in the same
manner as for the device itself (see 4.2).
7. The last step is to close the remote housing with the display cover that was previously
on the device.
1_BN/BR
2_WH/WS
3_BU/BL
Colour codes
BN/BR: Brown
WH/WS: White
BU/BL: Blue
BK/SW: Black
4_BK/SW
Figure 2: Connection of the remote display housing
BA_072 Rev 1A5 Pressure transmitter PASCAL Ci4
Page 4/28
This modification can be performed during operation. We do recommend, however, to
switch off the device during the modification.
max. 10 m
Figure 3: Remote display and control unit after installation
4
Operation
During operation, take care that the device remains within its intended pressure and
temperature ranges. No other monitoring is necessary.
Permissibe ambient temperature:
4.1
-40…80 °C
Test Terminals
You can check the output current without interrupting the current loop, using the test
terminals on the terminal board. When you connect a current meter to the "+Test" and "Test" terminals, the current is automatically routed through it.
A
Figure 4: Current measurement during operation using test terminals
4.2
Remove Display / Activate Write Protection
Using the DIP switch in the device, you can disable changes to the configuration via the
display or via HART.
To activate the write protection, you must first remove the display module. Proceed as
follows:
− Unscrew the front cover
− Turn the display module 20° counterclockwise
− Lift off the display module carefully
BA_072 Rev 1A5 Pressure transmitter PASCAL Ci4
Page 5/28
unscrew front cover
turn display module 20°
remove display module
Figure 5: Removing the display
After removing the display module you can reach the DIP switch on the CPU module. The
write protection is active when the DIP switch is in the "ON" position.
position
write protection „ON“
position
write protection „OFF“
Figure 6: Write protection via slide switch in the device
Re-mount the display module in the reverse order.
4.3
Maintenance / Service
When properly installed in accordance with applicable specifications, this device is
maintenance-free. However, we recommend an annual recalibration of the device.
In case of damage or defects, the customer can replace the following elements:
− Display module
− Cable glands (if applicable)
For defects to other components, repairs must be performed in the factory.
BA_072 Rev 1A5 Pressure transmitter PASCAL Ci4
Page 6/28
5
Disassembly
When measuring hot media, make sure that the device has cooled down prior to any
dismounting or wear appropriate protective clothing to avoid burns.
Switch off the power supply to the device before disconnecting the electrical connections.
Once this is done, the device may be mechanically removed.
Warning
Opening pressurized lines might cause severe injuries.
Danger of severe injuries or damage
Relieve the process pressure before attempting to remove the device.
Shut off the pressure supply for all feed lines to the device and relieve the
pressure in them.
Warning
Hazardous deposits and residues might remain on opened process
connections and removed devices.
Danger of injury
After the device has been removed, seal off the measuring point and
mark the open process connection accordingly. Consider a possible
danger due to residues when handling the removed device.
BA_072 Rev 1A5 Pressure transmitter PASCAL Ci4
Page 7/28
6
User Manual
The device can be configured via the display module as well as the HART protocol. The
following pages describe operation and configuration of the device using the display
module.
An overview of the menue structure can be found on the last page of this document.
6.1
Basics of the Operating Concept
The display module consists of a dot-matrix
display with 80x120 pixels as well as a
4-button control panel.
The four buttons below the display allow an
intuitive operation of the device. The
general functionality of the buttons is
identical in all operating modes.
Figure 7: Control elements
If you press and hold the up or down button, it will automatically be triggered multiple
times. This allows to easily navigate through longer selection lists. If you press and hold
the ESC button, you always return to the measured value display.
Button
/
Function
Select function, increase/decrease value
OK
Confirm selected function or selected value
ESC
Cancel action
ESC long
Return to measured value display
Table 1: General button functions
The structure of the display is the same in every operating mode. The display area is
divided into four zones:
−
−
−
−
Header
Icon indicating device status
Data area
Bar graph related to the currently measured value
BA_072 Rev 1A5 Pressure transmitter PASCAL Ci4
Page 8/28
Header
Icon
Data area
Bar graph of
measured value
Figure 8: Display Structure
The icon for the device status (see 6.2.3) as well as the bar graph is displayed in each
operating mode. The bar graph always shows the measured pressure value in per cent of
the pre-set measuring range. The contents of the header and the data area depend on the
operating mode:
Display of measured value
− Header: Icon description, if applicable. Otherwise "Value"
− Data area: Measured values and parameters according to the selected display
mode (see 6.2.4)
Display of device data (see 6.2.1)
− Header: Title for the displayed device data
− Data area: Device data
Operating menue
− Header: Selected menue item
− Data area: Submenue or dialogue during setting procedure
6.2
Display Mode / Measured Value Display
After applying the supply voltage and completion of the initialisation, the device switches to
the display mode. In the display, the currently measured value is shown.
If the measured value is larger than the displayable number due to setting a fixed decimal
point, the largest displayable number is shown flashing.
BA_072 Rev 1A5 Pressure transmitter PASCAL Ci4
Page 9/28
6.2.1
Quick Access to Device Data
You can access a number of device parameters directly from the measured value display
using the
/
-buttons. This allows a quick overview of the device configuration.
With the
-button you can display variable data (trailing pointers and counters), with the
-button static information such as configuration data.
From any screen of the device data, you can enter the operating menue with OK and go
back to the measured value display by pressing ESC.
The sequence of the screens with device data is as follows:
−
Counter (operating hour counter, maintenance timer)
Trailing pointer (pressure and sensor temperature)
−
− ----- Measured value display (starting point) --−
Pressure measurement (rel/abs, nominal range, measuring range, damping)
−
Current output (characteristic curve, alarm current, limits)
−
HART data (address, tag, descriptor, date)
−
Device identification (device ID, order number, serial number)
−
Module information (hardware and software versions, serial numbers)
6.2.2
Locking the Menue
You can lock the menue with a key combination at the device. Press and hold the ESCkey and press then OK to activate the menue lock. You can still access the device data but
the menue is now locked.
An active menue lock is indicated by the header text „Menue locked“ in combination with
the lock icon.
Use the same key combination to unlock the menu again. The menu cannot be unlocked
with the key combination if the hardware DIP-switch is aktivated.
Button
/
Function
Scroll through the pages with device data
OK
Go to the operating menue
ESC
Return to measured value display
ESC+OK Activate / deactivate menue lock
Table 2: Button functions in display mode
BA_072 Rev 1A5 Pressure transmitter PASCAL Ci4
Page 10/28
6.2.3
Icons indicating device status
In the top right corner of the display, depending on the device status an NE107-conform
icon is displayed. The following icons are defined:
Error/failure
Critical error, alarm current is activated
The error description is indicated in the display. The
operating menue can still be opened.
Warning
Temperature or pressure limits are exceeded.
Saturation
The output current has reached the pre-set upper or lower
current limit.
Function control
The output current corresponds to the pressure or current
simulation, but not to the applied pressure value.
Maintenance
The device indicates necessary maintenance due to
maintenance timer settings (see 6.4.7.2).
Write protection
The write protection of the device was activated via the
DIP switch or with the key combination in the display.
Table 3: Icons for device state
The list of icons is sorted in descending priority. Only the icon with the highest priority is
shown. The two most important icons for fault and/or warning are flashing when displayed.
BA_072 Rev 1A5 Pressure transmitter PASCAL Ci4
Page 11/28
6.2.4
Display layouts
You can configure the layout of the measured value display as well as the displayed
information individually. There are five different layouts available:
Designation
Five values
Layout
Description
1st value
Under the main value, four additional
values are shown.
2nd value
4th value
Four values
3rd value
5th value
1st value
2nd value 3rd value
4th value
Three values
1st value
2nd value
3rd value
Two values
1st value
Example
Under the main value, three additional
values are shown. One of these can use
the entire display width.
Under the main value, two additional
values are shown. Both of them can use
the entire display width.
Two values are shown in the same size,
one under the other.
2nd value
Large display
1st value
2nd value
unit
The main value is shown at the
maximum size (best readability from a
distance). One additional value can also
be shown.
Table 4: Display layouts
You can define what information shall be shown in the layout’s placeholders.
You can select the 1st value (main value) from the following data:
1.
2.
3.
4.
Pressure with the selected unit
Pressure in per cent of the measuring range
Pressure in milliampere of the output signal
Sensor temperature
For all further values, you can additionally choose from the following data:
− Device ID (see 6.4.10.1)
− HART tag
− HART descriptor
When information (such as the device ID) cannot be displayed in a short layout
placeholder, "###" appears on the screen. Then select another layout or assign the value
to a longer layout placeholder.
You can configure the display mode in the operating menue (see 6.4.4.3).
BA_072 Rev 1A5 Pressure transmitter PASCAL Ci4
Page 12/28
6.3
Menue Mode / Operating Menue
Press OK in the measured value display to go to the operating menue. Then the main
menue appears in the display.
In the operating menue you can navigate in the menus by using the arrow buttons. The
selected menue item is indicated by triangles on the left and right. The OK button selects
the menue item or switches to the corresponding submenue. You can return to the higherlevel menue by pressing ESC. From the main menue, pressing ESC returns to the
measured value display.
From every position in the operating menue, you can return to the measured value display
by pressing and holding the ESC button (for at least one second).
OK
ESC
OK
ESC
ESC
ESC long
Figure 9: The Operating menue
In long menus and selection lists, a scroll bar on the left side shows the position of the
currently selected item.
Menue items that open a setting dialogue differ from submenus by three trailing points,
e.g. "Lower range …" (setting dialogue) and "System" (submenue).
If no button is pressed in menue mode for five minutes, the device automatically returns to
the display mode without saving any values.
Button
Function
Scroll up in the menue, increase value/position in list
Scroll down in the menue, decrease value/position in list
OK
Select menue, confirm value/list entry
ESC
Cancel the data entry or menue selection, return to the next higher
menue
ESC long
Cancel menue mode, return to display mode
Table 5: Button functions in the operating menue
Numeric values and selection lists are handled differently, when entering parameters.
BA_072 Rev 1A5 Pressure transmitter PASCAL Ci4
Page 13/28
6.3.1
Selection of a value from a selection list
When opening a selection list, the currently set value is shown above the selection list. Up
to three entries are shown at the same time. When the selection list is longer, a scroll bar
on the left side of the display indicates the position of the selected item in the selection list.
set
value
scroll bar
for orientation
in long
selection lists
selection
list
Figure 10: Elements of a selection list
When you press the ESC button, you cancel the entry and go back to the menue entry.
The selected value is not saved.
With the OK button, the selected value is saved. Saving the value is confirmed with an
information window (see below) and the new value is shown above the selection list.
With ESC, you leave the selection list after saving. If you press and hold the ESC button,
you go back to the display mode.
OK
ESC
ESC
OK
ESC
ESC
long
Figure 11: Procedure for value selection (e.g. conversion from mbar to bar)
BA_072 Rev 1A5 Pressure transmitter PASCAL Ci4
Page 14/28
6.3.2
Setting a numeric value
When setting numeric values, the screen shows the following elements (from top to
bottom):
−
−
−
−
−
Description of the parameter that can be set
Help text
Numeric value
Unit
Bargraph
parameter designation
help text
numeric value
unit
bar graph
Figure 12 Elements when setting a numeric value
After selecting a menue item for numerical entry (e.g. upper range value), at first the value
is only displayed. The numeric value itself is shown in square brackets and its the unit
below. Unused leading digits are marked with bottom lines. You need to press OK again to
enter the edit mode.
Numeric values are entered digit by digit. First, always the leftmost digit is selected (visible
with two triangles above and below the number). By pressing OK, you go to the next digit.
You change the selected digit by pressing the
or
button. The higher value digit is
also increased or decreased when passing zero. For instance, you can easily go from 19
to 20 without having to edit two digits.
Lower value digits are not influenced, unless the parameter limit is reached. The value is
then set to the parameter limit.
You can set negative numbers by reducing the leftmost digit below zero.
When you press the ESC button, you can cancel the entry at any time and return to the
display of the set value. Any change of the value is not saved.
With the OK button you confirm the set digit value and jump to the next digit.
When you confirm the rightmost digit, the entire value is saved. You can save the new
value from any digit by pressing and holding the OK button.
BA_072 Rev 1A5 Pressure transmitter PASCAL Ci4
Page 15/28
OK
OK
OK
long
Figure 13: Procedure for number entry (e.g. changing from 4.0000 to 2.9000)
6.4
The Menue Tree
In the following, the display and adjustment options are described by their position in the
menue tree. An overview of the menue tree can be found on the last page of this
document.
6.4.1
Main menue
The main menue has the following entries:
Menue entry
Description
Quick setup
Selection of the most important settings
Adjustment
Adjustment functions for pressure measurement and current
output
Display
Functions for configuring the display
Measurement
Configuration of the pressure measurement
Current output
Configuration of the current output
Diagnosis
Diagnostic information such as trailing pointers, etc.
Simulation
Simulation of pressure and current for function check of the
measurement chain
Communication
Information and settings regarding HART communication
System
Device data and function such as factory reset
Table 6: The main menue
BA_072 Rev 1A5 Pressure transmitter PASCAL Ci4
Page 16/28
6.4.2
"Quick Setup" menue
In Quick Setup, basic configuration options are combined to make it possible to quickly
configure key functions. All functions of the quick setup can also be found at another
position in the menue tree.
The following functions are available in the Quick Setup menue:
Menue entry
Description
Sprache/Language
Select menue language (German or English)
Unit Pressure
Select unit for measured pressure (see 6.4.4.1)
Unit Temperature
Select unit for sensor temperature (see 6.4.4.2)
Lower Range Value
Setting of the pressure value that should correspond to 4 mA
(start of range) (see 6.4.5.1)
Upper Range Value
Setting of the pressure value that should correspond to 20 mA
(end of range) (see 6.4.5.1)
Damping
Setting the damping of the output signal (see 6.4.5.2)
Device ID
Setting the device ID (see 6.4.10.1)
Config.-memory
Configuration memory: reading, writing and status (see 6.4.10.3)
Table 7: "Quick Setup" menue
6.4.3
"Adjustment" menue
The following functions are available for the pressure adjustment:
Menue entry
Description
Zero Point
Set device at ambient pressure to zero (0 bar rel) (only for
devices measuring gauge pressure)
Position Correction
Correct zero point error due to installation position (only for
devices measuring gauge pressure)
Lower Adjustment
Offset correction with applied reference pressure
Upper Adjustment
Span correction with applied reference pressure
Table 8: "Pressure Adjustment" menue
6.4.3.1
Zero-point correction
The zero-point correction requires a non-pressurized pressure port e.g. during calibration
in the lab. When executing this function the applied pressure will be interpreted as zero bar
relative pressure.
The zero point correction results in an offset of the whole characteristic curve. Therefore it
is a special case of the lower adjustment (see below).
BA_072 Rev 1A5 Pressure transmitter PASCAL Ci4
Page 17/28
6.4.3.2
Position correction
Using the function "Position Correction", you can correct the offset error due to the
installation position independent of the zero-point offset.
In the corresponding submenue, you will find the following entries:
Menue entry
Description
Pos.Corr. On/Off
Activate/deactivate position correction
Set Pos. Corr.
Correct position error at ambient pressure
Table 9: "Position Correction" submenue
When you set the position correction, it will be activated automatically. You can deactivate
the position correction, for instance for a subsequent calibration to check the zero point
independently from the installation position.
6.4.3.3
Upper and lower adjustment
The lower adjustment results in an offset of the characteristic curve. It thus affects zero
and span of the measuring range.
The upper adjustment changes the slope of the characteristic curve by correcting the span
of the measuring range.
Execute the lower adjustment prior to the upper adjustment for a correct full adjustment.
measured
pressure
1) misaligned
characteristic curve
URV
2) characteristic curve
after lower calibration
(offset shift)
3) characteristic curve
after upper calibration
(span correction)
LRV
LRV
URV
true
pressure
Figure 14: Effect of the upper and lower adjustment on the characteristic curve
You can perform the upper and lower adjustment at any reference pressure level. For
instance, you can perform the lower adjustment of a -1…4 bar device at -900 mbar rel.
The reference pressure level for the upper offset can also be freely chosen. For an exact
adjustment, however, it should be as close to the upper range value as possible.
BA_072 Rev 1A5 Pressure transmitter PASCAL Ci4
Page 18/28
6.4.3.4
Current adjustment
You can use the current adjustment, if the reading at the end of the measurement chain
does not correspond to the measured pressure. With this function you can compensate
deviations in the output stage as well as the downstream measurement chain.
Proceed as follows (example for 4 mA):
− Select function "Current adjustment" –> "4mA"
− Use "OK" to activate constant current mode (4 mA). CAUTION! The output current
value now no longer corresponds with the measured pressure! This is indicated by
the icon "Function check" (see 6.2.3)
− Read the displayed current value at the end of the measurement chain.
− Enter this current value (e.g. 3.996) at the device. The device now corrects the
current output so that 4 mA are shown at the end of the measurement chain.
When leaving the function, the constant current mode is disabled and the current value
corresponds again to the measured pressure.
6.4.4
"Display" menue
In the "Display" menue, you find all the settings that affect the display on the screen.
Menue entry
Description
Language
Select menue language (German or English)
Unit Pressure
Select unit for measured pressure
Unit Temperature
Select unit for sensor temperature
Display Mode
Configuration of the display layout and content (see 6.2.4)
Decimal point
Selection of the decimal places by specifying the decimal point
Backlight
Switch backlight on/off
Table 10: "Display" menue
6.4.4.1
"Unit Pressure" submenue
The unit in which the measured pressure is to be shown can be selected from the following
list:
Unit
Description
mbar
Millibar (1 mbar = 0.001 bar)
bar
Bar (1 bar = 1000 mbar = 105 Pa)
Pa
Pascal (1 Pa = 1 kg/(m*s2) = 10-5 bar = 0.01 mbar)
hPa
Hectopascal (1 hPa = 100 Pa = 1 mbar)
kPa
Kilopascal (1 kPa = 1,000 Pa = 10 mbar)
MPa
Megapascal (1 MPa = 1,000,000 Pa = 10 bar)
g/cm2
Gram per square centimetre (1 g/cm2 = 0.981 mbar)
kg/cm2
Kilogram per square centimetre (1 kg/cm2 = 0.981 bar)
psi
Pound force per square inch (1 psi = 68.9 mbar)
BA_072 Rev 1A5 Pressure transmitter PASCAL Ci4
Page 19/28
Unit
Description
atm
Atmospheric pressure (1 atm = 1013 mbar)
mmH2O
Millimetre water column (1 mmH2O = 0.0981 mbar)
mH2O
Metre water column (1 mH2O = 98.1 mbar)
inH2O
Inch water column (1 inH2O = 2.49 mbar)
ftH2O
Foot water column (1 ftH2O = 29.84 mbar)
torr
Torr (1 Torr = 1 mmHg = 1.33 mbar)
mmHg
Millimetre mercury column (1 mmHg = 1.33 mbar)
inHg
Inch mercury column (1 inHg = 33.86 mbar)
Table 11: Possible units for pressure
The shown conversions are only meant for your orientation. The device uses conversion
values with ten decimal places.
Please note that units can only be selected for nominal ranges that the device can
display. For instance, the unit Pascal is hidden for nominal ranges above 1 bar.
The unit selection in this submenue only affects the display on the screen. Communication
via HART is performed using the unit set in the HART driver.
6.4.4.2
"Unit Temperature" submenue
The unit in which the sensor temperature is to be shown can be selected from the
following list:
Unit
Description
°C
Degree Celsius
°F
Degree Fahrenheit ( TFahrenheit = TCelsius*1.8 + 32 )
°R
Degree Rankine ( TRankine = TKelvin*1.8 )
K
Kelvin ( TKelvin = TCelsius + 273.15 )
Table 12: Possible units for temperature
6.4.4.3
"Display Mode" submenue
In the "Display Mode" submenue, you configure the representation of the measured values
and additional information on the display.
With the menue item “Screen Layout” you configure the information that is displayed and
its layout. Up to five values can be displayed at the same time. In the additional menue
entries "1st value" to "5th value" you define the contents of the placeholders in the layout.
The various layouts as well as the possible content of the values are described in Chapter
6.2.4.
BA_072 Rev 1A5 Pressure transmitter PASCAL Ci4
Page 20/28
6.4.5
"Measurement" menue
In the "Measurement" menue, you configure the pressure measurement.
Menue entry
Description
Lower Range Value
Setting of the pressure value that shall correspond to 4 mA (start
of range)
Upper Range Value
Setting of the pressure value that shall correspond to 20 mA (end
of range)
Damping
Setting the damping of the output signal
Measuring rate
Setting of the measuring rate (20 or 100 Hz)
Table 13: "Measurement" menue
6.4.5.1
Setting the measurement range
You can freely set the lower and upper range value within the nominal range of the device,
as long as the set range is not smaller than 1% of the nominal range (turndown 100:1).
Please note that when the turndown is increased, the measurement error also increases. If
you use a very small range you must therefore accept a significant measurement error.
We recommended a maximum turndown of 10:1.
The lower range value must be below the upper range value. For an inverse characteristic
curve, select the setting "inverse" under "Current output" -> "Output Function" (see 6.4.6).
6.4.5.2
Setting the damping
Using an adjustable damping you can eliminate fast pressure changes or peaks from
having direct influence to the output signal. The set value in seconds corresponds to the
of an exponential rise. After a suddon pressure change, it takes the
time constant
damping time to reach 63.2% of the actual pressure at the output. After the damping time
has elapsed three times, 95% of the pressure is reached.
actual pressure
100,0%
95,0%
pressure value
at current output
due to damping
63,2%
0,0%
0
1
2
3
4
5
τ
Figure 15: Damping effect
BA_072 Rev 1A5 Pressure transmitter PASCAL Ci4
Page 21/28
The damping affects the current output as well as the displayed pressure value.
6.4.5.3
Setting of the measuring rate
When shipped, the transmitter is set to a measuring rate of 20 Hz, i.e. 20 times per second
the pressure is measured and the current is calculated and imprinted in the current loop.
When a particularly fast measuring rate is required, for instance to detect pressure peaks,
you can increase the measuring rate to 100 Hz. This can lead to the following restrictions:
− Communication via HART can be disturbed by fast pressure changes.
− The measuring signal can be noisier.
For this reason, you should only increase the measuring rate to 100 Hz if necessary for the
application.
6.4.6
"Current Output" menue
In the "Current Output" menue, you configure all aspects of the current loop.
Menue entry
Description
Output function
Setting the output function (linear, inverse, square root, table)
Table
Specifying the interpolation points for the table function
Alarm current
Selection of the alarm current: High (>21 mA) or low (<3.6 mA)
Lower current limit
Limit of the lower output current (3.8…4.0 mA)
Upper current limit
Limit of the upper output current (20…21 mA)
Table 14: "Current Output" menue
Independent from the setting of the upper and lower current limit, the set measuring range
always corresponds to a current range of 4..20 mA.
6.4.6.1
Configuration of the table function
With the table function you can realise any output function. E.g. you can convert the fill
height to the fill quantity depending on the tank shape. You can use up to 64 interpolation
points for this purpose.
Menue entry
Description
Number of Points
Number of interpolation points
Table values
Combination of pressure in per cent and corresponding current
value that are used as interpolation points of the table function
Table 15: "Output Table" submenue
You can only edit the table points when the table function is not active. You may need to
set the output function to "linear", for instance (see above) before editing table points.
The table points must be sorted according to ascending pressure. For instance, the 20%
point may not be before the 10% point. Otherwise you cannot activate the table function.
If the first table point is set above 0%, the output of the actual current will not change
before the pre-set value of the first table point is reached. Until then, only the value of the
first table point will be output. If, for instance, the first table point is set to 10% and 5 mA,
the device outputs 5 mA from 0-10% of the set measuring range. The same applies when
the last table point is not at 100%.
BA_072 Rev 1A5 Pressure transmitter PASCAL Ci4
Page 22/28
With the
and
buttons, you can scroll through the table points and look at the
combinations of pressure in per cent and current in mA. With OK, you switch to the edit
mode for the displayed table point. Now enter the first per cent value and then the current
value. When you confirm the current value, you return to the display of the table point you
just edited.
OK
OK
long
OK
long
Figure 16: Changing a table point
6.4.6.2
Upper and lower current limit
In the standard setting, the current output is limited at 3.8 and 20.5 mA, meaning a further
drop or rise in the pressure does not change the current. You can freely select these
current limits for the lower limit between 3.8 and 4 mA and for the upper limit between 20
and 21 mA.
6.4.7
"Diagnosis" menue
In this menue you can view and configure various diagnostic information. The following
diagnostic functions are available:
Menue entry
Description
Counter
Display of operating hour counter and maintenance timer
Min/max Pressure
Display and reset of trailing pointer for the pressure measurement
Min/max Temp
Display and reset of trailing pointer for the sensor temperature
Last Error
Display and reset of the last critical error
Self Test
Self test of the device like after applying the power supply
Maintenance Timer
Management of maintenance intervals
Table 16: "Diagnosis" menue
BA_072 Rev 1A5 Pressure transmitter PASCAL Ci4
Page 23/28
6.4.7.1
The trailing pointers
The trailing pointers save the maximum and minimum measured pressure and
temperature levels until they are reset by the user. The menue item that shows the trailing
pointer, can also be used to reset it. The trailing pointers are also accessible directly from
the measured value display in the device data (see 6.2.1).
OK
OK
Figure 17: Display and resetting of the trailing pointer for pressure
6.4.7.2
The maintenance timer
Using the maintenance timer, the device can signal the need for maintenance after a freely
selectable number of operating hours. The timer counts down from the start value.
Maintenance need is indicated by an icon in the display (see 6.2.3) and, if necessary, the
HART protocol.
When the maintenance timer has expired, the counter continues into the minus range thus
the degree to which the interval has been exceeded is also visible.
Menue entry
Description
State
Displaying and stopping the maintenance timer
Set Interval
Setting and starting the maintenance timer
Table 17: "Maintenance timer" submenue
6.4.8
"Simulation" menue
In the "Simulation" menue, you can simulate the pressure as well as the current to test the
subsequent measuring chain.
Menue entry
Description
Current simulation
Setting a fixed current value
Pressure simulation
Setting a fixed pressure value
Table 18: "Simulation" menue
The current simulation influences only the current output. The pressure simulation takes all
settings into consideration, including the damping and an active table function.
BA_072 Rev 1A5 Pressure transmitter PASCAL Ci4
Page 24/28
6.4.9
"Communication" menue
In the "Communication" menue the settings for the HART communication are summarised.
Menue entry
Description
HART address
Setting the HART address for device identification in multi-drop
mode
Current mode
Setting the current mode (proportional/constant)
HART data
Display of HART information (HART tag, HART descriptor, etc.)
Send-preambles
Setting of the
communication
number
of
send-preambles
for
HART
Table 19: "Communication" menue
6.4.9.1
HART address
This address corresponds with the short address which is used for the HARTCommunication. It can be set within a range of 0 to 63. Please note, that setting the short
address between 1 and 63 will not automatically activate the constant current mode. This
must be done under the menue “Current mode” (see 6.4.9.2).
6.4.9.2
Current mode
The current mode determines whether the output current of the device is set to respond
proportionally to the pressure (selection “proportional”) or whether it should remain
constant at 4 mA (selection “constant”). When the current mode “constant” is in use the
measurement value can only be read using HART (e.g. for HART-multidrop-operation).
6.4.10 "System" menue
In the "System" menue, device-relevant functions are summarised.
Menue entry
Description
Device ID
Setting the device ID (e.g. to display a free-text in the display)
Device data
Display of device data (such as from measured value display)
Factory data reset
Reset to factory settings
Restart
Restarting the device (such as after a power outage)
Config.-memory
Configuration memory: reading, writing and status
Table 20: "System" menue
6.4.10.1 Device ID
Using the device ID, you can show a custom text in the display if you configure the display
mode accordingly (see 6.2.4). For instance, you can show the tag number continuously in
the display.
The device ID can be up to 16 characters long and consist of numbers, empty spaces,
capital letters and special characters.
For the selection, the characters are arranged in the order shown below. From the end of
the list (special character "@"), you are automatically guided back to the start (number
"0").
BA_072 Rev 1A5 Pressure transmitter PASCAL Ci4
Page 25/28
Character set:
0123456789 ABCDEFGHIJKLMNOPQRSTUVWXYZ[\]^_!“#$%&‘()*+,-./:;<=>?@
6.4.10.2 Factory reset
When carrying out a factory reset, all parameters are set to the state at the time of
delivery. This also includes the pressure and current adjustment. Exceptions are the
following operational parameters: “trailing pointers”, “change counter” and “operation
hours”.
6.4.10.3 Configuration memory
Starting with software version 1.2.0 of the display module you can store all device
parameters in the configuration memory of the display module. You can transfer the data
back to the device or to another device. Transferring a configuration to another device
requires a compatible target device. The same nominal range is not necessary. It is
sufficient if the measuring range of the stored configuration is equal or smaller than the
nominal range of the target device.
The configuration memory contains the parameter setting of the device at the time of
storage. If you change a device parameter afterwards, the stored configuration will not be
updated automatically.
The status screen of the configuration memory contains the following information:
- Available
YES: the display module contains a stored configuration
NO: no stored configuration
- Source
this device: the stored configuration originates from the connected device
Serial#: the stored configuration originates from the device with the listed
serial number.
- Up-to-date
YES: The device configuration has not been changed since the parameter
set has been stored in the display module
NO: The device configuration has been changed
The transfer of a configuration takes approx. 25 seconds. If you use a table function with
many support points the transfer can take up to 50 seconds.
BA_072 Rev 1A5 Pressure transmitter PASCAL Ci4
Page 26/28
BA_072 Rev 1A5 Pressure transmitter PASCAL Ci4
Page 27/28
6.4.11 Overview with menue tree and device functions
Quick Setup
Language…
Unit Pressure…
Unit Temperature…
Lower Value Range…
Upper Value Range…
Damping…
Device ID…
Config.-memory
Select menu language (German or English)
Select unit for measured pressure
Select unit for sensor temperature
Setting of the pressure value that should correspond to 4 mA (start of range)
Setting of the pressure value that should correspond to 20 mA (end of range)
Setting the damping of the output signal
Setting the device ID
Configuration memory: reading, writing and status
Adjustment
Pressure Adjustment
Adjustment of the pressure measurement
Zero Point…
Set device at ambient pressure to zero (0 bar rel) (only for gauge pressure devices)
Position Correction
Correct zero point error due to installation position (only for gauge pressure devices)
Pos.Corr On/Off… Activate/deactivate position correction
Pos.Corr Adjust… Correct position error at ambient pressure
Lower Adjustment… Offset correction with applied reference pressure
Upper Adjustment… Span correction with applied reference pressure
Current Adjustment
Adjustment of the current output
4 mA…
Justieren des Stromausgangs auf 4 mA am Ende der Messkette
20 mA…
Justieren des Stromausgangs auf 20 mA am Ende der Messkette
Display
Language…
Unit Pressure…
Unit Temperature…
Display Mode
Screen Layout…
1st Value…
2nd Value…
…
Decimal Point…
Backlight…
Select menu language (German or English)
Select unit for measured pressure
Select unit for sensor temperature
Configuration of the display layout and content
Define screen structure and layout
Content for 1st value in the selected layout
Content for 2nd value in the selected layout
Content for further values (up to five)
Selection of the decimal places by specifying the decimal point
Switch backlight on/off
Measurement
Lower Value Range…
Upper Value Range…
Damping…
Measuring Rate…
Setting of the pressure value that should correspond to 4 mA (start of range)
Setting of the pressure value that should correspond to 20 mA (end of range)
Setting the damping of the output signal
Setting of the measuring rate (20 or 100 Hz)
Current Output
Output Function…
Table
Number of Points…
Table Values…
Alarm Current…
Lower Current Limit…
Upper Current Limit…
Setting the output function (linear, inverse, square root, table)
Specifying the interpolation points for the table function
Number of interpolation points (2..64)
Interpolation points of table function
Selection of the alarm current: High (>21 mA) or low (<3.6 mA)
Limit of the lower output current (3.8…4.0 mA)
Limit of the upper output current (20…21 mA)
Diagnosis
Counters…
Min/Max Presure…
Min/Max Temp. …
Last Error…
Self Test…
Maintenance Timer
Status…
Set Interval…
Display of operating hour counter and maintenance timer
Display and reset of trailing pointer for the pressure measurement
Display and reset of trailing pointer for the sensor temperature
Display and reset of the last critical error
Self test of the device like after applying the power supply
Management of maintenance intervals
Displaying and stopping the maintenance timer
Setting and starting the maintenance timer
Simulation
Loop-Test…
Pressure Simulation…
Setting a fixed current value
Setting a fixed pressure value
Communication
HART Address…
Current Mode…
HART Data…
Send-Preambles…
Setting the HART address for device identification in multi-drop mode
Setting the current mode (proportional/constant)
Display of HART information (HART tag, HART descriptor, etc.)
Setting of the number of send preambles for HART communication
System
Device ID…
Device Data…
…
Factory Reset…
Device Reset…
Config.-memory
Setting the device ID (e.g. to display a free-text in the display)
Display of device data (same as from measured value display)
Various screens with device data
Reset to factory settings
Restarting the device (such as after a power outage)
Configuration memory: reading, writing and status
BA_072 Rev 1A5 Pressure transmitter PASCAL Ci4
Page 28/28