1
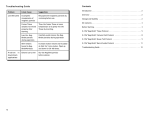
PhoenIX™ Midiprep Kit
Ion exchange purification of 45-100 µg
plasmid DNA from 15-100 ml of E. coli cells
Revision # 2075-200-4E01
PhoenIX™ Midiprep Kit
PhoenIX™ Midiprep Kit
Ion exchange purification of 45-100 µg plasmid
DNA from 15-100 ml of E. coli cells
Application Manual
Revision # 2075-200-4E01
Catalog # 2075-200
25 high-copy preps
12 low-copy preps
Storage:
Unopened box should be stored at ambient temperature (15-30ºC).
Once RNase A has been added to Cell Resuspension Buffer, store at 4ºC and
use within 6 months.
visit us on the web at www.qbiogene.com
3
PhoenIX™ Midiprep Kit
TABLE OF CONTENTS
1.
Introduction
2.
2.1
2.2
Kit Components and User Supplied Materials
PhoenIX™ Midiprep Kit Components
User Supplied Materials
3.
Safety Precautions
4.
4.1
4.2
4.3
4.4
4.5
4.6
4.7
Things to Know before Using the PhoenIX™ Midiprep Kit
Read Protocol Thoroughly before Use
High Copy vs. Low Copy Plasmids
Growth of Bacterial Cells
Prepare Cell Resuspension Buffer by adding RNase A
Precipitate Material in Lysis Buffer
Loading of PhoenIX™ Midi Columns
Assembly of Disposable Midi Column Rack
5.
Detailed Protocol for High Copy Plasmids (15 ml – 50 ml Bacterial Culture)
6.
Detailed Protocol for Low Copy Plasmids (51 ml – 100 ml Bacterial Culture)
7.
7.1
7.2
7.3
7.4
7.5
Troubleshooting
Low yields of plasmid DNA
Slow column flow
Chromosomal DNA contamination
Multiple plasmid forms seen on agarose gel
RNA contamination
8.
Recommended Reference Format for Publications
9.
9.1
9.2
Related Products
Plasmid Purification Kits
Molecular Biology Certified™ Growth Media
10.
Product Use Limitation & Warranty
11.
Trademarks and Patents
Appendix I. PhoenIX™ Midiprep Quick Reference Protocol
Appendix II. PhoenIX™ Midiprep Diagnosis Protocol
Appendix III. PhoenIX™ Midiprep Buffer Compositions
4
visit us on the web at www.qbiogene.com
PhoenIX™ Midiprep Kit
1. Introduction
PhoenIX™ plasmid purification systems from Qbiogene rely on ion-exchange chromatography through a
unique, patented solid-phase column. Precisely balanced pH values and salt concentrations permit optimal
purification of highly clean plasmid DNA from the unique ion-exchange resin. Unlike resins found in other
ion-exchange kits, PhoenIX™ columns are distinct: First, the smaller pore size of the resin particles
increases the surface area available for binding. Second, the spacer molecule linking the positively charged
amino group to the resin particles is longer than in other resins, allowing a better degree of separation
between different biomolecules during the binding and washing process.
The PhoenIX™ Midiprep Kit and PhoenIX™ Maxiprep Kit rely on centrifugation to clear the bacterial lysate,
and on gravity to pull liquids through the column material. The PhoenIX™ Gigaprep Kit is driven by vacuum
and offers lysate clearing via a filtration cartridge.
Plasmid DNA purified with PhoenIX™ columns can be used immediately in a wide variety of downstream
applications including automated fluorescent sequencing, enzymatic amplification, labeling, transcription,
cloning and other enzymatic manipulations. Additionally, the levels of endotoxin that remain after purification are so low that successful transfection will occur with even sensitive cell lines.
Two protocols are included in this instruction manual. The “high copy” protocol allows isolation of plasmid DNA
from bacterial cultures of 15 ml to 50 ml. The “low copy” protocol allows isolation of plasmid DNA from bacterial cultures of 51 ml to 100 ml. In either protocol, plasmid DNA is ready to precipitate in just over an hour.
2. Kit Components and User Supplied Materials
2.1
PhoenIX™ Midiprep Kit Components
Description
RNase A (red cap)
Cell Resuspension Buffer (yellow cap label)
Lysis Buffer (blue cap label)
Neutralization Buffer (green cap label)
PhoenIX™ Midi Columns
Disposable Midi Column Rack
Equilibration Buffer (gray cap label)
Column Wash Buffer (orange cap label)
Elution Buffer (pink cap label)
User Manual
MSDS
Certificate of Analysis
visit us on the web at www.qbiogene.com
Quantity
11 mg
110 ml
110 ml
110 ml
25 each
1 each
260 ml
525 ml
135 ml
1 each
1 each
1 each
5
PhoenIX™ Midiprep Kit
2.2
User Supplied Materials
Liquid collection container that can hold >50 ml
Centrifuge tubes that can hold > 12 ml of liquid and can withstand 12,000 x g (for “high copy” protocol)
Centrifuge tubes that can hold > 24 ml of liquid and can withstand 12,000 x g (for “low copy” protocol)
Isopropanol
70% ethanol
RNaseA and T1 (optional supplement for high-volume preps)
3. Safety Precautions
Several components contain compounds that may cause irritation or burning when in contact with human
tissue or during inhalation. Wear personal protective equipment to prevent skin contact (e.g. gloves, lab coat,
and eye protection) and prevent inhalation of reagent vapors and consumption of liquid during use. Consult
the enclosed Material Safety Data Sheet for additional details.
4. Things to Know before Using the PhoenIX™ Midiprep Kit
4.1
Read Protocol Thoroughly before Use
For optimal yield and purity of plasmid DNA, it is critical to closely follow the protocol as directed. Although
the process of bacterial cell growth and lysis may be able to withstand many short-cuts, each time a step
is not performed optimally the risk of an unacceptable result increases.
4.2
High Copy vs. Low Copy Plasmids
High copy plasmids (3 – 5 µg DNA/ml LB Medium) should be grown in a culture volume of 15 – 50 ml. If
working with low copy plasmids (0.2 – 1 µg DNA/ml LB Medium), the larger culture volume (51 – 100 ml)
requires the use of twice as much of the alkaline lysis buffers. The PhoenIX™ Midiprep Kit contains enough
buffer for 25 high-copy preps or 12 low-copy preps. If you plan to work exclusively with low copy plasmids,
the PhoenIX™ Midiprep Low Copy Refill Kit (Cat # 2075-250) is also available from Qbiogene. Large constructs (cosmids, BACs, YACs and P1 DNA) behave like very low copy plasmids, and additional protocol modifications are noted in the Low Copy Protocol (Section 6).
4.3
Growth of Bacterial Cells
Inoculate 5 ml of selective medium with a single colony from a freshly streaked selective agar plate.
Incubate at least 8 hours at 37°C with vigorous shaking (~300 rpm).
Dilute the starter culture 1:500 to 1:1000. (For example, add 100 µl of a high-copy plasmid starter culture
to 50 ml of fresh selective media). Grow E. coli cells at 37°C overnight with vigorous shaking to a density
between 1 – 5 x 10⁹ cells per ml of medium (1 – 1.5 OD600 units/ml).
6
visit us on the web at www.qbiogene.com
PhoenIX™ Midiprep Kit
4.4
Prepare Cell Resuspension Buffer by adding RNase A
To resuspend lyophilized RNase A (red cap), add 1.0 ml of Cell Resuspension Buffer (yellow cap label) and
vortex. Remove the entire volume of resuspended RNase A and add it to the bottle of Cell Resuspension
Buffer. Mix well and check the “Contains RNase A” box on the label. Prepared Cell Resuspension Buffer
should be stored at 4°C and used within 6 months.
Qbiogene strongly recommends preparing the entire volume of Cell Resuspension Buffer at once. However,
if it is certain that all of the prepared Cell Resuspension Buffer will not be used within 6 months, a partial
batch can be prepared instead. Resuspend the RNase A as described above and add the appropriate
amount to a smaller volume of Cell Resuspension Buffer. For example, instead of adding 1 ml of resuspended RNase A to 109 ml of buffer, add 0.5 ml of resuspended RNase A to 54.5 ml of buffer. The prepared Cell Resuspension Buffer should be stored at 4°C as directed above. The remaining volume of resuspended RNase A solution can be stored at -20°C for up to 2 years.
4.5
Precipitate Material in Lysis Buffer
If the PhoenIX™ Midiprep Kit was shipped or stored at a low temperature, a harmless precipitate may form
in the Lysis Buffer (blue cap label). If a precipitate is seen, incubate the bottle in a 37°C water bath for several minutes and mix to bring the precipitate back into solution.
4.6
Loading of PhoenIX™ Midi Columns
Do not overload the PhoenIX™ Midi Columns with excess bacterial culture. Up to 100 ml of bacterial culture can be used as long as the “low copy” protocol is followed. If purification of other quantities of plasmid
is desired, PhoenIX™ plasmid purification kits are available in Maxiprep and Gigaprep scales. See the
Related Products section for more information.
visit us on the web at www.qbiogene.com
7
PhoenIX™ Midiprep Kit
4.7
Assembly of Disposable Midi Column Rack
The purchase of a separate column rack is not necessary with the PhoenIX™ Midiprep Kit. Qbiogene provides a convenient and inexpensive way to support the PhoenIX™ Midi Columns through the use of the
cardboard Disposable Midi Column Rack. Refer to Figure 1. First, fold the rack along the lines as shown.
Starting with Tab A, insert each tab into its corresponding slot as shown. Refer to Figure 2 for a photograph
of the assembled rack.
Figure 1: Assembly of Column Rack
Figure 2: Assembled Column Rack
5. Detailed Protocol for High Copy Plasmids
(15 ml – 50 ml Bacterial Culture)
Before beginning, verify that RNase A (red cap) has been added to the Cell Resuspension Buffer (yellow cap
label) and that no precipitate can be seen in the Lysis Buffer (blue cap label). See Sections 4.3 and 4.4.
1. Place PhoenIX™ Midi column in the assembled Disposable Column Rack. Place a waste container
underneath that will hold > 50 ml.
2. Add 10 ml of Equilibration Buffer (gray cap label) to the surface of the column and allow the liquid to
drain by gravity flow.
Note: It will take 10-15 minutes for the column to drain completely. During this process, proceed to Step 3.
3. Pellet 15-50 ml of a 1 - 5 x 10⁹ cells/ml bacterial culture (see section 4.3) by centrifugation at 6,000
x g for 15 minutes at room temperature.
4. Remove all traces of liquid medium from the bacterial cell pellet with a pipette.
8
visit us on the web at www.qbiogene.com
PhoenIX™ Midiprep Kit
Note: If traces of culture medium remain with the cells, the ratio of salts and pH values will not be optimal
in subsequent steps.
5. Add 4 ml of RNase A-containing Cell Resuspension Buffer (yellow cap label) to the cell pellet and vortex
until completely resuspended.
6. Transfer resuspended cells to a centrifuge tube that can hold > 12 ml of liquid and can withstand
12,000 x g.
7. Add 4 ml of Lysis Buffer (blue cap label) and securely cap the tube. Mix thoroughly by inverting until the
lysate appears to be homogeneous (5-6 inversions). DO NOT VORTEX.
8. Incubate 5 minutes at room temperature.
Note: Do not incubate for longer than 5 minutes or plasmid DNA might become irreversibly denatured.
9. Add 4 ml of Neutralization Buffer (green cap label). Securely cap the tube and mix immediately by multiple
inversions until a homogeneous suspension containing no viscous matter is obtained. DO NOT VORTEX.
Note: If preparing several samples at once, thoroughly mix each sample immediately after the addition of
the Neutralization Buffer before adding the buffer to the next tube.
10. Centrifuge the thoroughly mixed sample at ≥ 12,000 x g for 10 minutes at room temperature.
Note: If a room temperature centrifuge is not available and sample is centrifuged at 4°C, the supernatant must be allowed to warm to room temperature (18 – 25°C) prior to loading on the
PhoenIX™ Midi Column.
11. Verify that the Equilibration Buffer has been collected in the waste container beneath the PhoenIX™
Midi Column. Discard the flow-through and replace the container.
12. Use a pipette to remove the cleared lysate supernatant from the centrifuged sample and add to the top
of the equilibrated column. Allow the lysate to drain by gravity flow (10-12 minutes). Discard the flowthrough and replace the empty container.
Note: Do not pour lysate directly onto the column. Use a pipette to ensure that precipitate particles do not
enter the column and cause clogging.
13. Add 10 ml of Column Wash Buffer (orange cap label) to the top of the column and allow the liquid to
drain by gravity flow (5-8 minutes).
Note: If any drops of liquid from the cleared lysate (added in step 13) remain on the plastic walls of the
column, wash them down into the column with the 10 ml of Column Wash Buffer.
visit us on the web at www.qbiogene.com
9
PhoenIX™ Midiprep Kit
14. Repeat the wash in step 13 with a second application of 10 ml of Column Wash Buffer (5-8 minutes,
orange cap label).
15. Discard the flow-through. Replace the waste collection container with a new centrifuge tube that can
hold > 12 ml of liquid and can withstand 12,000 x g.
16. Add 5 ml of Elution Buffer (pink cap label) to the top of the column. Allow the eluate to drain by gravity
flow (5 minutes) into the centrifuge tube.
17. Add 3.5 ml of Isopropanol to the eluted plasmid DNA in the centrifuge tube. Mix and centrifuge at
12,000 x g for 30 minutes at 4°C.
18. Pour out the supernatant taking care not to disturb the DNA pellet.
19. Add 3 ml of 70% ethanol and wash the pellet. Centrifuge at 12,000 x g for 5 minutes at 4°C.
20. Completely remove ALL of the supernatant from the pellet with a pipette.
21. Air-dry the pellet for 10 minutes.
Note: Drying with a vacuum chamber is not recommended because over-dried DNA may be difficult to
completely resuspend.
22. Dissolve the plasmid DNA in 200 µl of water or TE Buffer. DNA is immediately ready for downstream
applications and may be moved to a smaller tube if desired.
6. Detailed Protocol for Low Copy Plasmids
(51 ml – 100 ml Bacterial Culture)
Before beginning, verify that RNase A (red cap) has been added to the Cell Resuspension Buffer (yellow cap
label) and that no precipitate can be seen in the Lysis Buffer (blue cap label). See Sections 4.3 and 4.4.
1. Place PhoenIX™ Midi column in the assembled Disposable Column Rack. Place a waste container
underneath that will hold > 50 ml.
2. Add 10 ml of Equilibration Buffer (gray cap label) to the surface of the column and allow the liquid to
drain by gravity flow.
Note: It will take 10-15 minutes for the column to drain completely. During this process, proceed to Step 3.
10
visit us on the web at www.qbiogene.com
PhoenIX™ Midiprep Kit
3. Pellet 51-100 ml of a 1 - 5 x 10⁹ cells/ml bacterial culture (see section 4.3) by centrifugation at 6,000
x g for 15 minutes at room temperature.
4. Remove all traces of liquid medium from the bacterial cell pellet with a pipette.
Note: If traces of culture medium remain with the cells, the ratio of salts and pH values will not be optimal
in subsequent steps.
5. Add 8 ml of RNase A-containing Cell Resuspension Buffer (yellow cap label) to the cell pellet and vortex
until completely resuspended.
Note: Normally, the concentration of RNase A in the Cell Resuspension Buffer (100 µg/ml) should be sufficient to remove all traces of RNA. If you are working with a large construct (cosmid, BAC, YAC or
P1 DNA) in ≥ 100 ml of bacterial culture, it may be necessary to increase the amount of RNase A
in the Cell Resuspension Buffer (yellow cap label) to 400 µg/ml with user-supplied RNase A. The
Cell Resuspension Buffer can be additionally supplemented with 100 U/ml of RNase T1. The combined activities of RNase A and T1 will result in a better digestion efficiency of the bacterial RNA,
thus leading to a better removal of the RNA during the column procedure.
6. Transfer resuspended cells to a centrifuge tube that can hold > 24 ml of liquid and can withstand
12,000 x g.
7. Add 8 ml of Lysis Buffer (blue cap label) and securely cap the tube. Mix thoroughly by inverting until the
lysate appears to be homogeneous (5-6 inversions). DO NOT VORTEX.
8. Incubate 5 minutes at room temperature.
Note: Do not incubate for longer than 5 minutes or plasmid DNA might become irreversibly denatured.
9. Add 8 ml of Neutralization Buffer (green cap label). Securely cap the tube and mix immediately by multiple
inversions until a homogeneous suspension containing no viscous matter is obtained. DO NOT VORTEX.
Note: If preparing several samples at once, thoroughly mix each sample immediately after the addition of
the Neutralization Buffer before adding the buffer to the next tube.
10. Centrifuge the thoroughly mixed sample at ≥ 12,000 x g for 10 minutes at room temperature.
Note: If a room temperature centrifuge is not available and sample is centrifuged at 4°C, the supernatant must be allowed to warm to room temperature (18 – 25°C) prior to loading on the
PhoenIX™ Midi Column.
11. Verify that the Equilibration Buffer has been collected in the waste container beneath the PhoenIX™
Midi Column. Discard the flow-through and replace the container.
visit us on the web at www.qbiogene.com
11
PhoenIX™ Midiprep Kit
12. Use a pipette to remove the cleared lysate supernatant from the centrifuged sample and add to the top
of the equilibrated column. Allow the lysate to drain by gravity flow (10-12 minutes). Discard the flowthrough and replace the empty container.
Note: Do not pour lysate directly onto the column. Use a pipette to ensure that precipitate particles do not
enter the column and cause clogging.
13. Add 10 ml of Column Wash Buffer (orange cap label) to the top of the column and allow the liquid to
drain by gravity flow (5-8 minutes).
Note: If working with a large construct (cosmid, BAC, YAC or P1 DNA) from a high volume culture, removal
of residual RNA may be more efficient if a modified Column Wash Buffer [850 mM NaCl, 100 mM
sodium acetate pH 4.0] is prepared gravimetrically using 8.203 g Sodium acetate, 15 g of Glacial
acetic acid (99%), and 49.67 g of Sodium chloride. After adjusting the water (high quality) to a final
volume of 1.0 L, the final pH value should be 4.0 ±0.1. The higher salt concentration and the lower
pH value in the modified wash buffer allow better removal of residual RNA without significantly
affecting the DNA yield.
Note: If any drops of liquid from the cleared lysate (added in step 13) remain on the plastic walls of the
column, wash them down into the column with the 10 ml of Column Wash Buffer.
14. Repeat the wash in step 13 with a second application of 10 ml of Column Wash Buffer (5-8 minutes,
orange cap label).
15. Discard the flow-through. Replace the waste collection container with a new centrifuge tube that can
hold > 12 ml of liquid and can withstand 12,000 x g.
16. Add 5 ml of Elution Buffer (pink cap label) to the top of the column. Allow the eluate to drain by gravity
flow (5 minutes) into the centrifuge tube.
Note: If working with a large construct (cosmid, BAC, YAC or P1 DNA) elution of DNA can often be
enhanced by pre-warming the Elution Buffer to 50°C before use.
17. Add 3.5 ml of Isopropanol to the eluted plasmid DNA in the centrifuge tube. Mix and centrifuge at
12,000 x g for 30 minutes at 4°C.
Note: Especially large DNA species (cosmids, BACs, YACs or P1 DNA) are very "sticky" and can spread
out over the wall of the centrifuge tube if a fixed angle rotor is used. If possible, use a swingingbucket rotor or siliconized centrifuge tubes.
18. Pour out the supernatant taking care not to disturb the DNA pellet.
19. Add 3 ml of 70% ethanol and wash the pellet. Centrifuge at 12,000 x g for 5 minutes at 4°C.
12
visit us on the web at www.qbiogene.com
PhoenIX™ Midiprep Kit
20. Completely remove ALL of the supernatant from the pellet with a pipette.
21. Air-dry the pellet for 10 minutes.
Note: Drying with a vacuum chamber is not recommended because over-dried DNA may be difficult to
completely resuspend.
22. Dissolve the plasmid DNA in 100 µl of water or TE Buffer. DNA is immediately ready for downstream
applications and may be moved to a smaller tube if desired.
7. Troubleshooting
7.1
Low yields of plasmid DNA
7.1.1 Temperature was too low
Temperature plays an important role in the isolation of optimal amounts of plasmid DNA. All solutions should
be kept no cooler than room temperature (18 - 25°C). If cleared lysate was centrifuged at 4°C, the supernatant must be allowed to warm prior to adding to the column. Wash and elution buffers must also be used
at room temperature.
7.1.2 Culture medium was not completely removed
Plasmid DNA will not bind optimally to the PhoenIX™ Midi Column unless it is at the correct salt concentration and pH. Excess culture media that is resuspended with the cells in the Cell Resuspension Buffer will
have a significant negative impact on these critical parameters. Ensure all culture media is removed with a
pipette prior to resuspending cells in step 5 of the protocol.
7.1.3 Alkaline lysis reagents were not added precisely
Plasmid DNA will not bind optimally to the PhoenIX™ Midi Column unless it is at the correct salt concentration and pH. Measure volumes of alkaline lysis reagents precisely to ensure best results.
7.1.4 DNA pellet was over-dried
Once a DNA pellet is over-dried, it can be difficult if not impossible to completely resuspend. Air-dry the
pellet as directed in the protocol and do not use a vacuum pump system.
7.1.5 Variability in plasmid copy number
The total quantity of plasmid DNA in a particular E. coli host cell is influenced by many variables. The range
of plasmid DNA per ml culture can vary from 0.2 µg/ml (“low copy”) to > 5.0 µg/ml (“high copy”). The size
and sequence of specific DNA inserts will often influence the copy number of a particular plasmid; in some
cases the copy number of a normally “high copy” plasmid will be reduced with a different insert.
visit us on the web at www.qbiogene.com
13
PhoenIX™ Midiprep Kit
Qbiogene offers two protocols in this instruction manual, one for “high copy” plasmids and one for “low
copy” plasmids. If a “high copy” plasmid gives a DNA yield that is lower than expected, it may help to use
a larger culture volume and follow the “low copy” protocol to increase yield.
7.1.6 Diagnosis protocol for low or no yield
If the yield of an expected “high copy” plasmid still does not improve after the suggestions above are followed, perform the PhoenIX™ Midiprep Diagnosis Protocol in Appendix II to determine if the problem lies
with the supplied reagents or the procedure itself.
7.2
Slow column flow
If the flow of liquid through the PhoenIX™ Midi Column slows or stops, it may be due to the clogging of the
column with particulate matter carried over from the cleared lysate in step 12. Do not pour the cleared lysate
onto the column right from the centrifuge tube. Carefully separate the cleared lysate from the particulate
matter with a pipet and load the column as directed in the protocol.
7.3
Chromosomal DNA contamination
Chromosomal bacterial DNA is removed from the preparation by precipitation after the addition of the
Neutralization Buffer and by subsequent centrifugation. This is only successful if shearing of the chromosomal DNA after cell lysis is kept to a minimum. Shearing of the chromosomal DNA occurs when the sample
is vortexed after the addition of Lysis Buffer and/or Neutralization Buffer. Mix only by inversion after the addition of these solutions; do not vortex.
7.4
Multiple plasmid forms seen on agarose gel
A DNA band that runs slightly faster than the supercoiled plasmid DNA on a gel most likely represents irreversibly denatured plasmid DNA. Plasmid DNA will become irreversibly denatured if alkaline cell lysis (step
7) continues longer than the recommended 5 minutes.
7.5
RNA contamination
7.5.1 Preparation was at the incorrect salt concentration, pH or temperature
Due to the nature of the PhoenIX™ ion exchange resin, the separation of DNA and RNA is strongly
dependent on the salt concentration, pH and temperature during binding, washing and elution. Follow the
protocol exactly as directed and see sections 7.1.1 – 7.1 3 under “Low yields of plasmid DNA”.
7.5.2 Sample was left on the column too long
Once the cleared bacterial lysate is added to the column, proceed with subsequent steps with no interruptions. Long pauses between steps may cause contamination of the purified plasmid DNA with small
RNA species.
14
visit us on the web at www.qbiogene.com
PhoenIX™ Midiprep Kit
7.5.3 RNase A digestion was insufficient
Ensure the appropriate amount of RNase A was added to the Cell Resuspension Buffer prior to beginning
the protocol (see section 4.3). If the Cell Resuspension Buffer was not stored at 4°C, or if it has been stored
at 4°C for more than 6 months, new RNase A should be added prior to purifying more plasmid DNA.
Ensure the correct volume of prepared Cell Resuspension Buffer was added in step 5 of the protocol.
7.5.4 Host strain may be naturally rich in RNA
Some host strains are extremely rich in RNA. Therefore, it is possible that a slight contamination of the
plasmid DNA with residual RNA might occur, even in the presence of RNase. Increasing the volume of
Neutralization Buffer in step 8 of the protocol by 10% can minimize contaminating RNA without significantly
decreasing plasmid DNA yield.
8. Recommended Reference Format for Publications
“Plasmid DNA was purified using the PhoenIX™ Midiprep Kit (Qbiogene, Inc., CA)”.
9. Related Products
9.1 Plasmid Purification Kits
Purification Scale
Gigaprep
Maxiprep
Midiprep
Miniprep
Cat #
2075-400
2075-300
2075-350
2075-200
2075-250
2067-200
2067-400
2067-600
2067-200
2067-400
2069-400
2070-200
2070-400
2070-500
2070-600
2000-200
2002-200
Kit Name
PhoenIX™ Gigaprep Kit
PhoenIX™ Maxiprep Kit
PhoenIX™ Maxiprep Low Copy Refill Kit
PhoenIX™ Midiprep Kit
PhoeIX™ Midiprep Low Copy Refill Kit
RapidPURE™ Plasmid Mini Kit
RapidPURE™ Plasmid Mini Kit
RapidPURE™ Plasmid Mini Kit
RapidPURE™ Plasmid Mini 96 Kit
RapidPURE™ Plasmid Mini 96 Kit
Yeast RPM® Kit
RPM® Kit
RPM® Kit
RPM® Kit
RPM® Kit
MiniPrep Express™ Matrix
96well Prep Express
visit us on the web at www.qbiogene.com
Size
5 preps
25 preps
12 preps
25 preps
12 preps
60 preps
120 preps
300 preps
96 preps
4 x 96 preps
100 preps
60 preps
120 preps
300 preps
600 preps
1,250 preps
4 x 96 preps
15
PhoenIX™ Midiprep Kit
9.2
Molecular Biology Certified™ Growth Media
BIO 101® Systems is well known for providing an excellent selection of high-quality growth media in a
variety of formulations. We specialize in formulations for yeast and bacterial genetics, and offer more than
a thousand recipes and variations. Each product is subjected to extensive quantitative testing, and is
Molecular Biology Certified™ through qualitative, molecular biology based tests such as cell density and
plasmid yield. Choose from a wide variety of convenient packaging formats: Pre-mixed powders are available in capsule form, single-use pouches, or in bulk sizes. Liquid media, pre-poured plates, and custom
packaging options are also available. If you prefer to make your own media, BIO 101® Systems can supply
you with raw materials such as tryptones and peptones, yeast extract, a wide variety of sugars and salts,
antibiotics, and other media additives.
10. Product Use Limitation & Warranty
Unless otherwise indicated, this product is for research use only. Purchase of Qbiogene, Inc. products does
not grant rights to reproduce, modify, or repackage the products or any derivative thereof to third parties.
Qbiogene, Inc. makes no warranty of any kind, expressed or implied, including merchantability or fitness for
any particular purpose, except that the products sold will meet our specifications at the time of delivery.
Buyer’s exclusive remedy and the sole liability of Qbiogene, Inc. hereunder shall be limited to, at our discretion, no replacement or compensation, product credits, refund of the purchase price of, or the replacement of materials that do not meet our specification. By acceptance of the product, Buyer indemnifies and
holds Qbiogene, Inc. harmless against, and assumes all liability for, the consequence of its use or misuse
by the Buyer, its employees or others, including, but not limited to, the cost of handling. Said refund or
replacement is conditioned on Buyer notifying Qbiogene, Inc. within thirty (30) days of receipt of product.
Failure of Buyer to give said notice within thirty (30) days shall constitute a waiver by the Buyer of all claims
hereunder with respect to said material(s).
11. Trademarks and Patents
BIO 101® Systems and RPM® are registered trademarks of Qbiogene. MiniPrep Express™, Molecular
Biology Certified™, PhoenIX™ and RapidPURE™ are trademarks of Qbiogene.
PhoenIX™ plasmid purification materials are covered under U.S. Patent # 5, 843, 312 and foreign equivalents
16
visit us on the web at www.qbiogene.com
PhoenIX™ Midiprep Kit
Appendix I: PhoenIX™ Midiprep Quick Reference Protocol
Protocol Step
High Copy Midiprep
Add Equilibration Buffer to Column
Resuspend Pellet in Cell Resuspension
Low Copy Midiprep
10 ml
Buffer (with RNase A)
4 ml
8 ml
Add Lysis Buffer
4 ml
8 ml
Add Neutralization Buffer
4 ml
8 ml
Centrifuge
Apply Lysate to Column
12,000 x g for 10 minutes
~ 12 ml
Add Column Wash Buffer
2 x 10 ml
Add Elution Buffer
5 ml
Add Isopropanol
Centrifuge
3.5 ml
12,000 x g for 30 minutes at 4°C
Wash with 70% EtOH
Centrifuge
Air-dry pellet
Resuspend DNA
~ 24 ml
3 ml
12,000 x g for 5 minutes at 4°C
10 minutes at room temp
200 µl
100 µl
Appendix II: PhoenIX™ Midiprep Diagnosis Protocol
Starting Notes
If a high copy plasmid that is expected to yield a high amount of plasmid DNA still does not produce enough
DNA after the suggestions in section 7.1 are followed, perform the PhoenIX™ Midiprep Diagnosis Protocol
to determine if the problem lies with the supplied reagents or the procedure itself.
Before beginning, verify that RNase A (red cap) has been added to the Cell Resuspension Buffer (yellow cap
label) and that no precipitate can be seen in the Lysis Buffer (blue cap label). See Sections 4.3 and 4.4.
Diagnosis Protocol
1. Place PhoenIX™ Midi column in the assembled Disposable Column Rack. Place a waste container
underneath that will hold > 50 ml.
visit us on the web at www.qbiogene.com
17
PhoenIX™ Midiprep Kit
2. Add 10 ml of Equilibration Buffer (gray cap label) to the surface of the column and allow the liquid to
drain by gravity flow.
Note: It will take 10-15 minutes for the column to drain completely. During this process, proceed to Step 3.
3. Pellet 25 ml of a 1 - 5 x 10⁹ cells/ml bacterial culture (see section 4.3) by centrifugation at 6,000 x g
for 15 minutes at room temperature.
4. Remove all traces of liquid medium from the bacterial cell pellet with a pipette.
Note: If traces of culture medium remain with the cells, the ratio of salts and pH values will not be optimal
in subsequent steps.
5. Add 4 ml of RNase A-containing Cell Resuspension Buffer (yellow cap label) to the cell pellet and vortex
until completely resuspended.
6. Transfer resuspended cells to a centrifuge tube that can hold > 12 ml of liquid and can withstand
12,000 x g.
7. Add 4 ml of Lysis Buffer (blue cap label) and securely cap the tube. Mix thoroughly by inverting until the
lysate appears to be homogeneous (5-6 inversions). DO NOT VORTEX.
8. Incubate 5 minutes at room temperature.
Note: Do not incubate for longer than 5 minutes or plasmid DNA might become irreversibly denatured.
9. Add 4 ml of Neutralization Buffer (green cap label). Securely cap the tube and mix immediately by multiple inversions until a homogeneous suspension containing no viscous matter is obtained. DO NOT
VORTEX.
Note: If preparing several samples at once, thoroughly mix each sample immediately after the addition of
the Neutralization Buffer before adding the buffer to the next tube.
10. Centrifuge the thoroughly mixed sample at ≥ 12,000 x g for 10 minutes at room temperature.
Note: If a room temperature centrifuge is not available and sample is centrifuged at 4°C, the supernatant
must be allowed to warm to room temperature (18 – 25°C) prior to loading on the PhoenIX™ Midi
Column.
11. Verify that the Equilibration Buffer has been collected in the waste container beneath the PhoenIX™
Midi Column. Discard the flow-through and replace the container.
18
visit us on the web at www.qbiogene.com
PhoenIX™ Midiprep Kit
12. Remove 480 µl of cleared lysate from step 10 and transfer it to a separate 1.5 ml microcentrifuge tube.
THIS IS DIAGNOSIS SAMPLE #1.
13. Use a pipette to remove the remainder of the cleared lysate supernatant from the centrifuged sample
and add to the top of the equilibrated column. Allow the lysate to drain by gravity flow (10-12 minutes).
Note: Do not pour lysate directly onto the column. Use a pipette to ensure that precipitate particles do not
enter the column and cause clogging.
14. Mix the flow-through of the column well and remove 480 µl to a separate 1.5 ml microcentrifuge tube.
THIS IS DIAGNOSIS SAMPLE #2. Discard the remainder of the flow-through and replace the collection
container.
15. Add 10 ml of Column Wash Buffer (orange cap label) to the top of the column and allow the liquid to
drain by gravity flow. Mix the flow-through of the column well and remove 900 µl to a separate 1.5 ml
microcentrifuge tube. THIS IS DIAGNOSIS SAMPLE #3. Discard the remaining flow-through and replace
the empty collection container.
Note: If any drops of liquid from the cleared lysate (added in step 13) remain on the plastic walls of the
column, wash them down into the column with the 10 ml of Column Wash Buffer.
16. Repeat the wash in step 15 with a second application of 10 ml of Column Wash Buffer (orange cap
label). Mix the flow-through of the column well and remove 900 µl to a separate 1.5 ml microcentrifuge
tube. THIS IS DIAGNOSIS SAMPLE #4.
Note: Do not add the second application of Column Wash Buffer until the first wash has run completely
through the column.
17. Discard the remaining flow-through from the second wash and replace the collection container with a
new centrifuge tube that can hold > 15 ml of liquid and can withstand 12,000 x g.
18. Add 5 ml of Elution Buffer (pink cap label) to the top of the column. Allow the eluate to drain by gravity
flow (5 minutes) into the centrifuge tube.
19. Mix the eluted solution well and remove 900 µl to a separate 1.5 ml microcentrifuge tube. THIS IS DIAGNOSIS SAMPLE #5.
20. If completion of the protocol is desired, add 3.5 ml of Isopropanol to the remainder of the eluted solution in the centrifuge tube. Mix and centrifuge at 12,000 x g for 30 minutes at 4°C. Continue with steps
17-21 of the main protocol in section 5.
visit us on the web at www.qbiogene.com
19
PhoenIX™ Midiprep Kit
Precipitation of Diagnosis Samples
Diagnosis samples #1-5 must be precipitated with 0.7 volumes of isopropanol. After centrifugation in a
chilled microcentrifuge for 30 min at ≥ 14,000 x g, allow all liquid to drain from the pellets by inverting the
open tubes for at least 5 min on a sheet of absorbent paper towel. Washing the pellets with 70% ethanol
is not necessary. Dry the nucleic acids further under vacuum for 5 - 10 minutes. Do not over-dry the pellets. Dissolve the nucleic acids in 30 - 50 µl water or TE buffer for 10 minutes at 37°C.
Testing of Diagnosis Samples #1 – 5
Remove 50% of the volume from Diagnosis Sample #5 (from the elutate) and save for spectrophotometric
analysis. Add electrophoresis loading dye to the remainder of Sample #5, and to all of samples #1-4, and
run on a 0.8% agarose gel.
Expected results for Diagnosis Samples #1 – 5
Significant amounts of DNA can normally be expected only in Diagnosis Samples #1 (original cleared lysate)
and #5 (eluate).
Diagnosis Sample #1 (from the cleared lysate) represents the amount of DNA present in 1 ml of the bacterial culture. It allows an estimation of the overall plasmid content and yield of the culture. If yield is lower
than expected, optimization of the culture conditions (medium, temperature, time, etc.) may be required.
Diagnosis Sample #2 (from the lysate flow-through) represents the amount of DNA that did not bind to the
PhoenIX™ Midi Column. Only degraded RNA should be visible: No (or only a faint) DNA band should be seen
on the gel. If you get a DNA band nearly as intense as in Diagnosis Sample #1, the cleared lysate was likely
not at the right salt concentration or pH in order to allow optimal DNA binding. Follow the guidelines in the
Troubleshooting section of the instruction manual. If necessary, the volume of Neutralization Buffer can be
reduced by 10%.
Diagnosis Sample #3 (from the first column wash) should only contain degraded RNA and some or no traces
of plasmid DNA. Diagnosis Sample #4 (from the second column wash) should not contain more than traces
of nucleic acid. If you encounter significant amounts of DNA in the wash fractions, the salt content of the
Column Wash Buffer may be too high. Ensure the correct bottle was used, or prepare new wash buffer
(Contact Qbiogene’s Technical Support Department).
Diagnosis Sample #5 (from the eluate) represents the final amount of plasmid DNA recovered. The plasmid
DNA in the eluate should be free of genomic DNA, RNA and be mostly supercoiled. If you get no DNA in the
eluate and little to no DNA in the lanes 2, 3 and 4, ensure the correct bottle was used or prepare new elution solution (Contact Qbiogene’s Technical Support Department).
20
visit us on the web at www.qbiogene.com
PhoenIX™ Midiprep Kit
Appendix III. PhoenIX™ Buffer Compositions
Cell Resuspension Buffer
Lysis Buffer
Neutralization Buffer
Equilibration Buffer
Column Wash Buffer
Elution Buffer
[50 mM Tris HCl pH 8.0, 10 mM EDTA]
[200 mM NaOH, 1.0 % SDS (w/v)]
[3.1 M potassium acetate, pH 5.5]
[600 mM NaCl, 100 mM sodium acetate pH 5.0, 0.15 % Triton® X-100]
[800 mM NaCl, 100 mM sodium acetate pH 5.0]
[1250 mM NaCl, 100 mM Tris pH 8.5]
visit us on the web at www.qbiogene.com
21
PhoenIX™ Midiprep Kit
NOTES
22
visit us on the web at www.qbiogene.com


![[SU1.02.01] Notice d`utilisation du module Europlexus](http://vs1.manualzilla.com/store/data/006361860_1-614bf4408ab2aa41c7326b4178565873-150x150.png)