1
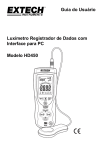
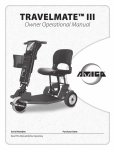
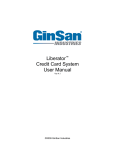
AMIGO® REAR DRIVE PRODUCTS
O P E R AT I O N A L M A N U A L
For Amigo® RT Express, Amigo® RT Express Junior, Amigo® RD,
Amigo® EXT350, Amigo® HD450
Serial Number: R ea d T h is M a n ua l Befor e O perati ng
Purchase Date:
TABLE OF CONTENTS
Safety First
3
Location of Controls
4-5
Adjusting Your Amigo
5-6
Operating Your Amigo
6-7
Riding Your Amigo
7-9
Safety Warnings
9
Helpful Hints for Everyday Use
10
Battery Information &
Charging Instructions
10-13
Cleaning Instructions
13
Maintenance
13-15
Troubleshooting16
Electromagnetic Interference
17
A new industry began in 1968, when Amigo
revolutionized mobility for people with walking
limitations. Amigo power-operated vehicles
(POVs) quickly became a household name for
their ease of operation and maneuverability.
Ever since our first creation, Amigo has
worked hard to bring comfort, freedom and
satisfaction to our customers.
In 1977, the United States Social Security
Act was amended to include the Amigo
power-operated vehicle as an official medical
mobility device, creating new opportunities
for accessibility by Medicare clients across the
nation. Worldwide, more people than ever are
discovering the Amigo lifestyle.
We would like to take this opportunity to thank
you for choosing Amigo. Amigo is committed
to providing you with personalized, innovative
electric mobility products and customer
satisfaction, today, and into the future.
Wiring Diagrams
18-19
Sincerely,
Exploded Views
20-22
Amigo Mobility International, Inc. (AMI)
Parts Lists
23-25
Warranty
26
Amigo® RT Express Jr.
Welcome to the Amigo family of active
and independent people. For thousands of
individuals around the world, Amigo provides
the opportunity to enjoy life more fully.
We are confident that the following instructions
and helpful hints will make your Amigo an
extremely useful and reliable “friend.”
Because we are concerned about your health
and safety, please read this manual carefully
before operating your vehicle. Once you’ve
learned to use your Amigo properly, you
will discover a world of enjoyment and
independence. Wishing you happiness and
good health from all of us at Amigo.
Amigo® RT Express
Amigo Mobility International, Inc. (AMI)
disclaims any responsibility for personal
injury or property damage resulting from the
improper or unsafe use of its products.
Amigo® RD
Amigo® HD450
Amigo® EXT350
SAFETY FIRST
For your convenience and understanding, signal words are defined below:
WARNING IS USED TO INDICATE THE PRESENCE OF A HAZARD, WHICH CAN CAUSE SEVERE
PERSONAL INJURY, DEATH OR SUBSTANTIAL PROPERTY DAMAGE IF THE WARNING IS IGNORED.
CAUTION IS USED TO INDICATE THE PRESENCE OF A HAZARD WHICH WILL OR CAN
CAUSE MINOR PERSONAL INJURY OR PROPERTY DAMAGE IF THE WARNING IS IGNORED.
Safety Suggestions
Use the following guidelines for the safe operation and use of your Amigo. Should you have any questions
about the safe operation of your vehicle, please contact your Amigo dealer. If you are in doubt about your
ability to operate your Amigo, consult your personal physician.
DO
• Read the operating manual before using your Amigo.
• Always turn the key switch OFF before getting on or off your Amigo.
• When transferring off your Amigo, make sure the seat lock is in the locked position.
• Always remain seated while the vehicle is in operation.
• Keep legs on the platform while driving.
• Drive to a complete stop before attempting to reverse.
• Always drive in a slow, sensible manner while pedestrians are around.
• Drive slowly while turning and on inclines.
• Always drive straight up and down inclines.
• Always be careful when maneuvering on inclines or ramps. Not all ramps are constructed according to
federal standards. The federal standard for wheelchair ramps is one-inch (2.5 cm) rise per foot (30 cm).
• Avoid sudden starts while the handle is turned sharply.
• Always approach obstacles at a low speed if you are to drive over them.
• Be aware of mechanical pinch points, especially when assembling and disassembling your Amigo.
• Always drive with the power seat lift in its lowest position.
• Always lock seat during vehicle operation.
TURNING THE KEY OFF WHILE IN MOTION WILL
BRING THE AMIGO TO AN ABRUPT STOP.
www.myamigo.com
3
DO NOT
• Do not exceed the maximum weight capacity. Exceeding the weight capacity voids your warranty and may result in personal injury and damage to your Amigo. Amigo will not be responsible for injuries and/or property damage resulting from failure to observe weight limitations.
• Do not drive over or off obstacles more than 1 inch (2.5 cm) high. This could be unsafe and could damage your Amigo.
• Do not turn your Amigo at high speeds, as this could result in tipping.
• Do not reverse down a steep hill or incline.
• Do not park on inclines or declines.
• Do not sit on the unit in a moving vehicle.
• Do not allow anyone to ride with you.
• Do not operate your Amigo near stairs, steps, curbs or terraces where you might accidentally drop a wheel off the edge.
• Do not operate your Amigo on streets or other areas with vehicular traffic.
• Do not disengage your motor brake on a slope.
• Do not leave the manual brake release on in freewheeling position.
• Do not disengage the motor brake while someone is on the vehicle.
• Do not remove handle from steering column when transporting your Amigo. Instead, fold the handle down to the seat. Place the handle down so the HI/LO speed adjustment knob or the TouchTron controls will not be damaged.
Tighten the knob to secure the handle.
• Do not use the handle to assist in transferring.
• Do not lift rear section of platform by holding the rear wheel.
• Do not expose your Amigo to spray-on cleaning solutions and excessive moisture such as spraying it with
a garden hose, shower or leaving it uncovered in heavy rain.
• Do not push or force the retractable cord reel into the rear cover.
AMI is not responsible for any damage or injury incurred due to the improper or unsafe use of the POV. AMI specifically
disclaims responsibility for any bodily injury or property damage that may occur during any use, which does not comply
with applicable federal, state or local laws or ordinances.
LOCATION OF CONTROLS
1. Accelerator lever (right and left)
3. Battery status gauge
4. ON/OFF key switch
5. Rabbit button – press to increase speed
6. Turtle button – press to decrease speed
7. Left turn indicator light button
9
5
2. HI/LO speed adjustment knob
3
10
4
6
11
7
12
8
1
8. E/M brake release button – press twice
9. Speed gauge – indicates level of speed
10. Power seat lift (PSL) UP button –
press to raise seat
11. Power seat lift (PSL) DOWN button –
press to lower seat
12. Right turn indicator light button
4
14
15
13
TouchTron handle
14
3
13. Front headlight and rear tail lights button
14. Horn button
15. Forward and reverse diagrams for accelerator levers
2
1
15
4
www.myamigo.com
HI/LO speed adjustment handle
HI/LO Speed Adjustment Handle
Handle controls include: HI/LO speed adjustment knob, ON/OFF key switch, battery status gauge and horn button. The
ON/OFF key switch, located on the right side of the handle control cover, will turn the power of the Amigo ON or OFF.
Turning the Amigo OFF may be used for emergency stops. Turning OFF the Amigo will also prevent drainage of batteries
and unauthorized use. The speed may be adjusted by turning the HI/LO speed adjustment knob.
TouchTron Handle
The TouchTron handle controls include: ON/OFF key switch, speed gauge (rabbit/turtle buttons),
battery status gauge, horn, headlight/rear tail lights, turn indicator lights, electromagnetic brake release and power seat lift.
To turn power ON, insert the key and turn it counterclockwise to the ON position. The ON/OFF key switch is on the right
side of the control cover. When the power is ON, the battery status gauge and speed gauge displays will light up, showing
the level of charge contained in your batteries and the last recorded speed setting prior to the Amigo being turned off.
Regulate your maximum speed with the rabbit and turtle buttons. To increase your top speed, press the rabbit button.
To lower the top speed, press the turtle button. Each segment in the speed gauge corresponds with approximately 15 to 20
percent of the maximum speed. Every time a button is activated on the touchpad, you will hear a “chirp.” The speed setting
has approximately 20 possible increments, so you may have to press the turtle or rabbit button several times to see
a change on the speed gauge. Continuous “chirping” sounds indicate highest and lowest speed settings.
The horn button should be used to avoid confrontation with pedestrians or other mobile entities. When using your Amigo at
night, turn the headlight ON, by pressing the light button. If you purchased the optional lighting package you will also have
tail lights and turn signals. Refer to the “High Intensity Light Package Operation” on page 7 for specific details
on using these features.
The electromagnetic brake release allows you to engage the freewheeling mode, enabling you to push the unit,
if necessary. Additional information on using the electromagnetic brake release can be found in the “Operating Your
Amigo” section on page 6.
Units with an optional power seat lift can raise or lower the seat height by pressing the seat button.
Please refer to the “Power Seat Lift Operation” on page 7, for specific instructions on using this feature.
ADJUSTING YOUR AMIGO
To adjust your Amigo to a comfortable driving position, you can alter the handle, seat and armrests as follows:
EZ-Tilt Handle Adjustment
To adjust the angle of the handle, turn the adjustment lever counterclockwise. Move the
handle to the desired position. Tighten the adjustment lever by turning it clockwise (Figure 1A).
The placement of the spring-activated adjustment lever, itself, can be moved out of the way for
your comfort. Pull the adjustment lever straight out. Turn in either direction. Release adjustment
lever at desired placement (Figure 1B).
DO NOT USE THE ADJUSTMENT LEVER FOR A FOOT REST.
SUCH USE MAY CAUSE THE ADJUSTMENT LEVER TO LOOSEN
THE HANDLE AND CAUSE PERSONAL INJURY.
Figure 1A
Seat installation
1. Unlock the seat lock.
2. Insert the upper seat post into the opening of the lower seat post.
3. Spin seat around to make sure it rotates freely.
4. To lock the seat, pull the seat lock lever toward the rear of the seat.
Figure 1B
www.myamigo.com
5
Adjusting Seat Height
Without a Power Seat Lift
To raise or lower your seat height, remove the nut and screw that
holds the seat collar in place on the seat post, then adjust and reinstall
in the desired hole on the seat post (Figure 2).
Figure 2
IT IS RECOMMENDED THAT THE SEAT LOCK BE INSTALLED IN THE
SECOND HOLE POSITION FROM THE SEAT ON A FOLDING SEAT
AND THE PREMIER II SEAT.
Seat Lock Lever
This allows the seat to rotate 360 degrees and lock in any position desired. The seat lock lever
is a bar with a vinyl cap on its end, located under the right or left side of the seat. Push the
lever forward to rotate to any position. Lock seat during vehicle operation.
Adjustable Armrest Width
The armrest width is determined by loosening the armrest knobs
and tightening them when the arms are at the desired width.
Forward
Flip Up Armrest
By pulling up on the end of either armrest, the armrest will flip back
for easy transfer in and out of the Amigo.
OPERATING YOUR AMIGO
Figure 3
To operate your Amigo, use the following procedures:
• For all Amigo rear drive models, the key switch is located on the
top of the handle. Insert and turn the key provided.
Reverse
• HI/LO: Adjust the speed adjustment knob to minimum (turn counterclockwise).
• TOUCHTRON: Adjust the speed to minimum (press turtle button).
•
Press the forward accelerator lever or the reverse accelerator lever to move the Amigo.
To move forward, pull the right side of the accelerator lever toward you (Figure 3).
You can also move forward by pushing the left side of the accelerator lever away
from you. To operate in reverse, pull the left side of the accelerator lever toward
you (Figure 4) or push the right side of the accelerator lever away from you.
Note: For optional “reverse polarity” handles, accelerator lever operation will be
the opposite – to move forward, pull the left side of the accelerator lever toward you or push the right side accelerator lever away from you. To move in reverse, pull the right side of the accelerator lever toward you or push the left side accelerator lever away from you.
• To stop, just release the accelerator lever and the vehicle will come to
a gradual stop within a few seconds after release.
• When the Amigo is used at night, you can turn the lights on
by pressing the light button (TouchTron only).
•
6
Figure 4
Manual brake
lever (Inside)
All models are equipped with a manual brake release lever.
To engage the freewheeling mode, push the brake lever forward. The freewheeling mode will allow you to push the unit,
if necessary. To terminate the freewheeling mode, pull the brake lever toward the rear of the Amigo (Figure 5). When pulled into “normal,”
the vehicle will be back into “drive” mode.
www.myamigo.com
Figure 5
Models with TouchTron controls have an additional electromagnetic brake
release button located on the handle (Figure 6). To electronically release
the electromagnetic brake, push the brake release button twice. The lowspeed segment of the speed gauge will blink to indicate you are now in
the freewheeling mode. To terminate the freewheeling mode when selected
electronically, activate any control button (except horn button)
on the TouchTron handle.
Brake Releases for Manual Pushing
Electromagnetic brake release (located on handle) – Figure 6
Manual brake lever (located on rear cover) – Figure 5
Electronic
brake
switch
Headlight/
Tail lights
Figure 6
Sleep Mode
A battery indicator and diagnostic system are incorporated into the touchpad of all Amigo rear drive models with a
TouchTron handle. The battery status gauge will be lit whenever the key is in the ON position. However, if the Amigo is
inactive for more than 25 minutes, the Amigo automatically switches to “sleep mode.” This feature substantially reduces
power to conserve battery capacity. To reactivate your Amigo, switch it OFF and then ON again to regain full function.
It is strongly recommended that you turn the key to the OFF position each time
Up
you are through using the Amigo to ensure the power is completely turned off.
Power Seat Lift Operation • Optional
To operate the power seat lift on Amigo models with a TouchTron handle,
press the seat/directional arrow buttons to raise or lower the seat (Figure 7).
To lift the seat to desired height, press the seat button with the arrow pointing
up. To lower the seat, press the seat button with the arrow pointing down.
The power seat lift can be activated only when you are not moving.
Always drive with the power seat lift in its lowest position.
Down
Turn indicator
Turn indicator
TO AVOID DAMAGING THE MOTOR OF THE POWER SEAT LIFT,
RELEASE THE SEAT BUTTON AFTER THE SEAT HAS REACHED ITS
HIGHEST OR LOWEST POINT.
Figure 7
High Intensity Light Package Operation • Optional
The optional lighting package available with the TouchTron handle includes a front headlight, rear tail lights
and turn signals. The power must be ON to operate the headlight or tail lights. The headlight and tail lights can
be activated by pressing the headlight button (Figure 6). Press this button again to turn the lights off.
The turn signals can be activated by pressing the left or right turn indicator buttons (Figure 7). Indicate a
“hazard” condition by pressing both turn indicator buttons. The power must be ON to operate the lights.
RIDING YOUR AMIGO
Be sure you are on a level surface. Insert the key in the switch, but leave the Amigo turned OFF.
Once seated, for safe transfer or driving, push seat lock lever forward (located under seat on the right side)
to easily position the seat as needed. Engage lever back to the locked position. Turn the speed adjustment knob
counterclockwise and turn the key to the ON position. Pull the right accelerator lever to start off in a forward motion.
To stop, simply let go.
www.myamigo.com
7
Basic Driving
Make sure you are properly seated and that the speed adjustment knob is turned fully counterclockwise.
Note: Reverse movement of vehicle may not occur when speed adjustment knob is turned fully counterclockwise.
Insert key into key switch and turn counterclockwise to the ON position. On handle, pull the accelerator lever
as described earlier. You will gently accelerate. The further you pull the accelerator lever, the faster you will go.
Release the lever and you will gently stop. Please note that reverse speed is slower than forward speed.
Practice these two basic functions until you get used to them.
Steering the Amigo is easy and logical. Just be sure to remember to give wide clearance when turning
so that the rear wheels clear any obstacle.
Shortcutting a sidewalk corner can cause the back wheel to go off the sidewalk. Avoid this at all times by steering
an exaggerated wide arc around the obstacle. If you must steer in a tight spot, such as entering a doorway
or when turning around, stop and then apply power gently. For more on maneuvering through obstacles,
see the next section.
Driving Through Doorways
Approach an unfamiliar door slowly. Does it have a knob or push bar? Does it open toward or away? Think in terms of
using the power of the Amigo to do the work for you. Hold the doorknob or bar in one hand and apply the power with the
other hand. If it is a self-closing door, you can go through allowing the door to close behind you. If it is not a self-closing
door, just stop when you are clear of the door and push it closed. If the door opens toward you, hold the knob or bar with
one hand and gently press on your reverse thumb lever and allow the gentle reverse power to do the work. When the door
is open wide enough, pull the forward accelerator lever moving forward, leaving your hand on the door to keep it
free of the Amigo and letting go as you pass the door jamb.
Driving On Ramps
With the ADA (Americans with Disabilities Act), buildings require ramps for POV (power-operated vehicle) access. Some
have U-turns in the middle where good cornering is required. Take wide swings with your front wheels around any tight
corners so the rear wheels follow a wide arc to stay clear of the corner. When you have stopped while facing uphill,
starting up again simply requires that you apply forward power. Accelerate gently after stopping on an incline.
When proceeding up a ramp or curb, lean forward in your seat for maximum stability and safety. Going down
any ramp or hill, drive slowly to ensure a safe descent.
Driving Over Grass, Gravel and Grades
The Amigo performs admirably in grass, gravel and on hills, but you must NOT exceed the parameters set down in this
manual. Please refer to the safety suggestions for use. Safety must come first. If you are unsure about any situation, avoid
it. Common sense is your best protection. Always act with caution. Feel free to use your Amigo on lawns or in park areas.
Avoid long unkempt grass; otherwise just follow the safety suggestions.
Transport
Amigos are NOT designed or tested for use as seats for users in private or public transporting vehicles. AMI advises against
transporting POVs in vehicles unless either the unit is dismantled and placed in the trunk of your car, or the assembled unit
is placed in the vehicle and strapped down. Any straps should be secured to non-removable parts of the unit, i.e. platform.
Even when strapped down, Amigos should not be used as seats in private or public transporting vehicles.
8
www.myamigo.com
To disassemble and transport your Amigo:
1. Turn your Amigo OFF.
2. Unlock the seat and remove it completely.
3. Remove the batteries.
4. Fold handle down to platform by loosening the handle adjustment knob.
5. Lift the rear into the trunk of the vehicle and slide the rest of the Amigo into the trunk.
6. The manual brake release lever must be in the “normal” position.
Note: when batteries are removed, the wheels will not rotate as long as the manual brake release lever is in the “normal” position.
7. Place seat and batteries into the trunk.
8. If your Amigo has a power seat lift, we suggest placing a cut out tennis ball or something similar over the
seat post to protect it.
Transport Your Amigo With A Lift-All ®
For greater convenience, obtain a Lift-All ® to assist you when loading and unloading. For more information
on the Lift-All®, contact your authorized dealer. We recommend using vans with ramps, not elevating van lifts.
Airline Travel
"Special Handling" tags are suggested when transporting your Amigo by air (figure 8). Visit
the support section of www.myamigo.com for a pre-designed tag. Non-spill, gel cell batteries
are approved for commercial airline travel by the Civil Aeronautics Board (CAB). When you
make your reservation, notify the airline and request escort assistance. This will assure that your
Amigo will be picked up and delivered at the boarding desk. For additional helpful hints for
airline travel, visit our website at www.myamigo.com.
Public Transportation
Some public transportation systems have accommodations for your Amigo.
If you must utilize public transportation (without the proper accommodations),
do not sit on the Amigo while the vehicle is in motion.
Figure 8
SAFETY WARNINGS
• The driving performance of your Amigo can be influenced by electromagnetic fields, such as emitted by cellular telephones and other emitting devices. We recommend the power on your unit be switched off when using such a device (refer to electromagnetic interference section for additional information).
• In some extreme circumstances, your Amigo’s performance could be affected by the electromagnetic field emitted from alarm systems in shops (refer to electromagnetic interference section for additional information).
• The Amigo is fitted with anti-tip devices, but this still means the maximum safe slope must not be exceeded.
In some extreme circumstances, anti-tippers may interfere with curb or obstacle climbing.
• The program settings in the controller should only be altered by factory trained service providers
in order to maintain safe driving functions.
www.myamigo.com
9
HELPFUL HINTS FOR EVERYDAY USE
WHEN TRANSFERRING OR NOT USING THE AMIGO,
WE RECOMMEND TURNING THE AMIGO TO THE OFF POSITION.
BATHROOM
In the bathroom, maneuvering room is usually limited. Back into bathroom, then position close to the toilet, swivel the seat,
lock it in position and transfer. When using the bathtub, back up parallel to the tub. Swivel the seat and place
your feet in the tub. Engage seat lock and carefully transfer.
DO NOT USE YOUR AMIGO WHILE TAKING A SHOWER. WATER MAY GET INTO THE MICROPROCESSING
CONTROLLER (MPC) AND CAUSE ELECTRONIC MALFUNCTIONS.
BEDROOM
To transfer to the bed, back up parallel to it. Swivel, lock seat into position and ease onto the bed. If charging the batteries
overnight, it may be easiest to plug in the battery charger before transferring. For added ease, when using a power seat lift,
raise your seat slightly higher than the surface to which you are transferring.
KITCHEN
For access to a refrigerator, make a parallel approach or back up to the outside of the refrigerator. Swivel the seat.
Approach a table, sink or stove by maneuvering parallel to it. Swivel the seat to the desired position.
The handle will be out of the way.
CAR
To transfer to a car, make a parallel approach to the side of the car, release the door latch and open the door as you drive
forward. Back parallel to the side of the car and into the door opening. Swivel the seat, lock it in position and carefully slide
onto the car seat. On the driver’s side, you can use the steering wheel for leverage.
USING AN ELEVATOR
Backing into an elevator allows you to exit forward. Be sure the elevator is level with the floor.
BATTERY INFORMATION &
CHARGING INSTRUCTIONS
Battery Information
For maximum range and life, it is recommended to fully charge the batteries before using. Extended charging is good for the
batteries and will not overcharge them. Amigos have an overcharge protection feature so that the batteries can be charged
anytime the Amigo is not being used. It is a popular misconception that batteries should be deeply discharged before
recharging. This is not the proper procedure for all batteries. They can actually be damaged if they are discharged too
deeply before recharging.
Battery range depends on driver weight, terrain and type of battery used. Charge your batteries daily when the
Amigo is used. Make sure that the charger cord is unplugged from the wall outlet before moving your Amigo.
10
www.myamigo.com
Batteries should be charged if the shortest segment bar on the battery status gauge is lit and blinking, along with a low,
chirping of the horn, at one-minute intervals. At the beginning of the charging process, the battery indicator light on the
handle will flash for approximately 20 seconds, then it will turn solid color. The batteries are fully charged when the tallest
bar on the far right is blinking. Your Amigo can be charged with the key in the ON or OFF position. The indication will
display only while in the charging mode (when power cord is plugged into AC outlet).
Charging Instructions for Amigo RD, RT Express,
RT Express Jr., EXT350 and HD450 Models
1. Place your Amigo near an AC outlet.
2. Pull gently on the cord reel plug in the rear cover near the rear bumper.
3. Pull as much cord as needed (up to 10 feet/3 meters) to reach the AC outlet.
4. Connect the cord reel plug to the AC wall outlet.
5. Upon completion of the charging process, unplug the cord reel plug from the AC wall outlet.
6. Gently tug on the cord to engage the retraction reel. Do not push cord into the hole in the rear cover.
Charging Frequency
• Charge batteries daily when the Amigo is used.
• If not in use for a long period of time, charge for 24 hours, every 30 days.
• Extended charging is good for the batteries and will not overcharge them.
Universal Charger Option
A universal charger is available on many Amigos sold outside the United States. The universal charger uses a range of
90-240 volts AC power input. This makes it possible to charge on any electrical system globally. (The universal charger is
an option on models in the U.S. for people who travel abroad and want this universal charging flexibility.) Your charger is
labeled, identifying which charging system it uses.
DO NOT USE A 24V CHARGER THAT IS CONFIGURED TO A 120V AC POWER INPUT OUTSIDE THE
U.S. IN COUNTRIES USING 220V AC POWER INPUT. DAMAGE WILL OCCUR TO THE CHARGER.
www.myamigo.com
11
Charger Standard Precautions
• Refer to these instructions frequently.
• Each time you use your charger, read and follow instructions exactly. Working in the vicinity of
a battery is dangerous. Batteries generate explosive gases during normal battery operation.
• Never smoke or allow an open flame in the vicinity of the battery.
• Use charger for charging a lead acid battery only. It is not intended to supply power to an
extra-low-voltage electrical system or to charge dry cell batteries.
• Do not operate charger in a closed-in area or restrict ventilation in any way.
• A spark near the battery may cause explosion.
To reduce risk of spark:
• Prevent external damage to AC and DC cords.
• When connecting charger, connect DC charging cord to the battery charge plug before
connecting charger AC cord to electrical outlet.
• When disconnecting charger, always do so in reverse sequence of connecting procedure.
Break first connection as far away from battery as possible.
•Be extra cautious not to drop a metal tool onto the battery(ies).
• Remove jewelry.
FAILURE TO FOLLOW THESE SAFETY INSTRUCTIONS MAY RESULT IN PERSONAL INJURY OR PROPERTY DAMAGE.
IF YOUR BATTERIES ARE DAMAGED AND A LEAK IS APPARENT, CALL YOUR AUTHORIZED DEALER IMMEDIATELY.
UNDER NO CIRCUMSTANCES SHOULD YOU TOUCH THE BATTERIES IF THEY ARE LEAKING.
Battery Storage
All the Amigo rear drive models use a battery system that allows the batteries to be removed after they have been
disconnected from the platform battery connections. Each battery has a wire assembly with a two-position connector that
slides into the connector mounted to the platform. The connection system is designed so that either battery may be placed on
either side of the unit. Always turn your Amigo OFF before removing and installing batteries.
TO AVOID DAMAGE TO BATTERIES DURING STORAGE, DO NOT PLACE THEM END-TO-END
WITH THE POSITIVE (+) AND NEGATIVE (-) TERMINALS NEXT TO EACH OTHER (FIGURE 9).
Figure 9
12
www.myamigo.com
If you remove your batteries from your Amigo, put them on a surface that cannot be damaged by acid fumes. Whenever a
battery is charged and discharged through a cycle, it breathes. The breathing of the battery emits acid fumes into the cloth
strap (used to lift the batteries on rear drive models) and may mark surfaces it rests on for long periods of time. Store batteries
indoors in a dry environment, away from any open flames. Temperature range is 0˚C (32˚F) to 40˚C (104˚F).
CLEANING INSTRUCTIONS
Tires
The tires should be cleaned with ordinary kitchen-type cleaners and a damp cloth.
Don’t use solvents on tires as they cause tire material to break down or become too soft.
Cover
The cover of the Amigo is constructed of ABS plastic and coated with a durable automotive type finish. Therefore, the cover
can be easily cleaned. Apply water directly on a cloth, wring, and use the dampened cloth with mild soap to remove dirt
and oils. Use same application to rinse off soap residue in order to eliminate any film build-up. You may also use this same
procedure to clean under the cover by fully removing it (see Fig. 10). DO NOT spray the entire vehicle with water. This will
damage the electrical parts. The cover may be waxed with car body wax and buffed by hand with a soft cloth.
Seat
The vinyl seat can be cleaned with a mild soap or detergent and a damp cloth. A vinyl cleaner can also be used.
Cloth seats can be cleaned with a damp cloth or as any upholstery. Care should be taken not to soak cloth seats,
as the interior foam rubber will hold water.
Floor Mat
The floor mat should be cleaned with ordinary kitchen-type cleaners and a damp cloth.
Do not use solvents on the floor mat, as they may cause the floor mat material to break down.
KEEP CLEANING SOLVENTS AWAY FROM ELECTRICAL WIRES AND CONNECTIONS.
MAINTENANCE
Minimum maintenance should prevent unnecessary repairs. You will get years of dependable operation
if you follow the suggested maintenance schedule. Check the following:
Daily
Charge batteries daily when the Amigo is used. Charge the battery until fully charged to ensure
proper battery operation. Extended charging is good for the batteries and will not overcharge them.
Monthly
• Check and clean battery terminals and the wire connections as needed with a light piece of emery cloth or
brush and mixture of ½ cup baking soda to 1–1½ cups water.
• Clean upholstery, plastic and metal with a mild surface cleaner.
• Inspect batteries for any cracks or damage of any kind.
• Check and tighten any exposed fasteners.
• Make sure all fasteners are tight on all battery connections.
• Check tire pressure on pneumatic tires. When air filling tires, always refer to the manufacturer’s specifications
located on the face of the tire. Uneven tire pressure will cause excessive battery consumption and the overheating
of the controller that will lead to failure of the vehicle.
• Check static ground wire located under vehicle. Replace if damaged or missing. Wire must be in contact with floor
when operating the Amigo.
• If rubber boot on arm rest joint is missing, replace immediately.
www.myamigo.com
13
KEEP CLEANING SOLVENTS AWAY FROM ELECTRICAL WIRES AND CONNECTIONS.
DO NOT EXCEED PROPER INFLATION LEVEL SPECIFIED ON TIRE OR TIRES MAY BE DAMAGED.
Six Months
• Check all screws and clips (that are holding wheels) for tightness and wear.
• Check all electrical connections for clean, tight contact.
• Charging connection should be inspected for tight connection.
• Check tires for wear. • Inspect seat posts for wear.
• Lubricate seat bearings on upper seat post.
Yearly
• Have your authorized service center check your Amigo completely.
• Grease axle and wheel hubs.
• Lubricate steering column bearings.
Checking the General Condition
For maintenance operations, consult your authorized dealer who has all the necessary information. Once a year have
the authorized dealer inspect your vehicle thoroughly and carry out in depth maintenance. Regular maintenance allows
defective or worn parts to be identified and improves the normal operation of the vehicle and extends its working life.
Removing the rear cover
The Amigo RD, EXT350 and HD450 units have a hinged rear cover (Figure 10).
To open cover: Tilt the handle fully forward. Pull cover off of the pins in the rear,
lift the cover over the seat post and tilt cover forward.
Note: It is important to adjust the handle fully forward,
to prevent scratching the rear cover on the handle screws.
To close cover: Reposition the handle to a comfortable position. Simply tilt cover
rearward, guide cover over the seat post, and place cover on the pins in the rear.
Note: It is important to ensure that the power cord is fully retracted,
and not loose, after the cover is repositioned back into place.
Figure 10
Lighting
The Amigo is equipped with a headlight, and with optional tail lights and turn signals. To replace the headlight bulb, twist
the gray rubber part of the light assembly counterclockwise and remove. Bulbs come straight out (do not twist bulbs) of
fixture and should be replaced in reverse order. The rear turn signals and tail lights must be completely replaced.
Battery Maintenance
VRLA deep cycle batteries are used for operating your Amigo. They are maintenance-free and are transportable on
aircraft, buses, trains, etc. as there is no danger of spillage. By following the charger and battery procedures, you can
expect extended battery life.
Fasteners Replacement
Use only Grade 8 (US) or 12.9 DIN (metric) in all applications. For service and
replacement parts, we recommend Amigo authorized parts.
14
www.myamigo.com
UNIPAC ® Drive Systems
The UNIPAC ® drive is a precision assembly lubricated for long service. Do not attempt to open or
service the assembly, this will void the warranty.
Microprocessor Controller
Do not attempt to service the controller or related electronic components, as this will void the warranty.
Circuit Breaker Replacement Instructions
An automatic resetting circuit breaker protects the wiring and battery in the event of a short circuit.
If the Amigo stops, check for overloads or short circuits before continuing to operate.
The circuit breaker is located under the rear cover and attached to the positive
terminal on the batteries (Figure 11). If you suspect the circuit breaker is defective,
use a jumper wire between the two terminals of the breaker. If the Amigo runs now,
replace the circuit breaker.
DO NOT CONTINUE TO OPERATE THE AMIGO UNTIL
THE CIRCUIT BREAKER IS REPAIRED.
Note: Tampering with electrical or mechanical parts will invalidate your warranty.
CIRCUIT BREAKER
(PART NO. 7441)
Figure 11
TROUBLESHOOTING
All Amigos covered in this operational manual are equipped with an ASIC MPC Controller. This controller has a built-in
diagnostic feature that will cause the battery indicator light LED to flash a numeric code to indicate when there is a
service problem.
Under normal operating conditions the battery indicator LED will flash
to indicate three different situations.
1To indicate a low battery condition when driving.
2To indicate the battery charging cycle has started.
3To indicate when the batteries are fully charged during the charging cycle.
HI/LO speed adjustment handle
TouchTron handle
www.myamigo.com
15
ASIC MPC DIAGNOSTICS CODES
The Amigo is equipped with an ASIC MPC. This controller has a built-in diagnostic feature that will cause the diagnostic light LEDs
(located on either side of the battery gauge) to flash a numeric code indicating service issues and to aid in diagnoses. When indicating
a service problem, the diagnostic light LEDs will flash, hesitate for a moment, and then flash again. Follow the code listings below to
determine the problem. If the code indicates a service problem, contact your local service representative or call the Amigo service
department at (800) 248-9131 for instructions to verify and correct the problem.
* *Note: First solution listed for each diagnostic code will fix that problem 80% of the time. Attempt solutions in the order listed.
CODE CAUSE
16
SOLUTIONS
1-1
EM Brake windings or
connections are shorted
(1)Unplug handle cable and plug back in.
(2) Check all wiring connections and output.
(3) Disconnect brake and cycle key, if code changes to 1-2, replace brake.
(4) Replace controller.
1-2
EM Brake windings or
connections are open or
EM brake release lever in
"freewheeling position"
(1)Ensure EM brake lever is in drive position.
(2) Unplug handle cable and plug back in.
(3) Check all wiring connections and output.
(4) Replace brake.
(5) Replace controller.
2-1
Motor windings or connections
are shorted
(1)Check motor wiring connections.
(2) Check running light (shorts).
(3) Disconnect brake and cycle key, if code changes to 2-2, replace motor.
(4) Replace controller.
2-2
Motor windings or connections
are open or EM brake release
lever in "freewheeling position"
(1)Ensure EM brake lever is in drive position.
(2) Check motor wiring connections.
(3) Replace motor.
(4) Replace controller.
2-3
Power shortage
(1)Check/replace batteries.
(2) Check/replace charger & charge wires.
(3) Check/replace controller.
2-4
PSL motor short
(1)Unplug unit and plug back in.
(2) Check PSL wiring and connections.
(3) Disconnect motor and cycle key, if code goes away, replace motor.
(4) Check/replace controller.
3-1
Over temperature condition
(1)Allow to sit idle for 15 minutes, restart and see if code disappears.
(2) Ensure EM brake and/or motor is not causing excessive amperage draw.
(3) Replace controller.
4-1
Charger is supplying too
much voltage during the
battery charge cycle
(1) Replace battery charger if voltage is 32 volts or higher.
(2) If 31 volts or lower, replace controller.
4-2
Charger not dropping back
into "float mode" during
battery charging cycle
(1) Replace charger wiring.
(2) Replace battery charger.
(3) Replace controller.
5-1
Controller drive FETS shorted
(1)Replace controller.
5-2
Controller regenerative
braking FETS shorted
(1)Replace controller.
5-3
Throttle potentiometer or
throttle circuitry reading fail
band fault
(1)Check to ensure handle cable is in good condition.
(2) Check that throttle lever moves freely and returns to center.
(3) Replace throttle potentiometer.
5-4
Requires software revision
(1)Replace controller.
5-5
Component failure
(1)Replace controller.
www.myamigo.com
ELECTROMAGNETIC INTERFERENCE
RADIO WAVE SOURCES MAY AFFECT POWERED MOBILE VEHICLE CONTROL.
Electromagnetic Interference (EMI) From Radio Wave Sources
Power-operated vehicles (POV) may be susceptible to electromagnetic interference (EMI), which is interfering electromagnetic
energy (EM) emitted from sources such as radio stations, TV stations, amateur radio (HAM) transmitters, two-way radios and
cellular phones. The interference (from radio wave sources) can cause the POV to release its brakes, move by itself, or move
in unintended directions. It can also permanently damage the POV’s control system. The intensity of the interfering EM energy
can be measured in volts per meter (V/m). Each POV can resist EMI up to a certain intensity. This is called its “immunity
level.” The higher the immunity level, the greater the protection. At this time, current technology is capable of achieving at
least a 20 V/m immunity level, which would provide useful protection from the more common sources of radiated EMI. The
immunity level of this POV is not known.
There are a number of sources of relatively intense electromagnetic fields in the everyday environment.
Some of these sources are obvious and easy to avoid. Others are not apparent and exposure is unavoidable.
However, we believe that by following the warnings listed below, your risk to EMI will be minimized.
The sources of radiated EMI can be broadly classified into three types:
1.
Handheld portable transceivers (transmitters-receivers) with antenna mounted directly on the transmitting unit.
Examples include: citizens band (CB) radios, “walkie talkie,” security, fire and police transceivers,
cellular telephones and other personal communication devices.
Note: Some cellular telephones and similar devices transmit signals while they are ON, even when not being used.
2.
Medium-range mobile transceivers, such as those used in police cars, fire trucks, ambulances and taxis.
These usually have the antenna mounted on the outside of the vehicle.
3.
Long-range transmitters and transceivers, such as commercial broadcast transmitters (radio and TV broadcast
antenna towers) and amateur (HAM) radios.
Note: Other types of handheld devices, such as cordless phones, laptop computers, AM/FM radios, TV sets, CD players and cassette players and small appliances such as electric shavers and hair dryers, so far as we know, are not likely to cause EMI problems to your POV.
POV Electromagnetic Interference (EMI)
Because EM energy rapidly becomes more intense as one moves closer to the transmitting antenna (source), the EM fields
from handheld radio wave sources (transceivers) are of special concern. It is possible to unintentionally bring high levels of
EM energy very close to the POV’s control system while using these devices. This can affect POV movement and braking.
Therefore, the warnings listed below are recommended to prevent possible interference with the control system of the POV.
Warnings
Electromagnetic Interference (EMI) from sources such as radio stations, TV stations, amateur radio (HAM) transmitters,
two-way radios and cellular phones, can affect electric vehicles. Following the warnings listed below should reduce the
chance of unintended brake release or mobile vehicle movement, which could result in serious injury.
1.
DO NOT operate or turn ON handheld personal communication devices, such as Citizens Band (CB) radios
and cellular phones while the vehicle is turned on.
2.
Be aware of nearby transmitters, such as radio or TV stations and try to avoid coming close to them.
3.
If unintended movement or brake release occurs, turn the vehicle off as soon as it is safe.
4.
Be aware that adding accessories or components or modifying the vehicle may make it more
susceptible to interference from radio wave sources.
Note: There is no easy way to evaluate their effect on the overall immunity of the vehicle.
5.
Report all incidents of unintended movement or brake release to the mobile vehicle manufacturer,
and note whether there is a source of EMI nearby.
1.
20 volts per meter (V/M) is a generally achievable and useful immunity level against EMI
(as of May 1994). The higher the level, the greater the protection.
2.
The immunity level of this product is not known.
Important Information
www.myamigo.com
17
WIRING DIAGRAMS
HI/LO Handle Controls
(for RD, RT and HD models)
18
www.myamigo.com
WIRING DIAGRAMS
TouchTron Handle Controls
(for RT and RD models only)
www.myamigo.com
19
EXPLODED VIEWS
RT EXPRESS
9855-STANDARD SET
9856-2" HIGHER SET
9699
300369
210203
210204-SET
9247
9250
10301
10765.20
11311
9980.10
9992.20
10065.10
1253
1036
267001
1299
2788
1450
1025
9936
8221.15
8223.16
1081
1254
4075
9248
9251
1444
1180
1344
3083
6191
11087
11236
3083
7361.30
5190
10702
10707
10711
10712
11365
11366
11375
11462
10539
8969
9768
7441
9798
2822
10710
7852.10
7599
9766
1344
9307.20
8300
10050
7541
7773
1192
8675
1192
10554
10580
1192
11556
8534
10585
5865
8216
7600
8670
10516
10976
10335.20
10336.20
11361.20
11381.20
1479
5630
1264
11466
7281
6227
2433
8944
10970
10971
10289
11041
8890RT
11289
8417
9950
10571.20
10568
11174
11082
11355
10548
9005
9300RT
7220
3083
7852
10709
2237
11320.20
6505
20
www.myamigo.com
10177
EXPLODED VIEWS
REAR DRIVE
9855-STANDARD SET
9856-2" HIGHER SET
210203
210204-SET
9699
9967.20
10347.20
10661.20
10662.20
300369
9247
9250
10301
10765.20
11311
1344
1180
1253
300514
1036
267001
1299
2788
1450
1025
4075
1081
1254
8221.15
8223.16
9248
9251
1444
6191
9936
3083
7361.30
11087
11236
11355
8669
9950
10289
11466
7281
11040
1192
1344
10516
10335.20
10336.20
11361.20
11381.20
10567
10591
10594
10595
11364
11374
1192
6227
8944
8216
11104
11289
8969
7852.10
5190
10976
9768
7773
8675
1192
4953
10585
5865
8890RD
8534
10554
8694
11174
11264
8417
6993
3083
7541
7599
6463
10571.20
8670
7600
3083
9766
7441
9798
2822
269002
10539
10050
8300
10513
10548
9005
9300RD
7220
7852
3083
10511
2237
10690
6505
9401
10177
www.myamigo.com
21
EXPLODED VIEWS
HD450 & EXT350
9856-SET
9497
10347.20
10980.20
210203
210204-SET
9250
10301
11081.20
11311
1444
9251
1344
300514
1036
1253
267001
9983.30
9983.31
1450
1025
4075
1081
1254
6191
9936
8223.16
3083
7361.30
8669
11087
11236
11355
9950
10571.20
7599
6463
11264
11174
4953
8417
6993
11466
3083
7281
10335.20
8944
10940HD
1192
1344
10585
11289
11175
8216
10516
8969
7852.10
8534
10568
5190
8675
1192
10595
10554
10976
269002
8300
10050
10514
10511
2237
10690
6505
22
www.myamigo.com
9766
2822
10539
9768
7773
7441
7541
1192
11043
10289
8670
7600
3083
8694
PARTS LISTS
#690000 RT EXPRESS PARTS LIST - AMI0071232 TO PRESENT
Part#
Description
1025
1036
1081
1180
1192
1253
1254
1264
1299
1344
1444
1450
1479
2237
2433
2788
2822
3083
4075
5190
5630
5865
6191
6227
6505
7220
7281
7361.30
7441
7541
7599
7600
7773
7852
7852.10
8216
8221.15
8223.16
8300
8417
8534
8670
8675
8890RT
8944
8969
9005
9247
9248
9250
9251
9300RT
9307.20
9699
9766
Bushing w/ Shoulder, 1 1/16 ID x 1 3/16 OD
Collar Stem
Bushing 1 3/16 OD x 1 Lg
Screw, Hex, 1/4-20 x 1 Lg
Washer, Flat, 9/32 ID x 5/8 OD
Nut, Hex, Keps, 5/16-18
Pin, Spring, 1/8 OD x 1 1/8 Lg
Nut, Hex, Keps, #10-32
Seat Lock Asm, RH
Screw, Hex, 1/4-20 x 1 1/2 Lg
Knob, Arm Adjustment
Screw, Hex, 5/16-18 x 2 1/2 Lg
Screw, Phillips, #10-32 x 5/8 Lg
Nut, Hex, 3/8-24
Screw, Phillips, #8-32 x 1 1/4 Lg
Seat Lock Asm, LH
Screw, Hex, 1/4-20 x 1 3/4 Lg
Nut, Hex Serrated Flange, 1/4-20
Screw, Flat Head Hex Socket, 1/4-20 x 2 Lg
Screw, Hex Socket, 1/4-28 x 3/8 Lg
Nut, Hex, Keps, #8-32
Screw, Shoulder, #10-24 x 1 1/4 Lg
Post, Lower Seat
Nut, Hex, Nylon Insert, #10-24
Screw, Hex, 3/8-24 x 4 1/2 Lg
Wire Asm Controller to PSL
Screw, Hex Socket, 1/4-20 x 7/8 Lg
Pot Asm, Health Care
Circuit Breaker, Auto Reset, 25 Amp
Wheel, Stability, 1 5/8
Rivet, Truss Head, 1/4 OD x 1 1/2 Lg
Nut, Push, 1/4 Stud
Cap, Vinyl Insulated
Wire Asm, Charger To Controller, Full Featured
Wire Asm, Charger To Controller
Charger, 3 Amp
Enclosure, Touch Tron
Enclosure, Hi/Lo w/ Battery Display
Strap, Battery Retaining
AC Cord Reel
Plug, Tube Square, 1"
Bracket, Bumper Wheel
Ground Wire Asm
Controller RT
Band, Controller and Charger Mounting
Cable, MPC Handle Control
Power Seat Lift (PSL)
Arm Asm, Right, Removable
Arm Asm, Left, Removable
Arm Asm, Right, 2" Higher Removable
Arm Asm, Left, 2" Higher Removable
Controller Full Feature RT
Battery, 12 Volt, 17 AH
Seat Asm, Premier I, 18" Gray
Wire Asm, Battery To QC
Qty/Unit
1
1
1
2
10
1
1
2
1
6
2
1
2
1
2
1
4
8
2
1
2
2
1
2
1
1
2
1
1
2
4
4
2
1
1
1
1
1
1
1
2
2
1
1
1
1
1
1
1
1
1
1
2
1
2
Part#
Description
Qty/Unit
9768
9798
9855
9856
9936
9950
9980.10
9992.20
10050
10065.10
10177
10289
10301
10335.20
10336.20
10516
10539
10548
10554
10568
10571.20
10580
10585
10702
10707
10709
10710
10711
10712
10765.20
10970
10971
10976
11041
11082
11087
11174
11236
11289
11311
11320.20
11355
11361.20
11365
11366
11375
11381.20
11462
11466
11556
210203
210204
267001
300369
Wire Asm, Battery QC To Controller
Seat Post Asm, PSL, Upper Accessory Adaptor
Arm Asm Set Flip-Up Adjustable Standard
Arm Asm Set Flip-Up Adjustable 2" Higher
Handle, Upper
Lever, Handle Adjustment
Cover Asm, Rear, Champagne, RT
Cover Asm, Rear, Blue, RT
Bearing Set
Cover Asm, Rear, Red, RT
Light, Front, Full Featured
Basket, Front
Bellows, Cover, Arm Rest
Column Asm, Red, EZ-Tilt
Column Asm, Champagne, EZ-Tilt
Boot, Lower Handle
Light, Front, Hi/Lo
Screw, Hex Socket, 1/4-20 x 1 5/8 Lg
Clip, Wire Guide
Trim, Bumper, RT
Bracket Asm, Basket
Wheel Asm, 9"
Hub Cap, Mag Style Wheel
Platform, Standard, Champagne
Platform, Standard, Red
Fork Weldment, Front
Mat, Standard
Platform, Short, Champagne
Platform, Short, Red
Seat Post Asm, Upper Accessory Adapter w/ Knobs
Velcro Loop
Velcro Hook
Clip, Wire Guide
Drive Asm, Narrow, 24V
Bracket Controller
Brake Asm, w/ Microswitch
Clamp, Motor
Motor Asm w/o Brake
Wire Asm Interface, Controller
Washer, Lock, 1/4 ID
Wheel 6" Front
Screw, Phillips, #6 x 1 1/2 Lg
Column Asm, Black, EZ-Tilt
Platform, Standard, Black
Platform, Short, Black
Platform, Short, Blue
Column Asm, Blue, EZ-Tilt
Platform, Short, Blue
Plate, Back, Standard, Ez Tilt
Pan Rear RT
Arm Pad Single Molded
Arm Pad Pair Molded
Stem Collar Screw & Nut
Seat Asm, Premier I, 18" Black
1
1
1
1
1
1
1
1
1
1
1
1
2
1
1
1
1
4
2
1
1
2
2
1
1
1
1
1
1
1
4
4
5
1
1
1
2
1
1
4
1
4
1
1
1
1
1
1
1
1
2
1
1
1
www.myamigo.com
23
#310000 REAR DRIVE PARTS LIST - AMI0063706 TO PRESENT
24
Part#
Description
1025
1036
1081
1180
1192
1253
1254
1299
1344
1444
1450
2237
2788
2822
3083
4075
4953
5190
5865
6191
6227
6463
6505
6993
7220
7281
7361.30
7441
7541
7599
7600
7773
7852
7852.10
8216
8221.15
8223.16
8300
8417
8534
8669
8670
8675
8694
8890RD
8944
8969
9005
9247
9248
9250
9251
9300RD
9401
9699
Bushing w/ Shoulder, 1 1/16 ID x 1 3/16 OD
Collar Stem
Bushing 1 3/16 OD x 1 Lg
Screw, Hex, 1/4-20 x 1 Lg
Washer, Flat, 9/32 ID x 5/8 OD
Nut, Hex, Keps, 5/16-18
Pin, Spring, 1/8 OD x 1 1/8 Lg
Seat Lock Asm, RH
Screw, Hex, 1/4-20 x 1 1/2 Lg
Knob, Arm Adjustment
Screw, Hex, 5/16-18 x 2 1/2 Lg
Nut, Hex, 3/8-24
Seat Lock Asm, LH
Screw, Hex, 1/4-20 x 1 3/4 Lg
Nut, Hex Serrated Flange, 1/4-20
Screw, Flat Head Hex Socket, 1/4-20 x 2 Lg
Screw, Hex, 1/4-20 x 2 1/2 Lg
Screw, Hex Socket, 1/4-28 x 3/8 Lg
Screw, Shoulder, #10-24 x 1 1/4 Lg
Post, Lower Seat
Nut, Hex, Nylon Insert, #10-24
Plug, Round, 7/8" OD
Screw, Hex, 3/8-24 x 4 1/2 Lg
Bracket, Cord Reel
Wire Asm Controller to PSL
Screw, Hex Socket, 1/4-20 x 7/8 Lg
Pot Asm, Health Care
Circuit Breaker, Auto Reset, 25 Amp
Wheel, Stability, 1 5/8
Rivet, Truss Head, 1/4 OD x 1 1/2 Lg
Nut, Push, 1/4 Stud
Cap, Vinyl Insulated
Wire Asm, Charger To Controller, Full Featured
Wire Asm, Charger To Controller
Charger, 3 Amp
Enclosure, Touch Tron
Enclosure, Hi/Lo w/ Battery Display
Strap, Battery Retaining
AC Cord Reel
Plug, Tube Square, 1"
Tube, Rear Bumper
Bracket, Bumper Wheel
Ground Wire Asm
Bumper Asm Rear
Controller RD
Band, Controller and Charger Mounting
Cable, MPC Handle Control
Power Seat Lift (PSL)
Arm Asm, Right, Removable
Arm Asm, Left, Removable
Arm Asm, Right, 2" Higher Removable
Arm Asm, Left, 2" Higher Removable
Controller Full Feature RD
Light, Front, High Intensity, Full Featured
Seat Asm, Premier I, 18" Gray
www.myamigo.com
Qty/Unit
Part#
Description
1
1
1
2
8
1
1
1
4
2
1
1
1
4
10
2
4
1
2
1
2
2
1
1
1
2
1
1
2
4
4
2
1
1
1
1
1
1
1
2
1
2
1
1
1
4
1
1
1
1
1
1
1
1
1
9766
9768
9798
9855
9856
9936
9950
9967.20
10050
10177
10289
10301
10335.20
10336.20
10347.20
10511
10513
10516
10539
10548
10554
10567
10571.20
10585
10591
10594
10595
10661.20
10662.20
10690
10765.20
10976
11040
11087
11104
11174
11236
11264
11289
11311
11355
11361.20
11364
11374
11381.20
11466
210203
210204
267001
269002
300369
300514
Wire Asm, Battery To QC
Wire Asm, Battery QC To Controller
Seat Post Asm, PSL, Upper Accessory Adaptor
Arm Asm Set Flip-Up Adjustable Standard
Arm Asm Set Flip-Up Adjustable 2" Higher
Handle, Upper
Lever, Handle Adjustment
Seat Asm, Premier II, 18"
Bearing Set
Light, Front, Full Featured
Basket, Front
Bellows, Cover, Arm Rest
Column Asm, Red, EZ-Tilt
Column Asm, Champagne, EZ-Tilt
Seat Asm, Vinyl, 20" w/ Pouch
Fork Weldment, Front
Mat, Standard
Boot, Lower Handle
Light, Front, Hi/Lo
Screw, Hex Socket, 1/4-20 x 1 5/8 Lg
Clip, Wire Guide
Trim, Bumper, RD
Bracket Asm, Basket
Hub Cap, Mag Style Wheel
Platform, Standard, Red
Platform, Standard, Champagne
Platform, Extended, Red
Seat Asm, Comfortflex I, 18"
Seat Asm, Comfortflex II, 21"
Wheel 9" Front
Seat Post Asm, Upper Accessory Adapter w/ Knobs
Clip, Wire Guide
Drive Asm, Standard, 24 V
Brake Asm, w/ Microswitch
Wheel Asm, 10 Inch
Clamp, Motor
Motor Asm w/o Brake
Bracket Charger/Controller
Wire Asm Interface, Controller
Washer, Lock, 1/4 ID
Screw, Phillips, #6 x 1 1/2 Lg
Column Asm, Black, EZ-Tilt
Platform, Standard, Black
Platform, Standard, Blue
Column Asm, Blue, EZ-Tilt
Plate, Back, Standard, Ez Tilt
Arm Pad Single Molded
Arm Pad Pair Molded
Stem Collar Screw & Nut
Battery, 12 Volt, 33 AH (U-1)
Seat Asm, Premier I, 18" Black
Cover Asm, Rear, Black, RD
Cover Asm, Rear, Blue, RD
Cover Asm, Rear, Champagne, RD
Cover Asm, Rear, Red, RD
Qty/Unit
2
1
1
1
1
1
1
1
1
1
1
2
1
1
1
1
1
1
1
4
2
1
1
2
1
1
1
1
1
1
1
5
1
1
2
2
1
2
1
4
4
1
1
1
1
1
2
1
1
2
1
1
#650000 HD450/ #670000 EXT 350 PARTS LIST - AMI0071239 TO PRESENT
Part#
Description
1025
1036
1081
1192
1253
1254
1344
1444
1450
2237
2822
3083
4075
4953
5190
6191
6463
6505
6993
7281
7361.30
7441
7541
7599
7600
7773
7852.10
8216
8223.16
8300
8417
8534
8669
8670
8675
8694
8944
8969
9250
9251
9497
9766
9768
9856
Bushing w/ Shoulder, 1 1/16 ID x 1 3/16 OD
Collar Stem
Bushing 1 3/16 OD x 1 Lg
Washer, Flat, 9/32 ID x 5/8 OD
Nut, Hex, Keps, 5/16-18
Pin, Spring, 1/8 OD x 1 1/8 Lg
Screw, Hex, 1/4-20 x 1 1/2 Lg
Knob, Arm Adjustment
Screw, Hex, 5/16-18 x 2 1/2 Lg
Nut, Hex, 3/8-24
Screw, Hex, 1/4-20 x 1 3/4 Lg
Nut, Hex Serrated Flange, 1/4-20
Screw, Flat Head Hex Socket, 1/4-20 x 2 Lg
Screw, Hex, 1/4-20 x 2 1/2 Lg
Screw, Hex Socket, 1/4-28 x 3/8 Lg
Post, Lower Seat
Plug, Round, 7/8" OD
Screw, Hex, 3/8-24 x 4 1/2 Lg
Bracket, Cord Reel
Screw, Hex Socket, 1/4-20 x 7/8 Lg
Pot Asm, Health Care
Circuit Breaker, Auto Reset, 25 Amp
Wheel, Stability, 1 5/8
Rivet, Truss Head, 1/4 OD x 1 1/2 Lg
Nut, Push, 1/4 Stud
Cap, Vinyl Insulated
Wire Asm, Charger To Controller
Charger, 3 Amp
Enclosure, Hi/Lo w/ Battery Display
Strap, Battery Retaining
AC Cord Reel
Plug, Tube Square, 1"
Tube, Rear Bumper
Bracket, Bumper Wheel
Ground Wire Asm
Bumper Asm Rear
Band, Controller and Charger Mounting
Cable, MPC Handle Control
Arm Asm, Right, 2" Higher Removable
Arm Asm, Left, 2" Higher Removable
Seat Asm, Black Vinyl, 22 Inch
Wire Asm, Battery To QC
Wire Asm, Battery QC To Controller
Arm Asm Set Flip-Up Adjustable 2" Higher
Qty/Unit
1
1
1
8
1
1
6
2
1
1
4
10
2
4
1
1
2
1
1
2
1
1
2
4
4
2
1
1
1
1
1
2
1
2
1
1
4
1
1
1
1
2
1
1
Part#
Description
Qty/Unit
9936
9950
9983.30
9983.31
10050
10289
10301
10335.20
10347.20
10511
10514
10516
10539
10554
10568
10571.20
10585
10595
10690
10940HD
10976
10980.20
11043
11081.20
11087
11174
11175
11236
11264
11289
11311
11355
11466
210203
210204
267001
269002
300514
Handle, Upper
Lever, Handle Adjustment
Seat Lock Asm, RH, 20" & 22" Seats
Seat Lock Asm, LH, 20" & 22" Seats
Bearing Set
Basket, Front
Bellows, Cover, Arm Rest
Column Asm, Red, EZ-Tilt
Seat Asm, Vinyl, 20" w/ Pouch
Fork Weldment, Front
Mat, Standard
Boot, Lower Handle
Light, Front, Hi/Lo
Clip, Wire Guide
Trim, Bumper, HD
Bracket Asm, Basket
Hub Cap, Mag Style Wheel
Platform, Extended, Red
Wheel 9" Front
Controller, HD 450
Clip, Wire Guide
Seat Asm, Cloth Back
Drive Asm, Heavy Duty, 24 V
Post, Upper Seat HD
Brake Asm, w/ Microswitch
Clamp, Motor
Wheel Asm, 10 Inch w/ Keyway
Motor Asm w/o Brake
Bracket Charger/Controller
Wire Asm Interface, Controller
Washer, Lock, 1/4 ID
Screw, Phillips, #6 x 1 1/2 Lg
Plate, Back, Standard, Ez Tilt
Arm Pad Single Molded
Arm Pad Pair Molded
Stem Collar Screw & Nut
Battery, 12 Volt, 33 AH (U-1)
Cover Asm, Rear, Red, HD 450
1
1
1
1
1
1
2
1
1
1
1
1
1
3
1
1
2
1
1
1
5
1
1
1
1
2
2
1
2
1
4
4
1
2
1
1
2
1
www.myamigo.com
25
WARRANTY
Amigo Brand Product Warranty
Effective July 9, 2003
Amigo Mobility International, Inc. (AMI) warranties the original completed unit it manufactures to the original purchaser.
1. Structural components including platform, frame and seat post, have a limited lifetime warranty (seven years)
against defects in materials and workmanship.
2. Transaxle, motor, controller and battery charger, are warranted against defects in materials
and workmanship for two years.
3. Seats and other components have a one year warranty against defects in materials and workmanship.
Cuts and tears in seats are not covered by warranty.
4.
AMI warranties batteries supplied from its factory. AMI factory-supplied batteries carry Amigo brand labels.
A one year battery warranty from the date of purchase applies against the battery manufacturer's defects
in workmanship or materials (freight not included after six months). Damage caused by battery moisture,
spillage, or leakage is exclusive of warranty. When removing a battery, always set on cardboard
or newspapers to avoid damage.
5. Weight restrictions: Use of a product by persons exceeding the specified load capacity
for that model is not recommended and voids warranty.
6. After 60 days, labor will be charged on warranty repairs, except where law prohibits.
7. Items replaced under warranty, are covered by the original warranty.
(Warranty replacement does not extend the warranty period.)
8. AMI is obligated to repair or replace products or parts returned by the purchaser, and found to be
defective under warranty at its headquarters in Bridgeport, Michigan.
9. For unit and parts, this warranty does not cover accidental damage, misuse, normal wear and tear,
such as LED lights, electrical and mechanical switches, wires, belts, chains and resistors, or use of products
for other than personal purposes. Damage during shipment is not covered by the warranty.
10. If inspection determines that a returned part or unit is fully functional, it will be returned at the
expense of the owner. Opening sealed components will void the warranty.
11. Accessories and parts that are not a part of the original completed unit, or rebuilt units,
will have a one year warranty against defects in materials and workmanship.
This warranty begins when the unit is sold to the original owner. If warranty information, such as owner’s name, serial
number or date of purchase is not available, then AMI will use the production date of the unit as the effective warranty date.
This warranty supersedes and is in lieu of all other warranties, expressed or implied, and no person, agent or dealer is
authorized to give any warranties on behalf of AMI, nor to assume for AMI any other liability concerning any of its products
unless made in writing and signed by an official of AMI. Any unauthorized repair or modification will void this warranty
and release AMI from any liability.
This warranty gives you specific rights, with the possibility of other rights, which vary depending upon your locality.
26
www.myamigo.com
MAINTENANCE HISTORY
DateRemark
DateRemark
DateRemark
DateRemark
DateRemark
DateRemark
DateRemark
www.myamigo.com
27
AMIGO MOBILITY INTERNATIONAL, INC.
6693 Dixie Highway, Bridgeport, Michigan 48722
Phone (800) 248-9131 • Fax (800) 334-7274 • www.myamigo.com
© 2012 Amigo Mobility International, Inc. Amigo® is a registered trademark of Amigo Mobility International, Inc. 1112-878