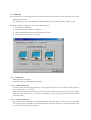
1
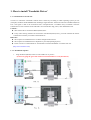
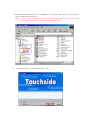
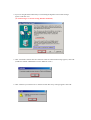
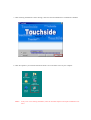
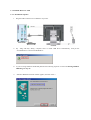
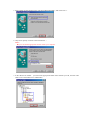
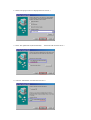
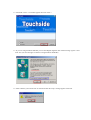
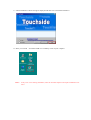
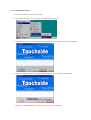
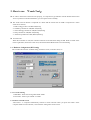
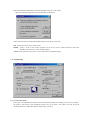
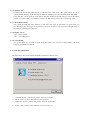
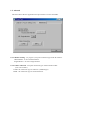
TouchSide
TouchScreen Controller
User Manual
For Windows 2000/ XP
Touch Drivers Download
1. How to install 'Touchside Driver'
1-1. Touchside Driver for RS-232
You have to install the 'Touchside' software driver selectively according to which operating system you use
(examples, Windows 98/SE/Me/2000/XP). Exchanges signal between 'Touchtron Controller' and 'RS-232(Serial)
Port'. The signal is read in the 'Touchtron' and is interpreted with x-coordinate and y-coordinate. Then the
software driver reacts with the mouse and offers various skills like 'drag, select, click and double-click'.
Cautions :
▶ This software driver should use RS-232(Serial) Port.
▶ If any other existing software has association with RS-232(Serial) Ports, you must uninstall the former
software driver before you install 'Touchside Driver'.
Reference :
▶ The sequence of installation below could be changed without notice.
▶ The sequence of installation below depends on your OS(Operating System).
▶ Latest version of ‘Touchside Driver’ and manuals can be downloaded at our internet web site
(http://www.hantouch.com).
1-1-1. Installation Sequence
1.
Plug the RS-232(Serial) Connector into COM Port of your PC.
(If necessary plug the given PS2 connector into MOUSE Port or Keyboard Port.)
2. Put the attached Driver CD into your CD-ROM Drive. And find the proper ‘Setup.exe’ file suitable for
your OS. Then execute it(Setup.exe).
Notes : Before starting installation, must check your Operating System and install the suitable
execution file (Setup.exe). It is below the 'RS-232(Serial)' folder.
3.
'Touchside Version 1.3' screen appears. Click
'Next >'.
4. If you are using Windows 2000/XP you can find 'Digital Signature Not Found’ message.
Ignore it and click 'Yes'
(No such messages are shown if using Windows 95/98/Me)
5. After 'Touchside controller has been found on COM1 at 19200 baud' message appears, click 'OK'.
(COM Port Number and Baudrate can have different values.)
6. After 'Calibrate your touchscreen on TouchTool after this setup.' message appears click 'OK'.
7. After Checking 'Installation is done' message, click 'Exit' and 'Touchside Driver' installation is finished.
8. After all sequences you can find 'TouchTool-Serial' icon on the main screen of your computer.
Notes : If any error occurs during installation, must do uninstall sequence and repeat installation once
more.
1-1-2. Uninstallation Sequence
1.
Remove RS-232(Serial) Connector
from COM Port of your PC.
2.
Goto taskbar and select ‘ Start / Programs / Touchside Serial / Uninstall’.
3.
Uninstallation window of ‘Touchside’ appears and click 'Next >'. Then the uninstallation is performed.
4.
After 'System reboot is required!' shows click 'OK' and the reboot sequence is automatically operated.
(Even if reboot sequence message is not appear you still have to reboot your computer to install
properly next time.)
1.2 Touchside Driver for USB
1-2-1. Installation Sequence
1. Plug the USB Connector into a USB Port of your PC.
2.
By 'Plug and Play' ability, computer starts to install USB driver automatically. And put the
‘Touchside Driver’ CD into CD-ROM drive.
3.
If you are using Windows 98/SE/Me performs the following sequence in order and if using Windows
2000/XP go to step 13.
4.
'Add New Hardware Wizard' window appears, and click 'Next >'.
5. Select 'Search for the best driver for your device(Recommended )', then click 'Next >'.
6. Only select 'Specify a location' and click 'Browse…'.
Notes :
▶If you can find an appropriate location restart your computer.
7. In the ‘Browse for Folder’ you must select appropriate folder which satisfies your OS, and click 'OK'.
(Select one of the folders below USB folder)
8. Check if the proper location is displayed and click 'Next >'.
9. Check 'The updated driver(Recommended) :
Touchside USB' and click 'Next >'.
10. Check if 'TSUSB.INF' is found and click 'Next >'.
11. Sometimes ‘Please insert the disk labeled ‘Windows 98 CD-ROM’, and then click OK.’ message
appears. Put Windows 98 CD into your CD-ROM drive, and click 'OK'.
12. After installation of needed files are finished click 'Finish'.
13. Check if the ‘Touchside Driver’ CD is in CD-ROM drive and select the proper folder suitable for your
OS. Then execute 'setup.exe'.(Below USB folder)
14. 'Touchside version 1.3' window appears then click 'Next >'.
15. If you are using Windows 2000/XP you can find 'Digital Signature Not Found' message. Ignore it and
click 'Yes' (No such messages are shown if using Windows 98/SE/Me)
16. After 'Calibrate your touchscreen on TouchTool after this setup.' message appears click 'OK'.
17. Check 'Installation is done' message is displayed and click 'exit' to finish the installation.
18. Then you can find
'TouchTool-USB' icon on desktop screen of your computer.
Notes : If any error occurs during installation, must do uninstall sequence and repeat installation once
more.
1-2-2. Uninstallation Sequence
1. First, remove USB connector from USB port.
2. Goto taskbar and select ' Start / Programs / Touchside USB / Uninstall'.
3. Uninstallation window of ‘Touchside’appears and click 'Next >'. Then the uninstallation is performed
4. Check 'Uninstallation is done' message is displayed and click 'exit' to finish the uninstallation.
Cautions : In Win 98/SE/Me, must reboot before you try to install again.
2. How to use 「Touch Tool」
▶ In order to utilize the Touchtron LCD properly, it is important to get familiar with the details about Touch
Tool. If you know well about the details, you can operate it more usefully.
▶ The Touch Tool for RS232 is composed of 5 sheets and the Touch Tool for USB is composed of 4. Each
sheets are as follows;
1. H/W Config [exclusive for RS-232(Serial)]
2. Calibrate [common for USB, RS-232(Serial]
3. Touch Setting [common for USB, RS-232(Serial)]
4. Info [common for USB, RS-232(Serial)]
5. Advanced [common for USB, RS-232(Serial)]
▶ Touch Process
When the Touchtron is used, the controller functions as the left button being clicked. When in needs of the
mouse right button, utilize the Touch Tool, and use the Mouse Button Select in Touch Setting.
2. 1. Hardware Configuration (H/W Config)
This includes the menu for standard setting, automatic search, controller status, etc.
2.1.1. Current Setting
1. Baud Rate : Select one among 4800/ 9600/ 19200.
2. Port Name.: Select a port COM1 or COM2
2.1.2. Detect a Touch Screen
Auto Detect : A computer automatically searches a touch controller when you press this button. If the
computer finds a touch controller, it will show the setting status on the screen.
2. 2. Calibration
▶ This menu is for calibrating Touchtron when the intended touch position doesn't match the cursor point
appeared on the screen.
It is important proceed; you should have to calibrate before use of Touchtron in order to avoid trouble.
▶ Please calibrate TouchTron in the case described as follows :
① first time driver installing.
② when the resolution of monitor is changed.
③ when the intended touch location doesn't match the cursor.
④ when a video card or monitor is replaced.
2.2.1. Initial State
Reset the status to initial state.
Note) Initial state is a setting done at the factory.
2.2.2. 2-Points Calibration
Touch the center of blue target appeared on the top of the left side in the screen until the color changes to
gray. (It takes about 1~ 2 seconds)
When the next target appears on the bottom of the right side in the screen, repeat same procedure to complete
calibration. Press "ESC" key if you want to stop calibration, in such a case, the previous calibration result
will be still valid.
2.2.3. 5-Points Calibration
The five blue targets will appear in the sequential manner. When one appears, touch the center of it until the
color changes to gray. Repeat the same procedures for following rest of targets to complete calibration. This
is more accurate than 2-Points Calibration.
When the calibration finished, the following massage will show on the screen.
(The same method is applied for 2-Points &5-Points Calibration.)
Please check the cursor is matched intended touch point in the all screen area.
OK : If the point correct, press "OK" button.
Modify : Draw a circle on the screen clockwise. If the cursor moves counter-clockwise, then press
"Modify" button and try to start calibration again.
Cancel : If the point incorrect, press "Cancel" button and try calibration again.
2. 3. Touch Setting
2.3.1. Cursor Movement
This menu is for adjusting the speed of cursor movement responding to touching action. If you set "Quick",
the speed is fast but the cursor trembling increase. If you set "Slow", the speed is low but the cursor
trembling decreases. Adjust the slide bar as desired as you want.
2.3.2. Double-Click
Double-touch provides the same function as "Double-Click" with mouse. This option allows for you to
optimize double-touching speed that might be different depending upon the touch habit of the individual.
Using slide bar, you can optimize a time interval between touched as favored. Also you can test the setting
if it fits to you with "bulb" icon. Double touch the icon. Bulb will go ON or OFF, if the setting works.
2.3.3. Mouse Button Select
This option provides the same functions as the ones that right of left button of mouse does. An
icon-showing mouse will appear in the screen if you select the option. You can choose left/right button of
the mouse by touching one as desired.
2.3.4. Display Cursor
"ON" - cursor appears.
"OFF" - cursor disappears.
2.3.5. Touch Sound
This option allows you to create a sound along with touch. You can elect sound ON/OFF, and adjust
frequency and duration as desired.
2. 4. Controller Information
This sheet shows the version of H/W and S/W specification currently used.
1.
2.
3.
Controller Version : It shows the present version of Controller.
Driver Version : It shows the present version of Driver.
Application Version : It shows the present version of Application.
4.
E-mail : This is for the e-mail address that you can contact us.
2. 5. Advanced
This sheet shows the user application for option and it is not user selectable.
2.5.1. Monitor Setting : ( in progress ) set up the connection type of the PC monitor.
Multi Monitor : In case of multi monitor.
Single Monitor : In case of single monitor.
2.5.2. Cable Connection : set up the connection type of the Touchtron cable.
(note : Do not alter.)
LTRB : the connection type is clockwise. (standard type)
BRTL : the connection type is counterclockwise.