1
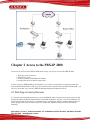
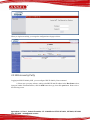
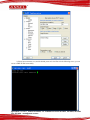
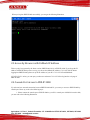
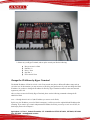
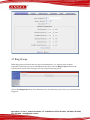
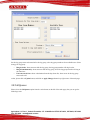
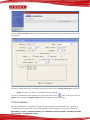
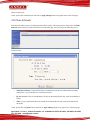
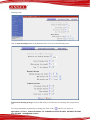
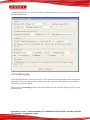
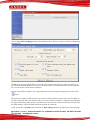
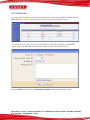
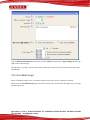
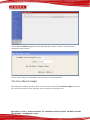
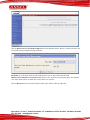
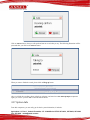
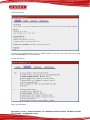
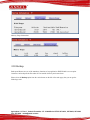
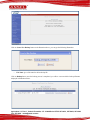
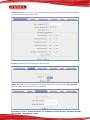
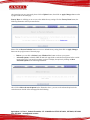
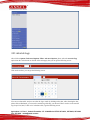
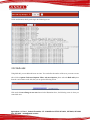
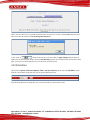
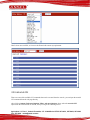
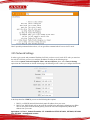
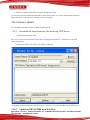
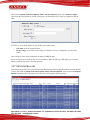
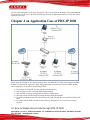
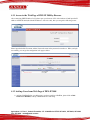
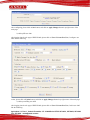
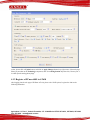
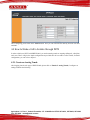
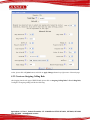
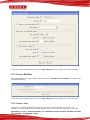
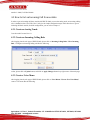
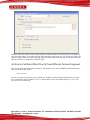
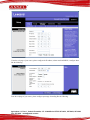
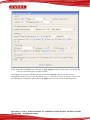
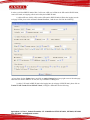
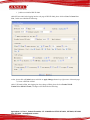
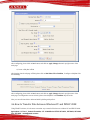
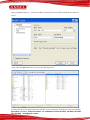
Manual PBX IP 2008 Version: 1.0 Content CONTACT ATCOM ............................................................................................................................... 3 CHAPTER 1 THE INTRODUCTION OF PBX-IP 2008............................................................................................ 4 CHAPTER 2 ACCESS TO THE PBX-IP 2008 ......................................................................................................... 7 2.1 WEB PAGE ACCESS BY BROWSER ............................................................................................................ 7 2.2 SSH ACCESS BY PUTTY .......................................................................................................................... 8 2.3 ACCESS BY BROWSER WITH FALLBACK IP ADDRESS ................................................................................... 10 2.4 CONSOLE PORT ACCESS TO PBX-IP 2008 .......................................................................................................... 10 CHAPTER 3 CONFIGURE PBX-IP 2008 BY WEB GUI ........................................................................................ 12 3.1 SYSTEM STATUS ................................................................................................................................. 12 3.2 CONFIGURE HARDWARE ...................................................................................................................... 12 3.3 TRUNKS ........................................................................................................................................... 12 3.3.1 Create Analog Trunks ............................................................................................................ 13 3.3.2 VoIP Trunks ............................................................................................................................ 14 3.4 OUTGOING CALLING RULES ................................................................................................................. 14 3.5 DIAL PLANS ...................................................................................................................................... 16 3.6 USERS ............................................................................................................................................. 16 3.6.1 Create SIP/IAX User ............................................................................................................... 17 3.6.2 Create Analog User ................................................................................................................ 18 3.7 RING GROUPS ................................................................................................................................... 19 3.8 CALL QUEUES ................................................................................................................................... 21 3.9 VOICE MENUS .................................................................................................................................. 22 3.10 TIME INTERVALS .............................................................................................................................. 23 3.11 INCOMING CALLING RULES ................................................................................................................ 24 3.12 VOICEMAIL ..................................................................................................................................... 25 3.13 CONFERENCING ............................................................................................................................... 26 3.14 FOLLOW ME ................................................................................................................................... 27 3.15 VOICEMAIL GROUPS ........................................................................................................................ 29 3.16 VOICE MENU PROMPTS .................................................................................................................... 30 3.17 SYSTEM INFO .................................................................................................................................. 31 3.18 BACKUP ......................................................................................................................................... 33 3.19 ACTIVE CHANNELS ........................................................................................................................... 34 3.20 OPTIONS ........................................................................................................................................ 35 3.21 ASTERISK LOGS ................................................................................................................................ 37 3.22 BULK ADD ...................................................................................................................................... 38 3.23 FILE EDITOR .................................................................................................................................... 39 3.24 ASTERISK CLI .................................................................................................................................. 40 3.25 NETWORK SETTINGS ........................................................................................................................ 40 3.26 FIRMWARE UPDATE.......................................................................................................................... 41 3.26.1 Download the Latest Firmware File and Set up TFTP Server. .............................................. 41 3.26.2 Update for PBX-IP 2008 from Web Page .......................................................................................... 42 3.27 CALL DETAIL RECORDS ...................................................................................................................... 43 CHAPTER 4 AN APPLICATION CASE OF PBX-IP 2008 ...................................................................................... 44 4.1 HOW TO MAKE INTERNAL CALLS THROUGH PBX-IP 2008 ..................................................................................... 45 4.1.1 Access to the Web Page of PBX-IP 2008 by Browser .......................................................................... 45 4.1.2 Add up Users from Web Page of PBX-IP 2008 .................................................................................... 45 4.1.3 Register a SIP user 6001 in AT610 ......................................................................................... 47 Agricultura 111 Piso 1, Colonia Escandón, C.P 11800 México DF 55 52714421, 52774459, 52719163 Fax: 52718216. [email protected] 4.2 HOW TO MAKE A CALL TO 0UTSIDE THROUGH PSTN ................................................................................ 48 4.2.1 Create an Analog Trunk ......................................................................................................... 48 4.2.2 Create an Outgoing Calling Rule ........................................................................................... 49 4.2.3 Create a Dial Plan .................................................................................................................. 49 4.2.4 Create a User ......................................................................................................................... 50 4.3 HOW TO GET AN INCOMING CALL FROM OUTSIDE .................................................................................... 50 4.3.1 Create an Analog Trunk ......................................................................................................... 50 4.3.2 Create an Incoming Calling Rule ............................................................................................ 50 4.3.3 Create a Voice Menu ............................................................................................................. 51 4.4 HOW TO CALL EACH OTHER DIRECTLY FROM DIFFERENT NETWORK SEGMENT. .............................................. 51 4.5 HOW TO CALL THROUGH VOIP TRUNK ................................................................................................... 55 4.5.1 Call from PBX-IP 2008 to IP04 ............................................................................................................ 55 4.5.2 Call from IP04 to PBX-IP 2008 ............................................................................................................ 58 4.6 HOW TO TRANSFER FILES BETWEEN WINDOWS PC AND PBX-IP 2008 .................................................................... 61 CHAPTER 5 REFERENCE .................................................................................................................... 63 Agricultura 111 Piso 1, Colonia Escandón, C.P 11800 México DF 55 52714421, 52774459, 52719163 Fax: 52718216. [email protected] Chapter 1 the Introduction of PBX-IP 2008 Overview of the PBX-IP 2008 The PBX-IP 2008 is a complete Asterisk Appliance with four Dual ports FXO or FXS modules. It is an embedded open source Linux system with built-in SIP/IAX2 proxy server and NAT features. It provides a solid, uniform platform for traditional PSTN communications as well as VoIP communications. Targeting for SOHO user and SMB market with an easy to use graphical interface, PBX-IP 2008 provides a cost-saving solution on their telecommunication/data needs. With PBX-IP 2008, company with branch offices in different countries can be easily combined together to work like a virtual single office through internet. Features Open Source Asterisk IP PBX High performance OSLEC (Open Source Line Echo Canceller) Configurable IVR menu Voice Mail, Voicemail to Email Call forward, Call waiting, Call transfer Call conference Call queues, Ring group SIP trunk, IAX trunk, PSTN analog trunk Call Detail Record Access via: SSH/telnet/web Firmware upgradable via web page 50+ available SIP/IAX2 extensions 20 concurrent calls Applications SOHO/SMB telephony system Hosted service FAX terminal IVR system Interface 2 * RJ45 port 1 * Power port 1 * MMC/SD slot 8 * RJ11 port (FXS/FXO interchangeable) 4 * Dual port FXO/FXS module slot 1 * USB port Hardware CPU: 400MHz Blackfin 532 Chip Agricultura 111 Piso 1, Colonia Escandón, C.P 11800 México DF 55 52714421, 52774459, 52719163 Fax: 52718216. [email protected] Eight analog (FXO/FXS) module interface. NAND flash 256 MB SDRAM 64M System Open Source uClinux Measurement and Weight Inner box G.W./unit Carton MEAS Units per Carton G.W./CTN 225 * 120 * 30mm 0.79KG 456 * 442 * 362 mm 21 units/ CTN 18 KG/CTN Package Item PBX-IP 2008 RS232 module Power Adapter Manual (disk) Quantity 1 1 1 1 For the usage of PBX-IP 2008 in VoIP field, you can refer to the following network topology. Agricultura 111 Piso 1, Colonia Escandón, C.P 11800 México DF 55 52714421, 52774459, 52719163 Fax: 52718216. [email protected] Chapter 2 Access to the PBX-IP 2008 You need a PC to access to the PBX-IP 2008, there are four ways for you to access the PBX-IP 2008: 1. Web page access by browser 2. SSH access by putty 3. Access by browser with Fallback IP Address 4. Console port access by RS232 console cable In order to access to PBX-IP 2008 by the first three ways, you have to check that if your network connection between PBX-IP 2008 and PC is OK. If you do not have network connection between PBX-IP 2008 and PC, you can try to use the last way to access to PBX-IP 2008 and change the IP address for IP-08. 2.1 Web Page Access by Browser It is the most convenient and common way to access the PBX-IP 2008, you just need to open your browser and input the IP address of PBX-IP 2008 WAN port (the default IP address is 192.168.1.100). You would better use Firefox instead of IE, because there are compatible issues. Then input the default Username: admin; Password: atcom (the password of old version is mysecret or could be also anselmex) in the presented screen like the following: Agricultura 111 Piso 1, Colonia Escandón, C.P 11800 México DF 55 52714421, 52774459, 52719163 Fax: 52718216. [email protected] When you login successfully, you can get the configuration web page as below: 2.2 SSH Access by Putty Logging into PBX-IP 2008 by SSH, you can configure PBX-IP 2008 by Linux command. 1) Please open your putty software, and input the PBX-IP 2008 IP address in the Host Name textbox, input port number in the Port textbox, click the SSH Connection type, then click open button. Please refer to the following screen: Agricultura 111 Piso 1, Colonia Escandón, C.P 11800 México DF 55 52714421, 52774459, 52719163 Fax: 52718216. [email protected] 2) Please input username: root, and the default password: 12xerXes16 in the following screen, you can access to PBX-IP 2008 successfully. Agricultura 111 Piso 1, Colonia Escandón, C.P 11800 México DF 55 52714421, 52774459, 52719163 Fax: 52718216. [email protected] When you log into PBX-IP 2008 successfully, you can get the following illustration: 2.3 Access by Browser with Fallback IP Address This way only be supported by the latest version (PBX-IP 2008-0.3.6) of PBX-IP 2008. If you forget the IP Address of PBX-IP 2008 you have set up, you can use the fallback IP Address: 172.31.255.254/30. Before logging into PBX-IP 2008, please set up the IP Address of your PC: 172.31.255.253 and SubMask: 255.255.255.252. At last, you can open your browser and enter:172.31.255.254 to log into the web page of PBX-IP 2008. 2.4 Console Port Access to PBX-IP 2008 If you do not have network connection between PBX-IP 2008 and PC, you can try to access to PBX-IP 2008 by console port. Please try to do as the following steps: 1. Please connect the console port of PBX-IP 2008 to your PC’s console port with RS232 console cable, you can refer to the following illustration: Agricultura 111 Piso 1, Colonia Escandón, C.P 11800 México DF 55 52714421, 52774459, 52719163 Fax: 52718216. [email protected] 2. Please run your Hyper Terminal, and set up the console port like the following: Bits per second: 115200 Data bits : 8 Parity: None Stop bits: 1 Flow control: None Change the IP Address by Hyper Terminal The default IP address of IP-08 is 192.168.1.100. Your network may have a different IP address range such as 192.168.10.xx. In this situation, you can not access to IP-08 by putty and browser if you do not change the IP-08 IP address. So you have to change the IP address for IP-08 by Hyper Terminal to make it in the same network segment as your LAN. After you have accessed to IP-08 by Hyper Terminal, please use the following command to change the IP address for IP-08. root:~> ifconfig eth0 192.168.1.151(the IP address you want to set for IP-08) By this way, the IP address you set for IP-08 is temporary, it will recover to the original default IP address after rebooting. If you want to give a static and permanent IP address for IP-08, you can try to set it in web GUI, for detail steps please refer to chapter 3. Agricultura 111 Piso 1, Colonia Escandón, C.P 11800 México DF 55 52714421, 52774459, 52719163 Fax: 52718216. [email protected] Chapter 3 Configure PBX-IP 2008 by Web GUI 3.1 System Status In the system status screen, it displays the functions you configured, such as: trunks, extensions, conference and so on like the following screen: 3.2 Configure Hardware In the configure hardware page, it includes the following components: analog hardware, tone region, advanced settings. Analog Hardware When you boot the PBX-IP 2008, which will detect the FXO and FXS modules automatically, the analog hardware component displays the modules which are detected correctly. Tone Region You should select the tone region according to your country, if it does not have your country’s name in the dropdown list, please ask your service operator which kind of tone region is used in your area. 3.3 Trunks To receive calls from PSTN and make calls to the outside world, you have to use trunk. Please select the Trunks option from the vertical menu on the left of the main page, then you can get the following screen: Agricultura 111 Piso 1, Colonia Escandón, C.P 11800 México DF 55 52714421, 52774459, 52719163 Fax: 52718216. [email protected] 3.3.1 Create Analog Trunks Analog trunk is associated with FXO port, and it will call outside by PSTN line. Click on New Analog Trunk in the illustration above, the pop-up screen is where you create and set up trunk. There are many parameters for you to set up, I just set the following two parameters: Channels: select the FXO port you want to use. Here I use the port 2. Agricultura 111 Piso 1, Colonia Escandón, C.P 11800 México DF 55 52714421, 52774459, 52719163 Fax: 52718216. [email protected] Trunk Name: a unique label to help you identify the trunk when listed in outgoing calling rules and incoming calling rules. Here I use the trunk2 as my trunk name. For the advanced options, you can put your cursor on the label, you can get the information of the parameter, customers have to set these parameters according to your service provider and your need. 3.3.2 VoIP Trunks A VoIP service provider (VSP) that you have signed up with is also a trunk. Via the VoIP trunk you can dial via the VoIP service to reduce your cost when making international calls. You can set up the VoIP trunk to make calls to the PSTN or other VoIP network depends on the service you use. You can also use the VoIP trunk to link headquarter and branch offices for free internal calls. Click on New SIP/IAX Trunk, the following screen is where you create and set up VoIP trunk: The important parameters are: Type: You can select SIP or IAX type to meet your need. Provide Name: a unique label to help you identify the trunk when listed in outgoing calling rules and incoming calling rules. Hostname: the IP address or domain name of your service provider’s server. Username: the username that your service provider configured. Password: the password that your service provider configured for the user. 3.4 Outgoing Calling Rules Outgoing calling rules is used to route an outgoing call, when you make an external call, which trunk and what dial-pattern the call used are configured in outgoing calling rules. Please select the Outgoing Calling Rules option from the vertical menu on the left of the main page, then you can get the following screen: Agricultura 111 Piso 1, Colonia Escandón, C.P 11800 México DF 55 52714421, 52774459, 52719163 Fax: 52718216. [email protected] Click on New Calling Rule button on the illustration above, the following screen is where you create and set up outgoing calling rule: The important parameters I configured are below: Calling Rule Name: a unique label to help you identify the outgoing calling rule when listed in dial plans, I use outgoing1 as the calling rule name here. Pattern: it acts like a filter for marching numbers you dialed, here I set up _2X., it means any number you dial out with prefix 2 will use this outgoing call rule. Use Trunk: select the trunk for outgoing calling rule, here I select the trunk2 I set up before. Strip: I press 1 here, it will strip the first number of the number string you dialed. You can get the detail information about every single parameter by putting your cursor on the label. Agricultura 111 Piso 1, Colonia Escandón, C.P 11800 México DF 55 52714421, 52774459, 52719163 Fax: 52718216. [email protected] At last, please click on Save button, and click on Apply Changes button in up right corner of the main page. The way of outgoing calling rules works: Every time you dial a number, asterisk will do the following in strict order: Examine the number you dialed. Compare the number with the pattern that you have defined in your first outgoing rule and if matches, it will initiate the call using that trunk. If it does not match, it will compare the number with the pattern that you have defined in the second outgoing rule and so on. Pass the number to the appropriate trunk to make the call. 3.5 Dial Plans A DialPlan is a set of Calling Rules that can be assigned to one or more users. Please select the Dial Plans option from the vertical menu on the left of the main page, then you can get the following screen: Click on New DialPlan button on the illustration above, the following screen is where you create and set up dial plan: DialPlan Name: a unique label to help you identify the dial plan when listed in user component, you have to set up a dial plan name and select outgoing call rule and local context that you want to use. 3.6 Users Users component is used to add or remove Analog, SIP, IAX extension. Please select the Users option from the vertical menu on the left, then you can get the following screen: Agricultura 111 Piso 1, Colonia Escandón, C.P 11800 México DF 55 52714421, 52774459, 52719163 Fax: 52718216. [email protected] 3.6.1 Create SIP/IAX User Click on Create New User button on the illustration above, the following screen is where you create and set up user: In General component, you have to set up Extension, CallerID, Name, OutBound CallerID parameters, and choose a DialPlan for the extensions. Here I set up user 6003, and select DialPlan1 for the user. I select Enable Voicemail for this User option, so the user has voicemail function. In the Technology component, you have to select SIP or IAX. Here I want to configure a SIP user, so I select SIP. For the Codec Preference, only the first two types of code you set are available. In the Other Options component, I select Is Agent which will be listed in Call Queues as a selectable member for call queue. At last, please click on Update button, and click on Apply Changes button in up right corner of the main page. 3.6.2 Create Analog User Click on Create New User button, the following screen is where you create and set up user: Agricultura 111 Piso 1, Colonia Escandón, C.P 11800 México DF 55 52714421, 52774459, 52719163 Fax: 52718216. [email protected] In the General component, you have to setup Extension, CallerID, Name, OutBound CallerID parameters, and choose a dialplan for the phone. Here I set up user 6005, and select DialPlan1 for the user. I select Enable Voicemail for this User option, so the user has voicemail function. In the Technology componet, you have to select the port in which the analog phone will be plugged from the drop-down list of Analog Station. I select Enable Voicemail for this User option, so the user have voicemail function. In the Other Options component, I select Is Agent which will be listed in Call Queues as a selectable member for call queue. At last, please click on Update button, and click on Apply Changes button in up right corner of the main page. Attension: in the textbox of Extension, the value you set is limited to a range, you can adjust the range in the following screen to meet your requirement. Please select the Options option from the vertical menu on the left, then you can get the following screen: Agricultura 111 Piso 1, Colonia Escandón, C.P 11800 México DF 55 52714421, 52774459, 52719163 Fax: 52718216. [email protected] 3.7 Ring Groups Define Ring groups to dial more than one extension simultaneously, or to ring more than one phone sequentially. This feature may also be called Hunt groups. Please select the Ring Groups option from the vertical menu on the left of the main page, then you can get the following screen: Click on New RingGroup button on the illustration above, the following screen is where you create and set up ring group: Agricultura 111 Piso 1, Colonia Escandón, C.P 11800 México DF 55 52714421, 52774459, 52719163 Fax: 52718216. [email protected] Set the ring group name and extension for the ring group, select ring group members from available users. Select strategy for ring group: • • • Ring in Order: when someone calls the ring group, the ring group member will ring in order. Ring all simultaneously: when someone calls the ring group, all of the ring group member will ring at the same time. If not answered Goto: choose a destination from the drop-down list, when no one in the ring group answers the call. At last, please click on Update button, and click on Apply Changes button in up right corner of the main page. 3.8 Call Queues Please select the Call Queues option from the vertical menu on the left of the main page, then you can get the following screen: Agricultura 111 Piso 1, Colonia Escandón, C.P 11800 México DF 55 52714421, 52774459, 52719163 Fax: 52718216. [email protected] Click on Create New Queue button on the illustration above, the following screen is where you create and set up call queue: Extension: a unique label to help you identify the call queue when listed in outgoing calling rules component. • Agents: select the users which you want them to be queue member. You can get information of other parameters by putting your mouse on the label. At last, please click on Update button, and click on Apply Changes button in up right corner of the main page. 3.9 Voice Menus Like most organization, we would like to redirect all of the incoming calls automatically. The voice menu is very handy for these sorts of things. The system should allow callers to make the selection according to the Agricultura 111 Piso 1, Colonia Escandón, C.P 11800 México DF 55 52714421, 52774459, 52719163 Fax: 52718216. [email protected] voice menu. Please select the Voice Menus option from the vertical menu on the left, then you can get the following screen: Click on Create New VoiceMenu button on the illustration above, the following screen is where you create and set up voice menu: Name: a unique label to help you identify the voice menu when listed in incoming calling rules. • Add new Step: select an action from the drop-down list. I add three steps above, so it will answer the call, and play a sound file, at last go to user 6001. Click on Allow KeyPress Events: when the caller is in voice menu, they can press some specific numbers which are defined here to enter other destination. Here I define three numbers for going to operator, ringgroup, Agricultura 111 Piso 1, Colonia Escandón, C.P 11800 México DF 55 52714421, 52774459, 52719163 Fax: 52718216. [email protected] and user respectively. At last, please click on Save button, and click on Apply Changes button in up right corner of the main page. 3.10 Time Intervals Time Intervals defines ranges of working time that will be used by call routing features. Please select the Time Intervals option from the vertical menu on the left of the main page, then you can get the following screen: Click on New Time Interval button on the illustration above, the following screen is where you create and set up time interval: • Time Interval Name: a unique label to help you identify the time interval when listed in incoming calling rules. I set up timeinterval1 as time interval name. • By day of week: I select it from Monday to Friday, the incoming call rule only works from Monday to Friday. • Time: I set up it from 09:00 AM to 06:30 PM, the incoming call rule only works from 09:00 AM to 06:30 PM. At last, please click on Update button, and click on Apply Changes button in up right corner of the main page. Agricultura 111 Piso 1, Colonia Escandón, C.P 11800 México DF 55 52714421, 52774459, 52719163 Fax: 52718216. [email protected] 3.11 Incoming Calling Rules This is where the behavior of incoming calls from all trunks is being handled. When an incoming call from PSTN or VoIP trunk is received, asterisk needs to know where to direct it. It can be directed to a ring group, an extension, digital receptionist, voice menu or queue. For this purpose, Incoming Calling Rules need to be set up. Please select the Incoming Calling Rules option from the vertical menu on the left of the main page, then you can get the following screen: Click on New Incoming Rule button on the illustration above, the following screen is where you create and set up time interval: • • • • Trunk: select trunk for incoming call to use. I select trunk2 I set up before. Time Interval: determine the time when the incoming call rule works, I select timeinterval1 I set up before. Pattern: match the destination number, I use S which will match any destination number. Destination: I select voicemenu1, so the call will be ruled to voice menu. At last, please click on Update button, and click on Apply Changes button in up right corner of the main page. 3.12 Voicemail When you call someone who does not answer the call, you can leave a voice message for the called party if the called party supports voice mail. Please select the Voicemail option from the vertical menu on the left of the main page, then you can get the Agricultura 111 Piso 1, Colonia Escandón, C.P 11800 México DF 55 52714421, 52774459, 52719163 Fax: 52718216. [email protected] following screen: Click on General Settings button on the illustration above. You can see the following screen: Extension for checking messages: when you dial 6750, you will hear the voice message other people left for you. You can get information of parameters by putting your cursor on the label. If you want to set Agricultura 111 Piso 1, Colonia Escandón, C.P 11800 México DF 55 52714421, 52774459, 52719163 Fax: 52718216. [email protected] voicemail function for the user, you have to enable voicemail component when you set up a user. Please refer to the following illustration: 3.13 Conferencing The conferencing function of Asterisk is similar to a Tele-conference call where multiple callers can call in and participate in a two-way conference like in a party room where everyone can talk and listen to one another or just to listen to a Tele-presentation. Please select the Conferencing option from the vertical menu on the left of the main page, then you can get the following screen: Agricultura 111 Piso 1, Colonia Escandón, C.P 11800 México DF 55 52714421, 52774459, 52719163 Fax: 52718216. [email protected] Click on New Conference Bridge button on the illustration above. Below is what my conference configuration page looks like: Naturally there are some options that you may wish to have for the conference room. They are entirely up to you. The main important things are for you to create the conference room number and the conference pin code for you to know how to enter into the conference. The rest of the fields are optional. You can get information of other parameters by putting your mouse on the label. This conference number is 6300, the Pin Code is 123 for common member, the Pin Code is 456 for Admin. So you have to dial 6300 then, press the Pin Code, if you want to enter the conference. I enable the play hold music for option and announce callers option, so the first member who enter the conference will listen to a music and the online members will be informed when someone enter the conference. At last, please click on Update button, and click on Apply Changes button in up right corner of the main page. Agricultura 111 Piso 1, Colonia Escandón, C.P 11800 México DF 55 52714421, 52774459, 52719163 Fax: 52718216. [email protected] 3.14 Follow Me If A calls B, B does not answer, the call will be transferred to C who is set up in follow me. Please select the Follow Me option from the vertical menu on the left, then you can get the following screen: You can choose user for which you want to setup follow me function, Here taking the user 6006 for an example, click on the edit button at the same line as 6006, you can get the following screen: Select the enable status, and click on Add FollowMe Number button to add a destination phone. Agricultura 111 Piso 1, Colonia Escandón, C.P 11800 México DF 55 52714421, 52774459, 52719163 Fax: 52718216. [email protected] Click on Dial Local Extension and select 6001. Click on Add button and click on Apply Changes button in up right corner of the main page. Through the above settings, someone calls 6006, but 6006 does not answer, the call will be transferred to 6001 automatically. 3.15 VoiceMail Groups Define VoiceMail Groups to leave a voicemail message for a group of users by dialing an extension. Please select the VoiceMail Groups option from the vertical menu on the left of the main page, then you can get the following screen: Agricultura 111 Piso 1, Colonia Escandón, C.P 11800 México DF 55 52714421, 52774459, 52719163 Fax: 52718216. [email protected] Click on New VoiceMail Group button on the illustration above. Below is what my VoiceMail Group configuration page looks like: From the above settings, I can dial 6600 to leave message for user 6005 and 6006. 3.16 Voice Menu Prompts This component is used for recording custom voice menu. Please select the Voice Menu Prompts option from the vertical menu on the left of the main page, then you can get the following screen: Agricultura 111 Piso 1, Colonia Escandón, C.P 11800 México DF 55 52714421, 52774459, 52719163 Fax: 52718216. [email protected] Click on Record a new Voice Menu prompt button on the illustration above. Below is what my Record a new Voice Menu prompt configuration page looks like: File Name: give a filename for the record sound file, here I give a name: WelcomToATCOM Dial this User Extension to record a new voice: dial to a user, then the user pick up the phone and speak the voice menu which will be recorded. Here I select 6001 I set up before. Click on Record button, the asterisk will call to 6001, 6001 will show like the following: Agricultura 111 Piso 1, Colonia Escandón, C.P 11800 México DF 55 52714421, 52774459, 52719163 Fax: 52718216. [email protected] Click on Answer button, then you call speak and start to record what you say. The following illustration will be presented after you click on the Answer button. When you want to finish the record, please click on Hang up button. After you finish the recording, please refresh you webpage, and enter into voice menu prompts component again, you can see you have had a sound file like the above. 3.17 System Info From this component, you can easily get the basic system information, it includes: Agricultura 111 Piso 1, Colonia Escandón, C.P 11800 México DF 55 52714421, 52774459, 52719163 Fax: 52718216. [email protected] General Information: The latest version of PBX-IP 2008 is atcom_ce_PBX-IP 2008-0.3.6. You can see the version that you are using from Version Details in the above illustration. Network Information: Disk Usage Information: Agricultura 111 Piso 1, Colonia Escandón, C.P 11800 México DF 55 52714421, 52774459, 52719163 Fax: 52718216. [email protected] Memory Usage Information: 3.18 Backup Backup and Restore are two of the mandatory functions of any application. PBX-IP 2008 is no exception. Customers can backup all the files under the /etc/asterisk/ directory and restore them. Please select the Backup option from the vertical menu on the left of the main page, then you can get the following screen: Agricultura 111 Piso 1, Colonia Escandón, C.P 11800 México DF 55 52714421, 52774459, 52719163 Fax: 52718216. [email protected] Click on Create New Backup button on the illustration above, you can get the following illustration: • File Name: give a file name for the backed up file. Click on Backup button, once the backup process is completed, you will see a screen with the backup filename displayed in illustration below. Agricultura 111 Piso 1, Colonia Escandón, C.P 11800 México DF 55 52714421, 52774459, 52719163 Fax: 52718216. [email protected] Backup itself is not useful if it cannot be restored, PBX-IP 2008 also has this function. This is a very simple procedure. All you need to do is to click on the Restore Previous Config option. 3.19 Active Channels The channels which are in communication status will be displayed in this component. Please select the Active Channels option from the vertical menu on the left, then you can get the following screen: Here my PBX-IP 2008 is using 2,3,4 channels, so I get the following information : 3.20 Options This component is used for administrator to manage the system, it includes the following modules: • • • • • General Preferences Language Change Password Factory Reset Reboot Advanced Options Agricultura 111 Piso 1, Colonia Escandón, C.P 11800 México DF 55 52714421, 52774459, 52719163 Fax: 52718216. [email protected] General Preferences: you can set up a user to be the operator and the range of extension number for different types’ extensions like the following screen: Language: change the sound file language in which they play. Change Password: it is used for customers to change the admin password, click on the Change Password button, the following illustration will be presented below: Agricultura 111 Piso 1, Colonia Escandón, C.P 11800 México DF 55 52714421, 52774459, 52719163 Fax: 52718216. [email protected] After inputting your new password, please click on Update button, then click on Apply Changes button on the up right corner of the main page. Factory Reset: it will help you to recover to the default factory settings. Click on Factory Reset button, the following illustration will be presented below: Please click on Reset to Defaults button to recover to default factory setting, then click on Apply Changes button on the up right corner of the main page. • • Reboot: you can click on Reboot buttonReboot Now button to reboot your system. Advanced Options: in default, PBX-IP 2008 web page hides several advanced options in the vertical menu on the left, if you need to use them, you have to display the options by clicking on Show Advanced Options in the following illustration: After click on Show Advanced Options in the illustration above, you can see the advanced options in the vertical menu on the left of the main page like the following: Agricultura 111 Piso 1, Colonia Escandón, C.P 11800 México DF 55 52714421, 52774459, 52719163 Fax: 52718216. [email protected] 3.21 Asterisk Logs After click on OptionsAdvanced OptionsShow Advanced Options, please select the Asterisk Logs option from the vertical menu on the left of the main page, then you can get the following screen: Click on the textbox, you can get the following screen: You can see a date table, and you can select the log to watch by clicking on the date. After choosing the date, please click on Go button, you can see the asterisk log of the day you choosed. Here I need to see the asterisk log of April 21st,2010, I click on 21 in the date table, I get the following screen: Agricultura 111 Piso 1, Colonia Escandón, C.P 11800 México DF 55 52714421, 52774459, 52719163 Fax: 52718216. [email protected] I click on Go button, then I get the log in the following screen: 3.22 Bulk Add Using bulk add, you can add multi-users one time. You can define the number of the users you want to create. After click on OptionsAdvanced OptionsShow Advanced Options, please select the Bulk Add option from the vertical menu on the left, then you can get the following screen: Click on the Create a Range of new users button in the illustration above, the following screen is where you create bulk users. Agricultura 111 Piso 1, Colonia Escandón, C.P 11800 México DF 55 52714421, 52774459, 52719163 Fax: 52718216. [email protected] Here I want to create five users, and the extensions starts from 6100, so I select 5 in the Create drop-down list, and I set 6100 in the textbox of User Starting from Extension. At last, click on button in the pop-up screen, then click on Apply Changes button on the up right corner of the main page. Please select the System Status option in the vertical menu on the left of the main page, you can see you have added five users: 6100, 6101,6102,6103,6104. 3.23 File Editor After click on OptionsAdvanced OptionsShow Advanced Options, please select the File Editor option from the vertical menu on the left, then you can get the following screen: From the drop-down list of config files, you can select the file you want to edit or read. Agricultura 111 Piso 1, Colonia Escandón, C.P 11800 México DF 55 52714421, 52774459, 52719163 Fax: 52718216. [email protected] Here I select users.conf file, so I can see the file and edit to meet my requirement. 3.24 Asterisk CLI These are some of the available CLI commands that can be executed from the console, you can input the asterisk CLI commands from the web page directly. After click on OptionsAdvanced OptionsShow Advanced Options, please select the Asterisk CLI option from the vertical menu on the left, then you can get the following screen: Agricultura 111 Piso 1, Colonia Escandón, C.P 11800 México DF 55 52714421, 52774459, 52719163 Fax: 52718216. [email protected] Here I input help command in the textbox, so I can get all the command which I can use in CLI mode. 3.25 Network Settings In order to give a static and permanent IP address for IP-08, you have to set it in web GUI. After you enter into the web GUI of IP-08, you can try to configure IP address according to the following steps: After click on OptionsAdvanced OptionsShow Advanced Options, please select Network Settings option from the vertical menu on the left of main page, the following screen is where you configure the network: In the drop-down list of DHCP, you can see the following three options: 1. DHCP: yes: PBX-IP 2008 will obtain the dynamic IP address from your router. 2. DHCP: auto: PBX-IP 2008 will use the static IP specified below and ping the default gateway.When there is no response from the default gateway, the IP-08 will switch to dynamically obtain the IP address from your router. Agricultura 111 Piso 1, Colonia Escandón, C.P 11800 México DF 55 52714421, 52774459, 52719163 Fax: 52718216. [email protected] 3. DHCP: no: PBX-IP 2008 will use the static IP address set below. If you want to get static and permanent IP address, please do not select “yes”, after configure other parameters, please click “save” in the bottom of your page to save your setting. 3.26 Firmware Update You can update to the latest version for PBX-IP 2008 by TFTP. 3.26.1 Download the Latest Firmware File and Set up TFTP Server. 1) Download the md5 file from http://www.atcom.cn/downloads/index.php?folder=SVBQQlgvZmlybXdhcmU= , then put it in your TFTP server root directory. 2) Run your TFTP server, and I set up it like the following: “E:\upgrade” is the root directory of my TFTP server, “192.168.1.111” is the IP Address of my TFTP server. 3.26.2 Update for PBX-IP 2008 from Web Page Agricultura 111 Piso 1, Colonia Escandón, C.P 11800 México DF 55 52714421, 52774459, 52719163 Fax: 52718216. [email protected] After click on OptionsAdvanced OptionsShow Advanced Options, please select Firmware update option from the vertical menu on the left of main page, the following screen is where you update for PBX-IP 2008: TFTP Server: enter the IP Address of your TFTP server in this textbox. • • File Name: enter the update file name Reset Configs: if you choose reset Configs, it will delete all of your configuration you have done before. After setting up, please click on Go button to update for PBX-IP 2008. Power off and power on the IP-08, wait for several minutes. When the TEL port LEDs light up, it means the update is finished and you have the latest firmware. 3.27 Call Detail Records This component provides the record of all incoming and outgoing calls including the channels used and duration of calls. After click on OptionsAdvanced OptionsShow Advanced Options, please select the Call Detail Records option from the vertical menu on the left, then you can get the following screen: Agricultura 111 Piso 1, Colonia Escandón, C.P 11800 México DF 55 52714421, 52774459, 52719163 Fax: 52718216. [email protected] You can click on the prev to look up the last page for call record, and click on the next to look up the next page for call record, you can also set the value from the drop-down list of view which means how many calls will be displayed in one page. Chapter 4 an Application Case of PBX-IP 2008 Figure: Network Topology In the network topology above: user 6020 and user 6001 will be registered to PBXIP 2008, user 6030 will be registered to IP04, analog phone 6005 is connected to FXS port of PBX-IP 2008. After configuration, it will realize the following function: 1) 2) 3) 4) 5) The internal user 6005 and user 6001 can call each other directly. 6005 and 6001 can dial-out through PBX-IP 2008 to PSTN. 6005 and 6001 can get incoming calls from PSTN by PBX-IP 2008. 6030 can call-out to PSTN and get incoming call from PSTN through IP04. User 6001 and 6030 can call each other through VoIP trunk, although they are registered to different IP PBX. 6) User 6020, 6005 and 6001 can call each other directly, although they are not in the same network segment. 4.1 How to Make Internal Calls through PBX-IP 2008 Agricultura 111 Piso 1, Colonia Escandón, C.P 11800 México DF 55 52714421, 52774459, 52719163 Fax: 52718216. [email protected] 4.1.1 Access to the Web Page of PBX-IP 2008 by Browser After connecting PBX-IP 2008 to LAN, please open your browser of PC with windows OS and input the IP Address of PBX-IP 2008 (the default IP address is 192.168.1.100), then you can get the following screen: Please input the default Username: admin; Password: atcom in the presented screen above. When you login successfully, you can get the configuration web page as below: 4.1.2 Add up Users from Web Page of PBX-IP 2008 1) Add up a DialPlan Before you add up user, you have to add up a DialPlan, please click on Dial PlansNew DialPlan, I add up a DialPlan like the following: Agricultura 111 Piso 1, Colonia Escandón, C.P 11800 México DF 55 52714421, 52774459, 52719163 Fax: 52718216. [email protected] After configuring, please click on Save button, and click on Apply Changes button in up right corner of the main page. 2) Add up SIP user 6001 After logging into the web page of PBX-IP 2008, please click on Users Create New User, I configure user 6001 like the following: At last, please click on Update button, and click on Apply Changes button in up right corner of the main page. 3) Add up an Analog user 6005 After logging into the web page of PBX-IP 2008, please click on Users Create New User, I add a user 6005 like the following: Agricultura 111 Piso 1, Colonia Escandón, C.P 11800 México DF 55 52714421, 52774459, 52719163 Fax: 52718216. [email protected] At last, please click on Update button, and click on Apply Changes button in up right corner of the main page. Please pay attention to the Technology component, there is an Analog Station drop-down list, I choose port 4 in which port the analog phone plugs. 4.1.3 Register a SIP user 6001 in AT610 After logging into the web page of IP Phone AT-610, please select VOIP option, I register the 6001 as the following illustration: Agricultura 111 Piso 1, Colonia Escandón, C.P 11800 México DF 55 52714421, 52774459, 52719163 Fax: 52718216. [email protected] After configuring, please click on the APPLY button. Now you can call each other directly between user 6001 and 6005. 4.2 How to Make a Call to 0utside through PSTN In order to dial out to PSTN with PBX-IP 2008, you need an analog trunk, an outgoing calling rule, a dial plan and a user. Here I will give the simple configuration steps which show how to make a call to outside, for detail configuration, you can refer to chapter 3. 4.2.1 Create an Analog Trunk After logging into the web page of PBX-IP 2008, please click on Trunks Analog Trunks, I configure an analog trunk like the following: Agricultura 111 Piso 1, Colonia Escandón, C.P 11800 México DF 55 52714421, 52774459, 52719163 Fax: 52718216. [email protected] At last, please click on Update button, and click on Apply Changes button in up right corner of the main page. 4.2.2 Create an Outgoing Calling Rule After logging into the web page of PBX-IP 2008, please click on Outgoing Calling Rules New Calling Rule, I configure an outgoing calling rule like the following: Agricultura 111 Piso 1, Colonia Escandón, C.P 11800 México DF 55 52714421, 52774459, 52719163 Fax: 52718216. [email protected] At last, please click on Save button, and click on Apply Changes button in up right corner of the main page. 4.2.3 Create a Dial Plan After logging into the web page of PBX-IP 2008, please click on Dial Plans New DialPlan, I configure a dial plan like the following: At last, please click on Save button, and click on Apply Changes button in up right corner of the main page. 4.2.4 Create a User I will use the user 6001 I created before, here I need to reselect a dial plan for 6001, here I need to use DialPlan2, so I select DialPlan2 in the DialPlan drop-down list. Now I can call out with prefix 2, if the caller Agricultura 111 Piso 1, Colonia Escandón, C.P 11800 México DF 55 52714421, 52774459, 52719163 Fax: 52718216. [email protected] number is 10086, I will dial 210086. 4.3 How to Get an Incoming Call from outside In order to get an incoming call from outside with PBX-IP 2008, you need an analog trunk, an incoming calling rule, a destination (here I use IVR). Here I will give the simple configuration steps which show how to get an incoming call from outside, for detail configuration, you can refer to chapter 3. 4.3.1 Create an Analog Trunk I use the trunk2 I created in 4.2.1 4.3.2 Create an Incoming Calling Rule After logging into the web page of PBX-IP 2008, please click on Incoming Calling Rules New Incoming Rule, I configure an incoming calling rule like the following: At last, please click on Update button, and click on Apply Changes button in up right corner of the main page. 4.3.3 Create a Voice Menu After logging into the web page of PBX-IP 2008, please click on Voice Menus Create New VoiceMenu, I create a voice menu like the following: Agricultura 111 Piso 1, Colonia Escandón, C.P 11800 México DF 55 52714421, 52774459, 52719163 Fax: 52718216. [email protected] When the call comes from port 2, the system will play a record sound file, if the caller presses 1, user 6001 will ring, if the caller presses 2, user 6005 will ring. If the caller does not press any key, the call will go to 6001. You can also configure IP04 to let 6030 call outside and get incoming call by IP04, the steps are the same as PBX-IP 2008, you can refer to configuration of PBX-IP 2008. 4.4 How to Call Each Other Directly from Different Network Segment. Take the user 6020, 6005 and 6001 for example, I will configure router, users and PBX-IP 2008, then the three users can call each other directly. 1) Set up router From the web page of your router, please configure the IP address, subnet mask and default gateway of WAN port, I configured a static IP Address 172.16.1.1; Subnet Mask: 255.255.0.0; Default Gateway: 172.16.1.254. You can refer to the following: Agricultura 111 Piso 1, Colonia Escandón, C.P 11800 México DF 55 52714421, 52774459, 52719163 Fax: 52718216. [email protected] From the web page of your router, please configure the IP address, subnet mask and DHCP, I configure them like the following: From the webpage of your router, please configure port range forwarding like the following: Agricultura 111 Piso 1, Colonia Escandón, C.P 11800 México DF 55 52714421, 52774459, 52719163 Fax: 52718216. [email protected] The user 6020 uses IAX2, the port number is 4569, 192.168.1.10 is the IP address of PBX-IP 2008. 2) Add an IAX user 6020 in PBX-IP 2008 After logging into the web page of PBX-IP 2008, please click on Users Create New User, I configure 6020 like the following: Agricultura 111 Piso 1, Colonia Escandón, C.P 11800 México DF 55 52714421, 52774459, 52719163 Fax: 52718216. [email protected] At last, please click on Update button, and click on Apply Changes button in up right corner of the main page. 3) Set up AT-620 and register an IAX2 user 6020 After logging into web page of IP Phone AT-620, please select Network option to enter the screen of configuring IP Address. I set up a static IP Address: 172.16.1.2; Netmask: 255.255.0.0; Gateway: 172.16.1.254. After finishing the configuration, please click on the Apply button. You can refer to the following screen: Agricultura 111 Piso 1, Colonia Escandón, C.P 11800 México DF 55 52714421, 52774459, 52719163 Fax: 52718216. [email protected] Please select the VOIP option, then select the IAX2 option, I register the IAX2 user 6020 as the following illustration: After configuring, please click on the APPLY button. Attention: here you must register IAX2 user instead of SIP user, because the user 6020 is not in the same network segment as PBX-IP 2008. If you use SIP user, you can not get sound when the communication is established. Now you can call each other among 6020,6001 and 6005 directly. 4.5 How to Call through VoIP Trunk 4.5.1 Call from PBX-IP 2008 to IP04 Agricultura 111 Piso 1, Colonia Escandón, C.P 11800 México DF 55 52714421, 52774459, 52719163 Fax: 52718216. [email protected] In order to call from PBX-IP 2008 to IP04, I will create a SIP user in IP04 for the SIP trunk in PBX-IP 2008, create a SIP trunk, an outgoing call rule and a dial plan in PBX-IP 2008. 1) Add an SIP user 6035(it will be used as SIP trunk in PBX-IP 2008) in IP04, after logging into the web page of IP04, please click on Users Create New User, I add the user 6035 like the following: At last, please click on Update button, and click on Apply Changes button in up right corner of the main page. Add a SIP user 6030 in IP04 for AT-620, the way is the same as adding 6035. 2) Add a VoIP trunk in PBX-IP 2008, after logging into the webpage of PBX-IP 2008, please click on TrunksVOIP TrunksNew SIP/IAX Trunk, I configure a SIPtrunk1 like the following: Agricultura 111 Piso 1, Colonia Escandón, C.P 11800 México DF 55 52714421, 52774459, 52719163 Fax: 52718216. [email protected] After configuring, please click on Add button, and click on Apply Changes button in up right corner of the main page. 3) Create an outgoing calling rule in PBX-IP 2008, after logging into the webpage of PBX-IP 2008, please click on Outgoing Calling RulesNew Calling Rule, I configure an outgoing2 rule like the following: Agricultura 111 Piso 1, Colonia Escandón, C.P 11800 México DF 55 52714421, 52774459, 52719163 Fax: 52718216. [email protected] After configuring, please click on Save button, and click on Apply Changes button in up right corner of the main page. 4) Create a dial plan in PBX-IP 2008, after logging into the webpage of PBX-IP 2008, please click on Dial PlansNew DialPlan, I configure a dialplan2 like the following: After configuring, please click on Save button, and click on Apply Changes button in up right corner of the main page. In configuration screens of 6001 and 6005, please select dialplan2 in the DialPaln drop-down list Now you can call from 6001 and 6005 to 6030 by dialing 96030 4.5.2 Call from IP04 to PBX-IP 2008 In order to call from IP04 to PBX-IP 2008, I will create a SIP user in PBX-IP 2008 for the SIP trunk in IP04, create a SIP trunk, an outgoing call rule and a dial plan in IP04. Agricultura 111 Piso 1, Colonia Escandón, C.P 11800 México DF 55 52714421, 52774459, 52719163 Fax: 52718216. [email protected] 1) Add a user 6008 in PBX-IP 2008 Add a SIP user: 6008, after logging into the web page of PBX-IP 2008, please click on Users Create New User, I add a user 6008 like the following: At last, please click on Update button, and click on Apply Changes button in up right corner of the main page. 2) Create a SIP trunk in IP04 Add a VoIP trunk in IP04, after logging into the webpage of IP04, please click on TrunksVOIP TrunksNew SIP/IAX Trunk, I configure a SIP trunk like the following: Agricultura 111 Piso 1, Colonia Escandón, C.P 11800 México DF 55 52714421, 52774459, 52719163 Fax: 52718216. [email protected] After configuring, please click on Add button, and click on Apply Changes button in up right corner of the main page. 3) Create an outgoing calling rule in IP04 After logging into the webpage of IP04, please click on Outgoing Calling RulesNew Calling Rule, I configure an outgoing1 rule like the following: Agricultura 111 Piso 1, Colonia Escandón, C.P 11800 México DF 55 52714421, 52774459, 52719163 Fax: 52718216. [email protected] After configuring, please click on Save button, and click on Apply Changes button in up right corner of the main page. 4) Create a dial plan in IP04 After logging into the webpage of IP04, please click on Dial PlansNew DialPlan, I configure a dialplan1 like the following: After configuring, please click on Save button, and click on Apply Changes button in up right corner of the main page. In configuration screens of 6030, please select dialplan1 in the DialPaln drop-down list. Now you can call from 6030 to 6001 and 6005 by dialing with prefix 9. 4.6 How to Transfer Files between Windows PC and PBX-IP 2008 Using WinSCP software, it is the most convenient way to transfer files between windows PC and PBX-IP 2008. Agricultura 111 Piso 1, Colonia Escandón, C.P 11800 México DF 55 52714421, 52774459, 52719163 Fax: 52718216. [email protected] Open your WinSCP software,enter the IP Address, username, password of PBX-IP 2008 like the following screen: At last, click on Login button, then you can get the following screen: The left part of the screen displays directories and files of your windows PC, the right part of the screen displays Agricultura 111 Piso 1, Colonia Escandón, C.P 11800 México DF 55 52714421, 52774459, 52719163 Fax: 52718216. [email protected] directories of PBX-IP 2008. If you want to transfer a file from windows PC to PBX-IP 2008, you just need to choose the file and drag it to the directory of PBX-IP 2008, at last, click on copy button in the popping-up screen like the following: Chapter 5 Reference http://www.ansel.com.mx/ Agricultura 111 Piso 1, Colonia Escandón, C.P 11800 México DF 55 52714421, 52774459, 52719163 Fax: 52718216. [email protected]