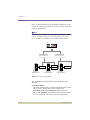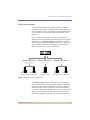
1
BIG/ip™ Controller
Administrator Guide
version 2.1
Service and Support Information
Product Version
This manual applies to version 2.1 of the BIG/ip® Controller.
Obtaining Technical Support
Web
tech.f5.com
Phone
(206) 505-0888
Fax
(206) 505-0802
Email (support issues)
[email protected]
Email (suggestions)
[email protected]
Contacting F5 Networks
Web
www.f5.com
Toll-free phone
(888) 88BIG-IP
Corporate phone
(206) 505-0800
Fax
(206) 505-0801
Email
[email protected]
Mailing Address
200 1st Avenue West
Suite 500
Seattle, Washington 98119
BIG/ip® Controller, v. 2.1
iv
Legal Notices
Copyright
F5 Networks, Inc. (F5) believes the information it furnishes to be
accurate and reliable. However, F5 assumes no responsibility for
the use of this information, nor any infringement of patents or other
rights of third parties which may result from its use. No license is
granted by implication or otherwise under any patent, copyright or
other intellectual property right of F5 except as specifically
described herein. F5 reserves the right to change specifications or
documentation at any time without notice.
Copyright ©1999 by
F5 Networks, Inc.
Seattle, Washington
All rights reserved. Printed in U.S.A.
U00210
Trademarks
F5, BIG/ip, and 3DNS are registered trademarks of F5 Networks,
Inc., and see/IT and global/SITE are trademarks of F5 Networks,
Inc. Other product and company names are registered trademarks
or trademarks of their respective holders.
Export Regulation Notice
Within the United States, the BIG/ip® Controller is shipped with
cryptographic software. Under the Export Administration Act, the
United States government may consider it a criminal offense to
export such BIG/ip Controller from the United States.
v
F5 Networks, Inc.
FCC Compliance
This equipment has been tested and found to comply with the limits
for a Class A digital device, pursuant to part 15 of the FCC Rules.
These limits are designed to provide reasonable protection against
harmful interference when the equipment is operated in a
commercial environment. This equipment generates, uses, and can
radiate radio frequency energy and, if not installed and used in
accordance with this instruction manual, it may cause harmful
interference to radio communications. Operation of this equipment
in a residential area is likely to cause harmful interference, in which
case the user will be required to correct the interference at his own
expense.
Acknowledgments
This product includes software developed by the University of
California, Berkeley and its contributors.
This product includes software developed by the Computer Systems
Engineering Group at the Lawrence Berkeley Laboratory.
This product includes software developed by the NetBSD
Foundation, Inc. and its contributors.
This product includes software developed by Christopher G.
Demetriou for the NetBSD Project.
This product includes software developed by Adam Glass.
This product includes software developed by Christian E. Hopps.
This product includes software developed by Dean Huxley.
This product includes software developed by John Kohl.
This product includes software developed by Paul Kranenburg.
This product includes software developed by Terrence R. Lambert.
This product includes software developed by Philip A. Nelson.
This product includes software developed by Herb Peyerl.
This product includes software developed by Jochen Pohl for the
NetBSD Project.
BIG/ip® Controller, v. 2.1
vi
This product includes software developed by Chris Provenzano.
This product includes software developed by Theo de Raadt.
This product includes software developed by David Muir Sharnoff.
This product includes software developed by SigmaSoft, Th.
Lockert.
This product includes software developed for the NetBSD Project
by Jason R. Thorpe.
This product includes software developed by Jason R. Thorpe for
And Communications, http://www.and.com.
This product includes software developed for the NetBSD Project
by Frank Van der Linden.
This product includes software developed for the NetBSD Project
by John M. Vinopal.
This product includes software developed by Christos Zoulas.
This product includes software developed by Charles Hannum.
This product includes software developed by Charles Hannum, by
the University of Vermont and State Agricultural College and
Garrett A. Wollman, by William F. Jolitz, and by the University of
California, Berkeley, Lawrence Berkeley Laboratory, and its
contributors.
This product includes software developed by the University of
Vermont and State Agricultural College and Garrett A. Wollman.
In the following statement, "This software" refers to the Mitsumi
CD-ROM driver: This software was developed by Holger Veit and
Brian Moore for use with "386BSD" and similar operating systems.
"Similar operating systems" includes mainly non-profit oriented
systems for research and education, including but not restricted to
"NetBSD," "FreeBSD," "Mach" (by CMU).
In the following statement, "This software" refers to the parallel
port driver: This software is a component of "386BSD" developed
by William F. Jolitz, TeleMuse.
vii
F5 Networks, Inc.
End-user Software License
BIG/ip® Controller
IMPORTANT - READ BEFORE INSTALLING OR
OPERATING THIS PRODUCT. CAREFULLY READ THE
TERMS AND CONDITIONS OF THIS LICENSE BEFORE
INSTALLING OR OPERATING THIS PRODUCT - BY
INSTALLING, OPERATING OR KEEPING THIS PRODUCT
FOR MORE THAN THIRTY DAYS AFTER DELIVERY YOU
INDICATE YOUR ACCEPTANCE OF THESE TERMS AND
CONDITIONS. IF YOU DO NOT AGREE WITH THE
TERMS AND CONDITIONS OF THIS AGREEMENT,
PROMPTLY CONTACT F5 NETWORKS, INC. ("F5") TO
ARRANGE FOR RETURN OF THE PRODUCT FOR A
REFUND.
1. Scope. This License applies to the software component
("Software") of the F5 product identified above ("Product")
and any corrections, updates, new releases and new versions
of such software. This License is a legal agreement between
F5 and the single entity ("Licensee") that has acquired
Software from F5 under applicable terms and conditions.
2. License Grant. Subject to the terms of this License, F5 grants
to Licensee a non-exclusive, non-transferable license to use
the Software in object code form on a single central
processing unit with an unlimited amount of servers. Other
than as specifically described herein, no right or license is
granted to Licensee to any of F5's trademarks, copyrights, or
other intellectual property rights. The Software incorporates
certain third party software which is used subject to licenses
from the respective owners.
3. Restrictions. The Software, documentation and the
associated copyrights and other intellectual property rights
are owned by F5 or its licensors, and are protected by law
and international treaties. Licensee may not copy or
reproduce the Software, and may not copy or translate the
written materials without F5's prior, written consent.
BIG/ip® Controller, v. 2.1
viii
Licensee may not copy, modify, reverse compile or reverse
engineer the Software, or sell, sub-license, rent or transfer
the Software or any associated documentation to any third
party.
4. Export Control. F5's standard US Software incorporates
cryptographic software. Licensee agrees to comply with the
Export Administration Act, the Export Control Act, all
regulations promulgated under such Acts, and all other US
government regulations relating to the export of technical
data and equipment and products produced therefrom, which
are applicable to Licensee. In countries other than the US,
Licensee agrees to comply with the local regulations
regarding exporting or using cryptographic software.
5. Limited Warranty.
a) Warranty. F5 warrants that for a period of 90 days from
the date of shipment: (i) the media on which the Software
is furnished will be free of defects in materials and
workmanship under normal use; and (ii) the Software
substantially conforms to its published specifications.
Except for the foregoing, the Software is provided AS IS.
In no event does F5 warrant that the Software is error free,
that it will operate with any software or hardware other
than that provided by F5 or specified in the
documentation, or that the Software will satisfy Licensee's
own specific requirements.
b)Remedy. Licensee's exclusive remedy and the entire
liability of F5 under this limited warranty and any other
guarantee made by F5 is, at F5's option, to repair or
replace any Software that fails during the warranty period
at no cost to Licensee. Any Product returned to F5 must
be pre-authorized by F5 with a Return Material
Authorization (RMA) number marked on the outside of
the package, and sent prepaid, insured and packaged
appropriately for safe shipment. The repaired or replaced
item will be shipped to Licensee, at F5's expense, no later
than 7 days after receipt by F5. Title to any returned
Products or components will transfer to F5 upon receipt.
F5 will replace defective media or documentation or, at its
ix
F5 Networks, Inc.
option, undertake reasonable efforts to modify the
Software to correct any substantial non-conformance with
the specifications.
c) Restrictions. The foregoing limited warranties extend only
to the original Licensee, and do not apply if the Software
or the Product (a) has been altered, except by F5, (b) has
not been installed, operated, repaired, or maintained in
accordance with F5's instructions, (c) has been subjected
to abnormal physical or electrical stress, misuse,
negligence or accident or (d) has been operated outside of
the environmental specifications for the product. F5's
limited software warranty does not apply to software
corrections or upgrades.
6. Infringement Indemnity. F5 will, at its expense, defend
any suit brought against Licensee based upon a claim that
the Software as delivered by F5 directly infringes a valid
patent or copyright. F5 will pay costs and damages finally
awarded against Licensee directly attributable to any such
claim, but only on condition that (a) F5 is notified in writing
of such claim within ten days following receipt by Licensee;
(b) F5 has sole control of the defense and settlement
negotiations, (c) Licensee provides F5 all information and
communications received by Licensee concerning such
claim, and (d) Licensee provides reasonable assistance to F5
when requested. F5 will have the right, at its option and
expense, (i) to obtain for Licensee rights to use the
Software, (ii) to replace or modify the Software so it
becomes non-infringing, or (iii) to accept return of the
Software in exchange or for a credit not to exceed the
purchase price paid by Licensee for such Software. The
foregoing, subject to the following restrictions, states the
exclusive liability of F5 to Licensee concerning
infringement.
Restrictions: F5 will have no liability for any claim of
infringement based on: (i) use of a superseded or altered
release of the Software, (ii) use of the Software in
combination with equipment or software not supplied or
specified by F5 in the Software documentation, where the
BIG/ip® Controller, v. 2.1
x
Software would not itself be infringing, (iii) use of the
Software in an application or environment not described in
the Software Documentation or (iv) Software that has been
altered or modified in any way by anyone other than F5 or
according to F5's instructions.
7. U.S. Government Restricted Rights. The Software was
developed at private expense and is provided with
"RESTRICTED RIGHTS." Use, duplication or disclosure
by the government is subject to restrictions as set forth in
FAR 52.227-14 and DFARS 252.227-7013 et. seq. or its
successor. The use of this Software by the government
constitutes acknowledgment of F5's and its licensors' rights
in the Software.
8. DISCLAIMER; LIMITATION OF REMEDY. EXCEPT
FOR THE WARRANTIES SPECIFICALLY DESCRIBED
HEREIN, F5 DOES NOT MAKE ANY GUARANTEE OR
WARRANTY, EXPRESS OR IMPLIED, WITH RESPECT
TO THE SOFTWARE, SPECIFICATIONS, SUPPORT,
SERVICE OR ANYTHING ELSE. F5 HAS NOT
AUTHORIZED ANYONE TO MAKE ANY
REPRESENTATION OR WARRANTY OTHER THAN AS
PROVIDED ABOVE. F5 DISCLAIMS ANY AND ALL
WARRANTIES AND GUARANTEES, EXPRESS,
IMPLIED OR OTHERWISE, ARISING, WITH RESPECT
TO THE SOFTWARE OR SERVICES DELIVERED
HEREUNDER, INCLUDING BUT NOT LIMITED TO
THE WARRANTY OF MERCHANTABILITY, THE
WARRANTY OF FITNESS FOR A PARTICULAR
PURPOSE, AND ANY WARRANTY OF NONINFRINGEMENT OF THE INTELLECTUAL PROPERTY
RIGHTS OF ANY THIRD PARTY. F5 WILL HAVE NO
OBLIGATION OR LIABILITY, WHETHER ARISING IN
CONTRACT (INCLUDING WARRANTY), TORT
(INCLUDING ACTIVE, PASSIVE OR IMPUTED
NEGLIGENCE, STRICT LIABILITY OR PRODUCT
LIABILITY) OR OTHERWISE FOR ANY SPECIAL,
INCIDENTAL, CONSEQUENTIAL OR INDIRECT
DAMAGES INCLUDING BUT NOT LIMITED TO LOSS
OF USE, LOSS OF DATA, BUSINESS INTERRUPTION,
xi
F5 Networks, Inc.
LOSS OF REVENUE, LOSS OF BUSINESS OR OTHER
FINANCIAL LOSS ARISING OUT OF OR IN
CONNECTION WITH THE SOFTWARE OR OTHER
GOODS OR SERVICES FURNISHED TO LICENSEE BY
F5, EVEN IF ADVISED OF THE POSSIBILITY OF SUCH
DAMAGES.
9. Termination. The license granted in Section 2 is effective
until terminated, and will automatically terminate if
Licensee fails to comply with any of its provisions. Upon
termination, Licensee will destroy the Software and
documentation and all copies or portions thereof.
10. Miscellaneous. This Agreement will be governed by the
laws of the State of Washington, USA without regard to its
choice of law rules. The provisions of the U.N. Convention
for the International Sale of Goods will not apply. Any
provisions found to be unenforceable will not affect the
enforceability of the other provisions contained herein, but
will instead be replaced with a provision as similar in
meaning to the original as possible. This Agreement
constitutes the entire agreement between the parties with
regard to its subject matter. No modification will be binding
unless in writing and signed by the parties.
BIG/ip® Controller, v. 2.1
xii
xiii
F5 Networks, Inc.
Table of Contents
Chapter 1
Introduction to the BIG/ip Controller
1-1
Welcome to the BIG/ip Controller . . . . . . . . . . . . . . . . . . . . . . . . . . . . . . . . . 1-2
BIG/ip Controller specifications . . . . . . . . . . . . . . . . . . . . . . . . . . . . . . . . . . 1-2
Internet protocol and network management support . . . . . . . . . . . . . . . 1-2
Security features . . . . . . . . . . . . . . . . . . . . . . . . . . . . . . . . . . . . . . . . . . 1-3
Configuration scalability . . . . . . . . . . . . . . . . . . . . . . . . . . . . . . . . . . . . 1-4
Configuration and monitoring tools . . . . . . . . . . . . . . . . . . . . . . . . . . . . 1-5
Load balancing options . . . . . . . . . . . . . . . . . . . . . . . . . . . . . . . . . . . . . 1-6
IP packet filtering and rate classes . . . . . . . . . . . . . . . . . . . . . . . . . . . . . 1-7
Configurable persistence for e-commerce and dynamic
content sites . . . . . . . . . . . . . . . . . . . . . . . . . . . . . . . . . . . . . . . . . . . . . . 1-7
BIG/ip Controller platform options . . . . . . . . . . . . . . . . . . . . . . . . . . . . 1-8
Finding help and technical support resources . . . . . . . . . . . . . . . . . . . . . . . . 1-9
What’s new in version 2.1 . . . . . . . . . . . . . . . . . . . . . . . . . . . . . . . . . . . . . . 1-10
New redundant system features . . . . . . . . . . . . . . . . . . . . . . . . . . . . . . 1-10
New persistence features . . . . . . . . . . . . . . . . . . . . . . . . . . . . . . . . . . . 1-12
Secure network address translations . . . . . . . . . . . . . . . . . . . . . . . . . . 1-13
Multiple interface cards . . . . . . . . . . . . . . . . . . . . . . . . . . . . . . . . . . . . 1-13
Wildcard ports . . . . . . . . . . . . . . . . . . . . . . . . . . . . . . . . . . . . . . . . . . . 1-13
Extended Content Verification for transparent nodes . . . . . . . . . . . . . 1-13
VLAN trunks . . . . . . . . . . . . . . . . . . . . . . . . . . . . . . . . . . . . . . . . . . . . 1-14
Enhancements to configuration and monitoring tools . . . . . . . . . . . . . 1-14
Managing your network traffic . . . . . . . . . . . . . . . . . . . . . . . . . . . . . . . . . . 1-15
A basic web site and e-commerce configuration . . . . . . . . . . . . . . . . . 1-15
A basic intranet configuration . . . . . . . . . . . . . . . . . . . . . . . . . . . . . . . 1-18
Chapter 2
Preparing for the Installation
2-1
Planning the BIG/ip Controller installation . . . . . . . . . . . . . . . . . . . . . . . . . . 2-2
Planning for a quick setup installation . . . . . . . . . . . . . . . . . . . . . . . . . . . . . . 2-2
xiv
Table of Contents
Planning for a standard or advanced installation . . . . . . . . . . . . . . . . . . . . . . 2-3
Choosing a load balancing mode . . . . . . . . . . . . . . . . . . . . . . . . . . . . . . 2-4
Setting up node ping and service checking . . . . . . . . . . . . . . . . . . . . . . 2-7
Setting up network address translations and IP forwarding . . . . . . . . . 2-8
Setting up redundant systems . . . . . . . . . . . . . . . . . . . . . . . . . . . . . . . 2-10
Setting up persistence features . . . . . . . . . . . . . . . . . . . . . . . . . . . . . . . 2-11
Configuring multiple network interface cards . . . . . . . . . . . . . . . . . . . 2-14
Using IP filters and rate filters . . . . . . . . . . . . . . . . . . . . . . . . . . . . . . . 2-15
Setting up the SNMP agent . . . . . . . . . . . . . . . . . . . . . . . . . . . . . . . . . 2-17
Setting up large configurations . . . . . . . . . . . . . . . . . . . . . . . . . . . . . . 2-17
Configuring virtual servers and nodes . . . . . . . . . . . . . . . . . . . . . . . . . . . . . 2-18
Mapping virtual servers to nodes . . . . . . . . . . . . . . . . . . . . . . . . . . . . . 2-18
Setting properties for virtual servers and nodes . . . . . . . . . . . . . . . . . . 2-20
Preparing additional network components . . . . . . . . . . . . . . . . . . . . . . . . . 2-23
Working with router configurations . . . . . . . . . . . . . . . . . . . . . . . . . . . 2-23
Setting up the servers to be load balanced . . . . . . . . . . . . . . . . . . . . . . 2-24
Preparing administrative workstations . . . . . . . . . . . . . . . . . . . . . . . . . 2-26
Preparing web site content . . . . . . . . . . . . . . . . . . . . . . . . . . . . . . . . . . 2-26
Chapter 3
Setting up the Hardware
3-1
Unpacking and installing the hardware . . . . . . . . . . . . . . . . . . . . . . . . . . . . . 3-2
Reviewing the hardware requirements . . . . . . . . . . . . . . . . . . . . . . . . . . 3-2
Familiarizing yourself with the BIG/ip Controller hardware . . . . . . . . 3-3
Environmental requirements and usage guidelines . . . . . . . . . . . . . . . . 3-5
Installing and connecting the hardware . . . . . . . . . . . . . . . . . . . . . . . . . 3-7
Running the First-Time Boot utility . . . . . . . . . . . . . . . . . . . . . . . . . . . . . . . 3-9
Gathering the information . . . . . . . . . . . . . . . . . . . . . . . . . . . . . . . . . . 3-10
Starting the First-Time Boot utility . . . . . . . . . . . . . . . . . . . . . . . . . . . 3-10
Defining a root password . . . . . . . . . . . . . . . . . . . . . . . . . . . . . . . . . . . 3-10
Defining a host name . . . . . . . . . . . . . . . . . . . . . . . . . . . . . . . . . . . . . . 3-11
Configuring a default route . . . . . . . . . . . . . . . . . . . . . . . . . . . . . . . . . 3-11
Configuring a time zone . . . . . . . . . . . . . . . . . . . . . . . . . . . . . . . . . . . 3-11
Configuring the interfaces . . . . . . . . . . . . . . . . . . . . . . . . . . . . . . . . . . 3-12
Configuring settings for a BIG/ip redundant system . . . . . . . . . . . . . . 3-15
Configuring remote administration . . . . . . . . . . . . . . . . . . . . . . . . . . . 3-16
Configuring settings for the BIG/ip web server . . . . . . . . . . . . . . . . . . 3-17
Confirming your configuration settings . . . . . . . . . . . . . . . . . . . . . . . . 3-18
Committing your configuration settings to the system . . . . . . . . . . . . 3-19
Defining additional host names . . . . . . . . . . . . . . . . . . . . . . . . . . . . . . . . . . 3-19
Preparing workstations for command line access . . . . . . . . . . . . . . . . . . . . 3-20
Downloading the F-Secure SSH client from
the BIG/ip web server . . . . . . . . . . . . . . . . . . . . . . . . . . . . . . . . . . . . . 3-21
xv
F5 Networks, Inc.
Table of Contents
Downloading the F-Secure SSH client using FTP . . . . . . . . . . . . . . . . 3-21
Setting up the F-Secure SSH client on a Windows 95
or Windows NT workstation . . . . . . . . . . . . . . . . . . . . . . . . . . . . . . . . 3-23
Setting up the F-Secure SSH client on a UNIX workstation . . . . . . . . 3-24
Chapter 4
Getting Started with a Basic Configuration
4-1
Setting up a basic configuration . . . . . . . . . . . . . . . . . . . . . . . . . . . . . . . . . . . 4-2
Configuring virtual servers . . . . . . . . . . . . . . . . . . . . . . . . . . . . . . . . . . . . . . 4-4
Using standard or wildcard virtual servers . . . . . . . . . . . . . . . . . . . . . . 4-5
Using optional virtual server properties . . . . . . . . . . . . . . . . . . . . . . . . . 4-6
Activating Transparent Node mode . . . . . . . . . . . . . . . . . . . . . . . . . . . . 4-6
Defining standard virtual servers . . . . . . . . . . . . . . . . . . . . . . . . . . . . . . 4-7
Defining wildcard virtual servers . . . . . . . . . . . . . . . . . . . . . . . . . . . . . 4-10
Allowing access to ports and services . . . . . . . . . . . . . . . . . . . . . . . . . . . . . 4-14
Configuring the timer settings . . . . . . . . . . . . . . . . . . . . . . . . . . . . . . . . . . . 4-15
Setting the node ping timer . . . . . . . . . . . . . . . . . . . . . . . . . . . . . . . . . 4-16
Setting the timer for reaping idle connections . . . . . . . . . . . . . . . . . . . 4-17
Setting the service check timer . . . . . . . . . . . . . . . . . . . . . . . . . . . . . . 4-18
Service checking for wildcard servers and ports . . . . . . . . . . . . . . . . . 4-20
Changing the load balancing mode . . . . . . . . . . . . . . . . . . . . . . . . . . . . . . . 4-21
Using Ratio mode . . . . . . . . . . . . . . . . . . . . . . . . . . . . . . . . . . . . . . . . 4-21
Configuring network address translations and IP forwarding for nodes . . . 4-23
Defining a standard network address translation (NAT) . . . . . . . . . . . 4-25
Defining a secure network address translation (SNAT) . . . . . . . . . . . . 4-26
Setting up IP forwarding . . . . . . . . . . . . . . . . . . . . . . . . . . . . . . . . . . . 4-28
Configuring Extended Content Verification service checking . . . . . . . . . . . 4-30
ECV service check properties . . . . . . . . . . . . . . . . . . . . . . . . . . . . . . . 4-31
Writing regular expressions for ECV service checks . . . . . . . . . . . . . 4-32
Setting up ECV service check in the F5 Configuration utility . . . . . . 4-34
Manually configuring and testing the /etc/bigd.conf file . . . . . . . . . . . 4-35
Configuring persistence for e-commerce and other dynamic content sites . 4-37
Setting up SSL persistence . . . . . . . . . . . . . . . . . . . . . . . . . . . . . . . . . 4-38
Setting up simple persistence . . . . . . . . . . . . . . . . . . . . . . . . . . . . . . . . 4-40
Configuring and synchronizing redundant systems . . . . . . . . . . . . . . . . . . . 4-42
Synchronizing configurations between controllers . . . . . . . . . . . . . . . 4-42
Configuring fail-safe settings . . . . . . . . . . . . . . . . . . . . . . . . . . . . . . . . 4-44
Addressing general networking issues . . . . . . . . . . . . . . . . . . . . . . . . . . . . . 4-46
Addressing routing issues . . . . . . . . . . . . . . . . . . . . . . . . . . . . . . . . . . 4-47
Configuring Sendmail . . . . . . . . . . . . . . . . . . . . . . . . . . . . . . . . . . . . . 4-51
Configuring DNS on the BIG/ip Controller . . . . . . . . . . . . . . . . . . . . 4-53
BIG/ip® Controller, v. 2.1
xvi
Table of Contents
Chapter 5
Working with Special Features
5-1
Introducing special features . . . . . . . . . . . . . . . . . . . . . . . . . . . . . . . . . . . . . . 5-2
Using advanced service check options . . . . . . . . . . . . . . . . . . . . . . . . . . . . . 5-3
Setting up advanced ECV service checks . . . . . . . . . . . . . . . . . . . . . . . 5-3
Introducing EAV service checks . . . . . . . . . . . . . . . . . . . . . . . . . . . . . . 5-5
Setting up EAV service checks . . . . . . . . . . . . . . . . . . . . . . . . . . . . . . . 5-5
EAV service check for SQL-based services . . . . . . . . . . . . . . . . . . . . . . 5-9
Using advanced persistence options . . . . . . . . . . . . . . . . . . . . . . . . . . . . . . 5-11
Using HTTP cookie persistence . . . . . . . . . . . . . . . . . . . . . . . . . . . . . 5-12
Using destination address affinity (sticky persistence) . . . . . . . . . . . . 5-14
Using persist mask on a virtual server . . . . . . . . . . . . . . . . . . . . . . . . . 5-16
Maintaining persistence across virtual servers that use
the same virtual addresses . . . . . . . . . . . . . . . . . . . . . . . . . . . . . . . . . . 5-17
Maintaining persistence across all virtual servers . . . . . . . . . . . . . . . . 5-18
Using advanced redundant system features . . . . . . . . . . . . . . . . . . . . . . . . . 5-20
Mirroring connection and persistence information . . . . . . . . . . . . . . . 5-20
Using gateway fail-safe . . . . . . . . . . . . . . . . . . . . . . . . . . . . . . . . . . . . 5-23
Using network-based fail-over . . . . . . . . . . . . . . . . . . . . . . . . . . . . . . . 5-25
Setting a specific BIG/ip Controller to be the preferred active unit . . 5-26
Configuring advanced Transparent Node mode options . . . . . . . . . . . . . . . 5-27
Port translation . . . . . . . . . . . . . . . . . . . . . . . . . . . . . . . . . . . . . . . . . . . 5-27
Node ping . . . . . . . . . . . . . . . . . . . . . . . . . . . . . . . . . . . . . . . . . . . . . . . 5-28
Configuring routes for Transparent Node mode . . . . . . . . . . . . . . . . . 5-28
Using standard virtual servers in Transparent Node mode . . . . . . . . . 5-28
Using FTP in Transparent Node mode . . . . . . . . . . . . . . . . . . . . . . . . 5-29
Setting up ECV service checks for transparent devices . . . . . . . . . . . . 5-29
Viewing final destination addresses in the printed connection table . . 5-30
Using specialized load balancing modes . . . . . . . . . . . . . . . . . . . . . . . . . . . 5-30
Understanding individual load balancing modes . . . . . . . . . . . . . . . . . 5-30
Setting the load balancing mode . . . . . . . . . . . . . . . . . . . . . . . . . . . . . 5-32
Controlling network access and traffic flow with filters . . . . . . . . . . . . . . . 5-35
IP filters . . . . . . . . . . . . . . . . . . . . . . . . . . . . . . . . . . . . . . . . . . . . . . . . 5-35
Rate filters and rate classes . . . . . . . . . . . . . . . . . . . . . . . . . . . . . . . . . 5-36
Working with more than two interface cards . . . . . . . . . . . . . . . . . . . . . . . . 5-39
Configuring additional interfaces with the First-Time Boot utility . . . 5-39
Specifying an interface for a virtual address . . . . . . . . . . . . . . . . . . . . 5-41
Specifying an interface for a NAT address . . . . . . . . . . . . . . . . . . . . . 5-42
Specifying an interface for a SNAT address . . . . . . . . . . . . . . . . . . . . 5-43
Routing with multiple NICs . . . . . . . . . . . . . . . . . . . . . . . . . . . . . . . . . 5-44
Editing httpd.conf for network administration with
the BIG/ip web server . . . . . . . . . . . . . . . . . . . . . . . . . . . . . . . . . . . . . 5-44
Optimizing large configurations . . . . . . . . . . . . . . . . . . . . . . . . . . . . . . . . . 5-46
xvii
F5 Networks, Inc.
Table of Contents
Reducing ARP traffic on the external network . . . . . . . . . . . . . . . . . .
Reducing the number of node pings and service checks issued
by the BIG/ip Controller . . . . . . . . . . . . . . . . . . . . . . . . . . . . . . . . . . .
Using alternative network configurations . . . . . . . . . . . . . . . . . . . . . . . . . .
Setting up 802.1q VLAN trunk mode . . . . . . . . . . . . . . . . . . . . . . . . .
Out of path routing . . . . . . . . . . . . . . . . . . . . . . . . . . . . . . . . . . . . . . . .
5-47
5-50
5-52
5-52
5-55
Chapter 6
Monitoring and Administration
6-1
Monitoring and administration utilities provided
on the BIG/ip Controller . . . . . . . . . . . . . . . . . . . . . . . . . . . . . . . . . . . . . . . . 6-2
Using the BIG/pipe command utility as a monitoring tool . . . . . . . . . . . . . . 6-3
Monitoring the BIG/ip Controller . . . . . . . . . . . . . . . . . . . . . . . . . . . . . 6-3
Monitoring virtual servers, virtual addresses, and services . . . . . . . . . . 6-7
Monitoring nodes and node addresses . . . . . . . . . . . . . . . . . . . . . . . . . . 6-9
Monitoring NATs . . . . . . . . . . . . . . . . . . . . . . . . . . . . . . . . . . . . . . . . . 6-10
Monitoring SNATs . . . . . . . . . . . . . . . . . . . . . . . . . . . . . . . . . . . . . . . . 6-10
Working with the BIG/stat utility . . . . . . . . . . . . . . . . . . . . . . . . . . . . . . . . 6-11
Working with the BIG/top utility . . . . . . . . . . . . . . . . . . . . . . . . . . . . . . . . . 6-12
Working with the Syslog utility . . . . . . . . . . . . . . . . . . . . . . . . . . . . . . . . . . 6-14
Removing and returning items to service . . . . . . . . . . . . . . . . . . . . . . . . . . 6-16
Removing the BIG/ip Controller from service . . . . . . . . . . . . . . . . . . 6-16
Removing individual virtual servers, virtual addresses, and ports
from service . . . . . . . . . . . . . . . . . . . . . . . . . . . . . . . . . . . . . . . . . . . . . 6-17
Removing individual nodes and node addresses from service . . . . . . 6-18
Viewing the currently defined virtual servers and nodes . . . . . . . . . . . 6-18
Viewing system statistics and log files . . . . . . . . . . . . . . . . . . . . . . . . . . . . 6-19
Viewing system statistics . . . . . . . . . . . . . . . . . . . . . . . . . . . . . . . . . . . 6-19
Viewing log files . . . . . . . . . . . . . . . . . . . . . . . . . . . . . . . . . . . . . . . . . 6-20
Printing the connection table . . . . . . . . . . . . . . . . . . . . . . . . . . . . . . . . . . . . 6-20
Changing passwords for the BIG/ip Controller . . . . . . . . . . . . . . . . . . . . . . 6-20
Changing the BIG/ip Controller password . . . . . . . . . . . . . . . . . . . . . 6-20
Changing passwords and adding new user IDs
for the BIG/ip web server . . . . . . . . . . . . . . . . . . . . . . . . . . . . . . . . . . 6-21
Working with the BIG/store database . . . . . . . . . . . . . . . . . . . . . . . . . . . . . 6-21
Using bigdba . . . . . . . . . . . . . . . . . . . . . . . . . . . . . . . . . . . . . . . . . . . . 6-22
Chapter 7
Configuring SNMP
7-1
Working with SNMP on the BIG/ip Controller . . . . . . . . . . . . . . . . . . . . . . . 7-2
Preparing the BIG/ip Controller for SNMP . . . . . . . . . . . . . . . . . . . . . . . . . . 7-3
BIG/ip® Controller, v. 2.1
xviii
Table of Contents
Downloading the MIBs . . . . . . . . . . . . . . . . . . . . . . . . . . . . . . . . . . . . .
Understanding configuration file requirements . . . . . . . . . . . . . . . . . . .
Configuring the BIG/ip SNMP agent . . . . . . . . . . . . . . . . . . . . . . . . . . . . . .
Configuring SNMP settings . . . . . . . . . . . . . . . . . . . . . . . . . . . . . . . . . .
Configuring options for the checktrap script . . . . . . . . . . . . . . . . . . . . .
7-3
7-3
7-8
7-8
7-9
Appendix A
Configuration Files
A-1
Configuration files for the BIG/ip Controller . . . . . . . . . . . . . . . . . . . . . . . . A-2
Appendix B
BIG/pipe Command Reference
B-1
BIG/pipe commands . . . . . . . . . . . . . . . . . . . . . . . . . . . . . . . . . . . . . . . . . . . B-2
-? . . . . . . . . . . . . . . . . . . . . . . . . . . . . . . . . . . . . . . . . . . . . . . . . . . . . . . B-4
alias . . . . . . . . . . . . . . . . . . . . . . . . . . . . . . . . . . . . . . . . . . . . . . . . . . . . B-5
configsync . . . . . . . . . . . . . . . . . . . . . . . . . . . . . . . . . . . . . . . . . . . . . . . B-7
conn . . . . . . . . . . . . . . . . . . . . . . . . . . . . . . . . . . . . . . . . . . . . . . . . . . . . B-8
-d . . . . . . . . . . . . . . . . . . . . . . . . . . . . . . . . . . . . . . . . . . . . . . . . . . . . . . B-9
-f . . . . . . . . . . . . . . . . . . . . . . . . . . . . . . . . . . . . . . . . . . . . . . . . . . . . . . B-10
failover . . . . . . . . . . . . . . . . . . . . . . . . . . . . . . . . . . . . . . . . . . . . . . . . . B-11
gateway . . . . . . . . . . . . . . . . . . . . . . . . . . . . . . . . . . . . . . . . . . . . . . . . B-12
-h and -help . . . . . . . . . . . . . . . . . . . . . . . . . . . . . . . . . . . . . . . . . . . . . B-13
interface . . . . . . . . . . . . . . . . . . . . . . . . . . . . . . . . . . . . . . . . . . . . . . . . B-14
lb . . . . . . . . . . . . . . . . . . . . . . . . . . . . . . . . . . . . . . . . . . . . . . . . . . . . . B-19
maint . . . . . . . . . . . . . . . . . . . . . . . . . . . . . . . . . . . . . . . . . . . . . . . . . . B-20
mirror . . . . . . . . . . . . . . . . . . . . . . . . . . . . . . . . . . . . . . . . . . . . . . . . . . B-21
nat . . . . . . . . . . . . . . . . . . . . . . . . . . . . . . . . . . . . . . . . . . . . . . . . . . . . . B-22
node . . . . . . . . . . . . . . . . . . . . . . . . . . . . . . . . . . . . . . . . . . . . . . . . . . . B-24
persist . . . . . . . . . . . . . . . . . . . . . . . . . . . . . . . . . . . . . . . . . . . . . . . . . . B-27
port . . . . . . . . . . . . . . . . . . . . . . . . . . . . . . . . . . . . . . . . . . . . . . . . . . . . B-29
-r . . . . . . . . . . . . . . . . . . . . . . . . . . . . . . . . . . . . . . . . . . . . . . . . . . . . . . B-31
ratio . . . . . . . . . . . . . . . . . . . . . . . . . . . . . . . . . . . . . . . . . . . . . . . . . . . B-32
-s . . . . . . . . . . . . . . . . . . . . . . . . . . . . . . . . . . . . . . . . . . . . . . . . . . . . . . B-34
snat . . . . . . . . . . . . . . . . . . . . . . . . . . . . . . . . . . . . . . . . . . . . . . . . . . . . B-35
summary . . . . . . . . . . . . . . . . . . . . . . . . . . . . . . . . . . . . . . . . . . . . . . . . B-40
timeout_node . . . . . . . . . . . . . . . . . . . . . . . . . . . . . . . . . . . . . . . . . . . . B-43
timeout_svc . . . . . . . . . . . . . . . . . . . . . . . . . . . . . . . . . . . . . . . . . . . . . B-45
tping_node . . . . . . . . . . . . . . . . . . . . . . . . . . . . . . . . . . . . . . . . . . . . . . B-47
tping_svc . . . . . . . . . . . . . . . . . . . . . . . . . . . . . . . . . . . . . . . . . . . . . . . B-48
treaper . . . . . . . . . . . . . . . . . . . . . . . . . . . . . . . . . . . . . . . . . . . . . . . . . B-50
udp . . . . . . . . . . . . . . . . . . . . . . . . . . . . . . . . . . . . . . . . . . . . . . . . . . . . B-52
xix
F5 Networks, Inc.
Table of Contents
-v . . . . . . . . . . . . . . . . . . . . . . . . . . . . . . . . . . . . . . . . . . . . . . . . . . . . .
version . . . . . . . . . . . . . . . . . . . . . . . . . . . . . . . . . . . . . . . . . . . . . . . . .
vip . . . . . . . . . . . . . . . . . . . . . . . . . . . . . . . . . . . . . . . . . . . . . . . . . . . .
Backward compatible commands . . . . . . . . . . . . . . . . . . . . . . . . . . . . . . . .
B-54
B-55
B-56
B-68
Appendix C
BIG/ip System Control Variables
C-1
Setting BIG/ip system control variables . . . . . . . . . . . . . . . . . . . . . . . . . . . . C-2
sysctl . . . . . . . . . . . . . . . . . . . . . . . . . . . . . . . . . . . . . . . . . . . . . . . . . . . C-3
bigip.vipnoarp . . . . . . . . . . . . . . . . . . . . . . . . . . . . . . . . . . . . . . . . . . . . C-4
bigip.bonfire_mode . . . . . . . . . . . . . . . . . . . . . . . . . . . . . . . . . . . . . . . . C-5
bigip.bonfire_compatibility_mode . . . . . . . . . . . . . . . . . . . . . . . . . . . . C-6
bigip.fastest_max_idle_time . . . . . . . . . . . . . . . . . . . . . . . . . . . . . . . . . C-7
bigip.max_sticky_entries . . . . . . . . . . . . . . . . . . . . . . . . . . . . . . . . . . . . C-8
net.inet.ip.forwarding . . . . . . . . . . . . . . . . . . . . . . . . . . . . . . . . . . . . . . . C-9
bigip.halt_reboot_timeout . . . . . . . . . . . . . . . . . . . . . . . . . . . . . . . . . . C-10
net.inet.ip.sourcecheck . . . . . . . . . . . . . . . . . . . . . . . . . . . . . . . . . . . . . C-11
bigip.webadmin_port . . . . . . . . . . . . . . . . . . . . . . . . . . . . . . . . . . . . . . C-12
bigip.persist_time_used_as_limit . . . . . . . . . . . . . . . . . . . . . . . . . . . . C-13
bigip.persist_on_any_vip . . . . . . . . . . . . . . . . . . . . . . . . . . . . . . . . . . . C-14
bigip.persist_on_any_port_same_vip . . . . . . . . . . . . . . . . . . . . . . . . . C-15
bigip.open_3dns_lockdown_ports . . . . . . . . . . . . . . . . . . . . . . . . . . . . C-16
bigip.tcphps_mss_override . . . . . . . . . . . . . . . . . . . . . . . . . . . . . . . . . C-17
bigip.open_telnet_port . . . . . . . . . . . . . . . . . . . . . . . . . . . . . . . . . . . . . C-18
bigip.open_ftp_ports . . . . . . . . . . . . . . . . . . . . . . . . . . . . . . . . . . . . . . C-19
bigip.open_ssh_port . . . . . . . . . . . . . . . . . . . . . . . . . . . . . . . . . . . . . . . C-20
bigip.open_rsh_ports . . . . . . . . . . . . . . . . . . . . . . . . . . . . . . . . . . . . . . C-21
bigip.verbose_log_level . . . . . . . . . . . . . . . . . . . . . . . . . . . . . . . . . . . . C-22
Appendix D
System Utilities
D-1
sod . . . . . . . . . . . . . . . . . . . . . . . . . . . . . . . . . . . . . . . . . . . . . . . . . . . . . D-2
bigd . . . . . . . . . . . . . . . . . . . . . . . . . . . . . . . . . . . . . . . . . . . . . . . . . . . . D-6
big3d . . . . . . . . . . . . . . . . . . . . . . . . . . . . . . . . . . . . . . . . . . . . . . . . . . D-11
Appendix E
Services and Port Index
E-1
Glossary
BIG/ip® Controller, v. 2.1
xx
Table of Contents
Index
xxi
F5 Networks, Inc.
1
Introduction to the BIG/ip
Controller
• Welcome to the BIG/ip Controller
• BIG/ip Controller specifications
• Finding help and technical support resources
• What’s new in version 2.1
• Managing your network traffic
1-1
Chapter 1
Welcome to the BIG/ip Controller
Welcome to the BIG/ip® Controller Administrator Guide. This
guide describes how to set up the BIG/ip Controller hardware and
how to configure your load balancing setup, as well as other BIG/ip
Controller features. The Administrator guide also includes the
software specifications for the BIG/ip Controller platform and
reviews some sample configurations that can help you in planning
your own configuration.
BIG/ip Controller specifications
The BIG/ip Controller is a network appliance that manages and
balances traffic for networking equipment such as web servers,
cache servers, routers, firewalls, and proxy servers. A variety of
useful features meets the special needs of e-commerce sites,
Internet service providers, and managers of large intranets. The
system is highly configurable, and its web-based and command line
configuration utilities allow for easy system set up and monitoring.
Adding a BIG/ip Controller to your network ensures that your
network remains reliable. The BIG/ip Controller continually
monitors the servers and other equipment it manages, and never
attempts to send connections to servers that are down or too busy to
handle the connection. The BIG/ip Controller uses a variety of
methods to monitor equipment, from simple pings to more
advanced methods, such as Extended Content Verification that
verifies whether a server returns specific site content. The BIG/ip
Controller also offers several layers of redundancy that ensure its
own reliability.
Internet protocol and network management support
The BIG/ip platform supports both TCP and UDP protocols, and
also supports popular network services including:
1-2
❖
HTTP
❖
SSL
F5 Networks, Inc.
Introduction to the BIG/ip Controller
❖
FTP (Active and Passive)
❖
SMTP
❖
NNTP
❖
POP
❖
DNS
❖
IMAP
❖
Real Audio/TCP
❖
Telnet
Note that the BIG/ip Controller supports administrative protocols,
such as Simple Network Management Protocol (SNMP) and
Simple Mail Transfer Protocol (SMTP) (outbound only), for
performance monitoring and notification of system events. The
BIG/ip Controller’s SNMP agent allows you to monitor status and
current traffic flow using popular network management tools,
including the F5 Configuration utility. The SNMP agent provides
useful data such as packets in and out per second, and current
connections being handled for each virtual server. You may also
want to take advantage of Telnet, FTP, and the F-Secure SSH client
(distributed only in the US). The F-Secure SSH client provides a
secure UNIX shell connection to the BIG/ip Controller from a
remote workstation.
Security features
The BIG/ip Controller offers a variety of features that protect both
the controller itself, and the network equipment that it manages.
Each of the following features can help prevent potentially hostile
attacks on your site or equipment.
❖
IP address protection
On its external network, the BIG/ip Controller does not expose
the IP addresses of the servers that it manages. Instead, it offers
firewall capabilities, translating addresses when servers connect
to other hosts on the external network. You can set up either
standard Network Address Translations (NATs) that allow both
incoming and outgoing traffic, or you can set up Secure Network
Address Translations (SNATs) that allow only outgoing traffic.
BIG/ip® Controller, v. 2.1
1-3
Chapter 1
❖
Port lockdown
The BIG/ip Controller prevents clients from connecting to any
port which you have not specifically opened for network traffic.
This feature helps prevent a common attack where users try to
gain access to the machine using one of the many ephemeral
ports that do not host a well-known service.
❖
Controlled administrative connections
The BIG/ip Controller allows you to make direct administrative
connections to the servers it manages, but it prevents direct
connections to those servers by random clients, based on their IP
address.
❖
IP address filtering
The IP filtering features allow you to specifically accept or deny
connections received from particular IP addresses or ranges of IP
addresses.
❖
Termination of inactive connections
The BIG/ip Controller automatically terminates connections that
remain inactive for a period of time you specify, which prevents
common denial of service attacks.
In addition to these features, BIG/ip Controllers distributed in the
US support encrypted administrative connections using F-Secure
SSH for shell connections, and SSL protocol for connections to the
web-based configuration utility.
Configuration scalability
The BIG/ip Controller is a highly scalable and versatile solution.
You can actually configure a single BIG/ip Controller to manage up
to 10,000 virtual servers, though most common configurations are
significantly smaller. The number of servers, firewalls, or routers
that a single BIG/ip Controller can load balance is limited only by
the capacity of your network media, such as Ethernet. The BIG/ip
Controller supports a variety of media options, including Fast
Ethernet, Gigabit Ethernet, and FDDI. The maximum number of
concurrent connections that a BIG/ip Controller can manage is
determined by the amount of RAM in your particular BIG/ip
Controller hardware configuration.
1-4
F5 Networks, Inc.
Introduction to the BIG/ip Controller
Configuration and monitoring tools
The BIG/ip platform provides the following web-based and
command line administrative tools that make for easy setup and
configuration.
The First-Time Boot utility
The First-Time Boot utility is a wizard that walks you through the
initial system set up. The utility helps you quickly define basic
system settings, such as a root password and the IP addresses for
the interfaces that connect the BIG/ip Controller to the network.
The First-Time Boot utility also helps you configure access to the
BIG/ip web server, which hosts the web-based F5 Configuration
utility.
The F5 Configuration utility
The F5 Configuration utility is a web-based application that you use
to configure and monitor the load balancing setup on the BIG/ip
Controller. In the F5 Configuration utility, you can configure
virtual servers, define IP and packet rate filters, and also configure
system objects including the SNMP agent and system settings. The
F5 Configuration utility allows you to monitor network traffic,
current connections, and the operating system itself, and it also
provides convenient access to downloads such as the SNMP MIB.
The F5 Configuration utility requires Netscape Navigator or
Microsoft Internet Explorer, version 4.0 or later.
The BIG/pipe and BIG/top command line utilities
The BIG/pipe™ utility is the command line counter-part to the F5
Configuration utility. Using BIG/pipe commands, you can
configure virtual servers, open ports to network traffic, and
configure a wide variety of features. To monitor the BIG/ip
Controller, you can use certain BIG/pipe commands, or you can
use the BIG/top™ utility, which provides real-time system
monitoring. You can use the command line utilities directly on the
BIG/ip Controller, or you can execute commands via a remote shell,
such as the SSH client (US only), or a Telnet client.
BIG/ip® Controller, v. 2.1
1-5
Chapter 1
Load balancing options
The BIG/ip Controller offers seven different load balancing modes,
including three static modes and four dynamic modes. A load
balancing mode defines, in part, the logic that a BIG/ip Controller
uses to determine which server should receive a particular
connection on a specific port.
Static load balancing
Static load balancing is based on pre-defined user settings, and
does not take current performance into account. The BIG/ip
Controller supports three static load balancing modes:
❖
Round Robin
Round Robin mode is a basic load balancing mode that
distributes connections evenly across all ports, passing each new
connection to the next port in line.
❖
Ratio
The Ratio mode distributes new connections across ports in
proportion to a user-defined ratio. For example, if your array
contained one new, high-speed server and two older servers, you
could set the ratio so that the high-speed server receives twice as
many connections as either of the two older servers.
❖
Priority
The Priority mode distributes connections in round robin fashion
to a specific groups of servers. It begins distributing new
connections to the highest priority group. If all servers in that
group should go down, it begins distributing connections to
servers in the next higher priority group.
Dynamic load balancing
Dynamic load balancing modes use current performance
information from each node to determine which node should
receive each new connection. The different dynamic load balancing
modes incorporate different performance factors:
❖
1-6
Least Connections
In Least Connections mode, the BIG/ip Controller sends each
new connection to the node that currently hosts the fewest current
connections.
F5 Networks, Inc.
Introduction to the BIG/ip Controller
❖
Fastest
In Fastest mode, the BIG/ip Controller sends each new
connection to the node that has the best response time.
❖
Observed
In Observed mode, the BIG/ip Controller sends each new
connection to the node that has the highest performance rating,
based on a combination of fewest connections and best response
time.
❖
Predictive
Predictive mode factors in both performance ratings and
performance improvement over time.
IP packet filtering and rate classes
The BIG/ip platform supports easy configuration of the BSD
operating system method of IP packet filtering. IP packet filtering
allows you to control both in-bound and out-bound network traffic.
For example, you can specify a single IP address, or a range of IP
addresses, from which your site either accepts or denies network
traffic. You can also specify one or more IP addresses to which you
specifically want to allow or prevent out-bound connections.
The BIG/ip platform also supports rate classes, which are an
extension to IP filters. A rate class defines a maximum outgoing
packet rate (bits per second) for connections that are destined for a
specific IP address or from a range of IP addresses. You can use
rate classes to help control the amount and flow of specific network
traffic. For example, you can offer faster connection speeds for
high priority connections, such as paying customers on an ecommerce site.
Configurable persistence for e-commerce and dynamic
content sites
Some e-commerce and other dynamic content sites occasionally
require returning users to go the same server that hosted their last
connection, rather than being load balanced to a random server. For
example, if a customer reserves an airline ticket and holds it for 24
BIG/ip® Controller, v. 2.1
1-7
Chapter 1
hours, the customer may need to return to a specific back-end server
that stores the reservation information in order to purchase the
ticket.
The BIG/ip Controller offers a variety of sophisticated persistence
options that support this functionality. In addition to simple
persistence and standard SSL persistence, the BIG/ip Controller
supports cookie persistence. Cookie persistence is a unique
implementation where the BIG/ip Controller stores persistence
connection information in a cookie on the client, rather than in a
table in its own memory. When the client returns and makes a
persistence connection request, the BIG/ip Controller uses the
information in the cookie to determine which back-end server
should host the client connection.
The BIG/ip Controller supports other useful persistence options,
including simple persistence for TCP and UDP (which bases
connection information on source and destination IP address) and
SSL persistence (which bases connection information on an SSL
session ID).
BIG/ip Controller platform options
The BIG/ip Controller platform offers three different systems, each
of which can be stand-alone, or can run in redundant pairs:
1-8
❖
The BIG/ip LB Controller
The BIG/ip LB Controller provides basic load balancing features.
Note that the BIG/ip LB Controller does not support all of the
features documented in this guide. For a comprehensive list of
the features that it does support, refer to the Quick Guide to the
BIG/ip LB Controller, provided with your BIG/ip LB Controller
product package.
❖
The BIG/ip HA Controller
In addition to the basic load balancing features supported on the
BIG/ip LB Controller, the BIG/ip HA Controller supports
advanced features, such as Extended Content Verification, and
also supports high-end security for administrative shell
connections. BIG/ip HA Controllers distributed in the US also
F5 Networks, Inc.
Introduction to the BIG/ip Controller
support encrypted administrative connections using SSH for shell
connections and SSL for connections to the web-based F5
Configuration utility.
❖
The BIG/ip HA+ Controller
The BIG/ip HA+ Controller supports the same features as the
BIG/ip HA Controller, but it offers high-end hardware for high
traffic sites.
Note
BIG/ip Controllers distributed outside of the United States,
regardless of system type, do not support encrypted
communications. They do not include the F-Secure SSH client, nor
do they support SSL connections to the BIG/ip web server. Instead,
you can use the standard Telnet, FTP, and HTTP protocols to
connect to the unit and perform administrative functions.
Finding help and technical support resources
In addition to this administrator guide, you can find technical
documentation about the BIG/ip Controller in the following
locations:
❖
Release notes
The release note for the current version of the BIG/ip Controller
is available on the BIG/ip web server. The release note contains
the latest information for the current version, including a list of
new features and enhancements, a list of fixes, and, in some
cases, a list of known issues.
❖
Online help for BIG/ip Controller features
You can find help online in three different locations:
• The BIG/ip web server has a PDF version of this administrator
guide. Note that some BIG/ip Controller upgrades replace the
online administrator guide with an updated version of the
guide.
• The web-based F5 Configuration utility has online help for
each screen. Simply click the Help button in the toolbar.
BIG/ip® Controller, v. 2.1
1-9
Chapter 1
• Individual BIG/pipe commands have online help, including
command syntax and examples, in standard UNIX man page
format. Simply type the command followed by the question
mark option (-?), and the BIG/ip Controller displays the syntax
and usage associated with the command.
❖
Third-party documentation for software add-ons
The BIG/ip web server contains online documentation for all
third-party software included with the BIG/ip Controller, such as
GateD.
❖
Technical support via the World Wide Web
The F5 Networks Technical Support web site,
http://tech.F5.com, provides the latest technical notes, answers
to frequently asked questions, and updates for administrator
guides (in PDF format). To access this site, you need to obtain a
customer ID and a password from the F5 Help Desk.
What’s new in version 2.1
The BIG/ip platform offers the following major new features in
version 2.1, in addition to smaller enhancements such as support for
VLAN trunks.
New redundant system features
Redundant BIG/ip Controller systems support three new important
features: connection mirroring, network fail-over, and gateway failsafe.
Connection and persistence mirroring
Connection and persistence mirroring allow the standby unit in a
redundant system to maintain the information necessary to sustain
the connections and persistence information currently running
through the active unit. If the active unit fails and the standby unit
takes over, it handles the current connections or persistence
information immediately, and allows them to continue virtually
1 - 10
F5 Networks, Inc.
Introduction to the BIG/ip Controller
uninterrupted. This is particularly useful if your site handles FTP,
Telnet, Chat, or other long-lived connections, that are especially
sensitive to interruption.
Fail-over configuration options
The BIG/ip Controller now offers two types of redundant system
configurations:
❖
Hardware fail-over
Hardware fail-over is the standard fail-over configuration that has
been supported on the BIG/ip Controller for the past several
versions. In a hardware fail-over configuration, the two BIG/ip
Controller units in the system are connected directly by a failover cable. This provides the highest level of reliability, because
it does not depend on any network equipment to get the important
fail-over data from one unit to the other.
❖
Network fail-over
Network fail-over is a new configuration option that allows you
to set up two individual BIG/ip Controllers as a redundant
system, without having a direct hardwired connection between
the two units. Instead, the units transfer the fail-over data via the
network. This option works well in many situations, but does not
provide as much reliability as the hardware fail-over setup. You
may actually want to consider using this option to provide an
additional layer of fail-over redundancy in a system that is
currently configured for hardware fail-over.
Gateway fail-safe
Gateway fail-safe is a new feature for redundant systems that
simply provides one more checkpoint that can trigger a fail-over.
You generally want to implement gateway fail-safe if your BIG/ip
Controller uses two different gateways to connect each unit in the
redundant system to the Internet. If the primary gateway fails, the
second BIG/ip Controller can still connect to the Internet through
the second gateway. Gateway fail-safe uses ICMP echo requests to
verify that a particular gateway is up and running.
BIG/ip® Controller, v. 2.1
1 - 11
Chapter 1
New persistence features
The BIG/ip Controller offers several new options for persistence,
including a unique persistence that stores persistent connection
information in an HTTP cookie on a client’s own workstation.
Cookie persistence
Cookie persistence is an important new feature unique to the BIG/ip
Controller. Cookie persistence allows persistent connection
information to be stored in an HTTP cookie on the client’s machine,
rather than in a table on the BIG/ip Controller. Web servers may
store client information independently, rather than storing it in
location available to all web servers in an array. Thus, even though
a returning client may have information stored in a cookie, the
server to which the client connects may not have the corresponding
information needed to process the cookie. In this case, the client
needs to return to the same server that stores the information needed
to process the cookie, and the BIG/ip Controller now allows for
that. Using cookie persistence offers you the advantage of reducing
the amount of storage space taken up on the BIG/ip Controller.
Destination address affinity
This feature provides a special type of persistence that is especially
useful for cache servers. Similar to simple persistence, destination
address affinity keeps track of incoming clients’ source and
destination IP addresses. When a client is looking to make a repeat
connection to a particular destination IP address, the BIG/ip
Controller directs the client to the same cache server or other
transparent node that it previously used. Forcing clients to
repeatedly use the same cache server can help you reduce the
amount of content that might otherwise be duplicated on two or
more cache servers in your network.
Simple persistence
You can now configure simple persistence for each individual
virtual server. (In previous versions, you could configure simple
persistence only for ports; any virtual server that used a specific
port would inherit that port’s persistence settings.)
1 - 12
F5 Networks, Inc.
Introduction to the BIG/ip Controller
Simple persistence for a virtual server provides a new persist mask
feature. The persist mask defines a range of IP addresses that can
be matched to a persistent connection. Any client whose source IP
address falls within the range is considered a match for the given
persistence entry.
Secure network address translations
Secure Network Address Translation (SNAT) is a new feature that
gives the BIG/ip Controller additional firewall functionality. You
can define a SNAT IP address that acts as the source IP address for
one or more clients on the BIG/ip Controller’s internal interface
looking to connect to hosts on the BIG/ip Controller’s external
interface. SNAT IP addresses are very secure because they cannot
accept incoming connections from clients on the BIG/ip
Controller’s external network.
Multiple interface cards
All BIG/ip Controller products now support having more than two
interface cards. You can enhance the reliability of a BIG/ip
Controller by installing redundant interface cards for each network
that the BIG/ip Controller connects to. The separate interface cards
can connect through different routers or gateways to the same
network, allowing for more than one available network path.
Wildcard ports
You can now use wildcard ports both in standard virtual servers and
in wildcard virtual servers. A virtual server defined with a wildcard
port inherently accepts any type of traffic. Accordingly, the nodes
that are members of that virtual server must also use wildcard ports.
Extended Content Verification for transparent nodes
You can now set up ECV service checks for transparent nodes.
These checks are used to determine if tranparent nodes are
operating. This is done by routing the ECV service check through
the transparent node to a configurable destination beyond the
transparent node.
BIG/ip® Controller, v. 2.1
1 - 13
Chapter 1
VLAN trunks
The BIG/ip Controller now supports IEEE 802.1q VLAN tags. You
can define a VLAN tag for the IP address, the shared IP alias in a
redundant system, and any IP addresses on the BIG/ip Controller’s
internal interface. Note however, that if you use a VLAN tag for
any one of these addresses, you must use VLAN tags for all of the
IP addresses defined for the BIG/ip Controller itself (excluding IP
addresses used for virtual servers, nodes, NATs, and SNATs).
Enhancements to configuration and monitoring tools
The F5 Configuration utility
The web-based F5 Configuration utility now supports multiple-user
access, which allows you to define three security levels for users:
full read-write, partial read-write, and read-only. The Config utility
also supports all of the new features in version 2.1. In addition to
several new screens, some existing screens have been reorganized
to accommodate new settings. For a review of each particular
screen, click the Help button in the toolbar.
BIG/pipe command line utility
The BIG/pipe® command line utility has been updated and
streamlined. In addition to new commands for new features, certain
existing commands support new syntax to make for more efficient
configuration.
System control variables
There are new system control variables, and the default settings for
some existing system control variables have changed in certain
cases. To view a description of the system control variables used by
BIG/ip Controllers, refer to Appendix C, BIG/ip System Control
Variables.
1 - 14
F5 Networks, Inc.
Introduction to the BIG/ip Controller
The SNMP MIB
The BIG/ip Controller includes an updated SNMP MIB that
supports the new features, as well as enhanced support for existing
features.
Managing your network traffic
The most common application of the BIG/ip Controller is to
distribute traffic across an array of web servers that host standard
web traffic, including e-commerce traffic. However, a BIG/ip
Controller can also control traffic distribution for other types of
servers, such as cache servers, proxy servers, firewalls, and even
routers.
The following sections provide you with two basic configuration
examples that can help you plan your installation. These examples
can also help you understand how people use some of the most
popular BIG/ip Controller features to resolve specific issues or to
enhance network performance in general.
A basic web site and e-commerce configuration
First, we start with a basic configuration where a BIG/ip Controller
load balances two sites: www.MySite.com and store.MySite.com.
The www.MySite.com site provides standard web content, and the
store.MySite.com site is the e-commerce site that sells items to
www.MySite.com customers. In this scenario, the BIG/ip
Controller provides simple load balancing for both sites.
Setting up the topology
To set up load balancing for these sites, you need to create two
virtual servers, one for each site. Even though the sites are related
and they may even share the same IP address, each requires its own
virtual server because it uses a different port to support its particular
protocol: port 80 for the HTTP traffic going to www.MySite.com,
and port 443 for the SSL traffic going to store.MySite.com.
BIG/ip® Controller, v. 2.1
1 - 15
Chapter 1
Figure 1.1 shows the topology for the sample configuration. Each
site uses two of the three web servers to host its content. Both sites
happen to share Server 2.
Note
Note that in this example, as in all examples in this guide, we use
only non-routable IP addresses. In a real topology, the virtual
server IP addresses would have to be routable on the Internet.
BIG /ip Controller
Virtual Server 1
ww w.M ySite.com
192.168.200.10:80
Virtual Server 2
store.M ySite.com
192.168.200.10:443
P ort 80
P ort 80
P ort 443
P ort 443
S erver 1
192.168.100.1
Server 2
192.168.100.2
S erver 3
192.168.100.3
Figure 1.1 A basic configuration
The virtual servers that you define always include three basic
elements:
❖
1 - 16
virtual IP address
This is the IP address that is registered with DNS and associated
with your site’s domain name. In our example, both
www.MySite.com and store.MySite.com use the same IP
address: 192.168.200.10. Both domain names would presumably
have to be registered with DNS to resolve to that IP address.
F5 Networks, Inc.
Introduction to the BIG/ip Controller
❖
Port
The port that hosts the specific service supported by your site. In
our example, we have two different sites that support two
different ports: port 80 and port 443.
❖
Servers that host your site
The list of physical servers that actually host your site
connections. For a given server, you list each IP address and port
number pair, referred to as a node, that the server handles. Even
though our example above only includes three servers, it actually
has four nodes:
• Server 1 hosts only one node: 192.168.100.1:80.
• Server 2 hosts two nodes, one for each service it supports:
192.168.100.2:80 and 192.168.100.2:443.
• Server 3 hosts only one node: 192.168.100.3:443.
The BIG/ip Controller distributes connections among the three
servers according to a user-specified load balancing mode. The
most common mode is Round Robin, which simply distributes each
new connection to the next server in line, eventually distributing the
connections equally among all the servers.
Using additional features
In this type of configuration, you might want to take advantage of
the following BIG/ip Controller features:
❖
Extended Content Verification
Verifies that the web servers are not only up and running, but also
able to send valid content to clients. For example, you could use
Extended Content Verification to make sure that
www.MySite.com returns its home page rather than an HTTP
404 error.
❖
Persistence
Allows returning e-commerce customers to bypass load
balancing and connect to the original back-end server that may
contain user-specific information. In our example,
store.MySite.com may allow users to fill a shopping cart,
disconnect from the site, and then return up to 24 hours later to
BIG/ip® Controller, v. 2.1
1 - 17
Chapter 1
purchase the items. When the user returns to purchase the items,
the user may need to go to the same back-end server, depending
on how the e-commerce site is set up.
❖
Network Address Translation
Allows you to make direct administrative connections to the web
servers through the BIG/ip Controller. If your administrative
workstation is on the network connected to the BIG/ip
Controller’s external interface, and administrative workstations
frequently are, this feature is essential.
❖
Secure Network Address Translation (SNAT)
Allows you to make map internally routable IP addresses to an
externally routable IP address. SNATs do not allow incoming
connections.
A basic intranet configuration
The next example is a configuration that might be found in a large
corporate intranet. In this scenario, the BIG/ip Controller performs
load balancing for two different types of connection requests:
1 - 18
❖
Connections to the company’s intranet web site
The load balancing for the company’s intranet web site is similar
to basic Internet web site load balancing. The BIG/ip Controller
simply load balances the two web servers that host the company
intranet web site.
❖
Connections to hosts on the Internet
In this example, the BIG/ip Controller provides load balancing
for connections bound for the Internet. However, the example
shows a somewhat sophisticated setup where the BIG/ip
Controller actually intercepts HTTP traffic and directs it to a
special cache server. Only clients using protocols other than
HTTP, such as FTP or SMTP email, get load balanced to one of
the two firewalls that lead to the Internet. This greatly reduces
the number of concurrent connections that the firewalls have to
maintain. Clients looking to retrieve web content get the content
from the cache server itself, instead of the actual web site host. If
the cache server does not have the content that the client is
looking for, the cache server retrieves the content from the real
web site on behalf of the client and then forwards it to the client.
F5 Networks, Inc.
Introduction to the BIG/ip Controller
Setting up the topology
To set up load balancing for this intranet example, you need to
create three virtual servers: one that handles load balancing for the
internal corporate web site, one that directs outbound HTTP traffic
to the cache server, and one that handles load balancing for the
firewalls.
Figure 1.2 shows the topology for the sample configuration. A
standard virtual server handles the load balancing for the corporate
intranet web site, Corporate.main.net. Wildcard Virtual Server 1
takes all of the outbound HTTP traffic and directs it to the cache
server. Wildcard Virtual Server 2 handles all of the remaining
traffic that actually has to go out to the Internet.
BIG /ip Controller
Standard Virtual Server
Corporate.m ain.net
192.168.30:80
W ildcard Virtual Server 1
0.0.0.0:80
W ildcard Virtual Server 2
0.0.0.0:0
W eb S erver 1 W eb S erver 2
192.168.100.10 192.168.100.11
C ache S erver
192.168.100.20
Firew all 1
F irew all 2
192.168.100.30 192.168.100.31
Figure 1.2 A basic intranet configuration
The wildcard virtual servers are a special type of virtual server,
which accept traffic going to IP addresses unknown to the BIG/ip
Controller, as all outside Internet addresses would be. When the
BIG/ip Controller receives a connection request, it immediately
tries to match the requested IP address to one of its virtual server IP
addresses. If it cannot find a match among the standard virtual
servers that it manages, it then looks for a wildcard virtual server.
BIG/ip® Controller, v. 2.1
1 - 19
Chapter 1
Wildcard virtual servers provide the default IP address of 0.0.0.0
that the BIG/ip Controller can use as a sort of catch-all IP address
match.
There are actually two types of wildcard virtual servers, and this
example takes advantage of both:
❖
Port-specific wildcard virtual servers
A port-specific wildcard virtual server uses the default IP
address, but it has a specific port number, and it only handles
traffic associated with that port number. In our example above,
the port-specific wildcard virtual server captures all outbound
traffic that uses port 80 and directs it to the cache server.
❖
Default wildcard virtual servers
A default wildcard virtual server is one that uses only port 0. Port
0, like the 0.0.0.0 IP address, is a catch-all match for outgoing
traffic that does not match any standard virtual server or any portspecific wildcard virtual server. Default wildcard virtual servers
typically handle traffic only for firewalls or routers. In our
example above, the default wildcard virtual server load balances
the intranet’s firewalls that connect to the Internet.
Using additional features
In this type of configuration, you might want to take advantage of
the following BIG/ip Controller features:
❖
1 - 20
State mirroring
This feature is available only for redundant BIG/ip Controller
systems, and it greatly enhances the reliability of your network.
A redundant system runs two BIG/ip Controllers at the same
time. One unit actively handles all connection requests, and the
other unit acts as a standby that immediately takes over if the
active unit fails and reboots. The state mirroring feature allows
the standby unit to maintain all of the current connection and
persistence information. If the active unit fails and the standby
unit takes over, all connections continue, virtually uninterrupted.
This is especially useful for long-lived connections, such as FTP
connections which would otherwise have to re-establish an entire
transfer session.
F5 Networks, Inc.
Introduction to the BIG/ip Controller
❖
Destination address affinity
Allows the BIG/ip Controller to cache content on specified cache
servers. This avoids caching the same content on multiple cache
servers. Because the above example includes only one cache
server, you would not actually implement this feature in that
example. However, the destination address affinity feature is
very useful for users who work with multiple cache servers in a
similar intranet scenario. It allows the BIG/ip Controller to cache
information on a specified server. Caching specific information
on the same cache server saves disk space on your cache servers.
❖
IP address filtering
Allows you to deny connections going to or coming from specific
IP addresses. This feature is useful if you are experiencing denial
of service attacks from hostile sources. You can set up an IP filter
to ignore traffic coming in from the hostile IP address.
BIG/ip® Controller, v. 2.1
1 - 21
Chapter 1
1 - 22
F5 Networks, Inc.
2
Preparing for the Installation
• Planning the BIG/ip Controller installation
• Planning for a quick setup installation
• Planning for a standard or advanced installation
• Configuring virtual servers and nodes
• Preparing additional network components
2-1
Chapter 2
Planning the BIG/ip Controller installation
This chapter provides detailed information about configuration
planning issues that you need to address before installing the
BIG/ip Controller. It also covers other important issues such as
how to configure network routing, and how to set up and distribute
site content before you actually connect the BIG/ip Controller to
the network.
There are essentially two types of installations you can do:
❖
Quick setup
The quick setup installation simply gets the BIG/ip Controller up
and running, doing basic round robin load balancing for web
servers. It uses default settings, and requires you to perform only
a few minimum configuration tasks, such as entering the IP
addresses for your site and host servers, and opening access to the
ports that your site needs.
❖
Standard/advanced setup
A standard/advanced setup takes advantage of additional
features, such as service check, that most users want to
implement.
The planning sections for standard and advanced setup provide
you a list of the main BIG/ip Controller features, and explain
what if any configuration issues you may need to address before
you implement that particular feature.
Planning for a quick setup installation
The quick setup installation sets up a basic, round robin load
balancing configuration. The quick setup installation requires that
you do only the following four tasks:
2-2
❖
Get the hardware connected and run the First-Time Boot utility (a
wizard that helps you define the settings necessary for connecting
the BIG/ip Controller to the network).
❖
Open access to the ports that your clients need to connect to.
F5 Networks, Inc.
Preparing for the Installation
❖
Define at least one virtual server.
❖
Set connection timeouts.
There are a few things you should probably take into consideration
before doing a quick setup installation. First, we recommend that
you review the section on Configuring virtual servers and nodes, on
page 2-18. The section simply helps you understand how to map
the IP address of your web site to the different back-end web
servers that host individual client connections. We also recommend
that you review the section on Preparing additional network
components, on page 2-23, which covers basic issues involved with
integrating a BIG/ip Controller into your overall network.
Once you are ready to do the install, turn to Chapter 3, Unpacking
and installing the hardware, which walks you through the process
of connecting the hardware and running the First-Time Boot utility.
After you complete that process, simply follow the instructions in
Chapter 4, Getting Started with a Basic Configuration.
Planning for a standard or advanced
installation
When planning a standard/advanced installation, you might want to
review the list of main BIG/ip Controller features in this section and
choose which features you want to implement in your own
configuration. For each main feature, the following sections give
you an overview of what the installation and planning issues are, if
any.
In addition to reviewing the following features, we recommend that
you also review the section on Configuring virtual servers and
nodes, on page 2-18, as well as the section on Preparing additional
network components, on page 2-23, which covers basic issues
involved with inserting a BIG/ip Controller into your overall
network.
Once you are ready to begin the install, you can start with Chapter
3, Setting up the Hardware, which walks you through the process of
connecting the hardware and running the First-Time Boot utility.
BIG/ip® Controller, v. 2.1
2-3
Chapter 2
After you complete that process, simply follow the instructions in
Chapter 4, Getting Started with a Basic Configuration. For
information about configuring advanced features, turn to Chapter 5,
Working with Special Features.
Choosing a load balancing mode
The BIG/ip platform supports seven different load balancing
modes, both static and dynamic. A static load balancing mode
distributes connections based solely on user-defined settings, while
a dynamic load balancing mode distributes connections based on
various aspects of real-time server performance analysis. Note that
the load balancing mode you choose applies to all of your virtual
servers. Setting the load balancing mode is easy; you can either
choose a different mode from a list box in the web-based F5
Configuration utility (see Changing the load balancing mode, on
page 4-21), or you can issue a single bigpipe command (see
Appendix B, BIG/pipe Command Reference).
Because each application of the BIG/ip Controller is unique, and
server performance depends on a number of different factors, we
recommend that you experiment with different load balancing
modes, and choose the one that offers the best performance in your
particular environment. For many sites, a static load balancing
mode, such as Round Robin, achieves very acceptable results. Sites
that have specific concerns, such as servers that vary significantly in
speed and capability, may benefit from using dynamic load
balancing modes.
Round Robin mode
Round Robin mode, a static load balancing mode, is the default
mode. In Round Robin mode, the BIG/ip Controller distributes
connections evenly across the nodes that it manages. Each time a
new connection is requested, the BIG/ip Controller passes the
connection to the next node in line. Over time, the total number of
connections received by each node associated with a specific virtual
server is the same.
2-4
F5 Networks, Inc.
Preparing for the Installation
Ratio mode
Ratio mode, another static load balancing mode, allows you to
assign weights to each node. Over time, the total number of
connections for each node is in proportion to the weights you
specify. For example, in simple configuration, you might have one
new, fast server and two older, slower servers. To get the newer
server to host the bulk of the traffic, you could use Ratio mode. You
would assign a higher weight to the fast server, such as 2, and lower
weights, such as 1, to the two slower servers. Over time, these
weight settings result in the faster server receiving 50% of the
network traffic, while each of the slower servers would receive only
25% of the network traffic.
WARNING
The default ratio weight for all nodes is 1. If you use the Ratio load
balancing mode, you must change the weight setting for at least one
node; otherwise, Ratio mode has the same result as Round Robin
mode.
Priority mode
Priority mode is also a static load balancing mode. In Priority
mode, you create groups of nodes and assign a priority level to each
group. The BIG/ip Controller distributes connections in a round
robin fashion to all nodes in the highest priority group. If all the
nodes in the highest priority group go down, the BIG/ip Controller
begins to pass connections on to nodes in the next lower priority
group. For example, in a configuration that has three priority
groups, connections are first distributed to all nodes set as priority
1. If all priority 1 nodes are down, connections begin to be
distributed to priority 2 nodes. If both the priority 1 nodes and the
priority 2 nodes are down, connections then begin to be distributed
to priority 3 nodes, and so on. Note, however, that the BIG/ip
Controller continuously monitors the higher priority nodes, and
each time a higher priority node becomes available, the BIG/ip
Controller passes the next connection to that node.
BIG/ip® Controller, v. 2.1
2-5
Chapter 2
Least Connections mode
Least Connection mode is a dynamic load balancing mode which
takes into account the number of connections each host server is
currently handling. The BIG/ip Controller simply passes a new
connection to the node with the least number of current
connections.
Fastest mode
Fastest mode, also a dynamic load balancing mode, passes a new
connection based on the fastest response of all currently active
nodes. Fastest mode works well in any environment, but you may
find it particularly useful in environments where the nodes are
hosted by servers of varying capabilities, or where nodes are
distributed across different logical networks.
Observed mode
Observed mode is a more sophisticated dynamic load balancing
mode that uses a combination of the logic used in the Least
Connection and Fastest modes. In Observed mode, nodes are
ranked based on a combination of the number of current
connections and the response time. The node that has the best
balance of fewest connections and fastest response time receives the
next connection from the BIG/ip Controller.
Predictive mode
Predictive mode is also a sophisticated dynamic load balancing
mode, which uses the ranking methods used by Observed mode,
where nodes are rated according to a combination of the number of
current connections and the response time. However, in Predictive
mode, the BIG/ip Controller analyzes the trend of the ranking over
time, determining whether a node’s performance is currently
improving or declining. The node with the best performance
ranking that is currently improving, rather than declining, receives
the next connection from the BIG/ip Controller.
2-6
F5 Networks, Inc.
Preparing for the Installation
Setting up node ping and service checking
The BIG/ip Controller has four different methods available to
determine whether a specific node is available to receive
connections. The default method node ping is on by default, but
you may want to turn on other verification features that allow for
more comprehensive checking. If you are managing web site
content in particular, you may want to use the Extended Content
Verification, or Extended Application Verification features.
Node ping
Node ping is the simplest method of availability checking, and it
only guarantees that the server hosting the node can respond to a
ping. The node ping setting applies to all virtual servers on the
system, and it is turned on by default. Normally you do not have to
worry about this setting during intital installation.
Simple service check
Simple service check verifies that the service the client needs is
available on the server. For example, if the client is looking to
connect to a standard web site, a simple service check for the site
would verify that a given server currently accepts connections to
port 80.
Setting up simple service check is a matter of turning the feature on
for a specific node, or for a global node port. Plan on setting up
simple service check after you define your virtual servers.
(Remember that you cannot define a node separately from a virtual
server; therefore, you cannot set any node properties until you have
defined the node by way of defining the virtual server.) Depending
on the number of nodes that you want to configure for service
check, you may want to set the service check on a node port first,
because all nodes that use the port inherit the service check settings.
If you need to, you can override the port service check settings for
an individual node.
BIG/ip® Controller, v. 2.1
2-7
Chapter 2
Extended Content Verification (ECV) service check
ECV service check verifies that a given server returns specific
content. Similar to simple service check, ECV service check is a
property of both individual nodes and global node ports, and you
set it up only after you define your virtual servers.
The concept behind ECV service check is acutally pretty simple.
The BIG/ip Controller tries to retrieve specific content from a
server, such as a web site’s home page. It searches the content it
receives, looking for text that you specify. If it finds a match, the
BIG/ip Controller considers the service check to be successful and
continues to send clients to the server.
Most users can work with the standard send string "GET /" which
simply returns a site’s home page. However, ECV service check
offers lots of other options that you may want to take advantage of,
including ECV for transparent nodes. If you want to use ECV
service check, we recommend that you review Configuring
Extended Content Verification service checking, on page 4-30, to
plan your ECV needs. For advanced configuration, such as
Transparent Node mode, refer to Using advanced service check
options, on page 5-3.
Extended Application Verification (EAV) service check
EAV service check performs a custom service check function. The
BIG/ip Controller essentially runs a script to do a service check on
its behalf. Several EAV service check scripts are bundled with the
BIG/ip Controller. The scripts bundled with the BIG/ip Controller
include scripts for checking FTP, NNTP, SMTP, SQL, and POP3.
Some customers write their own custom checker programs, and
others prefer to get assistance from the F5 Help Desk. You can
review Using advanced service check options, on page 5-3, for
further details on this feature.
Setting up network address translations and IP forwarding
The BIG/ip Controller supports three related features that provide
nodes with IP addresses that are routable on the external network.
Remember that nodes actually run on the BIG/ip Controller’s
internal interface, and, by default, their true IP addresses are
2-8
F5 Networks, Inc.
Preparing for the Installation
protected by the BIG/ip Controller. The features are important
because they allow you to make direct administrative connections
to nodes, or allow nodes to initiate connections to hosts on the
external network. Plan on setting up these features only after you
have defined the virtual servers on the BIG/ip Controller.
Network Address Translations (NATs)
NATs allow nodes to receive direct incoming connections, and also
allow nodes to make connections to hosts on the external network.
For example, if you have a node that runs the Sendmail utility, the
node may need to connect to a mail server that sits on the BIG/ip
Controller’s external interface. Also, if your administrative
workstation is on the BIG/ip Controller’s external interface, you
probably need to define a NAT address for each node that you want
to be able to administrate remotely.
If you plan on using network address translations, keep the
following in mind:
❖
Certain protocols, such as the NT Domain or CORBA protocols,
are not compatible with NAT.
❖
You need to provide a unique IP address for each NAT you want
to define.
WARNING
NAT is not compatible with the NT Domain or CORBA protocols.
Instead, you need to use the IP forwarding feature.
Secure Network Address Translation (SNAT)
The SNAT feature essentially provides additional firewall
functionality for the BIG/ip Controller. It translates source IP
addresses for nodes that are initiating connections with hosts on the
external network. SNATs are more secure because they do not
allow clients on the external network to connect to nodes on the
internal network.
If you plan on using SNAT, keep the following in mind:
❖
You can assign a SNAT address to one or more nodes.
BIG/ip® Controller, v. 2.1
2-9
Chapter 2
❖
A SNAT address can be the same as one of the virtual addresses
configured for the BIG/ip Controller.
IP forwarding
If your administrative workstation is on the BIG/ip Controller’s
external interface, but you cannot use the NAT feature, you need to
turn on IP forwarding instead. This feature is somewhat less secure
because it exposes the true addresses of your nodes to the external
network. However, it does allow you the direct administrative
access that you need. IP forwarding is controlled by a system
control variable, and you simply have to turn it on.
IP forwarding is also useful if you wish to maintain NT domain
authentication between networks. You can set up IP forwarding for
NT domain authentication.
Setting up redundant systems
Before you begin configuring the two units in the redundant system,
be sure that you have decided on the IP addresses for both systems.
The First-Time Boot utility on each system prompts you for the IP
address of other BIG/ip Controller, so that it can set up for
synchronization of the configurations between the two units.
Choosing a fail-over set up
You also need to decide whether you are going to use hardware failover, network fail-over, or both. Hardware fail-over is the most
reliable, because it provides a direct, hardwired connection between
the two units. You can actually add a layer of redundancy to the
standard hardware fail-over by turning on network fail-over and
using it as the secondary means of transfering fail-over data
between the two units.
If your BIG/ip Controllers are not physically located near each
other, you want to use network fail-over as the primary means of
exchanging fail-over data for the redundant system. Network failover is actually a feature that you simply turn on or off. The default
is off, but you can turn it on any time after you have completed the
First-Time Boot utility. Hardware fail-over does not have any
additional special settings.
2 - 10
F5 Networks, Inc.
Preparing for the Installation
Using connection and persistence mirroring features
If your site handles a lot of FTP or Chat traffic, persistent
connections, or other traffic that is highly sensitive to state loss
during a fail-over, you probably want to use this feature. In a
redundant system, this feature requires that both the active unit and
the standby unit maintain the state of each current connection. If a
fail-over occurs, no connection or persistence information is lost,
and connections continue virtually uninterrupted.
You can turn on connection and persistence mirroring for virtual
servers on an individual basis, and you can even specify whether
you want all connections mirrored, or just persistent information.
To help reduce the amount of overhead that this feature can
potentially generate, you should configure connection mirroring
only on those individual virtual servers that need it.
Using gateway fail-safe
Gateway fail-safe is an advanced feature that offers you yet another
layer of network redundancy. If each BIG/ip Controller in your
redundant system can use a separate router on the external
interface, you may want to implement this feature. When the
connection between a given BIG/ip Controller and its
corresponding router fails, the unit can fail-over to the standby unit
where the gateway connection is presumably still good. This
feature is supported only on BIG/ip Controller HA products.
Setting up persistence features
The BIG/ip platform supports persistence for TCP, UDP, and SSL
connections. You want to use persistence only if you have clients
that need to bypass load balancing and go to a specific server. For
example, if you run an airline reservation site and you allow clients
to reserve tickets for 24 hours before purchasing the ticket, you
need to use persistence if you store a specific client’s reservation
only on the server to which the client originally connected. If you
store reservation information on a back-end database or file server
that all of your web servers have access to, you would not need to
implement persistence.
The BIG/ip Controller now offers four basic persistence options:
BIG/ip® Controller, v. 2.1
2 - 11
Chapter 2
❖
Simple persistence
Bases persistence on a clients’ source IP address. The
persistence connection information is stored on the BIG/ip
Controller, and it applies to both TCP and UDP traffic.
❖
Destination address affinity
Bases persistence on the destination IP address of a connection.
This is actually a special type of persistence that you can use for
load balancing cache servers.
❖
SSL persistence
Bases persistence on an SSL session ID stored in a table on the
BIG/ip Controller.
❖
HTTP cookie persistence
Bases persistence on connection information stored in a cookie
on the client.
Important issues for all types of persistence
There are two issues you should consider when using persistence:
❖
Timeouts
Each type of persistence, other than destination address affinity,
uses timeouts that determine how long an individual persistence
connection information is considered valid. To get the best
performance, you should set the timeout settings so that they
correlate to the amount of time that nodes typically retain the
information that would be associated with a connection requiring
persistence.
❖
Persistence masks and sticky masks
If you plan to implement persist masks or sticky masks, you
should choose a static load balancing mode, such as Round
Robin, for the BIG/ip Controller. A dynamic mode, such as
Fastest, combined with a persistence mask, could cause persistent
connections to clump, or accumulate, on one server.
HTTP cookie persistence
HTTP cookie persistence requires HTTP 1.0 or 1.1
communications, and it does not work when data packets are
encrypted. However, there are a couple significant benefits to using
HTTP cookie persistence. For example, unlike other persistence
2 - 12
F5 Networks, Inc.
Preparing for the Installation
methods, it does not depend on a client’s source IP address, which
can change if the client is connecting to your site via an ISP or other
organization that uses dynamically assigned IP addresses. Also,
HTTP cookies store the persistent connection information on the
client’s hard drive rather than on the BIG/ip Controller the way
other persistence methods do.
You set up HTTP cookie persistence for individual virtual servers,
and you need to choose a method, as well as a timeout. The timeout
simply defines how long the persistent connection information is
valid, and the method determines whether the BIG/ip Controller
inserts the persistent server information into the header of the
HTTP response from the server, or rewrites the cookie as it is
passed from the server to the client. For more details on HTTP
cookie persistence, refer to Using HTTP cookie persistence, on
page 5-12.
SSL persistence
SSL persistence applies only to sites that use the SSL protocol,
which is typical of e-commerce sites in particular. You can turn on
SSL persistence for individual virtual servers, and you only need to
define the timeout value that determines how long a client’s SSL
session ID is valid. For additional information on SSL persistence,
see Setting up SSL persistence, on page 4-38.
Simple persistence
When simple TCP persistence is enabled, the BIG/ip Controller
actually records the IP address of the client, and it also records the
particular node that received the initial client connection. When a
new connection request comes from the same client, the BIG/ip
Controller uses a look-up table to determine the appropriate node
that should host the connection. The client record is cleared from
the look-up table when the persistence timeout expires.
Using SSL persistence with simple persistence
You may want to use SSL persistence and simple persistence
together. In situations where the SSL persistence times out and the
session information is discarded, or if a returning client does not
provide a session ID, it may still be desirable for the BIG/ip
BIG/ip® Controller, v. 2.1
2 - 13
Chapter 2
Controller to direct the client to the original node using the IP
address. The BIG/ip Controller can accomplish this as long as the
client's simple persistence record is still in the BIG/ip Controller
look-up table.
A note about persistence timeout settings
The BIG/ip platform supports two types of persistence timeout
settings:
❖
The standard persistence timeout mode is where the timer resets
itself upon receipt of each packet. Essentially, this keeps the
timer from running as long as there is traffic flow over the
connection. Once traffic stops on the connection, the timer runs
as normal. Note that the timer is reset if traffic over the current
connection resumes, or if the client subsequently reconnects
before the timer actually expires.
❖
An alternate persistence timeout mode is to start the timer when a
connection is first made. The timer runs until the timeout
expires. The BIG/ip Controller sends subsequent connections to
the same node until the timeout expires. Once the timeout
expires, however, the BIG/ip Controller treats a request for a
subsequent connection as if it were new, and starts a new timeout
period.
Configuring multiple network interface cards
The BIG/ip Controller supports multiple network interface cards
(NICs). In order to configure the BIG/ip Controller for multiple
NICs, you need to address the following configuration issues:
2 - 14
❖
The First-Time Boot utility
Use the First-Time Boot utility to detect and configure additional
interfaces if there are more than two NICs installed. For details
about how to use the First-Time Boot utility to configure multiple
interfaces, see Running the First-Time Boot utility, on page 3-9.
❖
RDP for more than one internal NIC
Use Router Discovery Protocol (RDP) for routing if you plan to
implement multiple NICs in the BIG/ip Controller.
By using RDP, a server can have its default route point to the
active BIG/ip Controller without using a shared alias. This is
F5 Networks, Inc.
Preparing for the Installation
useful when the server is multihomed (has more than one NIC
and multiple IP addresses) and you do not want to set the default
route to a specific IP address. If you do, and then one of your
NICs, cables, or ports goes down, there is no alternate route to
switch to. RDP allows you to implement default rerouting to any
of the BIG/ip Controller interfaces.
❖
Editing httpd.conf
The httpd.conf file defines the virtual web servers for the
external and internal interfaces to which IP addresses are
mapped. If the BIG/ip Controller contains multiple NICs, you
must edit this file, using a text editor such as vi or pico, to change
access to specific interfaces.
Using IP filters and rate filters
The BIG/ip Controller supports two different types of filters: IP
filters and rate filters.
IP filters
You can use IP filters to control the traffic flowing in and out of the
BIG/ip Controller. You can create and apply a single IP filter, or a
number of IP filters, on the BIG/ip Controller in the F5
Configuration utility. Once these filters are created , you can apply
them in a specified hierarchical order. You can filter network traffic
using IP filters in a number of different ways:
❖
Source IP address
Applies the filter to all network traffic coming from the specified
IP address, or range of IP addresses.
❖
Source port
Applies the filter to all network traffic coming from the specified
port, or range of port numbers.
❖
Destination IP address
Applies the filter to all network traffic going to the specified IP
address, or range of IP addresses.
BIG/ip® Controller, v. 2.1
2 - 15
Chapter 2
❖
Destination ports
Applies the filter to all network traffic going to the specified port,
or range of port numbers.
Note
The BIG/ip Controller only supports pre-input IP filters.
Rate filters
Rate filters allow you to control the amount of bandwidth used by
network traffic as it leaves the BIG/ip Controller. The first step in
creating a rate filter is to create a rate class. The rate class contains
the specific bandwidth limitations you want to apply to a rate filter.
After you have created at least one rate class, you can create a rate
filter.
You can apply rate filters in a hierarchical order by moving a rate
filter up or down in the rate filter table.
You can filter network traffic using rate filters in a number of
different ways:
2 - 16
❖
Rate Class
Applies the filter to network traffic based on the bits per second,
minimum bits outstanding, and queue length specified in the rate
class.
❖
Source IP Address
Applies the filter to all network traffic coming from the specified
IP address, or range of IP addresses.
❖
Source Port
Applies the filter to all network traffic coming from the specified
port, or range of port numbers.
❖
Destination IP Address
Applies the filter to all network traffic going to the specified IP
address, or range of IP addresses.
❖
Destination Ports
Applies the filter to all network traffic going to the specified port,
or range of port numbers.
F5 Networks, Inc.
Preparing for the Installation
Setting up the SNMP agent
The BIG/ip Controller contains an SNMP agent and MIBs for
managing and monitoring the BIG/ip Controller. This SNMP agent
supports the F5 Networks management product, see/IT Network
Manager, or your standard network management station (NMS).
The BIG/ip SNMP agent supports two MIBs, an F5 vendor-specific
MIB, and the UC Davis MIB:
❖
BIG/ip MIB
This is a vendor MIB that contains specific information for
properties associated with F5 specific functionality, such as load
balancing, NATs, and SNATs.
❖
UC Davis MIB
This is a MIBII (RFC 1213) that provides standard management
information.
You can configure the BIG/ip SNMP agent to send traps to your
management system with the F5 Configuration utility and by
editing several configuration files. For more information about
configuring the SNMP agent for the BIG/ip Controller, see Chapter
7, Configuring SNMP.
Setting up large configurations
The BIG/ip Controller supports up to 40,000 virtual servers and
nodes combined. Larger configurations on a BIG/ip Controller,
such as those that exceed 1,000 virtual servers or 1,000 nodes,
introduce special configuration issues. To ensure a high
performance level, you need to change certain aspects of the BIG/ip
Controller’s management of virtual servers and nodes. There are a
number of steps you can take to ensure your large configuration is
configured for optimum performance:
❖
Reduce ARP traffic on the external network.
❖
Reduce the number of node pings and service checks issued by
the BIG/ip Controller.
For information about configuring your large installation, refer to
Optimizing large configurations, on page 5-46.
BIG/ip® Controller, v. 2.1
2 - 17
Chapter 2
Configuring virtual servers and nodes
Virtual servers essentially represent the sites that the BIG/ip
Controller manages, and they use the IP address that you register
with DNS for your domain. The BIG/ip Controller manages virtual
servers on its external interface, the interface that always receives
the incoming client connection requests.
A virtual server is actually a specific combination of a virtual
address and a port. If you happen to have two related sites that use
the same IP address, but support different Internet services such as
HTTP and SSL, you would have to create two separate virtual
servers, one to manage each service. The port that you use in a
virtual server should generally be the same TCP or UDP port
number that is known to client programs looking to connect to the
site.
For example, our sample domain, www.MySite.com, is a standard
HTTP web site, and the related store.MySite.com site is an ecommerce site that sells items to www.MySite.com customers.
Both sites use the same IP address, 192.168.200.10, but
www.MySite.com requires port 80 for its HTTP traffic, and
store.MySite.com requires port 443 for its SSL traffic. If you were
to set up virtual servers on the BIG/ip Controller to manage these
sites, you would have to define www.MySite.com as
192.168.200.10:80, and store.MySite.com as 192.168.200.10:443.
Mapping virtual servers to nodes
An individual virtual server maps to at least one physical port on a
physical server, referred to as a node. Similar to a virtual server, a
node definition must contain both an IP address and a port. The
BIG/ip Controller manages nodes on its internal interface, the
interface through which the BIG/ip Controller always forwards
connection requests.
Although the topology shown in the Figure 2.1 contains only three
physical servers, it actually supports four separate nodes. Server 2
supports two different services, and therefore can be used as two
different nodes.
2 - 18
F5 Networks, Inc.
Preparing for the Installation
BIG /ip Controller
Virtu al Server 1
ww w.M ySite.com
192.168.200.10:80
Virtu al Server 2
store.M ySite.com
192.168.200.10:443
P ort 80
P ort 80
P ort 443
P ort 443
S erver 1
192.168.100.1
Server 2
192.168.100.2
S erver 3
192.168.100.3
Figure 2.1 Sample web site configuration
The two different virtual server definitions in the example are easy
to understand when represented in a simple mapping format:
192.168.200.10:80 to 192.168.100.1:80, 192.168.100.2:80
192.168.200.10:443 to 192.168.100.2:443, 192.168.100.3:443
Note that you can also map the configuration using host and service
names in place of IP addresses and port numbers:
www.MySite.com:HTTP to Server 1:HTTP, Server 2:HTTP
store.MySite.com:SSL to Server 2:SSL, Server 3:SSL
Virtual server mappings typically include multiple nodes, and each
node included in the mapping is referred to as a member of the
virtual server. Depending on your configuration needs, you can use
a node as a member of more than one virtual server.
BIG/ip® Controller, v. 2.1
2 - 19
Chapter 2
Setting properties for virtual servers and nodes
You can control several attributes of virtual servers and nodes, as
well as their individual component IP addresses and ports. If you
set a particular property for a virtual server or a node, the setting
applies only to that virtual server or node. However, if you set a
property for an IP address or a port, the property setting is
essentially global because it applies to any virtual server or node
that uses the IP address or port. Note that there are certain property
settings, such as simple persistence, that you can override at the
virtual server or node level.
Say for example, that you need to configure several virtual servers
to handle a group of web sites. If you want all but one of the virtual
servers to use persistence, it is easier to turn persistence on for port
80, and then simply disable persistence for the one virtual server
that does not need it.
Property settings for virtual addresses
For each virtual server (an IP address used for one or more virtual
servers), you can control the following settings:
❖
You can enable or disable the virtual address.
❖
You can set a maximum number of concurrent connections
allowed for the address.
❖
You can define a custom netmask and broadcast address.
❖
You can associate the IP address with a specific external
interface.
The BIG/ip Controller allows you to configure basic properties for
a virtual address including a connection limit, a netmask, and
broadcast address. The default netmask is determined by the
network class of the IP address you enter, and the default broadcast
address is a combination of the virtual address and the netmask.
You can override the default netmask and broadcast address if
necessary.
All virtual servers that have the same virtual address inherit the
properties of the virtual address.
2 - 20
F5 Networks, Inc.
Preparing for the Installation
Property settings for virtual ports
For convenience, the BIG/ip Controller allows you to define default
configuration settings for a virtual port number or service name.
Each virtual server that uses the port number or service name
inherits the default properties for that port number or service. The
only default property setting that a specific virtual server can
override is whether the port is enabled or disabled for that virtual
server.
The configurable settings for a virtual port include:
❖
Whether the port is currently enabled or disabled
❖
A connection limit
❖
A time-out for idle TCP connections
❖
A time-out for idle UDP connections
❖
Simple persistence for TCP and UDP sessions
Property settings for virtual servers
For each virtual server (a virtual address and port pair), you can
control the following settings:
❖
You can enable or disable the virtual server.
❖
You can set a maximum number of concurrent connections
allowed for the address.
❖
You can mirror persistence and/or connection information.
❖
You can override simple persistence settings and define a persist
mask.
❖
You can set up destination address affinity (for Transparent Node
mode).
❖
You can set up SSL or cookie persistence.
Once you define a virtual server, you can set its properties. For
example, you can set a connection limit for the virtual server, and
you can configure persistence settings for SSL connections for
virtual servers. You can also enable or disable a virtual server. The
enable/disable feature allows you to take a virtual server down for
BIG/ip® Controller, v. 2.1
2 - 21
Chapter 2
maintenance without interrupting any of the virtual servers’ current
connections. When you disable a virtual server, it does not accept
new connections, but it allows the current connections to complete.
Property settings for node addresses
Node addresses have property settings that apply to all nodes hosted
by the node address. Node address property settings include:
❖
Whether the node address is currently enabled or disabled
❖
A connection limit
❖
A load balancing ratio weight or priority level used when the load
balancing mode is set to Ratio or Priority
❖
An IP alias that the BIG/ip Controller can ping instead of the true
node address
Aliases for node addresses are useful for BIG/ip Controllers that
manage thousands of nodes. For more information about
optimizing large configurations, see Chapter 5, Optimizing large
configurations.
Property settings for node ports
You can set global properties for port numbers or service names
used by nodes. These settings apply to all nodes that include the
port number or service name, regardless of which physical server
hosts the node. You can override all global node port properties for
specific node except the service check frequency and service check
timeout settings. Node port properties include:
❖
Whether the node port is currently enabled or disabled
❖
A service check frequency and timeout, check port, extended
(type, first string, second string)
Property settings for nodes
Once you define a node, you can set specific properties on the node
itself including a connection limit, and special content verification
settings. You can enable or disable a node, which makes the node
available, or unavailable, to accept new connections. If you disable
a node while it is currently hosting connections, the node allows
2 - 22
F5 Networks, Inc.
Preparing for the Installation
those connections to complete, but does not allow any new
connections to start. This is useful when you want to take a node
down for maintenance without interrupting network traffic.
Preparing additional network components
Before you install a BIG/ip Controller in your network, you need to
make sure that your network meets several requirements. The
existing network should be fully functional, and it should support
one or more IP services. Several individual network components
including routers, hubs, gateways, and content servers, must also
meet specific requirements.
Working with router configurations
The BIG/ip Controller must communicate properly with both the
network router and the content servers that the BIG/ip Controller
manages. Because there are a multitude of router configurations
and varying levels of direct control an administrator has over each
router, you need to carefully review the router configurations in
your own network, and evaluate whether you need to change any
existing configuration before you install the BIG/ip Controller.
Each router connected to the BIG/ip Controller must be IP
compatible, and the router’s interface must be compatible with the
external interface on the BIG/ip Controller (either IEEE
802.3z/Ethernet or FDDI, depending on the model of BIG/ip
Controller that you purchase).
❖
The default route for the BIG/ip Controller must be set to the
gateway address of the router connected to the BIG/ip
Controller’s external interface (the interface from which it
receives connection requests). You can set the default route
during the First-Time Boot configuration, or you can set the
default route by editing the /etc/netstart file.
❖
The routers connected to the BIG/ip Controller’s external
interface must have appropriate routes to get to all of the virtual
addresses hosted by the BIG/ip Controller, and to get to the
BIG/ip Controller’s administrative address.
BIG/ip® Controller, v. 2.1
2 - 23
Chapter 2
Routing between a BIG/ip Controller and a router
Fortunately, you do not have to modify routing tables on a router
that routes to a BIG/ip Controller. Instead, the BIG/ip Controller
uses Address Resolution Protocol (ARP) to notify a router of the IP
addresses of its external interface as well as its virtual servers. The
BIG/ip Controller supports static route configurations, dynamic
routing (via BGP4, RIP1, RIP2, and OSPF), and subnetting.
You may use dynamic routing with the BIG/ip Controller, but it is
not normally required. Refer to Chapter 4, Setting up dynamic
routing with GateD, for information about implementing dynamic
routing in a BIG/ip Controller environment.
Routing between a BIG/ip Controller and content servers
All network traffic coming into and going out of the content servers
in the array must pass through the BIG/ip Controller. In order for
routing to these servers to work properly, you need to set each
server’s default route to be the IP address of the BIG/ip Controller
internal interface.
Setting up the servers to be load balanced
All servers managed by the BIG/ip Controller must have TCP/IPcompliant operating systems. For each server that the BIG/ip
Controller manages, you should verify the following information
and have it available when you begin the installation:
❖
Verify that the ports on the content server are properly configured
for the Internet services that the content server needs to support.
❖
Verify that each server has at least one unique IP address defined.
Note that a BIG/ip Controller can use multiple IP aliases defined
on a single physical server.
❖
Verify that the content server is communicating with other
devices on the network.
Each TCP/IP service supported by the BIG/ip virtual servers must
be configured on at least one of the servers in the array. For specific
information about configuring TCP/IP servers, and verifying
TPC/IP services on specific ports, refer to the documentation
provided by the server manufacturer.
2 - 24
F5 Networks, Inc.
Preparing for the Installation
Setting up content servers on different logical networks
A content server can be installed on a different logical network than
that of the BIG/ip Controller, as long as the path of the content
server’s default route goes through the BIG/ip Controller. If your
network environment includes this type of configuration, you need
to modify the /etc/rc.local file on the BIG/ip Controller. The
/etc/rc.local file stores the BIG/ip Controller’s routing information,
and you can edit it in a UNIX editor, such as vi or pico.
WARNING
Routing statements must be added to the beginning of the
/etc/rc.local file.
With this type of network configuration, you need to resolve one of
two different routing issues, depending on whether the logical
networks are running on the same LAN.
❖
If the logical networks are on the same LAN, they either share
media directly, or they have a switch or a hub between them. In
this configuration, you need to add an interface route to the
BIG/ip Controller’s internal interface. For example, if the BIG/ip
Controller’s internal interface were on logical network
192.168.5/24, and a content server’s were on logical network
192.168.6/24, you would need to add the following line to the
/etc/rc.local file:
route add -net 192.168.6 -interface exp1
❖
If the logical networks are on different LANs, they have a router
between them. In this environment, you need to do three things:
• On the BIG/ip Controller, you need to add a static gateway
route to the top of the /etc/rc.local file. In the example above,
where the BIG/ip Controller is on logical network
192.168.5/24 and the content servers are on logical network
192.168.6/24, you would need to add the following line to the
/etc/rc.local file:
route add -net 192.168.6.0 -gateway
192.168.5.254
BIG/ip® Controller, v. 2.1
2 - 25
Chapter 2
• On each content server, you need to set the default route to
point to the router between the LANs. The content server’s
default route using the above example would be:
route add default -gateway 192.168.6.254
• On the router between the LANs, you need to set the default
route to the internal interface address on the BIG/ip Controller.
The router’s default route using the above example would be:
route add default -gateway 192.168.5.200
Preparing administrative workstations
Before you can do command line administration from your
workstation, you may need to install the proper shell software.
BIG/ip HA and HA+ Controllers (distributed only in the US)
support a secure shell connection using F-Secure SSH. You can
actually download the SSH client directly from the BIG/ip
Controller’s web server once you complete the First-Time Boot
utility, which sets up the server for network access.
BIG/ip LB Controllers, as well as all BIG/ip Controllers distributed
outside the US, support remote shell administration via a Telnet
session. Most PCs usually have a Telnet client installed, but you
may want to check to verify that yours does.
You also need to review which administrative workstations should
be allowed to connect to your BIG/ip Controller and do command
line mainenance. When you run the First-Time Boot utility on any
BIG/ip Controller, it prompts you to enter the IP address, or range
of IP addresses, from which it will accept administrative
connections.
Preparing web site content
There are two basic configurations for site content that offer
different configuration considerations: static content, and dynamic
content.
2 - 26
F5 Networks, Inc.
Preparing for the Installation
Static web site content
If your web site content is read-only, you probably use a distributed,
replicated content scheme. With a replicated content scheme, the
content on one server is identical to that of the other servers
managing content for the same web site. This ensures that all client
requests access the same content, no matter which physical server
they are actually connected to.
In this setup, basic load balancing works well. You do not need to
address complex issues, such as configuring persistence features.
Dynamic site content
If your web site content is dynamic, such as content created with
Active Server Pages, and you store the stateful information, if not
all the content, on a single shared file server, you do not have to
address persistence issues. However, if you maintain stateful site
content on individual servers instead of a shared file server or backend database, you need to plan on configuring at least some type of
persistence on the BIG/ip Controller. See Mirroring connection
and persistence information, on page 5-20 for details.
BIG/ip® Controller, v. 2.1
2 - 27
Chapter 2
2 - 28
F5 Networks, Inc.
3
Setting up the Hardware
• Unpacking and installing the hardware
• Running the First-Time Boot utility
• Defining additional host names
• Preparing workstations for command line access
3-1
Chapter 3
Unpacking and installing the hardware
There are two basic tasks you need required to get the BIG/ip
Controller installed and set up. First, you need to connect the
peripheral hardware and connect the BIG/ip Controller to the
network, and then you need to turn the system on and run the FirstTime Boot utility. The First-Time Boot utility is a wizard that helps
you configure basic system elements such as administrative
passwords, IP addresses, and host names for both the root system
and for the BIG/ip web server. Once you complete the First-Time
Boot utility, you can continue the configuration process either from
a remote administrative workstation, or from the console itself.
Reviewing the hardware requirements
The BIG/ip Controller comes with the separate hardware pieces that
you need for installation and maintenance. However, you must
provide standard peripheral hardware, such as a keyboard or serial
terminal.
Hardware provided with the BIG/ip Controller
When you unpack the BIG/ip Controller, you should make sure that
the following components are included:
❖
One power cable
❖
One PC/AT-to-PS/2 keyboard adapter
❖
Four rack-mounting screws
❖
Two keys for the front panel lock
❖
One extra fan filter
❖
One BIG/ip Controller Administrator Guide
If you purchased a hardware-based redundant system, you also
receive one fail-over cable to connect the two controller units
together (network-based redundant systems do not require a failover cable). Additionally, if you purchased a US BIG/ip Controller
that supports encryption, you receive the F-Secure SSH Client
manual, published by Data Fellows.
3-2
F5 Networks, Inc.
Setting up the Hardware
Peripheral hardware that you provide
For each BIG/ip Controller in the system, you need to provide the
following peripheral hardware:
❖
You need standard input/output hardware for direct
administrative access to the BIG/ip Controller. Either of the
following options is acceptable:
• A VGA monitor and PC/AT-compatible keyboard
• Optionally, a serial terminal and a null modem cable (see To
configure a serial terminal in addition to the console, on page
3-8 for serial terminal configuration information)
❖
You also need network hubs, switches, or concentrators to
connect to the BIG/ip Controller network interfaces. The devices
you select must be compatible with the network interface cards
installed in your BIG/ip Controller. The devices can support
either 10/100 Ethernet, Gigabit Ethernet, and FDDI/CDDI
(including multiple FDDI and full duplex).
• For Ethernet, you need either a 10Mb/sec or 100 Mb/sec hub
or switch.
• For FDDI/CDDI, a concentrator or a switch is optional.
If you plan on doing remote administration from your own PC
workstation as most users do, we recommend that you have your
workstation already in place. Keep in mind that the First-Time
Boot utility prompts you to enter your workstation’s IP address
when you set up remote administrative access.
Familiarizing yourself with the BIG/ip Controller hardware
Before you begin to install the BIG/ip Controller, you may want to
quickly review the following figures that illustrate the controls and
ports on both the front and the back of a standard BIG/ip Controller.
BIG/ip® Controller, v. 2.1
3-3
Chapter 3
If you have a special hardware configuration, such as those that
include more than two interface cards, the ports on the back of your
unit will differ slightly from those shown below.
Note
The ports on the back of every BIG/ip Controller are individually
labeled, so it should be clear what each port is, no matter which
hardware configuration you have purchased.
4
2
8
5
3
6
9
1
7
1. Fan filter
2. Keyboard lock
3. Reset button
4. Keyboard lock LED
5. Hard disk drive LED
6. Power LED
7. On/off button
8. 3.5 floppy disk drive
9. CD-ROM drive
Figure 3.1 Front view of a BIG/ip Controller
Figure 3.1 illustrates the front of a BIG/ip Controller with the
access panel open. On the front of the unit, you can turn the unit off
and on, or you can reset the unit. You can also view the indicator
lights for hard disk access and for the keyboard lock.
Figure 3.2, the following figure, illustrates the back of a BIG/ip
Controller. Note that all ports are labeled, even those which are not
intended to be used with the BIG/ip Controller. Ports marked with
3-4
F5 Networks, Inc.
Setting up the Hardware
an asterisk (*) in the list following are not used by the BIG/ip
Controller, and do not need to be connected to any peripheral
hardware.
1
10
11
12
14
4
8
13
6
2
3
5
7
1. Fan
2. Power in
3. Voltage selector
4. Mouse port*
5. Keyboard port
6. Universal serial bus ports*
7. Serial terminal port
9
8. Printer port*
9. Fail-over port
10. Video (VGA) port
11. Internal interface (RJ-45)
12. External interface (RJ-45)
13. Interface indicator LEDs
14. Watchdog card*
*Not to be connected to any peripheral hardware.
Figure 3.2 Back view of a BIG/ip Controller
Environmental requirements and usage guidelines
A BIG/ip Controller is an industrial network appliance, designed to
be mounted in a standard 19-inch rack. To ensure safe installation
and operation of the unit, be sure to consider the following before
you install the unit in the rack:
❖
You should always install the rack according to the
manufacturer’s instructions, and be sure to check the rack for
stability before placing equipment in it.
BIG/ip® Controller, v. 2.1
3-5
Chapter 3
❖
You should build and position the rack so that once you install the
BIG/ip Controller, the power supply and the vents on both the
front and back of the unit remain unobstructed. The BIG/ip
Controller must have adequate ventilation around the unit at all
times.
❖
Do not allow the air temperature in the room to exceed 50° C.
The internal temperature of the room where the BIG/ip
Controller is located should be considered for continued safe
operation.
❖
Make sure that the branch circuit into which you plug the unit is
not shared by more electronic equipment than it is designed to
manage safely at one time.
❖
If you are installing the BIG/ip Controller in a location outside of
the United States, you need to verify that the voltage selector is
set appropriately before connecting the power cable to the unit.
WARNING
The unit must be connected to Earth ground, and it should have a
reliable ground path maintained at all times.
WARNING
The BIG/ip Controller contains a lithium battery. There is danger
of an explosion if you replace the lithium battery incorrectly. We
recommend that you replace the battery only with the same type of
battery originally installed in the unit, or with an equivalent type
recommended by the battery manufacturer. Be sure to discard all
used batteries according to the manufacturer’s instructions.
3-6
F5 Networks, Inc.
Setting up the Hardware
Installing and connecting the hardware
There are six basic steps to installing the hardware. You simply
need to install the controller in the rack, connect the peripheral
hardware and the external and internal interfaces, and then connect
the fail-over and power cables. If you have a unit with three or
more network interface cards (NICs), be sure to check step 3.
WARNING
Do not turn on a BIG/ip Controller until all peripheral hardware is
connected to the unit.
To install the hardware
1. Insert the BIG/ip Controller in the rack and secure it using
the four rack-mounting screws that are provided.
2. Connect the hardware that you have chosen to use for
input/output:
• If you are using a VGA monitor and keyboard, connect
the monitor connector cable to the video port (number 10
in Figure 3.2, on page 3-5) and the keyboard connector
cable to the keyboard port (number 5 in Figure 3.2, on
page 3-5). Note that a PC/AT-to-PS/2 keyboard adapter
is included with each BIG/ip Controller (see the
component list on page 3-2).
• Optionally, if you are using a serial terminal as the
console, connect the serial cable to the terminal serial
port (number 7 in Figure 3.2). Also, you should not
connect a keyboard to the BIG/ip Controller. When
there is no keyboard connected to the BIG/ip Controller,
the BIG/ip Controller defaults to using the serial port as
the console.
3. Connect the external interface (number 12 in Figure 3.2) to
the network from which the BIG/ip Controller receives
connection requests.
• If you have purchased a unit with three or more network
interface cards (NICs), be sure to note or write down
how you connect the cables to the internal and external
BIG/ip® Controller, v. 2.1
3-7
Chapter 3
interfaces. When you run the First-Time Boot utility, it
automatically detects the number of interfaces that are
installed and prompts you to configure more external
interfaces, if you want. It is important to select the
correct external interface based on the way you have
connected the cables to the back of the unit.
4. Connect the internal interface (number 11 in Figure 3.2) to
the network that houses the array of servers, routers, or
firewalls that the BIG/ip Controller load balances.
5. If you have a hardware-based redundant system, connect
the fail-over cable to the terminal serial port on each unit
(number 7 in Figure 3.2).
6. Connect the power cable to the BIG/ip Controller (number
2 in Figure 3.2), and then connect it to the power source.
WARNING
Before connecting the power cable to a power supply, customers
outside the United States should make sure that the voltage selector
is set appropriately.
To configure a serial terminal in addition to the console
If you want to configure a serial terminal for the BIG/ip Controller
in addition to the standard console, you need to follow the
configuration steps below. Note that if you are using a serial vt100
connection, you must edit both the /etc/ttys and bash_profile files
on the BIG/ip Controller.
1. Configure the serial terminal settings as follows:
-9600 baud
-8 bits
-1 stop bit
-No parity
2. Open the /etc/ttys file and find the line that reads tty00 off.
Modify it as shown here:
3-8
F5 Networks, Inc.
Setting up the Hardware
# PC COM ports (tty00 is DOS COM1) \
tty00 "/usr/libexec/getty default" vt100 in
secure tty01 off
3. Save the /etc/ttys file and close it.
4. Reboot the BIG/ip Controller.
Running the First-Time Boot utility
The First-Time Boot utility is a wizard that walks you through a
brief series of required configuration tasks, such as defining a root
password, and configuring IP addresses for the external and internal
interfaces. Once you complete the First-Time Boot utility, you can
connect to the BIG/ip Controller from a remote workstation and
begin configuring your load balancing set up.
The First-Time Boot utility is organized into three phases:
configure, confirm, and commit. Each phase walks you through a
series of screens, presenting the information in the following order:
❖
Root password
❖
Host name
❖
Default route (typically a router’s IP address)
❖
Time zone
❖
Update locate database
❖
Interface settings for the external network interface(s)
❖
Interface settings for the internal network interface(s)
❖
Configuration for BIG/ip redundant systems (fail-over IP
address)
❖
IP address for remote administration
❖
Settings for the BIG/ip web server
First, you configure all of the required information, then you have
the opportunity to confirm each individual setting or correct it if
necessary, and then your confirmed settings are committed and
saved to the system. Note that the screens you see are tailored to
BIG/ip® Controller, v. 2.1
3-9
Chapter 3
the specific hardware and software configuration that you have. If
you have a stand-alone system, for example, the First-Time Boot
utility skips the redundant system screens.
Gathering the information
Before you run the First-Time Boot utility on a specific BIG/ip
Controller, you should have the following information ready to
enter:
❖
Passwords for the root system and for the BIG/ip web server
❖
Host names for the root system and for the BIG/ip web server
❖
A default route (typically a router’s IP address)
❖
Settings for the network interfaces, including IP addresses, media
type, and custom netmask and broadcast addresses.
❖
Configuration information for redundant systems, including an IP
alias for the shared address, and the IP address of the
corresponding unit.
❖
The IP address or IP address range for remote administrative
connections.
Starting the First-Time Boot utility
You run the First-Time Booty utility directly on the console, using
the VGA monitor and keyboard. Once you turn on the power
switch (located on the front of the BIG/ip Controller as shown in
Figure 3.1, number 7), the BIG/ip Controller displays the License
Agreement screen. You must scroll through the screen, read it and
accept the agreement before you can move to the next screen. If
you agree to the license statement, the next screen you see is the
Welcome screen. From this screen, simply press any key on the
keyboard, and then follow the instructions on the subsequent
screens to complete the process.
Defining a root password
A root password allows you administrative access to the BIG/ip
Controller system. The password must contain a minimum of 6
characters, but no more than 128 characters. Passwords are case-
3 - 10
F5 Networks, Inc.
Setting up the Hardware
sensitive, and we recommend that your password contain a
combination of upper and lowercase characters, as well as
punctuation characters. Once you enter a password, the First-Time
Boot utility prompts you to confirm your root password by typing it
again. If the two passwords match, your password is immediately
saved. If the two passwords do not match, you receive an error
message and are asked to re-enter your password.
WARNING
The root password is the only setting that is saved immediately,
rather than confirmed and committed at the end of the First-Time
Boot utility process. You cannot change the root password until the
First-Time Boot utility completes and you reboot the BIG/ip
Controller (see Chapter 6). Note that you can change other system
settings when the First-Time Boot utility prompts you to confirm
your configuration settings.
Defining a host name
The host name identifies the BIG/ip Controller itself. Host names
must start with a letter or number, and must be at least two
characters. They may contain numbers, letters, and the symbols for
dash ( - ), underscore ( _ ), and period ( . ) if you like. There are no
additional restrictions on host names, other than those imposed by
your own network requirements.
Configuring a default route
If a BIG/ip Controller does not have a predefined static route for
network traffic, the unit automatically sends traffic to the IP address
that you define as the default route. Typically, a default route is set
to a router’s IP address.
Configuring a time zone
Next, you need to specify your time zone. This ensures that the
clock for the BIG/ip Controller is set correctly, and that dates and
times recorded in log files correspond to the time zone of the
system administrator. Scroll through the system file to find the time
BIG/ip® Controller, v. 2.1
3 - 11
Chapter 3
zone closest to your location. Note that one option may appear with
multiple names. Select the time zone you want to use, and press
Enter to continue.
Configuring the interfaces
On the Configure BIG/ip Interfaces screen, select Yes if you have a
redundant system. Next, select the version of system that you have,
such as HA, HA+, or LB. Your answers affect the subsequent
screens that display.
You must configure at least one external interface, and at least one
internal interface. The external interface is the one on which the
BIG/ip Controller receives connection requests. The internal
interface is the one that houses the servers, firewalls, or other
equipment that the BIG/ip Controller load balances. The utility
prompts you for each interface, and asks you to provide the IP
address, netmask, broadcast address, and the interface media type.
If you have a redundant system, you are also prompted to provide
the IP address that serves as an alias for both BIG/ip Controllers.
The IP alias is shared between the units, and is used only by the
currently active machine. Each unit also uses unique internal and
external IP addresses. The First-Time Boot utility guides you
through configuring the interfaces, based on your configuration:
❖
If you have a stand-alone system, the order is: external interface
IP address, internal interface IP address, internal shared alias.
❖
If you have a redundant system, the order is: external interface IP
address, external shared alias, internal interface IP address,
internal shared alias.
❖
If you have a system with multiple NICs, the order is: first
external interface IP address, first external shared alias, first
internal interface IP address, first internal shared alias.
You should set the internal alias as the default route for the node
servers. Note that for each IP address or alias that you assign to an
interface, you have the option of assigning a custom netmask and
broadcast address as well.
3 - 12
F5 Networks, Inc.
Setting up the Hardware
Configuring an interface to the external network
The Select External Interface screen shows a list of the installed
interfaces. Select the one you want to use for the external network,
and press Enter. The utility prompts you for the following
information, in many cases offering you a default:
❖
Interface IP address
❖
Netmask
❖
Broadcast address
❖
External shared alias IP address (on a redundant system)
❖
External shared alias network address (on a redundant system)
❖
External shared alias broadcast address (on a redundant system)
❖
Interface media type
Note
The IP address of the external network interface is not the IP
address of your site or sites. The IP addresses of the sites
themselves are specified by the virtual IP addresses associated with
each virtual server you configure.
WARNING
The configuration utility lists only the network interface devices
that it detects during boot up. If the utility lists only one interface
device, the network adapter may have come loose during shipping.
Check the LED indicators on the network adapters to ensure that
they have detected the available BIG/ip Controller media.
Once you select the interface, you need to enter the following
information:
❖
IP address
❖
Netmask
Note that the BIG/ip Controller uses a default netmask
appropriate to the subnetwork indicated by the IP address.
❖
Broadcast address
The default broadcast address is a combination of the IP address
and the netmask.
BIG/ip® Controller, v. 2.1
3 - 13
Chapter 3
❖
External shared IP alias (redundant systems only)
❖
Media type for External Interface
The media type options depend on the network interface card
included in your hardware configuration. The BIG/ip platform
supports the following types:
• auto
• 10baseT
• 10baseT,FDX
• 100baseTX
• 100baseTX,FDX
• FDDI
• Gigabit Ethernet
If you are configuring a BIG/ip Controller that has more than two
network interface cards installed, the First-Time Boot utility
prompts you to configure more external interfaces. If you choose to
configure an additional external interface, you return to the
previous screen and repeat the steps described above. When you
have finished configuring all external interfaces, you move on to the
internal interface configuration.
Tip
If you have only one interface left, the system does NOT ask if you
want more external interfaces to configure; it assumes that the one
left will be your internal interface.
Configuring an interface to the internal network
When you configure the interface that connects the BIG/ip
Controller to the internal network (the servers and other network
devices that sit behind the BIG/ip Controller), the First-Time Boot
utility prompts you for the following information:
3 - 14
❖
IP address
❖
Netmask
Note that the BIG/ip Controller uses a default netmask
appropriate to the subnetwork indicated by the IP address.
F5 Networks, Inc.
Setting up the Hardware
❖
Broadcast address
The default broadcast address is a combination of the IP address
and the netmask.
❖
Internal shared IP alias (redundant systems only)
❖
Media type for Internal Interface
The media type options depend on the network interface card
included in your hardware configuration. The BIG/ip Controller
supports the following types:
• auto
• 10baseT
• 10baseT,FDX
• 100baseTX
• 100baseTX,FDX
• FDDI
• Gigabit Ethernet
Configuring settings for a BIG/ip redundant system
If you have a redundant system, you need to enter specific
configuration information at this point. If you do not have a
redundant system, the First-Time Boot utility goes directly to the
next step in the configuration process where you define an
administrative IP address (see Configuring remote administration,
on page 3-16).
Each BIG/ip Controller in a redundant system configuration uses
unique internal and external IP addresses. However, in order for
connections to be routed to the active BIG/ip Controller in the
redundant system, you need to define two IP aliases that are shared
between the two BIG/ip Controllers in the redundant system:
❖
The external IP alias associated with each unit’s external
interface
❖
An internal IP alias associated with each unit’s internal interface
The shared IP aliases are actually used only by the active unit in the
redundant system. When a fail-over occurs, the IP alias is switched
to the newly active machine.
BIG/ip® Controller, v. 2.1
3 - 15
Chapter 3
Each network device behind the BIG/ip redundant system should
have the internal IP alias set as the default route, which again
guarantees that the network devices always communicate via the
active BIG/ip Controller in the redundant system.
For administration purposes, you can connect to the BIG/ip
Controller IP alias, which always connects you to the active
machine. To connect to a specific controller, simply connect
directly to the external or internal IP address of that BIG/ip
Controller.
Configuring the external IP alias
To configure the external IP alias, you need to provide the following
information:
❖
An IP alias
❖
A netmask
❖
A broadcast address
Configuring the internal IP alias
To configure the internal IP alias, you need to provide the following
information:
❖
An IP alias
❖
A netmask
❖
A broadcast address
Configuring remote administration
The screens that you see for configuring remote administration
vary, depending on whether you have a US BIG/ip Controller, or an
international BIG/ip Controller. On a US BIG/ip Controller, the
first screen you see is the Configure SSH screen, which prompts
you to type in an address for SSH command line access. On
international and BIG/ip LB Controllers that do not have SSH, the
First-Time Boot utility skips this screen.
Next, the First-Time Boot utility prompts you to enter a single IP
address or a range of IP addresses, from which the BIG/ip
Controller will accept administrative connections (either remote
3 - 16
F5 Networks, Inc.
Setting up the Hardware
shell connections, or connections to the BIG/ip web server). To
specify a range of IP addresses, you can use the asterisk (*) as a
wildcard character in the IP addresses.
The following example allows remote administration from all hosts
on the 192.168.2.0 network:
192.168.2.*
Tip
If you do not configure command line access, the configuration
synchronization feature for redundant units does not work.
Configuring settings for the BIG/ip web server
The BIG/ip web server requires you to define a domain name for
the server on both the internal and the external interfaces. The
BIG/ip web server configuration also requires that you define a user
ID and password. On US products, the configuration also generates
certificates for authentication.
The First-Time Boot utility guides you through three screens to set
up web server access. The first screen prompts you to type and
enter a fully qualified domain name for both the external and the
internal interfaces. The certification screen prompts you first for
country, and as you enter that, it prompts for state, city, and
company. The last web server screen prompts you for user name
and a password, which you enter twice. Once you have completed
this screen, the First-Time Boot utility moves into the confirmation
phase.
Note that if you ever change the IP addresses or host names on the
BIG/ip Controller interfaces, you need to reconfigure the BIG/ip
web server to reflect your new settings. You can run the reconfiguration utility from the command line using the following
command:
reconfig-httpd
BIG/ip® Controller, v. 2.1
3 - 17
Chapter 3
If you wish to create a new password for the BIG/ip web server,
delete the /var/f5/httpd/basicauth/users file before running the
reconfig-httpd utility. If this file is missing from the
configuration, the utility prompts you for both user ID and
password information.
You can also add users to the existing password file, change a
password for an existing user, or recreate the password file, without
actually going through the BIG/ip web server configuration
process. For more information, see Chapter 6.
WARNING
If you have modified the BIG/ip web server configuration outside of
the configuration utility, be aware that some changes may be lost
when you run the reconfig-httpd utility. This utility overwrites the
httpd.conf file, and several other files, but it does warn you before
doing so.
Confirming your configuration settings
At this point, you have entered all the configuration information,
and now you simply have to confirm each setting. Each
confirmation screen displays a setting, and prompts you to accept or
re-enter it. If you choose to edit it, the utility displays the original
configuration screen in which you defined the setting the first time.
When you finish editing the item, you return directly to the
Confirmation screen for that item, and continue the confirmation
process. Note that once you accept a setting in the Confirmation
screen, you do not have another opportunity to review it.
You confirm or edit the settings in the same order that you
configured them:
3 - 18
❖
Confirm Host name
❖
Confirm Default route
❖
Confirm time zone
❖
Confirm all interface settings, external and internal
❖
Confirm fail-over IP address, if necessary
❖
Confirm administrative IP address
F5 Networks, Inc.
Setting up the Hardware
❖
Confirm web server options
Once you have confirmed the last setting, the First-Time Boot
utility moves directly into the commit phase, where you are not able
to make any changes.
Committing your configuration settings to the system
Once you confirm all of the configuration settings, the
configuration utility saves the configuration settings. During this
commit process, the First-Time Boot utility creates the following
files and tables:
❖
An administrative IP access file
This file stores the IP address, or IP address range, from which
the BIG/ip Controller accepts administrative connections.
❖
An interfaces table
❖
A /etc/bigip.conf file
❖
A /etc/netstart file
❖
A /etc/hosts file
❖
A /etc/ethers file
❖
A /var/f5/httpd/conf/httpd.conf file
❖
A /etc/sshd_config file
If you want to change any information in these files at a later time,
you can edit the files directly, you can change the information in the
web-based Configuration utility, or for certain settings, you can
change them using command line utilities. If necessary, you can
also re-run the First-Time Boot utility.
Defining additional host names
Once you complete the First-Time Boot utility, you may want to
insert additional host names and IP addresses for network devices
into the /etc/hosts file to allow for more user-friendly system
administration. In particular, you may want to create host names
for the IP addresses that you will assign to virtual servers. You may
BIG/ip® Controller, v. 2.1
3 - 19
Chapter 3
also want to define host names for standard devices such as your
routers, network interface cards, and the servers or other equipment
that you are load balancing.
The /etc/hosts file, as created by the First-Time Boot utility, is
similar to the following example, shown in Figure 3.3.
#bigip host table ( default )
127.0.0.1 localhost localhost.host.domain
# add your default gateway here
207.17.112.254
# real - external interface
207.17.112.230 bigip ext
# real - internal interface
192.168.1.100 int
# VIPs ( add as necessary )
# nodes ( add as necessary )
Figure 3.3 The /etc/hosts file created by the First-Time Boot utility
This sample hosts file lists the IP addresses for the default router,
the internal network interface, and the external network interface,
and it contains place holders for both the virtual servers and the
content servers that your BIG/ip Controller will manage.
Preparing workstations for command line
access
The type of system you have determines the options you have for
remote command line administration:
3 - 20
❖
BIG/ip Controllers distributed in the US support secure shell
command line access using the F-Secure SSH client.
❖
BIG/ip Controllers distributed outside the US support command
line access using a standard Telnet shell.
F5 Networks, Inc.
Setting up the Hardware
If you are working with a US BIG/ip Controller, you probably want
to install the F-Secure SSH client on your workstation. The BIG/ip
platform includes a version of the F-Secure SSH client for each of
the following platforms: Windows, UNIX, and Macintosh. You
can download the F-Secure client using your web browser, or you
can download the client using an FTP server on the administrative
workstation.
Note that the F-Secure license agreement allows you to download
two copies of the F-Secure SSH client. If you require additional
licenses, you need to contact Data Fellows. For information about
contacting Data Fellows, as well as information about working with
the SSH client, refer to the F-Secure manual included with your
BIG/ip Controller.
Note
You can also use the F-Secure SSH suite for file transfer to and from
the BIG/ip Controller, as well as for remote backups. An F-Secure
SSH client is pre-installed on the BIG/ip Controller to assist with
file transfer activities. Please refer to the F-Secure User's Manual
for more information.
Downloading the F-Secure SSH client from the BIG/ip web
server
The F-Secure SSH client is available in the Downloads section of
the BIG/ip web server. For US products, you connect to the BIG/ip
web server via SSL on port 443 (use https:// rather than http:// in
the URL). Once you connect to the BIG/ip web server, click the
Downloads link. From the Downloads page, you can select the
SSH Client.
Downloading the F-Secure SSH client using FTP
The BIG/ip Controller has an FTP client installed, which allows
you to transfer the F-Secure SSH Client using FTP (note that your
destination workstation must also have an FTP server installed).
After you transfer the installation file, you simply decompress the
file and run the F-Secure installation program.
BIG/ip® Controller, v. 2.1
3 - 21
Chapter 3
You initiate the transfer from the BIG/ip Controller itself, using the
monitor and keyboard, or the serial terminal, attached directly to the
BIG/ip Controller.
To transfer the SSH client using FTP
1. Locate the SSH client that is appropriate for the operating
system that runs on the administrative workstation:
a) Go to the /usr/contrib/fsecure directory where the Fsecure SSH clients are stored.
b) List the directory, noting the file name that corresponds
to the operating system of your administration
workstation.
3. Start FTP:
ftp
4. Open a connection to the remote workstation using the
following command, where IP address is the IP address of
the remote workstation itself:
open <IP address>
Once you connect to the administrative workstation, the
FTP server on the administrative workstation prompts you
for a password.
5. Enter the appropriate user name and password to complete
the connection.
6. Switch to passive FTP mode:
passive
7. Switch the transfer mode to binary:
bin
8. Go to the directory on the administrative workstation where
you want to install the F-Secure SSH client.
3 - 22
F5 Networks, Inc.
Setting up the Hardware
9. Start the transfer process using the following command,
where filename is the name of the F-Secure file that is
specific to the operating system running on the
administrative workstation:
put <filename>
10. Once the transfer is done, type the following command:
quit
Setting up the F-Secure SSH client on a Windows 95 or
Windows NT workstation
The F-Secure SSH client installation file for Windows platforms is
compressed in ZIP format. You can use standard ZIP tools, such as
PKZip or WinZip to extract the file.
To unzip and install the SSH client
1.
Log on to the Windows workstation.
2. Go to the directory to which you transferred the F-Secure
installation file. Run PKZip or WinZip to extract the files.
3. The set of files extracted includes a Setup executable. Run
the Setup executable and install the client.
4. Start the F-Secure SSH client.
5. In the SSH Client window, from the File menu choose
Connect.
The Connect Using Password Authentication window
opens.
6. Click Properties.
7. In the Options dialog box, check Compression and
Forward X11, and set the Cipher option to Blowfish.
Click OK to return to the Connect Using Password
Authentication window.
8. In the Connect Using Password Authentication window,
type the following items:
BIG/ip® Controller, v. 2.1
3 - 23
Chapter 3
a) BIG/ip Controller IP address or host name
b) The root user name
c) The root password
9. Press the Return key to log on to the BIG/ip Controller.
Setting up the F-Secure SSH client on a UNIX workstation
The F-Secure installation file for UNIX platforms is compressed in
TAR/Gzip format.
To untar and install the SSH client
1. Log on to the workstation and go to the directory into
which you transferred the F-Secure SSH client tar file.
2. Untar the file and follow the instructions in the install file
to build the F-Secure SSH client for your workstation.
3. Start the SSH client.
4. Open a connection to the BIG/ip Controller:
ssh -l root [BIG/ip IP address]
5. Enter the root password.
3 - 24
F5 Networks, Inc.
4
Getting Started with a Basic
Configuration
• Setting up a basic configuration
• Configuring virtual servers
• Allowing access to ports and services
• Configuring the timer settings
• Changing the load balancing mode
• Configuring network address translations and IP
forwarding for nodes
• Configuring Extended Content Verification service
checking
• Configuring persistence for e-commerce and other
dynamic content sites
• Configuring and synchronizing redundant systems
• Addressing general networking issues
4-1
Chapter 4
Setting up a basic configuration
This chapter covers the three essential configuration tasks that all
users need to do, as well as the optional configuration tasks that
most users find they want to do. Even if you want to use advanced
features, such as IP filters or specialized load balancing modes, you
start with the instructions in this chapter to set up your initial
configuration. Then turn to Chapter 5, Working with Special
Features, for details on using advanced features.
A basic configuration just sets up the BIG/ip Controller to do load
balancing for one or more groups of content servers, firewalls,
routers, or cache servers. To set up the simplest configuration, you
need to do only the following three tasks. Other BIG/ip Controller
settings, such as the load balancing mode, are either pre-configured
or are not required for simple configurations.
❖
Configure the virtual servers and the virtual server mappings
The virtual servers are the backbone of the system configuration,
and they define the groups of servers or other network equipment
that the BIG/ip Controller load balances.
❖
Allow access to services
The services and ports on a BIG/ip controller are locked and
cannot accept connections until you specifically open them to
network access. For each service that one or more of your virtual
servers supports, you need to open the corresponding port
number to network access.
❖
Configure the timer settings
The BIG/ip Controller supports several timer settings, but there
are only two that you need to set for a simple configuration. First
you need to set the amount of time that idle connections are
allowed to remain open. Second, you need to set the frequency at
which the BIG/ip Controller checks nodes to make sure they are
up and available to accept connections passed on by a virtual
server.
This chapter also covers additional configuration options that users
typically add on to a simple configuration, including:
❖
4-2
Using an alternate load balancing mode
F5 Networks, Inc.
Getting Started with a Basic Configuration
❖
Setting up network address translation (NAT) or IP forwarding to
allow direct connections to and from nodes
❖
Configuring extended content verification (ECV) to allow the
BIG/ip Controller to verify that a web server or mail server is
responding to requests
❖
Setting up persistence to accommodate e-commerce and other
dynamic content sites that require returning clients to bypass load
balancing and return to the same node that they last connected to
❖
Setting up redundant BIG/ip Controller systems
Tip
When you set configuration options in F5 Configuration utility, they
are immediately saved to the appropriate configuration file.
However, when you set configuration options using the BIG/pipe
command line utility, they are temporarily stored in system memory,
and are not saved to a configuration file unless you execute the
appropriate command.
The following table, Table 4.1, describes the different virtual server
configurations available on the BIG/ip Controller.
BIG/ip® Controller, v. 2.1
4-3
Setup for
specific nodes
or hosts
Ports
Connections
Active FTP
support
NT Domain
support
Protocols
Security
Routable
address (**)
Chapter 4
NAT
Medium
No
TCP,
UDP
No
No
Not
connetion
oriented
Does not
matter
Yes
SNAT
High
No
TCP,
UDP
No
Yes
Outbound
only
Does not
matter
Yes, but
can use
wildcard
IP
forwarding
Low
Yes
Any IP
protocol
Yes
Yes
Not
connetion
oriented
Does not
matter
No
Virtual
server
High
No
TCP,
UDP
No
Yes
Inbound
only
Uses
specific
ports or
wildcard
Yes, but
can use
wildcard
Table 4.1 Virtual server properties
Note
The routable address column in Table 4.1 refers to whether or not
routable addresses are required on the internal network.
Configuring virtual servers
The first step in a basic configuration is to configure virtual servers.
Before you configure virtual servers, you need to know:
4-4
❖
If standard virtual servers or wildcard virtual servers meet the
needs of your network.
❖
Whether you need to activate optional virtual server properties.
❖
If Transparent Node mode is necessary for your implementation.
F5 Networks, Inc.
Getting Started with a Basic Configuration
Once you know which virtual server options are useful in your
network, you can:
❖
Define standard virtual servers.
❖
Define wildcard virtual servers.
Using standard or wildcard virtual servers
Virtual servers map to a group of content servers, firewalls, routers,
or cache servers, and they are associated with one or more external
interfaces on the BIG/ip Controller.
You can configure two different types of virtual servers:
❖
Standard virtual servers
A standard virtual server represents a site, such as a web site or
an FTP site, and it provides load balancing for content servers.
The virtual server IP address should be the same IP address that
you register with DNS for the site that the virtual server
represents.
❖
Wildcard virtual servers
A wildcard virtual server load balances transparent network
devices such as firewalls, routers, or cache servers. Wildcard
virtual servers use a special wildcard IP address (0.0.0.0), and
you can use them only if you have activated Transparent Node
mode.
Before you begin configuring the virtual servers, you should have
the following information ready to enter:
❖
The IP address and service name or port number of each virtual
server you are configuring
❖
The IP addresses and ports for each content server, firewall,
cache server, or other device that the virtual servers will load
balance
BIG/ip® Controller, v. 2.1
4-5
Chapter 4
Note that both the F5 Configuration utility and the BIG/pipe
command line utility accept host names in place of IP addresses,
and also accept standard service names in place of port numbers.
You can also include VLAN tags in a virtual server definition (for
details, see Setting up 802.1q VLAN trunk mode, on page 5-52).
WARNING
If you use VLAN tags, you must consistently use VLAN tags
throughout the configuration.
Using optional virtual server properties
When you define a virtual server, you can set optional virtual server
properties, such as network address translation or extended content
verification. If you are planning on using any of the following
features, you may want to read the corresponding section before
you actually begin the virtual server configuration process:
❖
Network address translations for nodes (see Configuring network
address translations and IP forwarding for nodes, on page 4-23)
❖
Extended Content Verification service checking (see Configuring
Extended Content Verification service checking, on page 4-30)
❖
Persistence for connections that should return to the node that
they last connected to (see Configuring persistence for ecommerce and other dynamic content sites, on page 4-37)
Tip
If you prefer to use command line utilities for configuration tasks,
you may find it more efficient to configure certain property settings
at the time you define the virtual server. For example, to turn SSL
persistence on using the bigpipe vip command, you actually add the
special ssl keyword to the end of the command when you define the
virtual server.
Activating Transparent Node mode
If you are load balancing only content servers, you can skip this
step and immediately begin configuring virtual servers. If you are
load balancing transparent firewalls, routers, cache servers, or
4-6
F5 Networks, Inc.
Getting Started with a Basic Configuration
proxy servers, you need to turn Transparent Node mode on before
you begin configuring virtual servers. Transparent Node mode
allows you to define special wildcard virtual servers that load
balance transparent network devices.
Note that when Transparent Node mode is on, you can still
configure standard virtual servers that load balance content servers,
as well as non-transparent firewalls and proxy servers.
To activate Transparent Node mode in the F5
Configuration utility
1. In the navigation pane, click the BIG/ip logo.
The BIG/ip System Properties screen opens.
2. On the toolbar, click Advanced Properties.
The Advanced Properties screen opens.
3. Check the Transparent Node Mode box.
4. Click the Apply button.
To activate Transparent Node mode from the command
line
Enter the following sysctl command:
sysctl -w bigip.bonfire_mode=1
Defining standard virtual servers
A standard virtual server represents a specific site, such as an
Internet web site or an FTP site, and it load balances content
servers. The IP address that you use for a standard virtual server
should match the IP address that DNS associates with the site’s
domain name.
Note
If you are using a 3DNS Controller in conjunction with your BIG/ip
Controller, the 3DNS Controller uses the IP address associated
with the registered domain name in its own configuration. For
details, refer to the 3DNS Controller Administrator Guide.
BIG/ip® Controller, v. 2.1
4-7
Chapter 4
When you define a virtual server, you actually define the virtual
server at the same time that you define the nodes which the virtual
server uses for load balancing. The combination of the virtual
server and the group of nodes that it load balances is referred to as
the virtual server mapping.
To define a standard virtual server mapping in the F5
Configuration utility
1. In the navigation pane, click Virtual Servers.
2. On the toolbar, click Add Virtual Server.
The Add Virtual Server screen opens.
3. In the Address box, enter the virtual server's IP address or
host name.
4. In the Netmask box, type an optional netmask. If you
leave this setting blank, the BIG/ip Controller uses a default
netmask based on the IP address you entered for the virtual
server. Use the default netmask unless your configuration
requires a different netmask.
5. In the Broadcast box, type the broadcast address for this
virtual server. If you leave this box blank, the BIG/ip
Controller generates a default broadcast address based on
the IP address and netmask of this virtual server.
6. In the Port box, either type a port number, or select a
service name from the drop-down list.
7. For External Interface, select the external interface on
which you want to create the virtual server. Select default
to allow the F5 Configuration utility to select the interface
based on the network address of the virtual server. If no
external interface is found for that network, the virtual
server is created on the first external interface. If you
choose None, the BIG/ip Controller does not create an alias
and generates no ARPs for the virtual IP address (see
Reducing ARP traffic on the external network, on page 5-47
for details).
8. In the Node Address box, enter the IP address or host name
of the first node to which the virtual server maps.
4-8
F5 Networks, Inc.
Getting Started with a Basic Configuration
9. In the Node Port box, type the node port number, or select
the service from the drop-down list. Note that in typical
applications, the node port is the same as the virtual server
port.
10. Click the Add button to save the virtual server settings.
Once you click the Add button, you return to the Virtual
Servers screen.
11. To add additional nodes to the virtual server mapping, click
the virtual server in the list.
The Virtual Server Properties screen opens.
12. On the toolbar, click Add Node.
The Add Node screen opens.
13. In the Add Node screen, type the IP address and port
number for the node.
14. Click the Add button to save the node to the virtual server
mapping.
Once you click the Add button, you return to the Virtual
Server Properties screen. Repeat steps 12 through 14 until
you have defined all nodes that should be included in the
virtual server mapping
To define a standard virtual server mapping on the
command line
Enter the bigpipe vip command as shown below. Note that when
you define a virtual server on the command line, you can define all
nodes in the mapping at once. Also note that you can use host
names in place of IP addresses, and that you can use standard
service names in place of port numbers.
bigpipe vip <virt IP>:<port> define <node IP>:<port> \
<node IP>:<port>... <node IP>:<port>
For example, the following command defines a virtual server that
maps to three nodes:
bigpipe vip 192.200.100.25:80 define 192.168.10.01:80 \
192.168.10.02:80 192.168.10.03:80
BIG/ip® Controller, v. 2.1
4-9
Chapter 4
Defining wildcard virtual servers
Wildcard virtual servers are a special type of virtual server designed
to manage network traffic for transparent network devices, such as
transparent firewalls, routers, proxy servers, or cache servers. A
wildcard virtual server essentially manages network traffic that has
a destination IP address unknown to the BIG/ip Controller. A
standard virtual server typically represents a specific site, such as an
Internet web site, and its IP address matches the IP address that
DNS associates with the site’s domain name. When the BIG/ip
Controller receives a connection request for that site, the BIG/ip
Controller recognizes that the client’s destination IP address
matches the IP address of the virtual server, and it subsequently
forwards the client to one of the content servers that the virtual
server load balances.
When you are load balancing transparent nodes, a client’s
destination IP address is going to be random--the client is looking
to connect to an IP address on the other side of the firewall, router,
or proxy server. In this situation, the BIG/ip Controller cannot
match the client’s destination IP address to a virtual server IP
address. Wildcard virtual servers resolve this problem by providing
a generic IP address of 0.0.0.0 that the BIG/ip Controller can use
for address matching. For example, when the BIG/ip Controller
does not find a virtual server match for a client’s destination IP
address, it matches the client’s IP address to a wildcard virtual
server. The BIG/ip Controller then forwards the client to one of the
firewalls or routers that the wildcard virtual server load balances,
which in turn forwards the client to the actual destination IP
address.
A note about wildcard ports
When you configure wildcard virtual servers and the nodes that
they load balance, you can use a wildcard port (port 0) in place of a
real port number or service name. A wildcard port handles any and
all types of network services.
A wildcard virtual server that uses port 0 is referred to as a default
wildcard virtual server, and it handles traffic for all services. A
port-specific wildcard virtual server handles traffic only for a
particular service, and you define it using a service name or a port
4 - 10
F5 Networks, Inc.
Getting Started with a Basic Configuration
number. If you use both a default wildcard virtual server and portspecific wildcard virtual servers, any traffic that does not match
either a standard virtual server or one of the port-specific wildcard
virtual servers is handled by the default wildcard virtual server.
You can use port-specific wildcard virtual servers for tracking
statistics for a particular type of network traffic, or for routing
outgoing traffic, such as HTTP traffic, directly to a cache server
rather than a firewall or router.
When you define transparent nodes that need to handle more than
one type of service, such as a firewall or a router, we recommend
that you define the node port number as 0.
Note
When you define a node with port 0, and you wish to perform a
service check on that node, you must configure service check
intervals and timeouts using port 0. Then, you can configure a
simple TCP service check. See Service checking for wildcard
servers and ports, on page 4-20, for more details.
Defining the wildcard virtual server mappings
All wildcard virtual server mappings must use an IP address of
0.0.0.0.
To define a wildcard virtual server mapping in the F5
Configuration utility
1. In the navigation pane, click Virtual Servers.
2. On the toolbar, click Add Virtual Server.
The Add Virtual Server screen opens.
3. In the Address box, type the wildcard IP address of 0.0.0.0.
4. In the Netmask box, type an optional netmask. If you
leave this box blank, the BIG/ip Controller generates a
default broadcast address based on the IP address and
netmask of this virtual server. Use the default netmask
unless your configuration requires a different netmask.
BIG/ip® Controller, v. 2.1
4 - 11
Chapter 4
5. In the Broadcast box, type the broadcast address for this
virtual server. If you leave this box blank, the BIG/ip
Controller generates a default broadcast address based on
the IP address and netmask of this virtual server.
6. In the Port box, type a port number, or select a service
name from the drop-down list. Note that port 0 defines a
virtual server that handles all types of services.
7. For External Interface, choose the external interface on
which you want to create the virtual server. Select default
to allow the F5 Configuration utility to select an external
interface to choose the interface based on the network
address of the virtual server. If no external interface is
found for that network, the virtual server is created on the
first external interface. If you choose None, the BIG/ip
Controller creates no alias and generates no ARPs for the
virtual IP address.
8. In the Node Address box, enter the address of the first
node to which the virtual server maps.
9. In the Node Port box, type the node port number, or select
the service from the drop-down list. Note that port 0
defines a node that handles all types of services.
10. Click the Add button to save the virtual server.
Once you click the Add button, you return to the Virtual
Servers screen.
11. To add additional nodes to the virtual server mapping, click
a virtual server in the list.
The Virtual Server Properties screen opens.
12. On the toolbar, click Add Node.
The Add Node screen opens.
13. In the Add Node screen, enter the IP address and service or
port number for the node.
14. Click the Add button to save the node to the virtual server
mapping.
Once you click Add, you return to the Virtual Server
4 - 12
F5 Networks, Inc.
Getting Started with a Basic Configuration
Properties screen. Repeat steps 12 through 14 until you
have defined all nodes that should be included in the virtual
server mapping.
To define a wildcard virtual server mapping on the
command line
Enter the bigpipe vip command as shown below. Note that all
wildcard virtual servers use 0.0.0.0 as the IP address.
bigpipe vip 0.0.0.0:<port> define <node IP>:<port> \
<node IP>:<port>... <node IP>:<port>
For example, the following command defines a wildcard virtual
server that maps to three firewalls. Because the nodes are firewalls
and need to handle a variety of services, both the virtual server and
the nodes are defined using port 0.
bigpipe vip 0.0.0.0:0 define 192.168.10.01:0 \
192.168.10.02:0 192.168.10.03:0
BIG/ip® Controller, v. 2.1
4 - 13
Chapter 4
Allowing access to ports and services
One of the security features of the BIG/ip Controller is that all ports
on the controller are locked down and unavailable for service unless
you specifically open them to network access. Before clients can
use the virtual servers you defined, you must allow access to each
port that the virtual servers use.
Tip
Virtual servers using the same service actually share a port on the
BIG/ip Controller. You only need to open access to a port once; you
do not need to open access to a port for each instance of a virtual
server that uses it.
Note
To enable access to wildcard virtual servers, you must enable port
0.
To allow access to services in the F5 Configuration utility
1. In the navigation pane, click Virtual Servers.
The Virtual Server list opens and displays each virtual
server’s IP address and associated port number or service
name.
2. Click the a virtual server in the list.
The Virtual Server Properties screen opens.
3. In the Port box, click the port number or service name.
The Global Virtual Port screen opens.
4. In the Global Virtual Port screen, check Enabled to open
the port and allow access to the service.
5. Click the Apply button.
6. Return to the virtual server list by clicking Virtual Servers
in the navigation pane.
7. Click the next virtual server in the list and repeat steps 2
through 7 until you have opened access to all the services
that your virtual servers use.
4 - 14
F5 Networks, Inc.
Getting Started with a Basic Configuration
To allow access to services on the command line
Using the bigpipe port command, you can allow access to one or
more ports at a time.
bigpipe port <port>... <port> enable
For example, if you are enabling HTTP (port 80) and Telnet (port
23) services, you can enter the following bigpipe port command:
bigpipe port 80 23 enable
WARNING
In order for FTP to function properly, you must allow both ports 20
and 21 (or ftp-data and ftp).
Configuring the timer settings
There are two essential timer settings that you need to configure:
❖
The node ping timer defines how often the BIG/ip Controller
pings node addresses to verify whether a node is up or down, and
also defines how long the BIG/ip Controller waits for a response
from a node before determining that the node is unresponsive and
should be marked down.
❖
The idle connection timer defines how long an inactive
connection is allowed to remain open before the BIG/ip
Controller reaps the connection, closing it and disconnecting the
client.
The service check timer is optional, and you need to set it only if
you want the BIG/ip Controller to check to see if a service, or even
specific content, is available on a particular node. If you plan on
using simple service checks, or ECV or EAV service checks, you
need to set the service check timer.
BIG/ip® Controller, v. 2.1
4 - 15
Chapter 4
Setting the node ping timer
The node ping timer is an essential setting on the BIG/ip Controller
that determines how often the BIG/ip Controller checks node
addresses to see whether they are up and available or down and
unavailable. The node ping timer setting applies to all nodes
configured on the BIG/ip Controller, and it is part of the BIG/ip
Controller system properties.
To set the node ping timer in the F5 Configuration utility
1. Click the BIG/ip logo.
The BIG/ip System Properties screen opens.
2. In the Ping box, type the frequency (in seconds) at which
you want the BIG/ip Controller to ping each node address it
manages. A setting of 5 seconds is adequate for most
configurations.
3. In the Timeout box, type the number of seconds you want
the BIG/ip Controller to wait to receive a response to the
ping. If the BIG/ip Controller does not receive a response
to the ping before the node ping timeout expires, the BIG/ip
Controller marks the node down and does not use it for load
balancing. A setting of 16 seconds is adequate for most
configurations.
To set the node ping timer on the command line
To define node ping settings, you actually use a series of two
commands. First, you set the node ping frequency using the
bigpipe tping_node command, and then you set the node ping
timer using the bigpipe timeout_node command.
bigpipe tping_node <seconds>
bigpipe timeout_node <seconds>
For example, the following series of commands sets the ping
frequency at 5 seconds, and the timer to 16 seconds, which should
be adequate for most configurations.
bigpipe tping_node 5
4 - 16
F5 Networks, Inc.
Getting Started with a Basic Configuration
bigpipe timeout_node 16
Setting the timer for reaping idle connections
The BIG/ip Controller supports two timers for reaping idle
connections, one for TCP traffic and one for UDP traffic. These
timers are essential, and if they are set too high, or not at all, the
BIG/ip Controller may run out of memory. Each individual port on
the BIG/ip Controller has its own idle connection timer settings.
WARNING
The BIG/ip Controller accepts UDP connections only if you set the
UDP idle connection timer.
To set the inactive connection timer in the F5
Configuration utility
1. In the navigation pane, click Virtual Servers.
The Virtual Server list opens and displays each virtual
server’s IP address and associated port number or service
name.
2. Click a virtual server in the list.
The Virtual Server Properties screen opens.
3. In the Port box, click the port number or service name.
The Global Virtual Port screen opens.
4. In the Idle Connection Timeout TCP box, type the
number of seconds you want to elapse before the BIG/ip
Controller drops an idle TCP connection. For HTTP
connections, 60 seconds should be adequate, but for other
services such as Telnet, higher settings may be necessary.
5. In the Idle Connection Timeout UDP box, type the
number of seconds you want to elapse before the BIG/ip
Controller drops UDP connections.
6. Click the Apply button.
7. Return to the virtual server list by clicking Virtual Servers
in the navigation frame.
BIG/ip® Controller, v. 2.1
4 - 17
Chapter 4
8. Click the next virtual server in the list and repeat steps 2
through 7 until you have opened access to all the services
that your virtual servers use.
To set TCP idle connection timers on the command line
You can define a TCP idle connection timeout for one or more ports
at a time using the bigpipe treaper command. For HTTP
connections we recommend only 60 seconds, but for other services
such as Telnet we recommend higher settings.
bigpipe treaper <port>... <port> <seconds>
For example, the following command sets a 120 second time limit
for idle connections on port 443:
bigpipe treaper 443 120
To set UDP idle connection timers on the command line
You can define a UDP idle connection timeout for one or more
ports at a time using the bigpipe udp command.
bigpipe udp <port>... <port> <seconds>
For example, the following command sets a 120 second time limit
for idle connections on port 80:
bigpipe udp 80 120
Setting the service check timer
The service check feature is similar to node ping, but instead of
testing the availability of a server, it tests the availability of a
particular service running on a server. The service check timer
affects the three different types of service check: simple service
check, ECV service check, and EAV service check. To set up
simple service check, you need only set the service check timer as
described below. To set up ECV service check or EAV service
check, however, you need to configure additional settings (see
Configuring Extended Content Verification service checking, on
page 4-30).
4 - 18
F5 Networks, Inc.
Getting Started with a Basic Configuration
Note that each individual node managed by the BIG/ip Controller
has its own service check timer settings.
Note
When you define a node with port 0, and you wish to perform a
service check on that node, you must configure service check
intervals and timeouts using port 0. Then, you can configure a
simple TCP service check. See Service checking for wildcard
servers and ports, on page 4-20.
To set the service check timer in the F5 Configuration
utility
1. In the navigation frame, click Nodes.
The Nodes screen opens.
2. Click a node in the list.
The Node Properties screen opens.
3. Click the port you want to configure.
The Global Node Port Properties screen opens.
4. In the Frequency box, type the frequency (in seconds) at
which you want the BIG/ip Controller to check the service
on the node for all defined nodes using this port. Five
seconds is adequate for most configurations.
5. In the Timeout box, type the number of seconds you want
the BIG/ip Controller to wait to receive a response to the
service check. If the BIG/ip Controller does not receive a
response to the service check before the timeout expires,
the BIG/ip Controller marks the service on the node down
and does not use it for load balancing. Sixteen (16)
seconds is adequate for most configurations.
6. Click the Apply button.
7. Return to the list of nodes by clicking Nodes in the
navigation pane.
BIG/ip® Controller, v. 2.1
4 - 19
Chapter 4
To set the service check timer on the command line
To define service check settings, you actually use a series of two
commands. First, you set the service check frequency using the
bigpipe tping_svc command, and then set the service check timer
using the bigpipe timeout_svc command.
bigpipe tping_svc <port> <seconds>
bigpipe timeout_svc <port> <seconds>
For example, the following series of commands sets the service
check frequency at 5 seconds, and the timer to 16 seconds, which is
adequate for most configurations.
bigpipe tping_svc 80 5
bigpipe timeout_svc 80 16
Service checking for wildcard servers and ports
The simple keyword is necessary to perform simple service checks
on nodes with wildcard ports. Add the following entry to the
/etc/bigd.conf file. Use the following syntax to set a check on a
node where the check port is not the node port:
simple [<node addr>:]<node port> <check port>
For example, if a wildcard server is defined with a non-wildcard
port
bigpipe vip 0.0.0.0:0 define n1:0
then to configure the check on it, use the simple keyword to
designate the wildcard <server:><port> and <check port>:
simple n1:0 80
4 - 20
F5 Networks, Inc.
Getting Started with a Basic Configuration
Changing the load balancing mode
The default load balancing mode is Round Robin, and it simply
passes each new connection request to the next server in line,
eventually distributing connections evenly across the array of
machines being load balanced. Round Robin mode works well in
most configurations, especially if the equipment that you are load
balancing is roughly equal in processing speed and memory. If you
want to use the round robin load balancing mode, you can skip this
section, and begin configuring features that you want to add on to
the basic configuration.
However, if you are working with servers that differ significantly in
processing speed and memory, you may want to switch to Ratio
load balancing mode. In Ratio mode, the BIG/ip Controller
distributes connections among machines according to ratio weights
that you set, where the number of connections that each machine
receives over time is proportionate to the ratio weight you defined
for each machine.
Tip
The default ratio weight for a node is 1. If you keep the default
ratio weight for each node in a virtual server mapping, the nodes
receive an equal proportion of connections as though you were
using round robin load balancing.
Note
The BIG/ip Controller also supports more sophisticated dynamic
load balancing modes that may be suitable for your site. Refer to
Chapter 5, Using specialized load balancing modes, for more
information about working with specialized load balancing modes.
Using Ratio mode
If you want to switch from Round Robin to Ratio mode, you need
to do two separate configuration tasks:
❖
Set the load balancing mode to Ratio as described below.
BIG/ip® Controller, v. 2.1
4 - 21
Chapter 4
❖
Define the ratio weight (percentage of connections to be handled)
for each individual node address.
Switching to Ratio mode
The first task you should do is to set the load balancing mode to
Ratio. The load balancing mode is actually a property of the BIG/ip
Controller system, and it applies to all virtual servers defined on the
system.
To switch the system to Ratio mode in the F5
Configuration utility
1. Click the BIG/ip logo.
The BIG/ip System Properties screen opens.
2. In the Load Balancing Mode box, choose Ratio.
To switch the system to Ratio mode on the command line
Enter the following bigpipe command:
bigpipe lb ratio
Setting ratio weights for node addresses in a virtual server mapping
Once you switch to Ratio load balancing mode, you need to set the
ratio weight for each node address. Weights are a property of a
node’s IP address, and the default ratio weight for a given node
address is 1.
To set ratio weights in the F5 Configuration utility
1. In the navigation pane, click Nodes.
2. In the Nodes list, click the node for which you want to set
the ratio weight.
The Node Properties screen opens.
3. In the Address box, click the node address or host name.
The Global Node Address Properties screen opens.
4. In the Ratio or Priority box, replace the default ratio
weight with the ratio weight of your choice.
4 - 22
F5 Networks, Inc.
Getting Started with a Basic Configuration
5. Click the Apply button to save your changes.
To set ratio weights on the command line
The bigpipe ratio command sets the ratio weight for one or more
node addresses:
bigpipe ratio <node IP>... <node IP> <ratio weight>
The following example defines ratio weights for three node
addresses. The first command sets the first node to receive half of
the connection load. The second command sets the two remaining
node addresses to each receive one quarter of the connection load.
bigpipe ratio 192.168.10.01
2
bigpipe ratio 192.168.10.02
192.168.10.03
1
Configuring network address translations and
IP forwarding for nodes
The IP addresses that identify nodes on the BIG/ip Controller’s
internal network need not be routable on the BIG/ip Controller’s
external network. This protects nodes from illegal connection
attempts, but it also prevents nodes, and other hosts on the internal
network, from receiving direct administrative connections, or from
initiating connections to clients, such as mail servers or databases,
on the BIG/ip Controller’s external interface.
Network address translation resolves this problem. Network
address translations (NATs) assign a particular node a routable IP
address that the node can use as its source IP address when
connecting to servers on the BIG/ip Controller’s external interface.
You can use the NAT IP address to connect directly to the node
through the BIG/ip Controller (rather than having the BIG/ip
Controller send you to a random node according to the load
balancing mode). IP forwarding is a feature that provides similar
functionality, and you may want to use it if your network does not
support NAT.
BIG/ip® Controller, v. 2.1
4 - 23
Chapter 4
There are actually three configuration options, and you need to
identify which method is suitable for your needs:
❖
Network Address Translation (NAT)
A network translation address provides a routable alias IP address
that a node can use as its source IP address when making or
receiving connections to clients on the external network. You can
configure a unique NAT for each node address included in a
virtual server mapping. Note that NATs do not support port
translation, and are not appropriate for FTP.
❖
Secure Network Address Translation (SNAT)
A secure network address translation provides functionality
similar to that of firewalls. A SNAT defines a routable alias IP
address that one or more nodes can use as a source IP address
only when making connections to hosts on the external network.
SNAT addresses support port translation, and they also prevent
hosts on the external network from connecting directly to the
node. Note that SNAT only supports TCP and UDP. SNAT also
features support for both passive and active FTP.
❖
IP forwarding
IP forwarding does not translate node addresses. Instead, it
simply exposes the node’s IP address to the BIG/ip Controller’s
external network and clients can use it as a standard routable
address. When you turn IP forwarding on, the BIG/ip Controller
essentially acts as a router when it receives connection requests
for node addresses. IP forwarding itself does not provide security
features, but you can use the IP filter feature to implement a layer
of security (see Setting up IP forwarding, on page 4-28) that can
help protect your nodes.
WARNING
NATs and SNATs do not support the NT Domain or CORBA
protocols. Instead, you need to configure IP forwarding (see
Setting up IP forwarding, on page 4-28).
4 - 24
F5 Networks, Inc.
Getting Started with a Basic Configuration
Defining a standard network address translation (NAT)
When you define standard network address translations (NATs),
you need to create a separate NAT for each node that requires a
NAT. You also need to use unique IP addresses for NAT addresses;
a NAT IP address cannot match an IP address used by any virtual or
physical servers in your network.
To configure a NAT in the F5 Configuration utility
1. In the navigation pane, click NATs.
The Network Address Translations screen opens.
2. On the toolbar, click Add NAT.
The Add Nat screen opens.
3. In the Node Address box, type the IP address of the node.
4. In the NAT Address box, type the IP address that you want
to use as the node’s alias IP address.
5. In the NAT Netmask box, type an optional netmask. If you
leave this box blank, the BIG/ip Controller generates a
default broadcast address based on the IP address and
netmask of this virtual server.
6. In the NAT Broadcast box, type the broadcast address for
this. If you leave this box blank, the BIG/ip Controller
generates a default broadcast address based on the IP
address and netmask of this NAT.
7. In the External Interface box, you can choose the external
interface on which the NAT address is to be used. Note that
this setting only applies if your BIG/ip Controller has more
than one external interface card.
8. Click the Apply button.
To configure a NAT on the command line
The bigpipe nat command defines one NAT for one node address.
bigppipe nat <node addr> to <NAT addr>
BIG/ip® Controller, v. 2.1
4 - 25
Chapter 4
Defining a secure network address translation (SNAT)
When you define secure network address translations (SNATs), you
can assign a single SNAT address to multiple nodes. The SNAT
address itself, however, must be a unique IP address that does not
match an IP address used by any virtual or physical servers in your
network.
SNAT addresses have global properties that apply to all SNATs
defined in the configuration.
Setting SNAT global properties
The SNAT feature supports three global properties that apply to all
SNAT addresses:
❖
Connection limits
The connection limit applies to each node that uses a SNAT, and
each individual SNAT can have a maximum of 50,000
simultaneous connections.
❖
TCP idle connection timeout
This timer defines the number of seconds that TCP connections
initiated using a SNAT address are allowed to remain idle before
being automatically disconnected.
❖
UDP idle connection timeout
This timer defines the number of seconds that UDP connections
initiated using a SNAT address are allowed to remain idle before
being automatically disconnected.
To configure SNAT global properties in the F5
Configuration utility
1. In the navigation frame, click Secure NATs.
The Secure Network Address Translations screen opens.
2. In the Connection Limit box, type the maximum number
of connections you want to allow each node using a SNAT.
Note that to turn connection limits off, set the limit to 0. If
you turn connection limits on, keep in mind that each
SNAT can support only 50,000 simultaneous connections.
4 - 26
F5 Networks, Inc.
Getting Started with a Basic Configuration
3. In the TCP Idle Connections box, type the number of
seconds that TCP connections initiated by a node using a
SNAT are allowed to remain idle.
4. In the UDP Idle Connections box, type the number of
seconds that TCP connections initiated by a node using a
SNAT are allowed to remain idle.
5. Click the Apply button.
To configure SNAT global properties on the command
line
Configuring global properties for a SNAT requires that you enter
three bigpipe commands. The following command sets the
maximum number of connections you want to allow for each node
using a SNAT.
bigpipe snat limit <value>
The following commands set the TCP and UDP idle connection
timeouts:
bigpipe snat timeout tcp <seconds>
bigpipe snat timeout udp <seconds>
Configuring SNAT address mappings
The SNAT address mappings define each SNAT address, and also
define the node or group of nodes that uses the SNAT address. Note
that a SNAT address does not necessarily have to be unique; for
example, it can match the IP address of a virtual server. A SNAT
address cannot match an address already in use by a NAT or another
SNAT address.
To configure a SNAT mapping in the F5 Configuration
utility
1. In the navigation pane, click Secure NATs.
The Secure Network Address Translations screen opens.
2. On the toolbar, click Add SNAT.
The Add SNAT screen opens.
BIG/ip® Controller, v. 2.1
4 - 27
Chapter 4
3. In the Node Addresses box, type the IP address of the node
or nodes that are assigned to the SNAT. If you are typing
multiple node addresses, separate each individual address
with a semicolon.
4. In the SNAT Address box, type the IP address that you
want to use as the alias IP address for the node(s).
5. In the External Interface box, you can choose the external
interface on which the NAT address is to be used. Note that
this setting only applies if your BIG/ip Controller has more
than one external interface card.
6. Click the Apply button.
To configure a SNAT mapping on the command line
The bigpipe snat command defines one SNAT for one or more
node addresses.
bigpipe snat map <node addr>... <node addr> to <SNAT addr>
For example, the command below defines a secure network address
translations for two nodes:
bigpipe snat map 192.168.75.50 192.168.75.51 to 192.168.100.10
Setting up IP forwarding
IP forwarding is an alternate way of allowing nodes to initiate or
receive direct connections from the BIG/ip Controller’s external
network. IP forwarding essentially exposes all of the node IP
addresses to the external network, making them routable on that
network. If your network uses the NT Domain or CORBA
protocols, IP forwarding is your only option for direct access to
nodes.
To set up IP forwarding, you need to do two tasks:
❖
4 - 28
Turn IP forwarding on
The BIG/ip Controller uses a system control variable to control
IP forwarding, and its default setting is off.
F5 Networks, Inc.
Getting Started with a Basic Configuration
❖
Address routing issues
You probably have to change the routing table for the router on
the BIG/ip Controller’s external network. The router needs to
direct connection requests for nodes to the BIG/ip Controller,
which in turn directs the requests to the nodes themselves.
Turning IP forwarding on
IP forwarding is a property of the BIG/ip Controller system, and it
is controlled by the system control variable net.inet.ip.forwarding.
To set the IP forwarding system control variable in the F5
Configuration utility
1. Click the BIG/ip logo.
The BIG/ip System Properties screen opens.
2. On the toolbar, click Advanced Properties.
The BIG/ip System Control Variables screen opens.
3. Check the Allow IP Forwarding box.
4. Click the Apply button.
To set the IP forwarding system control variable on the
command line
Use the standard sysctl command to set the variable. The default
setting for the variable is 0, which is off. You want to change the
setting to 1, which is on:
sysctl -w net.inet.ip.forwarding=1
To permanently set this value, you can use a text editor, such as vi
or pico, to manually edit the /etc/rc.sysctl file. For additional
information about editing this file, see Appendix C, Setting BIG/ip
system control variables.
BIG/ip® Controller, v. 2.1
4 - 29
Chapter 4
Addressing routing issues for IP forwarding
Once you turn IP forwarding on, you probably need to change the
default router’s routing table. Connection requests for the node
addresses need to be routed through the BIG/ip Controller. For
details about changing the routing table, refer to your router’s
documentation.
Configuring Extended Content Verification
service checking
Extended Content Verification service check is a special type of
service check that actually retrieves content from a server. If the
content matches the expected result, the BIG/ip Controller marks
the node up and uses it for load balancing. If the content does not
match, or if the server does not return content, the BIG/ip
Controller marks the node down, and does not use it for load
balancing.
You can set up ECV service check in the F5 Configuration utility,
or you can use a text editor, such as vi or pico, to manually create
the /etc/bigd.conf file, which stores ECV information.
ECV service check is most frequently used to verify content on web
servers, although you can use it for more advanced applications,
such as verifying firewalls or mail servers. The following section
focuses on setting up ECV for web servers. For details about using
advanced ECV service check options, see Setting up advanced ECV
service checks, on page 5-3.
Note
It is important to note that the intervals and timeouts for simple
service checks apply to EAV and ECV service checks. These
timeouts are configured by setting the service check timers. For
more information about setting these timers, see Configuring the
timer settings, on page 4-15.
4 - 30
F5 Networks, Inc.
Getting Started with a Basic Configuration
ECV service check properties
ECV service check is a property of both a node port and a node. If
you define ECV service check settings for a node port, all nodes
that use the port inherit the ECV service check settings. You can
override these settings by defining ECV service check settings for
the node itself.
There are actually three different types of ECV service check that
you can define:
❖
ECV normal
An ECV normal service check requires that the BIG/ip
Controller mark a node up (available for load balancing) when
the retrieved content matches the expected result. For example, if
the home page for your web site included the words Welcome
home, you could set up an ECV service check to look for the
string "Welcome home". A match for this string would mean
that the web server is up and available.
❖
ECV SSL
An ECV SSL service check performs the same function as an
ECV normal service check, but it is designed to work with secure
servers that use the SSL protocol, rather than standard servers
using HTTP. The BIG/ip Controller uses SSL version 3, as do
popular web browsers, but it is backward-compatible for web
servers that support only version 2.
❖
ECV reverse
In contrast, an ECV reverse service check requires that the
BIG/ip Controller mark a node down (not available for load
balancing) when the retrieved content matches the expected
result. For example, if the content on your web site home page is
BIG/ip® Controller, v. 2.1
4 - 31
Chapter 4
dynamic and changes frequently, you may prefer to set up a
reverse ECV service check that looks for the string "Error". A
match for this string would mean that the web server was down.
WARNING
When the BIG/ip Controller checks content looking for a match, it
reads through the content until the service check times out, or until
the read reaches 5000 bytes, whichever comes first. When you
choose text, an HTML tag, or an image name to search for, be sure
to pick one that appears in the first 5,000 bytes of the web page.
Writing regular expressions for ECV service checks
When you set up an ECV service check for a web server, you need
to define a send string and a receive expression. A send string is
the request that the BIG/ip Controller sends to the web server. Send
strings typically request that the server return a specific web page,
such as the default page for a web site. The receive expression is
the text string that the BIG/ip Controller looks for in the returned
web page.
Receive expressions use regular expression syntax, and they are not
case-sensitive. Although regular expressions can be complex, you
will find that simple regular expressions are adequate for most ECV
service checks. For example, the most common send string is
"GET /" which simply retrieves the default HTML page for a web
site. The corresponding receive string could be any text string
included in your home page, such as text, HTML tags, or image
names.
Sample send strings
The send string below is probably the most common send string,
and it retrieves the default HTML page for a web site. Note that all
send strings are enclosed by double quotation marks.
"GET /"
To retrieve a specific page from a web site, simply enter a fully
qualified path name:
4 - 32
F5 Networks, Inc.
Getting Started with a Basic Configuration
"GET /www/support/customer_info_form.html"
Sample receive expressions
The most common receive expressions contain a text string that
would be included in a particular HTML page on your site. The
text string can be regular text, HTML tags, or image names. Note
that all receive expressions are enclosed by double quotation marks.
For example, the following receive expression looks to match the
text Welcome, and it is useful for ECV reverse service checks:
"welcome"
The sample receive expression below searches for a standard
HTML tag. Note that even though you are searching for an HTML
tag, you still need to enclose the regular expression with double
quotation marks.
"<HEAD>"
You can also use null receive expressions, formatted as the one
shown below. When you use a null receive expression, the BIG/ip
Controller considers any content retrieved to be a match.
""
Null receive expressions are suitable only for ECV normal and
ECV SSL. Note, however, that if you use them you run the risk of
the BIG/ip Controller considering an HTML error page to be a
successful service check.
Note
The regular expression syntax discussed here is not the same as the
"wildcard syntax" that is commonly used in command shells. For
more information about regular expression, see the man page for
re_format.
BIG/ip® Controller, v. 2.1
4 - 33
Chapter 4
Setting up ECV service check in the F5 Configuration
utility
In the F5 Configuration utility, you can set ECV service check
options in the Global Node Port Properties screen, and also in
individual Node Properties screens. Regardless of which screen
you configure the options in, the steps are the same.
To set up ECV service check in the F5 Configuration
utility
1. In the navigation frame, click Nodes.
The Nodes screen opens.
2. Click a node in the list.
The Node Properties screen opens.
3. If you want to configure ECV service check options, stay in
this screen. If you want to configure ECV service check
options for the port that the node uses, click the port
number or service name in the Port box.
4. In the Type box, choose the type of ECV service check you
want to set up: ECV normal, ECV reverse, or ECV SSL.
5. In the First String box, type the send string that requests
the web page. Note that the F5 Configuration utility
automatically places quotation marks around the string
itself. For example, the following string retrieves the
default HTML page for the site.
GET /
6. In the Second String box, type the receive expression that
the BIG/ip Controller should look for in the returned web
page. For example, the following receive expression looks
for a text string in a web page:
Welcome home!
7. Click the Apply button.
4 - 34
F5 Networks, Inc.
Getting Started with a Basic Configuration
Manually configuring and testing the /etc/bigd.conf file
You can set up ECV service check on the command line by creating
an /etc/bigd.conf file in a text editor such as vi or pico. Each line in
the /etc/bigd.conf file defines a send string and a receive expression
for one node, or for one port. Remember that when you define a
ECV service check for a port, all nodes that use the port inherit the
service check settings.
Changes to the /etc/bigd.conf do not take effect until the system is
rebooted, or bigd is restarted. To restart bigd, simply run the
command bigd.
The BIG/ip Controller provides a command line tool that allows
you to verify the syntax of the /etc/bigd.conf file before the system
begins using it. Once you set up the file, we recommend that you
test it before you reboot the system or restart the bigd daemon and
begin using the file.
Setting up the /etc/bigd.conf file
The /etc/bigd.conf file uses three different types of syntax for lines
in the file that correspond to the three different types of service
check that you can configure: ECV normal, ECV SSL, and ECV
reverse. The following sections describe the syntax for each type,
and provide some useful examples.
To set up ECV normal service check
The line for a normal ECV service check begins with the keyword
active. The <node IP> parameter is optional, and you need to
include it only if you are defining ECV service check for a specific
node.
active [<node IP>:]<port> "<send_string>" "<recv_expr>"
For example, the following line sets up a normal ECV service check
for a node, where the BIG/ip Controller looks for the text Welcome
in the default page for the site.
active 192.168.100.10:80 "GET /" "welcome"
BIG/ip® Controller, v. 2.1
4 - 35
Chapter 4
To set up ECV SSL service check
The line for an SSL ECV service check begins with the keyword
ssl. The <node IP> parameter is optional, and you need to include
it only if you are defining ECV service check for a specific node.
ssl [<node IP>:]<port> "<send_string>" "<recv_expr>"
For example, the following line sets up an SSL ECV service check
for a node port. Note that the receive expression is null. When you
use a null receive expression, the BIG/ip Controller considers any
retrieved content to be a match.
ssl 443 "GET /www/orders/order_form.html" ""
To set up ECV reverse service check
The line for a reverse ECV service check begins with the keyword
reverse. The <node IP> parameter is optional, and you need to
include it only if you are defining ECV service check for a specific
node.
reverse [<node IP>:]<port> "<send_string>" "<recv_expr>"
For example, the following line sets up an SSL ECV service check
for a node port. Note that the receive expression is null. When you
use a null receive expression, the BIG/ip Controller considers any
retrieved content to be a match.
reverse 80 "GET /" ""
Testing /etc/bigd.conf syntax
To test /etc/bigd.conf syntax
You can test your /etc/bigd.conf file syntax using the following bigd
command:
/sbin/bigd -d
4 - 36
F5 Networks, Inc.
Getting Started with a Basic Configuration
This command parses the file, compiles any regular expressions,
reports any errors, and then exits.
Note
The /etc/bigd.conf file is read once at startup. If you change the file
on the command line, you must reboot or restart bigd for the
changes to take effect. If you make changes in the F5 Configuration
utility, clicking the apply button makes changes and restarts bigd.
See Appendix D, bigd, for details.
Configuring persistence for e-commerce and
other dynamic content sites
If you are setting up an e-commerce or other type of dynamic
content site, you may need to configure persistence on the BIG/ip
Controller. Whether you need to configure persistence or not
simply depends on how you store client-specific information, such
as items in a shopping cart, or airline ticket reservations. For
example, you may store the airline ticket reservation information in
a back-end database that all nodes can access; or on the specific
node to which the client originally connected; or in a cookie on the
client’s machine.
If you store client-specific information on specific nodes, you need
to configure persistence. When you turn on persistence, returning
clients can bypass load balancing and instead can go to the node
where they last connected in order to get to their saved information.
The BIG/ip Controller tracks information about individual
persistent connections, and keeps the information only for a given
period of time. The way in which persistent connections are
identified, depends on the type of persistence. The BIG/ip
Controller supports two basic types of persistence:
❖
SSL persistence
SSL persistence is a sophisticated type of persistence that tracks
SSL connections using the SSL session ID, and it is a property of
individual virtual servers. Using SSL persistence can be
BIG/ip® Controller, v. 2.1
4 - 37
Chapter 4
particularly important if your clients typically have translated IP
addresses or dynamic IP addresses, such as those that Internet
service providers typically assign. Even when the client’s IP
address changes, the BIG/ip Controller still recognizes the
connection as being persistent based on the session ID.
❖
Simple persistence
Simple persistence supports TCP and UDP protocols, and it
tracks connections based only on the client IP address. When a
client requests a connection to a virtual server that supports
simple persistence, the BIG/ip controller checks to see if that
client previously connected, and if so, returns the client to the
same node.
You may want to use SSL persistence and simple persistence
together. In situations where an SSL session ID times out, or where
a returning client does not provide a session ID, you may want the
BIG/ip controller to direct the client to the original node based on
the client’s IP address. As long as the client's simple persistence
record has not timed out, the BIG/ip controller can successfully
return the client to the appropriate node.
Note
The BIG/ip Controller also supports several advanced persistence
modes. For more information about these advanced modes, see
Using advanced persistence options, on page 5-11.
Setting up SSL persistence
SSL persistence is a property of a virtual server, and to set it up for
a given virtual server, you need to do three things:
4 - 38
❖
Turn SSL persistence on.
❖
Set the SSL persistence timer, which determines how long the
BIG/ip Controller considers a given SSL session ID to be valid.
F5 Networks, Inc.
Getting Started with a Basic Configuration
❖
Set the SSL session ID timeout, which determines how long the
BIG/ip Controller stores a given SSL session ID before removing
it from the system.
Tip
If you want to turn persistence on for an existing virtual server, you
may want to use the F5 Configuration utility, instead of the
BIG/pipe command line utility. In the F5 Configuration utility, you
simply set virtual server properties, whereas on the command line
you need to redefine the virtual server itself.
To configure SSL persistence in the F5 Configuration
utility
1. In the navigation pane, click Virtual Servers.
The Virtual Server list opens and displays each virtual
server’s IP address and associated port number or service
name.
2. Click the first virtual server in the list.
The Virtual Server Properties screen opens.
3. Check the Enable Session ID Persistence box.
4. In the Persistence Time box, type the number of seconds
that the BIG/ip Controller should consider SSL session IDs
to be valid.
5. In the Session ID Timeout box, type the number of
seconds that the BIG/ip Controller should store SSL
sessions IDs before removing them from the system.
6. Click the Apply button.
To configure SSL persistence on the command line
On the command line, you actually set SSL persistence properties
at the time you define the virtual server.
bigpipe vip <virt addr>:<port> define <node addr>:<port> \
special ssl <persist time>
BIG/ip® Controller, v. 2.1
4 - 39
Chapter 4
For example, the following command sets SSL persistence for a
virtual server, where the session ID record is valid for one hour
(3600 seconds).
bigpipe vip v1:ssl define n1:ssl n2:ssl special ssl 3600
Setting up simple persistence
You can set simple persistence properties for both an individual
virtual server, and for a port. Individual virtual server persistence
settings can override those of the port. When you set simple
persistence on a port, all virtual servers that use the given port
inherit the port’s persistence settings.
Setting simple persistence on virtual servers
Persistence settings for virtual servers apply to both TCP and UDP
persistence. Note that the persistence settings for the virtual server
override the persistence settings defined for the port that the virtual
server uses. When the persistence timer is set to a value greater
than 0, persistence is on. When the persistence timer is set to 0,
persistence is off.
To configure simple persistence for virtual servers in the
F5 Configuration utility
1. In the navigation pane, click Virtual Servers.
The Virtual Server list opens and displays each virtual
server’s IP address and associated port number or service
name.
2. Click a virtual server.
The Virtual Server Properties screen opens.
3. In the Timeout box, type the number of seconds that you
want the BIG/ip Controller to store persistent connection
information.
4. Click the Apply button.
4 - 40
F5 Networks, Inc.
Getting Started with a Basic Configuration
To configure simple persistence for virtual servers on
the command line
The bigpipe vip command sets simple persistence for one or more
virtual servers. Note that a timeout greater than 0 turns persistence
on, and a timeout of 0 turns persistence off.
bigpipe vip <virt IP>:<port>... <virt IP>:<port> persist <timeout>
For example, the following command sets simple persistence for
the virtual server, where the persistent connection information
expires after one hour (3600 seconds).
bigpipe vip 192.168.100.10:80 persist 3600
Setting simple persistence on ports
Defining persistence on a port requires you only to set the
persistence timer; you do not actually have to turn the persistence
on and off. When the persistence timer is set to 0, persistence is off.
When it is set to a value greater than 0, persistence is on.
To configure simple persistence for ports in the F5
Configuration utility
1. In the navigation pane, click Virtual Servers.
The Virtual Server list opens and displays each virtual
server’s IP address and associated port number or service
name.
2. Click any virtual server that uses the port for which you
want to turn persistence on.
The Virtual Server Properties screen opens.
3. In the Port box, click the port number.
The Global Virtual Port Properties screen opens.
4. In the Simple Persistence box, type the number of seconds
that you want the BIG/ip Controller to store persistent
connection information.
5. Click the Apply button.
BIG/ip® Controller, v. 2.1
4 - 41
Chapter 4
To configure simple persistence for ports on the
command line
The bigpipe persist command sets simple persistence for one or
more ports.
bigpipe persist <port>... <port> <seconds>
For example, the following command sets simple persistence for
port 80, where the persistent connection information expires after
one hour (3600 seconds).
bigpipe persist 80 3600
Configuring and synchronizing redundant
systems
Redundant BIG/ip Controller systems have special settings that you
need to configure, such as interface fail-safe settings. One
convenient aspect of configuring a redundant system is that once
you have configured one of the controllers, you can simply copy the
configuration to the other controller in the system using the config
sync feature.
There are two aspects about working with redundant systems:
❖
Synchronizing configurations between two controllers
❖
Configuring fail-safe settings for the interfaces
Synchronizing configurations between controllers
Once you complete the initial configuration on the first controller in
the system, you can synchronize the configurations between the
active unit and the standby unit. When you synchronize a
configuration, the following configuration files are copied to the
other BIG/ip controller:
4 - 42
F5 Networks, Inc.
Getting Started with a Basic Configuration
❖
/etc/bigip.conf
The /etc/bigip.conf file stores virtual server and node definitions
and settings, including node ping settings, the load balancing
mode, and NAT and SNAT settings.
❖
/etc/bigd.conf
The /etc/bigd.conf file stores service check settings.
❖
/etc/bigip.interfaces
The /etc/bigip.interfaces file stores interface configuration
information, such as failsafe timeouts.
❖
/etc/hosts.allow
The /etc/hosts.allow file stores the IP addresses that are allowed
to make administrative shell connections to the BIG/ip
Controller.
❖
/etc/netstart
The /etc/netstart file stores basic system start up settings.
❖
/etc/ipfw.conf
The /etc/ipfw.conf file stores IP filter settings.
❖
/etc/rateclass.conf
The /etc/rateclass.conf file stores rate class definitions.
❖
/etc/ipfwrate.conf
The /etc/ipfwrate.conf file stores IP filter settings for filters that
also use rate classes.
❖
/etc/snmpd.conf
The /etc/snmpd.conf file stores SNMP configuration settings.
If you use command line utilities to set configuration options, be
sure to save the current configuration to the file before you use the
config sync feature.
WARNING
If you are synchronizing to a controller that already has
configuration information defined, we recommend that you back up
that controller’s original configuration file(s).
BIG/ip® Controller, v. 2.1
4 - 43
Chapter 4
To synchronize the configuration in the F5 Configuration
utility
1. Click the BIG/ip logo.
The BIG/ip System Properties screen opens.
2. On the toolbar, click the Sync Configuration button.
To synchronize the configuration on the command line
You use the bigpipe configsync command to synchronize
configurations. When you include the -all option in the command,
all the configuration files are synchronized between machines.
bigpipe configsync -all
If you want to synchronize only the /etc/bigip.conf file, you can use
the same command without any options:
bigpipe configsync
Configuring fail-safe settings
For maximum reliability, the BIG/ip Controller supports failure
detection on both internal and external interface cards. When you
arm the fail-safe option on an interface card, the BIG/ip Controller
monitors network traffic going through the interface. If the BIG/ip
Controller detects a loss of traffic on an interface when half of the
fail-safe timeout has elapsed, it attempts to generate traffic. The
way in which it attempts to generate traffic depends on whether it is
an external or an internal interface.
• External interface
For external interfaces, the BIG/ip controller attempts to generate
network traffic by issuing ARP requests for the default router.
Any traffic through the interface, including a response to the ARP
request, averts a fail-over.
• Internal interface
For internal interfaces, the BIG/ip controller attempts to generate
network traffic by pinging each node address included in its
configuration. Any traffic through the interface, including a reply
to one or more of the pings, averts a fail-over.
4 - 44
F5 Networks, Inc.
Getting Started with a Basic Configuration
If the BIG/ip Controller cannot generate traffic on the interface
before the timer expires, it initiates a fail-over, switches control to
the standby unit, and reboots.
WARNING
You should arm the fail-safe option on an interface only after the
BIG/ip controller is in a stable production environment. Otherwise,
routine network changes may cause fail-over unnecessarily. Also
note that you cannot arm fail-safe on an internal interface card
before you have configured virtual servers and nodes.
Arming fail-safe on an interface
Each interface card installed on the BIG/ip controller has a unique
name, which you need to know when you set the fail-safe option on
a particular interface card. You can view interface card names in
the F5 Configuration utility, or you can use the bigpipe interface
command to display interface names on the command line.
To arm fail-safe on an interface in the F5 Configuration
utility
1. In the navigation pane, click NICs (network interface
cards).
The Network Interface Cards list opens and displays each
installed NIC.
2. Click an interface name.
The Network Interface Card Properties screen opens.
3. Check Arm Failsafe to turn on the fail-safe option for the
selected interface.
4. In the Timeout box, enter the maximum time allowed for a
loss of network traffic before a fail-over occurs.
5. In the Shared IP Alias box, enter the IP address shared for
the corresponding interface on both BIG/ip controllers.
6. Click the Apply button.
BIG/ip® Controller, v. 2.1
4 - 45
Chapter 4
To arm fail-safe on an interface on the command line
One of the required parameters for the bigpipe interface command
is the name of the interface itself. If you need to look up the names
of the installed interface cards, use the bigpipe interface command
with the show keyword:
bigpipe interface show
To arm fail-safe on a particular interface, use the bigpipe interface
command with the failsafe arm keyword and interface name
parameter:
bigpipe interface <ifname> failsafe arm
bigpipe interface timeout <seconds>
For example, say you have an external interface named exp0 and an
internal interface named exp1. To arm the fail-safe option on both
cards, you need to issue the following two commands:
bigpipe interface exp0 failsafe arm
bigpipe interface exp1 failsafe arm
Addressing general networking issues
When you install and configure the BIG/ip Controller, you may
need to address one or more of the following networking issues:
4 - 46
❖
Addressing routing issues
There are a variety of router configuration issues that you may
need to address. You need to configure a default route for the
BIG/ip Controller, and you may also need to set up routes for the
nodes that the BIG/ip Controller manages. You may also want to
configure GateD, which allows dynamic routing information to
automatically be updated on the BIG/ip Controller.
❖
Configuring sendmail on the BIG/ip Controller
There are some special requirements that you need to take into
account when configuring Sendmail on the BIG/ip Controller.
F5 Networks, Inc.
Getting Started with a Basic Configuration
❖
Configuring DNS on the BIG/ip Controller
You may need to configure the BIG/ip Controller for DNS
resolution or for DNS proxy, and you may even need to convert
from rotary or round robin DNS.
Addressing routing issues
The BIG/ip controller must communicate properly with network
routers, as well as the servers, firewalls, and other routers that it
manages. Because there are a variety of router configurations, and
varying levels of direct control an administrator has over each
router, you need to carefully review the router configurations in
your own network. You may need to change some routing
configurations before you put the BIG/ip controller into production.
The BIG/ip Controller supports static route configurations,
dynamic routing (via BGP4, RIP1, RIP2, and OSPF), and
subnetting. However, the BIG/ip controller is also designed to
eliminate the need for you to modify routing tables on a router that
routes to a BIG/ip controller. Instead, the BIG/ip controller uses
Address Resolution Protocol (ARP) to notify routers of the IP
addresses that it uses on its external interfaces as well as on its
virtual servers.
The following sections address these common routing issues:
❖
Routing from a BIG/ip Controller to a gateway to the external
internetwork
❖
Routing from content servers to the BIG/ip Controller
❖
Routing from a BIG/ip Controller to content servers that are on
different logical networks
❖
Setting up dynamic routing with GateD
Routing from a BIG/ip Controller to a gateway to the external net
The BIG/ip Controller needs a route to the external network. For
most configurations, this should be configured as the default route
on the BIG/ip Controller.
BIG/ip® Controller, v. 2.1
4 - 47
Chapter 4
During installation, you were prompted to configure a default route
for the BIG/ip Controller. If you need to change the default route at
this time, you can set a new default route by editing the /etc/netstart
file.
To change the default route
1. Open the /etc/netstart file in a text editor, such as vi or pico.
2. Change the default route entry using the following syntax:
defroute="<router IP>"
3. Save and close the file.
4. Reboot the BIG/ip Controller.
Routing between a BIG/ip Controller and content servers on different
logical networks
If you need to configure the BIG/ip Controller to use one or more
nodes that actually sit on a different logical network from the
BIG/ip Controller, you need to assign one or more additional routes
to get to those nodes. Set each node’s default route in such a way
that traffic goes back through the BIG/ip controller internal
interface.
In the following examples, the nodes are on 192.168.6/24 and the
BIG/ip Controller internal interface is on 192.168.5/24. There are
two possible situations which you may have to address:
❖
192.168.5/24 and 192.168.6/24 are on the same LAN (either
sharing media or with a switch or hub between them).
❖
192.168.5/24 and 192.168.6/24 are on two different LANs with a
router between them.
Case 1: Same LAN
If the nodes are on the same LAN as the BIG/ip Controller, you
simply need to add an interface route for 192.168.6/24 to the
BIG/ip Controller's internal interface. You can add this route to the
/etc/rc.local file using the following syntax:
4 - 48
F5 Networks, Inc.
Getting Started with a Basic Configuration
route add -net 192.168.6 -interface exp1
Note
You must have the interface defined correctly in the /etc/hosts file in
order to use this syntax.
If you are working with a redundant system, you need to set up an
additional shared IP alias in the /etc/bigip.interfaces file using the
following syntax:
<ifname> <ip address> <netmask> <broadcast address>
For example, an additional shared IP alias entry in the
/etc/bigip.interfaces for the interface exp1 might look like this:
"exp1" "192.168.6.254" "255.255.255.0" "192.168.6.255"
Note that you should always include shared IP aliases in the
/etc/bigip.interfaces file, so that each BIG/ip Controller in the
redundant system knows to use them when it is active, and not use
them when it is standby.
Case 2: Different LANs
If you have nodes on different LANs from the BIG/ip Controller,
you need to add a static gateway route on the BIG/ip Controller
itself. For example:
route add -net 192.168.6.0 -gateway 192.168.5.254
You also need to set the default route on the nodes to point to the
router between the LANs. For example:
route add default -gateway 192.168.6.254
Finally, you need to set the default route on the router between the
LANs to the BIG/ip Controller's shared alias. For example, type the
command:
BIG/ip® Controller, v. 2.1
4 - 49
Chapter 4
route add default -gateway 192.168.5.200
Note
These examples assume you are using a UNIX-based router. The
exact syntax for you router may be different.
It is not really necessary to set the default route for nodes directly to
the BIG/ip Controller, so long as the default path eventually routes
through the BIG/ip Controller.
Setting up dynamic routing with GateD
The GateD daemon allows the BIG/ip controller to exchange
dynamic routing updates with your routers. Setting up the GateD
daemon is a three-part task:
❖
You need to create the GateD configuration file, /etc/gated.conf.
❖
You need to enable the GateD daemon.
❖
You need to edit the /etc/netstart file.
Note
Configuring GateD on the BIG/ip Controller is not required. Most
routing requirements for the BIG/ip Controller can be met without
using GateD.
To create the GateD configuration file
GateD relies on a configuration file, typically named
/etc/gated.conf, which can be relatively simple, or can be very
complex, depending on the routing needs of your network. The
BIG/ip web server includes the GateD online documentation (in the
F5 Configuration utility home page, under Online Documentation
section, click GateD). Note that the GateD configuration guide
details the process of creating the GateD configuration file, and also
provides samples of common protocol configurations.
4 - 50
F5 Networks, Inc.
Getting Started with a Basic Configuration
To immediately start the GateD daemon on the BIG/ip
Controller
Once you create the GateD configuration file, you need to enable
the GateD daemon on the command line using the following
command:
bigip# gated
To enable starting GateD each time the BIG/ip Controller
starts
To start GateD each time the BIG/ip Controller starts, change the
gated variable in the /etc/netstart file as shown below:
gated=YES
Configuring Sendmail
You can configure the BIG/ip controller to send email notifications
to you, or to other administrators. The BIG/ip Controller includes a
sample Sendmail configuration file that you can use to start with,
but you will have to customize the Sendmail setup for your network
environment before you can use it.
Before you begin setting up Sendmail, you may need to look up the
name of the mail exchanger for your domain. If you already know
the name of the mail exchanger, skip to Configuring Sendmail.
Finding the mail exchanger for your domain
You can use the nslookup command on any workstation that is
configured for lookup. Once you find the primary IP address for
your domain, you can find the mail exchanger for your domain.
To find the mail exchanger
1. First you need to identify the default server name for your
domain. From a workstation capable of name resolution,
type the following on the command line:
bigip: /etc# nslookup
BIG/ip® Controller, v. 2.1
4 - 51
Chapter 4
2. The command returns a default server name and
corresponding IP address:
Default Server: <server name>
Address: <server
3. Next, use the domain name to query for the mail exchanger:
set q=mx
<domain name>
The information returned includes the name of the mail exchanger.
For example, the sample information shown in Figure 4.1 lists
bigip.net as the preferred mail exchanger.
bigip.net
preference = 10, mail exchanger = mail.SiteOne.com
bigip.net
nameserver = ns1.bigip.net
bigip.net
nameserver = ns2.bigip.net
bigip.net
internet address = 192.17.112.1
ns1.bigip.net
internet address = 192.17.112.2
ns2.bigip.net
internet address = 192.17.112.3
Figure 4.1 Sample mail exchanger information
Setting up Sendmail
When you actually set up Sendmail, you need to open and edit a
couple of configuration files. Note that the BIG/ip Controller does
not accept email messages, and that you can use the crontab utility
to purge unsent or returned messages, and that you can send those
messages to yourself or another administrator.
To set up and start Sendmail
1. Copy /etc/sendmail.cf.off to /etc/sendmail.cf.
2. To set the name of your mail exchange server, open the
/etc/sendmail.cf and set the DS variable to the name of
your mail exchanger. The syntax for this entry is:
DS<MAILHUB_OR_RELAY>
3. Save and close the /etc/sendmail.cf file.
4 - 52
F5 Networks, Inc.
Getting Started with a Basic Configuration
4. To allow Sendmail to flush outgoing messages from the
queue for mail that cannot be delivered immediately, open
the /etc/crontab file, and change the last line of the file to
read:
0,15,30,45 * * * *
root /usr/sbin/sendmail -q > /dev/null 2>&1
5. Save and close the /etc/crontab file.
6. To prevent returned or undelivered email from going
unnoticed, open the /etc/aliases file and create an entry for
root to point to you or another administrator at your site.
root: [email protected]
7. Save and close the /etc/aliases file.
8. You now need to run the newaliases command to generate
a new aliases database that incorporates the information
you added to the /etc/aliases file.
9. To turn Sendmail on, either reboot the system or type the
following command:
/usr/sbin/sendmail -bd -q30m
Configuring DNS on the BIG/ip Controller
There are three different DNS issues that you may need to address
when setting up the BIG/ip Controller:
❖
Configuring DNS resolution on the BIG/ip Controller
❖
Configuring DNS proxy
❖
Converting from rotary or round robin DNS
Configuring DNS resolution
When entering virtual addresses, node addresses, or any other
addresses on the BIG/ip Controller, you can use the address, host
name, or fully qualified domain name (FQDN).
BIG/ip® Controller, v. 2.1
4 - 53
Chapter 4
The BIG/ip Controller looks up host names and FQDNs in the
/etc/hosts file. If it does not find an entry in that file, then it uses
DNS to look up the address. In order for this to work, you need to
create an /etc/resolv.conf file. The file should have the following
format:
nameserver <DNS_SERVER_1>
search <DOMAIN_NAME_1> <DOMAIN_NAME_2>
In place of the <DNS_SERVER_1> parameter, use the IP address of a
properly configured name server that has access to the Internet.
You can specify additional name servers as backups, by inserting an
additional nameserver line for each backup name server.
If you configure the BIG/ip controller itself as a DNS server, then
we suggest that you choose its loopback address (127.0.0.1) as
the first name server in the /etc/resolv.conf file.
Replace <DOMAIN_NAME_1> <DOMAIN_NAME_2> with a
list of domain names to use as defaults. This list is used to resolve
hosts when only a host name, and not an FQDN, is used. When you
enter domain names in this file, separate each domain name with a
space.
An sample configuration file is shown in Figure 4.2 below.
; example /etc/resolv.conf
nameserver 127.0.0.1
nameserver 127.16.112.2
;ip address of main DNS server
search mysite.com store.mysite.com
Figure 4.2 Sample /etc/resolv.conf file
4 - 54
F5 Networks, Inc.
Getting Started with a Basic Configuration
You can also configure the order in which name resolution checks
are made by configuring the /etc/irs.conf file. You should set this
file so that it checks the /etc/hosts.conf file first, and then checks for
DNS entries. See Figure 4.3, make the following entry in the
/etc/irs.conf file:
hosts
hosts
local
dns
continue
Figure 4.3 Sample entry for the /etc/irs.conf file
Configuring DNS proxy
You can configure the BIG/ip controller as a DNS proxy or
forwarder. This is useful for providing DNS resolution for servers
and other equipment behind the BIG/ip controller that might want
to lookup a domain name or IP address.
To configure DNS proxy, you simply create a /etc/named.boot file
that contains only two lines:
forwarders <DNS_SERVERS>
options forward-only
In place of the <DNS_SERVER> parameter, use the IP addresses
of one or more properly configured name servers that have access to
the Internet.
You can also configure the BIG/ip Controller to be an authoritative
name server for one or more domains. This is useful when DNS is
needed in conjunction with phony domain names and network
numbers for the servers and other equipment behind the BIG/ip
Controller. Refer the BIND documentation for more details.
Converting from rotary or round robin DNS
If your network is currently configured to use rotary DNS, your
node configuration may not need modification. However, you need
to modify your DNS zone tables to map to a single IP address
instead of to multiple IP addresses.
BIG/ip® Controller, v. 2.1
4 - 55
Chapter 4
For example, if you had two Web sites with domain names of
www.SiteOne.com and www.SiteTwo.com, and used rotary DNS to
cycle between two servers for each Web site, your zone table might
look like the one in Figure 4.4:
www.SiteOne.com
www.SiteTwo.com
IN
IN
IN
IN
A
A
A
A
192.168.1.1
192.168.1.2
192.168.1.3
192.168.1.4
Figure 4.4 Sample zone table with two Web sites and four servers
In the BIG/ip Controller configuration, the IP address of each
individual node used in the original zone table becomes hidden
from the Internet. We recommend that you use the Internet
reserved address range as specified by RFC 1918 for your nodes. In
place of multiple addresses, simply use a single virtual server
associated with your site's domain name.
Using the above example, the DNS zone table might look like the
zone table shown in Figure 4.5
www.SiteOne.com
www.SiteTwo.com
IN A 192.168.100.231
IN A 192.168.100.232
Figure 4.5 Sample zone table with two Web sites and two servers.
4 - 56
F5 Networks, Inc.
5
Working with Special Features
• Introducing special features
• Using advanced service check options
• Using advanced persistence options
• Using advanced redundant system features
• Using advanced Transparent Node mode options
• Using specialized load balancing modes
• Controlling network access and traffic flow with
filters
• Working with more than two interface cards
• Optimizing large configurations
• Using alternative network configurations
5-1
Chapter 5
Introducing special features
In addition to the basic setup features available on the BIG/ip
Controller, a number of special setup features can be used to
optimize your network. This chapter describes the special setup
options available on the BIG/ip Controller. These features are
optional, and may not be required in your implementation of the
BIG/ip Controller. The following topics are described in this
chapter:
5-2
❖
Advanced software-based features
❖
Alternative BIG/ip Controller hardware configurations
❖
Optimized large configurations
❖
Alternative network configurations
F5 Networks, Inc.
Working with Special Features
Using advanced service check options
You can use advanced service check options to verify that your
content servers are functioning properly. There are two types of
advanced service checks: Extended Content Verification (ECV)
and Extended Application Verification (EAV). This section
describes how to set up, and use, these types of service checking.
This section also includes information for setting up EAV service
checks for SQL based services.
Setting up advanced ECV service checks
In addition to verifying content on web servers, you can use
Extended Content Verification (ECV) service checks to verify
connections to mail servers and FTP servers through transparent
nodes. If you want to set up ECV service checks through a
transparent node to these types of servers, there are certain special
issues that you need to address.
Configuring ECV for transparent nodes
You can set up ECV to verify that a transparent node is functioning
properly. To check if a transparent node is functioning, you can add
an entry to the /etc/bigd.conf file that allows you to retrieve content
through the node.
You can use a text editor, such as vi or pico, to manually create the
/etc/bigd.conf file, which stores ECV information. To create the
entry for checking a transparent node, use the following syntax:
transparent <node ip>:<node port> http://www-address[:port][/path]
["recv_expr"]
You can also use the following syntax for this entry:
transparent <node ip>:<node port> <dest ip>[:dest port][/path]
["recv_expr"]
For more information about these configuration entries, please refer
to Table 5.1.
BIG/ip® Controller, v. 2.1
5-3
Chapter 5
Configuration
Entry
Description
transparent
Transparent is required at the beginning of the entry.
node ip
The IP address, in dotted decimal notation, of the transparent firewall or
proxy. This IP cannot be a wild card IP (0.0.0.0). Note that the node must be
defined as a node in a VIP definition. Typically this would be a wild card VIP
(0.0.0.0).
This entry can also be specified as a fully qualified domain name (FQDN). In
order to use an FQDN, the BIG/ip Controller must be configured for name
resolution.
node port
This entry is the node port to use for the ECV check. This port can be zero.
This entry can be numeric or can use a well-known service name, such as http
or smtp.
dest ip:dest
port /URL
This is the combination of the destination, in dotted decimal notation, and port
number of the destination against which the ECV service check is performed.
The IP address cannot be a wild card (0.0.0.0). The port number is optional.
The port can be specified as any non-zero numeric port number, or specified
as a well-known port name, such as http or smtp.
The URL is an optional standard HTTP URL. If you do not specify a URL, a
default URL is retrieved using the HTTP 1.0 request format. This entry can
also be specified using a complete URL with an embedded FQDN. This entry
cannot be longer than 4096 bytes. In order to resolve an FQDN, the BIG/ip
Controller must be configured for name resolution.
recv string
This string is optional. If you specify a string, the string you specify is used to
perform standard ECV verification. This entry must be enclosed in quotation
marks, and cannot be longer than 128 bytes.
Table 5.1 Extended content verification configuration entries.
Note
The /etc/bigd.conf file is read once at startup. If you change the file
on the command line, you must reboot or restart bigd for the
changes to take effect. If you make changes in the F5 Configuration
utility, clicking the apply button makes changes and restarts bigd.
See Appendix D, bigd, for details.
5-4
F5 Networks, Inc.
Working with Special Features
Introducing EAV service checks
Extended Application Verification (EAV) is a sophisticated type of
service check typically used to confirm whether an application
running on a node is responsive to client requests. To determine
whether a node application is responsive, the BIG/ip Controller
uses a custom program referred to as an external service checker.
An external service checker program essentially provides the option
to customize service check functionality for the BIG/ip Controller.
It is external to the BIG/ip system itself, and is usually developed
by the customer. For example, you can use an external service
checker to verify Internet or intranet applications, such as a web
application that retrieves data from a back-end database and
displays the data in an HTML page.
An external service checker program works in conjunction with the
bigdnode daemon, which verifies node status using node pings and
service checks. If you configure external service check on a
specific node, the bigdnode daemon checks the node by executing
the external service checker program. Once the external service
checker executes, the bigdnode daemon looks for output written by
the external service checker. If the bigdnode daemon finds output
from the external service checker, it marks the node up. If it does
not find output from the external service checker, it marks the node
down. Note that bigdnode does not actually interpret output from
the external service checker; it simply verifies that the external
service checker created output.
Note
External service checker programs are custom programs that are
developed either by the customer, or by the customer in conjunction
with F5 Networks.
Setting up EAV service checks
An Extended Application Verification service check is a service
check that is performed by a custom application. There are four
tasks required to implement EAV service checks on the BIG/ip
Controller:
BIG/ip® Controller, v. 2.1
5-5
Chapter 5
❖
Verify that your external service checker program meets certain
requirements, such as creating a pid file.
❖
Install the external service checker program on the BIG/ip
Controller.
❖
Allow EAV service checks in the BIG/ip configuration.
❖
Configure the specific nodes to use the EAV service check.
Verifying external service checker requirements
Extended Application Verification (EAV) is intended to provide
maximum flexibility. The external service checker programs that
you create can use any number of methods to determine whether or
not a service or an application on a node is responsive. The external
service checker must, however, meet the following minimum
requirements:
❖
The external service checker must use a pid file to hold its
process ID, and the pid file must use the following naming
scheme:
/var/run/pinger.<ip>..<port>.pid.
❖
As soon as the external service checker starts, if the pid file
already exists, the external service checker should read the file
and send a SIGKILL command to the indicated process.
❖
The external service checker must write its process ID to the pid
file.
❖
If the external service checker verifies that the service is
available, it must write standard output. If the external service
checker verifies that the service is not available, it cannot write
standard output.
❖
The external service checker must delete its pid file before it
exits.
The BIG/ip Controller includes a several sample external service
checker scripts for HTTP, NNTP, SMTP, and POP3. These scripts
can be found in the following location:
/usr/local/lib/pingers/sample_pinger
The sample service checker, shown in Figure 5.1, is included with
the BIG/ip Controller.
5-6
F5 Networks, Inc.
Working with Special Features
# these arguments supplied automatically for all external
pingers:
# $1 = IP (nnn.nnn.nnn.nnn notation or hostname)
# $2 = port (decimal, host byte order)
# $3 and higher = additional arguments
#
# In this sample script, $3 is the regular expression
#
pidfile="/var/run/pinger.$1..$2.pid"
if [ -f $pidfile ]
then
kill -9 `cat $pidfile` > /dev/null 2>&1
fi
echo "$$" > $pidfile
echo "GET /" | /usr/local/lib/pingers/nc $1 $2 2> /dev/null | \
grep -E -i $3 > /dev/null
status=$?
if [ $status -eq 0 ]
then
echo "up"
fi
rm -f $pidfile
Figure 5.1 The HTTP external service checker program
Installing the external service checker on the BIG/ip Controller
To install an EAV service check script, place it in the
/usr/local/lib/pingers directory. This is the default location for
external service checker applications. You can install external
service checker applications to other directory locations if desired.
BIG/ip® Controller, v. 2.1
5-7
Chapter 5
Allowing EAV service checks
Once you install an external service checker on the BIG/ip
Controller, you need to add an entry to the /etc/bigd.conf file. The
standard syntax of the /etc/bigd.conf file includes the following
lines:
active
[<node_ip>:]<port> ["<send_string>" ["<recv_pattern>"]]
reverse [<node_ip>:]<port> ["<send_string>" ["<recv_pattern>"]]
ssl
[<node_ip>:]<port> ["<send_string>" ["<recv_pattern>"]]
To allow external service checking, you need to add the following
entry to the /etc/bigd.conf file:
external
[<node_ip>:]<port> [ <path> ]["<argument_string>"]
The <path> variable can be an absolute or a relative path to the
external checker application. Absolute paths should begin with a
slash ("/"). Other paths are relative to the directory default
directory, /usr/local/lib/pingers.
The "<argument_string>" variable must consist of exactly one
string in quotation marks. The string may include any number of
arguments, delimited in the usual way by white space, for example:
active n1:80 "GET /" "html"
external n1:8000 "my_pinger -a 600 -b"
In the above example, the BIG/ip Controller uses HTTP to check
port 80, but runs the script /usr/local/lib/pingers/my_pinger to
check port 8000, with additional arguments.
In the following example, there are three nodes on which the BIG/ip
Controller checks port 8000. The BIG/ip Controller runs a separate
copy of the external service checker named my_pinger for each
node:
external n1:8000 "my_pinger -a -b"
external 8000 "my_pinger -b"
5-8
F5 Networks, Inc.
Working with Special Features
In this example, the first entry specifies how to ping port 8000 on
node n1. The second entry specifies how to ping port 8000 on any
other node.
Configuring specific nodes to use EAV service check
The BIG/ip Controller performs the external service check at
specified intervals. The BIG/ip Controller actually uses the service
ping interval, which is set using the bigpipe tping_svc command.
The external service checker runs as root. The BIG/ip Controller
starts an external service checker using the following shell
command:
<path> <node_ip> <port> [ <additional_argument> ... ]
For the case of the example shown above, the appropriate command
would be:
/usr/local/lib/pingers/my_pinger n1 8000 -a 600 -b
The BIG/ip Controller inserts the node IP and port number before
the additional arguments that are specified in the /etc/bigd.conf file.
Note that the standard input and output of an external service
checker are connected to bigdnode. The bigdnode does not write
anything to the external service checker's standard input, but it does
read the external service checker's standard output. If bigdnode is
able to read any data from the external service checker program, the
particular service is considered up.
EAV service check for SQL-based services
This section describes how to set up the BIG/ip Controller to
perform EAV service checks on SQL-based services such as
Microsoft SQL Server versions 6.5 and 7.0, and also Sybase.
The service checking is accomplished by performing an SQL login
to the service. If the login succeeds, the service is considered up,
and if it fails, the service is considered down. An executable
program, tdslogin performs the actual login.
1. Test the login manually:
BIG/ip® Controller, v. 2.1
5-9
Chapter 5
cd /usr/local/lib/pingers
./tdslogin 192.168.1.1 1433 mydata user1
mypass1
Replace the IP address, port, database, user, and password
in this example with your own information.
You should receive the message:
Login succeeded!
If you receive the connection refused message, verify that
the IP and port are correct. See the Troubleshooting SQL
based EAV service checks section for more tips.
2. Create and entry in the /etc/bigd.conf with the following
syntax:
external 192.168.1.1:1433
"/usr/local/lib/pingers/SQL_pinger" "mydata
user1 mypass1"
In this entry, mydata is the name of the database, user1 is
the login name, and mypass1 is the password.
3. Add entries in the /etc/bigip.conf for the service checking:
tping_svc 1433 5
timeout_svc 1433 15
4. Reload the /etc/bigip.conf and restart bigd:
bigpipe -f /etc/bigip.conf
bigd
5. Verify that the service checking is being performed
correctly: If the service is "UP", change the password in
/etc/bigd.conf to an invalid password and restart bigd. The
service should go down after the timeout period elapses.
Correct the password and restart bigd and the service
should go up again.
5 - 10
F5 Networks, Inc.
Working with Special Features
Troubleshooting SQL-based service checks
If you are having trouble, you should verify that you can login
using another tool. For example, if you have Microsoft NT SQL
Server version 6.5, there is a client program ISQL/w included with
the SQL software. This client program performs simple logins to
SQL servers. Use this program to test whether you can login using
the ISQL/w program before attempting logins from the BIG/ip
Controller.
Creating a test account for Microsoft SQL
On the SQL server, you can run the SQL Enterprise Manager to add
logins. When first entering the SQL Enterprise Manager, you may
be prompted for the SQL server to manage.
You can register servers by entering the machine name, user name,
and password. If these names are correct, the server will be
registered and you will be able to click on an icon for the server.
When you expand the subtree for the server, there will be an icon
for Logins.
Underneath this subtree, you can find the SQL logins. Here, you
can change passwords or add new logins by right-clicking on the
Logins icon. Click this icon to open an option to Add login. After
you open this option, enter the user name and password for the new
login, as well as which databases the login is allowed to access. You
must grant the test account access to the database you specify in the
EAV configuration.
Using advanced persistence options
In addition to the simple persistence option provided by the BIG/ip
Controller, several advanced persistence options are available.
These options include HTTP Cookie persistence, Destination
Address Affinity (Sticky persistence), and Persist masking.
BIG/ip® Controller, v. 2.1
5 - 11
Chapter 5
Using HTTP cookie persistence
You can set up the BIG/ip Controller to use HTTP cookie
persistence. This method of persistence uses an HTTP cookie
stored on a client’s computer to allow the client to reconnect to the
same server previously visited at a web site. This method of
persistence can be used only with unencrypted HTTP 1.0 or 1.1
communication.
There are three types of cookie persistence available: Insert mode,
Rewrite mode, and Passive mode. The mode you choose affects
how the cookie is handled by the BIG/ip Controller when it is
returned to the client.
Insert mode
If you specify Insert mode, the information about the server to
which the client connects is written in the header of the HTTP
response from the server. This mode creates a cookie, named
BIGipServer, on the client computer that contains the information
about the chosen server. The expiration date for the cookie is set
based on the time-out configured on the BIG/ip Controller.
Rewrite mode
If you specify Rewrite mode, the BIG/ip Controller intercepts a
cookie, named BIGipCookie, sent from the server to the client and
rewrites the name of the cookie to BIGipServer. When the BIG/ip
Controller rewrites the cookie, the server information and time-out
value are reset.
Rewrite mode requires you to set up the cookie created by the
server. In order for Rewrite mode to work, there needs to be a blank
cookie coming from the web server for BIG/ip to rewrite. With
Apache variants, the cookie can be added to every web page header
by adding an entry in the httpd.conf file:
Header add Set-Cookie
BIGipCookie=0000000000000000000000000000000000
00000000
(There should be 75 zeros in the cookie).
5 - 12
F5 Networks, Inc.
Working with Special Features
Passive mode
If you specify Passive mode, the BIG/ip Controller does not insert
or search for existing cookies in the response from the server. It
does not try to set up the cookie. In this mode, it is assumed that the
server provides the cookie formatted with the correct node
information and time-out.
In order for Passive mode to work, there needs to be a cookie
coming from the web server with the appropriate node information
in the cookie. With Apache variants, the cookie can be added to
every web page header by adding an entry in the httpd.conf file:
Header add Set-Cookie:
BIGipServer=184658624.20480.000; expires=Sat,
19-Aug-2000 19:35:45 GMT; path=/
In this example, 184658624 is the encoded node address and 20480
is the encoded port.
The equation for an address (a.b.c.d) is:
d*256^3 + c*256^2 + b*256 +a.
The way to encode the port is to take the two bytes that store the
port and reverse them. So, port 80 becomes 80 * 256 + 0 = 20480.
Port 1433 (instead of 5 * 256 + 153) becomes 153 * 256 + 5 =
39173.
To activate HTTP cookie persistence in the F5
Configuration utility
1. In the navigation pane, click Virtual Servers.
The Virtual Servers Properties screen opens.
2. Click Application Persistence.
The Virtual Server Application Persistence screen opens.
3. Select HTTP Cookie Persistence.
4. Select the mode you want to use: Insert, Rewrite, or
Passive. Each mode handles the cookie in a different
manner (see the explanations preceding).
BIG/ip® Controller, v. 2.1
5 - 13
Chapter 5
5. Select the time-out value in days, hours, minutes, and
seconds. This value determines how long the cookie lives
on the client computer before it expires.
6. Click Apply.
To activate HTTP cookie persistence from the command
line
To activate HTTP cookie persistence from the command line, use
the following syntax:
bigpipe vip <virt addr>:<service> define <node addr> [...<node
addr>] special cookie <mode name> <timeout>
For the <mode name>, type Insert, Rewrite, or Passive. The
<timeout> value for the cookie is written using the following
format:
<days>d hh:mm:ss
Using destination address affinity (sticky persistence)
You can optimize your proxy server array with destination address
affinity (also called sticky persistence). Address affinity directs
requests for a certain destination to the same proxy server,
regardless of which client the request comes from.
This enhancement provides the most benefits when load balancing
caching proxy servers. A caching proxy server intercepts web
requests and returns a cached web page if it is available. In order to
improve the efficiency of the cache on these proxies, it is necessary
to send similar requests to the same proxy server repeatedly.
Destination address affinity can be used to cache a given web page
on one proxy server instead of on every proxy server in an array.
This saves the other proxies from having to duplicate the web page
in their cache, wasting memory.
WARNING
In order to prevent sticky entries from clumping on one server, use a
static load balancing mode, such as Round Robin.
5 - 14
F5 Networks, Inc.
Working with Special Features
To activate destination address affinity in the F5
Configuration utility
You can only activate destination address affinity on wildcard
virtual servers. For information on setting up a wildcard virtual
server, see Defining wildcard virtual servers, on page 4-10. Follow
these steps to configure destination address affinity:
1. In the navigation pane, click Virtual Servers.
The Virtual Servers screen opens.
2. Click the wildcard virtual server you want to configure.
The Virtual Server Properties screen opens.
3. Click the Destination Address Affinity Enable box to
enable destination address affinity.
4. In Destination Address Affinity Mask box, type in the
mask you want to apply to sticky persistence entries.
5. Click the Apply button.
To activate sticky persistence from the command line
Use the following command to turn sticky persistence on for the
virtual server:
bigpipe vip 0.0.0.0:<port> sticky enable
Use the following command to turn sticky persistence off for the
virtual server:
bigpipe vip 0.0.0.0:<port> sticky disable
Use the following command to show whether the sticky persistence
is on or off for the virtual server:
bigpipe vip 0.0.0.0:<port> sticky show
Use the following command to list sticky persistence entries for the
specified virtual server.
bigpipe vip 0.0.0.0:<port> sticky dump
BIG/ip® Controller, v. 2.1
5 - 15
Chapter 5
Use the following command to delete sticky entries for the
specified virtual server:
bigpipe vip 0.0.0.0:<port> sticky clear
Use the following command to define the sticky mask for the
virtual server:
bigpipe vip 0.0.0.0:<port> sticky mask <mask>
For example <mask> could be 255.255.255.0. To remove the
sticky mask for the virtual server:
bigpipe vip 0.0.0.0:<port> sticky mask none
To show the sticky mask for the virtual server:
bigpipe vip 0.0.0.0:<port> sticky mask show
To clear all sticky connections on a BIG/ip Controller, issue the
following bigpipe command:
bigpipe vip sticky clear
Using persist mask on a virtual server
The persist mask feature works only on virtual servers that
implement simple persistence. By adding a persist mask, you
identify a range of client IP addresses that will be managed as
simple persistent connections when connecting to a virtual server.
Applying a persist mask
The complete syntax for the bigpipe vip persist mask command is:
bigpipe vip <virt addr>:<port> persist mask <ip> | none | show
Use the following syntax to specify a range of IP addresses to be
included in persistence of the specified virtual port. The command
adds a persist mask to a port:
bigpipe vip <virt addr>:<port> persist mask <ip>
5 - 16
F5 Networks, Inc.
Working with Special Features
For example, the following command would keep persistence
information for addresses in the subnetwork 192.168.100 that
connect to the virtual server 10.10.10.90:80’s nodes:
bigpipe vip 10.10.10.90:80 persist mask 192.168.100.0
You can turn off a persist mask on a virtual server by using the
none option in place of the ip mask. To turn off the persist mask
that you set in the preceding example, use the following command:
bigpipe vip 10.10.10.90:80 persist mask none
To display all persist masks, use the show option:
bigpipe vip 10.10.10.90:80 persist mask show
Maintaining persistence across virtual servers that use the
same virtual addresses
The BIG/ip Controller platform provides a similar persistence
mode that is more granular. The BIG/ip Controller can maintain
persistence for all connections requested by the same client, as long
as the virtual server hosting each request uses the same virtual
address. When this mode is turned on, the BIG/ip Controller
attempts to send all persistent connection requests received from
the same client, within the persistence time limit, to the same node
only when the virtual server hosting the connection has the same
virtual address as the virtual server hosting the initial persistent
connection. Connection requests from the client that go to other
virtual servers with different virtual addresses, or those connection
requests that do not use persistence, are load balanced according to
the currently selected load balancing mode.
Using the preceding example, if a BIG/ip Controller configuration
includes the following virtual server mappings, where each virtual
server uses persistence:
bigpipe vip v1:http define n1:http n2:http
bigpipe vip v1:ssl
BIG/ip® Controller, v. 2.1
define n1:ssl
n2:ssl
5 - 17
Chapter 5
For example, a client makes an initial connection to v1:http and the
BIG/ip Controller's load balancing mechanism chooses n1:http as
the node. If the same client then connects to v1:ssl, the BIG/ip
Controller starts tracking a new persistence session, and it uses the
load balancing mode to determine which node should receive the
connection request because the requested virtual server uses a
different virtual address (v1) than the virtual server hosting the first
persistent connection request (v1). However, if the client
subsequently connects to v1:ssl, the BIG/ip Controller uses the
persistence session established with the first connection to
determine the node that should receive the connection request,
rather than the load balancing mode. The BIG/ip Controller should
send the third connection request to n1:ssl, which uses the same
node address as the n1:http node that currently hosts the client's
first connection with which it shares a persistent session.
WARNING
In order for this mode to be effective, virtual servers that use the
same virtual address, as well as those that use TCP or SSL
persistence, should include the same node addresses in the virtual
server mappings.
The system control variable bigip.persist_on_any_port_same_vip
turns this mode on and off. To activate the persistence mode, type:
sysctl -w bigip.persist_on_port_same_vip=1
To deactivate the persistence mode, type:
sysctl -w bigip.persist_on_port_same_vip=0
Maintaining persistence across all virtual servers
You can set the BIG/ip Controller to maintain persistence for all
connections requested by the same client, regardless of which
virtual server hosts each individual connection initiated by the
client. When this mode is turned on, the BIG/ip Controller attempts
to send all persistent connection requests received from the same
client, within the persistence time limit, to the same node.
5 - 18
F5 Networks, Inc.
Working with Special Features
Connection requests from the client that do not use persistence are
load balanced according to the currently selected load balancing
mode.
For example, if a BIG/ip Controller configuration includes the
following virtual server mappings, where each virtual server uses
persistence:
bigpipe vip v1:http define n1:http n2:http
bigpipe vip v1:ssl define n1:ssl
n2:ssl
bigpipe vip v2:http define n1:http n2:http
bigpipe vip v2:ssl
define n1:ssl
n2:ssl
Say that a client makes an initial connection to v1:http and the
BIG/ip Controller's load balancing mechanism chooses n1:http as
the node. If the same client subsequently connects to v1:ssl, the
BIG/ip Controller would send the client's request to n1:ssl, which
uses the same node address as the n1:http node that currently
hosts the client's initial connection.
WARNING
In order for this mode to be effective, virtual servers that use TCP
or SSL persistence should include the same node addresses in the
virtual server mappings.
The system control variable bigip.persist_on_any_vip turns this
mode on and off. To activate the persistence mode, type:
sysctl -w bigip.persist_on_any_vip=1
To deactivate the persistence mode, type:
sysctl -w bigip.persist_on_any_vip=0
BIG/ip® Controller, v. 2.1
5 - 19
Chapter 5
Using advanced redundant system features
In addition to the simple redundant features available on the BIG/ip
Controller, several advanced redundant features are available.
Advanced redundant system features provide additional assurance
that your content is available if a BIG/ip Controller experiences a
problem. These advanced redundant system options include:
❖
Mirroring connection and persistence information
❖
Gateway fail-safe
❖
Network-based fail-over
❖
Setting a specific BIG/ip Controller to be the active controller
Mirroring connection and persistence information
When the fail-over process puts the active controller duties onto a
standby controller, your connection capability returns so quickly
that it has little chance to be missed. By preparing a redundant
system for the possibility of fail-over, you effectively maintain your
site’s reliability and availability in advance. But fail-over alone is
not enough to preserve the connections and transactions on your
servers at the moment of fail-over; they would be dropped as the
active controller goes down unless you have enabled mirroring.
The mirror feature on BIG/ip Controllers is a specialized, ongoing
communication between the active and standby controllers that
duplicates the active controller’s real-time connection or
persistence information state on the standby controller. If mirroring
has been enabled, fail-over can be seamless to such an extent that
file transfers can proceed uninterrupted, customers making orders
can complete transactions without interruption, and your servers
can generally continue with whatever they were doing at the time of
fail-over.
5 - 20
F5 Networks, Inc.
Working with Special Features
The mirror feature is intended for use with long-lived connections,
such as FTP, Chat, and Telnet sessions. Mirroring is also effective
for persistence information.
WARNING
If you attempt to mirror all connections, the performance of the
BIG/ip Controller may degrade.
Commands for mirroring
New commands that support mirroring capabilities are presented in
overview in Table 5.2. For complete descriptions, syntax, and
usage examples, see Appendix B, BIG/pipe commands.
BIG/pipe command Options
bigpipe mirror
Options for global mirroring
bigpipe vip mirror
Options for mirroring connection and
persistence information on a virtual server.
bigpipe snat mirror
Options for mirroring secure NAT connections
Table 5.2 Mirroring command in BIG/pipe
Global mirroring on the BIG/ip Controller redundant
system
Mirroring must be enabled on a redundant system at the global
level before you can set mirroring of any specific types of
connections or information. The syntax of the command for setting
global mirroring is:
bigpipe mirror enable | disable | show
To enable mirroring on a redundant system, use the following
command:
bigpipe mirror enable
BIG/ip® Controller, v. 2.1
5 - 21
Chapter 5
To disable mirroring on a redundant system, use the following
command:
bigpipe mirror disable
To show the current status of mirroring on a redundant system, use
the following command:
bigpipe mirror show
Mirroring virtual server state
Mirroring provides seamless recovery for current connections,
persistence information, SSL persistence, or sticky persistence
when a BIG/ip Controller fails. When you use the mirroring
feature, the standby controller maintains the same state information
as the active controller. Transactions such as FTP file transfers
continue as though uninterrupted.
Since mirroring is not intended to be used for all connections and
persistence, it must be specifically enabled for each virtual server.
To control mirroring for a virtual server, use the bigpipe vip
mirror command to enable or disable mirroring of persistence
information, or connections, or both. The syntax of the command
is:
bigpipe vip <virt addr>:<port> mirror [ persist | conn ] \
enable | disable
Use persist to mirror persistence information for the virtual server.
Use conn to mirror connection information for the virtual server.
To display the current mirroring setting for a virtual server, use the
following syntax:
bigpipe vip <virt addr>:<port> mirror [ persist | conn ] show
If you do not specify either persist, for persistent information, or
conn, for connection information, the BIG/ip Controller assumes
that you want to display both types of information.
5 - 22
F5 Networks, Inc.
Working with Special Features
Mirroring SNAT connections
SNAT connections are mirrored only if specifically enabled. You
can enable SNAT connection mirroring by specific node address,
and also by enabling mirroring on the default SNAT address. Use
the following syntax to enable SNAT connection mirroring on a
specific address:
bigpipe snat <node addr> [...<node addr>] mirror enable | disable
In the following example, the enable option turns on SNAT
connection mirroring to the standby controller for SNAT
connections originating from 192.168.225.100.
bigpipe snat 192.168.225.100 mirror enable
Use the following syntax to enable SNAT connection mirroring the
default SNAT address:
bigpipe snat default mirror enable | disable
Using gateway fail-safe
Fail-safe features on the BIG/ip Controller provide network failure
detection based on network traffic. Gateway fail-safe monitors
traffic between the active controller and the gateway router,
protecting the system from a loss of the internet connection by
triggering a fail-over when the gateway is unreachable for a
specified duration.
Enabling gateway fail-safe
Gateway fail-safe monitoring can be toggled on or off from the
command line using the bigpipe gateway command.
For example, arm the gateway fail-safe using the following
command:
bigpipe gateway failsafe arm
To disarm fail-safe on the gateway, enter the following command:
bigpipe gateway failsafe disarm
BIG/ip® Controller, v. 2.1
5 - 23
Chapter 5
To see the current fail-safe status for the gateway, enter the
following command:
bigpipe gateway failsafe show
Adding a gateway fail-safe check
You can set up a gateway fail-safe check using the gateway
keyword and three parameters to define the check to the bigd
daemon:
❖
the name or IP address of the router (only one gateway can be
configured for fail-safe)
❖
the time interval (seconds) between pings sent to the router
❖
time-out period (seconds) to wait for replies before proceeding
with fail-over
To establish the parameters for gateway fail-safe monitoring, use
the following syntax to add a line to the /etc/bigd.conf:
gateway <IP addr> <ping_interval> <timeout>
You could also specify the device instead of the device’s IP address:
gateway <device> <ping_interval> <timeout>
For example, you could establish a router fail-safe check by placing
either of the following lines into the /etc/bigd.conf file. Note that
changes to this file are read only when bigd starts (at system boot,
or when you restart it with the command bigd from a command
line).
gateway 10.1.1.1 5 30
gateway router 5 30
Either of these two checks pings the router on IP address 10.1.1.1.
at five second intervals, and if a ping goes unacknowledged for 10
seconds, the BIG/ip Controller fails over to the standby unit.
For more information about the bigd daemon and /etc/bigd.conf,
see Appendix D, bigd.
5 - 24
F5 Networks, Inc.
Working with Special Features
Gateway fail-safe messages
The destination for gateway fail-safe messages is set in the standard
syslog configuration (/etc/syslog.conf), which directs these
messages to the file /var/log/bigd. Each message is also written to
the BIG/ip Controller console (/dev/console).
Using network-based fail-over
Network-based fail-over allows you to configure your redundant
BIG/ip Controller to use the network to determine the status of the
active controller. Network-based fail-over can be used in addition
to, or instead of, hard-wired fail-over.
Configuring network-based fail-over
To enable network-based fail-over, you need to change the settings
of specific BIG/store database keys using the bigdba utility. To
enable network-based fail-over, the bigip.Failover.Ethernet key
must be set to one (1). To set this value to one, type this command
to open the BIG/store database:
bigdba /var/f5/bigdb/user.db
At the bigdba prompt, type the following entry:
bigip.Failover.Network=1
Other keys are available to lengthen the delay to detect the fail-over
condition on the standby controller, and to lengthen the heart beat
interval from the active unit. To change the time required for the
standby unit to notice a failure in the active unit, set the following
value using the bigdba utility (the default is three seconds):
bigip.Cluster.StandbyTimeoutSec = <value>
To change the heart beat interval from the active BIG/ip Controller,
change the following value using bigdba (the default is one
second):
bigip.Cluster.ActiveKeepAliveSec = <value>
For more information about BIG/store and using bigdba, see
Appendix D, bigd.
BIG/ip® Controller, v. 2.1
5 - 25
Chapter 5
Setting a specific BIG/ip Controller to be the preferred
active unit
Setting a preferred active controller means overlaying the basic
behavior of a BIG/ip Controller with a preference toward being
active. A controller that is set as the active controller becomes
active whenever the two controllers negotiate for active status.
To clarify how this differs from default behavior, contrast the basic
behavior of a BIG/ip Controller in the following description. Each
of the two BIG/ip Controllers in a redundant system has a built-in
tendency to try to become the active controller. Each system
attempts to become the active controller at boot time; if you boot
two BIG/ip Controllers at the same time, the one that becomes the
active controller is the one that boots the first. In a redundant
configuration, if the BIG/ip Controllers are not configured with a
preference for being the active or standby controller, either
controller can become the active controller by becoming active first.
The active or standby preference for the BIG/ip Controller is
defined by setting the appropriate startup parameters for sod (the
switch over daemon) in /etc/rc.local. For more details on sod
startup and functioning, see Appendix D, sod.
The following example shows how to set the controller to standby:
echo " sod.";
/usr/sbin/sod -force_slave 2> /dev/null
A controller that prefers to be standby can still become the active
controller if it does not detect an active controller. It is not possible
for both controllers in a redundant system to be in active mode or in
standby mode at the same time.
This example shows how to set controller to active:
echo " sod.";
/usr/sbin/sod -force_master 2> /dev/null
A controller that prefers to be active can still serve as the standby
controller when it is on a live redundant system that already has an
active controller. For example, if an active controller that preferred
to be active failed over and was taken out of service for repair, it
5 - 26
F5 Networks, Inc.
Working with Special Features
could then go back into service as the standby controller until the
next time the redundant system needed an active controller, for
example, at reboot.
Configuring advanced Transparent Node
mode options
Transparent Node mode allows the BIG/ip Controller to perform
load balancing on routers and router-like devices. There are several
advanced configuration issues and options available if you run the
BIG/ip Controller in this mode. These issues and options include:
❖
Port translation
❖
Node ping
❖
Configuring routes
❖
Using standard virtual servers
❖
Using FTP in Transparent Node mode
❖
Setting up ECV service checks for transparent devices
WARNING
Before using Transparent Node mode: If you previously enabled
the IP source checking system control variable, disable it by
clearing the IP sourcecheck box.
Port translation
When you define nodes for wildcard virtual servers, you need to
use the addresses of the transparent devices on the internal network
of the BIG/ip Controller. If you specify port 0 in the node
definition, the BIG/ip Controller does not perform port translation.
If you use a non-zero port, the BIG/ip Controller performs port
translation.
BIG/ip® Controller, v. 2.1
5 - 27
Chapter 5
Node ping
The BIG/ip Controller's default node ping setting is ICMP ping.
Some transparent devices may not be configured to accept ICMP
pings. If the devices in your environment cannot be configured to
respond to ICMP pings on their internal ports, you have two
options:
❖
You can switch to TCP Echo ping.
❖
You can disable node ping entirely.
If you disable node ping entirely, you may want to set the global
properties for each node port to use service check. Service check
confirms that the BIG/ip Controller can connect to a node port and
establish communication with the service managed on that port. If
there is no appropriate port on the device, you should disable
service check as well.
Configuring routes for Transparent Node mode
You can configure the BIG/ip Controller to run a routing daemon,
GateD, or to simply use default and static routes. Aside from the
normal interface routes that the operating system automatically
creates, the BIG/ip Controller needs only gateway routes to the
internal networks (networks inside the firewall), to which the
BIG/ip Controller is not directly connected. The BIG/ip Controller
must use its external interface to reach these gateways. Note that
the BIG/ip Controller does not need any routes to the nodes
specified in the default wildcard virtual server.
Using standard virtual servers in Transparent Node mode
You can configure conventional virtual servers to handle traffic that
needs to be routed to non-transparent devices. This feature is useful
in resolving the following issues:
❖
5 - 28
Some client web browsers may be configured to use a nontransparent proxy.
F5 Networks, Inc.
Working with Special Features
❖
Certain email peers may be configured to use an SMTP gateway
that is on the firewall. In this case, you may want to add only one
firewall node to the virtual server in order to avoid maintaining
two or more email configurations.
❖
You may want to load balance client connections that go to
internal network servers.
Using FTP in Transparent Node mode
A default wildcard virtual server (0.0.0.0:0) does not handle FTP
connection requests. If you need to accommodate FTP connection
requests, you should configure two FTP-specific wildcard virtual
servers: 0.0.0.0:20 and 0.0.0.0:21. Note that the BIG/ip Controller
supports connections for non-default active ports on FTP proxy
servers.
Setting up ECV service checks for transparent devices
You can set up ECV to verify that a transparent node is functioning
properly. To check if a transparent node is functioning, you can add
an entry to the /etc/bigd.conf file that allows you to retrieve content
through the node.
You can use a text editor, such as vi or pico, to manually create the
/etc/bigd.conf file, which stores ECV information. To create the
entry for checking a transparent node, use the following syntax:
transparent <node ip>:<node port> http://www-address[:port][/path]
["recv string"]
You can also use the following syntax for this entry:
transparent <node ip>:<node port> <dest ip>[:dest port][/path]
["recv string"]
For more information about these configuration entries, please refer
to Table 5.1.
BIG/ip® Controller, v. 2.1
5 - 29
Chapter 5
Viewing final destination addresses in the printed
connection table
The BIG/pipe command line utility also offers a useful diagnostic
tool that prints the list of current connections. Normally, the
bigpipe dt command prints the client, virtual server, and node
addresses. In Transparent Node Mode, the bigpipe dt command
also prints the final destination address.
Using specialized load balancing modes
Load balancing is an integral part of the BIG/ip Controller. A load
balancing mode defines, in part, the logic that a BIG/ip Controller
uses to determine which node should receive a connection hosted
by a particular virtual server. The BIG/ip Controller supports
specialized load balancing modes that dynamically distribute the
connection load, rather than following a static distribution pattern
such as Round Robin. Dynamic distribution of the connection load
is based on various aspects of real-time server performance
analysis, such as the current number of connections per node or the
fastest node response time. The following section describes how
each load balancing mode distributes connections, as well as how to
set the load balancing mode on the BIG/ip Controller.
Understanding individual load balancing modes
Individual load balancing modes take into account one or more
dynamic factors, such as current connection count. Because each
application of the BIG/ip Controller is unique, and node
performance depends on a number of different factors, we
recommend that you experiment with different load balancing
modes, and choose the one that offers the best performance in your
particular environment.
5 - 30
F5 Networks, Inc.
Working with Special Features
Fastest mode
Fastest mode passes a new connection based on the fastest response
of all currently active nodes. Fastest mode may be particularly
useful in environments where nodes are distributed across different
logical networks.
Least Connections mode
Least Connections mode is relatively simple in that the BIG/ip
Controller passes a new connection to the node with the least
number of current connections. Least Connections mode works
best in environments where the servers or other equipment you are
load balancing have similar capabilities.
Observed mode
Observed mode uses a combination of the logic used in the Least
Connection and Fastest modes. In Observed mode, nodes are
ranked based on a combination of the number of current
connections and the response time. Nodes that have a better
balance of fewest connections and fastest response time receive the
a greater proportion of the connections. Observed mode also works
well in any environment, but may be particularly useful in
environments where node performance varies significantly.
Predictive mode
Predictive mode also uses the ranking methods used by Observed
mode, where nodes are rated according to a combination of the
number of current connections and the response time. However, in
Predictive mode, the BIG/ip Controller analyzes the trend of the
ranking over time, determining whether a node’s performance is
currently improving or declining. The nodes with better
performance rankings that are currently improving, rather than
declining, receive a higher proportion of the connections.
Predictive mode works well in any environment.
BIG/ip® Controller, v. 2.1
5 - 31
Chapter 5
Priority mode
Priority mode is a special type of round robin load balancing. In
Priority mode, you define groups of nodes and assign a priority
level to each group. The BIG/ip Controller begins distributing
connections in a round robin fashion to all nodes in the highest
priority group. If all the nodes in the highest priority group go
down or hit a connection limit maximum, the BIG/ip Controller
begins to pass connections on to nodes in the next lower priority
group.
For example, in a configuration that has three priority groups,
connections are first distributed to all nodes set as priority 3. If all
priority 3 nodes are down, connections begin to be distributed to
priority 2 nodes. If both the priority 3 nodes and the priority 2
nodes are down, connections then begin to be distributed to priority
1 nodes, and so on. Note, however, that the BIG/ip Controller
continuously monitors the higher priority nodes, and each time a
higher priority node becomes available, the BIG/ip Controller
passes the next connection to that node.
Setting the load balancing mode
The load balancing mode is a system property of the BIG/ip
Controller, and it applies to all standard and wildcard virtual servers
defined in the configuration.
To set the load balancing mode in the F5 Configuration
utility
1. In the navigation frame, click the BIG/ip logo.
The BIG/ip System Properties screen opens.
2. In the Load Balancing Mode box, choose the desired load
balancing mode.
3. Click Apply.
WARNING
If you select Ratio mode or Priority mode, be sure to set the ratio
weight or priority level for each node address in the configuration.
5 - 32
F5 Networks, Inc.
Working with Special Features
To set the load balancing mode on the command line
The command syntax for setting the load balancing mode is:
bigpipe lb <mode name>
Table 5.3 describes the valid options for the <mode name>
parameter.
Mode Name
Description
priority
Sets load balancing to Priority mode.
least_conn
Sets load balancing to Least Connections
mode.
fastest
Sets load balancing to Fastest mode.
observed
Sets load balancing to Observed mode.
predictive
Sets load balancing to Predictive mode.
Table 5.3 Options for the <mode name> parameter.
Setting ratio weights and priority levels for node addresses
If you set the load balancing mode to either Ratio mode or Priority
mode, you need to set a special property on each node address.
❖
Ratio weight
The ratio weight is the proportion of total connections that the
node address should receive. The default ratio weight for a given
node address is 1. If all node addresses use this default weight,
the connections are distributed equally among the nodes.
❖
Priority level
The priority level assigns the node address to a specific priority
group.
To set ratio weights and priority levels in the F5
Configuration utility
1. In the navigation pane, click Nodes.
BIG/ip® Controller, v. 2.1
5 - 33
Chapter 5
2. In the Nodes list, click the node for which you want to set
the ratio weight.
The Node Properties screen opens.
3. In the Address box, click the node address or host name.
The Global Node Address Properties screen opens.
4. In the Ratio or Priority box, replace the default ratio
weight with the ratio weight of your choice.
5. Click Apply to save your changes.
To set ratio weights on the command line
The bigpipe ratio command sets the ratio weight for one or more
node addresses:
bigpipe ratio <node IP> [<node IP>...] <ratio weight>
The following example defines ratio weights and priority for three
node addresses. The first command sets the first node to receive
half of the connection load. The second command sets the two
remaining node addresses to each receive one quarter of the
connection load.
bigpipe ratio 192.168.10.01
2
bigpipe ratio 192.168.10.02
192.168.10.03
1
WARNING
If you set the load balancing mode to Ratio or Priority, you must
define the ratio or priority settings for each node address. The
value you define using the bigpipe ratio command is used as the
ratio value if Ratio is the currently selected load balancing mode,
and the same value is used as the priority level if Priority is the
currently selected load balancing mode.
5 - 34
F5 Networks, Inc.
Working with Special Features
Controlling network access and traffic flow
with filters
Filters control network traffic by setting whether packets are
forwarded or rejected at the external network interface. Filters
apply to both incoming and outgoing traffic. When creating a filter,
you define criteria which are applied to each packet that is
processed by the BIG/ip Controller. You can configure the BIG/ip
Controller to forward or block each packet based on whether or not
the packet matches the criteria.
The BIG/ip Controller supports two types of filters, IP filters and
rate filters.
IP filters
Typical criteria that you define in IP filters are packet source IP
addresses, packet destination IP addresses, and upper-layer protocol
of the packet. However, each protocol has its own specific set of
criteria that can be defined.
For a single filter, you can define multiple criteria in multiple,
separate statements. Each of these statements should reference the
same identifying name or number, to tie the statements to the same
filter. You can have as many criteria statements as you want, limited
only by the available memory. Of course, the more statements you
have, the more difficult it is to understand and maintain your filters.
Configuring IP filters
When you define an IP filter, you can filter traffic in two ways:
❖
You can filter traffic going to a specific destination or coming
from a specific destination, or both.
❖
The filter can allow network traffic through, or it can reject
network traffic.
Defining an IP filter in the F5 Configuration utility
1. Click IP Filters in the navigation pane.
The IP Filters screen opens.
BIG/ip® Controller, v. 2.1
5 - 35
Chapter 5
2. In the IP Filters screen, click Add Filter.
The Add IP Filter screen opens.
3. On the Add IP Filter screen, in the Name box, type a filter
name.
4. From the Type list, choose Accept Packet to allow traffic,
or Deny Packet to reject traffic.
5. In the Source IP Address box, only if you want the filter to
be applied to network traffic based on its source, enter the
IP address from which you want to filter traffic.
6. In the Source Port box, only if you want the filter to be
applied to network traffic based on its source, enter the port
number from which you want to filter traffic.
7. In the Destination IP Address box, enter the IP address to
which you want to filter traffic, only if you want the filter to
be applied to network traffic based on its destination.
8. In the Destination Port box, enter the port number to
which you want to filter traffic, only if you want the filter to
be applied to network traffic based on its destination.
9. Click Add to add the IP filter to the system.
Note
For information on configuring IP filters and rate filter on the
command line, refer to the IPFW man page.
Rate filters and rate classes
In addition to IP filters,you can also defineratesofaccessby using
arate filter. Rate filtersconsistofthe basicfilterand a rate class.
Rateclassesdefinehow m any bitspersecond areallow ed per
connection and thenum berofpacketsin a queue.
5 - 36
F5 Networks, Inc.
Working with Special Features
Configuring rate filters and rate classes
Rate filters are a type of extended IP filter. They use the same IP
filter method, but they apply a rate class which determines the
volume of network traffic allowed through the filter.
Tip
You must define at least one rate class in order to apply a rate filter.
Rate filters are useful for sites that have preferred clients. For
example, an e-commerce site may want to set a higher throughput
for preferred customers, and a lower throughput for random site
traffic.
Configuring rate filters involves both creating a rate filter and a rate
class. When you configure rate filters, you can use existing rate
classes. However, if you want a new rate filter to use a new rate
class, you must configure the new rate class before you configure
the new rate filter.
To configure a new rate class in the F5 Configuration
utility
1. Click Rate Filters in the navigation pane.
The Rate Filters screen opens.
2. In the Rate Filters screen, click Add Class.
The Rate Class screen opens.
3. On the Rate Class screen, in the Name box, type a rate
class name.
4. In the Bits Per Second Allowed box, enter the maximum
number of bits per second that you want the class to allow.
5. In the Minimum Number of Bits Outstanding box, enter
the minimum number of bits required to be sent for
processing from the queue at one time.
6. In the Queue Length (in Packets) box, enter the maximum
number of packets allowed in the queue. Once the BIG/ip
Controller fills the queue, it begins to drop subsequent
packets received.
BIG/ip® Controller, v. 2.1
5 - 37
Chapter 5
7. Click Add to add the rate class to the system.
Note
For information on configuring IP filters and rate filter on the
command line, refer to the IPFW man page.
After you have added a rate class, you can configure rate filters for
your system.
To configure a rate filter in the F5 Configuration utility
1. Click Rate Filters in the navigation pane.
The Rate Filters screen opens.
2. In the Rate Filters screen, click Add Class.
The Add Class screen opens.
3. On the Rate Filter screen, in the Name box, type a name for
the rate filter.
4. From the Rate Class list, choose a rate class. Note that you
must have a rate class defined before you can proceed.
5. In the Source IP Address box, enter the IP address from
which you want to filter traffic, only if you want the filter to
be applied to network traffic based on its source.
6. In the Source Port box, enter the port number from which
you want to filter traffic, only if you want the filter to be
applied to network traffic based on its source.
7. In the Destination IP Address box, enter the IP address to
which you want to filter traffic, only if you want the filter to
be applied to network traffic based on its destination.
8. In the Destination Port box, enter the port number to
which you want to filter traffic, only if you want the filter to
be applied to network traffic based on its destination.
5 - 38
F5 Networks, Inc.
Working with Special Features
9. Click Add.
Note
For information on configuring IP filters and rate filter on the
command line, refer to the IPFW man page.
Working with more than two interface cards
When you configure a BIG/ip Controller with more than two
interface cards installed, you address the following issues:
❖
Additional interfaces should be configured.
❖
You need to specify an interface for each virtual address.
❖
You need to define an interface for NATs.
❖
You need to define an interface for SNATs.
❖
Verify routing with multiple NICs.
❖
Edit httpd.conf for network administration with the F5 web
server.
Configuring additional interfaces with the First-Time Boot
utility
The first step in configuring the BIG/ip Controller with additional
interfaces is to run the First-Time Boot utility. This utility detects
how many NICs are present in the BIG/ip Controller. If you have
more than two NICs present, the utility prompts you to define
additional external interfaces. The First-Time Boot utility prompts
you for information to configure the F5 web server.
You can also designate one of your additional internal NICs with
the route for which access is permitted for network administration
using SSH (or Telnet for international users).
The First-Time Boot utility, /bin/config, detects and configures
additional interfaces if they are present in the BIG/ip Controller.
BIG/ip® Controller, v. 2.1
5 - 39
Chapter 5
Running the First-Time Boot utility
As Administrator with root-level permission, enter the following
command from the command line:
/bin/config
After choosing and configuring the first external interface, you are
prompted to configure additional external interfaces:
More external interfaces to configure? [y or n]
Type y to configure a second external interface. Type n if you want
the remaining NICs to be set to internal. After you configure
external interfaces, the First-Time Boot utility sets any remaining
interfaces to internal by default.
When asked to configure the web server, you are prompted to
define a domain name for the external and internal interfaces. If you
have more than two NICs, an external interface and an internal
interface are automatically chosen to be the web server's interfaces.
Changing the domain name or configuring additional interfaces
must be done manually by editing the httpd.conf file. For more
information, refer to the Editing httpd.conf for network
administration section Editing httpd.conf for network
administration with the BIG/ip web server, on page 5-44.
If you already have the F5 web server configured from a previous
install, you can choose to not replace your httpd.conf file. The script
asks you if you want to replace your existing file. If you choose not
to replace the file, you are asked to confirm your choice. When you
choose Cancel, a message is displayed indicating that the
configuration was not successful. This message only applies to the
F5 web server configuration. Your BIG/ip configuration is still
valid.
The First-Time Boot utility creates a new /etc/netstart script which
supports more than two NICs. It also modifies the /etc/ethers and
/etc/bigip.interfaces files.
Note
When you rerun the First-Time Boot utility, it does not replace or
change your existing /etc/bigip.conf or your /etc/bigd.conf files.
5 - 40
F5 Networks, Inc.
Working with Special Features
You may need to edit the /etc/bigip.conf file using a text editor such
as vi or pico to add the appropriate interface statements. For
example, if you want to designate exp2 as an internal interface, add
the following lines to your bigip.conf file:
interface exp2 internal
interface exp2 failsafe disarm
interface exp2 timeout 30.
Once you are done editing the bigip.conf file, reboot the BIG/ip
Controller, or restart bigd by typing bigd on the command line and
pressing Enter, in order to implement your changes.
Specifying an interface for a virtual address
When you define a virtual server on a BIG/ip Controller that has
more than one external interface, you need to specify the external
interface that the virtual server’s address is associated with.
WARNING
All virtual servers that share a virtual address must be associated
with the same external interface.
To specify a virtual server interface in the F5
Configuration utility
1.
In the navigation pane, click Virtual Servers.
The Virtual Servers screen opens.
2. In the toolbar, click Add Virtual Server.
The Add Virtual Server screen opens.
3. In the Add Virtual Server screen, type in the properties for
the virtual server you want to add including the address and
port.
4. Click Add.
BIG/ip® Controller, v. 2.1
5 - 41
Chapter 5
To specify a virtual server interface on the command line
You can define virtual servers with the bigpipe vip command.
Normally, a virtual server is added to the external interface with a
network address that matches the network of the virtual address.
However, with multiple NICs, you can specify which external
interface a virtual server is added to using the bigpipe vip
command. To do this, add the <interface> argument to the
command.
bigpipe vip <virt addr>:<port>[/<bitmask>] [<interface>] \
define <node addr>:<port> ... <node addr>:<port>
bigpipe vip <virt addr>:<port> [<interface>] [netmask <netmask> \
[broadcast <broadcast_ip>]] define <node addr>:<port> ... \
<node addr>:<port>
You can set the <interface> parameter to none if you want to
prevent BIG/ip from issuing ARP requests for a specific virtual
server. This has the same effect as using the sysctl variable
bigip.vipnoarp, but on a server-by-server basis.
The following example shows how to define a virtual server that is
added to a FDDI NIC.
bigpipe vip 210.12.150.100:80 /24 fpa0 define 192.158.11.100:80 \
192.158.11.101:80 192.158.11.102:80
Specifying an interface for a NAT address
When you define a NAT address on a BIG/ip Controller that has
more than one external interface, you need to specify the external
interface that the virtual server’s address is associated with.
To specify an interface for a NAT in the F5 Configuration
utility
1. Click NATs in the navigation pane.
The Network Address Translations (NATs) screen opens.
2. Click the NAT you want to configure.
The NAT Properties screen opens.
5 - 42
F5 Networks, Inc.
Working with Special Features
3. In the External Interface list, choose the interface to
which you want to assign this NAT.
4. Click Apply.
To specify an interface for a NAT on the command line
When mapping a network address translation with the bigpipe nat
command, you must now specify which external interface a virtual
IP address is added to by using the new <interface> parameter.
bigpipe nat <internal_ip> to <external_ip> [/<bitmask>] \
[<interface>]
bigpipe nat <internal_ip> to <external_ip> [<interface>] [netmask \
<netmask> [broadcast <broadcast_ip>] |/<bitmask>]
The following example shows how to define a NAT where the IP
address represented by <external_ip> is added to an Intel NIC.
bigpipe nat 11.0.0.100 to 10.0.140.100/24 exp0
Specifying an interface for a SNAT address
When you define a SNAT address on a BIG/ip Controller that has
more than one external interface, you need to specify the external
interface that the virtual server’s address is associated with.
WARNING
All virtual servers that share a virtual address must be associated
with the same external interface.
To specify an interface for a SNAT in the F5
Configuration utility
1. Click Secure NATs in the navigation pane.
The Secure Network Address Translations (SNATs) screen
opens.
2. Click the SNAT you want to configure.
The SNAT Properties screen opens.
BIG/ip® Controller, v. 2.1
5 - 43
Chapter 5
3. In the External Interface list, choose the interface to
which you want to assign this SNAT.
4. Click Apply.
To specify an interface for a SNAT on the command line
When mapping a secure network address translation with the
bigpipe snat command, you must specify which external interface
a virtual IP address is added to by using the new <interface>
parameter.
bigpipe snat <internal_ip> to <external_ip> [/<bitmask>] \
[<interface>]
bigpipe snat <internal_ip> to <external_ip> [<interface>] [netmask]
<netmask> [broadcast <broadcast_ip>] |/<bitmask>]
The following example shows how to define a SNAT where the IP
address represented by <external_ip> is added to an Intel NIC.
bigpipe snat 11.0.0.100 to 10.0.140.100/24 exp0
Routing with multiple NICs
Use Router Discovery Protocol (RDP) for routing on a BIG/ip
Controller with more than one interface. For router configuration
information, please refer to documentation included with your
router.
Editing httpd.conf for network administration with the
BIG/ip web server
When you use the First-Time Boot utility, it configures the BIG/ip
web server and saves your changes in the httpd.conf file. This file
defines your virtual web servers for the external and internal
interfaces that your IP addresses are mapped to. You must edit this
file, using a text editor such as vi or pico, if you want to change
access to specific interfaces. If you subsequently run the reconfighttpd script (or config-httpd for international users), some or all
your changes may be lost and you must edit your BIG/ip web server
5 - 44
F5 Networks, Inc.
Working with Special Features
configuration file again. For an example of how to add a second
virtual host to the BIG/ip web server, see this sample configuration
of virtual hosts in an environment with more than two NICs:
httpd.conf file.
Example configurations for more than two NICs
The following two scenarios for configuring your network with
more than two NICs contain important details related to creating
virtual servers.
❖
In the first scenario, you have one gateway, with two routers and
two BIG/ip Controllers behind it.
❖
The second scenario involves two routers providing access into
the network, with two BIG/ip Controllers behind them.
Each scenario configuration has advantages and disadvantages
related to how you set up your virtual servers, which are detailed in
the following descriptions. For instructions on how to create virtual
servers on specific interfaces, see Specifying an interface for a
virtual address, on page 5-41
Configuration example: One gateway
When your network is configured with one gateway to the Internet,
and has two routers connected to two BIG/ip Controllers behind
that gateway, we recommend that you connect the first router to one
of the external interfaces on each BIG/ip Controller and the other
router to the remaining external interfaces on each BIG/ip
Controller for maximum redundancy.
If the gateway is running OSPF, it maintains redundancy by
ensuring that there is only one path from your network to the
Internet. In the unlikely event that the active router should fail,
OSPF determines that the router is not functioning properly, and
sends subsequent connections to the second router. Existing
connections will persist by going through the second router. Under
such conditions, when you create a virtual server, we recommend
that you create it to use the default interface.
By using the default interface, the virtual server is guaranteed to
handle connections in an efficient manner by cooperating with
OSPF's attempts to compensate for the failed router. Otherwise, if
BIG/ip® Controller, v. 2.1
5 - 45
Chapter 5
the virtual server is configured to use one specific external
interface, there is no way for connections to arrive at the virtual
server when the router leading to it fails.
Configuration example: Two gateways
When your network is configured with two routers to the Internet,
and has two BIG/ip Controllers behind them, we also recommend
that you connect the first router to one of the external interfaces on
each BIG/ip Controller and the other router to the remaining
external interfaces on each BIG/ip Controller. However, in this
configuration, you have two entry points into your network, one
through each router.
You have the flexibility to decide how you want clients to access
various web sites on your virtual servers based on how the virtual
servers are created. For example, your research department uses an
intranet site to exchange information and that sensitive material
needs to be protected. You can limit access to the virtual server that
hosts the research intranet by creating the virtual server to accept
connections through a specific external interface, such as exp1.
Then, by restricting access to the external interface to only your
researchers, you guarantee that the information is protected. On the
other hand, you want your employees, including the researchers, to
have access to the Human Resources information on the intranet.
You would then create the virtual server that hosts the Human
Resources intranet using the default external interface so that any
employee connecting from any location can make a connection to
that virtual server.
Optimizing large configurations
The BIG/ip Controller supports up to 40,000 virtual servers and
nodes combined. Larger configurations on a BIG/ip Controller,
such as those that exceed 1,000 virtual servers or 1,000 nodes,
introduce special configuration issues. To ensure a high
5 - 46
F5 Networks, Inc.
Working with Special Features
performance level, you need to change certain aspects of the BIG/ip
Controller’s management of virtual servers and nodes. The
following steps can be taken to optimize a large configuration.
❖
Reduce ARP traffic on the external network
❖
Reduce the number of node pings and service checks issued by
the BIG/ip Controller
Reducing ARP traffic on the external network
The BIG/ip Controller maintains an IP alias on its external interface
for each virtual address that it manages. IP aliases are broadcast on
the network when a virtual server is defined, and also each time a
BIG/ip Controller switches from standby mode to active mode in a
redundant system. Each time a new IP alias is defined, the router
on the external network must issue an ARP request for that virtual
server’s address. If you have defined thousands of virtual addresses
in the BIG/ip Controller configuration, the corresponding ARP
requests may lead to a significant increase in network traffic.
This type of configuration also increases fail-over recovery time in
BIG/ip redundant systems. When a fail-over occurs, the BIG/ip
Controller that becomes the active machine creates an IP alias for
each virtual server that it manages. Normally, this process takes
less than one second. However, if the BIG/ip Controller has 8,000
virtual servers, this process can take as long as 90 seconds. The
active BIG/ip Controller is unresponsive during the time it creates
the IP aliases, and it cannot begin processing connections until the
IP aliasing is complete.
To ensure a fast fail-over process, and to help reduce the amount of
ARP requests a router must make, you should run the BIG/ip
Controller in VIP-NoArp mode. In VIP-NoArp mode, the BIG/ip
Controller does not create IP aliases for virtual servers. Instead,
network traffic bound for virtual servers configured on the BIG/ip
Controller are routed using the BIG/ip Controller’s external
interface as a gateway. Configuring VIP-NoArp mode is a two-step
process:
❖
On the router, you must configure a gateway to the virtual servers
using the BIG/ip Controller’s external interface IP address.
BIG/ip® Controller, v. 2.1
5 - 47
Chapter 5
❖
On the BIG/ip Controller itself, you must change the vip_no_arp
system control variable. Note that you can use either the F5
Configuration utility, or the BIG/pipe command line utility, to
change system control variables.
Note
You can enable VIP-NoArp mode only if you have the ability to add
a route to your router. Note that in redundant systems, you need to
use the shared external IP address as the gateway address for the
virtual servers configured on the BIG/ip Controller.
Configuring the router
In the router configuration, you need to define a static route as the
gateway for each virtual address managed by the BIG/ip Controller.
The static route should set the gateway address to the IP address for
the external interface on the BIG/ip Controller. For example, if the
shared external address of a BIG/ip redundant system is 11.0.0.100,
and all virtual servers configured on the BIG/ip redundant system
use IP addresses 11.0.1.50 through 11.0.1.55, you need to configure
the router to use 11.0.0.100 as a gateway to the 11.0.1.* subnet.
Such a definition on a UNIX-like router would read:
route add -net 11.0.1.0 gw 11.0.0.100
Activating VIP-NoArp mode in F5 Configuration utility
In the F5 Configuration utility, the VIP-NoArp mode setting is
under BIG/ip sysctl configuration. To turn the VIP-NoArp
mode on, simply check the Disable IP Aliases on Virtual Servers
box. To turn VIP-NoArp mode off, clear the Disable IP Aliases on
Virtual Servers box.
WARNING
We recommend that you do not toggle this mode on or off while the
virtual servers are defined. Resetting the variable at that time may
result in system anomalies.
5 - 48
F5 Networks, Inc.
Working with Special Features
Activating VIP-NoArp mode on the command line
You can activate VIP-NoArp mode in one of two ways:
❖
You can edit the /etc/rc.sysctl file in a text editor, and then reboot
the system.
❖
You can immediately enable or disable the mode using sysctl
commands.
If you choose to edit the /etc/rc.sysctl file, you simply need to add
the following line to the file to activate VIP-NoArp mode:
sysctl -w bigip.vipnoarp=1
To deactivate VIP-NoArp mode, you can either comment the line
out, or delete it from the /etc/rc.sysctl file altogether. Once you edit
the file, the changes do not take affect until you reboot the system.
To immediately activate VIP-NoArp mode, type the following on
the command line:
bigpipe -f /dev/null
sysctl -w bigip.vipnoarp=1
bigpipe -f /etc/bigip.conf
To immediately deactivate VIP-NoArp mode, type the following on
the command line:
bigpipe -f /dev/null
sysctl -w bigip.vipnoarp=0
bigpipe -f /etc/bigip.conf
WARNING
We recommend that you do not toggle the VIP-NoArp mode on or
off while the virtual servers are defined. Resetting the sysctl
variable at that time may lead to a system crash.
BIG/ip® Controller, v. 2.1
5 - 49
Chapter 5
Reducing the number of node pings and service checks
issued by the BIG/ip Controller
The BIG/ip Controller checks node status at user-defined intervals
in two different ways:
❖
The BIG/ip Controller can issue a node ping to all node
addresses that it manages. If the BIG/ip Controller receives a
response to a node ping from a specific node address, all nodes
associated with that node address are marked up and available for
connections. The node ping can be either ICMP or TCP.
❖
The BIG/ip Controller can also perform a service check. For
each node that uses service check, the BIG/ip Controller connects
to the node and attempts to establish a connection with the
service configured on the node port. If the BIG/ip Controller is
able to establish a connection with the service, the BIG/ip
Controller marks the node up. If the BIG/ip Controller cannot
establish a connection with the service, the BIG/ip Controller
marks the node down. It is important to note that the node is
marked down, even if the node’s address is able to respond to the
BIG/ip Controller’s simple node ping.
If a BIG/ip Controller’s configuration includes thousands of nodes,
the node pings and service checks begin to take up more resources
on both the BIG/ip Controller and the servers than is preferred. You
can significantly reduce the number of node pings and service
checks in configurations that have a group of node addresses which
are all IP aliases on the same server. For each group of node
addresses that points to a given server, you can select one node
address out of the group to represent all node addresses in the
group. The representative node address is referred to as the node
alias. When the BIG/ip Controller issues a node ping or service
check, it sends the ping or performs the service check only on the
node alias, rather than on all nodes in the group. If the BIG/ip
Controller receives a valid response before the time-out expires, it
marks all nodes associated with the node alias as up and available
to receive connections. If the BIG/ip Controller does not receive a
valid response before the time-out expires, it marks all of the nodes
associated with the node alias as down.
5 - 50
F5 Networks, Inc.
Working with Special Features
An important note about service checks
You can set the BIG/ip Controller to use a node alias for nodes that
are configured for service checks; however, there are some
limitations to this implementation. Service checks are portspecific, unlike node pings which are merely sent to a node address.
If you assign a node alias to a node that uses service check, the node
alias must be configured to support the port number associated with
the node. If the node alias is not configured properly, the BIG/ip
Controller can not establish a conversation with the service that the
specific node supports, and the service check is invalid.
Note
If you have configured different ports on each node to handle a
specific Internet service and you want to use IP aliases, you can use
BIG/pipe commands to work around the situation. Refer to the
BIG/pipe Command Reference in Appendix B for more information
about the bigpipe alias command.
Setting up node aliases in the F5 Configuration utility
In the F5 Configuration utility, each node address has a set of
properties associated with it, including the Node Alias property.
Note that before you define a node alias for a specific node address,
you may want to check the properties for each node that uses the
node alias. The node alias must support each port used by a node
that is configured for service check, otherwise the service check
results are invalid.
1. Select Nodes in the System tree to display the Virtual
Servers page.
2. In the Node Properties table, click the node address.
3. In the Node Address Properties page, type the node alias in
the Node Alias box.
4. Click Apply.
BIG/ip® Controller, v. 2.1
5 - 51
Chapter 5
Setting up node aliases using the BIG/pipe command line utility
The BIG/pipe command line utility allows you to set node aliases
for multiple nodes at one time. With the bigpipe alias
command, you can do three things:
❖
View all node aliases defined in the current configuration
❖
View the node alias associated with a specific node address
❖
Define a node alias for one or more node addresses
For details about working with the bigpipe alias command,
refer to the BIG/pipe Command Reference in Appendix B.
Using alternative network configurations
There are a number of alternative network configurations you can
use with the BIG/ip Controller. These network configurations
include IEEE 802.1q VLAN trunk mode and out of path routing.
Setting up 802.1q VLAN trunk mode
The BIG/ip Controller supports VLANs based on the IEEE 802.1q
Trunk mode on BIG/ip Controller internal interfaces. VLAN tags
are not supported on the external interfaces. You can define a single
VLAN tag for each IP address defined for each BIG/ip Controller
internal interface. This includes node network addresses,
administrative addresses, shared administrative aliases, and
additional aliases.
WARNING
In order for 802.1q VLAN trunk mode to operate on a BIG/ip
Controller interface, all IP addresses on that interface must have a
VLAN tag.
In order to use VLAN tags, you must edit /etc/netstart.
Additionally, if you plan to use VLAN tags on a redundant BIG/ip
system, you must edit /etc/bigip.interfaces.
5 - 52
F5 Networks, Inc.
Working with Special Features
Adding VLAN tag definitions to /etc/netstart
The VLAN tag ID for the network needs to be specified at the time
the network address is defined for a particular internal interface.
This is done by extending the additional_xxx definition for the
internal interface (where xxx is the interface name, such as exp0,
exp1, or hmc0). For example, if you have an internal interface IP
defined as:
ipaddr_exp1="10.1.1.1"
netmask_exp1="255.0.0.0"
linkarg_exp1="media 100BaseTX,FDX"
additional_exp1="broadcast 10.255.255.255"
To define a VLAN tag ID 12 for this network (10.0.0.0), extend the
additional_exp1 definition in the following manner:
additional_exp1="broadcast 10.255.255.255 vlan 12"
Do this for each internal interface for which you want to define a
VLAN tag ID.
Adding VLAN tag definitions to /etc/bigip.interfaces
For a redundant configuration, this file contains the shared IP
addresses for the internal and external interfaces for BIG/ip. If you
plan to use VLAN tags on a redundant BIG/ip system, you must
edit the /etc/bigip.interfaces file.
For example, based on the previous example, the default
/etc/bigip.interfaces file would contain the following line:
"exp1" "10.1.1.10" "255.0.0.0" "10.255.255.255"
This line is extended with the same VLAN tag defined for its
primary address, in this case 12:
"exp1" "10.1.1.10" "255.0.0.0" "10.255.255.255"
"12"
BIG/ip® Controller, v. 2.1
5 - 53
Chapter 5
Configuring multiple VLANs on one interface
In order to set up multiple VLANs on the same interface, you need
to add a new IP address for the interface. The BIG/ip Controller
only supports one VLAN ID per network.
For example, to support an additional network, 12.0.0.0, with a
VLAN tag ID of 15 on the same interface, add the following line to
your /etc/netstart file after the ifconfig command:
/sbin/ifconfig exp1 add 12.1.1.1 netmask 255.0.0.0
media 100BaseTX,FDX broadcast 12.255.255.255
vlan 15
Note that you must add a shared address to the /etc/bigip.interfaces
file in a redundant BIG/ip scenario:
"exp1" "12.1.1.10" "255.0.0.0" "12.255.255.255"
"15"
To enable or disable VLAN tags on the command line
Once you have added VLAN tags, you can use the bigpipe
interface command to enable, disable, or show the current settings
for the interface. To globally enable or disable the VLAN tags for
your internal interface, use the following syntax:
bigpipe interface <ifname> vlans [ enable |
disable | show ]
For example, use the following command to enable VLAN tags on
the interface exp1:
bigpipe interface exp1 vlans enable
Using ifconfig to add another VLAN
You must use ifconfig to define an additional VLAN tag associated
with a network. For example, use the following command to add
the VLAN tag on the network:
ifconfig exp1 add <address> netmask <mask>
broadcast <address> vlan <tag>
5 - 54
F5 Networks, Inc.
Working with Special Features
You can also use ifconfig to display VLAN information for the
interface exp1 with the following command:
ifconfig exp1
Using netstat to view VLAN tags
You can also use the netstat utility to display VLAN tag
information with the route table for the BIG/ip Controller. Use the
following syntax to display VLAN tag information with netstat:
netstat -nrT
WARNING
802.1q VLAN tags are currently supported only on Intel
EtherExpressPro NICs and Packet Engines GNIC-2 NICs.
Out of path routing
Out of path routing allows you to route outgoing server traffic
around the BIG/ip Controller directly to an outbound router. This
method of traffic management increases the outbound throughput
of the BIG/ip Controller by taking the outbound server traffic off of
the BIG/ip Controller.
With out of path routing, the BIG/ip Controller must be configured
so that it does not translate the IP address or port of incoming
packets. This is important because packets are not translated when
they are outbound to the router. To avoid translation of incoming,
or destination packets, the BIG/ip Controller must be in
Transparent Node mode and configured with a wildcard virtual
server on the external interface.
The following tasks are required to configure the BIG/ip Controller
to use out of path routing:
❖
Set up Transparent Node mode on the BIG/ip Controller.
❖
Define a wildcard virtual server on an external interface.
❖
Set the route through the BIG/ip Controller.
BIG/ip® Controller, v. 2.1
5 - 55
Chapter 5
❖
Set the idle connection time-out value to remove stale
connections.
Configuring Transparent Node mode
You can use the F5 Configuration utility, or edit the /etc/rc.sysctl
file with a text editor, to set the BIG/ip Controller to Transparent
Node mode.
To activate Transparent Node mode in the F5
Configuration utility
1. In the navigation pane, click the BIG/ip logo.
The BIG/ip System Properties screen opens.
2. On the toolbar, click Advanced Properties.
The Advanced Properties screen opens.
3. Check the Transparent Node Mode box.
4. Click Apply.
To activate Transparent Node mode from the command
line
1. Enter the following sysctl command:
sysctl -w bigip.bonfire_mode=1
2. Save the /etc/rc.sysctl file using the following command:
/etc/rc.sysctl -s
Defining an external virtual server
After you configure Transparent Node mode on the BIG/ip
Controller, you can configure a wildcard virtual server for the
external interface. A wildcard virtual server does not translate
packets, which is key to Out of path routing.
To define a wildcard virtual server mapping in the F5
Configuration utility
1. In the navigation pane, click Virtual Servers.
5 - 56
F5 Networks, Inc.
Working with Special Features
2. On the toolbar, click Add Virtual Server.
The Add Virtual Server screen opens.
3. In the Address box, type the wildcard IP address of 0.0.0.0.
4. In the Netmask box, type an optional netmask. If you leave
this setting blank, the BIG/ip Controller uses the default
netmask. Use the default netmask unless your configuration
requires a different netmask.
5. In the Broadcast box, type the broadcast address for this
virtual server. If you leave this box blank, the BIG/ip
Controller generates a default broadcast address based on
the IP address and netmask of this virtual server.
6. In the Port box, type a port number, or select a service
name from the drop-down list. Note that port 0 defines a
virtual server that handles all types of services.
7. For External Interface, choose the external interface on
which you want to create the virtual server. Choose default
to allow the F5 Configuration utility to choose the interface
based on the network address of the virtual server. If no
external interface is found for that network, the virtual
server is created on the first external interface.
8. In the Node Address box, enter the address of the first
node to which the virtual server maps.
9. In the Node Port box, type the node port number, or select
the service from the drop-down list. Note that port 0
defines a node that handles all types of services.
10. Click Add to save the virtual server.
Once you click Add, you return to the Virtual Servers
screen.
11. To add additional nodes to the virtual server mapping, click
the virtual server in the list.
The Virtual Server Properties screen opens.
12. On the toolbar, click Add Node.
The Add Node screen opens.
13. In the Add Node screen, enter the IP address and service or
port number for the node.
BIG/ip® Controller, v. 2.1
5 - 57
Chapter 5
14. Click Add to save the node to the virtual server mapping.
Once you click Add, you return to the Virtual Server
Properties screen. Repeat steps 12 through 15 until you
have defined all nodes that should be included in the virtual
server mapping, and then complete the task with step 16.
15. If you have defined all nodes for the virtual server mapping,
click Apply to save the virtual server mapping.
To define a wildcard virtual server mapping on the
command line
Enter the bigpipe vip command as shown below. Note that all
wildcard virtual servers use 0.0.0.0 as the IP address.
bigpipe vip 0.0.0.0:<port> define <node IP>:<port> \
<node IP>:<port>... <node IP>:<port>
For example, the following command defines a wildcard virtual
server that maps to three nodes. Because the nodes are firewalls
and need to handle a variety of services, both the virtual server and
the nodes are defined using port 0.
bigpipe vip 0.0.0.0:0 define 192.168.10.01:0 \
192.168.10.02:0 192.168.10.03:0
Setting the route through the BIG/ip Controller
A route must be defined through the BIG/ip Controller on the
outbound router in your network configuration. This route should
be the IP address (or alias) for the server, or servers, for which you
want to set up Out of path routing.
For information about how to define this route, please refer to the
documentation provided with your router.
Setting the idle connection time-out
With Out of path routing, the BIG/ip Controller cannot track the
normal FIN/ACK sequences made by connections. Normally, the
BIG/ip Controller shuts down closed connections based on this
sequence. With Out of path routing, the idle connection time-out
must be configured to clean up closed connections. You need to set
5 - 58
F5 Networks, Inc.
Working with Special Features
an appropriate idle connection time-out value so that valid
connections are not disconnected, and closed connections are
cleaned up in a reasonable time.
To set the idle connection time-out in the F5
Configuration utility
1. In the navigation pane, click Virtual Servers.
2. In the Virtual Servers list, click wildcard virtual server you
created for Out of path routing.
The Virtual Server Properties screen opens.
3. In the Port box, click the port.
The Global Virtual Port Properties screen opens.
4. In the Idle connection timeout TCP (seconds) box, type a
time-out value for TCP connections. The recommended
time-out setting is 10 seconds.
5. In the Idle connection timeout UDP (seconds) box, type a
time-out value for TCP connections. The recommended
time-out setting is 10 seconds.
6. Click Apply.
To set the idle connection time-out in the /etc/bigip.conf
file
To set the idle connection time-out in the /etc/bigip.conf file, edit
the following lines:
treaper <port> <seconds>
udp <port> <seconds>
The <seconds> value is the number of seconds a connection is
allowed to remain idle before it is terminated. The <port> value is
the port on the wildcard virtual server for which you are
configuring out of path routing. The recommended value for the
TCP and UDP connection time-outs is 10 seconds.
BIG/ip® Controller, v. 2.1
5 - 59
Chapter 5
5 - 60
F5 Networks, Inc.
6
Monitoring and Administration
• Monitoring utilities provided on the BIG/ip
Controller
• Using the BIG/pipe command utility as a
monitoring tool
• Working with the BIG/stat utility
• Working with the BIG/top utility
• Working with the Syslog utility
• Removing and returning items to service
• Viewing system statistics and log files
• Printing the connection table
• Changing passwords for the BIG/ip Controller
• Working with the BIG/store database
6-1
Chapter 6
Monitoring and administration utilities
provided on the BIG/ip Controller
The BIG/ip platform provides several utilities for monitoring and
administration of the BIG/ip Controller. You can monitor system
statistics, as well as statistics specific to virtual servers and nodes,
such as the number of current connections, and the number of
packets processed since the last reboot.
The BIG/ip platform provides the following monitoring and
configuration and administration utilities:
6-2
❖
BIG/pipe
If you type certain BIG/pipe commands, such as bigpipe vip or
bigpipe node, and use the show keyword in the command, the
command displays statistical information about the elements that
you configure using that command.
❖
BIG/stat
This utility is provided specifically for statistical monitoring of
virtual servers, nodes, NATs, SNATs, and services. One benefit
of using BIG/stat is that it allows you to customize the display of
statistical information.
❖
BIG/top
BIG/top provides statistical monitoring. You can set a refresh
interval, and you can specify a sort order.
❖
Syslog
Syslog is the standard UNIX system logging utility, which
monitors critical system events, as well as configuration changes
made on the BIG/ip Controller.
❖
BIG/store
BIG/store is a database that contains various configuration
information for the BIG/ip Controller.
F5 Networks, Inc.
Monitoring and Administration
Using the BIG/pipe command utility as a
monitoring tool
Using the BIG/pipe utility, you can view information about the
BIG/ip Controller itself, as well as elements such as virtual servers,
virtual addresses, virtual ports, nodes, and node addresses.
Typically, the BIG/pipe utility provides the following statistics:
❖
Current number of connections
❖
Maximum number of concurrent connections
❖
Total number of connections since the last system reboot
❖
Total number of bits (inbound, outbound, total)
❖
Total number of packets (inbound, outbound, total)
Monitoring the BIG/ip Controller
The bigpipe summary command displays performance statistics
for the BIG/ip Controller itself. This display summary includes
current usage statistics, such as the amount of time a BIG/ip
Controller has been running since the last reboot. Type the
following command:
bigpipe summary
The performance statistics display in the format shown in Figure
6.1 (the output has been truncated for this example).
BIG/ip® Controller, v. 2.1
6-3
Chapter 6
BIG/ip total uptime
= 1 (day) 4 (hr) 40 (min) 8 (sec)
BIG/ip total uptime (secs)
= 103208
BIG/ip total # connections
= 0
BIG/ip total # pkts
= 0
BIG/ip total # bits
= 0
BIG/ip total # pkts(inbound) = 0
BIG/ip total # bits(inbound) = 0
BIG/ip total # pkts(outbound) = 0
BIG/ip total # bits(outbound) = 0
BIG/ip error no nodes available
= 0
BIG/ip tcp port deny
= 0
BIG/ip udp port deny
= 0
BIG/ip vip tcp port deny
= 0
BIG/ip vip udp port deny
= 0
BIG/ip max connections deny
= 0
BIG/ip vip duplicate syn ssl
= 0
BIG/ip vip duplicate syn wrong dest
= 0
BIG/ip vip duplicate syn node down
= 0
BIG/ip vip maint mode deny
= 0
BIG/ip virtual addr max connections deny = 0
BIG/ip virtual path max connections deny = 0
BIG/ip vip non syn
= 0
BIG/ip error not in out table
= 0
BIG/ip error not in in table
= 0
BIG/ip error vip fragment no port
= 0
BIG/ip error vip fragment no conn
= 0
BIG/ip error standby shared drop
= 0
BIG/ip dropped inbound
= 0
BIG/ip dropped outbound
= 0
BIG/ip reaped
= 0
BIG/ip ssl reaped
= 0
BIG/ip persist reaped
= 0
BIG/ip udp reaped
= 0
BIG/ip malloc errors
= 0
BIG/ip bad type
= 0
BIG/ip mem pool total 96636758 mem pool used 95552 mem percent
used
0.10
Figure 6.1 The BIG/pipe summary display screen
6-4
F5 Networks, Inc.
Monitoring and Administration
Table 6.1 contains descriptions of each individual statistic included
in the summary display screen.
Statistic
Description
total uptime
Total time elapsed since the BIG/ip Controller was last booted.
total uptime (secs)
Total uptime displayed in seconds.
total # connections
Total number of connections handled.
total # pkts
Total number of packets handled.
total # bits
Total number of bits handled.
total # pkts (inbound)
Total number of incoming packets handled.
total # bits (inbound)
Total number of incoming bits handled.
total # pkts
(outbound)
Total number of outgoing packets handled.
total # bits
(outbound)
Total number of outgoing bits handled.
error no nodes
available
The number of times the BIG/ip Controller tries to make a
connection to a node, but no nodes are available.
tcp port deny
The number of times a client attempted to connect to an
unauthorized TCP port on the BIG/ip Controller (unauthorized
port and source IP are logged in the syslog).
udp port deny
The number of times a client attempted to connect to an
unauthorized UDP port on the BIG/ip Controller (unauthorized
port and source IP are logged in the syslog).
vip tcp port deny
The number of times a client attempted to connect to an
unauthorized TCP port on a virtual address (unauthorized port
and source IP are logged in the syslog).
vip udp port deny
The number of times a client attempted to connect to an
unauthorized UDP port on a virtual address (unauthorized port
and source IP are logged in the syslog).
max connections deny
The total number of connections denied because the maximum
number of connections allowed was exceeded.
vip duplicate syn ssl
The number of duplicate connection attempts to existing SSL
connections from the same client.
vip duplicate syn
wrong dest
The number of duplicate connection attempts from the same
client (address and port combination) to a different virtual server.
BIG/ip® Controller, v. 2.1
6-5
Chapter 6
Statistic
Description
vip duplicate syn node
down
The number of duplicate connection attempts to a server that is
down when a connection to the server was made previously.
vip maint mode deny
The number of times a connection to a virtual server was denied
while the BIG/ip Controller is in maintenance mode.
virtual addr max
connections deny
The number of virtual address connections dropped because the
maximum number of connections was exceeded.
virtual path max
connections deny
The number of virtual path connections dropped because the
maximum number of connections was exceeded.
vip non syn
The number of packets received which are not connection
requests, and are destined to a virtual address, but not a valid
virtual server (port).
error vip fragment no
port
The number of IP fragments for which there is no port.
error vip fragment no
conn
The number of IP fragments for which there is no connection.
error standby shared
drop
The number of packets destined to the shared IP address in a
redundant system that is received and ignored by the standby
system.
dropped inbound
The total number of inbound packets dropped by the BIG/ip
Controller.
dropped outbound
The total number of outbound packets dropped by the BIG/ip
Controller.
reaped
The total number of connections that timed-out, and are deleted
by the BIG/ip Controller.
ssl reaped
The total number of SSL session ID records that timed-out, and
are closed by the BIG/ip Controller.
persist reaped
The total number of persistence records that timed-out, and are
closed by the BIG/ip Controller.
udp reaped
The total number of UDP connections that timed-out, and are
closed by the BIG/ip Controller.
malloc errors
The number of times a connection could not be created because
the system is low on memory.
6-6
F5 Networks, Inc.
Monitoring and Administration
Statistic
Description
mem pool total
The total amount of memory available in all combined memory
pools.
mem pool used
The total amount of memory, in all combined memory pools, in
use by the BIG/ip Controller.
mem percent used
The total percentage of memory in use by all combined memory
pools.
Table 6.1 BIG/pipe monitoring statistics
Viewing the status of the interface cards
The bigpipe interface command displays the current status and the
settings for external and internal interface cards. You can also use
the bigpipe interface command to view information for a specific
interface card, using the following command syntax:
interface <ifname>
Monitoring virtual servers, virtual addresses, and services
You can use different variations of the bigpipe vip command, as
well as the bigpipe port command, to monitor information about
virtual servers, virtual addresses, and services managed by the
BIG/ip Controller.
Displaying information about virtual servers and virtual addresses
The bigpipe vip command displays the status of virtual servers (up,
down, unchecked, or disabled), the current number of connections
to each virtual server, and the status of the member nodes that are
included in each virtual server mapping. The status for individual
member nodes includes whether the node is up, down, unchecked,
or disabled, and also includes the cumulative count of packets and
bits received and sent by the node on behalf of the virtual server.
The BIG/ip Controller displays the statistics as shown in Figure 6.2.
BIG/ip® Controller, v. 2.1
6-7
Chapter 6
bigpipe vip
VIP +------>
|
|
+---+-->
|
|
NODE
|
|
+-->
|
|
NODE
192.168.20.100
(cur, max, limit,
(pckts,bits) in =
PORT 23
(cur, max, limit,
(pckts,bits) in =
192.168.103.30:23
(cur, max, limit,
(pckts,bits) in =
PORT 21
(cur, max, limit,
(pckts,bits) in =
192.168.103.30:21
(cur, max, limit,
(pckts,bits) in =
tot) = (0, 0,
(0, 0), out =
UP
tot) = (0, 0,
(0, 0), out =
UP
tot) = (0, 0,
(0, 0), out =
UP
tot) = (0, 0,
(0, 0), out =
UP
tot) = (0, 0,
(0, 0), out =
0, 0)
(0, 0)
0, 0)
(0, 0)
0, 0)
(0, 0)
0, 0)
(0, 0)
0, 0)
(0, 0)
Figure 6.2 Virtual server statistics
If you want to view statistical information about one or more
specific virtual servers, simply include the virtual servers in the
bigpipe vip command as shown below:
bigpipe vip <virt addr>:<port>... <virt addr>:<port>
If you want to view statistical information about traffic going to one
or more virtual addresses, specify only the virtual address
information in the command:
bigpipe vip <virt addr>... <virt addr>
Displaying information about services
The bigpipe port command allows you to display information
about specific virtual ports managed by the BIG/ip Controller. You
can use the command to display information about all virtual
services, or you can specify one or more particular virtual services.
To view information about all virtual services, use the following
syntax:
6-8
F5 Networks, Inc.
Monitoring and Administration
bigpipe port
To view statistical information about one or more specific virtual
services, simply include the service names or port numbers as
shown below:
bigpipe port <port>... <port>
Monitoring nodes and node addresses
The bigpipe node command displays the status of all nodes
configured on the BIG/ip Controller. The information includes
whether or not the specified node is up, down, disabled, or
unchecked, and the number of cumulative packets and bits sent and
received by each node on behalf of all virtual servers. The BIG/ip
Controller displays the statistical information as shown in Figure
6.3.
bigpipe node
|
NODE 192.168.103.20
|
(cur, max, limit,
|
(pckts,bits) in =
+---PORT 23
(cur, max, limit,
(pckts,bits) in =
UP
tot) = (0, 0,
(0, 0), out =
UP
tot) = (0, 0,
(0, 0), out =
0, 0)
(0, 0)
0, 0)
(0, 0)
Figure 6.3 Node statistics screen
If you want to view statistical information about one or more
specific nodes, simply include the nodes in the bigpipe node
command as shown below:
bigpipe node <node addr>:<port>... <node addr>:<port>
If you want to view statistical information about traffic going to one
or more node addresses, specify only the node address information
in the command:
bigpipe vip <node addr>... <node addr>
BIG/ip® Controller, v. 2.1
6-9
Chapter 6
Monitoring NATs
The bigpipe nat show command displays the status of the NATs
configured on the BIG/ip Controller. The information includes the
number of cumulative packets and bits sent and received by each
node on behalf of all virtual servers. Use the following command
to display the status of all NATs included in the configuration:
bigpipe nat show
Use the following syntax to display the status of one or more
selected NATs:
bigpipe nat <node addr> [...<node addr>] show
An example of the output for this command is in Figure 6.4.
NAT { 10.10.10.3 to 9.9.9.9 }
(pckts,bits) in = (0, 0), out = (0, 0)
NAT { 10.10.10.4 to 12.12.12.12
netmask 255.255.255.0 broadcast 12.12.12.255 }
(pckts,bits) in = (0, 0), out = (0, 0)
Figure 6.4 NAT statistics
Monitoring SNATs
The bigpipe snat show command displays the status of the SNATs
configured on the BIG/ip Controller. The information includes
connections and global SNAT settings. Use the following bigpipe
command to show SNAT mappings:
bigpipe snat [<SNAT addr>] [...<SNAT addr>] show
bigpipe snat show
Use the following command to show the current SNAT
connections:
bigpipe snat [<SNAT addr>] [...<SNAT addr>] dump [ verbose ]
6 - 10
F5 Networks, Inc.
Monitoring and Administration
bigpipe snat dump [ verbose ]
The optional verbose keyword provides more detailed output.
The following command prints the global SNAT settings:
bigpipe snat globals show
Working with the BIG/stat utility
BIG/stat™ is a utility that allows you to quickly view the status of
the following elements:
❖
Virtual servers
❖
Services
❖
Nodes
❖
Network address translations (NATs)
You can customize the BIG/stat utility statistics display. For
example, you can customize your output to display statistics for a
single element, or for selected elements. You can set the display to
automatically update at time intervals you specify.
The bigstat command accepts one or more options, which allow
you to customize the statistical display. When you use the bigstat
command without specifying any options, the BIG/stat utility
displays the list of virtual servers, services, nodes, NATs, and
SNATs only one time. The basic command syntax is:
bigstat [ options...]
The following table, Table 6.2, describes the options that you can
use in the bigstat command.
BIG/ip® Controller, v. 2.1
6 - 11
Chapter 6
Option
Description
-bigip
Displays totals for the BIG/ip Controller overall.
-c <count>
Sets the interval at which new information is displayed.
-h and -help
Displays the help options.
-nat
Displays network address table (NAT) entries only.
-no_viptot
Removes virtual server totals from the display.
-no_nodetot
Removes node totals from the display.
-node
Displays nodes only.
-port
Displays ports only.
-v
Displays version information.
-vip
Displays virtual servers only.
Table 6.2 The bigstat command options
Working with the BIG/top utility
BIG/top™ is a real-time statistics display utility. The display
shows the date and time of the latest reboot and lists activity in bits,
bytes, or packets. Similar to BIG/stat, the BIG/top utility accepts
options which allow you to customize the display of information.
For example, you can set the interval at which the data is refreshed,
and you can specify a sort order. The BIG/top displays the statistics
as shown in the following figure, Figure 6.5.
6 - 12
F5 Networks, Inc.
Monitoring and Administration
|
bits
since
|
bits in prior
|
current
| Nov 28 18:47:50
| 3 seconds
|
time
BIG/ip
ACTIVE |---In----Out---Conn-|---In----Out---Conn-|
00:31:59
227.19.162.82
1.1G 29.6G 145
1.6K
0
0
VIP ip:port
Nodes Up-217.87.185.5:80
2
217.87.185.5:20
217.87.185.5:20
|---In----Out---Conn-|---In----Out---Conn-|-
NODE ip:port
State---129.186.40.17:80
UP
129.186.40.17:20
129.186.40.18:80
UP
129.186.40.17.21
129.186.40.18:21
UP
129.186.40.18:20
|---In----Out---Conn-|---In----Out---Conn-|--
1.0G
27.4G 139.6K
47.5M 2.1G
10.2M 11.5M
960.6M
3.1K
2.6K
1.6K
0
0
27.4G
69.8K
672
47.4M
2.1G
105.3M 189.0K
3.1K
69.8K
0
1.0K
9.4M 11.1M
700.8K 414.7K
1.3K
1.3K
0
1
0
352
320
0
0
0
0
0
0
0
0
0
0
0
0
0
UP
0
0
0
0
2
2
UP
0
0
UP
Figure 6.5 The BIG/top screen display
Using BIG/top command options
The bigtop command uses the syntax below, and it supports the
options outlined in Table 6.3:
bigtop
BIG/ip® Controller, v. 2.1
[options...]
6 - 13
Chapter 6
Option
Description
-bytes
Displays counts in bytes (the default is bits).
-conn
Sorts by connection count (the default is to sort by byte count).
-delay <value>
Sets the interval at which data is refreshed (the default is four seconds).
-delta
Sorts by count since last sample (the default is to sort by total count).
-help
Displays BIG/top help.
-nodes <value>
Sets the number of nodes to print (the default is to print all nodes).
-nosort
Disables sorting.
-once
Prints the information once and exits.
-pkts
Displays the counts in packets (the default is bits).
-scroll
Disables full-screen mode.
-vips <value>
Sets the number of virtual servers to print (the default is to print all
virtual servers).
Table 6.3 BIG/top command options
Using runtime commands in BIG/top
Unless you specified the -once option, the BIG/top utility
continually updates the display at the rate indicated by the -delay
option, and you can also use the following runtime options at any
time:
❖
The u option cycles through the display modes; bits, bytes, and
packets.
❖
The q option quits the BIG/top utility.
Working with the Syslog utility
The BIG/ip Controller supports logging via the Syslog utility. The
logs are generated automatically, and saved in user-specified files.
These logs contain all changes made to the BIG/ip Controller
6 - 14
F5 Networks, Inc.
Monitoring and Administration
configuration, such as those made with the bigpipe vip command,
or other BIG/pipe commands, as well as all critical events that
occur in the system.
Note
You can configure the Syslog utility to send email or activate pager
notification based on the priority of the logged event.
The Syslog log files track system events based on information
defined in the /etc/syslog.conf file. You can view the log files in a
standard text editor, or with the less file page utility.
Sample log messages
The following sample log messages give you an idea of how the
Syslog utility tracks events that are specific to the BIG/ip
Controller.
Sample message
Description
bigd: allowing connections on port 20
A user specifically allowed connections on
virtual port 20
bigd: node 192.168.1.1 detected up
The 192.168.1.1 node address was
successfully pinged by the BIG/ip Controller
bigd: added service port 20 to node
192.168.1.1
A user defined a new node, 192.168.1.1:20.
kernel: security: port denial
207.17.112.254:4379 ->
192.168.1.1:23
A client was denied access to a specific port.
The client is identified as coming from
207.17.112.254:4379, and the destination node
is 192.168.1.1:23.
Table 6.4 Sample Syslog messages
BIG/ip® Controller, v. 2.1
6 - 15
Chapter 6
Removing and returning items to service
Once you have completed the initial configuration on the BIG/ip
Controller, you may want to temporarily remove specific items
from service for maintenance purposes. For example, if a specific
network server needs to be upgraded, you may want to disable the
nodes associated with that server, and then enable them once you
finish installing the new hardware and bring the server back online.
If you specifically disable the nodes associated with the server, the
BIG/ip Controller allows the node to go down only after all the
current connections are complete. During this time, the BIG/ip
Controller does not attempt to send new connections to the node.
Although the BIG/ip Controller’s monitoring features would
eventually determine that the nodes associated with the server are
down, specifically removing the nodes from service prevents
interruptions on client connections.
You can remove the entire BIG/ip Controller from service, or you
can remove the following individual items from service:
❖
Virtual servers
❖
Virtual addresses
❖
Virtual ports
❖
Nodes
❖
Node addresses
Removing the BIG/ip Controller from service
The BIG/ip platform offers a Maintenance mode, which allows you
to remove the BIG/ip Controller from network service. This is
useful if you want to perform hardware maintenance, or make
extensive configuration changes. When you activate Maintenance
mode, the BIG/ip Controller no longer accepts connections to the
virtual servers it manages. However, the existing connections are
allowed to finish processing so that current clients are not
interrupted.
The bigpipe maint command toggles the BIG/ip Controller into or
out of Maintenance mode. The command syntax is simply:
6 - 16
F5 Networks, Inc.
Monitoring and Administration
bigpipe maint
If the BIG/ip Controller runs in Maintenance mode for less than 20
minutes and you return the machine to the normal service, the
BIG/ip Controller quickly begins accepting connections. However,
if the BIG/ip Controller runs in Maintenance mode for more than
20 minutes, returning the Controller to service involves updating all
network ARP caches. This process can take a few seconds, but you
can speed the process up by reloading the /etc/bigip.conf file using
the following command:
bigpipe -f /etc/bigip.conf
Removing individual virtual servers, virtual addresses, and
ports from service
The BIG/ip Controller also supports taking only selected virtual
servers, addresses, or ports out of service, rather than removing the
BIG/ip Controller itself from service. Each BIG/pipe command
that defines virtual servers and their components supports enable
and disable keywords, which allow you to remove or return the
elements from service.
When you remove a virtual address or a virtual port from service, it
affects all virtual servers associated with the virtual address or
virtual port. Similarly, if you remove a node address from service,
it affects all nodes associated with the node address.
Enabling and disabling virtual servers and virtual addresses
The bigpipe vip command allows you to enable or disable
individual virtual servers, as well as virtual addresses. To enable or
disable a virtual server, type the appropriate command:
bigpipe vip <virtual addr>:<virtual port> enable
bigpipe vip <virtual addr>:<virtual port> disable
To enable or disable a virtual address, type the appropriate
command:
BIG/ip® Controller, v. 2.1
6 - 17
Chapter 6
bigpipe vip <virtual addr> enable
bigpipe vip <virtual addr> disable
Enabling and disabling virtual ports
The bigpipe port command allows you to allow or deny traffic on a
virtual port:
bigpipe port <virtual port> enable
bigpipe port <virtual port> disable
Removing individual nodes and node addresses from
service
Enabling and disabling nodes and node addresses
The bigpipe node command allows you to enable or disable
individual nodes, as well as node addresses.
To enable or disable a node, type the appropriate command:
bigpipe node <node addr>:<node port> enable
bigpipe node <node addr>:<node port> disable
To enable or disable a node address, type the appropriate
command:
bigpipe node <node addr> enable
bigpipe node <node addr> disable
Viewing the currently defined virtual servers and nodes
When used without any parameters, BIG/pipe commands typically
display currently configured elements. For example, the bigpipe
vip command displays all currently defined virtual servers, and the
bigpipe node command displays all nodes currently included in
virtual server mappings. The following sections provide BIG/pipe
6 - 18
F5 Networks, Inc.
Monitoring and Administration
command syntax associated with configuration. For information
about using BIG/pipe commands for monitoring your existing
system, refer to Appendix B, BIG/pipe commands.
Viewing system statistics and log files
The F5 Configuration utility allows you to view a variety of system
statistics and system log files. Note that from each statistics screen,
you can access property settings for individual virtual servers,
nodes, IP addresses, and ports by selecting the individual item in
the statistics table.
Viewing system statistics
The F5 Configuration utility allows you to view the following
statistical information:
❖
BIG/ip system statistics, including the elapsed time since the last
system reboot, the number of packets and connections handled by
the system, and the number of dropped connections.
❖
Virtual servers, including virtual servers, virtual address only, or
virtual ports only.
❖
Nodes, including nodes, node addresses only, or node ports only.
❖
NAT statistics, such as the number of packets handled by each
NAT.
❖
SNAT statistics, such as SNAT mappings.
❖
IP filter statistics, including the number of packets accepted and
rejected by individual IP filters.
❖
Rate filter statistics, including the number of bits passed through,
delayed, and dropped by individual rate filters.
❖
Information about illegal connection attempts, such as the source
IP addresses from which the illegal connection is initiated.
Statistics are displayed in real-time. You can specify the update
frequency by setting an interval (in seconds), and then clicking
Update.
BIG/ip® Controller, v. 2.1
6 - 19
Chapter 6
Viewing log files
The F5 Configuration utility allows you to display three different
log files:
❖
The BIG/ip system log, which displays standard UNIX system
events
❖
The BIG/ip log, which displays information specific to BIG/ip
events, such as defining a virtual server
❖
The Pinger log, which displays status information determined by
each node ping issued by the BIG/ip Controller
Printing the connection table
The BIG/pipe command line utility also offers a useful diagnostic
tool that prints the list of current connections. Normally, the
bigpipe dt command prints the client, virtual server, and node
addresses. In Transparent Node Mode, the bigpipe dt command
also prints the final destination address.
Changing passwords for the BIG/ip Controller
During the First-Time Boot utility, you define a password that
allows remote access to the BIG/ip Controller, and you also define a
password for the BIG/ip web server. You can change these
passwords at any time.
Changing the BIG/ip Controller password
1. At the BIG/ip Controller command line prompt, log on as
root user and use the passwd command.
2. At the password prompt, enter the password you want to
use for the BIG/ip Controller and press Return.
3. To confirm the password, retype it and press Return.
6 - 20
F5 Networks, Inc.
Monitoring and Administration
Changing passwords and adding new user IDs for the
BIG/ip web server
You can create new users for the BIG/ip web server, change a
password for an existing user, or recreate the password file
altogether, without actually going through the BIG/ip web server
configuration process.
Creating new users and changing passwords for existing users
The following command creates a new user ID, or changes the
password for an existing user ID. In place of the <username>
parameter, enter the user ID for which you want to create a
password:
/var/f5/httpd/bin/htpasswd /var/f5/httpd/basicauth/users \
<username>
Once you enter the command, you are prompted to enter the new
password for the named user.
Creating a new password file
The following command recreates the BIG/ip web server password
file, and defines one new user ID and password. In place of the
<username> parameter, enter the user ID that you want to create:
/var/f5/httpd/bin/htpasswd -c /var/f5/httpd/basicauth/users \
<username>
Once you enter the command, you are prompted to enter the new
password for the named user.
Working with the BIG/store database
The BIG/store™ database holds certain configuration information
for the BIG/ip Controller. Two utilities currently use the
configuration stored in BIG/store: the State Mirroring daemon and
sod. The bigdba utility is provided for loading configuration
BIG/ip® Controller, v. 2.1
6 - 21
Chapter 6
information into BIG/store. An additional default.txt file is
included with the BIG/ip Controller which contains default
information you can load into the BIG/store database.
Using bigdba
Use the bigdba utility to modify the BIG/store database. The
bigdba utility allows you to create a database and insert and modify
keys and values. All values are entered into BIG/store as strings.
Accessing and modifying the default database
The default BIG/store database is created when you run the FirstTime Boot utility. To use bigdba from the command line run
bigdba with the name of the database.
bigdba /var/f5/bigdb/user.db
Database "/var/f5/bigdb/user.db" opened.
Using bigdba commands
Table 6.5 describes the commands you can use in bigdba.
6 - 22
F5 Networks, Inc.
Monitoring and Administration
Command
Description
subkey sk <string>
Add subkey to current key level
p <key name | *>
Print the value stored at <name>. If name value
is * (asterisk), all values stored under the current
subkey are displayed
up
Back up one subkey
up <string>
Back up through subkey <string>
d <string>[*]
Delete value stored under current key <string>
<string> = <value>
Store <value> under name <string> within the
current key
set confirm on
Confirm delete operations
set confirm off
Do not confirm deletions
set comments on
Show comments. By default, comments are off
set comments off
Do not show comments. By default, comments
are off
dump <file>
Dumps the database to the file name specified
load <file>
Loads the database with the file specified
quit | q | EOF
Quits the bigdba utility
help | ?
Display the help text for the bigdba utility
Table 6.5 The bigdba commands
Working with the default.txt file
The default.txt file documents the keys that are valid in the
BIG/store database. This file is located at /var/f5/bigdb/default.txt.
This text file, which can be loaded with the bigdba program,
BIG/ip® Controller, v. 2.1
6 - 23
Chapter 6
contains all the possible database keys, comments that document
these keys, and the default values used by programs that run on the
BIG/ip Controller.
Note
The values in the default.txt file are default values, several of the
keys listed are not present in the BIG/store database.
The default.txt file is intended to serve as documentation only.
Some of the records, such as those that represent IP addresses and
port numbers, need to be set to values other than the default values
for the system to work.
If you want to load default.txt into the BIG/store database, it is
recommended that you dump the existing database to another text
file. Make a copy of default.txt, and then edit the copy so that the
records which are present in your dump file match the values
contained in the default.txt file. After the values match, you can
load the edited copy of default.txt.
Supported configuration options
Currently, the only configuration options supported by BIG/store
are network-based fail-over and state mirroring for fail-over. For
information about setting up network-based fail-over, see Using
network-based fail-over, on page 5-25. For information about
setting up state mirroring, see Mirroring connection and
persistence information, on page 5-20
6 - 24
F5 Networks, Inc.
7
Configuring SNMP
• Working with SNMP on the BIG/ip® Controller
• Preparing the BIG/ip Controller for SNMP
• Configuring the BIG/ip SNMP agent
7-1
Chapter 7
Working with SNMP on the BIG/ip Controller
This chapter covers the management and configuration tasks for the
simple network management protocol (SNMP) agent and
management information bases (MIBs) available with the BIG/ip
Controller.
WARNING
The SNMP agent must be configured on the BIG/ip Controller in
order to use the F5 Networks see/IT Network Manager.
The BIG/ip SNMP agent and MIBs allow you to manage the BIG/ip
Controller by configuring traps for the SNMP agent or polling the
controller with your standard network management station (NMS).
You can configure the BIG/ip SNMP agent to send traps to your
management system with the F5 Configuration utility. You can also
set up custom traps agent setup by editing several configuration
files.
Security options are available that let you securely manage
information collected by the BIG/ip SNMP agent, including:
7-2
❖
Community names
❖
TCP wrappers
❖
View access control mechanism (VACM)
F5 Networks, Inc.
Configuring SNMP
Preparing the BIG/ip Controller for SNMP
The BIG/ip platform includes a private BIG/ip SNMP MIB. This
MIB is specifically designed for use with the BIG/ip Controller.
You can configure the SNMP settings in the the F5 Configuration
utility, or on the command line.
Downloading the MIBs
SNMP management software requires that you use the MIB files
associated with the device. You may obtain two MIB files from the
BIG/ip directory /usr/contrib/f5/mibs, or you can download the files
from the Additional Software Downloads section of the F5
Configuration utility home page.
❖
LOAD-BAL-SYSTEM-MIB.txt This is a vendor MIB that contains
specific information for properties associated with specific F5
functionality (load balancing, NATs, and SNATs)
❖
UCD-SNMP-MIB.txt This is a MIBII ( RFC 1213) that provides
standard management information.
For information about the objects defined in the LOAD-BALSYSTEM-MIB.txt, refer to the descriptions in the object identifier
(OID) section of the MIB file. For information about the objects
defined in UCD-SNMP-MIB.txt, refer to RFC 1213.
Understanding configuration file requirements
You need to make changes to several configuration files on the
BIG/ip Controller before you use the SNMP agent. Once you
change these configuration files, you need to restart the SNMP
agent.
/etc/hosts.deny
This file must be present to deny by default all TCP connections to
the SNMP agent. The contents of this file are as follows:
ALL : ALL
BIG/ip® Controller, v. 2.1
7-3
Chapter 7
/etc/hosts.allow
The /etc/hosts.allow file is used to specify which hosts are allowed
to access the SNMP agent. There are two ways to configure access
the the SNMP agent with the /etc/host.allow file. You can type in
an IP address, or list of IP addresses, that are allowed to access the
SNMP agent, or you can type in an IP address and mask to allow a
range of addresses in a subnetwork to access the SNMP agent.
For a specific list of address, type in the list of addresses you want
to allow to access the SNMP agent. Addresses in the list must be
separated by blank space or by commas. The basic syntax is as
follows:
daemon: <IP address> <IP address> <IP address>
For example, you can type the following line which sets the SNMP
agent to accept connections from the IP addresses specified:
bigsnmpd: 128.95.46.5 128.95.46.6 128.95.46.7
For a range of addresses, the basic syntax is as follows, where
daemon is the name of the daemon, and IP/MASK specifies the
network that is allowed access:
daemon: IP/MASK
For example, you might use the following line which sets the
bigsnmpd daemon to allow connections from the
128.95.46.0/255.255.255.0 address:
bigsnmpd: 128.95.46.0/255.255.255.0
The example above allows the 256 possible hosts from the network
address 128.95.46.0 to access the SNMP daemon. Additionally,
you may use the keyword ALL to allow access for all hosts or all
daemons.
7-4
F5 Networks, Inc.
Configuring SNMP
/etc/snmpd.conf
The /etc/snmpd.conf file controls most of the SNMP daemon. This
file is used to set up and configure certain traps, passwords, and
general SNMP variable names. A few of the necessary variables are
listed below:
❖
System Contact Name
The System Contact is a MIB-II simple string variable defined by
almost all SNMP boxes. It usually contains a user name, as well
as an email address. This is set by the syscontact key.
❖
Machine Location (string)
The Machine Location is a MIB-II variable that almost all boxes
support. It is a simple string that defines the location of the box.
This is set by the syslocation key.
❖
Community String
The community string clear text password is used for basic
SNMP security. This also maps to VACM groups, but for initial
read/only access, it is limited to only one group.
❖
Trap Configuration
Trap configuration is controlled by these entries in the
/etc/snmpd.conf file:
• trapsink <host>
This sets the host to receive trap information. The <host> is an
IP address.
• trapport <port>
This sets the port on which traps are sent. There must be one
trapport line for each trapsink host.
• trapcommunity <community string>
This sets the community string (password) to use for sending
traps. If set, it also sends a trap upon startup: coldStart(0).
• authtrapenable <integer>
Setting this variable to 1 enables traps to be sent for
authentication warnings. Setting it to 2 disables it.
BIG/ip® Controller, v. 2.1
7-5
Chapter 7
• data_cache_duration <seconds>
This is the time in seconds data is cached. The default value
for this setting is one second.
Note
To change the trap port, the trapport line must precede the trapsink
line. If you use more then one trapport line, then there must be one
trapport line before each trapsink line. The same follows for
trapcommunity. If you use more then one trapcommunity line,
then there must be one trapcommunity line before each trapsink
line.
/etc/rc.local
The following entry in the /etc/rc.local automatically starts up the
SNMP agent when the system boots up (Figure 7.1).
# BIG/ip SNMP Agent
if [ -f /etc/snmpd.conf ]; then
/sbin/bigsnmpd -c /etc/snmpd.conf
fi
Figure 7.1 Starting the SNMP agent in the /etc/rc.local file.
If the /etc/snmpd.conf is present on your system, the SNMP agent is
automatically started.
/etc/snmptrap.conf
This configuration file includes OID, trap, and regular expression
mappings. The configuration file specifies whether to send a
specific trap based on a regular expression. An excerpt of the config
file is shown in Figure 7.2.
7-6
F5 Networks, Inc.
Configuring SNMP
# Default traps.
.1.3.6.1.4.1.3375.1.1.110.2.6
.1.3.6.1.4.1.3375.1.1.110.2.5
.1.3.6.1.4.1.3375.1.1.110.2.4
.1.3.6.1.4.1.3375.1.1.110.2.3
.1.3.6.1.4.1.3375.1.1.110.2.2
#.1.3.6.1.4.1.3375.1.1.110.2.1
#.1.3.6.1.4.1.3375.1.1.110.2.1
ROOT LOGIN
REQUEST DENIAL
SYSTEM RESET
SERVICE UP
SERVICE DOWN
Unknown Error
Unknown Failure
Figure 7.2 Excerpt from the /etc/snmptrap.conf file
Some of the OIDs have been permanently mapped to BIG/ip
specific events. The OIDs that are permanently mapped for the
BIG/ip Controller include:
❖
Root login
❖
Request denial
❖
System reset
❖
Service up
❖
Service down
You may, however, insert your own regular expressions and map
them to the 110.1 OID. The /etc/snmptrap.conf file contains two
examples for mapping your own OIDs:
❖
Unkown error
❖
Unknown failure
By default, the lines for these files are commented out. Use these
OIDs for miscellaneous events. When lines match your expression,
they are sent to your management software with the 110.2.1 OID.
Syslog
You must configure syslog to send syslog lines to checktrap.pl. If
the syslog lines make a match the specified configuration in the
snmptrap.conf file, a valid SNMP trap is generated. The following
BIG/ip® Controller, v. 2.1
7-7
Chapter 7
lines in the /etc/syslog.conf file require the syslog look at
information logged, scan the snmptrap.conf file, and determine if a
trap should be generated:
local0.* | exec /sbin/checktrap.pl.
local1.* | exec /sbin/checktrap.pl.
auth.* | exec /sbin/checktrap.pl.
Configuring the BIG/ip SNMP agent
The F5 Configuration utility allows you to enable the BIG/ip
SNMP agent, and it allows you to easily define three aspects of the
SNMP agent:
❖
Client access
You can define an address and netmask for a workstation from
which SNMP requests are acceptable.
❖
System information
You can name a system contact, a machine location, and a
community string.
❖
Trap configuration
You can enter a trap sink, a trap community, or set up an
authentication trap.
Configuring SNMP settings
The F5 Configuration utility provides sample SNMP settings for
your reference. If you want to use the BIG/ip SNMP MIB, you
need to replace these sample settings with settings appropriate to
your environment and your specific SNMP management software.
To set SNMP properties in the F5 Configuration utility
1. Click SNMP in the navigation pane.
The SNMP Configuration screen opens.
7-8
F5 Networks, Inc.
Configuring SNMP
2. In the BIG/ip SNMP Configuration screen, check Enabled
to allow access to the BIG/ip SNMP agent.
3. In the Allow Address box, enter the IP address, or
addresses, of the management system from which the agent
can accept requests. This allows you to restrict access to
management information to a specific computer or
computers running a management system. If you type in a
list of addresses, type a comma after the last address.
4. In the Allow Netmask box, enter the netmask for a range of
IP addresses for machines from which the agent can accept
requests. If you type a list of IP addresses in the Allow
Address box, leave the Allow Netmask box blank.
5. In the System Contact box, enter the contact name and
email address for the person who should be contacted if this
BIG/ip Controller generates a trap.
6. In the Machine Location box, enter a machine location,
such as First Floor, or Building 1, that describes the
physical location of the BIG/ip Controller.
7. In the Community String box, enter a community name.
The community name is a clear text password used for
basic SNMP security and for grouping machines that you
manage.
8. In the Trap Sink box, enter the host that should be notified
when a trap is sent by the BIG/ip SNMP agent.
9. In the Trap Community box, enter the community name to
which this BIG/ip controller belongs. Traps sent from this
box are sent to the management system managing this
community.
10. Check Auth Trap Enabled to allow traps to be sent for
authentication warnings.
Configuring options for the checktrap script
The checktrap.pl script reads a set of lines from standard input.
The script checks each line against a set of regular expressions. If a
line matches the regular expression, an SNMP trap is sent.
BIG/ip® Controller, v. 2.1
7-9
Chapter 7
Options for checktrap
snmpd_conf_file=<snmp configuration file>
This is the file that contains the SNMP variables. The checktrap.pl
gets trap configuration information from this file. The default is
/etc/snmpd.conf.
trapd_conf_file=<snmp trap configuration file>
This is the file that contains the regular expression to SNMP trap
OID mappings. It also contains a description string that is added to
the trap message. The default is /etc/snmptrap.conf.
trap_program=<snmp trap program>
This is the program that sends the trap. This program should be the
snmptrap program included with the BIG/ip Controller. The
default is /sbin/snmptrap.
no_date_strip
This turns off automatic date stripping. Normally, each input line
is expected to begin with a date. Typically, this date is stripped off
before the trap is sent. This option keeps the date information in the
trap. By default, the date is stripped from the trap.
usage
Prints a usage string.
7 - 10
F5 Networks, Inc.
A
Configuration Files
A-1
Appendix A
Configuration files for the BIG/ip Controller
File
Description
/etc/bigip.conf
Stores virtual server and node definitions and settings, including
node ping settings, the load balancing mode, and NAT and
SNAT settings.
/etc/bigd.conf
Stores service check settings.
/etc/bigip.interfaces
Stores interface configuration information, such as fail-safe
timeouts.
/etc/hosts.allow
Stores the IP addresses of workstations that are allowed to make
administrative shell connections to the BIG/ip Controller.
/etc/netstart
Stores basic system start up settings.
/etc/ipfw.conf
Stores IP filter settings.
/etc/rateclass.conf
Stores rate class definitions.
/etc/ipfwrate.conf
Stores IP filter settings for filters that also use rate classes.
/etc/snmpd.conf
Stores SNMP configuration settings.
/etc/bigip.license
Stores authorization information for the BIG/ip Controller.
/etc/syslog.conf
Stores the configuration files for syslogd under the BIG/ip
Controller.
/etc/rc.sysctl
Stores the default UNIX and the BIG/ip Controller sysctl
variables.
/etc/hosts
Stores the hosts table for the BIG/ip Controller.
/etc/rc.local
Stores the local daemons, filters, local boot settings for the
BIG/ip Controller.
/etc/irs.conf
Controls information retrieval functions in the C library.
/etc/login.conf
UNIX system file, modified for the BIG/ip Controller.
/etc/rc
UNIX system startup script, modified for the BIG/ip Controller.
/etc/sshd_config
This is the configuration file for the secure shell server. It
contains all the access information for people trying to get into
the system via ssh.
A-2
F5 Networks, Inc.
Configuration Files
File
Description
/etc/wideip.conf
This is a 3DNS Controller configuration file. For more
information, please refer to the documentation for that product.
/VENDOR
This file contains information describing F5 Networks. It
includes the company name, a common name, contact
information, and the text of the licensing agreement for the
software.
/VERSION
Contains name of the product, the number, and the access rights
(BIG/ip 2.04 HA, for example).
/usr/contrib/bin/ssh-askpass
This is the external program used by the ssh configuration
utility to ask the user for his password from an X-windows
system. It allows SSH to connect to a remote site, or generate a
PPKey pair, in a secure manner.
/var/f5/httpd/conf/cert.conf
The information for the public key/private key certification
infrastructure for the webserver.
/var/f5/httpd/conf/httpd.conf
The main configuration file for the webserver.
/var/f5/httpd/ssl/lib/ssleay.cnf
This file holds the configuration information for how the SSL
library interacts with browsers, and how key information is
generated.
/var/f5/httpd/ssl/lib/ssleay.conf
This file holds the configuration information for how the SSL
library interacts with browsers, and how key information is
generated.
/var/f5/httpd/basicauth/users
The webserver password file. Contains the user names and
passwords of the people permitted to access whatever is
provided by the webserver.
/var/f5/bigdb/<db>
This is the location of the F5 BIG/store database. Where <db>
is the name specified for the database. This database holds
various configuration information.
BIG/ip® Controller, v. 2.1
A-3
Appendix A
A-4
F5 Networks, Inc.
B
BIG/pipe Command Reference
B-1
Appendix B
BIG/pipe commands
This appendix lists the various BIG/pipe commands with
descriptions. Some entries contain additional information about
using the command. At the end of the appendix is a list of
commands from previous versions of the BIG/pipe utility.
Command
Description
Page
-?
Displays online help for an individual bigpipe command.
B-4
alias
Defines an IP alias to be pinged on behalf of a specific group of
nodes.
B-5
configsync
Synchronizes the /etc/bigip.conf between the two BIG/ip
Controller units in a redundant system.
B-7
conn
Shows information about current connections such as the source
IP address, virtual server and port, and node connected to.
B-8
-d
Verifies command syntax for the specified command without
executing a command.
B-9
-f
Resets the BIG/ip Controller and loads a specified configuration
file.
B-10
failover
Sets the BIG/ip Controller as active or standby.
B-11
gateway
Turns the gateway fail-safe feature on and off.
B-12
-h and -help
Displays online help for BIG/pipe command syntax.
B-13
interface
Sets options on individual interfaces.
B-14
lb
Sets the load balancing mode.
B-19
maint
Toggles the BIG/ip Controller into and out of maintenance mode.
B-20
mirror
Sets mirroring of the active BIG/ip Controller to the standby
controller.
B-21
nat
Defines external network address translations for nodes.
B-22
node
Defines node property settings.
B-24
persist
Defines and displays persistence settings for simple TCP and
UDP persistence.
B-27
port
Defines properties for virtual ports.
B-29
B-2
F5 Networks, Inc.
BIG/pipe Command Reference
Command
Description
Page
-r
Clears the BIG/ip Controller define and counter values.
B-31
ratio
Sets load-balancing weights and priority levels used in the Ratio
and Priority load balancing modes.
B-32
-s
Writes the current configuration to a configuration file.
B-34
snat
Defines and sets options for SNAT (Secure NAT).
B-35
summary
Displays summary statistics for the BIG/ip Controller.
B-40
timeout_node
Sets the amount of time node addresses have to respond to a ping
issued by the BIG/ip Controller.
B-43
timeout_svc
Sets the amount of time services have to respond to a service
check issued by the BIG/ip Controller.
B-45
tping_node
Sets the interval at which the BIG/ip Controller pings node
addresses to determine node status.
B-47
tping_svc
Sets the interval at which the BIG/ip Controller issues service
checks to nodes to determine node status.
B-48
treaper
Sets the timeout for idle TCP connections on ports.
B-50
udp
Enables UDP traffic on ports, and sets the timeout for idle UDP
connections.
B-52
-v
Displays the BIG/pipe utility version number.
B-54
version
Displays the BIG/ip Controller software version number.
B-55
vip
Defines virtual servers, virtual server mappings, and virtual server
properties.
B-56
Backwardcompatible
commands
Lists the commands from previous versions of the BIG/ip
Controller that are compatible with this version.
B-68
BIG/ip® Controller, v. 2.1
B-3
Appendix B
-?
bigpipe <command> -?
Description
For certain commands, displays online help, including complete
syntax, description, and other related information. For example, to
see online help for the bigpipe port command, enter:
bigpipe port -?
B-4
F5 Networks, Inc.
BIG/pipe Command Reference
alias
bigpipe alias [<node addr> [...<node addr>] ] show
bigpipe alias <node addr> [...<node addr>] delete
bigpipe alias <node addr> [...<node addr>] pingnode <pingnode addr>
Description
Defines a single node address to represent a group of node
addresses which are actually IP aliases on the same physical server.
To determine if the nodes associated with the representative node
alias are available, the BIG/ip Controller sends a single node ping
to the node alias, rather than an individual ping to each node
address.
Note that you may also find this feature useful for nodes that are
configured for service check, as long as each node uses the same
port number.
Defining a node alias
Use the following syntax to define the node alias for one or more
node addresses, where <pingnode addr> is the node alias (the node
address that represents the group):
bigpipe alias <node addr> [...<node addr>] pingnode <pingnode addr>
Note
The address that serves as the node alias (<pingnode addr>) must
be a node address that is already defined in one or more virtual
server mappings.
The following command defines a node alias for two node
addresses, 192.168.42.2 and 192.168.42.3. The BIG/ip Controller
performs node pings on the alias address 192.168.42.1 to determine
the availability of 192.168.42.2 and 192.168.42.3.
bigpipe alias 192.168.42.2 192.168.42.3 pingnode 192.168.42.1
BIG/ip® Controller, v. 2.1
B-5
Appendix B
Deleting a node alias
The following command deletes the node alias defined for the
specific node:
bigpipe alias <node addr> delete
Displaying current node aliases
The following command displays all node aliases defined on the
BIG/ip Controller:
bigpipe alias show
The following command displays the node alias defined for a
specific node:
bigpipe alias <node addr> show
B-6
F5 Networks, Inc.
BIG/pipe Command Reference
configsync
bigpipe configsync [all]
Description
Synchronizes configurations of two BIG/ip Controllers in a
redundant system by copying the configuration file(s) from the
active system to the standby system.
Using the configsync command without the all option synchronizes
only the boot configuration file /etc/bigip.conf.
The all option changes the set of configuration files modified when
the command is executed. When you synchronize a configuration
using configsync all command, the following configuration files
are copied to the other BIG/ip Controller:
❖
/etc/bigip.conf
❖
/etc/bigd.conf
❖
/etc/bigip.interfaces
❖
/etc/hosts.allow
❖
/etc/netstart
❖
/etc/ipfw.conf
❖
/etc/rateclass.conf
❖
/etc/ipfwrate.conf
❖
/etc/snmpd.conf
Be sure to save the current configuration to the /etc/bigip.conf file
before you use the config sync feature.
WARNING
If you are synchronizing a standby controller that already has
configuration information defined, we recommend that you back up
that controller’s original configuration file(s).
BIG/ip® Controller, v. 2.1
B-7
Appendix B
conn
bigpipe conn [ <virt addr>[:<port>] ] dump
Description
Displays information about current client connections to virtual
addresses and virtual servers.
The following command displays all current client connections:
bigpipe conn dump
The output shows the source IP, virtual server and port, and node
connected to.
bigip conn dump
from
vip
node
100.100.100.30:49152 -> 100.100.100.100:23 -> 200.200.200.10:23
100.100.101.90:49153 -> 100.100.100.100:80 -> 200.200.200.10:80
...
Figure B.1 Formatted output of the conn command
B-8
F5 Networks, Inc.
BIG/pipe Command Reference
-d
bigpipe -d [-]
bigpipe -d -f <filename>
Description
Parses the command line and checks syntax without executing the
specified command.
This distinguishes between valid and invalid commands, and is
particularly useful with the -f option, to validate the configuration
file.
Use the -d command followed by a command that you want to
validate:
bigpipe -d vip 10.10.10.100:80 define 192.168.195.2:80
The command checks the syntax and logic, reporting any errors that
would be encountered if the command executed.
Use the -d command together with the -f <filename> command to
validate and load the specified configuration file. For example, to
check the syntax of the configuration file /etc/altbigpipe.conf, use
the following command:
bigpipe -d -f /etc/altbigip.conf
BIG/ip® Controller, v. 2.1
B-9
Appendix B
-f
bigpipe -f <filename>
Description
Resets all of the BIG/ip Controller settings and then loads the
configuration settings from the specified file, typically
/etc/bigip.conf file, or another file you specify.
bigpipe -f /etc/bigip.conf
For testing purposes, you can save a test configuration by renaming
it to avoid confusion with the boot configuration file. To load a test
configuration, use the -f command with the <filename> parameter.
For example, if you renamed your configuration file to
/etc/bigtest.conf, the test command would be:
bigpipe -f /etc/bigtest.conf
B - 10
F5 Networks, Inc.
BIG/pipe Command Reference
failover
bigpipe failover active | standby | show
Description
Switches the BIG/ip Controller to be the active or the standby unit
in a redundant system. The BIG/ip Controller automatically
switches between active and standby modes, without operator
intervention.
Show the status of the controller with the following command:
bigpipe failover show
WARNING
A standby controller that has been put into active mode with this
command is not fully configured for operation as the active
controller in a redundant system. Important fail-over processes that
properly handle an actual fail-over are not invoked by the failover
command.
BIG/ip® Controller, v. 2.1
B - 11
Appendix B
gateway
bigpipe gateway failsafe arm | disarm | show
Description
Turns the gateway fail-safe feature on and off. This command is
supported only for redundant systems.
The typical use of gateway fail-safe is where active and standby
BIG/ip Controllers use different routers as gateways to the internet.
Fail-over is triggered if the gateway for the active controller is
unreachable. Note that this is not a condition that is reliably
detected by the interface fail-safe feature, but is reliably detected by
gateway fail-safe.
To arm fail-safe on the gateway:
bigpipe gateway failsafe arm
To disarm fail-safe on the gateway, enter the following command:
bigpipe gateway failsafe disarm
To see the current fail-safe status for the gateway, enter the
following command:
bigpipe gateway failsafe show
B - 12
F5 Networks, Inc.
BIG/pipe Command Reference
-h and -help
bigpipe [-h | -help ]
Description
Displays the bigpipe command syntax or usage text for all current
commands.
Note
More detailed man pages are available for some individual bigpipe
commands. To display detailed online help for the bigpipe
command, type: man bigpipe
BIG/ip® Controller, v. 2.1
B - 13
Appendix B
interface
bigpipe interface <ifname> internal | external | show
bigpipe interface <ifname> failsafe arm | disarm | show
bigpipe interface <ifname> timeout <seconds> | show
bigpipe interface <ifname> mac_masq <mac_addr> | show
bigpipe interface <ifname> vlans enable | disable | show
Description
Displays names of installed network interface cards and allows you
to set properties for each network interface card.
Note
Interface fail-safe is not designed for gateway or node failure
detection, as it cannot detect router or node failures in instances
where other sources of Ethernet traffic are active on the interface.
Designating an internal or external interface
Use the following syntax to designate an interface as an internal or
external interface.
bigpipe interface <ifname> internal | external
The <ifname> parameter takes a valid interface name such as:
B - 14
❖
exp0
This is an Intel NIC on interface 0
❖
fpa1
This is an FDDI NIC on interface 1
❖
de2
This is a DEC/SMC NIC on interface 2
❖
hmc0
This is a Gigabit Ethernet NIC on interface 0
F5 Networks, Inc.
BIG/pipe Command Reference
The following example configures multiple (2) internal and one
external interface on the BIG/ip Controller:
bigpipe interface de2 internal
bigpipe interface fpa1 internal
bigpipe interface exp0 external
WARNING
Use caution when redefining internal and external interfaces.
When you reconfigure interfaces, make sure that you have set up the
interfaces you need for operation. It is possible to accidently take
the controller out of network service by redefining interfaces.
Displaying status for interfaces
Use the following syntax to display the current status and the
settings for all installed interface cards:
bigpipe interface show
Use the following syntax to display the current status and the
setting for a specific interface.
bigpipe interface <ifname> show
Arming and disarming the fail-safe mode
Use the following command to activate the BIG/ip Controller
interface fail-safe mode.
bigpipe interface <ifname> failsafe arm
BIG/ip® Controller, v. 2.1
B - 15
Appendix B
When armed, the active controller automatically fails over to the
standby controller whenever the active controller detects that there
is no activity on the specified interface, and subsequently detects no
activity on the interface in response to ARP requests. The default
fail-safe mode is set to disarm.
WARNING
You should arm the fail-safe mode only after you configure the
BIG/ip Controller, and both the active and standby units are ready
to be placed into a production environment.
Note that you must specify a default route before using the bigpipe
interface failsafe command. You specify the default route in the
/etc/hosts and /etc/netstart files.
Use the following command to deactivate the BIG/ip Controller
interface fail-safe mode.
bigpipe interface <ifname> failsafe disarm
Setting the fail-safe timeout
Use the following syntax to set the amount of time, in seconds, that
an interface will be monitored for activity in response to a BIG/ip
Controller ARP request, in order to be designated operational.
bigpipe interface <ifname> timeout <seconds>
If no activity is detected on the interface within the specified time,
the BIG/ip Controller assumes that the interface is down. Note that
the default setting is 30 seconds.
Warning messages are generated after half of the specified timeout
period. In the case of an armed BIG/ip Controller in a BIG/ip
redundant system, traffic is switched from the active unit to the
standby unit at the end of the timeout period. Note that the fail-safe
timeout is used only if the fail-safe option is armed on the interface.
Viewing the timeout setting
Use the following syntax to view the fail-over timeout setting for a
specific interface:
B - 16
F5 Networks, Inc.
BIG/pipe Command Reference
bigpipe interface <ifname> timeout show
Displaying the current fail-safe status
Use the following syntax to display the current status and settings
for the BIG/ip Controller fail-safe mode:
bigpipe interface failsafe show
Setting the MAC masquerade address
Sharing the MAC masquerade address makes it possible to use
BIG/ip Controllers in a network topology using secure hubs. You
can view the media access control (MAC) address on a given
controller using the following command:
/sbin/ifconfig -a
Use the following syntax to set the MAC masquerade address that
will be shared by both BIG/ip Controllers in the redundant system.
bigpipe interface <ifname> mac_masq <MAC addr>
WARNING
You must specify a default route before using the mac_masq
command. You specify the default route in the /etc/hosts and
/etc/netstart files.
Find the MAC address on both the active and standby units and
choose one that is similar but unique. A safe technique for
choosing the shared MAC address follows:
Suppose you want to set up mac_masq on the external interfaces.
Using the ifconfig -a command on the active and standby units, you
note that their MAC addresses are:
Active: exp0 = 0:0:0:ac:4c:a2
Standby: exp0 = 0:0:0:ad:4d:f3
BIG/ip® Controller, v. 2.1
B - 17
Appendix B
In order to avoid packet collisions, you now must choose a unique
MAC address. The safest way to do this is to select one of the
addresses and logically OR the first byte with 0x40. This makes
the MAC address a locally administered MAC address.
In this example, either 40:0:0:ac:4c:a2 or 40:0:0:ad:4d:f3 would be
a suitable shared MAC address to use on both BIG/ip Controllers in
the redundant system.
The shared MAC address is used only when the BIG/ip Controller
is in active mode. When the unit is in standby mode, the original
MAC address of the network card is used. On startup, or when
transitioning from standby mode to active mode, the BIG/ip
Controller sends gratuitous ARP requests to notify the default
router and other machines on the local Ethernet segment that its
MAC address has changed. See RFC 826 for more details on ARP.
Note
You can use the same technique to configure an internal interface
MAC address.
Enabling VLAN communication for an interface
If you want to use IEEE 802.1q VLAN Trunk mode, then VLAN
tags must be enabled on the BIG/ip Controller internal interface
using the bigpipe interface command.
Use the following syntax to enable, disable or show the VLAN
status of the specified interface:
bigpipe interface <ifname> vlans enable | disable | show
B - 18
F5 Networks, Inc.
BIG/pipe Command Reference
lb
bigpipe lb show
bigpipe lb round_robin
bigpipe lb ratio
bigpipe lb priority
bigpipe lb fastest
bigpipe lb least_conn
bigpipe lb predictive
bigpipe lb observed
Description
Sets the load balancing mode for all virtual servers.
Setting the load balancing mode
Use the following syntax to set the load balancing mode:
bigpipe lb <mode name>
The mode names allowed are displayed in the syntax section above.
The command below sets the load balancing mode to Least
Connections, which routes new connections to the node which
currently maintains the least number of connections.
bigpipe lb least_conn
Viewing the currently selected load balancing mode
The following command displays the currently selected load
balancing mode.
bigpipe lb show
BIG/ip® Controller, v. 2.1
B - 19
Appendix B
maint
bigpipe maint
Description
Toggles a BIG/ip Controller into and out of Maintenance mode.
When in Maintenance mode, a BIG/ip Controller accepts no new
connections, but it does allow existing connections to complete.
The maint command interactively prompts you to enter or exit the
maintenance mode.
bigpipe maint
If the BIG/ip Controller is already in maintenance mode, the maint
command takes the BIG/ip Controller out of maintenance mode. If
the BIG/ip Controller is in maintenance mode for more than 20
minutes, the BIG/ip Controller immediately begins to accept new
connection requests.
If the BIG/ip Controller has been in maintenance mode for more
than 20 minutes, it automatically updates all network ARP caches;
this process normally takes a few seconds. However, you can speed
the process up by reloading the configuration file, using the
following command:
bigpipe -f /etc/bigip.conf
B - 20
F5 Networks, Inc.
BIG/pipe Command Reference
mirror
bigpipe mirror enable | disable | show
Description
Enables and disables mirroring between active and standby BIG/ip
Controllers. Mirroring ensures that persistence and connection
information on the active controller is duplicated on the standby
controllers. This command enables and disables mirroring for all
virtual servers.
To enable mirroring on a redundant system:
bigpipe mirror enable
To disable mirroring on a redundant system:
bigpipe mirror disable
To show the current status of mirroring on a redundant system:
bigpipe mirror show
BIG/ip® Controller, v. 2.1
B - 21
Appendix B
nat
bigpipe nat <node addr> to <NAT addr>[/<bitmask>] [<ifname>]
bigpipe nat <node addr> to <NAT addr> netmask <netmask> \
[broadcast <broadcast_ip>] [<ifname>]
bigpipe nat <node addr> [...<node addr>] delete
bigpipe nat <NAT addr> [...<NAT addr>] delete
bigpipe nat [<NAT addr> [...NAT addr>] ] show
bigpipe nat [<node addr> [...<node addr>] ] show
Description
Defines an IP address, routable on the external network, that a node
can use to initiate connections to hosts on the external network and
receive direct connections from clients on the external network.
The NAT command defines a mapping between the IP address of a
server behind the BIG/ip Controller <node addr> and an unused
routable address on the network in front of the BIG/ip Controller
<NAT addr>.
Defining a NAT
A NAT definition maps the IP address of a node <node addr> to a
routable address on the external interface <NAT addr>, and can
include an optional interface and netmask specification. Use the
following syntax to define a NAT:
bigpipe nat <node addr> to <NAT addr>[/<bitmask>] [<ifname>]
The <ifname> parameter is the internal interface of the BIG/ip
Controller through which packets must pass to get to the destination
internal address. The BIG/ip Controller can determine the interface
to configure for the NAT in most cases. The <ifname> parameter is
useful, for example, where there is more than one internal interface.
The following example shows a NAT definition:
B - 22
F5 Networks, Inc.
BIG/pipe Command Reference
bigpipe nat 10.10.10.10 to 10.12.10.10/24 exp1
Deleting NATs
Use the following syntax to delete one or more NATs from the
system:
bigpipe nat <node addr> [...<node addr>] delete
Displaying status of NATs
Use the following command to display the status of all NATs
included in the configuration:
bigpipe nat show
Use the following syntax to display the status of one or more
selected NATs:
bigpipe nat <node addr> [...<node addr>] show
NAT { 10.10.10.3 to 9.9.9.9 }
(pckts,bits) in = (0, 0), out = (0, 0)
NAT { 10.10.10.4 to 12.12.12.12
netmask 255.255.255.0 broadcast 12.12.12.255 }
(pckts,bits) in = (0, 0), out = (0, 0)
Additional Restrictions
The nat command has the following additional restrictions:
❖
The IP address defined in the <node addr> parameter must be
routable to a specific server behind the BIG/ip Controller.
❖
You must delete a NAT before you can redefine it.
❖
The interface for a NAT may only be configured when the NAT is
first defined.
BIG/ip® Controller, v. 2.1
B - 23
Appendix B
node
bigpipe node <node addr>[:<port>][...<node addr>[:<port>]] \
enable | disable
bigpipe node [<node addr>[:<port>][...<node addr>[:<port>]] ] show
bigpipe node <node addr>[:<port>][...<node addr>[:<port>]] \
limit <max conn>
Description
Displays information about nodes and allows you to set properties
for nodes, and node addresses.
Enabling and disabling nodes and node addresses
To enable a node address, use the node command with a node
address and the enable option:
bigpipe node 192.168.21.1 enable
To disable a node address, use the node command with the disable
option:
bigpipe node 192.168.21.1 disable
To enable a node address, use the node command with a node
address and port, and the enable option:
bigpipe node 192.168.21.1:80 enable
To disable one or more node addresses, use the node command
with disable option:
bigpipe node 192.168.21.1:80 disable
Setting connection limits for nodes
Use the following command to set the maximum number of
concurrent connections allowed on a node:
bigpipe node 192.168.21.1:80 limit 100
B - 24
F5 Networks, Inc.
BIG/pipe Command Reference
Note that to remove a connection limit, you also issue the preceding
command, but set the <max conn> variable to 0 (zero):
Setting connection limits for node addresses
Use the following command to set the maximum number of
concurrent connections allowed for a node addresses:
bigpipe node 192.168.21.1 limit 100
To remove a connection limit, you also issue the above command,
but set the <max conn> variable to 0 (zero).
Displaying status of all nodes
bigpipe node show
When you issue the node show command, the BIG/ip Controller
displays the node status (up or down), and a node summary of
connection statistics, which is further broken down to show
statistics by port. The report shows the following information:
❖
current number of connections
❖
total number of connections made to the node since last boot
❖
maximum number of concurrent connections since the last boot
❖
concurrent connection limit on the node
❖
the total number of connections made to the node since last boot
❖
total number of inbound and outbound packets and bits
Figure B.2 shows the output of this command:
bigpipe node 192.168.200.50:20
NODE 192.168.200.50
UP
|
(cur, max, limit, tot) = (0, 0,
|
(pckts,bits) in = (0, 0), out =
+PORT 20
UP
(cur, max, limit, tot) = (0, 0,
(pckts,bits) in = (0, 0), out =
0, 0)
(0, 0)
0, 0)
(0, 0)
Figure B.2 Node status and statistics
BIG/ip® Controller, v. 2.1
B - 25
Appendix B
Displaying the status of individual nodes and node
addresses
Use the following command to display status and statistical
information for a node addresses:
bigpipe node 192.168.21.1 show
The command reads the status of each node address, the number of
current connections, total connections, and connections allowed,
and the number of cumulative packets and bits sent and received.
Use the following command to display status and statistical
information for one or more specific nodes:
bigpipe node 192.168.21.1:80 show
Setting connection limits for individual nodes and
node addresses
Use the following command to set the maximum number of
concurrent connections allowed for one or more nodes:
bigpipe node 192.168.21.1:80 limit <max conn>
Note that to remove a connection limit, you also issue the above
command, but you set the <max conn> variable to 0 (zero).
Use the following command to set the maximum number of
connections allowed for a node addresses:
bigpipe node <192.168.21.1> limit <max conn>
Note that to remove a connection limit, you also issue the above
command, but you set the <max conn> variable to 0 (zero).
B - 26
F5 Networks, Inc.
BIG/pipe Command Reference
persist
bigpipe persist <port> [...<port>] <seconds>
bigpipe persist [<port> [...<port>] ] show | dump
Description
Enables or disables simple persistence on one or more virtual ports.
Persistence tracks the source IP addresses and ports of all incoming
requests, and the nodes and ports that hosted the request. It forces
new connections from the source address to use the same node as
used by the prior connection from that source IP address and port.
A configurable time limit determines how long the BIG/ip
Controller retains persistent connection information. By default,
persistence is disabled on all ports. Persistence is affected by
certain system control variables.
Setting a persistence timeout
Use the following syntax to set the number of seconds for which the
BIG/ip Controller maintains persistent connection information on a
specific virtual port:
bigpipe persist <port> <seconds>
Set <seconds> to 0 to turn persistence off for a specific virtual port.
Displaying persistence settings for virtual ports
Use the following syntax to display the number of seconds for
which the BIG/ip Controller maintains persistent connection
information for all virtual ports that have persistence turned on:
bigpipe persist show
Use the following syntax to display persistence settings for a
specific virtual port:
bigpipe persist <port> show
BIG/ip® Controller, v. 2.1
B - 27
Appendix B
Displaying persistent connections on a virtual port
Use the following syntax to display information about current
persistent connections on a virtual port:
bigpipe persist [<port>] [...port] dump
B - 28
F5 Networks, Inc.
BIG/pipe Command Reference
port
bigpipe port <port> [...<port>] limit <max conn>
bigpipe port <port> [...<port>] enable | disable | show
Description
Enables and disables network traffic on virtual ports, and also sets
connection limits on ports. You can use standard port numbers,
service or port names (for example, www, http, or 80) for the
<port> parameter. Note that the port settings you define with this
command control the port service for all virtual servers that use the
port. By default, all ports are disabled.
A port is any valid port number, between 0 and 65535, inclusive, or
any valid service name in the /etc/services file.
Allowing and denying virtual ports
You can enable or disable traffic to specific virtual ports. The
default setting for all virtual ports is disabled. Use the following
syntax to allow one or more virtual ports:
bigpipe port <port> [...<port>] enable
To deny access to one or more virtual ports:
bigpipe port <port> [...<port>] disable
Setting connection limits on ports
Use the following syntax to set the maximum number of concurrent
connections allowed on a virtual port. Note that you can configure
this setting for one or more virtual ports.
bigpipe port <port> [...<port>] limit <max conn>
To turn off a connection limit for one or more ports, use the
preceding command, setting the <max conn> parameter to 0 (zero):
bigpipe port <port> [...<port>] limit 0
BIG/ip® Controller, v. 2.1
B - 29
Appendix B
Displaying the status of all virtual ports
Use the following syntax to display the status of virtual ports
included in the configuration:
bigpipe port show
Displaying the status for specific virtual ports
Use the following syntax to display the status of one or more virtual
ports:
bigpipe port <port> [...<port>] show
Figure B.3 shows a sample of formatted output of the port
command.
bigpipe port telnet show
PORT 23
telnet
enable
(cur, max, limit, tot, reaped) = (37,73,100,691,29)
(pckts,bits) in = (2541, 2515600), out = (2331, 2731687)
Figure B.3 Formatted output of port command showing the Telnet port statistics
B - 30
F5 Networks, Inc.
BIG/pipe Command Reference
-r
bigpipe -r
Description
Use the following syntax to clear the defined kernel and counter
values from memory:
bigpipe -r
WARNING
This command should be used with caution. All throughput is
stopped when you run this command.
Typically, this command is used on a standby BIG/ip Controller
prior to loading a new /etc/bigip.conf file that contains new tping
and treaper values.
For example, you can execute the following commands on a
standby BIG/ip Controller:
bigpipe -r
bigpipe -f <filename>
This sequence of commands ensures that only the values set in the
<filename> specified are in use.
BIG/ip® Controller, v. 2.1
B - 31
Appendix B
ratio
bigpipe ratio [<node addr>] [node addr> ...] show
bigpipe ratio <node addr> [<node addr>...] <weight>
Description
This command provides two functions related to load balancing:
❖
For the Ratio load balancing mode, the command sets the weight
or proportions for one or more node addresses.
❖
For the Priority load balancing mode, the command sets the
priority level. Note that multiple node addresses can have the
same priority level setting.
Setting ratio weight for one or more node
addresses
The default ratio setting for any node address is 1. If you use the
Ratio or Priority load balancing modes, you must set a ratio other
than 1 for at least one node address in the configuration. If you do
not change at least one ratio setting, the load balancing modes have
the same affect as the Round Robin load balancing mode.
Use the following syntax to set the ratio for one or more node
addresses:
bigpipe ratio <node addr> [...<node addr>] <weight>
For example, the following command sets the ratio weight to 3 for a
specific node address:
bigpipe ratio 192.168.103.20 3
Displaying the ratio weights for node addresses
The following command displays the current ratio weight settings
for all node addresses.
bigpipe ratio show
The command displays the following output:
B - 32
F5 Networks, Inc.
BIG/pipe Command Reference
192.168.200.51
ratio = 3
192.168.200.52
ratio = 1
Displaying ratio weight for specific node addresses
Use the following syntax to display the ratio setting for one or more
node addresses:
bigpipe ratio <node addr> [...<node addr>] show
Note
The <weight> parameter must be a whole number, greater than or
equal to 1.
BIG/ip® Controller, v. 2.1
B - 33
Appendix B
-s
bigpipe -s [ <filename> | - ]
Description
Writes the current BIG/ip Controller configuration settings from
memory to the default boot configuration file named
/etc/bigip.conf.
You can use a hyphen character ("-") in place of a file name to
display the configuration on the standard output device.
bigpipe -s -
If you are testing and integrating BIG/ip Controllers into a network,
you may want to use multiple test configuration files. Use the
following syntax to write the current configuration to a filename
that you specify:
bigpipe -s <filename>
For example, the following command saves the current
configuration from memory to an alternate configuration file named
/etc/bigip.conf2 .
bigpipe -s /etc/bigip.conf2
B - 34
F5 Networks, Inc.
BIG/pipe Command Reference
snat
bigpipe snat map default to <SNAT addr> [<ifname>] [netmask <ip>]
bigpipe snat map <node addr> [...<node addr>] to \
<SNAT addr> [netmask <ip>]
bigpipe snat <SNAT addr> [...<SNAT addr>] delete
bigip snat default delete
bigpipe snat default dump [verbose]
bigpipe snat [<node addr> [...<node addr>] ] dump [verbose]
bigpipe snat globals show
bigpipe snat default show
bigpipe snat [<node addr> [...<node addr>] ] show
bigpipe snat limit <max conn>
bigpipe snat default limit <max conn>
bigpipe snat <node addr> [...<node addr>] limit \
<max conn>
bigpipe snat <node addr> [...<node addr>] mirror \
enable | disable
bigpipe snat default mirror enable | disable
bigpipe snat <node addr> [...<node addr>] timeout tcp | udp \
<seconds>
bigpipe snat [default] timeout tcp | udp <seconds>
bigpipe snat <SNAT addr> [...<SNAT addr>] stats reset
bigpipe snat default stats reset
BIG/ip® Controller, v. 2.1
B - 35
Appendix B
Description
Defines one or more addresses that nodes can use as a source IP
address when initiating connections to hosts on the external
network. Note that clients cannot use SNAT addresses to connect
directly to nodes.
Defining the default SNAT
Use the following syntax to define the default SNAT. If you use the
netmask parameter and it is different from the external interface
default netmask, the command sets the netmask and derives the
broadcast address.
bigpipe snat map default to <SNAT addr> [<ifname>] [netmask <ip>]
Creating individual SNAT addresses
The following bigpipe command creates a SNAT mapping:
bigpipe snat map <node addr> [...<node addr>] to \
<SNAT addr> [<ifname>] [netmask <ip>]
If the netmask is different from the external interface default
netmask, the command sets the netmask and derives the broadcast
address.
Deleting SNAT Addresses
The following syntax deletes a specific SNAT:
bigpipe snat <SNAT addr> | default delete
Showing SNAT mappings
The following bigpipe command shows mappings:
bigpipe snat [<SNAT addr>] [...<SNAT addr>] show
bigpipe snat default show
The following command shows the current SNAT connections:
B - 36
F5 Networks, Inc.
BIG/pipe Command Reference
bigpipe snat [<SNAT addr>] [...<SNAT addr>] dump [ verbose ]
bigpipe snat default dump [ verbose ]
The optional verbose keyword provides more detailed output.
The following command prints the global SNAT settings:
bigpipe snat globals show
Limiting connections
Use the following commands to set the maximum number of
concurrent connections allowed for one or more SNAT addresses.
Zero indicates no limit.
bigpipe snat 192.168.12.3 limit <max conn>
The default SNAT address connection limit is set with the following
command:
bigpipe snat default limit <max conn>
Set global concurrent connection limit:
bigpipe snat limit <max conn>
Enabling mirroring for redundant systems
The following example sets SNAT mirroring for all SNAT
connections originating at 192.168.225.100 :
bigpipe snat 192.168.225.100 mirror enable
Setting idle connection timeouts
Use the following command to set the timeout for idle TCP
connections:
bigpipe snat timeout tcp <seconds>
BIG/ip® Controller, v. 2.1
B - 37
Appendix B
Use the following command to set the timeout for idle UDP
connections. Note that you must have a timeout set for UDP
connections; zero is not allowed:
bigpipe snat timeout udp <seconds>
Use the following command to set the timeout for idle TCP
connections originating at this node address. Set <seconds> to 0
(zero) to disable TCP timeout for these nodes.
bigpipe snat <node addr> [...<node addr>] timeout tcp <seconds>
Use the following command to set the timeout for idle TCP
connections originating at the default node address. Set <seconds>
to 0 (zero) to disable TCP timeout for these nodes.
bigpipe snat default timeout tcp <seconds>
Use the following syntax to set the timeout for idle UDP
connections originating at this node address. Note that you must
have a timeout set for UDP connections; zero is not allowed:
bigpipe snat <node addr> [...<node addr>] timeout udp <seconds>
Use the following syntax to set the timeout for idle UDP
connections originating at the default SNAT address. Note that you
must have a timeout set for UDP connections; zero is not allowed:
bigpipe snat default timeout udp <seconds>
Clearing statistics
You can reset statistics by node or by SNAT address. Use the
following syntax to clear all statistics for one or more nodes:
bigpipe snat <node addr> [ ...<node addr> ] stats reset
Use the following syntax to clear all statistics for one or more
SNAT addresses:
bigpipe snat <SNAT addr> [ ...<SNAT addr> ] stats reset
B - 38
F5 Networks, Inc.
BIG/pipe Command Reference
Use the following command to reset the statistics to zero for the
default:
bigpipe snat default stats reset
BIG/ip® Controller, v. 2.1
B - 39
Appendix B
summary
bigpipe summary
Description
Displays a summary of current usage statistics.
The output display format for the summary command is shown in
Figure B.4.
B - 40
F5 Networks, Inc.
BIG/pipe Command Reference
BIG/ip total uptime
= 1 (day) 4 (hr) 40 (min) 8 (sec)
BIG/ip total uptime (secs)
= 103208
BIG/ip total # connections
= 0
BIG/ip total # pkts
= 0
BIG/ip total # bits
= 0
BIG/ip total # pkts(inbound) = 0
BIG/ip total # bits(inbound) = 0
BIG/ip total # pkts(outbound) = 0
BIG/ip total # bits(outbound) = 0
BIG/ip error no nodes available
= 0
BIG/ip tcp port deny
= 0
BIG/ip udp port deny
= 0
BIG/ip vip tcp port deny
= 0
BIG/ip vip udp port deny
= 0
BIG/ip max connections deny
= 0
BIG/ip vip duplicate syn ssl
= 0
BIG/ip vip duplicate syn wrong dest
= 0
BIG/ip vip duplicate syn node down
= 0
BIG/ip vip maint mode deny
= 0
BIG/ip virtual addr max connections deny = 0
BIG/ip virtual path max connections deny = 0
BIG/ip vip non syn
= 0
BIG/ip error not in out table
= 0
BIG/ip error not in in table
= 0
BIG/ip error vip fragment no port
= 0
BIG/ip error vip fragment no conn
= 0
BIG/ip error standby shared drop
= 0
BIG/ip dropped inbound
= 0
BIG/ip dropped outbound
= 0
BIG/ip reaped
= 0
BIG/ip ssl reaped
= 0
BIG/ip persist reaped
= 0
BIG/ip udp reaped
= 0
BIG/ip malloc errors
= 0
BIG/ip bad type
= 0
BIG/ip mem pool total 96636758 mem pool used 95552 mem percent
used
0.10
Figure B.4 Summary output display
BIG/ip® Controller, v. 2.1
B - 41
Appendix B
For detailed descriptions of each of statistic displayed by the
summary command, refer to Using the BIG/pipe command utility
as a monitoring tool, on page 6-3.
B - 42
F5 Networks, Inc.
BIG/pipe Command Reference
timeout_node
bigpipe timeout_node show
bigpipe timeout_node <seconds>
bigpipe timeout_node 0
Description
Sets the amount of time that a server has to respond to a BIG/ip
Controller ping in order for the server to be marked up. If a server
fails to respond within the specified time, the BIG/ip Controller
assumes that the server is down, and the BIG/ip Controller no
longer sends requests to the services hosted by the server. If the
server responds to the next ping, or to subsequent pings, the BIG/ip
Controller then marks the server up, and resumes sending requests
to those services.
The default is 15 seconds.
Displaying the current timeout value
Use the following command to display the current timeout setting
for node ping:
bigpipe timeout_node show
Setting a timeout value for node ping
Use the following syntax to set the timeout setting for node ping:
bigpipe timeout_node <seconds>
The sample command below sets the time-out to 33 seconds.
bigpipe timeout_node 33
Disabling node ping
To disable node ping, you simply set the node ping timeout value to
0 (zero):
BIG/ip® Controller, v. 2.1
B - 43
Appendix B
bigpipe timeout_node 0
WARNING
Node ping is the only form of verification that the BIG/ip Controller
uses to determine status on node addresses. If you turn node ping
off while one or more node addresses are currently down, the node
addresses remain marked down until you turn node ping back on
and allow the BIG/ip Controller to verify the node addresses again.
B - 44
F5 Networks, Inc.
BIG/pipe Command Reference
timeout_svc
bigpipe timeout_svc [<port>] show
bigpipe timeout_svc <port> <seconds>
bigpipe timeout_svc <port> 0
Description
Sets the amount of time that a specific node has to respond to a
service check issued by the BIG/ip Controller. There are three
types of service checks, each of which is affected by this setting:
❖
Simple Service check where the BIG/ip Controller attempts to
establish a connection to the service hosted by the node
❖
Extended content verification where the BIG/ip Controller
requests specific content from the node
❖
Extended application verification where the BIG/ip Controller
executes an external service check program that verifies whether
or not specific content is available on the node
If a node fails to respond to any type of service check within the
specified time, the BIG/ip Controller assumes that the service is
down and no longer sends client requests to the service. If the node
responds to the next service check, or to subsequent service checks,
the BIG/ip Controller marks the service up, and resumes sending
requests to the service.
WARNING
The BIG/ip Controller does not attempt to detect the status of a
node if node ping is turned off (bigd -n) and the timeout_svc and
tping_svc values are set to 0 for a particular node.
The timeout_svc default for each port is set to 0, which disables
service checks on the port.
Note that the BIG/ip Controller monitors only those services that
have a timeout_svc value greater than 0.
BIG/ip® Controller, v. 2.1
B - 45
Appendix B
Setting the service check timeout
Use the following syntax to set the service check timeout for a
specific node port. Note that this setting applies to all nodes that
use the port.
bigpipe timeout_svc <port> <seconds>
For example, the following command sets the service check timeout
on port 80 to 120 seconds:
bigpipe timeout_svc 80 120
Disabling the service check
To disable service check on a specific port, use the above command,
but set the <seconds> parameter to zero:
bigpipe timeout_svc <port> 0
Displaying service check timeouts
Use the following command to display the current service check
timeout settings for all ports:
bigpipe timeout_svc show
The system displays the following output:
port 80 timeout after 120 seconds
The system only displays ports that have a timeout set to a value
other than 0.
Use the following syntax to display the current service check
timeout setting for a specific port:
bigpipe timeout_svc <port> [show]
B - 46
F5 Networks, Inc.
BIG/pipe Command Reference
tping_node
bigpipe tping_node show
bigpipe tping_node <seconds>
Description
Sets the interval (in seconds) at which a BIG/ip Controller issues a
ping to each server managed by the BIG/ip Controller. If a specific
server responds to the ping within a set time, the server is marked
up and the BIG/ip Controller sends connections to the services
hosted by that server. If a server fails to respond to a ping within
the specified time, the BIG/ip Controller assumes that the server is
no longer available, and it marks the node down.
Note that the timeout_node setting determines the number of
seconds that a server has to respond to the ping issued by the BIG/ip
Controller.
The default setting for tping_node is 5 seconds.
Setting a node ping interval
Use the following syntax to set the number of seconds which a
server has to respond to a ping issued by the BIG/ip Controller:
bigpipe tping_node <seconds>
Disabling node ping
To turn node ping off, simply set the interval to 0 seconds:
bigpipe tping_node 0
Displaying the current node ping setting
Use the following command to display the current node ping
setting:
bigpipe tping_node show
BIG/ip® Controller, v. 2.1
B - 47
Appendix B
tping_svc
bigpipe tping_svc show
bigpipe tping_svc <port> <seconds>
bigpipe tping_svc <port> 0
Description
Sets the interval (in seconds) at which BIG/ip Controller issues a
service check to one or more specific nodes included in the
configuration. There are three types of service check, each of
which is affected by this setting:
❖
Simple Service check where the BIG/ip Controller attempts to
establish a connection to the service hosted by the node
❖
Extended content verification where the BIG/ip Controller
requests specific content from the node
❖
Extended application verification where the BIG/ip Controller
executes an external service check program that verifies whether
or not specific content is available on the node
If a node fails to respond to a service check within the time
specified by the timeout_svc setting, the BIG/ip Controller marks
the service down, and no longer routes client requests to it.
WARNING
The BIG/ip Controller does not attempt to detect the status of a
node if node ping is turned off (bigd -n) and the timeout_svc and
tping_svc values are set to 0 for a node.
Setting global service check intervals for a node
port
Use the following syntax to set a service check interval for a
specific node port.
bigpipe tping_svc <port> <seconds>
B - 48
F5 Networks, Inc.
BIG/pipe Command Reference
Use the following syntax to turn service check off for a specific
node port.
bigpipe tping_svc <port> 0
Displaying the current service check interval
Use the following syntax to display the intervals at which the
BIG/ip Controller issues service checks to all nodes configured for
service check:
bigpipe tping_svc show
BIG/ip® Controller, v. 2.1
B - 49
Appendix B
treaper
bigpipe treaper show
bigpipe treaper <port> <seconds>
bigpipe treaper <port> 0
Description
Sets the expiration time for idle TCP connections on a specific port.
An idle connection is one in which no data has been received or
sent for the number of seconds specified by the treaper command.
The treaper default value is 0 seconds, meaning that no idle
connections are terminated. For treaper to be effective, you should
set its value to be greater than the configured timeout for the service
daemons installed on your nodes.
The treaper command clears the connection tables, avoiding
memory problems due to the accumulation of dead, but not
terminated, connections.
Setting the idle TCP connection timeout for a virtual
port
Use the following syntax to set an inactive connection timeout for
one or more virtual ports:
treaper <port> <seconds>
To turn inactive connection timeout off, use the same command but
set the number of seconds to zero:
treaper <port> 0
Note
Typical settings include 120s for 25/SMTP, 120s for 80/www, 300600 for 20/ftp-data and 21/ftp-data.
B - 50
F5 Networks, Inc.
BIG/pipe Command Reference
Displaying the current inactive connection timeout
Use the following syntax to display the current number of seconds
that connections are allowed to remain idle before being dropped:
bigpipe treaper show
BIG/ip® Controller, v. 2.1
B - 51
Appendix B
udp
bigpipe udp [<port> [...port] ] show
bigpipe udp <port> [...<port>] <seconds>
bigpipe udp <port> 0
Description
The udp command enables UDP traffic on virtual ports and also
sets a timeout for idle UDP connections. UDP traffic is enabled
only when the timeout is set to a value greater than 0 (zero). You
can disable UDP traffic on a port by setting the idle connection
timeout to 0 (zero). By default, UDP is disabled on all ports.
Setting the idle connection timeout for UDP traffic
Use the following syntax to set the UDP timeout on one or more
virtual ports, where the <seconds> parameter is the number of
seconds before an idle connection is dropped:
bigpipe udp <port> <seconds>
For example, the following command sets the UDP timeout to 300
seconds for port 53:
bigpipe udp 53 300
To turn UDP timeout off for a virtual port, use the above command,
setting the <seconds> parameter to zero:
bigpipe udp <port> 0
Displaying UDP settings
Use the following command to display the UDP timeout setting for
all ports that allow UDP:
bigpipe udp show
B - 52
F5 Networks, Inc.
BIG/pipe Command Reference
Use the following syntax to display the timeout setting for a
specific virtual port that allows UDP:
bigpipe udp <port> show
The system displays the output:
port 53 idle udp connections expire after 300
seconds
BIG/ip® Controller, v. 2.1
B - 53
Appendix B
-v
bigpipe -v
Description
Displays version number of the BIG/pipe command utility.
For example, bigpipe -v displays the following output:
bigpipe: 2.1
B - 54
F5 Networks, Inc.
BIG/pipe Command Reference
version
bigpipe version
Description
Displays the version number of the BIG/ip Controller’s operating
system.
The bigpipe version command outputs the following version
information:
BIG/ip: version 2.1
BIG/ip® Controller, v. 2.1
B - 55
Appendix B
vip
vip <virt addr>[:<port>] [/<bitmask>] [<ifname> | none ] define \
<node addr>[:<port>] [...<node addr>[:<port>] ] [special ssl \
<seconds> <seconds>]
vip <virt addr>[:<port>] netmask <ip> [broadcast <ip>] \
[<ifname> | none ] define <node addr>[:<port>] \
[...<node addr>[:<port>] ] [special ssl <seconds> <seconds>]
vip [<virt addr>[:<port>]] [...<virt addr>[:<port>] ] show
vip <virt addr>[:<port>] [<ifname>] [ ... <virt addr>[:<port>] ]
enable | disable | delete
\
vip <virt addr>[:<port>] [... <virt addr>[:<port>]] limit \
<max conn>
vip <virt addr>:<port> mirror conn enable | disable | show
vip <virt addr>:<port> mirror persist enable | disable | show
vip <virt addr>:<port> persist show | dump | value
vip <virt addr>:<port> persist mask <ip> | none | show
vip 0.0.0.0:<port> sticky [ enable | disable | show | clear | dump ]
vip 0.0.0.0:<port> sticky mask [ <ip> | none | show ]
vip sticky dump
vip sticky clear
Description
Creates, deletes, and displays information about virtual servers.
This command also sets mirroring, persistence, connection limits,
and timeouts on a virtual server.
B - 56
F5 Networks, Inc.
BIG/pipe Command Reference
Defining a virtual server
Virtual servers are port-specific, and if you are configuring a site
that supports more than one service, you need to configure one
virtual server for each service offered by the site. Use the following
syntax to define an individual virtual server and the node or nodes
to which the virtual server maps:
bigpipe vip <virt addr>:[<port>] define <node addr>[:<port>]
[...<node addr>[:<port>] ]
\
For example, the following command configures a virtual server
that uses three nodes. In the example, two of the nodes do not use
port 80, the standard HTTP port. Node port numbers do not
necessarily have to match the virtual server’s port number.
bigpipe vip 192.168.140.100:80 define 192.168.11.22:80 \
192.158.11.23:8080 192.168.11.23:8050
Note that if you want to add or remove a node from a virtual server,
you must redefine the virtual server. You cannot add or remove
individual nodes from a virtual server mapping without redefining
the virtual server itself.
The following example shows a similar definition where host
names are used in place of IP addresses, and service names are used
in place of port numbers. Note that if you use service names, the
default port number associated with that service is used.
bigpipe vip www.SiteOne.com:http define NodeOne:http NodeTwo:http \
NodeThree:http
If you are using non-default ports to host a specific service, you
should use the port number in the definition rather than the service
name.
Displaying information about virtual servers
Use the following syntax to display information about all virtual
servers included in the configuration:
bigpipe vip show
BIG/ip® Controller, v. 2.1
B - 57
Appendix B
Use the following syntax to display information about one or more
virtual servers included in the configuration:
bigpipe vip <virt addr>:<port> [...<virt addr>:<port>] show
The command displays information such as the nodes associated
with each virtual server, the nodes’ status, and the current, total, and
maximum number of connections managed by the virtual server
since the BIG/ip Controller was last rebooted.
Defining an interface for a virtual server
If you have multiple external interfaces, you can specify one of
them when you define a virtual server. If you specify an interface
name, the BIG/ip Controller responds to ARP requests for the
virtual address. If you do not specify an interface name, the BIG/ip
Controller responds to ARP requests for the virtual server only on
the default interface. If you do not want the BIG/ip Controller to
respond to ARP requests on any interface, use the option none in
place of the an <ifname> parameter.
(Use the bigpipe interface show command to see a list of
interfaces).
All virtual servers that share a virtual address must use the same
external interface. Changing the interface for a virtual server
changes the interface for all virtual servers having the same virtual
address.
Setting a user-defined netmask and broadcast
The default netmask for a virtual address, and for each virtual
server hosted by that virtual address, is determined by the network
class of the IP address entered for the virtual server. The default
broadcast is automatically determined by the BIG/ip Controller, and
it is based on the virtual address and the current netmask. You can
override the default netmask and broadcast for any virtual address.
All virtual servers hosted by the virtual address use the netmask and
broadcast of the virtual address, whether they are default values or
they are user-defined values.
B - 58
F5 Networks, Inc.
BIG/pipe Command Reference
Note that if you want to use a custom netmask and broadcast, you
define both when you define the virtual server:
bigpipe vip <virt addr>[:<port>] netmask <ip> [broadcast <ip>] \
[<ifname>] define <node addr>[:<port>] [... <node addr> \
[:<port>] ]
Note
For most configurations, the BIG/ip Controller correctly calculates
the broadcast based on the IP address and the netmask. A userdefined broadcast address is not necessary.
Again, even when you define a custom netmask and broadcast in a
specific virtual server definition, the settings apply to all virtual
servers that use the same virtual address. The following sample
command shows a user-defined netmask and broadcast:
bigpipe vip www.SiteOne.com:http netmask 255.255.0.0 \
broadcast 10.0.140.255 define NodeOne:http NodeTwo:http
The /bitmask option shown in the following example applies
network and broadcast address masks. In this example, a 24-bit
bitmask sets the network mask and broadcast address for the virtual
server:
bigpipe vip 206.168.225.1:80/24 define 192.198.255.1
You can generate the same broadcast address by applying the
255.255.255.0 netmask. The effect of the bitmask is the same as
applying the 255.255.255.0 netmask. The broadcast address is
derived as 206.168.225.255 from the network mask for this virtual
server.
Setting properties on a virtual server
You can set the following properties on a virtual server:
❖
Cookie persistence
❖
A connection limit
BIG/ip® Controller, v. 2.1
B - 59
Appendix B
❖
An SSL persistence timeout and an SSL session ID record
timeout
❖
Mirroring persistence and connection state information from
active controller to standby controller.
To activate HTTP cookie persistence from the command
line
To activate HTTP cookie persistence from the command line, use
the following syntax:
bigpipe vip <virt addr>:<service> define <node addr> [...<node
addr>] special cookie <mode name> <timeout>
For the <mode name>, type Insert, Rewrite, or Passive. The
<timeout> value for the cookie is written using the following
format:
<days>d hh:mm:ss
Setting a connection limit
The default setting is to have no limit to the number of concurrent
connections allowed on a virtual server. You can set a concurrent
connection limit on one or more virtual servers using the following
command:
bigpipe vip <virt addr>[:<port>] [...<virt addr>[:<port>] ] limit \
<max conn>
The following example shows two virtual servers set to have a
concurrent connection limit of 5000 each:
bigpipe vip www.SiteOne.com:http www.SiteTwo.com:ssl limit 5000
To turn the limit off, set the <max conn> variable to zero:
bigpipe vip <virt addr>[:<port>] [...<virt addr>[:<port>] ] limit 0
B - 60
F5 Networks, Inc.
BIG/pipe Command Reference
Defining SSL persistence settings
You can turn on SSL persistence for a virtual server when you
define the virtual server. The command includes parameters for
setting the persistence timeout, as well as an inactive connection
timeout for SSL session ID records:
bigpipe vip <virt addr>[:<port>] define <node addr>[:<port>] \
[...<node addr>[:<port>] ] [special ssl <persistence timeout> \
<ssl session id timeout>]
Note that if you want to change SSL settings on an existing virtual
server, you must redefine the virtual server, including the nodes to
which the virtual server maps and the SSL persistence settings. To
turn SSL persistence off, use the above command, setting both the
<persistence timeout> and <ssl session id timeout> parameters to
0:
bigpipe vip <virt addr>[:<port>] define <node addr>[:<port>] \
[...<node addr>[:<port>] ] special ssl 0 0
The following example shows a virtual server set to use SSL
persistence where SSL persistence is maintained by the BIG/ip
Controller for 36000 seconds, and SSL session id records are
maintained for 60000 seconds:
bigpipe vip 210.12.140.11:443 define NodeOne:ssl NodeTwo:ssl \
special ssl 36000 60000
Setting sticky persistence for Transparent Node
Mode
BIG/ip Controllers are enhanced with special persistence features
for balancing caching proxy server load. This special persistence,
called sticky persistence, is configurable to let you designate a
proxy server in an array to cache content from a specified IP
address range. The BIG/ip Controller can send all packets within
the IP range to the proxy server where it is cached. The
connections are directed to the proxy where the destination is
cached.
BIG/ip® Controller, v. 2.1
B - 61
Appendix B
To further optimize a proxy array using sticky persistence, you can
partition the global internet address space across the array of proxy
servers. A sticky mask can be defined for each virtual server.
Sticky entries do not timeout, so traffic goes to the same firewall
indefinitely. A limiting mechanism is built into the BIG/ip
Controller to control the amount of memory consumed by sticky
entries. Once the limit is reached, further attempts to write new
sticky entries fail, and are logged ("bigip: Reached maximum # of
sticky entries. Entry not added."). In this case, instead of reaping
useless entries, make the sticky mask less specific so it groups more
addresses together. Since sticky entries do not time out, use the
clear command to delete all the entries.
As with other methods of persistence, sticky persistence can be
configured using sysctl variables
bigip.persist_any_port_same_vip and bigip.persist_any_vip.
These define whether each virtual server maintains its own list of
persistence entries, or whether the entries are shared among virtual
servers. The sticky pesistence uses these settings as they are
documented for simple persistence.
Use the following command to turn sticky feature on for the virtual
server:
bigpipe vip 0.0.0.0:<port> sticky enable
Use the following command to turn sticky feature off for the virtual
server:
bigpipe vip 0.0.0.0:<port> sticky disable
Use the following command to show whether sticky is on or off for
the virtual server:
bigpipe vip 0.0.0.0:<port> sticky show
Use the following command to list sticky entries for the virtual
server:
bigpipe vip 0.0.0.0:<port> sticky dump
B - 62
F5 Networks, Inc.
BIG/pipe Command Reference
Figure B.5 displays the output of a sticky dump for a virtual server
with a sticky mask of 192.0.0.0:
Sticky Address
0.0.0.0
64.0.0.0
128.0.0.0
192.0.0.0
Firewall/Node
10.1.1.1
10.1.1.2
10.1.1.3
10.1.1.4
Figure B.5 Formatted output of sticky dump.
Use the following syntax to delete sticky entries for the virtual
server:
bigpipe vip <virt addr>:<port> sticky clear
Use the following syntax to define the sticky mask for the virtual
server:
bigpipe vip <virt addr>:<port> sticky mask <mask>
Use the following syntax to remove the sticky mask from a virtual
server:
bigpipe vip <virt addr>:<port> sticky mask none
Use the following syntax to show the sticky mask for the virtual
server:
bigpipe vip <virt addr>:<port> sticky mask show
Use the following command to clear all sticky connections on a
BIG/ip issue the following bigpipe command:
bigpipe sticky clear
Setting persistence timeout on virtual ports
The bigpipe persist and bigpipe persist mask commands set
persistence properties on virtual ports.
BIG/ip® Controller, v. 2.1
B - 63
Appendix B
Use the following syntax to set the persistence duration, that is, the
length of time in seconds that persistence information about a
connection is stored.
bigpipe vip <virt addr>:<port> persist <value>
For example, the following command sets persistence to 100
minutes on the http port:
bigpipe vip 192.168.100.1:80 6000
Showing persistence timeout on virtual ports
Use the following syntax to show the persistence duration on a
virtual port:
bigpipe vip <virt addr>:<port> persist show
Use the following syntax to display information about current
persistence connections on a virtual port:
bigpipe vip <virt addr>:<port> persist dump
The output of persist dump lists client address, virtual path, or
node/alive time.
Applying a persist mask
Use the following command to specify a range of IP addresses to be
included in persistence of the specified virtual port. The command
adds a persist mask to a port, where <mask> is an IP address:
bigpipe vip <virt addr>:<port> persist mask <mask>
For example, the following command would set persistence for the
specified port on all addresses in the subnetwork 192.168.100.0:
bigpipe vip <virt addr>:80 persist mask 192.168.100.0
B - 64
F5 Networks, Inc.
BIG/pipe Command Reference
Mirroring active to standby controllers
Mirroring provides seamless recovery for current connections and
persistence information when a BIG/ip Controller fails. When you
use the mirroring feature, the standby controller maintains the same
current connection and persistence information as the active
controller. Transactions such as FTP file transfers continue as
though uninterrupted.
To control mirroring for a virtual server, use the mirror command
to enable or disable mirroring of persistence information, or
connections, or both. The syntax of the command is:
bigpipe vip <virt addr>:<port> mirror [ persist | conn ] \
enable | disable
To print the current mirroring setting for a virtual server:
bigpipe vip <virt addr>:<port> mirror [ persist | conn ] show
If you do not specify either persist or conn, the BIG/ip Controller
displays connection information for both.
Note
If you set up mirroring on a virtual server that supports FTP
connections, you need to mirror the control port virtual server, and
the data port virtual server.
The following example shows the two commands used to enable
mirroring for virtual server v1 on the FTP control and data ports:
bigpipe vip v1:21 mirror conn enable
bigpipe vip v1:20 mirror conn enable
Removing and returning a virtual server to service
You can remove an existing virtual server from network service, or
return the virtual server to service, using the disable and enable
keywords. When you disable a virtual server, the virtual server no
longer accepts new connection requests, but it allows current
BIG/ip® Controller, v. 2.1
B - 65
Appendix B
connections to finish processing before the virtual server goes
down. Use the following syntax to remove a virtual server from
network service:
bigpipe vip <virt addr>:<port>
[ ... <virt addr>:<port>] disable
Use the following syntax to return a virtual server to network
service:
bigpipe vip <virt addr>:<port> enable
Removing and returning a virtual address to service
You can remove an existing virtual address from network service,
or return the virtual address to service, using the disable and enable
keywords. Note that when you enable or disable a virtual address,
you inherently enable or disable all of the virtual servers that use
the virtual address.
bigpipe vip <virt addr> disable
Use the following syntax to return a virtual address to network
service:
bigpipe vip <virt addr> enable
Displaying information about virtual addresses
You can also display information about the virtual addresses that
host individual virtual servers. Use the following syntax to display
information about one or more virtual addresses included in the
configuration:
bigpipe vip <virt addr> [... <virt addr> ] show
The command displays information such as the virtual servers
associated with each virtual address, the status, and the current,
total, and maximum number of connections managed by the virtual
address since the BIG/ip Controller was last rebooted, or since the
BIG/ip Controller became the active unit (redundant configurations
only).
B - 66
F5 Networks, Inc.
BIG/pipe Command Reference
Deleting a virtual server
Use the following syntax to permanently delete one or more virtual
servers from the BIG/ip Controller configuration:
bigpipe vip <virt addr>:<port> [... <virt addr>:<port>] delete
BIG/ip® Controller, v. 2.1
B - 67
Appendix B
Backward compatible commands
The following BIG/pipe commands have been included for users of
previous versions.
dt [<ip>[:<port> ] ]
port <port> [<port>... ] [allow | deny] [ limit <limit> ]
vip <virt addr>:<port> persistmask [ <IP address mask> ]
vip <virt addr>:<port> persistmask [ none | show ]
vip <virt addr>[:<port>] [<ifname>] netmask <ip> \
[ broadcast <ip> ] define <node addr>[:<port> \
[ <node addr>[:<port>... ] [ special ssl <value> <value> ]
nat <node addr> to <NAT addr> [<ifname>] netmask <ip> \
[ broadcast <ip> ]
fo [ master | slave ]
B - 68
F5 Networks, Inc.
C
BIG/ip System Control Variables
• Setting BIG/ip system control variables
C-1
Appendix C
Setting BIG/ip system control variables
The BIG/ip Controller hardware and software boot up with a
configuration specified, in part, by the system control variables
stored in the /etc/rc.sysctl file. Most of these variables are standard
BSD UNIX system control variables, while some are used
exclusively by the BIG/ip Controller. In most cases, a variable is
just toggled off (0) or on (1), but some variables may also store
specific values, such as a port number.
You can use three methods to set system control variables affecting
the BIG/ip Controller:
C-2
❖
The F5 Configuration utility
Navigate to a system control variable and edit it in the browser
with the F5 Configuration utility.
❖
sysctl command
Write system control variable values directly to /etc/rc.sysctl
using this command line utility.
❖
vi or pico
Use a text editor, such as vi or pico, to edit /etc/rc.sysctl directly.
F5 Networks, Inc.
BIG/ip System Control Variables
sysctl
sysctl -a
sysctl <variable name>
sysctl -w <variable name>=<value>
Displaying current system control variable settings
To display the settings of all system control variables, use the
following syntax:
sysctl -a
To display the current setting for an individual variable, use the
following command syntax:
sysctl <variable name>
Setting a system control variable
Use the following syntax to write a value for a system control
variable in /etc/rc.sysctl:
sysctl -w <variable name>=<value>
For example, the following command sets Transparent Node mode
to on at boot:
sysctl -w bigip.bonfire_mode=1
To turn Transparent Node Mode off at boot, you would write the
setting to /etc/rc.sysctl using the following command:
sysctl -w bigip.bonfire_mode=0
BIG/ip® Controller, v. 2.1
C-3
Appendix C
bigip.vipnoarp
Description
bigip.vipnoarp=1 Prevents the BIG/ip Controller from issuing
ARP requests when rebooted. This is useful for configurations that
contain 1,000 or more virtual servers. This setting also prevents
you from configuring virtual servers as IP addresses on the BIG/ip
Controller external interface.
bigip.vipnoarp=0 (Default) Issues ARP requests on reboot.
C-4
F5 Networks, Inc.
BIG/ip System Control Variables
bigip.bonfire_mode
Description
bigip.bonfire_mode=1 Sets the BIG/ip Controller to operate in
Transparent Node mode, where it can perform load balancing on
routers and router-like devices, such as transparent firewalls.
bigip.bonfire_mode=0 (Default) Transparent Node Mode is off.
BIG/ip® Controller, v. 2.1
C-5
Appendix C
bigip.bonfire_compatibility_mode
Description
bigip.bonfire_compatibility_mode=1 Turns off port translation
on the BIG/ip Controller. This is useful if a node port is only being
used to specify a service check port.
bigip.bonfire_compatibility_mode=0 (Default) Port translation is
on.
C-6
F5 Networks, Inc.
BIG/ip System Control Variables
bigip.fastest_max_idle_time
Description
bigip.fastest_max_idle_time=<seconds> Sets the number of
seconds a node can be left idle by the fastest load balancing mode.
This prevents the BIG/ip Controller from sending connections to a
node that is responding slowly.
BIG/ip® Controller, v. 2.1
C-7
Appendix C
bigip.max_sticky_entries
Description
bigip.max_sticky_entries=2048 This is the maximum number of
sticky entries allowed to accumulate on the BIG/ip Controller when
using destination address affinity (sticky persistence). When the
maximum value is reached, the BIG/ip Controller stops
accumulating sticky entries. The default value for this entry is
2048.
C-8
F5 Networks, Inc.
BIG/ip System Control Variables
net.inet.ip.forwarding
Description
net.inet.ip.forwarding=1 Exposes node IP addresses on the
internal network, allowing clients to connect directly to nodes, and
also allows nodes to initiate connections with computers external to
the BIG/ip Controller. Typically, this setting is used only on
systems that cannot use NATs (for example, a network that uses
CORBA or the NT Domain).
net.inet.ip.forwarding=0 (Default) IP forwarding is off.
BIG/ip® Controller, v. 2.1
C-9
Appendix C
bigip.halt_reboot_timeout
Description
bigip.halt_reboot_timeout=2 This value is the number of
seconds the BIG/ip Controller can stop during boot up before the
watchdog card hard reboots the controller. The default value for this
setting is 2 seconds.
C - 10
F5 Networks, Inc.
BIG/ip System Control Variables
net.inet.ip.sourcecheck
Description
net.inet.ip.sourcecheck=1 This setting enables the BIG/ip
Controller to check the source IP address of incoming packets
before it checks the packet for other information (for example, the
virtual server).
Source checking tries to allocate a route back to the source of the
packet, and if the route cannot be found, or if the route of the
interface is on an interface different from the interface from which
the packet was received, the packet is discarded. Each time a
packet is discarded, the bad source interface counter is
incremented.
net.inet.ip.sourcecheck=0 (Default) IP source checking is off.
BIG/ip® Controller, v. 2.1
C - 11
Appendix C
bigip.webadmin_port
Description
bigip.webadmin_port=443 Specifies the port number used for
administrative web access. (Default = 443)
C - 12
F5 Networks, Inc.
BIG/ip System Control Variables
bigip.persist_time_used_as_limit
Description
bigip.persist_time_used_as_limit=1 (Default) Forces the
persistent connection timer to reset on each packet for persistent
sessions.
bigip.persist_time_used_as_limit=0 Resets timer only when the
persistent connection is initiated.
For SSL persistence, the timer is always reset on each packet.
BIG/ip® Controller, v. 2.1
C - 13
Appendix C
bigip.persist_on_any_vip
Description
bigip.persist_on_any_vip=1 All simple persistent connections
from the same client IP address are sent to the same node (matches
the client IP address but not the virtual address or virtual port the
client is using).
bigip.persist_on_any_vip=0 (default) Off
C - 14
F5 Networks, Inc.
BIG/ip System Control Variables
bigip.persist_on_any_port_same_vip
Description
bigip.persist_on_any_port_same_vip=1 All simple persistent
connections from a client IP address that go to the same virtual
address also go to the same node. This matches the address the
client is using.
bigip.persist_on_any_port_same_vip=0 (default) Off
BIG/ip® Controller, v. 2.1
C - 15
Appendix C
bigip.open_3dns_lockdown_ports
Description
bigip.open_3dns_lockdown_ports=0 (default) This variable is
only required when running a 3DNS Controller. Set to 0 on the
BIG/ip Controller when the 3DNS Controller is not present. (See
the 3DNS Administrator Guide for more information.)
C - 16
F5 Networks, Inc.
BIG/ip System Control Variables
bigip.tcphps_mss_override
Description
bigip.tcphps_mss_override=(<1460) Allows you to decrease the
default maximum segment size (MSS) from 1460 to a smaller
value. This is the value announced to clients by the TCP server
proxy on the BIG/ip Controller in the SYN/ACK packet.
bigip.tcphps_mss_override=0 (Default) The BIG/ip Controller
requests the MSS from the node when negotiating connections on
the node’s behalf.
BIG/ip® Controller, v. 2.1
C - 17
Appendix C
bigip.open_telnet_port
Description
bigip.open_telnet_port=1 Opens the telnet port (23) to allow
administrative Telnet connections (useful for an international
BIG/ip Controller, or for a US controller that needs to communicate
with international 3DNS Controllers).
bigip.open_telnet_port=0 Opens the FTP port to allow
administrative FTP connections (useful for international BIG/ip
Controllers).
C - 18
F5 Networks, Inc.
BIG/ip System Control Variables
bigip.open_ftp_ports
Description
bigip.open_ftp_ports=1 Opens the FTP ports (20 and 21) to
allow administrative FTP connections (useful for international
BIG/ip Controllers).
bigip.open_ftp_ports=0 (default) FTP port does not allow
administrative FTP connections
BIG/ip® Controller, v. 2.1
C - 19
Appendix C
bigip.open_ssh_port
Description
bigip.open_ssh_port=1 Opens the SSH port (22) to allow
administrative connections (useful only for US BIG/ip Controllers).
bigip.open_ssh_port=0 (default) SSH port does not allow
administrative connections.
C - 20
F5 Networks, Inc.
BIG/ip System Control Variables
bigip.open_rsh_ports
Description
bigip.open_rsh_ports=1 Opens the RSH ports (512, 513, and 514)
to allow RSH connections (useful for international BIG/ip
Controllers, or on US controllers that need to communicate with
international 3DNS Controllers).
bigip.open_rsh_ports=0 RSH port does not allow RSH
connections.
BIG/ip® Controller, v. 2.1
C - 21
Appendix C
bigip.verbose_log_level
Description
bigip.verbose_log_level=1 Turns port denial logging on.
bigip.verbose_log_level=0 Turns port denial logging off.
C - 22
F5 Networks, Inc.
D
System Utilities
• sod
• bigd
• big3d
D-1
Appendix D
sod
sod [-help] [-v] [-tty00] [-tty01] \
[-force_slave|-force_master][-print_state_time <interval>]
SOD Option
Description
-help
Prints this message.
-v
Version information.
-tty00
Use tty0 for failover monitoring.
-tty01
Use tty1 for failover monitoring.
-force_slave
Sod prefers slave state when other sod is live and set to force master.
-force_master
Sod prefers master state when other sod is live and set to force
slave.
-print_state_time <value>
Slave prints the state of the serial lines at the specified interval.
Description
The switch-over daemon (sod) controls functions the BIG/ip
Controller fail-over functions. It has a command line interface for
some functions.
Command line usage
The sod daemon is used as a command line utility for some of its
functions.
To display the online help for sod:
sod -help
To display the sod version number:
sod -v
From the standby BIG/ip Controller, you can monitor and display
the state of the active controller:
sod -print_state_time <seconds>
D-2
F5 Networks, Inc.
System Utilities
The seconds parameter specifies the interval in seconds for the
serial line check to the active controller.
Daemon start up options
The sod daemon is configured in /etc/rc.local. You can configure
the sod daemon in two ways:
❖
Serial port(s) used for hardware fail-over cable connections
❖
Forced fail-over role (active or standby) at boot
Note
Every time you change your sod daemon configuration, you need to
reboot the BIG/ip Controller.
Note
In the examples in this section, sod starts the bigd daemon after sod
startup completes, as has been the default configuration since
BIG/ip version 1.8.2. This startup order is optimal, avoiding the
possibility of creating certain suboptimal conditions at boot. For
more information, see the F5 Labs Technical Note titled "Startup
Sequence for Large Numbers of Nodes."
Fail-over cable port configuration in sod startup
The sod daemon startup line in /etc/rc.local accepts two optional
parameters: -tty00 and -tty01. These parameters specify which of
the two 9-pin serial ports (one of them may be a 25-pin serial port
on older BIG/ip Controller models) is used as the fail-over cable
connection. The default is -tty01. Use one (or none) of the -ttyxx
options to configure a single fail-over cable. Use both options to
configure two cables (redundant fail-over cables), as in the
following example:
echo " sod (and bigd)."; /sbin/sod -tty00 -tty01 -- /
bigd ${bigdflags} 2> /dev/null
BIG/ip® Controller, v. 2.1
D-3
Appendix D
References to these fail-over cable connection ports in the sod
startup line in /etc/rc.local are always made using the UNIX device
name, while the hardware and BIOS settings for the ports use COM
and serial port designations respectively.
.
BIOS
COM
UNIX
Port 2 (2f8 irq 3)
COM2
/dev/tty01
Port 1 (3f8 irq 4)
COM1
/dev/tty00
Table D.1 9-pin serial port designations in BIOS, hardware, and
UNIX operating system.
Note
The 9-pin serial port labeled "Terminal" is COM2.
Setting -forced_master and -forced_slave in sod
startup
At boot, a BIG/ip Controller becomes the standby controller if an
active controller is detected.
You can modify this behavior by setting the option -force_ slave or
-force_master in the sod startup line in /etc/rc.local. In the
following example, start sod on one BIG/ip Controller with the force_slave option and sod on the other controller with the force_master option to force one of the BIG/ip Controllers to
become active at boot time.
1. Determine which BIG/ip Controller you want to be the
active controller.
2. In a text editor, such as vi or pico, open the /etc/rc.local file
on that BIG/ip controller .
(The editors pico and vi are provided with BIG/ip.)
3. Find the line in /etc/rc.local that starts the sod daemon.
For example:
D-4
F5 Networks, Inc.
System Utilities
echo " sod (and bigd)."; /sbin/sod -- bigd ${bigdflags} /
2> /dev/null
4. Add the -force_master command line argument.
In this case, it should now say:
echo " sod (and bigd)."; /sbin/sod -force_master -- bigd /
${bigdflags} 2> /dev/null
Now set the other BIG/ip Controller to boot as standby. Follow the
same procedure to edit the /etc/rc.local file on the standby
controller, adding the -force_slave option to the sod startup line.
For example, to edit the default line that starts sod on the controller
you want to boot as standby:
echo " sod (and bigd)."; /sbin/sod -- bigd ${bigdflags} /
2> /dev/null
by adding the -force_slave option:
echo " sod (and bigd)."; /sbin/sod -force_slave -- bigd /
${bigdflags} 2> /dev/null
Reboot both BIG/ip controllers to start sod with the new
configuration.
BIG/ip® Controller, v. 2.1
D-5
Appendix D
bigd
bigd [-d filename] [-n] [-s] [-v] [-V]
Description
This daemon monitors services and nodes for the BIG/ip Controller.
The bigd daemon provides service check functions for simple
(node ping), extended content verification, and extended
application verification service checks. Usage is supported for cases
where the check port for a node is not the same as the node port.
Option
Description
-d filename
Check syntax of the specified configuration file, and
then exit. This option cannot be used in conjunction
with any other option.
-n
Do not ping nodes.
-s
TCP node ping (default is ICMP)
-v
Print version number.
-V
Print verbose output to message logs.
Table D.2
FILES
/etc/bigip.conf
/etc/rc.local
/etc/bigd.conf
/var/log/bigd
/var/log/messages
D-6
F5 Networks, Inc.
System Utilities
Configuring bigd
File
Description
/etc/rc.local
Starts bigd with the options specified.
/etc/bigip.conf
Contains configuration information for timeout_svc
and tping_svc.
/etc/bigd.conf
Contains configuratoin information for ECV and
EAV service checks.
Figure D.1 bigd configuration files.
Starting bigd
The standard way to start bigd is by configuring the sod startup line
in /etc/rc.local :
echo " sod (and bigd)."; /sbin/sod -- bigd ${bigdflags} /
2> /dev/null
This syntax starts bigd after the boot configuration in
/etc/bigip.conf has been loaded and started. This is the optimal
sequence for startup if you use ping aliases. If bigd is started
before sod when ping aliases are defined, node pinging starts before
ping aliases have been loaded.
You can also start and restart bigd on the command line with
options:
bigd
This is the best way to restart bigd if you make changes to the
/etc/bigd.conf file. This method stops any existing bigd processes
and restarts the daemon using the configuration in /etc/rc.local and
/etc/bigd.conf.
BIG/ip® Controller, v. 2.1
D-7
Appendix D
Setting the node ping parameters used by bigd
Node ping uses the timeout_node and tping_node parameters (set
in /etc/bigip.conf) to set the length of time between pings and the
length of time to wait for a ping response before timeout.
Setting service check parameters used by bigd
Simple and extended service checks use the timeout_svc and
tping_svc parameters (set in /etc/bigip.conf) to set the length of
time between checks and the length of time to wait for a check
response before timeout.
Extended service checks also use data from the /etc/bigd.conf file.
There are seven ways to use Extended Content Verification and
Extended Application Verification to check status. The different
checks are listed in Table
Keyword in bigd.conf
Usage
ssl
ECV
active
ECV, ECV on nodes w/wildcard ports
reverse
ECV fails check if string is found
external
EAV
gateway
router ping
transparent
transparent node mode
simple
wildcard ports simple check
Table D.3 Keywords in /etc/bigd.conf
Service checking for wildcard servers and ports
The simple keyword is necessary to perform simple service checks
on nodes with wildcard ports. Use the following syntax to set a
check on a node where the check port is not the node port:
simple [<node addr>:]<node port> <check port>
D-8
F5 Networks, Inc.
System Utilities
For example, if a wildcard server is defined with a non-wildcard
port
bigpipe vip 0.0.0.0:0 define n1:0
then to configure the check on it, use the simple keyword to
designate the wildcard <server:><port> and <check port>:
simple n1:0 80
Use the following variation on the active keyword syntax to
configure ECV on nodes with wildcard ports:
active <node addr>:0 <check port> [<send string> [<regexp>]]
This syntax is only allowed when the node port is 0. When the
node port is 0, this is the only syntax that is allowed.
To support EAV on nodes with wildcard ports, an additional
variation on the "external" command in the /etc/bigd.conf file is
added:
external <node addr>:0 <check port> [<program name> [<arguments>]]
This syntax is only allowed when the node port is 0. When the
node port is 0, this is the only syntax that is allowed.
When this syntax is used, the calling convention for the external
pinger is changed to:
<program name> <node addr> <check port> <arguments>
Service checking through transparent nodes
The /etc/bigd.conf file supports ECV for transparent nodes. This is
done by checking a destination through the particular transparent
node you want to check.
The following syntax is supported in the /etc/bigd.conf file for ECV
through a transparent node:
transparent <node_ip>:<port> <site_ip>:<port> [<send_string>
[<recv_expr>]]
BIG/ip® Controller, v. 2.1
D-9
Appendix D
The bigdnode program uses this syntax to make the appropriate
socket option settings for the ECV check.
The following example shows how to set up an ECV check through
a transparent node. The following virtual servers are defined for this
example:
bigpipe vip 0.0.0.0:80 define p1:80 p2:80
bigpipe vip 0.0.0.0:0
define fw1:0 fw2:0
Configure the /etc/bigd.conf as shown:
transparent p1:80 www.yahoo.com:80 'GET /' 'Yahoo'
transparent p2:80 www.yahoo.com:80 'GET /' 'Yahoo'
transparent fw1:0 www.yahoo.com:80 'GET /' 'Yahoo'
transparent fw2:0 www.yahoo.com:80 'GET /' 'Yahoo'
Tip
Note that Wildcard Ports in virtual server definitions no longer
require a defined service check port with the node if you do not
want port translation. Instead, '0' is used to indicate that port
translation should not take place.
In this example, node p1:80 is tested by getting the web page
http://www.yahoo.com/. The web request is routed through p1.
The transparent node fw2:0 is tested by getting the same web page
(still on port 80), routed through fw1.
D - 10
F5 Networks, Inc.
System Utilities
big3d
The big3d daemon answers 3DNS Controller system queries.
3DNS uses big3d to collect information about the network path
between the BIG/ip Controller and the client requesting a
connection. The big3d utilities calculate performance data, and
return the data to the requesting 3DNS Controller. The 3DNS
Controller uses the path information for its own dynamic load
balancing.
You can start or stop the big3d process without affecting any other
processes on the BIG/ip Controller.
If you no longer want to run the big3d process on the BIG/ip
Controller, stop the process and remove the corresponding start line
from /etc/rc.local. The only reason you might want to do this is if
your installation once used 3DNS but no longer uses it.
WARNING
When the big3d daemon on the BIG/ip Controller is stopped, the
3DNS Controller can no longer provide dynamic load balancing for
the virtual servers that run on the BIG/ip Controller. This may
affect pool definitions on the 3DNS Controller.
big3d hardware and software compatibility
The version of the big3d daemon, the BIG/ip Controller, and the
3DNS Controller that sends requests to it must be compatible. Any
time you upgrade the BIG/ip Controller or the 3DNS Controller,
check to make sure the versions of big3d are compatible.
Installing big3d
Run the big3d install script on the 3DNS Controller to install the
correct version of big3d on the BIG/ip Controller, and add the auto
start info to the BIG/ip Controller /etc/rc.local file. This sets up the
proper fail-over configuration, so that if the BIG/ip Controller is
rebooted or fails over, big3d starts automatically on the standby
BIG/ip Controller.
BIG/ip® Controller, v. 2.1
D - 11
Appendix D
Services and port configurations
Communication between the 3DNS Controller and big3d daemon
on the BIG/ip Controller depends on the proper management of
specific ports.
Outbound iQuery requests
The port used by the iQuery protocol to pass queries and results
between the 3DNS Controller and big3d is now registered with the
IANA as port 4353.
In previous versions of the BIG/ip Controller, outbound iQuery
traffic service used port 245. Current releases of BIG/ip and 3DNS
Controller software enable both of these ports by default, and the
big3d daemon on the BIP/ip Controller detect iQuery requests on
either port.
Firewall ports
The firewall ports 245 and/or 4353 ports must allow traffic between
the BIG/ip Controller and the 3DNS Controller.
WARNING
Firewalls between the 3DNS and BIG/ip Controllers must allow
traffic on one or both of these ports. If the firewall rejects iQuery
traffic, then 3DNS cannot provide dynamic load balancing for the
virtual servers that run on the BIG/ip Controller, which may affect
pool definitions on the 3DNS.
D - 12
F5 Networks, Inc.
E
Services and Port Index
E-1
Appendix E
.
Service
Port
Description
tcpmux
echo
discard
systat
daytime
chargen
ftp-data
ftp
ssh
telnet
smtp
time
nameserer
ni-ftp
whois
xns-time
domain
xns-ch
xns-auth
xns-mail
tacacs-ds
sql*net
bootps
bootpc
tftp
gopher
finger
http
npp
objcall
hostnames
tsap
csnet-ns
rtelnet
snagas
1
7
9
11
13
19
20
21
22
23
25
37
42
42
43
52
53
54
56
58
65
66
67
68
69
70
79
80
92
94
101
102
105
107
108
TCP port multiplexer (RFC1078)
E-2
Active Users
Secure shell
sendmail
timserver
name, IEN 116
NI FTP
nicname
XNS Time Protocol
name-domain server
XNS Clearinghouse
XNS Authentication
XNS Mail
TACACS-Database Service
Oracle SQL*NET
bootp/dhcp server
bootp/dhcp client
www
Network Printing Protocol
Tivoli Object Dispatcher
usually from sri-nic
part of ISODE.
Mailbox Name Nameserver
Remote Telnet Service
SNA Gateway Access Server
F5 Networks, Inc.
Services and Port Index
Service
Port
pop2
pop
ident
sftp
sqlserv
nntp
ntp
ingres-net
netbios-ns
netbios-ssn
imap2
iso-tp0
iso-ip
sql-net
bftp
sgmp
sqlsrv
sgmp-traps
snmp
snmp-trap
print-srv
bgp
gacp
prospero
irc
smux
ipx
dbase
imap3
pdap
ulistserv
hp-collector
hp-managed-node
hp-alarm-mgr
unidata-ldm
ldap
109
110
113
115
118
119
123
134
137
139
143
146
147
150
152
153
156
160
161
162
170
179
190
191
194
199
213
217
220
344
372
381
382
383
388
389
BIG/ip® Controller, v. 2.1
Description
old pop port
pop3 postoffice
auth tap authentication
SQL Services
USENET News Transfer Protocol
network time protocol
INGRES-NET Service
SMB Name Service (SAMBA)
SMB Session Service (SAMBA)
Interactive Mail Access Protocol v2
ISO-IP0
ISO-IP
SQL-NET
Background File Transfer
SQL Service
Network PostScript
Border Gateway Protocol
Gateway Access Control Proto
Prospero Directory Service
Internet Relay Chat Protocol
dBASE Unix
Interactive Mail Access Protocol v3
Prospero Data Access Protocol
Unix Listserv
hp perf data collector
hp perf data managed node
hp perf data alarm manager
Unidata LDM Version 4
Lightweight Directory Access
E-3
Appendix E
Service
Port
synotics-relay
synotics-broker
netware-ip
prm-sm
prm-nm
rmt
infoseek
https
snpp
biff
login
shell
printer
talk
ntalk
route
timed
conference
netnews
klogin
kshell
gii
doom
flexlm
kerberos-adm
kerberos
kpasswd
krbupdate
webster
webster
phonebook
rpasswd
socks
kpop
prm-sm-np
prm-nm-np
391
392
396
408
409
411
414
443
444
512
513
514
515
517
518
520
525
531
532
543
544
611
666
747
749
750
751
760
765
765
767
774
1080
1109
1402
1403
E-4
Description
SynOptics SNMP Relay Port
SynOptics Port Broker Port
Novell Netware over IP
Prospero Resource Manager
Prospero Resource Manager
Remote MT Protocol
SSL-based http
Simple Network Pager Protocol
comsat
no passwords used
line printer spooler
router routed
timeserver
chat
readnews
Kerberos rlogin
Kerberos remote shell
Gated Interactive Interface
doom Id Software
Flexible License Manager
kerberos administration
Kerberos (server) tcp
Kerberos "passwd"
Kerberos registration
phone
SOCKS
Kerberos pop
Prospero Resource Manager
Prospero Resource Manager
F5 Networks, Inc.
Services and Port Index
Service
Port
Description
ms-sql-s
ms-sql-m
watcom-sql
ingreslock
dirsrv
prospero-np
pdap-np
tlisrv
coauthor
radius
snmp-tcp-port
gdp-port
eklogin
ccmail
iQuery
aol
amanda
kamanda
isode-dua
1433
1434
1498
1524
1525
1525
1526
1527
1529
1645
1993
1997
2105
3264
4353
5190
10080
10081
17007
Microsoft-SQL-Server
Microsoft-SQL-Monitor
Watcom-SQL
BIG/ip® Controller, v. 2.1
Archie directory service
Prospero Dir Service Non-priv
Prospero Data Access Proto
oracle
oracle
cisco SNMP TCP port
cisco Gateway Discovery Proto
Kerberos encrypted rlogin
cc:mail/lotus
F5 Networks iQueryfor 3DNS
America-Online
regular BSD auth amanda
Kerberos auth amanda
E-5
Appendix E
E-6
F5 Networks, Inc.
Glossary
active unit
In a redundant system, the controller which currently load balances
connections. If the active unit in the redundant system fails, the standby
unit assumes control and begins to load balance connections.
BIG/pipe
A utility that provides command line access to the BIG/ip Controller.
BIG/stat
A statistical monitoring utility that ships on the BIG/ip Controller. This
utility provides a snap-shot of statistical information.
BIG/top
A statistical monitoring utility that ships on the BIG/ip Controller. This
utility provides real-time information.
big3d
A monitoring utility that collects metrics information about paths
between a BIG/ip Controller and a specific local DNS server. The big3d
utility runs on BIG/ip Controllers and it forwards metrics information to
a 3DNS Controller.
BIND (Berkley Internet Name Domain)
The most common implementation of DNS, which provides a system
for matching domain names to IP addresses.
Glossary - 1
Glossary
chain
A series of filtering criteria used to restrict access to an IP address. The
order of the criteria in the chain determines how the filter is applied,
from the general criteria first, to the more detailed criteria at the end of
the chain.
default wildcard virtual server
A virtual server that has an IP address and port number of 0.0.0.0:0.
This virtual server accepts all traffic which does not match any other
virtual server defined in the configuration.
dynamic load balancing modes
Dynamic load balancing modes base connection distribution on live
data, such as current server performance and current connection load.
dynamic site content
A type of site content that is automatically generated each time a user
accesses the site. Examples are current stock quotes or weather satellite
images.
EAV service check
A service check feature that uses an external program to determine if a
node is up or down based on whether the node returns specific content.
EAV service check is only one of the three types of service checks
available on a BIG/ip Controller. See also service check, and external
service checker program.
ECV service check
A service check feature that allows you to determine if a node is up or
down based on whether the node returns specific content. ECV service
check is only one of the three types of service checks available on a
BIG/ip Controller. See also service check.
Glossary - 2
F5 Networks, Inc.
Glossary
Extended Application Verification (EAV)
A service check feature that uses an external program to determine if a
node is up or down based on whether the node returns specific content.
Extended Content Verification (ECV)
A service check feature that allows you to determine if a node is up or
down based on whether the node returns specific content.
external interface
A network interface on which a BIG/ip Controller receives connection
requests. In a normal configuration, this is typically a network interface
on which external clients request connections to internal servers. In a
Transparent Node Mode configuration, this is typically a network
interface on which internal clients request connections to external
servers.
external service checker program
A custom program that performs a service check on behalf of the BIG/ip
Controller. See also, EAV service check.
F-Secure SSH
An encryption utility that allows secure shell connections to a remote
system.
BIG/ip web server
The web server that runs on a BIG/ip Controller and hosts the F5
Configuration utility.
fail-over
The process whereby a standby unit in a redundant system takes over
when a software failure or a hardware failure is detected on the active
unit.
BIG/ip® Controller, v. 2.1
Glossary - 3
Glossary
fail-over cable
The cable that directly connects the two controller units together in a
redundant system.
Fastest mode
A dynamic load balancing mode that bases connection distribution on
which server currently exhibits the fastest response time to node pings.
FDDI (Fiber Distributed Data Interface)
A multi-mode protocol for transmitting data on optical-fiber cables up
to 100 Mbps.
First-Time Boot utility
A utility that walks you through the initial system configuration process.
The First-Time Boot utility runs automatically when you turn on a
controller for the first time.
host
A network server which manages one or more virtual servers that the
3DNS Controller uses for load balancing.
ICMP (Internet Control Message Protocol)
An Internet communications protocol used to determine information
about routes to destination addresses, such as virtual servers managed
by BIG/ip Controllers and 3DNS Controllers.
internal interface
A network interface through which a BIG/ip Controller distributes
connections. In a normal configuration, it is the network that houses the
server array. In a Transparent Node Mode configuration, it is the
network that houses the array of transparent network devices.
Glossary - 4
F5 Networks, Inc.
Glossary
iQuery
A UDP based protocol used to exchange information between BIG/ip
Controllers and 3DNS Controllers. The iQuery protocol is officially
registered for port 4353.
Least Connections mode
A dynamic load balancing mode that bases connection distribution on
which server currently manages the fewest open connections.
load balancing mode
A particular method of determining how to distribute connections across
an array.
MAC (Media Access Control)
A protocol that defines the way workstations gain access to transmission
media, most widely used in reference to LANs. For IEEE LANs, the
MAC layer is the lower sublayer of the data link layer protocol.
MAC Address
An address used to represent hardware devices on an Ethernet network.
member
A reference to a node when it is included in a particular virtual server
mapping. Virtual server mappings typically include multiple member
nodes.
named
The name server daemon, which manages domain name server software.
NAT (Network Address Translation)
An alias IP address that identifies a specific node managed by the
BIG/ip Controller to the external network.
BIG/ip® Controller, v. 2.1
Glossary - 5
Glossary
node
A specific combination of an IP address and port number associated
with a server in the array managed by the BIG/ip Controller.
node address
The IP address associated with one or more nodes. This IP address can
be the real IP address of a network server, or it can be an alias IP address
on a network server.
node alias
A node address that the BIG/ip Controller uses to verify the status of
multiple nodes. When the BIG/ip Controller uses a node alias to check
node status, it pings the node alias. If the BIG/ip Controller receives a
response to the ping, it marks all nodes associated with the node alias as
up, and if it does not receive a response to the ping, the BIG/ip
Controller marks all nodes associated with the node alias as down.
node ping
A feature that the BIG/ip Controller uses to determine whether nodes
are up or down. Node ping sends standard echo pings to servers and
transparent devices. If the server or device responds to the ping, it
marks the related nodes up. If the server or device does not respond to
the ping, it marks the related nodes down.
node port
The port number or service name hosted by a specific node.
node status
Whether a node is up and available to receive connections, or down and
unavailable. The BIG/ip Controller uses the node ping and service
check features to determine node status.
Glossary - 6
F5 Networks, Inc.
Glossary
Observed mode
A dynamic load balancing mode that bases connection distribution on a
combination of two factors: the server that currently hosts the fewest
connections, and also has the fastest response time.
persistence
A series of related connections received from the same client, having the
same session ID. When persistence is turned on, a controller sends all
connections having the same session ID to the same node instead of load
balancing the connections.
port
A number that is associated with a specific service supported by a host.
Refer to the Services and Port Index for a list of port numbers and
corresponding services.
port-specific wildcard virtual server
A wildcard virtual server address that uses a port number other than 0.
Predictive mode
A dynamic load balancing mode that bases connection distribution on a
combination of two factors: the server that currently hosts the fewest
connections, but also has the fastest response time. Predictive mode
also ranks server performance over time, and passes connections to
servers which exhibit an improvement in performance rather than a
decline.
Priority mode
A static load balancing mode that bases connection distribution on
server priority levels. The BIG/ip Controller distributes connections in a
round robin fashion to all nodes in the highest priority group. If all the
nodes in the highest priority group become unavailable, the BIG/ip
Controller begins to pass connections to nodes in the next lower priority
group.
BIG/ip® Controller, v. 2.1
Glossary - 7
Glossary
ratio
A parameter that assigns a weight to a virtual server for load balancing
purposes.
Ratio mode
The Ratio load balancing mode distributes connections across an array
of virtual servers in proportion to the ratio weights assigned to each
individual virtual server.
redundant system
A pair of controllers that are configured for fail-over. In a redundant
system, there are two controller units, one running as the active unit and
one running as the standby unit. If the active unit fails, the standby unit
takes over and manages connection requests.
remote administrative IP address
An IP address from which a controller allows shell connections, such as
Telnet or SSH.
Round Robin mode
A static load balancing mode that bases connection distribution on a set
server order. Round Robin mode sends a connection request to the next
available server in the order.
service check
A BIG/ip Controller feature that determines whether a node is up or
down. When a BIG/ip Controller issues a service check, it attempts to
connect to the service hosted by the node. If the connection is
successful, the node is up. If the connection fails, the node is down. See
also ECV service check, and EAV service check.
SNMP (Simple Network Management Protocol)
The Internet standard protocol, defined in STD 15, RFC 1157,
developed to manage nodes on an IP network.
Glossary - 8
F5 Networks, Inc.
Glossary
sod (switch over daemon)
A daemon that controls the fail-over process in a redundant system.
standby unit
A controller in a redundant system that is always prepared to become
the active unit if the active unit fails.
stateful site content
Content that maintains dynamic information for clients on an individual
basis and is commonly found on e-commerce sites. For example, a site
that allows a user to fill a shopping cart, leave the site, and then return
and purchase the items in the shopping cart at a later time has stateful
site content which retains the information for that client's particular
shopping cart.
static load balancing modes
Static load balancing modes base connection distribution on a
pre-defined list of criteria; it does not take current server performance or
current connection load into account.
static site content
A type of site content that is stored in HTML pages, and changes only
when an administrator edits the HTML document itself.
transparent node
A node that appears as a router to other network devices, including the
BIG/ip Controller.
Transparent Node Mode
A configuration option that allows a BIG/ip Controller to load balance
connections to routers and router-like devices.
BIG/ip® Controller, v. 2.1
Glossary - 9
Glossary
virtual address
An IP address associated with one or more virtual servers managed by
the BIG/ip Controller.
virtual port
The port number or service name associated with one or more virtual
servers managed by the BIG/ip Controller. A virtual port number
should be the same TCP or UDP port number to which client programs
expect to connect.
virtual server
A specific combination of a virtual address and virtual port, associated
with a content site that is managed by a BIG/ip Controller or other type
of host server.
virtual server mapping
The group of nodes across which a virtual server load balances
connections for a given site.
watchdog timer card
A hardware device that monitors the BIG/ip Controller for hardware
failure.
wildcard virtual server
A virtual server that uses an IP address of 0.0.0.0. A wildcard virtual
server accepts connection requests for destinations outside of the local
network. Wildcard virtual servers are included only in Transparent
Node Mode configurations.
Glossary - 10
F5 Networks, Inc.
Index
/etc/bigd.conf 4-43, 5-8, B-7
/etc/bigip.conf 3-19, 4-43, A-2, B-7
/etc/bigip.interfaces 4-43, B-7
/etc/ethers 3-19
/etc/hosts 3-19
/etc/hosts.allow 4-43, 7-4, A-2, B-7
/etc/ipfw.conf 4-43, B-7
/etc/ipfwrate.conf 4-43, B-7
/etc/netstart 2-23, 3-19, 4-43, B-7
/etc/rateclass.conf 4-43, A-2, B-7
/etc/rc.local 2-25
/etc/snmpd.conf 4-43, 7-5, B-7
/etc/snmptrap.conf 7-6
/etc/sshd_config 3-19
/etc/syslog.conf 6-15
/var/f5/httpd/conf/httpd.conf 3-19
A
administration
BIG/ip web server 3-17
B
Backward compatible commands B-68
BIG/config 1-5
BIG/ip controller
BIG/ip software log files 6-20
changing the password 6-20
default route 3-11
host name 3-11
Maintenance mode B-20
operating system version B-55
pinger log files 6-20
statistics 6-3, B-40
system log files 6-20
system statistics 6-19
BIG/ip web server
changing the password 6-21
configuration 3-17
password file 6-21
setting the password 3-17
BIG/pipe 1-5
monitoring 6-2
version number B-54
vip command keywords B-5
BIG/stat 6-11
BIG/stat command line options 6-12
BIG/store 6-21
bigdba 6-22
bigdba commands 6-23
default.txt 6-23
BIG/top 6-2, 6-12
BIG/top command line options 6-14
bitmask
for a network address translation B-22
broadcast
for a virtual address B-58
C
configuration
synchronizing redundant systems 3-15
configuration files 3-19
saving B-34
testing B-9
Index - 1
Index
configurations
optimization 5-50
planning 2-2
scalability 1-4
connection limits
node addresses B-24
nodes B-24
virtual ports B-29
virtual servers B-59
content servers
default route 2-25
installing on different
logical networks 2-25
Cookie persistence 5-12
D
destination address
affinity (sticky persistence) 5-14
DNS proxy 4-55
DNS, converting from rotary DNS 4-55
E
EAV service check
external service checker program 5-5
Ethernet 3-3
Extended Application Verification (EAV) 5-5
Extended Content Verification (ECV) 4-30
F
fail-over B-11
fail-safe 4-44
Fastest mode 2-6, 5-31
FDDI/CDDI 3-3
Filters 5-35
IP filters 5-35
Rate filters and rate classes 5-36
First-Time Boot utility 1-5, 3-9
saved files 3-19
FTP
allowing on ports 4-15
in Transparent Node Mode 5-29
Index - 2
G
GateD 4-50
gateway fail-safe 5-23
H
-? B-4
nat B-22
I
ICMP
in Transparent Node Mode 5-28
illegal connection attempts 6-19
installation
planning 2-2
rack mounting 3-5
Interface cards 5-39
Configuring additional interfaces 5-39
Routing with multiple NICs 5-44
interface cards 3-3
status 6-7
internal interface
configuring 3-14
intranet configuration 1-19
IP filters 1-7
destination IP addresses 5-36
illegal connection attempts 6-19
in BIG/config 5-35
source IP addresses 5-36
IP forwarding 4-28
L
Least Connections mode 2-6, 5-31
load balancing
dynamic modes 1-6
Fastest mode 1-7, 2-6, 5-31
Least Connections mode 1-6, 2-6, 5-31
Observed mode 1-7, 2-6, 5-31
Predictive mode 1-7, 2-6, 5-31
Priority mode 1-6, 2-5, 5-32, B-32
priority number 2-5, 5-32, B-32
Ratio mode 1-6, 2-5, B-32
F5 Networks, Inc.
Index
connection limits B-24
in Transparent Node Mode 5-27
members 2-19
properties 2-22
service check 5-50, B-45, B-48
statistics 6-3, 6-9, 6-19, B-24
viewing on the command line 6-18
virtual server mappings B-57
ratio value 2-5, B-32
Round Robin mode 1-6, 2-4
setting the mode B-19
static modes 1-6
log files 6-20
log messages 6-15
M
MAC addresses B-17
Maintenance mode B-20
members 2-19
Mirroring 5-20
O
N
P
NATs 4-24
statistics 6-19
netmask
for a network address translation B-22
for a virtual address B-58
network address translations 4-24
statistics 6-11, 6-19
network configurations 5-52
VLAN trunk mode 5-52
out of path routing 5-55
network requirements 2-23
network-based fail-over 5-25
node addresses
connection limits B-24
network address translations 4-24
node aliases 5-50, B-5
node ping 5-50, B-43, B-47
properties 2-22
statistics 6-3, 6-9, 6-19
node aliases 5-50, B-5
node ping 5-50, B-43, B-47
node ping log file 6-20
node pings
Reducing node pings 5-50
node ports
properties 2-22
statistics 6-19
nodes
passwords
BIG/ip controller 6-20
BIG/ip web server 3-17, 6-21
persistence B-27
Port translation
wildcard virtual servers 5-27
Predictive mode 2-6, 5-31
Priority mode 2-5, 5-32
properties
node addresses 2-22
node ports 2-22
nodes 2-22
virtual addresses 2-20
virtual ports 2-21
BIG/ip® Controller, v. 2.1
Observed mode 2-6, 5-31
Out of path routing 5-55
R
-r B-31
rack mounting 3-5
rate classes 1-7, 5-37
in BIG/config 5-37
rate filters
in BIG/config 5-38
Ratio mode 2-5
redundant systems
active unit B-11
fail-safe interfaces 4-45
shared IP aliases 3-15, 4-45
standby unit B-11
Index - 3
Index
synchronizing configurations 3-15
root password
defining 3-10
rotary DNS, converting 4-55
Round Robin mode 2-4
router configurations 2-23, 4-47, 5-48
routing
for the BIG/ip controller 2-23
in Transparent Node Mode 5-28
S
secure network address
translation (SNAT) 4-26
security
BIG/ip web server 3-17
changing passwords 6-20, 6-21
illegal connection attempts 6-19
serial terminals 3-3
service check 5-5, 5-50, B-45, B-48
site content
stateful 2-27
static 2-27
SNMP
client access 7-5, 7-8
in the F5 Configuration utility 7-8
MIB 1-15, 7-3, 7-8
OIDs 7-7
system contacts 7-9
trap configuration 7-5, 7-9
special features
introduction 5-2
SSH client
downloading via FTP 3-21
downloading via
the BIG/ip web server 3-21
UNIX 3-24
Windows 95 and Windows NT 3-23
SSL persistence B-61
allowing EAV service checks 5-8
statistics
BIG/ip system 6-3
network address
translations (NATs) 6-19
Index - 4
node addresses 6-3, 6-9, 6-19
node ports 6-19
nodes 6-3, 6-9, 6-19
virtual addresses 6-3, 6-8, 6-19, B-66
virtual ports 6-3, 6-8, 6-19
virtual servers 6-3, 6-7, 6-19, B-57
sysctl C-3
Syslog 6-2, 6-14, 7-7
system control variables
setting on the command line C-3
system statistics 6-19
T
TCP persistence B-27
TCP/IP services 2-24
timer 4-15
node ping timer 4-16
reaping idle connections 4-17
service check 4-18
Transparent Node Mode
conventional virtual servers 5-28
FTP 5-29
Transparent Node mode
Activating 4-6
advanced options 5-27
ECV service checks 5-29
node ping 5-28
routes 5-28
with FTP 5-29
with standard virtual servers 5-28
trap configuration 7-8
U
UDP persistence B-52
utilities
BIG/pipe 1-5, 6-3, A-2, B-2
BIG/stat 6-11
BIG/top 6-12
First-Time Boot 1-5, 3-9
V
virtual addresses
F5 Networks, Inc.
Index
defining a netmask B-58
properties 2-20
statistics 6-3, 6-8, 6-19, B-66
virtual ports
allowing 6-18, B-29
connection limits B-29
denying B-29
idle connection timeout B-50
properties 2-21
statistics 6-3, 6-8, 6-19
TCP persistence B-27
UDP persistence B-52
virtual server mappings B-57
displaying on the command line 6-18
virtual servers B-56
connection limits B-59
defining standard virtual servers 4-7
defining wildcard virtual servers 4-10
enabling B-65
in Transparent Node Mode 5-28
members 2-19
overview 1-16, 2-18
SSL persistence B-61
statistics 6-3, 6-7, 6-19, B-57
viewing on the command line 6-18
VLAN trunk mode 5-52
W
wildcard ports 4-10
wildcard virtual servers
adding nodes 5-27
BIG/ip® Controller, v. 2.1
Index - 5