1
Mediadent User manual 20120213
Mediadent User manual 20120213
Mediadent User manual 20120213
Table of Contents
1.
Welcome page
2.
Getting Started
2.1. Overview of the Mediadent screen elements
2.2. Acquiring an image
3.
1-2
3
3-4
4-10
2.3. Working with images
10-16
2.4. Saving an image
16-17
2.5. Printing images
17-22
Working with
3.1. Working with the Mediadent screen
23
23
3.1.1. Overview of the Mediadent screen elements
23-24
3.1.2. Overview of the export picture directory screen
24-26
3.1.3. Working with viewports
26-27
3.1.4. Working with desktops
27-34
3.2. Working with images
34
3.2.1. Working with images
34-40
3.2.2. Working with windowing
40-44
3.2.3. Working with pseudo colors
44-45
3.2.4. Working with annotations
45-66
3.2.5. Working with the zoom window
66-70
3.2.6. Working with regions of interest
70-72
3.2.7. Working with filters
72-75
3.2.8. Working with the optimize feature
75-76
3.3. Working with the teeth scheme
3.3.1. Working with the teeth scheme
3.3.2. Manipulating sensor and orientation
3.4. Working with the status mount
3.4.1. Working with the status mount and the image library
76
76-80
80
80-82
82-85
Mediadent User manual 20120213
3.4.2. Working with the status mount in acquisition mode
3.5. Working with the image library
89
3.5.1. Overview of the image properties
89-91
3.5.2. Overview of the specific Extra Info and Keywords
91-93
3.5.3. Working with the image library
93-98
3.6. Working with Mediadent Modules
3.6.1. Working with the reporter module
3.7. New: Working with the Video Still Capture module
3.7.1. Working with the Video Still Capture module
4.
85-89
How to's
98
98-111
111
111-118
119
4.1. Overview How to's
119
4.2. The Mediadent screen
119
4.2.1. How to select more viewports
119-121
4.2.2. How to customize the iconset
121-125
4.2.3. How do I select the ideal desktop
125-126
4.2.4. How do I delete a desktop
126-127
4.2.5. How to change practitioners info
127
4.2.6. How to configure the desktop
128-131
4.2.7. How to load another desktop
131-132
4.2.8. How to move the zoom window
132-134
4.3. The Mediadent image library
134
4.3.1. How to move images from one patient to another
134-136
4.3.2. How to find the patients recently accessed
136-137
4.3.3. How to search for images
137-144
4.4. Mediadent image manipulation
4.4.1. How to activate the negatoscope
4.4.2. How to calibrate an image
4.4.3. How to recover a deleted image
4.5. The Mediadent status mount
144-145
145
145-148
148
148
Mediadent User manual 20120213
4.5.1. How to create a status mount
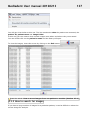
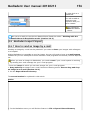
4.6. Mediadent export/import
156-158
4.6.2. How to drag and drop an image in an e-mail
158-161
4.6.3. How to export multiple pictures of a patient
161-164
4.6.4. New: How to burn a CD with images from Mediadent
164-166
4.7.1. How to create a macro
New: Quick Reference
5.1. New: Overview icons
6.
New: Questions and answers
6.1. New: What to do when Mediadent launches in DEMO mode?
7.
Mediadent Setup
7.1. Overview Mediadent Setup
166-173
174
174-177
178
178-179
180
180
180-183
7.3. Regional Registration Settings
183-185
7.4. Display Settings
185-192
7.6. Modules
Mediadent Module Setup
8.1. The optimize module
9.
166
7.2. General Settings
7.5. Misc setting and maintenance
8.
156
4.6.1. How to send an image by e-mail
4.7. Mediadent automatisation
5.
148-156
General topics explained
9.1. A viewport
192
192-193
194
194-199
200
200
9.2. A desktop
200-201
9.3. A status mount
201-202
9.4. The global and patient library
202-203
9.5. How does the histogram work?
10. Getting support
203
204
Mediadent User manual 20120213
1 1
Welcome page
Mediadent is an imaging software for dental and maxillo-facial diagnostic. It captures, displays
and saves digital images from x-ray units, intraoral or extraoral dental cameras, digital cameras
and images acquired by digitizing film with a scanner in order to help a dentist to diagnose the
dental health of a patient.
The Mediadent imaging module is always integrated in a Patient Management System (PMS)
such as Baltes, DentAdmin, ...
You will be able to launch Mediadent via the PMS system by clicking on the Mediadent icon
We recommend that you follow the 'Getting Started' module to get a good overview of the most
common tasks.
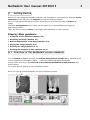
1. Getting Started
First time users can go to the 'Getting Started' section. Here you will find an overview of
common used functions in Mediadent.
It's a great starting point...
Getting Started (Section 2)
2. Step by Step
Follow these steps and learn how to acquire and image, manipulate the image, print and save
the image.
1. Acquisition of an image (Section 2.2)
2. Working with images (Section 3.2)
3. Saving and Printing ('Saving and Printing' in the on-line documentation)
Mediadent User manual 20120213
3. How to
The 'How to' section will offer a number of tips and tricks on how to use Mediadent.
How to (Section 4.1)
4. Help
In this section you will read how to get support.
Getting support (Section 10)
(Section 2)
(Section 2)
(Section 2)
2
Mediadent User manual 20120213
2 3
Getting Started
Before you start using the Mediadent software it's important to understand the different screen
elements and the way you can navigate through the different options.
After you are acquainted with the screen elements you can follow the steps to acquire an
image.
The basic manipulations of an image can be helpful if you need analyze the image for
diagnostic purposes.
There are several ways to share your images with colleagues or other systems.
Step by Step guidance
1. Overview screen elements (Section 2.1)
2. Acquiring an image (Section 2.2)
3. Basic manipulations of an image (Section 2.3)
4. Saving the image (Section 2.4)
5. Printing the image (Section 2.5)
6. Sending the image by e-mail (Section 4.6.1)
2.1 Overview of the Mediadent screen elements
You will launch Mediadent through your Patient Management System (PMS). Mediadent will
receive its patients information (name, ...) from the Patient Management System.
In this article we will give an overview of the different Mediadent screen elements and
there function.
It's a good start to getting to know Mediadent better.
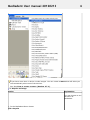
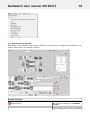
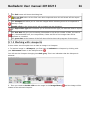
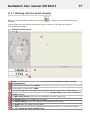
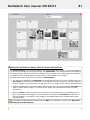
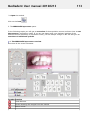
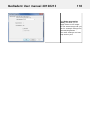
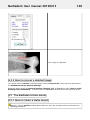
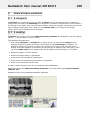
Once you have launched Mediadent can get the following screen:
Mediadent User manual 20120213
4
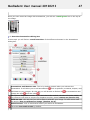
The numbers indicate the Mediadent version you are using at the moment. Preferably you
are using V6. This is the latest version and will give you the richest experience.
These are the different options in the menu. In most of the cases the options are also
available through the Iconset.
These boxes on the screen are called Viewports. You can activate a Viewport and load a
patients image. For analysis and diagnoses purposes you can have up to 5 Viewports on
your screen. This means you can compare up to 5 images of the same patient. Explore the
possibilities of the Viewports in the article Working with Viewports (Section 3.1.3) .
This is the Status Bar, it will show you the patient's name and practitioners' name.
The Iconset allows you to quickly access certain functionality. Clicking on an icon will get
you to the desired functionality.
The Imaging library contains all the images from a particular patient. The patient
information can be read on the Status bar. You can also see the images of the patient in
the Status Mount. See Also Working with the Image library (Section 3.5.3).
The Windowing slider is one of the most powerful features of Mediadent®. It allows you
to limit the number of gray scales in your image. See Also Working with Windowing
(Section 3.2.2) .
The Pseudo Color slider allows you to convert the gray scales from the image into pseudo
colors. See Also Working with Pseudo Colors (Section 3.2.3).
The Histogram of the image represents the distribution of the pixels. It shows the amount
of pixels per gray scale. You will be able to improve the images. See Also Basic
manipulation of an image (Section 2.3) .
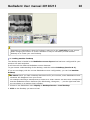
At the bottom of the screen you will see a bar :
The bar indicates how much disk space is in use. If the bar is green, you have enough room to
store the images. An orange or red bar indicates that it is time to look for an extension of your
hard disk/server.
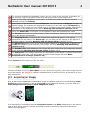
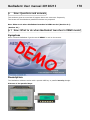
2.2 Acquiring an image
One of the unique capabilities of Mediadent is that it supports most of the world leading X-Ray
devices and video devices. To get an overview of the supported devices, go to our web site
www.imagelevel.com (http://www.imagelevel.com/).
It is important to understand that the acquisition screen may differ depending on the device
that is used. Often a device specific acquisition screen is launched, follow the instructions
offered by the supplier.
Mediadent User manual 20120213
5
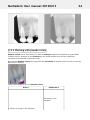
In the screen shots we will use an 'X-Ray Demo sensor' as an example. You can also use
the X-Ray Demo sensor to practice.
When you want to make an acquisition you first need to activate the correct device, then
you go to the acquisition screen. After you are finished acquiring the images for the
patient you can save the image.
This section will explain the steps to acquire an image:
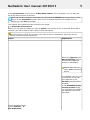
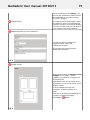
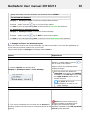
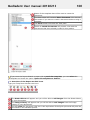
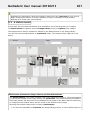
1. Check the active device
Before you can take an image you need to check if the correct device is selected. Once this is
selected, you will be able to take a picture with that device.
You don't have to check it every time you want to take an acquisition. Once the correct
device is selected it will stay active.
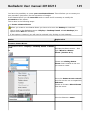
Action
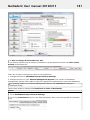
Explanation
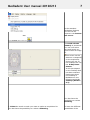
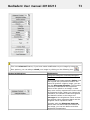
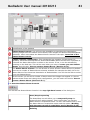
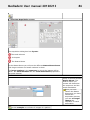
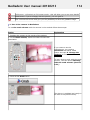
Within the Options > XRay Acquisition list you
will find the supported
devices in Mediadent.
Please make sure to
select your acquisition
device.
It is possible you only see
a limited list of devices.
This depends on the
Modules that have been
installed.
In the Mediadent Setup
section (Section 7.1)
you will learn more about
the Modules that can be
activated.
In the Mediadent Menu,
choose Options > XRay Acquisition
Mediadent User manual 20120213
6
If you have more than 1 device to take images. You can create a macro that will allow you
to automatically select one of the devices.
See Also How to create a macro (Section 4.7.1).
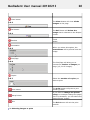
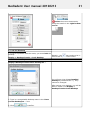
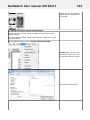
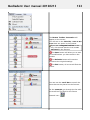
2. Acquire an image
Action
Explanation
You can choose to use
the Menu of
Mediadent.
1. In the Mediadent Menu choose
File>Acquire
Mediadent User manual 20120213
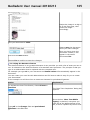
-or-
7
In the standard
Mediadent Desktop
you will see the
Iconset in the bottom
left corner.
In the Iconset click on the icon
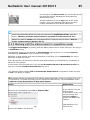
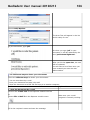
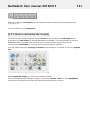
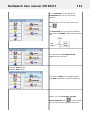
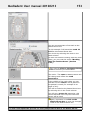
The teeth scheme
(Status) is presented.
You can now select
the tooth/teeth you
want to take an image
of.
This screen can be
different. It depends
on the acquisition
device you use. In
this example we use
the X-Ray Demo
Sensor.
It will also depend
on the Desktop that
has been selected.
Read more about
the Desktop in
Mediadent in the
following article A
desktop (Section
9.2).
You also have the
possibility to a select
Bitewing.
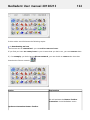
2. Select the teeth or tooth you want to make an acquisition for.
You also have the possibility to a select a Bitewing.
To learn the different
possibilities of the
Mediadent User manual 20120213
8
teeth scheme, read
the article Working
with the teeth
scheme (Section
3.3.1).
Once you have
selected the correct
tooth/teeth or
Bitewing you are
ready to take the
picture.
Don't forget to position the patient or the object you want to take
an image of before clicking the Grab button.
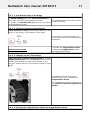
3. You can Grab the image by clicking on the Grab button in the image
acquisition screen.
.
The image will appear
in the Viewport and
in the Image library.
Mediadent User manual 20120213
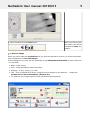
4. When finished click the Exit button.
9
When you click on the
Exit button you will be
prompted to save the
images.
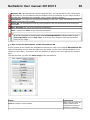
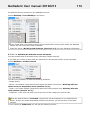
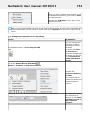
3. Save an image
When you have made an acquisition and you quit the acquisition screen you will be presented
with a dialog box to save the images.
In this dialog box you also get the possibility to add additional information for later reference.
You can add:
Name of the image
Info : extra information about the image
Settings : U (kV), I(mA), t(s), DAP
TÜV : This is optional and can be configured not to appear in the Save as ... dialog box.
Contact us for more information (Section 10).
To organize your images specify extra information and keywords.
Mediadent User manual 20120213
10
Name of the image.
Extra information for later reference.
Measures : pure for your information, this will not have an impact on the image or device.
You can add extra info and keywords to your image for later reference. See Also Working
with the Image Library (Section 3.5.3) and Specify Extra Info & Keywords (Section
3.5.2).
Setting TUV : When this is ticked your image will be locked and can no longer be
changed/saved. In some countries you have to make reference images that may not be
changed afterwards.
Save and Save All the pictures to the Image library.
Delete and Delete All the pictures in the Image library.
Quit the screen
Choose to change the position of the dialogue box = bottom, middle or top of the screen.
To save an image you give the image a name and fill in the extra information fields click on the
Save button.
It is however very practical to work with the Status Mount. This will allow you to save time
because the name of the images will be automatically filled (tooth/teeth number) based on
the association made in the Status Mount. Learn more about how to work with the Status
Mount in the topic : Working with the Status Mount. (Section 3.4.1)
It is possible that your acquisition process has been automated.
In some practices there is more than 1 acquisition device, for example a device for panoramic
and cephalometric images and another device for intra-oral images.
In Mediadent it is possible to automate the acquisition process and to use function keys or
icons in the Icon set to trigger the correct device for a particular picture.
An description of how to automate the acquisition process can be found in the topic How
to create a macro (Section 4.7.1).
2.3 Working with images
Mediadent offers a wide range of tools to manipulate your images so they can help you with
your diagnoses.
Often the raw image is of a poor quality, maybe images are too light or too dark.
It can also be practical to zoom into a particular area of the image for detailed analysis.
This article will explain the basic manipulations of images.
But first things first, load an image into a Viewport and find out what the possibilities are!
1. Manipulation of the image by using the mouse
Action
Result
- Go to full screen mode
LEFT mouse button
- Change the brightness and
contrast of the image.
Mediadent User manual 20120213
11
2.3.1 1. Full Screen View of an image
By double clicking with your left mouse button on
the image, you will see the image full screen.
For detailed analysis you can view the
To go back, just double click again and you will return image full screen.
to the Mediadent screen.
2.3.2 2. Change contrast and brightness
Press and hold the LEFT mouse button and move the
cursor on the image : up and down, left to right.
If you picture if of a bad quality you
can quickly change the contrast and/or
brightness.
- Activate the magnification frame
RIGHT mouse button
- Change the magnification within
the magnification frame
2.3.3 3. Magnify a part of the image
Press and hold the RIGHT mouse button to use the
magnification frame. You can move the cursor while
pressing and holding the right mouse button so you
can go to a particular area you want to analyse in more
detail.
For detailed analysis of a certain
problem area you can activate the
magnification frame.
The magnification frame will appear if
you press and hold the right mouse
button.
2.3.4 4. Change the magnification within the magnification frame
Mediadent User manual 20120213
12
Press and hold the RIGHT mouse button to use the
Sometimes the magnification in the
magnification frame.
magnification frame is not enough.
While pressing and holding the RIGHT mouse
You can zoom in or out in the
button you can turn the wheel the mouse up and
magnification frame. This will allow
down.
you to do a detailed analysis of the
patient's problem.
If you want to change the
magnification within the magnification
frame, you can turn the wheel of the
mouse up and down while pressing
and holding the RIGHT mouse
button.
2. Manipulating images by using the Windowing
The Windows function is a very powerful feature in Mediadent.
It will allow you to improve the quality of your image with 1 mouse click (automatic
windowing, described in the article).
It will allow you to modify the images that are of a lesser quality, too bright or too dark.
The Windowing feature will allow you to filter out the gray scales that are not relevant .
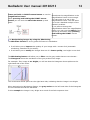
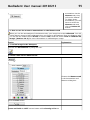
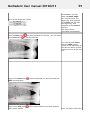
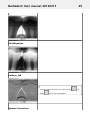
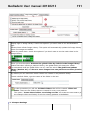
The histogram shows the retribution of the gray scales of an image.
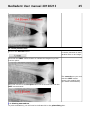
For example: If an image is too bright you will see that the histogram shows spikes on the
right hand side of the chart.
This screenshot shows spikes on the right hand side, indicating that the image is too bright.
When activating the Windowing feature, the gray scales on the left hand side of the histogram
are not relevant and can be discarded.
In this example the image is very bright as a result of too little exposure time.
Mediadent User manual 20120213
To get a better picture quality, we will use the
Windowing ruler.
13
The Windowing ruler and the histogram
work together.
In this section you we will cover the following topics :
1. Use the Windows slider
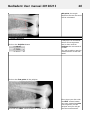
In this example we will slide the Windowing ruler to the right, because the histogram indicates
that there are relevant gray scales.
To slide PRESS and HOLD the left mouse button while dragging the slider to the right.
You will see the image changing on the fly.
Mediadent User manual 20120213
14
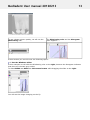
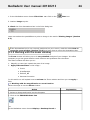
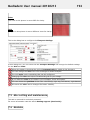
2. Use the automatic Windowing
We have made it even easier for you with the automatic Windowing feature.
Press the icon on the right hand side of the Windows ruler and Mediadent will automatically
filter out the most relevant gray scales.
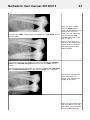
3. Reset the image
You can reset your changes by clicking on the small icon on the left hand side of the Windowing
ruler.
You will see the image revert to the original state.
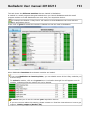
4. Save the modified image
Once you have modified the image via the Windowing feature, you can Save the image.
Mediadent User manual 20120213
15
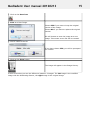
1. Click on the Save icon
.
2. Save as a New Image
Choose YES if you want to keep the original
version of the image.
Choose NO if you want to replace the original
version.
We will choose to save the image as a new
image. This means a new file will be created.
3. Give a name to the file
If you have chosen YES, you will be prompted
for a name.
4. Click on the Save button
.
The image will appear in the Image Library.
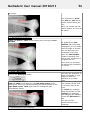
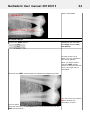
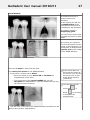
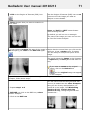
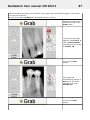
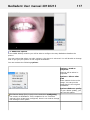
In this screenshot you see the difference between 2 images. The left image is the modified
image with the Windowing feature, the right image is the original image.
Mediadent User manual 20120213
16
2.4 Saving an image
When you have made an acquisition and you quit the acquisition screen you will be presented
with a dialog box to save the images.
In this dialog box you also get the possibility to add additional information for later reference.
You can add:
Name of the image
Info : extra information about the image
Settings : U (kV), I(mA), t(s), DAP
TÜV : This is optional and can be configured not to appear in the Save as ... dialog box.
Contact us for more information (Section 10).
To organize your images specify extra information and keywords.
Mediadent User manual 20120213
17
Name of the image.
Extra information for later reference.
Measures : pure for your information, this will not have an impact on the image or device.
You can add extra info and keywords to your image for later reference. See Also Working
with the Image Library (Section 3.5.3) and Specify Extra Info & Keywords (Section
3.5.2).
Setting TUV : When this is ticked your image will be locked and can no longer be
changed/saved. In some countries you have to make reference images that may not be
changed afterwards.
Save and Save All the pictures to the Image library.
Delete and Delete All the pictures in the Image library.
Quit the screen
Choose to change the position of the dialogue box = bottom, middle or top of the screen.
To save an image you give the image a name and fill in the extra information fields click on the
Save button.
It is however very practical to work with the Status Mount. This will allow you to save time
because the name of the images will be automatically filled (tooth/teeth number) based on
the association made in the Status Mount. Learn more about how to work with the Status
Mount in the topic : Working with the Status Mount. (Section 3.4.1)
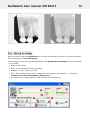
2.5 Printing images
Printing images is one of the easiest ways to share images with your colleagues or your
patients.
In Mediadent you have to:
1. Choose the patient you want to print images for
2. Choose the print icon in the iconset
- orChoose in the Mediadent menu File>Print
Mediadent User manual 20120213
18
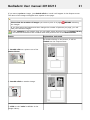
1. Overview Print module
Depending on the Desktop that has been selected, you will see the images of this patient in the
Status mount and in the Patient's Library.
Screen elements
Status Mount
Will show the images in the Status
mount.
All the images taken from this patient
Mediadent User manual 20120213
19
will be organized in his library. You
will see the subfolders. Select one of
the subfolders if you want to print
one of the images.
Image Library
The Status mount and Image Library
are different ways of organizing the
patient’s images. In the print module
you will see both and you can choose
your images from both Libraries.
Additional fields you can customize
You will be able to change the
patient’s name, date and
practitioner’s name.
If you want you can add some
additional comments.
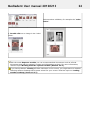
2.5.1
Output screen
This part will show the layout of the
images on the paper. In this
example you see that 3 images will
be printed out.
Just double-click on an image and it
will appear in one of the boxes of the
Output screen.
In this example we have the
possibility to add 3 images on 1
page.
This can be changed by adapting the
number of images per page
(Pics/Page)
2.5.2
option.
Mediadent User manual 20120213
20
Clear button
2.5.3
Del button
2.5.4
The Clear button will clear all the
images on the page
The Del Button will delete the
image that is selected on the Output
screen.
Fixed
Borders
Smart
Annotation
2.5.5
When you select this option, the
annotations will be printed onto the
image
Pics/Page
2.5.6
The Pics/Page will allow you to
choose the number of images per
page (1,2,3 or 6 images).
Copies
2.5.7
Select the number of copies you
want to print
Print button
The print button will print to your
primary printer.
Setup Printer
If you want to change the printer
setup, for example change the paper
size or orientation, you can select the
‘Setup Printer’ button.
Exit
2. Selecting images to print
The Exit button will exit the print
module.
Mediadent User manual 20120213
21
If you want to print an image, just double-click on it and it will appear in the Output screen.
The name of the image will appear as a caption on the page.
First select the number of images you want to print on a page
the images.
BEFORE selecting
If you first select the images and then change the number of pictures per page, you will
lose your selected images.
In this example we will explain how you can easily select pictures from the Image Library
in the different subfolders and combine them with pictures out of the Status Mount.
Action
Explanation and result
By double-clicking on the picture, it will be
loaded into the output screen.
1. Double click on a picture out of the
Status Mount
2. Double-click on another image.
3. Click on the 'ortho' subfolder in the
Image Library.
Mediadent User manual 20120213
22
Select another subfolder, for example the 'ortho
folder'.
4. Double click on an image in the 'ortho'
folder.
With the extra Reporter module you can create standard documents such as referral
documents and add the patient's images and information to them. For more information,
read the topic Working with the reporter module (Section 3.6.1).
If you have problems viewing all these elements on the screen, you might want to consider
choosing another Desktop that is better suited for your screen. Read the topic on Loading
another desktop (Section 4.2.7).
Mediadent User manual 20120213
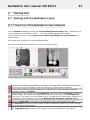
3 23
Working with
3.1 Working with the Mediadent screen
3.1.1 Overview of the Mediadent screen elements
You will launch Mediadent through your Patient Management System (PMS). Mediadent will
receive its patients information (name, ...) from the Patient Management System.
In this article we will give an overview of the different Mediadent screen elements and
there function.
It's a good start to getting to know Mediadent better.
Once you have launched Mediadent can get the following screen:
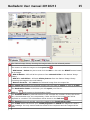
The numbers indicate the Mediadent version you are using at the moment. Preferably you
are using V6. This is the latest version and will give you the richest experience.
These are the different options in the menu. In most of the cases the options are also
available through the Iconset.
These boxes on the screen are called Viewports. You can activate a Viewport and load a
patients image. For analysis and diagnoses purposes you can have up to 5 Viewports on
your screen. This means you can compare up to 5 images of the same patient. Explore the
possibilities of the Viewports in the article Working with Viewports (Section 3.1.3) .
This is the Status Bar, it will show you the patient's name and practitioners' name.
The Iconset allows you to quickly access certain functionality. Clicking on an icon will get
you to the desired functionality.
The Imaging library contains all the images from a particular patient. The patient
Mediadent User manual 20120213
24
information can be read on the Status bar. You can also see the images of the patient in
the Status Mount. See Also Working with the Image library (Section 3.5.3).
The Windowing slider is one of the most powerful features of Mediadent®. It allows you
to limit the number of gray scales in your image. See Also Working with Windowing
(Section 3.2.2) .
The Pseudo Color slider allows you to convert the gray scales from the image into pseudo
colors. See Also Working with Pseudo Colors (Section 3.2.3).
The Histogram of the image represents the distribution of the pixels. It shows the amount
of pixels per gray scale. You will be able to improve the images. See Also Basic
manipulation of an image (Section 2.3) .
At the bottom of the screen you will see a bar :
The bar indicates how much disk space is in use. If the bar is green, you have enough room to
store the images. An orange or red bar indicates that it is time to look for an extension of your
hard disk/server.
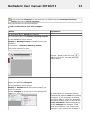
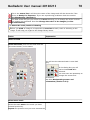
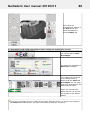
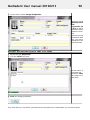
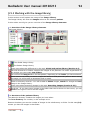
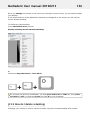
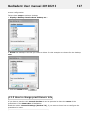
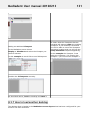
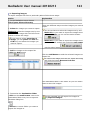
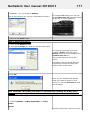
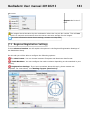
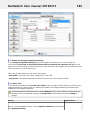
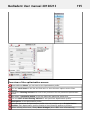
3.1.2 Overview of the export picture directory screen
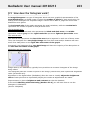
The Export Picture Directory screen
The Export Picture Directory screen is the dialog box used to select the images that need to be
exported in a specific format and to a particular folder (Destination folder).
This option is also used to sent images via e-mail.
Mediadent User manual 20120213
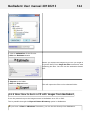
25
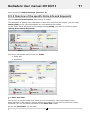
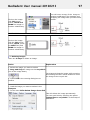
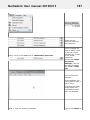
The Patient Image Library showing the images taken for the selected patient.
The buttons to add the images to the export list
- Add button : Select the picture and click the Add or click with the RIGHT mouse button
on an image.
- Add all button : Will add all the pictures from selected folder in the Patient Image
Library.
- Add all + sub folders : Will add all the pictures from the Patient Image Library
(including the images in the sub folders).
- Remove from list : Will remove the selected image from the export list.
The export list contains the selected images that you want to export or sent by e-mail.
The Destination folder is the folder you will export your files to.
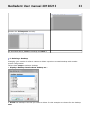
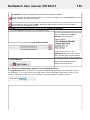
Click on
and browse to the destination folder.
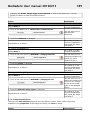
The Estimate button is practical because it will calculate the number of files, the source
size, the destination size, the compression, folder and file of the images that will be
exported or e-mailed. This information will be shown in the Info box
.
The Export button will actually export the images to the Destination folder.
The e-mail button will launch your e-mail program and attach the images to a new email message. You only need to add the names of the recipients and the images will be
sent.
Mediadent User manual 20120213
26
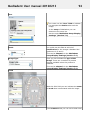
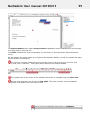
The Exit button will close the dialog box.
Do not Exit before all the files have been exported since this will break off the export
procedure.
The Viewport will allow you to view the images before selecting them to be exported or
sent by e-mail.
Double click on the image and it will be loaded into the Viewport.
The Export File Type box will allow you to choose the file type you want the files to export
to.
The Info box will give you interesting information such as the number of files, the source
size, the destination size, the compression, folder and file of the images that will be
exported or e-mailed.
The green bar at the bottom of the Info box will also show the progress of the export.
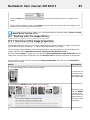
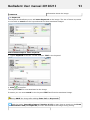
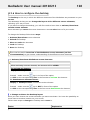
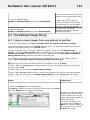
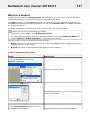
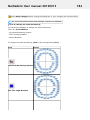
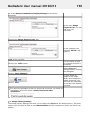
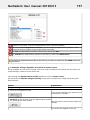
3.1.3 Working with viewports
In this article we will explain how to load an image in a Viewport.
1. To load an image in a Viewport, you first have to activate the Viewport by clicking with
your left mouse button in the Viewport area
.
You will see the Viewport changing into dark grey. This is an indication that the Viewport is
selected.
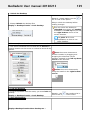
2. Then you need to double click on the image in the image library
loaded in the selected Viewport.
and the image will be
Mediadent User manual 20120213
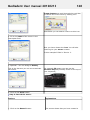
27
The image is now ready for analysis.
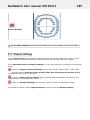
3.1.4 Working with desktops
In this article we will explain what the Mediadent Desktop is, how you can load another
Desktop to better suit your needs.
For the more advanced users, we will explain how to configure a new Desktop.
You also have the possibility to delete a Desktop you have created.
We will explain the following topics:
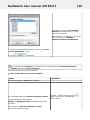
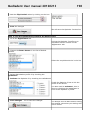
1. Overview of the Mediadent Desktop
A Desktop is the way in which the different screen elements like Viewports, Icon set, Image
Library, ... are presented on your screen.
The Desktop will determine :
How many Viewports A Viewport is a region where you can load an image into for
analysis purposes. Loading an image can be done by first activating the Viewport. To
activate a Viewport you have to select it by clicking in the region with your left mouse
button. Once the Viewport is activated you will see that it changes color (dark grey). Now
you can double click on the image and it will be loaded into the Viewport. are visible.
What the position is of the Iconset.
Where the Image library is positioned
If and where the histogram is positioned
If and where the brightness/contrast bar is positioned
What screen resolution will be used
In short it determines the look of your Desktop within Mediadent.
Read more about the different Desktop elements in the topic about the screen elements
(Section 2.1).
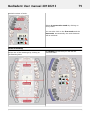
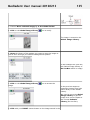
Example of one of the standard Mediadent Desktops :
Mediadent User manual 20120213
28
Important to understand is that the Desktop is also tied to the resolution of your screen.
When changing the screen or screen resolution it may be necessary to load another
Desktop or to create your own Desktop.
2. Loading another Desktop
The desktop that is loaded is the Mediadent screen layout that has been configured for your
monitor size and resolution.
It will show all the different Mediadent screen elements.
To get a better understanding of the desktop, read the article A desktop (Section 9.2).
If you are not happy with the current Mediadent screen configuration, you can load another
desktop.
Be aware that if you load a desktop that does not fit your monitor, some Mediadent screen
elements will disappear from your screen.
For example choosing a desktop that is suited for a wider monitor will have as a consequence
that the Mediadent screen elements (like Windowing, Histogram, ...) on the right hand side
are not shown on a monitor that is smaller.
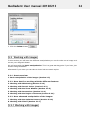
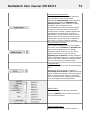
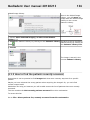
1. Choose in the Mediadent menu Display > Desktop Panels > Load desktop
2. Click on the Desktop you want to load
Mediadent User manual 20120213
29
You will see a list of pre-installed desktops. The names indicated most current screen
resolutions. Depending on the type of screen you have, you will be able to choose one of the
desktops.
A Desktop '1024x768' means that the Mediadent Desktop will be shown on your monitor in
'1024 pixels (width) x 768 pixels (hight) resolution'.
To load the ideal desktop suited for your monitor. You can choose the option
Display>Desktop Panels>Autoset desktop in the Mediadent menu.
3. Configuring the Desktop
The Desktop is the way in which the different elements of the Mediadent are presented on your
screen.
The advantage is that you can change the layout of the different screen elements,
reflecting your way of work.
If you want to change the desktop, you will first need to know how to activate/deactivate
certain screen element.
Once activated you move the screen elements or even re-size them to fit your needs.
To change the Desktop follow these steps:
1. Activate/Deactivate screen elements
2. Unlock the Desktop
3. Move or resize the elements
4. Lock the Desktop
5. Save the Desktop
First read the article Overview of the Mediadent screen elements (on-line
documentation) to get a better understanding of the different screen elements.
1. Activate/deactivate Mediadent screen elements
Mediadent User manual 20120213
30
When activating a screen element, the element will be visible.
To activate an element
Display > Desktop Panels > select the deactivated element
Remark : make sure the
sign is in front of the option
or click on the corresponding icon in the Iconset to activate the element.
To deactivate an element choose
Display > Desktop Panels > select the active element
Remark : make sure the
sign is NOT in front of the option
or click on the corresponding icon in the Icon set to deactivate the element.
2. Change and Save the Desktop layout
Once you have chosen the screen elements you want to activate. You have the possibility to
move them to another location on your screen.
Follow these steps to change the Desktop and to save it.
Action
1. Unlock the Desktop
Explanation
Remark : please make sure the
not in front of the option.
1. Always Unlock the desktop first
is
Always unlock the desktop before
making changes.
Display > Desktop Panels > Lock desktop
You will notice the desktop is
Unlocked when there are handles
available in the left top corner and
the right bottom corner of the
screen element.
See point 2. for more
explanation on how to use
these handles.
2. Move and/or resize the Mediadent screen elements
Move the screen elements to
another location by dragging and
2. The screen elements are free and can be moved to dropping the elements via the
another location on the screen or resized to show all the handles, situated in the left top hand
options.
corner of the element.
Mediadent User manual 20120213
31
Resize the screen elements by
using the handle in the right bottom
corner.
3. Lock the Desktop
3. If you are pleased with the result, you must lock the
desktop.
Remark : the
sign needs to be in
front
of
the
option
in the menu.
Display > Desktop Panels > Lock Desktop
4. Save the Desktop
Display>Desktop Panels>Save desktop as …
You will see a list of pre-installed
desktops (indicated with *). They
cannot be changed.
After saving your desktop, you will be
able to select it via Display >
Desktop Panels>Load Desktop
5. Type in a recognizable desktop name in the 'Save
current desktop as : ' box.
6. Click
to confirm.
Mediadent User manual 20120213
32
In the following examples we will show how to deactivate the Constrast/Intensity
combo and how to add a Viewport.
Click on this title to view the examples
Click on this title to view the examples
Action
As described above, unlock the desktop
Explanation
.
We will deactivate the Contrast/Intensity combo.
In the Mediadent menu choose
Display > Desktop Panels > deselect one of the
elements
For example : Contrast/Intensity combo
The screen element is gone.
Remark : please make sure the
is
not in front of the Contrast/Intensity
combo option.
Adding an additional Viewport
In the Mediadent menu choose
Display > ViewPort and select the Viewport you
want to activate.
In this example we would like to see 3 Viewports.
Be aware that the Viewports that are
activated will appear under the existing
Viewports. If you desktop is Unlocked
you will be able to move the Viewports
to another location and you will see the
newly activated Viewports appearing.
In this example the Viewport 3 was
under the Viewport 1. By moving the
Viewport 1 you will see the Viewport 3.
Mediadent User manual 20120213
33
Position the 3 Viewports correctly.
.
As described earlier, lock the desktop and save it.
.
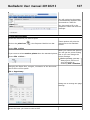
4. Deleting a Desktop
Changing your monitor is often a reason to delete a previous created desktop with another
screen configuration.
Follow these steps to delete a desktop
1. Display>Desktop Panels>Save desktop as ...
2. Select the desktop in the list you want to delete. In this example we choose for the desktop
test.
Mediadent User manual 20120213
3. Click the Delete button.
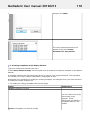
3.2 Working with images
In this section you will learn the different manipulation you can do make on an image so it
serves your diagnosis better.
We will start with the basic manipultation. This is a great starting point if you have just
started using Mediadent.
Afterwards if you want you can take a closer look at certain topics.
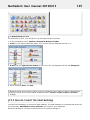
3.2.1 Great overview:
1. Basic manipulation of the images (Section 2.3)
3.2.2 More detail on working with the different features
2. Working with Windowing (Section 3.2.2)
3. Working with Pseudo Colors (Section 3.2.3)
4. Working with the Zoom Window (Section 3.2.5)
5. Working with Annotations (Section 3.2.4)
6. Working with the Region of Interest (Section 3.2.6)
3.2.3 More advanced manipulation of the images:
7. Working with the Optimize feature (Section 3.2.8)
8. Working with Filters (Section 3.2.7)
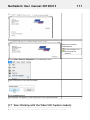
3.2.1 Working with images
34
Mediadent User manual 20120213
35
Mediadent offers a wide range of tools to manipulate your images so they can help you with
your diagnoses.
Often the raw image is of a poor quality, maybe images are too light or too dark.
It can also be practical to zoom into a particular area of the image for detailed analysis.
This article will explain the basic manipulations of images.
But first things first, load an image into a Viewport and find out what the possibilities are!
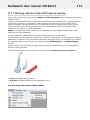
1. Manipulation of the image by using the mouse
Action
Result
- Go to full screen mode
LEFT mouse button
- Change the brightness and
contrast of the image.
3.2.1.1 1. Full Screen View of an image
By double clicking with your left mouse button on
the image, you will see the image full screen.
For detailed analysis you can view the
To go back, just double click again and you will return image full screen.
to the Mediadent screen.
3.2.1.2 2. Change contrast and brightness
Press and hold the LEFT mouse button and move the
cursor on the image : up and down, left to right.
If you picture if of a bad quality you
can quickly change the contrast and/or
brightness.
- Activate the magnification frame
RIGHT mouse button
- Change the magnification within
the magnification frame
3.2.1.3 3. Magnify a part of the image
Press and hold the RIGHT mouse button to use the
magnification frame. You can move the cursor while
pressing and holding the right mouse button so you
can go to a particular area you want to analyse in more
detail.
For detailed analysis of a certain
problem area you can activate the
magnification frame.
Mediadent User manual 20120213
36
The magnification frame will appear if
you press and hold the right mouse
button.
3.2.1.4 4. Change the magnification within the magnification frame
Press and hold the RIGHT mouse button to use the
Sometimes the magnification in the
magnification frame.
magnification frame is not enough.
While pressing and holding the RIGHT mouse
You can zoom in or out in the
button you can turn the wheel the mouse up and
magnification frame. This will allow
down.
you to do a detailed analysis of the
patient's problem.
If you want to change the
magnification within the magnification
frame, you can turn the wheel of the
mouse up and down while pressing
and holding the RIGHT mouse
button.
2. Manipulating images by using the Windowing
The Windows function is a very powerful feature in Mediadent.
It will allow you to improve the quality of your image with 1 mouse click (automatic
windowing, described in the article).
It will allow you to modify the images that are of a lesser quality, too bright or too dark.
The Windowing feature will allow you to filter out the gray scales that are not relevant .
The histogram shows the retribution of the gray scales of an image.
For example: If an image is too bright you will see that the histogram shows spikes on the
right hand side of the chart.
Mediadent User manual 20120213
37
This screenshot shows spikes on the right hand side, indicating that the image is too bright.
When activating the Windowing feature, the gray scales on the left hand side of the histogram
are not relevant and can be discarded.
In this example the image is very bright as a result of too little exposure time.
To get a better picture quality, we will use the
Windowing ruler.
The Windowing ruler and the histogram
work together.
In this section you we will cover the following topics :
1. Use the Windows slider
In this example we will slide the Windowing ruler to the right, because the histogram indicates
that there are relevant gray scales.
To slide PRESS and HOLD the left mouse button while dragging the slider to the right.
Mediadent User manual 20120213
38
You will see the image changing on the fly.
2. Use the automatic Windowing
We have made it even easier for you with the automatic Windowing feature.
Press the icon on the right hand side of the Windows ruler and Mediadent will automatically
filter out the most relevant gray scales.
3. Reset the image
You can reset your changes by clicking on the small icon on the left hand side of the Windowing
ruler.
Mediadent User manual 20120213
39
You will see the image revert to the original state.
4. Save the modified image
Once you have modified the image via the Windowing feature, you can Save the image.
1. Click on the Save icon
.
2. Save as a New Image
Choose YES if you want to keep the original
version of the image.
Choose NO if you want to replace the original
version.
We will choose to save the image as a new
image. This means a new file will be created.
3. Give a name to the file
If you have chosen YES, you will be prompted
for a name.
4. Click on the Save button
.
The image will appear in the Image Library.
In this screenshot you see the difference between 2 images. The left image is the modified
image with the Windowing feature, the right image is the original image.
Mediadent User manual 20120213
40
3.2.2 Working with windowing
The Windows function is a very powerful feature in Mediadent.
It will allow you to improve the quality of your image with 1 mouse click (automatic
windowing, described in the article).
It will allow you to modify the images that are of a lesser quality, too bright or too dark.
The Windowing feature will allow you to filter out the gray scales that are not relevant .
The histogram shows the retribution of the gray scales of an image.
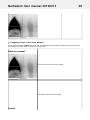
For example: If an image is too bright you will see that the histogram shows spikes on the
right hand side of the chart.
This screenshot shows spikes on the right hand side, indicating that the image is too bright.
When activating the Windowing feature, the gray scales on the left hand side of the histogram
are not relevant and can be discarded.
In this example the image is very bright as a result of too little exposure time.
Mediadent User manual 20120213
To get a better picture quality, we will use the
Windowing ruler.
41
The Windowing ruler and the histogram
work together.
In this section you we will cover the following topics :
1. Use the Windows slider
In this example we will slide the Windowing ruler to the right, because the histogram indicates
that there are relevant gray scales.
To slide PRESS and HOLD the left mouse button while dragging the slider to the right.
You will see the image changing on the fly.
Mediadent User manual 20120213
42
2. Use the automatic Windowing
We have made it even easier for you with the automatic Windowing feature.
Press the icon on the right hand side of the Windows ruler and Mediadent will automatically
filter out the most relevant gray scales.
3. Reset the image
You can reset your changes by clicking on the small icon on the left hand side of the Windowing
ruler.
You will see the image revert to the original state.
4. Save the modified image
Once you have modified the image via the Windowing feature, you can Save the image.
Mediadent User manual 20120213
43
1. Click on the Save icon
.
2. Save as a New Image
Choose YES if you want to keep the original
version of the image.
Choose NO if you want to replace the original
version.
We will choose to save the image as a new
image. This means a new file will be created.
3. Give a name to the file
If you have chosen YES, you will be prompted
for a name.
4. Click on the Save button
.
The image will appear in the Image Library.
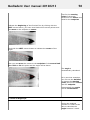
In this screenshot you see the difference between 2 images. The left image is the modified
image with the Windowing feature, the right image is the original image.
Mediadent User manual 20120213
44
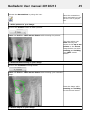
3.2.3 Working with pseudo colors
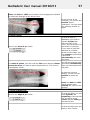
Pseudo colors can be used when you want to analyze images from patients in great detail.
It allows you for example to see fractions in the tooth because you will see a different
coloration of the fraction within the tooth.
By using the Pseudo colors the grayscales are converted to pseudo colors so you we see the
difference in density.
Follow these steps to use the Pseudo colors.
Action
Explanation
The image in the
Viewport.
1. Select an image in the Viewport
Mediadent User manual 20120213
2. Use the slider Pseudo color slider
3. Slide to the right
45
Slide to the right, the
grayscales on the left
hand side of the
histogram are colored.
Slide to the left, the
grayscales on the right
hand side of the
histogram are colored.
In this example we will
slide to the right.
4. Result
You will see the
greyscales converted into
pseudo colors.
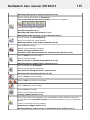
3.2.4 Working with annotations
Annotations can be an important analysis tool.
By adding annotations, you can provide your patients with extra information or point out to your
peers the problem area's.
Important to understand is that the annotations reside in a layer on top of your image. It will
not effect the original image.
You can add different types of annotations:
- Simple annotations (annotations tab)
- Measure annotations (measure tab)
- Implants (separate module)
The annotations can be saved, printed and sent by e-mail.
Mediadent User manual 20120213
46
There is an optional module for Implants. In Mediadent you will find support for new
implant templates such as Nobel Biocare, Replace straight groovy & replace tapered
groovy. The implants module is used to draw implants on the images. This can be interesting
to find out which implant will fit. Contact ImageLevel (Section 10) for more information.
- To activate the Annotations, click on the icon
in the Iconset.
- To de-activate the Annotations, click on the icon
in the Iconset. (Note that the
Annotations icon is grayed out, indicating that the Annotations are active)
VERY important remark : When you want to SAVE an image with annotations, you first
need to de-activate the Annotations dialog box. (This means the dialog box to draw
Annotations may NOT be on the screen!!)
To de-activate the Annotations, click on the Annotations icon
disappear.
Then SAVE the image.
and the dialog box will
Mediadent User manual 20120213
47
Once you have saved an image with annotations, you will see a small green bar on the top of
the image.
1. Overview Annotations dialog box
In this topic you will find an overall overview of the different elements in the Annotations
dialog box.
Annotations and Measure tab: This is by default opened when you activate the
Annotations. It will allow you to add annotations
such as pointers, freehand, Eclipse, Text
and Notes to your images. On this tab you will be able to Delete All
the annotations and
change the size
and the color
.
The optional Implants module. If you don't have this module, the tab will not be visible. If
you want to know how to acquire the Implants module, please contact us (Section 10).
Calibrate tab: with this tab you will be able to calibrate your image. To learn more read
the article 'How to calibrate an image' (Section 4.4.2).
Selection tool: click on this button before you select an annotation.
The active Annotations tab by default.
Mediadent User manual 20120213
48
Measure tab: On this tab that will be explained later, you will be able to add, other types
of annotations. The annotations that are added here are measured, so you image needs to
be calibrated. Examples are Rectangle, Circle, Angle, Polyline, Polygon...
Annotations: The different annotations available on this tab. These annotations are not
related to the size of the image.
Delete All: All annotations made by the Annotations tab will be deleted when clicking on
this button.
Size: Increase the size of the selected annotations.
Color: Change the color of the selected annotation.
If you are working in a large office with several specialists it can be useful to give
every specialist his/her own color. In this way you recognize who has annotated
what on the image.
2. How to use the annotations on the Annotations tab
In this section we will explain the annotations that can be used on the default Annotations tab.
These annotations are free and not relative to the image (so the size of the annotations is not
relative to the image). This can be used for example to quickly show your patient the problem
area.
This tab provides you with the basic usage of the annotations.
Action
Load an image in the Viewport.
Explanation
Make sure you have an
image loaded into a
Viewport and that the
Viewport is selected.
Mediadent User manual 20120213
Activate the Annotations by using the icon.
49
Once the annotations
tab is activated you will
see the icon is grayed
out.
1. Add a pointer to your image
Click on the Pointer button to add a pointer.
.
Press and hold the LEFT mouse button while drawing the pointer.
The point where you
start drawing the
pointer is the tip of the
pointer or the arrow.
Drag the box out while
pressing and holding
your LEFT mouse
button.
2. Add freehand drawing to your image
Click on the Freehand drawing button
.
Press and hold the LEFT mouse button while drawing your freehand
shape.
Draw the shape while
pressing and holding
the left mouse button.
3. Add an ellipse to your image
Mediadent User manual 20120213
50
Click on the Ellipse button
.
Press and hold the LEFT mouse button while drawing the ellipse.
Draw the ellipse while
pressing and holding
the left mouse button.
4. Add text to your image
Click on the Text button
.
Press and hold the LEFT mouse button while drawing the text box.
Draw the text box while
pressing and holding
the left mouse button.
The text box will appear
Type the text in the text box. In this example I have typed 'Problems!' and you can start
typing the text in the
text box.
5. Add a note to your image
Click on the Note button
By using the Note it
seems like you paste a
post-it on top of your
image.
Mediadent User manual 20120213
51
Press and hold the LEFT mouse button while drawing the note box.
Draw the note box while
pressing and holding
the left mouse button.
Type the text in the note box. In this example I typed 'Note'.
The note box will
appear and you can
start typing the text in
the text box.
6. Change the size of the annotations
In this example we will
change the size of an
eclipse.
Select the annotation (eclipse) by clicking on the select button (make The same steps can be
sure the select button is highlighted) and then on the border ellipse. applied to the other
annotations.
When the Select
button is pressed
and you move
towards the border
of the annotation,
you will notice that
the cursor changes
shape. At that
moment you can
click with the left
mouse button to
select the
annotation.
When selecting a
shape, you will
notice small
rectangles in the 4
corners.
This means the
Mediadent User manual 20120213
52
shape is correctly
selected.
Click on the right arrow of the size button to enlarge the eclipse
border.
In the example
we clicked about 10
times on the right
arrow of the size button
to have the result.
If you want to
decrease the size,
you will have to
click on the left
arrow of the size
arrow.
7. Change the color of the annotations
Select the annotation (eclipse) by clicking on the select button (make
sure the select button is highlighted) and then on the eclipse.
In this example we will
change the color of an
eclipse.
The same steps can be
applied to the other
annotations.
When selecting a shape,
you will notice small
rectangles in the 4
corners. This means
the shape is correctly
selected.
In this example we will
change the color into
red.
Click on one of the color icons to change the color
You can change it into
red, green, blue by
default.
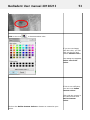
Mediadent User manual 20120213
Click on the icon
53
to choose another color.
If you are not happy
with the color, you can
click on the icon and
choose another color.
This dialog box appears,
select one of the
colors.
If this is not sufficient,
you can even define
custom colors!
Click with the mouse in
the colored area and
Add to Custom
colors.
Click on the Define Custom Colors>> button to customize your
colors.
Mediadent User manual 20120213
54
8. Delete annotations
3.2.4.1 Delete a particular annotation
Select the annotation you want to delete
To verify that the
correct annotation is
selected, you need to
see small rectangles
in the corners
surrounding the
annotation.
Press the delete button on your keyboard.
3.2.4.2 Delete All annotation
Be aware that the
Delete All button
will only delete the
annotations made
via de Annotations
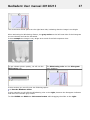
tab.
Click on the icon to Delete All annotations
If you have added
Mediadent User manual 20120213
55
annotations via the
Measure tab, they
will not be deleted.
To delete those
annotations, you will
have to select the
Measure tab and
click on Delete All
button.
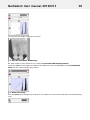
3. How to use the measure annotations on the Measure tab
When you use the annotations of the Measure tab, your image has to be calibrated. You will
notice that an image is NOT calibrated when you draw an annotations (from the Measure tab),
you will see the measurement Pixels in stead of mm. Read the article 'How to calibrate an
image' (Section 4.4.2) for more information on calibrating an image.
Action
Explanation
1. Load an image in the Viewport.
.
Activate the Annotations by using the icon.
.
2. Draw a line via the Measure tab
Choose the Measure tab
in the Annotations and
Measure dialog box.
Click the Line button
Press and hold the LEFT mouse button while drawing a line on
.
Mediadent User manual 20120213
56
the image.
It is important to press
and hold the left mouse
button while drawing the
line.
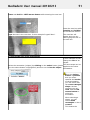
Once you release the left
mouse button, the line will
be drawn.
2.1. Manipulations of the line
Press and hold the LEFT mouse button when moving the line
handles.
By grabbing the line
handles (the little small
rectangles) you can make
the line longer or shorter.
You can also move the
orientation of the line.
Move the line handles
(small rectangles) from
left to right, to shorten or
lengthen the line.
Move them up and down
to change the orientation
of the line.
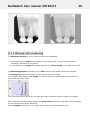
3. Draw a Rectangle
Click on the Rectangle button
Click the LEFT mouse button in the left hand corner of the
rectangular. When you have positioned the mouse pointer in the
right hand corner, click again and the rectangular gets
automatically drawn.
You have the possibility to
draw a rectangle on your
image to draw the
attention to a certain
area.
The handles can be used
in the same way as the
lines.
To resize the rectangle
drag the handles out will
enlarge the rectangle,
and dragging the handles
inward will decrease it's
size.
You also see the
measurements of the
rectangle.
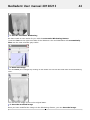
3.1 Manipulations of the rectangle
Mediadent User manual 20120213
57
Press and hold the LEFT mouse button while dragging the handles
to resize the rectangle to the desired size.
In the corners of the
rectangle, you will see the
handles (small
rectangles). You can make
the rectangle smaller or
larger.
4. Draw a circle
Click on the Circle 3 pt. button
To draw a circle in
Mediadent, you need to
indicate 3 point that
make the size of the
circle. (Hence the name of
the button: Circle 3pt.).
If you want to point the
attention to a certain
portion of the image, you
just outline the area with
3 point and
automatically the circle
get drawn.
To outline 3 points, just click with the left mouse button 3 times
around the area you want to point the attention to. The circle is
automatically drawn.
You will see that the circle
get drawn automatically
when you have placed the
3rd point.
As with the previous
shapes, you can use the
handles to resize the
circle.
Press and hold the LEFT
mouse button while
resizing the circle via the
handles.
5. Draw an Angle 3pt.
Click on the Angle 3 pt. button
To draw an angle, you will
need 3 points: the
beginning of the first half
line, the point of the
vertex and the ending of
the last half line.
To draw an angle you only
have to click 3 times :
Mediadent User manual 20120213
58
First for the starting
point of the angle,
second for the vertex and
third for the endpoint.
Indicate the beginning of the first half line by clicking with the
LEFT mouse button, you have now blocked the mouse pointer and
can move to the endpoint or vertex.
Click with the LEFT mouse button to indicate the vertex of the
angle.
Now you can move the mouse to the endpoint of the second half
line. Click to fix this point and the angle will be drawn.
The angle is
automatically calculated.
As in previous examples,
you can use the handles
to change the starting
point, point of the vertex
and the endpoint.
Automatically the angle
will be recalculated.
6. Draw an Angle 4pt.
During the analysis
process it is useful to be
able to calculate the
angle between 2 teeth.
Mediadent User manual 20120213
59
In Mediadent you can
draw a 4 point angle.
Click on the Angle 4pt. button
You need 4 points, the
beginning- and endpoint
of the first half line and
the beginning- and
endpoint of the second
half line.
The angle will be
calculated automatically.
Click the first point
to the end point
(you have blocked the mouse), you can move
of the first half line.
You need to click twice
with the LEFT mouse
button in the beginning of
the half line and a second
time at the end of the half
line.
Move to the first point
LEFT mouse button.
of the second half line and click with the
Move to the end point
LEFT mouse button..
of the second half line and click with the
Once you have clicked the
Mediadent User manual 20120213
60
4th point, the angle
between the two half lines
will be calculated.
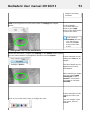
7. Draw a Polyline
Click on the Polyline button
A Polyline is a connected
series of line segments
and is often used to
analyse the root canal of
a tooth.
You will be able to get the
measurement of the root
canal.
Click on the first point of the polyline
Click with the LEFT mouse button to create a line segment.
Every time you click with
the LEFT mouse button
you have created a point
(line segment) on the
polyline and you will get
the the measurement.
Mediadent User manual 20120213
61
You will notice that the
line turns RED when you
have clicked with the LEFT
mouse button for the first
time. This means you
have created you first line
segment.
To end the polyline, double click with the LEFT mouse button.
You will see the total
measurement of the
polyline and the point you
have created.
8. Draw a Polygon
Click on the Polygon button
In the same spirit of the
Polyline, you will be able
to use the polygon to
calculate the surface of a
shape.
It can be practical to
calculate the surface of
particular problem area.
Click with the LEFT mouse button on the starting point of the area
you want to measure.
As long as you don't click
to add a point, the line
will remain black.
Every time you click with
the LEFT mouse button
you will create a point on
the Polygon.
You can add points to the area by clicking with the LEFT mouse
button
Mediadent User manual 20120213
62
Here I have created 4
points on the Polygon.
To end the polygon, double click with the LEFT mouse button
You don't have to close
the polygon, when you
double click the polygon is
closed automatically.
Automatically the surface
is measured.
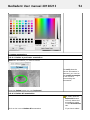
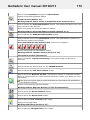
9. Draw Ratio lines pieces
Click on the Ratio button
You have the possibility to
draw 2 line pieces and let
Mediadent calculate the
ratio between the 2 line
pieces.
The ratio is calculated by
taking the length of the
first line piece and divide
it through the length of
the second line piece.
Click with the LEFT mouse button on the image to indicate the
begin point of the first line piece
Mediadent User manual 20120213
Click with the LEFT mouse button to indicate the end point of the
first line piece
63
Once you have clicked
with the LEFT mouse
button to indicate the end
point of the first line
piece, you will notice the
line piece turns RED,
indicating the end of the
first line piece.
You can now move the
mouse to the begin point
of the second line piece
and click with the LEFT
mouse button.
Move to the point on the image you want to indicate the starting
point of the second line piece and click with the LEFT mouse
button.
Move to the point on the image you want to indicate the end point
of the second line piece and click with the LEFT mouse button.
We want to calculate the
ratio between 2 line
pieces, this could be the
length of the teeth.
Once you have clicked the
last end point of you last
end point, you will see the
lines turn RED and the
Mediadent User manual 20120213
64
ratio is calculated.
10. Draw a Slope
Click on the Slope button
Mediadent will calculate
the slope between two
line pieces.
As long as the line is
black, you can reposition
the mouse pointer.
Once you have clicked
with the LEFT mouse
button to indicate the end
point, the slope will be
calculated.
Click with the LEFT mouse button to indicate the beginning of the
You will notice the slope is
RED indicated the
calculation is done.
first line piece.
Move the mouse to the end point and click a second time with the
LEFT mouse button.
Mediadent User manual 20120213
65
11. Draw parallel lines
Click on the Parallel button
It can be practical to draw
parallel lines on an image.
Click with the LEFT mouse button to indicate the beginning of the
first line piece.
The second time you click
with the LEFT mouse
button, the parallel lines
get drawn automatically.
Move the mouse to the end point and click a second time with the
LEFT mouse button.
4. Printing annotations
To print annotations, you will need to indicate this in the print dialog box.
Mediadent User manual 20120213
66
1. In the Mediadent menu choose File>Print -or- Click on the
Print icon.
2. Load an image to print.
3. Check the Print Annotations box in the Print dialog box.
Learn more about the possibilities to print an image in the article 'Printing images' (Section
2.5).
If the Annotations box is not correctly positioned on your screen, read the article How to
move the zoom window (Section 4.2.8) and learn how to move the Annotations box.
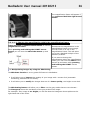
3.2.5 Working with the zoom window
The Zoom window will allow you to do very detailed analysis of your images. It is often
necessary to go into great detail to track fractions and problems with the tissue.
The Zoom window will allow you to:
1. Magnify or zoom into a particular part of an image
2. Apply different filters to the image :
Invert
HistoEqualize
Emboss_NE
Gamma Correction
In this article we will explain how to activate the Zoom window and how you can apply a
filter.
1. Working with the magnification or zoom function
Follow the steps to use the Zoom window:
Action
1. Select an image and load it into the Viewport
Explanation
.
2. Click on the ZOOM Windows icon
.
-orIn the Mediadent menu choose Display > Desktop Panels >
Mediadent User manual 20120213
67
Zoom Window
An additional screen is
opened next to the
Viewport.
In the screen you will see
a magnification of the
point where the mouse is
positioned in the Viewport.
The screen acts as a
magnifying glass.
You will see the tissue and
the teeth structure in large
detail.
By moving you mouse to
the correct position on the
image in the Viewport, you
will be able to analyze that
specific area of the image
in the ZOOM Window.
There are 2 ways to zoom into the area :
First move your mouse to the ZOOM Window.
1. If you have a mouse with a wheel :
Move the wheel of your mouse UP to increase the
magnification of the area.
Turn the wheel of the mouse DOWN and you will
decrease the magnification. (This will depend on the way
the wheel mouse is setup).
If the zoom does not
work with the wheel of
the mouse, you can use
the zoom ruler on top
of the Zoom window
(method 2).
You can also use the
arrow Up
or
Down
to increase
or decrease the
magnification.
2. Use the ruler on the top of the ZOOM Window and slide it to the
right to get a greater magnification.
Mediadent User manual 20120213
68
2. Applying a filter to the Zoom Window
If you want to apply a filter, click on the corresponding icons at the bottom of the screen. You
can switch from one filter to another at any time.
Back to normal
The first icon will reset the image.
This filter will invert the image.
Invert
Mediadent User manual 20120213
69
HistoEqualize
.
Emboss_NE
.
You can adjust this filter by using the Up
Down
Gamma Correction
key on your keyboard.
and
Mediadent User manual 20120213
70
.C
You can adjust this filter by using the Up
Down
and
key on your keyboard.
If the position of the ZOOM Window interferes with your analysis you can move the ZOOM
Window.
You will learn all about this in the topic Moving the Zoom Window (Section 4.2.8) and
Configuring the desktop (Section 4.2.6).
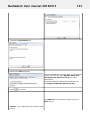
3.2.6 Working with regions of interest
Next to the Zoom Window (Section 3.2.5), the Region of Interest (ROI) is a very practical
feature if you want to analyze parts of your image in greater detail.
It will allow you to CUT a piece out of an image and analyze it in, for example another Viewport.
All the manipulation you make on an image are also possible in the ROI.
In this article you will learn how to create a ROI and how to analyze the ROI in a separate
Viewport. You will also learn how to save the ROI.
To create the Region of Interest follow these steps:
Action
Explanation
1. Load an image in a viewport
Load the image you want to analyze in more
details.
Mediadent User manual 20120213
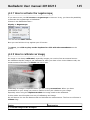
2. Click on the Region of Interest (ROI) icon.
71
Use the Region of Interest (ROI) icon to cut
a piece out of the image you want to
analyze in more details.
3. Draw the part that you want to examine in
more detail.
Press and hold the LEFT mouse button
while drawing the ROI.
By default you will cut out a rectangle.
The part of the image you have cut out can
be used for further analysis.
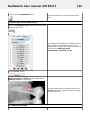
4. If you want to analyze this part of the image in Notice that the second time you click on the
this viewport, just click on the ROI icon again. ROI icon, it has a darker color. It means
you are ready to analyse this piece of the
image.
The result is that the image in the Viewport
is replaced by the ROI (piece that was cut
out).
If you want to revert to the original
image, click on the Reload icon
and the original image will appear
in the Viewport.
If you do not want the Viewport to be replaced and you want to analyze the ROI in another
Viewport, follow these steps:
You will notice that the ROI (part that was
cut out) is loaded into the other Viewport.
1. Repeat step 1 to 3
2. BEFORE you click on the ROI icon, select
another Viewport
3. Click on the ROI icon
Now you can do any manipulations you
would do on an image, like Windowing
(Section 3.2.2), Pseudo Coloring
(Section 3.2.3), change brightness and
contrast etc…
Mediadent User manual 20120213
72
To SAVE the ROI (piece of the image):
1. Select the Viewport with the ROI.
2. Click on the Save icon.
.
Give the image a name.
The image will appear in the Image
Library.
You can choose the way in which you cut out of piece of the image : rectangular or
freehand.
To choose another way : Click and hold the icon, you will notice that extra icons become
available, choose freehand or rectangular.
The first icon is a nice rectangle the second is freehand. With freehand, you can draw
yourself the area you want to analyze.
Read all about the manipulations in the article 'Basic manipulation of images' (Section
2.3), topic '1. Manipulation of the image by using the mouse'.
3.2.7 Working with filters
You have the possibility to tweak the image by using the different filters in Mediadent.
In this article you will learn about the different filters you can apply to your images in
Mediadent.
To activate the filter dialog box, click the icon
The Filter dialog box will appear with the different options you can use to modify your image.
Mediadent User manual 20120213
73
This is an advanced feature, if you have made modification to your image by using the
filter options, you can always reload your image by clicking on the following icon:
Option in Dialog box
Explanation
Using the Histogram Contrast/Histogram
Equalize
If your scanned image appears darker that
the original and you want to balance the
values to produce a lighter image, you can
use the Histogram Equalize. The Equalize
command redistributes the brightness
values of the pixels in an image, so that
they more evenly represent the entire range
of brightness levels. When you choose the
command, the software finds the brightest
and darkest values in the image and
averages all the brightness values so that
the darkest value represents black and the
brightest value represents white.
Together with the Histogram Contrast
which does not affect the color balance of
the image, you can see before and after
brightness comparisons.
Mediadent User manual 20120213
74
Using the Stretch Intensity
The Stretch intensity command performs
the equivalent of the Levels slider
adjustment automatically, these features
automatically define the lightest and
darkest pixels in each channel as white
and black, then redistribute the
intermediate pixel values proportionately.
In general, the Auto feature gives good
results when a simple contrast adjustment
is needed to an image with an average
distribution of pixel values. However, this
feature does not provide the more precise
control that can be achieved by adjusting
the Levels or Curves controls manually.
Using Gamma correction
This is used to adjust the way the images
are shown on the monitor or printed out.
Minor color corrections can be made,
depending which monitor you are using.
Gamma corrections is the process of
adjusting your monitor and the software
color conversion settings, to compensate for
factors that affect both the onscreen image
and it’s conversion to printed output.
Using Sharpen
For blurry images you can use the Sharpen
filter.
Sharpen filters focus blurry images by
increasing the contrast of adjacent pixels.
These include the Sharpen and Focus filters,
both of which find the areas in the image
where significant color changes occur (such
as at the edges) and sharpen them.
Spatial filters
These are advanced filtering possibility.
Press the RIGHT mouse button to get the
list of advanced filters.
Using Gaussian Blur
Noise reduction can be used to remove
Mediadent User manual 20120213
75
problem areas from an image, such as
electron noise, dust and scratches.
Gaussian blur gives better results, due to
the advanced formula, but this filter works
slower.
Using Unsharp Mask
This filter is interesting for images you want
to print or view online.
Unsharp mask or Focus is a traditional film
compositing technique used to sharpen
edges in an image. The Unsharp Mask filter
corrects blurring introduced during
photographing, scanning, re-sampling or
printing.
Unsharp mask locates pixels that differ from
surrounding pixels and increases the prixel’s
contrast by the amount you specify. In
addition, you specify the radius of the
region to which each pixel is compared.
The effects of the Unsharp Mask filter are
far more pronounced on-screen than in
high-resolution output. If your final
destination is print, experiment to
determine what settings work best for you
image.
Best setting for Focus:
Hi-res image (3000 pixels H or V):
Radius: 16
Fract: 6
Decrease Radius, if the image is smaller
(less pixels)
Decrease Fract if the filter is too
strongly promounced.
If your images you acquire always need the same adjustments, it can be useful to use the
Optimize option. This will apply by default the desired filters when selecting a certain
Optimizer
.
Read the article 'Working with the Optimize feature' (Section 3.2.8).
3.2.8 Working with the optimize feature
The Optimize feature is an advanced feature that allows you to standardize the filters
(masks ...) that can be applied to your image.
Often after acquiring the images, additional manipulations are necessary to provide the clarity
that is needed for detailed analysis. These manipulations can be automated through an
Mediadent User manual 20120213
76
optimization profile.
You have for example the possibility to determine which filters you will apply by default when
acquiring an image.
In Mediadent you can to configure 5 Optimization profiles.
You will be able to link a certain Optimize profile to a particular acquisition device. Read more
about this in the article The optimize module (Section 8.1).
Action
1. Apply Optimization profile 1
Click on the icon in the Iconset and the
Optimization 1 profile will be applied to the
image.
Explanation
By default the Optimization profile 1 is
available in your Iconset.
By clicking the icon a number of filters
and/or actions will be applied to the image
as configured in the Optimization profile 1.
2. Apply another Optimization filter
Press and hold the left mouse button on the
Optimization icon in the icon set.
The Optimization icon will expand and you
will get the 5 icons.
Select the Optimization profile you want to apply
to your image.
You will receive 5 icons (1 to 5),
representing 5 Optimizations
profiles you can apply to the image.
Choose for example 5, this will apply the
Optimization profile 5 to the image.
As an example choose Optimization profile
5 to test.
If you are not happy with the result of your optimizations, you have the possibility to re-load
your original image by clicking ,the re-load icon in the iconset
.
If you want to know how the optimization profiles are configured, read the following article:
The optimize module (Section 8.1).
The Optimization feature is related to the filter options.
The filter allows you to enhance the image on an ad hoc basis. Read more about this in the
article: Working with Filters (Section 3.2.7).
3.3 Working with the teeth scheme
Mediadent User manual 20120213
77
3.3.1 Working with the teeth scheme
Once you have selected to make an acquisition
scheme.
the status is presented with the teeth
In this screen you will indicate from which tooth or teeth you will make an image of.
This section will explain :
1. Overview of the screen
Menu of the Acquisition screen. See Also Overview of Acquisition menu (on-line
documentation).
Teeth scheme or status for an adult.
Teeth scheme or status for a child.
This small dialog box in the middle of the scheme will show the tooth or teeth that are
selected, the sensor and the orientation. See Also Manipulating sensor and orientation
(Section 3.3.2).
The Bite wing selector gives you the possibility to select a bite wing.
The Viewport where the image will be loaded.
The Image Library where the images for the patient will be stored.
The Grab button will make the acquisition.
The Exit button will exit the acquisition module and will prompt you to save the images.
See Also Saving an image (Section 2.4).
Mediadent User manual 20120213
78
This is the status line it will show the name of the image and will also show the if the
device is Ready For Exposure. If you are experiencing problems check the section
Troubleshooting (Section 6).
The little arrow will give you access to a menu allowing you to change the order in which
the images are presented. See Also Change the order of the images (on-line
documentation).
2. Select the tooth, teeth or bitewing
Before you Grab an image it is important to associate a tooth, teeth or bitewing to the
image. It will help you organize the Image library better.
Action
Explanation
Select 1 tooth
Select the tooth (Click on the tooth with the
left mouse button) in the status.
You will see the selected tooth is now dark
grey.
In the dialog box you will
notice that tooth 16 is
selected.
You now have the possibility to
change the sensor and
orientation.
See Also Manipulating sensor and
orientation (Section 3.3.2).
Select more teeth
Select the tooth next to the tooth you have
selected previously.
Repeat this process until you have selected the
Mediadent User manual 20120213
79
desired number of teeth.
Select 4 consecutive teeth by clicking on
every tooth.
You can also click on the first tooth and the
last tooth, automatically the teeth between
will be selected.
Select a bitewing
Select one of the bitewings by clicking on
the Bitewing bars.
By clicking on the bars you will see the
selected teeth.
Mediadent User manual 20120213
80
Go back to the topic about Acquisition (Section 2.2) and follow the instructions to Grab
the image (2. Acquire an image / 3. Grab the image)
3.3.2 Manipulating sensor and orientation
When you make an acquisition by means of the teeth scheme or status, you have the
possibility to change the orientation of the sensor.
Click on the sensor buttons to change the sensor orientation. The option with
the green dot is the active setting.
You can also flip the image from Left to right
or Top to bottom
.
The changes you make to the orientation of the sensor will be saved for the next time.
3.4 Working with the status mount
3.4.1 What is a Status Mount
In this topic we will explain the basics of an alternative way of working with your images.
The Status Mount is together with the Image Library a way to organize your images.
The images can be stored, modified or deleted in the Status Mount or the Image Library.
You can also use the Status Mount in acquisition mode. The images will be captured in the
boxes.
Mediadent User manual 20120213
81
Differences between the Image Library and the Status Mount
The Image Library is the main container where the images are stored in. The manipulations
you do on the images in the Image Library are permanent. This means deleting an image in
the Image Library will also result in the deletion of the image in the Status Mount. Removing
an image from the Status Mount will not result in the deletion of the image.
Working with a Status Mount has a couple of advantages:
You have the possibility to automate the image taking process. In some offices there is a
procedure in place for taking pictures. For example in some cases it is common practice
to take images of the full mouth. In that case it is very handy to be able to automate this.
Another advantage of using the Status Mount is that you can automatically associate the
tooth or teeth to the image. The name of the image will represent the tooth or teeth
association.
Also the order in which the pictures are taken can be determined in the Status Mount.
If you take intra-oral images it is also possible to change the orientation (rotate 90° or
flip horizontally or vertically) of the image in the Status Mount Box independent of the
original image.
An example of a Status Mount scheme is the AAO. This scheme is used by the American
Academy of Orthodontists.
Mediadent User manual 20120213
82
If you want to know how you can move images from the Image library into the Status
Mount, read the article : Working with the Status Mount and the Image Library
(Section 3.4.1).
Perhaps you want to use the Status Mount when you are acquiring an image, read the
article : Using the Status Mount in Acquisition Mode (Section 3.4.2).
Maybe you want to create your own Status Mount, read the How to article : How to
create a Status Mount (Section 4.5.1).
3.4.1 Working with the status mount and the image library
In this article we will explain how you can use the Status Mount. We will give an overview of
the screen elements and explain the Status Mount Controls and Submenu.
We will also show you how you can move images from the Image Library to the Status Mount
boxes.
1. How to activate the Status Mount
There are 2 ways to activate the Status Mount
Action
Explanation
In the Mediadent menu choose
Display > Desktop Panels > Mount
View
If you are not yet sure what the Status Mount can do
for you, you can read this article: A Status Mount
(Section 9.3).
If you want to move the Status mount dialog box
you will need to unlock the desktop and
reposition the dialog box.
To learn more about the the layout of the
desktop read the article How to configure the
desktop (Section 4.2.6) topic 2. Change the
desktop layout.
-orChoose the icon in the Icon set
The Status Mount will appear on your desktop and you will be able to view the different images
in the Status Mount.
2. Overview Status Mount Screen
Mediadent User manual 20120213
83
Identification of the patients
Status Mount Controls. You will have the possibility to start/stop the sequencing,
deleting images from the Status mount boxes, filter images and access the Status Mount
Submenu. Learn more about the Status Mount Controls in the topic: Overview of the
Status Mount controls.
Image container configurator: This rectangular box contains 32 little boxes (or
squares). Each little box represent a Status Mount box. When the little box is pressed-in
it means the Status Mount box is visible on the screen. If not, it can be activated by
pressing on the little box. This will be used when you want to create your own Status
Mount. See the topic ‘How to create a Status Mount. (Section 4.5.1)’
The Status Mount selector. You will be able to select another Status Mount. By default
there are a number of Status Mount schemes available for example the AAO, this is the
Status Mount of the American Association of Orthodontists. You will also be able to select
your own Status Mount.
On the screen you will see a number of boxes where the images can appear in. How to
activate these boxes and change their configuration, you will read in the article 'How to
create a Status Mount (Section 4.5.1).'
3. Overview Status Mount Controls
You will find the Status Mount Controls in the top right hand corner of the dialog box.
Start/Stop Sequencing
The Start/Stop icon will allow you to temporarily stop the
sequence when taking images. This is used when you use the
Status Mount in acquisition mode. To learn more about how to use
the Status Mount in acquisition mode read the article: Working
with the status mount in acquisition mode (Section 3.4.2).
Deleting
Mediadent User manual 20120213
84
This icon has the same usage as in the Image Library. When you
drag an image on the Delete icon the image will be deleted. See
the topic ‘Working with the Image Library’ (Section 3.5.3).
Filter
This icon will allow you to filter on different images, for example
images taken on a specific date. It will allow to search through the
images and filter out the relevant images based on date, grade,
user, type and keywords. The usage of the icon can be found
under the topic ‘Searching images’ (Section 4.3.3).
Sub Menu
To show the Status Mount sub menu click on the small arrow in
the right top corner of the Status Mount Dialog box.
These menu options are used when you want to create your own
Status Mount.
We will explain these options in the topic : ‘How to create a
Status Mount’ (Section 4.5.1).
4. Move an image from the Image Library to a Status Mount box
You have the possibility to move an image from the Image Library into one of the boxes in the
Status Mount.
Action
Display > Desktop Panels > Mount
View
or
Explanation
If you don't have the Status Mount screen on your
desktop, you first have to activate the Status Mount
via the Menu or my using the icon in the Iconset.
Select the image in the Image library and drag and
hold the left mouse button and point to the desired
Status Mount box. When you release the mouse the
image will appear in the Status Mount box.
By repeating this process with other images, you have
the ability to drag and drop more than 1 image on the
same Status Mount box.
Mediadent User manual 20120213
85
By clicking on the little arrows you will be able to see
the different images associated to that particular
Status Mount box.
Another indication is the +-sign next to the tooth
number. This is an indication that there are more
images associated to this Status Mount box.
Learn how the Status Mount can help you save time in acquisition mode: read the
article : Working with the status mount in acquisition mode (Section 3.4.2).
Maybe you want to create your own Status Mount, read the How to article : How to
create a Status Mount (Section 4.5.1).
3.4.2 Working with the status mount in acquisition mode
The biggest advantages of working with the Status Mount can be found when you are using it
in acquisition mode.
In acquisition mode you will be able to automatically take pictures in a certain sequence,
automatically associate a teeth or tooth to an image.
Especially in large offices with more practitioners it will allow you to standardize the way in
which the images are taken.
Every practitioner will be able to use the same Status Mount so a standard set of images are
taken for every patient.
In this article we will explain how you can use the Status Mount in Acquisition mode and
also how to select another Status Mount and use it.
The following steps explain how to activate the Status Mount in acquisition mode and how
to use it for taking 3 images.
Remember that the screenshots of the Status Mount acquisition screen may differ from your
environment. To follow the steps you can select the Demo Sensor, via the Mediadent menu
Options>X-Ray Acquisition>X-Ray Demo Sensor.
Action
Explanation
Choose in the Mediadent menu File > Acquire FMX
-orClick on the icon in the Icon set.
If you want to use the
Status Mount
in acquisition mode, you
can go through the
Mediadent Menu or
choose the icon in the
Iconset.
FMX stands for Full
Mount X-ray.
Mediadent User manual 20120213
86
1. Overview Acquisition screen
.
The acquisition dialog box has 3 parts :
The teeth scheme
A viewport
The Status Mount
In the Status Mount you will see the different Status Mount boxes
with large numbers and small numbers in them.
The large numbers is the sequence in which the images will be
taken. The small numbers are the tooth association prepared in
the teeth scheme.
2. Choose another Status Mount
Verify or choose another
Status Mount. The
Status mount you
choose will determine
the sequence and the
tooth association.
Once you have
chosen the Status
Mount and you have
started the
acquisition process,
you can no longer
change the
sequence or tooth
association.
In this example we will take 3 images of a patient.
Mediadent User manual 20120213
87
Without changing anything in the software, the images will automatically appear in the boxes
in the correct sequence.
You will only need to position the acquisition device correctly..
Position the acquisition
device and click on the
Grab button.
You will see the image
appear in the box nr 1.
This is tooth number
associated to this image
is number 18.
Click on the Grab
button.
The image will
automatically appear in
box nr. 2. The tooth
association is tooth
number 10.
Click on the Grab
button.
Mediadent User manual 20120213
88
The image will
automatically appear in
the box nr. 3. The
tooth association is
tooth number 11.
3. Automatic tooth/teeth association when exiting the acquisition screen
When you Exit this screen
you will be able to save
the images.
You have the possibility to
Save All the images.
The images will be saved
to the Image Library.
Notice that the name of
the images are the teeth
that were associated in the
Status Mount boxes.
When you activate the
Status Mount you will see
the images in the Status
Mount.
If you are not happy with the quality of the image and you want to re-acquire the image in
the same Status Mount box, you have the ability to STOP the sequence.
Mediadent User manual 20120213
Click the Stop icon
image.
89
to stop the secquence and to re-acquire the
If you want to continue, click on the Stop icon and when you acquire the next image it will
appear in the following Status Mount box.
If you want to learn how to create your own Status Mount, read the article 'How to create
a Status Mount' (Section 4.5.1).
3.5 Working with the image library
3.5.1 Overview of the image properties
The Image properties can give you some interesting information about the image. It will show
you de different tags (keywords ...) that are associated with your image.
To get a better understanding of the extra information and keywords you can associate to an
image, read the article Specify Extra Info and Keywords (Section 3.5.2).
Not only when saving an image you can associate Extra Information and Keywords with an
image also via the Image Properties you can modify/add the Extra Information or Keywords.
In this article you will see how to show the Image Properties and how you can associate a
keyword to an image.
Action
Explanation
1. Go to the Image Library and select an image.
To show the Image
Properties you have
to select an image in
the Image Library.
2. Click with the RIGHT mouse button on the image.
Important is to click
with the RIGHT
mouse button, a drop
down menu will
appear where you
can select the Image
Properties.
Mediadent User manual 20120213
90
3. In the menu choose Image Properties.
Read the article
'Specify Extra Info
and
Keywords' (Section
3.5.2) to learn more
about the different
options in this dialog
box.
Within the Image
properties dialog
box, you may also
change the values or
add keywords.
Example: Associate the keyword 'TEST' to an image
4. Select the tab ‘Keywords’.
5. Tick the ‘TEST’ keyword.
In this case I will
associate the
keyword ‘TEST'
the image for later
reference.
6. Save the Image properties.
.
It is clear that you can define yourself which keywords can be associated. You will learn about
Mediadent User manual 20120213
91
this in the article Display Settings (Section 7.4).
3.5.2 Overview of the specific Extra Info and Keywords
You can add extra information when saving an image.
The advantage of adding extra information is that when searching for images, you can easily
search/filter on the extra information you have added to the image.
To add ‘Extra Info & Keywords’ to the images during saving, you need to check the option
‘Specify Extra Info & Keywords’.
The screen will expand and you will see 2 tabs
Extra Info
Keywords
1. Extra Info field
You are free to use the 'Extra Info' fields at your convenience. The interpretation of the
fields depends on the way you want to classify the images. If you want to search on certain
keywords, you can use these keywords in the 'Extra Info' fields.
On the tab ‘Extra Info’ you can add:
Mediadent User manual 20120213
92
User
You could use the 'User' field to indicate
for example the dentist who took the
image.
In the setup of Mediadent you can
determine the users list.
See the topic Mediadent Setup:Display
Settings. (Section 7.4)
Grade
You could use this field as a kind of
clasification for the images. Standard the
grades are A, B and C.
This can be adapted via the Mediadent
Setup:Display Settings (Section 7.4).
Image Type
Here you can indicate the type of the
image. There are a number of presets
already available when the product is
installed.
This can be adapted via the Mediadent
Setup:Display Settings (Section 7.4).
Teeth
With this Info field you can indicate the teeth
or tooth that is associated with the image.
Free comment field you can use to add extra
Mediadent User manual 20120213
93
information about the image.
Comments
2. Keywords
The keywords tab allows you to add extra keywords to the image. The aim of these keywords
is to be able to search on the keywords and find that associated images.
Follow these steps to add a keyword:
1. Type a keyword in the box. In this example TEST is the keyword.
2. Click
to confirm.
The keyword TEST is now associated to the image.
It means you can now search for the keyword TEST and find the associated image.
Always SAVE the image after adding Extra Info or Keywords.
Read the article 'Searching images' (Section 4.3.3) to learn how to search on the Extra
Information and/or Keywords you have associated to the image during saving.
Mediadent User manual 20120213
94
3.5.3 Working with the image library
In this section we will explain the usage of the Image Library.
The Image Library will show the images taken for the selected patient.
In this article we will give you an overview of the Image Library elements.
1. Overview of the Image Library elements
This Image Library:
The Global Image Library
The Patient Image Library
Learn more about the differences in the topic Global and patient library (Section 9.4)
The sub-directories or folders contains the images of the patients. For better organization of
the images you can create new folders.
You will see the images taken for that patient, depending on the folder you have selected.
Teeth scheme will show you which images are taken for that particular patient. When saving
an image you will be able to associate teeth or tooth.
Folder or directory controls : You will be able to delete images, search for images and sort
image in the Image Library.
Learn more about searching images in the topic Searching images (Section 4.3.3).
Scroll bar : If you have more images in the folder than can be shown on the screen, you can
scroll to the right or left to see the images.
2. Structure of the patients library
The patient's directory contains the images you have taken.
The root directory is a number, in this example 1011.
Between brackets you see the number of images in the subdirectory or folder. In this case (24)
means you have 24 images in that folder.
Mediadent User manual 20120213
95
You can categorize the images in subfolders for example by type.
In this example you see several subdirectories :
Cosmetic (4) : with 4 images
DFO (5) : with 5 images
ortho (8) : with 8 images
other (4) : with 4 images
Pano-Ceph (8) : with 8 images
Video (3) : with 3 images
3. Select a folder
Click on the folder to select.
For example : When I click on the ortho (8) subdirectory, I will see the images.
4. Legend of the images (colored bars/lines on top op images)
You might notice little colored lines or bars on the top of an image.
Every color has it's own meaning. In this table you will get an explanation of the different lines
or bars.
The little green line on top of the image is an indication that there are annotations
for that image.
The little blue line on top of the image is an indication that there are DFO analysis
for that image.
RSP is the name of the picture. You will give this name when you save the image.
The little red line on top of the image is an indication that the actual image is the
original image.
72-75 is the name of the picture, in this example the numbers of the teeth 72 to
75. You will give this name when you save the image.
The yellow line indicates that the image has been modified.
5. Create a new subdirectory or subfolder
Action
Explanation
Mediadent User manual 20120213
96
For example : Click on 1011 (24)
1. To create a new subdirectory you first have to
select the root directory by clicking on it.
2. Click with the Right mouse button on the root
directory to obtain a menu.
3. Choose Add folder
4. Give the subdirectory a name.
For example : Example
5. Click
to confirm.
.
The new subdirectory is created and
will appear in the list.
You have the possibility to automatically create the same structure for all the patients. This
means you will have the same sub-directories for every patient. You will find the explanation
in the Mediadent Setup : Display Settings (Section 7.4)
6. Move or Copy an image to another folder
MOVE AND COPY
Mediadent User manual 20120213
Click on the image
with left mouse
button, HOLD and
DRAG the image to
another subdirectory
97
You will move a copy of the image to
another subdirectory by dragging and
dropping the image with you left mouse
button.
MOVE ONLY
Click on the image
with the left mouse
button, HOLD, press
the SHIFT key and
DRAG the image to
another subdirectory.
+
7. Deleting images
There are 2 ways to delete an image.
Action
Explanation
1. Select the image you want to delete
2. Drag and drop the image on the recyclebin
icon in the image library
You drag and drop the image while pressing
and holding the LEFT mouse button to move
the image to the recycle bin.
3. Choose OK in the warning dialog box to
confirm
1. Load the image you want to delete in the
Viewport
2. In the menu Edit>Delete Image from disk
This will delete the image permanently.
You can avoid this by selecting the option
'Delete files to recyclebin' in the Setup of
Mediadent.
Mediadent User manual 20120213
98
3. Klik OK to confirm
3.6 Working with Mediadent Modules
3.6.1 Working with the reporter module
The reporter module is an additional module that allows you to create standard letters that can
be used to send to patients / doctors / hospitals …
It is a module that is sold separately. You can always contact us (Section 10) for more
information about this module.
Advantages of working with the Reporter module:
- It is a practical module, because it offers standard word processor capabilities without
leaving Mediadent.
- All the related communication is stored in the patient’s file. This makes it easy to follow up
the patient’s history. Some examples of communication are referral letters, documents for
insurance, invitations for consultations etc …
- The standard document you create in Mediadent contains fixed text that can be re-used for
all your patients. The standard document can contain your logo, your address and some
standard text that is specific to that document. This standard document is called a template in
Mediadent. The advantage is that you don’t have to re-type the fixed text, but just fill in the
variable text like for example the diagnoses of your patient. It can also contain information that
is stored in your Patient Management System like the patient’s name, date of birth, address etc
…
In this article you will get a better understanding of the Report module in the first topic
'Overview of the Report Module'. In the second topic you will learn the basics of working with
the Report module. In the third topic you will learn how to create a standard document or
template in the Reporter module.
The Reporter module is loaded by clicking on the Reporter icon
in the icon set
-orChoose File>Reporter in the Mediadent menu.
If the icon has a green glow
Reporter module for this patient.
it means there are already documents available in the
1. Overview of the Report Module
Mediadent User manual 20120213
99
The Report Module offers basic word processor capabilities within Mediadent for the purpose
of writing letters, referrals etc.. .
The menu contains the most functionality you will find in a word processor (Word Processor
icons).
We will explain the topics which are unique to the Reporter Module, we will not explain the basic
word processor functionality.
The icon bar contains traditional word processor icons such as font type, font size, font
color, bold, italic, underline … and typical icons related to the Report Module.
The middle part of the screen is the standard document or template with the fixed text.
On the right hand side you will see a Task pane. This pane contains a list of standard
documents or templates you can choose from.
This is the list of standard documents or templates.
Mediadent User manual 20120213
100
Name of the template that will be used to name the
document.
The New button will create a blanc document. You can use
this button if you want to create a document without using a
template.
The Close button will close the Task pane
Switch to saved documents will present a list with the
documents that were already create for this patient.
If you want the Report Module to open with a particular template, you can select the
template and check the option ‘Open this template as default’.
2. Overview of the Report module icons
Type your Drop Down Section text here.
The Status Mount will appear and you will be able to add images from the Status Mount
in your documents.
The Image Library will appear and you will be able to add images from the Image
Library in your documents.
You will print the document, this icon is the equivalent of the Quick print and will print the
document to the standard printer.
Mediadent User manual 20120213
101
Sent the document as an attachment to an e-mail. It is clear that you need an e-mail
application that allows you to sent e-mails.
This icon will allow you to create a new document based on the selected template.
This icon will allow you to open a previous created document related to this patient.
By clicking this icon you will save the document.
This icon will Exit the Reporter Module.
3. Working with the Report Module
In this topic we will explain how to work with the Reporter Module.
We will first explain how to create a document based on existing templates. We will also show
what the different possibilities are to modify the documents, like adding pictures from
Mediadent but also from outside Mediadent.
The Auto Text feature of the reporter is a real time saver! It will allow you to create a list of
abbreviations that are automatically replaced in your documents. For example you will be able
to add technical terminology to this list.
Of course you want to share these documents with your patients or colleagues in the last topic
we will discuss how you can sent the document by e-mail, print the document or save the
document as PDF.
3.1. Create a new document based on a template
Action
Explanation
Launch the Reporter Module by clicking on the
icon
.
or
Choose File > Reporter in the Mediadent menu
To use one of the templates in the Reporter
Module just select one of the templates in the list.
I would like to use the patient referal
template.
In the middle of the screen the document
will appear with the fixed text. You can now
add comments to the document like the
diagnoses or any remarks about this
patient.
Mediadent User manual 20120213
102
Give your document a name
Always save the document when you make
changes.
Once you have given the document a name,
it will appear in the saved documents list.
and click the Save button.
Choose Yes to confirm to save the changes.
3.2. Modifying an existing document
Once you have created a document for a particular patient, you may want to modify the existing
text.
Action
Launch the Reporter Module by clicking
on the icon
or
Choose File > Reporter in the
Mediadent menu
Explanation
On the right side of the screen you will see a Task
pane. The task pane contains a list of templates you
can choose from to create a new document for that
particular patient.
At the bottom of the Task pane you will get the
opportunity to switch to the saved documents.
You will see a list of all the related documents
created for that particular patient.
Click on the button ‘Switch to saved
documents’
Choose the document from the list of
saved documents.
Saving the document will overwrite the existing
letter.
Make the modifications.
If you want to prevent the document from being
overwritten, you can choose File > Save As form
the Reporter module menu and give the document
another name.
Save the document.
To create a new document based on a
template
Click on the button 'Switch to
Mediadent User manual 20120213
103
templates'
You will get the list with the templates to choose
from.
3.3. Adding images to your document
Action
Explanation
You can add 2 types of images to your documents
1. Images from the patient’s Image Library
.
2. Images outside of Mediadent
1. Adding an image from the Image Library to a document
To add an image from the patient’s Image Library, position your
cursor in the document where you want to add the image.
Choose Insert > Image
.
You will see a box appearing
in the document with a
number in it, this is
the placeholder* and
indicates the position of the
image.
*The placeholder is a grey
box with a number in it.
To add a picture from the patient, call the patient's library by
clicking on the icon in the Report module icon bar.
Double click on the image in the Image Library to insert the
image in the document.
You can also choose to use
the Status Mount
select images from.
to
The Image Library will
appear.
When double clicking on the
Mediadent User manual 20120213
104
image you will see that the
placeholder is replaced by
the image.
2. Adding an image outside of Mediadent
Maybe you want to add pictures which are not stored in the
Image Library.
You can integrate .BMP, .WMF,.JPG,.GIF and .PNG files in your
communication
In the Reporter Menu choose Insert>External Image
Position the cursor in the
document where you want
to add the external image.
Select the image/picture.
Mediadent User manual 20120213
105
Maybe the image is to big to
fit on the first page, then
resize the image
accordingly.
Give your document a name
Always save the document
when you make changes.
and click the Save button.
Once you have given the
document a name, it will
appear in the saved
documents list.
Choose Yes to confirm to save the changes.
3.4. Using the Autotext feature
The AutoText feature is very practical because it can provides you with a list of texts you can reuse. It is based on the AutoText feature of a standard word processor. The principle is that you
type in an abbreviation that is replaced with the complete text.
For example you type dc in your document and dental caries will automatically appear in the
document.
You can create your own list with abbreviations and full text to make it easy for you to create
your documents.
In the example we will show how to create an Autotext for periodental ligament.
Action
To activate the Auto Text feature, choose Extras >
AutoText
Explanation
The ‘Auto Text Completion’ dialog box
appears.
Since the box 'Alter Text While
Typing' is checked, everytime you
type one of the abbreviations in the
list, it will be replaced by the full text.
Type pdl in the Change: field and periodental
ligament in the To: field.
Mediadent User manual 20120213
106
Choose Add/Replace
The Auto Text will appear in the list
and is ready for use.
In your document, type 'pdl'
So when you type 'pdl' in your
document, it will be replaced by the
text 'periodental ligament'.
After you hit the space bar, the text
will be replaced.
You will save a lot of time once you
have created your own list with
abbreviations.
3.5. Different ways to share your document
There are different ways to share your documents:
- You can sent them by e-mail
- Print your document and sent it by mail
- Save the document as a PDF file and copy it to another computer
Action
Explanation
1. Sent the document by e-mail
Click on the e-mail icon in the Reporter module icon bar
or
choose File > Mail To in the Reporter module menu
Fill in the recipient's name and sent the message
Make sure your e-mail
program is correctly working.
Mediadent User manual 20120213
107
You will notice the document
is automatically attached and
converted to a PDF file.
You just need to fill in the
recipient's name and sent the
message.
2. Print the document
Select the document you want to print.
Click on the print icon
in the Reporter Module icon bar
or
These options will print the
document to the standard
printer.
choose File > Print
When you choose this options,
you will get the printer dialog
If you want to select another printer than the standard printer, box so you can change the
printer settings.
choose File > Print …
Before printing, you can
always get a preview of
your document by
choosing File > Preview.
Changing the Paper Size, margins, orientation of the document
can be done via the option
File > Page Setup
Dialog box to change the page
settings.
3. Save the document as PDF
Select the letter you want to save as PDF.
Mediadent User manual 20120213
108
Choose File > Save As PDF in the Reporter menu
If you want to share your
document and you don't want
anybody to change it
afterwards or your recepient
does not have Word, you have
the possibility to save your
document in pdf format.
3.6. Show documents in the patients Image Library
If you want the document to appear together with your images in the Image Library you can
choose to export the document to the Image Library.
Action
Select the document you want to export to the Image Library.
Explanation
.
Choose File > Export to Image Library … in the Reporter
module menu
.
Give the document a name
You will need to give the
document a name.
Choose the Save button
Mediadent User manual 20120213
109
This image will appear as a PDF
file in the Image Library.
3.7. Importing existing documents
If you have already created documents, you will be able to import them in the Report Module.
Action
Explanation
Choose the option File > Import from the Reporter
module menu.
Files in RTF format (Rich Text
Format) can be imported into the
Reporter module.
Choose the file you want to import.
.
Click on the Save icon in the iconbar.
Give the imported document a name.
The document will appear in the
Reporter module.
You will need to save the document
Mediadent User manual 20120213
110
and give it a name.
The new imported document will
appear in the list of Saved
document for this patient.
4. Creating templates in the Report Module
Type your Drop Down Section text here.
In this more advanced topic we will explain how to create and modify a template in the Report
Module.
A template contains the fixed text that can be re-used in your communications. The templates
can contain your logo, address information, paragraphs of text ...
Sometimes you would like to modify an existing template, for example when you have moved or
a telephone number changes etc ...
1. To modify an existing template follow these steps
Action
Open the Reporter module
Explanation
.
You can select one of the
documents in the
reporter. These
documents are based on
templates that you can
modify.
Open the template you want to modify
Mediadent User manual 20120213
111
Make the necessary
modifications.
In this example we
will change the
address.
Choose File>Save As Template in the Mediadent menu
.
Type in the name of the new template
.
Click the Save button
The template will appear in the Task pane on the right hand side.
.
3.7 New: Working with the Video Still Capture module
Mediadent User manual 20120213
112
3.7.1 Working with the Video Still Capture module
Verify is the camera you want to use is WDM or VFW compatible. Some camera’s can also be
TWAIN devices.
These are all standards and it’s important to understand what standards are supported before
configuring the camera in Mediadent. This information can be found in the manual of the
camera. Normaly with the camera, a CD is delivered with the necessary software to get the
camera working under Windows. Make sure the camera already works on Windows before
attempting to configure it under Mediadent.
WDM is a standard and most camera’s are compatible with the WDM standard. Some older
camera’s are VfW compatible.
If your camera is a TWAIN device it can be configured as such in Mediadent.
In this article we will explain the usage of your camera in Mediadent. Configuring the camera in
Mediadent is explained in our technical manual and should be done by a specialist (your dealer).
As mentioned above, you can use your camera via the VFW StillCap or the WDM StillCap
module.
In this module you will be able to take pictures with your camera and store it in the patient’s
library for later reference.
The picture are taken by a wireless intra-oral camera, the Discovery wireless camera.
To open the WDM StillCap module
1. Activate the WDM StillCap via the Mediadent menu
Options>Video Still Capture\WDM StillCap
Mediadent User manual 20120213
113
2. Open the module
Click on the icon
3. The WDM StillCap screen opens.
In the following topics you will get an overview of the acquisition screen and learn how to use
the camera in acquisition mode. If you are not happy with your desktop (position of the
different screen elements) in acquisition mode, you can always change it. We will also give an
overview of additional options.
1. The WDM StillCap screen overview
Overview of the screen elements:
number function
Tooth Scheme
Screen showing the images from the camera
Status mount
Mediadent User manual 20120213
114
Full Screen : will switch to Full screen mode - this will allow you to see more details
Grab button: if you are happy with the picture, you can grab it.
Exit: will exit the screen and give you the possibility to save the grabbed image.
2. Use of the camera in Mediadent
To use the teeth scheme with the camera in the module follow these steps:
Action
Explanation
1. Position the camera in the mouth of the patient
.
2. In the teeth scheme, select the teeth to make the
association
If you want to use the
teethscheme, you need to
deactivate the status. Read
further the topic 3. Change the
desktop on how to do this.
To learn how to work with the teeth
scheme, read the article Working
with the teeth scheme (Section
3.3.1)
3. Click on the Grab button
.
The picture is grabbed and ready to
be used in the patient library.
Mediadent User manual 20120213
115
If you want to take more pictures,
you can press the Grab button.
Everytime you use the Grab button,
you will get a picture. If you are
ready, click on the Exit button
4. Press the Exit button to save the images to the image
library
.
By saving the image it will appear
in the patients library.
3. Change the desktop
3.7.1.1 1. Change the overall desktop
If you are not happy with the layout of the desktop in the acquisition screen, you can change
Mediadent User manual 20120213
116
the different screen elements in the Mediadent screen.
Choose Desktop > Load desktop in the menu
Don't forget that if you want to move the screenelements, always first Unlock the desktop
before you can move the screen elements.
Read the article: Working with desktops (Section 3.1.4) for more detailed information.
3.7.1.2 2. Activate/de-activate screen elements
You can activate and de-activate screen elements (Visible controls)
If you find your screen to busy and you would like to de-activate certain screen elements,
choose Desktop > Visible controls
You have the possibility to hide the following elements:
- Image library
- Mount = the Status mount (Read more about the Status mount here: Working with the
status mount in acquisition mode (Section 3.4.2))
- Teeth = the Teeth scheme (Read more about the Teeth scheme here: Working with the
teeth scheme (Section 3.3.1))
- FullScreen = this view will allow you to see more of the image you want to take
When the Status Mount is activated, the pictures will be displayed in the Status Mount
boxes. If there are tooth associations linked to the boxes, you will see this in the teeth
scheme.
If you choose for FullScreen you will get the following screen:
Mediadent User manual 20120213
117
4. Additional options
In the WDM StillCap module you will be able to configure the way Mediadent handles the
picture.
You may notice that when you take a picture, the picture is mirrored. You will be able to change
that so you get your picture in the original orientation.
You can activate the following options:
Options > Grab as
grayscale
Pictures will be taken in
grayscale
Options > Mirror after
grab
Some camera’s mirror the
image. You can put the
image back in the original
orientation.
Options>Enhance quality
To get a better quality, you
can use this option.
The Device Setup (F10) is only to be used when configuring
the camera in Mediadent. This is explained in our Technical
.
manual. Once it has been configured, there is no need to change
the settings in this option.
Mediadent User manual 20120213
118
The Video properties
(F11) will allow you to
apply filters to the image.
On the Video Image tab you
can for example change the
contrast/brightness …
The other settings are best
kept as they are.
Mediadent User manual 20120213
4 119
How to's
4.1 Overview How to's
Mediadent Screen
How to select more viewports (Section 4.2.1)
How to customize the iconset (Section 4.2.2)
How do I select the ideal desktop (Section 4.2.3)
How do I delete a desktop (Section 4.2.4)
How to change practitioners info (Section 4.2.5)
Automatisation
How to create a macro (Section 4.7.1)
Mediadent Image Library
How to move images from one patient to another (Section 4.3.1)
How to find the patients recently accessed (Section 4.3.2)
Mediadent Mount
How to create a status mount (Section 4.5.1)
Mediadent Image manipulation
How to activate the negatoscope (Section 4.4.1)
How to calibrate an image (Section 4.4.2)
How to recover a deleted image (Section 4.4.3)
Mediadent export
How to send an image by e-mail (Section 4.6.1)
How to export multiple pictures of a patient (Section 4.6.3)
How to import images? ('HT12 How to import images' in the on-line documentation)
How to drag and drop an image in an e-mail (Section 4.6.2)
New : New: How to burn a CD with images from Mediadent (Section 4.6.4)
4.2 The Mediadent screen
4.2.1 How to select more viewports
Sometimes it's necessary to analyse different images from one patient. Maybe you want to
compare images?
In Mediadent you will use the Viewports to load the images into. You can have up to 5
Viewports or analyse 5 different images.
In this example you see that 2 Viewports are visible with 2 images.
Mediadent User manual 20120213
120
To add Viewports to your Desktop:
Use to the Viewport icon in the Iconset :
In this example you can see that 2 Viewports (you see the number 2 on the icon) are
active.
To modify the number of Viewports :
PRESS and HOLD the left mouse button on the icon until the icon expands.
Mediadent User manual 20120213
121
Select the number of Viewports you would like to see by clicking the corresponding icon
(1,2,3,4 or 5).
You can choose up to 5 Viewports.
4.2.2 How to customize the iconset
The Iconset is by default displayed on the bottom of the screen in the left hand corner.
It will give you fast access to certain Mediadent functionality. It is also possible to use the
Mediadent menu, but often you will need more mouse clicks to get the same result.
The Iconset is interactive, it will only show the icons that are relevant.
You will notice that when no image is loaded in the Viewport, a number of icons are grayed
out.
After loading an image you will see the Iconset change.
This is the Iconset after loading an image, you see that all the icons are now highlighted.
The Iconset is interactive and will only activate the icons that are useful.
Mediadent User manual 20120213
122
In this article we will discuss the following topics:
1. Deactivating an icon
The Iconset can be customized: you can add or remove icons.
If you find you have too many icons in your iconset that you don't use, you can remove them.
If, for example, you don't have a Dicom network, you can decide to remove the icon that
launches the Dicom network:
Action
Explanation
We will activate the Button Toolbar
Customize via de Mediadent menu.
Options>Customize Button Toolbar
Mediadent User manual 20120213
123
The Button Toolbar Customize will
appear on the screen.
You will see on the left side, a list of the
icons that are active in the Iconset.
If you see a diagonal red bar in the
icon, this means that the icon is not
activated in the Iconset.
The Save button will allow you to save
the modifications you have made to the
Iconset
The Defaults button will reset the
Iconset to the original settings
The Exit button, of course will Exit the
screen.
You can use the scroll bar to see all the
icons that can be placed on the Iconset.
For the example, go through the list with
the scroll bar and look for the Dicom
network icon:
Mediadent User manual 20120213
124
In our example, we would like to
deactivate the icon for the Dicom
network.
Make sure you can see the icon in the
list
To deactivate an icon from the Iconset,
click with the RIGHT mouse button on the
icon.
You will see the red diagonal bar
appearing over the icon.
Press the Save button.
Press the Exit button.
You need to Save your changes before
your Exit the Button Toolbar Customizer.
Result, you will no longer see the
Dicom network icon
in the Iconset.
You will only see the Dicom printer icon.
Mediadent User manual 20120213
125
2. Reactivating an icon
To reactivate an icon, you will have to go through the same process.
1. In the Mediadent menu, Options>Customize Button Toolbar.
2. Find the icon want to activate again. This icon will have a diagonal red bar in it.
3. Press with the right mouse button on the icon. The red diagonal red bar will disappear.
4. Don't forget to Save and Exit.
Another usage of the icons is when you have created a macro and you want to activate the
macro from an icon in the Iconset. Read the article 'How to create a macro' (Section
4.7.1).
4.2.3 How do I select the ideal desktop
You have the possibility to select the ideal desktop. The ideal desktop is a desktop that shows all
the neccessary Mediadent screen elements you need for your diagnosis.
Once the desktop is correctly selected there is no need to change it.
Mediadent User manual 20120213
126
But if you change the monitor or PC screen (for example a wider screen) you will need to adapt
you desktop.
If you notice that not all the Mediadent elements are displayed on the screen you will need to
choose another desktop.
To choose the ideal desktop:
In the Mediadent menu, choose
Display>Desktop Panels>Autoset desktop
Or
Choose the keycombination : Ctrl+Alt+D
+
+
To correctly use this key combination, you first press and hold the CTRL key, then press
and hold the ALT key and then press the letter D on your keyboard.
4.2.4 How do I delete a desktop
Changing your monitor is often a reason to delete a previous created desktop with another
Mediadent User manual 20120213
127
screen configuration.
Follow these steps to delete a desktop
1. Display>Desktop Panels>Save desktop as ...
2. Select the desktop in the list you want to delete. In this example we choose for the desktop
test.
3. Click the Delete button.
4.2.5 How to change practitioners info
If you have a practice with several dentists it can be practical to have the name of the
practitioner in the Status bar of Mediadent.
Read the article: General Settings (Section 7.2), if you want to learn how to configure the
practitioner's name.
Mediadent User manual 20120213
128
4.2.6 How to configure the desktop
The Desktop is the way in which the different elements of the Mediadent are presented on your
screen.
The advantage is that you can change the layout of the different screen elements,
reflecting your way of work.
If you want to change the desktop, you will first need to know how to activate/deactivate
certain screen element.
Once activated you move the screen elements or even re-size them to fit your needs.
To change the Desktop follow these steps:
1. Activate/Deactivate screen elements
2. Unlock the Desktop
3. Move or resize the elements
4. Lock the Desktop
5. Save the Desktop
First read the article Overview of the Mediadent screen elements (on-line
documentation) to get a better understanding of the different screen elements.
1. Activate/deactivate Mediadent screen elements
When activating a screen element, the element will be visible.
To activate an element
Display > Desktop Panels > select the deactivated element
Remark : make sure the
sign is in front of the option
or click on the corresponding icon in the Iconset to activate the element.
To deactivate an element choose
Display > Desktop Panels > select the active element
Remark : make sure the
sign is NOT in front of the option
or click on the corresponding icon in the Icon set to deactivate the element.
2. Change and Save the Desktop layout
Once you have chosen the screen elements you want to activate. You have the possibility to
move them to another location on your screen.
Follow these steps to change the Desktop and to save it.
Action
Explanation
Mediadent User manual 20120213
129
1. Unlock the Desktop
Remark : please make sure the
not in front of the option.
1. Always Unlock the desktop first
is
Always unlock the desktop before
making changes.
Display > Desktop Panels > Lock desktop
You will notice the desktop is
Unlocked when there are handles
available in the left top corner and
the right bottom corner of the
screen element.
See point 2. for more
explanation on how to use
these handles.
2. Move and/or resize the Mediadent screen elements
2. The screen elements are free and can be moved to
another location on the screen or resized to show all the
options.
Move the screen elements to
another location by dragging and
dropping the elements via the
handles, situated in the left top hand
corner of the element.
Resize the screen elements by
using the handle in the right bottom
corner.
3. Lock the Desktop
3. If you are pleased with the result, you must lock the
desktop.
Remark : the
sign needs to be in
front of the option in the menu.
Display > Desktop Panels > Lock Desktop
4. Save the Desktop
Display>Desktop Panels>Save desktop as …
Mediadent User manual 20120213
130
You will see a list of pre-installed
desktops (indicated with *). They
cannot be changed.
After saving your desktop, you will be
able to select it via Display >
Desktop Panels>Load Desktop
5. Type in a recognizable desktop name in the 'Save
current desktop as : ' box.
6. Click
to confirm.
In the following examples we will show how to deactivate the Constrast/Intensity
combo and how to add a Viewport.
Click on this title to view the examples
Click on this title to view the examples
Action
As described above, unlock the desktop
We will deactivate the Contrast/Intensity combo.
In the Mediadent menu choose
Display > Desktop Panels > deselect one of the
elements
For example : Contrast/Intensity combo
The screen element is gone.
Explanation
.
Remark : please make sure the
is
not in front of the Contrast/Intensity
combo option.
Mediadent User manual 20120213
Adding an additional Viewport
In the Mediadent menu choose
Display > ViewPort and select the Viewport you
want to activate.
In this example we would like to see 3 Viewports.
131
Be aware that the Viewports that are
activated will appear under the existing
Viewports. If you desktop is Unlocked
you will be able to move the Viewports
to another location and you will see the
newly activated Viewports appearing.
In this example the Viewport 3 was
under the Viewport 1. By moving the
Viewport 1 you will see the Viewport 3.
Position the 3 Viewports correctly.
.
As described earlier, lock the desktop and save it.
.
4.2.7 How to load another desktop
The desktop that is loaded is the Mediadent screen layout that has been configured for your
monitor size and resolution.
Mediadent User manual 20120213
132
It will show all the different Mediadent screen elements.
To get a better understanding of the desktop, read the article A desktop (Section 9.2).
If you are not happy with the current Mediadent screen configuration, you can load another
desktop.
Be aware that if you load a desktop that does not fit your monitor, some Mediadent screen
elements will disappear from your screen.
For example choosing a desktop that is suited for a wider monitor will have as a consequence
that the Mediadent screen elements (like Windowing, Histogram, ...) on the right hand side
are not shown on a monitor that is smaller.
1. Choose in the Mediadent menu Display > Desktop Panels > Load desktop
2. Click on the Desktop you want to load
You will see a list of pre-installed desktops. The names indicated most current screen
resolutions. Depending on the type of screen you have, you will be able to choose one of the
desktops.
A Desktop '1024x768' means that the Mediadent Desktop will be shown on your monitor in
'1024 pixels (width) x 768 pixels (hight) resolution'.
To load the ideal desktop suited for your monitor. You can choose the option
Display>Desktop Panels>Autoset desktop in the Mediadent menu.
4.2.8 How to move the zoom window
The 'Zoom window' is one of the Mediadent screen elements you can move.
In this article we will explain how to move the 'Zoom window' screen element. The steps in this
article apply to all the Mediadent screen elements.
To move the Zoom window follow these steps:
Action
1. Unlock the desktop by de-selecting the option Lock
Desktop.
Explanation
Mediadent User manual 20120213
133
If you want to move the Zoom
Window, you will first need to
Unlock the desktop.
The setting should NOT be active
(no check mark
option).
in front of the
2. Move the Zoom Window by using the handles.
To move the ZOOM Window to the
desired area on your screen you
have to use the handles on the
top left corner of the Window.
You will see 2 horizontal lines in
the top left corner of the window,
this is an indication that the
ZOOM Window can be moved.
Mediadent User manual 20120213
134
Once positioned correctly, you can
choose to Lock the Desktop again.
3. Lock the desktop again.
Display > Desktop Panels and Select Lock desktop
4. Save the desktop
Display > Desktop Panels and select Save desktop
A check mark
must be in
front of the option Lock Desktop.
The next time you use the Zoom
Window, it will be repositioned.
The next time you launch
Mediadent the Window will be
correctly positioned.
4.3 The Mediadent image library
4.3.1 How to move images from one patient to another
This article will explain how to move an image from one patient’s library to another.
If you have stored an image in the wrong patient library, you have the possibility to move the
image to the Image library of the correct patient.
To move an image from one patient’s library to another, we will use the Global Image
Library . This is a common folder that is accessible from every patient’s library. It will act as a
temporary storage for images you want to move. Read the article: The global and patient
library (Section 9.4) and learn more about the differences.
If you want to check the list of recently accessed patients to retrieve your image, read the
article: How to find the patients recently accessed (Section 4.3.2).
Copying an image from one patient's library to another is done in 4 steps:
Step 1. Open the wrong patient's Image library. So this is the patient you want to copy the
wrong image from.
Step 2. Copy the image to the Global Image Library
Step 3. Open correct patient's library. So this is the patient you want to copy the image to.
Step 4. Copy the image from the Global Image Library into the correct patient's library.
Action
Explanation
1. Open the wrong patient's Image library
2. Select the image you want to move to another library and click
with your RIGHT mouse button on the image.
So this is the patient's library
containing the wrong image.
In this example we have an
image from another patient in
John Doe's library.
The menu will appear and
you will be able to Copy or
Move the selected image. In
our example we will choose
to Move the image.
Mediadent User manual 20120213
3. Choose 'Move selected image(s) to the Global Folder'
4. Click on the Global Image Library
135
.
icon to verify.
The image is moved to the
Global Image Library.
4. Open the Library of the patient you want to copy the image to.
This is done through your Patient Management System.
In this example we open the
the Patient Image Library of
De Vos Ben which is empty.
5. Click on the Global Image Library
image.
icon to access the
In the previous steps we
copied the image from John
Doe's library to the Global
Library.
We need to go to the Global
Image Library to get the
image so it can be copied to
the current Patient's
Library (De Vos Ben).
6. Click with your RIGHT mouse button on the image stored in the
Mediadent User manual 20120213
136
Global Image Library.
Once in the Global Image
Library, you will move the
image from the Global Image
Library to the current
Patient's Library.
7. Select 'Move selected image(s) to the current Patient
Folder (...)'
.
8. Select the Patient's Library by clicking on the Patient's Library Go back to the De Vos Ben's
Patient Library by clicking on
icon
the Patient's Library icon.
9. Result
The image is stored in the
current Patient's Library.
4.3.2 How to find the patients recently accessed
Sometimes it can be practical to find images back that were recently acquired for a specific
patient.
Maybe you have selected the wrong patient when acquiring the images? Or, you can't find
certain images back?
Mediadent can help you because you will be able access the list of patients that were recently
accessed.
This list contains the 100 recently patients accessed from this workstation.
To access this list:
Go to File > Show patients list, recently accessed from this workstation
Mediadent User manual 20120213
137
You will get a list similar to this one. The list contains the date the patient was accessed, the
patient ID, patient name and image folder.
In this way you can retrace when certain images were taken and where they were stored.
You can double click on the patient's name and the library will open.
To view the images, close this screen by clicking on the Exit button.
Read the article: How to move images from one patient to another (Section 4.3.1).
4.3.3 How to search for images
If you have a large number of images for a particular patient, it can be difficult to select the
correct image for analysis.
Mediadent User manual 20120213
138
In the Image Library you have the possibility to search, or better filter out the correct images.
You can determine the filter or search criteria based on the extra information or keywords
you have associated to the images.
It is clear that you can only search on keywords or additional information such as User,
Grade, Type and Keywords if they have been associated to an image.
If nothing is associated, the filter will not work.
To filter out images based on the extra information or keywords you need to use the
following icon
in the Image Library.
You can
filter or
search
images
based
on:
1. Date
2. User
3. Grade
4. Type
5.
Keywords
1. Search based on Date
You can filter out images that were taken in a particular date range.
If you know when the patient had an appointment, you can easily filter out the images that were
taken on that particular date.
You can:
- Include all images between certain dates, the result of this filter will only be the images
that were taken between certain dates
- Exclude all images between, the same as above, but the result will be you will see the
images that were taken outside of the date range
- Specify individual dates
Mediadent User manual 20120213
Click
139
to confirm.
When selecting this option, you will see the dates of the images that were taken for that
particular patient. If you select one of the dates, you will get the images that were taken for
that patient on that date.
To see all the images back, you will need to reset the Image Library. See the topic 6.
Resetting the Image Library.
2. Search based on User
You can include or exclude images that were taken by certain users.
In this example I have setup Mediadent so I can choose 2 Users (gunter, benjamin)
when I save an image or in the image properties.
Read the article Mediadent Setup: Display Settings (Section 7.4) to learn more on how to
configure Mediadent to be able to select particular users when saving an image.
Select one of the users and you will only see the images taken by that user.
Mediadent User manual 20120213
140
Example: We will select gunter, so we will only see the images where the User gunter is
associated with.
Action
Explanation
1. Click on the Search icon in the Image Library
.
2. Select tab User and select 'gunter'.
We have added this
keyword when we saved
this image.
See Also the topic Specify
Extra Info and
Keywords (Section
3.5.2) for more
information.
3. Click
to confirm
You can also add this via
the Image Properties
(Section 3.5.1)
afterwards.
3. Result: You will only see the images where the user gunter is
associated with.
The pink bar is an
indication that you have a
filter active.
See 6. Resetting the Image Library
To see all the images
back, you will need to
reset the Image Library.
See the topic 6.
Resetting the Image
Library.
To add the User association:
- See Also the topic Specify Extra Info and Keywords (Section 3.5.2) for more
information.
- You can also add this via the Image Properties (Section 3.5.1) afterwards.
3. Search based on Grade
Mediadent User manual 20120213
141
Search based on Grade works in the same manner as the Search based on User.
Click on the 'Grade' tab and for example select to see the images with Grade 'A' associated to
them.
You can also choose to Exclude those images.
Always click
to confirm.
If you don't get any images back, it means no images have the association with Grade A.
To add the Grade A association:
- See Also the topic Specify Extra Info and Keywords (Section 3.5.2) for more
information.
- You can also add this via the Image Properties (Section 3.5.1) afterwards.
To see all the images back, you will need to reset the Image Library. See the topic 6.
Resetting the Image Library.
4. Search based on Type
Click on the Type tab and select a particular
For example choose for the type XRAY.
Mediadent User manual 20120213
Always click
142
to confirm.
As a result you will see the images where XRAY is associated with.
Again you can also choose to exclude the images where XRAY is associated with.
If you don't get any images back, it means no images have the association with XRAY.
To add the Type XRAY association:
- See Also the topic Specify Extra Info and Keywords (Section 3.5.2) for more
information.
- You can also add this via the Image Properties (Section 3.5.1) afterwards
To see all the images back, you will need to reset the Image Library. See the topic 6.
Resetting the Image Library.
5. Search based on keywords
When you have saved an image with particular keywords, you have the possibility to search for
images based on those keywords.
Action
Explanation
1. Go to Image Library
2. Click on the small looking glass icon in
the Image Library.
The following dialogbox will open:
Mediadent User manual 20120213
143
3. Choose the Keywords tab.
.
4. Select the TEST keyword.
We have added this keyword when we saved this
image. See Also the topic Specify Extra Info
and Keywords (Section 3.5.2) for more
information.
A second method to associate keywords is via
the Image Properties (Section 3.5.1).
4. Click
to confirm.
.
The pink bar is an indication that you have a
filter active.
5. Result : The image with the keyword TEST
is found.
Mediadent User manual 20120213
See 6. Resetting the Image Library
144
To see all the images back, you will need to
reset the Image Library. See the topic 6.
Resetting the Image Library.
To add the Keywords association:
- See Also the topic Specify Extra Info and Keywords (Section 3.5.2) for more
information.
- You can also add this via the Image Properties (Section 3.5.1) afterwards.
6. Resetting the Image Library
After you have filtered out a number of images, you may want to reset the Image Library to see
all the images again.
Follow these steps to reset the Image Library.
Action
1. Click on the small looking glass icon again.
2. Click the
icon to confirm.
Associating additional information to images can be done in 2 ways:
1. When saving the image: read the article 'Specify Extra Info and Keywords' (Section
3.5.2) to understand the information and keywords you can associate to the images.
2. Add extra information or keywords via the Image properties. Read the article 'Image
Properties' (Section 3.5.1).
4.4 Mediadent image manipulation
Mediadent User manual 20120213
145
4.4.1 How to activate the negatoscope
If you want to use your PC screen as negatoscope to show an X-ray, you have the possibility
to activate the negatoscope in Mediadent.
Choose in the Mediadent Menu :
Display > Negatoscope
You will see the white screen.
Now you can hold the X-ray against your PC screen.
To return, just click any key on the keyboard or click with the mousebutton on the
screen.
4.4.2 How to calibrate an image
An image is not always calibrated, especially images you receive from an external source.
An indication that the image is not calibrated is when you draw a line via the Measure tab, the
measurement of the line is in Pixels and not in mm.
Calibrating an image is important when you start using annotations. When you draw
annotations on your image you want to make sure they are relative to your image.
Especially when using the implants module the image needs to be calibrated.
In this article we will explain one way of calibrating and image.
We will draw a line via the Measure tab and indicates its measurement. The line we will draw is
150mm long.
Action
1. Load an image in the Viewport
Explanation
Mediadent User manual 20120213
1. Click on the Annotations icon
146
In the Iconset this is by default the third
icon.
2. Draw a line via the Measure tab
Choose the Measure tab in the Annotations and
Measure dialog box.
The Measure annotations will appear with a
list of different annotations that can be
added to the image. The usage is explained
in the article 'Working with
annotations' (Section 3.2.4).
Click the Line button
.
Press and hold the LEFT mouse button while
drawing a line on the image.
You will notice that the measurement is in
Pixels. This is an indication that the image
is not calibrated.
3. Calibrate the image
Mediadent User manual 20120213
147
Click on the small arrow to the right to activate
the calibration tab. *
Click on the Calibrate tab
* Only if you have the Implant module, you
will have to do this step otherwise you will
see the Calibration tab.
Choose Line length in mm.
It is possible this is already selected.
In this example we have chosen for
150mm, this means the line we have drawn
on the image is 150mm long.
It can be practical that when acquiring
the image, you also integrate a ruler. In
that way you can easily calibrate by
using the ruler as a guide.
Fill in the length in mm of the line you have just
drawn and Apply.
Mediadent User manual 20120213
148
Your image is calibrated.
4.4.3 How to recover a deleted image
You will be able to retrieve a deleted image from the Recycle bin if this has been activated in
the Mediadent Setup>General Settings.
Read the article about the General Settings (Section 7.2) of Mediadent, topic 'How to avoid
deleting files permanently' to find out how to recover a deleted item from the Recycle bin.
4.5 The Mediadent status mount
4.5.1 How to create a status mount
Warning : Do not modify existing Status Mounts, since the changes will be removed when
updating Mediadent.
Mediadent User manual 20120213
149
You have the possibility to create your own Status Mount. This will allow you to create your
own procedure (sequence) for the acquisition of images.
In the Status Mount you can associate teeth or tooth and if necessary to modify the
orientation of the sensor.
This is done in the following steps:
1. Create a Status Mount
Before you create a new Status Mount you have to be sure the Desktop is Unlocked.
This is done in the Mediadent menu: Display > Desktop Panels > Lock desktop (this
option should NOT be checked)
If this option is checked, you will need to uncheck it by clicking on Lock desktop.
Action
Explanation
Create a Status Mount
In Mediadent Menu : Display > Desktop Panels > Mount
view
or
Activate the Status mount – See
topic ‘What is a Status
Mount’ (Section 9.3).
Choose an existing Status
Mount that is similar to the one
you want to create.
Go to the Status mount controls
and click on the icon to expand the
Submenu.
Choose to Create a New Scheme
from the menu
Give the Scheme a name.
Mediadent User manual 20120213
150
Result : A blank Status Mount with
the Status Mount boxes as defined
in the selected standard Status
Mount, in this example the Full
Mouth.
Now you are ready to adapt this
Status Mount.
Now you can activate the desired Status Mount Boxes.
2. Activate the Status Mount boxes
Action
Explanation
Add or remove Status Mount boxes
You can add or remove Status Mount boxes by using the
Image container configurator.
When a box is pressed-in, the Status Mount box is visible in
the scheme
When a box is not pressed-in the Status Mount box is not
visible in the scheme
Press on one of the boxes and a Status Mount box will appear.
The box will blink which is an indication that it has just been
added.
The boxes are numbered, but they are not yet associated with a
tooth or teeth.
Because you have Unlocked the desktop you can move the
box to another position in the Status Mount by using the handle
(two little bars in the top left hand corner of the box).
Don’t forget to Save the scheme.
Activate the Sub menu (Right hand top) in the Status Mount
box.
Mediadent User manual 20120213
151
You can repeat this process (adding and/or removing Status Mount boxes) until you have
defined the number of Status boxes you want in your Status Mount.
The next step is to determine per Status Mount box, the teeth/tooth association and if
necessary change the orientation.
Afterwards we will define the sequence in which the images will be taken.
3. Associate teeth/tooth to the Status Mount boxes
Action
Explanation
Overview Image Association
You can associate a tooth or teeth by
changing the properties of the box :
Select one of the Status Mount boxes.
You will notice when you select a box the
color changes into dark grey.
Choose in the Sub Menu > Image
associations
The Image association box will appear:
Orientation: This will allow you to
change the orientation of the Status Mount
box.
The first tab ‘Standard corrections’
represents the orientation of the digital
sensor. This means if you are using the
sensor to capture intra-oral images, you
have the possibility to change the
orientation via this screen. You also have
the possibility to flip the images from left to
right or from top to bottom depending on
how the sensor is placed in the patient's
mouth.
The second tab ‘Teeth Chart’ is partly
hidden and will allow you to associate a
tooth or teeth with the Status Mount box.
Change the orientation
Let’s take a closer look at the tab ‘Standard
corrections’
Depending on the way you place the sensor
in the patient's mouth, you will be able to
change the orientation.
Mediadent User manual 20120213
152
In this example I will change the Status
Mount box to 90° which is the position in
which I place the sensor in the patient's
mouth.
We can also change the visualization of the
Status Mount box.
The image I want to take in the Status
Mount box has to be in landscape, here I
can change this.
You will see the Status Mount box
orientation change into landscape.
Associate teeth/tooth to a Status Mount box
I will now associate teeth.
Click on the right arrow in the dialog box
to view the teeth association tab.
Click on the Teeth Chart tab
The Teeth Chart is presented
At this moment no teeth are associated to
the selected Status Mount box.
Mediadent User manual 20120213
153
You can now associate a few teeth to the
Status Mount box.
In this example I will associate teeth 22
to 25 to this Status Mount box.
You do this by selecting the teeth in the
teeth scheme.
To learn more about working with the Teeth
Chart, you can read the article ‘Working
with The Teeth scheme’ (Section
3.3.1).
You need to click on the Status Mount
box to confirm your association.
The result : The name of Status Mount box
will change and reflect the teeth
association.
In the middle of the teeth chart you can
indicate how the sensor will be placed in
the patient’s mouth (for example in an
angle of 90°).
This will be linked to the Status Mount box
by selecting this in the Teeth scheme.
You will see a green dot appearing, this
means that this is the way the intra-oral
sensor will be used.
Again, important is to click on the
Status Mount box to save the changes
made to the Status Mount box.
You will need repeat this process for every Status Mount box in the Status Mount.
Mediadent User manual 20120213
154
After you have repeated this process for all
the Status Mount boxes, you need to save
the status mount.
Activate the Sub menu (Top right) in the
Status Mount box
Once you have associated the teeth to the Status Mount boxes and you have associated the
correct orientation you are ready to create your own sequence in which the x-rays will be
taken.
4. Change the sequence for X-ray taking
Action
Explanation
In Mediadent Menu : File> Acquire FMX
You can change the
sequence in which
the images need to
be taken.
-or-
To check the order
or sequence in
which the images will
be taken you can go
to the Acquisition
mode with Status
Mount.
Go to the Status Mount Sub Menu
Select > Toolbars > Sequence selector
Activate the
Sequence Selector
Toolbar.
The toolbar will be
visible and shows the
Default sequence
scheme.
You can create your
own sequence by
clicking on the small
pull down arrow in
the Sequence
selector.
Mediadent User manual 20120213
Choose Add/record a sequence
155
This will bring up a
Sub Menu where
you can record your
sequence.
First give the
sequence a name.
The following
information box will
appear explaining
how you can change
the sequence of the
status boxes.
The cursor will
change into a 01.
This is the sequence
number.
Click on the Status
Mount box where the
first image has to
appear.
Click on the Status Mount box where the first image has to appear.
Repeat this process until you have selected all the boxes.
You will see the
cursor change into
02, now click on the
Status Mount box
where the second
image has to be
stored in.
The cursor will
change into 03, …
Repeat this process
until you have
selected all the
boxes.
Once you have
finished click on Esc
Mediadent User manual 20120213
156
or right-click on a
status box.
You will be able to
select the new
sequence that you
have created.
Don’t forget to
Save the Status
Mount.
Now you are ready to use the new Status Mount! Read the article: 'Working with the
Status Mount in Acquisition mode' (Section 3.4.2)
4.6 Mediadent export/import
4.6.1 How to send an image by e-mail
Sending an image by e-mail can be practical if you want to share your images with colleagues
or a hospital.
Within Mediadent it is possible to send an image, but you will need to have an e-mail system
installed on your PC. Examples of most common e-mail programs are Outlook, Outlook Express,
etc.
Before you sent an image via Mediadent, you need to test if your e-mail system is working
by sending an e-mail message via your e-mail program.
There are 2 ways in which you can sent images via your e-mail program.
1. Drag and drop an image in an e-mail. Read the following article: How to drag and drop
an image in an e-mail (Section 4.6.2).
2. Via the Export Picture Directory.
The second method is explained in this article.
Action
1. In the Mediadent menu you will find the feature in File > Export Picture Directory
Mediadent User manual 20120213
157
To get a detailed description of the screen elements, read the topic 'Export Picture Directory
screen' (Section 3.1.2).
2. Click on the image you want to send.
3. Choose 'Add'.
4.The image will appear in the list:
5. Choose the e-mail button.
Mediadent User manual 20120213
158
6. Your e-mail program will launch and the image will be attached to the e-mail.
7. Fill in the recipients names and send the message.
Use the ‘Estimate’ button to get information on the file size. Some e-mail systems do not
allow you to sent more than 5 MB. With the ‘Estimate’ button you will see the MB size of your
attachments to the mail. If it is bigger than the allowed size, you will be able to sent your
image in separate e-mails. Find more information about the screen elements and buttons in
the topic 'Export Picture Directory screen' (Section 3.1.2).
4.6.2 How to drag and drop an image in an e-mail
For your convenience we have the possibility to drag and drop images to your e-mail
environment. This is the fastest way for you to sent images.
Of course you will need an e-mail environment to be able to do this. Also, always check if your
e-mail environment is working before you try to sent an e-mail with images from Mediadent.
To be able to drag and drop images from Mediadent to your e-mail program, both programs
(Mediadent and your e-mail program) have to be open.
Action
Explanation
1. Open your e-mail program and create a
new message.
When you open your e-mail program and create a
new message, an additional icon will appear in the
taskbar on the bottom of your screen.
Your e-mail program is visible on the bottom of the
screen and is accessible from Mediadent.
Mediadent User manual 20120213
159
It is important to have these icons at the bottom of
the screen, because you will drag & drop the
images on the icon of 'New Message'.
You can select more than 1 picture by pressing
2. Go to Mediadent and select the image
you want to sent.
the
key on the keyboard while
selecting the images you want to sent.
3. Pick the image(s) you want to sent.
4. Drag and drop the image onto the New To drag and drop you have to press and hold the
Message icon in the taskbar.
LEFT mouse button while dragging the image onto
the New Message icon on the Windows taskbar.
5. The New Message will open and you will
see your mouse cursor with a small
+sign.
The small +sign indicates that you are copying an
image to the message.
5. Release the left mouse button in the
body of the message.
You can release the left mouse button in the body
of the message.
This will only occur the first time you drag and
drop an image, or you have not saved the format
settings.
You will need to choose one of these options.
1. If the recipient has Mediadent, you have the
possibilities to choose the following formats:
- Mediadent native format
- Mediadent native format (including all support
files) : most complete option
You will be prompted with the
-Same as above but zipped: this means all the files
get compressed into 1 file that the recipient can
Extract.
Mediadent User manual 20120213
following screen.
160
2. If the recipient does not have Mediadent you
can convert the image to JPEG.
- Converted to JPEG: the files get converted to
JPEG format.
3. Other formats
- Original image/video format
- Export CT image or Export CT image SFX
Archive: when applicable
Turn this flag ON if you don’t want to get this
screen again.
If you have ticked this option, Mediadent will
always sent your images in the format you just
indicated.
If you want to get this screen again after you
have ticked this option, you need to drag and
drop your image with the CTRL key pressed. So
you need to press and hold the CTRL + LEFT
mouse button while dragging your image.
If you know you will have to change the format
often, do not check this option and you will be
presented with this screen every time and you
are free to choose the format you want to sent
your image in.
6. Example: We will choose JPEG format..
Once you have chosen a format you will see the
image file(s) appear as attachment to your mail.
You can now fill in the name of the recipient and
sent the mail.
Be aware that some e-mail environments are
limited to the file size you can sent. You can
limit the file size by choosing ‘Same as above
but zipped’.
Mediadent User manual 20120213
161
In this case we have chosen for JPEG format. The
file is now an attachment in this e-mail.
4.6.3 How to export multiple pictures of a patient
Sometimes it can be necessary to export a number of images from a particular patient so they
can be shared with colleagues and patients.
To export 1 picture, choose for File > Export picture in the Mediadent menu.
If you want to export multiple images, you can use the option Export Picture Directory.
Go to the Mediadent Menu and choose File > Export Picture Directory
1. Overview of the Export Directory screen
You will be presented with the following screen:
Mediadent User manual 20120213
162
Image Library of the selected patient.
Viewport: you can preview an image before exporting it.
Action buttons:
Add: this will add the selected picture
Add all: this will add the pictures in the selected folder of the library
Add all+folders: this will add all the images of this patient
Remove from list: select the images to be removed from the list
List of files to be exported.
Destination folder: the folder you want to export the images to.
Additional information
Export File Type: gives you the possibility to change the file type in which you want to
export the files into.
Info: gives extra information on the size of the file, the number of files ... that will be
exported. This information will be filled in when clicking the Estimate button.
Estimate button: This action button will calculate the file count, source size, destination
size, overall compression, folder, files ... This information will be filled in the the Info box
Export button: This action button will export the files in the list
to the destination
folder.
E-mail button: This action button will launch your e-mail application and attach the
images in the list to an e-mail.
Exit
Mediadent User manual 20120213
163
2. Exporting images
To export multiple files from a particular patient follow these steps:
Action
1. In the Mediadent menu choose
File>Export Picture Directory
Explanation
.
There are different ways to select images you want to
export.
2. Select the images you want to export.
Method 1: select the images one by one
- Click on the image with the left mouse
button to select the image
If you want to select more than 1
image, you can press and hold the
CTRL key and select the images you
want to export.
You do not have to select the images one by one.
Method 2: If you want to export the images from the
selected folder you can use the action button
Method 3: If you want to export the images from a
particular folder and all the underlying sub folders
use the action button
3. Add the images to the export list
- Click the Add button
Click the Add button to add the selected images to the
export list.
To remove an image from the list, select the image
and click the button Remove from list
The destination folder is the folder on your PC where you
want to store the images.
4. Determine the destination folder
- Click on the small button next to the
Destination folder entry box to open de
Windows dialog box
- Select the correct folder you want to
export the images to
In this example we will export the images to
c:\exported images.
Mediadent User manual 20120213
164
5. Get an estimation of the file size
- Click the Estimate button
Before you export the images to your PC you might want
to get an idea of how large the file will become when
exporting the files. You can use the estimation button for
this.
6. Export to the folder
- Click the Export button
This will export the files to the selected folder.
4.6.4 New: How to burn a CD with images from Mediadent
It can be practical to put the images stored in Mediadent on a CD or DVD.
This is possible through the Export Picture Directory option in Mediadent.
If you have a Vista or Windows 7 machine, you can do this directly from Mediadent.
Mediadent User manual 20120213
165
For other operation systems, like Windows XP, you have to install a packet writer
software. This will create an extra drive letter on the computer. Use this drive letter in
Mediadent (Step 4.).
Action
Explanation
1. Verify your the disc drive letter.
Place an empty CD or DVD in the disc
drive of your computer, and verify the
driver letter. You can do this with the file
explorer of windows - in this case it is
letter F:\
2. In Mediadent, choose File > Export Picture
Directory
.
3. Select the drive letter as destination folder at
the bottom of the export window.
.
For Windows 7 or Vista, indicate the drive
letter where the CD or DVD is inserted.
For windows XP, indicate the drive letter
created by packet writer software.
4. The folder browser opens, navigate to the disc
drive, select it and click OK.
Mediadent User manual 20120213
5. We advice to choose the first option ‘Like a USB
flash drive’.
166
This step is only applicable if you have
Vista or Windows 7.
Make sure a new CD of DVD is in the disc
drive. Windows will ask in which format
you want to use the CD.
If you choose ‘Like a USB flash drive’,
you can use the CD multiple times, this
means, afterwards you can burn additional
pictures to the same CD.
If the option ‘With a CD/DVD player’ is
chosen, the disc will be opened with an
interface.
6. Select the images and click on the Export
button.
Select the images, videos or documents
you would like to export, by selecting the
files in the Image Library and click on the
Add button, if you like to export them all,
please click the export all button
When all the files are selected, please click
the Export button, the CD will be written.
If the progress bar is full green, the export
is done, and the CD can be ejected.
(Windows will close the write session on
the CD automatically.)
7. Click on the Exit button.
4.7 Mediadent automatisation
4.7.1 How to create a macro
You will leave the export window and
return to the Mediadent main screen.
Mediadent User manual 20120213
167
What is a macro?
A macro is often used for repeating tasks. For example if you often have to choose between
acquisition devices you have the possibility to automate these steps.
To create a macro, you will record a number of keystrokes or menu options. Afterwards you
can play the macro that has been recorded. You can use a function key or an icon in the Icon
set to play the macro.
It can be compared to a recording of music that you play over and over again.
A macro can be used in the following scenario :
You need to make images using 2 different devices.
To switch between the machines you will always need to go to the Mediadent Menu and
choose Options > X-Ray Acquisition > (device of your choose).
You will create a macro in Mediadent in these 2 steps:
1. Assign one of the icons or function keys you will use to play the macro. Optionally you can
assign a Hotkey* to the macro.
2. Record the macro. Record the keyboard stokes or menu options.
Step 1: Assign an icon/hotkey
Action
Explanation
1. In the Mediadent menu choose
Options > Macro's
Activate the Macro's menu.
2. Click on the Add button.
The Add button allows you to create a new entry
in the list of macro's.
3. Click Create Button and choose one of
the icons via de scrollbar
In this dialog box you will need to activate
Mediadent User manual 20120213
168
Create button and scroll through the scroll bar
to choose one of the icons by clicking on it.
Afterwards you will attach a macro to this icon.
4. Fill in the name of the macro in the
Description field.
Now you have chosen the icon. You will also
need to give your macro a name.
In this example I filled in 'Device 1'.
5. Optional : You can assign a Hotkey.
This is the shortcut you can use to activate
the macro.
For example F3 means you can use the
Function key F3 (normally found on the top of
your keyboard).
6. Click on the Save button
.
Step 2: Record the macro
Actions
Explanations
1. Click on the Record button.
This screen shows that you have created a
Mediadent User manual 20120213
169
macro with the name Device 1 and you have
assigned the Function key F3 to it.
Now we are ready to record the macro.
Recording a macro means that you are going to
record the steps you want to save in the
macro.
4.Click OK
The dialog box will explain you use Ctrl+F12
(Function key F12) to finish the recording.
+
3. Start recording your steps
4. When finished recording press the key
combination
See the steps you can record in the Example:
creating a macro.
This will end the recording
Ctrl + F12.
5. Click OK
OK to confirm the recording is done.
In the example we will explain how you can create a macro to automatically select the
demo sensor. You can re-use this example to automatically select your own devices.
Example: creating a macro
Actions
Step 1. Activate an icon
1. In the Mediadent menu choose
Options > Macro's
Explanations
Mediadent User manual 20120213
170
Activate the Macro's menu.
2. Click on the Add button.
The Add button allows you to create a
new entry in the list of macro's.
3. Click Create Button and choose one of
the icons via de scrollbar
In this dialog box you will need to
activate Create button and scroll
through the scroll bar to choose one
of the icons by clicking on it.
Afterwards you will attach a macro to
this icon.
4. Fill in the name of the macro in the
Description field.
Now you have chosen the icon. You
will also need to give your macro a
name.
In this example I filled in 'Device 1'.
Mediadent User manual 20120213
171
5. Optional : You can assign a Hotkey.
This is the shortcut you can use to activate the macro.
6. Click on the Save button
For example F3 means you can use
the Function key F3 (normally found
on the top of your keyboard).
.
Step 2. Record the macro
7. Click on the Record button.
Go through the steps you want to record in the macro.
This screen shows that you have
created a macro with the name
Device 1 and you have assigned the
Function key F3 to it.
Now we are ready to record the
macro.
Recording a macro means that you
are going to record the steps you
want to save in the macro.
8.Click OK
Once you are finished with all the
steps you want to record in your
macro you can use Ctrl-F12 to stop
the recording.
Step 3 Example : Recording the steps for automatically selecting the X-Ray Demo
sensor
9. Choose Options > X-Ray Acquisition > X-Ray
Demo
Sensor
These are the steps I want to record
Mediadent User manual 20120213
172
in my macro.
10. Click on the Acquisition icon in the iconbar
Click on the icon.
The screen of the acquisition device
opens.
Depending on the device you have
chosen you will get other screens.
11. To end the recording Ctrl + F12
Use the key combination Ctr + F12
(Function key 12)
12. Click OK
.
13. Test the macro by clicking on the Icon you have
assigned the macro to or use the Hotkey combination.
Mediadent User manual 20120213
173
In my case I assigned the macro to
the icon.
Mediadent User manual 20120213
5 174
New: Quick Reference
5.1 New: Overview icons
In this article we will briefly explain the usage of the iconset and give an overview of the
different icons and their function.
It will offer a great overview of the possibilities of Mediadent.
When an image is loaded into a Viewport, you will see the active relevant icons.
Icon
Explanation
Icon to activate the Image Library. The image library contains all the images of
the selected patient.
Articles concerning the Image Library:
Working with the image library (Section 3.5.3)
Change the order of the images (on-line documentation)
How to search for images (Section 4.3.3)
Icon to activate the Status Mount.
If the icon has a green glow it means that there are a number of Status Mounts
defined.
Articles concerning the Status Mount:
A status mount (Section 9.3)
Working with the status mount in acquisition mode (Section 3.4.2)
Icon to activate the Annotations.
Article concerning the Annotations:
Working with annotations (Section 3.2.4)
Icon to choose the shape of the Region of interest.
Press and HOLD the left mouse button until the icon expands.
Article concerning the Region of interest:
Mediadent User manual 20120213
175
Working with region of interest (Section 3.2.6)
Icon to choose the number of Viewports.
Press and HOLD the left mouse button until the icon expands.
Articles concerning the Viewports:
A viewport (Section 9.1)
Working with viewports (Section 3.1.3)
Manipulating the Viewport (on-line documentation)
Icon to activate the Zoom Window.
Article concerning the Zoom Window:
Working with the zoom window (Section 3.2.5)
Icon to save the image.
Articles concerning saving images:
Saving an image (Section 2.4)
Overview of the specific Extra Info and Keywords (Section 3.5.2)
Icon to delete the active image.
Articles deleting images:
How to recover a deleted image (Section 4.4.3)
Working with the image library (Section 3.5.3)
Icon to activate the histogram.
Articles concerning the histogram:
How does the histogram work? (Section 9.5)
Working with windowing (Section 3.2.2)
Icon to rotate the active image.
Icons to flip the vertical or horizontal.
Icon to invert the active image.
Icon to print the images.
Articles concerning printing images:
Printing images (Section 2.5)
This is one of the most important icons in Mediadent. When clicking on the icon,
you will launch the acquisition mode and you will be able to use your acquisition
device.
Articles concerning acquiring images:
Acquiring an image (Section 2.2)
Working with the status mount in acquisition mode (Section 3.4.2)
Mediadent User manual 20120213
176
Icon to make acquisition through the Status Mount.
Articles concerning the Status Mount:
A status mount (Section 9.3)
Working with the status mount in acquisition mode (Section 3.4.2)
Icon to activate the Video Still Capture module. This module will allow you to use
your camera to take pictures.
Article concerning the Video Still Capture module:
Working with the Video Still Capture module (Section 3.7.1)
Icon to activate the WDM Streaming Video module.
Icon to activate one of the optimization profiles. The optimalisation profiles can
enhance the quality of the images.
Press and HOLD the left mouse button until the icon expands.
Articles concerning the optimization profiles:
Working with the optimize feature (Section 3.2.8)
The optimize module (Section 8.1)
Icon to reload the original saved image. The orginal image can always be
retrieved.
Icon to activate the devices that use the TWAIN interface.
Icon to activate the Full Screen status screen.
Icon to launch the Reporter module. The Reporter module is a seperate module.
If you do not see this icon, it has not been activated. Contact your dealer for more
information.
If the icon has a green glow it means that there are documents for that patient
in the Reporter module.
Articles concerning the Reporter module:
Working with the Reporter Module (on-line documentation)
Icon to launch the Dicom network module.
Icon to launch the Dicom print module.
Icon to apply an auto contrast to the image.
Articles concerning filters:
Working with Filters (Section 3.2.7)
Icon to apply the sharpen filter to the image.
Mediadent User manual 20120213
177
Articles concerning filters:
Working with Filters (Section 3.2.7)
Icon to apply a noise reduction filter to the image.
Articles concerning filters:
Working with Filters (Section 3.2.7)
Icon to apply the cosmetic module.
Icon to apply filters to your image.
Articles concerning filters:
Working with Filters (Section 3.2.7)
Icon to exit Mediadent. Mediadent can be configured NOT to close, this will speed
up the process of launching Mediadent through a a patient management system.
You can hide unused icons. Read the article How to customize the iconset (Section
4.2.2) to learn how to do this.
Mediadent User manual 20120213
6 178
New: Questions and answers
This sections gives an overview of support issues we encounter frequently.
The issues are described and possible solutions are proposed.
New: What to do when Mediadent launches in DEMO mode? (Section 6.1)
(Section 6.1)
6.1 New: What to do when Mediadent launches in DEMO mode?
Symptom
When I launch Mediadent I get the word 'DEMO' in red on the screen.
Description
The Mediadent software works with a special USB key or parallel security dongle.
Pictures of the parallel keys:
Mediadent User manual 20120213
179
Picture of the USB security dongle:
When Mediadiadent launces in demo mode this can have several causes, for example:
1. If this key is not accessible on your PC or on the server, Mediadent will launch in demo
mode.
2. Another cause can be that the key is no longer valid for the installed version of Mediadent
Solution
This problem should be handled by your dealer, but before contacting them you can check the
following:
1. Please locate the USB key or parallel key. You will recognize this key because it has a green
sticker on it with a number starting with U or N. (U is a single user and N means network).
2. Make sure the key is inserted in the USB port or the parallel port of your PC, or in the case of
a network installation on the machine that acts as a server.
3. Check if the key is working correctly (In the case of the USB key you will see a small green
light, this is an indication that the key is working properly) - please contact your dealer if you
suspect your USB key is broken.
4. In case of a network installation, make sure that the server with the key is turned on
and that you have access to the server. You can restart the server and test if Mediadent
launches normaly.
5. Your firewall and or anti-virus product can be blocking the access to the security dongle.
To test this, turn off the firewall and or anti-virus product and check if Mediadent launches
normaly. Please contact your dealer for the correct firewall and anti-virus configuration.
6. If you have checked this, it is also possible that the key no longer supports the version of
Mediadent you are trying to run. Please contact your dealer for more information about
Mediadent upgrades.
Mediadent User manual 20120213
7 180
Mediadent Setup
7.1 Overview Mediadent Setup
These articles explain the different configuration options in Mediadent. This is an advanced
topic and changes might effect the behavior of Mediadent.
If you have any questions or remarks, please don't hesitate to contact us. Read the article
Getting support (Section 10) for more information.
1. General Settings (Section 7.2)
2. Regional Registration Settings (Section 7.3)
3. Display Settings (Section 7.4)
4. Misc setting and maintenance (Section 7.5)
5. Modules (Section 7.6)
7.2 General Settings
This advanced section will show a number of settings you can configure in Mediadent.
In the General Settings, you will be able to:
Change the Practitioner info
Determine how Mediadent will react in certain circumstances like deleting images, saving
files etc... You can also avoid permanently deleting images
Indicate how Mediadent has to handle the images format
Mediadent User manual 20120213
181
1. How to change the Practitioners Info
If you have a practice with a number of dentists it can be practical to show the name of the
dentist in the status bar.
There are 2 ways to change the name of the practitioner:
1. Change the name in Mediadent Setup>General Settings.
2. Change the name in your Patient Management System. The vendor of the Patient
management system will be able to help you integrate the practitioner's name into Mediadent.
The changes made in your Patient Management System will overrule the settings in
Mediadent Setup.
Follow these steps to change the Practitioner's name in Mediadent.
Action
1. Go to Mediadent Setup>General Settings
2. Fill in the practitioners name in the field Practitioner Info (overruled by OLE & CommandLine)
Mediadent User manual 20120213
182
3. Save the changes
4. Exit
2. How to avoid deleting files permanently
1. To avoid from permanently deleting files from the hard disk, follow these steps.
Action
1. Go to Options>Setup
2. In the General Settings tab : Select the option 'Delete files to recyclebin'.
If this is checked, you will always be able to retrieve the images from the recycle bin.
You only have to do this once. This setting will be retained in Mediadent.
This will only work on that particular PC. It will not work in a network configuration.
2. Retrieving images from the recycle bin
Action
Explanation
1. Double click on the recycle bin of Windows to open it
Open the recycle bin in
Windows.
Look for the image
files of mediadent.
The image file
consists of 3 files :
.DIC file
.mih file
.bmp file
You have to restore
these 3 files.
Select the first file and click with the RIGHT mouse button on the file. A
menu will appear and select Restore or choose Restore this item in
Mediadent User manual 20120213
183
the menu.
Repeat this for the 3
files.
The images should be taken by the workstation where the recycle bin resides. This will not
work in a network environment when the server acts as a storage for the images.
For more information about these settings, contact our Help desk.
7.3 Regional Registration Settings
In this advanced section we will explain the options in the Regional Registration Settings of
the Mediadent Setup.
On this tab you will be able to configure the following options:
The date format: You can choose between European and American date format
Teeth Numbers: You can configure the teeth numbers depending on the standard in your
country.
Registration Settings: If you have questions about this topic, please contact our
Helpdesk. For instructions, read Getting support (Section 10).
Mediadent User manual 20120213
184
Always Save Changes before exiting the dialog box or your changes will not take effect.
For more information about these settings, contact our Helpdesk.
How to change the teeth numbering
You have the possibility to change the teeth numbering.
There are 3 possibilities:
- Universal Numbering system
- FDI Two-Digit Notation
- Palmer Notation
To change the teeth numbering, click on the corresponding icons
Icon
Universal Numbering System
FDI Two-Digit Notation
Result
Mediadent User manual 20120213
185
Palmer Notation
Always Save Changes before exiting the dialog box or your changes will not take effect.
7.4 Display Settings
In this advanced top we will explain several settings that can be configured to help you find
images based on keywords and extra information you can associate with your images.
In the Mediadent Setup> Display settings you have the possibility to configure the following
things:
Define the Image Properties Settings like the 'User' fields, 'Grade' fields, 'Type' fields.
Read the article 'Overview of the specific Extra Info and Keywords (Section 3.5.2)'
to understand how they can be used.
Define the Image Library Settings like the default folders Mediadent will create in the
Image Library (for example DFO, Video, ...).
Define the Viewport Settings like showing a grid or a ruler on callibrated images.
To activate the Setup, choose Options>Setup and choose the tab Display Settings.
Mediadent User manual 20120213
186
1. Define the Image Properties Settings
In the Image Properties Settings you will configure the fields you can use to filter on.
In the article Overview of the specific Extra Info and Keywords (Section 3.5.2) you will
learn how to select extra info and keywords. In this article we will explain how to create the lists
with keywords you can choose from.
There are 2 tabs where you can enter extra fields:
- Extra Info: Info field, User field, Grade field, Type field
- Keywords: User defined keywords. These keywords you can choose yourself.
1.1 Extra Info
You have the possibilty to add Extra Info fields to your images. These fields are linked to your
images and can be used to filter on. Adding the fields in the Display Settings will make them
available in the Image Properties.
In this example we will show how to add 2 names to the "User" Field File. Once they are
created, they are available through the properties of the image and when saving an
image.
Action
Step 1. In the Mediadent menu, choose Options>Setup and choose the
tab 'Display Settings'
Explanation
Mediadent User manual 20120213
187
These are the
different fields you
can configure.
Step 2. Click on the icon next to <APPLDIR>\users.txt.
In the example we
want to add 2 Users,
so we can choose
between the 2 users
in the Image
Properties.
On the tab 'Image
Properties
Settings', click on
the icon to change
the "User " Field
File.
This will open the
Notepad.
In the Notepad you
will be able to type a
list of users.
Changing the grade,
image types and
comments are also
done via Notepad.
Step 3. Type the names in Notepad
Type in the names of
Mediadent User manual 20120213
188
the Users.
In this example the
users are gunter and
benjamin. Type in the
first name and enter,
then type in the
second name.
Step 4. Choose File>Save
Step 5. Choose File>Exit
After typing the
names, don't forget
to save the Notepad
file.
Step 6. Choose Save Changes in the Mediadent setup screen.
Step 7. Exit the Mediadent setup screen
Back in Mediadent
Setup screen, you still
have to save the
changes in
Mediadent.
You need to close Mediadent and restart the program to have your changes take effect
Next step Box
To test the changes made, select an image and change the properties.
Read the article Overview of the image properties (Section 3.5.1).
Mediadent User manual 20120213
189
Changing the Grade, Image Type and Comments is done in the same way. You can
repeat a number of steps as explained above.
Action
To change the Comments field
Repeat Step 1.
2. Click on the icon next to <APPLDIR>\comments.txt.
3. Type the comments in Notepad
Repeat Step 4. to Step 7.
Explanation
Go to Step 1. in the
previous explanation.
This will allow you to
add standard
comments
.
Go to Step 4. in the
previous explanation
and repeat the steps
until Step 7.
To change the Grade field
Repeat Step 1.
Go to Step 1. in the
previous explanation.
2. Click on the icon next to <APPLDIR>\imagegrades.txt.
This will allow you to
change the Grades. By
default you have
Grade A,B and C.
3. Type the grades in Notepad
.
Go to Step 4. in the
previous explanation
and repeat the steps
until Step 7.
Repeat Step 4. to Step 7.
To change the Image Type
Repeat Step 1.
2. Click on the icon next to <APPLDIR>\imagetypes.txt.
3. Type the different image types in Notepad
Repeat Step 4. to Step 7.
Go to Step 1. in the
previous explanation.
This will allow you to
change the image type
field. You can change
the list of the image
types in the Notepad
screen.
.
Go to Step 4. in the
previous explanation
and repeat the steps
until Step 7.
1.2. Image Keyword List
These are the user defined keywords you can define yourself. These fields will become
available in the properties of the image and when you save an image.
Action
Explanantion
Mediadent User manual 20120213
190
Go to the Setup of Mediadent: Display Settngs as previously
described
On the tab 'Image
Keyword List' you can
add your own
keywords.
Choose the 'Image Keyword List' tab
In this example, the
keyword 'Morita' was
typed in.
Type in the keyword.
Click on the 'Add' button.
Click on 'Save Changes'.
Click on 'Exit'.
You are ready to type
in a second keyword if
necessary.
Always Save the
changes before existing
the dialogbox.
To test, select an
image in the image
library and change the
image properties. You
will have the possibility
to add the new defined
keyword.
You have the possibility to ask for keywords everytime you make an
acquisition. Check the option 'Ask for keywords after
.
acquisition'.
2. Image Library Settings
The Image Library Settings will allow you to change the layout of the Image Library. Via these
options your will also be able to set default folders that are created every time we add a new
patient.
Mediadent User manual 20120213
191
Display logo in Image Library: Untick this option if you don't want to see the Mediadent
logo.
Monitor/Auto refresh Image Library: This option will automatically update the Image Library
when new images are added.
Show tiny teeth chart: Untick this options if you don't want to see the teeth chart in the
Image Library.
When you tick the option 'Activate the global folder by default in the Image Library'
means that when opening a patient's library, the global folder will always be visible.
To understand what the global folder can do, read the article The global and patient
library (Section 9.4) and How to move images from one patient to another (Section
4.3.1).
By default you can determine which folders are created in the patient's library.
To add a default folder, type the name of the folder in the box.
In this screenshot you will see 2 default folders that will be created: Video and
Ortho. These are the folders that are created for every new patients.
The option: 'Create these folders on existing records' will create the two folders (in
the example Video and Ortho) for all the existing patients in Mediadent.
3. Viewport Settings
Mediadent User manual 20120213
192
Ruler
The ruler in this picture is set to RED for clarity.
Grid
The grid in this picture is set to RED and 1mm for clarity.
This is the dialog box to configure the Viewport Settings:
In this dialog box, you can select the tab Viewport Settings and change the default settings
for the Grid and scale.
When this option is checked the grid will automatically be visible in the Viewport.
You can change the size of the Grid rectangle for better analysis.
The Grid style is also something that can be configured.
Changing the color can help to visualize the grid on your image.
If you want the ruler to be visible in your Viewport, check this option.
You can choose the position of the ruler: the left top, right top, left bottom, right bottom.
Of course the color can be changed for better visibility.
7.5 Misc setting and maintenance
This tab is reserved for technical personnel.
For more information read the article Getting support (Section 10).
7.6 Modules
Mediadent User manual 20120213
193
This tab shows the different modules that are loaded in Mediadent.
A module is a small program that gets loaded when you launch Mediadent and this small
program makes sure that Mediadent can work with your acquisition device.
For example the Module 'X-Ray Dexis' will make sure that Mediadent can work with the
Dexis acquisition device.
If the color is green it means the module is loaded and can be used in Mediadent.
When Mediadent launches the activated modules are loaded.
If you want Mediadent to launch quicker, you can disable some of the X-Ray modules you
are not using.
To unload a module, click on the green box. A red strike-through line will appear over de
module, indicating that the module will not be loaded.
Be aware that you do not de-activate your acquisition device!
If you are not sure about this setting, please contact us. Read the instructions on how to get
support: Getting support (Section 10).
Mediadent User manual 20120213
8 194
Mediadent Module Setup
8.1 The optimize module
Changing the Optimization profile is one of the advanced features in Mediadent.
You can create an optimization profile that will automatically perform certain actions that will
enhance your image.
In the optimization profile you can perform following actions to enhance the image:
- Flip vertical
- Flip Horizontal
- Rotate
- Invert
- Apply Unsharp Mask, Gamma, Glaussian Blur, ...
- Stretch Intensity
- Histo Equaliz
- ....
These settings can be saved in an optimization profile and applied to your images.
Applying an optimization profile, can be done in 2 ways.
1. The optimization profile gets applied automatically when an acquisition is made with an
particular acquisition device.
2. The optimization profile get applied manually. Read the article Working with the optimize
feature (Section 3.2.8).
In this advanced article you will learn how to modify an optimization profile and how you can
assign an optimization profile to an acquisition device so it the optimization profile gets applied
automatically (point 1.)
1. Modify an Optimization profile
Action
Explanation
In the Mediadent menu, choose Options>Setup
Scroll down in the Mediadent Set up
until you find the Optimize module.
Mediadent User manual 20120213
195
Overview of the optimization screen
These different filters you can save to the Optimization profile.
You can scroll down in the list and find more or less the same options as the Filter
options.
The list the filtering actions that need to be performed for this particular Optimization
profile.
Will delete a particular action in the list. Select the particular action first.
This will clear all the filtering actions for this particular Optimization profile.
Description of the Optimization profile
Each tab represents an Optimization profile. You can configure up to 5 Optimization
profiles. Each Optimization profile contains a list of filtering actions to perform.
Before existing this screen, always Save changes (this is NOT done automatically).
Mediadent User manual 20120213
196
By default a number of Optimization profiles are already available.
You can change the Optimization profiles, if you are not happy, you can revert back to the
default settings, by using this button.
The Appearance tab is used to link a particular Optimization profile to an acquisition
device. This will be explained later.
Example: We will modify Optimize 1 and add the action Flip Vertical
1. Go to the Optimize module in the Mediadent Setup
.
You will notice that the Flip Vertical
action is added to the list of
actions to be performed.
2. Click on the icon next to the Flip Vertical action
Everytime you click on the
Optimize 1 button in the iconset
these actions will be performed to
the selected image in the Viewport.
3. Save Changes
Always Save Changes before
exiting the setup screen.
2. Assign an Optimization profile to an acquisition device
The Appearance tab is used to link a particular Optimization profile to an acquisition device.
For example: If, for your device the image always has to be flipped horizontal, then you can
make an Optimize profile for this and assign it to that particular acquisition device.
Mediadent User manual 20120213
197
Default Core Preset. This is the Optimization that is default available.
This is the list of acquisition devices you can assign an Optimization profile to. The
action list that is defined in the profile will be executed.
To link the Optimization profile to the device, check this box.
To activate the Optimization profile to the device, check the radiobutton.
To assign an Optimization profile to the device, you have to check the box AND check the
radiobutton.
3. Example: Change Optimize 3 and link to Demo sensor
As an example we will do the 2 steps. First you need to determine the action list and then you
need to assign a device to this action list.
Let’s change the Optimization profile 3 and link it to the Demo sensor.
We would like to flip the image vertically every time we acquire an image when using the
Demo sensor.
Action
Step 1: Configure the action list
Explanation
1. Click on the Optimize 3 tab
First we will configure the action list for
the Optimize 3 profile.
2. Remove all the actions from the Optimization profile
3, by pressing the Clear button
We will remove all the actions that are
default.
The action will appear in the list.
Mediadent User manual 20120213
198
3. Add the Flip Vertical action by clicking on the icon
4. Save the changes
We will save the Optimize 3 action list.
Step 2: Link the optimization profile to the Demo sensor
1. Go to the Appearance tab.
Linking the Optimize 3 profile to an
acquisition device is done via the
'Appearance' tab.
2. Choose the Demo Sensor in the list of Module
Presets.
Select the acquisition device in the list.
3. Select Optimization profile 3 by checking the
Optimize 3
4. Activate the Optimize 3 by checking the radiobutton
Check the Optimize 3 box to link the
profile to the device.
You also need to activate it, this is
done by checking the radiobutton in
front of the Optimize 3 profile.
5. Save changes – Yes to save the changes
You always need to Save before exiting
the module, otherwise you settings will
not be saved.
Mediadent User manual 20120213
6. Exit
199
Everytime you use this device the
Optimize 3 action list will execute. In
this case a Vertical Flip.
TThe optimization profile is also linked to the filters you can apply to your image. All the
settings in the filter can be saved in an optimization profile and applied during acquisition.
Mediadent User manual 20120213
9 200
General topics explained
9.1 A viewport
A Viewport is a region where you can load an image into for analysis purposes. Loading an
image can be done by first activating the Viewport. To activate a Viewport you have to select it
by clicking in the region with your left mouse button. Once the Viewport is activated you will see
that it changes color (dark grey). Now you can double click on an image in the Image
Library and it will be loaded into the Viewport.
9.2 A desktop
A Desktop is the way in which the different screen elements like Viewports, Icon set, Image
Library, ... are presented on your screen.
The Desktop will determine :
How many Viewports A Viewport is a region where you can load an image into for
analysis purposes. Loading an image can be done by first activating the Viewport. To
activate a Viewport you have to select it by clicking in the region with your left mouse
button. Once the Viewport is activated you will see that it changes color (dark grey). Now
you can double click on the image and it will be loaded into the Viewport. are visible.
What the position is of the Iconset.
Where the Image library is positioned
If and where the histogram is positioned
If and where the brightness/contrast bar is positioned
What screen resolution will be used
In short it determines the look of your Desktop within Mediadent.
Read more about the different Desktop elements in the topic about the screen elements
(Section 2.1).
Example of one of the standard Mediadent Desktops :
Mediadent User manual 20120213
201
Important to understand is that the Desktop is also tied to the resolution of your screen.
When changing the screen or screen resolution it may be necessary to load another
Desktop or to create your own Desktop.
9.3 A status mount
In this topic we will explain the basics of an alternative way of working with your images.
The Status Mount is together with the Image Library a way to organize your images.
The images can be stored, modified or deleted in the Status Mount or the Image Library.
You can also use the Status Mount in acquisition mode. The images will be captured in the
boxes.
Differences between the Image Library and the Status Mount
The Image Library is the main container where the images are stored in. The manipulations
you do on the images in the Image Library are permanent. This means deleting an image in
the Image Library will also result in the deletion of the image in the Status Mount. Removing
an image from the Status Mount will not result in the deletion of the image.
Working with a Status Mount has a couple of advantages:
You have the possibility to automate the image taking process. In some offices there is a
Mediadent User manual 20120213
202
procedure in place for taking pictures. For example in some cases it is common practice
to take images of the full mouth. In that case it is very handy to be able to automate this.
Another advantage of using the Status Mount is that you can automatically associate the
tooth or teeth to the image. The name of the image will represent the tooth or teeth
association.
Also the order in which the pictures are taken can be determined in the Status Mount.
If you take intra-oral images it is also possible to change the orientation (rotate 90° or
flip horizontally or vertically) of the image in the Status Mount Box independent of the
original image.
An example of a Status Mount scheme is the AAO. This scheme is used by the American
Academy of Orthodontists.
If you want to know how you can move images from the Image library into the Status
Mount, read the article : Working with the Status Mount and the Image Library
(Section 3.4.1).
Perhaps you want to use the Status Mount when you are acquiring an image, read the
article : Using the Status Mount in Acquisition Mode (Section 3.4.2).
Maybe you want to create your own Status Mount, read the How to article : How to
create a Status Mount (Section 4.5.1).
9.4 The global and patient library
Global Image Library
The Global Image Library is a library which is accessible from every patient's library.
It can be used to store images for demonstration purposes or as a temporary storage for
images you want to move from one patient's library to another.
The icon for the Global Image Library can be found in the Image Library :
Click on the Global Image Library icon to see the images that are stored in this Library.
Patient Image Library
The Patient Image Library is the folder you will store the images taken for that specific
patient. You have the ability to structure the Patient's Library in any way that is suited for you.
You will be able to create subfolders in the Patient's library.
The icon for the Patient Library can be found in the Image Library :
Clicking on the icon will show the images in the Patient's Image Library.
Learn more about using the Patient's Library in the topic 'Working with the Image
library' (Section 3.5.3).
You can use the Global Image Library if you want to move or copy an image from one
patient's library to another. See the topic 'How to move images from one patient to
another'. (Section 4.3.1)
Mediadent User manual 20120213
203
9.5 How does the histogram work?
An image histogram is a type of histogram which acts as a graphical representation of the
tonal distribution in a digital image. It plots the number of pixels for each tonal value. By
looking at the histogram for a specific image a viewer will be able to judge the entire tonal
distribution at a glance.
The horizontal axis of the graph represents the tonal variations, while the vertical axis
represents the number of pixels in that particular tone.
The horizontal axis:
The left side of the horizontal axis represents the black and dark areas, the middle
represents medium grey and the right hand side represents light and pure white areas.
The vertical axis:
The vertical axis represents the size of the area that is captured in each one of these zones.
Thus, the histogram for a very bright image with few dark areas and/or shadows will have
most of its data points on the right side and center of the graph.
Conversely, the histogram for a very dark image will have the majority of its data points on
the left side and center of the graph.
Mediadent and the histogram
Image editors, like Mediadent, typically have provisions to create a histogram of the image
being edited.
The histogram plots the number of pixels in the image (vertical axis) with a particular brightness
value (horizontal axis).
Algorithms in the digital editor (Mediadent) allow the user to visually adjust the brightness
value of each pixel and to dynamically display the results as adjustments are made.
Improvements in picture brightness and contrast can thus be obtained.
In the article Working with windowing (Section 3.2.2) you will learn how to use the
histogram in Mediadent.
(Source: Wikipedia)
Mediadent User manual 20120213
204
10 Getting support
If you have any additional questions concerning Mediadent, you can contact the organisation
you bought Mediadent from (your dealer).
In case of technical issues, be prepared:
1. When you are experiencing technical problems be sure to have the following materials at
hand:
- Mediadent installation CD
- Installation CDs of your acquisition device
2. The questions you can expect to be asked are the following:
- What are the circumstances in which the problem occurs?
- What is the version of Mediadent running on the PC?
- What is the operating system running on the PC?
...
To help you better, provide as much background information as possible.
Mediadent User manual 20120213
Index
, 1-2, 3
A desktop, 200-201
A status mount, 201-202
A viewport, 200
Acquiring an image, 4-10
Display Settings, 185-192
General Settings, 180-183
Getting Started, 3
Getting support, 204
How do I delete a desktop, 126-127
How do I select the ideal desktop, 125-126
How does the histogram work?, 203
How to activate the negatoscope, 145
How to calibrate an image, 145-148
How to change practitioners info, 127
How to configure the desktop, 128-131
How to create a macro, 166-173
How to create a status mount, 148-156
How to customize the iconset, 121-125
How to drag and drop an image in an e-mail, 158-161
How to export multiple pictures of a patient, 161-164
How to find the patients recently accessed, 136-137
How to load another desktop, 131-132
How to move images from one patient to another, 134-136
How to move the zoom window, 132-134
How to recover a deleted image, 148
How to search for images, 137-144
How to select more viewports, 119-121
How to send an image by e-mail, 156-158
Manipulating sensor and orientation, 80
Misc setting and maintenance, 192
Modules, 192-193
New: How to burn a CD with images from Mediadent, 164-166
New: Overview icons, 174-177
New: Questions and answers, 178
New: What to do when Mediadent launches in DEMO mode?, 178-179
Overview How to's, 119
Overview Mediadent Setup, 180
205
Mediadent User manual 20120213
Overview of the export picture directory screen, 24-26
Overview of the image properties, 89-91
Overview of the Mediadent screen elements, 3-4, 23-24
Overview of the specific Extra Info and Keywords, 91-93
Printing images, 17-22
Regional Registration Settings, 183-185
Saving an image, 16-17
The global and patient library, 202-203
The optimize module, 194-199
Welcome page, 1-2
Working with annotations, 45-66
Working with desktops, 27-34
Working with Filters, 72-75
Working with images, 10-16, 34, 34-40
Working with pseudo colors, 44-45
Working with region of interest, 70-72
Working with the image library, 93-98
Working with the Mediadent screen, 23
Working with the optimize feature, 75-76
Working with the reporter module, 98-111
Working with the status mount, 80-82
Working with the status mount and the image library, 82-85
Working with the status mount in acquisition mode, 85-89
Working with the teeth scheme, 76-80
Working with the Video Still Capture module, 111-118
Working with the zoom window, 66-70
Working with viewports, 26-27
Working with windowing, 40-44
206