1
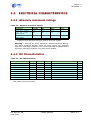
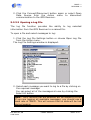
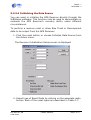
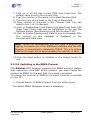
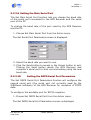
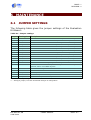
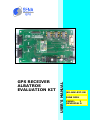
USER’S MANUAL
GPS RECEIVER
ALBATROS
EVALUATION KIT
MU-AEK-037-SN
JUNE 2001
ISSUE:
1
REVISION: 0
ISSUE: 1
REVISION: 0
TABLE OF CONTENTS
1
INTRODUCTION ........................................................... 1.1
2
OVERVIEW ................................................................... 2.1
2.1
PACKAGE CONTENTS ................................................. 2.1
2.2
RELATED DOCUMENTATION ........................................ 2.1
2.3
PRODUCT PRESENTATION........................................... 2.2
2.4
ELECTRICAL CHARACTERISTICS .................................. 2.3
2.4.1
Absolute maximum ratings ..................................... 2.3
2.4.2
DC Characteristics................................................. 2.3
2.5
3
FUNCTIONS .............................................................. 2.4
INSTALLATION ............................................................ 3.1
3.1
ENVIRONMENT CONSIDERATIONS ............................... 3.1
3.2
CONNECTING THE EVALUATION KIT ............................. 3.1
3.3
INSTALLING THE SOFTWARE....................................... 3.1
4
INTERFACES DESCRIPTION ......................................... 4.1
4.1
POWER CONNECTOR .................................................. 4.1
4.2
SERIAL PORTS .......................................................... 4.1
4.2.1
Serial port A......................................................... 4.1
4.2.2
Serial port B......................................................... 4.1
4.3
DISCRETE I/O CONNECTOR......................................... 4.2
4.3.1
INP2/DBGEN input ................................................ 4.2
4.3.2
OUT4/TIMEMARK output ........................................ 4.2
4.4
JTAG CONNECTOR ..................................................... 4.2
MU-AEK-037-SN
JUNE 2000
USER’S MANUAL
PAGE: I
ISSUE: 1
REVISION: 0
4.5
LED INDICATORS ...................................................... 4.3
4.6
RESET SWITCH ......................................................... 4.4
4.7
BACKUP BATTERY ...................................................... 4.4
4.8
TEST POINTS ............................................................ 4.4
5
INCLUDED SOFTWARE ................................................. 5.1
5.1
SIRFFLASH ............................................................... 5.1
5.2
SIRFDEMO................................................................ 5.1
5.2.1
The Setup Menu ................................................... 5.2
5.2.1.1 Defining the Data Source ................................... 5.3
5.2.1.2 Changing Preferences ........................................ 5.4
5.2.1.3 To Exit the SiRFdemo Software ........................... 5.5
5.2.2
The View Menu ..................................................... 5.5
5.2.2.1 The 12-Channel Signal Level View Screen ............. 5.6
5.2.2.2 The Tracking View Screen .................................. 5.7
5.2.2.3 The Map View Screen ........................................ 5.9
5.2.2.4 The Measured Navigation Message View Screen... 5.11
5.2.2.5 The Response View Screen ............................... 5.12
5.2.2.6 The Error Message View Screen......................... 5.12
5.2.2.7 The Development Data View Screen................... 5.13
5.2.2.8 The DGPS Status View Screen........................... 5.13
5.2.3
The Action Menu ................................................. 5.13
5.2.3.1 Opening a Data Source .................................... 5.14
5.2.3.2 Opening a Log File .......................................... 5.15
5.2.3.3 Pause the Display ........................................... 5.16
MU-AEK-037-SN
JUNE 2000
USER’S MANUAL
PAGE: II
ISSUE: 1
REVISION: 0
5.2.3.4 Initializing the Data Source .............................. 5.17
5.2.3.5 Switching to the NMEA Protocol......................... 5.19
5.2.3.6 Switching to the SiRF Protocol........................... 5.21
5.2.3.7 Sending a Serial Break Command...................... 5.21
5.2.3.8 Synchronize Protocol and Baud Rate .................. 5.21
5.2.3.9 Setting the Main Serial Port .............................. 5.22
5.2.3.10 Setting the DGPS Serial Port Parameters ............ 5.22
5.2.3.11 Setting the UART Configuration ......................... 5.23
5.2.3.12 Uploading an Almanac to the GPS Receiver ......... 5.23
5.2.3.13 Uploading an Ephemeris to the GPS Receiver ...... 5.24
5.2.3.14 Switching Operating Mode ................................ 5.25
5.2.3.15 Setting the TricklePower Parameters.................. 5.26
5.2.4
The Navigation Menu ........................................... 5.28
5.2.4.1 Setting Navigation Mode Control ....................... 5.28
5.2.4.2 Setting the DOP Mask Control ........................... 5.30
5.2.4.3 Setting the DGPS Mode.................................... 5.32
5.2.4.4 Selecting the DGPS Source ............................... 5.33
5.2.4.5 Selecting an Elevation Mask.............................. 5.34
5.2.4.6 Selecting a Power Mask.................................... 5.34
5.2.4.7 Steady State Detection .................................... 5.35
5.2.5
The Poll Menu..................................................... 5.36
5.2.5.1 The Software Version....................................... 5.36
5.2.5.2 The Clock Status ............................................. 5.37
5.2.5.3 The Navigation Parameters............................... 5.37
MU-AEK-037-SN
JUNE 2000
USER’S MANUAL
PAGE: III
ISSUE: 1
REVISION: 0
5.2.5.4 Downloading an Almanac File............................ 5.37
5.2.5.5 Downloading Ephemeris Data ........................... 5.38
6
MAINTENANCE............................................................. 6.1
6.1
JUMPER SETTINGS..................................................... 6.1
6.2
TROUBLESHOOTING .................................................. 6.2
6.3
SOFTWARE DOWNLOADING ........................................ 6.2
7
WARRANTY .................................................................. 7.1
8
GENERAL INFORMATION ............................................. 8.1
MU-AEK-037-SN
JUNE 2000
USER’S MANUAL
PAGE: IV
ISSUE: 1
REVISION: 0
TABLE INDEX
Table 2.a : Absolute maximum ratings ...................................... 2.3
Table 2.b : DC Characteristics.................................................. 2.3
Table 4.a : Discrete I/O connector pinout .................................. 4.2
Table 4.b : JP7 configuration ................................................... 4.3
Table 4.c : LED indicators ....................................................... 4.3
Table 4.d : Test points............................................................ 4.5
Table 5.a : SiRFDemo menus................................................... 5.2
Table 5.b : 12-Channel Signal Level View Information ................. 5.7
Table 5.c : Status field value definition...................................... 5.7
Table 5.d : Satellite color coding .............................................. 5.7
Table 5.e : Measured Navigation Message View Information ....... 5.12
Table 5.f : Messages than can be logged to a file ...................... 5.16
Table 5.g : Reset types ......................................................... 5.18
Table 5.h : NMEA Messages................................................... 5.20
Table 5.i : GPS Receiver Modes.............................................. 5.26
Table 5.j : Navigation Mode Options ....................................... 5.30
Table 5.k : DOP Modes ......................................................... 5.31
Table 5.l : DGPS Modes ........................................................ 5.32
Table 5.m : DGPS Sources .................................................... 5.34
Table 6.a : Jumper settings ..................................................... 6.1
Table 6.b : Troubleshooting tips ............................................... 6.2
MU-AEK-037-SN
JUNE 2000
USER’S MANUAL
PAGE: V
ISSUE: 1
REVISION: 0
1 INTRODUCTION
The Albatros OEM GPS Receiver from SENA GPS is a new OEM
GPS receiver product that features the revolutionary SiRFStar-II
chipset. This complete 12-channel, provides a vastly superior
position accuracy performance in a much smaller package. The
SiRFStar-II architecture built on the high-performance SiRFStar-I
core, adding an acquisition accelerator, differential GPS
processor, multipath mitigation hardware and satellite-tracking
engine. Albatros delivers major advancements in GPS
performance, accuracy, integration, computing power and
flexibility.
The Albatros Evaluation Kit provides all the necessary tools and
components to allow the customer to easily start, test, evaluate
and integrate the Albatros GPS receiver in his own design.
MU-AEK-037-SN
JUNE 2000
USER’S MANUAL
PAGE: 1.1
ISSUE: 1
REVISION: 0
2 OVERVIEW
2.1
PACKAGE CONTENTS
The Albatros Evaluation Kit package contains the following
components :
Albatros Evaluation Kit Motherboard.
Albatros GPS Receiver.
User’s guide (this guide).
Evaluation kit CD : contains PC software, documentation in
PDF format.
Active 3V GPS antenna
Power supply adaptor
Serial cable
2.2
RELATED DOCUMENTATION
Albatros User’s Guide from SENA GPS, code MU-ALB-036SN.
MU-AEK-037-SN
JUNE 2000
USER’S MANUAL
PAGE: 2.1
ISSUE: 1
REVISION: 0
2.3
PRODUCT PRESENTATION
The Albatros Evaluation Kit Motherboard provides the necessary
interface to test the Albatros GPS receiver.
Serial port A
JTAG
Connector
Serial port B
Backup
capacitor
RS232
transceivers
Reset switch
Albatros
GPS receiver
Discrete I/O
lines
Main power
jack
LED
indicators
See INTERFACES DESCRIPTION on page 4.1 for more details.
MU-AEK-037-SN
JUNE 2000
USER’S MANUAL
PAGE: 2.2
ISSUE: 1
REVISION: 0
2.4
ELECTRICAL CHARACTERISTICS
2.4.1 Absolute maximum ratings
Table 2.a : Absolute maximum ratings
Parameter
Power supply voltage
1
Symbol
Min
Max
Units
VDD
-15.0
15.0
V
Input Pin Voltage
discrete inputs
on VIN
-0.3
5.0
V
Input Pin Voltage
RS323 inputs
on VRS
-14
14
V
1
: negative value denotes that jack polarity does not matter.
Warning – Stressing the device beyond the “Absolute Maximum Ratings”
may cause permanent damage. These are stress ratings only. Operation
beyond the “Operating Conditions” is not recommended and extended exposure
beyond the “Operating Conditions” may affect device reliability.
2.4.2 DC Characteristics
Table 2.b : DC Characteristics
Parameter
Symbol
Min
Max
Conditions
Units
Vdd
6
12
Vdd nominal = 9V
V
Input High Level
Vih
0.7xVdd
5.0
All discrete input pins
V
Input Low Level
Vil
0
0.3xVdd
All discrete input pins
V
Output high level
Voh
2.4
All discrete output pins (@Ioh = 2mA)
V
Output low level
Vol
0.4
All discrete output pins (Iol = 2mA)
V
Input Leakage current
li
1
All discrete input pins
µA
Input Capacitance
3
All discrete input pins
pF
Output Capacitance
3
All discrete output pins
pF
Power supply voltage
1
1
-1
: Jack polarity does not matter.
MU-AEK-037-SN
JUNE 2000
USER’S MANUAL
PAGE: 2.3
ISSUE: 1
REVISION: 0
2.5
FUNCTIONS
The Albatros
functions :
Evaluation
Kit
mainly
supplies
the
following
Provide alimentation to the Albatros GPS receiver.
Provide RS232 interface to the GPS receiver for its two
serial ports. Port A does not provide hardware
handshaking. Port B can provide RTS/CTS hardware
handshaking. Each port con independently be configured to
use RS232 o 3.3V TTL electric levels (with solder jumpers
on the board)
Provide discrete I/O for the module. Three inputs, and 6
outputs are available on the I/O connector.
Provide backup current source to maintain GPS data when
the power is removed.
Provide 20-pin JTAG interface to the SiRF GSP2e ARM
microprocessor.
A set of jumpers allows easy configuration of the board
resources (software downloading, electric levels, JTAG
enable/disable, etc).
MU-AEK-037-SN
JUNE 2000
USER’S MANUAL
PAGE: 2.4
ISSUE: 1
REVISION: 0
3 INSTALLATION
3.1
ENVIRONMENT CONSIDERATIONS
The evaluation board is intended to be used in a soft
environment and has not been designed for field operation or
testing. Hence, when using the Albatros Evaluation Kit, you may
avoid these conditions:
Exposure to water or moisture.
Extreme temperatures (-40 to +85 degrees C)
Any vibration
Electrostatic environments
CAUTION : the electronic devices must be protected from
electrostatic discharges. Use a grounded area when manipulating
the boards.
3.2
CONNECTING THE EVALUATION KIT
To operate the Albatros Evaluation Kit, connect the power cable
to the power source and the GPS antenna to the antenna
connector. Use the serial cable to connect the board to an
appropriate serial communications port on the PC computer.
Note that Port A is the standard serial communication port and
Port B is used for differential input.
The default protocol on port A is the NMEA protocol, at
4800,8,N,1.
The alternate protocol on port A is the SiRF protocol, at
19200,8,N,1.
3.3
INSTALLING THE SOFTWARE
To install the toolkit software:
MU-AEK-037-SN
JUNE 2000
USER’S MANUAL
PAGE: 3.1
ISSUE: 1
REVISION: 0
Insert the Albatros Evaluation Kit CD into your CD-ROM
drive.
Copy the directory and contents of the tools directory from
the CD to your hard drive.
MU-AEK-037-SN
JUNE 2000
USER’S MANUAL
PAGE: 3.2
ISSUE: 1
REVISION: 0
4 INTERFACES DESCRIPTION
4.1
POWER CONNECTOR
The Albatros Evaluation Kit must be alimented with a 6 to 12 Volt
DC source. The jack connector has the following characteristics :
external diameter: 5.5 mm. Internal diameter 2.1 mm. The
polarity does not matter, since the board accepts any polarity.
4.2
SERIAL PORTS
4.2.1 Serial port A
This port is the Albatros’ main serial port.
During normal operation, it outputs navigation data in SiRF or
NMEA format. Refer to Albatros user’s manual from SENA GPS
for more information on communication modes.
This port is also used to download new software releases in the
GPS receiver.
Jumpers JP3/JP6 can configure the electric levels of this port. The
default configuration is RS232 electric levels. Note that these
jumpers are footprint jumpers : to switch to 3.3V TTL electric
levels, it is necessary to remove U3 (RS232 driver) and to short
the jumpers with solder.
Port A does not provide handshaking.
4.2.2 Serial port B
This port is used to receive differential corrections (DGPS).
Jumpers JP2/JP5 can configure the electric levels of this port. The
default configuration is RS232 electric levels. Note that these
jumpers are footprint jumpers : to switch to 3.3V TTL electric
levels, it is necessary to remove U3 (RS232 driver) and to short
the jumpers with solder.
MU-AEK-037-SN
JUNE 2000
USER’S MANUAL
PAGE: 4.1
ISSUE: 1
REVISION: 0
Port B can provide RTS/CTS handshaking. The RTS/CTS electric
levels can also be configures with JP1/JP4.
4.3
DISCRETE I/O CONNECTOR
This 9 pins male Sub-D connector provides 9 discrete I/O lines :
3 inputs, and 6 outputs.
Table 4.a : Discrete I/O connector pinout
Pin number
Name
1
INP1
2
INP2/DBGEN
3
INP3
4
OUT1
5
OUT2
6
OUT3
7
OUT4/TIMEMARK
8
OUT5
9
OUT6
4.3.1 INP2/DBGEN input
The INP2 input signal is shared with the DBGEN input. This
setting is configured by the jumper JP7. See JTAG CONNECTOR
on page 4.2 for more details.
4.3.2 OUT4/TIMEMARK output
During normal operation, the OUT4/TIMEMARK pin outputs an
accurate pulse-per-second signal. The signal level is according to
the Table 2.b : DC Characteristics.
4.4
JTAG CONNECTOR
The Multi-ICE interface is provided through a 20-pin header
where the Multi-ICE connector will plug in. This interface is an
extension version of JTAG interface, IEEE-1091 compliant, which
provides control of the GSP2e internal ARM core. More details of
Multi-ICE are provided in ARM Multi-processor EmbeddedICE
Interface Unit User Guide at web site:
http://www.arm.com/Documentation/UserMans.
MU-AEK-037-SN
JUNE 2000
USER’S MANUAL
PAGE: 4.2
ISSUE: 1
REVISION: 0
The GSP2e ARM processor provides a hardware protection
against ICE debugging, through the pin INP2/JTAGEN of the
Albatros GPS module. The jumper JP7 allows the user to
configure the ICE lock :
Table 4.b : JP7 configuration
JP7 configuration
Multi-ICE state
1-2
INP2 not connected. Debug may be enabled
2-3*
INP2 is connected. Multi-ICE may not be able to
operate (depends on INP2 level on I/O connector). A
low level will lock the debug port.
*
: default configuration
Note : the JP7 configuration remains dependent of the
current version of the software running on the Albatros GPS
module. Some versions of the software can force ICE lock,
independently of JP7 setting and INP2 input level.
Note : In 2-3 configuration, the lock depends on INP2 state.
If INP2 input is high or left open, and if the software is not
protected, the Multi-ICE will operate correctly.
4.5
LED INDICATORS
The Albatros Evaluation Kit provides two LED indicators.
Table 4.c : LED indicators
LED Indicator
Name
Function
Green (DL1)
DC IN
ON when power is applied to the board
Red (DL2)
ON/STANDBY
ON when the GPS is ON, OF when the GPS is OFF in push-to-fix OFF
mode
Note : the green LED should always be ON when power is
connected.
Note : on power-on, the red LED should keep ON al least two
seconds (then it can get OFF if the GPS module is configured
for push-to-fix mode). If it is not, check the GPS module
connections.
MU-AEK-037-SN
JUNE 2000
USER’S MANUAL
PAGE: 4.3
ISSUE: 1
REVISION: 0
4.6
RESET SWITCH
The switch S1 resets the Albatros GPS module. Note that a
module reset will not cause a cold start of the GPS : it will just
reset the processor.
A cold start will only be executed if one of the following occurs :
The non volatile RAM backup battery is exhausted or
removed. This will occur if the power is removed during a
long time, or if the Albatros GPS module is removed from
its connector.
The user sends a cold start order to the GPS module. This
can be done while in SiRF mode, or in NMEA mode. See the
Albatros user’s manual for more details on SiRF and NMEA
protocols.
4.7
BACKUP BATTERY
The
Evaluation
Kit
accumulator/capacitor.
Board
if
fitted
with
a
backup
The jumper J10 allows connecting this accumulator. The factory
setting of this jumper is Left Open, to avoid discharge of the
accumulator during shipping.
Note : If you wish to change the fitted accumulator (for
example to increase OFF time autonomy), you must only
connect rechargeable accumulators. Never use nonrechargeable batteries that could damage the board and
cause personal injury.
4.8
TEST POINTS
The board provides test points that allow the user to measure or
define various parameters :
MU-AEK-037-SN
JUNE 2000
USER’S MANUAL
PAGE: 4.4
ISSUE: 1
REVISION: 0
Table 4.d : Test points
Test point
Description
TP1
GND : Ground
TP2
VBK : backup alimentation measurement. Note that this voltage will not be the same as
the fitted accumulator/capacitor :
With power applied, the voltage measured on TP2 will be around 3.3V
•
Without power applied, the voltage measured on TP” will be a little less than
•
the backup accumulator voltage.
TP3
VCC : should be around 3.2V
TP4
VANT : external source for 5V active antenna. In order to use a 5V active antenna, it is
necessary to :
Supply 5VDC on TP4
•
Change antenna power configuration on the Albatros GPS module. See the
•
Albatros User’s Manual for more details.
MU-AEK-037-SN
JUNE 2000
USER’S MANUAL
PAGE: 4.5
ISSUE: 1
REVISION: 0
5 INCLUDED SOFTWARE
5.1
SIRFFLASH
This program allows the user to download a new software release
in the Albatros GPS receiver.
The detailed procedure to download a new software release is
explained in the section SOFTWARE DOWNLOADING on page 6.2.
For more information on SiRFFlash, see the online help.
5.2
SIRFDEMO
SiRFdemo is the GPS Receiver configuration and monitoring
software provided with the Albatros Evaluation Kit. This software
can be used to monitor real-time operation of the Albatros
Receiver, log data for analysis, and configure the GPS Receiver
operation.
Before running the software, you need to attach the GPS
Receiver to your PC, which must be connected to a power source.
You should also have an antenna on the GPS Receiver and
position it so the antenna has a clear view of the sky.
To start the SiRFdemo software, either double-click on the
sirfdemo.exe file or, if you created a short-cut on your desktop,
double-click the SiRFdemo icon.
The SiRFdemo software has six menus, which are described in
Table 5.a.
MU-AEK-037-SN
JUNE 2000
USER’S MANUAL
PAGE: 5.1
ISSUE: 1
REVISION: 0
Table 5.a : SiRFDemo menus
Menu
Description
Setup
The Setup menu lets you configure the data source used by SiRFdemo, and configure operating
preferences. See “The Setup Menu” on page 5.2 for detailed information about the Setup menu.
View
The View menu lets you display different view windows. The available view windows include:
Signal Level
•
Tracking
•
Map
•
Navigation
•
Response
•
Error
•
Development
•
DGPS Status
•
See “The View Menu” on page 5.5 for detailed information about the View menu.
The Action menu provides access to most of the SiRFdemo functionality including configuration
of the GPS Receiver and data logging for later analysis. See “The Action Menu” on page 5.13 for
detailed information about the Action menu.
Action
Navigation
Navigation The Navigation menu lets you configure items that effect how a position solution is
acquired or the type of position needed. From the Navigation menu, you can set various
operating masks, the DGPS mode, and the DGPS source. See “The Navigation Menu” on page
5.28 for detailed information about the Navigation menu.
Poll
You use the Poll menu to obtain GPS Receiver information such as software version, navigation
parameters, and clock status. You can also use the Poll menu to obtain the latest ephemeris and
almanac. See “The Poll Menu” on page 5.36 for detailed information about the Poll menu.
Window
The commands on the Window menu are standard Windows commands (Cascade, Tile, etc).
Note : The values that appear in the dialog boxes are GPS
Receiver default values and not what is currently set in the
GPS Receiver. See “The Navigation Parameters” on page 5.37
to determine the current settings of all navigation
parameters.
5.2.1 The Setup Menu
This section describes the SiRFdemo functions on the Setup
menu:
“Defining the Data Source” on page 5.3
“Changing Preferences” on page 5.4
“To Exit the SiRFdemo Software” on page 5.5
MU-AEK-037-SN
JUNE 2000
USER’S MANUAL
PAGE: 5.2
ISSUE: 1
REVISION: 0
5.2.1.1 Defining the Data Source
The SiRFdemo software is capable of receiving data from
different sources. You can configure the software to receive data
directly from a connected Albatros Evaluation Kit, or generate its
own random data.
To configure the source of the data used by the SiRFdemo
software:
1. Click the Data Source button or choose Data Source from
the Setup menu.
The Data Source Setup screen is displayed.
2. Select either the Supplied Data or Random option:
Random option uses randomly generated data. Use this
option to verify that the SiRFdemo software is running
without the GPS Receiver connected.
With Supplied Data option, the software will use real
data from a GPS Receiver.
Note : The Simulator (Truth Data) option is not
implemented. Do not use the File radio button. This
option is not implemented.
MU-AEK-037-SN
JUNE 2000
USER’S MANUAL
PAGE: 5.3
ISSUE: 1
REVISION: 0
3. To use data directly from the Albatros Evaluation Kit, select
the Serial Port radio button.
Use the selection lists to choose the serial port to which the
GPS Receiver is connected on your PC, and the correct baud
rate.
4. Click the OK button to continue.
5.2.1.2 Changing Preferences
You can change the appearance of some of the view windows to
suit your personal preferences. View preferences include the
Signal Level view, the Tracking view, and the Map view.
To change the appearance of the view windows:
1. Choose Preferences from the Setup menu.
The Preferences screen is displayed.
2. Select the type of signal graph that you want to view on the
12-Channel Signal
Signal Graph Type :
o Bar : Displays the data with vertical bars to represent
the observed signal strength of each satellite.
o Line : Displays the data in a continuous line graph
form.
3. Select the direction of the tracking orientation that you want
to use in the Tracking View screen :
Tracking orientation :
o North Up : True north points to the top of the circle.
MU-AEK-037-SN
JUNE 2000
USER’S MANUAL
PAGE: 5.4
ISSUE: 1
REVISION: 0
o Heading Up This is typically used when driving in a
vehicle or if the receiver is moving. Current heading
points to the top of the circle.
4. To change the scale of the Map view, type the number of
meters you want each pixel to represent in the Meters Per
Pixel field.
5. Click the Centered Position check box if you want to display
the Map View with the current position at the map center.
6. Click the Save button to save the changes or Cancel to exit
without saving changes.
5.2.1.3 To Exit the SiRFdemo Software
Select Exit from the Setup pulldown menu.
This closes SiRFdemo software.
5.2.2 The View Menu
This section describes the SiRFdemo functions on the View menu:
“The 12-Channel Signal Level View Screen” on page 5.6
“The Tracking View Screen” on page 5.7
“The Map View Screen” on page 5.9
“The Measured Navigation Message View Screen” on page
5.11
“The Response View Screen” on page 5.12
“The Error Message View Screen” on page 5.12
“The Development Data View Screen” on page 5.13
“The DGPS Status View Screen” on page 5.13
MU-AEK-037-SN
JUNE 2000
USER’S MANUAL
PAGE: 5.5
ISSUE: 1
REVISION: 0
5.2.2.1 The 12-Channel Signal Level View Screen
The 12-Channel Signal Level View screen is a combined graphical
and text display of satellite tracking. Information shown by the
Signal Level view includes the satellite number, status, azimuth,
elevation, C/No, and last five seconds of measured signal
strength.
To display the 12-Channel Signal Level view screen:
1. Click the Signal Level View button or choose Signal Level
from the View menu.
Note : If you double-click on the 12-Channel Signal Level
View screen, the Preferences screen is displayed, as
described in “Changing Preferences” on page 5.4. The
Preferences screen enables you to modify the way
information is displayed on the screen.
MU-AEK-037-SN
JUNE 2000
USER’S MANUAL
PAGE: 5.6
ISSUE: 1
REVISION: 0
Table 5.b : 12-Channel Signal Level View Information
Information displayed
Description
Satellite Number (SV)
The GPS satellite PRN number.
Status (St)
The status of each satellite tracked (see Table 5.c : Status field value definition
for more information).
Azimuth (Az)
Satellite azimuth (in degrees).
Elevation (El)
Satellite elevation (in degrees) with the horizon being zero degrees in elevation,
and directly over-head being ninety degrees.
C/No
Signal level (in dB-Hz).
Signal Level (-5 sec)
5-second history of the measured signal strength.
Table 5.c : Status field value definition
Hex value
Description
0x01
Set, if acq/reacq is done successfully
0x02
Set, Integrated carrier phase is valid
0x04
Set, Bit sync completed flag
0x08
Set, Subframe sync has been done
0x10
Set, Carrier pullin done
0x20
Set, Code locked
0x40
Set, Failed to acquire S/V
0x80
Set, Ephemeris data available
Note : When a channel is fully locked and all data is valid,
the status shown is 0xBF.
The information displayed in the Signal Level view is also assisted
by color coding. As the tracking status of each satellite changes,
the associated text and signal levels are colored to represent the
current status (see Table 5.d).
Table 5.d : Satellite color coding
Color
Description
Red
The satellite location is know from almanac information; however, the satellite is not currently
being tracked.
Blue
The satellite is being tracked; however, it is not being used in the current position solution.
Green
The satellite is being tracked and is being used in the current position solution.
5.2.2.2 The Tracking View Screen
The Tracking View screen graphically displays the location of
each of the tracked, used, and available satellites in the form of a
polar plot.
MU-AEK-037-SN
JUNE 2000
USER’S MANUAL
PAGE: 5.7
ISSUE: 1
REVISION: 0
To display the Tracking view screen:
1. Click on the Tracking View button or choose Tracking from
the View menu.
In addition to the satellite locations, the current tracking status is
represented by color (see Table 5.d : Satellite color coding on
page 5.7).
Current speed and heading (in a dynamic environment such as a
moving vehicle) is represented by an arrow. The direction of the
arrow represents heading while the length of the arrow indicates
speed over ground.
Configuring the Tracking View Screen :
You can configure the orientation and the velocity representation
of the Tracking view screen.
To configure the Tracking view screen:
1. Double-click the Tracking View screen to display the
Tracking View Configuration screen.
MU-AEK-037-SN
JUNE 2000
USER’S MANUAL
PAGE: 5.8
ISSUE: 1
REVISION: 0
2. Select the direction of the tracking orientation that you want
to use.
o North Up : True north points to the top of the circle.
o Heading Up This option can be used when driving.
Current heading points to the top of the circle.
3. Type the Outer circle velocity (in m/sec).
Note : The setting of the outer circle velocity means that if
the arrow length reaches the outer circle of the plot, then the
outer circle velocity has been reached.
4. Click OK to save the changes or Cancel to exit without
saving changes.
5.2.2.3 The Map View Screen
The Map view screen displays a combination of graphical and
text-based information.
Positions generated by the Albatros Evaluation Kit are plotted on
the Map view screen while other information such as GPS time,
GPS week, position mode, current position, heading, velocity,
DOP, type of position fix, and satellites tracked are displayed as
text.
To display the Map view screen:
MU-AEK-037-SN
JUNE 2000
USER’S MANUAL
PAGE: 5.9
ISSUE: 1
REVISION: 0
1. Click the Map View button or choose Map from the View
menu. The Map View screen is displayed.
The current position is represented on the plot by a red dot, while
past positions are displayed in blue.
Note : Before using the Map view, it is necessary to create or
edit an existing text file that contains the position on which
you want to center the map view. Provided with the
SiRFdemo software is an example file - ring90.smp. You can
edit this file to specify your required position. For information
on the format of the .smp file, please see below.
To change the map view preferences :
The ability to change the scale of the Map view and to select the
appropriate .smp file is provided by the Map view preferences.
1. Double-click on the Map View screen to display the
Preferences window.
MU-AEK-037-SN
JUNE 2000
USER’S MANUAL
PAGE: 5.10
ISSUE: 1
REVISION: 0
2. Enter the number of meters you want each pixel to
represent in the Meters Per Pixel field. This value controls
the map scale.
3. Click the Center Current check box if you want the Map
View to be centered.
4. Select the appropriate .smp file by either typing the path
and file name or using the browse button.
5. Click the Save button to save the changes or the Cancel
button to exit.
5.2.2.4 The Measured Navigation Message View Screen
The Measured Navigation Message view screen is used to display
position solution information such as GPS time, GPS week,
position mode, current position, heading, velocity, DOP, type of
position fix, and satellites tracked.
To view the Measured Navigation Message View screen:
1. Choose Messages Navigation from the View menu.
The Measured Navigation Message View screen is displayed.
MU-AEK-037-SN
JUNE 2000
USER’S MANUAL
PAGE: 5.11
ISSUE: 1
REVISION: 0
Table 5.e : Measured Navigation Message View Information
Information displayed
Description
X, Y, Z positions
Coordinates of user’s position in ECEF (meters)
Velocity
User’s velocity in ECEF (m/s)
Latitude
User’s latitude (decimal of degrees)
Longitude
User’s longitude (decimal of degrees)
Altitude
User’s altitude (meters)
Mode
Navigation solution type
GPS Week
GPS week number
DOP
Dilution of Precision
Fix
Validated/invalidated
Time
Current GPS time (seconds)
Svs
Used in Fix Sv PRN used in solution
Note : ECEF XYZ is converted geodetic latitude, longitude,
and altitude based on the WGS84 ellipsoid parameters.
5.2.2.5 The Response View Screen
The Response View screen is used to display any response to a
poll request. You can poll the GPS Receiver for the software
version (see “The Software Version” on page 5.36), clock status
(see “The Clock Status” on page 5.37), and navigation
parameters (see “The Navigation Parameters” on page 5.37).
To display the Response View screen:
1. Choose Messages Response from the View menu.
5.2.2.6 The Error Message View Screen
The Error Message View screen is used to display any error
messages that the GPS Receiver may generate. Error messages
are generated automatically by the Albatros GPS Receiver under
certain conditions. Many are caused by normal GPS operations
such as acquiring a low elevation satellite. This could result in a
bad parity.
To view the Error Message View screen:
1. Choose Messages Error from the View menu.
MU-AEK-037-SN
JUNE 2000
USER’S MANUAL
PAGE: 5.12
ISSUE: 1
REVISION: 0
5.2.2.7 The Development Data View Screen
The Development Data View screen displays additional
information about the GPS Receiver operation. The data is
generated automatically by the Albatros GPS Receiver.
To view the Development Data View screen:
1. Choose Messages | Development from the View menu.
Note : To view incoming development data the Enable
Development Data checkbox must be enabled on the
Receiver Initialization screen. See “Initializing the Data
Source” on page 5.17.
5.2.2.8 The DGPS Status View Screen
The Albatros GPS Receiver has two options for DGPS operation WAAS, or external RTCM. See “Selecting the DGPS Source” on
page 5.33 for more information about each of these options. The
DGPS Status View screen provides information about the DGPS
source and current operation.
To view the DGPS Status View screen:
1. Choose Messages | DGPS Status from the View menu.
5.2.3 The Action Menu
This section describes the SiRFdemo functions on the Action
menu:
“Opening a Data Source” on page 5.14
“Opening a Log File” on page 5.15
“Pause the Display” on page 5.16
“Initializing the Data Source” on page 5.17
“Switching to the NMEA Protocol” on page 5.19
“Switching to the SiRF Protocol” on page 5.21
“Sending a Serial Break Command” on page 5.21
“Synchronize Protocol and Baud Rate” on page 5.21
MU-AEK-037-SN
JUNE 2000
USER’S MANUAL
PAGE: 5.13
ISSUE: 1
REVISION: 0
“Setting the Main Serial Port” on page 5.22
“Setting the DGPS Serial Port Parameters” on page 5.22
“Setting the UART Configuration” on page 5.23
“Uploading an Almanac to the GPS Receiver” on page 5.23
“Uploading an Ephemeris to the ” on page 5.24
“Switching Operating Mode” on page 5.25
“Setting the TricklePower Parameters” on page 5.26
Note : All values that appear in the dialogue boxes under
this menu are Albatros GPS Receiver default values. To
determine the current settings of all Navigation Parameters,
refer to page 5.37.
5.2.3.1 Opening a Data Source
Before any data can be received from or sent to the GPS Receiver
a communications channel must be established or a data source
must be opened.
To open a data source:
1. Click the Connect/Disconnect button or select Open Data
Source from the Action menu.
MU-AEK-037-SN
JUNE 2000
USER’S MANUAL
PAGE: 5.14
ISSUE: 1
REVISION: 0
2. Click the Connect/Disconnect button again or select Open
Data Source from the Action menu to disconnect
communication to the GPS Receiver.
5.2.3.2 Opening a Log File
The log file function provides the ability to log selected
information from the GPS Receiver to a named file.
To open a file and select messages to log:
1. Click the Log File Settings button or choose Open Log File
from the Action menu.
The Log File Settings window is displayed.
2. Select each message you want to log to a file by clicking on
the required message.
You can select all of the messages at once by clicking the
Select All button
Note : Only records that are selected will be logged to a file.
If you are logging all available messages, you should use a
baud rate of 38400. This will ensure that no data will be lost
during logging.
MU-AEK-037-SN
JUNE 2000
USER’S MANUAL
PAGE: 5.15
ISSUE: 1
REVISION: 0
3. Click OK to begin logging the selected messages or Cancel
to abort opening a file.
Each of the available message types and a brief description is
provided in Table 5.f.
Table 5.f : Messages than can be logged to a file
Messages
Description
002 Measured Navigation
Time, position, velocity,...
004 Measured Tracking
Satellite status and C/No
005 Raw Track Data
Satellite raw data measurements
006 SW Version
Software version of the Evaluation Kit
007 Clock Status
Receiver clock performance
00850 BPS Subframe Data
Satellite ephemeris and almanac data
009 Throughput
CPU throughput usage
010 Error
Various error messages
011 Cmd Ack
Acknowledgment of received commands
012 Cmd Nak
Input message failures
013 Visible List
Satellite visibility list (based on current almanac)
014 Almanac
Satellite almanac data
015 Ephemeris
Satellite ephemeris data
017 Raw DGPS
Differential GPS corrections in RTCM format
019 Rcvr Params
Parameters affecting navigation solutions
028 Navigation Measurements
Observed satellite measurement data
029 DGPS Measurements
Received differential GPS correction information
030 SV State Parameters
Observed velocity, position and clock information
031 Startup Initialization
Startup initialization information
255 Development
Various development information
5.2.3.3 Pause the Display
All of the open windows can be paused to allow easy viewing of
the existing data without receiving any further data.
To pause all of the open windows:
1. Click the Pause button or choose Pause Display from the
Action menu.
Note : No data is logged while the display is paused.
MU-AEK-037-SN
JUNE 2000
USER’S MANUAL
PAGE: 5.16
ISSUE: 1
REVISION: 0
5.2.3.4 Initializing the Data Source
You can reset or initialize the GPS Receiver directly through the
SiRFdemo software. This function may be used to demonstrate or
evaluate the GPS Receiver’s recovery ability under different
circumstances.
To perform a receiver reset or allow Raw Track or Development
data to be output from the GPS Receiver:
1. Click the reset button or choose Initialize Data Source from
the Action menu.
The Receiver Initialization Setup screen is displayed.
2. Select type of Reset Mode by clicking on the associate radio
button. Each of the reset types are described in Table 4-7.
MU-AEK-037-SN
JUNE 2000
USER’S MANUAL
PAGE: 5.17
ISSUE: 1
REVISION: 0
Table 5.g : Reset types
Option
Description
Hot Start
The GPS Receiver restarts by using the values stored in its internal
memory. The stored ephemeris and almanac are both valid.
Warm Start (no init)
This option has the same functionality as Hot Start except that it clears
the ephemeris data and retains all other data.
Warm Start (init)
This option clears all initialization data in the GPS Receiver and
subsequently reloads the data that is currently displayed in the Receiver
Initialization Setup screen. The almanac is retained but the ephemeris is
cleared.
Cold Start
This option clears all data that is currently stored in the internal memory
of the GPS Receiver including position, almanac, ephemeris, time, and
clock drift.
Factory Reset
Factory Start This option effectively performs a cold start but also sets
all GPS Receiver parameters back to the factory defaults.
3. If you selected the Warm Start (Init) reset mode, enter or
load the X, Y, and Z coordinates for the current position of
the GPS Receiver. You can load a file containing the X, Y, Z
coordinates by clicking the Load button.
4. Select the appropriate file sample Sirf.pos configuration file.
5. Click the OK button to accept or the Cancel button to exit.
The Receiver Initialization Setup screen is displayed again.
6. Type 96,000 in the Clock field (96,000 is a typical clock drift
value of the crystal in the GPS Receiver).
Note : If you type 0 in the Clock field, the GPS Receiver uses
its last stored value, or a default of 96,000 if no prior stored
value is available.
MU-AEK-037-SN
JUNE 2000
USER’S MANUAL
PAGE: 5.18
ISSUE: 1
REVISION: 0
7. Click on or off the Use current DOS time check box. The
default value is set to the current time.
8. Type the number of the week in the Week Number field.
9. Type the time of the week in the Time of Week field.
10.Type number of channels in the Channel field. You can
specify from 1 to 12 channels.
11.Click on Enable Raw Track Data to Log Raw Track Data. 005
[Raw Track] Data must also be highlighted on the Log File
Settings Screen (See Opening a Log File on page 5.15).
12.Click on Enable Development Data to turn on message 255.
The content of this message is displayed in the
Development Data View.
Note : When the Development and Raw Data is selected for
logging, the baud rate of the SiRFdemo software and the GPS
Receiver is automatically changed to 57600. This is to ensure
sufficient through-put to accommodate the quantity of data.
13.Click the Send button to initialize or the Cancel button to
exit.
5.2.3.5 Switching to the NMEA Protocol
The Albatros GPS Receiver supports the NMEA protocol. Rather
than operating in the SiRF binary protocol, you may change the
protocol to NMEA for the port that is currently connected.
To change the protocol to NMEA for the port currently connected
to your PC:
1. Choose Switch to NMEA Protocol from the Action menu.
The Select NMEA Messages screen is displayed.
MU-AEK-037-SN
JUNE 2000
USER’S MANUAL
PAGE: 5.19
ISSUE: 1
REVISION: 0
2. Select the NMEA Messages that you want to use by clicking
on the required message. Table 5.h provides a brief
description of each of the available NMEA messages.
Table 5.h : NMEA Messages
Option
Description
GGA
Time, position, and fix related data for a GPS receiver.
GLL
Latitude and longitude of present position, time of position fix and status.
GSA
GPS receiver operating mode, satellites used in the position solution,
and DOP values.
GSV
The number of GPS satellites in view satellite ID numbers, elevation,
azimuth, and SNR values.
MSS
Signal-to-noise ratio, signal strength, frequency, and bit rate from a
radio-beacon receiver.
RMC
Time, date, position, course and speed data provided by the GPS
receiver.
VTG
The actual course and speed relative to the ground.
3. Select the update rate for each NMEA message that you
want to use from the corresponding Update Rate pulldown
menu. Each NMEA message can be output at a maximum
rate of 1 per second and at a minimum rate of 1 per 255
seconds.
4. Select the baud rate that you want to use from the Baud
Rate pulldown menu.
5. Click the OK button to save or the Cancel button to exit.
MU-AEK-037-SN
JUNE 2000
USER’S MANUAL
PAGE: 5.20
ISSUE: 1
REVISION: 0
Note : When the GPS Receiver is selected to operate using
the NMEA protocol, the output messages can be viewed in
the Development Data screen. It can also be logged by using
the same technique as a SiRF binary file. Select 255Development in the Log File Settings screen and Enable
Development Data must be checked in the Messages field of
the Receiver Initialization screen.
5.2.3.6 Switching to the SiRF Protocol
If you are already operating using the SiRF binary protocol, this
menu item is unavailable. It can be used, however, with the
NMEA protocol and if you want to change the operating protocol
back to the SiRF binary protocol.
To change the operating protocol from NMEA to SiRF binary:
1. Choose Switch to SiRF Protocol from the Action menu to
return to the SiRF binary protocol.
5.2.3.7 Sending a Serial Break Command
This function sends a serial break on the current serial port.
5.2.3.8 Synchronize Protocol and Baud Rate
All GPS Receiver settings including selected protocol and serial
port settings are held in battery backed SRAM. If the GPS
Receiver is powered off, these settings will remain. If the GPS
Receiver is left in an unknown state, it is difficult to regain
communication with it.
The synchronize protocol and baud rate function attempt to
communicate with the GPS Receiver using all possible baud rates
and both NMEA and SiRF binary protocols. When communication
is established with the GPS Receiver, it is set to the SiRF binary
protocol and at a baud rate of 19200. Other serial settings of
parity, data bits, and stop bits are left at current settings.
MU-AEK-037-SN
JUNE 2000
USER’S MANUAL
PAGE: 5.21
ISSUE: 1
REVISION: 0
5.2.3.9 Setting the Main Serial Port
The Set Main Serial Port function lets you change the baud rate
of the serial port connected to the GPS Receiver and the serial
port of the PC.
To change the baud rate of the port used by the GPS Receiver
and the PC:
1. Choose Set Main Serial Port from the Action menu.
The Set Serial Port Parameters screen is displayed.
2. Select the baud rate you want to use.
3. Click the Send button to accept or the Cancel button to exit.
Clicking the Send button resets the GPS Receiver and
computer’s serial port to start communicating using the new
baud rate.
5.2.3.10
Setting the DGPS Serial Port Parameters
The Set DGPS Serial Port Parameters function will configure the
second serial port (the serial port not currently used by the
SiRFdemo software) of the GPS Receiver for reception of RTCM
data.
To configure the available port for RTCM reception:
1. Choose Set DGPS Serial Port from the Action menu.
The Set DGPS Serial Port Parameters screen is displayed.
MU-AEK-037-SN
JUNE 2000
USER’S MANUAL
PAGE: 5.22
ISSUE: 1
REVISION: 0
2. Select the baud rate, data bits, parity, and stop bits that
you want to use for the DGPS serial port parameters from
each pulldown menu.
3. Click the Send button to accept or the Cancel button to exit.
Clicking the Send button resets the GPS Receiver and
changes the protocol of the second port to RTCM and the
serial port settings to the selected values.
Note : The differential correction data source must be
configured separately. See “Defining the Data Source” on
page 5.3.
5.2.3.11
Setting the UART Configuration
This function is not currently implemented.
5.2.3.12
Uploading an Almanac to the GPS Receiver
An almanac file is used by a GPS receiver to assist with locating
and tracking available satellites. If a current almanac file does
not exist in the GPS Receiver due to a cold start or if it has not
been used for a long period of time, loading a recent almanac file
will assist the GPS Receiver in locating and tracking satellites.
To upload an almanac file to the GPS Receiver:
1. Choose Set Almanac from the Action menu.
The Specify Almanac Data Filename To Load screen is
displayed.
MU-AEK-037-SN
JUNE 2000
USER’S MANUAL
PAGE: 5.23
ISSUE: 1
REVISION: 0
2. Specify the file you want to use.
3. Click the OK button to accept or the Cancel button to exit.
Note : The almanac file must be in the same format as
polled from the GPS Receiver. To download an almanac file
from the GPS Receiver, see “Downloading an Almanac File”
on page 5.37.
5.2.3.13
Uploading an Ephemeris to the GPS Receiver
An ephemeris is used by a GPS receiver to calculate the position
of the satellites and hence, the position of the GPS receiver. If an
ephemeris file is not available, then this must be downloaded
from a GPS satellite. To eliminate the time required to download
this information from the GPS constellation, a current ephemeris
file can be uploaded to the GPS Receiver using the SiRFdemo
software.
To upload an ephemeris file to the GPS Receiver:
1. Choose Set Ephemeris from the Action menu.
The Specify Ephemeris Data Filename To Load screen is
displayed.
MU-AEK-037-SN
JUNE 2000
USER’S MANUAL
PAGE: 5.24
ISSUE: 1
REVISION: 0
2. Specify the file you want to use.
3. Click the OK button to accept or the Cancel button to exit.
Note : The ephemeris file must be in the same format as
polled from the GPS Receiver. To download an ephemeris file
from the GPS Receiver, see “Downloading Ephemeris Data”
on page 5.38.
5.2.3.14
Switching Operating Mode
It is possible to place the GPS Receiver into a test operating
mode. This mode allows a single selected satellite to be tracked
by all 12 channels of the GPS Receiver.
To place the GPS Receiver into test mode:
1. Choose Switch Operating Mode the Action menu.
The Switch Operating Mode screen is displayed.
MU-AEK-037-SN
JUNE 2000
USER’S MANUAL
PAGE: 5.25
ISSUE: 1
REVISION: 0
2. Select Test if you want to track a specific satellite on all
channels and output test results.
3. In the Period field, enter the output rate of the test reports
in seconds.
4. Enter the SV number that you want to be tracked by all 12
channels of the GPS Receiver.
5. Select Normal (default) to track all available satellites.
6. Send the command to the GPS Receiver by clicking the
SEND button.
5.2.3.15
Setting the TricklePower Parameters
The Albatros GPS Receiver can operate in three modes (shown
in Table 5.i).
Table 5.i : GPS Receiver Modes
Mode
Description
Full Power
Full power mode is the standard operating mode. Power is supplied to
the unit continuously and the GPS Receiver continues to operate
without an interrupt.
TricklePower
In TricklePower mode, the power to the SiRF chipset is cycled
periodically, so that it operates only a fraction of the time. Power is
applied only when a position fix is scheduled.
Push-To-Fix
In Push-to-Fix mode, the GPS Receiver is generally off, but turns on
frequently enough to collect ephemeris data to maintain the GSP2 real
time clock calibration so that, upon user request, a position fix can be
provided quickly after power-up.
MU-AEK-037-SN
JUNE 2000
USER’S MANUAL
PAGE: 5.26
ISSUE: 1
REVISION: 0
TricklePower
In this mode, the power to the GRF2i chip is cycled regularly,
according to two user-specified parameters:
• Update Rate
• OnTime
During TricklePower operation, the GRF2i chip is powered on for
OnTime (in milliseconds), then powered off for a specified
number of milliseconds as determined by the update rate. This
cycle repeats indefinitely.
The GSP2e chip is not explicitly powered down, but its primary
operation is driven by the GPS clock generated by the GRF2i, so
it draws very little power while the GRF2i is powered down. The
real time clock (RTC) portion of the GSP2e continues operation at
all times, and is used to generate the interrupt that turns
everything back on.
The microprocessor on which the SiRF code executes is not
explicitly powered down.
After the OnPeriod has elapsed, the processor continues
operating long enough to complete its navigation tasks, then puts
itself in sleep mode until it is reawakened by the RTC-generated
interrupt.
The default parameters values are:
• OnPeriod = 200ms
• Update Rate = 1 second
Push-to-Fix
For applications where a position fix is required on demand (that
is, not continuous) then the Push-to-Fix mode is the most
appropriate mode of operation for power sensitive situations. In
this mode, the receiver turns on periodically (approximately
every 30 minutes) to update ephemeris records and calibrate the
clocks. When all internal updating tasks are complete, the unit
powers itself off (except for RTC) and schedules the next wake up
period. When the GPS Receiver is power cycled externally, a
navigation solution will be available to the user in 3 seconds.
MU-AEK-037-SN
JUNE 2000
USER’S MANUAL
PAGE: 5.27
ISSUE: 1
REVISION: 0
5.2.4 The Navigation Menu
This section describes the SiRFdemo software functions under the
Navigation menu:
“Setting Navigation Mode Control” on page 5.28
“Setting the DOP Mask Control” on page 5.30
“Setting the DGPS Mode” on page 5.32
“Selecting the DGPS Source” on page 5.33
“Selecting an Elevation Mask” on page 5.34
“Selecting a Power Mask” on page 5.34
“Steady State Detection” on page 5.35
5.2.4.1 Setting Navigation Mode Control
Navigation mode control is used to configure the specifics of how
the GPS Receiver is to navigate or calculate a position. In
particular, selecting how a position should be derived if a
minimum number of satellites are not available to calculate a full
3D position.
To set the navigation mode control:
1. Choose Mode Control from the Navigation menu.
The Navigation Mode Control screen is displayed.
MU-AEK-037-SN
JUNE 2000
USER’S MANUAL
PAGE: 5.28
ISSUE: 1
REVISION: 0
2. Select the required options. Table 5.j describes each of the
navigation mode options available.
MU-AEK-037-SN
JUNE 2000
USER’S MANUAL
PAGE: 5.29
ISSUE: 1
REVISION: 0
Table 5.j : Navigation Mode Options
Option
Description
Enable Track Smoothing
Enables smoothing of the calculated positions based on acceptable variances
from the last calculated position. This assists in eliminating any sporadic position
jumps possibly caused by multipath, for example.
Enable Altitude Constraint
Restrict any variations in the altitude to 10% of currently calculated horizontal
variation. This assists in creating a smoother ground track.
Altitude Hold Mode
Automatic
Switch automatically to a 2D solution and hold the altitude fixed if only three
satellites are available. A 3D solution will be calculated if four or more satellites
are available.
Always
Stay in 2D mode regardless of the number of satellites available. The altitude will
always remain fixed.
Disable Altitude Hold
Only calculate 3D solutions. If it is not possible to calculate a 3D solution due to
insufficient satellites, then no navigation will be provided.
Last Computed Altitude
If the GPS Receiver is operating in 2D mode, then the altitude will be held to the
last known altitude calculated by the GPS Receiver.
Fixed to
If the GPS Receiver is operating in 2D mode, then the altitude will be held to the
value entered in the FIXED TO field.
Degraded Modes
Use Direction then Clock If the number of available satellites is reduced to two, the GPS Receiver will hold
Hold
the elevation fixed, and use the last direction and doppler values (change in
distance) to continue positioning. If the available satellites is then reduced to one,
the clock bias is then extrapolated.
Use Clock then Direction This mode is similar to the above Direction then Clock Hold mode. However, the
Hold
clock bias is extrapolated first, and then the direction and doppler measurements
are used.
Direction (Curb) Hold Only
This mode will restrict positioning to using direction hold only and does not use
the extrapolating the clock bias method. Two satellites need to be available.
Clock (Time) Hold Only
Positioning is restricted to using the clock bias extrapolation method only and
does not hold the direction. Two satellites need to be available.
Disable Degraded Modes
If less than three satellites are available, no position will be calculated.
Timeout
The GPS Receiver will only operate in any degraded mode for the period of time
specified by the timeout (default : 60s)
Dead Reckoning
Enable
Mode
Dead
Timeout
Reckoning If a position solution is not possible due to insufficient satellites, a positions will
be calculated using the last known velocity. Only applies if the GPS Receiver is
being used in a dynamic environment.
The GPS Receiver will only calculate positions using dead reckoning for the
period of time specified by the timeout (default : 30s).
3. Click the Send button to accept or the Cancel button to exit.
5.2.4.2 Setting the DOP Mask Control
This mask enables you to control the position output of the GPS
Receiver so that positions computed with a high DOP value are
not output. When the DOP mask is exceeded, the position
message status changes to DOP mask exceeded and the position
does not update.
MU-AEK-037-SN
JUNE 2000
USER’S MANUAL
PAGE: 5.30
ISSUE: 1
REVISION: 0
To set the DOP mask controls:
1. Choose DOP Mask Control from the Navigation menu.
The DOP Mask Control screen is displayed.
2. Select the Mode that you want to use.
Table 5.k : DOP Modes
Option
Description
Auto PDOP/HDOP
The PDOP mask will be used if four or more satellites are available. If only three
satellites are available, the HDOP mask will be used.
Use PDOP only
Only the PDOP mask will be used regardless of the number of satellites
available.
Use HDOP only
Only the HDOP mask will be used regardless of the number of satellites
available.
Use GDOP only
Only the GDOP mask will be used regardless of the number of satellites
available.
Do not use
No DOP based mask will be applied. Any available position will be output
regardless of any of the DOP values. This is the default.
3. Enter a DOP mask value for the corresponding selected DOP
mask. For each of the DOP masks, the default value is 10.
This value is a maximum value and the mask will apply if
the current set mask is exceeded.
4. Click the Send button to accept or the Cancel button to exit.
MU-AEK-037-SN
JUNE 2000
USER’S MANUAL
PAGE: 5.31
ISSUE: 1
REVISION: 0
5.2.4.3 Setting the DGPS Mode
The DGPS mode is used to control the position output of the GPS
Receiver based on whether positions are differentially corrected
or not. The options include automatic, exclusive, and never use.
To set the DGPS mode:
1. Choose DGPS Mode from the Navigation menu.
The DGPS Control screen is displayed.
2. Select the Mode that you want to use.
Table 5.l : DGPS Modes
Option
Description
Automatic
Use differential corrections when they are available, otherwise compute a non
differential solution. (see note below). This is the default.
Exclusive
Only compute a differential solution. If no corrections are available no solution is
output.
Never use
Only compute a non differential solution (even if corrections are valid).
3. Enter the timeout value (in seconds) you want to use in the
Timeout field. A received differential correction will be
applied to the solution until either the timeout value is
exceeded, or a new differential correction is received.
4. Click the Send button to accept or the Cancel button to exit.
MU-AEK-037-SN
JUNE 2000
USER’S MANUAL
PAGE: 5.32
ISSUE: 1
REVISION: 0
Note : For a differential position to be calculated, a
pseudorange correction must be valid for each satellite being
tracked by the GPS Receiver. If the there are less corrections
than tracked satellites, then a non-differential position will
result. If corrections exist for different satellites to that being
tracked by the GPS Receiver, then a non-differential position
will result.
5.2.4.4 Selecting the DGPS Source
The Albatros GPS Receiver has the ability to receive RTCM
differential corrections from different sources. The DGPS source
control is used to select which source will be used to obtain RTCM
differential corrections.
To select the DGPS source:
1. Choose DGPS Source from the Navigation menu.
The DGPS Source screen is displayed.
2. Select the Source that you want to use. Table 5.m describes
each of the available DGPS sources.
MU-AEK-037-SN
JUNE 2000
USER’S MANUAL
PAGE: 5.33
ISSUE: 1
REVISION: 0
Table 5.m : DGPS Sources
Option
Description
None
The GPS Receiver will not use any of the available DGPS sources.
WAAS Channel
The GPS Receiver will use the WAAS correction service if available. One of
the twelve channels will be dedicated to the WAAS signal.
External RTCM Data
The GPS Receiver will use any RTCM corrections that are input directly
through one of the serial ports. This is the default.
Internal DGPS Beacon Receiver
The Albatros GPS Receiver does not support this option.
3. Click the OK button to accept or the Cancel button to exit.
5.2.4.5 Selecting an Elevation Mask
GPS satellites that are low on the horizon are subject to noise
due to the amount of atmosphere that the signal must travel
through. Better position accuracy is often achieved if lower
elevation satellites are not used in the position solution. The
elevation mask is used to exclude the use of satellites in the
position solution that are below a defined elevation mask.
To select an elevation mask:
1. Choose Elevation Mask from the Navigation menu.
The Elevation Mask screen is displayed.
2. Enter the minimum elevation angle for satellites to be used
in any position solution.
3. Click the Send button to accept or the Cancel button to exit.
5.2.4.6 Selecting a Power Mask
GPS satellites that have a low signal strength are not easily
tracked by the GPS Receiver and may result in using signals that
are either noisy or have been effected by multipath or other
interference source. To increase accuracy, it may be necessary to
MU-AEK-037-SN
JUNE 2000
USER’S MANUAL
PAGE: 5.34
ISSUE: 1
REVISION: 0
exclude GPS satellites with a signal strength below a selected
value.
To exclude satellites from the position solution with a signal
strength below a selected value:
1. Choose Power Mask from the Navigation menu.
The Power Mask screen is displayed.
2. Enter the minimum satellite signal level for satellites to be
used in any position solution.
3. Click the Send button to accept or the Cancel button to exit.
5.2.4.7 Steady State Detection
The steady state detection allows the navigating algorithms to
decrease the noise in the position output when the acceleration is
below the threshold. This improves position accuracy especially in
stationary applications.
To select the static navigation mode:
1. Choose Static Navigation from the Navigation menu.
The Static Navigation screen is displayed.
2. Select the option that you want to use.
MU-AEK-037-SN
JUNE 2000
USER’S MANUAL
PAGE: 5.35
ISSUE: 1
REVISION: 0
3. Click the Send button to accept or the Cancel button to exit.
Note : The Static Navigation filter is Disabled when DGPS
corrections are used in the navigation solution.
5.2.5 The Poll Menu
This section describes the SiRFdemo software functions under the
Poll menu:
“The Software Version” on page 5.36
“The Clock Status” on page 5.37
“The Navigation Parameters” on page 5.37
“Downloading an Almanac File” on page 5.37
“Downloading Ephemeris Data” on page 5.38
5.2.5.1 The Software Version
The poll software version function allows you to query the GPS
Receiver for the version of embedded software currently being
run.
To view the current software version:
1. Choose SW Version from the Poll menu.
The Response View screen is displayed showing the software
version currently being run.
MU-AEK-037-SN
JUNE 2000
USER’S MANUAL
PAGE: 5.36
ISSUE: 1
REVISION: 0
5.2.5.2 The Clock Status
The poll clock status function allows you to query the GPS
Receiver for clock performance information including the GPS
week number, GPS time, clock drift, and clock bias.
To poll the GPS Receiver for clock status information:
1. Choose Clock Status from the Poll menu.
The Response View screen is displayed with the clock status.
5.2.5.3 The Navigation Parameters
All of the user settings that have been set under the Action and
Navigation menus can be polled for their current status and
settings.
To poll the GPS Receiver for it’s current navigation parameters:
1. Select Navigation Parameters from the Poll menu.
The current settings are displayed in the Response View window.
5.2.5.4 Downloading an Almanac File
You can download an almanac file from the GPS Receiver and
load it back into the unit at a later date or to another GPS
Receiver. This is to assist with initial satellite tracking. This file
may also be used for mission planning and constellation
investigations.
To download an almanac file:
1. Choose Almanac from the Poll menu.
The Specify Almanac Data Filename To Load screen is
displayed.
MU-AEK-037-SN
JUNE 2000
USER’S MANUAL
PAGE: 5.37
ISSUE: 1
REVISION: 0
2. Specify the file name in which to save the almanac
information.
3. Click the OK button to save or the Cancel button to exit.
Clicking the OK button saves the data to file. A message box
is displayed to confirm completion.
5.2.5.5 Downloading Ephemeris Data
You can download an ephemeris file from the GPS Receiver and
load it back into the unit at a later date or to another GPS
Receiver. This is to assist with initial position calculations. This
file may also be used for mission planning and
constellation investigations.
To download an ephemeris file:
1. Choose Ephemeris from the Poll menu.
The Specify Ephemeris Data Filename To Load screen is
displayed.
MU-AEK-037-SN
JUNE 2000
USER’S MANUAL
PAGE: 5.38
ISSUE: 1
REVISION: 0
2. Specify the file name that you want to save the ephemeris
information to.
3. Click the OK button to save or the Cancel button to exit.
Clicking the OK button saves the data to file. A message box
is displayed to confirm completion.
MU-AEK-037-SN
JUNE 2000
USER’S MANUAL
PAGE: 5.39
ISSUE: 1
REVISION: 0
6 MAINTENANCE
6.1
JUMPER SETTINGS
The following table gives the jumper settings of the Evaluation
Kit Board :
Table 6.a : Jumper settings
Jumper
Shorting pins
Description
JP1**
1-2
3.3V TTL electric level for CTS-B. U1 MUST NOT be present for correct operation
JP1**
Left open*
RS232 electric level for CTS-B. U1 must be present for correct operation.
JP2**
1-2
3.3V TTL electric level for RX-B. U1 MUST NOT be present for correct operation
JP2**
Left open*
RS232 electric level for RX-B. U1 must be present for correct operation.
JP3**
1-2
3.3V TTL electric level for RX-A. U1 MUST NOT be present for correct operation
JP3**
Left open*
RS232 electric level for RX-A. U1 must be present for correct operation.
JP4**
1-2
3.3V TTL electric level for RTS-B. U1 MUST NOT be present for correct operation
JP4**
Left open*
RS232 electric level for RTS-B. U1 must be present for correct operation.
JP5**
1-2
3.3V TTL electric level for TX-B. U1 MUST NOT be present for correct operation
JP5**
Left open*
RS232 electric level for TX-B. U1 must be present for correct operation.
JP6**
1-2
3.3V TTL electric level for TX-A. U1 MUST NOT be present for correct operation
JP6**
Left open*
RS232 electric level for TX-A. U1 must be present for correct operation.
JP7
1-2
INP2 activated : Multi-ICE may not operate correctly.
JP7
2-3*
JTAGEN activated : Multi-ICE will operate correctly if the software is not protected.
Therefore, INP2 is not available anymore.
JP9
1-2
Software downloading
JP9
2-3
Forbidden
JP9
Left open*
Normal operation
JP10
1-2
Connect backup accumulator/capacitor
JP10
Left open*
Disconnect backup accumulator/capacitor
* : denotes factory settings
** : PCB type jumper, to avoid unintended changes of configuration
MU-AEK-037-SN
JUNE 2000
USER’S MANUAL
PAGE: 6.1
ISSUE: 1
REVISION: 0
6.2
TROUBLESHOOTING
Table 6.b : Troubleshooting tips
Problem encountered
Solution
The Green LED keeps OFF
Check power source, cable and connector
The Red LED keeps OFF all the time Check Albatros connections to the evaluation board. Ensure the
(even on power-on)
connector is not misplaced (the connector pitch is quite small).
The GPS does not output any data, and Check serial cable and connections. Check the communication program
the red LED is ON
on the PC.
The default protocol on port A is the NMEA protocol, at 4800,8,N,1.
The alternate protocol on port A is the SiRF protocol, at 19200,8,N,1.
The communication port B does not output anything : it is only designed
to receive differential corrections.
The GPS does not output any data on Ensure the red LED is ON at power-up for at least two seconds. If it is
Port A, and the red LED is OFF
not, look at the beginning of the table.
If it is, then the GPS module may be in push-to-fix mode. The push-to-fix
cycle may be as long as 30 minutes. An easy way to erase push-to-fix
configuration is to remove the GPS receiver from its connector, and plug
it again.
The GPS does not see any satellites
6.3
The antenna must be placed outside any building, with a good visibility
of the sky. Trees and buildings affect signal quality.
The antenna must not be covered with conductor materials (metal case,
metallic paint, etc).
Check the antenna connector. Avoid connecting and removing
frequently the antenna, thus it could damage the RF connector.
SOFTWARE DOWNLOADING
The Albatros OEM GPS Receiver allows software actualizations.
Follow these steps to download the new software image in the
receiver.
Turn the evaluation board power OFF.
Configure jumper JP9 in 1-2 position
Connect the serial port A to a PC with
95/98/2000/Me, with the provided serial cable.
Windows
Execute the program SiRFFlash.exe. You will get the
following screen :
MU-AEK-037-SN
JUNE 2000
USER’S MANUAL
PAGE: 6.2
ISSUE: 1
REVISION: 0
In Communication settings, select the COM port to use in
the PC.
In File selection, type the name of the image to download.
Turn the evaluation board power ON.
Click on Execute, and wait for download completion.
Turn the evaluation board power OFF.
Configure the jumper JP9 in open position (no pins
connected : remove jumper).
MU-AEK-037-SN
JUNE 2000
USER’S MANUAL
PAGE: 6.3
ISSUE: 1
REVISION: 0
7 WARRANTY
CERTIFICATE OF WARRANTY
MODEL:
ALBATROS EVALUATION KIT
SERIAL NUMBER:
DATE OF SALE:
DATE OF INSTALATION:
BUYER NAME:
ADRESS:
CITY:
SENA GPS, S.A. GUARANTEES THIS EQUIPMENT AGAINST ANY
MANUFACTURING DEFECT FOR A PERIOD OF ONE YEAR AFTER
THE DATE OF PURCHASE, INCLUDING COMPONENTS AND
LABOUR REQUIRED FOR FACTORY REPLACEMENT OF THE
DEFECTIVE PIECES
EXCLUDED FROM THIS GUARANTEE ARE PROBLEMS DUE TO
INCORRECT INSTALLATION, MISUSE OR MISHANDLING OF
THE EQUIPMENT. INTERNAL MANIPULATION BY PERSONS
OTHER THAN THE MANUFACTURER OR HIS AUTHORIZED
TECHNICAL ASSISTANCE SERVICES SHALL ALSO VOID THIS
WARRANTY.
IN THE CASE OF DAMAGE, SEND THE EQUIPMENT DULY
PACKAGED, POSTAGE PAID, WITH A COPY OF THE PURCHASE
INVOICE OR THE WARRANTY CERTIFICATE. WE ACCEPT NO
RESPONSIBILITY FOR POSSIBLE DAMAGE OCCURRING
DURING TRANSPORT.
TECHNICAL SERVICE
AVDA. DE EUROPA, 21
PARQUE EMPRESARIAL LA MORALEJA
28100 ALCOBENDAS MADRID
Tel.: +34 91 657 21 70
Fax: +34 91 657 49 35
Email: [email protected]
Web: www.senagps.com
MU-AEK-037-SN
JUNE 2000
SIGNATURE
USER’S MANUAL
DATE
PAGE: 7.1
ISSUE: 1
REVISION: 0
8 GENERAL INFORMATION
Service and information is available on SENA GPS web site:
http://www.senagps.com
Disclaimer
GPS receiver unit specifications and manuals are subject to
change without notice. SENA GPS assumes no liability for
damage incurred directly or indirectly from errors, omissions or
discrepancies between the GPS receiver unit and their manuals
Trademarks
Some mentioned products are registered trademarks of SENA
GPS.
Copyright
This manual is copyrighted by SENA GPS with rights reserved. No
part of this manual may be reproduced in any form without the
prior written permission of SENA GPS.
No patent liability is assumed with respect to the use of the
information contained herein.
MU-AEK-037-SN
JUNE 2000
USER’S MANUAL
PAGE: 8.1