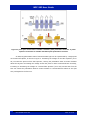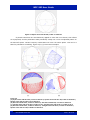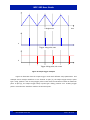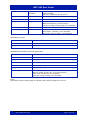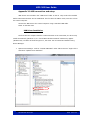
1
MPC-202
Advanced Fiber Optic Multifunction
Polarization Control System
User Guide
Version: 1.04
Date: September 28, 2015
MPC-202 User Guide
General Photonics Corporation is located in Chino California.
For more information visit the company's website at:
www.generalphotonics.com
or call 909-590-5473
GP-UM-MPC-202-104
Page 2 of 75
MPC-202 User Guide
SAFETY CONSIDERATIONS
The following safety precautions must be observed during operation of this product.
Failure to comply with these precautions or with specific warnings elsewhere in this manual
violates safety standards of design, manufacture, and intended use of the product. General
Photonics assumes no liability for customers’ failure to comply with these requirements.
Before operation, the user should inspect the product and review the manual carefully.
Properly ground the chassis and work space using the chassis ground terminal.
Use only in a safe work environment in terms of temperature, humidity, electrical power and risk
of fire or shock. The product is designed for indoor use. Avoid exposure to liquids or water
condensation. Provide adequate ventilation for cooling.
Operate the product on a stable surface. Avoid excess vibration.
Standard laser safety procedures should be followed during operation.
Never look into the light source fiber connector when the light source is
turned on. THE OUTPUT LIGHT FROM A HIGH POWER LASER IS HARMFUL
TO HUMAN EYES. Follow industry standard procedures when operating a
high power laser source.
GP-UM-MPC-202-104
Page 3 of 75
MPC-202 User Guide
GP-UM-MPC-202-104
Page 4 of 75
MPC-202 User Guide
Section 1.0
Overview ............................................................... 7
1.1 Principle of Operation.............................................................. 7
Section 2.0
Features .............................................................. 11
2.1 Front Panel and Optical Inputs .............................................. 11
Fiber Connectors ..........................................................................12
Ferrule Cleaning Procedure ..........................................................12
2.2 Rear Panel: Electrical and Remote Control Interfaces ........... 13
Section 3.0
Operation Instructions ...................................... 15
3.1 Unpacking ............................................................................. 15
3.2 Front Panel Operation ........................................................... 15
3.3 Operation Modes ................................................................... 17
Polarization Scrambling ...............................................................17
11896 Scrambling ........................................................................23
Manual Polarization Control .........................................................24
Polarization Modulation................................................................27
System Setup ...............................................................................33
System Reset ...............................................................................38
3.4 Troubleshooting .................................................................... 39
Front Panel...................................................................................39
Remote Control ............................................................................39
Section 4.0
Specifications ..................................................... 41
Optical..........................................................................................41
Electrical/Communication ............................................................41
Physical and Environmental .........................................................41
System .........................................................................................41
Polarization Scrambler .................................................................41
Polarization Control .....................................................................42
Polarization Modulation (function generator) ..............................42
GP-UM-MPC-202-104
Page 5 of 75
MPC-202 User Guide
WARRANTY................................................................................. 43
Appendices ................................................................................. 45
Appendix 1.0 Remote Control Commands ................................... 45
Command Lists.............................................................................45
Appendix 2.0 RS-232 connection and setup ................................ 57
Appendix 3.0 USB connection and setup ..................................... 59
USB Driver Installation ................................................................59
Appendix 4.0 Ethernet setup....................................................... 65
Appendix 5.0 GPIB setup and control.......................................... 67
Setting the GPIB Address .............................................................67
GPIB control.................................................................................67
Appendix 6.0 LabView sample control program .......................... 69
Driver Installation........................................................................69
Setup............................................................................................69
General control ............................................................................71
Polarization Scrambling ...............................................................72
11896 Scrambling ........................................................................73
Polarization Modulation................................................................74
Manual Control .............................................................................75
GP-UM-MPC-202-104
Page 6 of 75
MPC-202 User Guide
Section 1.0
Overview
The MPC-202 is an advanced Multifunction Polarization Controller specifically designed for
polarization testing of coherent detection systems. It combines a high speed version of General
Photonics’ PolaRite™ III polarization controller with proprietary control algorithms to achieve a
wide range of polarization control functionalities: manual polarization control, polarization function
generation/modulation, and polarization scrambling, with peak SOP variation rates for selected
functions of up to 360 krad/s. The instrument contains a microprocessor based control circuit
packaged in a 2U-height, ¾ -rack size package, as shown in Figure 1. The all-fiber construction
polarization controller provides very wide operation bandwidth with low insertion loss, polarization
dependent loss, and activation loss.
Figure 1 MPC-202 Multifunction Polarization Controller
1.1 Principle of Operation
A polarization controller can be constructed either from a series of rotatable fixedretardation plates or a series of variable retardation plates of fixed orientation. An example of this
second construction, with four variable retardation wave plates, is shown in Figure 2a. A fiberbased version of this design which consists of four piezoelectric actuator-driven fiber squeezers
oriented at 0°-45°-0°-45° is shown in Figure 2b. Each fiber squeezer is driven by an applied
voltage signal. Squeezing the optical fiber produces a linear birefringence in the fiber, which alters
the state of polarization of a light signal passing through it. The MPC-202 is built around a
modified version of this design that is optimized for high speed.
GP-UM-MPC-202-104
Page 7 of 75
MPC-202 User Guide
Figure 2 a) Free space construction of variable retardation plate polarization controller. b) Fiber
squeezer construction of variable retardation plate polarization controller.
An arbitrary polarization state of monochromatic light can be represented by a single point
on the Poincaré Sphere, as shown in Figure 3. Increasing the voltage on one fiber squeezer (X1 or
X3) increases the pressure from that squeezer, causing the polarization state to rotate clockwise
about the OQ axis. Decreasing the voltage causes the point to rotate counterclockwise. Similarly,
increasing or decreasing the voltage on a second fiber squeezer (X2 or X4) oriented 45° from the
first one causes the polarization state to rotate clockwise or counterclockwise about an axis (OH
axis) orthogonal to the first one.
GP-UM-MPC-202-104
Page 8 of 75
MPC-202 User Guide
LCP
R
V
X2, X4
O
H
Q
X1, X3
RCP
SOP on Poincaré Sphere
H: Horizontal Linear Polarization
V: Vertical Linear Polarization
Q: +45 degree Linear Polarization
R: −45 degree Linear Polarization
Increase the
Applied Voltage
CW
V
Q
X1, X3
LCP: Left Circular Polarization
RCP: Right Circular Polarization
CW
H
Q
CCW
CCW
H
R
X2, X4
Decrease the
Applied Voltage
Figure 3 Poincaré Sphere SOP representation and illustration of effects of fiber squeezers
Using different modes of control of the drive voltages, the polarization controller can
perform various functions. In manual control mode, the user has direct control over the output
polarization state. By adjusting the DC drive voltage to each of the 4 fiber squeezers via the front
panel, the output polarization can be changed from any initial state to the desired final state.
If the output polarization is required to change with time in a controlled fashion, the builtin waveform generator can generate a sine, triangle, or square wave of user-controlled amplitude,
offset, and frequency on each of the 4 channels. This function can be used to accomplish anything
from a simple periodic switching between two polarization states to a periodic sweeping out of a
complicated pattern on the Poincaré sphere.
When acting as a polarization scrambler, the MPC-202 varies the output polarization state
for even coverage of the Poincaré sphere using either a series of discontinuous random points
(discrete scrambling) or a continuous trace (triangle, Rayleigh, and Tornado scrambling). The
continuous scrambling methods create different SOP trace patterns and SOP variation rate
GP-UM-MPC-202-104
Page 9 of 75
MPC-202 User Guide
distributions. The MPC-202 also has a triggered random state generation function, in which it
generates a random polarization state triggered by the rising or falling edge (user-selectable) of
an input TTL trigger signal.
GP-UM-MPC-202-104
Page 10 of 75
MPC-202 User Guide
Section 2.0
Features
2.1 Front Panel and Optical Inputs
The front panel of the MPC-202 is shown in Figure 4.
Thumb Wheel
(change parameters,
pause/resume scrambling)
Power
Switch
Channel
(squeezer)
select
Navigate
menu levels
Figure 4 MPC-202 front panel
Front panel features:
OLED display: Displays data and operation mode information
Power:
Power on/off switch
Input:
Adapter for optical fiber input
Output:
Adapter for optical fiber output
CH1-CH4:
Channel select (in modes with individual channel control)
FUNC:
Navigate the menu levels. Pressing FUNC moves one level up in the menu
hierarchy.
ENTER:
Select menu option or move to setup for next parameter.
◄ ►:
Navigate selections or move cursor position
Thumb wheel
Rotate: Move between menu selections
Increment/decrement active digit
Press
GP-UM-MPC-202-104
Pause/resume scrambling or modulation
Page 11 of 75
MPC-202 User Guide
Fiber Connectors
The MPC-202 has two fiber connectors on the front panel to accommodate the input and
output optical beams. The front panel adapters are universal connector interfaces (UCI), which
feature a male-type adapter top piece that can be removed for direct access to the ferrule end for
routine cleaning and maintenance without removing the entire adapter from the panel. This
feature helps avoid high insertion loss, high return loss and measurement instability caused by
dirty or contaminated connectors. In addition, the MPC-202’s universal interchangeable adapter
allows the user to switch to ST, SC, or FC connectors without opening the instrument panel.
Although the MPC-202 is shipped with a customer specified fiber adapter, other interchangeable
inserts are available. For additional information on different input fiber adapter inserts, please
contact General Photonics.
External fiber connectors should be cleaned using industry standard cleaning methods
before connection to the MPC-202. If this procedure is followed before each connection, the
instrument’s internal connector ferrules should not need regular cleaning. However, high insertion
loss or measurement instability that does not improve after cleaning the external connectors may
indicate that the instrument’s internal connector ferrules require cleaning.
Ferrule Cleaning Procedure
Each connector ferrule is contained in a universal connector interface consisting of a front
piece that connects to the external fiber connector, and a base piece that is mounted on the front
panel of the instrument, as shown in Figure 5. To clean a connector ferrule, first, make sure no
external connector is connected to the universal connector interface. Then, using a Phillips
screwdriver, remove the two small screws connecting the front and back parts of the adapter, and
carefully pull the front flange straight out. (Note: never remove the adapter base from the front
panel). The ferrule end should now be exposed. Clean the ferrule using standard cleaning
procedures (compressed air or a fresh lint-free tissue and alcohol or other connector-cleaning
solvent), taking care to avoid scratching the ferrule surface. Finally, replace the front flange
(position it so that the key notch faces up, and the small alignment pin lines up with the hole in
the base piece, before pushing it in) and the screws. For frequent measurements, we recommend
that the user prepare a patch cord fiber to avoid wear on the internal connector.
GP-UM-MPC-202-104
Page 12 of 75
MPC-202 User Guide
Hole for
alignment pin
Remove screws
Front flange
Adapter basedo not remove
Ferrule end
Figure 5 Diagram of universal connector interface
2.2 Rear Panel: Electrical and Remote Control Interfaces
The AC power plug, fuse, trigger and communication interface connectors are mounted on
the rear panel, as shown in Figure 6.
The MPC-202 includes RS-232, USB, Ethernet, and GPIB interfaces for external computer
operation of the system. LabView™ (National Instruments, www.ni.com) control programs are
provided. Control commands, USB driver installation instructions, and instructions for running
control programs are located in the appendices.
Figure 6 rear panel
Rear Panel Features:
Trigger Out: BNC for output trigger
Line: External AC input connector
Trigger In: BNC for input trigger
Cooling fan air intake
USB 2.0 interface port
: Chassis ground
RS-232 serial interface port
Ethernet interface port
GPIB interface port
GP-UM-MPC-202-104
Page 13 of 75
MPC-202 User Guide
Fuse location:
Figure 7 shows the location of the fuse compartment
under the power cord plug. There are two fuses in the
compartment- the one in use and a spare. The fuse
further inside the compartment is active. The one
closer to the compartment opening is the spare.
Replace the fuse with one with the exact rating of the
original.
Figure 7 Fuse compartment
GP-UM-MPC-202-104
Page 14 of 75
MPC-202 User Guide
Section 3.0
Operation Instructions
3.1 Unpacking
Inspect MPC-202 for any physical damage due to shipping and transportation. Contact
carrier if any damage is found. Check the packing list to see if any parts or accessories are
missing.
Packing List
Item #
Description
1
MPC-202
2
Power cord
3
RS-232 cable (straight-wired)
4
USB cable
6
User guide
7
Software cd
3.2 Front Panel Operation
1.
Connect power cord and plug it into wall receptacle. Make sure the ground pin of the
power cord is connected to earth ground.
2.
Connect input and output fibers. Make sure laser source is turned off while cleaning
connectors and making connections.
3.
Turn on the instrument. It will run through an initialization sequence, during which the
OLED screen will display the instrument identification. Once the initialization is complete, it
will display the mode selection options (items 1-6 in the first level of the menu tree shown
in Figure 8.
GP-UM-MPC-202-104
Page 15 of 75
MPC-202 User Guide
Main menu
1.
Pol. Scrambling
Rate
Triangle
Type
Scan
Rate
Rayleigh
(mean ΔSOP)
Discrete
(frequency)
3.
Pol. Manual
Ctrl.
2.
11896 Scrambling
Tornado
(rev/sec)
Set
time
V1
V2
4.
Pol.
modulation
V3
5.
system setup
a. wavelength
V4
amplitude
frequency
External
Trigger
6.
system
reset
b.
Amplitude
units
(V, π, rad)
c.
Comm type
offset
Waveform
(triangle,
sine,
square)
d. Comm EOS
e.
Trigger
f.
GPIB addr.
g. Dynamic IP
h.
Static IP
i. RS232 Setup
Figure 8 System Menu Tree
¾ 1. Pol. Scrambling
2. 11896 Scrambling
↓
The screen displays two options at a time. Rotate the wheel or use the ◄► keys to move
between options, then use the ENTER key to select the highlighted option.
GP-UM-MPC-202-104
Page 16 of 75
MPC-202 User Guide
3.3 Operation Modes
The MPC-202 has four main-menu operation mode groups: polarization scrambling,
Agilent 11896A scrambling emulation, manual polarization control, and polarization modulation
(waveform generation).
Polarization Scrambling
The MPC-202 includes several built-in polarization scrambling functions. Three of them
(Triangle, Rayleigh, and Tornado) generate continuous SOP traces on the Poincaré sphere, while
the fourth (Discrete) generates a sequence of randomly distributed, discrete SOPs. A fifth type
(Trigger) performs discrete random-state generation in response to an external trigger signal
rather than automatically at a set rate. These scrambling types are grouped under option 1 (Pol.
Scrambling) on the main menu. When “Pol. Scrambling” is selected from the main menu, the
display shows the scrambling control screen:
unit
Main menu options
Scrambling control screen
waveform icon
(animated)
The scrambling control screen has two settable parameters: scrambling rate and
scrambling type. To change the scrambling rate, use the ◄► buttons to move the cursor and
rotate the wheel to change the value of the underlined digit. Press ENTER to switch to type
selection. Either use the ◄► buttons or rotate the wheel to change the type setting. Both rate and
type setting changes are applied in real time as the values are changed.
Scrambling is enabled by default, so as soon as the “Pol Scrambling” option is selected
from the main menu, the MPC-202 will begin polarization scrambling, using the current scrambling
type and rate settings. The default setting is triangle scrambling at rate = 0, so when the “Pol.
Scrambling” option is first invoked after instrument power-on, the SOP will be static, but
scrambling will begin as soon as the rate is changed to a nonzero value.
Scrambling Pause/Resume
In any of the scrambling modes, polarization scrambling can be paused, with the
polarization controller remaining in the setting at which it was paused. When scrambling is
resumed, the SOP variation will start from the point at which it was paused.
Press the thumb wheel to pause/resume scrambling.
GP-UM-MPC-202-104
Page 17 of 75
MPC-202 User Guide
The animated waveform icon at the bottom right of the scrambling control screen indicates
the scrambling pause/resume status. The icon moves when scrambling is enabled and stops
moving when scrambling is paused.
Scrambling Types
The scrambling control screen includes three status indicators at the right of the screen. At
the top, the word “Scramble” indicates that the MPC-202 is in scrambling mode. Immediately
below it, the unit in which the scrambling rate is expressed for the active scrambling type is
displayed:
Scrambling Type
Scrambling rate unit
Set value
Range
Triangle
Multiples of 2π/s
0.00 - 2000
Rayleigh
Rad/s
Tornado
Revolutions/s
Highest frequency used to
drive a channel of the
polarization controller
Mean of Rayleigh
distribution
# of rotations per second
0.00 – 60,000
Discrete
Points/s
# of points/s generated
0.00 – 20,000
0.00 - 2000
At the bottom right of the screen is a small animated icon illustrating the current
scrambling type. In the example above, the MPC-202 is in triangle scrambling, and the icon is a
moving triangle wave. As noted above, this icon also indicates the scrambling pause/resume
status: it moves while the MPC-202 is scrambling, and stays still while scrambling is paused.
The scrambling types are described below, with their SOP variation patterns illustrated
using a General Photonics polarimeter. The continuous trace scrambling types (Triangle, Rayleigh,
and Tornado) will be described first.
Triangle
In triangle scrambling, the four channels of the polarization controller are driven with
triangle-wave control signals at different frequencies. The user-set frequency is the highest
frequency used, and the frequencies of the other channels are set by the scrambling algorithm
such that the resultant continuous polarization trace evenly covers the Poincaré sphere. This
function can be used for such applications as PDL measurement, in which the maximum and
minimum light output power as a function of input polarization state is measured: for maximum
accuracy, all polarization states need to be covered, but each power reading should be taken at a
distinct polarization state. Since the photodetector in such a measurement often cannot follow a
fast polarization scrambler, a function in which the polarization changes continuously allows the
photodetector to average over states that are close to each other for each reading.
GP-UM-MPC-202-104
Page 18 of 75
MPC-202 User Guide
Figure 9 Triangle scrambling control screen
Figure 10 shows sample SOP traces for Triangle scrambling taken at different scrambling
rates over the same capture period.
(a)
(b)
(c)
Figure 10 10-second SOP capture of triangle scrambling at rate = (a) 1×2π/s (b) 10×2π/s, and (c)
100×2π/s.
Rayleigh
Rayleigh scrambling also produces a continuous SOP trace with even SOP distribution on
the Poincaré sphere, but the rate of change of SOP (ΔSOP rate) follows a Rayleigh distribution,
which emulates the SOP change rate in real fibers. ΔSOP is defined as the angle between two
neighboring SOP points, measured from the center of the Poincaré sphere, and is measured in
radians. The ΔSOP rate follows a Rayleigh distribution, independent of input SOP. ΔSOP rate
distributions will be discussed in more detail later.
Figure 11 Rayleigh scrambling control screen
Figure 12 shows sample SOP traces for Rayleigh scrambling taken at different scrambling
rates over the same capture period. Note that in the middle plot, dense lines indicate slower SOP
movement and thinner lines indicate faster SOP movement.
GP-UM-MPC-202-104
Page 19 of 75
MPC-202 User Guide
(a)
(b)
(c)
Figure 12 10-second capture of Rayleigh scrambling at (a) 10, (b) 100, and (c) 1000 rad/s mean
SOP variation rate.
Tornado
Tornado scrambling generates a continuous spiral polarization trace with a quasi-uniform
rate of SOP variation, which is useful in stress testing a device or an algorithm’s polarization
tracking capabilities. The user-set scrambling rate is the number of complete circles traced out on
the sphere per second. While the number of revolutions per second is constant, the SOP variation
rate in rad/s can vary depending on where on the sphere the circle is. The maximum value of
ΔSOP occurs when the rotation is around the equator, in which case, ΔSOP = 2π (# rotations/s).
Tornado icon
Figure 13 Tornado Scrambling control screen
Tornado scrambling can be performed by tracing out the spiral with either a fixed or
randomly rotating spin axis, as shown in Figure 14. Press the CH4 button to enable/disable the
rotation of the spin axis. The animated tornado icon in the bottom right of the control screen
indicates the axis-rotation status; if the axis is rotating, the funnel icon rotates from horizontal to
vertical. If the axis is fixed, the tornado icon remains vertical while moving from left to right. The
default state is axis rotation enabled.
(a)
GP-UM-MPC-202-104
(b)
Page 20 of 75
MPC-202 User Guide
(c)
Figure 14 10 second SOP capture of tornado scrambling: (a) randomly rotating spin axis at 20
revolutions per second, (b) fixed rotating spin axis at 100 rev/s. (c) Tornado scrambling rate of
40,000 revolutions/s confirmed by measurement of one of the three Stokes parameters vs time,
measured using the oscilloscope mode of a General Photonics polarimeter. The measured
periodicity is 25µs per revolution, or 40,000 rev/s.
Continuous Scrambling Rate Distributions
The three types of continuous scrambling have different ΔSOP rate distributions and are
useful for different applications. As mentioned earlier, the Rayleigh distribution shown in Figure
15(a) most resembles the natural statistics in real fiber, and is therefore useful for emulation of
fiber SOP variation. The ΔSOP rate distribution for Triangle scrambling is more uniform than the
Rayleigh distribution, and is therefore more suitable for averaging out polarization effects,
although the distribution is slightly input SOP dependent. Figure 15(b) shows the input-SOPaveraged ΔSOP rate distribution for triangle scrambling. The tornado scrambling rate distribution,
shown in Figure 15(c), is concentrated at the high end of the rate distribution, providing a high,
nearly uniform rate of SOP variation for stress testing polarization tracking performance.
While the Rayleigh distribution always has the same shape, the ΔSOP rate distributions for
Triangle and Tornado mode scrambling are somewhat input polarization dependent.
(a)
(b)
(c)
Figure 15 SOP variation rate distributions of (a) Rayleigh, (b) Triangle, and (c) Tornado
scrambling.
Discrete
Discrete scrambling sends random combinations of drive voltages to the fiber squeezers,
causing the polarization to make step changes to different random states at time intervals
determined by the selected frequency. This pattern also generates even coverage of the Poincaré
sphere, and can be used at high frequencies for applications requiring unpolarized light, as well as
for polarization recovery time tests. Figure 17 shows SOP variation patterns taken at different
scrambling rates over the same capture period.
GP-UM-MPC-202-104
Page 21 of 75
MPC-202 User Guide
Figure 16 Discrete Scrambling control screen.
(a)
(b)
(c)
Figure 17 10 second SOP capture of discrete random scrambling at f= (a) 10, (b) 100, and (c) 1000
points/s.
Output Trigger
When in discrete scrambling mode, the MPC-202 can send a TTL pulse synchronized with
each output SOP change to the output trigger BNC connector on the rear panel. This output trigger
signal can be used to synchronize to an external device.
The output trigger is disabled by default. To enable it, send the appropriate remote control
command to the MPC-202 (See Table 1 through Table 5 in Appendix 1 for command lists,
responses, and error codes). Other commands can be used to set up control parameters (pulse
width, selection of rising or falling pulse) for the output trigger pulse. The pulse type can also be
selected from the setup menu:
1.
Pulse type setup for the output trigger signal:
- From the main menu, select option 5 (setup).
- Select Option 5e (trigger).
Trig (in)
Slope: Rising
Trig (out)
Slope: Rising
Trig (out) controls the output trigger. For the output trigger, “rising” means a rising
pulse
, and “falling” means a falling pulse
Trigger (Triggered Random SOP Generation)
The final operation mode under the “Pol. Scrambling” option on the main menu is
triggered random state generation. The output polarization state updates one step to a different
GP-UM-MPC-202-104
Page 22 of 75
MPC-202 User Guide
random state on receipt of each pulse from an external (input) trigger signal. This function can be
used to synchronize with other equipment. One such application is in a recirculating loop
experiment. To use this function:
1.
Pulse edge setup for the external trigger signal:
- From the main menu, select option 5 (setup).
- Select Option 5e (trigger).
Trig (in)
Slope: Rising
Trig (out)
Slope: Rising
On the trigger control screen, set the MPC-202 to trigger on the rising or falling edge
of the input trigger pulse (Trig in).
2.
Connect external trigger (TTL signal) source to BNC connector on rear panel of MPC202.
- Minimum pulse width: 100ns
- Threshold voltage for TTL high: 3.3V.
3.
Select externally triggered random state generation:
- From the main menu, select option 1 (Pol. Scrambling).
- Set the Type to Trigger.
Pulse edge
Trigger response
enable/disable status
On this screen, the rate displayed will be 0.00, because the rate of random state
generation depends on the interval between input trigger pulses.
The status indicators at the right of the screen show the pulse edge setting (trigger on
rising edge of pulse, in the example above) and whether trigger response is enabled or disabled.
When Trigger mode is entered using the front panel control, the trigger response should be
enabled, but it can be disabled by remote control command. When trigger response is disabled,
the MPC-202 will not respond to the input trigger.
11896 Scrambling
The 11896 Scrambling mode emulates the scrambling function of the discontinued Agilent
11896A polarization controller. It performs continuous-trace polarization scrambling at any of 8
speed settings.
GP-UM-MPC-202-104
Page 23 of 75
MPC-202 User Guide
11896
Paused
Scan rate = 8
Set
Time
:00:00
Run
Time
Scan status indicator
:00:00
Figure 18 11896 Scrambling control screen
Scan rate:
Rotate the wheel to set the scan rate. Press ENTER to move the cursor to “Set
Time”.
Options: 1-8.
Set time:
Use the ◄►keys to move the cursor and rotate the wheel to change the value of
the active digit. Time is expressed in minutes:seconds.
Range: 0:00-99:59
Press ENTER to move the cursor to the scan status indicator.
Start the scan: The default status is “Paused”. Rotate the wheel to change the status to “Restart”,
then press ENTER to begin scrambling. During scrambling, the “Run Time”
indicator will count up to the set time. Once the set time is reached, scrambling
will stop.
Pause/resume: During scrambling, pressing the wheel will pause/resume the scrambling
operation. Scrambling resumes from the SOP at which it was paused.
With the cursor on the scan status indicator, scrambling can also be paused by
rotating the wheel to change the status to “Paused” and pressing ENTER.
The scan status has 3 states: Paused, Run, and Restart. When a scan is paused,
selecting “Run” will resume the scan currently in progress (the run time will start
counting up from where it was paused. This is the same effect as pressing the
thumb wheel to resume the scan.). Selecting “Restart” restarts the counter.
While the scan is paused, pressing ENTER moves the cursor to the scan rate setup
position.
Manual Polarization Control
This mode allows the user to convert any input polarization state into any desired output
polarization state by tuning the DC control voltage signals to each fiber squeezer. Changing the
voltage on each channel rotates the position of a point on the Poincaré sphere about some axis.
Directions and some examples are given below.
GP-UM-MPC-202-104
Page 24 of 75
MPC-202 User Guide
Active channel
Amplitude units
Wavelength
Figure 19 Manual Polarization Control screen
Figure 19 shows the manual polarization control screen. The status indicators at the top
right of the screen show, from top to bottom:
Active channel (fiber squeezer whose control signal is currently adjustable)
Amplitude units (control signal for each fiber squeezer can be expressed in terms of
voltage, radians, or multiples of π radians).
Wavelength setting.
Since the voltage mapping used to express the amplitude in radians or multiples of π is
wavelength dependent, it is important that the wavelength setting match the wavelength of the
light source being used.
Both the wavelength setting and the amplitude unit setting can be changed from the
Setup menu (main menu option 5). From the manual control screen, press the FUNC button to
return to the main menu and select option 5 for setup. Once the setup is done, return to the
manual polarization control screen by selecting option 3 from the main menu.
1.
Select channel to be controlled using the Ch1-4 buttons. The cursor will move to the
corresponding channel.
2.
Use the ◄ ► buttons to move the cursor and rotate the wheel to change the value of
the underlined digit. Ranges for each unit are:
Voltage:
0~150V
Phase retardation (π radians): 0~4π phase retardation
Phase retardation (radians):
3.
0~4π phase retardation (=0 ~ 12.6 radians)
Repeat steps 1 and 2 to control other channels.
Figure 20(a) shows the change in polarization as the DC drive voltage on channel 1 of the
polarization controller is increased from 0 to 2Vπ (Vπ for each channel is about 28V) with the
voltage on the other channels remaining unchanged at 0V. Figure 20(b) to (d) show the
corresponding cases for channels 2-4, respectively. As the voltage to each channel is increased,
the point representing the input polarization is rotated about some axis, tracing out a circle on the
Poincaré sphere.
GP-UM-MPC-202-104
Page 25 of 75
MPC-202 User Guide
(a)
(b)
(c)
(d)
Figure 20 0 to 2Vπ voltage increase applied to (a) channel 1. (b) channel 2. (c) channel 3. (d)
channel 4.
Figure 21(a) shows the effects of increasing the voltage on channel 4 from 0 to 150V: the
point makes more than 3 turns from its starting point A to its final state B.
Figure 21(b) illustrates one practical example of manual polarization control. A random
input polarization state (point A) is changed to horizontal linear polarization at the output (point B)
by sequentially adjusting the drive voltages to channels 1 and 2.
(a)
(b)
Figure 21 (a) 150V applied to channel 4. (b) Conversion of a random state to horizontal linear
polarization
GP-UM-MPC-202-104
Page 26 of 75
MPC-202 User Guide
Polarization Modulation
In this mode, an internal function generator supplies the drive voltage signals to each of
the four channels of the polarization controller. For each channel, the user can select a sine,
triangle, or square waveform, and then set the frequency, amplitude, and offset for that
waveform. Since the piezoelectric actuators require the application of positive voltages only, the
amplitude setting is always less than the offset; as the amplitude is increased, the offset adjusts
accordingly.
Figure 22 shows the polarization modulation control screen. The status indicators at the
top right of the screen show, from top to bottom:
Active channel (fiber squeezer whose waveform parameters are currently displayed)
Amplitude or frequency units: The amplitude and offset of the waveform can be expressed
in terms of voltage, radians, or multiples of π radians. The frequency is expressed
in Hz. While the cursor is on the amplitude or offset, the unit indicator will display
the currently selected amplitude unit. While the cursor is on the frequency, the
unit indicator will display the frequency unit (Hz).
Animated waveform icon: The waveform icon indicates the waveform type (sine, square,
or triangle), as well as the enable/disable state of the modulation.
Since the voltage mapping used to express the amplitude in radians or multiples of π is
wavelength dependent, it is important that the wavelength setting match the wavelength of the
light source being used.
Both the wavelength setting and the amplitude unit setting can be changed from the
Setup menu (main menu option 5). From the modulation control screen, press the FUNC button to
return to the main menu and select option 5 for setup. Once the setup is done, return to the
modulation control screen by selecting option 4 from the main menu.
Channel #
Amplitude or
frequency unit
Waveform type Icon
(animated)
Figure 22 Polarization modulation control screen
1.
Select channel to be controlled using the Ch1-4 buttons. The channel indicator in
the upper right corner of the screen shows the active channel.
2.
Press the ENTER button to toggle between amplitude (A), offset, frequency (f),
and waveform type (Wf). The underscore indicates the selected parameter.
a.
Amplitude, offset and frequency: Use the ◄ ► buttons to move the cursor
and rotate the wheel to change the value of the underlined digit.
GP-UM-MPC-202-104
Page 27 of 75
MPC-202 User Guide
Voltage
π
Radians
Amplitude Range
0.0 to 45.0
0.0 to 1.5
0.0 to 4.71
Offset Range
A to (90 − A)
A to (3π − A)
A to (9.42− A)
Note that amplitude for this function works the way it does on a standard
function generator. Therefore, Vpp = 2A, and an amplitude setting
corresponding to Vπ will result in a complete circle polarization trace for a
sine or triangle wave.
Frequency range: 0~1000Hz
b.
Waveform type: Use arrow buttons or thumb wheel to choose sine,
triangle, or square wave. (The default is triangle wave.)
3.
Repeat steps 1 and 2 to control other channels.
Waveform modulation is enabled by default, so as soon as the “Pol Modulation” option is
selected from the main menu, the waveforms will be applied on all channels, using the current
settings for each channel. The default setting is triangle modulation with all parameters set to 0,
so when the “Pol. Modulation” option is first invoked after instrument power-on, the SOP will be
static, but all changes to modulation parameters are applied in real-time as the value changes.
Waveform Pause/Resume
The pause/resume function for modulation works the same as in the polarization
scrambling functions: modulation can be paused, with the polarization controller remaining in the
setting at which it was paused. When modulation is resumed, the SOP variation will start from the
point at which it was paused.
Press the thumb wheel to pause/resume modulation.
The animated waveform icon at the bottom right of the screen indicates the pause/resume
status. The icon moves when modulation is enabled and stops moving when modulation is paused.
Waveform Examples
Applying a sine wave to one channel sweeps out a ring (or portion thereof, depending on
the amplitude), sinusoidal in time, on the Poincaré sphere. Figure 23 shows examples of this for
each of the 4 channels individually. Figure 23 (a) is the trace for a sine wave with amplitude 28V
and frequency 5 Hz applied to channel 1. Figure 23 (b) is the same sine wave applied to channel
2. Figure 23 (c) shows the trace for a sine wave with amplitude 15V and frequency 5 Hz applied to
channel 3, and Figure 23 (d) shows the trace for a sine wave with amplitude 20V and frequency 5
Hz applied to channel 4. Since Vπ is about 28V, the first two traces sweep out close to a full ring,
while the last two sweep out about half a ring.
GP-UM-MPC-202-104
Page 28 of 75
MPC-202 User Guide
(a)
(b)
(c)
(d)
Figure 23 (a) Sine wave with A=28V, f=5Hz on channel 1 (b) Sine wave with A=28V, f=5Hz on
channel 2 (c) Sine wave with A=15V, f=5Hz on channel 3 (d) Sine wave with A=20V, f=5Hz on
channel 4.
A triangle wave applied to a single channel also sweeps out a ring (or portion thereof,
depending on the amplitude) on the Poincaré sphere, but the polarization change along that path
occurs at a constant speed set by the frequency. The final trace over several periods will look the
same as that of a sine wave.
If a square wave is applied to a single channel, the polarization will switch periodically
between two polarization states determined by the amplitude and offset settings of the wave. The
frequency determines the dwell time at each polarization state. Figure 24 shows the trace for a
square wave with amplitude 15V and frequency 5 Hz, applied to one of the channels. For clarity of
illustration, the sampling settings of the polarimeter used to generate this figure were set such
that only the two terminal SOP positions (and not the transition traces) were captured.
GP-UM-MPC-202-104
Page 29 of 75
MPC-202 User Guide
Figure 24 Square wave with A=30V, f=5Hz on channel 1
If periodic waveforms are simultaneously applied to more than one channel, their effects
are superposed, and the polarization state periodically sweeps out a more complicated pattern on
the Poincaré sphere. Certain frequency combinations will cover the entire sphere. This can be a
basis for polarization scrambling. Figure 25(a)-(d) show some examples.
(a)
(c)
(b)
(d)
Figure 25
(a) square wave with A=7.5V, f=1Hz on channel 1, square wave with A=7.5V, f=2Hz on channel 2,
Square wave with A=7.5V, f=3 on channel 3
(b) Sine wave with A=4V, f=1Hz on channel 1, Sine wave with A=4V, f=1.1Hz on channel 2.
(c) Triangle wave with A=13.5V, f=1.1Hz on ch 1, Triangle wave with A=3V, f=11.3Hz on ch. 2
(d) Sine wave with A=3V, f=3Hz on channel 1, Triangle wave with A=3V, f=3.1Hz on channel 2,
Square wave with A=7.5V, f=0.2Hz on channel 3.
GP-UM-MPC-202-104
Page 30 of 75
MPC-202 User Guide
Square Wave with Fast Slew Rate
A fast transition between two SOPs is especially useful for SOP recovery time testing.
The MPC-202 is configured such that a square wave modulation on channel 3 of the
polarization controller has a slew rate of 360 krad/s (10 to 90%). To use this function, select
channel 3 and perform the waveform setup as described above (select amplitude, offset, and
frequency as desired, and select a square wave as the waveform.
Output Trigger
The MPC-202 can send a TTL pulse synchronized with the waveform on a particular
channel to the output trigger BNC connector on the rear panel. This output trigger signal can be
used to synchronize to an external device.
The output trigger is disabled by default. It can be enabled via remote control command
(See Table 1 through Table 5 in Appendix 1 for command lists, responses, and error codes). Other
commands can be used to set up control parameters (pulse width, etc.) for the output trigger
pulse. The pulse type (rising/falling) selection can also be set from the setup menu (main menu
option 5).
Output trigger setup parameters:
Channel:
Output trigger synchronizes with waveform on selected channel.
Options: 1-4
Pulse Type
Options: rising pulse
, falling pulse
Default: Falling
Position
Synchronize trigger pulse with selected extremum of waveform.
Options: Max, Min, Zero. (Note: Min and Zero have the same effect)
Default: Zero
Pulse width
Width of trigger pulse
Range: 0-65535µs
Default: 25µs
Enable/Disable status
Default: Disabled
GP-UM-MPC-202-104
Page 31 of 75
MPC-202 User Guide
Triangle wave
time
a
Trigger- rising pulse, max
b
Trigger- falling pulse, min or zero
Figure 26 Output trigger examples
Figure 26 illustrates how the output trigger works with different setup parameters. This
example uses a triangle waveform on one channel. In plot (a), the output trigger setup is pulse
type: rising, position: max. A rising trigger pulse is sent when the waveform reaches its maximum
point. In plot (b), the output trigger setup is pulse type: falling, position: min. A falling trigger
pulse is sent when the waveform reaches its minimum point.
GP-UM-MPC-202-104
Page 32 of 75
MPC-202 User Guide
System Setup
The system setup menu (option 5 in the mode selection menu) allows the user to set up
several operation parameters (see items a-i under “system setup” in the menu tree in Figure 8).
These setup parameters are written to nonvolatile memory and will be retained after power-off.
From the initial setup option screen, use the wheel or arrow keys to move between options
and the ENTER key to select an option to set the desired operation parameter.
¾ 5a. Wavelength
5b. Amplitude Unit
↓
Setup
Wavelength:
Wavelength
1550 nm
This option selects the operation wavelength for the MPC-202.
Range:
1260-1650nm for standard version
Default Value
1550nm
Use the ◄►keys to move the cursor and rotate the wheel to change the value of the
underlined digit. The wavelength setting updates in real time as the value is changed.
When finished setting the wavelength, press the FUNC key once to return to the setup
option menu or twice to return to the main menu.
Amplitude Units:
Amplitude Units
π
This option sets the units used to express the magnitude of the control signal applied to
each fiber squeezer. The selected unit is used for the control signal magnitudes in manual control
mode, and for the waveform amplitudes in polarization modulation mode. Amplitude can be
GP-UM-MPC-202-104
Page 33 of 75
MPC-202 User Guide
expressed in terms of the control voltage applied to the squeezers. The voltage to phase
retardance of each fiber waveplate is also mapped out such that the amplitude can be displayed in
units of radians, or in multiples of π radians. The phase retardance is factory calibrated to within
5% accuracy. Since phase retardance is wavelength dependent, it is important to specify the
correct operating wavelength to ensure accurate results.
Available options:
multiples of π
Radians
Voltage
Default value:
π
Rotate the wheel to select the desired amplitude unit. The setting updates in real time as
the value is changed.
When finished, press the FUNC key once to return to the setup option menu or twice to
return to the main menu.
Comm Type:
Command Type
SCPI
The MPC-202 has two available remote control command formats: SCPI, and a legacy
format for users who may have control programs written for the MPC-101 that they may wish to
use with the MPC-202.
This option allows the user to set the MPC-202 to respond to a particular command
format.
Options:
SCPI, GP
Default:
SCPI
Rotate the wheel to toggle between SCPI and GP.
When finished, press the FUNC key once to return to the setup option menu or twice to
return to the main menu.
GP-UM-MPC-202-104
Page 34 of 75
MPC-202 User Guide
Comm EOS:
Command EOS
CR + LF
This option allows the user to select the end-of-string indicator for SCPI commands.
Options:
CR + LF
CR (= carriage return)
LF (= line feed)
Default:
CR + LF
Rotate the wheel to change the end-of-string indicator setting. The setting updates in real
time as the value is changed.
When finished, press the FUNC key once to return to the setup option menu or twice to
return to the main menu.
Trigger:
Trig (in)
Slope: Rising
Trig (out)
Slope: Rising
This option selects the pulse edge setting for the input trigger signal and the pulse type
setting for the output trigger signal.
Options:
Rising, Falling
Default:
Falling
Rotate the wheel to toggle between rising and falling settings on the current line, and use
the ENTER key to toggle between the input and output trigger setting lines.
When finished, press the FUNC key once to return to the setup option menu or twice to
return to the main menu.
GP-UM-MPC-202-104
Page 35 of 75
MPC-202 User Guide
GPIB Address:
GPIB
Address = 5
This option sets the instrument’s GPIB address.
Range:
0-30
Default:
5
Rotate the wheel to change the GPIB address. The GPIB address changes in real time as
the value is changed.
When finished, press the FUNC key once to return to the setup option menu or twice to
return to the main menu.
Dynamic IP address:
The instrument’s IP address must be known in order to control it via Ethernet.
See Appendix 4 for Ethernet setup details.
The “Dynamic IP” option sets the instrument for dynamic IP addressing and requests a
dynamic IP address from the server.
From the Setup menu, select “Dynamic IP”, then press the ENTER key to request a
dynamic IP address from the server.
If the instrument is able to establish communication with the DHCP server and successfully
retrieve an IP address, the address will be displayed on-screen.
Dynamic IP Address
192.168.2.150
If the MPC-202 is unable to connect to the server, it may display 0.0.0.0. In this case,
first, check the connection. If the connections are correctly set up, press the ENTER key to re-send
the request.
When finished, press the FUNC key once to return to the setup option menu or twice to
return to the main menu
GP-UM-MPC-202-104
Page 36 of 75
MPC-202 User Guide
Each time this menu option is selected, the instrument requests a dynamic IP address
from the server. If this menu option is selected while the instrument is already in communication
using a dynamic IP address, the instrument may be assigned a dynamic IP address other than the
one it is currently using. This may interrupt communication, and the address may not be displayed
correctly on the front panel.
Static IP address:
Selecting “Static IP” sets the instrument for Ethernet communication using static IP
addressing and allows the user to set the static IP address, Net Mask, Gateway, and Name Server.
The setup screens for this option are as follows:
Static IP Address
↓
a. 192.168.002.150
Static Net Mask
↑
b. 255.255.255.000
↓
Static GateWay
↑
c. 192.168.002.001
↓
Static NameServer
↑
d. 192.168.002.001
Rotate the wheel to move between static IP setup parameter options when the cursor is on
the setup parameter index (a-d).
Press the ENTER or ►keys to move to setup for the currently selected parameter.
To set a particular parameter, use the ◄►buttons to move the cursor position and rotate
the wheel to change the value of the active digit. Once the parameter is set, press ENTER to move
the cursor position back to the parameter index (a-d).
When finished, press the FUNC key once to return to the setup option menu or twice to
return to the main menu.
GP-UM-MPC-202-104
Page 37 of 75
MPC-202 User Guide
RS-232 Setup:
Baud Rate
9600
This option allows the user to set the baud rate for RS-232 communication.
Options:
110, 300, 600, 1200, 2400, 4800, 9600, 19200, 28800, 38400, 43000,
56000, 57600
Default:
9600
Rotate the wheel to change the baud rate setting. The setting updates in real time as the
value is changed.
When finished, press the FUNC key once to return to the setup option menu or twice to
return to the main menu.
System Reset
Selecting this option from the main menu reinitializes the instrument and resets all of the
operation parameters to their default values.
GP-UM-MPC-202-104
Page 38 of 75
MPC-202 User Guide
3.4 Troubleshooting
The performance of the MPC-202 can be tested using a polarized light source and a fast
polarimeter.
Front Panel
1.
To ensure a stable output SOP, place the setup on a stable surface and fix SM fibers in
place.
2.
For proper scrambling performance, do not interchange the input and output connectors.
Remote Control
Command Format
1.
Make sure the “Command Type” setting (SCPI or GP) matches the format of the actual
command format to be used.
2.
SCPI format: Command strings without an end-of-string (EOS) character will not be
executed. Make sure that the “Command EOS” setting matches the EOS being used.
3.
GP format: If the beginning (“*”) or ending identifiers (“#” or “?”) of a command are
missing, the instrument will not respond.
4.
The instrument will beep to indicate an improperly received command or other error.
RS-232
1.
Make sure that the cable is straight-wired (pin-to-to pin wired) not cross-wired.
2.
Verify active Comm Port (COM1, COM2, etc.).
3.
Verify Comm Port settings: 8 data bits, 1 stop bit, no parity bits.
4.
Make sure baud rate setting on instrument matches baud rate being used by control
computer.
USB
1.
Make sure that the USB driver is installed before communicating via USB.
Ethernet
1.
Make sure that the Ethernet communication setting (Static or Dynamic) matches the
Ethernet addressing type being used.
2.
Make sure that the cable type is correct: cross-linked cable for static IP, straight-linked
cable for dynamic IP.
GP-UM-MPC-202-104
Page 39 of 75
MPC-202 User Guide
3.
Every time “Dynamic IP” is selected from the Settings menu, the instrument requests a
new dynamic IP address from the server. If this happens while the instrument is already in
communication via dynamic IP, the communication may be interrupted.
GP-UM-MPC-202-104
Page 40 of 75
MPC-202 User Guide
Section 4.0
Specifications
Optical
Operating wavelength range
1260-1650 nm or
980-1300nm
0-1000 mW
Power Handling
Insertion Loss
Return Loss
<0.15 dB intrinsic
<0.6 dB with connectors
>50 dB
PDL
<0.1 dB with connectors
PMD
<0.2 ps with connectors
Activation Loss
<0.1 dB
Electrical/Communication
Front panel display
OLED graphic display
Power Supply
100-240VAC, 50-60 Hz
Input/Output Triggers
TTL pulse, BNC connector
Communication Interfaces
RS-232, USB, Ethernet, GPIB
GPIB Address
0-30
RS-232 Baud Rate
110, 300, 600, 1200, 2400, 4800, 9600, 19200, 28800,
38400, 43000, 56000, 57600
Physical and Environmental
Dimensions
Fiber Type
2U ¾ 19” rack width
14” (L) × 14” (W) × 3.5” (H)
Single mode fiber
Fiber Input/Output Connectors
FC/PC, FC/APC, SC/PC, SC/APC
Weight
10.6 lb
Operation temperature
0 to 50ºC
Storage Temperature
−20 to 70ºC
System
Polarization Scrambler
Scrambling Types
Scrambling Rate
Continuous trace
Tornado, Rayleigh, Triangle, 11896A emulation
Discrete SOPs
Random, Triggered Random
Tornado
0 to 60,000 Rev/s
Rayleigh
0 to 2000 rad/s (mean SOP variation rate)
Triangle
0 to 2000 × 2π rad/s
GP-UM-MPC-202-104
Page 41 of 75
MPC-202 User Guide
Output Trigger Pulse
Agilent 11896A
emulation
8 scan rates, matched to same settings on
Agilent 11896A
Set time: Variable to 99 min, 59 sec.
Discrete
0 to 20,000 points/s
Triggered Random
1 random SOP per input trigger pulse (TTL)
Maximum frequency: 20,000 points/s
Trigger on rising or falling edge (user selectable)
Discrete Mode
1 output TTL pulse per SOP generated
Pulse width: 1-65535 µs, user selectable
Pulse type: rising or falling, user selectable
Polarization Control
SOP mapping
Arbitrary- convert any input SOP to any output SOP
SOP control
4 independently addressable channels
SOP tuning range
4π retardation per channel (or 0-150V control voltage range)
Polarization Modulation (function generator)
Modulation Control
Single channel or independent multi-channel waveform control
Amplitude
0.00 to 1.5π rad (peak to peak variation = 2 × Amplitude)
Offset
Amplitude < Offset < 3π−Amplitude
Frequency
0.00 to 1000 Hz
Waveforms
Sine, Triangle, Square
Square wave slew rate
360k rad/s (10% to 90%, channel 3)
Output Trigger
1 output TTL pulse per cycle on selected channel
Options: Trigger at max, min, or zero of waveform
Pulse width: 1-65535 µs, user selectable
Pulse type: rising or falling, user selectable
Notes:
Specifications listed in table apply for standard 1260-1650nm operation at 23±5°C.
GP-UM-MPC-202-104
Page 42 of 75
MPC-202 User Guide
WARRANTY
All of General Photonics’ products have been inspected and found to comply with our
quality assurance standards before shipping. If any damage occurs during shipment, please
contact the carrier and inform us or your distributor as soon as possible.
Do not attempt repair of any General Photonics product. Repair of defective products must
be performed by factory trained engineers.
General Photonics warrants that this product will be free from defects in materials or
workmanship for a period of one year from the date of shipment. A product found to be defective
during the warranty period will be repaired or replaced, at no charge, at General Photonics’ option.
If a problem is found, please contact General Photonics for assistance and instructions for
any necessary returns.
General Photonics Customer Service
T: 909-590-5473
Email: [email protected]
www.generalphotonics.com
You will be provided with a problem report form. Please complete the form with as
complete a description of the problem and the conditions under which it occurred as possible. If
the product is found to require factory repair, General Photonics will issue an RMA number for the
return. Please label the product clearly with the RMA number. Failure to follow this procedure may
delay the evaluation and repair of the product.
The above warranty specifically excludes products that have been repaired or modified by
non-manufacturer-authorized personnel, products with a broken warranty seal or opened
enclosure, and damage caused by misuse, abuse, improper storage or handling, or acts of nature.
This warranty is in lieu of all other warranties, expressed or implied. General Photonics will not be
liable for any indirect or consequential damages or losses resulting from the use of its products.
GP-UM-MPC-202-104
Page 43 of 75
MPC-202 User Guide
GP-UM-MPC-202-104
Page 44 of 75
MPC-202 User Guide
Appendices
General Photonics provides a test program for remote control of the MPC-202. The control
software is included on the accompanying cd. The following appendices include the remote control
command lists, setup for different control interfaces, and installation and application procedures
for the control software.
Appendix 1.0 Remote Control Commands
The commands and responses listed in Table 1, Table 2, and Table 4 are the same for all
communication protocols: RS-232, USB, Ethernet, and GPIB.
Once the MPC-202 receives a command, it goes into remote control mode, and the front
panel keypad is locked. A small LCL indicator will appear on the front panel display. Press ENTER
to return to front panel control. The indicator will disappear once front panel control is restored.
The MPC-202 needs to be set to respond to a particular command format before it can
receive commands. Use the “Comm Type” setup screen under “System Setup” to select SCPI or
GP format before sending commands.
For SCPI commands, multiple commands can be concatenated in one string, using
semicolons as separators, up to a limit of 128 characters per string.
For GP format commands, only one command string can be sent at a time.
If the MPC-202 beeps after receiving a command, that indicates that there was a problem
with the command. Typically, this happens if the command was incorrectly formatted, or does not
match the control mode (for example, if the MPC-202 is in GP command mode, and an SCPI
command is sent).
Command Lists
SCPI Commands
SCPI command notes:
1.
Each command sequence can be queried by using “?” in place of set parameters to check the
command’s current parameter settings. There is no space between the command sequence
and “?”.
2.
There is a space between a command sequence and a set parameter. Settable parameters are
listed in the table using triangular brackets < >.
3.
Command segments listed in the table in square brackets [ ] are optional; they are included
for human interpretability.
4.
Many command segments can be written out as full words or in pre-defined abbreviated forms
consisting of 3 or 4 letters. The abbreviated commands are capitalized in the command
GP-UM-MPC-202-104
Page 45 of 75
MPC-202 User Guide
sequences listed in the table. E.g. the firmware version query command can be written out as
either :SYSTem:VERSion? or :SYST:VERS?
5.
Multiple command strings can be concatenated using a semicolon “;”.
6.
An end-of-string (EOS) is required to execute a complete command string, the EOS can be
configured as Line Feed (LF), Carriage Return (CR), or both (LF+CR).
7.
If the MPC-202 beeps after a command is sent, check the MPC’s command type setting (GP or
SCPI) and EOS setting to make sure they match the format of the command being sent. Also,
check that the command is correctly formatted before resending.
8. If the instrument does not carry out a command and does not beep, it may not have
received the EOS character. Make sure that the command string ends with the
correct EOS. The default EOS is CR + LF (0D 0A in HEX)
Table 1 SCPI Remote Control Command List
Command Sequence
:SYSTem:ERRor?
:SYSTem:VERSion?
:SYSTem:COMMunicate:EOS
:SYSTem:COMMunicate:HSHake
:SYSTem:GPIB:ADDRess
:SYSTem:NET:IP
:SYSTem:NET:MASK
:SYSTem:NET:GWAY
:SYSTem:NET:NSERver
:SYSTem:NET:MODE
:SYSTem:SERial:BAUDrate
Parameters
Description/Example
System Information
Return error sequence, 20 error messages max,
errors read out in FIFO sequence.
Query firmware version: return value <string>
(e.g. 1.0.1-20111216A)
Communication
<LF|CR|CR+LF> Set/query End Of String type for SCPI
:SYST:COMM:EOS CR+LF
<ON|OFF>
Set/query handshake enable/disable status.
:SYST:COMM:HSH ON
< integer >
Set/query GPIB address, range: 0 to 30.
:SYST:GPIB:ADDR 10
<string>
Set/query IP address.
:SYST:NET:IP 192.168.1.122
<string>
Set/query net mask.
:SYST:NE:MASK 255.255.255.0
<string>
Set/query gateway address.
:SYST:NET:GWAY 192.168.1.1
<string>
Set/query nameserver.
:SYST:NET:NSER 206.13.30.12
< SIP | DHCP >
Set/query Ethernet mode
(Static or Dynamic)
:SYST:NET:MODE DHCP
0~12
Set/query RS-232 baud rate.
0: 110;
1: 300;
2: 600;
3: 1200;
4: 2400; 5: 4800;
6: 9600; 7: 19200
8: 28800; 9: 38400;
10: 43000; 11: 56000; 12: 57600
:SYST:SER:BAUD 6
Note: NET commands (IP, MASK, GWAY, NSERver) are used to set parameters for static IP addressing.
However, the query versions will return values for either static or dynamic IP depending on MODE setting.
GP-UM-MPC-202-104
Page 46 of 75
MPC-202 User Guide
Manual Polarization Control
< float>[unit] Set/query DC voltage for Channel n.
Unit = V, PI, or RAD. If unit not specified,
uses default unit (V).
Range: 0 to 150 V
0 to 4 pi
0 to 12.6 rad
Ex: :INP:CHAN1:DC 8.8V or :CHAN1 8.8
:INP:CHAN1:DC 1PI or :CHAN1 1PI
Polarization Modulation
[:INPut]:CHANnel(n):WAVeform:TYPE
< SIN |
Set/query waveform type.
TRIangle |
:CHAN2:WAV:TYPE SIN
SQUare>
[:INPut]:CHANnel(n):WAVeform:AMPLitude
< float>[unit] Set/query amplitude value.
Unit: V, PI, or RAD.
Range: 0 to 45 unit=V
0 to 1.5 unit=PI
0 to 4.71 unit=RAD
:CHAN2:WAV:AMPL 8.8V
[:INPut]:CHANnel(n):WAVeform:FREQuency < float>
Set/query frequency value, in Hz.
Range: 0.01 to 1000
:CHAN2:WAV:FREQ 888
[:INPut]:CHANnel(n):WAVeform:OFFSet
< float>[unit] Set/query amplitude offset value.
Unit: V, PI, or RAD.
Range: refer to table on p. 28
:CHAN2:WAV:OFFS 8.8V
[:INPut]:CHANnel(n):WAVeform:PHASe
< float>
Set/query amount of phase shift, in
degrees; range: 0 to 360.
:CHAN2:WAV:PHAS 88.8
[:INPut]:CHANnel(n):WAVeform:STATe
< ON | OFF > Start or pause waveform on specific channel
:CHAN2:WAV:STAT ON
[:INPut]:CHANnel(n):WAVeform:RESTart
Restart waveform on a specific channel
:CHAN2:WAV:REST
Polarization Scrambling
[:INPut][:SCRamble]:DISCrete:RATE
< float>
Set/query discrete scrambling rate in
points/s
Range: 0.01 to 20000
:DISC:RATE 188
[:INPut][:SCRamble]:DISCrete:STATe
< ON | OFF > Start or pause discrete scrambling.
:DISC:STAT ON
[:INPut][:SCRamble]:TRIangle:RATE
< float>
Set/query triangle scrambling rate in
multiples of 2π radians/s.
Range: 0.01 to 2000
:TRI:RATE 188
[:INPut][:SCRamble]:TRIangle:STATe
<ON|OFF>
Start or pause triangle scrambling.
:TRI:STAT ON
[:INPut][:SCRamble]:RAYLeigh:RATE
< float>[unit] Set/query Rayleigh scrambling rate
(mean of distribution, in rad/s).
Range: 0.01 to 2000
:RAYL:RATE 88.8
[:INPut][:SCRamble]:RAYLeigh:STATe
< ON | OFF > Start or pause Rayleigh scrambling.
:RAYL:STAT ON
[:INPut][:SCRamble]:TORNado:RATE
<float>
Set/query Tornado scrambling rate in
revolutions per second (rev/s)
Range: 0.01 to 60000
:TORN:RATE 88.8
[:INPut][:SCRamble]:TORNado:STATe
<ON|OFF>
Start or pause Tornado scrambling
:TORN:STAT ON
[:INPut][:SCRamble]:TORNado:TYPE
<0 | 1>
Set/query Tornado rotation axis status.
0: fixed rotation axis
1: moving rotation axis
:TORN:TYPE 0
[:INPut:]CHANnel(n)[:DC]
GP-UM-MPC-202-104
Page 47 of 75
MPC-202 User Guide
:INITiate:IMMediate
:SCAN:RATE
:SCAN:TIMer
:SCAN:TIMer:CLEar
:TRIGger:INPut:STATe
:TRIGger:INPut:TYPE
:TRIGger:INPut:COUNter:VALue?
:TRIGger:INPut:COUNter:CLS
:TRIGger:OUTPut:STATe
:TRIGger:OUTPut:TYPE
:TRIGger:OUTPut:COUNter:VALue?
:TRIGger:OUTPut:COUNter:CLS
:TRIGger:OUTPut:PWIDth
Agilent Model 11896 emulator
Restart Agilent scrambling emulation
:INIT:IMM
<id>
Set/query scan rate setting.
scan rate range: 1 to 8
:SCAN:RATE 8
<MIN:SEC>
Set/query scan time length setting.
Range: 0:00 to 99:59
:SCAN:TIM 8:30
Clear set time
:SCAN:TIM:CLE
Trigger Menu
< ON | OFF >
Enable/disable input trigger. default: <OFF>
:TRIG:INP:STAT ON
< REDGe|FEDGe>
Set/query input trigger edge type: rising or
falling edge. Default: Falling edge.
:TRIG:INP:TYPE REDG
Query TRIGGER input counter
Clear TRIGGER input counter
< ON | OFF>
Enable/disable output trigger. default: OFF
:TRIG:OUTP:STAT ON
< REDGe|FEDGe>
Set/query output trigger type:
Rising/Falling pulse.
Default: Falling pulse
:TRIG:OUTP:TYPE REDG
Query TRIGGER output counter
Clear TRIGGER output counter
< integer >
Set/query TRIGGER output pulse width,
:TRIGger:OUTPut:CHANnel(n)
<
:DISPlay:LOCK
<
:CONFigure:WLENgth
<
:UNIT:DC
<
:ABORt
:PAUSe
:RESTart
:STATus:MODE?
GP-UM-MPC-202-104
Range: 0-65535µs
default: 25μs.
:TRIG:OUTP:PWID 8888
MAX|MIN|ZERO>
Set/query trigger output position for channel n:
minimum or maximum point of waveform.
Note: min and zero have the same effect.
Default: zero.
:TRIG:OUTP:CHAN1 MAX
System Setting
ON|OFF>
ON: OLED displays “REMOTE CONTROL.”
OFF: OLED displays current function.
:DISP:LOCK ON
float>
Set/query operation wavelength in units of
nm.
Range: 1260 to 1650
:CONF:WLEN 1550.0
V | RAD | PI >
Set/query units used for control signal
magnitude in manual polarization control (DC),
and for AMPLitude and OFFSet for waveforms.
Default unit: V
:UNIT:DC RAD
Stop current function
Pause current function
Restart current function
Query current system mode:
0: Discrete scrambling;
1: Triangle scrambling;
2: Rayleigh scrambling;
3: Trigger-in scrambling
4: Tornado scrambling;
5: Agilent scrambling
6: Polarization modulation;
7: Polarization manual control;
8: System Setup.
User menu
Page 48 of 75
MPC-202 User Guide
:STATus:QUEStion:EVENt?
:STATus:QUEStion:CONDition?
:STATus:QUEStion:ENABle
:STATus:OPERation:EVENt?
:STATus:OPERation:CONDition?
:STATus:OPERation:ENABle
0 ~ 65535
(16 bits)
0 ~ 65535
(16 bits)
Query questionable event register; returns
integer within range 0 ~ 65535 (16 bits)
Reading the register clears all bits.
Query questionable condition register.
0 = disable, 1 = enable
Set enable/disable status of all bits of
questionable event enable register.
0 = disable, 1 = enable
Or query questionable event enable register.
:STAT:QUES:ENAB 888
Query operation event register
Query operation condition register.
Set enable/disable status of all bits of
operation event enable register.
0 = disable, 1 = enable
Or query operation event enable register.
:STAT:OPER:ENAB 888
Sample commands:
1.
Set MPC to Rayleigh scrambling mode with mean ΔSOP rate of 100rad/s, and start running.
:INP:SCR:RAYL:RATE 100;:INP:SCR:RAYL:STAT ON
2.
Set MPC to waveform mode, with sinusoidal waveform on channel 1, 20V amplitude, 30Hz
frequency, and start running.
:CHAN1:WAV:TYPE SIN;:CHAN1:WAV:AMPL 20 V;:CHAN1:WAV:FREQ 30;:CHAN1:WAV
:STAT ON
3.
Set MPC units to Volts, and then set channel 1 to 10V and channel 2 to 20V in manual mode.
:UNIT:DC V;:CHAN1 10V;:CHAN2 20V
4.
Query waveform type on Channel 3.
:INPut:CHANnel3:WAVeform:TYPE?
Table 2 SCPI Common Commands and Queries (GPIB specific)
These commands are common to all GPIB-enabled devices.
Command
*IDN?
Parameters
n/a
*RST
n/a
Response
<company >,
<model>, <serial>,
<firmware ver>
n/a
*TST?
n/a
0 or 1
*ESE
<data>
(Range: 0-255)
n/a
Description
The Identification query outputs an identifying
string.
Resets most functions to factory-defined
conditions. Each command shows *RST value
if the setting is affected.
This command queries the internal self-test
when system initiates and returns a result. (0)
All tests passed. (1) One or more tests failed.
Selects the desired bits from the standard
Event Status Enable register. The variable
<data> represents the sum of the bits that will
be enabled.
This register monitors I/O errors and
synchronization conditions such as operation
complete, request control, query error, device
dependent error, status execution error,
command error and power on. The selected
bits are OR’d to become a summary bit (bit 5)
in the byte register which can be queried. The
setting by this command is not affected by the
*RST.
GP-UM-MPC-202-104
Page 49 of 75
MPC-202 User Guide
*ESE?
n/a
0 or 1
*ESR?
n/a
<value>
(Range: 0 - 255)
*OPC
n/a
n/a
*OPC?
n/a
0 or 1
*SRE
<data>
(Range: 0-255)
n/a
*SRE?
n/a
*STB?
n/a
*PSC
0 or 1
<value>
(Range: 0–63 or
128–191)
<value>
(Range: 0–255)
n/a
*PSC?
n/a
0 or 1
*CLS
n/a
n/a
The Standard Event Status Enable query
returns the value of the *ESE Register.
The Standard Event Status Register query
returns the value of the Standard Event Status
Register.
The Operation Complete command sets bit 0 in
the Standard Event Status Register when all
pending operations have finished.
The Operation Complete query returns the
ASCII character 1 in the Standard Event
Status Register when all pending operations
have finished.
This query stops any new commands from
being processed until the current processing is
complete. This command blocks the controller
until all operations are complete (i.e. the
timeout setting should be longer than the
longest sweep).
Sets the value of the Service Request Enable
Register. The variable <data> is the decimal
sum of the bits that will be enabled. Bit 6
(value 64) is ignored and cannot be set by this
command.
The Service Request Enable query returns the
value of the Service Request Enable Register.
The Read Status Byte query returns the value
of the status byte without erasing its contents.
The Power-On Status Clear command controls
the automatic power-on clearing of the Service
Request Enable Register, the Standard Event
Status Enable Register, and device-specific
event enable registers. (1) Enable. (0) Disable.
The Power-On Status Clear query returns the
flag setting as enabled by the *PSC command.
Clear Status. Clears the status byte by
emptying the error queue and clearing all the
event registers including the Data
Questionable Event Register, the Standard
Event Status Register, the Standard Operation
Status Register and any other registers that
are summarized in the status byte.
Table 3 SCPI Error and Status Codes
Error code
-100
-102
-109
-110
-113
-120
-144
Command Errors
Description
“Command error”: this is the generic syntax error code used if the device cannot
detect more specific errors.
“Syntax error”: command improperly formatted.
“Missing parameter”: values or parameters needed in command are missing.
“Command header error”: command does not contain the expected header.
“No header matched”: cannot find matched header
“Numeric data error”: value or parameter needed in command is out of range or is not
a numeric character.
“Characteristic data too long”: a command or value/parameter in a command is more
than 20 characters.
GP-UM-MPC-202-104
Page 50 of 75
MPC-202 User Guide
Error code
-300
-313
-315
-350
-360
-363
Code
-500
-600
-700
-800
Device Specific Errors
Description
“Device specific error”: this is the generic error code used if the device cannot detect
more specific errors in device-dependent commands.
“Calibration data lost”: indicates error in loading calibration data.
“Configuration data lost”” indicates error in loading configuration data.
“Queue overflow”: an error occurred but was not recorded because the error queue
was full.
“Communication error”: this is the generic communication error code used if the
device cannot detect more specific errors.
“Input buffer overflow”: The command/query is too long.
Operation/Device Control Status Codes
Description
Device power on: Device sends this code when it powers on or restarts.
“User request event”: Device sends this code when it receives a control command via
any interface other than GPIB or local front panel keys.
“Request control event”: Device sends this code when it receives a control command
via GPIB.
Operation completed
GP Format Commands
As a backward compatibility feature for MPC-101 users who may be replacing an older
MPC-101 with an MPC-202, and may have existing control programs for the MPC-101, the MPC202 will respond to commands in the MPC-101 command format, with a few minor differences.
The GP legacy format command list includes only commands relating to functions available
in the MPC-101: manual polarization control, polarization modulation (known as waveform mode
in the MPC-101), discrete random scrambling, triangle scrambling, and externally triggered
random state generation. It cannot be used to control functions unique to the MPC-202, such as
Rayleigh or Tornado scrambling.
Manual Control:
Set control voltages to individual channels of the polarization controller.
Units: Volts. No options for phase control in radians or multiples of π.
Range: 0 to 150V.
Polarization Modulation (Waveform):
Amplitude
Units: Volts. No option for phase control in radians or multiples of π.
Range: 0 to 45V.
GP-UM-MPC-202-104
Page 51 of 75
MPC-202 User Guide
Notes:
1.
For the MPC-101, the waveform amplitude setting corresponds to Vpp (peak to peak voltage
variation for the waveform). For the MPC-202, the waveform amplitude setting corresponds
to Vpp/2. Therefore, any MPC-101 programs involving the waveform function need to have
the amplitude settings modified before use with the MPC-202.
2.
The MPC-101 has no offset control. Any waveform functions set up using the GP legacy
command format will have offset = A (the default setting). In other words, the voltage swing
will be 0 to 2A, where A is the amplitude setting.
Frequency:
Units: Hz
Range: 0 to 1000 Hz.
Other than the range, there are no changes from the MPC-101 frequency setup.
Waveform type:
Options: Sine, Triangle, Square
No changes from MPC-101 waveform type setup.
Phase:
Units: Degree
Range: 0 to 360
Defines the starting phase position of the waveform.
Polarization Scrambling:
There are separate command sets for discrete random scrambling and for continuous
triangle scrambling. Each command set includes scrambling rate setup, an enable/resume
command, and a disable/pause command. Note that the enable and disable commands are
scrambling-type-specific, i.e. if the MPC-202 was paused in random scrambling, and the triangle
mode enable command is sent, it will begin triangle scrambling.
Newer scrambling types such as Rayleigh and Tornado cannot be set up from the GP
legacy command list.
Externally Triggered Random State Generation:
The *EXT# command puts the MPC-202 into externally triggered random state generation
mode. The MPC-202 will generate one random SOP per trigger pulse received. Rising/falling edge
selection can be done using the front panel controls. There is no edge selection command
available in this list.
GP-UM-MPC-202-104
Page 52 of 75
MPC-202 User Guide
Table 4 GP Format Commands
System Information
Description
Response
Query product number.
*GeneralPhotonics,MPC-202,V1.0.020130425#
*VER?
Query Firmware Version.
*VER 1.0-20130425#
Version dependent
*ADR?
Query GPIB address.
*ADR 10# if address is 10
*ADR NN#
Set the GPIB Address
*E00#
Range: 0 to 30
Example: *ADR 10#
*MOD?
Query current operation mode
Possible responses:
*PAN#: Manual Control Mode
*WAV# Modulation Mode
*SCR#: Scrambling Mode
*TGR#: Trigger Mode
*ADR#: GPIB Setup Mode
Manual Control
The first valid Voltage Command received will set the MPC-202 to Manual Control Mode.
Command
Description
Response/Example
*CV1 FFF#
Set Channel 1 Voltage
Example: *CV1 42.4#
Range: 0.0 to 150.0 V
*CV2 FFF#
Set Channel 2 Voltage
Example: *CV2 140.3#
Range: 0.0 to 150.0 V
*CV3 FFF#
Set Channel 3 Voltage
Example: *CV3 8.5#
Range: 0.0 to 150.0 V
*CV4 FFF#
Set Channel 4 Voltage
Example: *CV4 100.0#
Range: 0.0 to 150.0 V
*CHV?
Query control voltages of all channels.
Response: *V1,V2,V3,V4#
Units: Volts
Example: *23.0,18.5,21.3,0.0#
Modulation (individual channel waveforms) Mode
The Amplitude, Frequency and Waveform Type of each channel can be independently set.
The first valid Waveform Command received will set the MPC-202 to Modulation Mode.
Amplitude
Command
Description
Response/Example
*WA1 FFF#
Set channel 1 waveform amplitude.
Example: *WA1 21.5#
Range: 0.0 to 45.0 V
*WA2 FFF#
Set channel 2 waveform amplitude.
Example: *WA2 30.0#
Range: 0.0 to 45.0 V
*WA3 FFF#
Set channel 3 waveform amplitude.
Example: *WA3 3.5#
Range: 0.0 to 45.0 V
*WA4 FFF#
Set channel 4 waveform amplitude.
Example: *WA4 10.5#
Range: 0.0 to 45.0 V
Frequency
*WF1 FFF#
Set channel 1 frequency
Example: *WF1 85.5#
Range: 0.0 to 1000.0 Hz
*WF2 FFF#
Set channel 2 frequency
Example: *WF2 85.5#
Range: 0.0 to 1000.0 Hz
*WF3 FFF#
Set channel 3 frequency
Example: *WF3 120#
Range: 0.0 to 1000.0 Hz
*WF4 FFF#
Set channel 4 frequency
Example: *WF4 75.5#
Range: 0.0 to 1000.0 Hz
Waveform Type
*WT1 SIN#
Set channel 1 Waveform Type.
*WT1 TRI#
SIN = sine wave
*WT1 SQU#
TRI = triangle wave
SQU = square wave
*WT2 SIN#
Set channel 2 Waveform Type.
*WT2 TRI#
SIN = sine wave
*WT2 SQU#
TRI = triangle wave
SQU = square wave
*WT3 SIN#
Set channel 3 Waveform Type.
*WT3 TRI#
SIN = sine wave
*WT3 SQU#
TRI = triangle wave
SQU = square wave
Command
*IDN?
GP-UM-MPC-202-104
Page 53 of 75
MPC-202 User Guide
*WT4 SIN#
*WT4 TRI#
*WT4 SQU#
Set channel 4 Waveform Type.
SIN = sine wave
TRI = triangle wave
SQU = square wave
Waveform
Query
*WC1?
Query waveform settings Channel 1
*WC2?
Query waveform settings Channel 2
*WC3?
Query waveform settings Channel 3
*WC4?
Query waveform settings Channel 4
Return:
*amplitude,frequency,wavetype#
Example: *23.5,12.5,TRI#
Return:
*amplitude,frequency,wavetype#
Example: *3.5,12.5,TRI#
Return:
*amplitude,frequency,wavetype#
Example: *23.5,6.5,SIN#
Return:
*amplitude,frequency,wavetype#
Example: *29.5,18.4,SQU#
Scrambling Mode
The first valid Scramble Command received will set the MPC-202 to Scramble Mode
*RAN FFFF#
Set random scrambling rate to FFFF.
Example: *RAN 123.56#
Range: 0.01 to 20000.00 points/s
*RAN ENA#
Enable random scrambling at current
scrambling rate setting.
Resumes a paused operation.
*RAN DIS#
Disable random scrambling.
Pauses random scrambling operation.
*TRI FFFF#
*TRI ENA#
*TRI DIS#
*SCR?
*EXT#
Set triangle scrambling rate to FFFF.
Range: 0.01 to 2000.00 ×2π rad/s
Enable triangle scrambling at current
scrambling rate setting.
Resumes paused operation.
Disable triangle scrambling.
Pauses triangle scrambling operation.
Example: *TRI 123.56#
Query the Scramble Mode Setting
Return: *frequency,mode#
Example: *10.0,TRI#
External Trigger Mode
Set MPC-202 to external trigger mode.
MPC-202 will generate a random SOP on
receiving a TTL trigger pulse.
Table 5 Command Response Codes
E00
E01
E02
E03
E04
E05
E06
E07
E08
E09
E10
E11
E12
No error (Correct command received)
Undefined Command
Missing parameter
Invalid syntax found in command string
String of characters too long (>buffer limit)
Parameter has too many digits after the decimal point
Parameter outside the allowed range
Failed Self Test
Power too high
Power too low
Incorrect operating wavelength
(Outside the operating wavelength range)
Error loading stored values
Unable to store state
GP-UM-MPC-202-104
Page 54 of 75
MPC-202 User Guide
Scrambling Control Sequence:
To pause and resume a triangle scrambling function, a user would send the following sequence of
commands:
1.
*TRI 10.0#
Set scrambling rate to 10.0 × 2π rad/s.
2.
*TRI ENA#
Begin scrambling.
3.
*TRI DIS#
Pause scrambling.
4.
*TRI ENA#
Resume scrambling.
Commands 3 and 4 can be repeated as many times as necessary.
Note that the rate setting command only sets the scrambling rate. If scrambling is already
enabled, the rate of the ongoing operation can be changed without re-sending the “enable”
command. However, if scrambling is not yet enabled, the “enable” command is necessary to begin
scrambling.
GP-UM-MPC-202-104
Page 55 of 75
MPC-202 User Guide
GP-UM-MPC-202-104
Page 56 of 75
MPC-202 User Guide
Appendix 2.0 RS-232 connection and setup
1.
The RS-232 connector on the rear panel of the MPC-202 is a DB9 male connector. Use a
straight (not cross connected) RS-232 cable with DB9 female connectors to connect the
MPC-202 to the control computer.
GND
RXD
TXD
5 4 3 2 1
9 8 7 6
Figure 27 RS-232 connector pin assignment on MPC-202 rear panel.
2.
Power on the instrument.
3.
Set the RS-232 baud rate. From the main menu, select “System Setup” (option 5), and
then “RS-232 Setup” (option 5i).
4.
Select the command type (System Setup → Comm Type) and, for SCPI, command EOS.
5.
Send a command string to the instrument (See Appendix 1 for commands. Any program
that supports RS-232 communication protocols can be used to send ASCII commands to
the instrument. Many programming languages support serial communications, including
Visual Basic, LabView and C.
RS-232 settings:
RS-232 port uses asynchronous framing, 8 data bits, no parity bit, and 1 stop bit.
RS-232 baud rate: configurable. Default is 9600 bps.
GP-UM-MPC-202-104
Page 57 of 75
MPC-202 User Guide
GP-UM-MPC-202-104
Page 58 of 75
MPC-202 User Guide
Appendix 3.0 USB connection and setup
USB drivers are included in the “USB Driver” folder on the cd. They need to be installed
before USB communication can be established. The first time the USB is used, insert the cd into
the control computer.
Connect the MPC-202 to the control computer using a standard USB cable.
Power on the MPC-202.
USB Driver Installation
The first time the computer detects a USB connection to the instrument, the driver may
install automatically (Windows 7) or a “Found New Hardware Wizard” window may appear
(Windows XP). If neither of these things occur, the driver can be located and installed using
Device Manager.
1.
Open Device Manager. Look for “FT245R USB FIFO” under “Other Devices”. Right-click it
and select “Update Driver Software”.
GP-UM-MPC-202-104
Page 59 of 75
MPC-202 User Guide
↓
↓
2.
Select “Browse my computer for driver software”:
D:\USB Driver GP-UM-MPC-202-104
Page 60 of 75
MPC-202 User Guide
3.
Make sure that the software cd is inserted. Click “Browse”, navigate to the cd drive, and
select the “USB Driver” folder. Make sure the “include subfolders” box is checked. Click
“Next”.
4.
The computer will ask whether to install the software. Click “Install”.
5.
When the installation is finished, a “software successfully updated” message will appear.
This completes the first part of the installation, during which the USB to serial converter is
installed. The second part consists of the installation of the serial port driver.
GP-UM-MPC-202-104
Page 61 of 75
MPC-202 User Guide
6.
In Device Manager, “USB Serial Port” should now appear under “Other Devices. Right-click
it and select “Update Driver Software”. Follow the same procedure as described above to
specify the driver location and install the driver until the completion window for the USB
serial port appears:
GP-UM-MPC-202-104
Page 62 of 75
MPC-202 User Guide
7.
In “Device Manager”, there should now be a USB Serial Port listed under “Ports (COM &
LPT)”:
GP-UM-MPC-202-104
Page 63 of 75
MPC-202 User Guide
Note the port number that the MPC-202 is using (COM3, in this example).
The USB driver can drive more than one instrument, but the instruments will be connected
under different port numbers.
GP-UM-MPC-202-104
Page 64 of 75
MPC-202 User Guide
Appendix 4.0 Ethernet setup
There are two connection configurations for Ethernet control:
a) Static IP: the administrator assigns the instrument a fixed IP address. In this
mode the instrument can be directly connected to the control PC, as shown in
Figure 28. For this configuration, a cross-linked network cable must be used.
b) Dynamic IP: the DHCP server assigns the instrument an available address when
requested. Connect the instrument with a DHCP server (running on router or
exchange server), as shown in Figure 29. For this configuration, a standard
straight-linked network cable must be used.
DHCP server
PC
MPC-202
Switch
PC
Figure 28 Direct connection: MPC-202 to PC
MPC-202
Figure 29 Connection with DHCP server
Once the physical connections are established, the instrument’s Ethernet configuration can
be set up from the front panel.
MPC-202 Setup for Ethernet communication:
The “Dynamic IP” function in the setup menu sets the MPC-202 for dynamic IP addressing
and requests a dynamic IP address from the DHCP server. The “Static IP” function in the setup
menu sets the MPC-202 for static IP addressing and allows the user to set the static IP address,
net mask, gateway, and name server. See section 3.3 for a more detailed description.
GP-UM-MPC-202-104
Page 65 of 75
MPC-202 User Guide
The MPC-202 writes its most recently saved static IP settings and its active mode to
memory. If it is powered off while in static mode, when it is powered back on, it will be in static
mode, and the most recently saved set of IP configuration information can be used for
communication.
If the MPC-202 is powered off while in dynamic IP mode, when it is powered back on, it
will be in dynamic IP mode. However, it is still necessary to use the “Dynamic IP” function in the
setup menu to request a new dynamic IP address.
For static IP control, the net mask and gateway for the instrument should be the same as
those for the control computer. The first 3 groups of numbers in the IP address should be the
same as those for the control computer (192.168.2, for example). The last number can be any
available number, but cannot be the same as the IP address of the control computer. The range of
numbers is 1 to 254. In this example, n = 0, so the available IP addresses are 1 to 254. If the
computer’s IP address is 17, for example, the user can set the IP address for the MPC-202 to any
number in the range 1-254 except 17.
For static IP control, make sure that the control computer is also set to use a static
(defined) IP address (check the TCP/IP properties to find the computer’s Ethernet setup
information).
For dynamic IP control, make sure that the control computer is set to obtain its IP address
automatically. This information is also under TCP/IP properties.
•
To connect the instrument directly to a PC, use a PC to PC cable. To connect the
instrument to a LAN, use a standard network cable.
GP-UM-MPC-202-104
Page 66 of 75
MPC-202 User Guide
Appendix 5.0 GPIB setup and control
Setting the GPIB Address
To set the instrument’s GPIB address:
Main menu → System setup (option 5) → GPIB addr (option 5f)
GPIB
Address = 5
Rotate the wheel to change the GPIB address. The GPIB address changes in real time as
the value is changed, and the address is retained in memory after power-off.
Range:
0-30
Default:
5
GPIB control
Connect the instrument to the computer with a GPIB cable. After determining/setting the
MPC-202’s GPIB address, select the corresponding port number in the corresponding box of the
LabView control program (see Appendix 6) and run the control program.
In addition to using the provided control programs, individual commands can be sent
through the GPIB port. Enter the GPIB address in the communication program being used. The
instrument will then be ready to receive commands. The command lists, responses, and error
codes are given in Table 1 through Table 5 in Appendix 1.
To ensure proper communication, use a GPIB cable that is fully compatible with the IEEE
488.1 standard. All GPIB/IEEE 488 interface connections must be made before turning on the
instruments.
GP-UM-MPC-202-104
Page 67 of 75
MPC-202 User Guide
GP-UM-MPC-202-104
Page 68 of 75
MPC-202 User Guide
Appendix 6.0 LabView sample control program
The command lists in Appendix 1 can be used to write control programs for the MPC-202.
General Photonics provides a sample control program that can be used as a base for customization
by the user. The program is written in LabView, using the SCPI command format and EOS = CR +
LF. The source code (vi files) can be opened and edited using LabView 2012 SP1 or above.
For users who do not need to customize the control program or do not have LabView
installed on the control computer, General Photonics also provides an executable version of the
program for added convenience.
Driver Installation
If the control computer does not have LabView (2012 SP1 or above) installed, then the
LabView Run-Time Engine and VISA Run-Time Engine are required to run the executable version
of the control program. The installation files for both run-time engines are in the “LabView RunTime” folder on the software cd, and can also be downloaded from the National Instruments
website (ni.com).
Note: LabView Run-Time Engines are version specific and are not backward compatible, so
make sure that the correct versions are installed on the control computer. The versions required
for the MPC-202 control program are:
LabVIEW Run-Time Engine 2012 SP1 - (32-bit):
Operating system: Windows 8; Windows 7; Windows Vista; Windows XP (SP3) 32-bit; Windows
Server 2008 R2 64-bit; Windows Server 2003 R2 32-bit
NI-VISA Run-Time Engine 5.3:
Operating system: Real-Time OS; Windows 7 64-bit; Windows 7 32-bit; Windows Vista 64-bit;
Windows Vista 32-bit; Windows XP; Windows XP Embedded; Windows Server 2008 R2 64-bit;
Windows Server 2003 R2 32-bit
Setup
To control the MPC-202 using the control program:
1.
Connect the MPC-202 to the control computer via USB, GPIB, RS-232 or Ethernet.
2.
Power on the MPC-202.
3.
If necessary, follow instructions in Appendices 3, 4, and 5 for USB driver installation, Ethernet
setup, and GPIB setup, respectively.
4.
Set the MPC-202 communication protocol (“Comm Type” under the Setup menu) to SCPI, and
the “Comm EOS” to <CR +LF>.
5.
Run the control program.
6.
The program will first prompt the user to confirm the communication interface.
GP-UM-MPC-202-104
Page 69 of 75
MPC-202 User Guide
Click “OK” in the pop-up window.
Click either the “RS232/USB/GPIB” button or the “Ethernet” button at the top of the main window.
For RS-232, USB, or GPIB connections, the program should auto-sense the connection and
establish communication. The “RS232/USB/GPIB” button will be replaced by a pull-down menu
showing available communication ports. If this does not happen, click the “Search MPC-202”
button to scan for available connections.
For an Ethernet connection, enter the IP address of the MPC-202 in the IP address box and
click the “Make Connection” button. If the connection is successfully established, the button label
should change to “Connected”.
The full interface screen is shown below.
GP-UM-MPC-202-104
Page 70 of 75
MPC-202 User Guide
General control
The following controls are common to all interface screens.
Wavelength: Set the operation wavelength from the wavelength setup box at the top left of the
screen.
Front panel display enable/disable: Use the “Turn On/Off Display” button at the top right of the
screen to enable/disable display updates to the instrument’s front panel OLED screen.
Disabling the instrument display can speed up the program’s reaction time.
Function selection: The button panel at the left of the screen allows the user to select the desired
polarization control functions. These include polarization scrambling, modulation, and
manual control functions.
The “MPC-202 Info” button displays the version and serial number:
The exit button stops the program.
GP-UM-MPC-202-104
Page 71 of 75
MPC-202 User Guide
Polarization Scrambling
Clicking the “Pol. Scrambling” button in the function selection panel brings up the
polarization scrambling control screen.
Scrambling mode selection: Select the desired scrambling mode from the pull-down menu at the
bottom center of the screen:
Discrete: Discrete random state generation
Triangle: Polarization scrambling with continuous SOP trace
Rayleigh: Continuous-SOP trace with Rayleigh distribution of SOP change rate
Trigger: Externally triggered random-state generation
Tornado: Continuous scrambling with quasi-uniform rate of SOP variation and spiral SOP
trace.
Scrambling rate selection: Adjust the scrambling rate by turning the virtual dial, using the up and
down arrows next to the box below the dial, or typing the value into the box and pressing
ENTER on the keyboard. The scrambling rate range and units change automatically with
scrambling mode selection.
Start/Pause: The start/pause button next to the mode selection menu starts and pauses/resumes
the scrambling operation. When a paused scrambling operation is resumed, it begins from
the SOP at which it was paused.
Scrambling status indicator: The status indicator just above the scrambling rate dial turns green
when scrambling is enabled.
GP-UM-MPC-202-104
Page 72 of 75
MPC-202 User Guide
Tornado axis rotation: Enables/disables rotation of the tornado mode spin axis. See Figure 14 for
Tornado mode SOP traces with and without axis rotation.
Scrambling timer: The scrambling timer at the right of the screen counts up the time elapsed. The
count can be restarted by clicking the “Reset Timer” button.
Scrambling rate setting summary: The indicator block on the right of the screen lists the
scrambling rate settings for all scrambling modes.
11896 Scrambling
This function emulates the scrambling function of the Agilent 11896A polarization
controller. There are 8 scrambling rate settings.
Scrambling rate selection: Adjust the scrambling rate by turning the virtual dial, using the up and
down arrows next to the box below the dial, or typing the value into the box and then
pressing ENTER on the keyboard.
Set time: This scrambling function runs for a preset duration. Set the scrambling duration, in
minutes and seconds, by dragging the sliders, using the up and down arrows, or typing in
the boxes and then clicking outside the boxes.
Start/restart: Once the time is set, clicking “Start” starts the scrambling. While the scrambling is
in process, clicking “Restart” restarts the timer.
Run time: Counts up the duration of the scrambling. Scrambling stops once the set time has been
reached.
Continue/pause clock: Pauses and resumes scrambling. If the scrambling is paused, clicking this
button resumes the scrambling from the SOP at which it was paused. The timer resumes
counting up from the value at which it was paused.
GP-UM-MPC-202-104
Page 73 of 75
MPC-202 User Guide
Polarization Modulation
This function allows the user to apply periodic control signals to one or more of the
channels of the polarization controller.
Each channel has the following set of controls:
Amplitude: Set the amplitude for the waveform by using the arrow buttons or by typing in the box
and then pressing ENTER on the keyboard. Amplitude equals half the peak-to-peak
variation. Range is determined by the selected units.
Offset: Set the DC offset for the waveform by using the arrow buttons or by typing in the box and
then pressing ENTER on the keyboard. The default value is offset = amplitude. Range is
determined by the selected units.
Frequency: Set the frequency by using the arrow buttons or by typing in the box and then
pressing ENTER on the keyboard. Range is 0 to 1000 Hz.
Waveform: Select the waveform from the pull-down menu. Available waveforms are sine, square,
and triangle waves.
Ena/Dis: Enable/disable the waveform control signal to the corresponding channel.
Common controls:
Units: Select the units for the amplitude and offset from the pull-down menu. Options include
volts, radians, and multiples of π.
Pause all: Pause/resume waveform control to all channels. A paused operation resumes from the
SOP at which it was paused.
Waveform plot: This plot shows the waveforms for all channels for which the waveforms are
enabled.
GP-UM-MPC-202-104
Page 74 of 75
MPC-202 User Guide
Manual Control
This function allows the user to tune the polarization state by setting the control voltage of
each channel of the polarization controller.
Individual channel controls: Tune the control voltage of each channel by dragging the slider, using
the arrow buttons, or typing a value in the box and then pressing ENTER on the keyboard.
Range is determined by the selected units.
Units: Select units from the pull-down menu. Options include volts, radians, and multiples of π.
Set all to zero: This button sets all of the control voltages to zero.
Set all to maximum: This button sets all channels to maximum voltage.
Set all to maximum/2: This button sets the control voltages of all channels to mid-range
GP-UM-MPC-202-104
Page 75 of 75