1
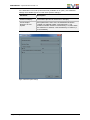
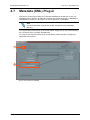
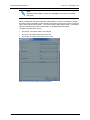
USER MANUAL OpenCube XFConverter 1.4 3.2 Input Plug-in Configuration 2 1 3 Figure 8: Configure conversion window - Source part The first step consists in defining the source plug-in(s) either through an automatic or manual configuration: Automatic Configuration: click on the folder icon located in (1). This will open a browser window where you can select one or several files. These files should be in MPEG (Elementary, Program and Transport Stream), DV, WAV, AIFF, JPEG 2000, MCC, SCC, AVI, GXF, MOV or MXF format. If the files are recognized by OpenCube XFConverter, the graph view will be initialized in (3) to reflect the content of the file(s) you selected. If the files are not recognized or you do not have a valid license to use the corresponding plug-in(s), an error message will be displayed. Manual Configuration: In the drop-down box (2), select the input plug-in corresponding to the format of your source file. If your conversion requires several source files, you should select “Wrap” in the drop-down box. Once you have selected the input format, you can access the plug-in’s settings by clicking on the wrench icon located in (2). Note that some of the plug-ins are not configurable; in that case the wrench icon will be disabled. Refer to the individual plug-in documentation in Section 4 for a more detailed description of these settings. The input plug-in view shows the current plug-in(s) configuration. In the case of wrapper formats embedding several streams, the input plug-in view (3) will display a brief description for each embedded video, audio, metadata or timecode stream. Each stream can be individually configured with the corresponding wrench icon. If you click on this button, it will open a new dialog box whose content will vary depending on the format. Refer to the Section 4 for a more detailed description of these settings Configuring OpenCube XFConverter 11