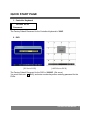
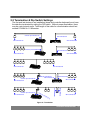
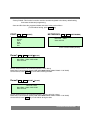
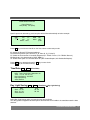
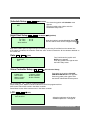
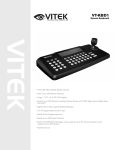
1
DISCLAIMER
x
While every effort has been made to ensure that the information contained in this
guide is accurate and complete, no liability can be accepted for any errors or
omissions.
x
NUVICO reserves the right to change the specifications of the hardware and
software described herein at any time without prior notice.
x
No part of this guide may be reproduced, transmitted, transcribed, stored in a
retrieval system, or translated into any language in any form, by any means, without
prior written permission of NUVICO.
x
NUVICO makes no warranties for damages resulting from corrupted or lost data due
to a mistaken operation or malfunction of the Camera, peripheral devices, or
unapproved/unsupported devices.
CONTROLLER KEYBOARD
1
WARNING AND CAUTION
WARNING!
TO REDUCE THE RISK OF FIRE OR ELECTRIC SHOCK, DO NOT EXPOSE THIS PRODUCT
TO RAIN OR MOISTURE. DO NOT INSERT ANY METALLIC OBJECTS THROUGH THE
VENTILATION GRILLS OR OPENINGS ON THE EQUIPMENT.
CAUTION!
The lightning flash with arrowhead symbol, within an equilateral triangle, is intended to
alert the user to the presence of uninsulated “dangerous voltage” within the product’s
enclosure that may be of sufficient magnitude to constitute a risk of electric shock to
persons.
The exclamation point within an equilateral triangle is intended to alert the user to the
presence of important operating and maintenance (servicing) instruction in the literature
accompanying the product.
CONTROLLER KEYBOARD
2
FCC COMPLIANCE STATEMENT
FCC INFORMATION: THIS EQUIPMENT HAS BEEN TESTED AND
FOUND TO COMPLY WITH THE LIMITS FOR A CLASS A DIGITAL
DEVICE, PURSUANT TO PART 15 OF THE FCC RULES. THESE LIMITS
ARE DESIGNED TO PROVIDE REASONABLE PROTECTION AGAINST
HARMFUL INTERFERENCE WHEN THE EQUIPMENT IS OPERATED IN
A COMMERCIAL ENVIRONMENT. THIS EQUIPMENT GENERATES,
USES, AND CAN RADIATE RADIO FREQUENCY ENERGY AND IF NOT
INSTALLED AND USED IN ACCORDANCE WITH THE INSTRUCTION
MANUAL, MAY CAUSE HARMFUL INTERFERENCE TO RADIO
COMMUNICATIONS.
OPERATION OF THIS EQUIPMENT IN A
RESIDENTIAL AREA IS LIKELY TO CAUSE HARMFUL INTERFERENCE
IN WHICH CASE THE USER WILL BE REQUIRED TO CORRECT THE
INTERFERENCE AT HIS OWN EXPENSE.
CAUTION: CHANGES OR MODIFICATIONS NOT EXPRESSLY
APPROVED BY THE PARTY RESPONSIBLE FOR COMPLIANCE COULD
VOID THE USER'S AUTHORITY TO OPERATE THE EQUIPMENT.
THIS CLASS A DIGITAL EQUIPMENT COMPLIES WITH CANADIAN
ICES-003.
CET APPAREIL NUMÉRIQUE DE LA CLASSE A EST CONFORME À LA
NORME NMB-003 DU CANADA.
CE COMPLIANCE STATEMENT
WARNING
THIS IS A CLASS A PRODUCT. IN A DOMESTIC ENVIRONMENT THIS
PRODUCT MAY CAUSE RADIO INTERFERENCE IN WHICH CASE THE
USER MAY BE REQUIRED TO TAKE ADEQUATE MEASURES.
CONTROLLER KEYBOARD
3
IMPORTANT SAFEGUARDS
1.
2.
3.
4.
5.
6.
Read these instructions.
Heed all warnings.
Follow all instructions.
Do not use this equipment near water.
Clean only with dry cloth.
Do not block any ventilation openings. Install in accordance with the manufacturer's
instructions.
7. Do not install near any heat sources such as radiators, heat registers, stoves, or
other equipment (including amplifiers) that produce heat.
8. Do not defeat the safety purpose of the polarized or grounding-type plug. A
polarized plug has two blades with one wider than the other. A grounding type plug
has two blades and a third grounding prong. The wide blade or the third prong is
provided for your safety. If the provided plug does not fit into your outlet, consult an
electrician for replacement of the obsolete outlet.
9. Protect the power cord from being walked on or pinched, particularly at plugs,
convenience receptacles, and the point where they exit from the equipment.
10. Only use attachments/accessories specified by the manufacturer.
11. Unplug this equipment during lightning storms or when unused for long periods of
time.
12. Refer all servicing to qualified service personnel. Servicing is required when the
equipment has been damaged in any way, such as power-supply cord or plug is
damaged, liquid has been spilled or objects have fallen into the equipment, the
equipment has been exposed to rain or moisture, does not operate normally, or has
been dropped.
13. CAUTION - THESE SERVICING INSTRUCTIONS ARE FOR USE BY QUALIFIED
SERVICE PERSONNEL ONLY. TO REDUCE THE RISK OF ELECTRIC SHOCK
DO NOT PERFORM ANY SERVICING OTHER THAN THAT CONTAINED IN THE
OPERATING INSTRUCTIONS UNLESS YOU ARE QUALIFIED TO DO SO.
14. Use Certified/Listed Class 2 power supply transformer only.
CONTROLLER KEYBOARD
4
TABLE OF CONTENTS
WARNING AND CAUTION............................................................................................. 2
FCC COMPLIANCE STATEMENT ................................................................................. 3
IMPORTANT SAFEGUARDS ......................................................................................... 4
QUICK START PAGE..................................................................................................... 6
1. INTRODUCTION ......................................................................................................... 7
2. INSTALLATION .......................................................................................................... 9
2.1 Connection Diagram ............................................................................................................................. 9
2.1.1 Basic Installation Diagram .....................................................................................................................................................9
2.1.2 Single DVR Configuration ....................................................................................................................................................11
2.1.3 Single Controller Keyboard with Two DVR Configuration ...............................................................................................12
2.1.4 Multiple Controller Keyboard Configuration......................................................................................................................13
2.2 Termination & Dip Switch Settings ................................................................................................... 14
3. OPERATION ............................................................................................................. 16
3.1 Basic Operation................................................................................................................................... 16
3.1.1 Master Controller Mode .......................................................................................................................................................16
3.2 Controller Keyboard Configuration................................................................................................... 18
4. ADVANCED OPERATION ..................................................................................................................... 24
4.1 Selection of the Camera (ID of the Camera) ..................................................................................... 24
4.2 Selection of the DVR (ID of the DVR) ................................................................................................ 24
4.3 Key Description of the Controller...................................................................................................... 24
4.4 Keys for DVR ....................................................................................................................................... 25
5. SPECIFICATION .................................................................................................................................... 27
CONTROLLER KEYBOARD
5
QUICK START PAGE
1. Controller Keyboard
CK-1000 Vx.xx
Password :
The Factory Default Password for the Controller Keyboard is “9999”.
2. DVR
[EV-Series DVR]
[APEX-Series DVR]
The Factory Default Password for the DVR is “000000”. (Six zeros)
You must hold onto
(Shift), and enter number keys when entering password for the
DVRs.
CONTROLLER KEYBOARD
6
1. INTRODUCTION
ABOUT THIS MANUAL
Thank you for purchasing NUVICO product.
The controller is designed to control up to 64 EasyTrakTM PTZ speed dome cameras. (It
is expandable up to 255 cameras when in simplex control mode). Rollover key functions
make it capable of controlling a variety of external switching devices such as EV / APEX
Series Digital Video Recorders.
* Before installing and using this controller keyboard, please read this manual fully
and carefully and be sure to keep it handy for later use.
Key Features
x The capability of controlling a camera’s panning and tilting movement with
variable speed from 0.1q/sec to 90q/sec (64 speed steps). It has capability to
manually override the zoom camera’s auto focus and auto iris functions. Speed is
inversely proportional to the zoom ratio. With
(Shift) key pressed, it enables
the wide zoom speed mode.
x The ability to define and recall up to 248 presets, which are immediate camera
call-ups of preset position view, with automatic zoom and focus.
x Program 4 patterns, which comprise a sequential series of pan, tilt, zoom, and
focus movements from a single camera.
x One define (continuous rotation) with 16 scans.
x 8 tours consisting of 64 presets, patterns, scans and alternate tours. It is
expandable to over 512 functions with nested tours.
x Manual override mode of auto focus or auto iris is switched to Auto Iris/Focus
mode by slight movement of the joystick handle.
x Programmable user preferences (alarm, preset, title, etc.).
x Two levels of password, administrator and user, are supported for higher security.
x One Master and multiple slave Keyboards are supported for distributed control.
x DVR system (Max 99) can be controlled remotely.
x Dome cameras’ programmed data can be downloaded to none volatile memory
space in the joystick controller for the purpose of transfer to a new dome
cameras.
CONTROLLER KEYBOARD
7
Content Verification
Before installing the controller Keyboard, please make sure that the following items are
included in the box:
1.
2.
3.
4.
5.
6.
7.
Controller Keyboard
12VDC SMPS Power Transformer
Power Cord
This Instruction Manual
Junction Box: J-Box (Optional)
3m Cable: Data cable (Optional)
M4 Self Tapping Screws (Optional)
If any of these materials are missing, please contact your distributor or NUVICO
Technical Support for assistance.
CONTROLLER KEYBOARD
8
2. INSTALLATION
2.1 Connection Diagram
2.1.1 Basic Installation Diagram
4 ALARM INPUT
1 AUX OUTPUT
EO
VID
R
S48
5+
/R
S48
5-
POWER
AC 24V
STP AWG#22
ER
W 4V
POC 2
A
ER
AT
HE 24V
AC
RS-485+
RS-485-
RS-485
HALF DUPLEX MODE
CONTROLLER
RXB
RXA
REAR
DOME
POWER
AC 24V
STP AWG#22
COM Port of the DVR
REAR
CONTROLLER KEYBOARD
9
Figure 1 – Basic installation diagram (w/o J-Box)
Figure 2 – Basic installation diagram with J-Box
CONTROLLER KEYBOARD
10
2.1.2 Single DVR Configuration
POWER
AC 24V
POWER
AC 24V
RS-485-
RS-485+
AWG # 24
BNC
5+
S48
R
BNC
EO
MAIN MONITOR
VID
/R
S48
5-
4 ALARM INPUT
1 AUX OUTPUT
SPOT MONITOR
ER
W 4V
POC 2
A
ER
AT
HE 24V
AC
BNC
RXB
RXA
RS-485+
RS-485-
RS-485
HALF DUPLEX MODE
CONTROLLER
DOME
Figure 3 – Single DVR
CONTROLLER KEYBOARD
11
2.1.3 Single Controller Keyboard with Two DVR Configuration
POWER
AC 24V
POWER
AC 24V
Camera 1~16
RS-485-
RS-485+
AWG # 24
Camera 17~12( 15)
MAIN MONITOR
O
VIDE
SPOT MONITOR
R
S48
5+
/R
S48
5-
4 ALARM INPUT
1 AUX OUTPUT
MAIN MONITOR
ER
W 4V
POC 2
ER
A
AT
HE 24V
AC
BNC
BNC
Figure 4 – Two DVR
CONTROLLER KEYBOARD
12
2.1.4 Multiple Controller Keyboard Configuration
POWER
AC 24V
POWER
AC 24V
Camera 17~12( 15)
BNC
4 ALARM INPUT
1 AUX OUTPUT
/R
85
+
S-4
R
1ST MAIN MONITOR
Master K/B Setup
SPOT MONITOR
2ND MAIN MONITOR
Figure 5 – Two DVR with Slave Controller
O
VIDE
S-4
85
-
Camera 1~16
RS-485-
RS-485+
AWG # 24
ER
W 4V
POC 2
A
ER
AT
HE 24V
AC
Slave K/B Setup
Shft + Menu ÎPort ÎSlave
Shft + Menu ÎNetworks
SLAVE SETUP MENU
Device
: Controller
Baud Rate : 9600bps
NETWORKS
Slave ID :1 --- ID setup
Baud Rate : 9600bps
CONTROLLER KEYBOARD
13
2.2 Termination & Dip Switch Settings
The first and last devices in an installation (dome and controller keyboard) must have
the data line terminated by setting the DIP switch. Without proper termination, there
may be control signal errors. Total length of the cable for communication should not
exceed 0.74 Mile or 1.2 Kilometer.
S1:Dome1 port Termination On
DVR Termination ON
SW1:Termination ON
SW1:Termination ON
S1:Dome1 port Termination On
DVR Termination ON
SW1:Termination ON
SW1:Termination ON
SW1:Termination ON
SW1:Termination ON
S1:DOme1 port Termination On
S4:DVR port Termination On
DVR Termination ON
DVR Termination ON
SW1:Termination ON
S3
:Do
me
2T
erm
ina
tio
n
Repeater
TERMINATION ON
S1:DOme1 port Termination On
SW1:Termination ON
TERMINATION ON
SW1:Termination ON
SW1:Termination ON
ON
Figure 6 – Termination
CONTROLLER KEYBOARD
14
Figure 7 – Rear View of the Keyboard
DC 12V
DATA1
D ATA2
+ - G + - G
ON
TRX1 TRX2
R S -4 8 5
O FF
S1 S2 S3 S4
1
2
3
4
S5 S6 S7 S8
1
S1
2
3
4
S2
S 5 :R E S E R V E D
S 6 :R E S E R V E D
S 7 :R E S E R V E D
S 8 :O F F -M A S T E R / O N -S L A V E
S 1 :D O M E 1 P O R T T E R M IN A T IO N
S 2 :D O M E 2 P O R T T E R M IN A T IO N
S 3 :S L A V E P O R T T E R M IN A T IO N
S 4 :D V R P O R T T E R M IN A T IO N
S1:Dome1 Port Termination ON
S4:DVR Port Termination ON
DVR Termination ON
Figure 8 – Termination and Switches
Last DVR
SW1:Termination ON
SW1:Termination ON
DVR2
DVR1
DATA1
IN
OUT
S5:Slave port termination ON
DATA1
S8:Slave mode ON
S8:Slave mode ON
S8:Slave mode ON
Figure 9 – Termination of Slave controller
CONTROLLER KEYBOARD
15
3. OPERATION
3.1 Basic Operation
Principal of operation in the programming (editing) mode.
Button or Joystick movement in menu
Joystick left or right
Joystick up or down
Zoom handle twist
SHFT + Joystick
ESC
Function
Go into the sub-menu items.
Execute the command(exit)
Change value.
Navigate through the menu items.
Navigate through the menu items.
Change value.(Increase / Decrease)
Enter editing title mode.
Turbo speed.
Escape from the menu without change.
Home or Off button
Delete value or name of the field.
3.1.1 Master Controller Mode
As the DIP S/W position 8 OFF, the joystick controller works as master controller. Position 8 ON,
controller will work as slave controller.
When the joystick controller is powered on, a password will be required to access the controller keyboard.
CK-1000 Vx.xx
Password :
Master Controller mode
CK-1000 Vx.xx
Password :
S8 ON : Slave Controller mode
Unless you have changed the passwords, the factory default for the administrator’s password is 9999+Enter and
1111+Enter for the user-level password.
Press
9
9,
9,
9,
and then
consecutively. (9999+Enter)
If you have forgotten your password and are no longer able to access the administrative
controls to your unit, please contact your distributor or NUVICO Technical Support for
assistance.
CONTROLLER KEYBOARD
16
The controller keyboard will be displayed the following screen and is ready to control dome cameras.
Press
CAMERA
key will get you back to system mode (camera control) from DVR control
LCD display in System mode
Cam : 001N
PM 09 : 34 : 04
When you need to control the DVR, press
DVR
Camera ID & Time
key. The LCD screen will be shown following DVR mode.
LCD display in DVR mode
DVR : 001
Cam : 001N
PM 09 : 34 : 04
Press
CAMERA
key to go back to the system mode from the DVR control mode.
CONTROLLER KEYBOARD
17
3.2 Controller Keyboard Configuration
If the user needs to setup the network, change passwords, or perform special tasks such as Uploading
and Downloading programmed data from the dome cameras, hold down
key, and then press
key
(Shift + Menu.) You will see the following menu. Joystick Up/Down scrolls menu items, turn the joystick
to Right to enter the sub-menu.
MAIN MENU (
= Shft + Menu )
+
MASTER MENU
SLAVE MENU
Configuration
Port
Camera
DVR
Time/Date
Alarm
Alias Preset
Schedule
Data
Slave Control SetUp
LCD
Exit
Configuration
Networks
Time/Date
LCD
Exit
Slave Controller Mode (S8 ON)
Master Controller mode
CONFIGURATION (Shft + Menu ÎCONFIGURATION)
Key Beep : ON / OFF
Key Lock : NO / 1Min ~30Min
Chg User Password
Chg Admin Password
Factory Default
Save and Exit
Key Beep
: ON / OFF
Alarm Beep : ON / OFF
Key Lock : NO / 1Min ~30Min
Chg User Password
Chg Admin Password
Factory Default
Save and Exit
Slave Controller Mode (S8 ON)
- Key Beep: ON - Enable key beep sound
OFF - Disable beep sound.
- Key Lock: 1Min ~ 30Min - After elapsed setup time, keyboard locks automatically.
NO - Disable Auto Key-Lock function.
User needs the login password to operate the Keyboard again.
- User Password: Simple operation (changing setup and programming disabled)
Password: Enter current user’s password.
New Password: Enter 1~6 digits new password.
Confirm Password: Confirm 1~6 digits new password.
- Admin Password: Fully accessible menu (changing setup and programming enabled)
Password: Enter current admin password.
New Password: Enter 1~6 digits for new password.
Confirm Password: Confirm 1~6 digits for new password.
Note: Factory default Administrator’s password is 9999+Enter and user password is 1111+Enter.
CONTROLLER KEYBOARD
18
- Factory Default: This function is used to reset the controller keyboard to the factory default setting,
It will erase all data and programming.
- Save and Exit: Save the programmed data and return to the previous Menu
(To exit without saving, press
PORT (Shft + Menu ÎPORT)
ESC
key)
NETWORKS (Shft + Menu ÎNETWORKS)
Slave ID : 1
Baud rate : 9600
Save and Exit
Dome1
Dome2
Slave
DVR
Alarm
Exit
Master Controller mode
Slave Controller Mode (S8 ON)
Dome1 (Shft + Menu ÎPORTÎDome1)
Device
: Camera / DVR / None
Baud Rate : 9600 / 2400~230K
Save and Exit
Device: Select Device to be controlled (Camera / DVR / None)
Baud Rate: Communication speed (2400/ 4800/ 9600/19200/ 38400/ 57600/ 11.5K /230K)
Save and Exit, Press ESC key to exit without saving the data.
Dome2 (Shft + Menu ÎPORTÎDome2)
Device
: Camera / AUX IN
/ AUX I/O / None
Baud Rate : 9600 / 2400~230K
Save and Exit
Device: Select Device to be controlled (Camera / AUX IN / AUX I/O / None)
Baud Rate: Communication speed (2400/ 4800/ 9600/19200/ 38400/ 57600/ 11.5K /230K)
Save and Exit, Press ESC key to exit without saving the data.
CONTROLLER KEYBOARD
19
Slave (Shft + Menu ÎPORTÎSlave)
Device
: Controller / None
Baud Rate : 9600 / 2400~230K
Save and Exit
Device: Select Device to be controlled (Controller / None)
Baud Rate: Communication speed (2400/ 4800/ 9600/19200/ 38400/ 57600/ 11.5K /230K)
Save and Exit, Press ESC key to exit without saving the data.
DVR SETUP MENU (Shft + Menu ÎPORTÎDVR)
Device
: DVR / Alarm / AUX IN
/ AUX I/O / None
Baud Rate : 9600 / 2400~230K
Save and Exit
Device: Select Device to be controlled (DVR / Alarm / AUX IN / AUX I/O / None)
Baud Rate: Communication speed (2400/ 4800/ 9600/19200/ 38400/ 57600/ 11.5K /230K)
Save and Exit, Press ESC key to exit without saving the data.
ALARM SETUP MENU (Shft + Menu ÎPORTÎALARM)
Device
: DVR / Alarm / AUX IN
/ AUX I/O /None
Baud Rate : 9600 / 2400~230K
Save and Exit
Device: Select Device to be controlled (DVR / Alarm / AUX IN / AUX IO / None)
Baud Rate: Communication speed (2400/ 4800/ 9600/19200/ 38400/ 57600/ 11.5K /230K)
Save and Exit, Press ESC key to exit without saving the data.
CAMERA SETUP MENU (Shft + Menu ÎCamera)
Dome Scan
Camera Configuration
Exit
Dome Scan option detects the specific protocols of all dome cameras on the Dome1, Dome2 ports.
CONTROLLER KEYBOARD
20
DOME RESCAN MODE
Dome Rescan ?
YES (Enter) / No (ESC)
Specific protocols detected by previous option will be filled automatically as below example
ID
0001
----
PR
PT
NC
P1
NC
P1
SHIFT : save
BR
9600
9600
AL
ON
OFF
p:001
Press No. key or twist zoom handle on the first column to enter setup mode.
ID: Assign the Dome (PTZ Camera) address.
PR: Select the protocol. (NC: NUVICO, P_D: Pelco D, P_P: Pelco P)
PT: Select the Port number of Controller Keyboard (P1: TRX#1 / Dome 1, P2: TRX#2 / Dome 2)
BR: Baud rate. (It is determined by PORT MENU.)
AL: Select alarm option for communication fail. (ON: Enable/Simplex, NO: Disable/Half-duplex).
Press OFF key to delete the dome ID. Shft key to save & exit.
Press ESC key to exit without saving.
Time/Date (Shft + Menu ÎTime/Date)
Display
: ON / OFF
Date : Asia / US/ EURO 2005/JAN /18
Time : 12 / 24 08: 59 : 04
Day Light Saving : ON/ OFF
Day Light Saving
Save and Exit
Day Light Saving (Shft + Menu ÎTime/Date ÎDay Light Saving)
Date
Start : 01 / 01
Stop : 01 / 01
Save and Exit
Time
00 : 00
00 : 00
Select Day Light Saving option, program the start and end Date.
Turn the joystick to Right/Left to select options and twist the zoom handle to increase/decrease the date
and time.
CONTROLLER KEYBOARD
21
Alarm Menu (Shft + Menu ÎAlarm)
Alarm Beep
: ON / OFF
Alarm Dwell
: OFF / 3sec~200sec
Alarm Action
Alarm History
Save and Exit
Alarm Beep: Enable or disable the beep sound when there is alarm activated.
Alarm Dwell: Instant alarm will be extended until programmed time.
Alarm Action (Shft + Menu ÎAlarmÎ Alarm Action)
DOME
Alarm
OUT
Ali
0001
1 2 3 4 5 6 7 8 001
999
---ON : ins
page: 001
DOME: ID of the dome to be programmed.
Ex) 0001
Alarm: 8 Alarm input of dome.
OUT: 001 Alarm output number.
Alias: 999 alias presets. See Alias Preset menu.
If there is an alarm from the programmed dome, signal can be sent out to one of 999 external dry contact
outputs.
Also, in conjunction with the alarm, multiple dome presets will be called if programmed.
500 alarm schedules can be stored in this joystick controller.
Turn Up/Down the joystick will scroll previous/next page on the first/last row.
Twisting the zoom handle on the camera ID field to enter program mode and select ID. Rotating the
handle, the programmed IDs (programmed in camera setup menu) will be scrolled.
Turn the joystick to the right to setup alarm field. Activate or deactivate specific alarm inputs by rotating
the zoom handle. And then program the rest of the part (Alarm input, Output and Alias)
Alarm History (Shft + Menu ÎAlarmÎ Alarm History)
CAM
Alarm
0001
com.
-----------OFF : Clear
Date
Time
06SEP10
1306
--------------page : 0001
This screen shows up to 500 of the most recent alarms activations.
Alias Preset Menu
No.
0001 :
0001
------ALRM : exe.
(Shft + Menu Î Alias Preset)
Dome ID
0003
0004
------Page : 001
This screen allows you to set the Controller’s
internal alias preset, each alias preset can have
3 dome camera’s position.
This Programmed data is saved at the Controller’s
memory.
Alias preset can be saved up to 999.
CONTROLLER KEYBOARD
22
Schedule Setup (Shft + Menu ,
Î Schedule)
Turn down the joystick until Schedule menu
appears
Turn the joystick to the right to enter the
SCHEDULE setup menu.
Night Shot
Exit
Night Shot Setup (Shft + Menu Î Schedule Î Night Shot)
Night Shot : OFF / ON
On Time
: 00 00
Off Time
: 00 00
Save and Exit
Night shot option is enabled/disabled (ON) by
On time and Off Time can be configured using
.
.
Night Shot Enable Option changes low light sensitivity by removing IR cut filter from the camera lens.
If the option is enabled, the controller sends the same control command to all the cameras attached on
the control line.
Data (Shft + Menu
Î Data)
ID
Data Bank : - - Exit
Saved Date
-- -- --
Slave Controller Setup (Shft + Menu
No. of Controller
D Hold Time
DVR Control
DMenu Control
Save and Exit
: 00/01~08
: 1~200sec ,Infinity
: Enable / Disable
: Enable / Disable
Turn Push down the joystick until
DATA menu appears
Push the joystick to the right to enter
the DATA setup menu.
Î Slave Control Setup)
Push down the joystick until SLAVE
CONTROLLER SETUP menu appears
Push the joystick to the right to enter
the SLAVE CONTROLLER setup menu.
No. of Controller: 1~8 – Total No. of slave controllers
Dome Holding Time: Master controller holds dome control as programmed time
DVR Control: Allow DVR control in the Slave controller.
Dome Menu Access: Allow camera menu in the Slave controller.
LCD (Shft + Menu
Î LCD)
Bright : 10 / 01~22
Save and Exit
Adjust the brightness of the picture.
Available options are 1 through 22.
CONTROLLER KEYBOARD
23
4. ADVANCED OPERATION
4.1 Selection of the Camera (ID of the Camera)
There are three ways for dome camera selection 1 , ,
and
(Next) or (Prev)
selections, the keyboard controller has the full control of the selected dome camera.
. With these
4.2 Selection of the DVR (ID of the DVR)
A DVR must be selected before being controlled by the joystick controller.
Press Numeric button, then press DVR button to change DVR ID to be controlled.
<Ex 1> Select DVR ID #3
DVR
Press numeric 3 then
displayed on the LCD window.
<Ex 2> Select DVR ID # 73
Press 7 and 3 then
DVR
button on the controller, DVR-003 will be
button, DVR-073 will be displayed on the LCD window.
4.3 Key Description of the Controller
Function
Numeric
Key Buttons
0
, 1
CAM SEL
ESC
Alarm
ON
OFF
Home
Preset
Tour
Pattern
Auto Scan
~ 9
Description
Camera ID selection with CAM SEL key.
Function number selection with function keys.
(e.g., 1+CAM SEL, 3+Tour, 5+Scan, 6+Prst)
Select camera ID (address).
ESC
Exits from currently running functions or menu, error status, etc.
Disregards all currently activated alarms and turns off the beep temporarily. If
alarm is activated again within the programmed hold time, the timer will restart
and beep again.
Relay No. 1~4+ ON will activate the selected relay.
Relay No. 1~4+ OFF will disable the selected relay.
Immediately calls Home function.
Deletes selected value or function in programming mode
Pressing Preset will bring up the preset programming menu.
Recalls preset; e.g.; 1, 2… 31… 240 +
(Preset)
In the preset or tour programming mode, the operator can review the existing
preset (selected by cursor) by pressing this key.
Pressing Tour will bring up the tour programming menu directly.
Recalls programmed presets or functions sequentially. Ex) 1 ~ 8+
(Tour)
Pressing Pattern will bring up the pattern programming menu directly.
Repeats the selected pattern of the current dome camera. Ex) 1 ~ 4+
(Pattern)
Pressing Scan will bring up the Auto Scan programming menu.
Calls Auto panning function. ex) 2+
(Scan) -- repeats Auto Scan 2.
CONTROLLER KEYBOARD
24
Enter the dome programming menu.
Menu
+
Shift+Menu will invoke Keyboard set up menu
No.+Shft+Preset will store current view as a preset directly.
No.+Shft+Tour will open programming menu
No.+Shft+Scan will open programming menu
Shift+Joystick : In a programming mode (Preset, Pattern, Scan, Privacy….) the
joystick operates as if in the normal control mode.
While pressing and holding down the Shft key, all movements of the joystick will
start recording when in the pattern programming menu.
Shift+Joystick:, In normal operation mode, manual speed of the joystick control
will be operated in wide zoom mode.
Completes entering data for the password or title
ENTER+Joystick : Direction key in DVR remote mode or Mux ( PTZ, Mouse,
Cursor)
Shift
Enter
Manual Focus
Overrides auto focus. Return to Auto Focus mode by moving the joystick.
Manual Iris
Turbo Speed
Overrides auto iris. Moving the joystick reactivates Auto Iris mode.
Once the turbo key is pressed, manual control speed will go up-to 360º/sec.
To go back to normal speed, press the key one more. It is a toggle key.
T
Pan, Tilt, Zoom controls in normal control mode.
Navigate the menu items and increase/decrease the value in program mode.
Joystick
4.4 Keys for DVR
Function
Key Buttons
DVR
DVR
Play/Reverse Play
Rewind /
Step Rewind
Fast Forward
Stop/Pause
Record
Menu
Display Mode
MON
Description
DVR ID Selection. (e.g.:1 or 2+DVR).
Play recorded data / Reverse playing.
Play video backwards at high speed. Pressing the button again
toggles the playback speed from ,
and
.
Shift+Rewind: Step Rewind
Play video forward at high speed. Pressing the button again toggles
the playback speed from
,
and
Shift+Forward: Step Forward
Stop recording or playback.
Shift+Stop: Pause playback.
Start recording, Shift+REC: Start schedule recording
DVR Menu
Toggle between different display formats.
This button is used to select different monitors to control.
Full
Camera No. 1~16+Main will display the selected camera full screen
SEQ
This button is used to activate camera sequencing.
Shift+SEQ: to activate user sequence mode.
CONTROLLER KEYBOARD
25
Lock
OSD
LOCK
OSD
This button is used to lock the buttons on the front panel/remote
controller by logging off. Press it again and then apply appropriate
password to deactivate the functions.
This button is used to change on screen display.
Search
SEARCH
This button accesses the search menu.
Backup
BACK
UP
This button is used to open the backup MENU.
ACK
ACK
Panic
!
Zoom
INFO
Info
/ Log
SEL
Down / Up
/ Left / Right
Enter
LOG
SEL
This button is used to manually turn off alarm relay and buzzer when
set for unlimited duration.
This button is used to manually turn on/off Panic recording mode. It
can be manually configured in Quick Setup menu.
This button is used to digitally zoom into a specific area in live screen.
Use directional buttons to navigate.
The information screen displays the basic information about
the DVR.
The logs can be used to search and review directly to a point in
time of the recorded data.
This button is used to select a camera for PTZ control in multi display
mode at the DVR.
Navigate the menu items and increase/decrease the value in program
mode. Control the PTZ camera.
This button is used on the menu of the DVR.
CONTROLLER KEYBOARD
26
5. SPECIFICATION
Power Consumption
12VDC, 500mA
Communication
2 RS-485, RS-232C
Baud Rates
2,400 ~ Up to 230,000 bps
Joystick
3-Axis
Slave Keyboard Support
1 Master, 7 Slave
User Login
Admin / User
Operating Temperature
o
o
0°C to 50°C (32 F to 140 F)
Humidity
0 to 90%RH (non-condensing)
Storage temperature
-20°C to 60°C (-40oF to 122oF)
Dimension (mm)
410x185x113 (16.1” x 7.3” x 4.4”)
Weight
1.0kg
Control
Dome Connection : Max 64 (simplex 256)
DVR Connection : Max 99
Figure 10 – Dimension
CONTROLLER KEYBOARD
27
Notes
This page is intentionally left blank.
CONTROLLER KEYBOARD
28
Notes
This page is intentionally left blank.
CONTROLLER KEYBOARD
29
Notes
This page is intentionally left blank.
CONTROLLER KEYBOARD
30