1
Home/Vehicle Safeguard
Portable Time Lapse Security Camera
User’s manual
Thank you for your purchase of our Portable Time Lapse
Security Camera.
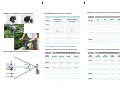
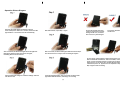
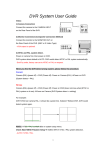
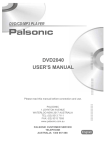
Diagram of using Windshield-mount Bracket
Standard Accessories
Features
•
•
•
•
•
•
•
•
•
•
•
•
•
Portable “standalone” video-based surveillance camera.
Camera easily mounts in almost any vehicle and any
place.
Easily record the intruders or driving condition in front
of you.
Capture video for legal or insurance purposes.
Time lapse recording time up to 288 days @ 1280x1024
resolution color image.
Three selectable resolution: 1.3M, VGA, QVGA
Flexible time lapse mode from 1 second up to 3 minutes.
Optional Looping mode permits continuously repeated
recording or stop recording when memory is full.
Uses SD/SDHC memory card up to 8GB (not included).
Forward/Reverse Play & Frame by Frame playback.
Shown time and date recorded on provided AVI Player
Easily extract photo and save to JPEG
Three power options:
•
100~240V AC/DC5V adaptor
•
DC12V car cigarette lighter adaptor
•
2 AAA alkaline batteries
Camera
Power Link
Fix Stand
CD-ROM
Windshieldmount
Bracket
Bicyclemount
Bracket
Optional Accessories
Wall-mount
Bracket
Car Cigarette
Lighter Plug
Diagram of using Fix Stand
Product Descriptions
Tripod (not included)
Diagram of using Wall-mount Bracket
{1}
Diagram of using Bicycle-mount Bracket
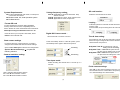
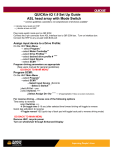
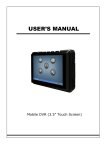
300K pixels resolution reference data (Under light):
ER-130VH Battery life time reference data:
Battery life time
VGA-SD card recording time
Time
setting
Panasonic AAA
LR03TTS/8B
ALKALINE
Great AAA
ENERGY_MICRO
ALKALINE
Time
setting
1G
SD
2G
SD
4G
SDHC
8G
SDHC
1 sec.
4H
3.3H
1 Sec.
20 H
1.7 D
3.4 D
6.8 D
3 sec.
8H
7.5H
3 Sec.
2.5 D
5D
10 D
20 D
5 sec.
9H
8.5H
5 Sec.
4.2 D
8.5 D
17 D
34 D
10 sec.
13H
12.5H
10 Sec.
8.5 D
17 D
34 D
68 D
30 sec.
17H
13H
30 Sec.
25 D
50 D
100 D
200 D
1 Min.
17H
17H
1 Min.
50 D
100 D
200 D
400 D
2 Min.
17H
17H
2 Min.
100 D
200 D
400 D
800 D
3 Min.
17H
17H
3 Min.
150 D
300 D
600 D
1,200 D
Below data is for your reference only because recording time
will be subjected to complexity of color image background.
1.3M pixels resolution reference data( Under light):
Record angle and focusing distance
>30°
CIF- 50cm ~ ∞
VGA- 50cm ~ ∞
1.3M- 50cm ~∞
>30°
70K pixels resolution reference data (Under light):
1.3M-SD card recording time
CIF-SD card recording time
Time
setting
1G
SD card
2G
SD card
4G
SDHC
8G
SDHC
1 Sec.
5H
10 H
20 H
1.6D
3 Sec.
15 H
1.2 D
2.5 D
5D
5 Sec.
1D
2D
4D
8D
10 Sec.
2D
4D
8D
16 D
30 Sec.
6D
12 D
24 D
48 D
1 Min.
12 D
24 D
48 D
96 D
2 Min.
24 D
48 D
96 D
192 D
3 Min.
36 D
72 D
144 D
288 D
{2}
Time
setting
1G
SD card
2G
SD card
4G
SDHC
8G
SDHC
1 Sec.
1.7 D
3.4 D
6.8 D
13.6 D
3 Sec.
5D
10 D
20 D
40 D
5 Sec.
8.5 D
17 D
34 D
68 D
10 Sec.
17 D
34 D
68 D
136 D
30 Sec.
50 D
100 D
200 D
400 D
1 Min.
100 D
200 D
400 D
800 D
2 Min.
200 D
400 D
800 D
1,600 D
3 Min.
300 D
600 D
1,200 D
2,400 D
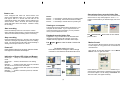
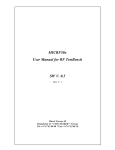
System Requirements :
PC with embedded SD card reader, or USB port to
connect with card reader
Windows 2000, XP, Vista Operation system
CD-ROM device
SD card location :
Voltage frequency setting:
None Î Applicable for electronic fluorescent lamp
without area limit.
60 Hz Î Applicable for Taiwan, Japan, America area.
50 Hz Î Applicable for China, Europe area
Select the drive location of SD Card.
Flash Drive
Looping :
Format SD card
If selected, permits to overwrite old data when SD card
memory is full.
If leave it blank, stops recording when SD card memory is
full.
You are suggested to use major brand SD/SDHC
memory card to ensure 100% compatibility with our
device. Below are some recommended SD card brands:
Adata/Apacer/Kingston/SanDisk/Transcend…etc.
Looping
Insert SD card in your computer card reader, select
FAT32 to format the SD card..
Time & date setting :
Set time interval to 0 minute 0 second
Start camera settings
For the first time use of camera device, you need to
configure the formatted SD card with camera settings.
Looping
Digital Still Camera mode :
Press Record/Stop button to take still picture, press
Record/Stop button again to take second picture.
Ascending
Open installed AVI Player to start SD card configuration.
Options ÎCamera Settings Æ complete the
following selection.
Save real-time clock to SD card and load to camera
device as long as configured SD card is inserted to
camera device and power on.
System Time Î set system time of PC as
starting time of recording.
System Time + 1 min.Î set system time of
PC plus 1min as starting time of recording.
System Time + 5 min.Î set system time of
Descending
Camera resolution setting:
PC plus 5mins as starting time of recording.
Set time to
Set time to
Time-lapse mode:
Select recording time interval from 1 second up to 3
minutes.
Finish camera settings
Click “OK” to save camera settings in SD card. Take out
SD card and insert it to camera device and press power
on to load all settings into camera device.
1280 x 1024 Î 1.3M resolution camera
640 x 480 Î VGA resolution camera
320 x 240 Î QVGA resolution camera
{3}
Start to use
Insert configured SD Card into camera device and
press Power ON/OFF button for 1 second, the Green
LED light is ON for 1 second and then will turn off
automatically means start loading camera settings into
camera device. After 2 seconds, the Green LED light
will be ON again with 2 short beeps. Camera is ready
for recording.
Start recording
Press Record/Stop button for 1second, the camera
device will start recording after 1 second with short beep.
The Green LED flickers, indicating that it is recording.
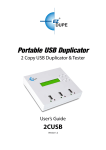
Save photos from recorded video files
Buzzer:
Buzzer……2 short beeps, camera device is in waiting mode.
Buzzer……1 short beep, camera device starts recording.
Buzzer……2 short beeps, camera device is powering off.
Viewing on a computer
Take out SD card from camera device and insert in your
computer SD card reader. If your computer does not
come with a built in SD card reader, you can purchase
one at your local electronics store.
Playback recorded video files
Stop recording
Press Record/Stop button for 1 second to stop recording.
The Green LED light stops flickering and turn to waiting
mode. The camera device will power off automatically if
waiting mode is kept inactive for 1 minute.
Power off
Press Power button for 2 seconds, then the Green
LED light turn off with 2 short beeps.
You can extract and save photos from recorded AVI file.
Click “Pause” to stop video playback. Click << / >>
forward or backward key to desired image, then save to
folder.
Suggested to copy recorded file to the selected folder
directly through Windows “file manager”, then open
installed AVI Play application and follow below steps.
File ÎOpen ÆSelect video file folder ÆSelect file
ÆOpen
The default setting is 0.5 time
Click video screen to enlarge or reduce image
0.5 timeÆ1 timeÆ2 timeÆ0.25 timeÆ0.5 time
File ÎSave Current ÆSelect folder to save desired
picture ÆSave
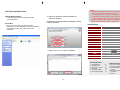
Motion Search
You can use the “Motion Search” function to fast search
a motion object in a long period time of motionless or idle
recorded video.
Click “Pause” to stop video playback. Go to “Motion
Search” menu on right hand side.
Indication of Green LED Light and Buzzer:
Green light ……always on, camera device is in waiting
mode.
Green light ……flickers, camera device is in working
mode.
Red light ………flashes 3 times then power off, indicates
SD card is not inserted or SD card failure.
Red light ………flashes 3 times then power off, indicates
low memory capacity.
Red light ………flashes 1 time then power off, indicates
low battery power.
1x
0.5x
0.25x
2x
Uses “Search Forward” or “Search Backward” key to
search motion object image. Repeat the step to search
next motion object. You can change “Threshold” value.
The lower value, the higher sensitivity.
{4}
Notes:
AVI Play Installation Guide
System Requirements:
1. Windows 2000, XP, Vista operating system.
2. CD-ROM Drive
Procedure:
2. Select “No-Questions-Asked installation” to
continue installation.
(In general, you can skip advance Installation, shown
as B, C, D, and E.)
1. Turn on your computer, and insert provided
installation CD to CD-ROM drive. Open CD-ROM files
and double-click AVI_Play_setup icon to start
installation.
Please don't take SD card out when Camera Device
is power on to prevent damage to SD Card.
If it is happened, you can simply unplug power cord
or take out the battery and put it back again after
10 sec. without SD card. Press Power button, the
red LED will flash 3 times with 3 short beeps, then
power off automatically. Reset is completed.
Specification
Model name
ER-130VH
Sensor
1.3M pixels CMOS image sensor
Time interval
1 second up to 3 Minutes (Maximum).
Resolution
A
Focusing
B
C
Auto exposure
D
E
1280x1024,640x480,320x240 pixel
Fix. 0.5M~inifinity
C
Auto white balance
Movie image
Still image
Storage
3. Select “Yes, I do” to confirm installation
{圖一}
DC power
Battery
Dimension
Computer OS
AVI format (Motion JEPG)
JPG format
AVI format (Motion JEPG)
JPG format
SD/SDHC up to 8GB
DC 5V 500mA
2*AAA Alkaline Batteries
90x57x26mm ( L x W x T)
WIN2000/XP/Vista
Standard items:
1. Camera Device
2. Installation CD
3. Quick user manual
4. Fix Stand
5. AC Power adapter
6. AAA alkaline battery
{5}
Optional items:
x1
x1
x1
x1
x1
x2
1. DC 12V car adapter
2. Wall mount Bracket
3. Car Windshield mount
bracket
4. Bicycle mount bracket
foundation
5. SD card
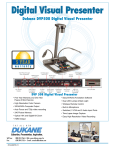
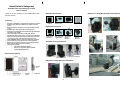
Operation Picture Diagram
Connect 100~240V AC/DC 5V adapter to device.
Press & hold power button for 1 second, the Green LED
light is ON for 1 second then turn off automatically.
After 2 seconds, the Green LED light will be ON again but
Red light is flashing 3 times then power off again,
indicating SD card is not inserted.
After SD inserted, repeat Step 1 again.
Do not take out SD card while
camera is Power On to prevent
damage of SD card, recorded
files or device system hanged.
Turn Power Off before take
out SD card.
After 2 seconds, the Green LED light in ON with 2 short beeps.
The camera device is ready to start recording at anytime.
In case device system hanged, simply unplug power cord or
take out batteries and SD card. After 10 seconds, connect
power cord or put batteries back to camera device but do not
insert SD card. Press Power On, the Red LED light will flashes
3 times then power off. System reset is completed. Repeat
Step 2 again to start recording.
Insert formatted & configured “Camera Settings” SD card
into SD card slot.
Press Record/Stop button, after 2 seconds, the Green LED
light will be ON and flickers, indicating it is recording
{6}