1
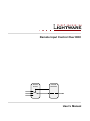
Remote Input Control Over DDC
RICOD
SLAVE
RICOD
MASTER
User’s Manual
Remote Input Control Over DDC
User’s Manual
Table of contents
1.
INTRODUCTION....................................................................................................................................... 4
2.
RICOD CAPABLE DEVICES ................................................................................................................... 4
3.
OPERATION ............................................................................................................................................. 4
3.1.
MASTER AND SLAVE MODE ................................................................................................................... 4
3.2.
FACTORY DEFAULTS ............................................................................................................................. 5
3.3.
ENABLE / DISABLE RICOD .................................................................................................................... 5
3.4.
VALIDITY OF RICOD ............................................................................................................................ 5
3.5.
LOCKING THE REMOTE DEVICE .............................................................................................................. 6
3.5.1.
Extenders ................................................................................................................................... 6
3.5.2.
Routers ...................................................................................................................................... 7
4.
PROGRAMMERS REFERENCE.............................................................................................................. 8
4.1.
RICOD WITH PROTOCOLS .................................................................................................................... 8
4.1.1.
Change (view) protocol on the front panel ................................................................................. 8
4.1.2.
Change (view) protocol via remote connection ......................................................................... 8
4.2.
LIGHTWARE PROTOCOL DESCRIPTION .................................................................................................... 9
4.3.
RICOD MASTER COMMANDS ............................................................................................................. 9
4.3.1.
Set RICOD command on input .................................................................................................. 9
4.3.2.
Query the set RICOD command on input ................................................................................ 10
4.4.
RICOD SLAVE COMMANDS ............................................................................................................... 10
4.4.1.
Set RICOD slave status on output ........................................................................................... 10
4.4.2.
Query RICOD slave status on output ...................................................................................... 10
5.
COMMANDS – QUICK SUMMARY ....................................................................................................... 11
6.
AN EXAMPLE APPLICATION ............................................................................................................... 11
6.1.
FRONT PANEL OPERATION ON UMX4X4-PRO ...................................................................................... 11
6.1.1.
CONTROL LOCK .................................................................................................................... 11
6.1.2.
Basic concept........................................................................................................................... 12
6.1.3.
Menu structure ......................................................................................................................... 12
6.1.4.
Navigation ................................................................................................................................ 12
6.1.5.
Normal mode ........................................................................................................................... 12
7.
VERSION APPLICABILITY .................................................................................................................... 15
8.
WARRANTY ........................................................................................................................................... 15
9.
DOCUMENT REVISION HISTORY ........................................................................................................ 15
Page 3 / 15
1. Introduction
The main goal of Remote Input Control Over DDC (RICOD) is to control the remote
Lightware transmitters attached to a router (local device). The control means input
switching (select video and audio sources) and locking / unlocking the remote
buttons / switches.
Info:
There is no possibility to send other kind of commands, including Lightware protocol
commands or any other character sequence. The "RS-232 extension" function is out of
the question.
Info:
RICOD is Lightware’s intellectual property and proprietary function. It works only with
Lightware devices.
2. RICOD capable devices
The RICOD functionality must be implemented in the firmware of the devices. (It can be
implemented in the Lightware devices with more than one input ports.)
It is currently implemented in the following devices:
UMX4x4-Pro, firmware version 1.2.4r and above
WP-UMX-TP-TX100, firmware version 1.1.0r and above
FP-UMX-TP-TX100, firmware version 1.1.0r and above
UMX-TP-TX100R, with firmware version 1.1.6r and above
MX-CPU2, with firmware version 3.3.5r and above*
* The MX-FR series modular matrix frames with MX-CPU2 processor boards (with firmware
version 3.3.5r and above) support reduced RICOD capabilities: only MASTER mode is
available and only by protocol commands. RICOD SLAVE mode and the front panel
operation are not implemented.
3. Operation
3.1.
Master and Slave mode
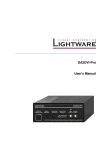
First of all it is important to understand the direction of RICOD and the working modes.
Lightware RICOD capable devices are able to send out remote switching commands on
their video inputs towards another RICOD capable devices’ video output and / or they can
receive remote switching commands on their video outputs from another RICOD capable
devices’ video input.
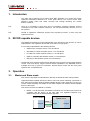
One device can work as a Master or a Slave.
Master - If a device sends out RICOD commands over its video input it works as
a Master, like the device on the right side. The Lightware Matrices (e.g.
UMX4x4-Pro) work as RICOD Masters typically.
RICOD capable
device’s Output
Lightware RICOD
capable device
Video
Inputs
Outputs
Outputs
RICOD
Slave
Page 4 / 15
Master
Section 1. Introduction
Remote Input Control Over DDC
User’s Manual
Slave - If a device receives RICOD commands over its video outputs it works as
a Slave, like the device on the left side. In this case the devices are capable of
receiving commands over their outputs (e.g. connected to another Lightware
device) if the function is enabled. This means that the remote device is capable of
being controlled from that given output. (The command affects only that output
where the RICOD command was received). The Lightware transmitters (e.g.
WP-UMX-TP-TX100) work as RICOD Slaves typically.
RICOD capable
device’s Input
Lightware RICOD
capable device
Video
Inputs
Inputs
Outputs
RICOD
Master
Slave
3.2.
Factory defaults
After firmware upgrade the Slave mode is always enabled (commands from the Master
devices are accepted and executed) and the Master mode is always disabled. This state
will be caused by reloading the factory defaults with {FACTORY=ALL}, protocol
command. For more information about reloading the factory defaults see the user’s
manual of the devices.
3.3.
Enable / disable RICOD
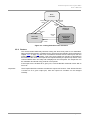
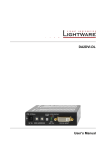
Users can enable or disable the RICOD function for each input and output video port
st
nd
separately. For example, one can enable the RICOD on the 1 and the 2 video input
st
rd
and the 1 and the 3 video output port. RICOD is disabled on the other video input and
output ports. Figure 3-1 shows this case. Video ports where RICOD is enabled are green.
Lightware RICOD capable device
Inputs
Outputs
I1
O1
I2
O2
I3
O3
I4
O4
Master
Slave
Legend:
I
O
I
O
RICOD is enabled (can control)
over this input port
RICOD is enabled (can be controlled)
over this output port
RICOD is disabled (cannot control)
over this input port
RICOD is disabled (cannot be controlled)
over this output port
Figure 3-1. Enabling RICOD
The RICOD can be enabled or disabled by LW2 protocol commands for every Lightware
device. (For more information see section 4 on page 8.)
Another way to change RICOD state is available for devices which have front panel LCD.
In this case users can change settings with front panel operation. The section 6.1 on
page 11 introduces the UMX4x4-Pro front panel menu contents affected by RICOD.
3.4.
Validity of RICOD
The last command will be saved for each input and will be preserved until a new
command arrives or until the function is disabled. If the remote controlled device is
Page 5 / 15
restarted, replaced or disconnected and connected again, then the command will be
executed again. The command will take effect even if the local device (e.g. the
UMX4x4-Pro) is restarted or the function is enabled again.
Figure 3-2. Working of RICOD
Info:
3.5.
The communication between the devices is uni-directional, so there is no feedback from
the remote controlled device.
Locking the remote device
The intention of this feature is to prevent accidental or unwanted switching when the
remote device is installed near to the end-users. The remote device can be locked by the
local device via a RICOD command. The behavior is different for the video routers and for
the extenders:
3.5.1. Extenders
If an extender (talking about transmitters, i.e. WP-UMX-TP-TX100) receives a lock
command by the RICOD function, then it will disable the front panel switching buttons.
The buttons are disabled until the device is disconnected (connection is detected by the
Hotplug detect signal – which is carried by the DDC CAT cable when using CATx
extenders) or the remote lock command is cleared by the local device. This can be done
by turning off the RICOD function or by turning off only the lock command.
If a new device is connected which doesn't support RICOD commands then the remote
lock will be disabled.
Note that when the buttons are disabled, then they don’t react at all - switching and
unlocking are also impossible.
The transmitters are still able to receive and execute commands via their local control
interface (e.g. RS232 or USB) while RICOD lock is enabled. The remote lock command
affects only the buttons, but doesn't prevent the switching if it is commanded locally.
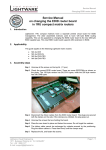
Locking operation flowchart
Buttons on the extenders can be locked by front panel operation or remotely, but the two
ways of locking are not the same. If buttons were locked by a front panel operation, they
can be unlocked by a RICOD unlock command followed by an unlock operation on the
front panel.
To better understand the locking sequence, please study Figure 3-3.
Page 6 / 15
Section 3. Operation
Remote Input Control Over DDC
User’s Manual
NOT
LOCKED
Remote
unlock
Front panel
unlock
Remote
lock
REMOTE
LOCKED
Front panel
lock
Remote
lock
BUTTON
LOCKED
Remote
unlock
BUTTON &
REMOTE
LOCKED
Figure 3-3. Locking flowchart of the extenders
3.5.2. Routers
The routers behave differently because locking the whole front panel is not reasonable.
When the RICOD function is enabled for an output port (see RICOD_SLEN command in
chapter 4.4.1 on page 10) and a lock command is received over the same port, then the
output port will be "output locked". This is the same output lock function as described in
the manual of the router. The output lock is reported back by the protocol (is shown in the
control software and in the web) and is displayed on the front panel. The output lock can
be overridden and turned off by protocol or front panel.
If the output lock is enabled for a given port, a remote RICOD command is also able to
turn it off.
Important!
The accepted RICOD command overrides the output lock function. If the RICOD function
is turned on for a given output port, then the output lock condition can be changed
remotely.
Page 7 / 15
4. Programmers reference
4.1.
RICOD with protocols
The Lightware matrices are equipped with multiple router protocols.
Important!
RICOD works only with the Lightware protocol. The currently used protocol can be
viewed or changed at any time via the matrix front panel or via protocol commands.
4.1.1. Change (view) protocol on the front panel
Step 1. Switch the router to TAKE mode if used previously in AUTOTAKE mode by
pressing TAKE button for 4 seconds. (light will go off)
Step 2. Press Control Lock button for 3 seconds (it lights in up red continuously)
Step 3. Press and keep pressed the Output Lock button. Now the active protocol is
displayed: (view protocol) One source button lights up according to the current
protocol:
Source#1 lights:
Lightware protocol active
Source#2 lights:
Protocol#2 is active
Step 4.
a)
If you do not want to change the protocol, release the Output Lock button
(view only).
b)
If you want to change the protocol keep the Output Lock button pressed,
and press the desired Source button.
Step 5. If the control protocol for any interface has changed then a beep will sound to
notify the change.
4.1.2. Change (view) protocol via remote connection
Connect to the matrix through any control interface, then use the commands described in
the Lightware protocol section of the device’s user’s manual.
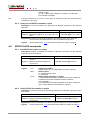
View current control protocol
Description: Shows the current control protocol.
Format
Example
Command {P_?}
→ {p_?}
Response (CURRENT●PROTOCOL●=●#<x> ← (CURRENT●PROTOCOL●=●#1)
)CrLf
CrLf
Explanation: Protocol 1 is active here.
Legend:
<x>
stands for the active protocol.
Set current control protocol
Description: Sets the control protocol (Default is ’1’).
Format
Command {P_x}
Response (PROTOCOL●#<x>●SELECTED!)
CrLf
Example
→
←
{p_1}
(PROTOCOL●#1●
SELECTED!)CrLf
Explanation: Protocol 1 is activated.
Legend:
Info:
Page 8 / 15
<x>
stands for the active protocol.
For detailed information, see the user’s manual of the devices.
Section 4. Programmers reference
Remote Input Control Over DDC
User’s Manual
4.2.
Lightware protocol description
The protocol description hereinafter stands for Lightware protocol.
The matrices accept commands surrounded by curly brackets - { } - and responds with
data surrounded by round brackets - ( ) - only if a command was successfully executed.
All input commands are converted to uppercase, but respond commands can contain
upper and lower case letters as well.
Legend for control commands:
4.3.
CrLf
=
Carriage return, Line feed (0x0D, 0x0A)
●
=
space character (0x20)
→
=
each command issued by the controller
←
=
each response received from the router
RICOD MASTER commands
4.3.1. Set RICOD command on input
Description: Sets the RICOD command for the selected input port.
Format
Command {:RICOD#<in>@<S/A>I=<A1><A2>;
<B>;<C>;}
Response (RICOD#<in>@<S>I=<A1><A2>;
<B>;<C>;)CrLf
→
Example
{:RICOD#1@SI=10;2;1;}
←
(RICOD#1@SI=10;2;1;)CrLf
Explanation: RICOD control is enabled on the first input port, which unlocks the remote
device and selects the second video input and the first audio input port on it.
Legend:
<in>:
<S/A>:
<A1>
<A2>
Info:
Input port number:
Input number in 1 or 2 digit ASCII format (01,3,04 etc.)
Affected ports:
S = single selected input
A = all inputs
RICOD enable parameter on the input:
1: The RICOD function is enabled to this input port on the local
device (where the command was given).
0: The RICOD function is disabled to this input port on the local
device (where the command was given).
Remote lock enable parameter:
1: The front panel buttons (in case of transmitters) or the output
(in case of video matrix) is locked on the remote device.
0: The front panel buttons (in case of transmitters) or the output
(in case of video matrix) is unlocked on the remote device.
The remote lock function takes effect only if RICOD is enabled by <A1>.
<B>
<C>
The selected video input:
“-“ (hyphen) = There is no video switch command.
“A” = Automatic input select must be performed on the remote
device if available. (i.e. Autoselect function)
“0” (zero) = The output needs to be muted if available.
(switch to zero)
“1” , ”2” , .. , ”80” (number between 1 and 80) - Use the given
input number if available.
The selected audio input:
“-“ (hyphen) = There is no video switch command.
“A” = Automatic input select must be performed on the remote
device if available. (i.e. Autoselect function)
“0” (zero) = The output needs to be muted if available.
Page 9 / 15
(switch to zero)
“1”,”2”,..,”80” (number between 1 and 80) - Use the given
input number if available.
Info:
If the first character of <A1><A2> is zero, then no command is sent, the RICOD function
is disabled on this input.
4.3.2. Query the set RICOD command on input
Description: Checks the status of the previously set RICOD command for the selected
input port.
Format
Example
Command {:RICOD#<in>@<S/A>I=?}
→ {:RICOD#1@SI=?}
Response (RICOD#<in>@<S>I=<A1><A2>;<B>;<C>; ← (RICOD#1@SI=11;1;1;)CrLf
)CrLf
Explanation: RICOD command was enabled on the first input port, which locks the
remote device and selects the first video and audio input port on it.
Legend:
4.4.
Please read section 4.3.1 (Set RICOD command on input) on page 9.
RICOD SLAVE commands
4.4.1. Set RICOD slave status on output
Description: Enables or disables the reception of RICOD commands over the selected
output port of the local device.
Format
Example
Command {:RICOD_SLEN#<out>@<S/A>O= → {:RICOD_SLEN#1@SO=1}
<num>}
Response (RICOD_SLEN#<out>@<S>O=
← (RICOD_SLEN#1@SO=1)CrLf
<num>)CrLf
Explanation: RICOD functionality is enabled on the first output port on the local device.
Legend:
<out>
<S/A>:
<num>
Output port number:
Output number in 1 or 2 digit ASCII format (01,3,04 etc.)
Affected ports:
S = single selected output
A = all outputs
RICOD enable parameter on output:
1: The RICOD functionality is enabled on the given output port.
If a RICOD command is detected it will be executed.
(If it is possible.)
0: The RICOD functionality is disabled on the given output port.
Any incoming RICOD command will be rejected.
4.4.2. Query RICOD slave status on output
Description: Checks the previously set RICOD status for the selected output port of the
local device.
Format
Example
Command {:RICOD_SLEN#<out>@<S/A>O=?} → {:RICOD_SLEN#1@SO=?}
Response (RICOD_SLEN#<out>@<S>O=
← (RICOD_SLEN#1@SO=1)CrLf
<num>)CrLf
Explanation: RICOD functionality is enabled on the first output port on the local device.
Legend:
Page 10 / 15
Please read section 4.4.1 (Set RICOD slave status on output) on page 10.
Section 4. Programmers reference
Remote Input Control Over DDC
User’s Manual
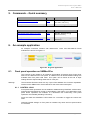
5. Commands – Quick summary
RICOD MASTER commands
Section
Command
Set RICOD command on input
4.3.1
{:RICOD#<in>@<S/A>I=
<A1><A2>;<B>;<C>;}
Query the set RICOD command on input
4.3.2
{:RICOD#<in>@<S/A>I=?}
RICOD SLAVE commands
Section
Command
Set RICOD slave status on output
4.4.1
{:RICOD_SLEN#<out>@
<S/A>O=<num>}
Query RICOD slave status on output
4.4.2
{:RICOD_SLEN#<out>@
<S/A>O=?}
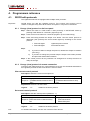
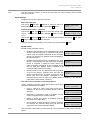
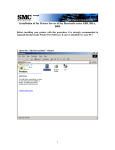
6. An example application
An example connection variation with UMX4x4-Pro router and WP-UMX-TP-TX100
extenders are shown on Figure 6-1.
Figure 6-1. A typical application
6.1.
Front panel operation on UMX4x4-Pro
The purpose of this chapter is to introduce the handling of Remote Input Control Over
DDC on the UMX4x4-Pro’s front panel. In UMX4x4-Pro, all RICOD-related settings are
available from front panel LCD menu. This option can be found at the end of Input
settings and the Output settings submenu for each port.
Warning!
The mentioned functions below are only a part of the UMX4x4-Pro’s function capabilities.
Please see the UMX4x4-Pro User’s Manual for the whole menu description.
6.1.1. CONTROL LOCK
Front panel button operations can be enabled or disabled using CONTROL LOCK button,
while RS-232 and Ethernet control is still enabled. If the button is not illuminated, front
panel button operations are enabled. If it illuminates red continuously, front panel
operations are inhibited (including LCD menu).
Press and hold the CONTROL LOCK button for 3 seconds to toggle the control lock
state.
Info:
Reaching RICOD settings via front panel is available only when the front panel buttons
are unlocked
Page 11 / 15
6.1.2. Basic concept
One of the three operating modes of the LCD menu is the normal mode.
Normal mode
Most settings can be done in this mode. It is active when
neither the EDID nor the SIGNAL PRESENT button is lit.
Use this mode to reach the RICOD settings.
6.1.3. Menu structure
Info:
Submenus and options affected by RICOD are bold.
Normal mode
Default display
IP settings…
Power status
Firmware versions
RS-232 settings
View log…
Factory reset
Input settings
Interface
Audio
HDCP enabled
Analog video….
Analog audio….
Remote input control….
RICOD master
Video source
Audio source
Return
Return
Output settings
Mode
Analog audio…..
HDCP
RICOD slave
Return
HDCP keycounter
6.1.4. Navigation
The front panel LCD has 2 lines and 16 characters in each line. The left ◄ and right ►
buttons can be used to scroll between menu items. Use the enter button to step into a
submenu or to take changes. The up ▲ and down ▼ navigation buttons modify the value
of the current menu item.
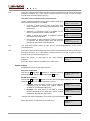
6.1.5. Normal mode
Main menu list
Left ◄ and right ► buttons select between menu items. Enter button steps into
submenus or selects the adjustable values.
Default display
Default display activates after power up. This screen shows
the current IP address, the current IP port and the serial
number of the matrix.
Page 12 / 15
192.168.002.045
10001 11230101
Section 6. An example application
Remote Input Control Over DDC
User’s Manual
Info:
Use the navigation buttons to reach the input and the output settings where RICOD
options can be set.
Input settings
Navigate to this menu in the main menu list.
Select the input port
Use the up ▲ and down ▼ buttons to select the port that
needs adjustment and then press the ENTER button.
Input settings
Input 1
Remote input control… submenu
Use the left ◄ and right ► buttons to select the remote input
control… submenu and press the ENTER button to enter
into it.
Input 1
Remote input con
Use the left ◄ and right ► buttons to select the part, and then use the up ▲ and down
▼ buttons to change the value of that part.
Info:
Changes take effect immediately, don’t need to press the ENTER button.
RICOD master
RICOD master parameter can be:
Disabled: The RICOD function is disabled on the local
device’s selected input port. It means the local device
cannot send out RICOD commands to the controlled
device over its input port. (Master mode is disabled on
the selected input.)
Enabled: The RICOD function is enabled on the local
device’s selected input port and the remote controlled Input 1
RICOD master:Ena
device is unlocked. It means the local device can
send out RICOD commands to the controlled device
over its input port. (Master mode is enabled on the selected input and the
connected slave device is unlocked.)
Enabled & slave lock: The RICOD function is enabled
on the local device’s selected input port and the Input 1
remote controlled device is locked. It means the local RICOD master:Ena
device can send out RICOD commands to the
controlled device over its input port. (Master mode is enabled on the selected
input and the slave device is locked.)
Input 1
RICOD master:Dis
The video source selection of the remote device
“Video” parameter gives the remote device which video input
port will be selected if it is available:
Info:
From 1. input to 8. input: If the given input port is
available on the remote controlled device it will be
selected.
Automatic: If Autoselect mode is available on the
remote controlled device it will be selected.
Muted: If output port muting is available it will be
executed on the video layer.
Not controlled: If audio switching or locking command
is executed, the selected video input port won’t be
changed on the remote controlled device.
Input 1
Video source:1.
Input 1
Video source:Aut
Input 1
Video source:Mut
Input 1
Video source:Not
The LCD menu shows always 8 input ports to control regardless of the remote controlled
device.
Page 13 / 15
Info:
All the four cases will take effect only if the remote controlled device is able to perform the
switching command. (e.g. If the remote controlled device is not able to mute its output
port the mute command will be ignored.)
The audio source selection of the remote device
“Audio” parameter gives the remote device which audio input
port should be selected if it is available:
st
Input 1
Audio source:1.
th
From the 1 input to the 8 input: If the given input
port is available on the remote controlled device it will
be selected.
Automatic: If Autoselect mode is available on the
remote controlled device it will be selected.
Muted: If output port muting is available it will be
executed on the audio layer.
Not controlled: If video switching or locking command
is executed, the selected audio input port won’t be
changed on the remote controlled device.
Input 1
Audio source:Aut
Input 1
Audio source:Mut
Input 1
Audiosource:Not
Info:
The LCD menu shows always 8 input port to control irrespecetively of the remote
controlled device.
Info:
All the four cases will take effect only if the remote controlled device is able to perform the
switching command. (e.g. If the remote controlled device is not able to mute its output
port the mute command will be ignored.)
Select the ‘Return’ to step back to the “Input settings”
submenu.
Input 1
Return
Select the ‘Return’ again to step back to the main menu.
Output settings
Navigate to this menu in the main menu list.
Select the output port
Use the up ▲ and down ▼ buttons to select the port that
needs adjustment and then press the ENTER button.
Output settings
Output 1
RICOD slave options
Use the left ◄ and right ► buttons to select the RICOD slave settings. Use the up ▲
and down ▼ buttons to change the value. It can be:
Info:
Enabled: The local device is able to receive RICOD
commands over its output port. (Slave mode is
enabled on the selected output port.)
Output 1
RICOD slave:Enab
Disabled: The local device is not able to receive
RICOD commands on its output port. (Slave mode is
disabled on the selected output port.)
Output 1
RICOD slave:Disa
Changes take effect immediately, don’t need to press the ENTER button.
Select the ‘Return’ to step back to the main menu.
Page 14 / 15
Output 1
Return
Section 6. An example application
Remote Input Control Over DDC
User’s Manual
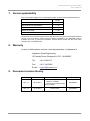
7. Version applicability
This User’s Manual applies to the following firmware versions of the mentioned devices:
version
UMX4x4-Pro firmware
1.2.4r
WP-UMX-TP-TX100 firmware
1.1.0r
FP-UMX-TP-TX100 firmware
1.1.0r
UMX-TP-TX100R
1.1.6r
MX-CPU2 firmware*
3.3.5r
* The MX-FR series modular matrix frames with MX-CPU2 processor boards (with firmware
version 3.3.5r and above) support reduced RICOD capabilities: only MASTER mode is
available and only by protocol commands. RICOD SLAVE mode and the front panel
operation are not implemented.
8. Warranty
In case of defect please call your local representative, or Lightware at
Lightware Visual Engineering
15 Peterdy Street, Budapest H-1071, HUNGARY
Tel.:
+36 1 889 6177
Fax.:
+36 1 342 9903
E-mail:
[email protected]
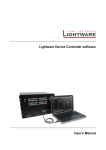
9. Document revision history
Document
Release Date
Changes
Checked by
Rev. 1.1
03-03-2014
New RICOD capable devices:
UMX-TP-TX100R,
MX-CPU2 processor board,
Minor changes
Zsolt Markó
Rev. 1.0
27-02-2013
Initial version
Zsolt Markó
Page 15 / 15