1
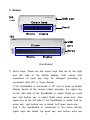
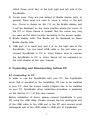
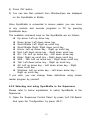
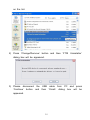
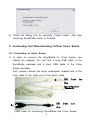
SyncBraille User Manual HIMS Co., Ltd. 139-9, Gajung-dong, Yuseong-gu Daejeon, Korea 305-350 Tel : 042-864-4460 Fax : 042-864-4462 E-mail : [email protected] http://www.himsintl.com List 1. User guide ............................................................. 1 2. SyncBraille in the Package .................................... 1 3. Nam es.................................................................... 2 4. Connecting and Disconnecting to/from PC .............. 3 4.1 Connecting to PC .................................................................... 3 4.1.1 Installing SyncBraille Driver on the Windows 2000, XP and Vista ....................................................................................... 5 4.2 Selecting and using SyncBraille in screen reader program .............................................................................................. 8 4.2.1 Selecting and using SyncBraille in the Window-Eyes ......... 8 4.2.2 Selecting and using SyncBraille in the Supernova............ 10 4.3 Disconnect from PC ............................................................. 13 4.4 Remove the driver ............................................................... 13 5. Connecting and Disconnecting to/from Voice Sense 15 5.1 Connecting to Voice Sense ............................................... 15 5.2 Disconnect from Voice Sense .......................................... 17 6. W arranty term : 1 year ......................................... 17 7. Product Specification ........................................... 17 8. An FCC warning ................................................... 17 1. User guide Thank you for purchasing SyncBraille. For the correct use of SyncBraille, please read this user manual carefully. 1) ‘SyncBraille’ is brand name of HIMS Braille display devices, where B20N is a device with 20 cells and B32N is a device with 32 cells. 2) For using the SyncBraille, you have to connect this unit to Voice Sense or PC. But for connecting SyncBraille to PC, screen reader program must be installed earlier in your PC. 3) There is no cap for USB port of SyncBraille. So please be careful not to insert dust or moisture in the USB port. 4) Do not use the SyncBraille in the humid place like as bathroom or shower room. 5) Do not put anything that is heavy on the SyncBraille. 6) Do not reorganize, disassemble and repair the SyncBraille. These acts will damage the SyncBraille and it cannot be an exception of warranty service. 2. SyncBraille in the Package You can find below things when you open the new package. 1) SyncBraille 2) User manual 3) USB cable 4) Driver installation CD 5) Carrying case 1 3. Names (20 USB port cell) Cursor keys Scroll keys Braille (32 display cells cell) USB Cursor port keys Scroll keys Braille display cells [SyncBraille] 1) Scroll keys: These are the round keys that are at the right and left operations side of of each the key Braille may display. be And changed names and according to connected units (PC or Voice Sense). If the SyncBraille is connected to PC and is used as Braille display device of the screen reader program, the upper key at the right side of the SyncBraille is called ‘Right up scroll key’ and bottom key is called ‘Right down arrow key’. And upper key at the left side of the SyncBraille is called ‘Left up arrow key’, and bottom key is called ‘Left down arrow key’. And if the SyncBraille is connected to the Voice Sense, upper keys are called ‘Up scroll key’ and bottom keys are 2 called ‘Down scroll key’ at the both right and left side of the SyncBraille. 2) Cursor keys: They are just behind of Braille display cells. In general, these keys are used to move a cursor in the edit box. Cursor is shown as ‘dot 7-8’ on the Braille display and it will be displayed on the same position where the cursor of the PC or Voice Sense is located. But the cursor key may be used as the other function according to the screen reader. 3) Braille display cells: The Braille will be displayed on these Braille display cells. 4) USB port: It is small port and it is on the right side of the SyncBraille. You can insert USB cable in this port when you connect SyncBraille to PC or Voice Sense. How to connect the SyncBraille to PC or Voice Sense will be explained on the next chapter of this user manual. 4. Connecting and Disconnecting to/from PC 4.1 Connecting to PC In order to use the SyncBraille with your PC, the SyncBraille driver that is provided in the Installation CD has to be installed in your PC. Also the screen reader program has to be installed on your PC. SyncBraille driver installation procedure is explained on the Section 4.1.1 of this user manual. Before installation of driver, please connect SyncBraille to your PC using the USB cable. Please connect the big rectangular end of the USB cable to the USB port in the PC and connect small rectangular end of the USB cable to USB port of SyncBraille. 3 Connection to SyncBraille Connection to PC [USB cable for connecting SyncBraille and PC] After you install the SyncBraille driver and connect the SyncBraille to your PC using the USB cable, please refer to the user manual of the screen reader that is installed in your PC in order to check how to use the Braille display. 4 4.1.1 Installing SyncBraille Driver on the Windows 2000, XP and Vista 1) Insert the Drive Installation CD into CD-ROM drive or DVDROM drive in you PC after connecting SyncBraille to PC using USB cable. And then installation dialog will be appeared on your PC screen. 2) Press “Install” button and then wait for a moment. Completion dialog box will be appeared with voice message as “Please close the screen reader program that is running on your PC before pressing ‘OK’ button.” A. FTDI COM driver will enable USB to convert to Serial in logical. 3) If you have a running screen reader program on your PC, Installation may be failed. So please close the running screen 5 reader program and then press “OK” button. 4) After closing the running screen reader program and then pressing “OK” button, Installation program will search screen reader programs to be installed in your PC. 5) According to the screen reader program to be installed in your PC, Installation program will install the driver to communicate with the screen reader program. A. Note this installation support only Window-Eyes and Supernova. 6) During installing the driver, completion message will be displayed in text and voice as “The XXX patch was installed successfully.” where XXX is a name of screen reader program. A. If you have a running screen reader program on your PC, installation will be failed and will generate error message. 6 7) When finishing installation, voice message with “Please restart screen reader” will be displayed. After then, all process of Installation will be finished. 8) Run the screen reader program again. 9) Select “SyncBraille 20/32” for “Braille Display” in the menu of screen reader program. (Please refer to the next chapter about setting up the Braille display on the each screen reader program.) 10) And then contents from screen reader will be displayed on the SyncBraille in Braille. If you already selected “SyncBraille” for Braille display before installing the driver, SyncBraille will display contents from screen reader in Braille just after finishing the driver installation. 7 If the SyncBraille does not display the Braille, please check that USB cable firmly connected to SyncBraille and PC. And please also check if setting for ‘USB Serial Port’ was correct or if selecting ‘Braille Display’ on the screen reader program was correct. If any error happens during installation of SyncBraille driver, or if your PC does not recognize the SyncBraille after you installed the drive and made sure of the connection between PC and SyncBraille, please reinstall the driver after removing it. How to remove the driver will be explained on the Section 4.4 in this user manual. 4.2 Selecting and using SyncBraille in screen reader program Selecting Braille Display differs from each screen reader program. Please refer to below explanation to select SyncBraille as a Braille display on screen reader program. 4.2.1 Selecting and using SyncBraille in the Window-Eyes Please refer to below explanation to select SyncBraille in the Window-Eyes. 1) Open the ‘Window-eyes Control Panel’ by press ‘Left Ctrl-\’. And open the ‘File’ by press ‘Alt-F’. 8 2) Press ‘B’ and then ‘Select Braille Display’ dialog box will be appeared. 3) Select ‘Sync Braille 20/32’ for Braille Display and ‘USB’ for Port in this dialog box. 9 4) Press ‘OK’ button. 5) You can see that contexts from Window-Eyes are displayed on the SyncBraille in Braille. Once SyncBraille is connected to screen reader, you can move to any controls and execute programs in PC by pressing SyncBraille keys. The available commend keys on the SyncBraille are as follows; Up arrow: Left up arrow key Down arrow: Left down arrow key Scroll Braille Left: Right up scroll key Scroll Braille Right: Right down scroll key Home: Left up arrow key - Right up scroll key End: Left down arrow key - Right down scroll key Alt - F4: Left up arrow key - Left down arrow key Enter: Right up scroll key - Right down scroll key Shift - Tab: Left up arrow key - Right down scroll key Tab: Left down arrow key - Right up scroll key Alt: Left up arrow key - Left down arrow key - Right down scroll key Windows: Left up arrow key - Left down arrow key Right up scroll key If you wish, you can change these definitions using screen reader program by yourself. 4.2.2 Selecting and using SyncBraille in the Supernova Please refer to below explanation to select SyncBraille in the Supernova. 1) Open the ‘Supernova Control Panel’ by press ‘Left Ctrl-Space’. And open the ‘Configuration’ by press ‘Alt-C’. 10 2) Press ‘A’ and then ‘SAM Configuration’ dialog box will be appeared. 11 3) Press ‘Detect all devices now’ button and then ‘Hardware change stage 1’ dialog box will be appeared. 4) Press ‘OK’ and then ‘Hardware change stage 2’ dialog box will be appeared. 5) Press ‘OK’ button. 6) You can see that contexts from Supernova are displayed on the SyncBraille in Braille. Once SyncBraille is connected to screen reader, you can move to any controls and execute programs in PC by pressing SyncBraille keys. The available commend keys on the SyncBraille are as follows; Braille Line Start: Left up arrow key - Right up scroll key Braille Line End: Left down arrow key - Right down scroll key Braille Width Left: Right up scroll key Braille Width Right: Right down scroll key 12 Simulate Keystroke Up: Left up arrow key Virtual Focus Previous Line: Left up arrow key Simulate Key Press Down: Left down arrow key Virtual Focus Next Line: Left down arrow key Simulate Key Press Home: Left up arrow key - Right up scroll key Simulate Key Press End: Left down arrow key - Right down scroll key Simulate Key Press Enter: Right up scroll key - Right down scroll key Simulate Key Press Tab: Left down arrow key - Right up scroll key Simulate Key Press Shift Tab: Left up arrow key - Right down scroll key Simulate Key Press Windows: Left up arrow key - Left down arrow key - Right up scroll key Simulate Key Alt: Left up arrow key - Left down arrow key - Right down scroll key If you wish, you can change these definitions using screen reader by yourself. 4.3 Disconnect from PC You can disconnect SyncBraille from PC by removing USB cable to be connected to PC. And you can connect again SyncBraille to PC by connecting USB cable. 4.4 Remove the driver As mentioned before, If you have any error while installing SyncBraille driver or if you can’t connect to your PC with correct cable, please reinstall SyncBraille driver after removing it. Please refer to below explanation to remove SyncBraille driver. 1) Open the ‘Add or Remove Programs’ in the control panel and move to the ‘FTDI USB Serial Converter Drivers’ item 13 on the list. 2) Press ‘Change/Remove’ button and then ‘FTDI Uninstaller’ dialog box will be appeared. 3) Please disconnect ‘Continue’ button the USB cable and then ‘Finish’ appeared. 14 from PC dialog and box press will be 4) Close the dialog box by pressing ‘Finish’ button. And then removing SyncBraille driver is finished. 5. Connecting and Disconnecting to/from Voice Sense 5.1 Connecting to Voice Sense 1) In order to connect the SyncBraille to Voice Sense, two cables are needed. You can find a long USB cable in the SyncBraille package and a short USB cable in the Voice Sense package. First, please connect the large rectangular shaped end of the long cable to the large end of the short cable. (B) Part the SyncBraille A (B) A Part for the Sense [USB cable for connecting SyncBrailleVoice and Voice Sense 15 for Connect “A” part at long cable and another “A” part at short cable for connecting SyncBraille and Voice Sense] 2) Please connect the other end of the long USB cable to the SyncBraille. And then turn on the power of Voice Sense and connect the other end of short USB cable to the USB port of Voice Sense. 3) If SyncBraille with 32 cells is connected to Voice Sense successfully, Voice Sense will display ‘SyncBraille 32 is connected’ in voice and SyncBraille will display ‘SyncBraille 32 is connected’ in Braille. If SyncBraille with 20 cells is connected to Voice Sense, ‘SyncBraille 20 is connected’ will be displayed in voice and Braille. If SyncBraille does not display any Braille, you have to check if cables are connected firmly or directions of cable are correct. In this case, remove all cables and carefully connect again or try again after reboot the Voice Sense. If you want to connect SyncBraille to Voice Sense while Voice Sense is turned off, please connect all cables in advance before turning on the Voice Sense. After connect Voice Sense to SyncBraille, Braille will be scrolled in the previous direction by pressing the ‘Up scroll key’ of SyncBraille and Braille will be scrolled in the next direction by pressing the ‘Down scroll key’ of SyncBraille. If you want to learn more about how to use SyncBraille with Voice Sense, please refer to the Voice Sense user manual. 16 5.2 Disconnect from Voice Sense Please just remove the cable between the SyncBraille and the Voice Sense. If you want to connect again, just connect USB cable to both units. 6. Warranty term: 1 year 7. Product Specification 1) Support USB 2.0 2) Auto change 32 cells, 20 cells 3) Weight - SyncBraille 32 cells: 350g - SyncBraille 20 cells: 280g 4) Size - SyncBraille 32 cells: 26cm(W) x 8.5cm(L) x 2cm(H) - SyncBraille 20 cells:18.3cm(W) x 8.5cm(L) x 2cm(H) 8. An FCC warning NOTE: This equipment has been tested and found to comply with the limits for a Class B digital device, pursuant to part 15 of the FCC Rules. These limits are designed to pro-vide reasonable protection against harmful interference in a residential installation. This equipment generates, uses and can radiate radio frequency energy and, if not in-stalled and used in accordance with the instructions, may cause harmful 17 interference to radio communications. However, there is no guarantee that interference will not occur in a particular installation. If this equipment does cause harmful interference to radio or television reception, which can be determined by turning the equipment off and on, the user is encouraged to try to correct the interference by one or more of the following measures: -Reorient or relocate the receiving antenna. -Increase the separation between the equipment and receiver. -Connect the equipment into an outlet on a circuit different from that to which the receiver is connected. -Consult the dealer or an experienced radio/TV technician for help. CAUTION : Changes or modifications not expressly approved by the manufacturer responsible for compliance could void the user’s authority to operate the equipment. 18