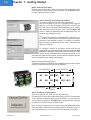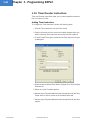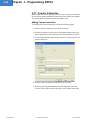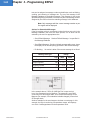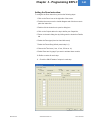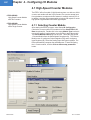
1
Introduction
EZPLC Software Manual
Manual Part Number EZPLC-EDIT-M
Revision A.6
This page intentionally left blank.
Introduction
EZPLC Software Manual
Manual Part Number EZPLC-EDIT-M
Revision A.6
WARNING!
Programmable control devices such as EZPLC are not fail-safe devices and as such must not be used for
stand-alone protection in any application. Unless proper safeguards are used, unwanted start-ups could result
in equipment damage or personal injury. The operator must be made aware of this hazard and appropriate
precautions must be taken.
In addition, consideration must be given to the use of an emergency stop function that is independent of the
EZPLC.
The diagrams and examples in this user manual are included for illustrative purposes only. The manufacturer
cannot assume responsibility or liability for actual use based on the diagrams and examples.
Trademarks
This publication may contain references to products produced and/or offered by other companies. The product
and company names may be trademarked and are the sole property of their respective owners. EZAutomation
disclaims any proprietary interest in the marks and names of others.
Manual part number EZPLC-EDIT-M
© Copyright 2006, EZAutomation
All Rights Reserved
No part of this manual shall be copied, reproduced, or transmitted in any way without the prior written consent
of EZAutomation. EZAutomation retains the exclusive rights to all information included in this document.
Designed and Built by AVG
4140 Utica Ridge Rd. • Bettendorf, IA 52722-1327
Marketed by EZAutomation
4140 Utica Ridge Road • Bettendorf, IA 52722-1327
Phone: 1-877-774-EASY • Fax: 1-877-775-EASY • www.EZAutomation.net
EZPLC-EDIT-M
Table of Contents
Getting Started
1.1 EZPLC EDITOR ........................................................................................1-2
1.1.1 System Requirements ...............................................................1-2
1.1.2 Installation .................................................................................1-2
To Install .................................................................................1-2
To Uninstall .............................................................................1-3
1.2 EZLAUNCH PAD ......................................................................................1-4
1.2.1 Overview....................................................................................1-4
1.2.2 Installation .................................................................................1-4
1.2.3 Function .....................................................................................1-4
1.3 EZSTART ..................................................................................................1-5
1.3.1 Programming Ladder Logic .......................................................1-7
1.3.2 Creating a Complete Rung ........................................................1-8
EZPLC Editor User Interface
2.1 MAIN PROGRAMMING SCREEN ............................................................2-3
2.2 STANDARD TOOLBAR ............................................................................2-4
2.3 INSTRUCTIONS TOOLBARS ..................................................................2-5
2.3.1 Relay/Boolean Operations.........................................................2-5
2.3.2 Compare Operations .................................................................2-5
2.3.3 Math Operations ........................................................................2-6
2.3.4 Bitwise Operations.....................................................................2-6
2.3.5 Move Operations .......................................................................2-7
2.3.6 Timer/Counter Operations .........................................................2-7
2.3.7 Program Control Operations......................................................2-7
2.3.8 String Operations.......................................................................2-7
2.3.9 Communication Operations .......................................................2-8
2.3.10 Miscellaneous Operations .......................................................2-8
2.4 PLC TOOLBAR.........................................................................................2-9
2.5 MENUS ...................................................................................................2-10
2.5.1 File Menu .................................................................................2-10
2.5.2 Edit Menu ................................................................................2-14
2.5.3 View Menu ...............................................................................2-18
2.5.4 Subroutine Menu .....................................................................2-20
2.5.5 Rung Menu ..............................................................................2-21
2.5.6 Instructions Menu ....................................................................2-23
2.5.7 EZPLC Menu ...........................................................................2-25
2.5.8 Setup Menu .............................................................................2-30
2.5.9 Window Menu ..........................................................................2-47
2.5.10 Help Menu .............................................................................2-48
2.5.11 Right-Click Menus..................................................................2-49
EZAutomation
www.EZAutomation.net
1-877-774-EASY
i
ii
Table of Contents
Instructions for Programming EZPLC
3.1 LADDER LOGIC PROGRAMMING IN EZPLC.........................................3-2
3.3.1 Relay/Boolean Instructions ........................................................3-9
Adding Relay/Boolean Instructions.........................................3-9
3.3.2 Compare Instructions ..............................................................3-16
Adding Compare Instructions ...............................................3-16
3.3.3 Math Instructions .....................................................................3-21
Adding Math Instructions ......................................................3-21
3.3.4 Bitwise Instructions ..................................................................3-28
Adding Bitwise Instructions...................................................3-28
3.3.5 Move Instructions ....................................................................3-33
Power Flow ...........................................................................3-33
Adding Move Instructions .....................................................3-33
3.2 MEMORY MAP..........................................................................................3-3
3.2.1 System Discretes.......................................................................3-3
3.2.2 System Registers ......................................................................3-4
3.3 RLL INSTRUCTIONS IN EZPLC ..............................................................3-5
RLL Instructions Table (continued) .........................................3-6
RLL Instructions Table (continued) .........................................3-7
RLL Instructions Table (continued) .........................................3-8
3.3.6 Timer/Counter Instructions ......................................................3-40
Adding Timer Instruction .......................................................3-40
3.3.7 Counter Instruction ..................................................................3-44
Adding Counter Instruction ...................................................3-44
Counter: ...............................................................................3-45
3.3.8 Program Control Instructions ...................................................3-47
Adding Program Control Instructions....................................3-47
3.3.9 String Instructions ....................................................................3-50
Adding String Instructions.....................................................3-50
Adding String Length Instruction ..........................................3-50
3.3.10 Communication Instructions ..................................................3-54
Adding Communication Instructions .....................................3-54
Adding Open Port Instructions..............................................3-54
Adding Send To and Receive From Port Instructions ...........3-55
Adding Send to Marquee Instruction ....................................3-55
Adding Modbus Master Instruction .......................................3-55
3.3.11 Miscellaneous Instructions.....................................................3-62
Introduction to Drum Sequencing .........................................3-62
Adding the Drum Instruction: ................................................3-63
Configuring I/O Modules
4.1 HIGH-SPEED COUNTER MODULES .......................................................4-2
4.1.1 Selecting Counter Module .........................................................4-2
4.1.2 Configuring the Counter ...........................................................4-3
4.1.2a Count Mode ................................................................4-4
4.1.2b Set Point (1-4) ............................................................4-5
4.1.2c Preset Value ...............................................................4-5
4.1.2d Preset Mode ...............................................................4-5
4.1.3 Output Register Information .........................................4-5
Wiring ..................................................................................................4-5
4.1.4 Input Register Information .............................................4-6
4.1.5 Closing .........................................................................4-6
EZAutomation
www.EZAutomation.net
1-877-774-EASY
Table of Contents
iii
4.2 ENHANCED THERMOCOUPLE MODULE ...............................................4-7
4.2.1 Selecting the Thermocouple Module .........................................4-7
4.2.2 Configuring the Thermodcouple Module ....................................4-8
4.2.2a Type .............................................................................4-8
4.2.2b Unit ..............................................................................4-8
4.2.2c Report Error .................................................................4-8
4.2.3 Wiring Information ......................................................................4-9
Message Display on EZMarquee
5.1 MESSAGE DISPLAY ON EZMARQUEE ..................................................5-2
5.2 MESSAGE CONTROLLER FUNCTION ...................................................5-2
Message Database.................................................................5-3
Message Number Register .....................................................5-3
System Discretes....................................................................5-3
5.2.1 Message Database....................................................................5-4
Add/Edit ..............................................................................................5-6
Message Number ...................................................................5-6
Marquee Address ...................................................................5-6
Display Message at Position ..................................................5-7
Select Reset Before Display Mode .........................................5-7
Select Message Effects ..........................................................5-7
Message Text .........................................................................5-8
Preview ...................................................................................5-8
5.2.2 Communication Setup ...............................................................5-8
5.2.3 Displaying Messages.................................................................5-9
5.2.4 Example...................................................................................5-10
Rung 1: Enable Marquee & Check Status ........................... 5-11
Rung 2: Marquee Control .................................................... 5-11
Rung 3: Production & Reject Rates ..................................... 5-11
PID Loop
6.1 INTRODUCTION TO PID ..........................................................................6-2
PID Terminology ..................................................................................6-2
PID on EZPLC .....................................................................................6-3
The EZPLC uses the following algorithms for PID computations: .......6-3
6.2 PID SETUP................................................................................................6-4
Autotune Setup .......................................................................6-7
Control Output ........................................................................6-9
Creating PID Tags ................................................................6-10
6.3 PID MONITOR.........................................................................................6-11
6.4 PID LOOP TUNING..................................................................................6-14
Autotuning Pre-requisites ..................................................................6-14
Autotune Control................................................................................6-14
Autotuning Loops...............................................................................6-14
EZAutomation
www.EZAutomation.net
1-877-774-EASY
iv
Table of Contents
Modbus RTU and Modbus TCP/IP Communications
7.1 MODBUS OVERVIEW ..............................................................................7-2
7.2 EZPLC AS A MODBUS MASTER: ............................................................7-2
7.2.1 Open Port Command..................................................................7-3
7.2.2 Modbus Master Instruction .........................................................7-4
7.2.3 Ladder-Logic Examples ..............................................................7-8
7.3 EZPLC AS A MODBUS SLAVE ................................................................7-9
7.3.1 Overview.....................................................................................7-9
7.3.2 EZPLC as a Modbus Slave: .......................................................7-9
7.3.3 Memory Map.............................................................................7-10
7.3.4 Supported Modbus Commands ................................................7-10
Protecting Your EZPLC Program
8.1 SAVE PROJECT AS PROTECTED ........................................................8-12
8.2 RESTRICTING ONLINE/READ-BACK ACCESS ....................................8-12
User Program Backup
9.1 USER PROGRAM BACKUP ON ONBOARD FLASH ............................9-14
9.1.1 When is Flash Backup done? ...................................................9-14
9.1.2 When is data restored from the Flash Backup? .......................9-14
9.1.3 What is restored from Flash Backup? ......................................9-14
EZAutomation
www.EZAutomation.net
1-877-774-EASY
Table of Contents
Technical Support
Consult EZPLC Editor Programming Software Help or you may find answers to your questions in the
operator interface section of our website @ www.EZAutomation.net. If you still need assitance, please call
our technical support at 1-877-774-EASY or FAX us at 1-877-775-EASY.
Manual Revision History
Revision
Date
Pages Affected
Changes Made
A.1
1/15/05
all
A.2
5/15/05
Chapters 5 & 6
Added Message Display on
EZMarquee and PID Loop.
A.3
8/15/05
Chapter 7
Added Modbus RTU
Communication
A.4
9/10/05
Chapter 7
Added Modbus TCP/IP
Communication
A.5
9/07/05
Chapters 2,6,8,9
Added Chapters 8
(Protecting Your EZPLC
Data) and 9 (User Program
Backup), sections for
Read Event Log, Show
full/abbreviated tag names
(chapter 2), PID Autotuning
(chapter 6).
A.6
11/06/06
Chapters 2, 4, 6
Updated PID Information
(Chapter 9). Renamed
Chapter 4 and added
configuration information
for enhanced thermocouple
module. Added information
for subroutine logic and
interrupt logic (Chapter 2).
EZAutomation
www.EZAutomation.net
1-877-774-EASY
v
1
Getting Started
In this chapter...
• EZPLC Editor
- System Requirements
- EZPLC Editor Installation
• EZLaunchPad
- Overview
- Installation
- Function
• EZStart
- Programming Ladder Logic
- Creating a Complete Rung
1-2
Chapter 1 - Getting Started
1.0 Getting Started
1.1 EZPLC Editor
EZPLC Editor is an intuitive and simple to use Relay Ladder Logic (RLL)
Editor for programming EZAutomation’s EZPLC, EZTouchPLC, and
EZTextPLC family of products.
Note: Since this Editor allows you to program any of EZAutomation’s
PLC products, anytime a reference is made to “PLC”, it applies to your
corresponding EZPLC, EZTouchPLC, or EZTextPLC.
1.1.1 System Requirements
The EZPLC Editor works on a Pentium class PC running Windows
2000 or XP and requires at least 20 MB of free space on hard drive for
installation.
1.1.2 Installation
The EZPLC Editor is distributed as a single setup file. The setup file for the
editor is EZPLCSetup.exe. (The name may contain the version number of
the software.)
Installation of the editor is quick and simple. Just run the setup file and
follow the on screen instructions. The default directory where the software
installs is …\Program Files\EZAutomation\EZPLC. You may also choose
to install EZPLC Editor in another directory as specified in installation
settings. If you are familiar with the installation process, you may skip the
detailed instructions.
To Install
Below are the detailed instructions for installing the software. Just follow the
instructions step by step to install EZPLC Editor on your hard drive.
1. Run the Setup file. You will see the dialog box below. Press the Next
button.
EZAutomation
www.EZAutomation.net
1-877-774-EASY
Chapter 1 - Getting Started
1-3
2. Please read the License Agreement text and continue:
3. The setup program will display the dialog box below to allow
you to choose the installation folder. As a default, the folder is
c:\Program Files\EZAutomation\EZPLC. You can change this if
you would like to.
Click the Install button to start installation.
4. During installation you will see a dialog box
which will list in detail the files being copied to
your hard drive for installation.
5. After copying necessary files and making
registry entries, the installation is complete,
and you will see the dialog box below. Click
the Finish button to finish the installation. If
the Run EZPLC checkbox is checked, the
program starts after closing this dialog box.
The setup program places the icon below on your desktop.
To Uninstall
If you need to uninstall this program, you can use the Uninstall command from
Start->All Programs->EZPLC-> Uninstall.
The uninstaller will prompt you to make sure that you want to uninstall EZPLC Editor and all
its components from your computer. If you select YES, all the components of EZPLC Editor
will be uninstalled from your computer.
EZAutomation
www.EZAutomation.net
1-877-774-EASY
1-4
Chapter 1 - Getting Started
1.2 EZLaunch Pad
Note: EZLauch Pad is not required for programming EZPLC products.
However, if you have more than one EZAutomation software products
installed on your computer, consider installing the EZLauch Pad
software to have one convenient place to run any of the installed
EZAutomation software products.
1.2.1 Overview
EZLaunch Pad is a convenient place to run all EZAutomation software
applications from one dialog box.
EZLaunch Pad software is distributed along with all EZAutomation software
packages, such as EZPanel Editor, EZText, EZPLC and EZMarquee
software. The software is also available on www.ezautomation.net as a
free download.
1.2.2 Installation
To install this software, please run the EZLaunchPadSetup.exe file. The
software installs itself and creates a desktop icon for your convenience.
1.2.3 Function
To use EZLaunchPad software, click the EZLauchPad icon. The software
opens up a dialog box that lists all the installed and not-installed
EZAutomation software on your computer. You may click on any of the
installed software to launch that software. The software not-installed is also
listed but cannot be used.
If you have multiple versions of any EZAutomation software installed, the
LaunchPad lists all versions for your convenience.
EZAutomation
www.EZAutomation.net
1-877-774-EASY
Chapter 1 - Getting Started
1-5
1.3 EZStart
You can start the EZPLC Editor in one of the following 3-ways:
1. Click the EZEditor Icon.
2. Select the program using Start>All Programs>EZPLC Editor.
3. Start EZLaunch Pad, and then click the EZPLC Editor Icon.
The following figure shows the startup dialog box and
the information you can enter in the dialog box:
The dialog box allows you to select Programming
mode, Project folder location, Project Name, and I/O
base. In addition, you can configure the EZPLC I/O
base (defining I/O module locations and addresses)
from this dialog box.
2
1
Select Project Name
Select
ACTION
3
4
Select & Configure I/O
Base (or do it later)
Configure
Communications
Step 1: Select ACTION
Edit Program OFF-LINE:
Select this mode to create a new program or edit an existing (on your computer) program in OFFLINE mode. OFF-LINE mode means that you are not connected to your PLC.
Read Program from EZPLC and Edit OFF-LINE:
This mode allows you to first read an existing project from a PLC, save it on PC, and then edit
your program OFF-LINE. You may want to use this mode if you do not have your program on your
computer. For reading back the program, the EZPLC can be in RUN or PROGRAM mode.
Edit Program ON-LINE:
This mode allows you to program your PLC on-line. This mode is very useful in troubleshooting and
dynamic programming as you can see the current state of memory locations and make appropriate
changes. The EZPLC must be in PROGRAM or RUN/PROGRAM mode for on-line editing.
EZAutomation
www.EZAutomation.net
1-877-774-EASY
1-6
Chapter 1 - Getting Started
Step 2: Select Project Name
Enter the name of the project. The Project Location field indicates the folder
name where the Project will be saved. If need be, use the Browse button
to select a different Project location.
Step 3: Selecting and Configuring I/O Base
(You can do this later when you start programming)
Select the I/O base for your PLC. Currently, EZPLC offers I/O
bases for 4, 6, 8, and 12 modules. (EZText PLC and EZTouch
PLC offer only 4 or 8 module bases depending on the model).
After selecting the I/O base size, Click on the Configure I/O
button to define the placement and the addresses of the I/O
modules (See dialog box on left).
The Module slot positions are identified as M1, M2, M3 etc, on
the I/O base. The dialog box shows only the available module
positions for the selected I/O base. For example, a 4-module
base will show only M1-M4 positions, while a 6-slot base will
display rows M1-M6.
To configure a module on a position, double click the row
corresponding to the position number (say M1) or click the Add/
Edit button. Select the module type from the available modules
and its I and/or O addresses from respective drop downs. You
select the start address of the module, and the software computes and fills
up the end address of the module automatically.
Module Position Numbering System
The Module positions on I/O bases are numbered as shown below. Please
keep this in mind while defining the I/O configuration.
6 module EZPLC
12 module EZPLC
M1
M3
M5
M7
M9
M2
M4
M6
M8
M10 M12
4 module EZPLC
M11
8 module
EZPLC
Step 4: Configure Communication
(You can do this later too, when you start programming)
This allows you to select the communication port on your PC that would be
used to transfer developed ladder logic to the EZPLC. You can make this
selection later by clicking the Configure button in the Ethernet/Com group
to choose the Com port number or Ethernet port.
If you choose a Com port, you don’t need to set any other parameters, as the
Editor and EZPLC utilize fixed com parameters (set at 38.4 Baud, 8, N, 1). If
you select Ethernet port, you’ll need to set the IP address of the EZPLC.
EZAutomation
www.EZAutomation.net
1-877-774-EASY
Chapter 1 - Getting Started
1-7
1.3.1 Programming Ladder Logic
Once you make your selections in the first dialog box and click OK, you will
come to the main programming screen as shown below:
Tool Bars
Tool bars provide quick
and easy access to
instructions and other
editing functions.
Project Explorer
View
Project view offers
a convenient way
to view your project
including I/O
configuration, main,
interrupt & subroutine
logic.
Instructions
Easy access to
Instructions Symbols
conveniently organized
in categories. Click on
a symbol and place in
Rung area. Use the Line
tool to connect symbols.
Double click
onto a symbol to
program instruction
parameters.
To program a rung, perform the following steps:
1. Select instruction. You can select instructions using a menu, or tool
bar, or the instruction bar on the right. The instruction bar provides all
instructions symbols organized by types. Once you select an instruction,
the cursor changes shape. Click on the location in the rung area where
you want to place the instruction.
2. Connect all placed instructions by using the Line tool.
3. Double click on any instruction to program its parameters.
4. At any time you may Syntax check the logic by selecting View>Syntax
Check-current Logic.
5. Once you are satisfied with the Ladder Logic, you can transfer the
developed project to the EZPLC by selecting File > Transfer to EZPLC
menu.
That’s all you need to do to program ladder logic for EZPLC.
The following chapters describe the EZPLC Editor User Interface, Ladder
Logic Programming, and Instructions in detail.
EZAutomation
www.EZAutomation.net
1-877-774-EASY
1-8
Chapter 1 - Getting Started
1.3.2 Creating a Complete Rung
This short example is provided to show you just how easy it is to create
a completed rung using EZPLC Editor. To complete a rung, perform the
following steps:
1. Place an instruction onto the Main Logic window. In this example,
we’ve used the Normally Open Contact instruction.
2. Place the other instructions you’d like to include in your rung onto the
Main Logic window. In this example, we’ve used another Normally
Open Contact and a Normally Open Coil instruction.
to draw a horizontal line connecting the first
3. Use the Line Tool
Normally Open Contact instruction to the Normally Open Coil
instruction.
4. Use the Line Tool
to draw a vertical line connecting the first
Normally Open Contact instruction to the second Normally Open
Contact instruction and you’re finished completing a rung. It’s just
that easy!
This is what your Rung should look like when
you’re finished.
EZAutomation
www.EZAutomation.net
1-877-774-EASY
2
EZPLC Editor User Interface
In this chapter....
• Main Programming Screen
• Standard Toolbar
• Instruction Toolbars
- Relay/Boolean Instructions
- Compare Instructions
- Math Instructions
- Bitwise Instructions
- Move Instructions
- Time/Counter Instructions
- String Instructions
- Communication Instructions
- Miscellaneous Instructions
• PLC Toolbar
• Menus
- File Menu
- Edit Menu
- View Menu
- Subroutine Menu
- Rung Menu
- Instructions Menu
- EZPLC Menu
- Setup Menu
- Window Menu
- Help Menu
- Right-Click Menu
2-2
Chapter 2 - EZPLC Editor User Interface
2.0 EZPLC Editor User Interface
In this chapter, you will become more familiar with the EZPLC Editor
user interface. The following pages will introduce you to the Main
Programming Screen and the various elements located there; all of the
Toolbars (Standard Toolbar, Instruction Toolbar, and PLC Toolbar);
all of the Menus (File Menu, Edit Menu, View Menu, Subroutine Menu,
Rung Menu, Instructions Menu, EZPLC Menu, Setup Menu, Window
Menu, and Help Menu); and the Instruction Toolbars (Relay/Boolean,
Compare, Math, Bitwise, Move, Timer/Counter, Program Control,
String, Communication, Miscellaneous) you will be using while
creating your EZPLC projects.
EZAutomation
www.EZAutomation.net
1-877-774-EASY
Chapter 2 - EZPLC Editor User Interface
2-3
2.1 Main Programming Screen
Once you have configured your project information in the opening dialog
box, the following screen will appear:
Title Bar
Logic Display
Window
Instructions
Tool Bar
Main Menu
Bar
Instruction
Icons
Project
View
Status Bar
Title Bar
The title bar displays the software name and logo as well as the name of the project currently open.
Main Menu Bar
This contains all of the drop menus available in EZPLC Editor. Some of the menus are context sensitive, so
they are hidden or displayed based on context.
Project View
This displays different elements being used in your current project. The Project View can also be used as a
navigational tool. If you click onto an element in Project View, it will be displayed in the Logic Display Window.
With EZPLC you can organize your logic in Main, Interrupt, and Subroutines. You have only one main and one
interrupt logic; however you can have multiple subroutines. Main Logic, as the name suggests, is the main logic
of your control program. You can place some of the functions as Subroutine Logic, which is then Called” from
main logic. You may want to use Subroutine to write some logic once and use at many places in your main logic
(by calling it), or just to organize your main logic in modules. The interrupt logic is a special logic section, which
is executed when an external interrupt occurs. The purpose of interrupt logic is to provide a fast response to
some time critical events. You will need to use the Interrupt input module to trigger execution of Interrupt logic.
Status Bar
This line at the bottom of the screen displays the status of the current project.
Instruction Icons
This area contains all of the RLL Instruction icons you will use in your project.
Instructions Toolbars
This is another way for you to access the RLL instructions and many other functions in EZPLC Editor.
EZAutomation
www.EZAutomation.net
1-877-774-EASY
2-4
Chapter 2 - EZPLC Editor User Interface
2.2 Standard Toolbar
The EZPLC Editor offers multiple toolbars for convenient access to many
functions and instructions. These toolbars can be displayed or hidden
using menu Edit > Toolbars. This section describes various tool bars
available in EZPLC Editor.
Open Project
Zoom Default
Save Ladder
Zoom In
Save Project
Zoom Out
Cut
Syntax Check
Copy
Line Tool
Paste
Go To Rung
Undo
Go To Label
Redo
Cascade Windows
Toggle Project View
Tile Windows
Print
Tag Database
About
Toggle Operator Bar for Instructions
Display
Help
Monitor Mode
EZAutomation
www.EZAutomation.net
1-877-774-EASY
Chapter 2 - EZPLC Editor User Interface
2-5
2.3 Instructions Toolbars
2.3.1 Relay/Boolean Operations
2.3.2 Compare Operations
All the icons for instructions shown in this section
will be described in detail in Chapter 3 - RLL
Instructions.
All the icons for instructions shown in this section
will be described in detail in Chapter 3 - RLL
Instructions.
The Instructions Toolbar consists of icons
for all the instructions available for Relay type
instructions. These commands are also found in,
and accessible from, the Main Menu > Instructions.
Normally Open Contact
Normally Closed Contact
The Compare Operations Toolbar consists of
icons for all the instructions available for Compare
Operations. These commands are also found in,
and accessible from, the Main Menu > Instructions.
Equal To
Not Equal To
Positive Contact
Greater Than
Negative Contact
Normally Open Coil
Normally Closed Coil
Less Than
Greater Than or Equal To
Set Coil
Less Than or Equal To
Reset Coil
Normally Open Contact - Immediate Input
Limit
Normally Closed Contact - Immediate Input
Normally Open Coil - Immediate Output
Normally Closed Coil - Immediate Output
EZAutomation
www.EZAutomation.net
1-877-774-EASY
2-6
Chapter 2 - EZPLC Editor User Interface
2.3.3 Math Operations
2.3.4 Bitwise Operations
All the icons for instructions shown in this section
will be described in detail in Chapter 4 - RLL
All the icons for instructions shown in this section
will be described in detail in Chapter 4 - RLL
Instructions.
The Math Operations Toolbar consists of
icons for all the instructions available for Math
Operations. These commands are also found
in, and accessible from, the Main Menu >
Instructions.
The Bitwise Operations Toolbar consists of
icons for all the instructions available for Bitwise
Operations. These commands are also found in,
and accessible from, the Main Menu > Instructions.
Add
And
Subtract
Or
Multiply
XOR
Divide
Not
Modulo
Shift Left
Absolute
Shift Right
X=Y Conversion
Rotate Left
Format Conversion
Rotate Right
EZAutomation
www.EZAutomation.net
1-877-774-EASY
Chapter 2 - EZPLC Editor User Interface
2-7
2.3.7 Program Control Operations
2.3.5 Move Operations
The Program Control Operations Toolbar consists of
icons for all the instructions available for Program Control
Operations. These commands are also found in, and
accessible from, the Main Menu > Instructions.
The Move Operations Toolbar consists of
icons for all the instructions available for Move
Operations. These commands are also found
in, and accessible from, the Main Menu >
Instructions.
All the icons for instructions shown in this section will be
described in detail in Chapter 4 - RLL Instructions.
All the icons for instructions shown in this section
will be described in detail in Chapter 4 - RLL
Instructions.
Jump
Move Data
For Loop
Move Block
Next
Block Fill
Call Subroutine
Move Table of Constants
Return (from a subroutine)
Bit Move
2.3.6 Timer/Counter Operations
The Timer Counter Operations Toolbar consists
of icons for all the instructions available for Move
Operations. These commands are also found in,
and accessible from, the Main Menu > Instructions.
All the icons for instructions shown in this section
will be described in detail in Chapter 4 - RLL
Instructions.
2.3.8 String Operations
The String Operations Toolbar consists of icons for all
the instructions available for String Operations. These
commands are also found in, and accessible from, the
Main Menu > Instructions.
All the icons for instructions shown in this section will be
described in detail in Chapter 4 - RLL Instructions.
String Move
Timer
String Compare
Counter
String Length
EZAutomation
www.EZAutomation.net
1-877-774-EASY
2-8
Chapter 2 - EZPLC Editor User Interface
2.3.9 Communication Operations
The Communication Operations Toolbar consists of icons for all the
instructions available for Communication Operations. These commands
are also found in, and accessible from, the Main Menu > Instructions.
All the icons for instructions shown in this section will be described in
detail in Chapter 4 - RLL Instructions.
Open Port
Send to Serial Port
Receive From Serial Port
Close Port
Send to Marquee
Modbus Master
2.3.10 Miscellaneous Operations
The Miscellaneous Operations Toolbar consists of icons for all the
instructions available for Miscellaneous Operations. These commands
are also found in, and accessible from, the Main Menu > Instructions.
All the icons for instructions shown in this section will be described in
detail in Chapter 4 - RLL Instructions.
Drum
EZAutomation
www.EZAutomation.net
1-877-774-EASY
Chapter 2 - EZPLC Editor User Interface
2-9
2.4 PLC Toolbar
The PLC Toolbar consists of icons for all the PLC hardware related
functions. These commands are also found in, and accessible from, the
Main Menu > EZPLC. Please see description under Menus for details of
these functions.
Write to PLC
PLC Information
Reboot PLC
PLC Time and Date
Monitor Tags
COM Configuration
EZAutomation
www.EZAutomation.net
1-877-774-EASY
2-10
Chapter 2 - EZPLC Editor User Interface
2.5 Menus
The Main Menu bar consists of the following menus:
Each of the above menus has a pull-down menu with further available
options which will be described in this section.
2.5.1 File Menu
When you click onto the File Menu, you can access the following
functions:
Open Project
To open an existing project or to create a new project while in a
programming window, click on File > Open Project. The Step 1, Project
Information dialog box will appear. Click on one of the SELECT ACTION
buttons. Choose from the available project files or enter a new Project
Name. Click on OK to open the project, or Exit to quit without opening.
Close Project
Click on File>Close Project to quit the current project.
Save Ladder
Click on File > Save Ladder to save the current ladder logic only.
Save Project
Click on File > Save Project to save the current project. Ladder, Project
Attributes and databases will all be saved.
Copy Project As…
Click on File > Copy Project As... to save your project under another
name.
EZAutomation
www.EZAutomation.net
1-877-774-EASY
Chapter 2 - EZPLC Editor User Interface
2-11
Save Project As Protected…
Click on File > Save Project As Protected to save the current project
as a password protected file. The Protection Password dialog box will
appear, as shown below:
Once saved, if you attempt to open this project again or read this project
from an EZPLC, you will then be prompted to enter your password, as
shown below:
The password protection feature will prevent unauthorized users from
viewing/editing the project, but will still allow a user to read from or write
to an EZPLC.
In the event that a user should not have access to edit a project, but have
the ability to write to an EZPLC, click Cancel in the window above. This
will provide the option to transfer the project to the EZPLC, as shown
below:
Click Yes, and you will be prompted to transfer your project, as shown on
the following page:
EZAutomation
www.EZAutomation.net
1-877-774-EASY
2-12
Chapter 2 - EZPLC Editor User Interface
Copy Rungs…
When you click on File > Copy Rungs… following window will appear as
follows:
Using the Copy Rungs options you can copy rungs from another project
into your existing project.
EZAutomation
www.EZAutomation.net
1-877-774-EASY
Chapter 2 - EZPLC Editor User Interface
2-13
Transfer to EZPLC...
Transfer to EZPLC allows you to transfer the current (open) project
to the PLC connected to your computer. For details on how to restrict
unauthorized readback/online access to your user program, see the
chapter titled Protecting you EZPLC Program.
Print
When you click on the Print menu item, you will be asked if you want
to save the project. Click on Yes or No. The screen shown below will
appear.
Once you click Yes or No it will take you to another screen as follows:
Using the above screen, you can choose if you want to print the Tag
Database or the Rungs in the ladder logic program
Print Setup
Choose or change your print settings here.
Exit
Click on Exit to quit the program.
EZAutomation
www.EZAutomation.net
1-877-774-EASY
2-14
Chapter 2 - EZPLC Editor User Interface
2.5.2 Edit Menu
When you click onto the Edit Menu, you can access the following
functions:
Undo / Redo
The Undo command is used to reverse the previous action. This function
must be performed next in order for the action to be undone. The
undo command goes back sixteen levels of undo. Redo will “redo” the
previously undone action.
Cut
This allows you to Cut (remove) a selected item(s) to the clipboard.
Copy
This allows you to Copy (without removing) a selected item(s) to the
clipboard.
Paste
This allows you to Paste a selected item from the clipboard onto the
displayed screen.
Select All
Click on Select All to select all items on the displayed screen.
Delete
Click on Delete to remove a selected item without placing it on the
clipboard.
Edit
Select an object and then click on the Edit command to make changes to
an object’s / instruction’s characteristics.
EZAutomation
www.EZAutomation.net
1-877-774-EASY
Chapter 2 - EZPLC Editor User Interface
2-15
Toolbars
Click on Toolbars to see the available menus where you can click on
the desired toolbars to be displayed on the toolbar section of the main
screen.
When Edit Multiple Toolbars… is selected, it further takes you to the
following screen which allows you to hide/select multiple toolbars from
one dialog box:
EZAutomation
Select Toolbars
Select Toolbars can be used to select / deselect available toolbars to be
displayed in the main toolbar section.
www.EZAutomation.net
1-877-774-EASY
2-16
Chapter 2 - EZPLC Editor User Interface
Default Tag Data Type
Default Tag Data Type allows you select the default Tag (memory
location of PLC) type. Every time a new Tag is added after this, it will
have the default type as chosen by this command through the following
screen:
Tag Name as Address
Click on File > Edit > Tag Name as Address. The EZPLC supports tag
names for addresses so that you can use meaningful names in your
instructions. For example, if a start button is wired at input I5, you may
use tag name “Start” (and assign it address I5) to refer to this button in
your logic. The EZPLC editor checks syntax of the address, but not of
the tag name. If you don’t want to use tag names, you may check the
option “Tag Name as Address.” You will be prompted to enter an address
instead of a tag name. In the Tag Database, you will see the address
itself as tag name.
For Example:
Tag Name and Address
Tag Name AS Address
Go to Rung…
Click on File > Edit > Go to Rung… for a convenient way to quickly
navigate to the desired rung. The menu will open the following dialog
box:
Go to Label…
Click on File > Edit > Go to Label… to go the specified label as shown
in the following screen:
EZAutomation
www.EZAutomation.net
1-877-774-EASY
Chapter 2 - EZPLC Editor User Interface
2-17
Show Full/Abbreviated Tag Names
In the EZPLC application, you can choose whether you want to display full
or abbreviated tag names in the ladder logic.
To display full tag names,
Select Edit>Show Full Tag Names. All tag names would now be displayed
in full. If a tag name is too large to fit, other entities in the ladder logic (such
as the diagram of the instruction, wires etc) would overlap it.
To display abbreviated tag names,
Select Edit>Show Abbreviated Tag Names. Note that tag names are
displayed abbreviated by default on the ladder logic.
EZAutomation
www.EZAutomation.net
1-877-774-EASY
2-18
Chapter 2 - EZPLC Editor User Interface
2.5.3 View Menu
When you click onto the View Menu, you can access the following
functions:
Syntax Check – Current Logic…
Click on View > Syntax Check – Current Logic… to display any errors
present in the logic currently being displayed on the screen. Once
selected, it displays the following message if NO errors are found.
If there are errors in the current logic, then it displays a similar screen as
below with all the errors present along with their position (e.g. rung etc):
Syntax Check – All Logic…
When using Syntax Check – All Logic, EZPLC Editor checks the entire
ladder logic program and displays the errors if found as shown above for
Syntax Check – Current Logic.
Main Logic…
Click on this option to display the Main Logic in the Main Window of
EZPLC Editor when Interrupt or Subroutine logic is present in the Main
Window. Main Logic, as the name suggests, is the main logic of your
control program. You can place some of the functions as Subroutine
Logic, which is then called from main logic. You may want to use
Subroutine to write some logic once and use at many places in your
main logic (by calling it), or just to organize your main logic in modules.
The interrupt logic is a special logic section, which is executed when
an external interrupt occurs. The purpose of interrupt logic is to provide
a fast response to some time-critical events. You will need to use the
Interrupt input module to trigger execution of Interrupt logic.
EZAutomation
www.EZAutomation.net
1-877-774-EASY
Chapter 2 - EZPLC Editor User Interface
2-19
Interrupt Logic…
Click on this option to display Interrupt Logic in the Main Window of
EZPLC Editor
Interrupt logic provides you a way of executing ladder placed in Interrupt
Logic section immediately in response to an external event. The interrupt
logic works with EZIO interrupt module (Part number: EZIO-4DCI4DCIF).
The input number 8 on this module (labeled as Fast Input (8)) is used for
executing the interrupt logic. A low to high transition on this input causes
PLC to suspend whatever it is currently executing, process the logic in
Interrupt Logic section, and then resume the execution from the point it
left. Interrupt Logic should be used only for events requiring an immediate
attention. While PLC is processing an interrupt, other interrupts on
interrupt input(s) would be ignored. You can have multiple interrupt
modules in a system, but only one interrupt logic section. Consequently,
the same section is executed regardless of the source of interrupt.
Subroutine Logic
Click on this to display the Subroutine Logic in the Main Window of the
EZPLC Editor.
Note: To display and switch between Main Logic, Interrupt Logic, and
Subroutine Logic, you can also use the Project Window to display the
appropriate logic in the Main Window.
Subroutines give you a way of grouping frequently used instructions
together into a separate ladder logic. Subroutine Logic is very similar
to Main Logic, with two main differences - subroutine ladder allows you
to use the Return instruction, and subroutine logic needs to be called,
by either the Main Logic or another subroutine (via the Call Subroutine
instruction) in order to be activated. EZPLC allows a maximum of 64
subroutines to be defined.
EZAutomation
www.EZAutomation.net
1-877-774-EASY
2-20
Chapter 2 - EZPLC Editor User Interface
2.5.4 Subroutine Menu
Subroutines have two main uses. One, you can write some commonly
used functions once, and use those multiple times within the main logic
by calling the subroutine. Second, you can use subroutines to write
modular logic. You can have multiple subroutines within a project. You
can call a subroutine from another subroutine. Such nested calls can not
exceed 16 levels deep. When you click onto the Subroutine Menu, you
can access the following functions:
Add
Use this function to add a Subroutine as shown in following screen:
Rename
This function can be used to rename an existing subroutine as shown in
the following screen:
Delete
This function can be used to delete an existing subroutine as shown in
the following screen:
Note: Subroutines can also be added by right clicking on Subroutine in
the Project Window.
EZAutomation
www.EZAutomation.net
1-877-774-EASY
Chapter 2 - EZPLC Editor User Interface
2-21
2.5.5 Rung Menu
When you click onto the Rung Menu, you can access the following
functions:
Insert New Rung
Click on this to add a new rung to the main ladder logic program.
Insert Rows
This function is used to add single or multiple rows within a rung. In
order to use this function, first select the RUNG in which you wish to add
single or multiple rows. Then click on the sub menu as follows to add the
appropriate number of lines within a RUNG.
EZAutomation
www.EZAutomation.net
1-877-774-EASY
2-22
Chapter 2 - EZPLC Editor User Interface
If you click on Insert Multiple Rows…, the following screen will appear
and will require the number the rows to be added within a RUNG.
Delete Row
Use this function to delete excessive rows from a RUNG. You must select
a RUNG from where a row is to be deleted. If Logic exists on the row
being deleted, it will prompt you with the following message:
Cut
Click on Rung > Cut for cut and paste functions for RUNGS present in
ladder logic. Before you apply this function you must select the desired
RUNG which is to be Cut. Once RUNGS are cut using this function, they
can be pasted into the desired location using the Insert Copied Rungs
function.
Copy
This function is used to Copy the selected Rungs present in ladder
logic. Once copied they can be pasted using the Insert Copied Rungs
function.
Insert Copied Rungs
This function is used to paste RUNGS that have been Cut or Copied
using the Cut and Copy functions in the Rung menu.
Delete
Use this function to delete the selected rungs from ladder logic.
Insert Label / Comment
Use this function to insert Label/Comment for a RUNG whose label and
or comment were deleted using the Delete Label / Comment function.
Edit Label / Comment
Use this function to add Labels and Comments for individual rungs.
Labels are useful when using the Jump instruction, which allows you to
skip RUNGS and go to the one specified in Jump instruction.
Clear Label
Can be used to clear label of an individual RUNG.
EZAutomation
www.EZAutomation.net
1-877-774-EASY
Chapter 2 - EZPLC Editor User Interface
2-23
Clear Comment
Can be used to clear the comments of an individual RUNG.
Delete Label / Comment
This function can be used to delete a Label and Comment for an
individual RUNG. When deleted, a rung can be re-labeled / commented
by using the Insert Label / Comment function in Rung Menu > Insert
Label/Comment.
Show Label / Comment
Use this function to Hide or Display the Labels and Comments for all the
RUNGS present in the ladder logic program.
2.5.6 Instructions Menu
All the Instructions used for Relay Ladder Logic are explained in detail
in Chapter 4 - RLL Instructions. When clicked on appropriate Instruction,
the EZPLC allows you to place that instruction in ladder logic by clicking
in the Main Programming window.
Relay/Boolean Instructions Menu
EZAutomation
www.EZAutomation.net
1-877-774-EASY
2-24
Chapter 2 - EZPLC Editor User Interface
Compare Instructions Menu
Timer/Counter Instructions Menu
Program Control Instructions Menu
Math Instructions Menu
String Instructions Menu
Communication Instructions Menu
Bitwise Instructions Menu
Miscellaneous Instructions Menu
Move Instructions Menu
Line
The Line Tool allows you to connect instructions and
objects in the ladder logic.
Selection
Click on this function to switch back to the Selection
Tool from the Line Tool.
EZAutomation
www.EZAutomation.net
1-877-774-EASY
Chapter 2 - EZPLC Editor User Interface
2-25
2.5.7 EZPLC Menu
The EZPLC menu allows you to access and control the EZPLC. In order
to utilize most of the functions present in this menu, EZAutomation’s
EZPLC, EZTouchPLC, or EZTextPLC must be connected to the
programming PC.
If the corresponding PLC is not connected to the programming PC, the
following error message will appear:
Information
Click on this function to acquire information for the PLC connected to
the programming PC. When connected, it displays information regarding
Status and Memory as shown in the following screen:
If the corresponding PLC is not connected to the programming PC, the
following message will appear:
EZAutomation
www.EZAutomation.net
1-877-774-EASY
2-26
Chapter 2 - EZPLC Editor User Interface
Reboot
Use this function to perform a Warm Reboot of the corresponding PLC
while connected to the programming PC as shown in the following
screen:
If corresponding PLC is not connected to the programming PC, the
following message will appear:
Clear Program
This function is used to clear the existing program present in the memory
of the PLC. When used, it will prompt for confirmation as follows:
Warning: If you select Yes, the corresponding PLC’s program will be
cleared!
Time/Date
This function can be used to Monitor and Change the current Time and
Date settings on a PLC. The PLC’s clock can be set for either 24-hour
or 12-hour along with the option to synchronize the PLC’s clock with the
clock of the programming PC as shown below:
programming PC as shown below:
EZAutomation
www.EZAutomation.net
1-877-774-EASY
Chapter 2 - EZPLC Editor User Interface
2-27
If the corresponding PLC is not properly connected to the programming
PC, the following error message will appear:
Monitor Tags
Click on this function to monitor/read in real time the memory addresses/
Tags from the corresponding PLC. When used, the following screen will
appear:
As shown in this screen, you can select the Tags (memory locations)
that need to be monitored in real time. Once they are selected, the Start
Monitoring button will start reading the Tags from the PLC unless the
End Monitoring button is pressed.
If the corresponding PLC is not properly connected to the programming
PC, the following error message will appear:
Start PLC
Use this function to Start the corresponding PLC into RUN mode.
Note: This function will only Start the PLC when present in RUN/Program
mode as selected by the DIP switches.
Stop PLC
Use this function to Stop the corresponding PLC when present in RUN/
Program mode.
Note: This function will only Stop the PLC when present in RUN/Program
mode as selected by DIP switches.
EZAutomation
www.EZAutomation.net
1-877-774-EASY
2-28
Chapter 2 - EZPLC Editor User Interface
COM Configuration…
This function is only available when programming in OFF-Line mode. Use
this function to select the COM port / Ethernet’s IP address of your PLC
based on how you are connecting i.e. via the COM port or Ethernet port.
The following screen appears when this function is selected:
If Ethernet is selected, the following screen will prompt you for the IP
address of your corresponding PLC.
Switch Monitor Mode / Switch to Edit Mode
Click on this function to switch between Monitor and Edit mode when
connected to the corresponding PLC.
Note: Monitor mode will not allow any editing of the ladder logic program
present in the PLC.
PID Monitor...
Click on this to open the dialog box for the PID Monitor function
(explained in detail on page 6-3)
EZAutomation
www.EZAutomation.net
1-877-774-EASY
Chapter 2 - EZPLC Editor User Interface
2-29
Read Event Log
Certain events, such as when EZPLC was started, TCP/IP errors, modbus master errors etc, are logged by EZPLC.
To view this log, perform the following steps:
● Select ELPLC->Read Event Log... This brings up the Read Event
Log dialog shown below:
● If you want the log to be cleared after you view it, check the box
labeled Clear Event Log after Reading. Otherwise, keep the box
unchecked.
● To view the log, click on the button labeled Read Event Log. Each
individual event is displayed in a single line. For each event, you can
see the date, time and description of the event.
● If you want to save the log to a file, click on the button labeled
Save Log to File. This brings up a Save As dialog that allows you to
specify the name and location of the file. The default extension of
this file is .log. The file that is saved is a tab-separated text file that
can be opened with a text viewer such as WordPad.
EZAutomation
www.EZAutomation.net
1-877-774-EASY
2-30
Chapter 2 - EZPLC Editor User Interface
2.5.8 Setup Menu
When you click onto the Setup Menu, you can access the following
functions:
Tag Database…
Tag Database allows you to view and add/edit current and new Tags
(memory addresses) of your corresponding PLC. Click on this function to
display the following screen:
As shown in the above screen, it will display all the Tags that have
already been entered for your PLC.
Clicking onto the Add/Edit button will display the following screen:
EZAutomation
www.EZAutomation.net
1-877-774-EASY
Chapter 2 - EZPLC Editor User Interface
2-31
As shown in the Add New Tag Details screen, you can add the Tag
Name, Tag Data Type, and Address for the Tag that is being created. You
can also specify the Initial Value of the Tag that is being added, where
the Initial Value is the value that the PLC assumes for this particular Tag
when using it the first time.
Tag Name: Every memory address (Tag) can also be assigned a
Tag Name which is used while programming the PLC. E.g. “O1”
is the memory location of physical output 1 present on an EZIO
module. Instead of remembering the function of O1, you can
specify a more meaningful name to it (for instance “Light1”). Now
you can use “Light1” everywhere in this ladder instruction and it
will be automatically referred to “O1”, which is the actual memory
address (Tag) of the PLC.
Tag Data Type: Based on the type of address selected in
“Address”, the available Tag Data Types will appear in this pull
down menu. For example, if you select “O1”, which is a discrete
output address of EZIO module, then the only valid Tag Data Type
will be Discrete. If R1 is selected as the Address which is the
internal word register for the PLC, then the valid Tag Data Types
will be Signed_INT_16, UnSigned_INT_16 etc.
Address: Address is used to specify the actual Tag (memory
address) of the corresponding PLC. For example, O1 refers to
Output 1, R1 refers to internal register 1, SR1 refers to system
register 1 etc.
As described above, the following screen is an example of adding a valid
Tag whose Address is O1, Data Type is Discrete, and the Tag Name is
Light1. Also, the Initial Value has been assigned to be ON or “1”.
When you have entered your Tag information, click on Apply Changes to
add the new Tag created by Edit Tag Details. Click Close to return back
to the main Tag Database screen.
# of Characters can only be specified when using an ASCII type Data
Type for a word register and the maximum number of characters is 40.
The main Tag Database screen also offers features for easy handling of
Tags entered in the database. Let’s take a look at the functions available
in this screen.
EZAutomation
www.EZAutomation.net
1-877-774-EASY
2-32
Chapter 2 - EZPLC Editor User Interface
The Search and Replace function can be used to find and replace Tags
present in the Tag Database. This allows you to easily make changes to
Tags previously entered in the database.
When the above check box is checked, it will highlight all the tags in
the PLC database which are not being utilized by an instruction. When
checked it will highlight unused Tags as follows:
As shown in the above screen, all the Tags not being utilized anywhere
in the PLC program will be highlighted. You can also delete these Tags
which might be present in access by clicking on Delete Unused Tags
which will prompt the following message:
If YES is selected, the corresponding Unused Tags in the database will
be deleted.
Once you are done adding/editing the Tags, click OK to return to the
main programming window.
EZAutomation
www.EZAutomation.net
1-877-774-EASY
Chapter 2 - EZPLC Editor User Interface
2-33
Tag Cross Reference…
This function is extremely useful for identifying the objects and
instructions utilizing a certain PLC Tag in the ladder logic program as
shown in the following screen:
As shown above, Tag Cross Reference provides all the details where
and how many times a certain Tag is used in the ladder logic program. In
the example shown, the “PRESET VALUE” register is being used in two
instructions: The Timer instruction is present in Rung 1, Row 4, Column 8
and the Counter instruction is present in Rung 1, Row 7, Column 8.
Tip: Use the Cross Reference function before changing the functionality
of any Tag. This will allow you to figure out very quickly where and how
many times that register is utilized in the ladder logic program.
Read EZ Tags…
This function is particularly useful when using EZTouchPLC and
EZTextPLCs, or if you are using EZPLC with EZPanels. Using this
function, the Tag Database of a project can be very easily populated by
automatically reading from a pre-existing Tag Database of an EZPanel
Enhanced, EZCE TouchPanel, EZText Enhanced, and or another EZPLC
project. Click on this function to display the screen on the following page.
EZAutomation
www.EZAutomation.net
1-877-774-EASY
2-34
Chapter 2 - EZPLC Editor User Interface
As shown in the example screen, you can decide which pre-existing
project is to be used for copying and adding the Tag information to the
existing Tag Database. Click on the Browse button to select the directory
and the name of the project to be utilized for copying the Tag information
as shown below:
As shown in the Read EZ Tags screen, you also have the option to
select the action in case the Tag being copied to the Tag Database
already exists.
Export Tags
Click on this function to expand this menu as shown below:
When Comma delimited is selected, this function exports all the Tags in
the Tag Database into a CSV file as specified by the user in the following
screen:
EZAutomation
www.EZAutomation.net
1-877-774-EASY
Chapter 2 - EZPLC Editor User Interface
2-35
When “To Excel…” is selected, this function automatically opens Excel
software on the programming computer and exports all the Tags in the
Tag Database as shown below.
Note: When using the “To Excel…” function, the EPLC Editor software
automatically opens a new “Book1,xls” file and exports the Tag information. Also the file is NOT saved on the hard drive unless you manually
save it. You must have Microsoft Excel software installed on your computer to utilize this function.
Import Tags
Click on this function to expand this menu as shown below:
When Comma delimited is selected, this function imports all the Tags
present in a CSV file as specified by the user in the following screen:
Once the user has selected a CSV file which is to be imported, the
following screen will appear and prompt user as follows for more
information:
EZAutomation
www.EZAutomation.net
1-877-774-EASY
2-36
Chapter 2 - EZPLC Editor User Interface
When Comma delimited is selected, this function imports all the Tags
present in an Excel file as specified by the user in the following screen:
Project Options…
Use this dialog to select options for Multiple Drop, Clearing registers
on program upload, Displaying information for warnings and restricting
unathorized readback/online access as shown in the following screen.
For details on how to restrict unauthorized readback/online access
to your user program, see the chapter titled Protecting you EZPLC
Program:
Click on the Application Colors tab. to edit the color and configuration
for the Ladder Logic programming window as shown in the screen below:
EZAutomation
www.EZAutomation.net
1-877-774-EASY
Chapter 2 - EZPLC Editor User Interface
2-37
I/O Configurations…
Click on this function to select the I/O configuration for your
corresponding PLC as shown in the screen below.
Using the above screen, you can specify the PLC that is to be used along
with each and every module description and location that is to be used.
Use “Select EZPLC I/O Base” to specify the corresponding base
information for EZPLC, EZTouchPLC, and EZTextPLC as shown in the
following screens:
It has a pull-down menu which will allow you to select between the
following bases for your corresponding PLC.
Note: The PLC base information will change as per the PLC used and
might not allow all the models as shown above.
Based on the selection chosen above, the following screen will display
information for all the available slots and the modules selected.
EZAutomation
www.EZAutomation.net
1-877-774-EASY
2-38
Chapter 2 - EZPLC Editor User Interface
Click on the Add/Edit button to add the module you wish to use with your
PLC.
Clicking on Add/Edit will display the following screen which will prompt
you to provide information regarding the module that you wish to add.
Under Select Module the drop-down menu will prompt you to add the
appropriate EZIO module as shown below:
Under Address Range specify the starting point for the registers (Tags)
which will be associated with that particular EZIO module.
Click onto Apply Changes to add the module information and repeat the
same steps 1-6 for all the modules that you wish to add:
EZAutomation
www.EZAutomation.net
1-877-774-EASY
Chapter 2 - EZPLC Editor User Interface
2-39
Ethernet Setup...
Select this function for defining the Ethernet settings for your
corresponding PLC. When selected, the following screen will be shown.
As shown in the above screen, you can specify the IP Address, Subnet
Mask, and Gateway for the corresponding PLC.
Note: Ethernet settings can only be adjusted on PLC models with
Ethernet communication capabilities.
Device Network…
This function can be used to select the settings for PLCs with DeviceNet
Slave and Profibus Slave communication capabilities. When selected the
following screen will appear:
EZAutomation
www.EZAutomation.net
1-877-774-EASY
2-40
Chapter 2 - EZPLC Editor User Interface
Network Type
Under Select Network Type the following three choices will appear in
the pull-down menu as follows:
Using the above menu, select the type of network you wish to configure.
Note: The DeviceNet and Profibus settings can only be configured for
PLCs with DeviceNet and Profibus communication interfaces installed.
1. DeviceNet Slave
When DeviceNet is selected, the following screen will appear:
Use the above screen to add information on Mac-ID, Data Timeout, Poll
Time, Maximum Consumed Words, Maximum Produced Words, along
with Baud Rate.
Baud rates of 125, 250, and 500 kb/s are available for DeviceNet Slave
PLC as shown below:
EZAutomation
www.EZAutomation.net
1-877-774-EASY
Chapter 2 - EZPLC Editor User Interface
2-41
2. Profibus Slave
When Profibus is selected the following screen will appear:
Use the above screen to add information on Node Address, Data
Timeout, Poll Time, Maximum Input Words, and Maximum Output Words.
Network Memory Map
Whether you select DeviceNet or Profibus communication settings, you
have to enter the Network memory map settings for both the networks.
1. DeviceNet
Once you have selected the network to DeviceNet, click on Network
Memory Map tab to display the following screen:
EZAutomation
www.EZAutomation.net
1-877-774-EASY
2-42
Chapter 2 - EZPLC Editor User Interface
View Memory Area has a pull down menu and is used to toggle view
between Network to PLC and PLC to Network settings as shown below.
The Network to PLC memory area corresponds to the maximum input
words and PLC to Network corresponds to the maximum output words as
selected under network type for DeviceNet.
Click on the Add Map button to display the following screen:
The Add Map Entry box as shown above is used to allocate the memory
information of your corresponding PLC to the consumed words and the
produced words of the DeviceNet Salve network.
Under PLC Address you can enter the type of PLC Tags to be shared
over the network along with starting and ending addresses as shown
below:
Under the Type pull-down menu, you can select from any of the PLCs’
registers defined in the Tag Database as shown below:
EZAutomation
www.EZAutomation.net
1-877-774-EASY
Chapter 2 - EZPLC Editor User Interface
2-43
Map to Network can be used to specify an offset if desired as follows:
Once all the selections have been filled as per user specifications, click
OK to add the mapping as shown below:
Similarly map all the desired memory locations of your PLC to the
produced ad consumed words of the DeviceNet network as explained
above.
Profibus
If you have selected the network to Profibus, click on Network Memory
Map tab to display the following screen:
EZAutomation
www.EZAutomation.net
1-877-774-EASY
2-44
Chapter 2 - EZPLC Editor User Interface
The View Memory Area has a pull down menu and is used to toggle
view between Read From PLC and Write To PLC settings as shown
below.
Read From PLC corresponds to the maximum Input Words and Write
to PLC corresponds to the maximum Output Words as selected under
network type for Profibus.
Click on the Add Map button to display the following screen:
The Add Map Entry box as shown above is used to allocate the memory
information of your corresponding PLC to the input and the output words
of the Profibus Salve network.
Under PLC Address you can enter the type of PLC Tags to be shared
over the network along with starting and ending addresses as shown
below:
Under the Type pull-down menu, you can select from any of the PLCs
registers defined in the Tag Database as shown below:
EZAutomation
www.EZAutomation.net
1-877-774-EASY
Chapter 2 - EZPLC Editor User Interface
2-45
Map to Network can be used to specify an offset if desired as follows:
Once all the selections have been filled as per your specifications, click
OK to add the mapping as shown below:
Similarly, map all the desired memory locations of your PLC to the input
and output words of the Profibus network as explained above.
PID...
Click on this to open the PID Setup dialog box (explained in greater
detail on page 6-4).
Upgrade Firmware (SEE CAUTION, BELOW)
There may be occasional upgrades to your EZPLC, EZTouchPLC, and
EZTextPLC internal software, also referred to as the Exec or Firmware.
(Check the EZAutomation website periodically for information about
software and firmware upgrades.)
EZAutomation
www.EZAutomation.net
1-877-774-EASY
2-46
Chapter 2 - EZPLC Editor User Interface
To Upgrade Firmware:
1. Back up the user program currently stored in the PLC and save to
disk.
2. Click on Upgrade Firmware and navigate (click the on Browse
button) to the new firmware file (.hex_plc file).
NOTE: These settings must match the PLC Communications Port that
you are connecting to.
3. Select the appropriate COM port under Ethernet/Com Port and click
on the OK button to begin the upgrade. A status bar will let you know
when the upgrade is complete.
Message Database
The Message Database for EZPLC Editor is used for populating a messages which can be utilized with the Send to Marquee instruction. Click
on this function to display the following screen:
EZAutomation
www.EZAutomation.net
1-877-774-EASY
Chapter 2 - EZPLC Editor User Interface
2-47
Click onto the Add/Edit button to display the following screen:
In the Add New Message window, add the details of the message as
shown. you can select the message number, marquee address, message
positioning, and message text along with options for previewing the
messages exactly how they would appear on an EZMarquee when
sent. Click on Add New Message to add the message to the database
and continue the same operation for all the messages that need to be
populated.
2.5.9 Window Menu
When you click onto the Window Menu, you can access the following
functions:
Close
Use this function to close the current ladder logic window open in the
main programming window. Double click on the ladder logic window in
the Project View window to show them again.
Close All
Use this function to close all the ladder logic windows open in the main
programming window. Double click on the ladder logic window in the
Project View window to show them again.
EZAutomation
www.EZAutomation.net
1-877-774-EASY
2-48
Chapter 2 - EZPLC Editor User Interface
Cascade
Click here to view open screen files in the window. Screens will cascade
down the window, overlapping each other, but with their title bars in view.
This is helpful when you are making changes to two or more screens at
the same time. Click on the title bar of one of the screens to bring it to the
front. The title bar is grayed out in screens that are not currently active.
The picture above shows screen files
arranged in Cascade Mode.
Tile
Click here to view open screen files in the window. Screens will be
arranged within the window. This is helpful if you want to copy or cut and
paste objects or drawings between screens. The title bar is grayed out in
screens that are not currently active.
2.5.10 Help Menu
The picture above shows screen files
arranged in Tile Mode.
Help Topics…
Click on Help Topics to view the help topics for the EZPLC Editor
Programming Software. The help window is in Windows 2000 format.
Use the Contents tab to view help topics by category. Click on the Index
tab to view an alphabetical list of all help topics. Click on the Search tab
and enter a word or words to search the help topics for.
About EZPLCEdit…
Click on About EZPLCEdit for copyright, manufacturer, and version
number of the EZPLC Editor Programming Software.
EZAutomation
www.EZAutomation.net
1-877-774-EASY
Chapter 2 - EZPLC Editor User Interface
2-49
2.5.11 Right-Click Menus
In addition to the drop-down menus mentioned earlier in this section,
there are two more menus available to give you more options while
working with your EZPLC Editor. They can be accessed by right-clicking
in two different areas in the Main Programming Screen.
The first menu can be accessed by right clicking in the rungs area of the
Main Programming Screen.
When you right click in the Rung area (in the square above) the following
menu will appear:
Through this menu, you can access the following functions: Insert New
Rungs, Insert Rows, Delete Rows, Cut, Copy, Insert Copied Rungs,
Delete, Insert Label/Comment, Edit Label/Comment, Clear Label, Clear
Comment, Delete Label/Comment, and Show Label/Comment.
EZAutomation
www.EZAutomation.net
1-877-774-EASY
2-50
Chapter 2 - EZPLC Editor User Interface
The second menu can be accessed by right clicking in the Main Logic
area of the Main Programming Screen.
When you right click in the Main Logic area (in the square above) the
following menu will appear:
Through this menu, you can access the following functions: Cancel
Selection, Edit, Cut, Copy, Paste, Delete, Select All, Go to Rung, Go To
Label, Ladder Options, and Switch to Monitor Mode.
EZAutomation
www.EZAutomation.net
1-877-774-EASY
Chapter 2 - EZPLC Editor User Interface
2-51
Ladder Options
When you select Ladder Options from the Right-Click Menu, the
following dialog box will appear:
This dialog box allows you to change a variety of the color attributes of
your ladder. Use the drop arrows to select different colors for the various
elements in your ladder. Click on the Miscellaneous tab to select the
options shown in the image below:
EZAutomation
www.EZAutomation.net
1-877-774-EASY
3
Instructions for Programming
EZPLC
In this chapter....
• Ladder Logic Programming in EZPLC
• Introduction to EZPLC Editor
• RLL Instructions in EZPLC Editor
- Relay/Boolean Instructions
- Compare Instructions
- Math Instructions
- Bitwise Instructions
- Move Instructions
- Timer/Counter Instructions
- Program Control Instructions
- String Instructions
- Communication Instructions
- Miscellaneous Instructions
3-2
Chapter 3 - Programming EZPLC
3.0 Programming EZPLC
3.1 Ladder Logic Programming in EZPLC
EZPLC Editor is used for developing relay ladder logic (RLL) programs using a
Personal Computer running windows.
A PLC accepts inputs from a variety of devices such as Switches, Sensors, etc.,
processes inputs according to user programmed control logic, and controls a
variety of devices (e.g. relay, motors, valves etc.) connected to the outputs of the
PLC. The Relay Ladder Logic is the user programmed control algorithm.
A ladder program is made up of a set of instructions to achieve the desired control
processes. Ladder Logic is built on the basis of electrical relay diagrams. A ladder
diagram graphically represents the elements of an electro-mechanical circuit. The
user makes rungs of a ladder comprised of series or parallel combinations of the
input devices and memory locations, which are usually followed by an output
device or memory location. The Output element is usually the last element on the
rung. Based on the conditional state of the inputs, Output receives an action signal.
When the logical rung continuity is not achieved, the output is not executed.
An example of a rung is shown in the picture on the left.
If you are new to RLL programming, here is a simple sequence you should follow
to develop RLL (Relay Ladder Logic) programs:
• Define your machine automation or automated process
• Determine hardware requirements for the control action
• Define a control algorithm
• Assign inputs and output parameters of the process to the control
algorithm
• Develop ladder program on a PC using EZPLC Editor Software
• Match I/O addresses of the Controller to the correct input/output devices
• Load the program into the PLC
• Validate the program
• Run program
EZAutomation
www.EZAutomation.net
1-877-774-EASY
Chapter 3 - Programming EZPLC
3-3
3.2 Memory Map
Each instruction is associated with one or more memory locations in the PLC. When tested, the logic
instructions test, set, reset bits and/or modify values in associated bits and/or registers.
EZPLC supports several types of memory elements (please see the hardware manual for a description of
these). The tables below summarize various memory types and the ranges for each.
Description
Syntax
Read/Write
Range
Use
Discrete Inputs
I
Read Only
1 – 128
For physical Discrete inputs (Input Image table, see below)
Discrete Outputs
O
Read/Write
1 – 128
For physical outputs (Output Image table, see below)
Discrete Internals
S
Read/Write
1 – 1024
General Purpose bits
System Discretes
SD
Read Only
1 – 16
Read-only System bits
Input Registers
IR
Read Only
1 – 64
For Input modules providing register type information (such
as counter module, analog input module)
Output Registers
OR
Read/Write
1 – 64
For output modules providing register type information (such
as counter module, analog output module)
Register Internals
R
Read/Write
1 – 8192
System Registers
SR
See Below
1 – 20
System Register (some read-only) some read-write
*Index Registers
XR
Read/Write
1–4
For indexed addressing
*Data value of R
register as pointed
by XR register
#R
Read/Write
1–4
Value of a register pointed to by corresponding index
register e.g. if XR1 has a value of 20, and R20 has value
100, then #R1 will have value 100 (the value in register
pointed to by XR1)
General purpose internal registers
*These types are used only with the Move Block, Move Data, and Block Fill Instructions.
What is Image Table?
EZPLC first reads INPUTS and stores them in its internal Image Table. Then it executes the logic where any
reference to Inputs/Outputs made is read from the Image Table only (except for Immediate instructions) and
NOT from the actual values of Inputs/Outputs on the EZIO Modules. During execution, any Outputs changed
are also written to the Image Table. After completion of the RLL execution, EZPLC writes the Outputs from the
Image Table to EZIO Modules and reads the Inputs again to the Image Table and the process continues.
3.2.1 System Discretes
The table below describes all of the System Discretes available in EZPLC Editor.
System
Discretes
Description
Read/Write
SD1
Read Only
First Scan Bit: Bit is On ONLY during the first scan of logic
SD2
Read Only
Bit toggles every100 millisecond. i.e. the bit is ON for 100 ms, and then off for 100 ms.
SD3
Read Only
Bit toggles every second, i.e. the bit is ON for 1 Sec, and then OFF for 1 sec.
SD4
Read Only
Run Bit: Bit is ON or 1 while PLC is executing ladder logic; can be monitored by an HMI
SD5
Enable
Setting this bit will open the port at the specified baud rate. Next, it will search for the Message
Database for the defined message number in SR20.
SD6
Baud Rate
A value of 0x01 will set the baud rate to be 38400. A value of 0x00 will set the value of Baud Rate
to 9600.
SD7
Error
This system discrete will be set if the Message Database is not defined or the message number
is NOT defined.
SD8
Busy
This bit is set when a valid message is unable to be sent and will be retired.
SD9-16
N.A.
Reserved - Do Not Use
EZAutomation
www.EZAutomation.net
1-877-774-EASY
3-4
Chapter 3 - Programming EZPLC
3.2.2 System Registers
The table below describes all of the System Registers available in EZPLC Editor. The numbers in these
registers are in Binary format.
System
Register
Read/Write
Description
SR1
N.A.
Reserved
SR2
N.A.
Reserved
SR3
Read Only
Firmware Major Revision
SR4
Read Only
Firmware Minor Revision
SR5
Read Only
Firmware Build Number
SR6
Read Only
Watchdog Timer Register; Increments every 10 ms
SR7
Read Only
Scan Time in ms
SR8
Read Only
Status- used to indicate some errors-- See below for defined bits
SR9
Read Only
Error Message Number (see below for defined errors)
SR10
Read/Write
Real Time Clock (RTC) Second
SR11
Read/Write
RTC Minute
SR12
Read/Write
RTC Hour
SR13
Read/Write
RTC Day: 1= Sunday, 2=Monday,...7=Saturday
SR14
Read/Write
RTC Date
SR15
Read/Write
RTC Month
SR16
Read/Write
RTC Year (only 2 digits)
SR17
Read/Write
Clock Mode: 0=24 Hour, 1= 12 Hour
SR18
Read/Write
AM PM: 0= AM, 1=PM
SR19
Read/Write
Update Clock:
In Ladder Logic ONLY Set to 1 to update internal clock with the values in these registers.
If setting time from a computer or HMI, DON’T write to this bit.
SR20
MSG_NUM
The message number to be displayed if valid. A message number not defined in the
message database is not a valid message and therefore the default message will be
displayed.
The PLC reports its errors in two system registers: SR8 and SR9. SR8 uses bits for indicating errors, while SR9
uses values to indicate the same errors. When these errors occur, the PLC halts the execution of ladder logic,
but continues to communicate. So an HMI can be used to detect these errors. When PLC halts execution of
ladder logic, the outputs are disabled.
Status Reported in SR8
(PLC stops executing ladder logic if error detected)
Error
Invalid User Program
Bit Set to 1
Error Number Reported in SR9
(PLC stops executing ladder logic error detected)
Error Number
Description
Bit 0 (lsb)
0
No error
No Label for Jump
Bit 1
1
Invalid User Program
Invalid Move data range
Bit 2
2
No Label for Jump
System Error
Bit 3
3
Invalid Move data range
4
System Error
5
Either FOR without NEXT, or NEXT without
FOR
EZAutomation
www.EZAutomation.net
1-877-774-EASY
Chapter 3 - Programming EZPLC
3-5
3.3 RLL Instructions in EZPLC
This section provides you with detailed information about using the RLL
(Relay Ladder Logic) instructions in EZPLC. This set of 55 instructions is
adequate to develop some of the most powerful control programs and at
the same time it’s concise enough to provide the shortest learning curve.
Each of the following sections is dedicated to a type of instructions. It is
organized in such a way that you will find:
• How to use the instructions
• Descriptions of every individual instruction, including a graphical example
and supported data types
The following table is provided as a quick reference to all RLL instructions
available in EZPLC Editor, as well as a brief description of what each
instruction is used for.
Instruction
Description
Relay/Boolean Instructions
NO Contact
When the corresponding memory bit is a 1 (on) it will allow power flow through this element
NC Contact
When the corresponding memory bit is a 0 (off) it will allow power flow through this element
Positive Transition
If the corresponding bit has changed from 0 (off) to 1 (on) in the current scan, power flows through this
element
Negative Transition
If the corresponding bit has changed from 1 (off) to 0 (on) in the current scan, power flows through this
element
NO Coil
As long as the power flows to the instruction, corresponding memory bit is remains 1(on)
NC Coil
As long as the power flows to the instruction, corresponding bit to remains 0 (off)
Set Coil
When power flows to the instructions, corresponding bit is set to 1 (on) and remains 1 (on) even if the
rung condition goes to false (use RESET COIL instruction to turn the corresponding bit Off)
Reset Coil
When power flows to the instructions, corresponding bit is set to 0 (off) and remains 0(off) even if the
rung condition becomes false (use SET COIL instruction to turn the corresponding bit on)
NO Immediate Input
EZPLC reads the addressed bit immediately from the input module (instead of memory). The power
flows through the instruction if the read bit is 1 (on). (Please note all the bits corresponding to the
input module are updated with the read value).
NC Immediate Input
EZPLC reads the addressed bit immediately from the input module (instead of memory). The power
flows through the instruction if the read bit is 0 (off). (Please note all the bits corresponding to the
input module are updated with the read value).
NO Immediate Output
The bit status is immediately written to corresponding output module. The bit remains 1(on) as long as
the power flows to the instruction.
NC Immediate Output
The bit status is immediately written to corresponding output module. The bit remains 0(on) as long as
the power flows to the instruction.
EZAutomation
www.EZAutomation.net
1-877-774-EASY
3-6
Chapter 3 - Programming EZPLC
RLL Instructions Table (continued)
Instruction
Description
Compare Instructions
Equal To
Allows power flow through this element if the data value of “Opr1” register is Equal to “Opr2” register
Not Equal To
Allows power flow through this element if the data value of “Opr1” register is NOT Equal to “Opr2” register
Greater Than
Allows power flow through this element if the data value of “Opr1” register is Greater Than “Opr2” register
Less Than
Allows power flow through this element if the data value of “Opr1” register is Less Than “Opr2” register
Greater Than or
Equal To
Allows power flow through this element if the data value of “Opr1” register is Greater Than or Equal to
“Opr2” register
Less Than or Equal
To
Allows power flow through this element if the data value of “Opr1” register is Less Than or Equal to “Opr2”
register
Limit
Allows power flow through this element if the data value of “Input” register is within the data values of “High
Limit” and “low Limit” registers
Math Instructions
Add
Adds two data values in “Opr1” and “Opr2” registers and stores the result in “Result” register
Subtract
Subtracts “Opr2” register data value from “Opr1” register data value and stores the result in “Result”
register
Multiply
Multiplies two data values in “Opr1” and “Opr2” registers and stores the result in “Result” register
Divide
Divides “Opr1” register data value by “Opr2” register data value and stores the result in “Result” register
Modulo
Divides “Opr1” register data value by “Opr2” register data value and stores only the remainder in “Result”
register
Absolute
Converts a negative data value from “Opr1” register to a positive value and stores it in “Result” register
Conversion
Copies the data value of “Opr” register, converts it into “Result” registers data type, and stores the data
value in “Result” register
Binary Conversion
Converts the data value of “Source” register in Binary, BCD, or GRAY code to the data value of “Result”
register in Binary, BCD or GRAY Code
Bitwise Instruction
AND
Performs a bitwise AND operation between the data values of two registers “Opr1” and “Opr2”. The result
is stored in “Result” register
OR
Performs a bitwise OR operation between the data values of two registers “Opr1” and “Opr2”. The result is
stored in “Result” register
XOR
Performs a bitwise XOR operation between the data values of two registers “Opr1” and “Opr2”. The result
is stored in “Result” register
NOT
Performs a bitwise NOT operation on the data value of “Source” register and stores the result in
“Destination” register
Shift Left
Performs a logical Shift Left on the data value of “Opr1” register by the data value of “Opr2” register and
stores the result in “Result” register
Shift Right
Performs a logical Shift Right on the data value of “Opr1” register by the data value of “Opr2” register and
stores the result in “Result” register
Rotate Left
Performs a logical Rotate Left on the data value of “Opr1” register by the data value of “Opr2” register and
stores the result in “Result” register
Rotate Right
Performs a logical Rotate Right on the data value of “Opr1” register by the value of “Opr2” register and
stores the result in “Result” register
EZAutomation
www.EZAutomation.net
1-877-774-EASY
Chapter 3 - Programming EZPLC
3-7
RLL Instructions Table (continued)
Instruction
Description
Move Instructions
Move Data
Moves data value of “Source” register to “Destination” register
Bit Move
Moves either words to bits or bits to words with user-specified length for the number of words to move.
Maximum of 16 words can be moved at a time
Move Block
Moves a block of memory area. “Source” register defines the starting area of memory address/register to
Move from and “Destination” register defines the starting area of memory address/register to move to. The
number of elements to move is user defined
Block Fill
Fills a block of memory area. “Source” register defines the data value to Fill with and “Destination” register
defines the starting area of memory address/register to Fill to. The number of elements to move is user
defined. The number of elements to Fill is user defined
Move Table of
Constants
Loads a table of user defined constants to a consecutive memory/register locations with the starting
memory address/register location defined by “Destination” register
Timer/Counter Instructions
Timer
This instruction starts timing when called and once it reaches the preset value as defined by the data value
of “Timer Preset Value” register, it will stop timing and will allow power flow through the element
Counter
This instruction starts counting either Up or Down by the increments of one until the counter reaches the
data value of “Counter Preset Value” register. The Counter will then allow power flow through the element
Program Control Instructions
Jump
Skips the rung containing Jump instruction (after execution of the rung) to a rung with the label specified in
the JUMP instruction and continues executing the program thereafter
For Loop
Executes the logic between the FOR Loop and NEXT instructions by the data value of “Loop Count”
register
Next Statement
Specifies the return/end point for the FOR Loop instruction
Call Subroutine
Calls a Subroutine specified by the label in CALL Subroutine instruction and is terminated by the RETURN
instruction
Return
Terminates a subroutine and returns back to the main logic
String Instructions
String Move
Moves the data value (string type) of “Source” register to “Destination” register by the number of
characters specified by the user
String Compare
Allows power flow through this element if the data value (string type) of “Source1” register is Equal to
“Source2” register by the number of characters specified
String Length
Computes the length of a null-terminated “String” register (string type) and stores the result in “Save
Length in” register
EZAutomation
www.EZAutomation.net
1-877-774-EASY
3-8
Chapter 3 - Programming EZPLC
RLL Instructions Table (continued)
Instruction
Description
Communication Instructions
Open Port
Opens the serial port for communication using the parameters specified by the user
Send to Serial Port
Send an ASCII string data from “Source” register to the serial port with control and character count from
user defined “Control Address” and “Character Count Address” registers respectively
Receive From
Serial Port
Receives an ASCII string data from serial port to “Source” register with control and character count from
user defined “Control Address” and “Character Count Address” registers respectively
Close Port
Closes the serial port opened for communication
Send to Marquee
Sends ASCII instructions for marquee communication. The message to be displayed on a marquee is
selected by the data value of “Message Number” register which looks up the message number for a
corresponding message from the central message database. If message number is not found in the
message database, user selected action for unmatched messages is done.
Miscellaneous Instructions
Drum
EZAutomation
Time and/or Event driven drum type sequencer with up to 16 steps and 16 discrete outputs per step. The
outputs are updated during each step. Counts have a specified time base (1MSec to 1 Sec) and every
step has its own counter along with an event to trigger the count. After the time expires for one step, it
transitions to the next step and completes up to 16 steps total. After the completion of all the steps this
element allows power flow through it
www.EZAutomation.net
1-877-774-EASY
Chapter 3 - Programming EZPLC
3-9
3.3.1 Relay/Boolean Instructions
Use discrete instructions to monitor and control the status of bits in the PLC.
The bits that can be monitored / controlled by using relay instructions are
inputs, outputs, internal bits and system bits.
Adding Relay/Boolean Instructions
To configure all of the various Relay/Boolean instructions, perform the
following steps:
1. Click on any Boolean instruction icon on the right side of the
screen.
2. Position the mouse over the Ladder diagram and click to place the
instruction.
3. To enter the Tag name/address, double click the instruction to
open its Dialog box.
4. Select a proper Tag name/address from the drop down list called Tag
Name.
EZAutomation
www.EZAutomation.net
1-877-774-EASY
3-10
Chapter 3 - Programming EZPLC
Normally
Open Contact
Normally
Closed Contact
Normally Open Contact:
The Normally Open Contact instruction reads/examines an input
or storage bit at memory location Aaaaa. If the corresponding
memory bit is ON (1), power will flow through this element.
Normally Closed Contact:
The Normally Closed Contact instruction reads/examines
an input or storage bit at memory location Aaaaa. If the
corresponding memory bit is OFF (0), power will flow through
this element.
Memory Data Type
Range
A
aaaa
Discrete Inputs
I
1 – 128
Discrete Outputs
O 1 – 128
Discrete Internals
System Discrete
S
SD
1 – 1024
1 – 16
Allowed Data Formats: Discrete Only
In the example above, when input I1 is ON, output O1 will energize.
In the example above, when input I2 is OFF, output O1 will energize.
EZAutomation
www.EZAutomation.net
1-877-774-EASY
Chapter 3 - Programming EZPLC
Positive Contact
Negative Contact
Note: The Positive
and Negative Contact
instructions test whether
a bit has changed from
0 to 1 or 1 to 0 during the current
scan of ladder logic respectively.
Therefore, to use these instructions,
the logic to change the state of the
bit MUST be placed before the logic
containing this instruction. If the
logic for change of state is placed
after the instruction, the instruction
will never see the transition, and
therefore will never be true.
3-11
Positive Contact:
The Positive Contact instruction reads/examines an input or
storage bit at memory location Aaaaa. If the addressed bit
has transitioned from the OFF (0) to the ON (1) state in the
current scan, power will flow through this element for the rest
of that scan.
Negative Contact:
The Negative Contact instruction reads/examines an input
or storage bit at memory location Aaaaa. If the addressed bit
has transitioned from the ON (1) to the OFF (0) state in the
current scan, power will flow through this element for the rest
of that scan.
Memory Data Type
Range
A
Discrete Inputs
aaaa
I
1 – 128
Discrete Outputs
O
1 – 128
Discrete Internals
S
1 – 1024
System Discrete
SD
1 – 16
Allowed Data Formats: Discrete Only
In the example above, every time I3 makes an off-to-on transition in
current scan, O3 will energize for a single scan.
In the example above, every time I4 makes an on-to-off transition in
current scan, O3 will energize for a single scan.
EZAutomation
www.EZAutomation.net
1-877-774-EASY
3-12
Chapter 3 - Programming EZPLC
Normally Open Coil:
As long as power flows to this element, the bit Aaaaa associated
with the Normally Open Coil instruction remains ON (1).
Normally
Open Coil
Normally
Closed Coil
Normally Closed Coil:
As long as power flows to this element, the bit Aaaaa associated
with the Normally Closed Coil instruction remains OFF(0).
Memory Data Type
Range
A
aaaa
Discrete Outputs
O
1 – 128
Discrete Internals
S
1 – 1024
Allowed Data Formats: Discrete Only
In the example above, 03 energizes when I3 transistions from 0 to 1.
In the example above, O6 will be de-energized as long as I2 is ON.
EZAutomation
www.EZAutomation.net
1-877-774-EASY
Chapter 3 - Programming EZPLC
Set Coil
Reset Coil
3-13
Set Coil:
When power flows to this element, the Set Coil instruction
sets/turns ON (1) the specified output or storage bit at memory
location Aaaaa. Once the specified output or storage memory bit
is turned ON (1), it will remain ON (1) even if the rung conditions
change later to stop power flow to the element. The only way
to change the status of the specified storage or memory bit set by ‘Set Coil’
is to use the ‘Reset Coil’ instruction.
Reset Coil:
When power flows to this element, the Reset Coil instruction
resets/turns OFF (0) the specified output or storage bit at
memory location Aaaaa. Once the specified output or storage
memory bit is turned OFF (0), it will remain OFF (0) even if the
rung conditions change later to stop power flow to the element.
The only way to change the status of the specified storage or memory bit
reset by ‘Reset Coil’ is to use the ‘Set Coil’ instruction to set/turn ON (1).
Memory Data Type
Range
A
aaaa
Discrete Outputs
O
1 – 128
Discrete Internals
S
1 – 1024
Allowed Data Formats: Discrete Only
In the example above, bit 07 is Set when I1 is ON. Bit 07 will remain
Set even after I1 becomes FALSE.
In the example above, if I2 is ON, S1 will be Reset (turned OFF).
EZAutomation
www.EZAutomation.net
1-877-774-EASY
3-14
Chapter 3 - Programming EZPLC
Normally Open
Immediate Input
Normally Closed
Immediate Input
A Normal PLC scan consists of
reading inputs (and saving the
input status in memory or input
image table), solving ladder logic,
and writing outputs (from memory
or output image table). During a
logic scan, if a reference to an
input comes up, the value stored
in memory is used for that input.
Similarly, if logic needs to energize
an output, a corresponding memory
bit is set, which is later written to
the physical output during the I/O
scan phase.
The immediate input instructions
allow you to read a corresponding
input bit at the time of instruction
execution, and use the most current
bit status (instead of the status stored
in memory during input read) in logic
solving. Immediate input instructions
update all the bits corresponding to
an input module, even if only one
of the bits is used in an Immediate
input instruction. For example, if I1
is used for immediate input, which is
on a 8 input card, bits I1 - I8 would
be updated immediately.
EZAutomation
Normally Open Immediate Input:
The Normally Open Immediate Input instruction reads/examines
the status of the specified Input point at location Aaaaa directly
from the EZIO module at the time of execution and NOT from
the memory bit present in the Image Table. If the corresponding
input state is ON (1), power will flow through this element. All
the available inputs on corresponding module are read only. The Image
Table is also updated with the read input memory locations.
Normally Closed Immediate Input:
The Normally Closed Immediate Input instruction reads/
examines the status of the specified Input point at location
Aaaaa directly from the EZIO module at the time of execution
and NOT from the input memory bit present in the I/O scan
image. If the corresponding input state is OFF (0), power will
flow through this element. When Aaaaa corresponds to an EZIO input
module, all the available inputs on the corresponding module are read only.
The Image Table is also updated with the read input memory locations.
Memory Data Type
Range
A
Discrete Inputs
I
aaaa
1 – 128
Allowed Data Formats: Discrete Only
In the example above, when instruction --|i|-- is executed, the input
module addressed I8 is read, and then the rung is solved. All inputs (I1I8) on that module are read and the memory is updated.
In the example above, when instruction ---|i|--- is executed, the input
module addressed I8 is read, and then the rung is solved. All inputs (I1I8) on that module are read and the memory is updated.
www.EZAutomation.net
1-877-774-EASY
Chapter 3 - Programming EZPLC
Normally Open
Immediate Output
Normally Closed
Immediate Output
Normally Open Immediate Output:
When power flows to this element, the Normally Open
Immediate Output instruction sets/turns ON (1) the specified
output point at memory location Aaaaa directly on the EZIO
module and the output memory bit in the Image Table at the
time of execution.
Normally Closed Immediate Output:
When power flows to this element, the Normally Open
Immediate Output instruction resets/turns OFF (0) the
specified output point at memory location Aaaaa directly on
the EZIO module and the output memory bit in the Image
Table at the time of execution.
Memory Data Type
Range
A
Discrete Outputs
A Normal PLC scan consists of
reading inputs (and saving the
input status in memory or input
image table), solving ladder logic,
and writing outputs (from memory
or output image table). During
logic scan, if a reference to an
input comes up, the value stored
in memory is used for that input.
Similarly, if logic needs to energize
an output, a corresponding memory
bit is set, which is later written to
physical output during the I/O scan
phase.
3-15
O
aaaa
1 – 128
Allowed Data Formats: Discrete Only
In the example above, if the power flows to the output instruction,
O8 will be energized and immediately written to the physical output
corresponding to O8.
The immediate Output instructions
allow you to write to the
corresponding physical output at the
time of instruction execution, instead
of waiting for the I/O scan to write the
output. Only the output referred to by
the instruction is updated.
In the example above, if the power flows to the output instruction, O8
will be de-energized and immediately written to the physical output
corresponding to O8.
EZAutomation
www.EZAutomation.net
1-877-774-EASY
3-16
Chapter 3 - Programming EZPLC
3.3.2 Compare Instructions
Compare instructions allow you to compare values using a specific
comparison instruction. When using compare instructions you must
compare values of the same data and display type. The parameters you
enter are program constants or logical addresses of the values you want
to compare.
Compare instructions perform comparisons of two addresses Opr1 and Opr2
defined by the data box selected. When the processor finds the expression
is true, the power flows through these instructions.
Opr1 = Operand 1
Opr2 = Operand 2
Adding Compare Instructions
To add Compare Instructions, perform the following steps:
1. Click on any Compare instruction icon on the right side of the
screen.
2. Position the mouse over the Ladder diagram and click the mouse to
place the instruction.
3. To enter Data/Display types, double click the instruction to open its
Dialog box.
4. Select a proper Tag name/address from the drop down list for
Operand 1.
5. Select a proper Tag name/address from the drop down list for
Operand 2.
6. Choose the correct data format from the last drop down list on
the dialog box.
7. Data types for both Operand 1 and 2 must be the same.
Note: 1) Data of five different types SIGNED_INT_16, SIGNED_INT_32,
UNSIGNED_INT_16, UNSIGNED_INT_32 or FLOAT 32 is allowed. 2) Word
Data Types default to decimal display type. 3) UNSIGNED Data Types also
allow Hex and Octal displays. 4) Display Type allows you to select how the
number will be displayed in the program. There are three display options
HEX, OCTAL or DECIMAL.
EZAutomation
www.EZAutomation.net
1-877-774-EASY
Chapter 3 - Programming EZPLC
Equal To
Not Equal To
3-17
Equal To:
The Equal To instruction can be used to
compare two Operands, Opr1 at memory
location Aaaaa and Opr2 at memory location
Bbbbb. If Opr1 = Opr2 then power will flow
through this element. Either Operand can be
assigned a constant value. Values can be
displayed in Decimal, Hex, or Octal format. Both Opr1 and Opr2 must be
of the same data type.
Not Equal To:
The Not Equal To instruction can be used
to compare two Operands, Opr1 at memory
location Aaaaa and Opr2 at memory location
Bbbbb. If Opr1 ≠ Opr2 then power will flow
through this element. Either Operand can be
assigned a constant value. Values can be displayed in Decimal, Hex, or
Octal format. Both Opr1 and Opr2 must be of the same data type.
Memory Data Type
Range
A, B
Input Registers
aaaa
bbbb
IR
1 – 64
1 – 64
Output Registers
OR
1 – 64
1 – 64
Register Internals
R
1 – 8192
1 – 8192
System Registers
SR
1 – 20
1 – 20
Allowed Data Formats: all register data type except ASCII.
In the example above, if R1 equals R2, power will flow out of EQ and
O1 will be energized.
In the example above, if R1 does not equal R2, power will flow out of
NEQ and O1 will be energized.
EZAutomation
www.EZAutomation.net
1-877-774-EASY
3-18
Chapter 3 - Programming EZPLC
Greater Than
Greater Than:
The Greater Than instruction can be used
to compare two Operands, Opr1 at memory
location Aaaaa and Opr2 at memory location
Bbbbb. If Opr1 > Opr2 then power will flow
through this element. Either Operand can be
assigned a constant value. Values can be
displayed in Decimal, Hex, or Octal format. Both Opr1 and Opr2 must be
of the same data type.
Less Than
Less Than:
The Less Than instruction can be used to
compare two Operands, Opr1 at memory
location Aaaaa and Opr2 at memory location
Bbbbb. If Opr1 < Opr2 then power will flow
through this element. Either Operand can be
assigned a constant value. Values can be
displayed in Decimal, Hex, or Octal format. Both Opr1 and Opr2 must be
of the same data type.
Memory Data Type
Range
A, B
aaaa
bbbb
Input Registers
IR
1 – 64
1 – 64
Output Registers
OR
1 – 64
1 – 64
Register Internals
R
1 – 8192
1 – 8192
System Registers
SR
1 – 20
1 – 20
Allowed Data Formats: all register data type except ASCII
In the example above, if R1 is Greater Than R2, power will flow out and
O1 will be energized.
In the example above, if R1 is Less Than R2, power will flow and O1
will be energized.
EZAutomation
www.EZAutomation.net
1-877-774-EASY
Chapter 3 - Programming EZPLC
Greater Than
or Equal To
Less Than
or Equal To
3-19
Greater Than Or Equal To:
The Greater Than Or Equal To instruction can
be used to compare two Operands, Opr1 at
memory location Aaaaa and Opr2 at memory
location Bbbbb. If Opr1 is Greater Than Or
Equal To Opr2 then power will flow through
this element. Either Operand can be assigned
a constant value. Values can be displayed in Decimal, Hex, or Octal format.
Both Opr1 and Opr2 must be of the same data type.
Less Than Or Equal To:
The Less Than Or Equal To instruction can
be used to compare two Operands, Opr1 at
memory location Aaaaa and Opr2 at memory
location Bbbbb. If Opr1 is Less Than Or Equal
To Opr2 then power will flow through this
element. Either Operand can be assigned a
constant value. Values can be displayed in Decimal, Hex, or Octal format.
Both Opr1 and Opr2 must be of the same data type.
Memory Data Type
Input Registers
Output Registers
Memory Data Type
A, B
aaaa
bbbb
IR
1 – 64
1 – 64
OR
1 – 64
1 – 64
1 – 8192
1 – 8192
1 – 20
1 – 20
Register Internals
R
System Registers
SR
Allowed Data Formats: all register data type except ASCII.
In the example above, if R1 is Greater Than or Equal To R2, power will
flow out and O1 will be energized.
In the example above, if R1 is Less or Equal To R2, power will flow out
and O1 will be energized.
EZAutomation
www.EZAutomation.net
1-877-774-EASY
3-20
Chapter 3 - Programming EZPLC
Limit
Limit:
The Limit instruction can be used to compare
register data values of the Input at memory
location Aaaaa with Low at memory location
Bbbbb and High at memory location Ccccc.
If Aaaa ≤ Ccccc and Aaaaa ≥ Bbbbb then
power will flow through this element. Any of
the registers (Input, High or Low) can be assigned a constant value. Values
can be displayed in Decimal, Hex, or Octal format. All the registers must
be of the same data type.
Memory Data Type
Input Registers
Output Registers
Range
A , B, C
aaaa
bbbb
cccc
IR
1 – 64
1 – 64
1 – 64
OR
1 – 64
1 – 64
1 – 64
1 – 8192
1 – 8192
1 – 8192
1 – 20
1 – 20
1 – 20
Register Internals
R
System Registers
SR
Allowed Data Formats: all register data type except ASCII
In the example above, if the input R1 is within R2 and R3, power will
flow out and O9 will be energized.
EZAutomation
www.EZAutomation.net
1-877-774-EASY
Chapter 3 - Programming EZPLC
3-21
3.3.3 Math Instructions
The instructions listed within this chapter perform arithmetical operations
on user specified values or addresses. All Math Instructions are always
TRUE (that is, power flows through them).
Adding Math Instructions
To configure all of the various Math instructions, perform the following
steps:
1. Click on any Math instruction icon on the right side of the screen.
2. Position the mouse over the Ladder diagram and click the
mouse to place the instruction.
3. To enter Data/Display types, double click the instruction to open its
Dialog box.
4. Select a Tag name/address from the drop down list for Operand 1.
5. Select a Tag name/address from the drop down list for Operand 2.
6. Select a Tag name/address from the drop down list for Result.
7. For Absolute, X=Y Conversion, and Binary Conversion instructions,
select Source and Destination Tag names/addresses.
8. Choose the correct data format from the last drop down list on
dialog box.
9. Data types for all Operand 1, Operand 2 and Result must be the same
(Source and Destination for Absolute and Conversion instructions).
EZAutomation
www.EZAutomation.net
1-877-774-EASY
3-22
Chapter 3 - Programming EZPLC
Add
Subtract
Add:
When power flows to this element, the Add
instruction adds the register data values of two
Operands, Opr1 at memory location Aaaaa and
Opr2 at memory location Bbbbb. The added
value is stored in Result at memory location
Ccccc. Opr1 and Opr2 can be assigned a
constant value. Values can be displayed in Decimal, Hex, or Octal format.
Both the Operands and Result must be of the same data type.
Subtract:
When power flows to this element, the Subtract
instruction subtracts the register data value of
Opr2 at memory location Bbbbb from Opr1 at
memory location Aaaaa. The subtracted value
is stored in Result at memory location Ccccc.
Opr1 and Opr2 can be assigned a constant
value. Values can be displayed in Decimal, Hex, or Octal format. Both the
Operands and Result must be of the same data type.
Memory Data Type
Input Registers
Output Registers
Range
A, B, C
aaaa
bbbb
cccc
IR
1 – 64
1 – 64
1 – 64
OR
1 – 64
1 – 64
1 – 64
1 – 8192
1 – 8192
1 – 8192
1 – 20
1 – 20
1 – 20
Register Internals
R
System Registers
SR
Allowed Data Formats: all register data type except ASCII.
In the example above, R1 will be added to R2 and the result will be
placed in R3.
In the example above, R2 will be subtracted from R1 and the result will
be placed in R3.
EZAutomation
www.EZAutomation.net
1-877-774-EASY
3-23
Chapter 3 - Programming EZPLC
Multiply
Divide
Multiply:
When power flows to this element, the Multiply
instruction multiplies the register data values
of two Operands, Opr1 at memory location
Aaaaa and Opr2 at memory location Bbbbb.
The multiplied value is stored in Result at
memory location Ccccc. Opr1 and Opr2 can be
assigned a constant value. Values can be displayed in Decimal, Hex, or Octal
format. Both the Operands and Result must be of the same data type.
Divide:
When power flows to this element, the Divide
instruction divides the register data value of
Opr1 at memory location Aaaaa by Opr2 at
memory location Bbbbb. The divided value
is stored in Result at memory location Ccccc.
Opr1 and Opr2 can be assigned a constant
value. Values can be displayed in Decimal, Hex, or Octal format. Both the
Operands and Result must be of the same data type.
Memory Data Type
Input Registers
Output Registers
Range
A, B, C
aaaa
bbbb
cccc
IR
1 – 64
1 – 64
1 – 64
OR
1 – 64
1 – 64
1 – 64
1 – 8192
1 – 8192
1 – 8192
1 – 20
1 – 20
1 – 20
Register Internals
R
System Registers
SR
Allowed Data Formats: all register data type except ASCII.
In the example above, R1 will be Multiplied by R2 and the product will
be placed in R3.
In the example above, R1 will be divided by R2 and the result will be
placed in R3.
EZAutomation
www.EZAutomation.net
1-877-774-EASY
3-24
Chapter 3 - Programming EZPLC
Modulo
Modulo:
When power flows to this element, the Modulo
instruction divides the register data value of
Opr1 at memory location Aaaaa by Opr2 at
memory location Bbbbb. The Remainder Value
is stored in Result at memory location Ccccc.
Opr1 and Opr2 can be assigned a constant
value. Values can be displayed in Decimal, Hex, or Octal format. Both the
Operands and Remainder must be of the same data type.
Memory Data Type
Input Registers
Output Registers
Range
A, B, C
aaaa
bbbb
cccc
IR
1 – 64
1 – 64
1 – 64
OR
Register Internals
R
System Registers
SR
1 – 64
1 – 64
1 – 64
1 – 8192
1 – 8192
1 – 8192
1 – 20
1 – 20
1 – 20
Allowed Data Formats: signed and unsigned integers only.
In the example above, R1 is divided by R2 and only the remainder is
placed in R3.
EZAutomation
www.EZAutomation.net
1-877-774-EASY
Chapter 3 - Programming EZPLC
Absolute
3-25
Absolute:
When power flows to this element, the
Absolute instruction converts the signed
(negative) register data value of Src at memory
location Aaaaa to the absolute (positive only)
data value and stores it in Dest at memory
location Bbbbb. Both Source and Destination
must be of the same data type.
Memory Data Type
Input Registers
Output Registers
Range
A, B
aaaa
bbbb
IR
1 – 64
1 – 64
OR
1 – 64
1 – 64
1 – 8192
1 – 8192
1 – 20
1 – 20
Register Internals
R
System Registers
SR
Allowed Data Formats: signed and floating point data types only.
In the example above, R11 will contain the Absolute value of R10 (for
example, if R10 was -10, R11 will contain +10).
EZAutomation
www.EZAutomation.net
1-877-774-EASY
3-26
Chapter 3 - Programming EZPLC
X=Y
Conversion
X=Y Conversion:
When power flows to this element, the X=Y
Conversion instruction converts the register
data type of Opr at memory location Aaaaa
to Res at memory location Bbbbb and copies
the converted data value to Res at memory
location Bbbbb. If Opr has a Floating Point data
type it can either be rounded off to the nearest integer value or truncated
when converting to other data types.
When the integer or floating point data value is converted to an ASCII type
data value, the number of digits, decimal position and justification (leading
zeros, leading spaces, or trailing spaces) can be assigned as per user.
Memory Data Type
Input Registers
Output Registers
Range
A, B
aaaa
bbbb
IR
1 – 64
1 – 64
OR
1 – 64
1 – 64
1 – 8192
1 – 8192
1 – 20
1 – 20
Register Internals
R
System Registers
SR
Allowed Data Formats: all register data types.
Note: If converting a signed 16 bit (with a negative value -1) to an
unsigned 16 bit register the result will always be zero.
In the example above, variable A, (R500) which is an UNSIGNED_32
(U32) Type, will be converted to an UNSIGNED_16 Type (U16) and saved
in B.
EZAutomation
www.EZAutomation.net
1-877-774-EASY
Chapter 3 - Programming EZPLC
Format
Conversion
3-27
Format Conversion:
When power flows to this element, the Format
Conversion instruction converts the data
format of From at memory location Aaaaa to
To at memory location Bbbbb as follows:
• Binary to BCD
• BCD to Binary
• Binary to Gray Code • Gray Code to Binary
Both the From and To data types must be a 16bit Signed Integer, 16bit
Unsigned Integer, or 16bit BCD for Format Conversion instruction.
Memory Data Type
Input Registers
Output Registers
Range
A, B
aaaa
bbbb
IR
1 – 64
1 – 64
OR
1 – 64
1 – 64
1 – 8192
1 – 8192
1 – 20
1 – 20
Register Internals
R
System Registers
SR
Allowed Data Formats: SIGNED_INT_16, UNSIGNED INT 16, BCD INT
16
In the example above, R1 which is in Binary format, is converted to
Gray Code and saved in R2.
EZAutomation
www.EZAutomation.net
1-877-774-EASY
3-28
Chapter 3 - Programming EZPLC
3.3.4 Bitwise Instructions
Bitwise Instructions operate on 16-bit or 32-bit SIGNED and UNSIGNED
data types. Operations are performed on the bit patterns of two registers.
After the operation, the results are stored in a third register (Res). Neither
input is changed.
Adding Bitwise Instructions
To configure all of the various Bitwise instructions, perform the following
steps:
1. Click on any Bitwise instruction icon on the right side of the screen.
2. Position the mouse over the Ladder diagram and click the
mouse to place the instruction.
3. To enter Data/Display types, double click the instruction to open its
Dialog box.
4. Select a proper Tag name/address from the drop down list for
Operand 1.
5. Select a proper Tag name/address from the drop down list for
Operand 2.
6. Select a proper Tag name/address from the drop down list for
Result.
7. Choose the correct data format from the last drop down list on
dialog box.
8. Data types for all Operand 1, Operand 2 and Result must be the
same.
EZAutomation
www.EZAutomation.net
1-877-774-EASY
3-29
Chapter 3 - Programming EZPLC
And
Or
AND:
When power flows through this element,
the AND instruction performs a bitwise AND
operation on data values of Opr1 at memory
location Aaaaa and Opr2 at memory location
Bbbbb and stores the output in Res at
memory location Ccccc. Opr1 and Opr2 can
be assigned a constant value. Values can be displayed in Decimal, Hex, or
Octal format. The Operands and Res must be of the same data type.
OR:
When power flows through this element,
the OR instruction performs a bitwise OR
operation on data values of two registers Opr1
at memory location Aaaaa and Opr2 at memory
location Bbbbb and stores the output in Res at
memory location Ccccc. Opr1 and Opr2 can
be assigned a constant value. Values can be displayed in Decimal, Hex, or
Octal format. The Operands and Res must be of the same data type.
Memory Data Type
Input Registers
Output Registers
Range
A, B, C
aaaa
bbbb
cccc
IR
1 – 64
1 – 64
1 – 64
OR
1 – 64
1 – 64
1 – 64
1 – 8192
1 – 8192
1 – 8192
1 – 20
1 – 20
1 – 20
Register Internals
R
System Registers
SR
Allowed Data Formats: SIGNED_INT_16, SIGNED_INT_32, UNSIGNED_
INT_16, UNSIGNED_INT_32.
Status=0001 0011 0101 0111
MASK=0000 1111 0000 0000
Status After AND:
=0000 0011 0000 0000
In the example above, Status in R300 is ANDed with MASK in R305
and the result is stored in Status.
Status=0001 0011 0101 0111
MASK=0000 1111 0000 0000
Status After OR:
=0001 1111 0101 0111
In the example above, Status in R300 is ORed with MASK in R305 and
the result is stored in Status.
EZAutomation
www.EZAutomation.net
1-877-774-EASY
3-30
Chapter 3 - Programming EZPLC
XOR
XOR:
When power flows through this element, the
XOR instruction performs a bitwise XOR
operation on data values of two registers,
Opr1 at memory location Aaaaa and Opr2
at memory location Bbbbb and stores the
output in Res at memory location Ccccc. Opr1
and Opr2 can be assigned a constant value. Values can be displayed in
Decimal, Hex, or Octal format. The Operands and Result must be of the
same data type.
NOT
NOT:
When power flows through this element,
the NOT instruction performs a bitwise NOT
operation on data value of Src at memory
location Aaaaa and stores the output in Dest at
memory location Bcccc. Src can be assigned a
constant value. Values can be displayed in Decimal, Hex, or Octal format.
Both Source and Destination must be of the same data type.
Memory Data Type
Input Registers
Output Registers
Range
A, B, C
aaaa
bbbb
cccc
IR
1 – 64
1 – 64
1 – 64
OR
1 – 64
1 – 64
1 – 64
1 – 8192
1 – 8192
1 – 8192
1 – 20
1 – 20
1 – 20
Register Internals
R
System Registers
SR
Allowed Data Formats: SIGNED_INT_16, SIGNED_INT_32, UNSIGNED_
INT_16, UNSIGNED_INT_32.
Status=0001 0011 0101 0111
MASK=0000 1111 0000 0000
MASK After XOR:
=0001 0000 0101 0111
In the example above, Status in R300 is XORed with MASK in R305
and the result is stored in Status.
MASK=0000 1111 0000 0000
MASK After NOT:
=1111 0000 1111 1111
In the example above, the MASK is inverted and saved back in MASK.
EZAutomation
www.EZAutomation.net
1-877-774-EASY
3-31
Chapter 3 - Programming EZPLC
Shift Left
Shift Left:
When power flows through this element, the
Shift Left instruction performs a Logical Shift
Left on Opr1 at memory location Aaaaa by the
value of Opr2 at memory location Bbbbb and
stores the result in Res at memory location
Ccccc. No bits are shifted into the right and
any bits shifted from the left are lost. Opr1 and Opr2 can be assigned a
constant value. Values can be displayed in Decimal, Hex, or Octal format.
The Operands and Res must be of the same data type.
Shift Right
Shift Right:
When power flows through this element, the
Shift Right instruction performs a Logical Shift
Right on Opr1 at memory location Aaaaa by
the value of Opr2 at memory location Bbbbb
and stores the result in Res at memory location
Ccccc. No bits are shifted in from the left and
any bits shifted from the right are lost. Opr1 and Opr2 can be assigned a
constant value. Values can be displayed in Decimal, Hex, or Octal format.
The Operands and Result must be of the same data type.
Memory Data Type
Input Registers
Output Registers
Range
A, B, C
aaaa
bbbb
cccc
IR
1 – 64
1 – 64
1 – 64
OR
1 – 64
1 – 64
1 – 64
1 – 8192
1 – 8192
1 – 8192
1 – 20
1 – 20
1 – 20
Register Internals
R
System Registers
SR
Allowed Data Formats: SIGNED_INT_16, SIGNED_INT_32, UNSIGNED_
INT_16, UNSIGNED_INT_32.
R1
= 1100 0000 0000 0101
Shift Left by = 4
R3 after shift = 0000 0000 0101 0000
In the example above, the value of Level is shifted Left by 4.
All bits are shifted left by 4 (MS bits are lost).
R1
= 1100 0000 0000 0101
Shift Right by = 4
R3 after shift = 0000 1100 0000 0000
In the example above, the value of Level is Shifted Right by 4.
All bits are shifted right by 4 (LS bits are lost).
EZAutomation
www.EZAutomation.net
1-877-774-EASY
3-32
Chapter 3 - Programming EZPLC
Rotate Left
Rotate Right
Rotate Left:
When power flows through this element, the
Rotate Left instruction performs a logical
Rotate Left on Opr1 at memory location Aaaaa
by the value of Opr2 at memory location Bbbbb
and stores the result in Res at memory location
Ccccc. Bits are rotated into the right and any
bits shifted from the left are rotated in. Opr1 and Opr2 can be assigned a
constant value. Values can be displayed in Decimal, Hex, or Octal format.
The Operands and Result must be of the same data type.
Rotate Right:
When power flows through this element, the
Rotate Right instruction performs a logical
Rotate Right on Opr1 at memory location
Aaaaa by the value of Opr2 at memory location
Bbbbb and stores the result in Res at memory
location Ccccc. Bits are rotated into the left and
any bits shifted from the right are rotated in. Opr1 and Opr2 can be assigned
a constant value. Values can be displayed in Decimal, Hex, or Octal format.
The Operands and Result must be of the same data type.
Memory Data Type
Input Registers
Output Registers
Range
A, B, C
aaaa
bbbb
cccc
IR
1 – 64
1 – 64
1 – 64
OR
Register Internals
R
System Registers
SR
1 – 64
1 – 64
1 – 64
1 – 8192
1 – 8192
1 – 8192
1 – 20
1 – 20
1 – 20
Allowed Data Formats: SIGNED_INT_16, SIGNED_INT_32, UNSIGNED_
INT_16, UNSIGNED_INT_32.
MASK1 = 1100 0000 0000 0101
Rotate Right by = 4
MASK2 after shift
= 0000 0000 0101 1100
In the example above, MASK1 is rotated left by 4 and saved in MASK2.
MASK1 = 1100 0000 0000 0101
Rotate Right by = 4
MASK2 after shift
= 0101 1100 0000 0000
In the example above, MASK1 is rotated right by 4 and saved in MASK2.
EZAutomation
www.EZAutomation.net
1-877-774-EASY
Chapter 3 - Programming EZPLC
3-33
3.3.5 Move Instructions
Move Instructions allow the movement of data between registers. Move
based instructions can also be used to move constant values into registers,
move blocks of data from one location to another, or to fill a block of registers
with the same value.
Power Flow
Move instructions are always true so power flow always passes through
the rung. The exception to this is the Indirect Move Element. In this case,
the move is considered invalid and power flow is false if either the source
or destination register contains 0 (zero) or the length of the move exceeds
the number of elements available in the controller.
Adding Move Instructions
To configure all of the various Move Instructions, perform the following
steps:
1. Click on a Move instruction icon on the right side of the screen.
2. Position the mouse over the area on the Ladder diagram where you
want to insert the instruction and click the mouse to place the
instruction.
3. To enter Data/Display types, double click the instruction to open its
Dialog box.
4. For a Bit Move instruction, choose if you want to move register bits
to discrete or vice versa.
5. Enter a Tag Name in the Data Type field or use the drop arrow to make
your selection.
6. Select a proper Tag name/address from the drop down list for
Source.
7. Select a proper Tag name/address from the drop down list for
Destination.
EZAutomation
www.EZAutomation.net
1-877-774-EASY
3-34
Chapter 3 - Programming EZPLC
8. Enter the number of elements to move/fill (only for the Move Block and Block
Fill instructions).
9. Enter the numeric constants in the Table of Constants and select a
proper Tag name/address for the Destination from the drop down list
(only for the Move table of Constants instruction).
10. Choose the correct data format from the last drop down list on dialog
box.
11. Data types for both source and destination must be the same.
EZAutomation
www.EZAutomation.net
1-877-774-EASY
Chapter 3 - Programming EZPLC
Move Data
Move Block
3-35
Move Data:
When power flows through this element, the
Move Data instruction moves data value from
Src at memory location Aaaaa to Dest at
memory location Bbbbb. Src can be assigned
a constant value. Values can be displayed in
Decimal, Hex, or Octal format. Both Src and
Dest must be of the same data type.
Move Block:
When power flows through this element,
the Move Block instruction moves a block of
memory area. Src at memory location Aaaaa
provides the starting address of the memory
area to move from and Dest at memory
location Bbbbb provides the starting address
of the memory area to move to. The number of elements to move is user
specified. The maximum number of elements that can be moved with one
Move Block instruction is 128 for 16 Bit registers and 64 for 32 Bit registers.
Src can be assigned a constant value. Values can be displayed in Decimal,
Hex, or Octal format. Both Src and Dest must be of the same data type.
Memory Data Type
Input Registers
Output Registers
Range
A, B
aaaa
bbbb
IR
1 – 64
1 – 64
OR
1 – 64
1 – 64
Register Internals
R
1 – 8192
1 – 8192
System Registers
SR
1 – 20
1 – 20
Index Registers
XR
1–4
1–4
1–4
1–4
Data value of R register as
pointed by XR register
#R
Allowed Data Formats: all register data type except ASCII
In the example above, R2 = R1 after the move.
This instruction is used to copy multiple elements. In this example, 10
registers starting from R10 (R10-19), are copied to R50-49.
EZAutomation
www.EZAutomation.net
1-877-774-EASY
3-36
Chapter 3 - Programming EZPLC
Block Fill
Move Table
of Constants
Block Fill:
When power flows through this element, the
Block Fill instruction fills a block of memory
area. Src at memory location Aaaaa provides
the data value to fill with; whereas Dest at
memory location Bbbbb provides the starting
address of memory area to fill to. The number
of elements to fill is user specified. The maximum number of elements that
can be filled with one Block Fill instruction is 128 for 16 Bit registers and 64
for 32 Bit registers. Src can be assigned a constant value. Values can be
displayed in Decimal, Hex, or Octal format. Both Source and Destination
must be of the same data type.
Move Table of Constants:
When power flows through this element, the
Move Table of Constants instruction loads user
specified table of constants to consecutive
memory addresses with the starting memory
address defined by Dest at memory location
Aaaaa. Src is the user specified table of constants. The maximum number
of constants that can be moved are 128 for 16bit registers and 64 for 32bit
registers. N displays the number of Dest addresses occupied by the user
specified table of constants. Source and Destination must be of the same
data type.
REAL numbers less than zero must contain a leading zero (e.g., .999 is
not valid, 0.999 is valid). It is possible to copy and paste data to/from other
Windows applications including Microsoft Excel and Word.
Memory Data Type
Input Registers
Output Registers
Range
A, B
aaaa
bbbb
IR
1 – 64
1 – 64
OR
1 – 64
1 – 64
Register Internals
R
1 – 8192
1 – 8192
System Registers
SR
1 – 20
1 – 20
Index Registers
XR
1–4
1–4
1–4
1–4
Data value of R register as
pointed by XR register
#R
Allowed Data Formats: all register data type except ASCII.
EZAutomation
www.EZAutomation.net
1-877-774-EASY
Chapter 3 - Programming EZPLC
3-37
In the example above, Value of R1 is copied to 10 registers starting with
register R3 (the number of elements in instruction is specified as 10).
In the example above, a table of constant is copied to registers starting
with R1. Number of elements are shown as N.
EZAutomation
www.EZAutomation.net
1-877-774-EASY
3-38
Chapter 3 - Programming EZPLC
Move Bit
Move Bit:
When power flows through this element, the
Move Bit instruction can either copy bits from
a maximum of 16 contiguous discrete bits to
a single 16-bit word register or a single 16-bit
word register to a maximum of 16 contiguous
discrete bits. The two available modes are
available as follows:
• Map Register Bits to Discretes
When using the Move Bit instruction to map register bits to
discretes, Src at memory location Aaaaa provides the address of
the register from which the bits are to be moved. The Number of
Bits selected by you defines the total number of consecutive bits
which are to be moved starting from the Src address location. Dest
at memory location Bbbbb provides the address of the register
where bits from Src are being moved to. The user selectable
Start Bit Number specifies the bit location in Dest register where
onwards the bits are to be moved in.
• Map Discretes to Registers
When using the Move Bit instruction to map discretes to registers,
Src at memory location Aaaaa provides the address of the register
where bits are to be moved from. The user selectable Start Bit
Number specifies the starting point in the register where onwards
the bits are to be moved and the Number of Bits specify the total
number of bits to be moved. Dest at memory location Bbbbb
provides the starting address for consecutive bits which are being
moved into from Src register.
Memory Data Type
Range
A, B
Discrete Inputs
aaaa
bbbb
I
1 – 128
1 – 128
O
1 – 128
1 – 128
Discrete Internals
S
1 – 1024
1 – 1024
System Discretes
SD
1 – 16
1 – 16
IR
1 – 64
1 – 64
OR
1 – 64
1 – 64
1 – 8192
1 – 8192
1 – 20
1 – 20
Discrete Outputs
Input Registers
Output Registers
Register Internals
R
System Registers
SR
Allowed Data Formats: SIGNED_INT_16, UNSIGNED INT 16, BCD INT
16, Discrete
EZAutomation
www.EZAutomation.net
1-877-774-EASY
Chapter 3 - Programming EZPLC
3-39
In the example above, all 16 bits (N=16) of R1are copied to Scratch Bits
S100 to S115. The Least significant bit of R1 is moved to S100, and the
most significant to S115.
S115 114 113 112 111 110 109 108 107 106 105 104 103 102 101 100
0 0 0 0 0 0 0 0
1 1 1 1 1 1 1 1
In the example above, 4 bits (N=4) starting from O1 are copied to
Status Tag (R300).
R300 Bit16 15 14 13 12 11 10 9 8 7 6 5 4 3 2 1 0
O4 O3 O2 O1
EZAutomation
www.EZAutomation.net
1-877-774-EASY
3-40
Chapter 3 - Programming EZPLC
3.3.6 Timer/Counter Instructions
Timer and Counter instructions allow you to control operations based on
time or number of events.
Adding Timer Instruction
To configure the Timer instruction, perform the following steps:
1. Click the Timer instruction icon side of the screen.
2. Position the mouse over the area on the Ladder diagram where you
want to insert the Timer instruction and click the mouse to place it.
3. To enter Preset/Timer types, double click the Timer instruction to open
its dialog box.
4. Check the box for desired Timer Action, Delayed On or Off or Delayed
Retentive On.
5. Select one of the Time Base options.
6. Select a proper Tag name/address from the drop down list for the Timer
Preset Value or enter a number in the Constant Value field.
7. Select a proper Tag name/address from the drop down list for the Timer
register.
EZAutomation
www.EZAutomation.net
1-877-774-EASY
Chapter 3 - Programming EZPLC
Timer
3-41
Timer Instruction
When power flows to this element, the Timer
instruction starts timing. Once it reaches the
Preset Value as defined by the Timer Preset
register, it will stop timing and either allow
power flow or stop power flow based on the
type of Timer instruction used. When using a
Retentive timer, you must use a Reset bit to reset the timer. When using a
Non-Retentive timer you must reset the logic in front of the timer.
Timer Preset Value:
Pre at memory location Aaaaa defines the timer preset value. Pre
can also be assigned a constant value. The Timer preset value
allows the Timer instruction to count to a certain value based on
the Time Base Selected.
Timer Register and Timer Status Register:
Tmr at memory location Bbbbb defines the timer register value.
The next register is automatically used for Timer Status. E.g. If R1
(16 Bit word register) is assigned as Tmr (Bbbbb), then the Timer
instruction will use R1 for Timer Register and automatically use
R2 (the next consecutive register) for the Timer Status Register.
The Timer Status Register holds information about the Timer
instruction’s enable and outputs status.
If we take the same example where R1 is assigned to Tmr
(Bbbbb) then:
• The R1 register value will hold the accumulated value of the
Timer at any given time.
• The R2 register Bit 14 will hold the Timer Enable Status and Bit 15
will hold the Timer Output Status.
Time Base:
The Time Base is user selectable and allows one of the following
time bases:
• 1 Millisecond
• 10 Millisecond
• 100 Millisecond
• 1 Second
e.g. If Preset = 15 and Time Base = 10 Millisecond, then the Timer
instruction will time for 150 Milliseconds. Similarly, if Pre =11 and
Time Base = 100 Millisecond, then the Timer instruction will time
for 1100 Milliseconds.
EZAutomation
www.EZAutomation.net
1-877-774-EASY
3-42
Chapter 3 - Programming EZPLC
Reset Input Bit for Retentive Timer:
Reset at memory location Ccccc defines the reset input bit for the
Retentive Timer ONLY. Reset only becomes available to you when
the “Delayed On – Retentive Counts” type of timer is utilized.
Types of Timer:
There are three types of Timers available as specified by
you: Delayed ON, Delayed OFF, and Delayed ON-Rententive
Counts.
Delayed ON: When power flows to this type of Timer it starts timing
until it reaches the Timer Preset Value as specified by Pre. Once
it completes the specified count, it allows power flow through this
element. If power flow to this Timer stops before it reaches the
Timer Preset value, it resets itself to zero and starts timing from 0
when power flows to this instruction again.
Delayed ON Timing Diagram
Delayed OFF: This type of Timer allows power flow though it as
long as power flows to this element. When power flow STOPS
to this type of timer, it still allows power flow through it and starts
counting at the same time. When the Timer reaches the Timer
Preset Value as specified by Pre, it STOPS the power flow through
it. If power flows back to this Timer before it reaches the Timer
Preset value, it resets itself and starts timing from 0 again anytime
power flow stops to it.
Delayed OFF Timing Diagram
EZAutomation
www.EZAutomation.net
1-877-774-EASY
3-43
Chapter 3 - Programming EZPLC
Delayed ON – Retentive Counts: When power flows to this type
of timer it starts timing until it reaches the Timer Preset Value as
specified by Pre. Once it completes the specified count, it allows
power flow through this element. If power flow to this timer stops
before it reaches the count specified by Pre, it retains the count and
starts from the point where it had stopped timing. Once it reaches
the Timer Preset Value it will allow power flow through it. This
remains true unless the Reset Input Bit is toggled, at which point
it resets itself and starts timing whenever power flows to it.
Delayed ON – Retentive Counts Timing Diagram
Memory Data Type
Range
A, B, C
Discrete Inputs
Discrete Outputs
Discrete Internals
Input Registers
Output Registers
Register Internals
aaaa
bbbb
cccc
I
1 – 128
O
1 – 128
S
IR
OR
R
1 – 1024
1 – 64
1 – 64
1 – 64
1 – 8192
1 – 8192
Data formats supported: UNSIGNED_INT_16 AND DISCRETE
In the example above, the timer is an ON timer, with 0.001’s time base.
The preset value is R4, and accumulated value in R5. If R5=1000, then
once timer is enabled (power flows to it), it will timer for 1000x0.001=1s
then power will flow out of it energizing the fan.
EZAutomation
www.EZAutomation.net
1-877-774-EASY
3-44
Chapter 3 - Programming EZPLC
3.3.7 Counter Instruction
When called, the Counter instruction will count up or down by increments
of one until the counter reaches the data value of the Preset Value register.
The counter will then allow power flow through the rung.
Adding Counter Instruction
To configure the Counter instruction, perform the following steps:
1. Click the Counter instruction icon side of the screen.
2. Position the mouse over the area on the Ladder diagram where you
want to insert the Counter instruction and click the mouse to place it.
3. To enter Preset/Counter types, double click the Counter instruction to
open its dialog box.
4. Check the box for desired Counter Action (Up or Down).
5. Select a proper Tag name/address from the drop down list for the
Counter Preset Value or enter a number in the Constant Value field.
EZAutomation
www.EZAutomation.net
1-877-774-EASY
Chapter 3 - Programming EZPLC
3-45
Counter:
Counter
Please note that:
If you select counter parameters
as unsigned-16 (U16), the counter
is a 16 bit counter. If R100 is the
counter register, R101, the next
register, is automatically assigned
to counter status.
If you select Unsigned 32 bit (U32),
then the counter is a 32 bit counter.
If the counter register is R100,
EZPLC automatically assigns R102
(and 103) for the Counter status.
When the power flow to this element is switched
from OFF (0) to ON (1), this instruction keeps
track of the number of times power flow
switches. Once it reaches its specified preset,
it allows power flow through it.
Counter Preset Value: Pre at memory location Aaaaa defines
the Counter Preset Value. This is the value that the counter will
increment to or decrement from. Pre can occupy a 16 or 32 bit
register and can also be assigned a constant value.
Counter Register and Counter Status Register: Cnt at memory
location Bbbbb defines the Counter register value. When the Cnt
register is specified, it occupies a 32 Bit word register. E.g. If R1
(16 Bit word register) is assigned as Cnt (Bbbbb), then the Counter
instruction will automatically use R1 for the Counter Register and
R2 (consecutive 16 Bit register) for the Counter status Register.
The Counter Status register holds information about the Counter
instruction’s enable and output status. If we take the same example
where R1 is assigned to Cnt (Bbbbb) then:
• The R1 register value will hold the value of the Counter
instruction at any given time.
• The R2 register Bit 14 will hold the Counter Enable Status
and Bit 15 will hold the Counter Output Status.
Reset Input Bit: Reset at memory location Ccccc defines the Reset
Input Bit for the Counter instruction. When this bit is enabled, the
Counter instruction is reset to its default value based on the type
of Counter instruction being used.
There are two types of counters, Up Counter and Down Counter,
which are user selectable as follows:
Up Counter: When the Reset Input Bit is disabled (0) and the
power flow to the counter instruction switches from 0 to 1, the count
register increments one count. When the Counter Preset Value
and Counter register value become equal, power flows through it.
Whenever the reset input is enabled the Counter register value is
set to 0 and the power flow through it is stopped.
Up Counter Timing Diagram
EZAutomation
www.EZAutomation.net
1-877-774-EASY
3-46
Chapter 3 - Programming EZPLC
Down Counter: When the Reset Input Bit is disabled (0) and the power flow
to the counter instruction switches from 0 to 1, the count register decrements
one count. When the Counter Preset Value and Counter register value
become equal, power flows through it. Whenever the Reset input is enabled
the Counter register value is set to 0 and the power flow through it stops.
Memory Data Type
Range
A, B, C
Discrete Inputs
Discrete Outputs
Discrete Internals
Input Registers
Output Registers
Register Internals
aaaa
bbbb
cccc
I
1 – 128
O
1 – 128
S
IR
OR
R
1 – 1024
1 – 64
1 – 64
1 – 64
1 – 8192
1 – 8192
Allowed Data Formats: UNSIGNED INT 16, UNSIGNED INT 32
In the example above, the counter is a 16 bit UP counter [U16]. Once
the count value = Preset value, the power flows out of the instruction.
EZAutomation
www.EZAutomation.net
1-877-774-EASY
Chapter 3 - Programming EZPLC
3-47
3.3.8 Program Control Instructions
Use the Program Control instructions to alter the sequence of Main Logic
Program scan.
Adding Program Control Instructions
To configure Program Control instructions, perform the following steps:
1. Click the instruction icon on the right side of the screen.
2. Position the mouse over the Ladder Logic and click the mouse to place
the instruction.
3. Double click the Jump instruction to open the instruction’s dialog
box.
A) Jump Instruction
Select a proper Rung label from the drop down list.
B) For Loop Instruction
Select a proper Tag name/address from the drop down list for the Loop
Count or enter a number in the Constant Value field.
C) Call Subroutine Instruction
Select a Subroutine from the drop down list.
EZAutomation
www.EZAutomation.net
1-877-774-EASY
3-48
Chapter 3 - Programming EZPLC
Jump
For
Next
Jump:
When power flows to this element,
the Jump instruction skips from the
rung where used to a rung with the
Label specified in the Jump instruction
and continues executing the program
thereafter. Before the Jump instruction skips to the specified label instruction,
the rung containing the Jump instruction is executed first. The Jump
instruction can only be used to skip forward in the direction of the ladder
logic flow. When a new rung is created, you can add “label” and “comments”
for every rung added by double clicking on any rung. Only rungs which are
labeled can be utilized by the Jump instruction. The Select Label pull down
menu only shows rungs which have been labeled by the user.
For Loop:
When power flows to this element, the For
Loop instruction loops/repeats the ladder logic
(RLL) between itself and the Next instruction
for the number of times specified by the data
value of the Loop Count at memory location
Aaaaa. When the For Loop instruction is done
executing the RLL between itself and the Next instruction by the number
specified by the Loop Count, it allows execution of ladder logic after the Next
instruction. The Loop Count can also be assigned a constant value.
Next Statement:
When power flows to this element, the Next Statement
instruction specifies the end point of the For Loop instruction
and shifts power flow back to the point where the For Loop
instruction is located. Once For Loop execution is completed
for the number of times specified by the Loop Count, power
will flow through this element.
Memory Data Type
Range
Input Registers
Output Registers
A
aaaa
IR
1 – 64
OR
Register Internals
R
1 – 64
1 – 8192
Allowed Data Formats: UNSIGNED INT 16
EZAutomation
www.EZAutomation.net
1-877-774-EASY
Chapter 3 - Programming EZPLC
Call
Subroutine
3-49
Call Subroutine:
When power flows to this element, the Call
Subroutine instruction invokes a subroutine
as specified by SUB. you can either specify
an existing Subroutine, or create a new one.
When a subroutine is added in SUB which
already does not exist, it is automatically
added under Subroutine Logic. Once a subroutine is used, it must contain
a Return instruction to return back to the main logic.
Note: Subroutines are very useful for organizing the main body
of ladder logic. They can be utilized to break the body of ladder
logic into sections which are either specific to a certain operation
or are repeated in the main logic. If certain logic is to be repeated
several times, it is useful to place that logic in a subroutine and call
that subroutine by using the Call Subroutine instruction instead.
By utilizing subroutines efficiently, the number of rungs in ladder
logic could be reduced drastically.
Return Statement:
When power flows to this element, the Return Statement instruction specifies
the end of the Subroutine logic where present and returns back to the Main
logic. The Return statement can only be used in a Subroutine.
In the example above, when power flows to this
instruction, the execution jumps to “Rung 31”.
In the example above, any instructions between
For and Next will be executed multiple times.
The number of times the instructions will be
executed is equal to the value of the “Loop
Count” variable.
When power flows to this instruction, subroutine
named “Subroutine” would be called.
EZAutomation
www.EZAutomation.net
1-877-774-EASY
3-50
Chapter 3 - Programming EZPLC
3.3.9 String Instructions
A string is succession of characters. EZPLC’s string instructions operate on
ASCII String Data files only.
Adding String Instructions
To configure String instructions, click on the String instruction icon on the
right side of the screen. Position the mouse over the Ladder diagram and
click the mouse to place the instruction. To enter Tag Name/Address, double
click the instruction to open its dialog box.
To configure the String Move and String Compare instructions, perform the
following steps:
1. Select a Tag name/address from the drop down list for the Source
register (Source1 for String Comparison Instruction).
2. Enter a value in the Number of Characters field.
3. Select a Tag name/address from the drop down list for the Destination
register (Source 2 for String Comparison Instruction).
4. Data types for both source and destination must be the same.
Adding String Length Instruction
1. Select a Tag name/address from the drop down list for the ‘String’
register.
2. Select a Tag name/address from the drop down list for the ‘Save in’
register.
EZAutomation
www.EZAutomation.net
1-877-774-EASY
Chapter 3 - Programming EZPLC
String Move
3-51
String Move:
When power flows through this element, the
String Move instruction moves an ASCII string
with a starting address of Src at memory
location Aaaaa to Dest at memory location
Bbbbb by the number of characters defined by
the user. This instruction can move up to 40
characters with every two characters occupying one ASCII register.
For example, if the number of characters to move is 2, this instruction will
move the single Src register at memory location Aaaaa to Dest at memory
location Bbbbb. If the number of characters to move is 4, then this instruction
will move TWO consecutive registers with a starting address of Src to TWO
consecutive registers with starting address of Dest. Similarly, 6 characters
would move THREE consecutive registers, 8 characters would move FOUR
consecutive registers and so on.
Memory Data Type
Register Internals
Range
A
aaaa
R
1 – 8192
Data Format: ASCII only
In the example above, the “number of characters”
defined in the dialog box are moved strarting from
R100 to the destination starting from R300. If a
null is found in the source string before all the
“number of characters” are moved, the rest of the
characters are padded with null in the destination.
EZAutomation
www.EZAutomation.net
1-877-774-EASY
3-52
Chapter 3 - Programming EZPLC
String Compare
String Compare:
The String Compare instruction is used to
compare an ASCII String with a starting
address of Src1 at memory location Aaaaa
and Src2 at memory location Baaaa by the
number of characters specified by the user.
If Src1 = Src2 power will flow through this
element. This instruction can compare up to 40 characters with every two
characters occupying one ASCII register.
For example, if the number of characters to compare is 2, this instruction
will compare the single Src1 register at memory location Aaaaa to Src2 at
the memory location Bbbbb. If the number of characters to compare is 4,
then this instruction will compare TWO consecutive registers with a starting
address of Src to TWO consecutive registers with a starting address of Src2.
Similarly, 6 characters would compare THREE consecutive registers, 8
characters would compare FOUR consecutive registers and so on.
Memory Data Type
Register Internals
Range
A
aaaa
R
1 – 8192
Data Format: ASCII only
In the example above, the string starting from R100 is compared
with the string at R299. The strings are compared up to the
“number of characters”, or 40, or up to a null character in either of
the sources, whichever occurs first.
EZAutomation
www.EZAutomation.net
1-877-774-EASY
Chapter 3 - Programming EZPLC
String Length
3-53
String Length:
When power flows through this element, the
String Length instruction counts the number
of characters in a null-terminated ASCII string
specified by the starting address of Str at
memory location Aaaaa. The result is stored
in Len at memory location Bbbbb.
Memory Data Type
Input Registers
Output Registers
Register Internals
Range
A, B
aaaa
IR
1 – 64
OR
R
bbbb
1 – 64
1 – 64
1 – 8192
1 – 8192
Allowed Data Formats: UNSIGNED INT 16, UNSIGNED INT 32, ASCII
STRING.
In the example above, when power flows to the instruction, the length of
the string starting at R100 is computed. The computation stops when a
null character is found. The length value is saved in R5.
EZAutomation
www.EZAutomation.net
1-877-774-EASY
3-54
Chapter 3 - Programming EZPLC
3.3.10 Communication Instructions
Use Communication instructions to open and close the serial port for sending
ASCII data to communicate with external devices.
Adding Communication Instructions
To configure String instructions, perform the following steps:
1. Click on the Communication instruction icon on the right side of the
screen.
2. Position the mouse over the Ladder diagram and click the mouse to
place the instruction.
3. Double click the instruction to open its dialog box.
Adding Open Port Instructions
To configure the Open Port instruction, perform the following steps:
1. Enter the specified characters.
2. Select a Baud Rate using the drop down list.
3. Select a Parity value (None, Odd, or Even) using the drop down list.
4. Select Data Bits (7 or 8) using the drop down list.
5. Select Stop Bits (1 or 2) using the drop down list.
6. Select a Protocol (None, Xon, or Xoff) using the drop down list.
Enter Optional Parameters:
1. Enter Send Start Characters in the Start Characters field (up to 4
characters).
2. Enter Send End Characters in the End Characters field (up to 4
characters).
3. Enter Receive Start Characters in the Start Characters field (up to
4 characters).
4. Enter Receive End Characters in the End Characters field (up to 4
characters).
EZAutomation
www.EZAutomation.net
1-877-774-EASY
Chapter 3 - Programming EZPLC
3-55
Adding Send To and Receive From Port Instructions
To add the Send to Port and Receive From Port instructions, perform the
following steps:
1. Select an ASCII tag that contains the string to be sent in the Source
Tag field using the drop down list (for a Receive instruction: the String that
will receive the characters from the serial port in the Destination Tag
field).
2. Select an integer register used by the instruction for status in the Control
Register Tag field using the drop down list. The following table
describes the control bits in the register:
Bit number
Function
Bit 0 (lsb)
Enable (0=Disabled, 1=Port is Open AND Instruction
is Enabled (Power flows to instruction))
Bit 1
Serial transmission done (1= function (transmit or
receive) done, 0=not done)
Other bits of the register are used for internal purposes and change
state during transmission/receiving.
3. Select an integer register that displays the number of characters
transferred from the source tag to the serial output buffer in the
Character Count Tag field using the drop down list (for a Receive
instruction: the Number of characters transferred from the serial port to the
destination tag).
4. Check either Send Start Character or Send End Character box if
needed.
Adding Send to Marquee Instruction
To add the Send to Marquee instruction, perform the following steps:
1. Select a Source Tag name/Address using the drop down list.
2. Check the Use Mask box and enter a value, if you want to use Mask
capabilities to compute message number.
3. Enter a numeric constant as an Offset value to the message number
if desired.
4. Select a Message Status Tag name/Address using the drop down
list.
5. Check one option for the action for Unmatched message numbers.
6. Add/Edit the Message database by clicking on the View/Edit
Message Database button.
Adding Modbus Master Instruction
See Chapter 7
EZAutomation
www.EZAutomation.net
1-877-774-EASY
3-56
Chapter 3 - Programming EZPLC
Open Port
NOTE:
The Open Port instruction is
executed once every time the
power flows to the instruction.
It is recommended that the port
be opened once, unless the com
parameters have to be changed.
In that case, the port should first
be closed, and then reopened with
different parameters.
Open Port:
When power flows through this element, the
Open Port instruction opens the RS422 serial
port by user specified parameters available
as follows:
• Baud Rate: 1200, 2400, 4800, 9600,
19200, 38400
• Parity:
None, Odd, Even
• Data Bits: Seven, Eight
• Stop Bits: One, Two
• Protocol:
No Protocol, XOn /XOff, Modbus Master, Modbus Slave
Send Character Sequence can be used to add up to a maximum of FOUR
characters in the beginning and/or ending of every command that is sent out
using this port. The 4 characters must be separated by a comma.
Receive Character Sequence can also be used to verify a maximum of
FOUR characters in the beginning and/or ending of every command that is
received using this port. The 4 characters must be separated by a comma.
You can also specify to make the Receive Character Sequence the same
as the Send Character Sequence.
If HEX values are used for the two sequences, two characters must be used
to specify 1 HEX value.
In the above example, if S4 is on, the port will be opened with the
parameters shown in the instruction. Please note that the Port
command is executed ONLY once every time S4 changes state
from 0 to 1.
EZAutomation
www.EZAutomation.net
1-877-774-EASY
Chapter 3 - Programming EZPLC
Close Port
Send to
Serial Port
3-57
Close Port:
When power flows through this element, the Close
Port instruction closes the serial port previously
opened for communication by the Open Port
instruction. Once the port is closed, it cannot be
used unless it is re-opened by the Open Port instruction.
Send to Serial Port:
When power flows through this element, the
Send to Serial Port instruction will send an
ASCII string present in Src at memory location
Aaaaa to the RS422 port. The control and
character count used for sending the ASCII
string is specified by Cnt at memory location
Ccccc and Ctr1 at memory location Bbbbb, respectively.
This instruction can only send out the specified ASCII string if the
corresponding RS422 port has been already opened by the Open Port
instruction in advance. If the serial port has not been initiated, the Send to
Serial Port instruction will not send the ASCII string to the specified port.
Start and End characters can also be sent along with the ASCII string being
sent out from the Src register. You can specify Start and/or End characters to
be included along with the ASCII string. The starting and ending characters
are specified in the Open Serial Port Instruction.
Receive From
Serial Port
Receive From Serial Port:
When power flows through this instruction,
the Receive From Serial Port instruction will
receive an ASCII string from the serial port and
store it in Dest at memory location Aaaaa. The
control and character count used for receiving
the ASCII string is specified by Cnt at memory
location Ccccc and Ctr1 at memory location Bbbbb, respectively.
This instruction can only receive the specified ASCII string if the
corresponding RS422 port has been already opened by the Open Port
instruction in advance. If serial port has not been initiated, the Receive from
Serial Port instruction will not receive the ASCII string.
Start and End characters can also be received along with the ASCII
string being received. You can specify Start and or End characters to be
verified when received along with the ASCII string. The starting and ending
characters are specified in the Open Serial Port Instruction.
EZAutomation
www.EZAutomation.net
1-877-774-EASY
3-58
Chapter 3 - Programming EZPLC
Memory Data Type
Input Registers
Output Registers
Range
A, B, C
aaaa
bbbb
cccc
IR
1 – 64
1 – 64
1 – 64
OR
1 – 64
1 – 64
1 – 64
1 – 8192
1 – 8192
1 – 8192
1 – 20
1 – 20
1 – 20
Register Internals
R
System Registers
SR
In the example above, if power flows to the close port instructions, the
opened serial port is closed. Once the port is closed, it will not send any
serial communication for any command (such as Send to Port, Send to
Marquee) without reopening the port.
In the example above, if S5 is ON (and the Port is Open), the Send Port
command would send the ASCII string as per programmed parameters.
If the port is not yet open, the instruction will do nothing, and the Enable
Bit in the control register will remain 0, even if the S5 is on.
In the example above, if S6 is ON (and the Port is Open), the Send
Port command would receive the ASCII string as per programmed
parameters. If the port is not yet open, the instruction will do nothing,
and the Enable Bit in the control register will remain 0, even if the
S6 is on.
EZAutomation
www.EZAutomation.net
1-877-774-EASY
Chapter 3 - Programming EZPLC
Send to
Marquee
Please Note:
1. The port should be already open
before this command can be used.
2. The Send Marquee sends the
message to Marquee only once
each time power flows to it (rung
condition becomes true) and does
not send again until the Power
flow is cycled to it (rung condition
goes to false and true again).
3-59
Send to Marquee:
When power flows through this instruction,
the Send to Marquee instruction sends out a
message to a marquee based on the message
number as specified in Src at memory location
Aaaaa and Message Status Tag as specified
by Ctrl at memory location Bbbbb.
The Send to Marquee instruction must be used in conjunction with the
Open Port instruction. If the serial port is not enabled by the Open Port
instruction in advance, the Send to Marquee instruction will not be able to
send messages to a marquee.
The Send to Marquee instruction uses a message database. You can place
multiple Send-to-marquee instructions in your ladder logic. But there is only
a single message database. The database contains messages uniquely
identified by message numbers. The Send-to-marquee instruction looks
up messages from this database using the value in its source register as
the Message number (or computed from it-- see below). If a message is
found matching the number in source register, it is sent to the Marquee. If
a matching message is not found, then the action depends on the option
selected for unmatched messages.
The messages can have embedded variables in them, allowing you to
display dynamic data on the marquee.
Message Number Computation:
Src can also be assigned a constant value along with option to use Mask
(in HEX). You can also add an offset to the message number based on the
value specified. The Message number is computed as follows:
Message Number = [ (Source AND MASK) >> number of right 0s
in MASK ] + Offset
MASK allows you to use only selected bits from a word as a
message number. Offset allows you to add a constant to the
message number which allows grouping of messages.
Example: Source number = 0x1234, MASK = 0xFFF0
Source AND MASK = 0x1230
Shift by 4 = 0x0123 (There are 4 zeros on right of MASK)
Add Offset to get the message number
Message Status Tag:
Ctrl is used by the Send to Marquee instruction to specify the status of the
message being sent to a marquee. If the message is being transmitted to
the serial port, the bit 0 (lsb) of Ctrl is enabled (1). When the message is
successfully sent to the serial port, the bit 1 of Ctrl is enabled (1).
Message Database:
When the Send to Marquee instruction is assigned a message number
through Src, the message corresponding to the message number is selected
for transmitting to the serial port. The Message database is populated by
using “View/Edit Message Database” tab. When adding a new message the
EZAutomation
www.EZAutomation.net
1-877-774-EASY
3-60
Chapter 3 - Programming EZPLC
text can be assigned a message number and attributes such as blinking,
scrolling, and centering of messages etc. The very first message in the
Message Database is the default message. This message is sent to the
specified marquee(s) (broadcast or a certain unit) when the message number
assigned by Src does not have the matching message in this database.
Note: Only messages with the correct message number as per
Src register will be displayed.
Actions for Unmatched Messages:
If the Src register points to a message number that does not exist in the
Message Database, then there are three options, one of which can be
selected by the user for appropriate action.
• Send Default Message: Sends a”Default Message “ as specified in
the Message Database
• Send Blank Message: Sends out a blank message with no text; clears
the display line of the marquee(s) specified in the Default Message
• Do Nothing:
No action is taken if the correct message is not found
Memory Data Type
Input Registers
Output Registers
Range
A, B
aaaa
IR
1 – 64
OR
1 – 64
1 – 64
1 – 8192
1 – 8192
1 – 20
1 – 20
Register Internals
R
System Registers
SR
bbbb
In the example above, if S5 is On (AND the Port is open and not
busy), the message is sent to Marquee. The message is sent ONLY
once every time S5 changes state. So to refresh the message on the
Marquee (for example, if an embedded variable changed), ensure that
S5 changes state.
Another example for the send marquee is shown on next page. In this
example, the logic is monitoring 3 temperature ranges, and displays
one of the 3 messages based on the temperature value.
EZAutomation
www.EZAutomation.net
1-877-774-EASY
Chapter 3 - Programming EZPLC
3-61
Send to Marquee Example
EZAutomation
www.EZAutomation.net
1-877-774-EASY
3-62
Chapter 3 - Programming EZPLC
3.3.11 Miscellaneous Instructions
Introduction to Drum Sequencing
Conventionally, electro-mechanical drums are used in control of processes
where a certain number of steps is repeated over time. Such drums are a
popular control technique because they save a lot of logic programming.
Drum sequencing instruction in EZPLC mimics the electro-mechanical
drums. There are 2 types of Drums, 1) Timed and 2) Timed with Event.
• Each row on a drum chart represents a step on the drum. When rung
power condition is true the drum resets to a particular reset step defined
by the user.
• Each column in a drum chart represents an output from the drum.
We can have 16 discrete outputs numbered from 1 to 16. The outputs
are updated during each step.
• The Drum advances from one step to the next per the timer or after
triggered by an external event. A Jog tag can also be used to control
the drum movement.
• Checked boxes on the drum chart mark ON states of outputs on a
particular step. Empty boxes represent OFF outputs.
• Each Drum sequences up to 16 steps having 16 discrete outputs per
step.
• Counts have a specified time base and every step has its own counter
along with an event to trigger the count.
• When power flows through this element, the Drum instruction starts
its sequence while EZPLC continues with the logic after this
instruction.
EZAutomation
www.EZAutomation.net
1-877-774-EASY
Chapter 3 - Programming EZPLC
3-63
Adding the Drum Instruction:
To configure the Drum instruction, perform the following steps:
1. Click on the Drum icon on the right side of the screen.
2. Position the mouse over the Ladder diagram and click the mouse to
place the instruction.
3. Double click the instruction to open its dialog box.
4. Click on the Outputs tab on the top to define your Output bits.
5. Return to the main dialog box by clicking onto the Instruction Details
tab.
6. Select the Drum type (timed or timed with event).
7. Select the Preset Step (default preset step is 1).
8. Choose the Time base (1 ms, 10 ms, 100 ms or 1s).
9. Select Reset and Jog tags if you want to activate these controls.
10. Define counters for each step.
11. Check the ON-Off states of outputs in each step.
EZAutomation
www.EZAutomation.net
1-877-774-EASY
3-64
Chapter 3 - Programming EZPLC
Drum
Drum
When power flows through this element, the
Drum instruction starts a sequence of outputs
which can be either Timed or Timed with
Event. The maximum number of steps that
can be defined in a sequence is 16 with the
maximum number of outputs per step being
16 as well.
Drum Type:
There are two types of user selectable Drum types:
• Timed Only
When you select this option, the Drum instruction
completes its sequence based on time specified by
Count with specified Time Base only. When the Count is
completed, it enables (1) or disables (0) the specified
outputs as selected by the user through checkboxes.
• Timed with Event
When you select this option, the Drum instruction
completes its sequence based on the time specified by Count
with specified Time Base and Events. When this selection is
chosen, a tab for Events is available for you to select the
desired addresses for events for every step.
Step #:
If using the Timed Only Drum instruction, the total number of
programmable steps is 16. When using the Timed with Event
Drum instruction then the total number of programmable steps
is limited to 10.
Counts:
Every Step has a Count associated with it. The Count is a user
specified constant which controls the duration of time before a
certain step is executed. The Count can have a different time base
as specified by the user in Time Base.
Time Base:
Time Base allows the Count variable to be mapped to different
Time Bases as follows:
• 1 millisecond
• 10 millisecond
• 100 millisecond
• 1 second
If the Time Base is set to 1 millisecond, then a Count value of 10
would correspond to 10 milliseconds. Similarly, if the Time Base is
set to 10 milliseconds, then a Count value of 10 would correspond
to 100 milliseconds and so on.
EZAutomation
www.EZAutomation.net
1-877-774-EASY
Chapter 3 - Programming EZPLC
3-65
Preset Step:
This user selected value is used in conjunction with the Reset Tag.
If the Reset Tag is enabled (1) then the drum sequence jumps to
the step specified by the Preset Step.
Reset Tag:
Rst address at memory location Aaaaa is used to reset the drum
sequence to a user selected Step location every time the Rst bit
transitions from disable (0) to enable (1). When Rst is enabled,
the Drum Sequence is immediately shifted to the Preset Step
regardless of its current position and Count value.
Jog Tag:
Jog address at memory location Bbbbb is used to jog the Drum
Sequence to the next step. If present on Step 16, it will be jogged
to step 1. When Jog is enabled, the Drum Sequence is immediately
shifted to the next step regardless of its current position and
Count value.
Current Step Tag:
Stp address at memory location Ccccc is used by the Drum
instruction to write the current value of Step where Drum Sequence
exists at any given time during its operation.
Current Count Tag:
Cnt address at memory location Ddddd is used by the Drum
instruction to write the current value of Count where the Drum
Sequence exists at any given time during its operation.
Outputs:
The total number of Outputs that can be used per Step is 16 which
is reduced to 10 when using the Timed with Event type Drum
instruction. Every Output utilized in any step must have a Discrete
memory location assigned to it. Memory locations are assigned
in the second tab when adding a Drum instruction. During Drum
instruction operation, if the checkbox corresponding to a certain
Output is checked, it will be enabled, otherwise it is disabled.
Events:
This is an optional tab which only appears if the Timed with Event
type Drum instruction is used. For every Step utilized in the Time
and Event type Drum instruction, there must be a corresponding
Event address assigned to a discrete bit. During Drum Sequence,
after the time corresponding to a certain Step is elapsed, the
instruction looks at the corresponding Event address. If enabled,
Drum Sequence will advance to the next step; otherwise it will start
the Count again for the same Step. Once the Count is elapsed
it will look again at the Event address to see if it’s enabled. If
enabled, it will move forward to the next Step, otherwise it will
repeat until the corresponding Event address is enabled.
EZAutomation
www.EZAutomation.net
1-877-774-EASY
3-66
Chapter 3 - Programming EZPLC
This page intentionally left blank.
EZAutomation
www.EZAutomation.net
1-877-774-EASY
4
Configuring I/O Modules
In this chapter...
• Configuring the High-Speed Counter Modules
- Selecting Counter Module
- Configuring the Counter
- Wiring
- Output Register Information
- Input Register Information
- Closing
• Configuring the Enhanced Thermocouple Module
- Selecting Enhanced Thermocouple Module
- Configuring the Thermocouple
- Wiring
4-2
Chapter 4 - Configuring I/O Modules
4.1 High-Speed Counter Modules
• EZIO-4HSCM1:
High Speed Counter Module
with Two Counters
• EZIO-4HSCM2:
High Speed Counter Module
with a Single Counter
EZAutomation
The EZPLC offers 2 models of High Speed counters: one with one 24-bit
counter, and another with two 24-bit counters.The counters accept input
from quadrature encoders and offer features to multiply counts by 2 or 4.
In addition, modules offer programmable set points and outputs to create
high speed Programmable Limit Switch type outputs.
4.1.1 Selecting Counter Module
After starting the EZPLC program, select Setup>IO Configuration.
Choose the correct number of IO modules from the Select EZPLC I/O
Base drop-down list. Double-click in the empty Module Type box that is
next to the “position” number where you would like to place the module.
The Edit IO Module Data dialog box will open. Select the High Speed
1-Counter Module from the Select Module drop-down list. The Counter
Module uses 21 contiguous Output Registers (OR) and 5 contiguous
Input Registers (IR). Select the starting Input and Output registers. The
Editor automatically computes the end addresses. To start configuring
the 1-Counter module, click the Click to define setup parameters
button.
www.EZAutomation.net
1-877-774-EASY
4-3
Chapter 4 - Configuring I/O Modules
4.1.2 Configuring the Counter
Dialog box for 1-Counter Module:
•Single Counter
•4 PLS Outputs
•Information tabs show
register allocation
Dialog box for 2-Counter Module:
•Two Counters
•Each Counter supports two
PLS outputs
•Information tabs show
register allocation
Except for the differences
mentioned above, the two
modules are configured similarly.
EZAutomation
www.EZAutomation.net
1-877-774-EASY
4-4
Chapter 4 - Configuring I/O Modules
4.1.2a Count Mode
The Counter Module supports 5 Counting Modes as described below.
Select the desired mode. As shown in the dialog box, bits b2-b0 of the
configuration register stores the count mode of the counter.
Quadrature Counting
Quadrature x1 - This mode will give 1 count for every quadrature period.
Count rising edge of signal A only.
Quadrature x1
Phase relation of A & B determines the direction.
Quadrature x2 - This mode will give 2 counts for every quadrature period,
giving the user twice the resolution of 1X.Count rising and falling edges
of A.
Phase relation of A & B determines the direction.
Quadrature x2
Quadrature x4 - This mode will give 4 counts for every quadrature period,
giving the user twice the resolution of 2X.Count both edges of A and B.
Direction is determined by the phase relation of A & B.
Quadrature x4
Count Down
Count Up
Count Rising Edges
Count Down
Count Up
Count Both Edges
Pulse and Direction Counting
Count Rising Edges
This mode only counts Signal A. The signal from B establishes the
direction. This mode will count for the rising edge of Signal A from
Encoder 1. If direction is high, then the counter will be incremented by 1.
If direction is low, then the counter will be decremented by 1.
Count only rising edges.
Count Both Edges
This mode only counts Signal A. The signal from B establishes the
direction. This mode will count the rising and falling edge of Signal A
from Encoder 1, giving the user twice the resolution of the “Count Rising
Edges” mode. If direction is ‘1’, then the counter will be incremented by
1. If direction is ‘0’, then the counter will be decremented by 1.
Count both rising and falling edges.
EZAutomation
www.EZAutomation.net
1-877-774-EASY
4-5
Chapter 4 - Configuring I/O Modules
4.1.2b Set Point (1-4)
Output = ON if
ON Value <= OFF Value
The Counter Module provides 4 programmable Limit Switch Outputs.
Please enter the ON & OFF values for each of the setpoints. The dialog
box shows the registers used for setpoints. Each setpoint controls a
corresponding output on the module. E.g. Setpoint 1 controls Output 1.
Output 1 is ON when the count value is greater than or equal to the ON
value, but is less than the OFF value. Each value is a 24-bit value but
takes up two 16-bit registers.
4.1.2c Preset Value
When the preset input is triggered (see preset mode below), the value
in the Value (Long) field will replace the current count of Counter 1. The
count then starts with this value. Preset is a 24 bit value, but takes up 2
16-bit registers.
4.1.2d Preset Mode
As shown in the dialog box, preset mode is saved in bits b7 and b6 of the
Counter configuration register.
High
This option will set the counter to the preset value while being held high.
While the preset signal is high, no new count signals will be counted.
Preset Input
Counter preset at this edge.
On Rising Edge
This option will preset on the rising edge of the preset signal.
On Falling Edge
This option will wait for the falling edge of the preset input to trigger a
preset pulse.
Preset Input
Counter preset at this edge.
Preset High AND Counter 1 A Input
This option triggers a preset pulse every time that there is a rising edge
Signal A and the preset signal is high.
4.1.3 Output Register Information
Wiring
Preset Input
Input A
Counter preset at this time.
EZAutomation
Pin Out #
Description
1
Quad A encoder 1
2
Quad B encoder 1
3
Inhibit
4
Reset
5
Common
6
Preset
7
Counter 1 Output 1
8
Counter 1 Output 2
9
Counter 1 Output 3
10
Counter 1 Output 4
11
Vs+
www.EZAutomation.net
1-877-774-EASY
4-6
Chapter 4 - Configuring I/O Modules
As previously mentioned, one
counter module (1- or 2Counter) uses 21 contiguous
Output Registers (OR). You
will specify a starting OR. The
Editor automatically allocates 21
contiguous registers. All values
(such as Setpoint ON, OFF, preset,
etc.) are 24 Bits, but occupy 2
registers each. The configuration
register is a single register (16 bit).
The Output Register tab lists information about the Output Registers.
4.1.4 Input Register Information
The image shown to the right is
from the 1-Counter Module dialog
box. The 2-Counter Module has
similar information.
The Input Register tab lists information about the Input Registers.
4.1.5 Closing
After all configurations are set, click Apply or Apply Changes before
closing out of the window.
EZAutomation
www.EZAutomation.net
1-877-774-EASY
4-7
Chapter 4 - Configuring I/O Modules
4.2 Enhanced Thermocouple Module
Unlike the regular thermocouple module, the enhanced thermocouple
module requires configuration. The following subsections explain the
configuration details for the enhanced thermocouple module.
4.2.1 Selecting the Thermocouple Module
After starting the EZPLC program, select Setup>IO Configuration.
Choose the correct number of IO modules from the Select EZPLC I/O
Base drop-down list. Double-click in the empty Module Type box that is
next to the “position” number where you would like to place the module.
The Edit IO Module Data dialog box will open. Select the Enhanced
Thermocouple Module from the Select Module drop-down list. The
Enhanced Thermocouple Module uses 4 contiguous Output Registers
(OR) and 4 contiguous Input Registers (IR). Select the starting Input and
Output registers. The Editor automatically computes the end addresses.
To start configuring the Enhanced Thermocouple module, click the Click
to define setup parameters button.
EZAutomation
www.EZAutomation.net
1-877-774-EASY
4-8
Chapter 4 - Configuring I/O Modules
4.2.2 Configuring the Thermodcouple Module
The configuration dialog for the enhanced thermocouple module is shown
below:
The module takes 4 input registers and 4 output registers. The input
registers return the readings from the thermocouple, and the output
registers configures thermocouple options such as type, unit and error
reporting scheme. To use these registers, you will need to create tags.
For config registers, the data types for the tags should be UNSIGNED_
INT_16. For the input register tags, the datatype should be SIGNED_
INT_16 except for B Type thermocouple which should use UNSIGNED_
INT_16. The selectable parameters, namely type, unit, and report error,
as well as the computed config value, are described below:
4.2.2a Type
Select the type of the thermocouple using this field. The possible choices
are: J Type, K Type, S Type, T Type, E Type, R Type, B Type, N Type,
Ambient Type. The display-only range field depends on the type of the
thermocouple selected (along with the unit)
4.2.2b Unit
Select the unit for measurement for each thermocouple. The possible
choices are: Celsius, Fahrenheit and Kelvin. The display-only range field
depends on the unit selected (along with the type of the thermocouple).
4.2.2c Report Error
The Report Error function on the thermocouple module provides
diagnostic capabilities to detect open or burnt thermocouple, or incorrect
configuration (which can happen if the ladder logic writes an incorrect
value to the config register).The following table describes the choices and
the resulting actions:
EZAutomation
www.EZAutomation.net
1-877-774-EASY
4-9
Chapter 4 - Configuring I/O Modules
Changes
Value Returned
B Type
Do Not Report
Others (Except B Type)
Indeterminate
Use Low Value
0
-32768
Use High Value
65535
32767
4.2.2d Config Value
The Config Value is the value written to the config (output) register. Each
thermocouple input is configured via its config register. The Config Value
Display Format option allows you to display this config value in either
decimal or hex. The actual config value depends on the selections made
for the type, unit and report error as shown in the following table.
Config Value Bits
Determined By
Default Value
Bit 3 - Bit 0
Type Selection
0000 (J Type)
Bit 5 - Bit 4
Unit Selection
00 (Celsius)
Bit 7 - Bit 6
Report Error Selection
00 (Do Not Report)
4.2.3 Wiring Information
EZAutomation
Pin Number
Enhanced Thermocouple Input
1
INPUT 1+
2
INPUT 1-
3
INPUT 2+
4
INPUT 2-
5
INPUT 2+
6
INPUT 2-
7
INPUT 2+
8
INPUT 2-
9
DO NOT USE
10
DO NOT USE
11
ANALOG GND
www.EZAutomation.net
1-877-774-EASY
5
Message Display on EZMarquee
In this chapter...
• Message Display on EZMarquee
• Message Controller Function
- Message Database
- Message Number Register
- System Discretes
- Add/Edit
- Message Number
- Marquee Address
- Display Message at Position
- Select Reset Before Display Mode
- Select Message Effects
- Message Text
- Preview
- Communication Setup
- Displaying Messages
- Example
- Valid ASCII Commands
*NOTE: This feature requires firmware revision B.0 or later. To view the
firmware revision of the connected EZPLC, click onto the EZPLC Menu and
select Information.
5-2
Chapter 5 - Message Display on EZMarquee
5.0 Message Display on EZMarquee
5.1 Message Display on EZMarquee
RS422 Port
RS422 Port
For wiring information, please
refer to your EZMarquee and
EZPLC Hardware manuals.
This feature requires firmware revision B.0 or later. To view the
firmware revision of the connected EZPLC, click onto the EZPLC
Menu and select Information.
EZPLC allows you to display text messages on EZMarquee LED
displays. EZAutomation offers several marquee models, starting
from single-line 10-characters, to 4-line 40-characters, for plant-wide
communications. Large marquee displays are visible from a distance
and get the attention of operators and management, providing them
with invaluable production information and machine/process status
instantaneously.
EZPLC makes it extremely simple to integrate an EZMarquee in a control
system. The EZPLC has built-in features to make displaying messages
on EZMarquee very easy.
The EZPLC has a message database where you can define all of the
messages. Each message is identified by a unique message number
and is displayed by telling EZPLC the identifying number of the message.
The EZPLC displays a message using one of two methods:
• Send-to-Marquee instruction
• Message controller function
The Send-to-Marquee instruction is described earlier on page 3-59 of this
manual. A description of the Message Controller function appears below.
Send-to-Marquee is an instruction that you use in your ladder logic. While
the Send-to-Marquee instruction is more flexible (allowing you to define
a register that would contain a message number, masking the message
number, etc). The Message Controller function is easier to use, and for
most of the applications it will be more than adequate. The rest of this
chapter will focus on the Message Controller Function.
5.2 Message Controller Function
We recommend that you use either the Send-to-Marquee instruction, or
the message controller feature, but not both. However, if you choose to
use both methods in the same program, make sure that the messages
are properly triggered and that the two methods are not fighting to send
messages at the same time.
The message controller in the EZPLC consists of the following:
(Register/Discrete address in parentheses)
EZAutomation
1. A Message Database
2. Message-Number System Register (SR20)
3. Message-Enable System Discrete (SD5)
4. Select-Baud-Rate System Discrete (SD6)
5. Message-Number-Not-Found System Discrete (SD7)
6. Message-Controller-Busy System Discrete (SD8)
www.EZAutomation.net
1-877-774-EASY
Chapter 5 - Message Display on EZMarquee
5-3
Message Database
The Message Database holds all messages that you may want to display.
Each message has a unique identifying number. To display a message,
the corresponding message number is moved to message register SR20.
SR20
40
Message Number
Register
Message Number Register
SR20 is defined as the Message Number Register. The message
corresponding to the value in this register is displayed on EZMarquee,
provided that SD5 is set.
System Discretes
The Message Controller function uses a few discrete system bits to
manage the message display. The table below summarizes the functions
of the System Discretes (SD5-SD8):
Bit
Function
Read/Write
Description
SD5
Message Enable
Read/Write
1: Enables message controller function
0: Disables message controller function
SD6
Baud Rate
Read/Write
0: (Default) 9600 Baud
1: 38400 Baud
SD7
Message Number
not found
Read Only
1: Message number in SR20 did not match any message in database
(Message defined as “default” is sent)
0: Otherwise
SD8
Message
Controller Busy
Read Only
1: Message controller busy processing a message
0: Message controller function is free
The operation of the Message Controller is shown in the diagram below:
EZAutomation
www.EZAutomation.net
1-877-774-EASY
5-4
Chapter 5 - Message Display on EZMarquee
5.2.1 Message Database
As mentioned earlier, the Message Database holds all the messages to
be displayed. Click onto the Setup Menu and select Message Database
to define all your messages. Messages can have embedded variables
which enable you to display PLC register values as part of the message.
To access the Message Database, begin by clicking onto the Setup
Menu.
Once inside the Setup Menu, select Message Database and the
following dialog box will appear:
The Message Database Lists all the programmed messages stored in the
EZPLC. The default message is a message that is displayed if the value
in the message-number register does not match any message number
programmed. The default message is blank to start with. You may
define the text of the default message.
EZAutomation
www.EZAutomation.net
1-877-774-EASY
Chapter 5 - Message Display on EZMarquee
5-5
The functions of all of the buttons in the Message Database window
are as follows:
Click the Add/Edit button to edit the selected message or to add a new
one.
Click the Delete button to delete the selected message.
Click the Help button to open context-sensitive Help.
Click the OK button to accept the changes and close the Message
Database dialog box.
Click the Cancel button to cancel any changes and close the Message
Database dialog box.
The Set as Default Message attributes button allows you to
conveniently define default attributes for a message. A message has
several properties or attributes as shown in the Add New Message dialog
box on the previous page. To setup defaults, select the message whose
attributes should be considered as default, and click this button. Once
defined, all fields of the Edit dialog box will be automatically filled with the
default values the next time you add a new message, saving you time.
You can change the default attributes any time.
When you click the Change attributes to Default attributes button
you can select multiple messages and change the attributes of all the
selected messages to those defined as default.
EZAutomation
www.EZAutomation.net
1-877-774-EASY
5-6
Chapter 5 - Message Display on EZMarquee
Add/Edit
Message Number
Each message in the Message Database has a unique number assigned
to it. The numbers need not be contiguous--allowing you flexibility when
organizing your messages. The maximum number of messages allowed
in the message database is 999. The messages can be numbered from
1 to 65535. Enter a number between 1 and 65535 in this field. When you
click on the Add/Edit button, the following dialog box will appear.
Marquee Address
EZMarquees can be networked using an RS422 network. The EZPLC
can send a message to one unit, a group of units, or to all units on a
marquee network.
Each EZMarquee has a DIP Switch selectable Group Number (1 or 2)
and Unit Number (1 through 8). Please refer to the table below for use of
Marquee address fields:
EZAutomation
To Send Messages To
Select This
Group & Unit Number
A specific EZMarquee
Specific Unit
User-programmed group (1
or 2) and Unit Numbers (1-8).
This must match with the DIP
Switch setting on EZMarquee.
All units in a Group
Specific Group
User-Programmed Group
Number (Unit Number = 0)
All units in Network
Broadcast
Group=0, unit=0
www.EZAutomation.net
1-877-774-EASY
Chapter 5 - Message Display on EZMarquee
5-7
Display Message at Position
In this group, you define where on the display the message should start.
The table below describes the choices.
Select
Description
Center
Center the message on EZMarquee
Default
Don’t send any positioning information with the
message (Message will start at the position where last
message ended)
At position
Start message at user-programmed Line and Column
numbers
Clear Message check box: Check this box if you would like to clear the
line before displaying the message on that line.
Select Reset Before Display Mode
You can choose certain message reset functions before displaying a new
message. The choices are as follows:
Select
Description
Do Nothing
To do nothing with the previous message.
The new message is appended to previously
displayed message.
Clear Display, Home
Cursor
Clear the previous message and place cursor
at Line 1, column 1.
Clear Display, Home
Cursor, Reset
Clear the previous message and place cursor
at Line 1, Column 1, and Reset EZMarquee
(Reset will clear all current ASCII commands,
such as Center, Blink, etc).
Clear Display,
Cursor Unchanged
Clear the previous message, leave cursor
unchanged.
Clear Line, Cursor at
Line Start
Clear only the line and place cursor at the start
of the line.
Select Message Effects
This field allows you to include commands for certain message effects.
The choices are described in the table below:
EZAutomation
Message Effect
Description
Default
No Effect
Blink Whole Message
The entire message will blink on
and off
Turn Off Blinking
The message will not blink
Scroll Repeatedly
The message will continuously
scroll
Scroll Once
The message will scroll only once
www.EZAutomation.net
1-877-774-EASY
5-8
Chapter 5 - Message Display on EZMarquee
Message Text
In this area you Enter the actual text of the message along with its
character size and color. To change the text size, you select the
characters and choose the desired size from the drop down menu. To
change the color, use the drop down menu to select Red, Yellow, or
Green. You can also choose to Blink selected characters of a message
(to Blink the whole message, use the Blink Selected Message effect
from the drop down menu).
You can embed up to 4 variables within a message. To embed a
variable, press F7 at the position where you want to embed the variable
and supply the information about the variable in the dialog box.
You can use the key combination Ctrl+Enter to move the next line in the
Edit Text box. The maximum number of characters per message is 200
(this includes any embedded attributes such as text color, text size, etc).
Preview
The Preview function allows you to see how the message will look on the
marquee. Blink and scroll effects are also shown; however, these are
only representations since the scroll/blink may appear differently on the
actual marquee.
Finally, to add the message, click the Add New Message button. You
will see the message added to the database.
5.2.2 Communication Setup
The EZPLC sends messages to an EZMarquee over a serial RS422 port.
All communication parameters (Data Bits, Parity, and Stop Bits), except
Baud Rate, are fixed between two devices.
The EZPLC supports two Baud Rates: 9600 (factory default), and
38,400. The EZPLC uses System Discrete SD6 to select between the
two baud rates as follows.
Bit SD6
State
Baud Rate
Selected
0
9600
1
38,400
Please set SD6 to the proper value based on the Baud Rate of the
EZMarquee in your initialization logic.
EZAutomation
www.EZAutomation.net
1-877-774-EASY
Chapter 5 - Message Display on EZMarquee
5-9
5.2.3 Displaying Messages
SR20
Message Number Register
To send a message to the marquee, set the Message-Enable bit (SD5)
and place the number of the message to be displayed in the MessageNumber register (SR20). When you set the enable bit, the EZPLC will
open the communication port using the Baud Rate determined by SD6
and sends the message corresponding to the message number in the
SR20 register. If the message number is not found in the message
database, EZPLC will set bit SD7 to indicate that the message number
is not found and sends the “Default” message. You may monitor SD7 to
detect this condition. EZPLC also sets the SD8 bit whenever it is busy
processing a message. You should not change the Message Number
register when SD8 is 1 (Busy), otherwise part of the previous message
may be lost.
Once a message has been sent to the marquee, it is not sent again until
one or more of the following conditions occur:
1. SD5 is disabled and enabled again.
2. The value of the register(s) embedded in the message changes.
Bit
Function
If the embedded register value changes, the message on EZMarquee is
refreshed. The table below summarizes the functions of System Discrete
(SD5-SD8):
Read/Write
Description
SD5
Message Enable
Read/Write
1: Enables message controller function
0: Disables message controller function
SD6
Baud Rate
Read/Write
0: (Default) 9600 Baud
1: 38400 Baud
SD7
Message Number
not found
Read Only
1: Message number in SR20 did not match any message in database
(Message defined as “default” is sent)
0: Otherwise
SD8
Message
Controller Busy
Read Only
1: Message controller busy processing a message
0: Message controller function is free
EZAutomation
www.EZAutomation.net
1-877-774-EASY
5-10
Chapter 5 - Message Display on EZMarquee
5.2.4 Example
Assume that the EZPLC is controlling a machine that makes
parts. We need to display Production and Reject Rate,
available in tags “Production Rate” (R50) and “Reject Rate”
(R60) respectively, as shown in the marquee image to the left.
Logic also allows for a “Machine Down” message. Machine
status is available in scratch bit S100. In order to produce
this example, begin by adding your messages to the Message
Database. You can do so by performing the following steps:
1. Click onto the Setup Menu and select Message
Database.
2. Click the Add/Edit button to open the Add New Message
# dialog box and set the parameters as shown in the
image to the left. We created a message “Machine Down”
as message number 1.
Once you’ve set the parameters as shown to the left, click
onto the Close button. The Message Database will
appear as shown in the image to the left.
3. The Production/Rejection rate message has a static part
and a dynamic part. We create these as two messages.
The static message is created as message #2 and is sent
only once. The Dynamic part is created as message #3,
and is sent repeatedly. Repeat the instructions in step 2
and set up the parameters in Messages 2 and 3 as shown
in the two examples below:
As shown in the dialog boxes above, use F7 to embed variable data. Variable Data appears as “<_#>” in
the Message Database and in the Message Text box. You can click in the text box onto “<_#>” to edit the
embedded variable. Please refer to the EZMarquee manual for message syntax and details. We’ve provided a
table of Valid ASCII commands on page 5-12 for your easy reference.
EZAutomation
www.EZAutomation.net
1-877-774-EASY
Chapter 5 - Message Display on EZMarquee
5-11
Once you’ve completed those first three steps, the
Message Database should appear as shown to the
left.
Now that you’ve set up the Message Database,
you’ll need to design the ladder logic in order to
complete this example project. You only need to
design 3 Rungs of ladder logic. To design these
Rungs, perform the following steps.
Rung 1: Enable Marquee & Check
Status
The FIRST SCAN contact sets the Marquee Enable
SD5. Input 1 controls the machine status.
Rung 2: Marquee Control
Line 1: If Machine Status (S100) is OFF, set the
Marquee Message Register to SR20 to a value of 1.
This will display the “Machine Down” (Message 1) on
the Marquee.
Line 2: When the machine switches from stop to
run, set the Marquee Message Register SR20 to a
value of 2. This will display the “Production Rate”
and “Reject Rate” (Message 2) on the marquee.
Line 3: Display and update the production rate value
and the reject rate value on the Marquee.
Rung 3: Production & Reject Rates
This rung simulates production and reject rates.
EZAutomation
www.EZAutomation.net
1-877-774-EASY
5-12
Chapter 5 - Message Display on EZMarquee
The table below summarizes the Valid ASCII Commands in
EZMarquee. For information on message syntax and details, please
refer to the EZMarquee User Manual.
EZAutomation
www.EZAutomation.net
1-877-774-EASY
6
PID Loop
In this chapter...
• Introduction to PID
• PID Setup
• PID Monitoring
• PID Loop Tuning
*NOTE: To use the PID Loop feature, you will need firmware revision B.0 or later. To view the firmware
revision of the connected EZPLC, click onto the EZPLC Menu and select Information. To upgrade your
firmware, click onto the Setup Menu and select Upgrade Firmware (see page 2-40 for more information).
6-2
Chapter 6 - PID Loop
6.1 Introduction to PID
NOTE: To use the PID Loop
feature, you will need firmware
revision B.0 or later.
To view the firmware revision of the
EZPLC, go to the EZPLC Menu and
select INFORMATION.
To upgrade your firmware, go to
the Setup Menu and select Upgrade
Firmware (see page 2-40 for more
information).
Industrial Manufacturing Processes involve many variables such as
temperature, pressure, flow, etc. It is important to control these variables
for proper operation of the process.
There are several methods to control process variables. PID is one of
the most popular control algorithms used in the industry. PID, as applied
to Industrial Process Controls, stands for Proportional, Integral and
Derivative control algorithm. The algorithm computes control action by
using a mathematical equation which contains Proportional, Integral
(Reset) and Derivative (Rate) terms. With proper choices of P, I, and D
terms, a user can maintain a process value very close to the Setpoint.
In addition, if the Setpoint or the process dynamics changes, the PID
algorithm can bring the process back under control quickly. Selection of
appropriate P, I and D coefficients is critical to the proper operation of the
PID control. A block diagram of a generic process control is given below:
Process Disturbances
Setpoint (SP)
Control
Value (CV)
Error (E)
Process Variable (PV)
Process Variable (PV)
As shown in the figure, the user sets a target or Setpoint for the process.
The system compares the actual Process Variable against the Setpoint
and generates an Error value. The PID algorithm uses this error and
computes a Control Variable as a function of the error. The computation
function contains P, I, and D terms with user defined coefficients. The
PID algorithm’s goal is to minimize the error. If the Setpoint changes or
the process is disturbed (resulting in a change in the Process Variable), a
new error value is generated which results in a new Control Variable that
should bring the Process Variable closer to the Setpoint.
PID Terminology
Before we discuss more of the details involved with the PID Loop, you
should have an understanding of some of the terms used in PID.
Manufacturing Process - A process that transforms a material’s
properties. The transformation may involve physical or chemical changes
in the material. Examples of processes are: Steam Generation, Air
conditioning, Milk Pasteurization, Oil refinement, etc.
Process Variable - Materials that have physical measurable properties,
such as temperature, volume, viscosity, pressure, etc. A Process variable
is a measurable physical property that we want to control. For example,
in the air conditioning of a building, we want to control temperature, and
therefore temperature is the Process Variable..
Setpoint Value - The target or desired value of the Process Variable. The
EZAutomation
www.EZAutomation.net
1-877-774-EASY
Chapter 6 - PID Loop
6-3
purpose of PID loop is to maintain the Process Variable as close to the
Setpoint as possible.
Control Variable - The Control Variable is calculated by a control
algorithm. It depends on the error and PID coefficients. (see next section
for the equations used in the computations).
Error - Error equals the algebraic difference between the process
variable and the setpoint. Magnitude and variation of the error depends
on the process dynamics as well as on the PID coefficients. A well
designed system will keep the error to a minimum value.
External Disturbance - Something that changes the equilibrium of the
process. This results in a change in the control action to bring the process
back into range. For example, in an air conditioned building, open doors
and rainstorms are all changes that can affect the temperature.
PID on EZPLC
EZPLC products support up to 8 PID loops. For each loop the user
defines several parameters (such as Setpoint, Proportional, Integral
(Reset) and Derivative (Rate) Gains, Limits, etc.(further discussed in
the next section). You can change most of these parameters at run time
using ladder logic by using the EZPLC Editor software in online mode.
PID Algorithms used in EZPLC
The EZPLC uses the following algorithms for PID computations:
Let SPn = Setpoint at sample instance n
PVn = Process Variable at sample instance n
CVn = Control Variable at sample instance n
Kp = Gain, Proportional term
Ti = Reset (integral) time in seconds
Td = Derivative or React time, in seconds
Ts = Sample time in seconds
En = Error at sample instance n
CV0 = Control Variable offset
The Error is computed as follows:
En = PVn - SPn for Direct Acting
= SPn - PVn for Reverse Acting
Then the CVn is computed as follows:
Note: There are options in
the setup that will modify
the CV computations. For
example, the user can choose
to use PV Square root instead of PV
in error computations. Please see the
PID setup where these options are
discussed.
EZAutomation
Position Algorithm:
n
CVn = Kp * [En + (Ts/Ti) * Σ Ei + (Td/Ts)*(En - En-1)] + CV0
i=0
n
Velocity Algorithm:
CVn = Kp * [En + (Ts/Ti) * Σ Ei + (Td/Ts)*(PVn - PVn-1)] + CV0
i=0
www.EZAutomation.net
1-877-774-EASY
6-4
Chapter 6 - PID Loop
6.2 PID Setup
The following section will explain how to setup a PID loop using your
EZPLC Editor software. To access the PID Setup, perform the following
steps:
1. Go to the Setup Menu and select PID. The following dialog box will
appear (If you have already defined one or more loops, the image
below will be different).
2. Use the drop-down arrow to select the Number of PID Loops you
would like to use (you can select up to 8 PID Loops).
3. As soon as you select a number of loops other than 0, the following
dialog box will appear:
EZAutomation
www.EZAutomation.net
1-877-774-EASY
Chapter 6 - PID Loop
6-5
The Dialog box above allows you to define all your PID Parameters.
It will show as many tabs as the number of PID loops selected. The
tabs are labeled Loop1, Loop2, and so on.
Each PID loop requires a contiguous block of 32 Registers and a
contiguous block of 8 discrete for storing parameters and status. The
blocks start at user-specified starting base addresses. In addition to
the start-of-block of addresses, following tags are required: Process
Variable, Control Variable and, optionally, Control Output.
The user defines the Base (or Starting) address/tag of the Register
Block. The EZPLC then maps the next 31 registers automatically,
making a total of 32 registers per block. Out of the block of 32
registers, 15 are used currently, and the rest are reserved for future
use. Similarly, the user defines a Base (or Starting) address/tag for
the Discrete Block. Then the EZPLC will map the next 7 addresses
automatically, making a total of 8 discrete in the block.
The dialog box shows which register of the block will store what for
your ready reference. For example, the Sample Rate is stored in the
first register of the Block (Base+0), while Deadband is in Base + 5
register.
Since you know the addresses of all parameters, you can define these
parameters in this dialog box, and/or dynamically define/modify these
using ladder logic during runtime. The buttons and fields that appear in
the PID Setup dialog box are explained below.
NOTE: If the PLC
is stopped and the PID is
running only the tags
defined in PID loop setup will
be updated; so to control a process while
the PLC is stopped, make sure that
the PV and CV refer to physical I/O
(IR and OR type).
Process PID when PLC is Stopped - When PLC is stopped (not in
Run Mode), it does NOT process ladder logic or Update I/O. However
in some cases, it may be desirable to continue the PID loop even when
the PLC is stopped. Use this check box to indicate that the PID should
be processed when the PLC is stopped. The default is to continue PID
processing.
Action - You must select either Direct Acting or Reverse Acting. In
a Direct Acting loop, the Control Variable and Process Variable follow
the same direction i.e. Increase in Control Variable increases the
Process Variable and vice versa. For example in a heating application,
the more power through a heater (CV) increases the temperature (PV).
The Reverse Acting loop, the CV and PV move in opposite direction.
SO an increase in CV decreases the PV. For example, in an
air conditioning or cooling application, more power is applied to reduce
the temperature.
EZ PLC computes error term, based on this choice, as follows:
En = PVn - SPn for Direct Acting
En = SPn - PVn for Reverse Acting
Process Variable (PV) Tag - Use the drop-down arrow or enter a tag
address where you would like the Process Variable to be stored. You
can use R or IR register types. If you use an IR type tag, then you are
reading the Process Variable directly from an Input Module. If use an
R-type
EZAutomation
www.EZAutomation.net
1-877-774-EASY
6-6
Chapter 6 - PID Loop
R-type tag used for PV, you will have to move the actual PV (possibly
after some scaling) using logic to the R-type register so that PID
computations can use the PV.
*NOTE: If you would like PID to run while the PLC is stopped, you
should choose an IR type tag so that the PV is updated with the actual
value.
Control Variable (CV) Tag - Use the drop-down arrow or enter a tag
address where you would like the Control Variable to be stored. The
CV tag has the flexibility of using R or OR registers, If you use OR,
then EZPLC writes the CV directly to an Output Module. If you use the
R type for CV tag, you will have to move the actual CV (possibly after
some scaling) using ladder to an output module for control.
*NOTE: If you would like to PID to run when PLC is stopped, please
use OR type tag for CV so that it can be updated.
Base Register Tag - Base Register Tag/Address defines the starting
address of a Contiguous Block of 12 registers that are used to store
PID Parameters and Status information. Please see the dialog box to
find the addresses of desired parameter within the block.
Base Discrete Tag - Base Discrete Tag/Address defines the starting
address of a Contiguous Block of 4 registers that are used to store PID
Parameters and Status information.
PID Loop Mode - In Auto mode, the PID Loop calculates a new Control
Variable value every sample period. In Manual mode, the Control
Variable is controlled by user manually. The manual mode may be used
for manual control of process. PID Monitor dialog box (Menu
EZPLC>PID Monitor) can be used to modify Control Variable in manual
mode.
When the mode is switched from manual to auto, the integral term
of the PID equation is set to the control value. This provides bumpless
transfer from manual to auto.
Anti-Windup - This option inhibits integration when the control value is
saturated. It controls the integral term of the PID equation when the
control value is saturated. If Anti-Windup is selected, the integral term
is not included when the output is saturated and the sign of the Error
will cause the integral term to drive the output further into saturation.
This help loops to come back into equilibrium sooner.
Use PV Square Root - If this option is selected, Square root of PV is
used instead of PV in error computation.
Saturation - This line is for information only. This line shows the
address of the discrete bit that would be set if the Control Variable is
saturated (i.e. if the Control Variable is either 0 or 4095). You may use
this in ladder logic to monitor the saturation of control variable.
EZAutomation
www.EZAutomation.net
1-877-774-EASY
Chapter 6 - PID Loop
6-7
Autotune Setup
The EZPLC can autotune PID loops, i.e. it can estimate the values for
the Proportional Gain, Integral (Reset) time, and Derivative (Rate) time
for PID loop. The dialog box allows you to setup the loop for autotune.
EZPLC uses Ziegler-Nichols method to estimate the PID parameters.
Following are the setup parameters for Autotune:
Start Autotune - Shown on the dialog box for information only. The Start
Autotune discrete is at Discrete Base+4. EZPLC initiates autotuning of a
loop when this bit transitions from 0 to 1. Autotuning of the loop is started
regardless of the selected “PID Loop Mode” of the loop. Once Autotune
is started, you can stop it by making setting this bit to 0.
NOTE: Autotune is performed by
EZPLC observing open loop response
to a step change in the control value.
Before starting autotune, the process
should be in a steady state. During
Autotune, watch the process variable
closely for it to be within the safe
limits.
Autotune Status - Shown on the dialog box for information only. During
Autotune, EZPLC reports the status of Autotune in the register.
Register Value
Description
0
Tuning in progress
1
Tuning done
2
User cancelled tuning
3
Control value could not be incremented
4
The tuning algorithm failed to fit the curve
5
Division by zero error
6
Could not determine dead time
7
One or more P, I, or D was out of range
Timeout Time (in sec): User programs Autotune timeout in seconds
in this register. If EZPLC can not finish autotuning within this time,
the Autotune is aborted. User should program this field based on the
dynamics of the process.
Tuning Type: User selects if PI or PID tuning is required.
EZAutomation
www.EZAutomation.net
1-877-774-EASY
6-8
Chapter 6 - PID Loop
Algorithm (Position or Velocity) - EZPLC supports two PID
algorithms, know as Position and Velocity algorithms. Select whether
you would like to use a Position math equation or a Velocity math
equation (as shown on page 6-3).
Sample Rate - Enter the desired Sample Rate in this field. The
Sample Rate is seconds and can be changed from 0.05 to
99.99 seconds
*NOTE: All numeric fields in this dialog box use Implied Decimal
points. So to enter 0.05, you simply enter 5; the EZPLC assumes two
digits after the decimal point for most of the numeric entry fields,
except where noted.
Setpoint - Enter the Setpoint in this field. This is the Setpoint used in
the PID Loop calculation. The Setpoint is the desired process level.
Proportional Gain - Enter the Proportional Gain in this field. This is
the gain of the proportional term of the PID equation. The valid range
is 00.00 to 99.99. Setting this to zero removes the proportional term
from the PID equation.
*NOTE: The decimal point is implied. For example, “125” is 1.25.
Default is 1.00
Integral (Reset) Time (Ti)- The units for this time are in seconds.
The Valid range is 00.00 to 6000.0. This (along Kp and Ts) controls
the integral term. Setting it to zero removes the integral term from the
PID equation.
*NOTE: The decimal point is implied. For example, “125” is 1.25
seconds. Default is 0.3 In this case ONLY ONE DIGIT after decimal
point is implied. So 125 in this field means 12.5
Derivative (Rate) Time (Td) - Enter the Derivative Gain in this field.
This along with (Ts and Kp) makes the coefficient of the derivative term.
The units are in seconds. The valid range is 00.00 to 600.0. Setting
this to zero removes the derivative term from the PID equation.
*NOTE: The decimal point is implied. For example, “125” is 1.25
seconds. Default is 0.3
Deadband - Enter the Deadband value in this field. This value is
compared with the error value at loop update. If the absolute value of
the error is less than the deadband value, then the error is considered
as zero for PID computations.
Setpoint Low Limit - Enter the lower limit of your desired setpoint in
this field. If the setpoint is below this value, then it will be set to the
value you’ve entered in this field.
Setpoint High Limit - Enter the higher limit of your desired setpoint in
this field. If the setpoint is above this value, then it will be set to the
value you’ve entered in this field.
EZAutomation
www.EZAutomation.net
1-877-774-EASY
Chapter 6 - PID Loop
6-9
Control Value (CV) Low Limit - Enter the lower limit of the Control
Value in this field. If the CV is below this value, then it will be set to the
value you’ve entered in this field. Default is 0.
Control Value (CV) High Limit - Enter the higher limit of the Control
Value in this field. If the CV is below this value, then it will be set to the
value you’ve entered in this field. Default is 4095.
CV Offset - This is the constant offset that is added to the control
variable. So, even when the Error is zero, the Control Variable equals
offset.
Error – Shown on the dialog box for information only. EZPLC used this
register to store Error value.
Control Output
EZPLC allows you to control a Digital output using PID control. The
digital output provides a pulse out put on selected output address. The
width of the pulse (within the cycle time) is proportional to the control
value, as illustrated below:
The following fields are programmed for the Digital Control Output:
Enable Control Output: Check box to enable Digital Control Output.
If the check box is unchecked, no digital output is provided.
Control Output Tag: Enter the discrete output address (O type) to
provide Digital Control Output from the PID loop. The output module
can be of any type (DC, AC or Relay type).
Cycle Time: Enter the Cycle time for the control output in tenths of a
second. While selecting cycle time, keep in mind the load type that the
output would be driving. For EM relays, we suggest that keep this time
as high as possible to extend relay life.
Min Duty Cycle: This field is for display only. It is computed from
the CV Low Limit ((CV_LowLimit/4096)*100) and expressed in
percentage. As the name suggest, the output will remain on for
minimum time even if the computed control value falls below the CV
Low Limit.
Max Duty Cycle: This field is for display only. It is computed from
the CV High Limit ((CV_HighLimit/4096)*100) and expressed in
percentage. As the name suggest, the output will remain on for this
maximum time even if the computed control value is above the CV
high Limit.
EZAutomation
www.EZAutomation.net
1-877-774-EASY
6-10
Chapter 6 - PID Loop
Creating PID Tags
EZPLC can automatically create tags corresponding to all the PID
loop related variables (such as Sample Rate, SetPoint etc). To do so,
perform the following steps:
(1) Check the Create Tags checkbox (located beside the OK button) in
the PID dialog.
(2) Click the OK button. The following dialog box appears.
This dialog box tells you the naming convention that will be used for
creating the PID loop tags. Note that all the tag names are fixed and
denote the PID loop number the tag is associated with the variable
the tag represents. Also, tags representing certain variables are only
created if they were specified in the PID Loop (example, the tag
representing Cycle Time).
(3) Click the Create Tags button. At this point all the tags are created
and the results are displayed in a dialog as shown below. Note that if a
tag already exists, that tag will not be created and it would be reported
in this dialog. By clicking the Save button, you can save the this list of
tags created and failed in a text file.
EZAutomation
www.EZAutomation.net
1-877-774-EASY
Chapter 6 - PID Loop
6-11
6.3 PID Monitor
This section will explain how to setup and use the PID Monitor
function within the EZPLC Editor. You can use this function to monitor
and make real-time changes to your PID Loop. In order to use the
PID Monitor function, you must be connected to the PLC. To begin,
click to the EZPLC Menu and select PID Monitor (as shown to
the left). The dialog box below will appear. The various fields and
parameters will be explained in the following pages.
Select PID Loop - Use the drop arrow to select which PID Loop you
would like to monitor (1 - 8).
Setpoint - This field displays the current value of your Setpoint. You
can change the setpoint by entering a value in the New Value field and
clicking the Apply New Values button at the bottom of the window.
Process Variable (PV) - This field displays the current value of the
Process Variable (PV).
Control Variable (CV) - This field displays the current value of the
Control Variable (CV).
Minimum SP - Enter the Minimum Setpoint value in this field.
Maximum SP - Enter the Maximum Setpoint value in this field.
*NOTE: When selecting your values for Minimum and Maximum SP,
it’s a good idea to choose a number relatively close to the Process
Variable. That way, when your graph is created you will be able to see
more detail. The greater the range between your Minimum and
Maximum SP, the less detail your graph will display. The shorter the
range, the more detailed your graph will be. For this example, the
Process Value is at 550, so the Maximum SP is set at 575 and the
Minimum SP is set for 525, leaving a range of 50 (25 above and
below) to be displayed on the graph.
EZAutomation
www.EZAutomation.net
1-877-774-EASY
6-12
Chapter 6 - PID Loop
Minimum CV - Enter the Minimum Control Variable (CV) value in this
field.
Maximum CV - Enter the Maximum Control Value (CV) value in this
field.
Interval (mSec) - Enter the Interval value (in milliseconds) in this field.
No of Ticks - In this field, enter the Number of Ticks you would like to
have displayed in the graph.
Show Grid Lines - Check this box if you would like Grid Lines to be
displayed in your graph.
Sample Rate - In this field enter the Sample Rate to determine how
often the PID Loop checks the process.
Proportional Gain - in this field enter the value of the Proportional
Gain.
Integral - In this field enter the Integral value.
Derivative - In this field enter the Derivative value.
Mode - In this box you can choose Auto or Manual (you can only
change the Control Variable in the Manual Mode).
Once all of the parameters are defi ned, press the Start Monitoring
button (shown to the left) to begin monitoring your PID Loop. A graph
will begin to appear as shown in the image below:
Control Variable
Setpoint
Process Variable
EZAutomation
www.EZAutomation.net
1-877-774-EASY
Chapter 6 - PID Loop
6-13
As you can see, the graph above has been created using the
parameters explained on the previous page. The Setpoint and Process
Variable were set to 450 and are represented in the graph by the line
running through the middle of the graph. The Minimum SP of 400 is
shown at the bottom left and the Maximum Limit of 500 is shown at
the top left of the graph. The Control Variable was set to 110 and is
represented on the right side of the graph. The rest of the controlling
buttons for PID Monitor are explained below.
End Monitoring - Press this button when you wish to stop the PID
Monitor.
Apply New Values - Press this button once you have changed some of
the parameters in PID Monitor and would like to begin monitoring those
changes.
Freeze Graph - Press this button if you would like to see a still picture
of the graph in its current state.
Export to Excel - Press this button to send all of the data within the
graph to an Excel spreadsheet (you must have the Excel software
installed onto your computer).
Close - Press this button stop the monitoring process and close the
PID Monitor window.
EZAutomation
www.EZAutomation.net
1-877-774-EASY
6-14
Chapter 6 - PID Loop
6.4 PID Loop Tuning
Proper selection of PID parameters, such as Proportion, Integral and
Derivative coefficients, is important to get stable and responsive process
control.
Many experienced users can estimate good starting values for the PID
loops, and then tweak those to optimize PID loop performance, i.e. they
can manually tune the process.
For those users who would like a help in estimating these starting values
of P, I, and D coefficients, EZPLC provides Autotune feature.
Please read following caution note carefully before attempting autotune.
CAUTION:
● PID Loop control follows complex algorithm and its output depends
on user-programmed PID parameters as well as the dynamics of the
process being controlled.
● For safety reasons, users MUST ensure proper working of the PID
before attempting autotune or before leaving loops in Auto mode. For
example:
■ Ensure that Process Value is correctly measured
■ Ensure that the Control Variable moves the Process Variable in
the right direction. You can set the control Variable manually to
check for this.
● During Autotune, users MUST observe the process closely and have
access to emergency stops to stop the process if it goes out of control.
Autotuning Pre-requisites
The following two pre-requisites must be met before autotuning PID
loops:
1. The EZPLC must have firmware revision C.3 or later.
2. PID loops must be configured.
Autotune Control
Each PID Loop is controlled by the Start Autotune discrete variable
(which is at Discrete Base+4). If the variable goes from false to true, and
the loop is in manual mode, EZPLC would start autotuning that loop.
Autotuning Loops
To Autotune one or more loops, please follow below given steps:
• Make sure you have read the caution at the beginning of this topic.
• Set the PID Loop Mode to Manual for all the loops that require
autotune.
• To start Autotuning a loop, set the Start Autotune discrete variable to
ON.
• EZPLC would start Autotune by changing Control Variable (CV),
measuring the impact on the Process Variable (PV) of this change
EZPLC estimates the P, I, D gains using the Ziegler-Nichols open loop
two point tuning method.
• EZPLC Editor can be used to monitor CV and PV while EZPLC is
autotuning loops.
EZAutomation
www.EZAutomation.net
1-877-774-EASY
Chapter 6 - PID Loop
EZAutomation
www.EZAutomation.net
6-15
1-877-774-EASY
7
Modbus RTU and Modbus
TCP/IP Communications
In this chapter...
• Overview
• EZPLC as a Modbus Master
• Open Port Command
• Modbus Master Instruction
• Ladder-Logic Examples
• EZPLC as a Modbus Slave
• Overview
• EZPLC as a Modbus Slave
• Memory Map
• Supported Modbus Commands
7-2
Chapter 7 - Modbus RTU and Modbus TCP/IP Comm.
Modbus RTU Serial: Requires firmware revision B.3 or later
Editor revision version 1.1 later
Modbus TCP/IP and RTU: Requires firmware revision B.4 or later
Editor revision version 1.2 or later
7.1 Modbus Overview
EZPLC provides connectivity to other devices over Modbus RTU
protocol. You can use EZPLC either as a Modbus Master/Client or a
Modbus Slave/Server.
In this document we will use Modbus master and Modbus Client
synonymously. Similarly, Modbus Slave and Modbus Server would be
used synonymously
When used as a Modbus Master/Client, EZPLC communicates and
exchanges data with other Modbus slaves. When used as a Modbus
Slave, the EZPLC can respond to Modbus commands from a Master.
Both the RS422/RS485 port and the Ethernet port on EZPLC can be
used for Modbus communication.
7.2 EZPLC as a Modbus Master:
Modbus Master Instruction
To use the EZPLC as a Modbus Master, use following steps (Ladder
Logic instructions – under the communications tab):
1. Open Port: Open the communication port for Modbus Master
Instruction. The RS422/485 port on EZPLC is used for this
communication. You need to open the port only once. Select
Modbus Master in the protocol drop down field.
NOTE – This step is not necessary if the connection is only via
Ethernet. Each Modbus Master instruction specifies if the instruction
uses the RS422 or Ethernet port.
2. Use Modbus Master Instruction to read from or write to a slave’s
memory area. You can use several Modbus Master Instructions in
your ladder logic.
Please note that when using the RS422 port only one instruction
is executed at one time. When using the Ethernet port up to four
instructions can be executed at one time.
EZAutomation
www.EZAutomation.net
1-877-774-EASY
Chapter 7 - Modbus RTU and Modbus TCP/IP Comm.
7-3
7.2.1 Open Port Command
(Not required for Modbus TCP/IP)
Below is the Open Port Instruction dialog box.
The following attributes will need to be set in this dialog box for the
Modbus Network you are connecting to.
1. Baud Rate
2. Parity
3. Data bits
4. Stop bits
5. Select Mode “RS422 or RS485”
6. For Protocol Select “Modbus Master”
EZAutomation
www.EZAutomation.net
1-877-774-EASY
7-4
Chapter 7 - Modbus RTU and Modbus TCP/IP Comm.
7.2.2 Modbus Master Instruction
Select Modbus Master Instruction from the Menu item Instruction>
Communication>Modbus or from the Instruction side bar. The instruction
on ladder logic appears as follows:
Please note the following about the Modbus Master instruction:
• The instruction is initiated when the rung is true (i.e. all instructions in
the rung preceding the Modbus instruction are true)
• The instruction involves sending a command to the addressed slave,
and processing the reply back from the slave, which is asynchronous
to the ladder scan. The Power flows out of the instruction only after
the instruction is completed, i.e. after either the reply is received or the
instruction times out. The Control Word register, which can be user
specified, can be used to see the progress of the instruction.
• If the rung condition becomes false before the completion of the
instruction, the instruction is not completed. (the sending of the
command is completed but the reply is not processed, even if
received). If the command was a write command, the values MAY be
written, but can not be guaranteed.
• It is advisable to check the error code register, also user specified, for
any potential errors after the instruction is completed. When using the
Ethernet port the error code register is not valid until the instruction is
complete.
• ONLY one Modbus Master Instruction should be active at any time. If
more than one instruction is active, results would be unpredictable. For
Modbus TCP/IP up to 4 instructions can be active at the same time.
EZAutomation
www.EZAutomation.net
1-877-774-EASY
Chapter 7 - Modbus RTU and Modbus TCP/IP Comm.
7-5
Double click to bring-up the dialog box:
The following attributes need to be set in the Modbus Master Dialog box.
1. Slave ID
The Network ID number of the Slave Device we are communicating
to. This may either be stored in a Tag or defined as a constant.
2. Modbus Command and Modbus Address Offset
Select Modbus command and address to communicate to. You
don’t need to enter the command codes. In addition the Modbus
address type is not entered; only the offset within the address type
is entered. For example for holding register 400123, use only 123.
The address type is implied by the command.
EZAutomation
www.EZAutomation.net
1-877-774-EASY
7-6
Chapter 7 - Modbus RTU and Modbus TCP/IP Comm.
MODBUS COMMAND
CODE
MODBUS ADDRESS RANGE
(only Offset is entered; the type is implied by
the command)
Read Coils
01
000001-065535 (Offset 1- 65535)
No more then 1024 Coils at a time.
Read Discrete Inputs
02
100001 -165535 (Offset 1- 65535)
No more then 1024 Inputs at a time.
Read Holding Registers
03
400001 – 465535 (Offset 1- 65535)
No more then 100 Holding Registers at a time.
Read Input Register
04
300001 – 365535 (Offset 1- 65535)
No more then 100 Input Registers at a time.
Write Single Coil
05
000001-065535 (Offset 1- 65535)
Only one at a time.
Write Single Register
06
400001 – 465535 (Offset 1- 65535)
Only one at a time.
Write Multiple Coils
15
000001-065535 (Offset 1- 65535)
No more then 1024 Coils at a time.
Write Multiple Registers
16
400001 – 465535 (Offset 1- 65535)
No more then 100 Registers at a time.
3. Byte Order
Modbus registers are usually arranged as MSB-LSB. This flag
allows you to change the order if necessary.
4. Data Length
Number of Data Items to process. The data length may either be
stored in a Tag or defined as a constant.
5. EZPLC Address
Please enter the Starting EZPLC Address for data exchange with
the Modbus Addresses.
6. Control
Enter the EZPLC address that will store the state of the execution
of the Modbus Master instruction. Bit 0 (LSB) to Bit 4 of the Control
address are used to indicate the status of the Modbus instruction as
follows:
EZAutomation
Bit Number
Status when set
B0 (LSB)
Modbus serial Enable
B1
Waiting on reply
B2
Reply processed
B3
Not used
B4
Invalid length for starting address
www.EZAutomation.net
1-877-774-EASY
Chapter 7 - Modbus RTU and Modbus TCP/IP Comm.
7-7
7. Error
Enter the EZPLC address that will store the Error codes if there is
any error in execution of the instruction. A zero value (0) indicates
no error has occurred. The error code must be checked only after
the instruction is completed (i.e. the power flows out of instruction).
See below for error codes and their descriptions.
Error
CODE
Error
Description
01
Illegal Function
The function code (command code) in the
Modbus Master command is not understood
by the Slave.
02
Illegal Data Address
The Modbus Master command tried to access
an address not available in the Modbus slave
device.
03
Illegal Data Value
The Modbus Master Instruction sent a value
not acceptable to the slave.
04
Slave Device Failure
An error occurred in slave device, while the
slave was trying to perform action requested
by Modbus Master.
06
Timeout
A reply was never received from the slave (the
communication link Between the Master and
the Slave may be disconnected.)
07
Checksum Error
Error in check sum of the reply
08
Slave ID Failure
The slave id in the master command message
does not match the slave id Returned in the
reply message from the Slave.
09
Port not open error
The Port on EZPLC is not opened for Modbus
Master Instruction
8. Timeout
Enter the timeout period in tenth of seconds. EZPLC Modbus
Instruction will time out if a slave does not respond to a command
within the specified amount of time.
9. Communication Port
Select the port for use with the Modbus instruction. There are two
choices:
a) RS422/485 port for use with the Modbus RTU (serial) instruction
b) Ethernet (Modbus TCP/IP) protocol. You will be prompted to enter
slave/servers IP details.
EZAutomation
www.EZAutomation.net
1-877-774-EASY
7-8
Chapter 7 - Modbus RTU and Modbus TCP/IP Comm.
7.2.3 Ladder-Logic Examples
Below we provide some partial ladder logic sample to illustrate the use of
Modbus Master Instruction.
Example 1:
Example below shows two Modbus instructions. When S1 is true,
first instruction gets enabled, and communication to addressed slave
starts. S2 will become true when S1 is true AND the Modbus instruction
completes its operation.
By placing S2 before second modbus instruction we ensure that the
second instruction does not start until the first is completed. This will
ensure that each Modbus Master command will execute sequentially
Correct
Example 2:
This example shows a way to repeatedly execute the Modbus Master
instruction. S1 will enable the instruction, the Modbus master instruction
will then repeatedly execute as long as S1 is true. (Modbus master
instruction executes only once when it is enabled; to execute it repeatedly
the instruction needs to be enabled and disabled as shown below)
Repeat
EZAutomation
www.EZAutomation.net
1-877-774-EASY
Chapter 7 - Modbus RTU and Modbus TCP/IP Comm.
7-9
Example 3:
This example shows the incorrect way to execute two Modbus Master
Commands using the RS422 port. In the above example the reply of
the first command will be corrupted as the second command will send its
data too soon.
(Please note that this format is valid for Modbus TCP/IP, as up to 4
Modbus Master Instructions are allowed in the Modbus TCP/IP.)
Incorrect
7.3 EZPLC as a Modbus Slave
7.3.1 Overview
EZPLC provides connectivity to Modbus Master over Modbus RTU
protocol. When used as a Modbus Slave, the EZPLC responds to
Modbus commands from a Master. The RS422 port on EZPLC is used for
the Modbus connection.
7.3.2 EZPLC as a Modbus Slave:
To use EZPLC as a Modbus Slave, use following steps:
1. Open RS422/485 Port: Open the communication port for Modbus
Slave operation. You need to open the port only once. Port once
opened remains open until closed or power is cycled.
NOTE – This step is not necessary if the connection is via Ethernet.
2. Initiate Modbus commands from the master unit, to exchange data
with the EZPLC memory. The tables below show the mapping
between the Modbus addresses to EZPLC memory area and
supported Modbus commands
(see next page for tables)
EZAutomation
www.EZAutomation.net
1-877-774-EASY
7-10
Chapter 7 - Modbus RTU and Modbus TCP/IP Comm.
EZPLC Type
Range
Modbus Address
Modbus Type
O - Discrete Outputs
O1 - O128
00001 - 00128
DISCRETE
01001 - 02024
DISCRETE
7.3.3
Memory
S - Discrete
Internals
S1 -Map
S1024
SD - System Discrete
SD1 - SD16
03001 - 03016
DISCRETE
I - Discrete Inputs
I1 - I128
10001 - 10128
DISCRETE
IR - Input Registers
IR1 - IR64
300001 - 300064
WORD
R - Register Internals
R1 - R8192
400001 - 408192
WORD
OR - Output Registers
OR1 - OR64
410001 - 410064
WORD
SR - System Registers
SR1 - SR20
411001 - 411020
WORD
MODBUS COMMAND
CODE
MODBUS ADDRESS RANGE
(only Offset is entered; the type is implied by
the command)
7.3.4 Supported Modbus Commands
EZAutomation
Read Coils
01
000001-065535 (Offset 1- 65535)
No more then 1024 Coils at a time.
Read Discrete Inputs
02
100001 -165535 (Offset 1- 65535)
No more then 1024 Inputs at a time.
Read Holding Registers
03
400001 – 465535 (Offset 1- 65535)
No more then 100 Holding Registers at a time.
Read Input Register
04
300001 – 365535 (Offset 1- 65535)
No more then 100 Input Registers at a time.
Write Single Coil
05
000001-065535 (Offset 1- 65535)
Only one at a time.
Write Single Register
06
400001 – 465535 (Offset 1- 65535)
Only one at a time.
Write Multiple Coils
15
000001-065535 (Offset 1- 65535)
No more then 1024 Coils at a time.
Write Multiple Registers
16
400001 – 465535 (Offset 1- 65535)
No more then 100 Registers at a time.
www.EZAutomation.net
1-877-774-EASY
8
Protecting Your EZPLC Program
In this chapter...
• Save Project as Protected
• Restricting Online/Readback Access
8-12
Chapter 8 - Protecting Your EZPLC Program
EZPLC offers two features for protecting OEM’s programs as given below:
8.1 Save Project As Protected
This feature will prevent unauthorized users from opening/viewing/editing the project, but will still allow a user to read from or write to an EZPLC.
This method of protection is useful if OEMs don’t have a problem with user
duplicating the program, but would not like them to accidentally or intentionally modify the program (because that may create malfunction of machines
and hence support calls to OEMs). A user (including the OEM) would have
to provide a password before he/she can open the program for view/edit.
For details on how to configure this feature, see section the section titled
Save Project as Protected under File Menu in the EZPLC User Interface
chapter.
8.2 Restricting online/read-back access
This feature provides OEMs capability to effectively lock their programs
within EZPLC, preventing anyone from copying their logic to another ezplc.
This feature is useful for OEMs who would like to protect their programs
from unauthorized copying. With this feature, every time the user tries to
read back the user program or go online with the EZPLC, he/she will have
to enter the access password. The access password can be configured from
either Project Options (Setup > Project Options) or before transferring to
EZPLC (File > Transfer to EZPLC).
To restrict access online/reading back projects, perform the following steps:
● Select File > Project Options... The project options dialog box shows
up.
● Check the checkbox labeled “Require password to read project back
or access online”. The access password edit box becomes enabled.
● Enter the access password. The password can contain a maximum of
16 characters.
● Click OK to finalize the changes and dismiss the Project Options dialog.
● Transfer the user program to the EZPLC (by selecting File > Transfer
to EZPLC and then clicking Start). Note that the access password
could have been set from this dialog as well.
Once this is done, every time the user tries to read back the user program
or go online with the EZPLC, he/she will have to enter the access password.
To remove the access restriction to online/reading back user programs,
perform the following steps:
● Select File > Project Options... The project options dialog box shows
up.
● Uncheck the checkbox labeled “Require password to read project back
or access online”. The access password edit box becomes disabled.
● Click OK to finalize the changes and dismiss the Project Options dialog.
● Transfer the user program to the EZPLC (by selecting File > Transfer
to EZPLC and and then clicking Start). Note that the access password
could have been disabled from this dialog as well.
Once this is done, the user can read back the user program or go online
with the EZPLC without having to enter any access password.
EZAutomation
www.EZAutomation.net
1-877-774-EASY
9
User Program Backup
In this chapter...
• User Program Backup on Onboard Flash
9-14
Chapter 9 - User Program Backup
9.1 User Program Backup on Onboard Flash
Every time a user program is downloaded to the EZPLC (or when the program loader is
closed after you have made one or more online changes), it is automatically stored on
the onboard flash. In case the RAM battery of your EZPLC fails (or if the user program
somehow becomes corrupted), the user program will be loaded into RAM from the copy
in flash upon power up. Three important questions regarding Flash Backup are:
1. When is Flash Backup done?
2. When is data restored from Flash Backup?
3. What is restored from Flash Backup?
9.1.1 When is Flash Backup done?
Flash backup occurs automatically when either of the following happens:
● A user program is downloaded to the EZPLC
● After one or more online changes are made AND the program loader is closed.
Note that until the program loader is closed, the newly made online changes are
not stored in flash.
9.1.2 When is data restored from the Flash Backup?
On power up, EZPLC compares ladder logic in RAM with the one stored in the FLASH.
If EZPLC finds them to be different, the program is restored from FLASH to the RAM.
This can happen in the following cases:
● If the RAM battery is low or fails
● If online changes were made to the user program, and the power was unplugged
without closing the application. In this case the online changes would be written to
RAM but not flash, and upon power up the RAM copy of the user program will not
match the FLASH copy
● If the user program somehow become corrupted.
9.1.3 What is restored from Flash Backup?
The program is restored to it’s initial state, i.e. any changes in data from programs initial
state will be lost. Effectively, the restored program would match the program initially
transferred to the EZPLC (or the program after proper on line changes). Thus please
note:
What is restored:
● Ladder logic
● Initial Data values (i.e. the user program to its initial state)
What is NOT restored:
● Dynamic Data values
● I/O status
● Real time Clock
EZAutomation
www.EZAutomation.net
1-877-774-EASY
A
Index
About 2-4
About EZPLCEdit 2-48
Absolute 3-25
Action 6-5
Actions for Unmatched Messages 3-60
Add 2-20,3-22
Add/Edit 2-38,5-5,5-6
Adding Bitwise Instructions 3-28
Adding Communication Instructions 3-54
Adding Compare Instructions 3-16
Adding Counter Instruction 3-44
Adding Math Instructions 3-21
Adding Move Instructions 3-33
Adding Open Port Instructions 3-54
Adding Program Control Instructions 3-47
Adding Relay/Boolean Instructions 3-9
Adding Send to Marquee Instruction 3-55
Adding Send To Port and Receive From Port
Instructions 3-55
Adding String Instructions 3-50
Adding String Length Instruction 3-50
Adding the Drum Instruction 3-63
Adding Timer Instruction 3-40
Add Map Entry 2-42,2-44
Add New Message 2-47,5-8
Add New Message # 5-10
Add New Tag Details 2-31
Algorithm (Position or Velocity) 6-8
AND 3-29
Anti-Windup 6-6
ASCII Commands 5-12
At position 5-7
B
Base Discrete Tag 6-6
Base Register Tag 6-6
Baud Rate 2-40,3-56,5-9
BCD to Binary 3-27
Binary to BCD 3-27
Binary to Gray Code 3-27
Bitwise Instructions 3-28
Bitwise Instructions Menu 2-24
Bitwise Operations Tool Bar 2-6
Blink Selected Message 5-8
Blink Whole Message 5-7
Block Fill 3-36
Byte Order 7-6
C
Call Subroutine 3-49
EZAutomation
Index
I-1
Call Subroutine Instruction 3-47
Cancel 5-5
Cascade 2-48
Cascade Windows 2-4
Center 5-7
Change attributes to Default attributes 5-5
Clear Comment 2-23
Clear Display, Cursor Unchanged 5-7
Clear Display, Home Cursor 5-7
Clear Display, Home Cursor, Reset 5-7
Clear Label 2-22
Clear Line, Cursor at Line Start 5-7
Clear Program 2-26
Close 2-47,5-10
Close All 2-47
Close Port 3-57
Close Project 2-10
Closing 4-6
Communication Instructions 3-54
Communication Instructions Menu 2-24
Communication Operations Tool Bar 2-8
Communication Port 7-7
Communication Setup 5-8
Compare Instructions 3-16
Compare Instructions Menu 2-24
Compare Operations Tool Bar 2-5
COM Configuration… 2-28
Configure Communication 1-6
Configure Communications 1-5
Configuring the Counter 4-3
Configuring the Counter Tab 4-3
Control 7-6
Control Output 6-9
Control Value (CV) High Limit 6-9
Control Value (CV) Low Limit 6-9
Control Variable 6-2,6-3
Control Variable (CV) 6-11
Control Variable (CV) Tag 6-6
Control Variable offset 6-3
Copy 2-4,2-14,2-22
Copy Project As… 2-10
Copy Rungs… 2-10
Counter 3-45
Counter 1 A Input 4-5
Counter Instruction 3-44
Counter Preset Value 3-45
Counter Register 3-45
Counter Status Register 3-45
Counts 3-64
Count Both Edges 4-4
Count Mode 4-4
Count Rising Edges 4-4
Current Count Tag 3-65
Current Step Tag 3-65
www.EZAutomation.net
1-877-774-EASY
I-2
Index
Cut 2-4,2-14,2-22
CV0 6-3
CVn 6-3
CV Offset 6-9
D
Data Bits 3-56
Data Length 7-6
Data Timeout 2-40
Deadband 6-8
Default 5-7
Default Tag Data Type 2-16
Delayed OFF 3-42
Delayed ON 3-42
Delayed ON – Retentive Counts 3-43
Delete 2-14,2-20,2-22,5-5
Delete Label / Comment 2-23
Delete Row 2-22
Derivative 6-12
Derivative (Rate) 6-2
Derivative (Rate) Time 6-8
DeviceNet 2-41
DeviceNet Slave 2-40
Device Network 2-39
Displaying Messages 5-9
Display Message at Position 5-7
Divide 3-23
Down Counter: 3-46
Do Nothing 5-7
Drum 3-62,3-64
Drum Sequencing 3-62
Drum Type 3-64
E
Edit 2-14
Edit Label / Comment 2-22
Edit Menu 2-14
Edit OFF-LINE 1-5
Edit Program OFF-LINE 1-5
Edit Program ON-LINE 1-5
En 6-3
Enable Marquee & Check Status 5-11
Equal To 3-17
Error 6-2,6-3
Ethernet Setup 2-39
Events 3-65
Example 5-10
Exit 2-13
Export Tags 2-34
External Disturbance 6-3
EZPLC Address 7-6
EZPLC as a Modbus Slave 7-9
EZPLC Editor 1-2
EZPLC Menu 2-25
EZAutomation
F
File Menu 2-10
For 3-48
For Loop 3-48
For Loop Instruction 3-47
G
Go To Label 2-4
Go to Label… 2-16
Go To Rung 2-4
Go to Rung… 2-16
Gray Code to Binary 3-27
Greater Than 3-18
Greater Thanor Equal To 3-19
Group & Unit Number 5-6
H
Help 2-4,5-5
Help Menu 2-48
Help Topics 2-48
High 4-5
I
I/O Configurations 2-37
Import Tags 2-35
Information 2-25
Input Registers Information 4-6
Input Register Information 4-6
Insert Copied Rungs 2-22
Insert Label / Comment 2-22
Insert New Rung 2-21
Insert Rows 2-21
Installation 1-2,1-4
InstructionIcons 2-3
InstructionsTool Bar 2-3
Instructions Menu 2-23
Instructions Toolbars 2-5
Integral 6-12
Integral (Reset) 6-2
Integral (Reset) Time 6-8
Interrupt Logic… 2-19
Interval (mSec) 6-12
Introduction to Drum Sequencing 3-62
Introduction to EZPLC Editor 3-3
Introduction to PID 6-2,7-2,7-9
IO Configuration 4-2,4-7
IO Module Data 4-2,4-7
J
Jog Tag 3-65
Jump 3-48
Jump Instruction 3-47
www.EZAutomation.net
1-877-774-EASY
Index
K
Kp 6-3
L
Ladder Logic Programming in EZPLC 3-2
Ladder Options 2-36
Less Than 3-18
Less Thanor Equal To 3-19
Limit 3-20
Line 2-24
Line Tool 2-4
M
Mac-ID 2-40
mage Table 3-3
Main Logic… 2-18
Main MenuBar 2-3
Main Menu bar 2-10
Main Programming Screen 2-3
Manufacturing Process 6-2
Map Discretes to Registers 3-38
Map Register Bits to Discretes 3-38
Marquee Address 5-6
Marquee Control 5-11
MASK 3-59
Math Instructions 3-21
Math Instructions Menu 2-24
Math Operations Tool Bar 2-6
Maximum Consumed Words 2-40
Maximum CV 6-12
Maximum Produced Words 2-40
Maximum SP 6-11
Memory Map 7-10
Message-Controller-Busy System Discrete
(SD8) 5-2
Message-Enable 5-9
Message-Enable System Discrete (SD5) 5-2
Message-Number-Not-Found System Discrete
(SD7) 5-2
Message-Number System Register (SR20) 5-2
Message Controller Busy 5-9
Message Controller Function 5-2
Message Database 2-46,3-59,5-2,5-3,5-4,5-10
Message Display on EZMarquee 5-2
Message Enable 5-9
Message Number 3-59,5-6
Message Number Computation 3-59
Message Number not found 5-9
Message Number Register 5-3,5-9
Message Status Tag 3-59
Message Text 5-8
Minimum CV 6-12
Minimum SP 6-11
Miscellaneous 2-36
EZAutomation
I-3
Miscellaneous Instructions 3-62
Miscellaneous Instructions Menu 2-24
Miscellaneous Operations Tool Bar 2-8
Modbus Address Range 7-6,7-10
Modbus Command and Modbus Address 7-5
Modbus Error Codes 7-7
Modbus Master Dialog box 7-5
Modbus Master Instruction 7-2
Modbus Master Ladder-Logic Examples 7-8
Modbus Slave 7-9
Mode 6-12
Module Position Numbering system 1-6
Modulo 3-24
Monitor Mode (Shift to Run/Edit Mode) 2-4
Monitor Tags 2-27
Move Bit 3-38
Move Block 3-35
Move Data 3-35
Move Instructions 3-33
Move Instructions Menu 2-24
Move Operations Tool Bar 2-7
Move Table of Constants 3-36
Multiple Drop 2-36
Multiply 3-23
N
Negative Contact 3-11
Network Memory Map 2-41
Network Type 2-40
Next 3-48
Normally Closed Coil 3-12
Normally Closed Contact 3-10
Normally Closed Immediate Input 3-14
Normally Closed Immediate Output 3-15
Normally Open Coil 3-12
Normally Open Contact 3-10
Normally Open Immediate Input 3-14
Normally Open Immediate Output 3-15
NOT 3-30
Not Equal To 3-17
No of Ticks 6-12
Number of PID Loops 6-4
O
OK 5-5
On Falling Edge 4-5
On Rising Edge 4-5
Open Port 3-56
Open Project 2-4,2-10
Operand 1 3-16
Operand 2 3-16
Operator Bar for Instructions 2-4
Opr1 3-16
Opr2 3-16
OR 3-29
www.EZAutomation.net
1-877-774-EASY
I-4
Index
Outputs 3-65
Output Register’s Information 4-5
Output Register Information 4-5
Overview 1-4
Quadrature Counting 4-4
Quadrature x1 4-4
Quadrature x2 4-4
Quadrature x4 4-4
P
R
Parity 3-56
Password protection 2-11
Paste 2-4,2-14
PID Algorithms used in EZPLC 6-3
PID Autotune Setup 6-7
PID Autotune Status 6-7
PID loop 6-4
PID Loop Mode 6-6
PID Monitor 6-11
PID on EZPLC 6-3
PID Parameters
PID Setup 6-4
PID Terminology 6-2
PLC Tool Bar 2-9
Poll Time 2-40
Position Algorithm 6-3
Positive Contact 3-11
Power Flow 3-33
Preset High 4-5
Preset High AND Counter 1 A Input 4-5
Preset Mode 4-5
Preset Step 3-65
Preset Value 4-5
Preview 5-8
Print 2-4,2-13
Print Setup 2-13
Process Variable 6-2,6-5
Process Variable (PV) 6-11
Process Variable (PV) Tag 6-5
Production & Reject Rates 5-11
Profibus 2-43
Profibus Slave 2-41
Programming Ladder Logic 1-7
Program Control Instructions 3-47
Program Control Instructions Menu 2-24
Program Control Operations Tool Bar 2-7
Project Explorer View 1-7
Project Name 1-5
Project View 2-3,2-4
Project Window 2-19
Proportional 6-2
Proportional Gain 6-8,6-12
Protocol 3-56
Pulse and Direction Counting 4-4
PVn 6-3
PV Square root 6-3
React time 6-3
Read EZ Tags… 2-33
Read Program from EZPLC 1-5
Reboot 2-26
Receive FromSerial Port 3-57
Redo 2-4
Register/Discrete address 5-2
Relay/Boolean Instructions 3-9
Relay/Boolean Instructions Menu 2-23
Relay/Boolean Operations 2-5
Rename 2-20
Reset Coil 3-13
Reset Input Bit 3-45
Reset Input Bit for Retentive Timer 3-42
Reset Tag 3-65
Return Statement 3-49
Right-Click Menus 2-49
RLL Instructions in EZPLC 3-5
Rotate Left 3-32
Rotate Right 3-32
Rung Edit Area
Rung Menu 2-21
Q
EZAutomation
S
Sample Rate 6-8,6-12
Sample time 6-3
Saturation 6-6
Save Ladder 2-4,2-10
Save Project 2-4,2-10
Save Project As Protected 2-11
Scroll Once 5-7
Scroll Repeatedly 5-7
SD5 5-3
SD6 5-3
SD7 5-3
SD8 5-3
Search and Replace 2-32
Select-Baud-Rate System Discrete (SD6) 5-2
Selecting and Configuring I/O Base 1-6
Selecting Counter Module 4-2,4-7
Selection 2-24
Select ACTION 1-5
Select All 2-14
Select EZPLC I/O Base 2-37
Select Message Effects 5-7
Select Reset Before Display Mode 5-7
Select Toolbars 2-15
Select Project Name 1-6
www.EZAutomation.net
1-877-774-EASY
Index
Send-to-Marquee 5-2
Send toMarquee 3-59
Send to Serial Port 3-57
Setpoint 6-2,6-8,6-11
Setpoint High Limit 6-8
Setpoint Low Limit - 6-8
Setpoint Value 6-2
Setup Menu 2-30,5-10
Set as Default Message attributes 5-5
Set Coil 3-13
Set Point 4-5
Set Point 1 4-5
Shift Left 3-31
Shift Right 3-31
Show Grid Lines 6-12
Show Label / Comment 2-23
Slave ID 7-5
SPn 6-3
SR20 5-3,5-9
Standard Toolbar 2-4
Start PLC 2-27
Status Bar 2-3
Step # 3-64
Stop Bits 3-56
Stop PLC 2-27
String Compare 3-52
String Instructions 3-50
String Instructions Menu 2-24
String Length 3-53
String Move 3-51
String Operations Tool Bar 2-7
Subroutine Logic 2-19
Subroutine Menu 2-20
Subtract 3-22
Supported Modbus Commands 7-10
Switch Monitor Mode 2-28
Switch to Edit Mode 2-28
Syntax Check – All Logic… 2-18
Syntax Check – Current Logic… 2-18
System Check 2-4
System Discretes 5-3
System Requirements 1-2
Timeout 7-7
Timer/Counter Instructions 3-40
Timer/Counter Instructions Menu 2-24
Timer Counter Operations Tool Bar 2-7
Timer Instruction 3-41
Timer Preset Value 3-41
Timer Register 3-41
Timer Status Register 3-41
Time Base 3-41,3-64
Title Bar 2-3
Toolbars 2-15
Tool Bars 1-7
Transfer to EZPLC... 2-13
Ts 6-3
Turn Off Blinking 5-7
Types of Timer 3-42
T
Zoom Default 2-4
Zoom In 2-4
Zoom Out 2-4
Tag Cross Reference… 2-33
Tag Database 2-4
Tag Name as Address 2-16
Td 6-3
Thermocouple Module (Enhanced) 4-7
Ti 6-3
Tile 2-48
Tile Windows 2-4
Time/Date 2-26
Timed Only 3-64
Timed with Event 3-64
EZAutomation
I-5
U
Undo 2-4
Undo / Redo 2-14
Upgrade Firmware 2-45
Up Counter 3-45
Use PV Square Root 6-6
V
Valid ASCII Commands 5-12
Velocity Algorithm 6-3
View Menu 2-18
W
Window Menu 2-47
Wiring 4-5
X
X=Y Conversion 3-26
XOR 3-30
Z
www.EZAutomation.net
1-877-774-EASY